

Page 1

Manual
Preface
Firstly thanks for choosing the company MID products!
For easily operate the machine, before using, please read the instructions attached so that you can properly operate.
No notice if this manual is updated, and do not afford the error or omission in any event.
Caution
This manual contains important safety measures and proper operation information, in order to avoid accidents,
please read carefully before operation.
1. Do not place product on low, high temperature, humidity or much dust places; do not use on magnetic, electrostatic
environment
2. Avoid dropping or strong impact, do not let the screen shake strongly, or it may cause the display damage or
display incorrect
3. This machine is not water-resistance, if there is water and other liquids into the machine, turn off the unit and
air-dried.
4. Please select the appropriate volume, using earphones should not be too large, if feel ringing in the ears, please
turn down the volume or discontinue use.
5. Charge under the following cases:
1) The battery icon shows
2) The system automatically shutdown, power off again soon after restart
3) Operating buttons with not respond
6. This machine adopts built-in high capacity lithium battery and can rechargeable use. Only after three completely
charge and discharge cycles, new battery can achieve the best performance. Advice to extend the previous 3-4 hours
after fully charged and run out of battery power per charge which can extend battery life.
7. Battery available time may depend on volume; the file type, screen brightness and other factors. Users can use
related settings to extend battery life, such as the volume to a suitable location, setting the automatic off time,
listening with black screen and so on.
8. Please do not suddenly disconnect during in the progress of format or upload or download, otherwise it will cause
a program error.
9. The company will no responsible because of damage to the product, service or other causes the memory loss;
please follow the user manual for standard operation.
10. Do not disassemble the product; do not use alcohol, thinner or benzene to clean the surface of the product.
11. Do not use in those areas where prohibit to use electronic devices, such as aircraft.
12. Do not use while driving or walking in the street, or may cause an accident.
13. The Company reserves the right to improve products, specifications and design without notice. If there is
something not matched, please refer to the actual machine.
14. All pictures for reference only, refer to practical effect.
System hardware and software compatibility introduction:
This machine is recommended to use pre-installed Android operating system, and you may can install other
non-pre-installed operating system, but because it has not been strictly tested, so we can not make sure that other
non-pre-installed operating system work stability, reliability and security, also other operating system drivers. This
"non-pre-installed operating systems" includes pre-installed upgrade visions, previous versions and other different
operating systems.
The machine pre-installed operating system or any application software functions is not divisible with itself functions,
so can not explain any pre-installed software functions as the machine’s.
when no power
Page 2

Contents
1. MID .............................................................................................................................................................................3
1.1Main features ...........................................................................................................................................................3
2. MID basic operations ...............................................................................................................................................3
2.1 Charging ..................................................................................................................................................................3
2.2 Connect to transmission files ............................................................................................................................3
2.3Insert memory card ..................................................................................................................................................4
2.4 Turn on/off.............................................................................................................................................................4
2.5 Main interface........................................................................................................................................................4
2.6 Application program interface ............................................................................................................................5
3. MID basic system settings ......................................................................................................................................5
3.1 Wireless and network.............................................................................................................................................5
3.2 Sound and display ..................................................................................................................................................6
3.3 Location and security...........................................................................................................................................6
3.4 Application.............................................................................................................................................................7
3.5 Privacy. ..................................................................................................................................................................7
3.6 Micro SD card and device memory.........................................................................................................................7
3.7 Language and keyboard............................................................................................................................................7
3.8 Date and time ..........................................................................................................................................................8
3.9 Touch panel calibration ........................................................................................................................................8
3.10 About device .........................................................................................................................................................8
4. MID software installation and management...........................................................................................................8
4.1 APK installation....................................................................................................................................................8
4.2 Explorer..................................................................................................................................................................9
4.3 Electronic market.................................................................................................................................................10
5. MID software applications and operation ..........................................................................................................10
5.1 Wireless internet ................................................................................................................................................10
5.2 Video play..............................................................................................................................................................11
5.3 Music play..............................................................................................................................................................12
5.4 Browse photo..........................................................................................................................................................12
5.5 E-book....................................................................................................................................................................13
5.6 E-mail....................................................................................................................................................................14
5.7 Alarm clock............................................................................................................................................................15
5.8 Recorder ................................................................................................................................................................16
5.9 Other functions.....................................................................................................................................................16
6. Troubleshooting ......................................................................................................................................................17
7. Technical specifications ......................................................................................................................................17
2
Page 3
1. MID
1.1Main features
• 4.3 inch TFT screen,480X272 pixel,touch screen
• Android 2.2,256M DDR2,4GB Storage
• Support third-party APK software installation and application
• Built-in Wi-Fi module sensitive, easy to experience wireless Internet.
• Support USB OTG function, can plug U disk and other USB devices
• Support G-Sensor.
• Support RM / RMVB, AVI, FLV, MP4 and other video formats.
• Support online video
• Support MP3, WMA, WAV, APE, FLAC and other audio formats.
• Support TXT/FB2/EPUB and other e-book formats.
• Support JPEG, BMP, PNG, TIFF and other image formats, slide show.
• Personalized features, customizable software, shortcuts, desktop background change, the screen unlock pattern
change.
• Support sound recording, alarm clock, calculator and other useful features.
• support multiple languages, and support firmware upgrade.
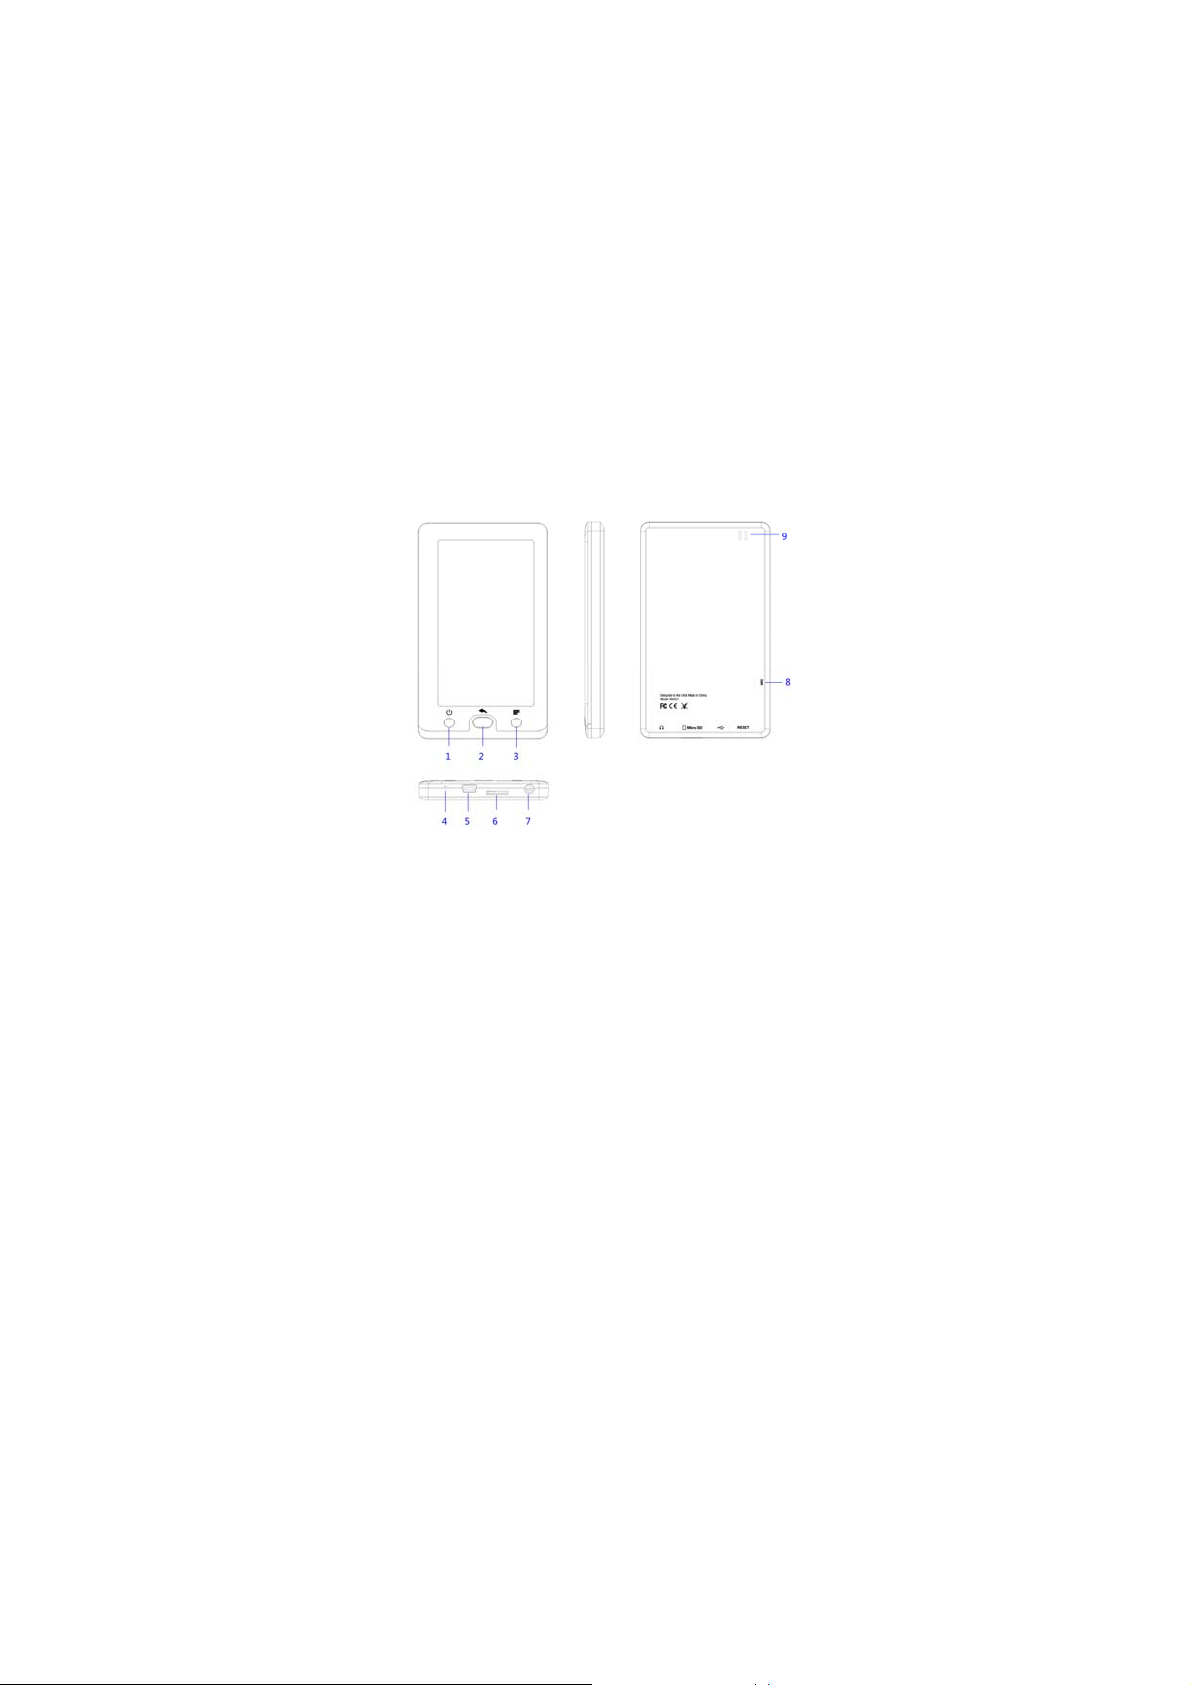
1.2 Buttons
1. Power
2. Previous /HOME
3. Menu
4. Reset
5. Mini USB /DC interface
6. Micro SD card interface
7. Earphone
8. MIC
9. Speaker
2. MID basic operations
2.1 Charging
The high-capacity lithium battery is built in the machine, and you can charge by po wer adapter. To ensure the
battery life, do not use the machine when charging. In order to effectively activate the new battery, please run out of
battery and then charge more than 12 hours for the first three times.
Charge when power off: It will show scrolling battery icons, when press the power button.
Charge when power on: It will show screen icons and the percentage of charge while charging and the battery
icon will scroll. After completion, the battery icon will turn green and stop scrolling, showing 100%.
It’s strongly suggested that th e user charge when power off. If charging when power o n, the machine will charge
and discharge at the same time, which causes error of the charge indicator, which should be noted. In the process of
charging, it is normal that the charger and the machine have a certain temperature rise.
Note: If not use the machine for long time, make sure that at least one complete cycle of charging and discharging
of the machine within a month is done in order to avoid damage caused by excessive consumption of the battery and
prevent battery drain.
The charger must satisfy the spec below, otherwise when any accident or failure occurs, it will be deemed as
man-made damage.
Input: 100-240V 50/60Hz 0.6A
Output: DC 5V 1500mA (DC)
2.2 Connect to transmission files
z Connect to the computer and copy files
Transmit files between the PC and MID; please connect the unit to the computer.
(1) Put USB cable MINI end into the MID USB interface, the other end into the computer's USB port.
(2) Under the connecting state, you can always click and hold the screen at the top of the toolbar, then drag down to
display the USB connection status. Click the USB connection status bar can display the connection machine tips.
3
Page 4
(3) If successful connection, your computer will appear two new letters, one is the Micro SD Card memory, and the
other is the FLASH memory.
(4) Double click to open the removable disk, copy the file from your computer or from the MID.
z Disconnect
(1) Ensure that data transmission has been completed between MID and computer.
(2) Left click the Safely Remove icon on the bottom right corner ( ). Small window will pop up display "Stop USB
Mass Storage Device Driver." Left click the small window; the system appears safe remove the prompt, click OK.
(3) Click and hold the toolbar at the top of the screen, until the drop-down window displa y, then drag down and
display the USB connection status. Click the USB connection status bar to prompt, and then click "Close" to cancel
the connection.
Note: after disconnect from the computer (step 2), in the case of no removed USB connection to operate the machine,
but be sure close the file loading condition according Step 3, , or you can not view or use the local stored memory or
the memory card file.
2.3Insert memory card
Plug Micro SD Card memory card into the unit SD card slot, you can directly read Micro SD Card memory card files.
Note:
(1) While playing audio and video files, please not freely plug memory card, or damage the card or the machine.
(2) Intermittent pluggable card time has better more than 3 seconds, for example, after allocate the Micro SD Card,
do not immediately insert, wait 3 seconds and then re-insert.
(3) If allocate memory card, recommend a safe way to remove it to avoid card damage. Select the "SD card and
device memory" option in the "Settings" menu, then select "Uninstall SD card" and remove.
2.4 Turn on/off
Power on: Press the power button to boot then appear LOGO and system boot.
Power off: Press the power button until display "off" option. Click "off", and then click "OK."
Sleep: When without any operation during a period of time, the unit will automatically enter sleep mode, the screen
will be off screen. If continue to use, press the power button to light up the screen.
2.5 Main interface
After into the main interface, the media library is on updated status until update completed, slide to unlock screen is
effective.
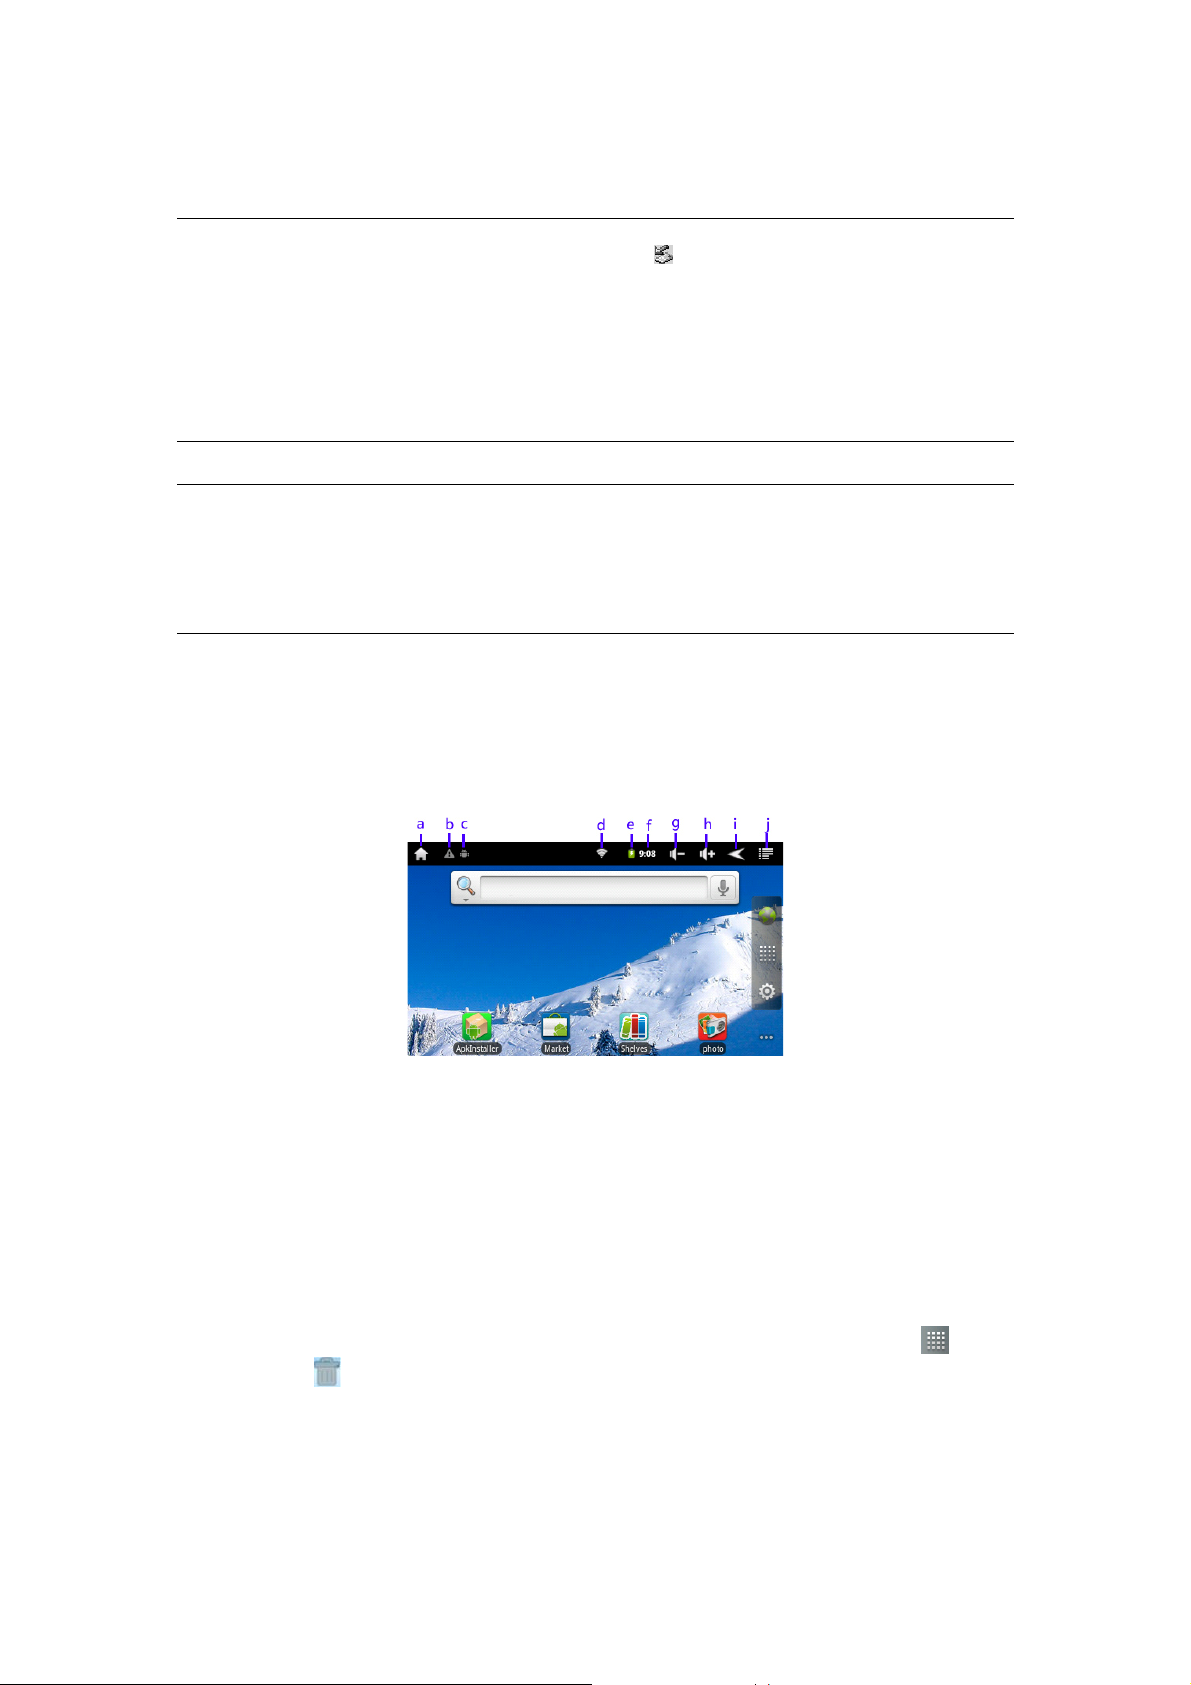
The main interface is as follows:
The main interface icons Description:
a. Touch this button to return to the main interface directly
b. USB connection state information
c. USB debugging
d. WIFI information icon
e. Battery power / battery charge status
f. the current time
g. Volume - button
h. Volume + button
i. return key
j. Menu button
Do as the following in the main interface:
(1) Add and remove software shortcuts: long press software icon, the icon changes to a floating selected, drag the
icon to the main interface, then you can add a shortcut. Long press the main interface software icon, "
will become trash "
", drag the software icon to the trash, wait until the symbol turn red, then you can remove th e
" identity
software shortcuts.
(2) 5 layers personalized regions: you can slide your finger left and right horizontal slide or click the left or right
extension of the main interface of the 5 layer regions and can be personalized to each region. Advice you to place
frequently used functions or applications in different areas for quick selection.
(3) Add to the main screen: In the main screen, press touch screen and pop-up su b-menu "Add to Home Screen",
then can personalized shortcuts,widgets,
folders, wallpaper, as follows:
4
Page 5
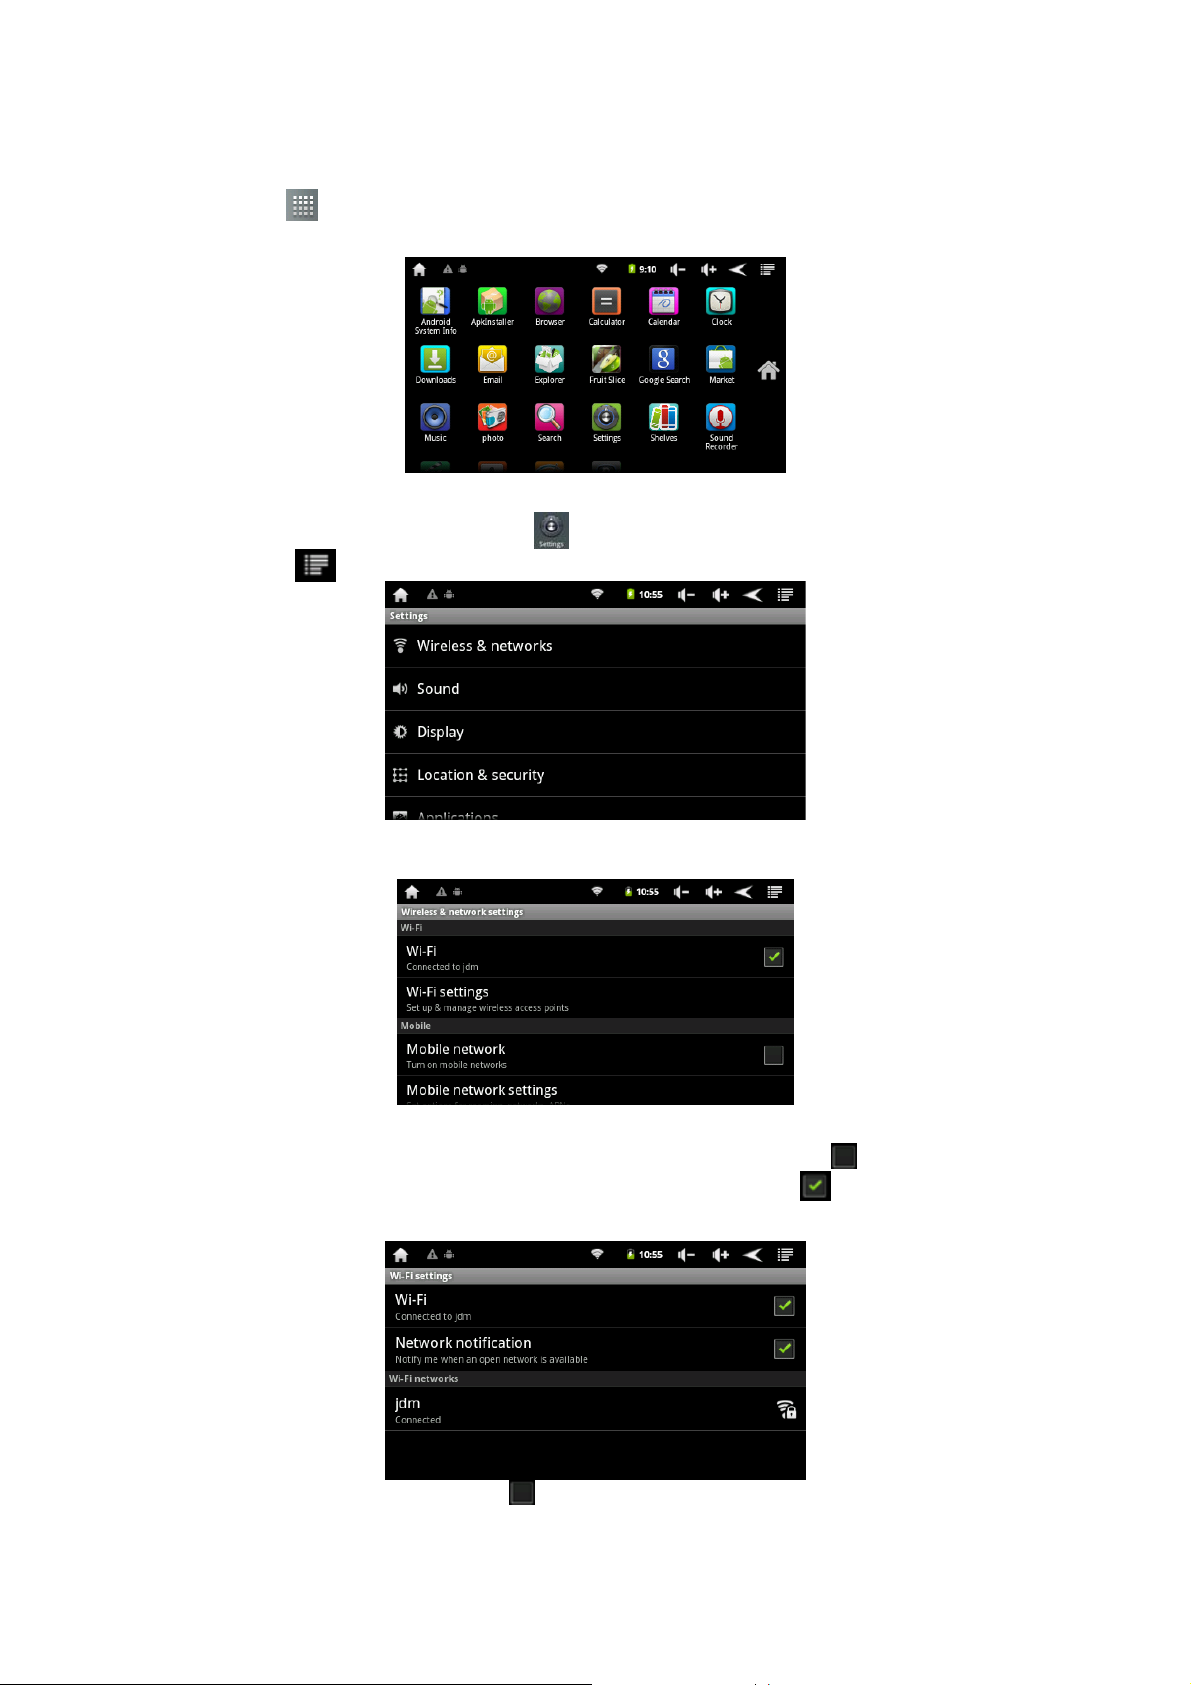
2.6 Application program interface
Click the icon "
As shown below:
" into the application program interface, the interface to show all machine listed in the application.
3. MID basic system settings
Click the settings icon in the application interface "
the menu button
3.1 Wireless and network
This interface is used to set Wi-Fi wireless networks.
, select "Settings", you can see the menu options as follows:
" into the system setting menu, or in the main interface, click
Wi-Fi wireless network
(1) Wi-Fi switcher: Wi-Fi Tips "to open Wi-Fi", the right side of the icon shows gray icon "
turns off. Click the "Wi-Fi", it says "Opening ..." on the right icon tips as the green icon ""
on.
(2) Wi-Fi setting: set up and manage the wireless access point.
- Network notification on the right icon is gray "
" which means automatically scan turns off.
5
”, which means Wi-Fi
, which means WIFI turns
Page 6
- Click "Network Notice" on the right green icon " ", means scanning turns on, the device will automatically search
for available WIFI network connection, click the wireless network side, you can connect to the network. After
successful connection, the icon is displayed in the WIFI settings as "connected to the ..." means that it has
connected to the network.
- For the connected WIFI router, the unit automatically records and when you need to connect again, only in the
"WIFI settings" "open WIFI", or simply click to select the WIFI router connection. When the WIFI settings status is
open, it will automatically look for WIFI which has connected before to connect to the router.
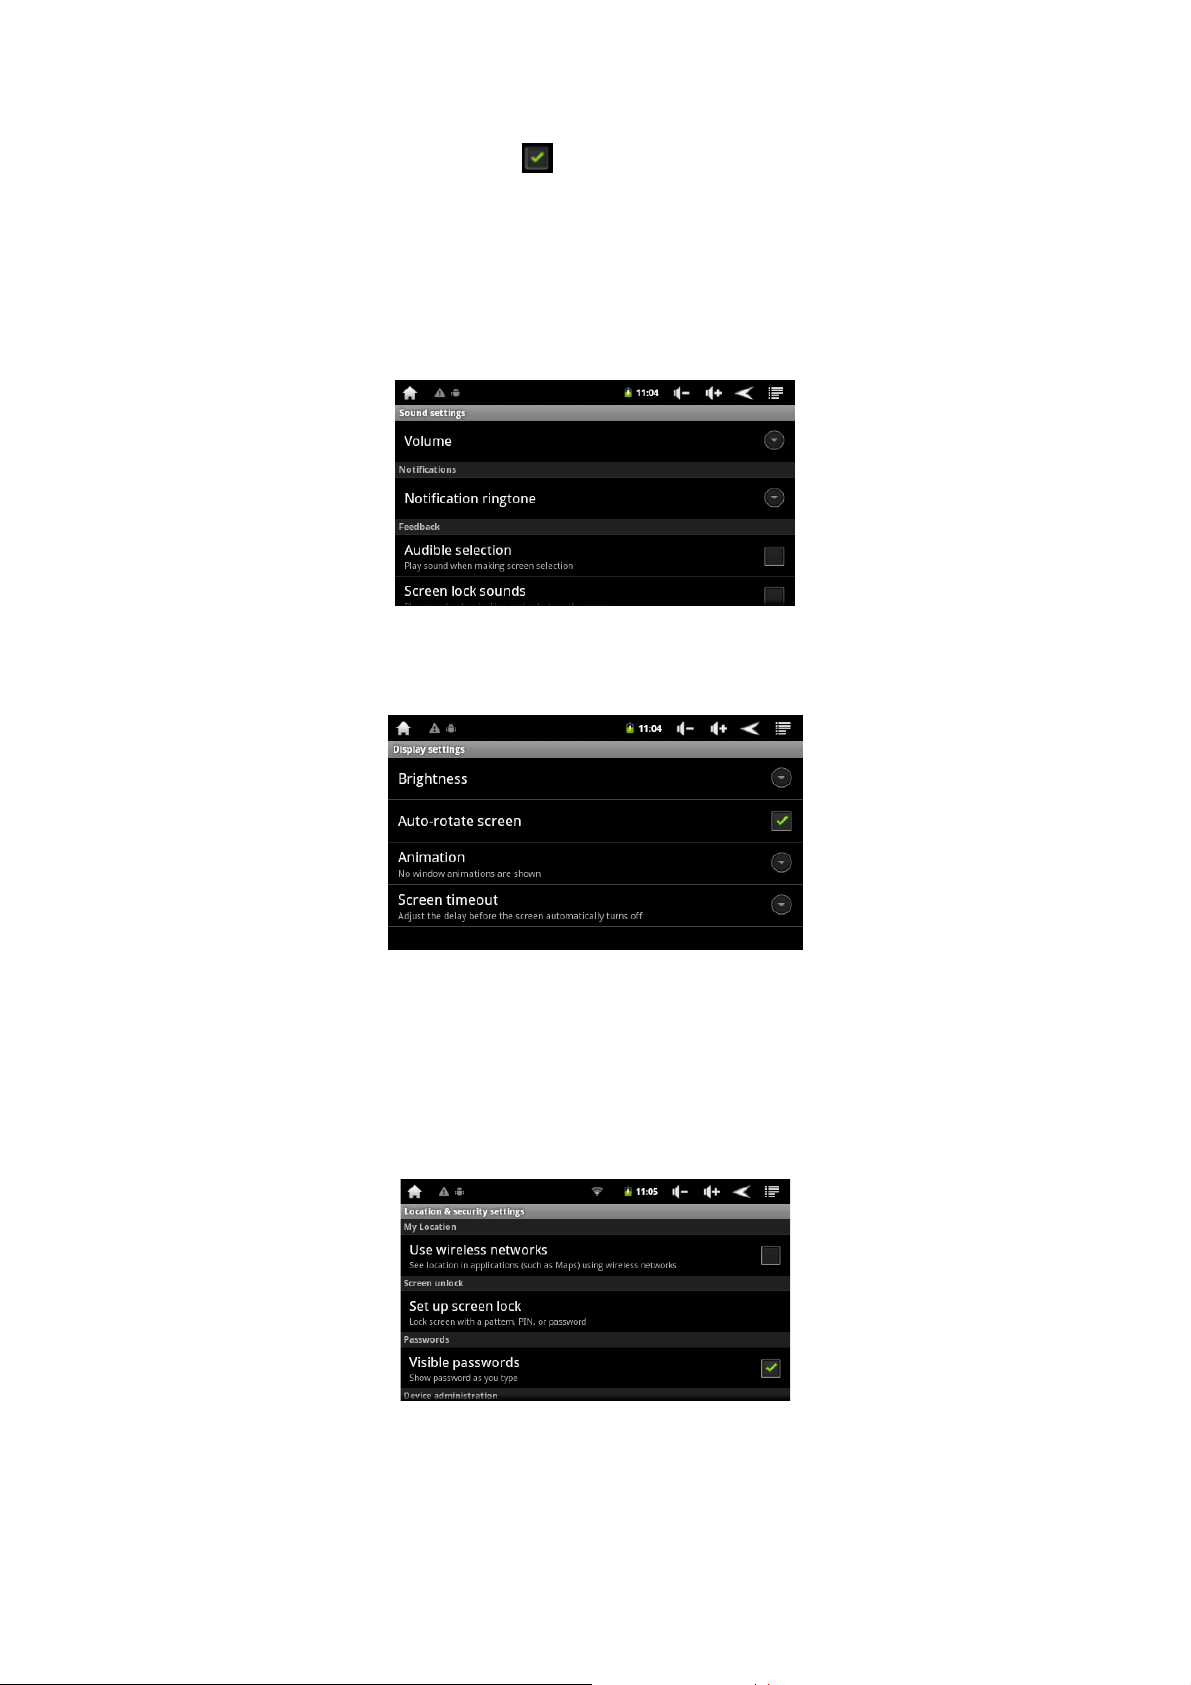
3.2 Sound and display
This interface is used to set the media volume, informed tone, sound options, SD card notice, direction, animation,
brightness, standby screen, etc.
z Sound setting
Media volume: Set the volume of music and video player, you can click the button to adjust the volume on the
machine.
Informed tone: set the default notification tone.
Sound options: Click the sound of the touch screen switcher.
TF card notice: plug TF card sound switcher.
z Display setting
Direction: gravity sensing switcher, when open, it allows rotation, rotation is not allowed when it is off. (Note: Video,
Photo and some other interface, the rotating equipment must not change the display orientation)
Animation: select no animation, part of the animation, all animation
Brightness: adjust the screen brightness.
Standby screen: adjust the delay before the screen automatically locks; set the machine automatically off after a long
idle screen, when the screen is closed, according to the power key to open the screen. You can select 15 seconds,
30 seconds, 1 minute, 2 minutes, 10 minutes, 30 minutes six times items
3.3 Location and security
This interface is used to set the unlock pattern and more visible password options:
Use the wireless network: check that you can view the Google Map to find your location, use the vertical and
horizontal feature map, friends can find out your specific location.
Visible password: show the password you type
Screen unlock pattern: you can create a personal screen unlock pattern, to prevent unauthorized use.
6
Page 7

3.4 Application
This interface for application setting:
Unknown Source: allow to install non-electronic market applications.
Management applications: management or remove the installed applications.
Running services: view and control the services currently running.
Development: set up the application development options, such as: USB teat / maintain wake-up status / allow
simulation of location.
3.5 Privacy.
This interface is used to maintain the privacy setting, restore factory setting and other related information.
Location: “use my position," set my location to Google search results and other Google services.
Settings: backup my setting.
Personal data: Click to restore factory settings, will clear all files on the device and the users own third-party installed
applications please use this feature carefully.
Note: Restore factory settings will clear all files on the device, please use in caution.
3.6 Micro SD card and device memory.
This interface is used to display Micro SD card and FLASH memory
Micro SD Card: View the total capacity of Micro SD card, Micro SD card free space, uninstall Micro SD card, and
format the data on the Micro SD card memory, built-in Flash Memory: Built-in Flash memory available view space.
Device memory: View device memory free space.
Note: the option of "Unmount TF card” remove the Micro SD card in safety and avoid pulling heat caused by friction
damage to the equipment.
3.7 Language and keyboard
This interface is used to set language choosing, input method, the user dictionary option.
7
Page 8

Language choose:Choose other countries languages.
Android full screen:Handwriting input setting
Android keyboard:English input setting
Google Pinyin Input Method: Chinese pinyin input setting
The user dictionary: common user dictionary setting.
3.8 Date and time
This interface is used to set the date, time, time zone and other options.
Automatic: Check, the system automatically uses the network value.
Set date: you can manually set the date.
Select time zone: You can manually set the time zone.
Set time: you can manually set the time.
Use 24-hour format: set the time display format.
Select date format: Choose a different date format date.
3.9 Touch panel calibration
Enter the touch-screen emendation options, touch screen will appear the cross-shaped symbol followed by the top
left, top right, bottom left, bottom right corner and the center, touch the touch screen to emend.
3.10 About device
Display information about the device, including software version number, model and so on.
4. MID software installation and management
4.1 APK installation
It supports for third-party on android platform applications, most applications can be obtained from the network,
copy into the local flash or Micro SD Card card. You can install or dismount the machine required for application.
Click "
" icon, and pop-up APK installation options: Installation, management, exit three options.
z Installation: Click installation, enter the APK installer interface.
Click the Internal Memory and SD card flash disk with corresponding Micro SD Card card storage space. Select the
inside the APK format setup, click installation,the operation finish and return to the main interface, that there is a
corresponding application.
z Management: click management, access to third-party software interface.
Click the software icon, enter the action interface:
8
Page 9

Launch: Run the software
Export: Export to Flash memory
Uninstall: Uninstall the software
Cancel: cancel the operation
4.2 Explorer.
In explorer, you can browse the local FLASH memory, Micro SD Card memory card, U disk files and folders. From
the main screen select "
You will see two areas:
The above area is used to browse the tools menu files. You can click grey hide the menu bar on the top of the tools
menu at the, click gray bar again to re-display the toolbar menu.
The following area is the list of files and folders area.
z Browsing files and folders
- You can slide up and down the list in the file list of finger sliding.
- To open a file or folder, click on the file or folder.
" into the file browser.
- Short press the menu button , you can manage the application.
- Click to return to the previous folder.
- Click back one catalog; click forward one catalog.
- Press the back key or the home key to return to the main interface.
z Tools menu options
9
Page 10

Note: You can drag left and right show other options
z Copy / move the file or folder
- In the file list, press and hold to copy or move files / folders, until the pop-up menu.
- From pop-up menu, select "Copy" or "move."
- Browse the file which you want to copied or moved to the destination directory.
- Click the Tools menu "Edit" menu and select "Paste" button
z Delete a file or folder
- In the file list, press and hold to delete the files / folders until the pop-up menu.
- From pop-up menu, select "Delete."
- Select "Delete" to confirm the deletion, or select "Cancel" to cancel the deletion.
z Rename a file or folder
- In the file list, press and hold to rename the file / folder, until the pop-up menu.
- From pop-up menu, select "Rename."
- Click the file name area to show a virtual keyboard, use virtual keyboard to enter a new file name.
- Click "OK."
z Select multiple files
- You can select multiple files at the same time
- On the tools menu, select "multiple choice."
- Click the file you want to select; select the file name becomes purple.
- You can select the file copy / delete / move operations (refer to the previous copy, delete, move, and files / folders
section.)
4.3 Electronic market
The machine attaches with "electronic market
" (android application software market), after network connection to
enter Google market, input the account number and password, you can online search applications on the network. If
there is no account to enter the electronics market, the system prompts to register a new account, which only takes a
few minutes to complete; you can download and install the application. Electronics market supports all kinds of
applications, including office, entertainment, system management, and other categories.
5. MID software applications and operation
5.1 Wireless internet
Open the WIFI, about the WIFI network connection, check 3.1 description for wireless and network.
z Browser
you can open the page in two ways.
- On the main screen, click the icon
. If you have connected to the network, the browser will open the page
directly.
- Input URL in the main interface "Google" search bar.
10
Page 11

- On the page, you can slide your finger up and down the page.
- Click the link to open the page.
- Visit the website, click enlarge / lessen icon on the web page.
- You can open several pages, and then click one page for full-screen viewing.
- To return to the previous page, click the back key .
- On the page, you can press a link display the other menu options.
-Input type text, you can click on the area to enter text, and then use the virtual keyboard to input the required
information.
Note: The default browser start page as Google home page.
z Browser menu
Open the browser; press the menu button
to display the browser menu.
New window In the current web page window can add multiple
pages windows, up to 8 windows.
Bookmark Open the bookmark manager bookmark, you will see
three tabs: "bookmark", "most visited", "History."
“bookmark ": list all bookmarks, click on any bookmark
to open the page. Bookmarks can pop-up menu
options; you can edit, rename, or delete bookmarks by
using the menu. You can use the "Add Bookmark" to
add new bookmarks, or use the menu icons
to the
last viewed page.
"Most visited": list the most frequently visited website.
"History": list the records of the history list. You can
to clear history records
Window
click
If you open the multiples windows currently, you can
click "window" which can display eight windows in the
same screen window, you can slide a small window on
the screen to enlarge the window to full screen mode.
Click the right corner of the window close icon to close
the window.
Refresh
Forward
More
Click "Refresh" to refresh the current page.
Skip to the next visited page
View more options ("Add Bookmark", "Find in page",
"select text", "Web Information", "download", "Setting")
5.2 Video play
z Video player
Click "
" into the video player on the main screen, the playlist will automatically load all video files, just click the
video file you can enter and play the video.
Set bookmarks, after setting successful, the video will play
each time from the bookmark.
Note: Each video file can only set a bookmark; the new
bookmark will overwrite the old one.
Adjust the video brightness
11
Page 12

5.3 Music play
z Music player
Previous video , press and hold rewind functions to
achieve down forward functions
Pause
Play
Set the screen aspect view ratio(full screen, the original
size, 16:9,4:3)
Back to the top list
Pop-up submenu
Click "
Click "
" icon to enter the music.
" icon to enter the music list.
- When MID music files are update, the media library is automatically updated.
- You can slide your finger up and down the list on the song list.
- Click to select a song start playing.
z Play music files
Click the music files into the player to play music
- Click Pause
- Click
- Click the icon
/ Play icon to pause or play the songs.
/ play previous or next song.
loop songs
5.4 Browse photo
z Photo browser
Click on the main interface "
" to enter the picture viewing modes.
Into the picture mode, you first see the picture browsing interface.
12
Page 13

Click into
In this interface, you can view all abbreviate pictures. To view the pictures, only need to click on the abbreviate
pictures.
z Photo tool
When you view the pictures, click on the screen display / hide pictures tools menu.
Automatically browse pictures, click
Rotate the picture,click
Edit picture,click
Set as desktop background, click
Display the picture information, click
Return to the picture browser interface, click
5.5 E-book
Click “
" into e-book reader.
Open the program, the program's main page will display the icon of the recently read books.
- Click the shelves, display books which can be supported by tray and download books.
Click Internet books, support online download.
Click the file name of the author and folders, which classified by author and title.
Choose book, press the Menu key, you can set the book:
- Skip page: Enter the page number, click OK
- Bookmarks: Show bookmarks, add bookmark, delete bookmark
- Book Information: Display the title and author
- Automatic page flip: manual flip, 15 seconds, 30 seconds, 60 seconds.
Note: This application supports e-book formats, including: PDF/TXT/FB2/EPUB/RTF/PDB.
Because of the causes of memory space, except PDF, EPUB, other file formats can not be larger than 2M, or can not
properly open.
13
Page 14

5.6 E-mail
Click " " into e-mail setting, input your email address and password, you can send and receive email.
z Set e-mail account
Before using e-mail function, you must first set the mailbox account.
- Into the application options, and then select "Email" to start using e-mail.
- The system will prompt you to set the mail account.
- Input your e-mail address and password, such as: aa1233@163.com
Enter the password and click
Set the e-mail POP3/IMAP or other servers, you can get information from your network administrator
If using the POP3 account type, the service setup interface appears as follows:
According to different information provided by suppliers to set different parameters, such as: POP3 server, the
system defaults to "163.com," now it is revised as "POP.163. Com", port number "110", then select “Next ", will be
entering the accepted checked service setting. If the settings are correct, the “outgoing server settings” appears.
Need to modify the SMTP server 163.com to smtp.163.com, and then modify the port 587 to 25, select next, enter the
outgoing server checking interface, if the settings are correct, will enter the following interface:
14
Page 15

Select "next" to enter the personalized account information interface:
Enter your desired name in the "Your Name" column on outgoing messages, such as : Rocky, and then click "Done"
to enter the mail interface, the system will automatically load to your inbox, read Your e-mail, show mailing list as
follows:
z Check e-mail
(1) After entering the mailbox, you can slide the mailing list by sliding your finger up and down.
(2) You can click to open the mail you want to read. Open the mail, you can reply or delete.
(3) On the mailing list, press on the desired e-mail until the mail pops up. Using this menu, you can open reply,
forward, delete mail and so on.
z E-mail menu
On the mailing list interface, press the menu button
Refresh Refresh e-mail
Compose write a new mail
Folder browse mail folders
Accounts View all mail accounts
Account Setting set up mail account
z Delete mail account
you can remove your mail account from the machine.
(1)Enter the email; press the menu button
(2) Click "Account" to display mail account.
(3) Click the mail account you want to delete and press until account options pop up.
(4) Click "Delete Account", then click "OK" button.
z Gmail
to display mail menu.
to display the Mail menu.
" into Gmail, create / login in Gmail, you can send and receive Gmail messages.
Click "
5.7 Alarm clock
Click "
" icon to enter the alarm clock setting
15
Page 16

Click“
” enter alarm clock. You can add or exis alarm clock
5.8 Recorder
z Recording
Click "
" to enter the recording mode.
(1)Click "
(2)In the recording process, click "
" to start recording.
" Stop recording, and then click the " " can replay, select whether to use the
recording or quit.
(3) When the recording finish, click "
" to stop recording, the machine will display "to use this recording" and "quit"
option. Select "Use this record" to save the recording; choose "give up" not save but directly exit.
z Play recording
Recording is saved in the RECORD folder, you can open the "Explorer", and then open the RECORD folder, find the
file you want to play, click to play. The operation is the same as the music mode.
File is named as: audio file appears as "year, month, day, hour .3 gpp".
Note: This device is not professional Voice Recorder. The recorded format is normal 3GPP Format. The effect of
recording factors in environment of user recording 、volume and so on. If users need special recording quality, please
use professional voice recorder.
5.9 Other functions
z Calculator
Digital calculator, click on the corresponding figures or characters in addition, subtraction and other simple operations.
z Calendar
Display year, month, day.
16
Page 17

6. Troubleshooting
z Reset the MID
if MID not respond or it crashes, you can use sharp objects (toothpicks, pins, etc.) press reset button to reset, and
then try to reboot.
z Touch screen problem
if touch screen no response, deviation; please use the "touch-screen calibration" to set the calibration screen.
z Power cannot on and no respond
it is usually because of the MID power off. Please charge some time, MID will automatically start and display the
charge.
z PC capacity display and the capacity of the machine do not match
the calculation of PC capacity is calculated by1024 bytes, while the machine is calculated by 1000 bytes, so the
differential is normal; the other actual capacity of available capacity will be different, because the system partition
occupies part of the capacity, the operating system takes a greater capacity.
z Can not copy files
In this case, make sure whether your computer is properly connected to the machine, or the memory storage space
is full, USB cable is damaged?
7. Technical specifications
Item Description
CPU RK2816;(ARM926 600Mhz)
Memory 256MB
Built-in operating
system
Android OS 2.2
IBM PC with USB interface and compatible,
System Requirements
notebook computers, Apple computers;
Windows2000/XP/Windows 7/Vista, Mac
OS10.4 and above visions.
Storage capacity 2GB-16GB
Memory card types Micro SD card
Memory card capacity 1GB/2GB/4GB/8GB/16GB (optional)
Volume output 3.5mm headphones, speakers
Input Android keyboard
MP3:MPEG1/2/2.5 Audio Layer 3 decoding,bit
rate 8-320kbps;sampling rate:8-48KHz。
MPEG1/2/2.5 Audio Layer 3 encoding:
16Kbps—224Kbps,8-48KHz。
PCM encoding,MS ADPCM encoding
WMA:8-320Kbps
Audio formats
WAV:MS-ADPCM,IM-ADPCM,PCM
APE: supportV3.95/3.97/3.98/3.99 grades as
normal or fast compressed files,free bit rate
limitations.
FLAC:support all streams and the bit rates
AAC、AAC+:suffix . AAC file format, sampling
rate 8-48KHz
RM/RMVB frame/rate:25frame@720*576
RM/RMVB rate:<2Mkbps
AVI frame/rate:30frame/800*480
AVI rate:<2Mbps
AVI video encoding:XVID,DviX3/4/5, MS
Video format
MPEG-4V3
AVI audio encoding :
MP3/WMA/WMV/FLAC/APE
FLV frame/rate:30frame@640*480
FLVf rate: <2500kbps
MP4 frame/rate: 30frame@640*480
MP4rate:<15000kbps
Image format JPEG/BMP/GIF/PNG/TIFF
Wi-Fi Support 802.11b/g/n
Other applications web browsing, e-mail, calculator, sound
17
Page 18

recording, etc.
Sound mode
Language support multiple languages
Repeat mode
Recording support Microphone
Google browser support
Explorer support
Audio bit rate MP3: 8~320Kbps;WMA: 8~320Kbps
Video pixels 480X272(Max.)
Video bit rate
Recording format 3GPP(ordinary quality:6kbps/8kHz)
Charging time About 2-3 hrs
Display screen
ratio 〉85dB
Frequency response 20Hz—20KHz
Power built-in lithium polymer; external power adapter
Storage temperature -20℃ ~ +65℃
Operating temperature 0℃ ~ +50℃
Operating relative
humidity
Storage relative
humidity
normal, pop, rock, classical, heavy bass, jazz,
my sound
single time, single repeat, all once, all repeat,
listen
Max.6Mbps for MPEG4, XVID, DIVX4/5/6
Max.2.5Mbps for H.264, Real video 8/9/10
Max.2Mbps for Sorenson H.263
4.3 inch TFT screen,480X272 pixel,
touch screen
20% ~ 90%(40℃)
20% ~ 93%(40℃)
FCC Warning Statement
Changesormodificationsnotexpresslyapprovedbythepartyresponsiblefor
compliancecouldvoidtheuser’sauthoritytooperatetheequipment.
ThisequipmenthasbeentestedandfoundtocomplywiththelimitsforaClassBdigital
device,pursuanttoPart15oftheFCCRules.Theselimitsaredesigned
reasonableprotectionagainstharmfulinterferenceinaresidentialinstallation.This
equipmentgeneratesusesandcanradiateradiofrequencyenergyand,ifnotinstalled
andusedinaccordancewiththeinstructions,maycauseharmfulinterferencetoradio
communications.However,thereisnoguaranteethatinterferencewillnotoccurin
particularinstallation.Ifthisequipmentdoescauseharmfulinterferencetoradioor
televisionreception,whichcanbedeterminedbyturningtheequipmentoffandon,the
userisencouragedtotrytocorrecttheinterferencebyoneormoreofthefollowing
measures:
‐‐Reorientorrelocatethereceivingantenna.
‐‐Increasetheseparationbetweentheequipmentandreceiver.
‐‐Connecttheequipmentintoanoutletonacircuitdifferentfromthattowhichthe
receiverisconnected.
‐‐Consultthedealeroranexperiencedradio/TVtechnicianforhelp.
toprovide
a
18
 Loading...