

Page 1
V1.0
VitalASC VisPad Stylus Pad User Manual
○
A
○
B
○
C
○
G
○
H
○
D
○
A
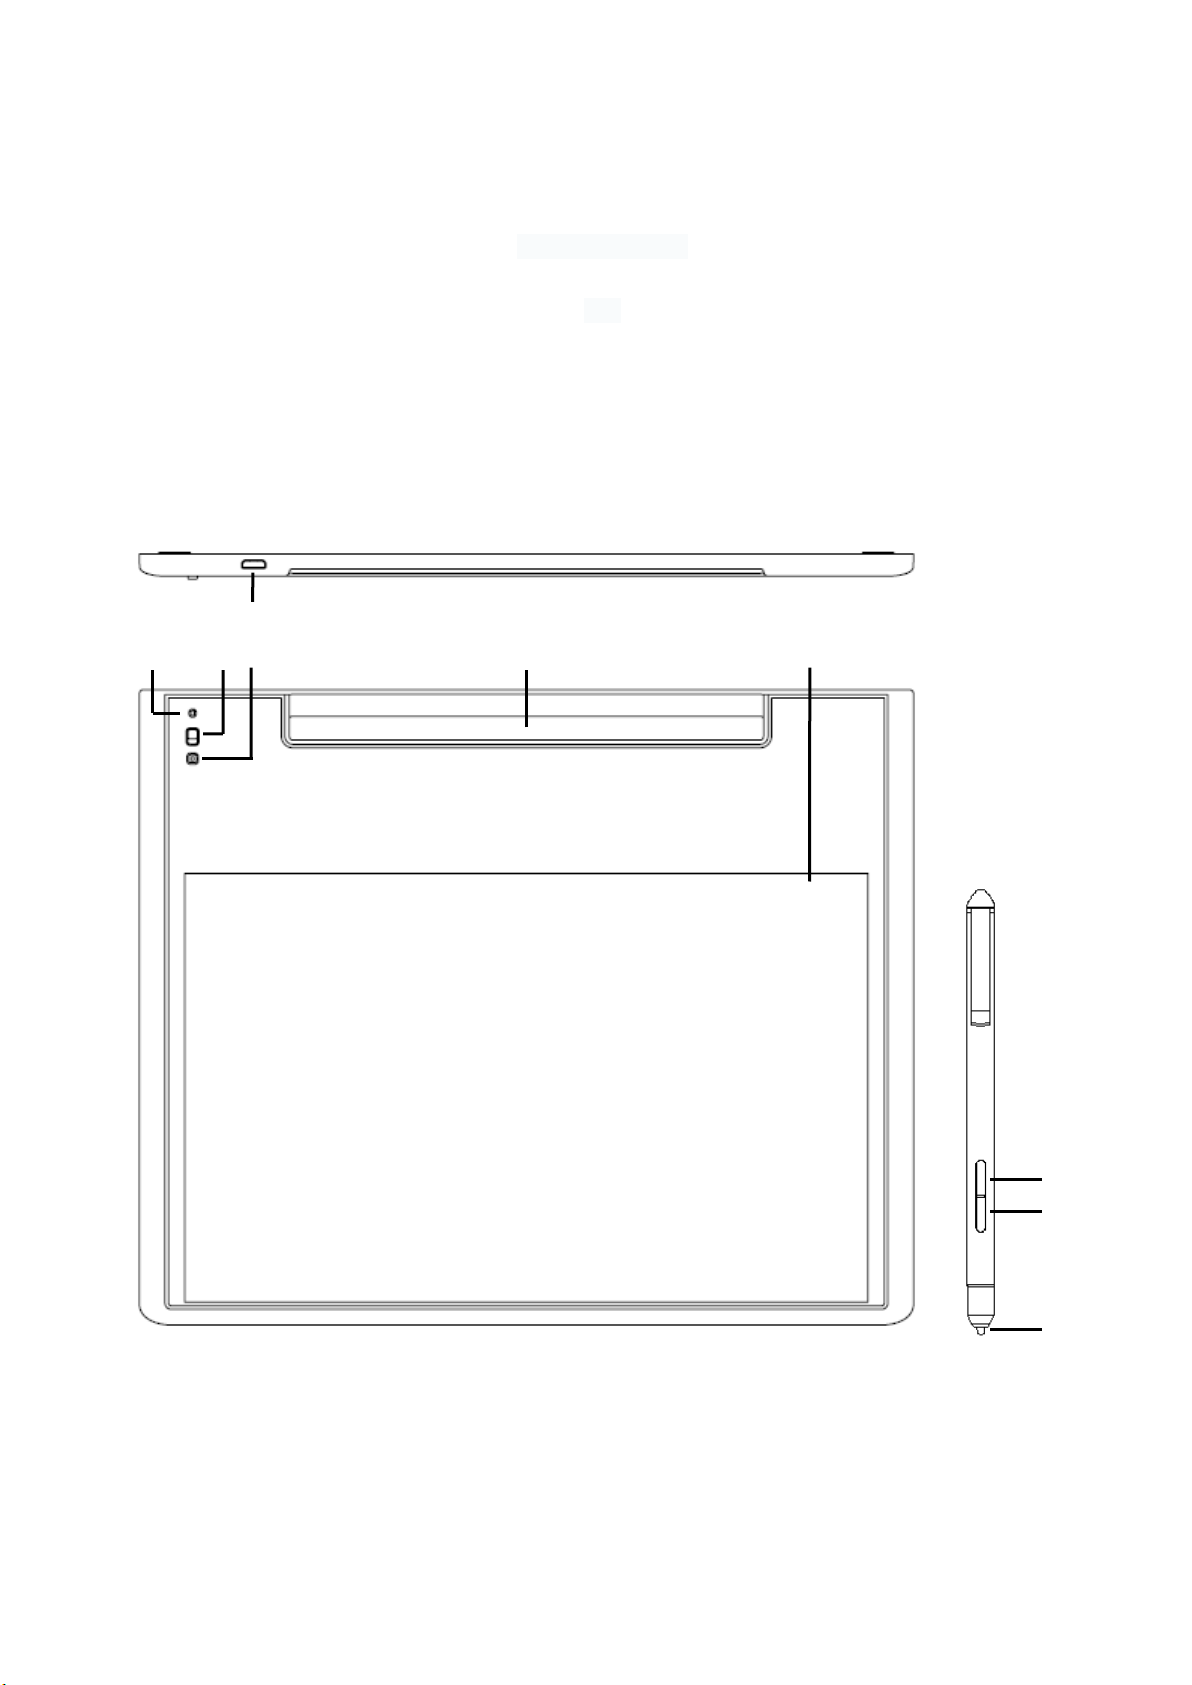
Micro USB Power Port
○
B
Indicator LED
○
C
On/Off Switch
○
D
Connecting Button/LED
○
E
Pen Slot
○
F
Stylus Area
○
G
Erase Button
○
H
Right Button
○
I
Pen Tip
○
E
○
F
○
I
VitalASC VisPad Stylus Pad :
Electronic tablet
730
Page 2

V1.0
Package included
VisPad Stylus Pad
VisPad Stylus Pen
Micro USB Charger Cable
RF 2.4G Dongle
User Manual
Adaptive Operation System
Windows (10X is recommended), iMac
Wireless Connecting
2.4GHz RF
Available time
Continuous Use : 12 Hours
Standby : 360 Days Max.
Charging time
USB +5V / 1 Hours
The Function of Related Parts:
A
○
Micro USB Power Port
Use the Micro USB Cable to Charge.(*1)
B
○
Indicator LED
(1) Blue – Means Power on.
(2) Red – Means Power is Charging. Go out When Power is full.
(3) Flash Red – Means Need to be recharged.
C
○
On/Off Switch
Left – Turn off the Power.
Right – Turn on the Power. Begin to Search for Connecting
D
○
Connecting Button / LED
Push to Connect with the Dongle when the First Time Using.(*2)
Flash Blue – Means 2.4GHz RF is Searching for Connecting.
Go out When Connected.(*3)
E
○
Pen Slot
Keep the VisPad Stylus Pen here. It Attracts the Pen to remain in Both Directions.
F
○
Stylus Area
Active Area that the VisPad Stylus Pen Works.
G
○
Erase Button
Erase the Marks Been Written on APP or Applications of PC.
Push this Button before the Pad Detects the VisPad Stylus Pen(*4)
H
○
Right Button
Use As the Right Button of the Mouse.
H
○
Pen Tip
Plastic Material and can be Exchanged with Another New Pen Tip
*1 : This Port is for Charging Only, It can not Transfer the Stylus Data to Computer.
*2 : Be Sure to Connect the Dongle to the USB Port of the Computer in Advance.
*3 : This Pad will Remember the Last Dongle Which has been Connected.
*4 : The VisPad will Detect the Stylus Pen upon the Mylar about 6mm Height.
When the Stylus Pen is Detected, it will Show a Cursor on the Display Screen.
*5 This product is connected to the computer through 2.4G wireless and can draw pictures,
normal use Usually placed next to the computer and belongs to the mobile device
Page 3

V1.0
Customer Service
This device complies with part 15 of the FCC Rules. Operation is subject to the condition that this device does
not cause harmful interference (1) this device may not cause harmful interference, and (2) this device must
accept any interference received, including interference that may cause undesired operation.
Any changes or modifications not expressly approved by the party responsible for compliance
could void the user's authority to operate the equipment.
NOTE: This equipment has been tested and found to comply with the limits for a Class B digital device,
pursuant to Part 15 of the FCC Rules. These limits are designed to provide reasonable protection against
harmful interference in a residential installation. This equipment generates, uses and can radiate radio
frequency energy and, if not installed and used in accordance with the instructions, may cause harmful
interference to radio communications. However, there is no guarantee that interference will not occur in a
particular installation.
If this equipment does cause harmful interference to radio or television reception,
which can be determined by turning the equipment off and on, the user is encouraged to try to correct the
interference by one or more of the following measures:
-- Reorient or relocate the receiving antenna.
-- Increase the separation between the equipment and receiver.
-- Connect the equipment into an outlet on a circuit different
from that to which the receiver is connected.
-- Consult the dealer or an experienced radio/TV technician for help.
To maintain compliance with FCC’s RF Exposure guidelines, This equipment should be installed and operated
with minimum distance between 20cm the radiator your body: Use only the supplied antenna.
FCC ID: 2AFNZ-730
 Loading...