

Page 1
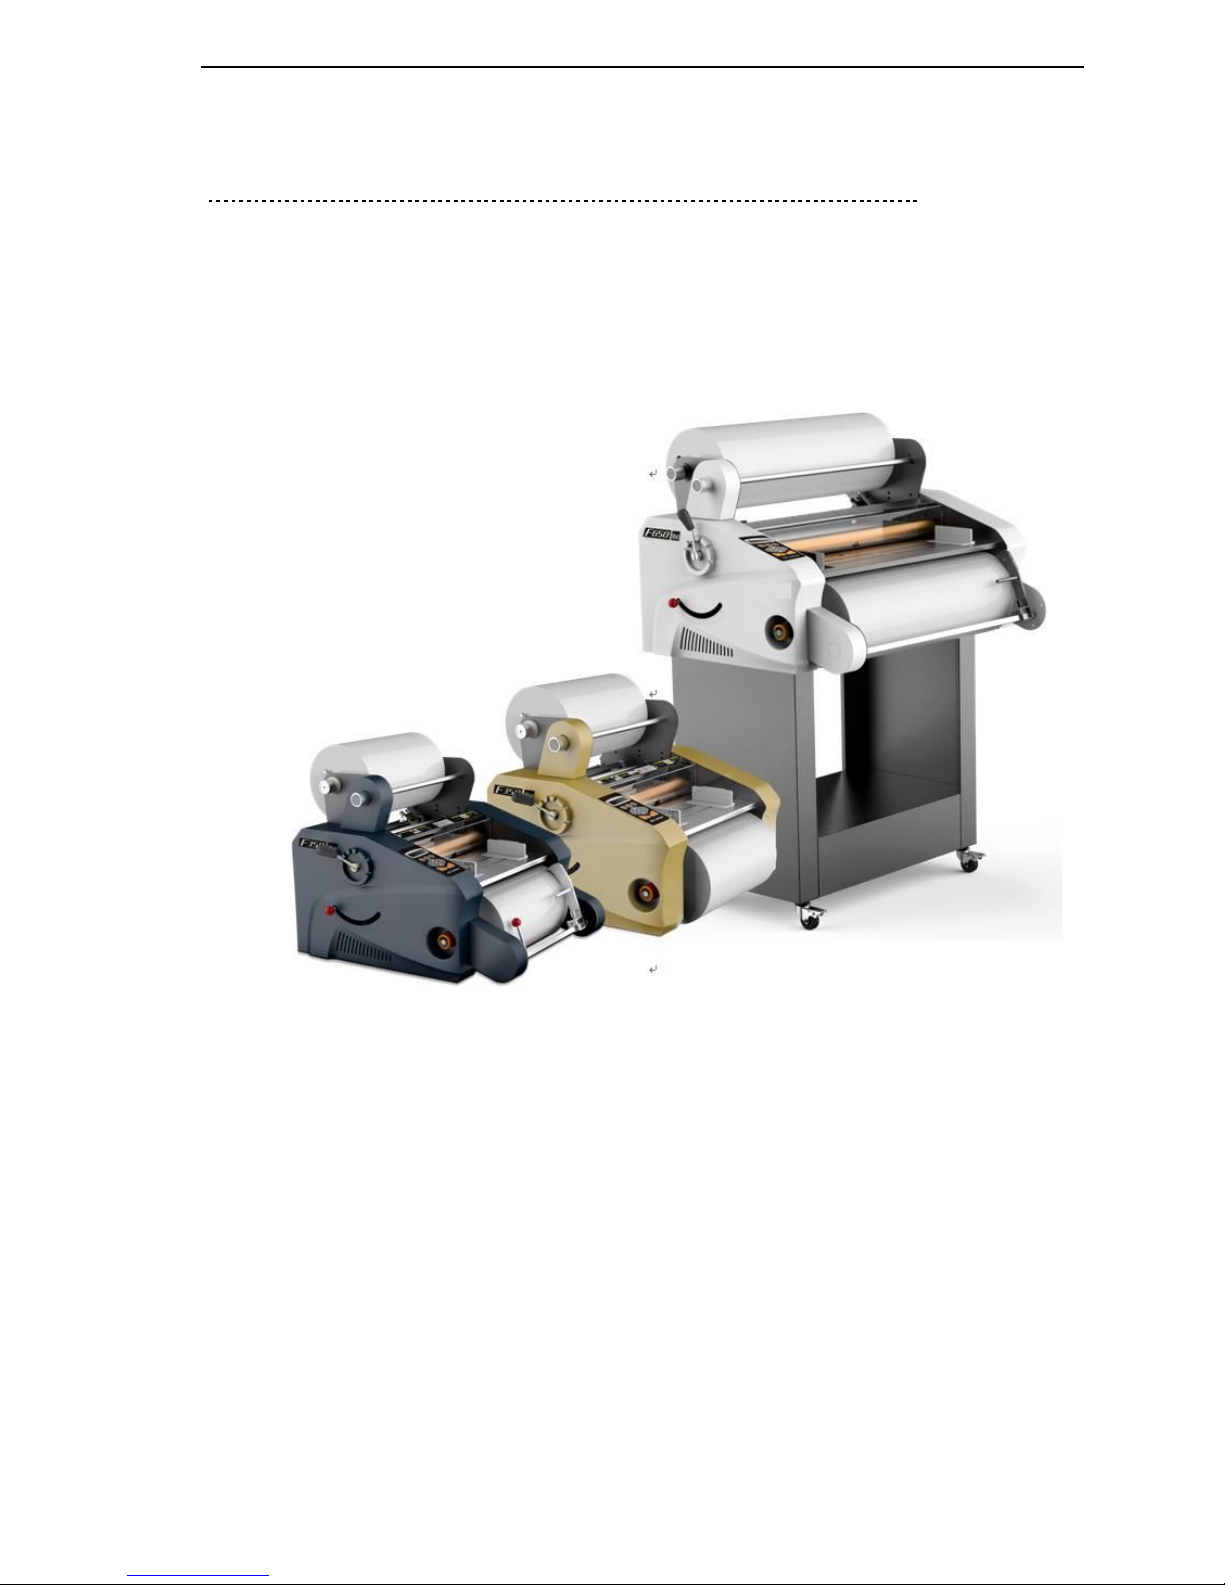
F350/F650
laminator manual
If any change, we won’t make the notice, please make the object as the standard.
March.2014. (second edition)
Page 2

F350,F650
Laminator manual
Contents
foreword …………………………………………………………………1
Notes of safety ……………………………………………………………1
1、open box and check……………………………………………………2
2、Name and function of parts ……………………………………………3
3、Technical parameter …………………………………………………5
4、Operation panel …………………………………………………………6
5、Controllable parts and keys ………………………………………………7
6、How to use the machine …………………………………………………11
6.1 How to work………………………………………………………11
6.2 Operation steps……………………………………………………12
6.3 Clean jammed films ……………………………………………13
6.4 Adjust wrinkled paper……………………………………………13
6.5 Clean jammed films………………………………………………14
7、Laminator Techniques and skills…………………………………………14
8、Daily Maintenance………………………………………………………15
9、Self checking……………………………………………………………16
10、Troubles and Troubleshooting ………………………………………17
11、Electrical diagram ……………………………………………………18
Page 3
F350,F650
Laminator manual
foreword
Thank you for your choosing our product. In order to correct use this
product , kindly read this manual carefully. Take care every operate detail.
Therefore it will help your operate skills and make the perfect production
and improve the operate speed.
This machine is developed by rich experience, abundant economy and
technology of corporation. There is serious quality control process which
from design to material purchase and produce. Fully reflecting the
corporation motto: “perfection pursuing, Customer satisfaction”.
Safety caution:
Be care to use this machine, don’t put the hand or another body to
running part of the machine , which avoid any accident. Kindly see more
using, maintenance caution as below.
1.Put the machine on the solid and air circulate place .
2.According the mechanical rear instruction to connect the power, If the
voltage is too lower or higher ,the machine will run abnormally.
。
3.Ensure your safe, please use the earthed power socket.
4.Don’t put several electric in one socket,because if overload will caused
to fire or electric shock.
5.Before clean the machine, please take off the power .
6.H
eating roller temp. is over 130℃, So don’t touch the heating roller
when using or power off in a short time.
7.Don’t put irrelevant things into the laminator .
8.Don’t touch the heating roll and film surface, or the film will be adhered to the roller
and difficult to clean.
9.Don’t repair the laminator by yourself. If problem, kindly connect the agent.
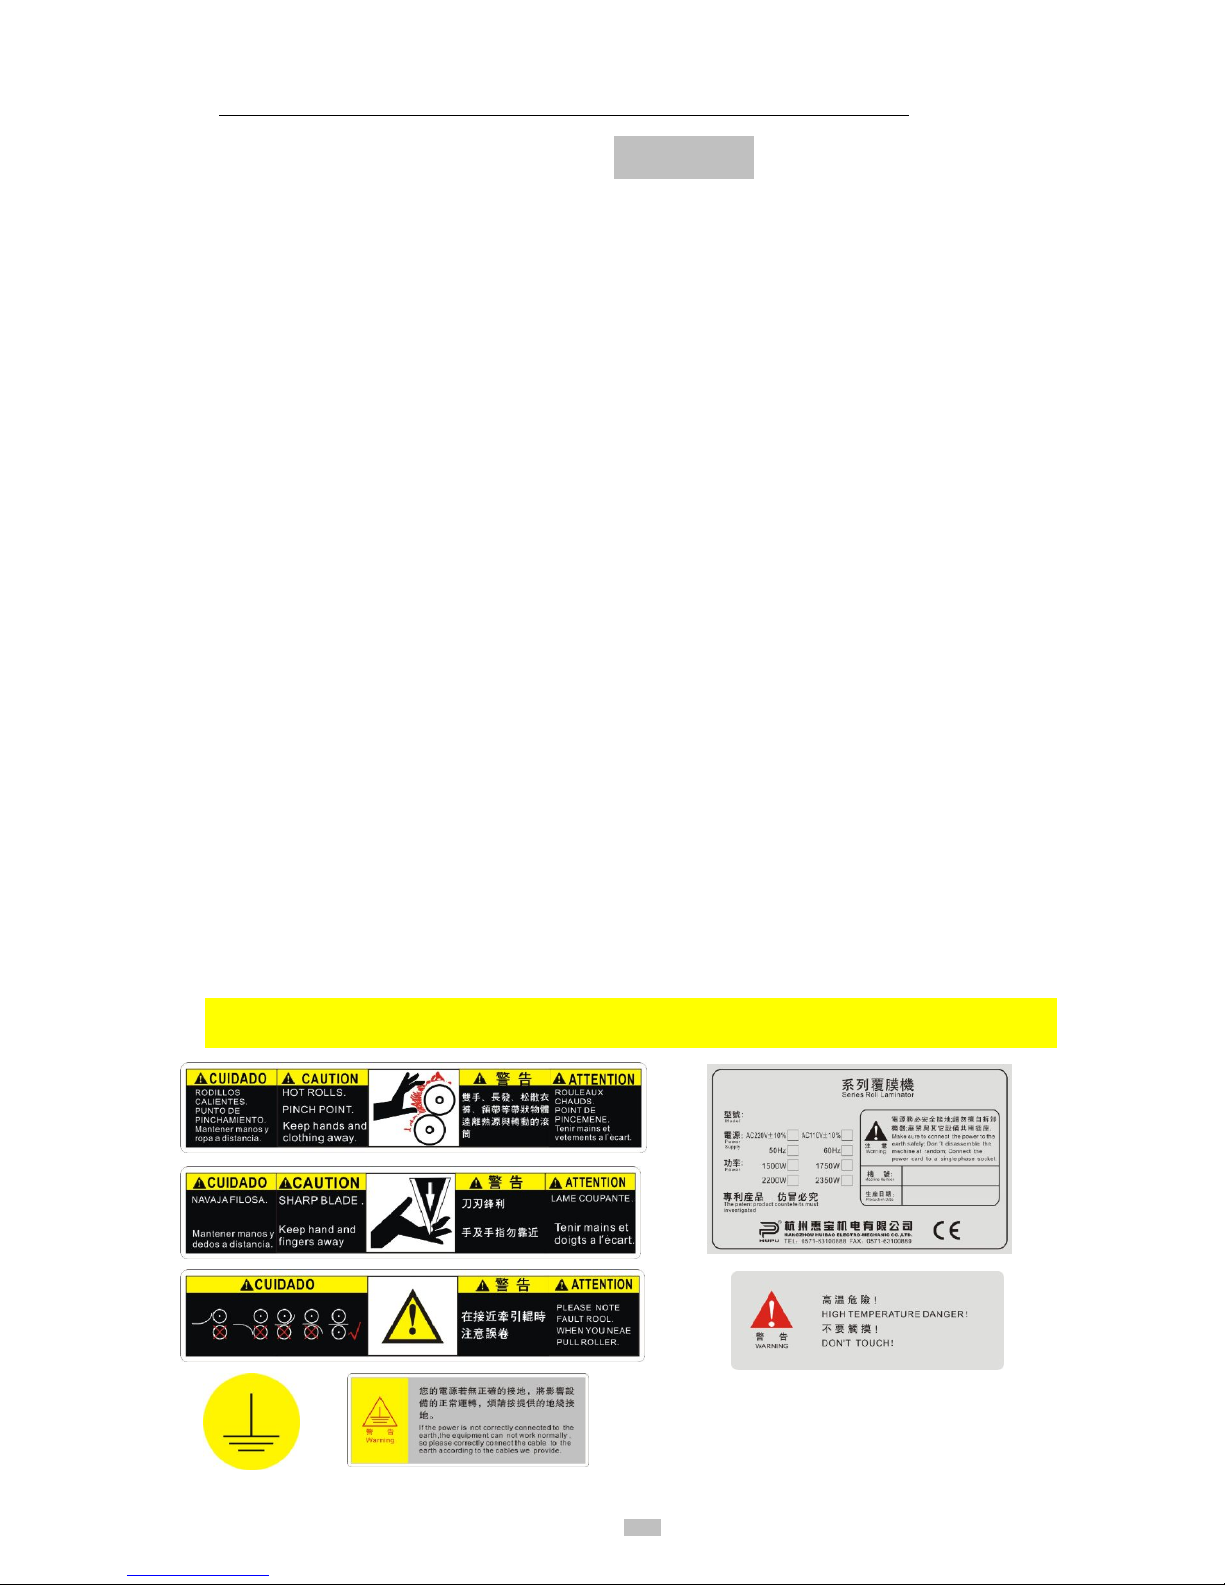
Following”warning”labels, you can find it from the machine:
Page 4
F350,F650
Laminator manual
1、open box and check
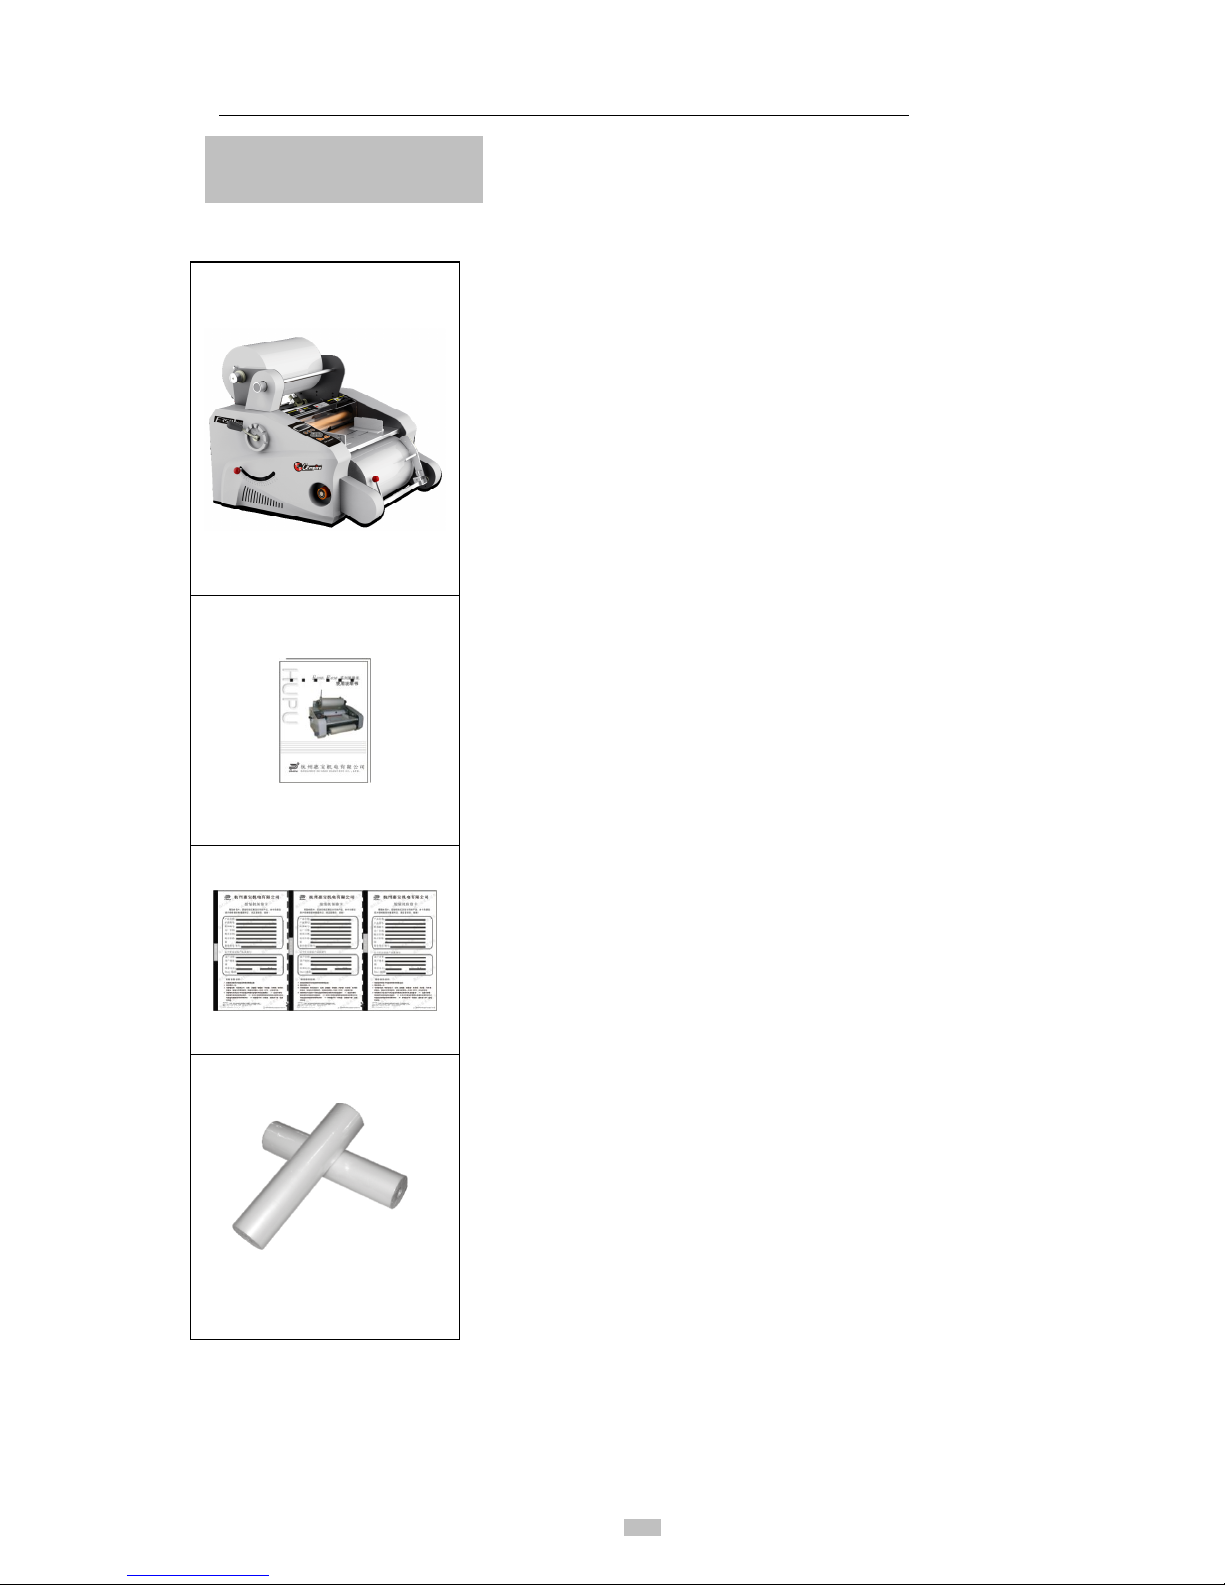
Kindly check the accessory, after open the
laminator box,any damage or miss, kindly contact
the agent or head company.
(1) Machine
(2) Manual or CD
(3) warranty card
(4) Film(Installed)
Note:
Before use, kindly read this manual carefully,
it’s will useful for laminator skills and get the more
beautiful filmed papers;
Kindly keep the packed polybag, box and etc
which for the re-transport.
Machine
Manual
warranty card
Film
Page 5
F350,F650
Laminator manual
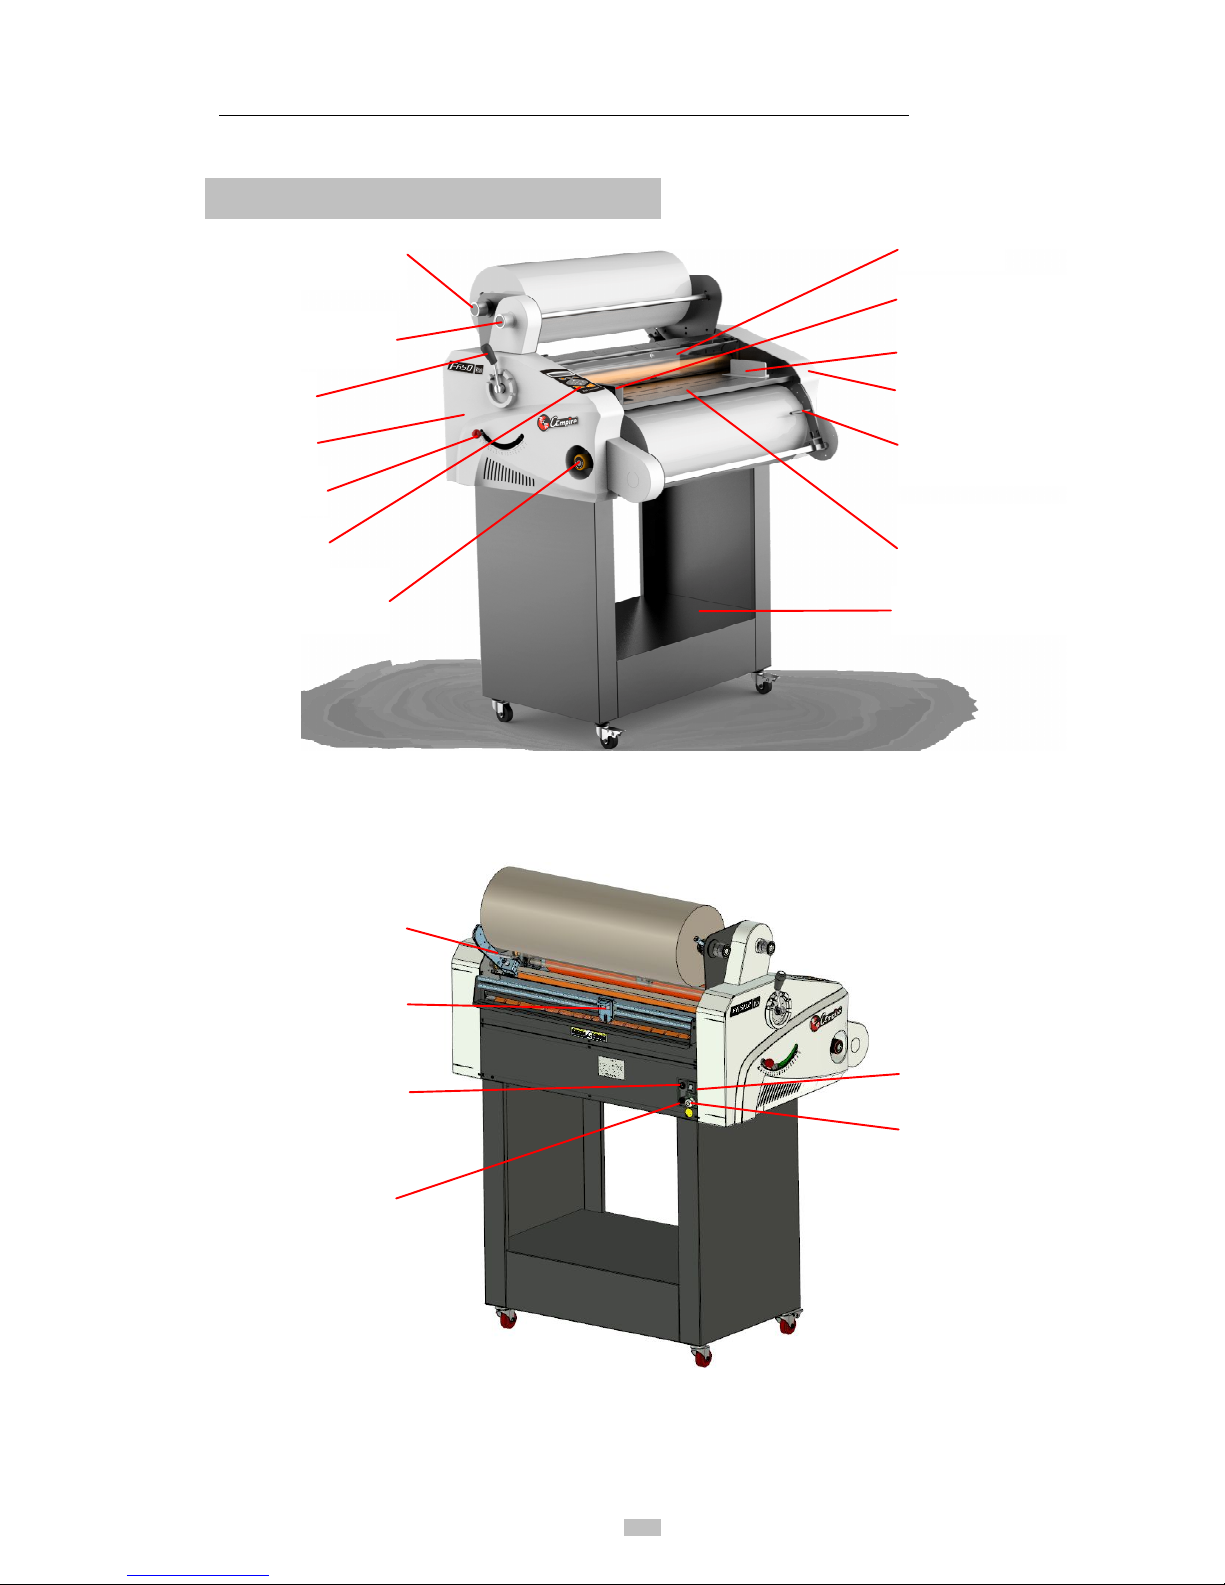
2、Name and function of parts
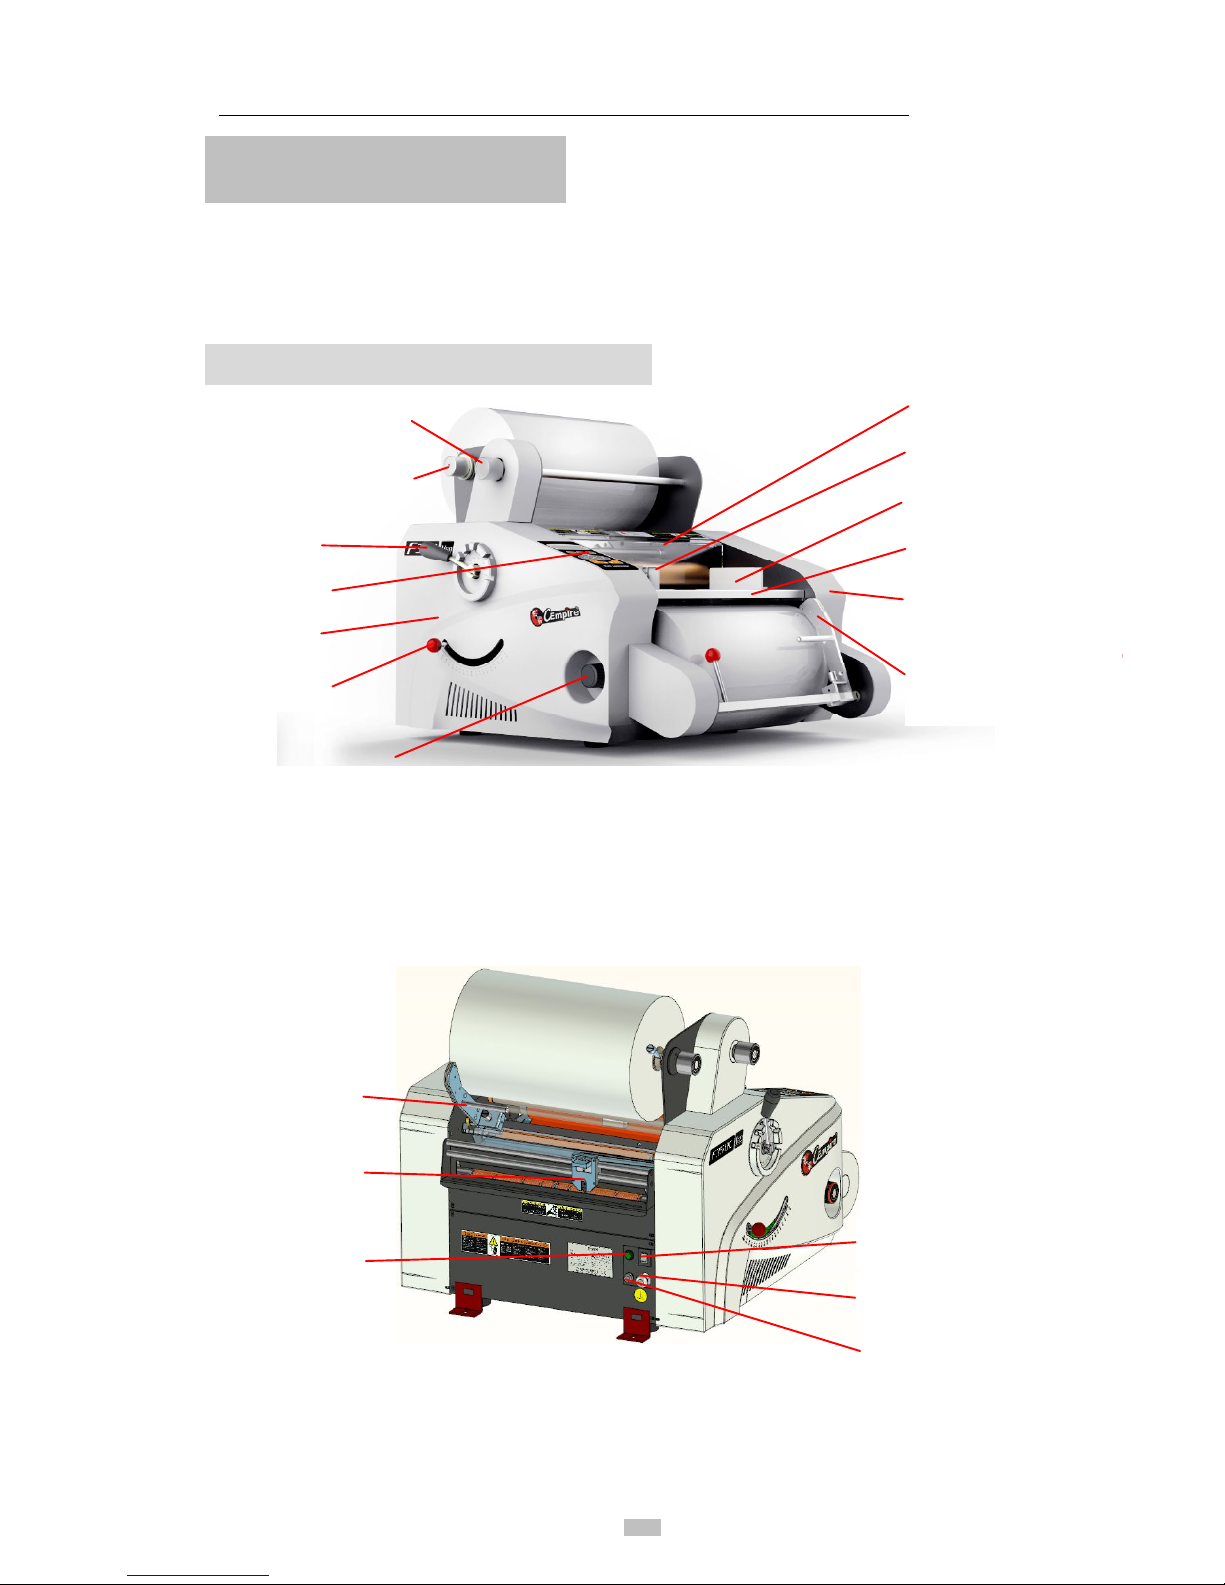
Before use and install this machine, Kindly know the name and function
of parts by the below photo .
2.1、F350 parts and function
tension adjusting handle
Right
Paper fixed position
Left Paper
fixed position
Gear knife handle (
only for
F350C/F350B)
Feeding desk
right side cover
left cover
down film tension
adjusting
handle
pressure wheel
safety cover
Operate panel
C
old film
tension
adjusting
handle (only for F350C、F350B)
Anti roll gear
power switch
Fan switch
(only for F350C、F350B)
Gear knife handle
(only for
F350C/F350B)
power line
supply power fuse
manual cutting
Page 6
F350,F650
Laminator manual
2.2、F650 Name and function of parts
machine base
up film tension adjusting handle
Right Paper fixed position
Left Paper fixed position
Gear knife handle
(only for F650B)
Working table
right cover
left cover
down film tension
adjusting
handle
pressure wheel
safety
operate panel
Cold
film
tension
adjusting
handle (only F650B)
anti curl handle
power switch
Fan switch
(only for F650B)
Gear knife handle
(only for F65
0B)
power line
supply power fuse
manual cutting
Page 7

F350,F650
Laminator manual
3、Laminator Parameter
Type F350 F350B F350C F650 F650B
P
aper
width
(mm)
130-350 130-350 130-350 130-650 130-650
paper
length
(mm)
110-999 110-999 110-999 110-999 110-999
paper
thickness
(g/㎡)
80-400 80-400 80-400 80-400 80-400
Sp
eed
(m/h)
300 300 300 300 300
Feeder
Manual Manual Manual Manual Manual
Display
LCD LCD LCD LCD LCD
Max. film
diameter
160 220 220 160 220
Auto.
slitting
/ /
√
/ /
manual
cutting
√ √ √ √ √
Heating
rolls
2 2 2 2 2
double
sides film
√ √ √ √ √
F
ilm press
gear
/
√ √
/
√
Anti curl
18 18 18 18 18
cold
laminator
roller
/
√ √
/
√
voltage
AC220V(110V)
±10%
50Hz(60Hz)
1450W
AC220V(110V)
±10%
50Hz(60Hz)
1450W
AC220V(110V)
±10%
50Hz(60Hz)
1450W
AC220V(110V)
±10%
50Hz(60Hz)
2050W
AC220V(110V)
±10%
50Hz(60Hz)
2050W
machine
size(mm)
460*600*510
460*600*510
460*600*510 460*900*1400 460*900*1400
NW(kg)
45 50 52 70 75
Page 8
F350,F650
Laminator manual
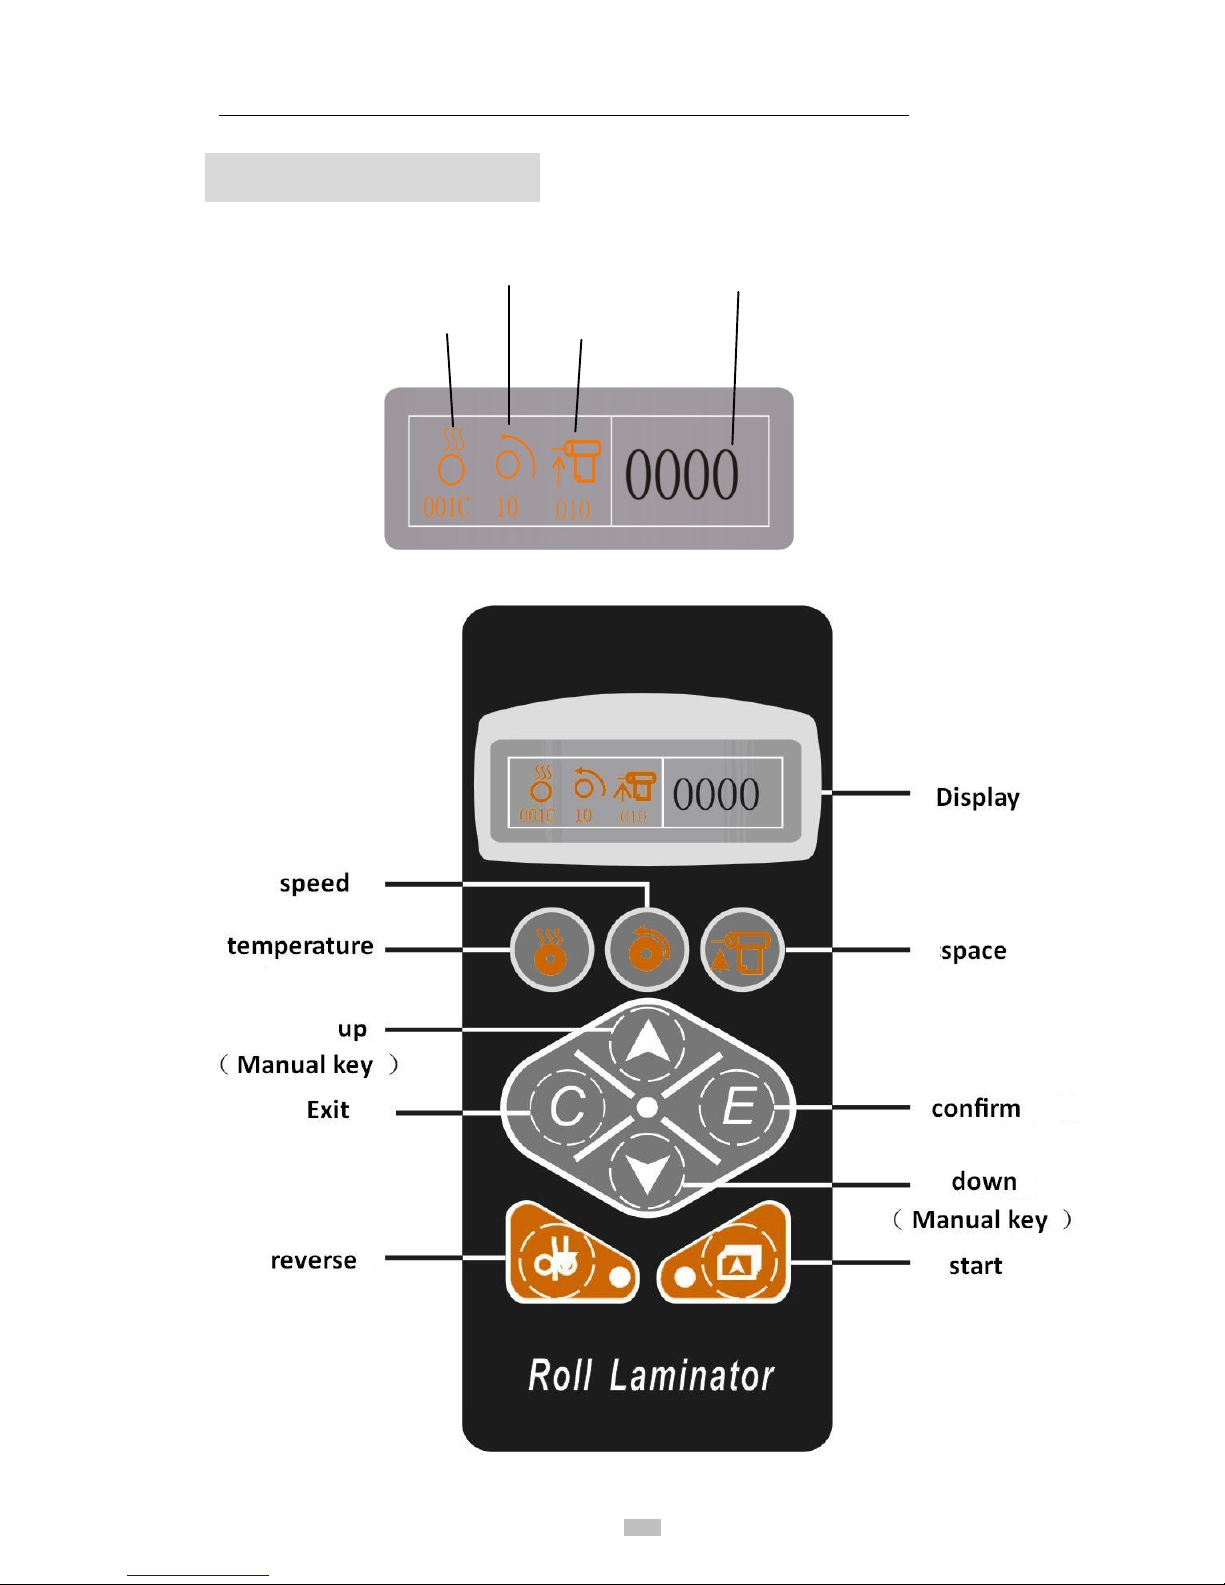
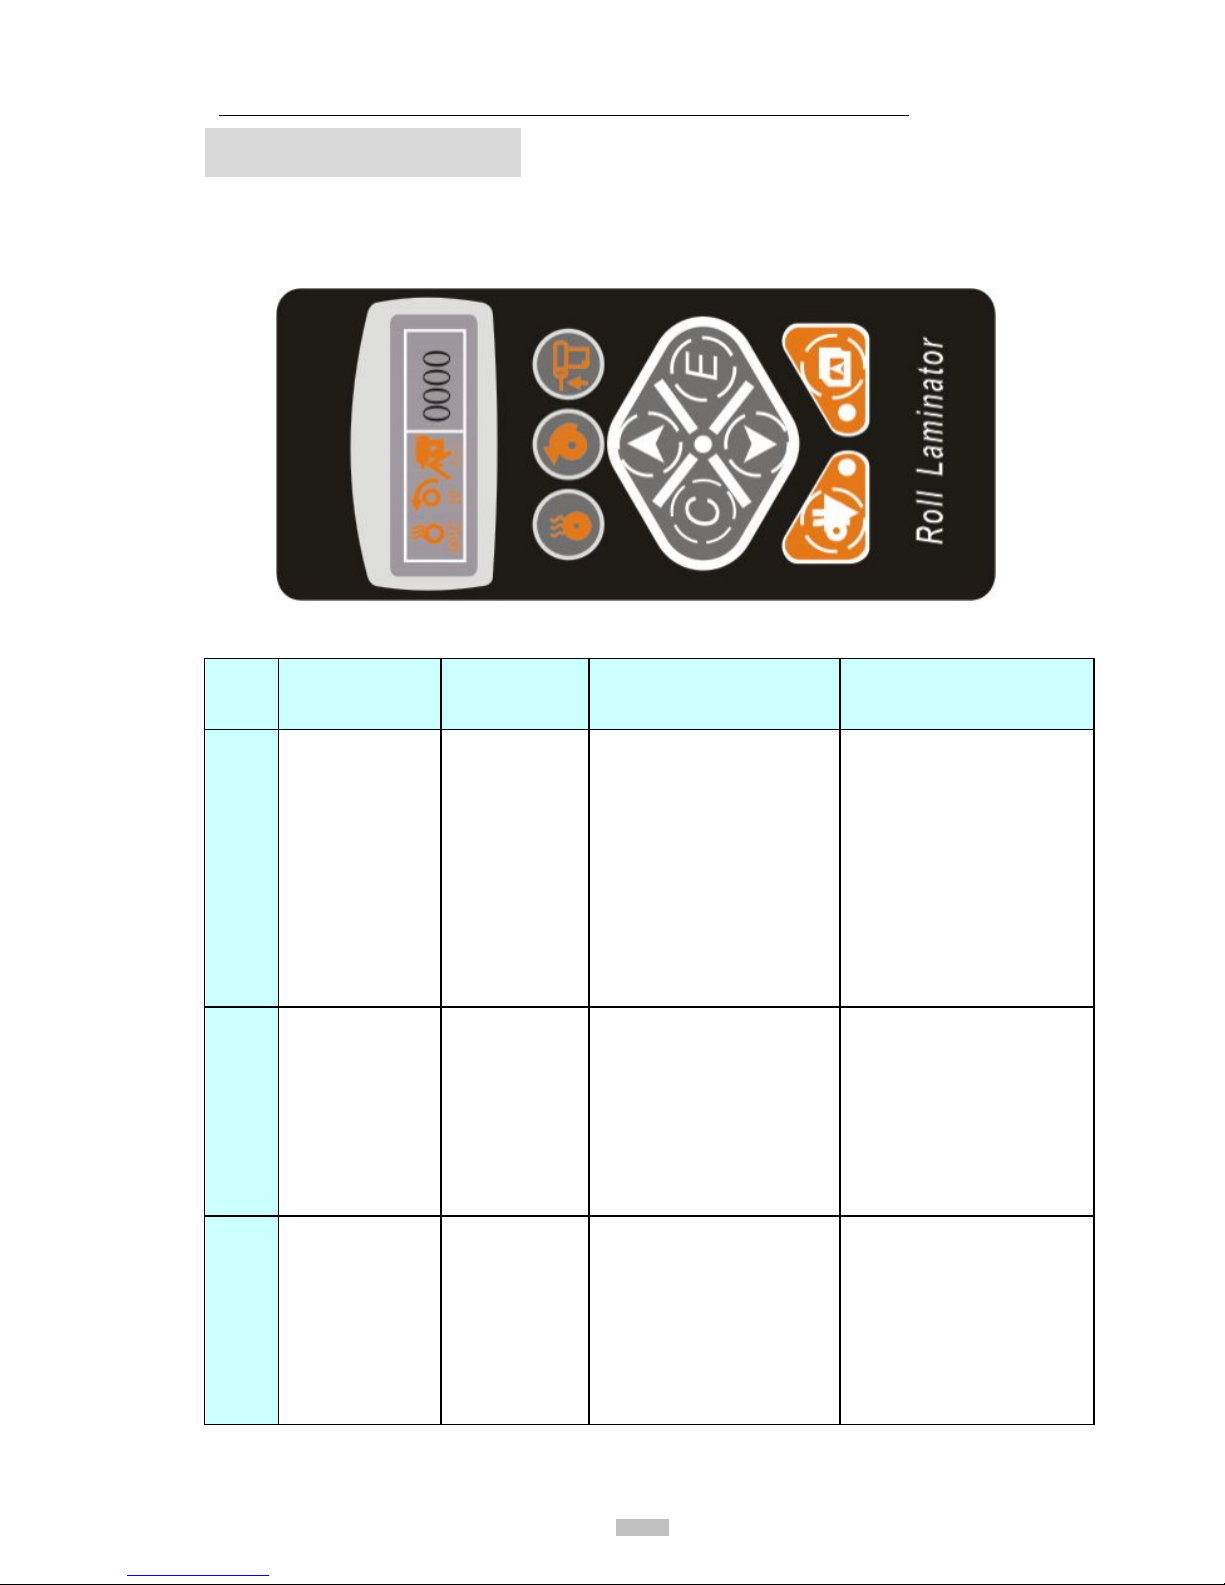
4、Operation panel
(LCD display)
Setting
paper
distance
Set temp.
Speed setting
Counter
Page 9
F350,F650
Laminator manual
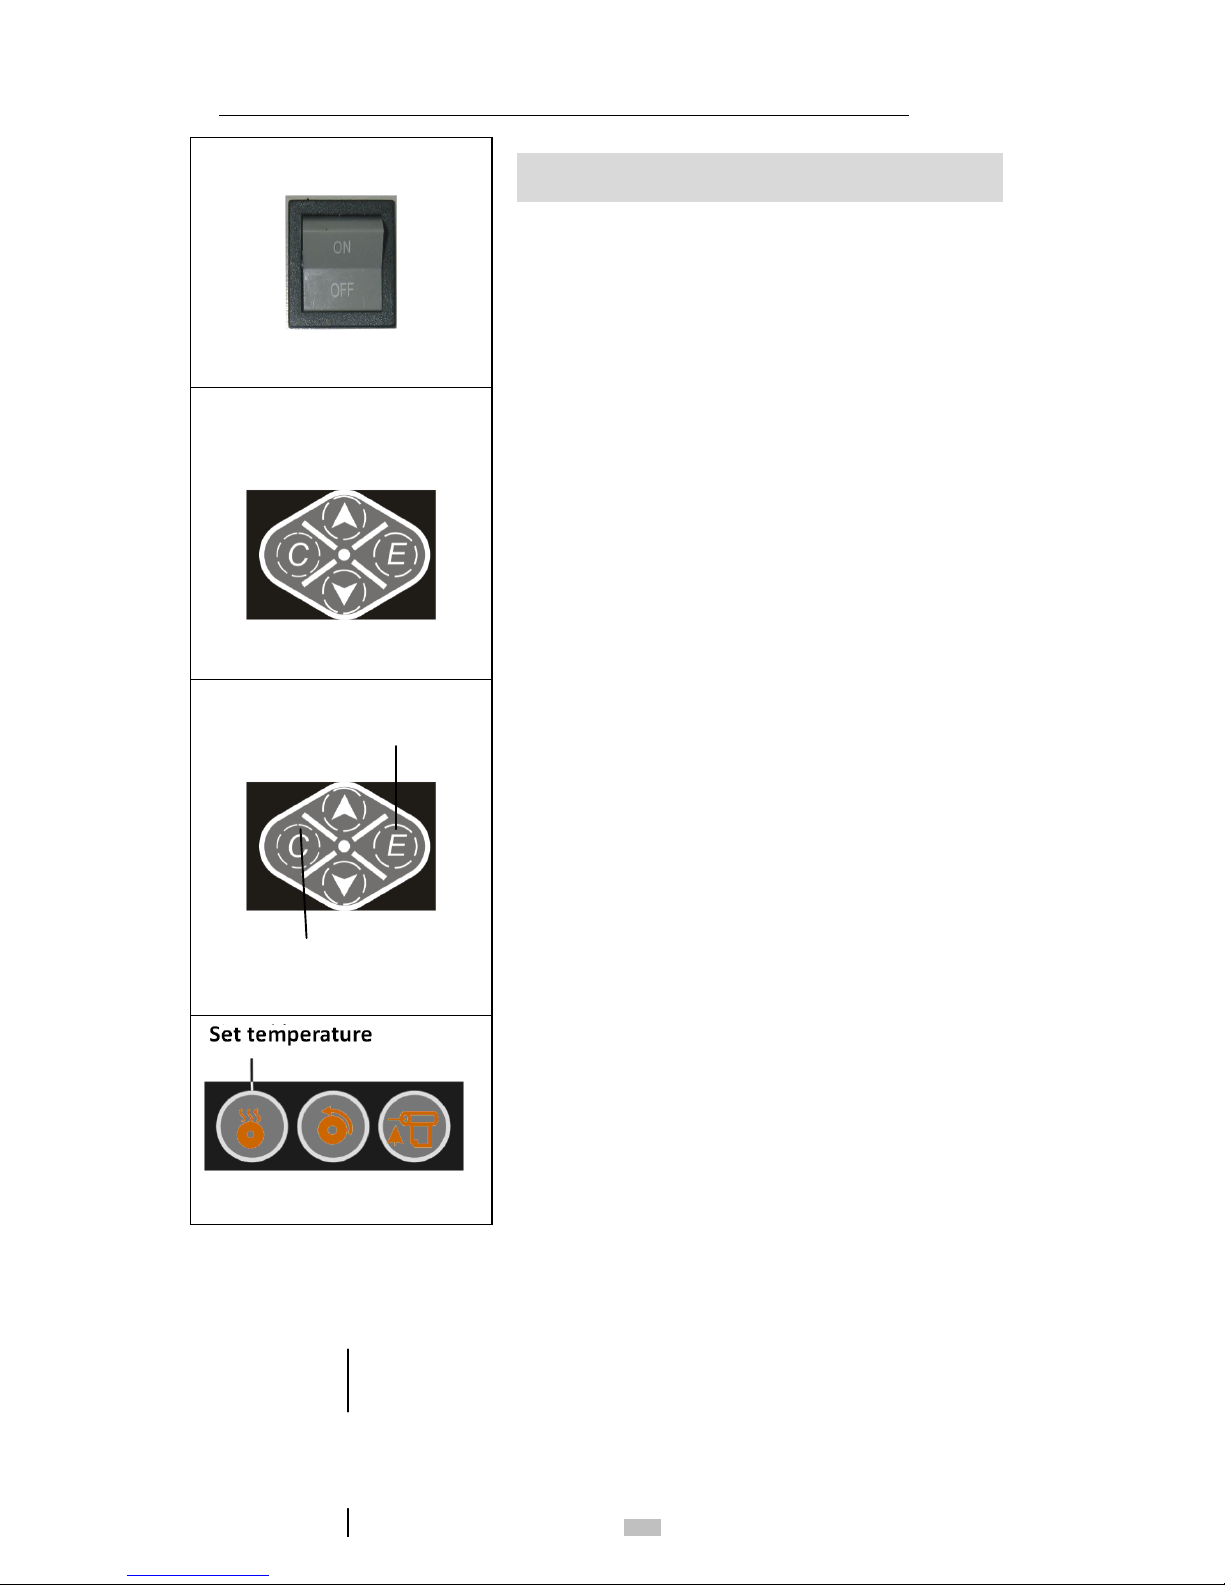
5、
control unit and key function
5.01 power switch
Shift to the upper(“ON”),power on
Shift to the lower(“OFF” ),power off
5.02 confirm key
press“E” key to choice the menu functions
,press,when you choose someone function,press
“∧”“∨”to select the parameters,after setting,
press“E”to confirm。
5.03 Exit(means clear)
Press “C ”to exit menu select function after
you have set well, Or you can eliminate, ignore
the error, when there is a alarm, to keep former
well working condition.
5.04 UP key、down key
after enter the menu,press“∨”appear in turn:
setting paper length- operate
mode-unit-counter-laminator mode-tolerance of
up roller-tolerance of down roller,press“∧”
appear inverse menu,press continuity “∧”
“ ∨”key to re- cycle working,choose someone
function press “ E ” key to enter parameter
setting,then press“∧”“ ∨”modify parameter,
after setting press “E”to confirm.
5.05 set temperature
After press“setting temp.”,temp. display is shinning,means it’s can setting the temp.
now.press“∧”or“∨”can modify the temp. parameter,after setting,pres “setting temp.”
to confirm。There is cold operation mode if the temp. appear 0 degree.
Note:Lowest temp.is 0 degree,highest tem. is 130 degree。There is best temp.
about 110 degree as factory setting. Any adjust value, the machine have the memory.
power switch
confirm key
exit
up key
down key
Page 10
F350,F650
Laminator manual
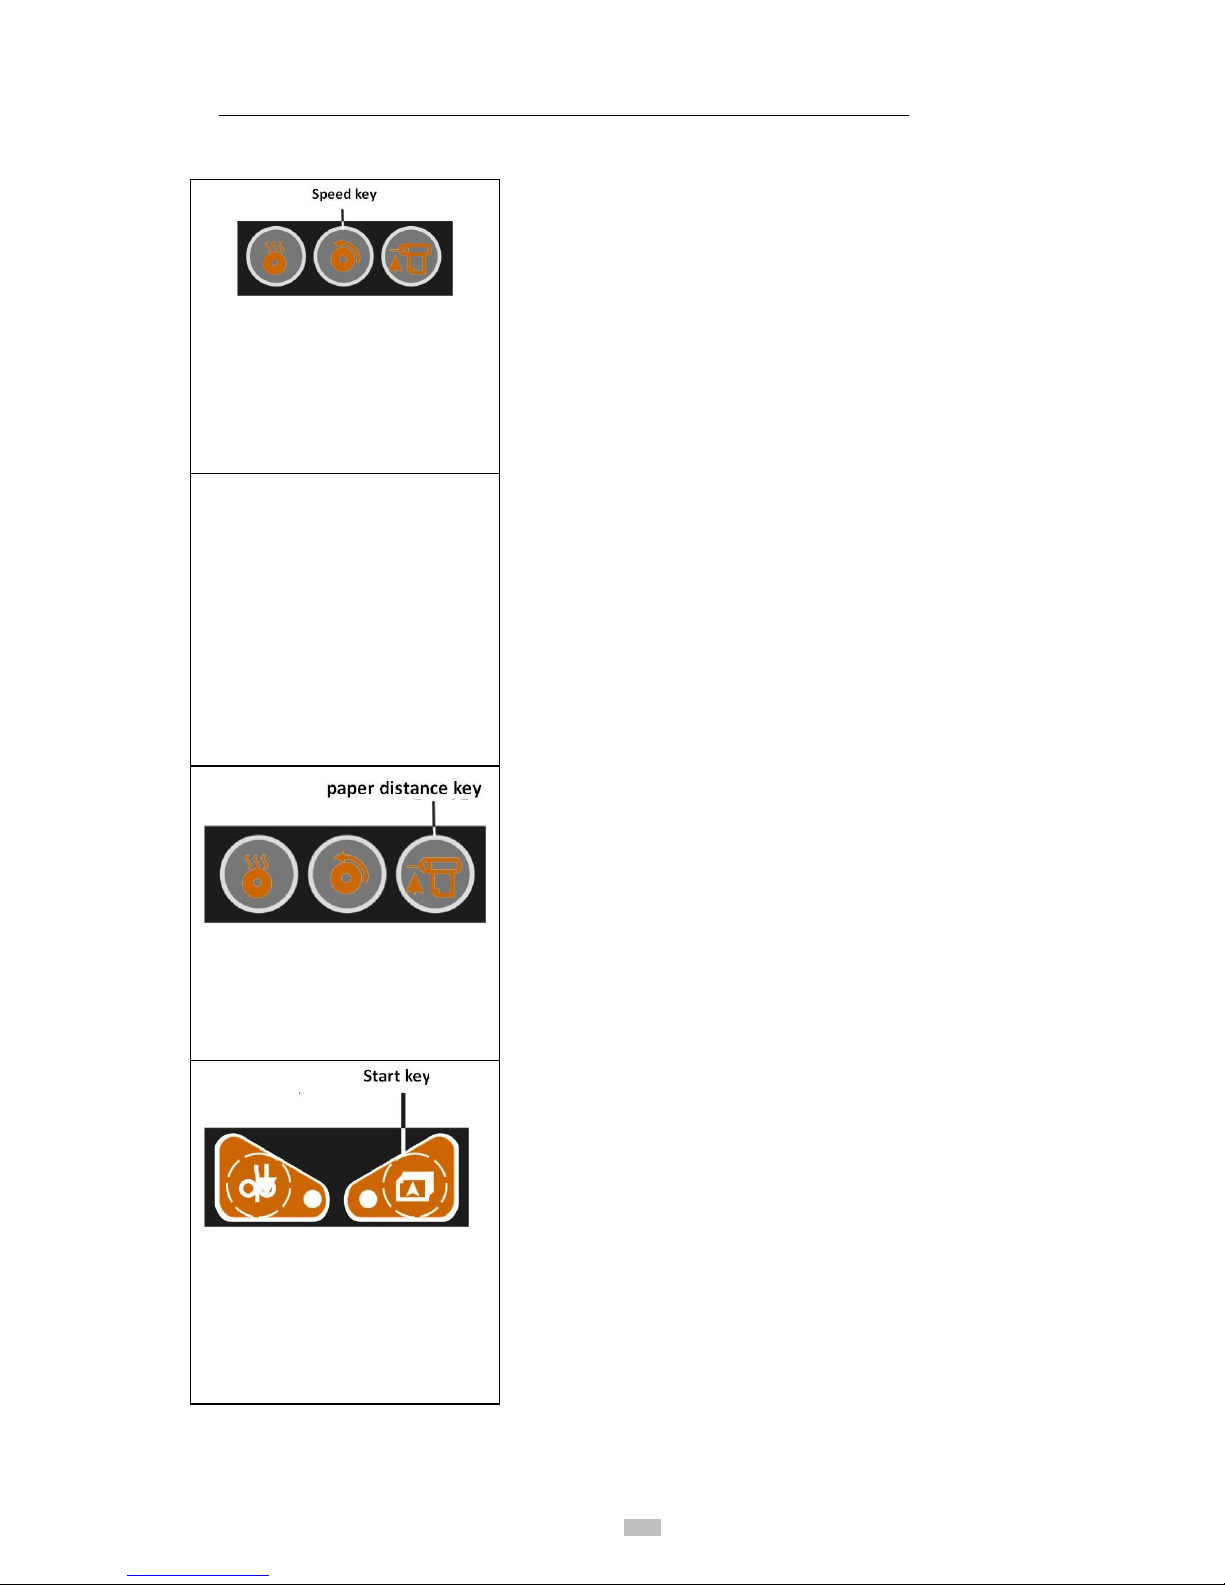
5.06 speed key(setting speed)
After press“speed key”,speed key is shinning,
means you can set the speed, press“∧”or“∨”
can modify the temp.,after setting,press
“speed key”to confirm。
5.07 space
After press“space”,space is shinning, means
you can setting. press“∧”or “∨”can modify
the space parameter,more bigger value means
the space is more bigger of two papers. less
value means the two papers are lapped more.
After setting,press“space” to confirm。
Note: Standard parameter is 45 as factory
setting; space value is 0-250mm。
5.08 reverse key
Reverse key to confirm the motor reverse, start
key light is not lighting, press “reverse key”,
main motor reverse,you should take away the
“reverse key” when stopping。
5.09 Start key
press“start key”,motor is running,press again
“start key”motor is running by reversal。In
auto. model,press“start key,lighting is on,
the machine is readying,the main motor is
running when the paper go through the cover
sensor。The main board is stopping when the
paper is left the cover sensor.
Page 11
F350,F650
Laminator manual
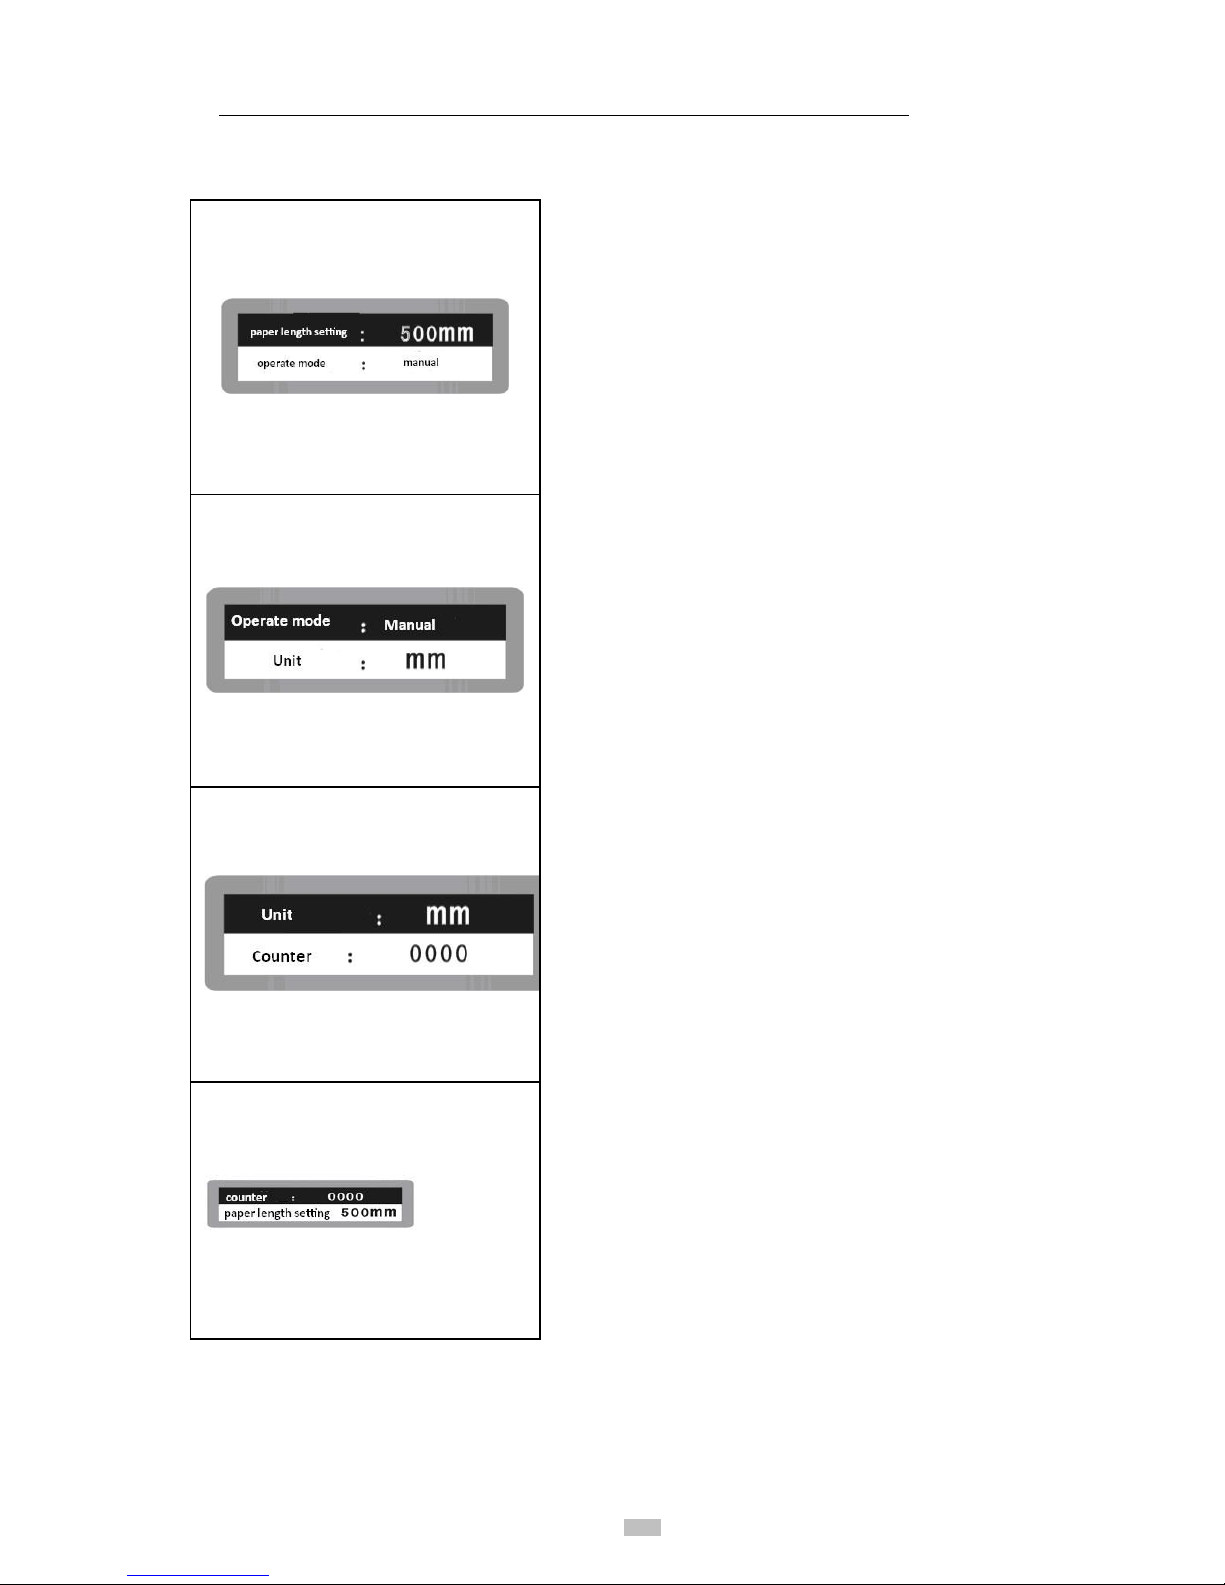
5.10 paper length setting
press“E”enter into menu,press“∧”“ ∨”
key to choose “paper length setting”menu,
press again“E”to confirm,paper length key
is shinning,means can set the paper length
now。press“∧”“ ∨”set the parameter
which according the paper size , after
setting ,press “E”to confirm。min value
100mm,max length 700mm
Note:when setting700mm,means no limited
length.
5.11 Operate mode
press“E”enter into the menu,press“∧”
“ ∨”key to choose“operate mode”menu,
press again“E”to confirm,operate mode key
is shinning, there is manual and auto mode
in there. According your operate skills to
choose the suitable operate mode by Press
“∧”“ ∨”,after choose press“E”to
confirm。
Note: factory setting with auto. Operate
mode.
5.12 Unit
press“E”key enter menu,press “∧”“ ∨”
key to choose“unit”menu. And press“E”
to confirm,unit key is shinning,the unit size
is mm,and you can change the size to inch.
5.13 Counter
Press“E”key to enter menu,press“∧”
“ ∨”key to choose“counter”menu,press“E”to confirm,you can see
the counter value.
Page 12

F350,F650
Laminator manual
5.14 laminating mode
press“E”key into menu,press“∧”“ ∨”key to choose “laminating mode”
menu,press“E”to confirm,laminating mode key is shinning,mode detail:
double sides laminating、up laminating、down laminating。press“∧”“ ∨”
according your demand to choose the laminating mode, press “E”to
confirm。
5.15 up roll compensation
press“E”key enter menu,press“∧”“ ∨”key to choose “up compensation”
menu,press again“E”to confirm,”up compensation” key is shinning,
which means you can set the temp. compensation. According your needs to
set the parameter which by Press“∧”“ ∨”,After setting,press “E”to
confirm,compensation range:-15 ~ +15。
5.16 down roll compensation
press“E” into menu,and press “∧”“ ∨”key to choose“down roll
compensation”menu,press again“E”to confirm,”down roll compensation”
key is shinning,Means you can set the temp. compensation value。According
your needs to press“∧”“ ∨”to set the parameter,after setting ,press “E”
to confirm,compensation range:-15 ~ +15。
Page 13
F350,F650
Laminator manual
6、How to use the laminator
6.1、start to work
6.11、 check the shipping fixed screw and
belting is removed or not;
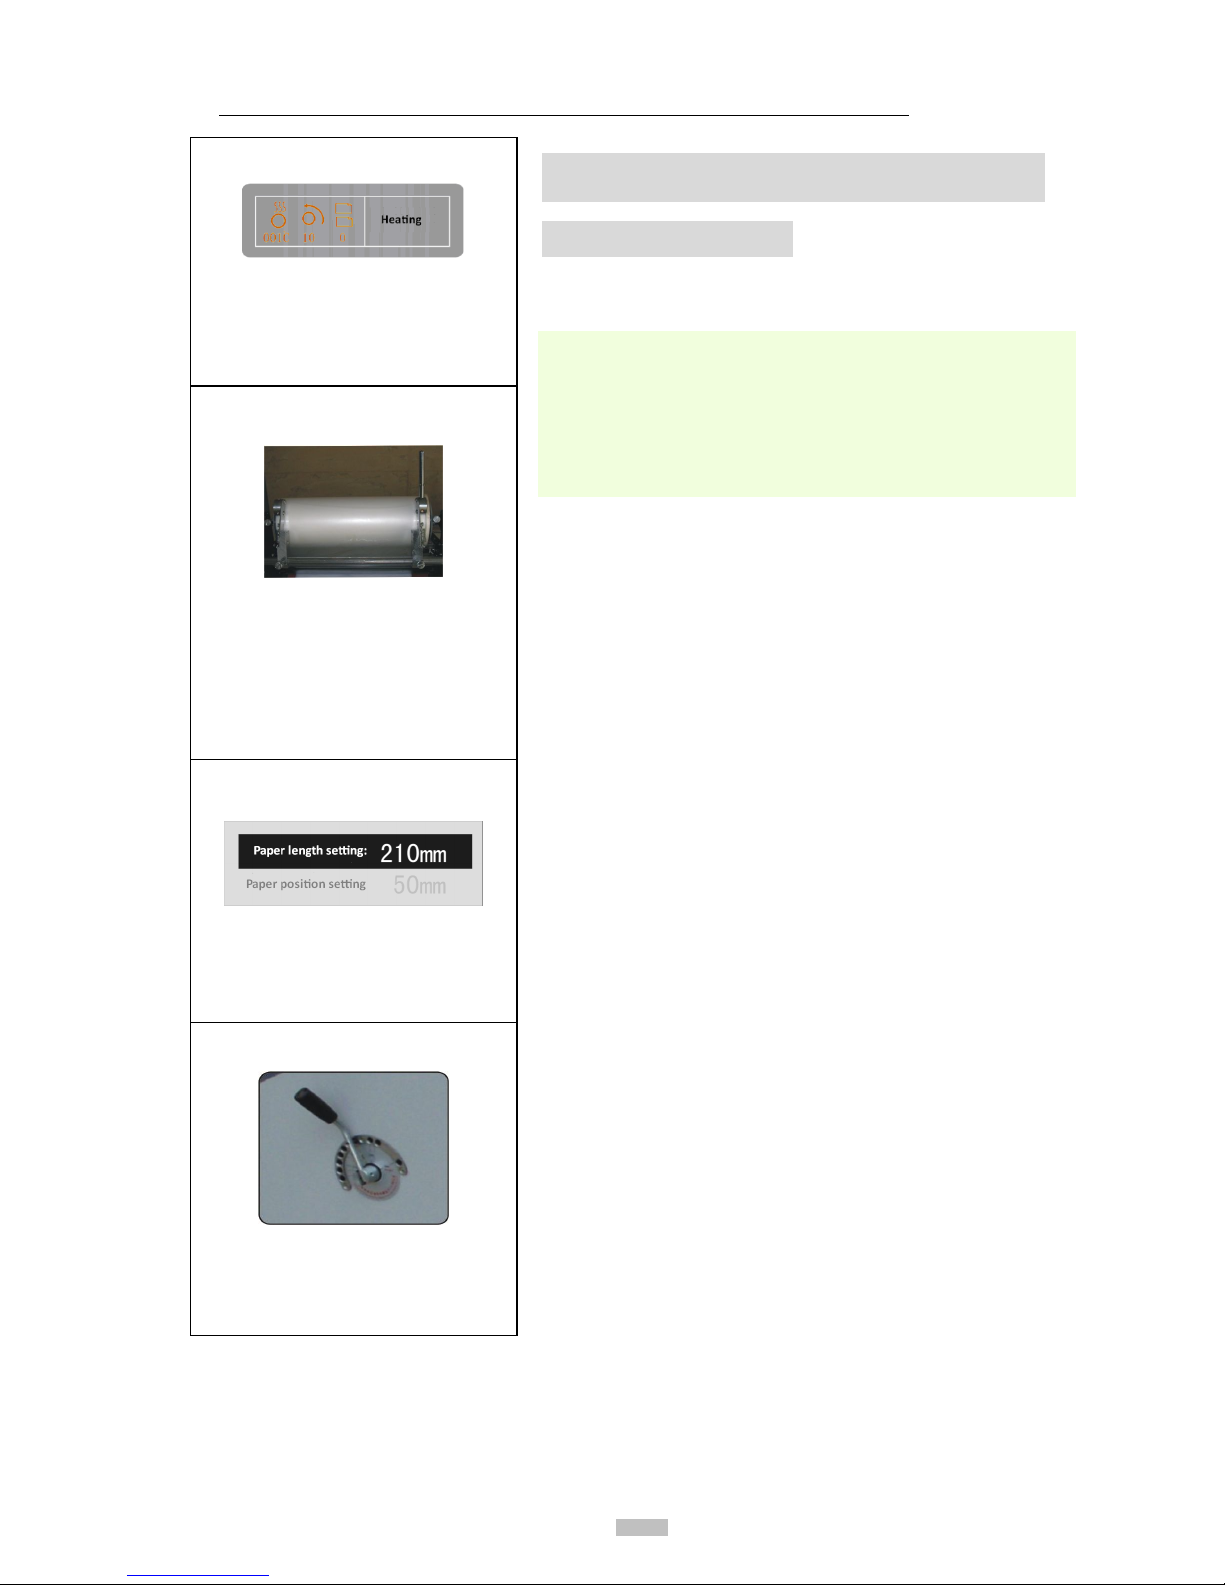
6.12、Switch on the plug,and power
on, the machine is heating (same as
pic-1),Means the machine is
starting normally;
6.13、catch the film locating sleeve with hands
when install the films,take our the film fixing
wheel from right side. And take away the
fixing screw of locating sleeve, take down the
locating sleeve and put film in . finally screw
up fixed position to finish;
Note:A、Don’t anti-installed the film;
B、left and right justification of up and
down film ;
6.14、According the paper size to automatic
slitting the film, adjust the slitting device
position(pic-2),which just take away the
fixing screw of the slitting device;
Note:when don’t use the auto. slitting,
Please take the gear knife and edge cutting
knife to right side ,which avoid to hurt the
hand.
6.15、Setting the temp. and machine speed
parameter which according the paper type.
(Pic-1);
6.16、Setting feeding paper length ,lap distance
and other parameter after into the machine
which according the paper size(pic.-3);
6.17、Check the feeding paper is well or not,You should adjust the feeding
pressure which according the paper thickness to adjust(pic-4)。
(Pic-1)
(Pic-2)
(Pic-3)
(Pic-4)
Page 14
F350,F650
Laminator manual
6.18、According the actual effect to setting the film tension and gap of rolls
which avoid the paper bending and wrinkle .;
Note:
1、Single laminating,tension is more light,paper bending is more small(pic 4);
2、anti-bending adjustment:: 6 level,From big to small:
4mm\2mm\1mm\0.5 m\0.02mm\0.04mm(pic. 4);
6.2、install film
6.21、Take away the film tension wheel from right to back;
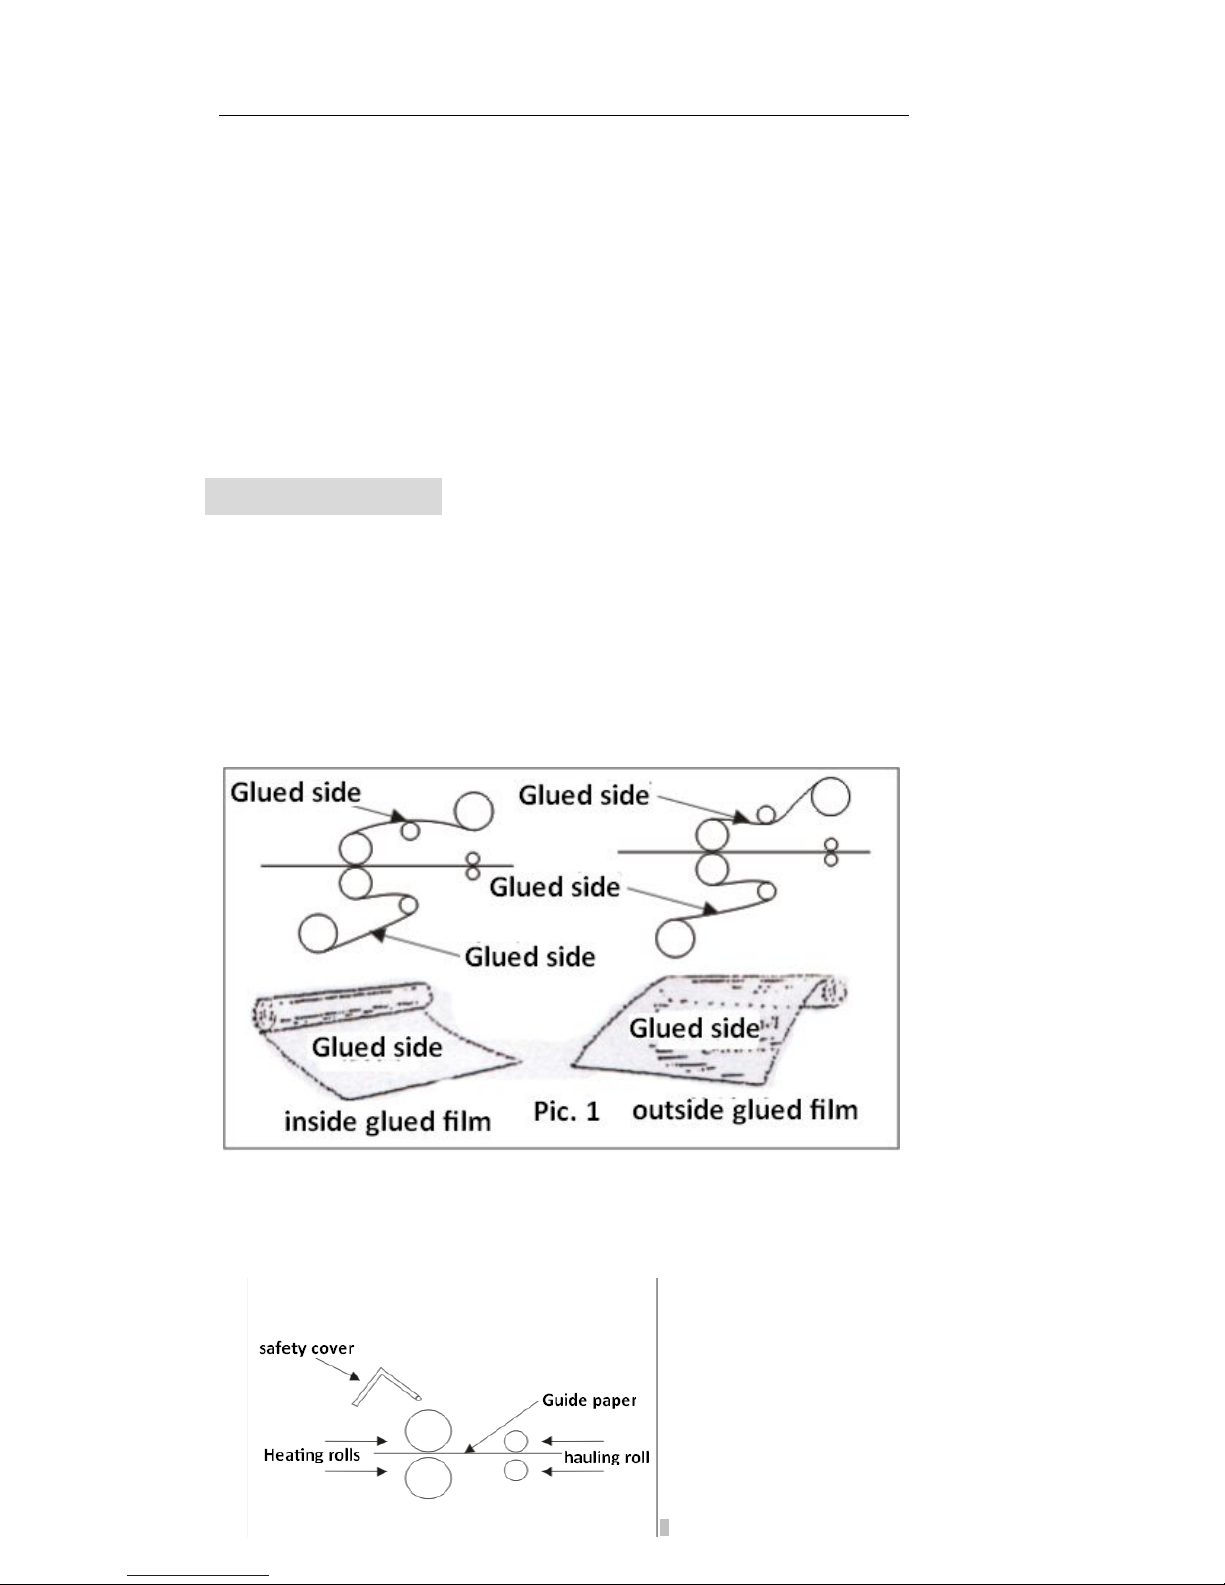
6.22、Take away left fixing screw of film tension axis,Put the film in,,screw
the fixing screw;install notes:there are 2 glued films ,inside and
outside.,Kindly according the left instruction to install the inside glued
film.,according the following instruction to install out side glued film。
Note:Align up and down glued film。
6.23、Install glued film to guide the paper。open the safety cover,take down
the working table,take a piece paper which same width of glued film,
as guide and pass the front and back rolls,see pic.2;
Page 15
F350,F650
Laminator manual
6.24、when catch the setting temperature,Put the up film on heating roll,(see
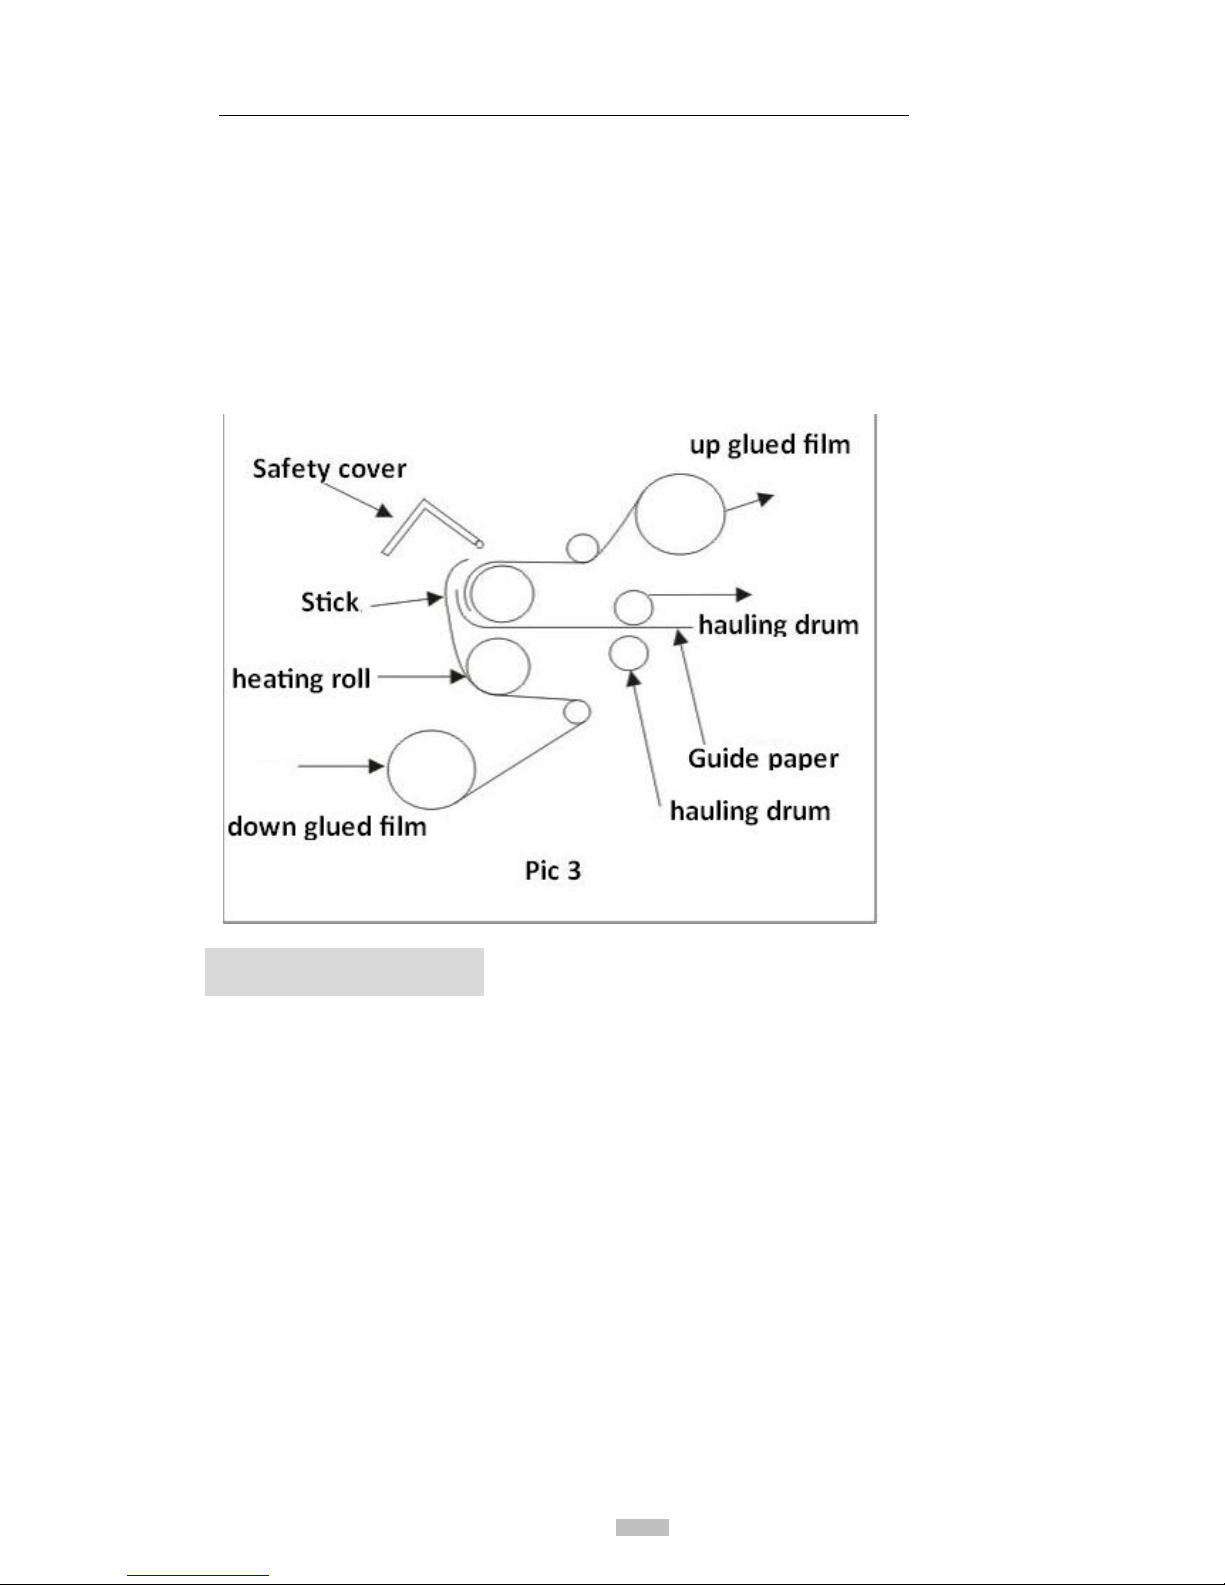
pic.3)Put the guide paper up and stick on the glued film, and put the
down film also stick on,put on safety cover,install the working table,
adjust the suitable position , Locking paper positioning side regulation ,
put roll space adjustment lever on and corresponding the scale of glued
film ;
6.3、Laminating
6.31、manual mode:
Press“start”,The paper is running from front to back side, And left it
from heating roll to hauling roll,press again“start”,motor is stopping.
Using the horizontal blade to cutting, Finally, a paper is finishing
laminating 。
6.32、Automatic mode:
Press“start”,the start key is lighting,Put the paper to working table,
the motor will automatic run after 2 sec,paper is running from front
to back side and via heating roll. The motor is stopping when the
back of paper leave the cover sensor, Using the horizontal blade to
cutting,Finally, a paper is finishing laminating. Re-put paper on
should do automatic re-work。
Page 16

F350,F650
Laminator manual
6.4、Wrinkles adjustment:
If there is any wrinkles, Anticlockwise loose the intension adjustment
key, and clockwise to adjust it till no wrinkles. If single laminating,We
just adjust the up glued film to solve this problem;In order to less
wrinkles, Up stretching at the film’s exit.
6.5、To clean the jammed film
When the roll is heating,printed matter or glued film stick on the
surface of roll, cyclic rotation maybe caused the roll is damaged and
the machine is broken, don’t use any clear liquid or solvent, which in
order to rolls are burned.
Using the following solution to clean it:
6.51、Stopping the machine and speed to slowest,Cut the involved printed
matter or glued paper,start“reverse key”,Take out the involved
printed matter or glued film from front .
6.52、Put the up roll to highest position,take away the safety cover and
working table;
6.53、Setting the temp. 80-90℃;
6.54、press on“reverse key”,Using a soft cloth to clean the up and down
heating rolls which till the surface of the rolls are clean.
6.55、Install the working table and safety cover;
6.56、Re-stall the film;
Note:when clean the roll,don’t touch any metal or something hard parts, in
order to hurt the surface of the roll,when clean, we need to positive
operation and machine inversion, in order to cloth or hand get into
the roll.
7、Laminator Techniques and skill
7.1、To do the perfect laminating image,there are some important characters :
temperature ,tension regulate and detection time of glued film on
heating rolls. So,see the printed matte detail, choose the suitable film,
temperature ,speed and tension。In general, More thickness film or
printed matte, we need more slow speed and more higher temperature ,
because we need more melt time for the thickness film;otherwise,thin
film or printed matte, will be more faster speed and low temperature.
Page 17

F350,F650
Laminator manual
7.2、Under the glued film can be melted ,we can setting the temperature
more lower , so that the film glue is melting as the best situation (the
glue is melting from white color to transparent, means it start to have
the toughness) . According the paper thickness to setting the
temperature 80—120℃
7.3、Under no wrinkle and stick very well, we can set the tension more
smaller. If the temperature is too higher or tension is more bigger,
maybe the laminated paper will be curl.
7.4、If the film stop on rolls for some times, best take away that film before
use,Because the down film will be expansion seriously, After cool and
shrink, the paper will be easily curl on one side
7.5、It’s not suitable for more thin paper to laminating. Because If the paper
is very thin , it will be curl caused by cooled of film. If glue or
something else stick on rolls, It will be affect laminating effect. Please
clean it in time.
Suggestion:Overlapping the back of standby paper, do the double sides
laminating, after this, we can cutting it and get the single laminating ,So that
we can improve the work efficiency.
8、Daily Maintenance
8.1 The stability and service life of machine are related to daily
maintenance, Regularly to clean the laminator. Apply oil on activity
parts , the machine service life will be more longer.
8.2 Clean heating roll, set the temperature about 80℃, then use soft cloth to
clean the left glued liquid.
8.3 In order to keep clean the machine, we can clean the sundries, dust in
regularly
8.4 If you have the Mechanical repair of common sense, You can regularly
to check the screw is solid or not.
8.5 If happen any un-clear question, please contact the local agent or our
company.
Warning:Not allowed from agent or our company, please don’t
disassemble the laminator, or you will loose the warranty.
Page 18
F350,F650
Laminator manual
9、Self -checking
Press on“E”key and turn on power to enter the checking situation.。
Checking the following in turn。
Nos
checking
content
operating
way
judgment method solution
1.
Safety
cover
sensor
Open the
safety
cover
LCD appear ”0”
for sensor is
normal
if appear”1” for
feeder sensor is not
well
If safety cover
sensor “0” ,means
the safety cover
don’t close or
sensor is broken,
we have to
exchange the
sensor.
2.
Infrared
feeder
sensor
Put
something
cover the
infrared
feeder
sensor
LCD appear “1”
for feeder sensor is
normal,
If appear “0” for
feeder sensor is not
well.
If infrared cover
sensor appear “0”
for not well, we
need to repair or
exchange it.
3.
main motor
Auto.
Motor
Positive
and
negative
circulation
If auto. Motor, and
it can Positive and
negative
circulation.
Means it’s normal
Page 19

F350,F650
Laminator manual
10、Troubles and Troubleshooting
Nos
troubles trouble reason
solution
1
safety cover
error
Check the
safety cover
Cover up the safety cover
2
Up temp.
sensor error
Check up
rolls
temperature
1、check up temp. sensor
wire is well
or not。
2、change the main board or temp.
sensor
.
3
down temp.
sensor error
Check down
rolls
temperature
1、check up temp. sensor wire is well
or not。
2、change the main board or temp.
sensor.
4
it’s
wrinkled
after
laminating
F
ilm tension
adjust is not
well
Adjust the tension
reference 6.4 wrinkle adjustment
P
ressure is
too light
Appropriate increase the pressure of
rolls
Half side
wrinkle
Pressure of
setting bolt
spring is not
even
open the cover
,
using two sides rolls
of setting bolt spring to adjust the
rolls gap
solution:more heavy the wrinkled
side setting bolt spring or light non
wrinkles side
setting bolt spring
.
Middle or
both sides
wrinkle
Too heave of
setting bolt
spring
open the cover
,
using two sides
rolls
of setting bolt spring to adjust the
rolls gap。
solution:even ease the 8 pcs setting
bolt spring pressure on right and left
sides.
5
bubble after
laminating
roll is not
parallel
Adjust the parallelism of rolls
Pressure is
too light
Appropriate
increase
the pressure of
rolls
Middle or
both
sides
bubble
Not Even
pressure of
spring
Reference the wrinkle solution
6
Rolls is
curled up
roll is not
parallel
Adjust the parallel of rolls
setting bolt
spring
pressure is too
heavy or not
even
even ease the 2 sides of up rolls
setting bolt spring pressure .
Page 20
F350,F650
Laminator manual
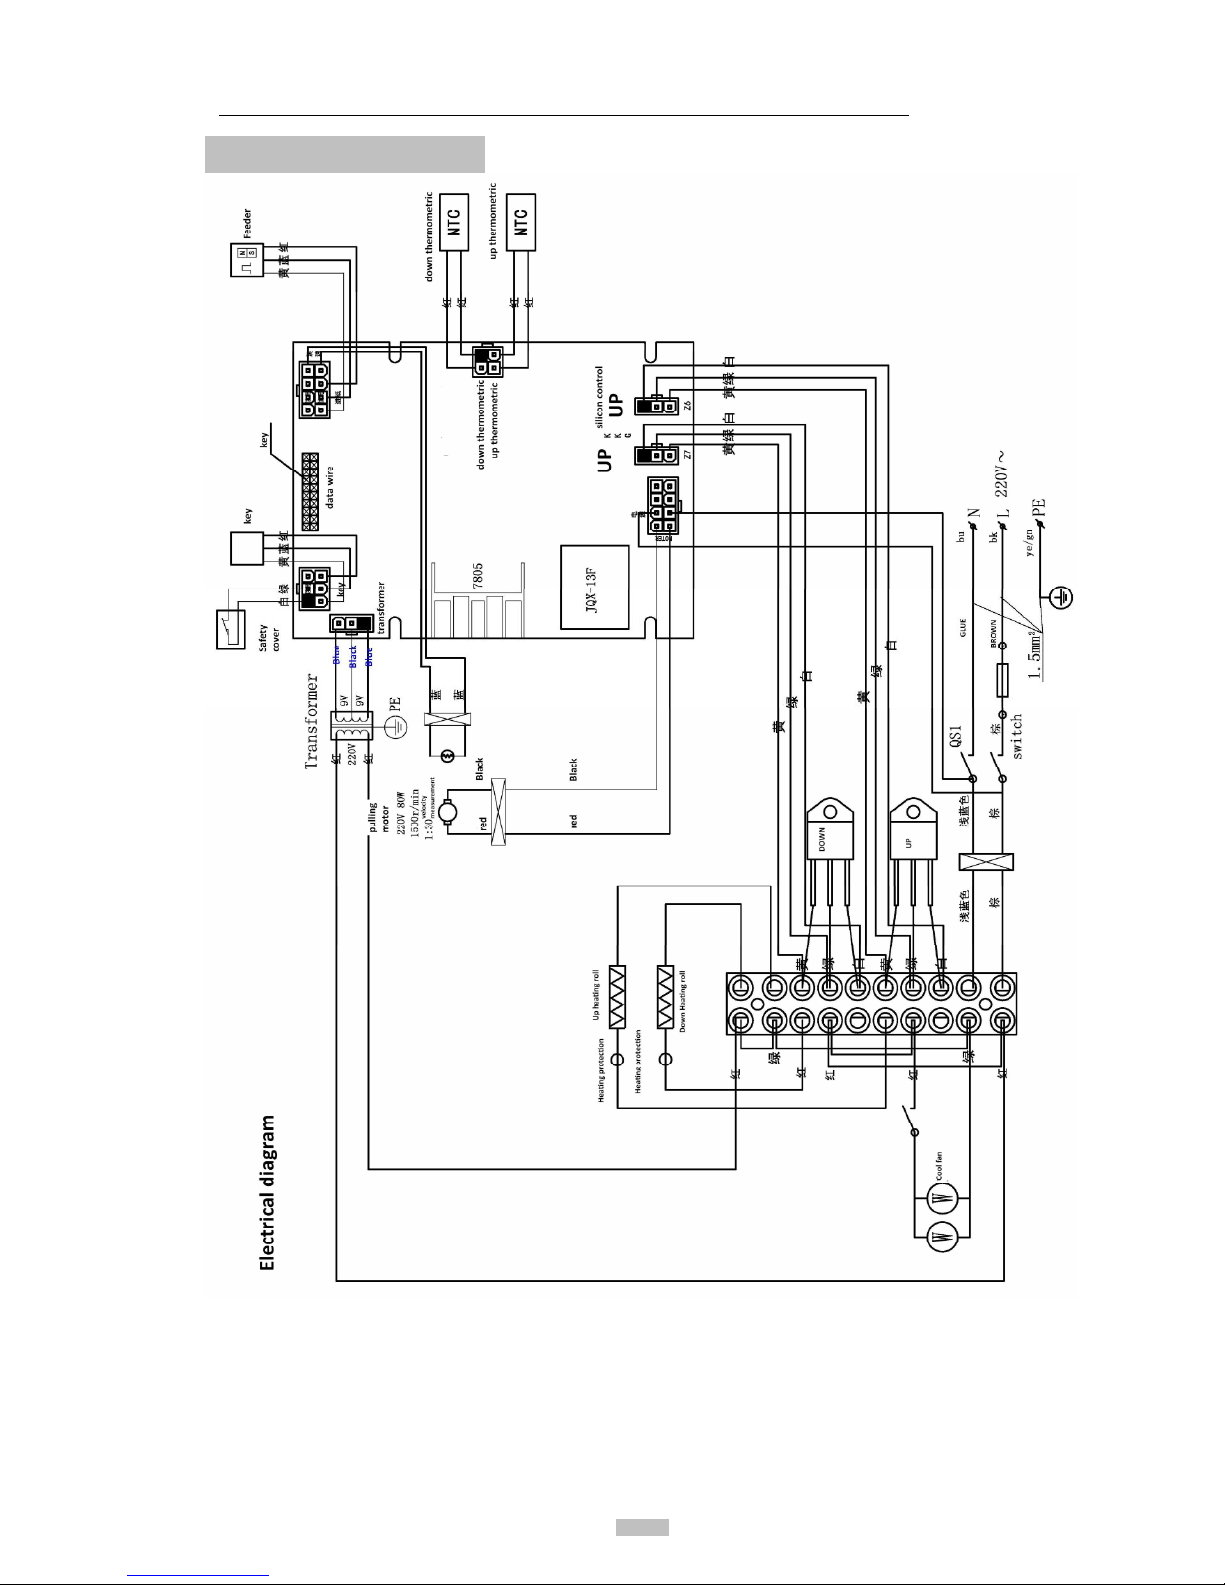
11、Electrical diagram
 Loading...