

Page 1
Page 2

JVR-32 Voice Recorder
Thank you for purchasing this product. This is
your Quick Start Guide, which tells you about the
basic operations of the recorder. Please read it
carefully before using this product.
1.Precautions
Charging
Please do not use the recorder or leave it in a
location accessible to children during the
charging process.
Protecting Files
Please do not press the power switch to prevent
the current recording from being lost during the
recording process.
Interference
If placed near other electronic devices, the
functions of this device maybe adversely affected.
To prevent this, please keep this recorder away
from such other devices.
Backup
1
Page 3
JVR-32 Voice Recorder
We recommend backing up your files regularly to
prevent loss of data due to external errors or
operation failure.
Transfer of Data
Do not disconnect the recorder from your
computer during the data transfer process to
prevent data loss.
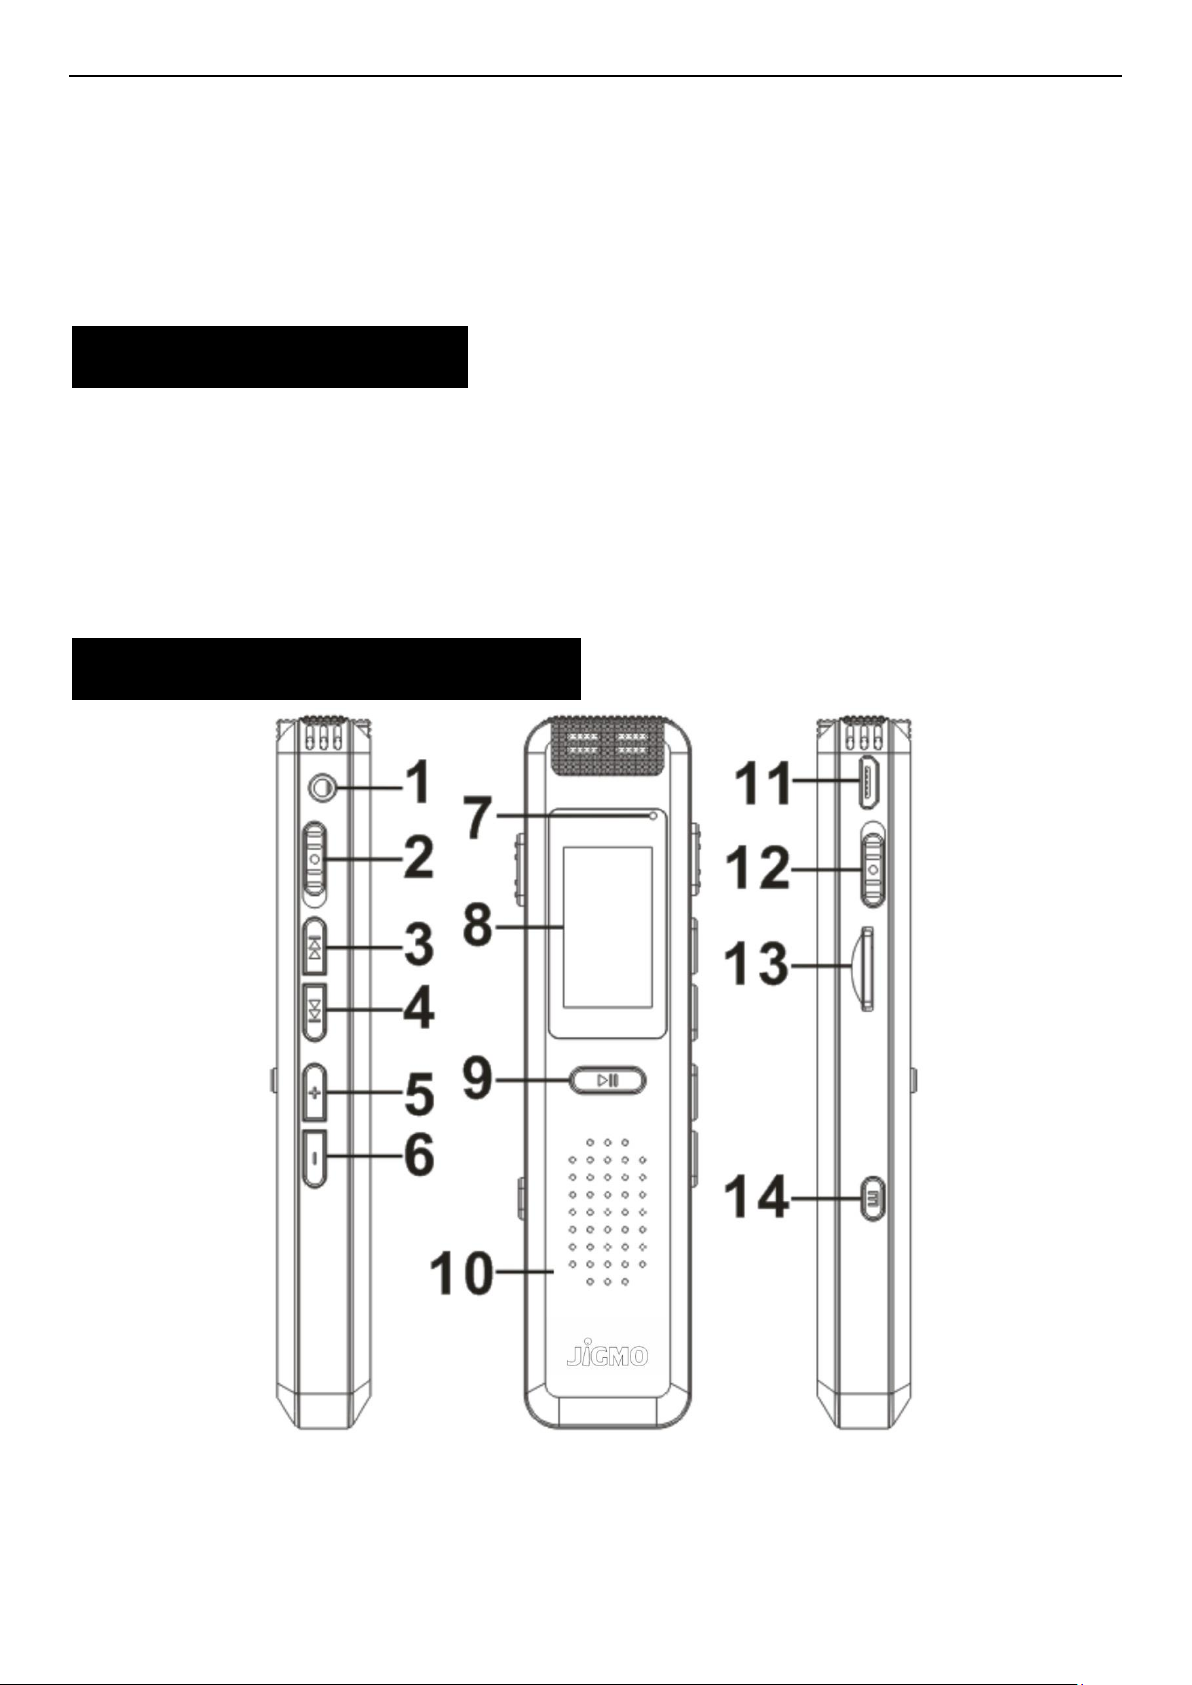
2.Parts and Controls
1.Headphone jack
2.Record/Save button
2
Page 4
JVR-32 Voice Recorder
3.Rewind/Previous file button
4. Fast forward/Next file button
5.Volume up button
6.Volume down button
7.Pilot light
8.Screen
9.Pause/Play button
10.Speaker
11.USB port
12.Power switch
13.Expansion CARDS
14.Menu button
3.Charging
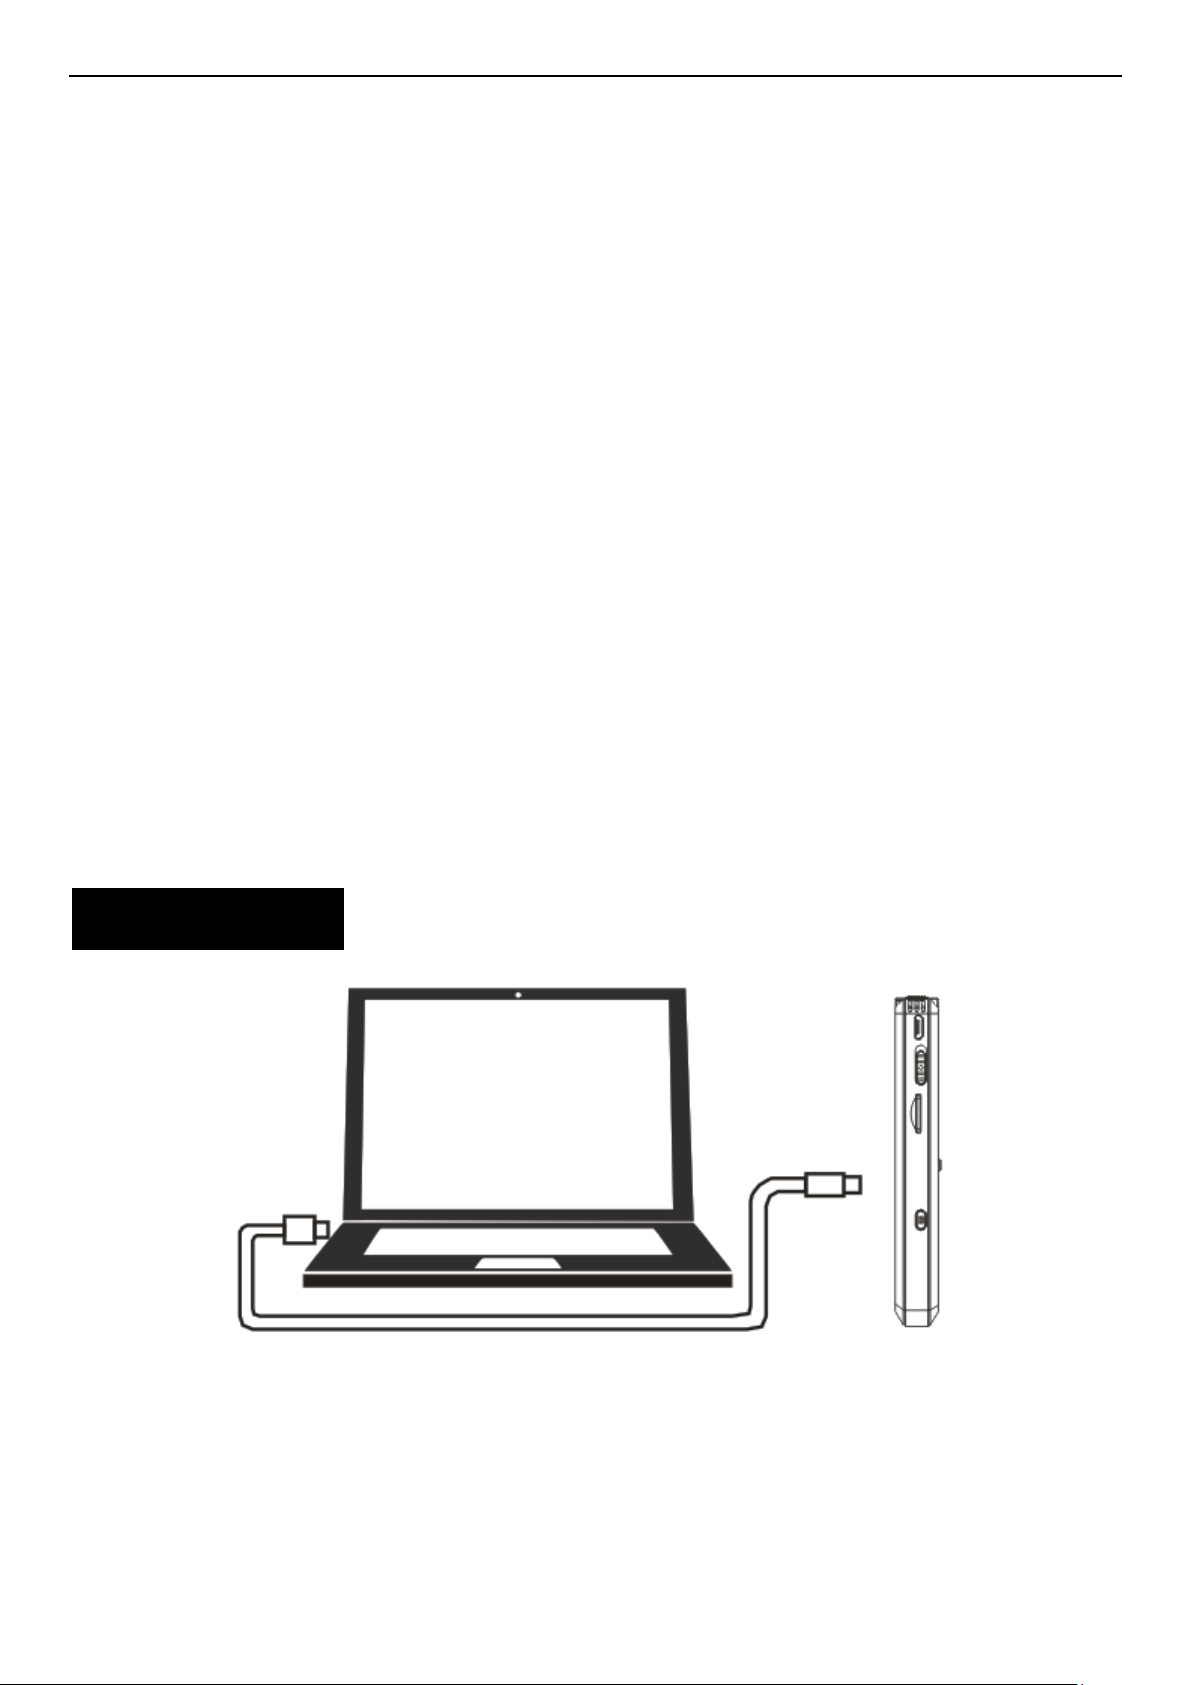
The power switch on the recorder must be ON.
Please connect the recorder to your computer via
the USB cable (supplied). Insert the micro USB
end of the cable to the recorder, and the USB end
3
Page 5
JVR-32 Voice Recorder
to the USB port of a computer which is ON. You
may also use a phone charger.
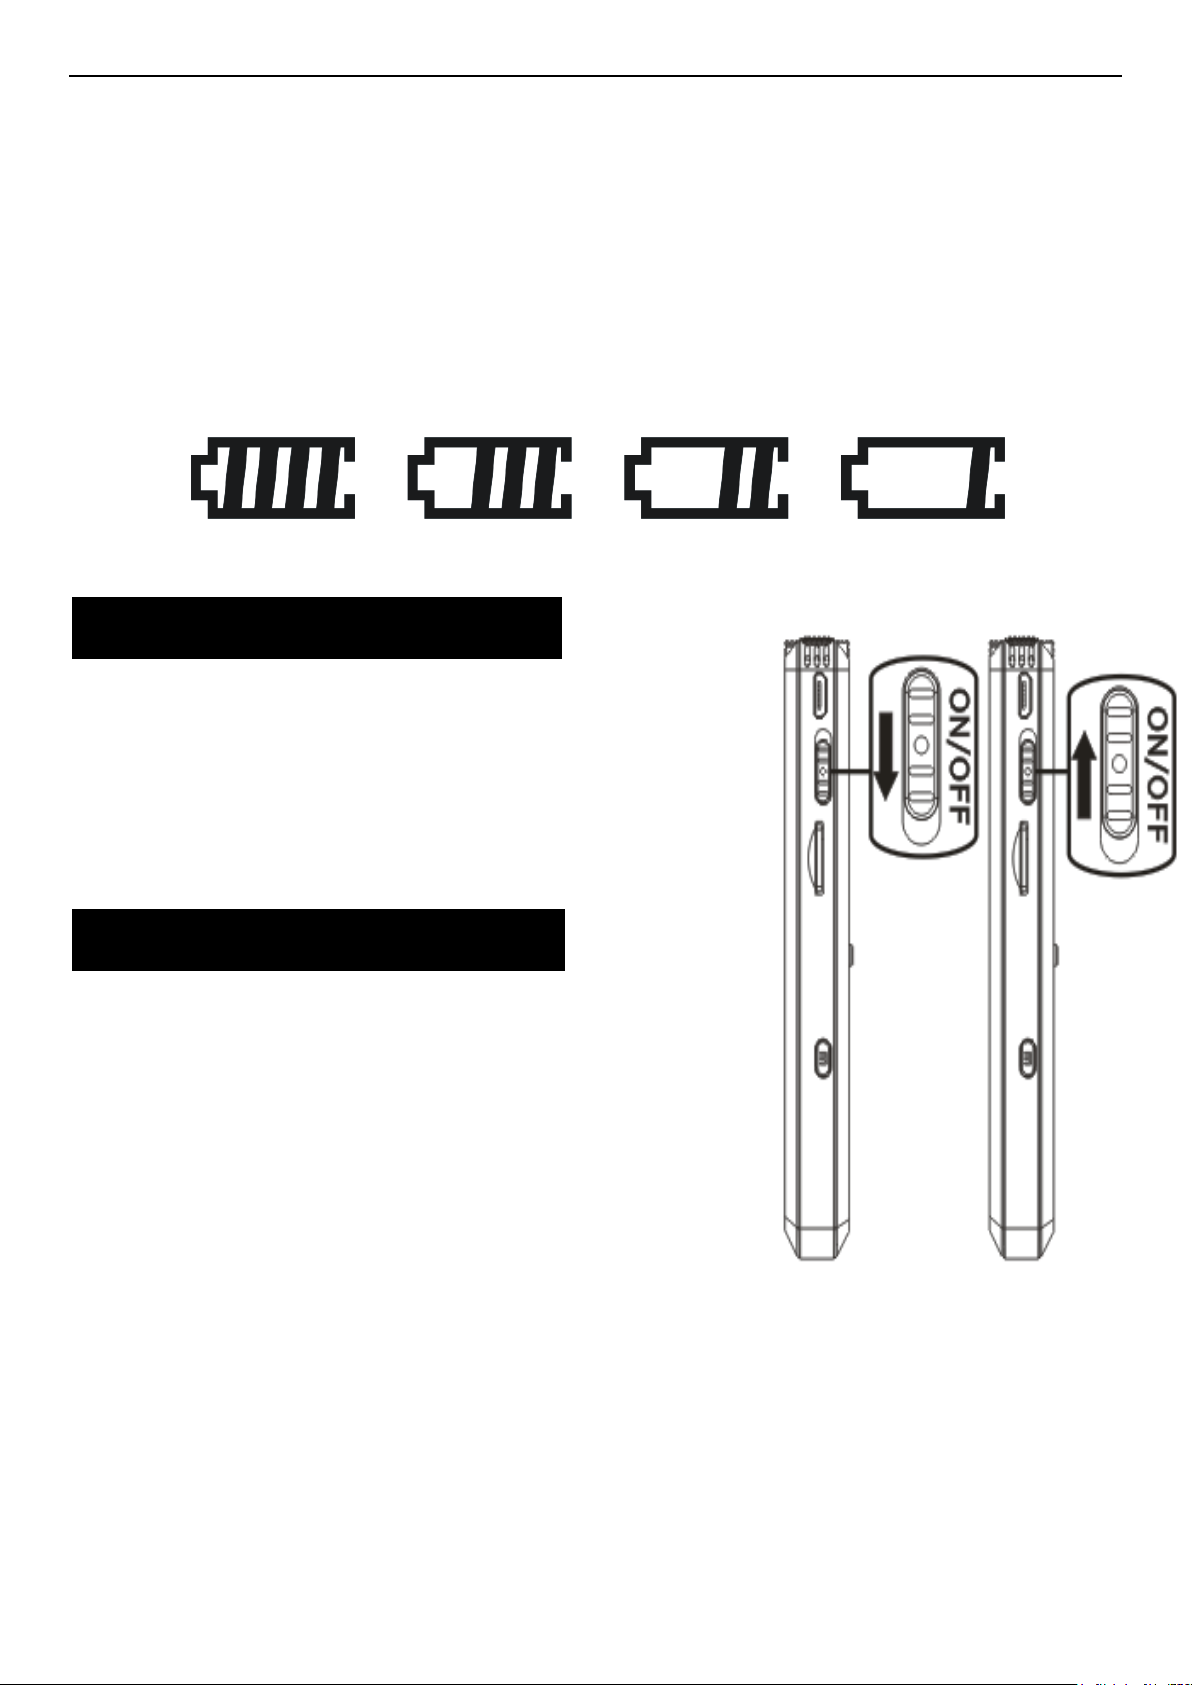
When the recorder is charging, the screen will
show the battery charge indicator at the top right.
4.Turning Power On
Turn on the power switch and
turn on the recorder.
5.Turning Power Off
Slide down the “Power
switch”, and the recorder is
switched OFF.
Hint:
When the recorder is not in playback mode,
and if there is no activity for 5 minutes, the
recorder will power off automatically. This is the
auto power off function and can be set in the
4
Page 6
JVR-32 Voice Recorder
menu under “Auto Switch Off”.
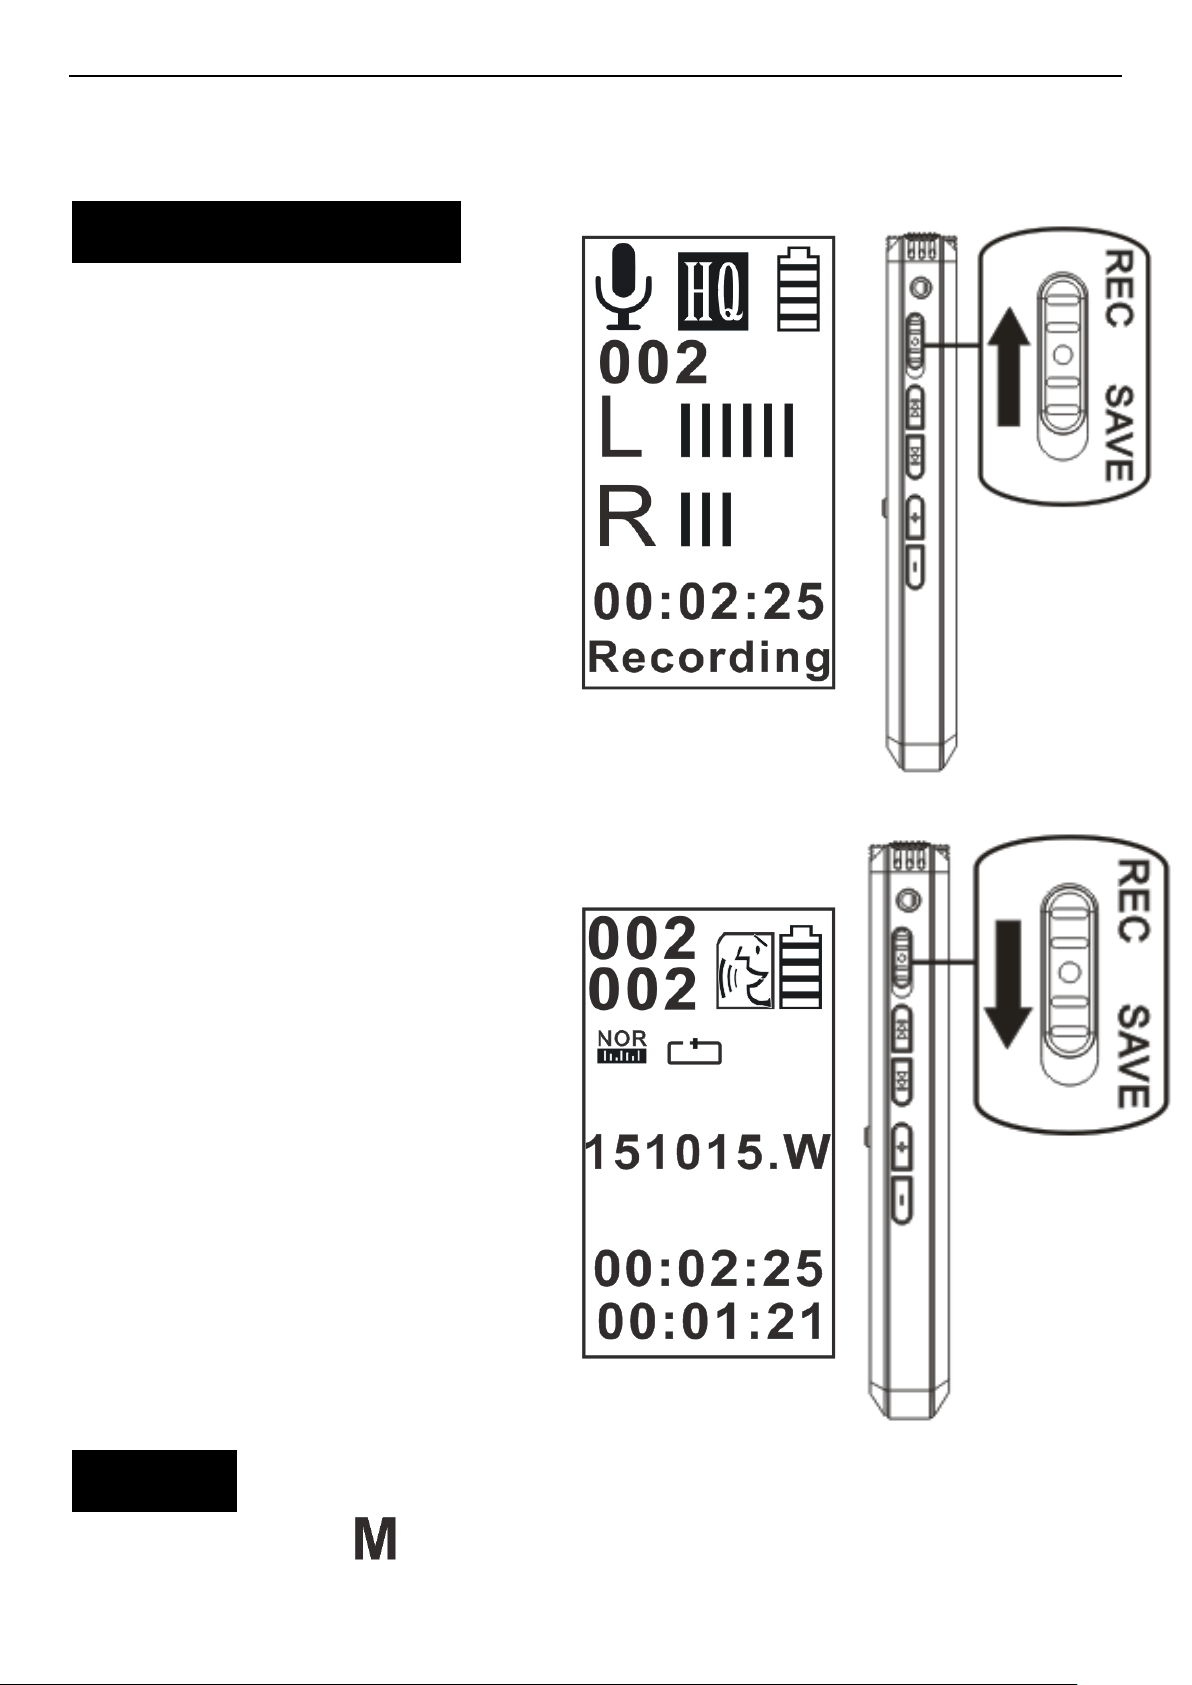
6. Record/SAVE
Turn on the
recording switch to
enter recording
mode.
Place the recorder
so that the built-in
microphones face the direction of
the source to be recorded.
The new file will be automatically
recorded as the last
file in the current
folder.
Slide down the
“REC/SAVE” button,
in the direction of
“SAVE” to stop and
save your recording.
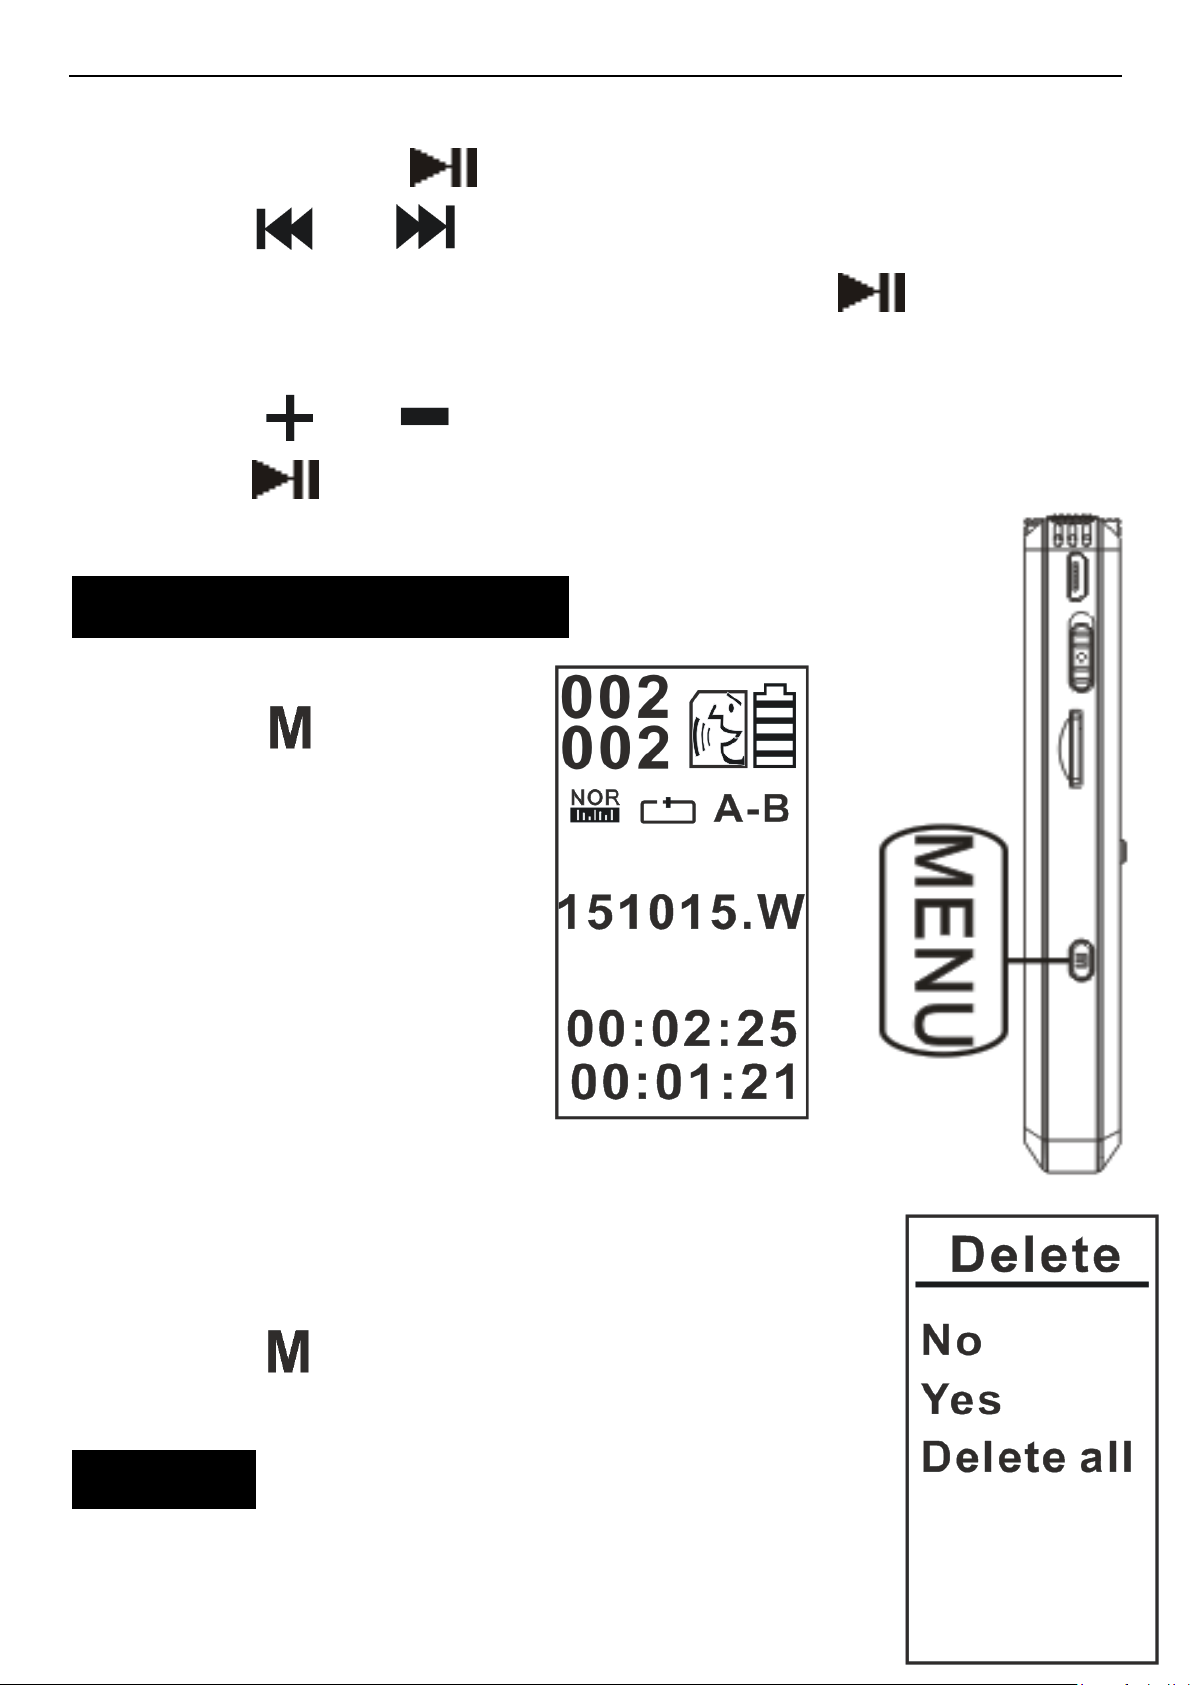
7. Play
Press the “ ” key on the side of the device to
5
Page 7
JVR-32 Voice Recorder
switch between the Recording folder/Music
folder. Press “ ” to play.
Press“ ”or“ ”button to select the file you
want to playback, and then press “ ” button to
start playing the file.
Press “ ”or “ ”button to adjust the volume.
Press“ ” button to Pause play.
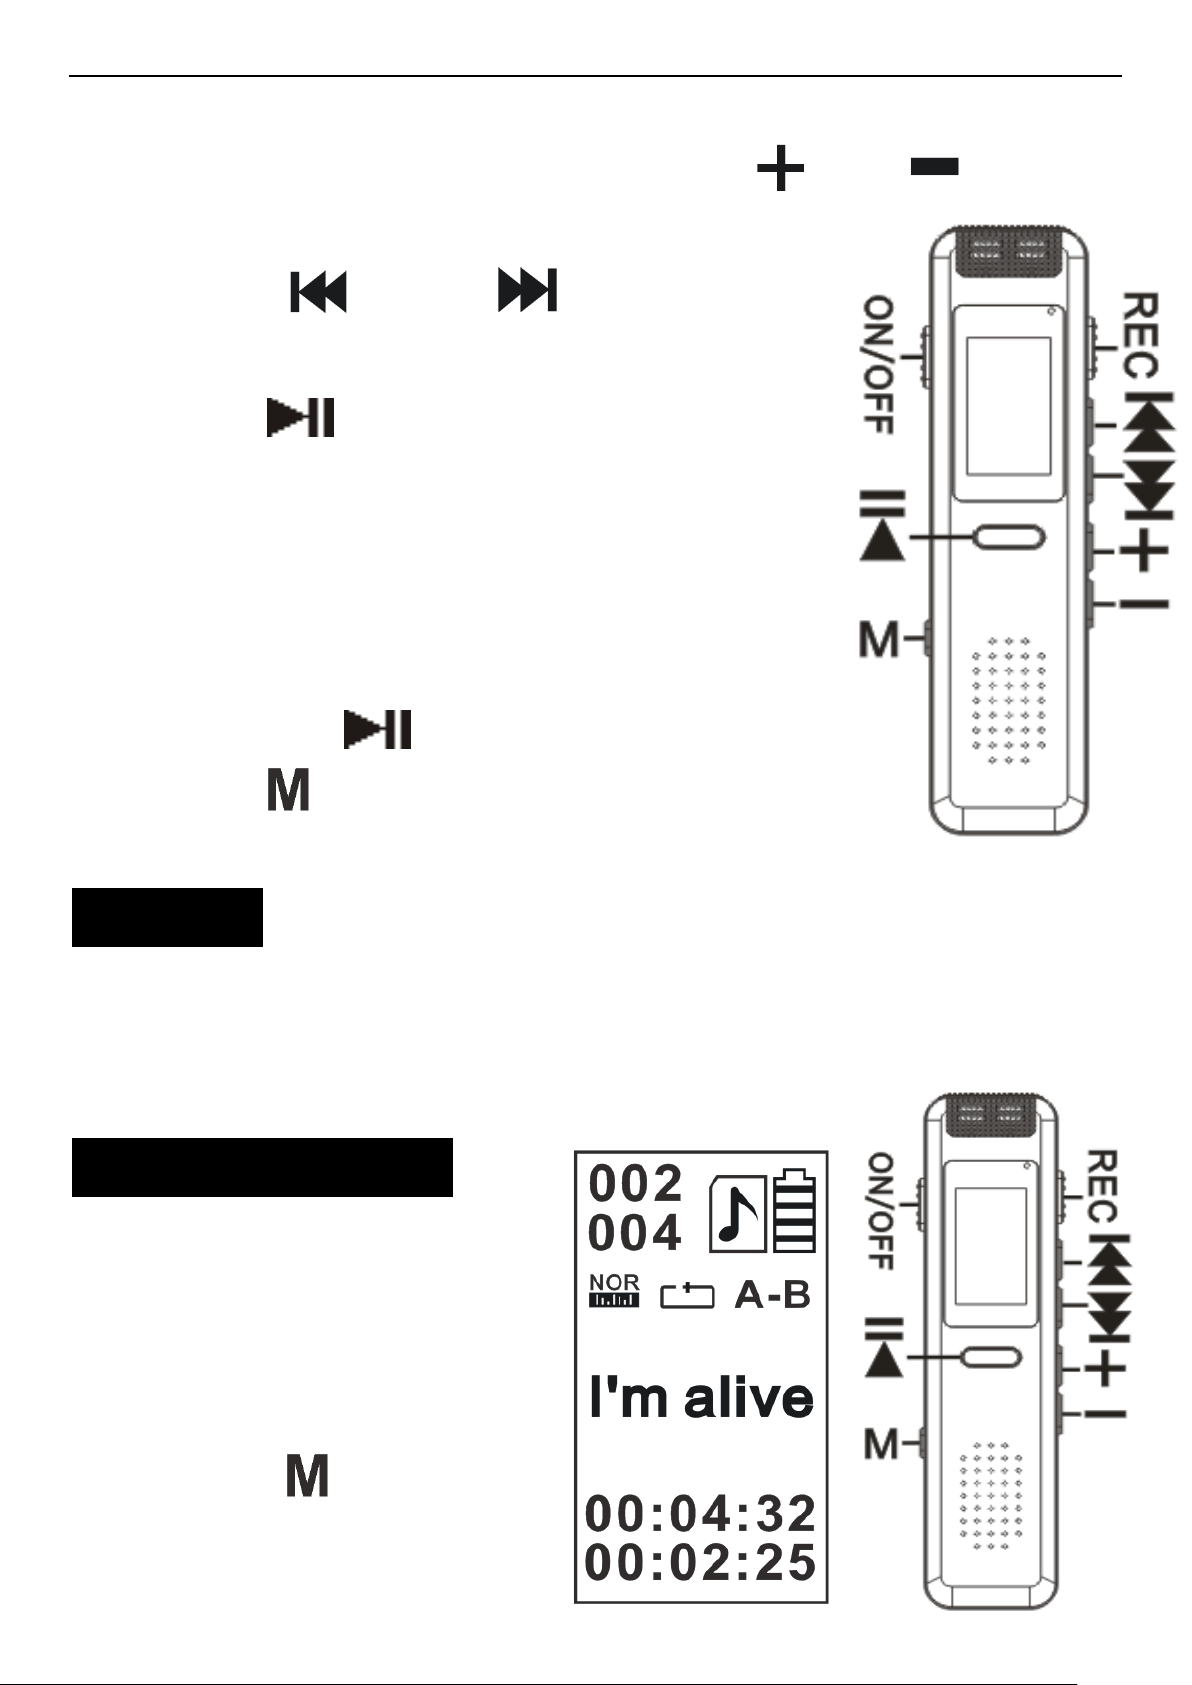
8. “A-B”Repeat Play
In PLAY mode,
press “ ” to select
“A”. Once “A” starts
flashing on the
screen, press this
button again to
select “B”, and then
the segment “A-B”
of the file will start repeating.
Once selected, it will repeat and
play back the A-B interval
Press “ ”again to cancel.
9.Delete
When the recorder is in standby
6
Page 8
JVR-32 Voice Recorder
mode (not playing a file), select the file you
want to delete, hold down “ ”or “ ”key to
enter.
Press " " or " " buttons to
select “No”/“Yes”/“Delete all”.
Press " " to confirm your choice.
“No”:Cancel the Delete process.
“Yes”:Delete single file.
“Delete all”:Delete all files in
folder.
Press the “ ” button to confirm.
Press “ ”to return standby mode.
Note
Once a file has been erased, you cannot retrieve
it.
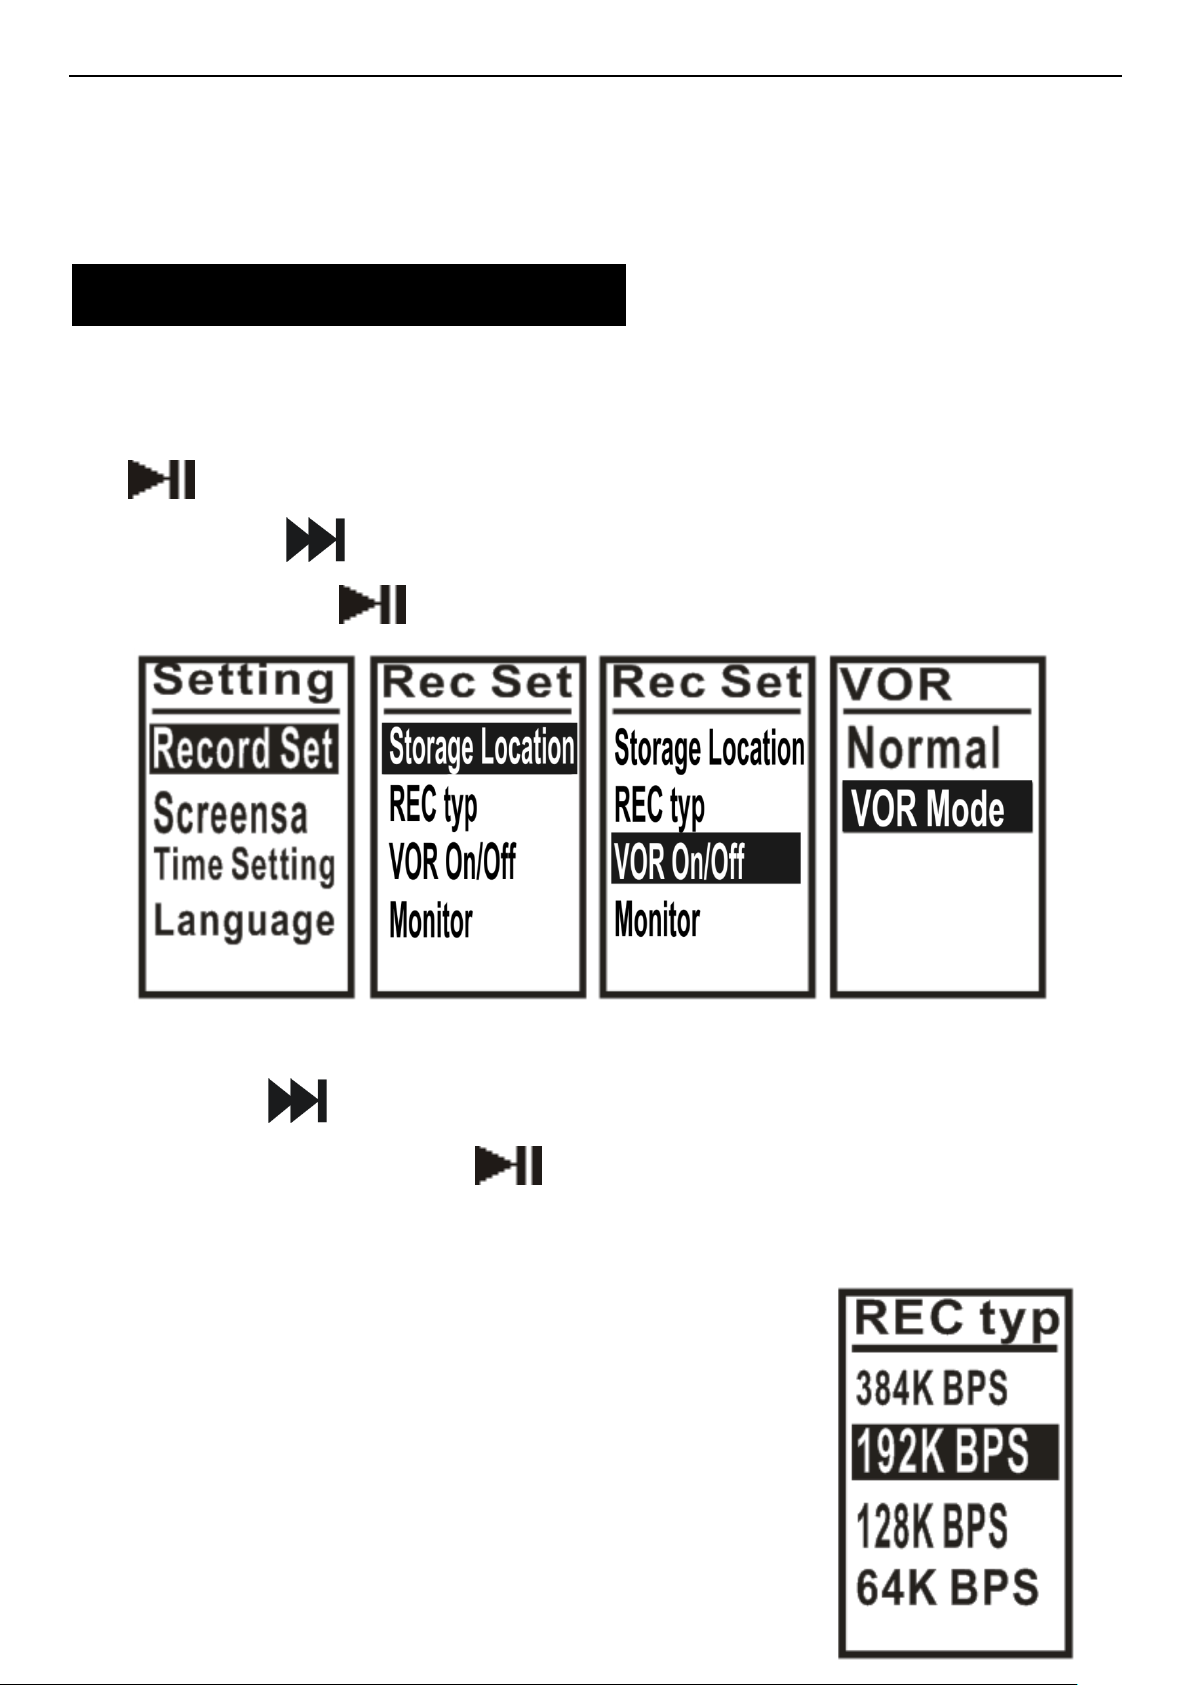
10.MP3 Function
Download music to
the root directory of
the machine through
USB.
Press “ ” to enter
the MP3 player
7
Page 9
JVR-32 Voice Recorder
interface.
Play music just like playing a recording file.
11. Recording Settings
In standby mode, hold down "M" button to enter.
For scrolling through the options, press the
“ ” button to select, press the “M” key to exit.
Press “ ” to select the recording settings,
press the “ ” to enter.
1) Storage Location
Press " " briefly, then select "memory", "card",
and then press " " to save your recording in
your preferred location storage. Press "M" to
exit.
2) Record type
a. 384KBPS
b. 192KBPS
c. 128KBPS
8
Page 10
JVR-32 Voice Recorder
d. 64KBPS
e. 32KBPS
3) Recorder Mode (VOR on/off)
a. Normal Mode
b. VOR Mode (Voice Activated Recording)
Note
In VOR mode, if the ambient noise level
exceeds -40dB, the recorder will start
recording. If the ambient noise level
drops below this threshold, it will stop
recording and resume once the
threshold is exceeded. If you want to be
ready to record at short notice, you can
use this feature, keeping in mind the noise
threshold.
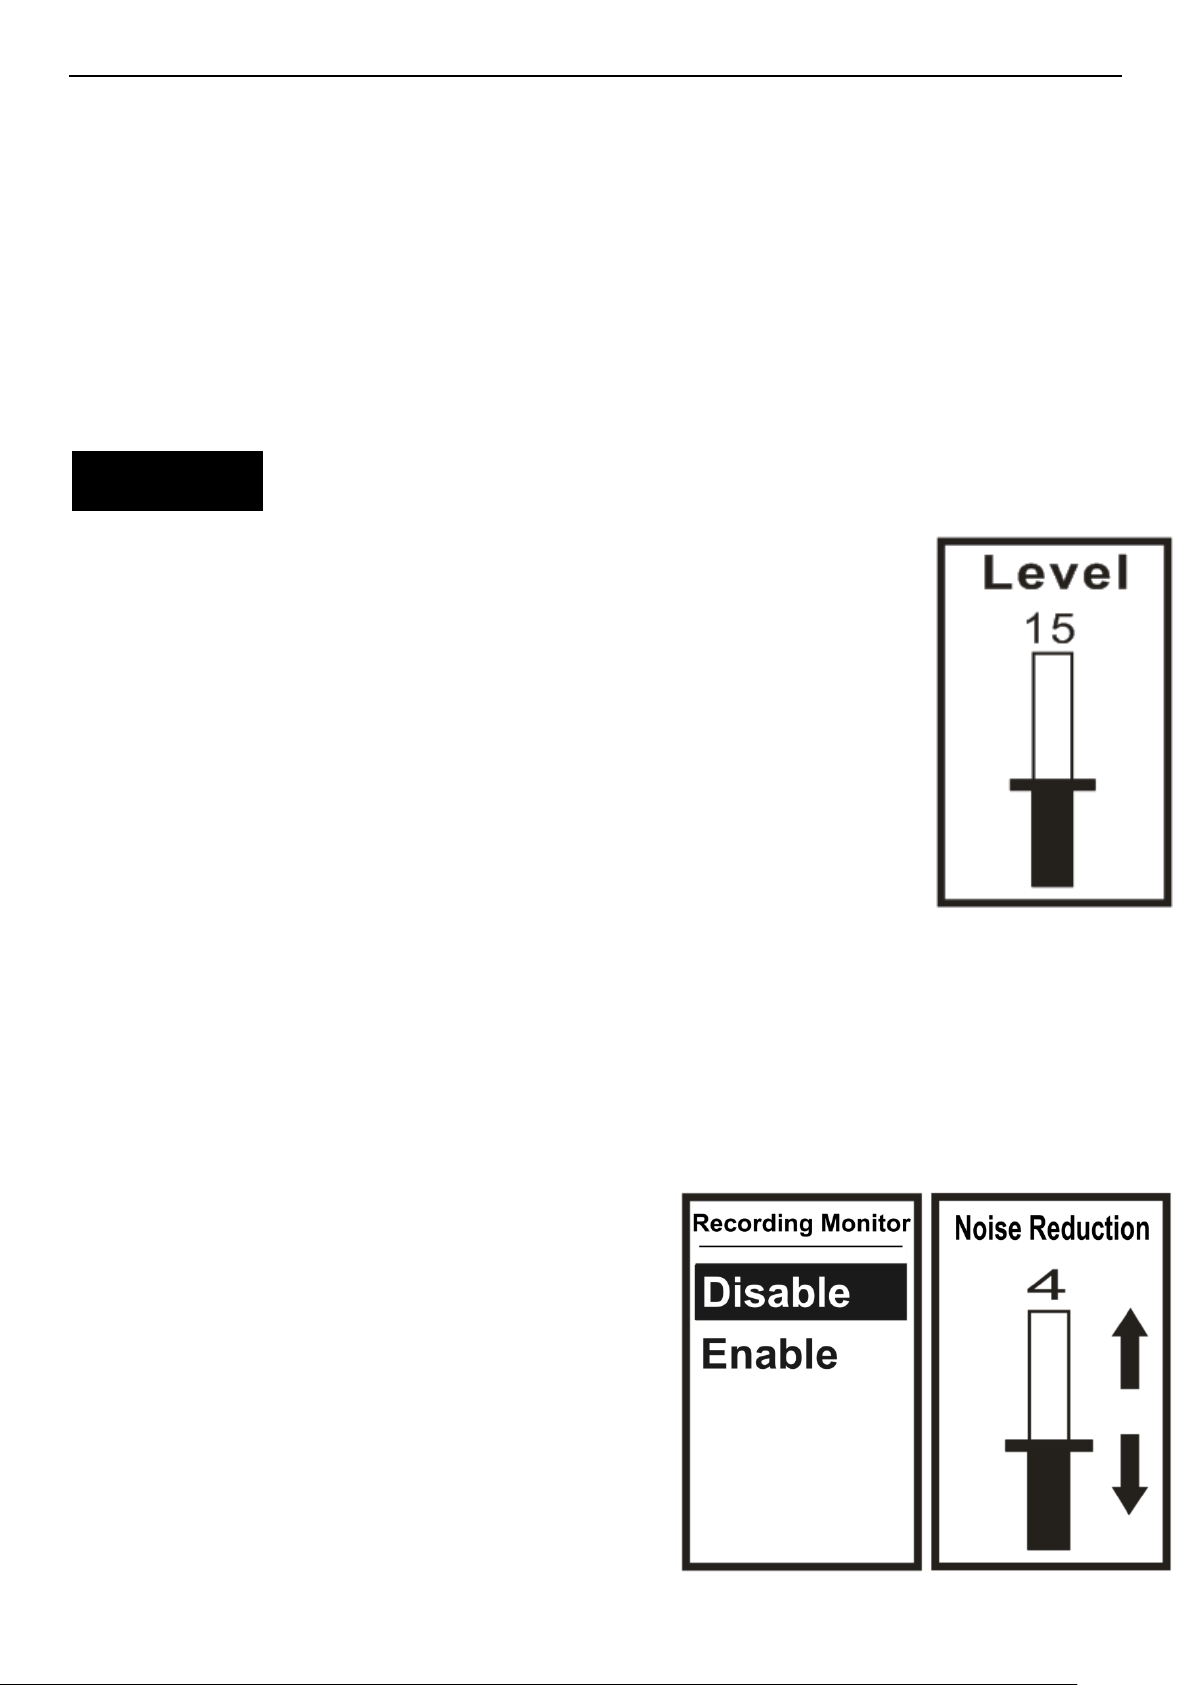
4) Recording Monitor: Use this feature for live
monitoring during a
recording. This feature
needs earphones to be
used.
a.Disable
b.Enable
5) Noise Reduction: Here
9
Page 11
JVR-32 Voice Recorder
you can set the level of noise reduction you
prefer.
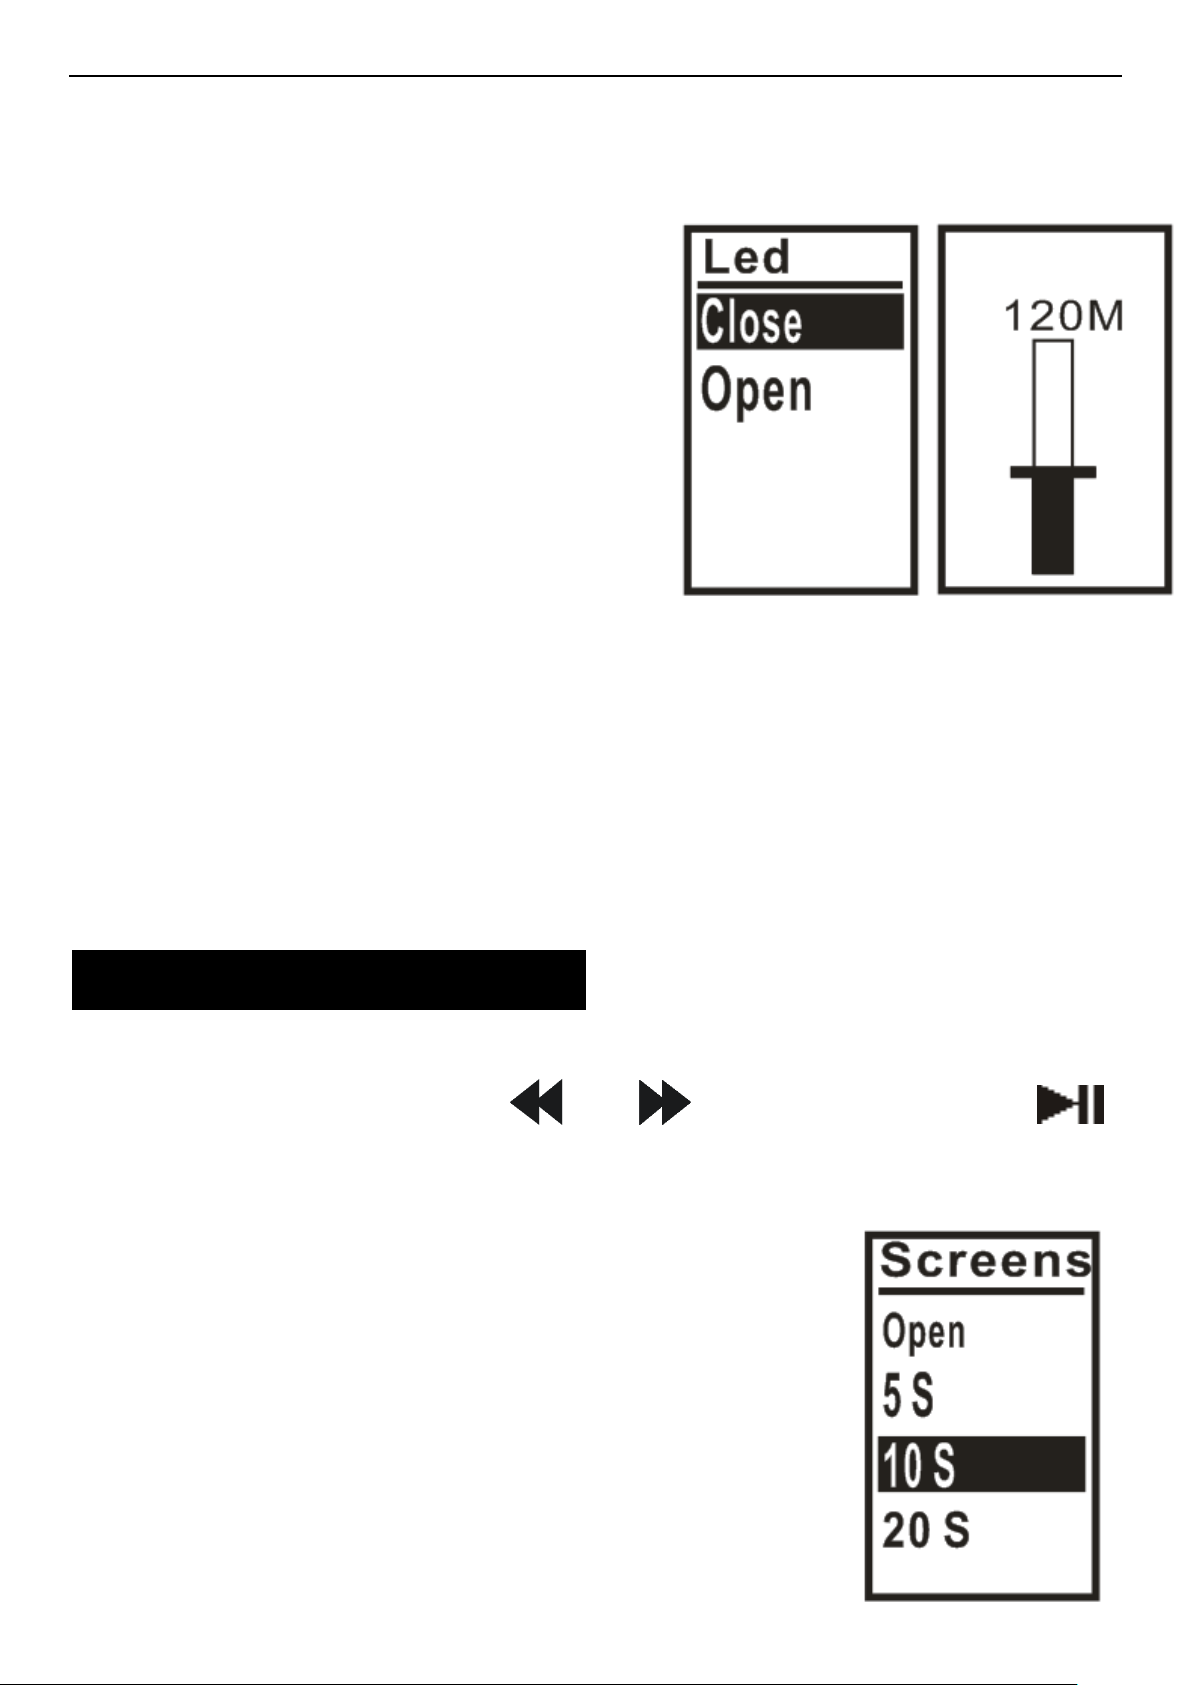
6) VOR Level
When the sound recording
is turned on, it can adjust
the level of the input.
7) LED Set
a. Close
b. Open
8) Record Subsection
Based on requirements, recording files can be
divided into: 30 minutes, 60 minutes, and all the
way upto 360 minutes, in 30 minute increments。
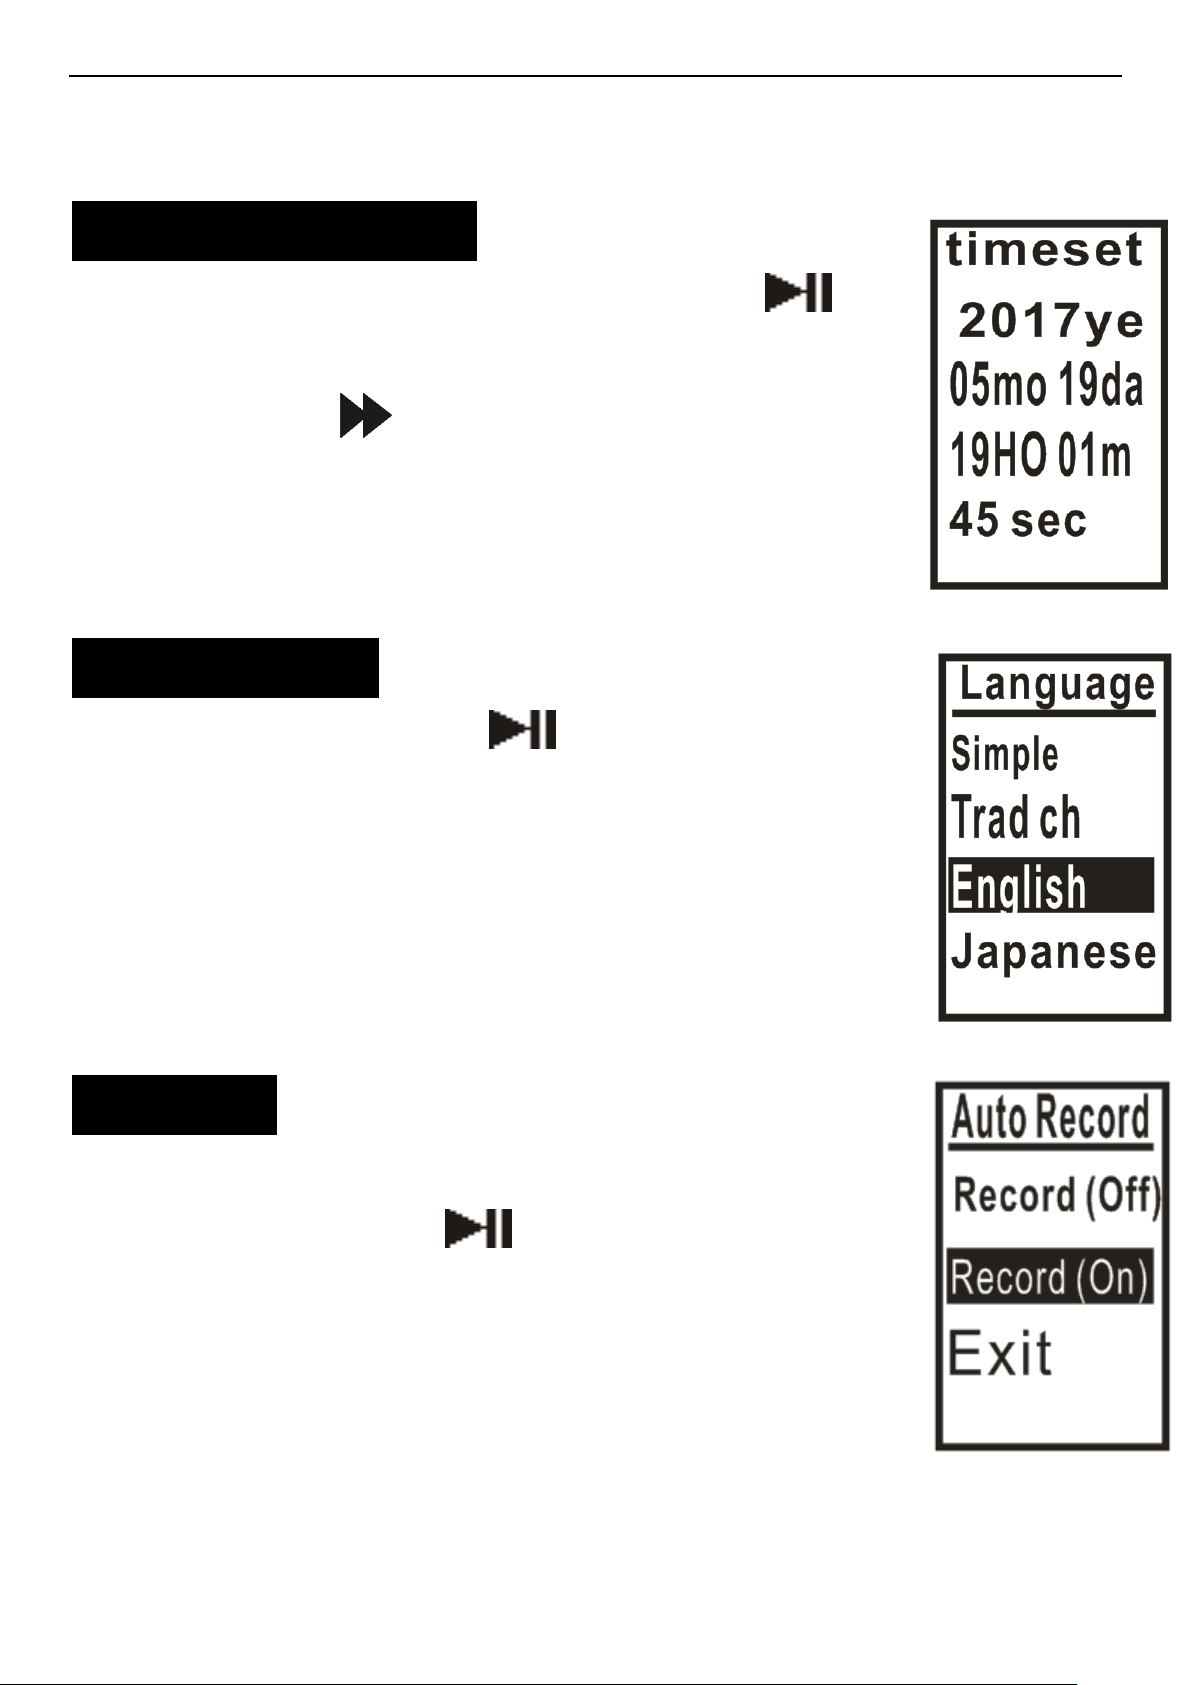
12. Screensaver Time
You can scroll through the various options for
this feature using “ ”or“ ”. Please press “ ”
to confirm, and press “M” to exit.
1) Open
2) 5 S
3) 10 S
4) 20 S
5) 30 S
Save battery charge by selecting
10
Page 12
JVR-32 Voice Recorder
screen saver settings.
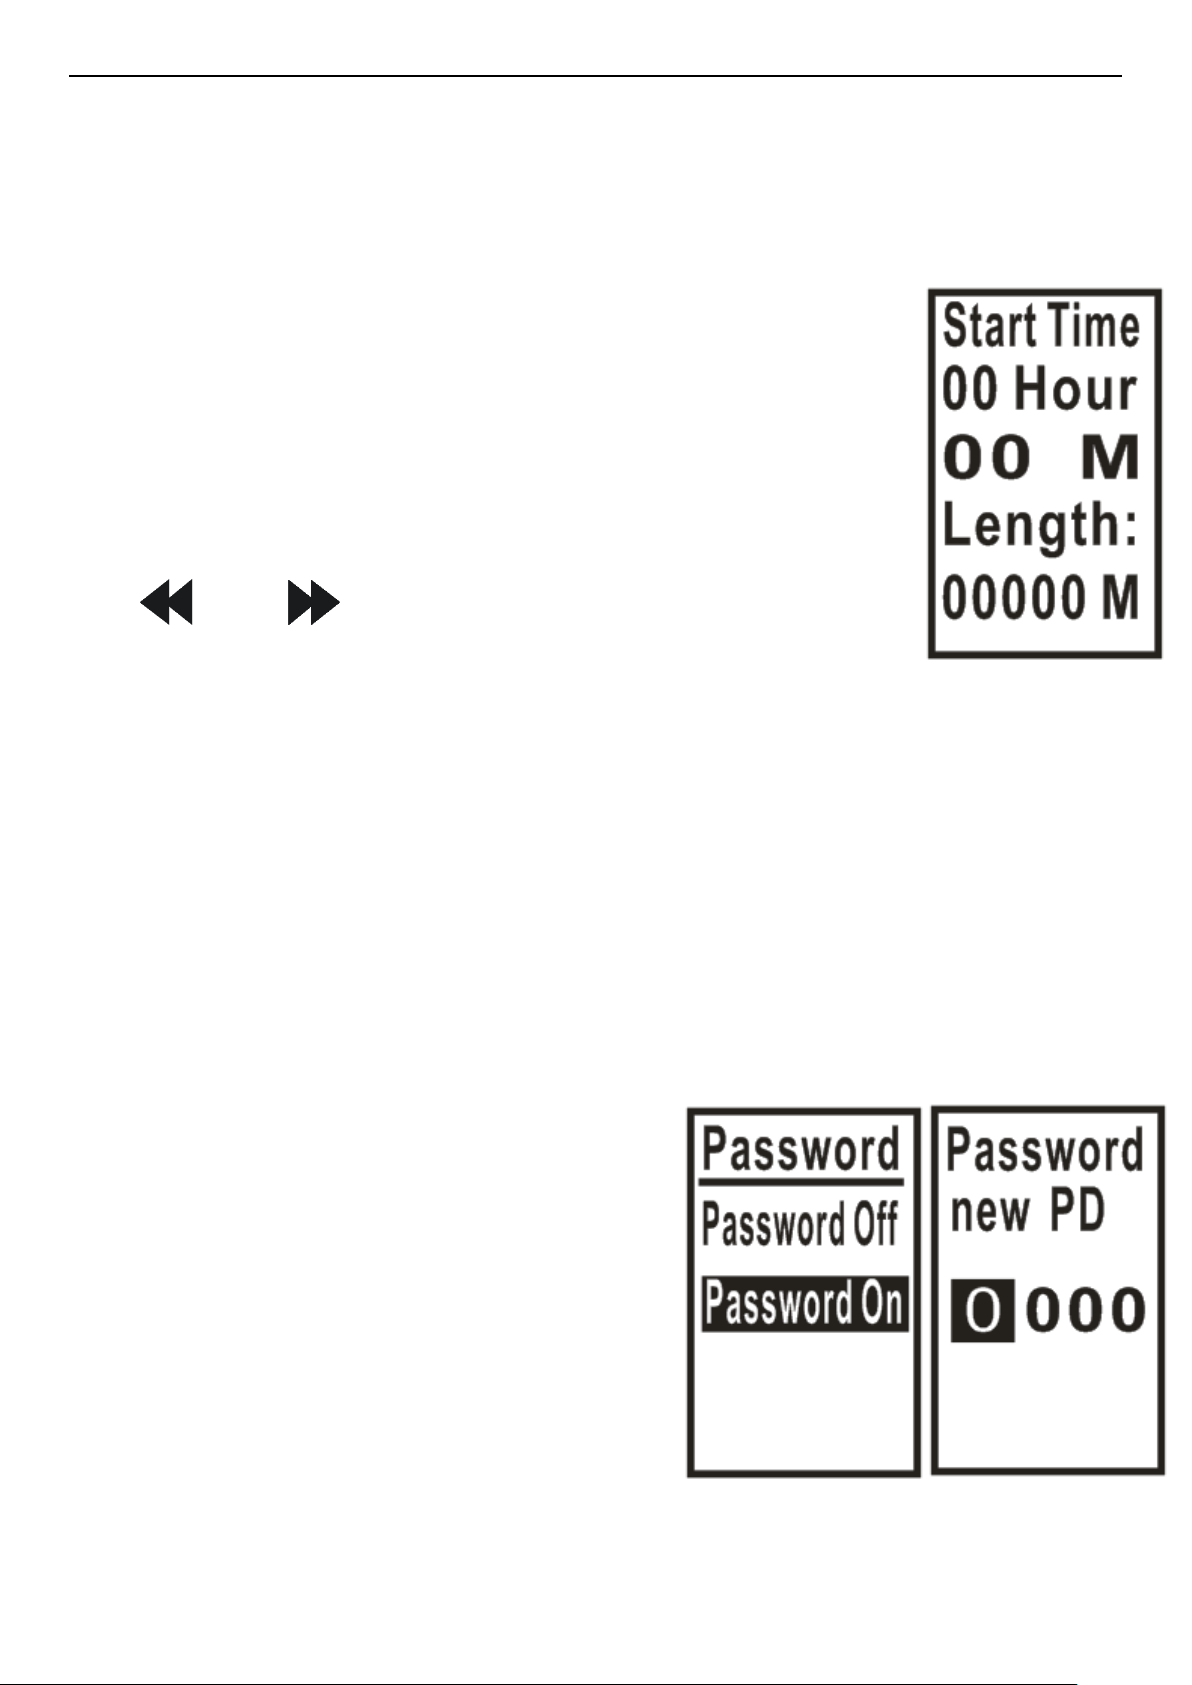
13.Time Settings
You can select and press “ ” to
confirm, and press “M” to exit.
1) Press “ ”to select the desired
position.
2) Press“+/-” to adjust the number.
14. Language
Please press “ ”to confirm, and
press “M” to exit.
1) Scroll through the options and
select your preferred choice.
2) Multi language support
15. Tools
For this function, select the option,
then press the “ ” button to confirm,
and press the “M” key to exit.
1) Auto Record options:
a.Record (Off)
b.Record (On)
Note: Your recorder time must be synchronized to
11
Page 13
JVR-32 Voice Recorder
the current time zone (see time settings).
Timed recording: The power switch must be
ON.
Set the time at which you want to
start recording: Record (On) - (sort of
like setting an alarm).
To adjust the time at which you would
like the recording to begin, press
“ ”or“ ” to select the hour or
minute, and use “+/-” to adjust the
time. Once it is set, you need to also specify the
duration of the recording (Length) in minutes.
Once set, at the specified time, the recording
will start automatically and once it has reached
the specified length, the file will be saved and
the recorder will go to sleep mode by itself.
2) Password Switch
a.Password Off
b.Password On
When you select
“Password On”, you can
set a password to the
device.
3) Password Set
12
Page 14
JVR-32 Voice Recorder
Press “ ”or“ ” to adjust position, “+/-” to
adjust the number.
If you have set a password, when you boot with
the connection PC you will need a password.
Please store your password in a safe place. If
you forget the password, enter 9999 and hold
down the “ ” key to bypass the password.
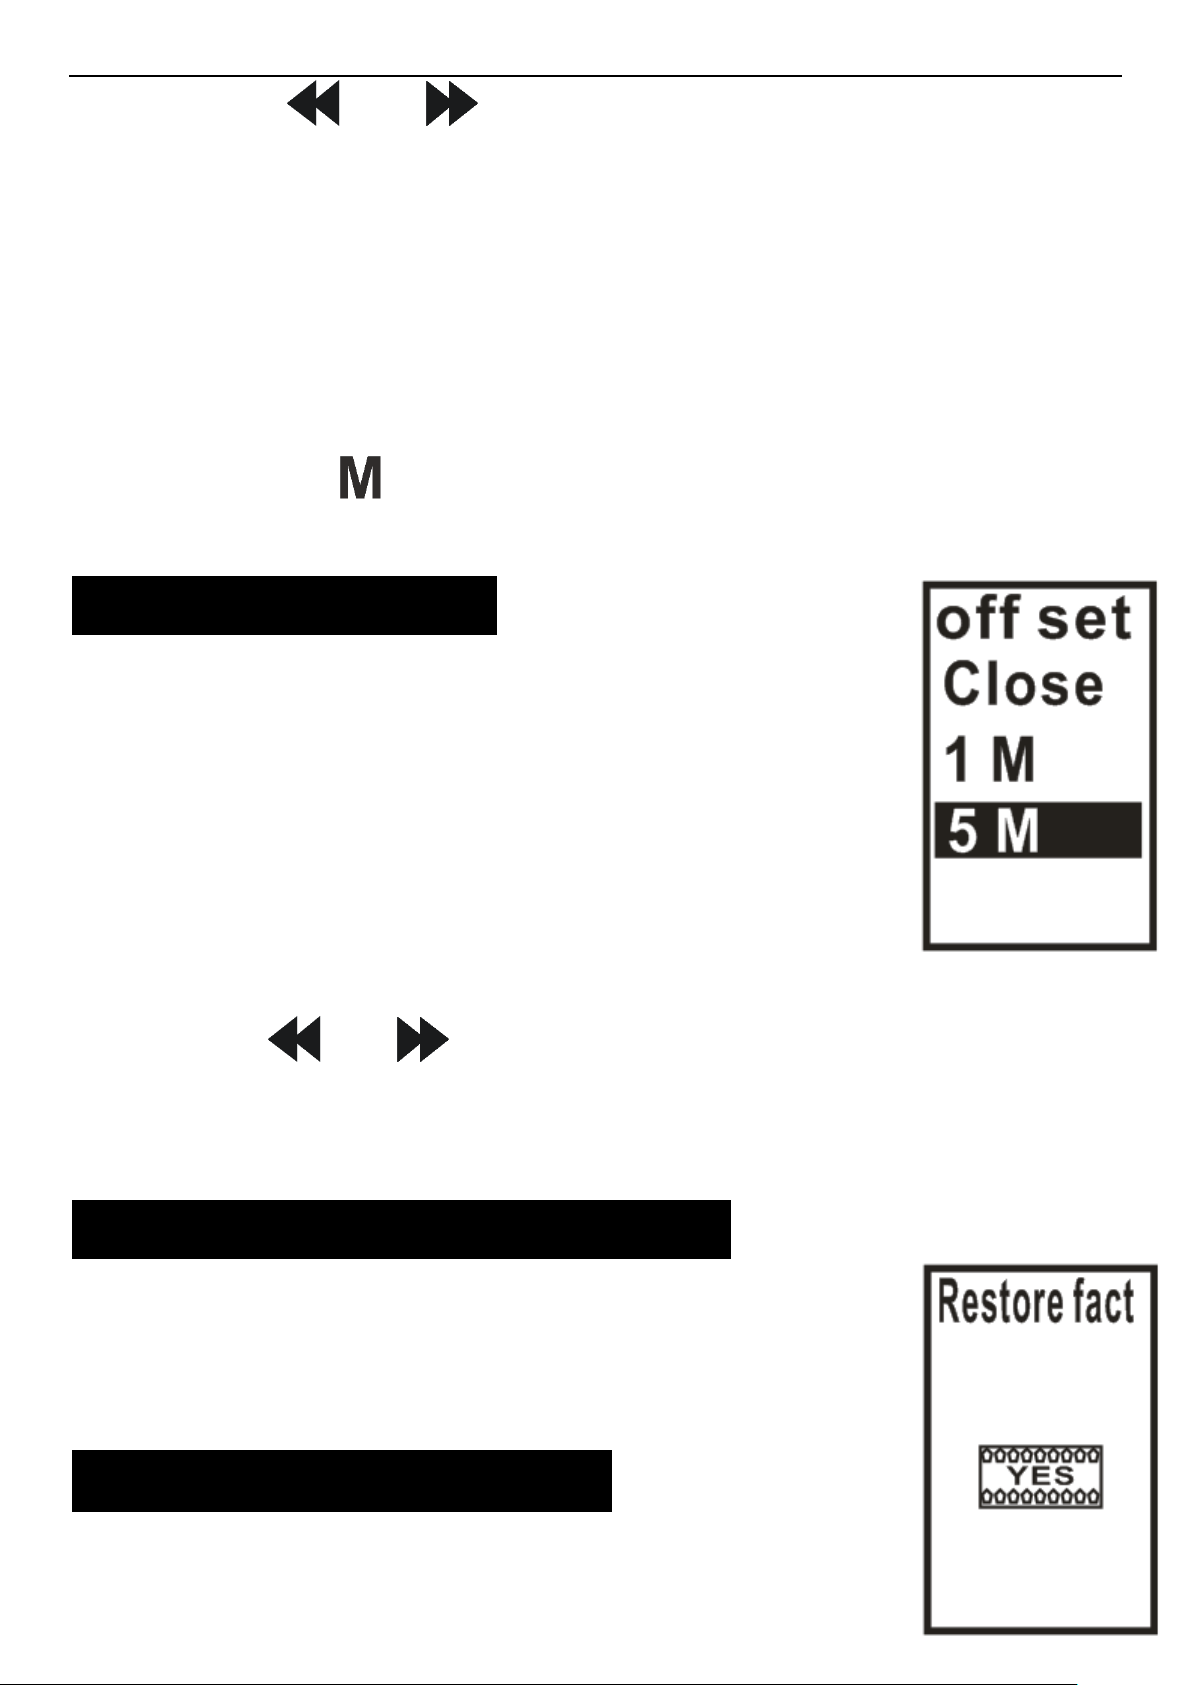
16. Auto switch off
a. Close
b. 1 Minute
c. 5 Minute
d. 10 Minute
e. 30 Minute
f. 60 Minute
Use the “ ”or“ ” keys to select your preference
in setting the switch off time.
17. Restore factory Settings
All settings are restored to the
default factory settings.
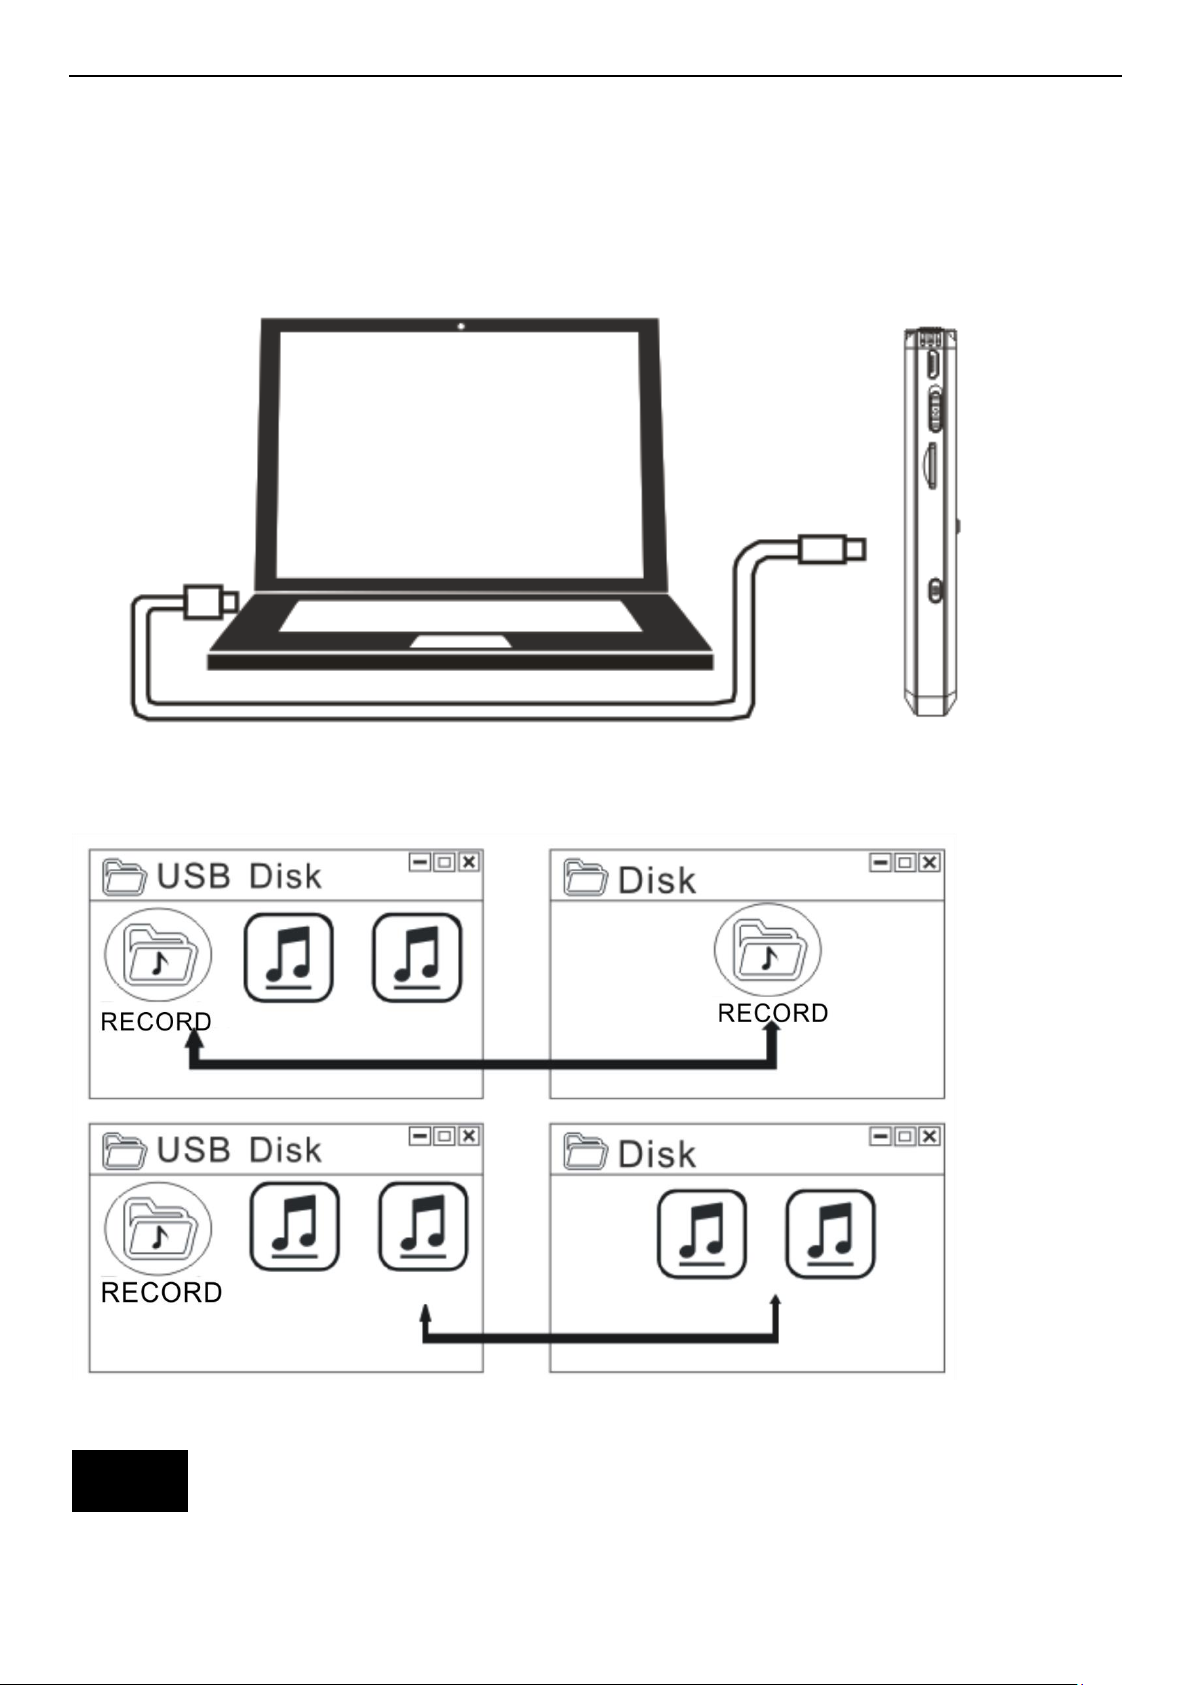
18.Copy Files with PC
Connect the Recorder to the PC via
13
Page 15
JVR-32 Voice Recorder
the USB cable.
Copy files or folders to your computer.
Note
Copy files from the computer to the recorder. Any
14
Page 16

JVR-32 Voice Recorder
music files (for mp3 playback on the recorder)
must not be put inside the RECORD folder. They
should be simply copied to the root directory.
15
Page 17
JVR-32 Voice Recorder
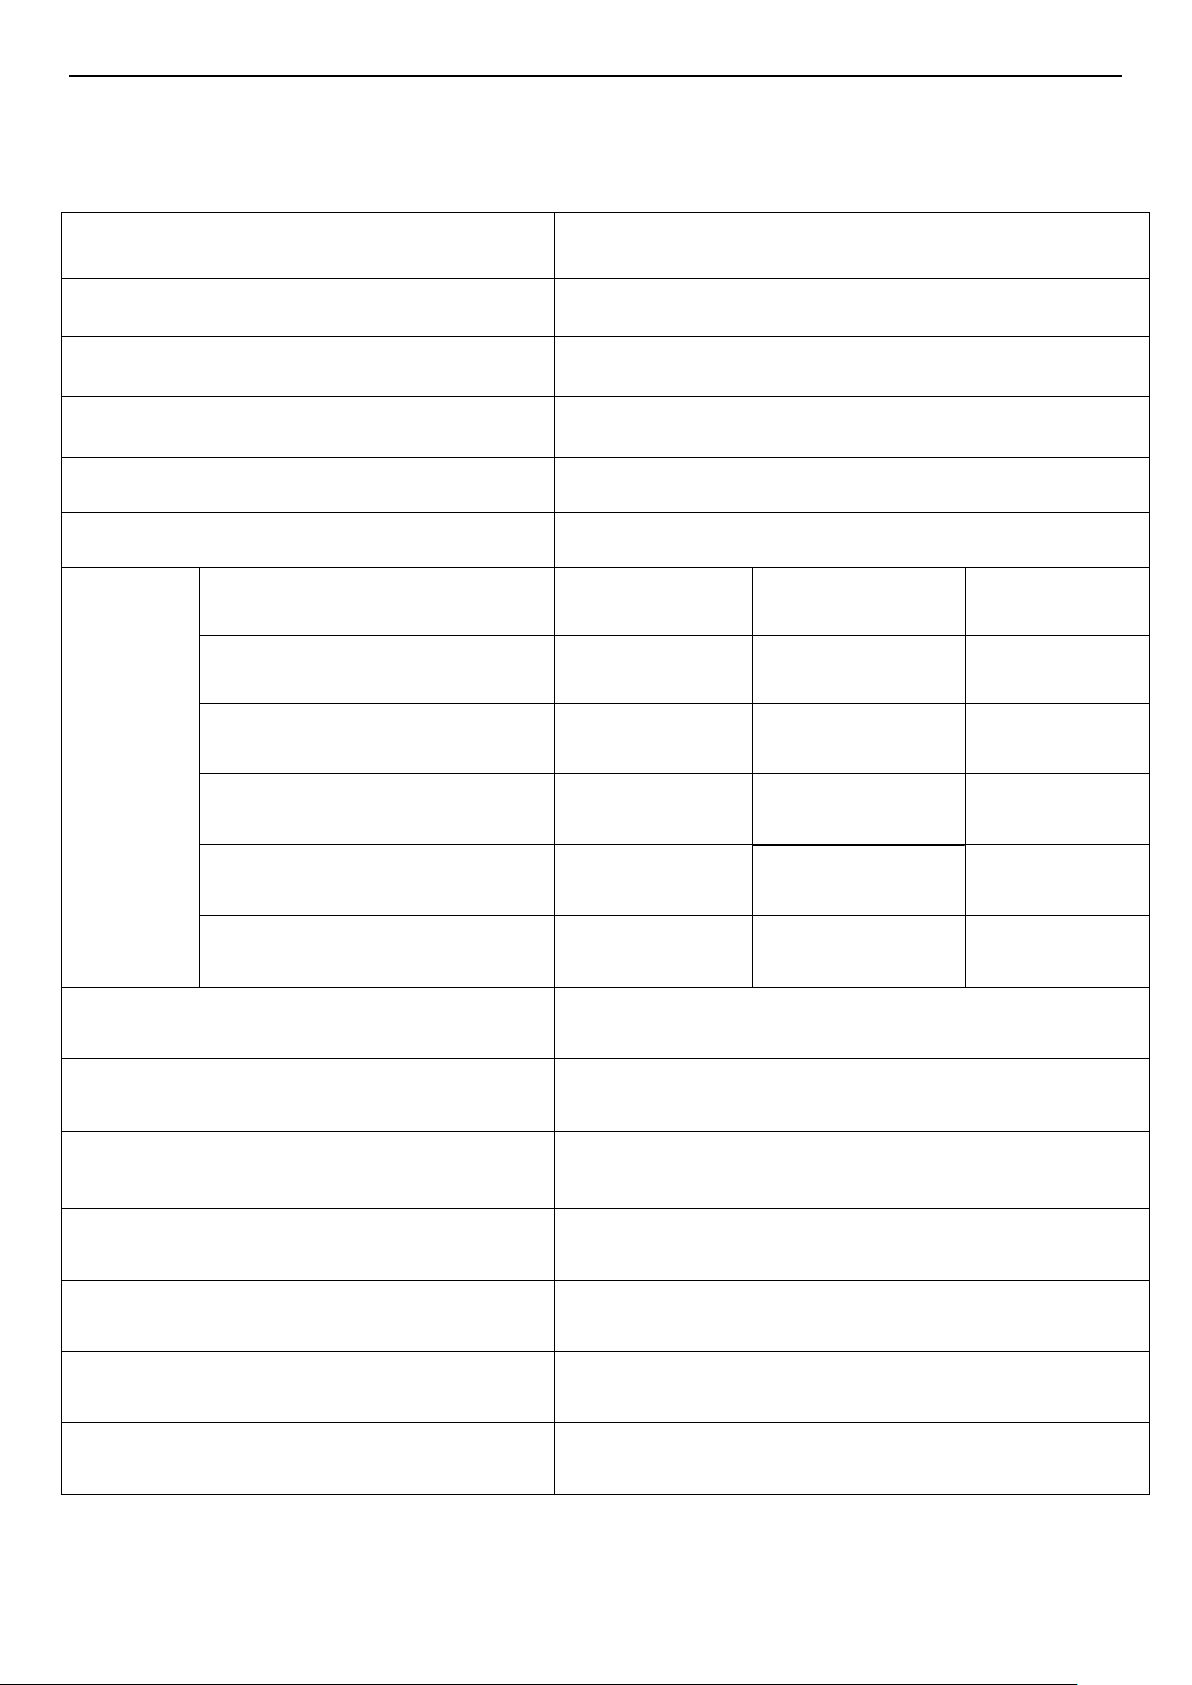
Display screen
96*64 LCD screen
Disk Capacity
8GB/16GB/32GB
Product size
4.03 x0.94x0.53 Inches
Weight
2.40 Oz
Recording Format
WAV
Recording Mode
Microphone
WAV
Recording
8GB
16GB
32GB
PCM/384kbps
47hrs
94hrs
188hrs
SHQ
94hrs
188hrs
376hrs
HQ
139hrs
278hrs
556hrs
SP Rec/64kbps
278hrs
556hrs
1112hrs
LP Rec/32kbps
560hrs
1120hrs
2240hrs
Music Format
MP3,WAV
Interface
USB2.0
Usage Temperature
0°C~45°C
Power Supply
Built-in lithium polymer
Battery Capacity
1100mAh
Earphone jack
3.5 mm Stereo
Built in speaker
8Ω1W
General Specifications:
16
 Loading...