

Jiffy Esteam, J-Series, Esteam J-Series Owner's Manual

Worldwide Leader in
Steaming Equipment Since 1940
Esteam®and J-Series
OWNER’S MANUAL
PRINTED IN THE USA
FORM #5500B - REVISION 14
Printed on Post-Consumer Recycled Paper
© Copyright 2013

Congratulations and Thank You!
Table of Contents
2
Thank you for purchasing your Jiffy®Steamer
from the world’s leading manufacturer of
steaming equipment since 1940. We strive to
engineer and manufacture the very best
steamer available backed by
superior customer service.
With proper maintenance and cleaning, your Jiffy
®
Steamer will last through years of demanding use.
Thank you again and we sincerely appreciate your
business.
Warmest regards,
Jiffy®Steamer Company, LLC
Made in the USA Since 1940
Safety Instructions .....................................................................3
How to Steam..............................................................................4
Esteam
®
Hand Held Steamer .................................................5-8
Jiffy Steamer Accessories ..........................................................9
Model J-1 & J-2 Jiffy
®
Steamers .......................................10-15
Model J-2000 Jiffy
®
Steamer .............................................16-21
Model J-4000 Pro-Line Jiffy
®
Steamer .............................22-27
Model J-1, J-2 & J-2000 Jiffy
®
Steamers
Cleaning Instructions...............................................................28
Model J-4000 Jiffy
®
Steamer Cleaning Instructions.............29
Jiffy
®
Steamer Maintenance ....................................................30
More Jiffy
®
Steamer Accessories.............................................31
Jiffy
®
Steamer Steam Head Configurations .....................32-33
Jiffy
®
Steamer Cord Plug Configurations..............................33
Troubleshooting ..................................................................34-35
Jiffy
®
Matrix Charts ...........................................................36-39
Product Specifications .............................................................40
Jiffy
®
Steamer Warranty & Return Policy ............................41
Jiffy
®
Steamer Contact Information.......................................42

LISTED
COMMERCIAL
GARMENT STEAMER
579M
3
Important Jiffy®Steamer Safety Instructions
When using your Jiffy®Steamer, basic precautions should always
be followed, including the following:
1. WARNING! Read all instructions prior to usage.
2. To reduce the risk of contact with hot water emitting from steam vents,
check appliance before each use by holding it away from body and operating.
3. Use appliance only for its intended use. Steam only in an up and down
vertical motion. Never use steamer in a horizontal position
or tilt into a backward position, this may result in water discharge.
4. To avoid the risk of electric shock, do not immerse the appliance in
water or other liquids.
5. Never tug cord to disconnect from outlet; instead grasp plug and pull to
disconnect.
6. Do not allow cord to touch hot surfaces. Let appliance cool completely
before storing.
7. Always disconnect appliance from electrical outlet when filling with water,
emptying, and when not in use.
8. Do not operate appliance with a damaged cord, or if the appliance has been
dropped or damaged. To reduce the risk of electric shock, do not disassemble
or attempt to repair the appliance, take it to a qualified service person or return
to the Jiffy®Steamer factory for examination and repair. Incorrect reassembly or
repair could cause a risk of fire, electric shock or injury to persons when the
appliance is used.
9. Close supervision is necessary for any appliance being used near children. Do
not leave appliance unattended while connected to power source.
10. Burns could occur from touching hot parts, hot water or steam. Use care
when you empty a steam appliance as there may be hot water in the reservoir.
11. Indoor use only.
12. Never attempt to steam clothing while on body.
13. Never use an extension cord.
14. This marking on the product denotes that the unit is grounded.
SAVE THESE INSTRUCTIONS
RISK OF
ELECTRIC
SHOCK
RISK OF
BURNS

How to Steam
As your dry cleaner knows, steam is the gentlest, safest, most efficient method to
remove wrinkles. Not only is steaming five times faster than ironing, it is guaranteed
not to scorch even the most delicate materials and fabrics. Our steamers will remove
wrinkles from clothing, drapery, tablecloths...virtually any fabric. Use the following
information to help guide you to more proficient steaming.
Some articles
can be steamed
better from the
underside. This
allows the
steam to relax
the fibers of the
material, thus
removing the wrinkles.
Jiffy
®
Steamers are
great for removing
“closet crunch,” and
they eliminate most
trips to the drycleaner.
Convenient
hanger/hook
mechanism holds both
clothes and steam head securely.
Always steam with
the hose in an
upright position so
any condensation is
free to flow back
into the steamer. If
steaming in a low
position near floor,
frequently extend
hose up and out to keep hose clear
of condenstation
Pants may be easily steamed by
hanging them by the cuff. You may
also use your Jiffy Steamboard to
serve as a vertical pressing board to
steam your garments.
4
When steaming,
touch material
lightly with steam
head and wrinkles
will vanish instantly.
The combination of
the warm, moist
steam and the steam
head is important for
a smooth finish.
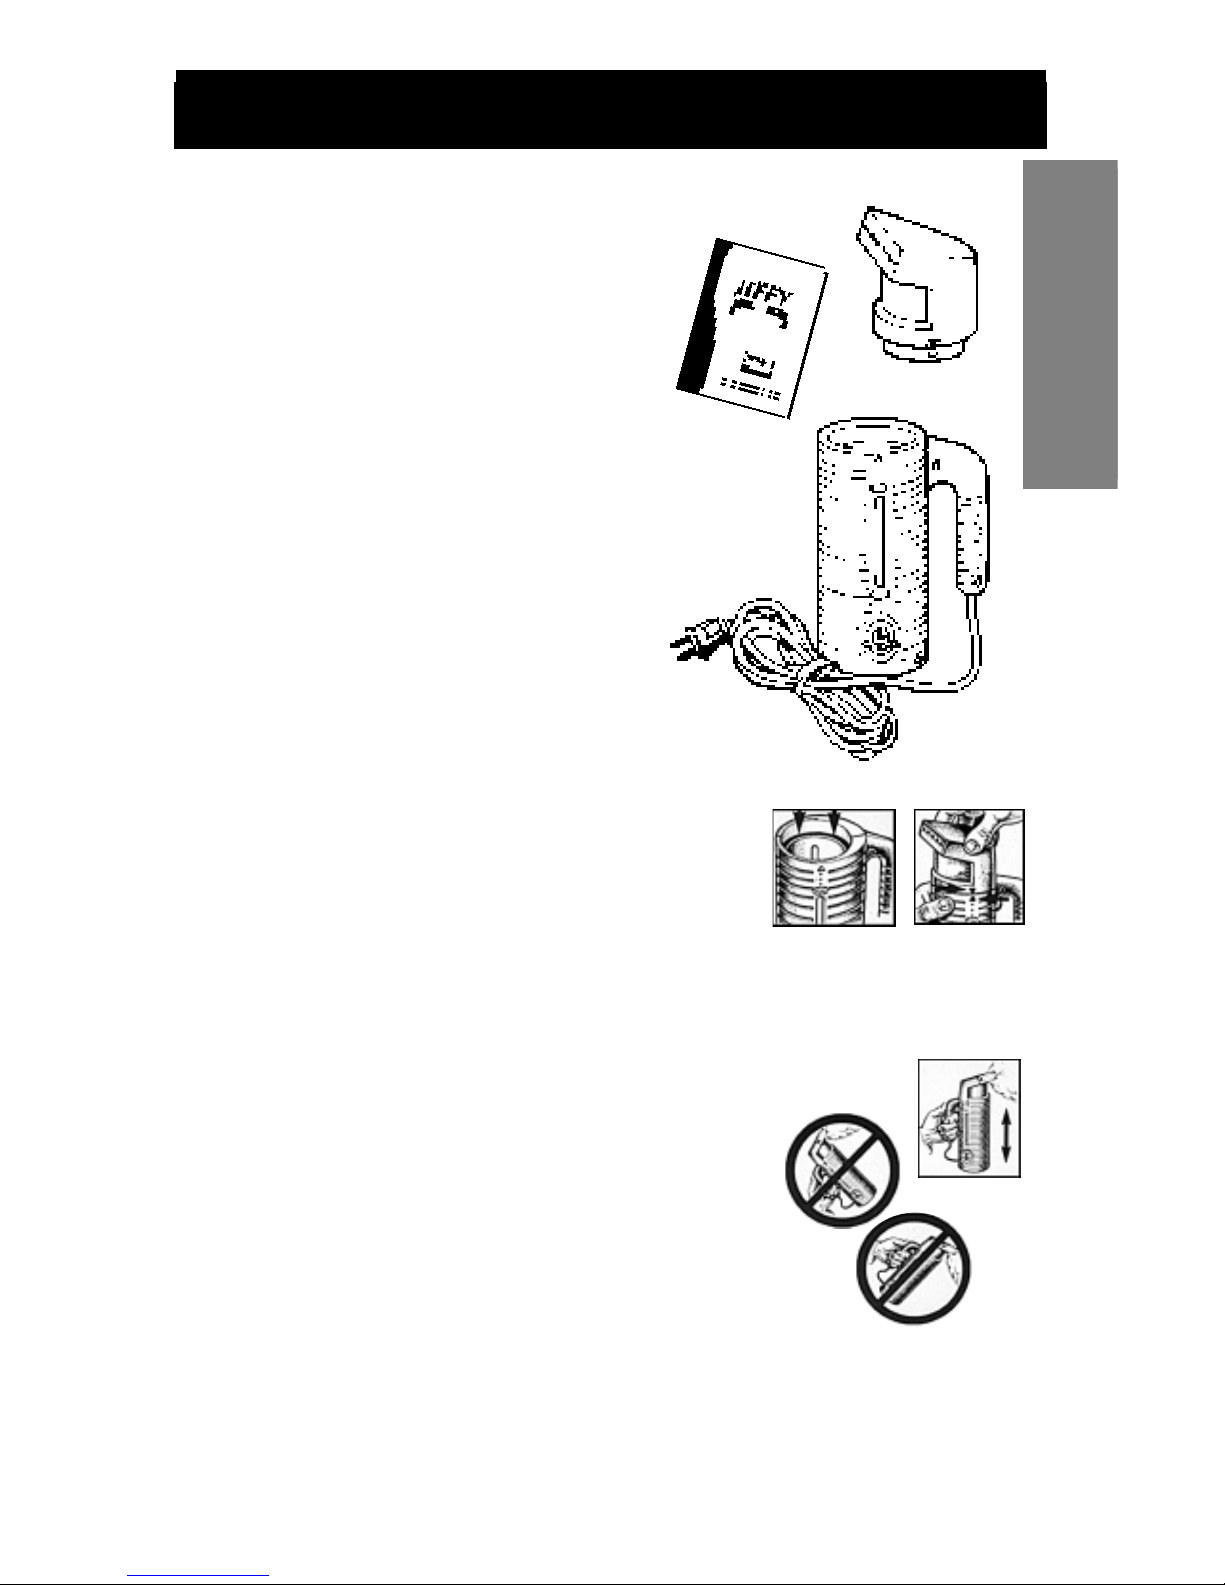
Esteam®Features and Directions.
ESTEAM
®
Directions for Use
1. Make sure your Esteam®is unplugged before filling.
2. Check to make sure the factory-installed red o-ring is
secure inside the water tank before operating steamer
(figure #1).
3. Fill with tap or distilled water to the full mark on the outside of the steamer.
Never overfill. Never use water left overnight in steamer. Stale water causes
foaming action and can create water droplets.
4. After filling, place steam cap on steamer and twist firmly until cap
arrows align with arrows on the tank (figure #2). Make
sure it is secure before operating unit.
5. Plug your Esteam
®
into proper voltage outlet. Steamer
will start heating within 15 seconds, providing live
steam from cold water within 2 minutes.
6. Always steam with a vertical up and down motion (figure #3).
Do not tilt unit forward or backward.
7. Avoid allowing steamer to run dry of water.
8. Refer to page 8 for complete cleaning instructions.
WARNING: Never operate without water. Unplug after each use.
Figure 1
Figure 2
5
Features
• 3 times more powerful than any other
hand-held steamer on the market
• Largest water reservoir available
• Wide mouth, easy-to-fill water tank
• 600-watt heating element; automatic safety
shut-off temporarily cuts unit off when
it runs dry
• Uses plain tap or distilled water (no
additives required)
• Comfortable, easy-to-grip handle
• Special outer housing for cool-to-thetouch operation
• No internal water lines or pumps to
become clogged by hard water
• 9-foot power cord for more manageable
handling
• Fits neatly inside attaché or suitcase
• Available with a multiple plug converter for world travel
Ownerʼs
Manual
Steam Cap
Figure 3
Includes:
ESTEAM
®
Main Body

Esteam®Parts Diagram
6

7
Esteam®Parts Diagram Key
ESTEAM
®
Should you ever need replacement parts for your Jiffy®Steamer, you may purchase
them separately. Use this handy diagram and parts list to identify any part you may
need. Please include model and serial number when ordering.
Jiffy Steamer
Key# Part # Part Description
1 0653 Esteam 120 Volt 600 Watt Heater
with Gaskets and Nut
0655 Esteam 230 Volt 625 Watt Heater
with Gaskets and Nut
1a. Esteam Heater
(Sold with Item #0653 or #0655 as a Kit)
1b. Gasket for Esteam Heater
(Sold with Item #0653 or #0655 as a Kit)
1c. Nut for Esteam Heater
(Sold with Item #0653 or #0655 as a Kit)
2 0661 Red Inside O-Ring
3 0662 Black Outside O-Ring
4 0669 Esteam Water Tank
5 0640 Esteam 36 T-L263 Thermostat
6 0643 Fusible Link Clamp
7 0644 Fusible Link Clamp Screw
8 0641 Fusible Link Wire with Insulated Lug (Orange)
9 0681 Red Wire with Insulated Lugs
10 0645 Pilot Light with Wiring Harness
for 120 Volt Electrical Systems
0646 Pilot Light with Wiring Harness
for 230 Volt Electrical Systems
11 0647 Cord set (18/2 gauge)
12 0665 Right Case Half
13 0666 Left Case Half
14 0667 Four (4) Screws for Esteam Outer Case Halves
15 0663 Complete Steam Cap with Face Plate
ACCESSORIES
0619 Voltage Converter for Travel
0899 Liquid Cleaner - 3 Ten (10) Ounce
Bottles per Package*
*Not Available for Export.
ESTEAM Steam Caps with Face Plates and Case Halves are Available in Black or Pink.
Please specify color when ordering.
If you donʼt see the part you need, please contact us.

8
Esteam®Cleaning Instructions
Once you begin to see calcium scale
collect in the bottom of your
ESTEAM
®
hand steamer, it is time
to use the Jiffy®Steamer Liquid
Cleaner. Please follow these
instructions:
1. Pour 4 ounces of water in your
ESTEAM®hand steamer.
2. Plug in the unit and bring to full steam.
3. Unplug the unit and allow to cool for 2
minutes.
4. Pour out all water.
5. Pour in 5 ounces (1/2 bottle) of the Jiffy®Steamer Liquid Cleaner.
6. DO NOT STEAM THE UNIT WITH THE LIQUID CLEANER.
7. Leave the liquid cleaner in the unit for 3 hours.
8. Pour out the liquid cleaner solution.
9. Scrub with a stiff bristled brush to remove excess sediment as necessary.
10. Flush the unit 3 times with fresh water.
11. Resume steaming as normal.
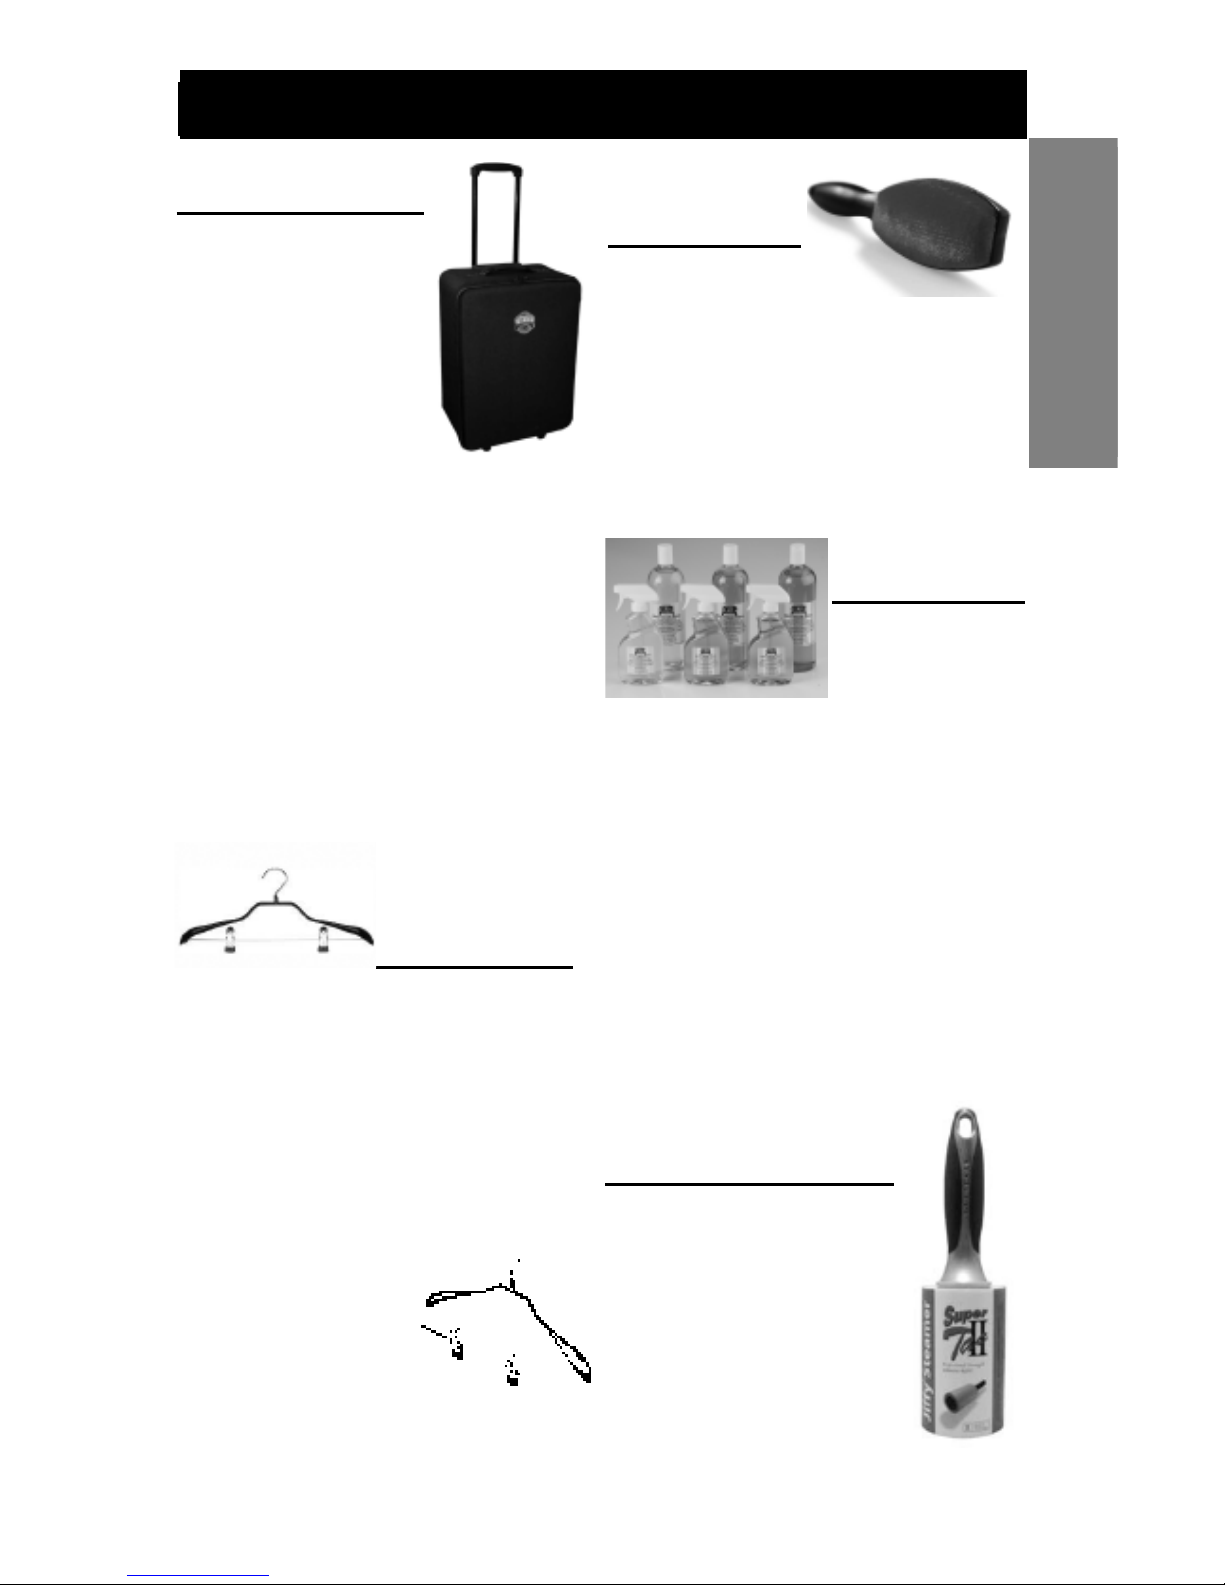
Jiffy®Steamer Accessories
9
Accessories
Jiffy Travel Case
ITEM # 0890
Now you can take your Jiffy
Steamer everywhere you go
with our innovative Jiffy
Steamer Travel Case. This
case can be used with any
model Jiffy Steamer and is
ideal for transporting your
steamer to trade shows,
work sites, trunk shows,
conferences and
conventions. Never be without your Jiffy
Steamer again! The Jiffy Steamer Travel Case
is constructed with the finest materials to
insure the protection of your steamer. External
Dimensions: 25" x 17" x 11"
• Push-button retractable handle with
comfort-grip
• Molded protective corners
• Heavy-duty, dual zippers with 1" pull tabs
• Premium twin in-line skate wheels.
• Large interior pocket for storing steam
head and hose attachment
• Reinforced, interior adjustable straps to
secure your Jiffy Steamer
Jiffy Steamer
Professional
Garment Hanger
ITEM # 0897
This unique Professional Garment Hanger
design works in concert with your Jiffy®
Steamer to prevent unsightly hanger marks
and to facilitate the steaming process. They
are ideal for retail showrooms, trade shows,
traveling sales people,and residences. These
high quality hangers will last you a lifetime.
Jiffy® Steamer Professional Garment
Hangers are loaded with features including:
• Solid metal chrome
construction
• Formed shoulders to
prevent hanger marks
• Non Slip, adjustable,
coated clips for pants
and skirts
• 360 degree swivel
hook
• Removable pants bar
Jiffy Steamer
Magik Brush
ITEM # 1042
Jiffy Steamer Magik
Brush quickly and
effectively removes
lint, fuzz, dust, dandruff and pet hair from
clothing, bedding and upholstery. A
comfort-grip handle and double-sided surface
ensures longer brush life, twice the pick-up
capacity of one-sided brushes, plus
convenient left or right hand use. Keep your
clothing and upholstery looking their best
with this handy brush.
Jiffy Steamer Professional
Lint Roller
ITEM # 1045
Our Professional Grade Lint
Roller features a reusable
comfort-grip handle and Super
Tac2 Professional Strength
Adhesive lint strips. The Zip
Strip technology enables quick
and easy sheet removal with no
waste. The roll is 4 inches wide
and 30 feet long. 1 handle and 1
roll per order. 3 part roll refills
are available. Great for home,
office or travel!
Jiffy Steamer
Steam Spray
Gently fragrant and
natural, Jiffy
®
Steamer’s new,
scented Jiffy
®
Steam
Spray leaves your clothes and fabrics
smelling fresh and clean. The Jiffy
®
Steam
Spray is offered to you in three delightful
fragrances, each made with high quality
essential oils for a long lasting refreshing
scent. The Jiffy
®
Ocean Breeze scent (item
#1054) captures the essence of a perfect day
by the sea in a bottle. Jiffy
®
Lavender Steam
Spray (item #1052) brings the freshness of
Provence into your home, or try the Jiffy®
Tickled Pink Steam Spray (item #1036) for
the fresh scent of springtime. 32 ounce refill
bottles are available for all scents.

J-2 Base Unit
Rod Set
(not included with
J-1 series)
Jiffy®J-1 and J-2 Model Steamer
10
FEATURES
• Cast aluminum housing for durability (Models J-1 and J-2)
• Lightweight, flexible hose - Models J-2 (J-1 series
utilizes a brass hat nozzle)
• Shatterproof water bottle
• Safety wiring feature temporarily turns the unit off if it
accidentally runs dry
• Comfortable, easy-to-grip handle
• Removes wrinkles up to five times faster than
conventional ironing
• Easy-roll casters for mobility (casters not included with
J-1 series)
• Numerous steam head attachments available
• 120 volt or 230 volt units available
• Backed by Jiffy
®
’s renowned customer service--should your
steamer need repair, send it to us and we will repair and ship
the unit within 24 hours from its arrival to our plant
Assembly
Wrench
Water
Bottle
INCLUDES:
Steam Head
and Hose
Attachment
(not included
with J-1
series)
Ownerʼs
Manual
Hat Nozzle
(J-1 Models)

J-2
1
. For J-2 models, attach hose firmly with included
assembly wrench, which is magnetized and located on
the bottom of the unit (figure #1). Assemble and attach
hose hanger rod set. For J-1 models, the brass hat nozzle
should already be attached. There is no rod set or hose
attachment for J-1 models.
Every Jiffy®Steamer has
been factory tested and it is not uncommon for small
amounts of water to be in the unit.
2. Invert bottle of fresh tap or distilled water, plug into proper voltage
outlet, turn switch to lighted ON position and you will have steam
within minutes. Never use your foot to turn steamer on/off. Never substitute
the Jiffy®Steamer water bottle.
3. For easy operation, mount optional Jiffy®Steamboard to
door or wall to hold clothing while steaming (figure #2).
For hanging garments without optional Jiffy
®
Steamboard, simply install an eye screw or nail to inside
of a doorway or directly onto a wall or you may use
steamer’s rod set as shown in figure 3. Touch material
lightly with steaming head and wrinkles will vanish
instantly. The combined touch of the steaming head and
the direct steam is very important. Some articles can be
steamed better from the underneath side. Speed and
efficiency is accomplished with a little practice. Always
steam with hose in an upright position, so any
condensation is free to flow back into
steamer. If steaming in a low position
near floor, extend hose up and out
frequently to keep clear of
condensation.
DO NOT ALLOW STEAMER TO RUN
DRY.
4. Hang steam head in an upright position
in the hose hanger section when not in
use and turn switch to OFF (figure #3).
5. Periodically, pour old water out of
steamer to avoid sediment buildup and maintain proper
water level (figure #4). Remove hard water deposits with
Jiffy®Liquid Cleaner. See page 28 for complete cleaning
instructions.
NOTE: No two water supplies have the same mineral content. If your steamer begins to
cut on and off during normal use, the thermostat is indicating the heating unit needs the
sediment cleaned out.
Figure 1
Jiffy®J-1 and J-2 Model Steamer Directions
Figure 2
Figure 4
11
Figure 3
WARNING: Never operate without water. Unplug after each use.
Jiffy Steamer
Key# Part # Part Description
1 1030 Rod Set and Nut Complete with Metal Studs
0031 Hose Hanger Rod Set with Adapter Complete
0031A Hose Hanger Rod Set without Adapter Complete
0041 Base Adapter with Thumb Screw (for Old Style Rods Sets)
2 0035 Hook Section of Rod Set
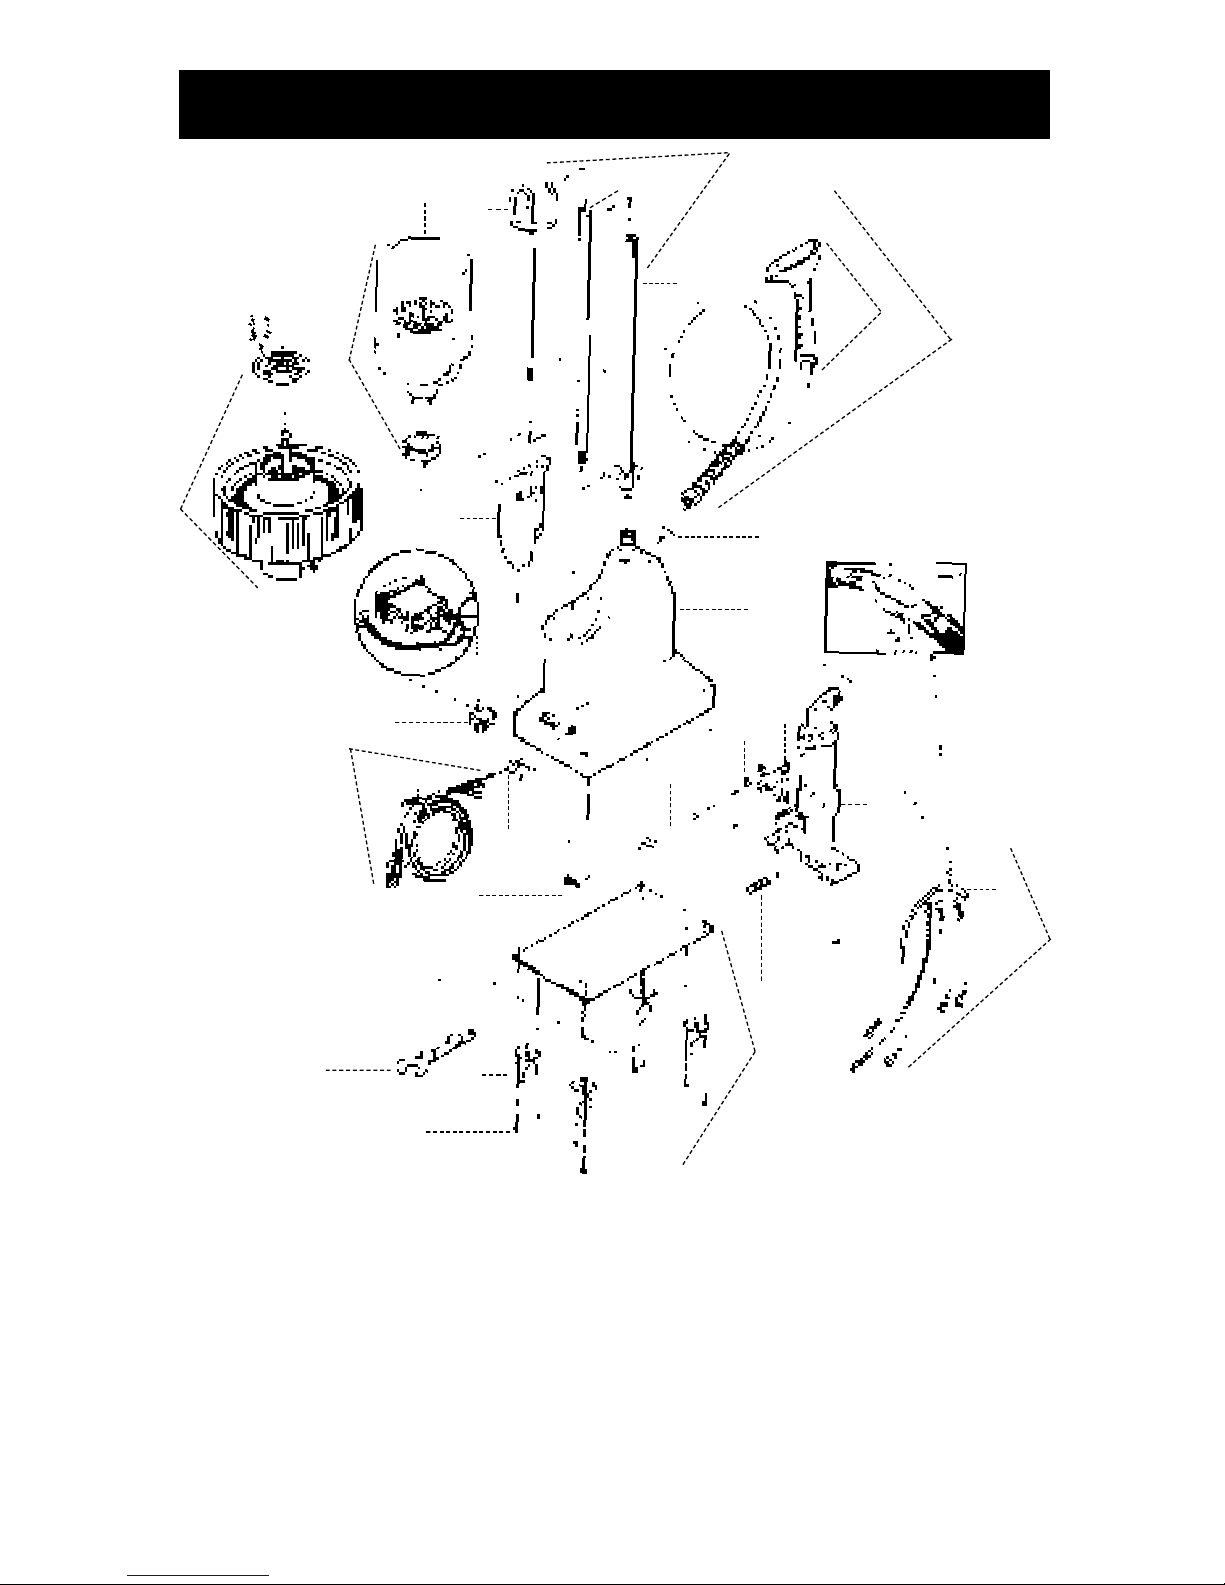
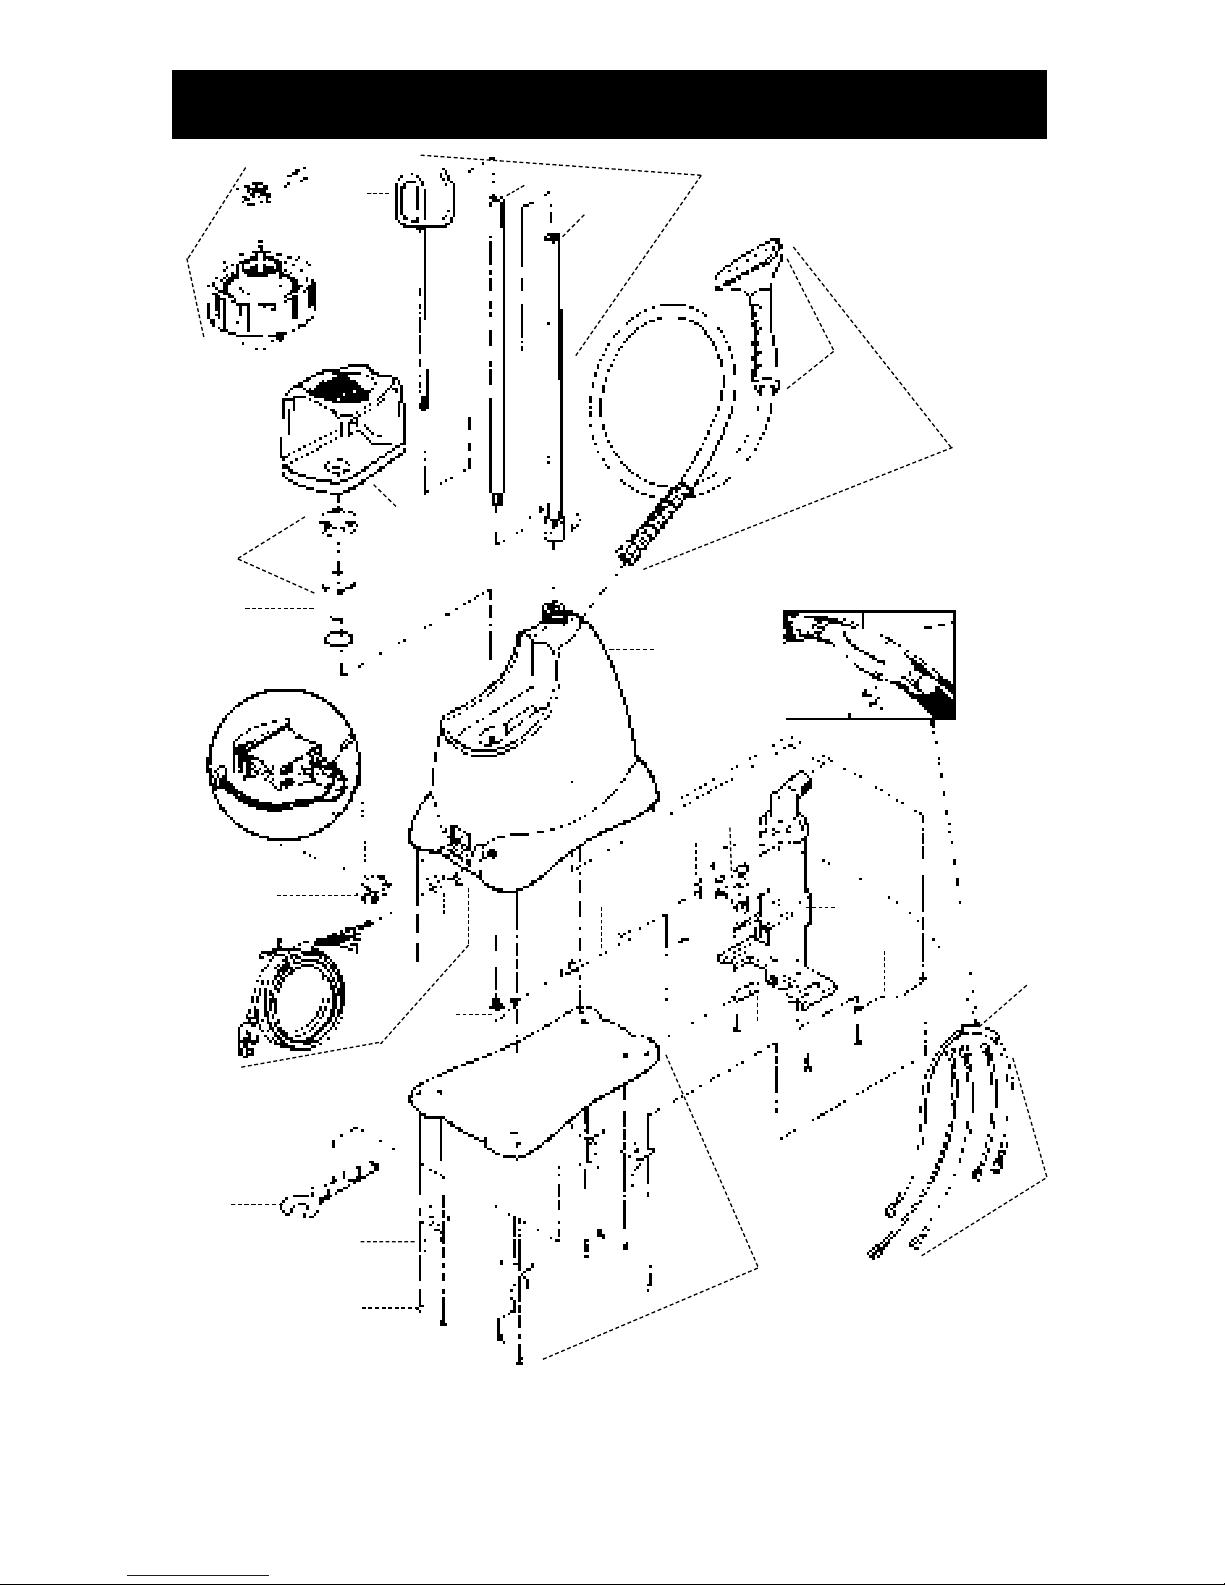
Should you ever need replacement parts for your Jiffy®Steamer, you may
purchase them separately. Use this handy diagram and parts list to identify any
part you may need. Please include model and serial number when ordering.
Jiffy®J-1 and J-2 Parts Diagram
12
24
17
20
18
25
27
26
28
22
23
21
19
15
14
13
7
12
16
11
10
9
8
2
1
3
4
5
6

13
Jiffy®J-1 and J-2 Parts Diagram Key
J-1/J-2/J-200
Jiffy Steamer
Key# Part # Part Description
3 0036 Middle Section of Rod Set
4 1033 Bottom Section of Rod Set (with Nut Attached)
0037 Bottom Section of Rod Set (without Nut)
0043 Metal Threaded Cap Screw for Rod Set
0039 Metal Threaded Stud for Rod Sections
5 0253 Plastic Steam Head/Handle Replacement Kit
6 0251 Plastic Head/Handle Hose Attachment Complete
0280 Hose Per Foot (Black in Color)
7 0003 Painted Die Cast Aluminum Housing Kit 120 Volt
0003A Painted Die Cast Aluminum Housing Kit 230 Volt
0023 Plastic Water Bottle “A” with Cap
0027 Replacement Cap for Water Bottle “A”
8 0026A Plastic Water Bottle “B” without Check Valve Cap
9 0025 Plastic Water Bottle “B” with Check Valve Cap
10 0027A Replacement Check Valve Cap for Water Bottle “B”
11 0027B Replacement Check Valve Cap Baffle Only
12 0004 Round Beauty Ring
0122 Toggle Switch (3 Pieces)
0127 Red Neon Pilot Light with Lock Ring 120 Volt
0128 Red Neon Pilot Light with Lock Ring 230 Volt
13 1125 Green Lighted Contura Rocker Switch 120 Volt
1126 Green Lighted Contura Rocker Switch 230 Volt
14 0132 Cord Set (16/3 gauge) with Strain Relief
15 0146B Cord Strain Relief
16 0028 Water Cup with 90 Degree Brass Fitting
0147 Internal Wire Set for Models with Front Red Light
17 0148 Internal Wire Set for Models with Green Contura Rocker Switch
0596 Heating Unit Kit (wiring included) for Models with Front Red Light
– 120 Volt Cord Set and 4” Water Line
0177A Heating Unit Kit (wiring included) for Models with Front Red Light
– 230 Volt Cord Set and 4” Water Line
0597 Heating Unit Kit (wiring included) for Models with Green Lighted
Rocker Switch - 120 Volt Cord Set and 4” Water Line
0597A Heating Unit Kit (wiring included) for Models with Green Lighted
Rocker Switch - 230 Volt Cord Set and 4” Water Line
18 0161A Heating Unit Assembly (no wiring included)
– 120 Volt and 4” Water Line
0162A Heating Unit Assembly (no wiring included)
– 230 Volt and 4” Water Line
19 0030 Brass 90 Degree Elbow Joint
20 1130 3/8” x 1/4” Straight Brass Fitting for Heating Element Housing. *Beginning in
November 2012, this fitting is now cast into the heating element.
21 0591 Copper Tube (4” length) with Nuts and Compression Rings
1191 Copper Tube (4 1/2” length) with Nuts and Compression Rings
0187 Copper Tube (5” length) with Nuts and Compression Rings
22 0160 L-290 Thermostat
23 0195 Fusible Link Clamp
24 0151 Fusible Link Wire with Insulated Lug and Clamp
25 0009 Bottom Plate with Casters
26 0011 Bottom Plate Casters (Set of 4)
27 0010 Screws for Bottom Plate (4 Screws Total)
ACCESSORIES
28 1026 “I” Kit - 5.5ʼ Hose with Four Attachments
1050 Jiffy Steamer Assembly Wrench
0274 Brass Hat Nozzle Attachment
0254 Metal Head/Wood Handle Hose Attachment Complete
0256 Metal Head / Wood Handle Only
0269 Replacement Wooden Handle (for Metal Steam Heads)
0262 Wig Hose Attachment
1062 Steam Cleaning “B” Brush Hose Attachment
1063 Brush Only for the B” Hose Attachment
0899 Liquid Cleaner - 3 Ten (10) Ounce Bottles per Package*
*Not Available for Export.
If you donʼt see the part you need, please contact us.
2
Black
from
Cordset
11
White from Cordset
7
7
Brass Nuts
3
Ground Location
1
Cordset
13
Strain Relief
Green
White
Black from Cordset
White
Orange
Yellow
5
6
2
3
8
Element
Mounting
Screws
9
White Wire
4
Blue Wire
Orange
Fusible Link
Brass
Heating Unit
12
5
10
Yellow Wire
6
L-290
Thermostat
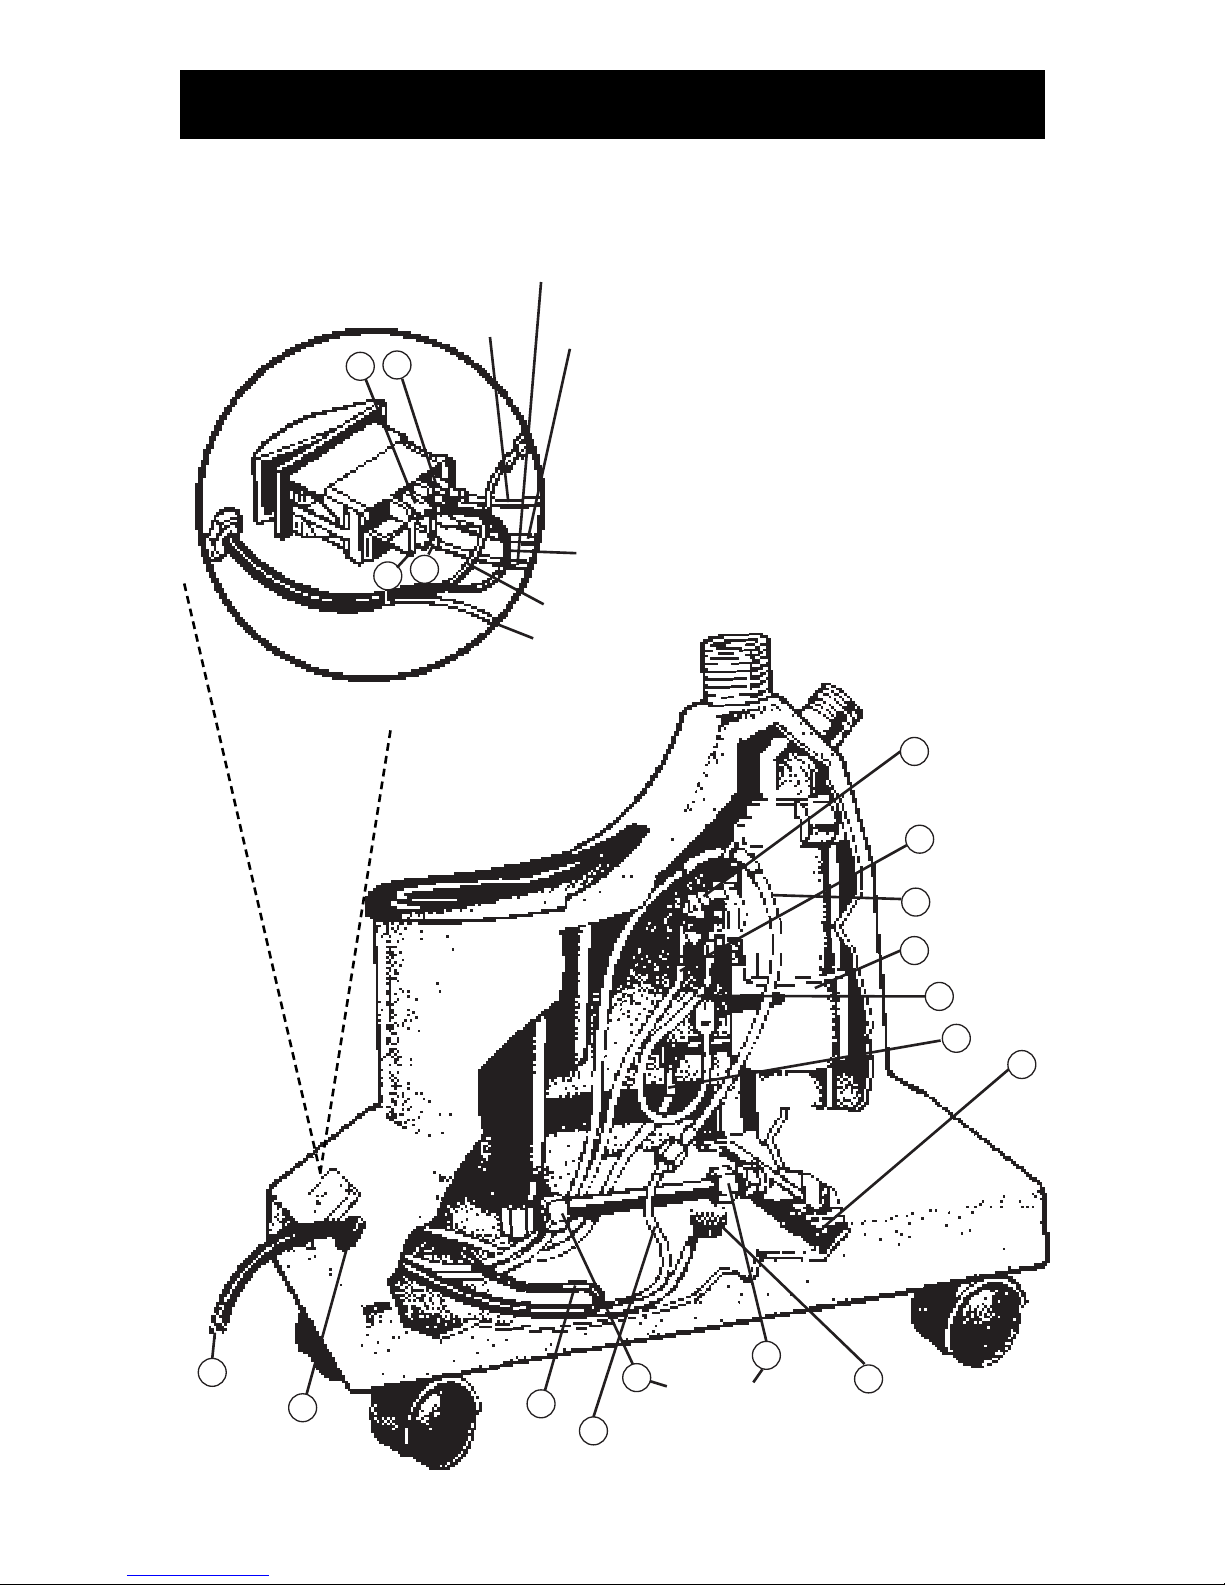
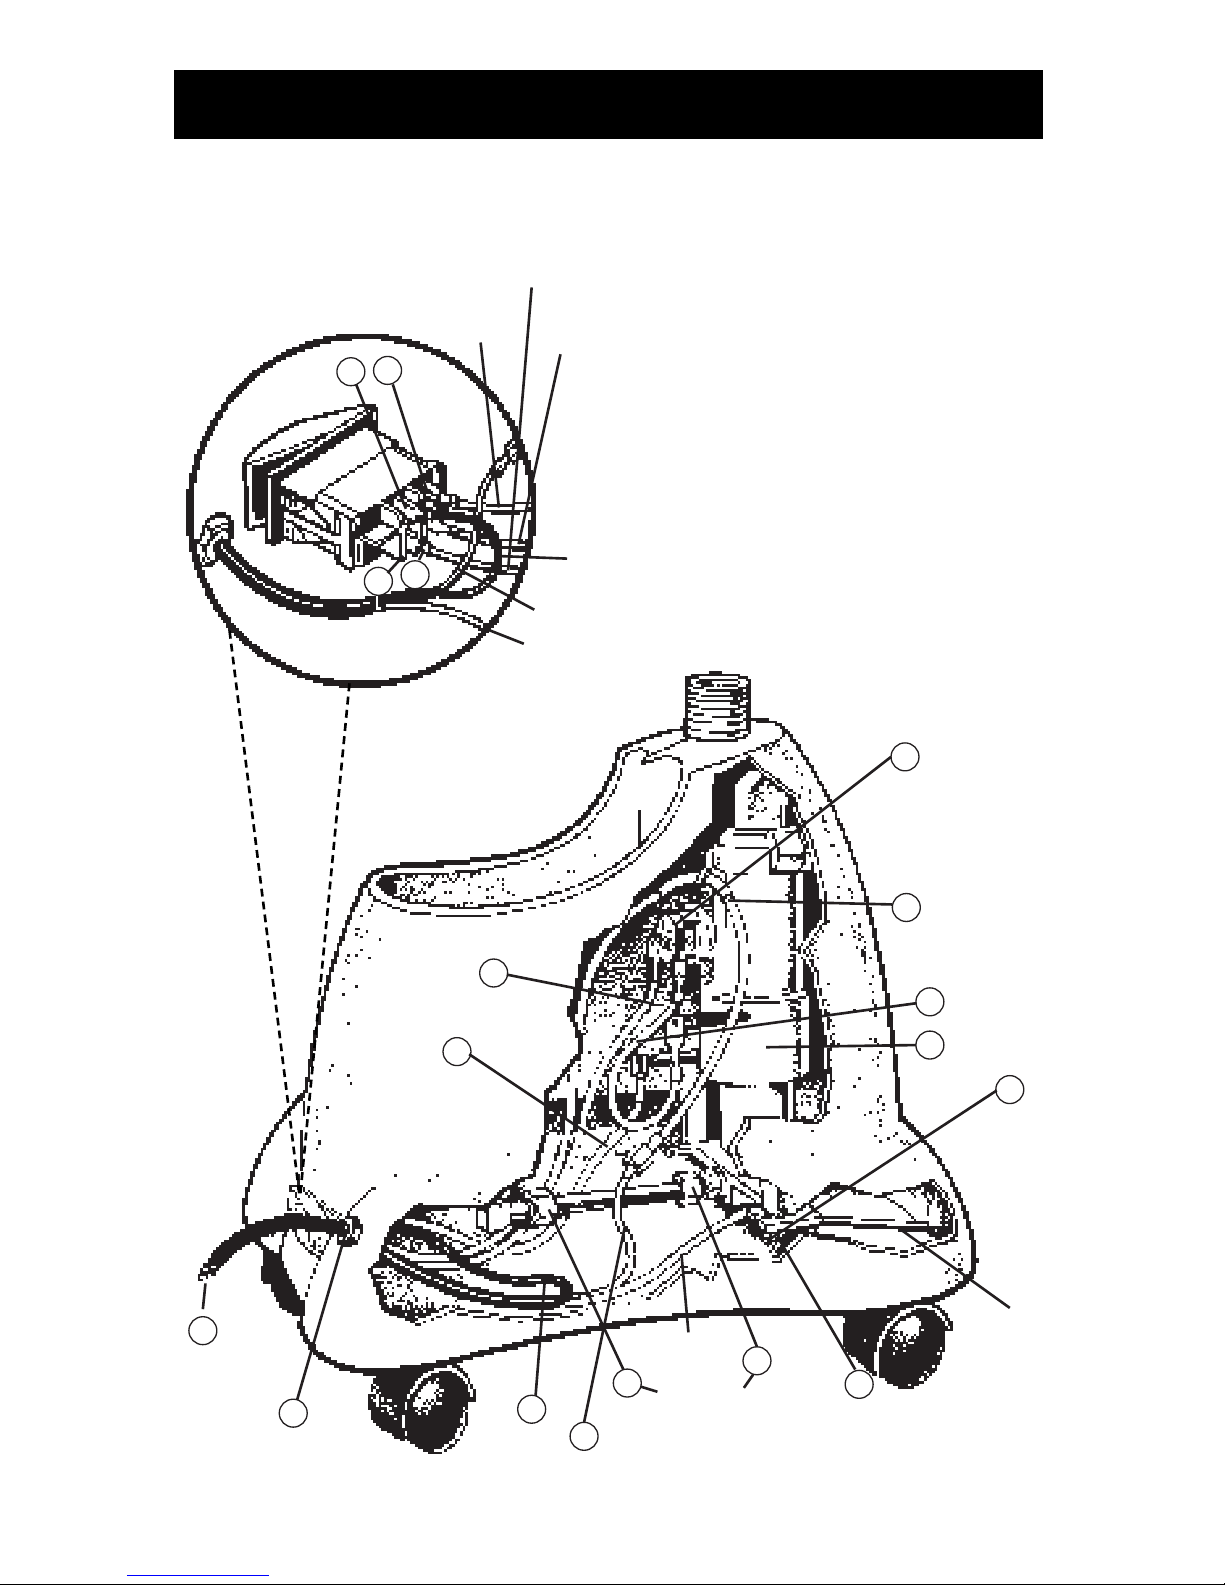
Jiffy®J-1 and J-2 Wiring Diagram
14
Caution:
Insure that the power cord is
unplugged from the electrical
outlet before attempting to
repair your Jiffy
®
Steamer.

15
Jiffy®J-1 and J-2 Wiring Instructions
1. Insert cord set (1) into housing and connect black positive wire (2) from
cord set to terminal number 5 on the switch.
2. Secure with grounding screw ground wire from cord set to the ground
location on the housing (3).
3. Connect blue wire (4) from the right side of brass heating element (5) to
right side of the L-290 thermostat (6).
4. Insert brass heating element unit into housing. Hand tighten the brass nuts
(7) on the water line to the element and to the 90 degree fitting from the
cup. Tighten 2 mounting screws (8) at the base of heating element. Now,
use a 5/8” wrench to securely tighten the brass nuts on the water line to the
element and to the 90 degree fitting from the water cup. Heating unit may
be loosened and adjusted for a better fit if necessary.
5. Connect white wire (9) from the left side of the heater unit to terminal
number 6 on switch.
6. Connect yellow wire (10) from the left side of the thermostat to terminal
number 3 on the switch.
7. Connect white neutral wire (11) from cord set bundle to orange fusible link
with plastic connector (12).
8. Connect other end of orange fusible link to terminal number 2 on the
switch.
9. Set steamer upright and place black plastic strain relief (13) approximately
4 1/2” from end of cord set and insert into housing using pliers.
10. Secure bottom plate with four screws.
11. To avoid leakage, be sure to tighten hose (or hat nozzle) with wrench before
using steamer.
Before attempting any repair on a Jiffy Steamer product, make sure that it is
unplugged from the outlet. If you have any questions, please contact our repair
department at 1-800-525-4339 between 7:30 AM - 4:00 PM Central Standard
Time.
Please note switch terminal 2, 3, 5 and 6 indicated on the enlarged switch
diagram are marked on the actual switch. Jiffy® Steamers manufactured before
May 2000 are not marked with the terminal switch numbers. Numbers in
parenthesis refer to the drawing on on the right.

Jiffy®J-2000 Model Steamer
16
FEATURES
• Polymer outer housing unit for durability
• Lightweight, flexible hose
• Shatterproof water caddy
• Safety wiring feature temporarily turns the unit off should it
accidentally run dry
• Comfortable, easy-to-grip handle
• Removes wrinkles up to five times faster than conventional
ironing
• Easy-roll casters for mobility
• Numerous steam head attachments available
• 120 volt or 230 volt units available
• Backed by Jiffy
®
’s renowned Customer Service--should your
steamer need repair, send it to us and we will repair and ship
the unit within 24 hours from its arrival to our plant
INCLUDES:
J-2000 Base Unit
Rod Set
(Not included
with J-2000H series)
)
Owner's
Manual
Assembly
Wrench
Water
Caddy
Check
Valve Cap
Steam Head
and Hose
Attachment
(Not included
with J-2000H
series)

Jiffy®J-2000 Directions
1. Attach hose firmly with included assembly wrench,
which is magnetized and located on the bottom of the
unit. Assemble and attach hose hanger rod set.
Every
Jiffy® Steamer has been factory tested and it is not
uncommon for small amounts of water to be in the unit.
2. Invert water caddy filled with distilled or tap water,
plug into proper voltage outlet, turn switch to lighted
ON position and you will have steam within minutes.
Never substitute the Jiffy®Steamer water caddy.
3. For easy operation, mount optional Jiffy®Steamboard to door or wall to
hold clothing while steaming (figure #2). For hanging garments without
optional Jiffy®Steamboard, simply install an eye screw or nail to inside of a
doorway or directly onto a wall or you may use your steamer’s rod set as
shown in figure 3. Touch material lightly with steaming head and wrinkles
will vanish instantly. The combined touch of the
steaming head and the direct steam is very important.
Some articles can be steamed better from the
underneath side. Speed and efficiency is accomplished
with a little practice. Always steam with hose in an
upright position, so any condensation is free to flow
back into steamer. If steaming in a low position near
floor, straighten hose up and out frequently to keep
clear of condensation. DO NOT
ALLOW STEAMER
TO RUN DRY.
4.
Hang steam head in an upright position in the hose hanger
section when not in use and turn switch to OFF (figure #3).
5. Periodically, pour old water out of steamer to avoid
sediment buildup and maintain proper water level (figure
#4). Remove hard water deposits with Jiffy®Liquid
Cleaner. Wipe water cup out with a hand towel. See page
28 for complete cleaning instructions.
NOTE: No two water supplies have the same mineral content.
If your steamer begins to cut on and off during normal use, the
thermostat is indicating the heating unit needs the sediment
cleaned out.
F
igure 1
J-2000
Figure 2
Figure 3
Figure 4
17
WARNING: Never operate without water. Unplug after each use.
Should you ever need replacement parts for your Jiffy®Steamer, you may
purchase them separately. Use this handy diagram and parts list to identify any
part you may need. Please include model and serial number when ordering.
Jiffy®J-2000 Parts Diagram
18
16
23
5
17
19
21
22
20
18
15
13
14
27
25
26
24
8
7
6
1
1
1
8.2
10
4
3
2
8.1

Jiffy Steamer
Key# Part # Part Description
1 1030 Rod Set and Nut Complete with Metal Studs
2
0035 Hook Section of Rod Set
3 0036 Middle Section of Rod Set
4
1033 Bottom Section of Rod Set (with Nut Attached)
0
043 Metal Threaded Cap Screw for Rod Set
0039 Metal Threaded Stud for Rod Sections
5 1102 Grounding Strap for Heating Element
6
0253 Plastic Steam Head/Handle Replacement Kit
7 0251 Plastic Head/Handle Hose Attachment Complete
0280 Hose Per Foot (Black in Color)
8 1107 J-2000 Beige Housing Kit with Water Cup
1108 J-2000 Beige Housing Kit without Water Cup
1107P J-2000 Pink Housing Kit with Water Cup
1108P J-2000 Pink Housing Kit without Water Cup
1107S J-2000 Silver Housing Kit with Water Cup
1108S J-2000 Silver Housing Kit without Water Cup
8.1 1110 O-Ring for J-2000 Water Cup
8.2 1111 J-2000 Water Cup with 90 degree Bass Fitting and o-ring
9 1140 J-2000 Water Caddy Complete
with Check Valve Cap
10 1141 J-2000 Water Caddy Complete
without Check Valve Cap
11 0027A Replacement Check Valve Cap
0564 Ryton Insulator Set (2 feet and 1 ring)
12 0027B Replacement Check Valve Cap Baffle Only
13 1125 Green Lighted Contura Rocker Switch - 120 Volt
1126 Green Lighted Contura Rocker Switch - 230 Volt
14 0132 Cord Set (16/3 gauge) with Strain Relief
15 0146B Cord Strain Relief
16 0148 Internal Wire Set
0597 Heating Unit Kit (wiring included) for Models with Green
Lighted Contura Rocker Switch - 120 Volt Cord Set and
4” Water Line
0597A Heating Unit Kit (wiring included) for Models with Green
Lighted Contura Rocker Switch - 230 Volt Cord Set and
4” Water Line
17 0161A Heating Unit Assembly (no wiring included) for
Models with Green Lighted Rocker Switch - 120 Volt
Cord Set and 4” Water Line
0162A Heating Unit Assembly (no wiring included) for
Models with Green Lighted Contura Rocker Switch 230 Volt Cord Set and 4” Water Line
18 1131 Brass 90 Degree Elbow Joint - Extended Version
19 1130 3/8” x 1/4” Straight Brass Fitting for Heating Element Housing. *Beginning in
November 2012, this fitting is now cast into the heating element.
20 0591 Copper Tube(4” length) with Nuts and
Compression Rings
21 0160 L-290 Thermostat
22 0195 Fusible Link Clamp
23 0151 Fusible Link Wire with Insulated Lug and Clamp
24 1120 Bottom Plate with Casters
25 0011 Bottom Plate Casters (Set of 4)
26 1114 Screws for Bottom Plate (4 Screws Total)
ACCESSORIES
1026 “I” Kit - 5.5ʼ Hose with Four Attachments
27 1050 Jiffy Steamer Assembly Wrench
0254 Metal Head/Wood Handle Hose Attachment Complete
0256 Metal Head / Wood Handle Only
0262 Wig Hose Attachment
1062 Steam Cleaning “B” Brush Hose Attachment
1063 Brush Only for the “B” Hose Attachment
0899 Liquid Cleaner - 3 Ten (10) Ounce Bottles per Package*
*Not Available for Export.
19
Jiffy®J-2000 Parts Diagram Key
J-2000
If you donʼt see the part you need, please contact us.
2
Black
from
Cordset
11
White from Cordset
7
7
Brass Nuts
3
Ground Location
1
Cordset
13
Strain Relief
Green
White
Black from Cordset
White
Orange
Yellow
5
6
2
3
8
Element
Mounting
Screws
9
White Wire
4
Blue Wire
Orange
Fusible Link
Brass
Heating Unit
12
5
10
Yellow Wire
6
L-290
Thermostat
Grounding
Strap
Green
Ground Wire
20
Caution:
Insure that the power cord is
unplugged from the electrical
outlet before attempting to
repair your Jiffy
®
Steamer.
Jiffy®J-2000 Wiring Diagram

21
Jiffy®J-2000 Wiring Instructions
1. Insert cord set (1) into housing and connect black positive wire (2) from
cord set to terminal number 5 on the switch.
2. Connect blue wire (4) from the right side of brass heating element (5) to
right side of the L-290 thermostat (6).
3. Insert brass heating element unit into housing. Hand tighten the brass nuts
(7) on the water line to the element and to the 90 degree fitting from the
cup. Tighten 2 mounting screws (8) at the base of heating element. Now,
use a 5/8” wrench to securely tighten the brass nuts on the water line to the
element and to the 90 degree fitting from the cup. Heating unit may be
loosened and adjusted for a better fit if necessary.
4. Place the copper 4 inch grounding strap as shown in drawing. Secure
grounding strap and the green ground wire with the grounding screw by
attaching to the heating element ground location (3).
5. Connect white wire (9) from the left side of the heater unit to terminal
number 6 on switch.
6. Connect yellow wire (10) from the left side of the thermostat to terminal
number 3 on the switch.
7. Connect white neutral wire (11) from cord set bundle to orange fusible link
with plastic connector (12).
8. Connect other end of orange fusible link to terminal number 2 on the
switch.
9. Set steamer upright and place black plastic strain relief (13) approximately
4 1/2” from end of cord set and insert into housing using pliers.
10. Secure bottom plate with four screws.
11. To avoid leakage, be sure to tighten hose (or hat nozzle) with wrench before
using steamer.
Before attempting any repair on a Jiffy Steamer product, make sure that it is
unplugged from the outlet. If you have any questions, please contact our repair
department at 1-800-525-4339 between 7:30 AM - 4:00 PM Central Standard Time.
Please note switch terminal 2, 3, 5 and 6 indicated on the enlarged switch diagram
are marked on the actual switch. Jiffy® Steamers manufactured before May 2000
are not marked with the terminal switch numbers. Numbers in parenthesis refer to
the drawing on on the right.
Jiffy®J-4000 Pro-Line Model Steamer
22
FEATURES
• Built-in, easy-to-read sight gauge which indicates water level
and sediment build-up.
• Cast aluminum housing unit for durability
• Corrosion-proof stainless steel boiler tank--no water lines to
become clogged with hard water deposits
• Dual thermostats for preheat and steam settings.
• Safety wiring feature temporarily turns the unit off should it
accidentally run dry
• Pressure release water fill cap
• Numerous steam head attachments available
• Backed by Jiffy®’s renowned customer service--should your
steamer need repair, send it to us and we will repair and ship
the unit within 24 hours from its arrival to our plant
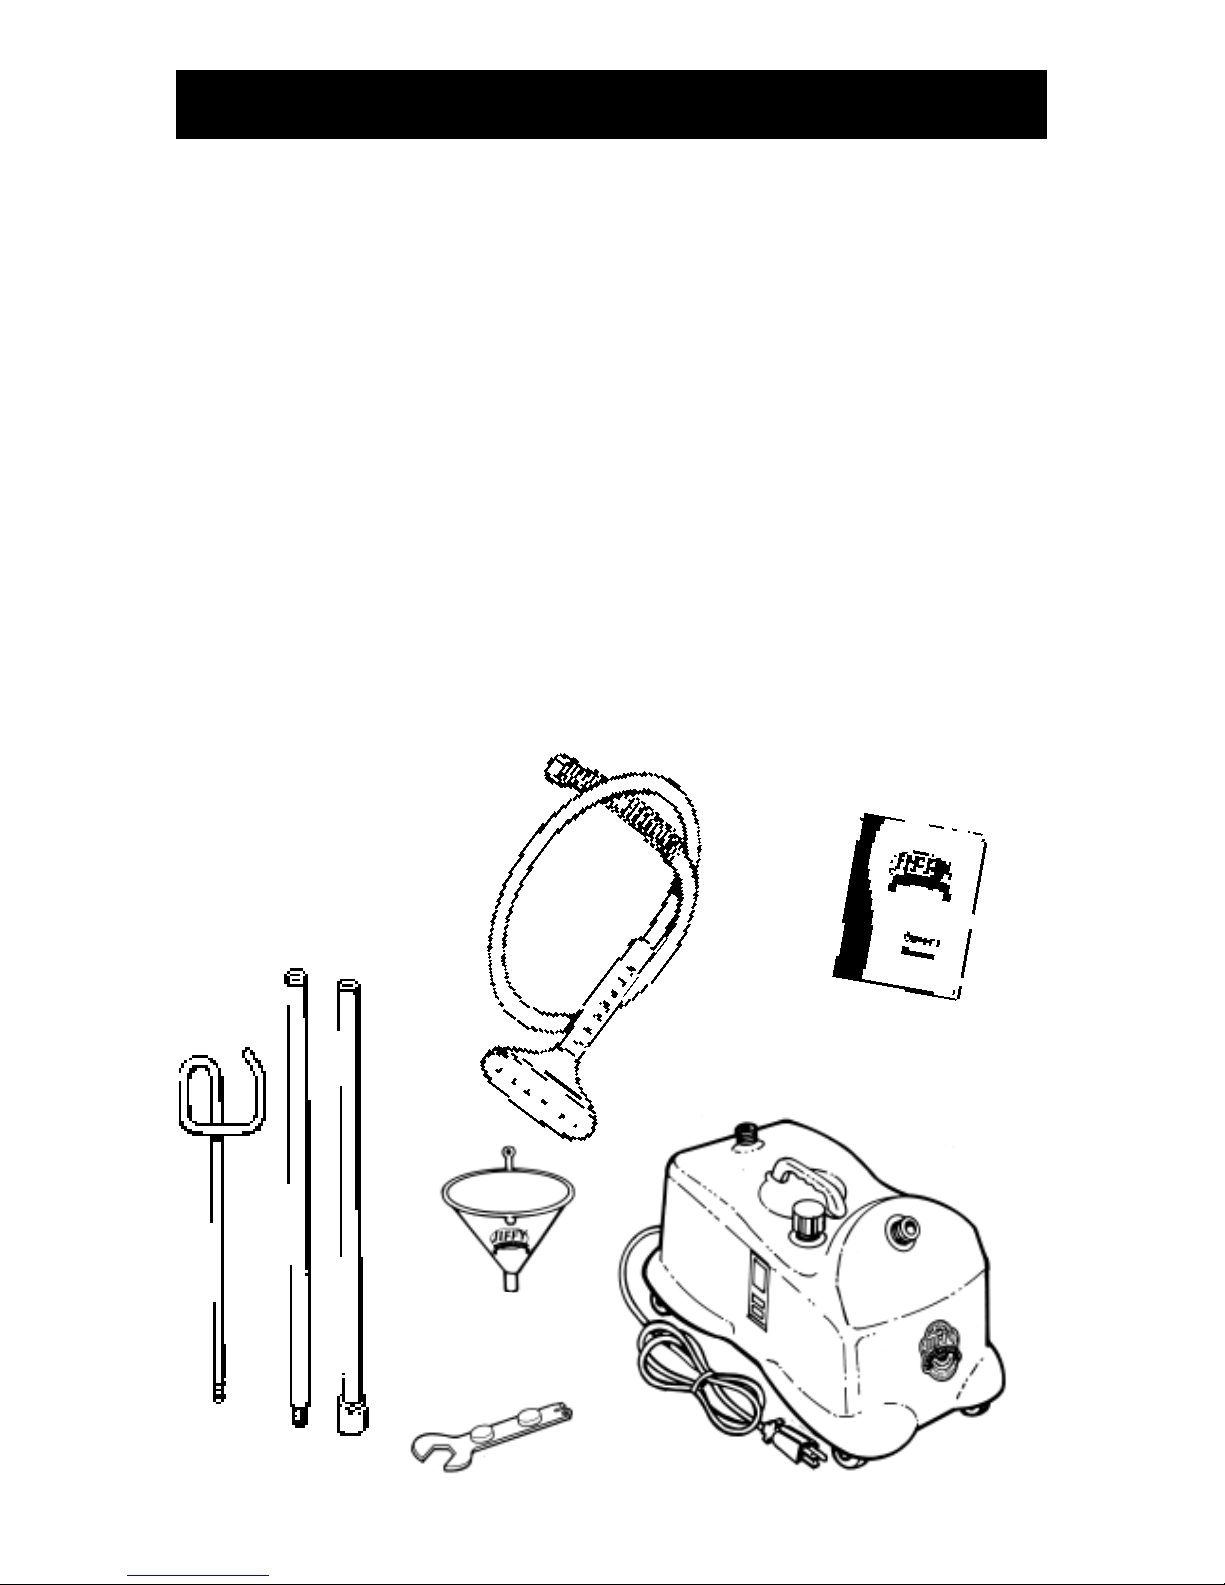
INCLUDES:
Rod Set
(Not included on
J-4000H Series)
Owner's
Manual
Assembly
Wrench
Funnel
Steam Head
and Hose
Attachment
J-4000
Base Unit
(Not included
on J-4000H
Series)
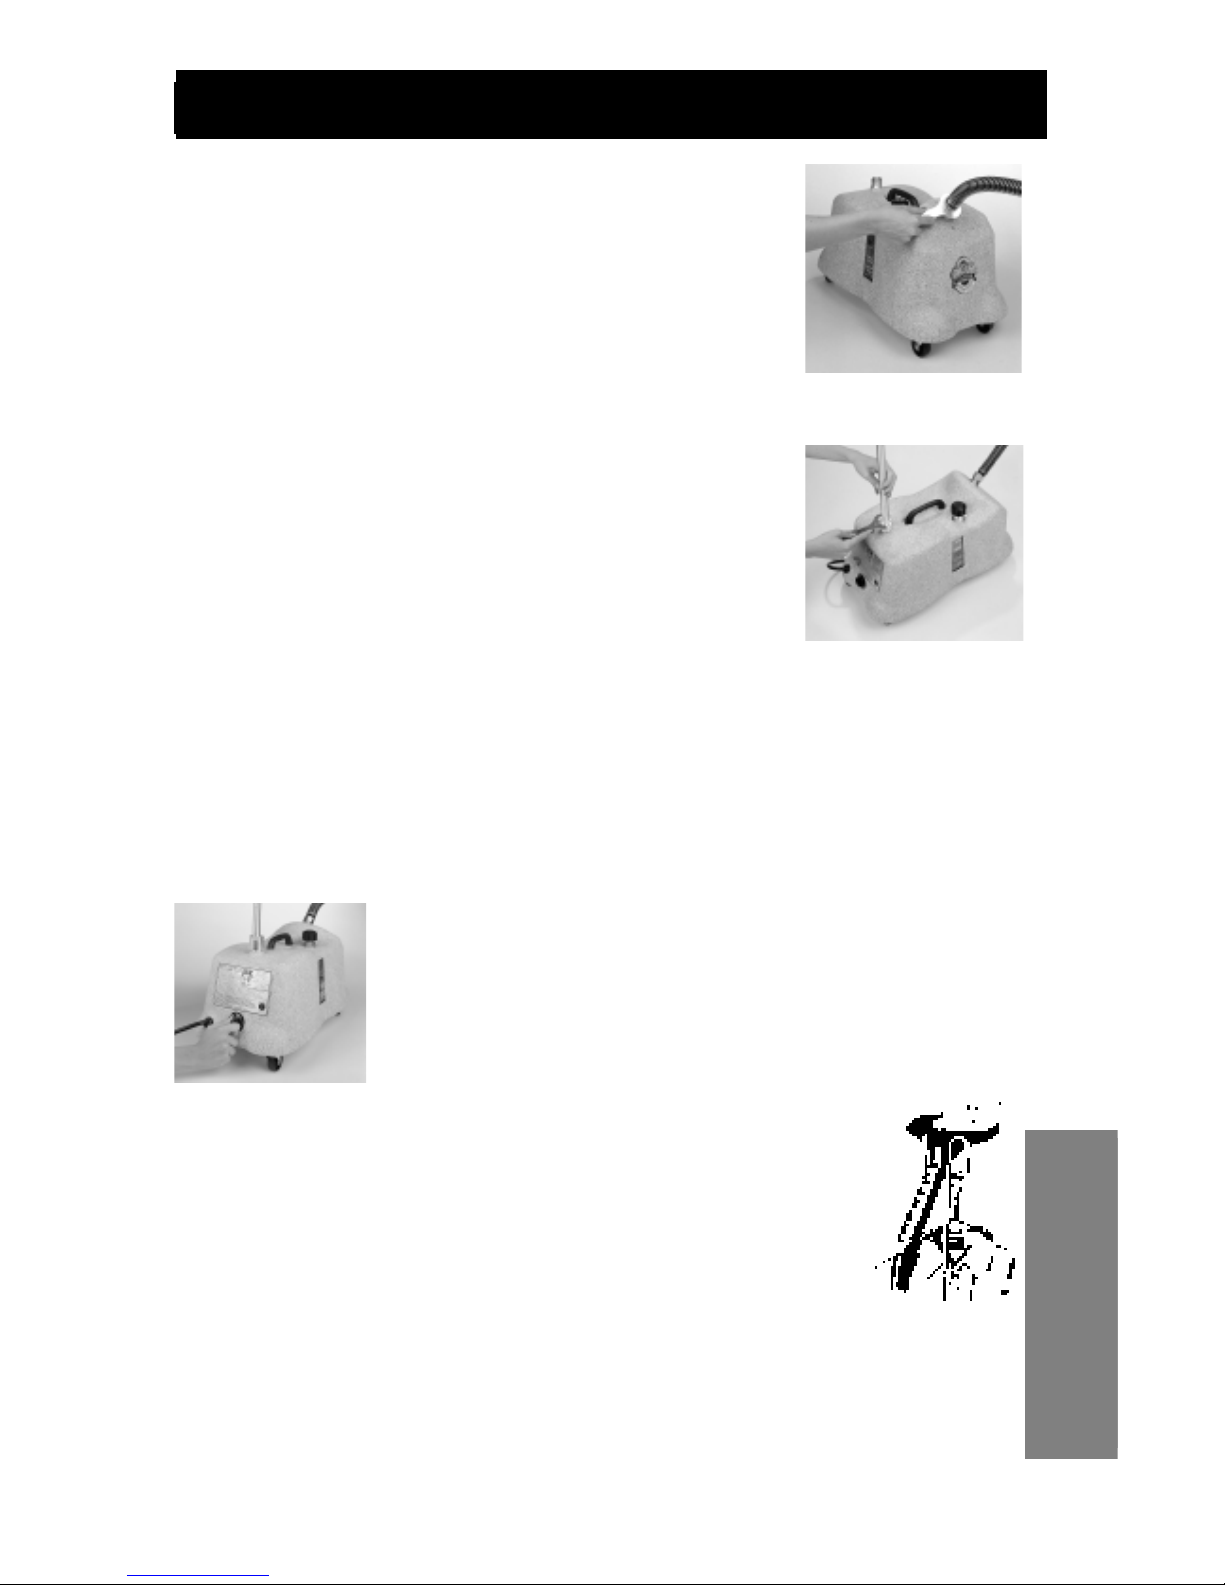
1. Attach hose firmly with included assembly wrench,
which is magnetized and located on the bottom of the
unit (figure #1). Assemble and attach hose hanger rod
set (figure #2). For “H” series models, there will be no
hose attachment or rod set to attach.
2. Using supplied funnel, add a maximum of four quarts
of warm (fresh tap or distilled) water (cold water takes
longer to preheat). Do not overfill. The black water fill
cap has a pressure release feature that is designed to
activate should there be an increase of pressure in the
boiler tank. If you start to see or hear steam escaping
from the cap, check to see if the hose has a kink or
loop in it. If so, straighten out the hose. If the escaping
steam does not cease, please contact Jiffy Steamer at
731-885-6690. Plug into proper voltage outlet, turn
switch to “PREHEAT”. Steamer will hold at this
temperature, and the light will go off and on
occasionally. NOTE: The J-4000 Steamer contains a
large water reservoir for 2 hours of continuous
steaming. Leave the switch in the “PREHEAT” position (figure #3) if you
plan to use your steamer throughout the day. This will maintain water
temperature in the reservoir.
3. Immediately after water is preheated, (red pilot light turns off) turn switch to
“STEAM” position for steam in approximately 2 minutes. The combined
touch of the steaming head and the direct steam is very important. Some
articles can be steamed better from the underneath side.
Always steam with hose in upright position so any
condensation is free to flow back into steamer. If steaming
in a low position near floor, straighten hose up and out
frequently to keep it clear of condensation. If steamer runs
dry it will temporarily shut off. Once finished using the
unit, turn the switch to the “OFF” position.
If more water needs to be added to the
steamer, allow steamer to cool before
removing fill cap and adding more water. Never pour cold
water on a hot element. Resume steaming by resetting the
switch to the “STEAM” position.
4. Hang steam head and hose in upright position in the hose
hanger section (figure #4), turn switch to the “OFF” position
(figure #3) and unplug the cord set when not in use.
5. Periodically, pour old water out of steamer to avoid
sediment build up and maintain proper water level. Never
have more than 4 quarts of water in steamer. If overfilled, water will boil up
into hose. The Jiffy®Liquid Cleaner is recommended every 6 months to flush
mineral deposits. See page 29 for complete cleaning instructions.
Every Jiffy®Steamer has been factory tested and it is not uncommon for small amounts
of water to be in the unit.
WARNING: Never operate without water. Unplug after each use.
23
Jiffy®J-4000 Directions
J-4000
F
igure 1
Figure 2
Figure 3
Figure 4
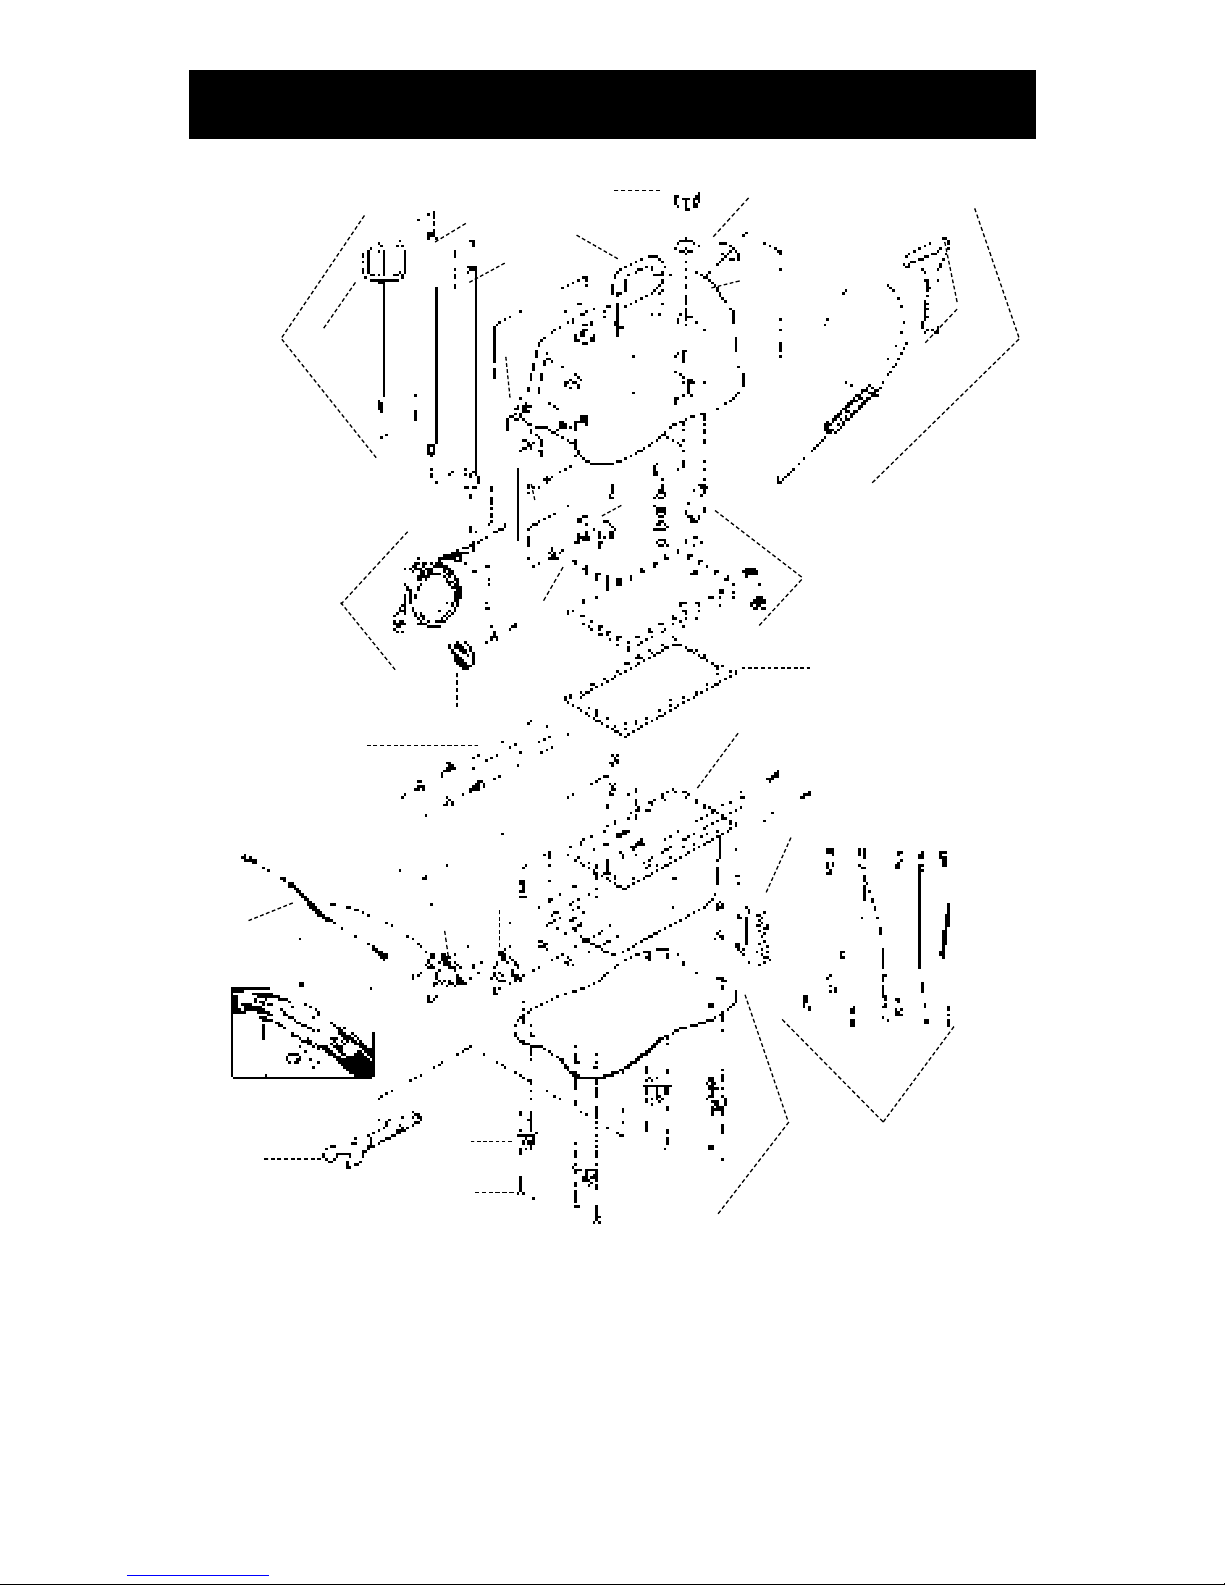
Should you ever need replacement parts for your Jiffy®Steamer, you may
purchase them separately. Use this handy diagram and parts list to identify any
part you may need. Please include model and serial number when ordering.
24
Jiffy Steamer
Key# Part # Part Description
1 1030 Rod Set and Nut Complete with Metal Studs
1034 Rod Set and Nut Complete for Drapery Steamers
2 0035 Hook Section of Rod Set
Jiffy®J-4000 Parts Diagram
* For models manufactured after March 2005.
24
26
25
29
28
27
16
22
23
17
21
12
20
14
18
5
6
19
13
15
7
89
10
4
3
1
11
2

Jiffy Steamer
Key# Part # Part Description
3 0036 Middle Section of Rod Set (with Barrel Stud and Cap Screw)
4 1033 Bottom Section of Rod Set (with Nut Attached)
0037 Bottom Section of Rod Set (without nut)
0038 Additional Middle Section of Rod Set for Drapery Steamers
0043 Metal Threaded Cap Screw for Rod Set
0039 Metal Threaded Stud for Rod Sections
5 0253 Plastic Steam Head/Handle Replacement Kit
6 0251 Plastic Head/Handle Hose Attachment Complete
0280 Hose Per Foot (Black in Color)
7 1301 J-4000 Die Cast Aluminum Housing
0006 Hex Beauty Ring
8 0004 Round Beauty Ring
9 0049P Pressure Release Water Fill Cap
0053 Funnel
10 0054 Housing Handle with Two Screws
11 0199 Rotary Power Switch and Knob
12 0201 Replacement Knob Only for Rotary Power Switch
13 1310 Red Neon Pilot Light (120 VOLT)
1311 Red Neon Pilot Light (230 VOLT)
14 0133 Cord Set (14/3 gauge) with Strain Relief
15 0146C Cord Strain Relief
16 0050 Water Level Sight Gauge with Nuts and Washers
1353 Stainless Steel Boiler Tank Kit Complete (120 Volt/1500 Watts)
1354 Stainless Steel Boiler Tank Kit Complete (230 Volt/1500 Watts)
0074A Stainless Steel Boiler Tank with Sight Gauge (J-4)
17 0074C Stainless Steel Boiler Tank Only
18 1370
Stainless Steel Boiler Tank Lid with 2 Brass Fittings and 2 Beauty Rings
19 0071 Boiler Tank Screw Set (Set of 30)
0061 Boiler Tank Silicone Sealer (2.8 Fluid Ounces)
0062 Boiler Tank Silicone Sealer (10.1 Fluid Ounces)
20 0075 Boiler Tank Gasket
21 0063 “W” Bend Heating Element (120 Volt, 1500 Watt) with Hardware
0064 “W” Bend Heating Element (230 Volt, 1500 Watt) with Hardware
22 0203 Preheat Thermostat (L-170)
23 0204 Steam Thermostat (L-220)
24 0155 Internal Wire Set (Set of 5 Wires) for “W” Bend Element
25 0158 Fusible Link Wire with Insulated Cap and Clamp
26 1320 Bottom Plate with Four Casters
27 0017 Bottom Plate Screws (Set of 4)
28 0018 Bottom Plate Casters (Set of 4)
ACCESSORIES
1026 “I” Kit - 5.5ʼ Hose with
Four Interchangeable Steam HeadAttachment
s
1027 “I” Kit - 7.5ʼ Hose with
Four Interchangeable Steam HeadAttachment
s
29 1050 Jiffy Steamer Assembly Wrench
0259 Auto Hose Attachment with Dual Metal Heads
0257 Carpet Hose Attachment with 12” wide Metal Head
0252 7.5ʼ Drapery Hose Attachment with Plastic Steam Head
0255 7.5ʼ Drapery Hose Attachment with Metal Steam Head
0254 Metal Head / Wood Handle Hose Attachment Complete
0256 Metal Head / Wood Handle Only
0269 Replacement Wooden Handle (for Metal Steam Heads)
0262 Wig Hose Attachment
0274 Brass Hat Nozzle Attachment
1062 Steam Cleaning “B” Brush Hose Attachment
1063 Brush Only for the “B” Hose Attachment
0899 Liquid Cleaner - 3 Ten (10) Ounce Bottles per Package*
*Not Available for Export.
25
Jiffy®J-4000 Parts Diagram Key
J-4000
If you donʼt see the part you need, please contact us.
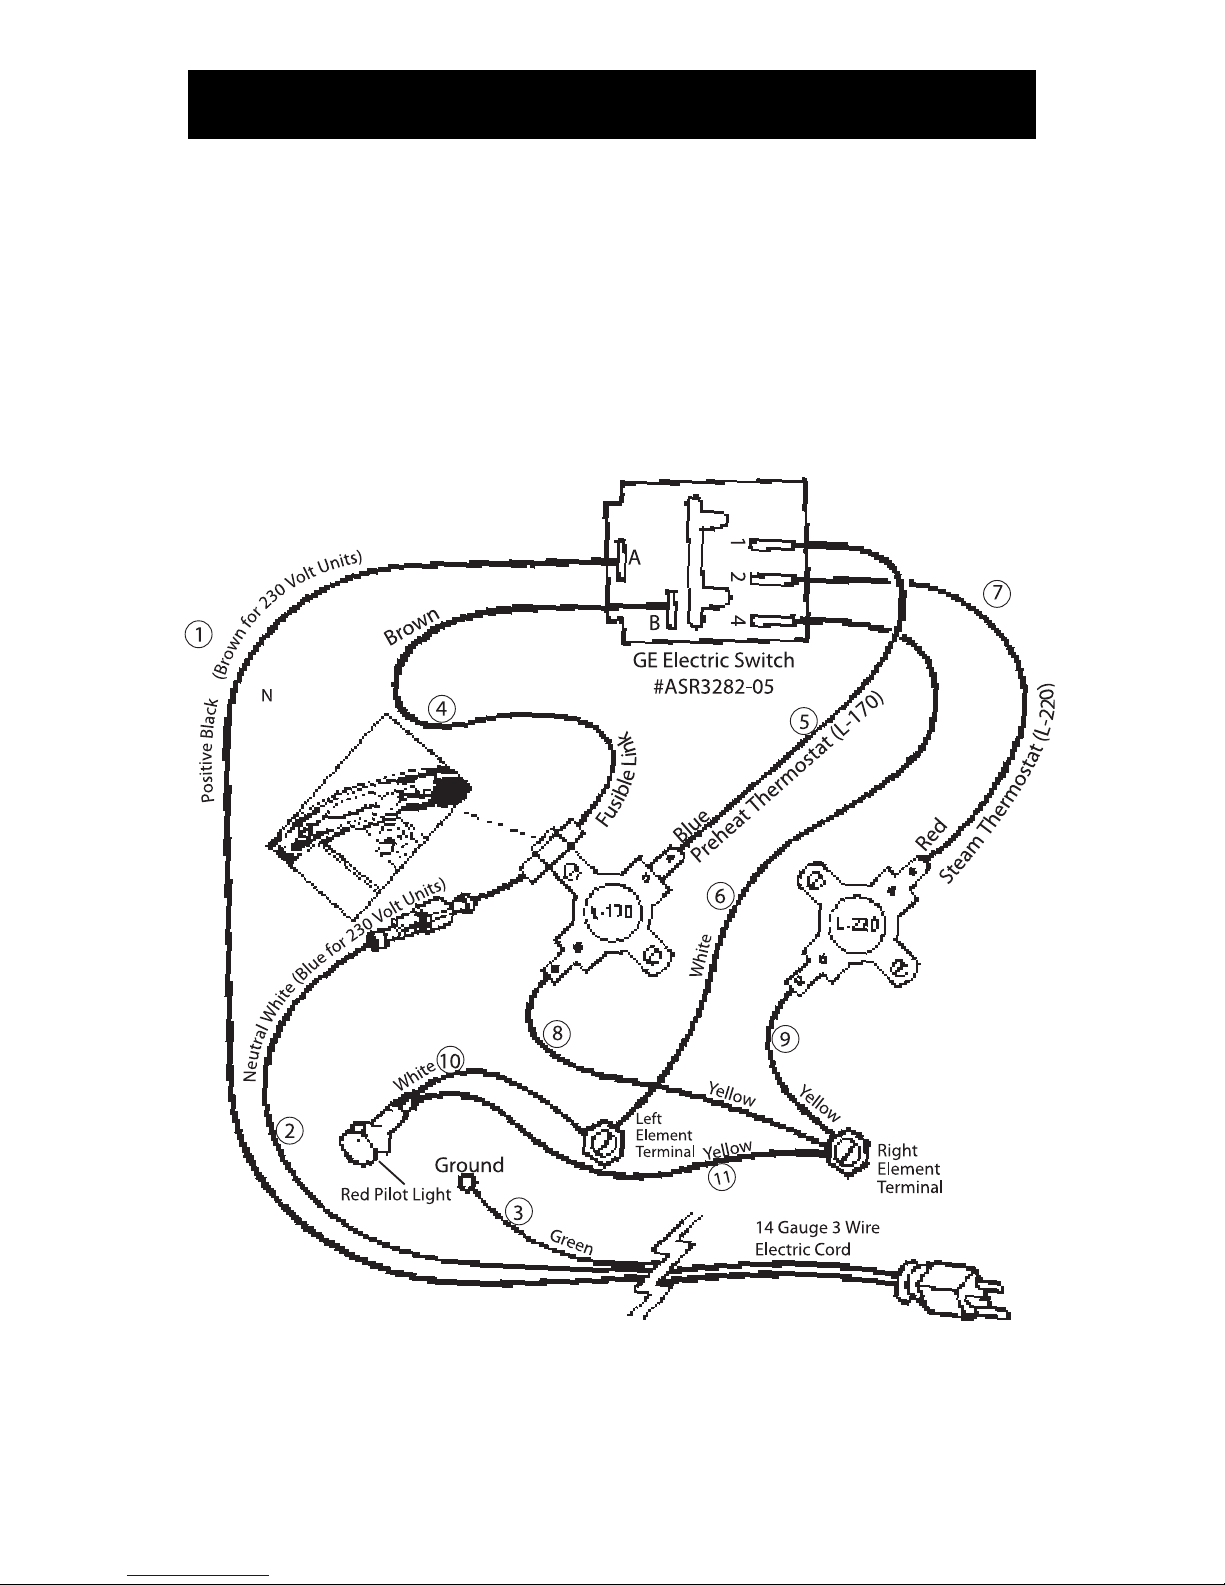
Jiffy®J-4000 Wiring Diagram
26
Caution:
Insure that the power cord is unplugged from the electrical
outlet before attempting to repair your Jiffy
®
Steamer.
 Loading...