

JIAYIYANG ELECTRONICS PET620 User Manual

Table of Contents:
Important Safety Information
WARNING: NOT FOR AGGRESSIVE DOGS. Do not use this product if your dog
is aggressive, or if your dog is prone to aggressive behavior, Aggressive dogs
can cause severe injury and even death to their owner and others. If you are
unsure whether this product is appropriate for your dog, please consult your
veterinarian or certified trainer.
CAUTION:
Risk of skin damage: Please read and follow the instructions carefully in this
guide, Proper fit of the collars is important because a loose collar may caus e
inconsistent performance. A collar worn for too long or made too tight on the
pet’s neck may cause skin damage, ranging from redness to pressure ulcers
(commonly known as bedsores). These collars can cause pressure necrosis if
used incorrectly and is often misidentified as burns.
Avoid leaving the collar on the dog for more than 12hours per day.
When possible reposition the collar on the pet’s neck every 1 to 2hours.
Check the fit to prevent excessive pressure, and it is okay to trim any excess
strap length.
Never connect a lead to the electronic collar because it may cause excessive
pressure on the contacts.
Wash the dog’s neck area and contacts of the collar weekly with a damp cloth.
Examine the contact area daily for signs of a rash or a sore.
If a rash or sore is found, discontinue use of the collar until the skin has healed.
If the condition persists beyond 48 hours, see your veterinarian.
These steps will help your pet safe and comfort able. Millions of pets are comfortable
while wearing stainless steel contacts. Some pets are sensitive to contact pressure.
You may find after some time that your pet is very tolerant of the collar. If so you may
relax some of these precautions. It is important to continue daily checks of the contact
area. If redness or sores are detected, discontinue use until the skin has fully healed.
Thank you for choosing the iPets brand! You and your pet deserve a companionship
that includes memorable moments and a shared understanding together. Our
mission is to ensure your pet’s safety by providing you the tools and techniques
to successfully train your pet. Should you have any queries, please contact our
customer service.
NOTE: Please charge before using the product.
Components:
How the dog training system works?
iPets products are reliable, effective, and comfortable for large or small dogs. The system assists
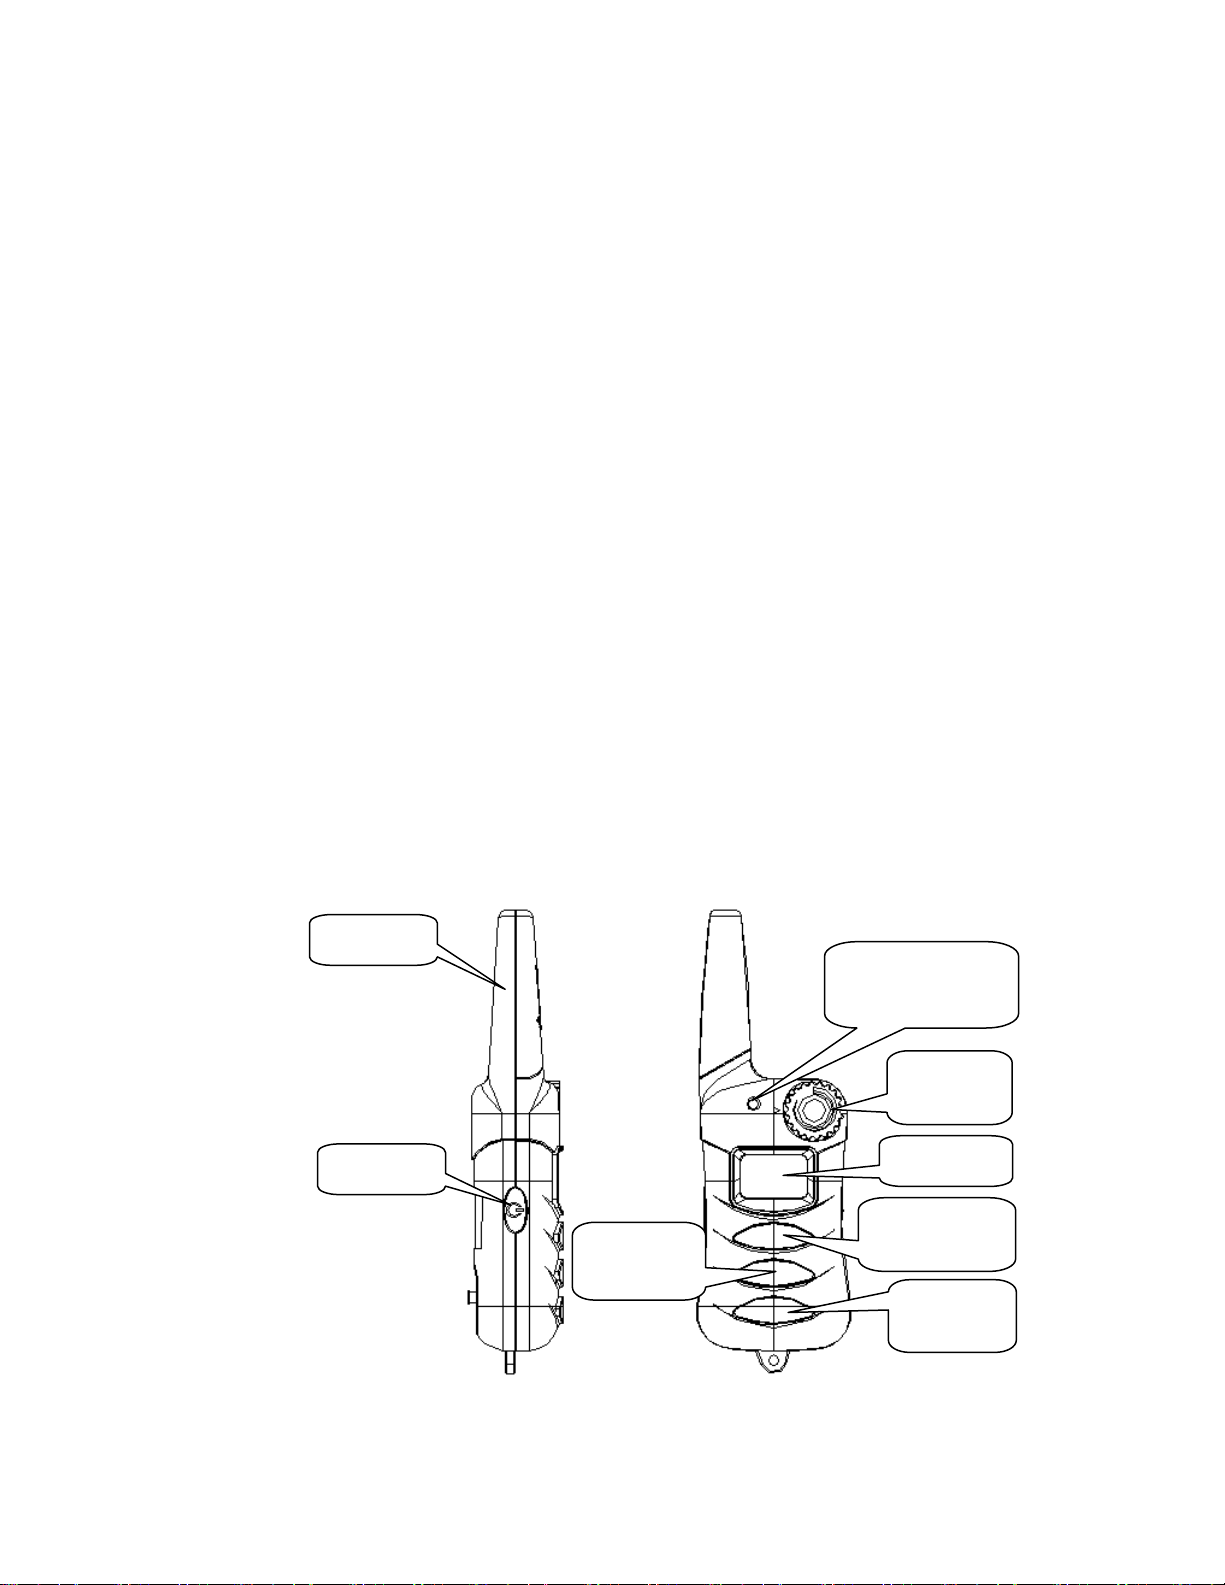
Antenna
ON/OFF
Transmitter
Intensity
Dial
Display
Vibration
Button
Stimulation
Button
Sound
Button
in controlling your dog without a leash in a range up to 330 yards away! Instantly send a signal
from the Remote Transmitter, which activates your dog’s Collar Receiver. The dog will receive an
annoying but safe, harmless stimulation. With correct, consistent use of this product, the dog
will associate his misbehavior with your corrections, and soon enough, you will have a welltrained dog. This particular model features adjustable levels of stimulation, enabling the user to
tweak accordingly to the dog’s temperament, removing the risk of over stimulation.
Features
• Rechargeable Remote Transmitter and Collar Receiver
• Waterproof Remote Transmitter and Collar Receiver
• 100 intensity levels of Vibration
• 100 intensity levels of Static Shock
• Standard Tone
• Easy to use, adjustable Intensity Dial
• Simple, ergonomic design layout
• Quick and straightforward pairing process
• Range of 330 Yards
• Capable of simultaneous control of two dogs (extra receiver is purchasable)
• Adjustable TPU strap to accommodate any size of dog
• Auto-off feature to conserves power when not in use to extend battery life
• Remotely turn on/off Collar Receiver
Key Definitions
Indicator Light
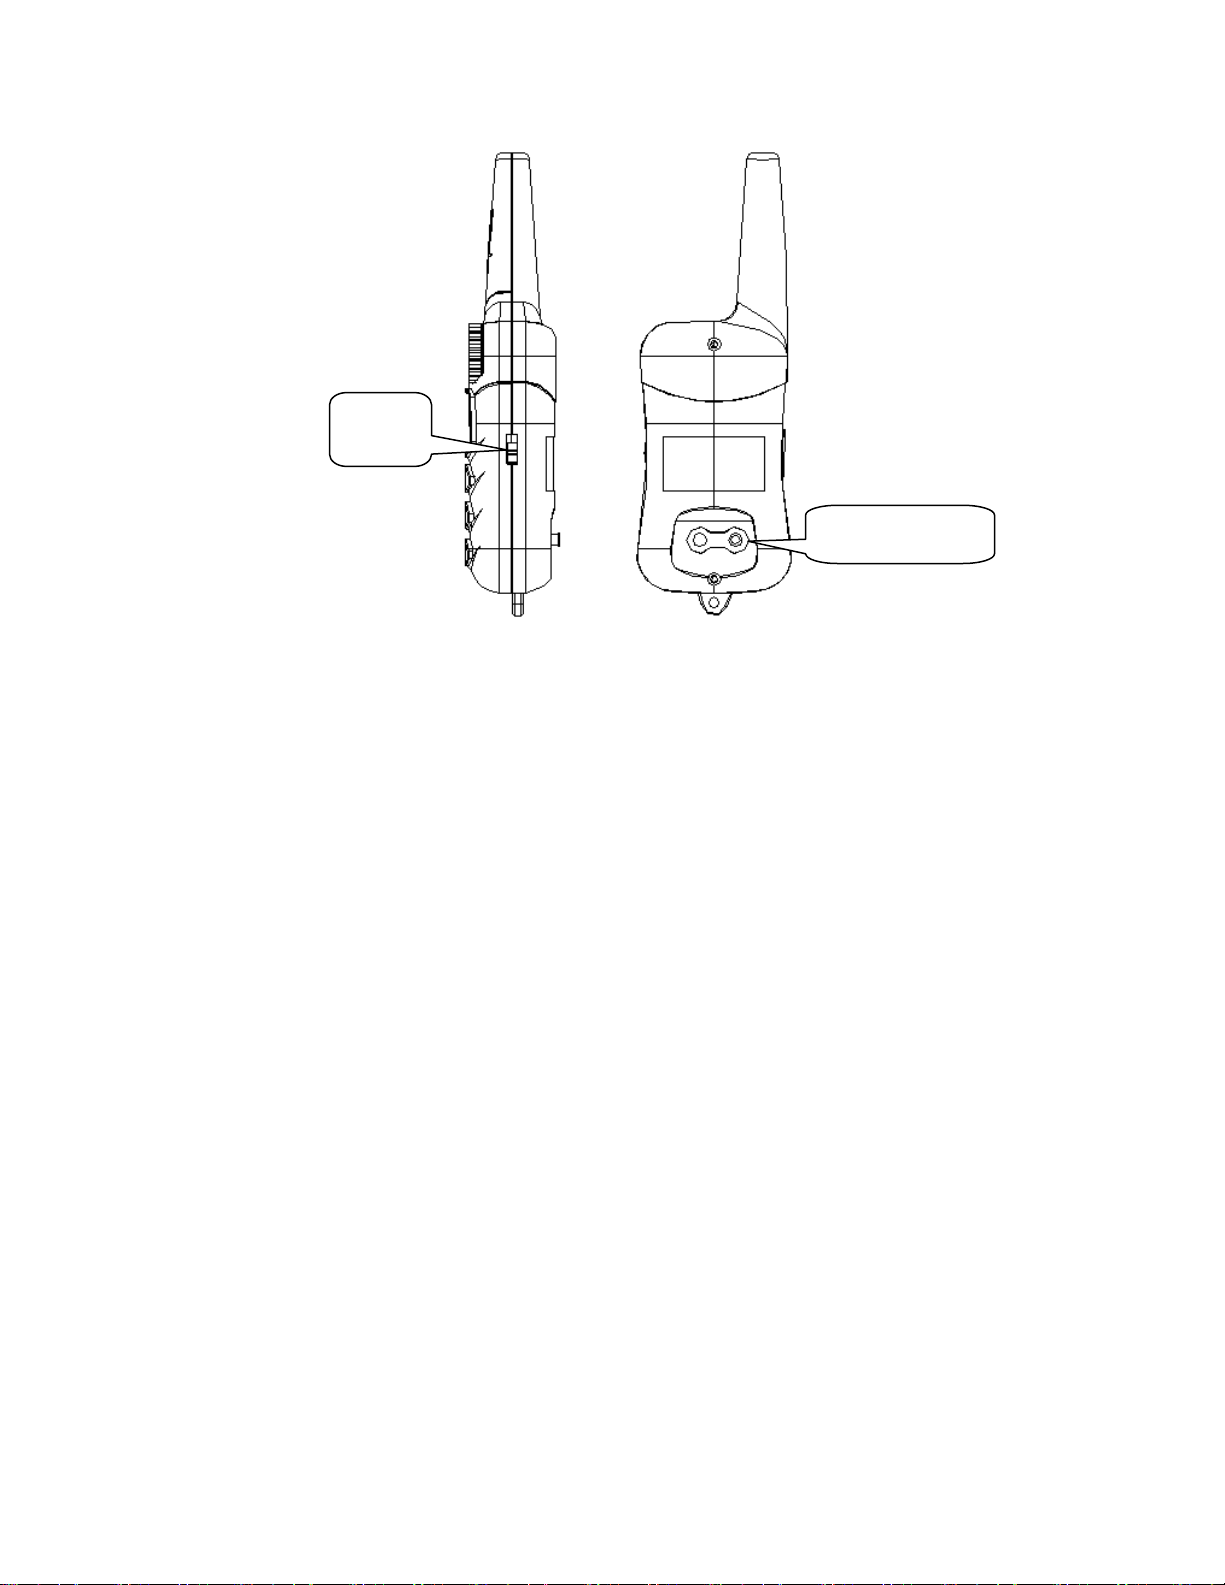
Toggle
Switch
Charging Port
Remote Transmitter
• Antenna: Transmits signal from Remote Transmitter to the Collar Receiver
• LED Display: The numerical value shows the intensity of the electric shock or vibration
(The intensity of the sound can not be adjusted, and will always display as 000), rotate
the dial to adjust the level of vibration or static shock stimulation
• ON/OFF: Press this button to turn the LCD display on and off, the product can only be
used normally when the LCD display is on
• Transmitter Indicator Light: Flashes green when any of the stimulation buttons are
pressed. Will blink red if battery power is low to indicate the transmitter needs
recharging.
• Intensity Dial: Rotate the dial to adjust the level of vibration or static shock stimulation
from 0 to 100.
• Toggle Switch (Dog Selection): Switches control between Collar Receiver 1 or Collar
Receiver 2 (Dog 1 or Dog 2).
• Vibration Button: Delivers vibration to a Collar Receiver, depending on the position of
the Toggle Switch.
• Stimulation Button: Delivers electronic pulse stimulation to a Collar Receiver, depending
on the position of the Toggle Switch.
• Sound Button: Delivers a sound to a Collar Receiver, depending on the position of the
Toggle Switch.
• Charging Port: Charges the battery of the Remote Transmitter when connected to a
power source.
Collar Receiver
• ON/OFF Button: Powers on/off the Collar Receiver and used for Pairing or

Synchronization of the Collar Receiver to the Remote Transmitter.
• Electrodes: Contact points cover the electrodes, and through them electronic pulse
stimulation is delivered.
• Charging Port: Charges the battery of the Collar Receiver when connected to a power
source.
• Indicating Light: Flashes green when any of the stimulations are pressed. Will blink red if
the battery power is low to indicate the Collar Receiver needs recharging.
Operating Guide
Step 1 - Prepare the Remote Transmitter and Receiver Collar:
Charge the Remote Transmitter and Receiver Collar
1. Uncover the Charging Port by lifting the rubber cover.
2. Insert the charging connector into the Charging Port.
3. Plug the charger into a standard wall outlet.
4. A solid red light will appear on the Indicator Light, indicating charging is occurring.
5. Once charging is complete, the solid red light will turn to a solid green light.
6. Remove the charging connector, and replace the rubber cover to protect the Charging
Port.
Note: Before first use, charge the Remote Transmitter and Receiver Collar until completion.
Powering on and off the Remote Transmitter
Press the ON/OFF button on the transmitter to power the unit on or off. When the transmitter is
powered on, the indicating light will flash green.
Powering on and off the Collar Receiver
Press the ON/OFF button on the receiver to power the unit on or off. When the receiver is
powered on, the indicating light will flash green.
Step 2 – Pairing Collar Receiver to Transmitter
Note: Transmitter and receiver are pre-paired when leaving our manufacturing facility. In case
the pairing is not established or you would like to repair the units, please follow the instructions
below:
1. Power on the Collar Receiver by pressing the ON/OFF button on the Collar Receiver.
2. Press and hold the ON/OFF button for about 3 seconds until a beep sounds, and the
indicating light will begin flash quickly.
3. Press any button on the transmitter once the Collar Receiver beeps. When the Remote
Transmitter and Collar Receiver are paired successfully the indicating will stop flashing
quickly.
 Loading...