


Tally Dascom 2600/2610/PRN-7
6.3.5 Printer Configuration
Selecting this option allows you to configure specific parameters in the printer. When
one of
these menu options is selected, a new page will load showing the options which can be
viewed or modified.
55

Tally Dascom 2600/2610/PRN-7
Example 1
Changing the dropdown menu option.
In this example, we are modifying the selected font to a different font. Select “Font”. A
new page appears.
Select the Font dropdown menu and choose the new font. Select “Send”.
1) Changes are not applied until “Send” is selected.
2) To reset the changed value to the prior value, select “Refresh” instead of “Send”.
3) To return to the prior page without applying the change, select “Back”.
56

Tally Dascom 2600/2610/PRN-7
Example 2
Changing an entered value menu option.
In this example, we are modifying the selected form length to a different form length.
Select
“Forms”. A new page appears:
Select the Form Length field by highlighting the contents of the box and enter the new
form length.
The acceptable parameters are listed to the right of the field. Select “Send”.
1) Changes are not applied until “Send” is selected.
2) If the entered value is out of range of the acceptable parameters, the previous value
will be re-instated.
3) To reset the changed value to the prior value, select “Refresh” instead of “Send”. To
return to the prior page without applying the change, select “Back”.
4) The default name is “conf.cfg”, but it can be renamed. Saving the file to disk. This will
allow it to be transferred to other printers using the “Send Configuration To Printer”
option on the actions web page.
57

Tally Dascom 2600/2610/PRN-7
6.3.6 Printer Actions
Selecting the Printer Actions link will produce a page with a list of actions that can be
performed on the printer.
58
Tally Dascom 2600/2610/PRN-7
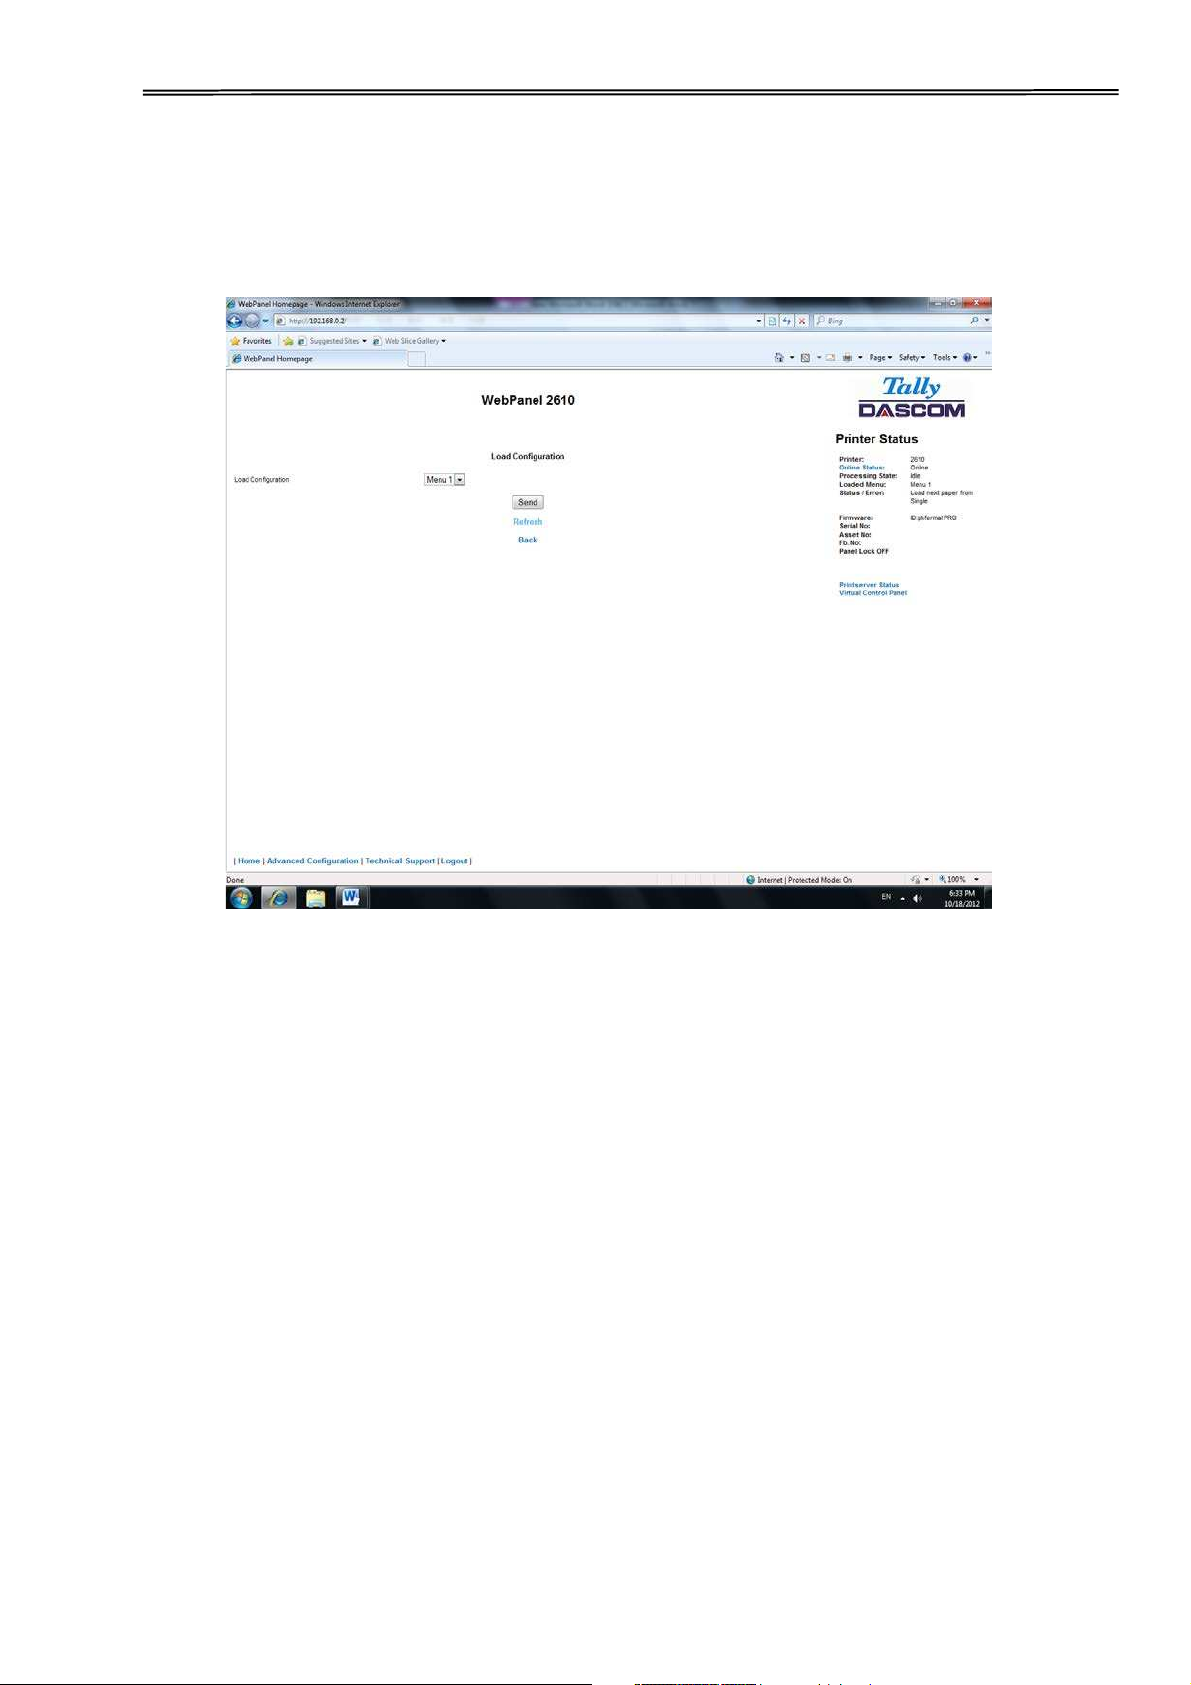
6.3.7 Load Configuration
Loads the settings stored in a menu into the printer as the current settings. When the
Load Configuration link is selected, the following page will be displayed:
Select a menu and confirm your selection by selecting the Send button.
59

Tally Dascom 2600/2610/PRN-7
6.3.8 Save Configuration
You can save selected printer settings in up to 5 independent menus.
When the Save Configuration link is selected, the following page will be displayed:
Select a menu. Select send.
6.3.9 Retrieve Configuration From Printer
Selecting this option will save all the printer settings of all menus in a file. Uploading
this file to
other printers will clone the printer menu settings to the other printer.
When this option is selected, the following will appear (note that the actual image will
be browser specific):
60

Tally Dascom 2600/2610/PRN-7
6.3.10 Send Configuration to Printer
Selecting this option will upload a Configuration File of another printer (see “Retrieve
Configuration From Printer”). The complete configuration of this source printer will be
transferred to your printer.
To upload the configuration file, first click “Send Configuration To Printer”. The
following page
will be displayed:
61

Tally Dascom 2600/2610/PRN-7
Use the “Browse” button to find the file to upload. Once the file is selected, click on the
“Send” button. It is important to note the warning on this page. There is some delay
while the file is transmitted so it is important not to resend or click on the “Send” button
until the process is complete.
If the process is successful, the printer will reboot and the following page will be
displayed:
Since the printer will reboot with successful completion of this action, the
user will have to reconnect to the printer through the browser.
62

Tally Dascom 2600/2610/PRN-7
6.3.11 Report
Selecting the report link will open up a separate browser window and a report of the
printer settings will appear. This functionality is the same as pressing the “Print”
option on the control panel of the printer.
6.3.12 Reset Printer
This link does a hard reset of the printer, similar to cycling power. There is no user
feedback as to success since the printer is rebooting. Since the printer will reboot with
successful completion of this action, the user will have to reconnect to the printer
through the browser.
6.3.13 Panel Lock On/Off
This link toggles the panel lock feature of the printer. This option affects the physical
control panel on the printer as well as the virtual panel in WebPanel. The state of the
option is displayed in the printer status page on the right of the display.
6.3.14 Download Firmware
Through this link it is possible to download firmware updates to the printer. When this
link is selected, the follow page will appear:
63

Tally Dascom 2600/2610/PRN-7
After following the directions on this page, select the “Continue“ link and the
following page
is displayed:
Using the “Browse” button, find the firmware file to download. Once the file is
selected, click
on the “Send” button. It is important to note the warning on this page. There will be
some
delay while the file is transmitted so it is important NOT to resend or click on the “Send”
button until the process is complete.
64

Tally Dascom 2600/2610/PRN-7
If the process is successful, the printer will reboot and the following page will be
displayed:
Since the printer will reboot with successful completion of this action, the user will
have to
reconnect to the printer through the browser.
65

Tally Dascom 2600/2610/PRN-7
6.3.15 TallyCom Status
Selecting this link will replace the information in the Printer Status area with
networking
information on the printer.
The Name, Contact and Location information is set up from the General link within the
Advanced Configuration page.
66

Tally Dascom 2600/2610/PRN-7
6.3.16 Advanced Configuration
The Advanced Configuration page allows the user to set up and modify network
connectivity information as well as setting up the password, email notification and
logical
printers. From this page it is also possible to Logout of TallyCom and restart TallyCom.
The
Administration page looks like this:
67
Tally Dascom 2600/2610/PRN-7
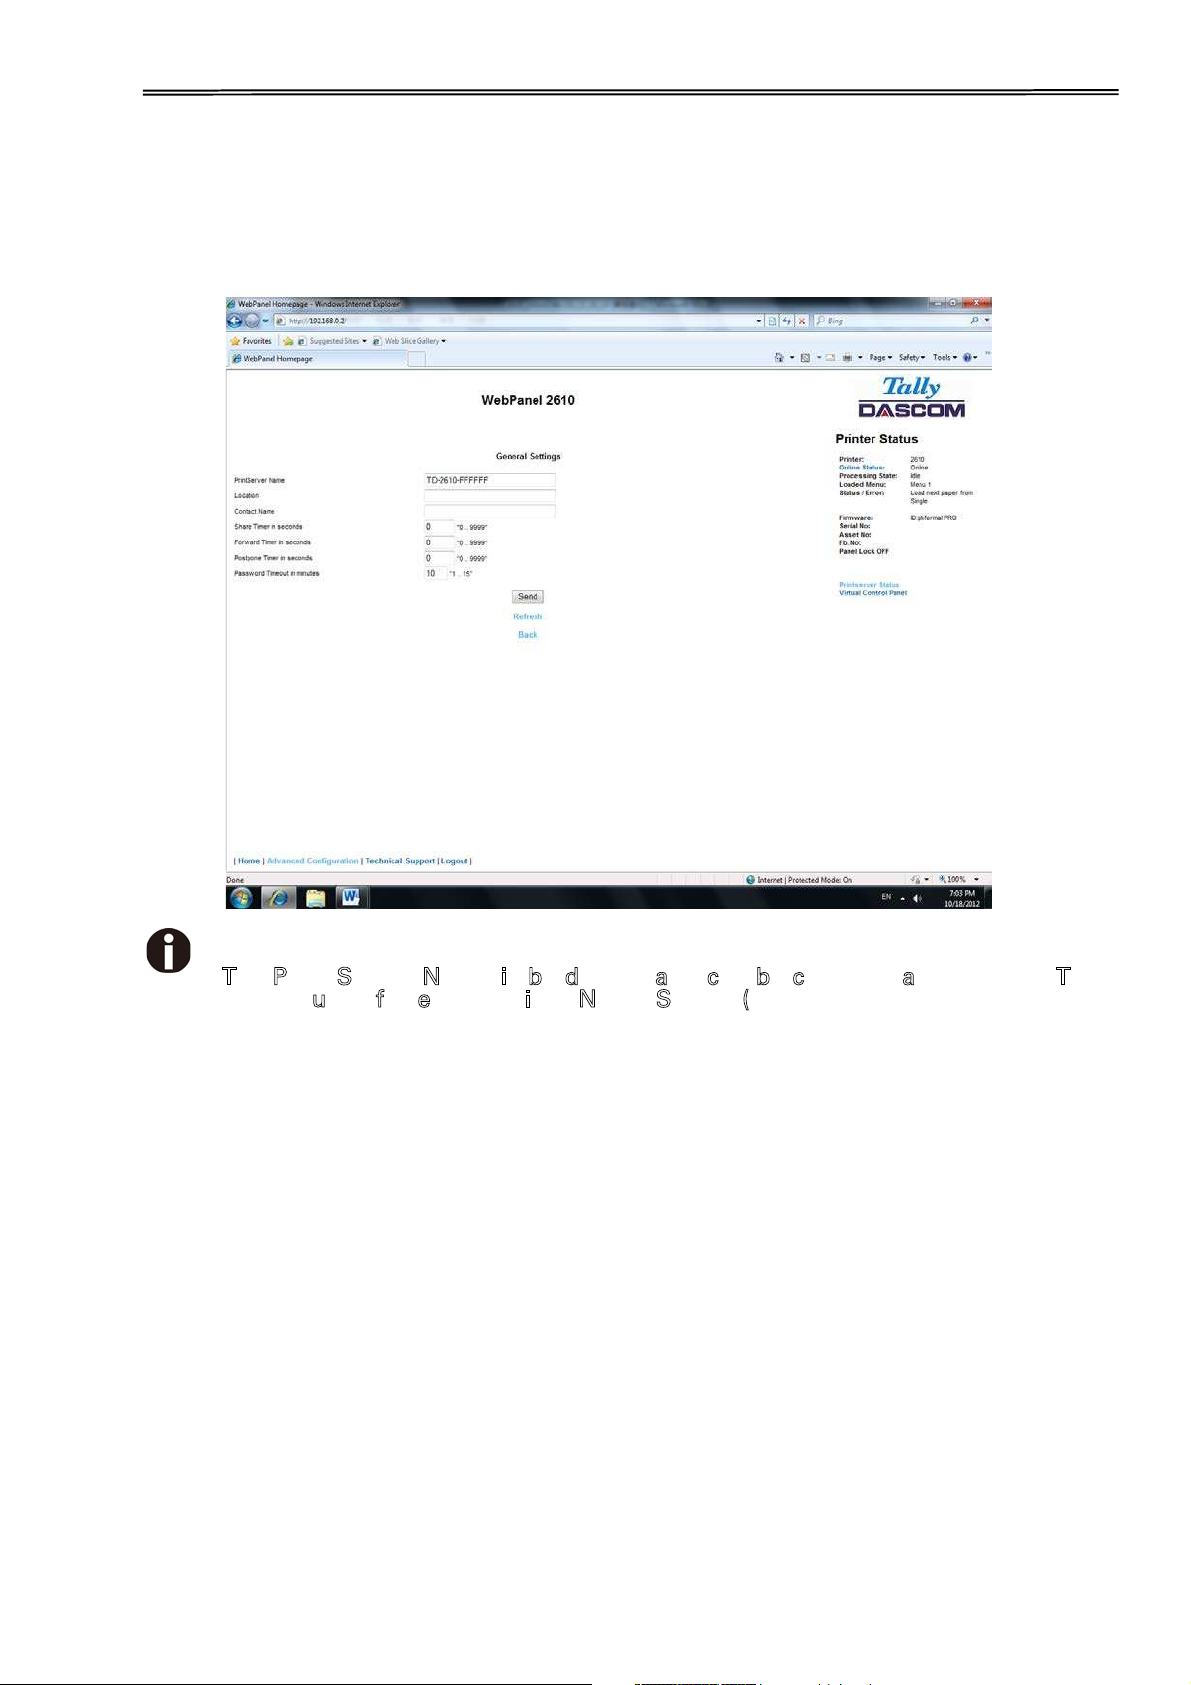
6.3.17 General
The General page sets up the timers and the labels for name, contact and location of
the printer.
T
he Print Server Name is by default and can be changed accordingly. This
n
ame used for entering into Name Server (DNS/DHCP).
68

Tally Dascom 2600/2610/PRN-7
6.3.18 TCP/IP
The TCP/IP Page allows the user to modify the existing TCP/IP information for the
printer.
After changing the particular parameters, it is necessary to restart TallyCom from the
Advanced Configuration page. If the IP Address is changed and the Send button
selected
you will disconnect from the current session and will need to reconnect at the new IP
Address.
69

Tally Dascom 2600/2610/PRN-7
6.3.19 SNMP
The SNMP page allows the user to set the Community Name and the Access. The page
looks like this:
70

Tally Dascom 2600/2610/PRN-7
6.3.20 Password
The Password page allows the user to set a password which would limit access to
certain
configuration and action links in WebPanel. The maximum number of characters for
the password is 7. The default password is no password at all (“null“). However,
“adm” is also acceptable as the default password to be compatible with the external
TallyCom ċ pocket NICs (Options), which use this as the default password. If this or
no password at all (“null“) is set as the password, all of the web pages are accessible
by everyone. If any other password is set, the first time a user accesses a password
protected page, a window will open asking for verification with user and password
information. Once the password has been successfully recognized, all password
protected pages will be available. Once the password is recognized, a timer is set,
based on the Password Timer value set in the General web page. If there is inactivity in
the browser which lasts beyond the timer time, the password will have to be reentered
to access the protected pages.
The password page looks like this:
6.3.21 User Name
The default user name is “adm” and cannot be changed.
6.3.22 Resetting Password
In order to reset password the printer needs to be defaulted. See
“Loading Default
”.
71

Tally Dascom 2600/2610/PRN-7
6.3.23 Email Notification
With the email notification link the user will be able to set up and receive email notices
for error and status conditions of the printer. Up to 4 email addresses can be set.
The page looks like this:
The user must set up the SMTP Mail Server as well as one or more users. The Reply
address can be left as is unless there is reason to have to mail to the Reply address.
To activate the mail notification:
Select which notifications are to be sent out.
Click on the check box(es) on the right of the desired notification(s) for the
particular
user(s).
Confirm your settings by clicking the Send button.
There is also a test mail option which sends a test email to “User 1” and is activated by
checking the box and clicking on the “Save” button.
72

Tally Dascom 2600/2610/PRN-7
The “Configure” link at the end of each line of notification options allows the user
to set
up the message information for the email as well as selecting other pertinent
information to be added to the email. In addition, the timer can be set which
determines when the email notification is sent out.
The page looks like this:
In this example, the Online message is set to “Printer is Online”, and information on
Description, Location, and Printer Name will be added to the email. In this example, the
event timer is set for 10 seconds after the event occurs and will be sent only once,
unless the printer is rebooted or the state changes. If the timer is set to 0, no email
message will be sent, regardless of whether the user box has been selected. Selecting
the “Save” button will set these values.
73

Tally Dascom 2600/2610/PRN-7
6.3.24 Logical Printers
The logical printers page will add text or commands to the beginning and ending of
print jobs. This is done by pre and post strings, defined in each of the logical printers.
For entering binary data in these strings, the backslash character is used followed by 2
hexadecimal digits.
Examples of this are \1b for an escape character, \0a for linefeed and \\ for backslash.
Selecting the Logical Printers link gives the following page which lists seven possible
logical printers plus Raw Port, which is port 9100:
74

Tally Dascom 2600/2610/PRN-7
When selecting one of the logical printers under the Description column, the following
page is
displayed:
In this example if the Enable checkbox is checked, the pre-string of “Beginning to print
job”
followed by a CR/LF will print at the beginning of every job sent to this LPR Queue. At
the end of the print job, the message “End of job” with a formfeed will print.
Unchecking the Enable checkbox will not send the pre or post strings. The LPD Queue
Name is the name of the print queue that comes from the host. The Description can be
changed by the user and does not have to match the LPD Queue Name.
6.3.25 String Replacement Example Plain Text
O
riginal Text / New Text
String Replacement Example Commands /\1B[8419t/\1B[4196t/
Control codes are entered with a back slash “\”.
In this example the Formlength of A4 (8419”/720) represented by “1B[8419t” is being
replaced by the string “1B[4196t” (4196”/720) which results in A5.
Multiple strings are separated by a semicolon “;”.
75
Tally Dascom 2600/2610/PRN-7
6.3.25 Logout of TallyCom
The Logout link disconnects the browser session from the printer. Clicking on the
“Home”
link reestablishes the connection.
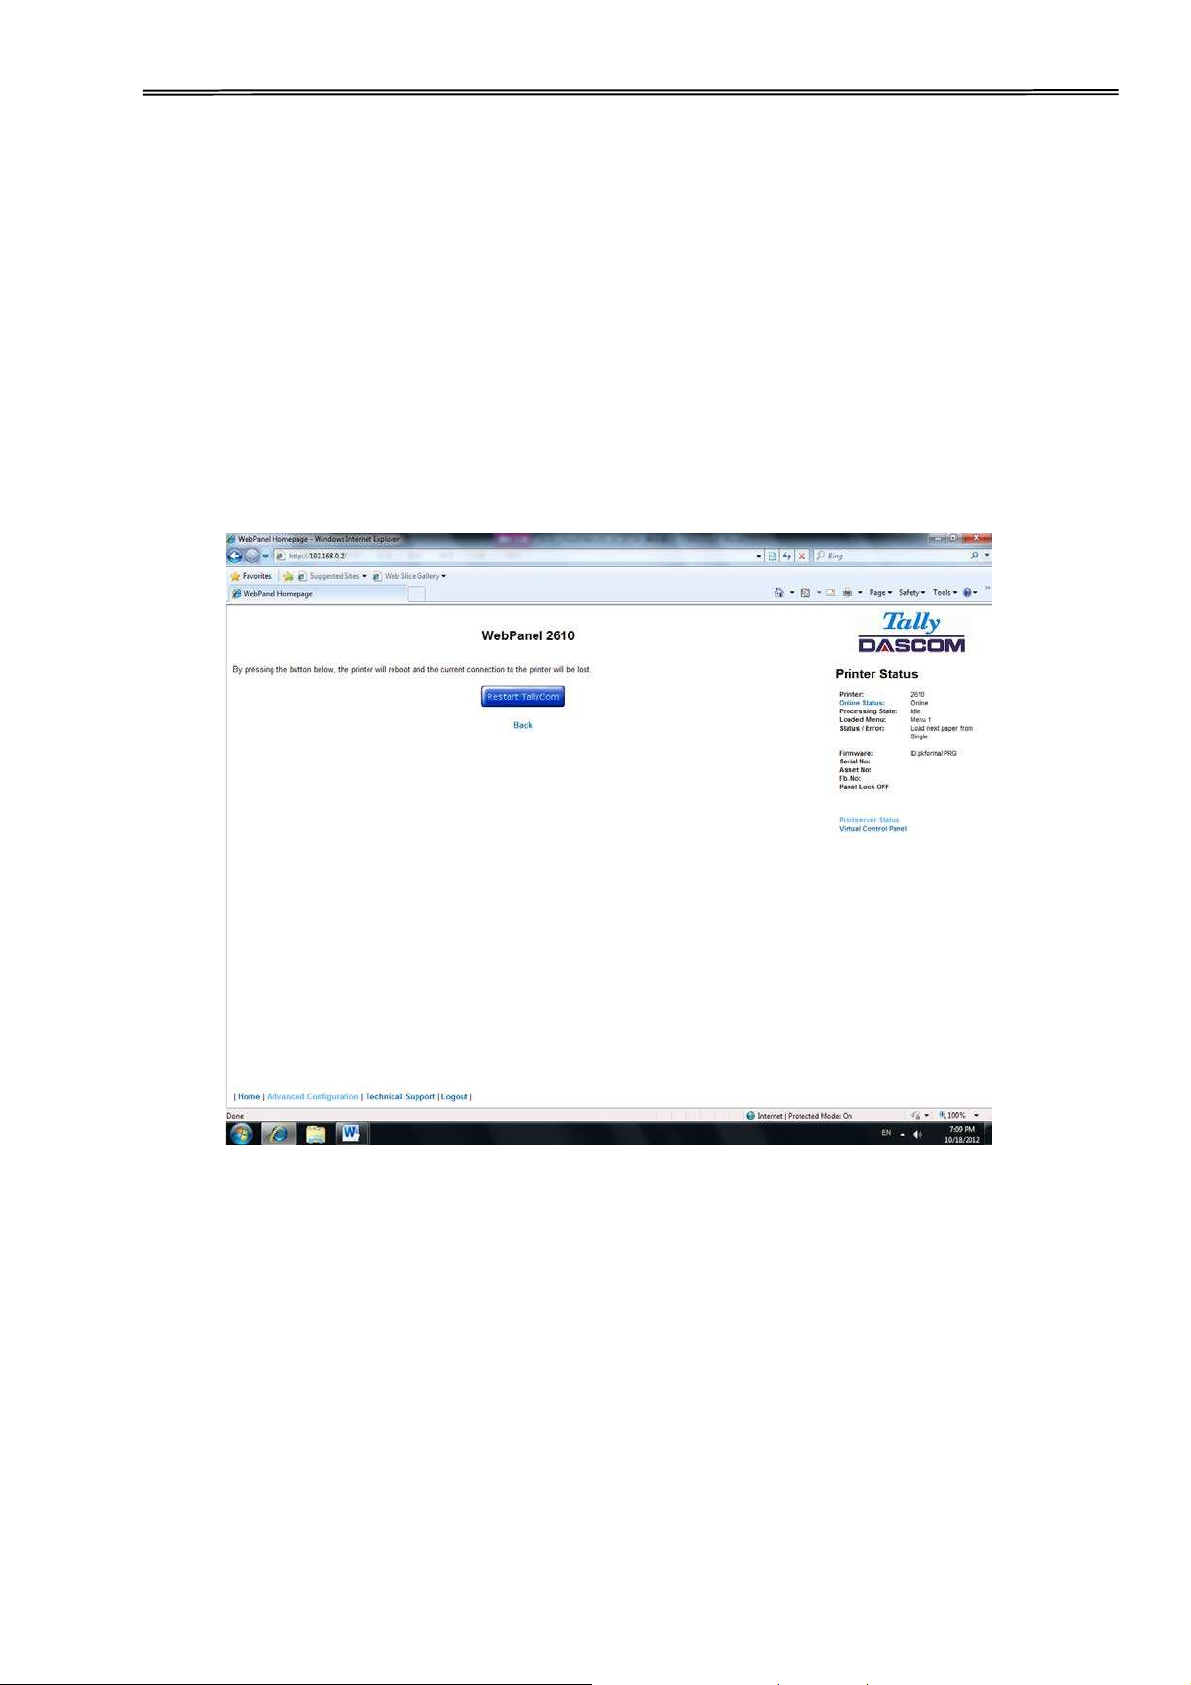
6.3.26 Restart TallyCom
Selecting this link will reboot the printer and disconnect the current printer connection.
It is
used to reset certain TCP/IP variables that were set in the General and TCP/IP pages.
Once TallyCom has restarted, those new setting will take effect. When this link is
selected, the follow page is displayed, giving the user the option to continue or not.
76

Tally Dascom 2600/2610/PRN-7
6.3.27 Virtual Control Panel
The Virtual Control Panel link is in the Printer Status area of the web page. This control
panel is a visual representation of the actual control panel on the printer. It allows the
user to remotely read and set panel information as if they were standing at the control
panel. The functionality of the virtual panel is identical to the physical LCD panel.
Before using the virtual panel, it is important to configure the browser to allow popup
windows from the printer, otherwise the panel will not display. Once the browser is
configured, the page will look similar to this:
The Virtual Control Panel will be the active window. This window will show the current
error state and display the contents of the printer’s LCD display. Selecting the buttons
on the display will behave the same as if selecting the buttons on the printer itself. The
LCD information on the virtual panel refreshes every 15 seconds. The physical panel,
virtual panel and Online Status in the Printer Status are all active, so there may be
some synchronization delay issues if a user presses a button on the physical printer or
the Online Status in the Printer Status area. The Panel Lock feature affects the virtual
panel in the same way as the physical panel. The only functional difference between
the physical and virtual panel is that in the virtual panel, the LF/FF option will always
do a FF.
To close the virtual panel, click on the X in the upper right of the window.
1) This feature needs the browser to allow pop ups.
2) The LED version unit does not support this function.
77

Tally Dascom 2600/2610/PRN-7
7 Addendum
7.1 Character Set
standard character set 1
standard character set 2
78

Tally Dascom 2600/2610/PRN-7
IBM character set 1
IBM character set 2
79

Tally Dascom 2600/2610/PRN-7
OCR-A character set 1
OCR-A character set 2
80

Tally Dascom 2600/2610/PRN-7
OCR-B character set 1
OCR-B character set 2
81

Tally Dascom 2600/2610/PRN-7
International Character Set Commands
Country
Basic Command
USA
˘ESC˚“R”CHRˀ˄0˅
FRANCE
˘
ESC˚“R”CHR
ˀ˄1˅
GERMANY
˘ESC˚“R”CHRˀ˄2˅
UK
˘
ESC˚“R”CHR
ˀ˄3˅
DENMARK 1
˘ESC˚“R”CHRˀ˄4˅
SWEDEN
˘ESC˚“R”CHRˀ˄5˅
ITALY
˘ESC˚“R”CHRˀ˄6˅
SPAIN 1
˘ESC˚“R”CHRˀ˄7˅
JAPAN
˘
ESC˚“R”CHR
ˀ˄8˅
NORWAY
˘ESC˚“R”CHRˀ˄9˅
DENMARK 2
˘
ESC˚“R”CHR
ˀ˄10˅
SPAIN 2
˘ESC˚“R”CHRˀ˄11˅
LATINAMERICA
˘
ESC˚“R”CHR
ˀ˄12˅
DENMARK/NORWAY
˘
ESC˚“R”CHR
ˀ˄13˅
CHINA
˘
ESC˚“R”CHR
ˀ˄16˅
International character sets˖
82

Tally Dascom 2600/2610/PRN-7
7.2 Control Codes Summary
The following table shows sequences marked by a ĸ if they are available in the various
emulations. The MTPL sequences can be used within all emulation modes. The
corresponding sequences are marked by a *.
I
f you want to learn more about control codes, we recommendto download
the Programmer’s Application Manual from our internet support pages.
MTPL
IBM
XL24
IBM
AGM
Epson
LQ-2550
Epson
LQ-2170
Code
Function
Ĝ Ĝ
Ĝ Ĝ
<BEL>
Signal tone
Ĝ Ĝ Ĝ Ĝ Ĝ
<BS>
Control character BS (Backspace)
Ĝ Ĝ
<CAN>
Deleting a data line
Ĝ Ĝ Ĝ Ĝ Ĝ
<CR>
Control character CR (Carriage return)
Ĝ
<CSI>
Start character for MTPL sequences, corr. ESC [
Ĝ Ĝ
<DC1>
Selecting the printer
Ĝ Ĝ
<DC2>
Condensed printing OFF (set by <Sl> or <ESC><Sl>)
Ĝ Ĝ
<DC3>
Deselecting the printer
Ĝ Ĝ
<DC4>
Double-wide printing OFF (set by <SO> or <ESC><SO>)
Ĝ Ĝ
*
Ĝ Ĝ
<DEL>
Delete line. Epson: Delete last character
Ĝ Ĝ Ĝ Ĝ Ĝ
<ESC>
Start character for programming sequence
Ĝ Ĝ Ĝ Ĝ
<ESC>!<n>
Print mode selection
Ĝ Ĝ Ĝ
<ESC>#
Bit 8 = unchanged
Ĝ Ĝ
<ESC>$<n1><n2>
Perform absolute horizontal step
Ĝ Ĝ
<ESC>%<0><0>
Select ROM character generator
Ĝ Ĝ
<ESC>%<1><0>
Select download generator
Ĝ
*
* * *
<ESC>%1<n1><n2>
Graphics print with 180 dpi/HQ
Ĝ
*
* * *
<ESC>%2<n1><n2>
Graphics print with 360 dpi/HQ
Ĝ
*
* * *
<ESC>%3<n1> <n2>
Graphics print with 60 dpi
Ĝ
*
* * *
<ESC>%4<n1> <n2>
Graphics print with 120 dpi
Ĝ
*
* * *
<ESC>%5<n1> <n2>
Graphics print with 80 dpi
Ĝ
*
* * *
<ESC>%7<n1> <n2>
Graphics print with 240 dpi
Ĝ
*
* * *
<ESC>%8<n1> <n2>
Graphics print with 72 dpi
Ĝ
*
* * *
<ESC>%9<n1><n2>
Graphics print with 90 dpi
Ĝ Ĝ
<ESC>&<s><x><y>..
Define download character
Ĝ
*
* * *
<ESC>(&
Character set ISO 8859-2
Ĝ
*
* * *
<ESC>(*
Character set ISO 8859-5
Ĝ
*
* * *
<ESC>(+
Character set ISO 8859-1 SAP
83

Tally Dascom 2600/2610/PRN-7
MTPL
IBM
XL24
IBM
AGM
Epson
LQ-2550
Epson
LQ-2170
Code
Function
Ĝ
*
* * *
<ESC>(.
Character set ISO 8859-9
Ĝ
*
* * *
<ESC>(/
Character set ISO 8859-15
Ĝ
*
* * *
<ESC>(<
Character set Cro ASCII
Ĝ
<ESC>(c
Defining the page format
Ĝ
<ESC>(v
Relative vertical printing position
Ĝ
<ESC>(t
Assigning a character table
Ĝ
*
* * *
<ESC>(m
Character set BRASCII
Ĝ
*
* * *
<ESC>(n
Character set Abicomp
Ĝ
*
* * *
<ESC>(p
Windows character set 1250 (Latin2)
Ĝ
*
* * *
<ESC>(q
Windows character set 1251 (Cyrillic)
Ĝ
*
* * *
<ESC>(r
Windows character set 1252 (Latin1)
Ĝ
*
* * *
<ESC>(t
Windows character set 1254 (Turkish)
Ĝ
*
* * *
<ESC>(`
Character set Norwegian
Ĝ
<ESC>(^<n1><n2><d1><dn>
Print data as characters
Ĝ
*
* * *
<ESC>(A
Character set UK-ASCII
Ĝ
*
* * *
<ESC>(B
Character set US-ASCII
Ĝ
<ESC>(B<n1>-<n8>
Barcode Setup and print
Ĝ
<ESC>(C
Defining the page length
Ĝ
*
* * *
<ESC>(MI>F
Assign character set G0
Ĝ
<ESC>(G
Selecting graphics mode
Ĝ
*
* * *
<ESC>(H
Character set Swedish-Finnish
Ĝ
*
* * *
<ESC>(K
Character set German
Ĝ
*
* * *
<ESC>(L
Character set Portuguese
Ĝ
*
* * *
<ESC>(R
Character set French
Ĝ
<ESC>(U
Setting positioning units in n/3600 inch
Ĝ
<ESC>(V
Absolute vertical printing position
Ĝ
*
* * *
<ESC>(Y
Character set Italian
Ĝ
*
* * *
<ESC>(Z
Character set Spanish
Ĝ
*
* * *
<ESC>)MI>F
Assign character set G1
Ĝ Ĝ
Ĝ
<ESC>*<0><n1><n2>
Set graphics print to 60 dpi
Ĝ Ĝ
Ĝ
<ESC>*<1><n1><n2>
Set graphics print to 120 dpi
Ĝ Ĝ
Ĝ
<ESC>*<2><n1><n2>
Set graphics print to 120 dpi
Ĝ Ĝ
Ĝ
<ESC>*<3><n1><n2>
Set graphics print to 240 dpi
Ĝ Ĝ
Ĝ
<ESC>*<32><n1> <n2>
Set graphics print to 60 dpi
Ĝ Ĝ
Ĝ
<ESC>*<33><n1> <n2>
Set graphics print to 120 dpi
Ĝ Ĝ
Ĝ
<ESC>*<38><n1> <n2>
Set graphics print to 90 dpi
Ĝ Ĝ
Ĝ
<ESC>*<39><n1> <n2>
Set graphics print to 180 dpi
84

Tally Dascom 2600/2610/PRN-7
MTPL
IBM
XL24
IBM
AGM
Epson
LQ-2550
Epson
LQ-2170
Code
Function
Ĝ
Ĝ Ĝ
<ESC>*<4><n1><n2>
Set graphics print to 80 dpi
Ĝ
Ĝ Ĝ
<ESC>*<40><n1> <n2>
Set graphics print to 360 dpi
Ĝ
*
* * *
<ESC>*MI>F
Assign character set G2
Ĝ
Ĝ
Ĝ
<ESC>-<n>
Underlining ON/OFF
Ĝ
<ESC>/<m>
Select vertical tab channels
Ĝ
<ESC>.
Printing raster graphics
Ĝ
Ĝ
<ESC>:
Condensed printing 12 cpi ON
Ĝ Ĝ
<ESC>:<0><n><m>
Copy ROM character set
Ĝ Ĝ
<ESC><
Unidirectional printing for 1 line
Ĝ Ĝ
<ESC>=
Set bit 8 = 0
Ĝ
Ĝ
<ESC>=<C1><C2>...
Load font/character set
Ĝ Ĝ
<ESC>>
Set bit 8 = 1
Ĝ Ĝ
<ESC>?<s><n>
Reload a graphics mode
Ĝ Ĝ
<ESC>@
Initialize printer
Ĝ
*
* * *
<ESC>[
MTPL start character for programming
sequence
Ĝ
*
* * *
<ESC>[:y
Right justification and centering OFF
Ĝ
*
* * *
<ESC>[=z
Bold ON
Ĝ
*
* * *
<ESC>[>z
Bold OFF
Ĝ
*
* * *
<ESC>[?1~
MTPL command set
Ĝ
*
* * *
<ESC>[?10~
Barcode interpretation OFF
Ĝ
*
* * *
<ESC>[?11~
Start barcode interpretation
Ĝ
*
* * *
<ESC>[?4~
MTPL + IBM Proprinter-24 command set
Ĝ
*
* * *
<ESC>[?50h
Selecting character sets with 256 characters
Ĝ
*
* * *
<ESC>[?50l
Selecting character sets with 94 characters
Ĝ
*
*
*
<ESC>[?51h
Proportional fonts automatic NLQ and LQ
Ĝ
*
*
*
<ESC>[?51l
Proportional fonts in draft mode possible
Ĝ
*
* * *
<ESC>[?52h
Font selection (ESC[10...19m]) possible only
for NLQ and LQ
Ĝ
*
* * *
<ESC>[?52l
Font selection (ESC[10...19m]) Draft
Ĝ
*
* * *
<ESC>[?53h
Extended character set
Ĝ
*
* * *
<ESC>[?53l
Standard character set
Ĝ
*
* * *
<ESC>[?6~
MTPL + EPSON LQ-2550 command set
Ĝ
* * * *
<ESC>[?8~
MTPL + EPSON LQ-2170 command set
Ĝ
*
* * *
<ESC>[?7h
Line overrun = CR + LF
85

Tally Dascom 2600/2610/PRN-7
MTPL
IBM
XL24
IBM
AGM
Epson
LQ-2550
Epson
LQ-2170
Code
Function
Ĝ
*
* * *
<ESC>[?7l
Line overrun = Truncating data outside of the printing area
Ĝ
*
* * *
<ESC>[?<n>~
Change emulation
Ĝ
Ĝ
<ESC>[@<n1> <n2>...
Set double height
Ĝ
Ĝ
<ESC>[\<n1> <n2>...
Change vertical base units
Ĝ
*
* * *
<ESC>[0;;n{
Select single sheet operation
Ĝ
*
* * *
<ESC>[0;0r
Clear top and bottom margin
Ĝ
*
* * *
<ESC>[0;0s
Clear left and right margin
Ĝ
*
* * *
<ESC>[0g
Clear horizontal tab at the current print head position
Ĝ
*
* * *
<ESC>[0m
Clear all selected fonts
Ĝ
*
* * *
<ESC>[0m
Reset color (reserved)
Ĝ
*
* * *
<ESC>[0 SP I
Measuring unit decipoint
Ĝ
*
* * *
<ESC>[0 SP K
Set horizontal pitch to 10 cpi
Ĝ
*
* * *
<ESC>[0 SP L
Set vertical spacing to 6 lpi
Ĝ
*
* * *
<ESC>[0 SP X
LQ print quality
Ĝ
*
* * *
<ESC>[0w
Set 5 cpi
Ĝ
*
* * *
<ESC>[0y
Selecting Draft printing quality
Ĝ
*
* * *
<ESC>[0z
Superscript ON
Ĝ
*
* * *
<ESC>[10m
Font 0 Default: Draft
Ĝ
*
* * *
<ESC>[10y
Right and center adjustment OFF
Ĝ
*
* * *
<ESC>[10z
Microscript ON
Ĝ
*
* * *
<ESC>[11e
Set PUM (absolute measuring unit) to OFF
Ĝ
*
* * *
<ESC>[11h
Set PUM (absolute measuring unit) to ON
Ĝ
*
* * *
<ESC>[11m
Font 1 Default: Courier NLQ
Ĝ
*
* * *
<ESC>[11w
Set 20 cpi
Ĝ
*
* * *
<ESC>[11y
Select print quality HS-Draft
Ĝ
*
* * *
<ESC>[12m
Font 2 Default: Courier LQ
Ĝ
*
* * *
<ESC>[12 SP K
Set horizontal pitch to 12 cpi
Ĝ
*
* * *
<ESC>[12w
Set horizontal pitch to 10 cpi
Ĝ
*
* * *
<ESC>[12y
Select print quality LQ
Ĝ
*
* * *
<ESC>[12z
Double height ON (top portion)
Ĝ
*
* * *
<ESC>[13m
Font 3 Default: Sans Serif NLQ
Ĝ
*
* * *
<ESC>[13y
Select print quality LQ
Ĝ
*
* * *
<ESC>[13z
Double height ON (lower portion)
Ĝ
*
* * *
<ESC>[14m
Font 4 Default: Sans Serif LQ
Ĝ
*
* * *
<ESC>[15m
Font 5 Default: Roman LQ
Ĝ
*
* * *
<ESC>[15 SP K
Set horizontal pitch to 15 cpi
86
Tally Dascom 2600/2610/PRN-7
MTPL
IBM
XL24
IBM
AGM
Epson
LQ-2550
Epson
LQ-2170
Code
Function
Ĝ
*
* * *
<ESC>[16m
Font 6 Default: Script LQ
Ĝ
*
* * *
<ESC>[17m
Font 7 Default: Prestige LQ
Ĝ
*
* * *
<ESC>[18m
Font 8 Default: OCR-B LQ
Ĝ
*
* * *
<ESC>[19m
Font 9 Default: OCR-A LQ
Ĝ
*
* * *
<ESC>[1 g
Clear vertical tab at current position
Ĝ
*
* * *
<ESC> [ 1 SP k
Printout in Royal Mail customer barcode
Ĝ
*
* * *
<ESC>[1 SP L
Set vertical spacing to 4 lpi
Ĝ
*
* * *
<ESC>[1 SP p
Initiate US Postnet Barcode
Ĝ
*
* * *
<ESC>[1 SP X
Print quality NLQ
Ĝ
*
* * *
<ESC>[1w
Set 6 cpi
Ĝ
*
* * *
<ESC>[1y
Print quality NLQ
Ĝ
*
* * *
<ESC>[1z
Subscript ON
Ĝ
*
* * *
<ESC>[21{
ASF-1: Select feeder front
Ĝ
*
* * *
<ESC>[22{
ASF-2: Select feeder rear
Ĝ
*
* * *
<ESC>[21m
Double underlining
Ĝ
*
* * *
<ESC>[23m
Italics OFF
Ĝ
*
* * *
<ESC>[24m
Underline OFF
Ĝ
*
* * *
<ESC>[26m
Proportional font ON
Ĝ
*
* * *
<ESC>[2g
Clear all horizontal tabs in the current line
Ĝ
*
* * *
<ESC>[2J
Print page
Ĝ
*
* * *
<ESC>[2 SP l
Measuring unit decipoint
Ĝ
*
* * *
<ESC> [ 2 SP k
Printout in Kix barcode
Ĝ
*
* * *
<ESC>[2 SP L
Set vertical spacing to 3 lpi
Ĝ
*
* * *
<ESC>[2 SP X
Print quality Draft
Ĝ
*
* * *
<ESC>[2w
Set 7.5 cpi
Ĝ
*
* * *
<ESC>[2y
Proportional font ON
Ĝ
*
* * *
<ESC>[2z
Double height OFF
Ĝ
*
* * *
<ESC>[2z
Superscript, subscript and microscript OFF
Ĝ
*
* * *
<ESC>[30m
Black
Ĝ
*
* * *
<ESC>[<n>m
Color; n = 31…36
Ĝ
*
* * *
<ESC>[3g
Clear all horizontal tabs
Ĝ
*
* * *
<ESC>[3m
Italics ON
Ĝ
*
* * *
<ESC>[3 SP L
Set vertical spacing to 12 lpi
Ĝ
*
* * *
<ESC>[3w
Set 8.6 cpi
Ĝ
*
* * *
<ESC>[3z
Line density 6 lpi (= line spacing 1/6 inch)
Ĝ
*
* * *
<ESC>[4g
Clear all vertical tabs
87

Tally Dascom 2600/2610/PRN-7
MTPL
IBM
XL24
IBM
AGM
Epson
LQ-2550
Epson
LQ-2170
Code
Function
Ĝ
*
* * *
<ESC>[4m
Underline ON
Ĝ
*
* * *
<ESC>[4 SP L
Set vertical spacing to 8 lpi
Ĝ
*
* * *
<ESC>[4w
Set 10 cpi
Ĝ
*
* * *
<ESC>[4y
Selecting NLQ printing quality at 10 cpi
Ĝ
*
* * *
<ESC>[4z
Line density 8 lpi (= line spacing 1/8 inch)
Ĝ
*
* * *
<ESC>[5{
Select fanfold paper mode tractor 1
Ĝ
*
* * *
<ESC>[6{
Select fanfold paper mode tractor 2
Ĝ
*
* * *
<ESC>[50m
Proportional font OFF
Ĝ
*
* * *
<ESC>[50{
Page at print position
Ĝ
*
* * *
<ESC>[51{
Page at tear off position (perforation)
Ĝ
*
* * *
<ESC>[52{
Page at view position
Ĝ
*
* * *
<ESC>[53m
Overlining ON
Ĝ
*
* * *
<ESC>[55m
Overlining OFF
Ĝ
*
* * *
<ESC>[5n
Request status report
Ĝ
*
* * *
<ESC>[5w
Set 12 cpi
Ĝ
*
* * *
<ESC>[5y
NLQ with 12 cpi
Ĝ
*
* * *
<ESC>[5z
Graphics normal
Ĝ
*
* * *
<ESC>[6~
Initialize the printer
Ĝ
*
* * *
<ESC>[6 SP K
Set horizontal pitch to 6 cpi
Ĝ
*
* * *
<ESC>[6w
Set 15 cpi
Ĝ
*
* * *
<ESC>[6z
Graphics inverted
Ĝ
*
* * *
<ESC>[7w
Set 17.1 cpi
Ĝ
*
* * *
<ESC>[7y
Proportional font OFF
Ĝ
*
* * *
<ESC>[7z
Bit 8 = unchanged
Ĝ
*
* * *
<ESC>[8w
Reset double stroke
Ĝ
*
* * *
<ESC>[8y
Right justification ON
Ĝ
*
* * *
<ESC>[8z
Set bit 8 = 0
Ĝ
*
* * *
<ESC>[9 SP L
Set vertical spacing to 2 lpi
Ĝ
*
* * *
<ESC>[9w
Set double stroke
Ĝ
*
* * *
<ESC>[9y
Centering ON
Ĝ
*
* * *
<ESC>[9z
Set bit 8 = 1
Ĝ
<ESC>[g<n1> <n2><0>
Set graphics print to 60 dpi
Ĝ
<ESC>[g<n1> <n2><1>
Set graphics print to 120 dpi
Ĝ
<ESC>[g<n1> <n2><11>
Set graphics print to 180 dpi
Ĝ
<ESC>[g<n1> <n2><12>
Set graphics print to 360 dpi
88

Tally Dascom 2600/2610/PRN-7
MTPL
IBM
XL24
IBM
AGM
Epson
LQ-2550
Epson
LQ-2170
Code
Function
Ĝ
<ESC>[g<n1> <n2><2>
Set graphics print to 120 dpi
Ĝ
<ESC>[g<n1> <n2><3>
Set graphics print to 240 dpi
Ĝ
<ESC>[g<n1> <n2><8>
Set graphics print to 60 dpi
Ĝ
<ESC>[g<n1> <n2><9>
Set graphics print to 120 dpi
Ĝ Ĝ
<ESC>[j
Position paper back 1/180"
Ĝ
*
* * *
<ESC>[<n1> <n2>f
Set absolute horizontal and vertical position
Ĝ
*
* * *
<ESC>[<n>+w
Interface holding time n = 1 - 30 s
Ĝ
*
* * *
<ESC>[<n>+x
Head position horizontal in n/720", also paper load pos.
Ĝ
*
* * *
<ESC>[<n>SP q
Load menu
Ĝ
*
* * *
<ESC>[<n1>...<n5>+v
Paper handling options
Ĝ
*
* * *
<ESC>[<n1>...<n16>SP
Print transparent characters
Ĝ
*
* * *
<ESC>[<n1> <n2>f
Set absolute horizontal and vertical position
Ĝ
*
* * *
<ESC>[<n1> <n2>SP 0
Change character size
Ĝ
*
* * *
<ESC>[<n1> <n2>SP D
Select font
Ĝ
*
* * *
<ESC>[<n1> <n2>SP G
Set character/line spacing
Ĝ
*
* * *
<ESC>[<n1> <n2>r
Set top and bottom margin
Ĝ
*
* * *
<ESC>[<n1> <n2>s
Set left and right margin
Ĝ
*
* * *
<ESC>[<n> a
Set relative horizontal position
Ĝ
*
* * *
<ESC>[<n> d
Set absolute vertical position
Ĝ
*
* * *
<ESC>[<n> e
Set relative vertical position
Ĝ
*
* * *
<ESC>[<n> j
Relative horizontal position back (to the left)
Ĝ
*
* * *
<ESC>[<n> k
Relative vertical position back (to the top)
Ĝ
*
* * *
<ESC>[<n> p
Set HMI
Ĝ
*
* * *
<ESC>[<n> q
Set horizontal step
Ĝ
*
* * *
<ESC>[<n> SP \
Set additional spaces
Ĝ
*
* * *
<ESC>[<n> SP C
Select character size
Ĝ
*
* * *
<ESC>[<n> SP f
Set reduced spacing
Ĝ
*
* * *
<ESC>[<n> SP g
Set character spacing
Ĝ
*
* * *
<ESC>[<n> SP h
Line spacing
Ĝ
*
* * *
<ESC>[<n> SP s
Transmitsthe “n” character as an ASCII character (n= 0–255)
Ĝ
*
* * *
<ESC>[<n> SP U
Beginning of line (default value)
Ĝ
*
* * *
<ESC>[<n> SP V
End of line (default value)
Ĝ
*
* * *
<ESC>[<n> t
Set form length in lines
Ĝ
*
* * *
<ESC>[<n> u
Set horizontal tab
89

Tally Dascom 2600/2610/PRN-7
MTPL
IBM
XL24
IBM
AGM
Epson
LQ-2550
Epson
LQ-2170
Code
Function
Ĝ
*
* * *
<ESC>[<n> v
Set vertical tab
Ĝ Ĝ
<ESC>[\<n1><n2>
Perform relative horizontal step
Ĝ
<ESC>\<n1>;<n2>
Transparent mode for the characters following
Ĝ
<ESC>^
Transparent mode for the character following
Ĝ
<ESC>_<n>
Overline ON/OFF
Ĝ
Ĝ Ĝ Ĝ
<ESC>0
Set line feed to 1/8 inch
Ĝ
<ESC>1
Set line feed to 7/72 inch
Ĝ
Ĝ
Ĝ Ĝ
<ESC>2
Set line feed to 1/6 inch
Ĝ
<ESC>2
Set line feed to n/72 inch
Ĝ
Ĝ Ĝ
<ESC>3<n>
Set line feed to n/180 inch
Ĝ
<ESC>3>n>
Set line feed to n/216 inch
Ĝ Ĝ
<ESC>4
Italics ON
Ĝ
Ĝ
<ESC>4
Set beginning of form
Ĝ Ĝ
<ESC>5
Italics OFF
Ĝ
Ĝ
<ESC>5<n>
Autom. line feed ON/OFF
Ĝ Ĝ
<ESC>6
Print ASCII codes dec. 129 to dec. 159
Ĝ
Ĝ
<ESC>6
PC character set 2 (expanded)
Ĝ Ĝ
<ESC>7
Suppress ASCII codes 129 to 159
Ĝ
Ĝ
<ESC>7
PC character set 1 (standard)
Ĝ
<ESC>a<n>
Select orientation
Ĝ
Ĝ Ĝ
<ESC>A<n>
Line spacing n/60 inch
Ĝ
<ESC>A<n>
Prepare line spacing n/72 inch
Ĝ
<ESC>b<m><0>
Clear all tabs
Ĝ
<ESC>b<m><n><0>
Set vertical tabs in channels
Ĝ
Ĝ
Ĝ Ĝ
<ESC>B<0>
Clear all vertical tabs
Ĝ Ĝ
<ESC>B<n1>...<n16><0
>
Set vertical tabs
Ĝ
Ĝ
<ESC>B<n1>...<n64><0
>
Set vertical tabs
Ĝ
<ESC>c
Reset to initialization status
Ĝ
<ESC>c
Setting the horizontal motion index (HMI)
Ĝ
Ĝ
Ĝ Ĝ
<ESC>C<0><n>
Set form length in inches
Ĝ
Ĝ
Ĝ Ĝ
<ESC>C<n>
Set form length in lines
Ĝ
Ĝ
Ĝ
<ESC>d<n1> <n2>
Perform relative horizontal step
Ĝ
Ĝ Ĝ Ĝ
<ESC>D<0>
Clear all horizontal tabs
Ĝ
Ĝ
Ĝ Ĝ
<ESC>D<n1>...<n32><0
>
Set horizontal tabs
Ĝ
Ĝ
<ESC><DC2>
Condensed printing OFF
Ĝ
Ĝ
<ESC><DC4>
Double-wide printing OFF (set with <SO> or <ESC><SO>)
90

Tally Dascom 2600/2610/PRN-7
MTPL
IBM
XL24
IBM
AGM
Epson
LQ-2550
Epson
LQ-2170
Code
Function
Ĝ
Ĝ
Ĝ Ĝ
<ESC><SO>
Double-wide printing ON
Ĝ Ĝ
<ESC><SP><n>
Set character spacing
Ĝ Ĝ
<ESC>t<n>
Select character set
Ĝ
Ĝ Ĝ Ĝ
<ESC>T
Superscript or subscript OFF
Ĝ
Ĝ
Ĝ Ĝ
<ESC>U<n>
Unidirectional print ON/OFF
Ĝ Ĝ
<ESC>Un
Unidirectional print ON/OFF
Ĝ
Ĝ
Ĝ Ĝ
<ESC>W<n>
Continuous double width ON/OFF
Ĝ Ĝ
<ESC>w<n>
Double height print ON/OFF
Ĝ Ĝ
<ESC>x<n>
Set print quality (PQ)
Ĝ Ĝ
<ESC>x<0>
sets Draft or HS-Draft
Ĝ Ĝ
<ESC>x<1>
sets LQ or NLQ
Ĝ
<ESC>X
Font selection according to pitch and points
Ĝ
Ĝ
<ESC>X<n><m>
Set left and right margin
Ĝ
Ĝ
Ĝ Ĝ
<ESC>Y<n1> <n2>
Set graphics print to 120 dpi
Ĝ
Ĝ
Ĝ Ĝ
<ESC>Z<n1> <n2>
Set graphics print to 240 dpi
Ĝ
*
* * *
<ESC>+F
Assign character set G3
Ĝ
*
* * *
<ESC>|
Character generator LS3R
Ĝ
*
* * *
<ESC>}
Character generator LS2R
Ĝ
*
* * *
<ESC>~
Character generator LS1R
Ĝ Ĝ
Ĝ Ĝ Ĝ
<FF>
Form feed
Ĝ Ĝ
Ĝ
Ĝ Ĝ
<HT>
Horizontal tab jump
Ĝ
<HTS>
Set tab stop at actual horizontal position
Ĝ
<IND>
Line feed without CR
Ĝ Ĝ
Ĝ Ĝ Ĝ
<LF>
Line feed
Ĝ
<NEL>
Line feed with CR
Ĝ
<PLD>
Half step line feed
Ĝ
<PLU>
Half step line feed back
Ĝ
<RI>
Line feed without CR back
Ĝ
Ĝ
Ĝ Ĝ
<SI>
Condensed printing of 17.1 cpi ON
Ĝ
<SI>
Switching the character generator (SS 3)
Ĝ
Ĝ
Ĝ Ĝ
<SO>
Double-wide printing ON
Ĝ
<SO>
Switching the character generator (SS 2)
Ĝ Ĝ
Ĝ
Ĝ Ĝ
<VT>
Vertical tab jump
Ĝ
<VTS>
Set tab stop at current vertical position
91

Tally Dascom 2600/2610/PRN-7
7.2.1 PJL commands
These PJL commands can be used with internal Ethernet interface as well as with
external
TallyCom III Pocket interface.
This functionality may be activated via the parameter J
obcntl in the Advanced Menu.
Sequenc e
Brief description
"ESC"%-12345X@PJL Universal Exit Language (UEL)
@PJL ECHO ECHO command
@PJL EOJ
@PJL EOJ NAME=
EOJ (End of Job) commands
@PJL INFO STATUS INFO (Information Request) command
@PJL INFO CONFIG INFO of the printer configuration
@PJL INFO VARIABLES INFO of variables which can be s
et by
@PJL INFO MEMORY INFO about the memory of the printer
@PJL USTATUS DEVICE = ON
@PJL USTATUS DEVICE = OFF
@PJL USTATUS DEVICE =
VERBOSE
@PJL USTATUS JOB = ON
@PJL USTATUS JOB = OFF
USTATUS (unsolicited status)
commands
@PJL JOB NAME =
@PJL JOB FILE =
@PJL JOB START =
@PJL JOB END =
@PJL JOB COPY =
JOB (Start of Job) commands
@PJL ENTER LANGUAGE Exit PJL and start normal parser
@PJL INFO USTATUS List each type of unsolicited status
@PJL USTATUS TIMED Enables timed unsolicited status
7.2.2 Barcode
Even the standard version of your printer has the possibility of using up to 23
different MTPL barcode types.
Barcode mode can be accessed within every emulation. The user can
d
ecide whether barcode is activated permanently or activated
d
epending on the situation by means of an escape sequence.
The printer prints small barcode in 240 dpi and wider barcodes in 120
d
pi.
92

Tally Dascom 2600/2610/PRN-7
7.2.3 List of available MTPL barcodes
Type
Barcode
Type
Barcode
A*
2/5 Matrix (default)
N
UPC A (with HRI)
B*
2/5 Industrial
O
UPC A (without HRI)
C*
2/5 Interleaved
P
UPC E (with HRI)
D*
Code 11
Q
UPC E (without HRI)
E*
BCD Matrix
R*
Delta Distance (IBM)
F*
Code 39
S
Code 128
G*
Codabar
T
EAN 128
H
EAN 8 (with HRI)
1)
US-Postnet
I
EAN 8 (without HRI)
1)
KIX Barcode
K
EAN 13 (with HRI)
1)
Royal Mail Customer
Barcode
L
EAN 13 (without HRI)
1)
USPS Intelligent Mail
Barcode
M*
MSI/modified PLESSEY
*These barcodes may be printed out horizontal and vertical, the unmarked
only horizontal.
1) See description on following pages.
The barcode types K, L, N, O may be expanded by using Add-On Barcodes:
Add-On 2 and Add-On 5.
The information to be printed is transmitted in a “bracket” (DC4) A control
sequence (Header) defines the parameters of the used barcode once (e.g.
type, ratio, etc.). If no header is defined, the informaton in the “bracket” will
be printed in Code 2/5 Matrix.
Please note that within the Barcode environment the barcode commands
h
ave priority in case of conflicts with the emulation.
Additional information is provided in the Barcode Programmer’s
A
pplication Manual on this CD-ROM.
7.2.4 US Postnet barcode
Postnet is a special US-American type of barcode. Is printed in character size.
Numeric
values from 0 to 9 are printable.
After activating this barcode type, numeric characters from 0 (hex. 30) to 9 (hex. 39)
are interpreted as barcode figures. All other characters terminate the Barcode
mode.
Exception: the TAB function (hex. 09) is allowed within Barcode mode. The Postnet
sequence is accessible in every emulation.
The character (e.g. CR = carriage return, hex. 0D), which terminates the
b
arcode is not printed or carried out. US Postnet barcode does not
require a barcode bracket.
Example:
ASCII
ESC
[1SPP12345
CR
93

Tally Dascom 2600/2610/PRN-7
HEX
1B5B31207031323334350D
The numbers 1 to 5 are printed as Postnet stripes.
7.2.5 Royal Mail Customer barcode
The Royal Mail Customer barcode is a special Mail type barcode. It is printed in
character size. Numeric values from 0 to 9 and alpha- numeric values from A to Z are
printable. After activating this barcode type, numeric characters from 0 (hex.30) to 9
(hex. 39) and alphanumeric values from A (hex. 41) to Z (hex. 5A) are interpreted as
barcode figures. Lower cases from a (hex. 61) to z (hex. 7a) are automatically converted
to capital characters. Control characters from hex. 0 (dec. 0) to hex.1F (dec. 31)
terminates this barcode mode. All other characters are ignored. Exception: the TAB
function (hex. 09) is allowed within Barcode mode. The Royal Mail Customer sequence
is accessible in MTPL emulation. The printer prints barcode in LQ.
T
he character (e.g. CR = carriage return, hex. 0D), which terminates the
b
arcode is not printed or carried out.
R
oyal mail customer barcode does not required barcode bracket.
Example:
ASCII
ESC[1SPkSO36XY1A
CR
HEX1B5B31206B534F3336585931410D
The characters “SO36XY1A” are printed as Royal Mail Customer stripes.
7.2.6 KIX barcode
The KIX barcode prints numeric values from 0 to 9 and alpha-numeric values from
A to Z as barcode characters.
After activating this barcode type, numeric characters from 0 (hex. 30) to 9 (hex. 39) and
alphanumeric values from A(hex. 41) to Z (hex. 5A) are interpreted as barcode figures.
Lower cases from a (hex. 61) to z (hex. 7a) are automatically converted to capital
characters. Control characters from hex. 0 (dec. 0) to hex.1F (dec. 31) terminates this
barcode mode. All other characters are ignored. Exception: the TAB function (hex. 09) is
allowed within Barcode mode. The KIX sequence is accessible in MTPL emulation. The
printer prints barcode in LQ.
T
he character (e.g. CR = carriage return, hex. 0D), which terminates the
b
arcode is not printed or carried out. KIX barcode does not require a barcode
b
racket.
Example:
ASCII
ESC
[2kSO36XY1A
CR
HEX
1B5B316B534F3336585931410D
The characters “SO36XY1A” are printed as KIX stripes.
7.2.7 USPS Intelligent Mail barcode
The USPS Intelligent Mail barcode is a 4-state barcode which works in MTPL, IBM and
Epson emulation. 4-state barcode data must be converted into only 0, 1, 2 or 3. Each
number represents one of the four possible bars. Tabs (Hex 09) and spaces can separate
either the bars or the barcodes horizontal, but every other character below Hex 20 will
terminate barcode mode.
You can enter the barcode mode with the sequence ESC [ ? 11 ~, the sequence ESC [ 10
~ exits the barcode mode.
94

Tally Dascom 2600/2610/PRN-7
Example:
ASCII
ESC
[9SPK<data>
HEX
1B5B39026B
<data>
7.2.8 LC printing
Certain professional applications may require unusually Large character sizes.
Therefore your printer has the possibility of scaling standard size characters up to factor
99 by means of control sequences (LCP*).
The Header sequence defines the parameters (e.g. height) once. This definition
remains until the printer is switched off. The printable LCP* information is transmitted
in an LCP “bracket” (SI).
The following character sets (with national characters) are available.
ID
23
24
40
5B
5C
5D
5E
60
7B
7C
7D
7E
US ASCII
01
# $ @
[ \ ] ? ` { | } ¯
GERMAN
02
# $ § Ä * Ü ? ` ä * ü ß
The character sets are selected via the following LCP sequence ESC ”P“ ”L“ ”S“ n
ESC ”\“. The value of n may range between 01 and 02 (as ASCII characters) – see ID
column in the above table.
To select e.g. the German character set, you must use the following data set:
ASCII
ESC
P L S 0 1
ESC
\
HEX
1B
50 4C
53 30 31 1B 5C
DEC
27
80
76 83 48
49* 27
92
The printout of LCP characters can be selected in all of the emulations.
P
rerequisite: Printer must be in Barcode mode.
N
ote that this printer supports some scalable fonts in the LQ-2170 emulation
i
f a compatible driver is used.
95

Tally Dascom 2600/2610/PRN-7
7.2.9 List of additional control Codes
You can use both the ESC sequences and the control codes
Sequences
Control codes
Function
<ESC>[?10~
<ESC>[?11~
<ESC> PSC 0 <ESC> \
<ESC> PSC 1 <ESC> \
<ESC> PLS <n> <ESC> \
<ESC>[<n><SP>s
<ESC>[20<SP>s
<ESC>[16<SP>s
<ESC>[25<SP>s
<ESC>[15<SP>s
<ESC>[26<SP>s
<ESC>[1 SP p
<ESC>[1 SP k
<ESC>[2 SP k
<ESC>[9 SP k
—
—
—
—
—
—
<DC4>
<DLE>
<EM>
<SI>
<SUB>
—
—
—
—
Barcode Off
Barcode On
Unsecured mode
Secured mode
LCP character set
Sends a character as ASCII
character;
n > 0–255 decimal
Barcode bracket
Start code LCP Header
Termination code
Header LCP bracket
Start code
Barcode-Header
US-Postnet Barcode
Royal Mail Customer
Bar- code
Kix-Barcode
Header
Function
<DLE> [!] nn EM LCP header
[ ] = optional
nn = factor
<SUB> [F] a [nn][;xyz][;p] EM Barcode header
[ ] = optional
a = Barcode type
p = 0: Barcode horizontal
p = 9: Barcode vertical
Additional information is provided in the Barcode Programmer’s
A
pplication Manual on this CD-ROM.
96

Tally Dascom 2600/2610/PRN-7
7.3 Interfaces Specifications
Your matrix printer offers connectivity via a parallel interface, USB and Ethernet
interface. Serial I/O RS232C interface is an option. This appendix informs you about the
parallel Interface, USB, Ethernet interface and optional serial interface RS232C, and
describes the communication between your computer and the printer.
These interfaces are linked to form a called shared interface. Your printer can be
configured to use only one interface or three alternately. When only one interface is
used, it is monitored by the printer. If the printer is configured to use three interfaces
simultaneously it monitors all interfaces for incoming data. As soon as the printer
recognizes a signal, it switches to the respective interface and sends the BUSY signal to
the other interface. After finishing the data transmission, the printer remains switched to
the interface for a certain period of time (30 seconds). When this time has elapsed, the
controller again enables all interfaces and the sequence described restarts. If incoming
data is on the other interface and the current print position is not “Top of Form”, a form
feed is carried out.
97

Tally Dascom 2600/2610/PRN-7
7.3.1 Parallel I/O IEEE 1284
The bidirectional parallel interface offers the “nibble” mode of IEEE1284 interface. This
enables installation in accordance with Windows “Plug & Play”.
The standard parallel interface is able to transfer data at a speed of max. 30, 000 bytes
per second. When the receiving buffer is full, the data input is blocked until the data
buffer is empty.
C
onnector assignment
Co
nnector no.
Direction
Printer–PC
Signal
1
2
3
4
5
6
7
8
9
10
11
12
13
14
15
16
17
18
19–30
31
32
33
34–35
36
䊹
䊹
䊹
䊹
䊹
䊹
䊹
䊹
䊹
䊻
˩
˩
˩
˩
䊹
˩
䊹
STROBE (active low)
DATA 1
DATA 2
DATA 3
DATA 4
DATA 5
DATA 6
DATA 7
DATA 8
ACK (active low)
BUSY
PAPER EMPTY (PE)
SELECT
AUTO FEED (active low)
not used
SIGNAL GROUND
CHASSIS GROUND
5 V (Imax = 500 mA)
SIGNAL GROUND INIT
(active low) ERROR
(active low) SIGNAL
GROUND not used
SELECT IN
Transmission length: max. 2,0 m
98

Tally Dascom 2600/2610/PRN-7
7.3.2 Ethernet I/O 10/100 Mulitprotocol
The Ethernet interface enables the printer to connect to local area networks. Its
attributes are:
Hardware
LAN/Ethernet: RJ45, Ethernet 100BaseTX with 100
Mbps
(IEEE802.3u), 10Base-T with 10 Mbps
(IEEE802.3)
Speed: 100 Mbps / Full Duplex
Supported operating
Systems
Windows XP, Windows Server 2003, Windows 2000,
Windows NT, Windows 7, Windows Vista, Windows
Server 2008, Windows Server 2013, Windows 8
Linux
Unix
Sun
Solaris
Supported Protocols
SNMP
SMTP
TCP/IP
FTP
Ipr / Ipd Port 9100
Designation of IP
Address
DHCP
BOOTP
Static (manually via the printer’s control panel)
Configuration
HTTP
TCP/IP
Status
SNMP
TCP/IP
SMTP
PING
Management
Web Panel
HP Web Jet Admin
E-Mail notification with SMTP
Pre-string, Post-String, String Replacement
Setup
Setup via the printer’s control
panel
Web Panel
(HTTP/HTML)
E
thernet TCP/IP
When using your printer in a local network with Ethernet connections and the TCP/IP
protocol, you have to assign address information.
Address information for the Ethernet Port can only be made available by your
network administrator, who has the necessary rights to install Printers on the
n
etwork and/or make any changes.
99

Tally Dascom 2600/2610/PRN-7
Example of a Printer connected to a computer in an Network
䕺
The assumed address space corresponds to the TCP/IP address, class C, 192.168.1.xxx.
䕺 The subnet mask to be used is 255.255.255.0.
䕺 The address of the router, or gateway, is 0.0.0.0, if not available.
E
xample of several devices in an Ethernet
7.3.3 USB 2.0 I/O – Full Speed
The USB interface conforms to the Universal Serial Bus 2.0 Specifications. It supports
the Full Speed mode at 12 Mbps. It uses the “B” type USB connector.
100

Tally Dascom 2600/2610/PRN-7
7.3.4 Optional Serial Interface RS232C
Your printer’s serial interface supports the RS232C specification. The signals are
received and transmitted by a 9 pin connector.
Basically 3 lines are enough for exchanging information between computer and printer
(one receive line, one send line, one line for common grounding).
Type
RS232C interface
Synchronization
Asynchronous
Transmission rate
600 Baud to 19200 Baud
Signal status
OFF (log.1) -3 V to -15 V
ON (log. 0) +3 V to +15 V
Connection cable
up to 15 m length
Interface connections
ITT Cannon connector, series DB-9 S
Transmission protocol
XON/XOFF, ENQ/STX, READY/ BUSY,
Robust XON/XOFF, ETX/ ACK, ACK/NAK
Capacity of data buffer
512Byte min. 256KByte max
Connector assignment
Connector no.
Direction Printer–PC
Signal
3 ė
TxD
4 ė
DTR
2 ĕ
RxD
6 ĕ
DSR
7 ė
RTS
8 ĕ
CTS
5
Signal Ground SG
Shield
Frame Ground FG
101

Tally Dascom 2600/2610/PRN-7
1
) The serial cable length must not exceed 15 meters.
2
) Make sure the “Interface Setup” selects serial interface and the settings are the
same as PC communication port settings. See example below:
102

Tally Dascom 2600/2610/PRN-7
Interface cable (serial interface)
The cables used must be shielded. The cable shield must be connected to the connector
shield on both ends.
PC/AT˄9 Pin˅ Printer˄9 Pin˅
RxD
2 3 TxD
TxD
3 2 RxD
CTS
8 4 DTR/RDY
SG
5 5 SG
DSR
6
DTR
4
PC/AT˄25 Pin˅ Printer˄9 Pin˅
FG
1 FG
TxD
2 2 RxD
RxD
3 3 TxD
CTS
5
4
DTR/RDY
SG
7 5 SG
DSR
6
DTR
20
I
t depends on the menu setting whether DTR or RDY (Ready) is active at Pin
4
.
䕺
I
nput signals
Signal
Function
CTS
DSR
RxD
Clear to Send
Data Set Ready
Receive Data
䕺 Output signals
Signal
Function
DTR
RTS
READY
TxD
Data Terminal Ready
Request to Send
Ready to receive
data Transmit Data
103

Tally Dascom 2600/2610/PRN-7
Protocols
䕺 M
emory mode XON/XOFF
The received characters are stored in a FIFO buffer (first in/first out).
The characters are processed in this buffer.
The buffer capacity can be adjusted from 0 to 128 Kb.
If the buffer is full, the interface signals NOT READY (signal acknowledgement: Level 1,
-12 V) and XOFF (hex. 13, dec. 19). This results in stopping the data transmission. When
the FIFO buffer is empty again, the interface signals READY (level 0, +12 V) and XON
(hex.11, dec. 17). Data transmission can be continued.
In addition, the READY signal is influenced by the status of the printer (On/Off Line). If the
printer assumes an undefined state, the interface also signals NOT READY and XOFF.
䕺 Memory mode Robust XON/XOFF
Robust XON/XOFF is similar to XON/XOFF. However, the state of the printer (XON or
XOFF) is also periodically transmitted via the TxD line in the case of Robust XON/XOFF.
䕺 E
xtended menu functions with the ENQ/STX and ETX/ACK protocols selected
protocol
104

Tally Dascom 2600/2610/PRN-7
䕺 E
NQ/STX protocol
In addition to this XON/XOFF message, the possibility exists of requesting a status byte
from the printer using the ENQ code (hex. 05, dec. 5). The STX code (hex 02, dec. 2) is
used to clear any error messages (parity error, buffer overflow).
Status byte
Bit 0-1
BUSY
Bit 1-1
Off Line
Bit 2-0
Paper end
Bit 3-1
Always 1
Bit 4-1
Cover open
Bit 5-1
Buffer overflow
Bit 6-1
Parity or frame error
Bit 7-0
Always 0
STX (hex02):
ENQ (hex05):
XON/XOF:
HandThr.= ON:
HandThr.=
OFF:
Clears any previous parity or framing error as well as any buffer
overflow error.
The current printer status is sent to the host.
This protocol is automatically used for data flow control and printer
status handling.
The STX and ENQ characters are not filtered out of the data stream
and control the interface in addition.
The STX and ENQ are filtered out of the data stream and handled
immediately by the interface.
䕺 E
TX/ACK protocol
ETX (hex03):
XON/XOFF:
ACK (hex06):
HandThr.=ON:
HandThr.
=OFF:
Acknowledgement informing the host that further data may be
transmitted.
This protocol is used in addition to data flow control and printer status
handling.
Block end character.
An ETX is not acknowledged by ACK before all previously arrived data
have been printed.
When the printer receives an ETX, it returns an ACK to the host. Any
previously sent data or blocks may still be present in the printer buffer.
䕺 A
CK/NAK protocol
The ACK/NAK Protocol is a so called block Protocol.
Normally the Blocks are starting with the Block Start Character (STX, dec 02, hex 02) and
end with a Block End Character (ETX, dec 03, hex 03).
As soon as a Block is received by the printer it acknowledges it with the Acknowledge
Character (ACK, dec 06, hex 06).
If there is an Error in the transmission a Not-Acknowledge-Character (NAK, dec 21, hex
15) is being sent back. As a block end character other codes are possible.
One can check the printer condition/status; During the transmission of graphic data or
download character per se problems can come up within the block mode as in this data
block end characters can be transmitted as normal graphic or other data.
105

Tally Dascom 2600/2610/PRN-7
8 Options and accessories
The following options can be ordered for your printer.
8.1 Options
Tractor Unit 2600
Tractor Unit 2610
Name Part no.
Second Tractor for push and pull position
(rear, top and front installable).
99993
Serial Interface 2600/2610
Name Part no.
Serial Interface RS232C, 9pin female
99994
Name Part no.
Second Tractor for push and pull position
(rear, top and front installable).
99992
106

Tally Dascom 2600/2610/PRN-7
8.2 Consumables
Ribbons
Name
Part no.
Ribbon cassette monochrome black for
narrow model
99061
Ribbon cass
ette monochrome black for
wide
99071
Refill Kits
Name
Part no.
Refill Kit monochrome black fabric for
narrow
99002
Refill Kit monochrome black fabric for wide
model, on demand
99072
8.3 Accessories
Programming manuals
The following programming manuals are available. You can download the manuals
from
our internet page.
Name
Part no.
Programmer’s application manual MTPL
(in English)
379 298
Programmer’s application manual Barcode
(in English)
379 300
Programmer’s application manual Epson
(in English)
379 302
107

Tally Dascom 2600/2610/PRN-7
9 General Specifications
9.1 Printer Specifications
P
rint System Mono-chrome serial impact dot matrix
Print Technology Uni-/bi-directional logic seeking for text and graphics
Print Head
Number of pins: 24 pins (2 x 12; staggered)
Firing frequency: Normal mode: 2 kHz
Pin diameter: 0.25 mm
Distance between pins: horizontal 1/20 inch, vertical 1/90 inch
Life: 500 million strokes/pin @ Draft mode
Print Speed
Pitch HS Draft Draft NLQ LQ in CPS
(characters per second)
10 CPI 500 333 222 111
12 CPI 500 400 267 133
15 CPI *) 500 500 333 167
15 CPI 500 500 167 167
17.1 CPI 286 285 190 190
20 CPI 333 333 222 222
17.1 CPI **) 571 --- --- ---
20 CPI **) 680 --- --- ---
Character Pitch 5 / 6 / 7.5 / 8.6 / 10 / 12 / 15 / 17.1 / 20 CPI (characters per inch)
Print attributes in all
character pitches
Double width / italics / right justification / shadowed / auto centered / double height
/ bold / proportionally spaced / underlined / overlined / superscript / subscript;
Scalable with special LQ-2170 fonts
Character Size
Height: 3.32 mm (inclusive descenders)
Width: max. 2.43 mm
Font Matrix
Pitch HS Draft Draft NLQ LQ
(Matrix/DPI)
10 CPI 24x8/80H 24x12/120H 24x18/180H 24x36/360H
12 CPI 24x8/96H 24x10/120H 24x15/180H 24x30/360H
15 CPI *) 16x8/120H 16x8/120H 16x12/180H 16x24/360H
15 CPI 24x8/120H 24x8/120H 24x18+6/360H 24x18+6/360H
17.1 CPI 24x12+2/240H 24x12+2/240H 24x18+3/360H 24x18+3/360H
20 CPI 24x10+2/240H 24x12+2/240H 24x15+3/360H 24x15+3/360H
17.1 CPI **) 24x06+1/240H --- --- ---
20 CPI **) 24x05+1/240H --- --- ---
Paper Feed
Feed speed: 5 ips (tractor and friction)
Feed first line (6lpi): 43 ms
View / Tear position: 5 ips
Reverse motion: up to max form length of 14 inches
*) Only with ESC/P (sub-/superscript, 15 CPI) and MTPL Micro-script
**) Reduced matrix, selectable by menu, named Ultra-Draft
108

Tally Dascom 2600/2610/PRN-7
T
ab Speed
50 ips
Graphic Densities
Horizontal: 60 / 72 / 80 / 90 / 120 / 180 / 240 / 360 DPI (dot per inch)
Vertical: 90 / 180 / 360 DPI
Print width
Narrow version Wide version
10 CPI: 80 CPL 136 CPL (characters per line)
12 CPI: 96 CPL 163 CPL
15 CPI: 120 CPL 204 CPL
17.1 CPI: 137 CPL 233 CPL
20 CPI: 160 CPL 272 CPL
Fonts,
r
esident
Print qualities:
Ultra-Draft, HS-Draft and Draft in Data Print Quality
NLQ same as LQ with reduced matrix, LQ
Roman, Roman PS, Sans Serif, Sans
Serif PS, Courier, Courier (IBM®),Courier PS (IBM®), OCR A, OCR B, Prestige,
Script, Orator, Gothic, Souvenir
DLL Character Sets in EPSON® and IBM® format
Barcodes,
r
esident
Selectable via programming:
Code 2/5 Industrial
Code 2/5 Interleaved
Code 39
Code EAN-8 with HRI (human readable index)
Code EAN-8 without HRI
Code EAN-13 with HRI
Code EAN-13 without HRI
Code UPC-A with HRI
Code UPC-A without HRI
Code UPC-E with HRI
Code UPC-E without HRI
Code 128 EAN (also called EAN-128)
Code 128
U.S. Postnet (fix format, non-scalable)
KIX Barcode
Royal Mail Customer Barcode
USPS Intelligent Mail Barcode
Emulation MTPL, EPSON® ESC P/2 (LQ2170), EPSON® ESC P (LQ 2550), IBM® PP XL 24e
Code Pages and
National Character
Sets
See the list at the end of the Printer Specifications where Fonts, Code pages
and
available pitch sizes are given by corresponding relationships.
Line Spacing 2 LPI / 3 LPI / 4 LPI / 6 LPI / 8 LPI / 12 LPI / 1/72" / 1/180" / 1/360 inches
109

Tally Dascom 2600/2610/PRN-7
P
aper Handling
Feeding method: Friction (Single) and Tractor (FF-front / FF-rear / FF-pull)
Path selection: By selection lever located at the right device side
Paper path: Cut sheets: Front in, front or top out
Fanfold paper: Front or rear in, top out
For details enter the Paper Specifications –
9.3 below
Ribbon Type
Ribbon Cartridge, monochrome;
Wide version: 470 x 93 x 39mm max, (WxDxH), fabric: 13mm height
Narrow version: 330 x 93 x 39mm max, (WxDxH), fabric: 13mm height
Ribbon Life
Wide version: 12 million characters (rolling Draft 10 CPI)
Narrow version: 6 million characters (rolling Draft 10 CPI)
Windows Drivers
Windows Server 2000 / 2003 / 2008 / 2012
Windows 7 and Windows 8 (for 32 and 64bit versions)
Î covers Windows XP, Windows 2000 and Windows Vista.
Interfaces
Ethernet 10/100MHz
Parallel (Bi-directional IEEE-1284 nibble mode)
USB 2.0 (Full Speed 12 MHz, B type connector)
For details enter the Interface Specifications –
7.3 above
Input Data Buffer
Up to 256KB
Operation Panel
LED version: 4 keys and 5 indicator LEDs
LCD version: 6 keys and LCD with 2 lines x 16 characters
Self test
Menu setting print out
Rolling ASCĊ80 or 136
Hex-Dump
Noise Level
Sound pressure level = d 55 dB(A) in LQ
Environmental
C
onditions
Temperature Operating:
+10 to +35°C.
Storage: - 5 to +45°C
Transport: - 40 to +70°C
Humidity Operating: 16 to 73% RH (No condensation)
Storage: 5 to 95% RH (No condensation)
Transport: 5 to 95% RH (No condensation)
Dimensions
Wide version: 600 mm (W) x 267 mm (D) x 202 mm (H)
Narrow version: 458 mm (W) x 267 mm (D) x 202 mm (H)
Weight
Wide version: 10.62 kg
Narrow version: 8.1 kg
110

Tally Dascom 2600/2610/PRN-7
P
ower Supply
Unit type: Autosensing wide range power supply
Power cord: Detachable
Voltage rating: AC 100 to 240V / 47Hz to 63Hz
Nominal power: 30W
ESD: Comply with IEC801-2;
Contact discharge: 4kV
Air discharge: 8kV
Fuse
T6.3AH/250V
MTTR
< 15 minutes
Continuous
operation
Throughput: 422 p/h in Draft mode according IEC 10561:1999 (ECMA
132)
MTBF: 20.000 hours
Certifications CE, UL, FCC, ICES, Energy Star,
111

Tally Dascom 2600/2610/PRN-7
9.2 Non-Scalable Fonts, Code Pages and National Character Sets
ID for ESC R/ESC (
High Speed Draft
Draft
Roman
Sans Serif
Courier (incl. Courier
IBM)
OCR-B
OCR-A
Prestige
Script
Orator
Gothic
Souvenir
ISO USA
42XXXXXXXXXXXX
ISO UK
41XXXXXXXXXXXX
ISO France
52XXXXXXXXXXXX
ISO Germany
4BXXXXXXXXXXXX
ISO Italy
59XXXXXXXXXXXX
ISO Sweden
48XXXXXXXXXXXX
ISO Norway
60XXXXXXXXXXXX
ISO Spain
5AXXXXXXXXXXXX
ISO Portugal
4CXXXXXXXXXXXX
Epson USA
00XXXXXXXXXXXX
Epson France
01XXXXXXXXXXXX
Epson Germany
02XXXXXXXXXXXX
Epson UK
03XXXXXXXXXXXX
Epson Denmark I
04XXXXXXXXXXXX
Epson Sweden
05XXXXXXXXXXXX
Epson Italy
06XXXXXXXXXXXX
Epson Spain I
07XXXXXXXXXXXX
Epson Japan
08XXXXXXXXXXXX
Epson Norway
09XXXXXXXXXXXX
Epson Denmark II
0AXXXXXXXXXXXX
Epson Spain II
0BXXXXXXXXXXXX
Epson Latin America
0CXXXXXXXXXXXX
Epson Korea
0DXXXXXXXXXXXX
Epson Legal
40XXXXXXXXXXXX
CRO-ASCII
3CXX-XX-------
Arabic Farsi
96--*1*1*1*1------
Arabic Urdu
97--*1*1*1*1------
Greek DEC
46XX
-X -------
-
ELOT 928 (Greek)
6CXX-X--------
CP437 Latin US
80XXXXXXXXXXXX
CP737 Greek
93XX
-X -------
-
CP775 Baltic
A6XX-XX-------
CP850 Latin 1
82XXXXXXXXXXXX
CP851 Greek
88XX-X--------
CP852 Latin 2
87XX-XX-------
CP857 Turkish
8DXX-XX-------
CP858 (IBM with €)
9EXXXXXXXXXXXX
CP860 Portugal
84XXXXXXXXXXXX
CP861 Icelandic
94XXXXXXX-----
CP863 French Canada
85XXXXXXXXXXXX
CP864 Arabic
8C--*1*1*1*1------
CP864 Arab. Extended
95--*1*1*1*1------
112

Tally Dascom 2600/2610/PRN-7
ID for ESC R/ESC (
High Speed Draft
Draft
Roman
Sans Serif
Courier (incl. Courier
IBM)
OCR-B
OCR-A
Prestige
Script
Orator
Gothic
Souvenir
CP865 Nordic
86XXXXXXXXXXXX
CP866 Cyrillic
8EXX-XX-------
CP866 Bulgaria
9DXX-XX-------
CP866 Ukraine
8FXX-XX-------
CP866 Kazakhstan
90XX-XX-------
Siemens Turkish
9BXX-XX-------
DEC Turkish
9CXX-XX-------
CP1250 Win Latin 2
70XX-XX-------
CP1251 Win Cyrillic
71XX-XX-------
CP1252 Win Latin 1
72XXXXXXX-----
CP1253 Win Greek
73XX
-X -------
-
CP1254 Win Turkish
74XX-XX-------
CP1256 Arabic
76--*1*1*1*1------
CP1257 Baltic
77XX-XX-------
8859-1 Latin 1
25XXXXXXXXXXXX
8859-1 Latin 1 (SAP)
2BXXXXXXXXX---
8859-2 Latin 2
26XX-XX-------
8859-5 Cyrillic
2AXX-XX-------
8859-6 Arabic
24--*1*1*1*1------
8859-7 Greek
2DXX
-X -------
-
8859-9 Turkish
2EXX-XX-------
8859-15 Latin 9 (Euro)
2FXXXXXXXXX---
BRASCII
6DXXXXXXX-----
Abicomp
6EXXXXXXX-----
Roman 8
4DXXXXXXX-----
Coax/Twinax(Hebrew)
4FXXXX*2--*3*4---
New-437 (Hebrew)
81XXXX*2--*3*4---
New-DIG 850 (Hebr.)
83XXXX*2--*3*4---
Old-Code 860 (Hebr.)
98XXXX*2--*3*4---
Flarro 863 (Hebrew)
99XXXX*2--*3*4---
Table 865 (Hebrew)
9AXXXX*2--*3*4---
Mazovia (Poland)
92XX-XX-------
Kamenicky (Czech)
91XX-XX-------
*1: only in 10 and 12 cpi, *2 : same as Sans Serif, *3 : same as Roman, *4 : only in 10 cpi
113

Tally Dascom 2600/2610/PRN-7
9.3 Paper Specifications
9.3.1 Standard Tractor (Front, Rear and Pull position) – narrow and wide versions
Usable figures of print area (dimensions in mm (inches))
Pos Titel
Narrow model.
Wide.model
min
max
min
max
A
paper width,
76.2
(3”)
278
(11”)
76.2
(3”)
420
(16.5”)
B
printable line length
203.2
(8”)
345.44
(13.6”)
C
Max left tractor position to first
printable character
38
(1.4”)
38
(1.4”)
D
Max right tractor position to first
printable character
38
(1.4”)
38
(1.4”)
E
top margin
1
)
0
(0/72”)
77.6
(220/72”) 0 (0/72”)
77.6
(220/72”)
E1
top margin, default setting
1
)
4.23
(12/72”)
4.23
(12/72”)
F
form length
1
)
76,2
(3”)
559
(22”)
76.2
(3”)
559
(22”)
G
bottom margin
0 0 0
0
H
left margin, default setting “0”
1
)
0
198.1
(78/10”)
0
340.4
(134/10”)
I
right margin, default setting “80” 1)
or “136/10”
2
203.2
(80/10”)
2
345.44
(136/10”)
reverse paper feed for front and rear
tractor path
356
(14”)
356
(14”)
1
) Figure variable setting via interface or panel
E1
E
A
B
C
D
F
H
I
114

Tally Dascom 2600/2610/PRN-7
9.3.2 Front Feed / Manual Insertion – Narrow and wide versions
Usable figures of print area (dimensions in mm (inches))
Pos Title
Narrow model
Wide model
min
max
min
max
A
paper width,
76
(3”)
278
(11”)
76
(3”)
420
(16.5”)
B
printable line length
203.2
(8”)
345.44
(13.6”)
C
Max left paper guide position to first
printable character
38
(1.4”)
38
(1.4”)
D
Max right paper guide position to first
printable character
38
(1.4”)
38
(1.4”)
E
top margin
1
)
0
(0/72”)
77.6
(220/72”)
0
(0/72”)0
77.6
(220/72”)
E
top margin, default setting
1
)
4.23
(12/72”)
4.23
(12/72”)
F
form length
148
(5.8”)
420
(16.5”)
148
(5.8”)
420
(16,5”)
G
bottom margin
0 0 0
0
H
left margin, default setting “0”
1
)
0
198.1
(78/10”)
0
340.4
(134/10”)
I
right margin, default setting “80”
1
)
or “136/10”
2
203.2
(80/10”)
2
345.44
(136/10”)
reverse paper feed
(front ejection)
420
(16.5”)
420
(16,5”)
9.3.3 Paper Weights
Narrow and wide
Single Part Forms
60 – 120g/m²
Number of copies
1 + 5
Multi Part Forms – original sheet
45 – 65g/m²
Multi Part Forms – copy sheets
45 – 56g/m²
Maximum thickness
0.50mm
1
) Figure variable setting via interface or panel
115

Tally Dascom 2600/2610/PRN-7
10 Maintenance
Your printer requires very little care. Occasional cleaning and replacement of the ribbon
cartridge are all that is required. Cleaning is recommended approximately every 6
months or 300 hours of operation, whichever is sooner. Lubrication of the printer is not
usually necessary. If the print head carriage does not move smoothly back and forth,
clean the printer in the manner described in this chapter. If the problem continues,
contact your dealer.
S
witch printer off and unplug the power cord from the mains before doing
a
ny maintenance work.
10.1 Cleaning
The housing and the top cover of the printer help protect it against dust, dirt, and other
contaminants. However, paper produces small particles that accumulate inside the
printer. This section explains how to clean and vacuum the printer and how to clean the
paper bail rollers. It is easier to clean the printer when the cover is open.
10.1.1 Cleaning and Vacuuming the Printer
If the print head carriage does not move smoothly back and forth or paper particles have
accumulated in the printer, clean the printer.
To clean and vacuum the printer:
1) Remove any paper from the printer. Make sure that the power is off, and then
disconnect the printer power cord.
2) Using a soft vacuum brush, vacuum the exterior of the printer. Also vacuum the cut
sheet edge.
3) Use a soft, damp cloth to wipe the exterior of the printer, including the cover. A mild
detergent may be used. Do not use solvents, kerosene, or abrasive cleaning
materials that may damage the printer.
4) Open the cover of the printer and remove the ribbon cartridge. Using a soft vacuum
brush, gently vacuum the platen, the print head carriage and shaft, and surrounding
areas. You can easily slide the print head to the left or right when the power is off. Be
careful not to press too hard on the flat head cable that extends from the print head
carriage.
5) Re-install the ribbon cartridge.
10.1.2 Cleaning the Paper Rollers
Clean the platen and paper bail rollers occasionally or when stains or smudges appear
on the paper. Use a mild detergent as appropriate. Do not use alcohol to clean the
platen or the rollers. Alcohol may cause the rubber to harden.
To clean the rollers and the platen:
1) Apply a small amount of water to a soft cloth. Avoid spilling liquid inside the printer.
2) Place the cloth against the platen and manually rotate the hand wheel.
3) Repeat this procedure for each roller.
4) To dry the platen, place a dry cloth against the platen and the rollers and manually
rotate the paper feed knob.
116

Tally Dascom 2600/2610/PRN-7
10.2 Troubleshooting
Your printer is extremely reliable, but occasionally problems may occur. This chapter
provides information on some of the common problems you may encounter and how
you may solve them. If you encounter problems that you cannot resolve, contact your
dealer or service partner for assistance.
10.2.1 Print Quality Problems and Solutions
Problem
Solution
Printing is too light or too
dark.
t.BLFTVSFUIBUUIFSJCCPODBSUSJEHFJTQSPQFSMZ
installed and that the ribbon feeds smoothly.
t3FQMBDFUIFSJCCPOJGOFDFTTBSZ
t.BLFTVSFUIBt the print gap lever is set for the
thickness of your paper.
Smears and stains appear
on the page.
t.BLFTVSFUIBUUIFQSJOUHBQMFWFSJTTFUGPSUIF
thickness of your paper.
t$IFDLGPSSJCCPOXFBS3FQMBDFUIFSJCCPOJG
necessary.
t$IFDLXIFUIFSthe tip of the print head is dirty.
Clean the head with a soft cloth if necessary.
t5IFQSJOUIFBENBZOFFEUPCFSFQMBDFE
Printing is erratic or the
wrong characters are
printed. Many “?” or
unexpected characters are
printed.
t.BLFTVSFUIBUUIFJOterface cable is securely
connected to both the printer and computer.
t.BLFTVSFUIBUUIFQSJOUFSESJWFSTFMFDUFEJOZPVS
software is the same as the emulation selected on
the printer.
t$IFDLUIFMFOHUIPGUIFJOUFSGBDFDBCMF.BYJNVN
Parallel & USB: 2 meters, Serial: 15 meters)
t5SZBOPUIFSJOUFSGBDFDBCMF
The page is blank.
t.BLFTVSFUIBUUIFSJCCPODBSUSJEHFJTQSPQFSMZ
installed.
t.BLFTVSFUIFHBQMFWFSJTTFUDPSSFDUMZ
The top margin is wrong.
t$IFDLUIFBQQMJDBUJPOUPQNBSHJOTFUUJOH
t"EKVTUUIF5PQ.BSHJOTFUUJOHJO1BHF4FUVQNFOV
if necessary.
Lines are double spaced
instead of single spaced.
t Change the Auto LF setting in the System Setup
menu to No.
The printer overprints on
the same line.
t Change the Auto CR setting in the System Setup
menu to No.
The next print line starts
where the previous line
ended instead of at the left
margin.
t Change the Auto CR setting in the System Setup
menu to Yes.
117
Tally Dascom 2600/2610/PRN-7
10.2.2 Paper Handling Problems and Solutions
Problem
Solution
Paper cannot be loaded or
fed.
t.BLFTVSFUIBUUIFQBQFSTFMFDUMFWFSMPDBUFEPO
the top right of the printer is set correctly.
Paper jams while loading.
t5VSOPGGUIFQSJOUFSBOESFNPWFUIFKBNNFE
paper. Remove any obstructions from the paper
path.
t.BLFTure that the Print Gap lever is set for the
thickness of your paper.
t.BLFTVSFUIBUUIFQBQFSJTOPUGPMEFEDSFBTFEPS
torn.
t.BLFTVSFUIBUUIFMFGUBOESJHIUUSBDUPSTBSFTFUTP
that the continuous forms are stretched tightly.
Paper jams while printing.
t5VSOPGGUIFQSJOUFSBOESFNPWFUIFKBNNFE
paper. Remove any obstructions from the paper
path.
t.BLFTVSFUIBUUIF1SJOU(BQMFWFSJTTFUGPSUIF
thickness of your paper.
t'PSDPOUJOVPVTGPSNTNBLFTVSFUIBUUIF
incoming and outgoing paper stacks are correctly
placed. Paper should feed straight.
Paper slips off the forms
tractors or the perforated
holes of the paper tear
during printing.
t Make sure that the forms tractors are positioned
correctly for the width of your paper and that the
perforated holes of the paper fit directly over the
tractor pins.
10.2.3 Operating Problems and Solutions
Problem
Solution
The power does not turn
on.
t$IFDLXIFUIFSUIFNBJOTWPMUBHFJTDPSSFDU
t.BLFTVSFUIBUUIFQPXFSDPSEJTTFDVSFMZ
connected to both the printer and the mains power
outlet.
t.BLFTVSFUIBUUIFQPXFSPVUMFUJTGVODUJPOBM*G
not , use other outlet.
t5VSOUIFQPXFSPGG8BJUBNJOVUFBOEUIFOUVSO
the printer on again. If the printer still has no power,
contact your dealer.
The printer is on but it will
not print.
t.BLFTVSFUIBUUIF0OMJOFJOEJDBUPSJTMJU
t*GZPVVTFUIFJOUFSGBDFDBCMFNBLFTVSFJUJT
securely connected to both the printer and the
computer.
t.BLFTVSFQBQFSJTMPBEFE
t3VOUIFQSJOUFS4UBUVT1Bge. If printing executes
normally, the problem is caused by: the interface,
the computer, incorrect printer settings, or incorrect
software settings.
t.BLFTVSFUIBUUIFQSJOUFSESJWFSTFMFDUFEJOZPVS
software is the same as the emulation selected on
118

Tally Dascom 2600/2610/PRN-7
the printer.
Paper select lever error
t If paper is loaded and the paper select lever is
moved to the incorrect position, the printer turns
offline, and the buzzer sounds continuously. Switch
the paper select lever back to its correct position.
119

Tally Dascom 2600/2610/PRN-7
FCC STATEMENT
MODIFICATION: Any changes or modifications not expressly approved by the grantee of
this device could void the user’s authority to operate the device.
NOTE: This equipment has been tested and found to comply with the limits for a
class B digital device, pursuant to Part 15 of the FCC Rules. These limits are designed
to provide reasonable against harmful interference in a residential installation. This
equipment generates, uses and can radiate radio frequency energy and, if not
installed and used in accordance with the instructions, may cause harmful
interference to radio communications. However, there is no guarantee that
interference will not occur in a particular installation. If this equipment does cause
harmful interference to radio or television reception, which can be determined by
turning the equipment off and on, the user is encouraged to try to correct the
interference by one or more of the following measures:
x Reorient or relocate the receiving antenna.
x Increase the separation between the equipment and receiver.
x Connect the equipment into an outlet on a circuit different from that to which the
receiver is connected.
x Consult the dealer or an experienced radio/TV technician for help.

Tally Dascom 2600/2610/PRN-7
DASCOM REPRESENTATIVES
G
ERMANY
DASCOM Europe GmbH
Heuweg 3
D-89079 Ulm
De
utschl
and
Tel.: +49 (0) 731 2075 0
Fax: +49 (0) 731 2075 100
www.dascom.com
SI N G APO RE ( ASI A PACI FIC)
DASCOM AP Pte Ltd
21 Bukit Batok Crescent
#29-81,WCEGA Tower
Singapore
658065
Phone: +65 6760 8833
Fax: +65 6760 1066
www.dascom.com
FRANCE
DASCOM Europe GmbH
117
Avenue
Victor Hugo
92100
Boulogne-Billancourt
France
Phone: +33 (1) 73 02 51 98
www.dascom.com
UNITED
KINGDOM
DASCOM GB Ltd
Hart House,Priestley Road
,
Basingstoke, Hampshire
RG24 9PU, England
Phone: +44 (0) 1256 481481
Fax: +44 (0) 1256 481400
www.dascom.com
A
MERICA S
Dascom Americas Corporation
34 Lakeview Court
Verona, VA 24482
USA
Phone:+1
(877)
434 1377
Fax: +1 (540) 242 7221
www.dascom.com
C
HI NA
JIANGMEN DASCOM COMPUTER
PERIPHERALS CO., LTD
No.399, jinxing Road,
Jianghai District Jiangmen,
P.R. China
www.dascom.com
“All
rights
reserved. Translations, reprinting
or
copying
by any means of this
manual
complete or in part
or in any different form requires
our
explicit
approval.
We
reserve
the
right
to make changes to this
manual withou
t notice. All care has been taken to ensure accuracy of
information contained
in this
manual. However,
we cannot accept
responsibilit y for
any errors or damages
resulting
from errors or
inaccuracies
of
information
herein.”
©
20 1 3 DA S C OM
Part No: 21.511.532.5671R
 Loading...