

Page 1

FP-530si, DP-530si
Operator’s Manual
Printek, LLC
2515 Lakeshore Drive
Saint Joseph, MI 49085-2977
269-925-3200
www.printek.com
Printek, LLC. A Company.
Part Number 7666 Rev A
Page 2

FCC Part 15 Class B
This device complies with Industry Canada license-exempt RSS standard(s). Operation is subject to the following two
conditions: 1) this device may not cause interference; 2) this device must accept any interference, including
interference that may cause undesired operation of the device. Under Industry Canada regulations, this radio
transmitter may only operate using an antenna of a type and maximum (or lesser) gain approved for the transmitter
by Industry Canada. To reduce potential radio interference to other users, the antenna type and its gain should be
so chosen that the equivalent isotropically radiated power (e.i.r.p.) is not more than that necessary for successful
communication. Maximum power output plus maximum antenna gain of the EUT is: 4.5W/m2 , Limit is 10W/m2.
Le présent appareil est conforme aux CNR d'Industrie Canada applicables aux appareils radio exempts de licence.
L'exploitation est autorisée aux deux conditions suivantes : (1) l'appareil ne doit pas produire de brouillage, et (2)
l'utilisateur de l'appareil doit accepter tout brouillage radioélectrique subi, même si le brouillage est susceptible d'en
compromettre le fonctionnement. Conformément à la réglementation d'Industrie Canada, le présent émetteur radio
peut fonctionner avec une antenne d'un type et d'un gain maximal (ou inférieur) approuvé pour l'émetteur par
Industrie Canada.
Dans le but de réduire les risques de brouillage radioélectrique à l'intention des autres utilisateurs, il faut choisir le
type d'antenne et son gain de sorte que la puissance isotrope rayonnée équivalente (p.i.r.e.) ne dépasse pas
l'intensité nécessaire à l'établissement d'une communication satisfaisante. La puissance de sortie maximale plus
gain d'antenne maximal du EUT est : 4.5W/m
2
Limite est 10W/m
2
This device complies with Part 15 of the FCC Rules. Operation is subject to the following two conditions: (1) this device
may not cause harmful interference, and (2) this device must accept any interference received, including interference that
may cause undesired operation.
This equipment has been tested and found to comply with the limits for a Class B digital device, pursuant to Part 15 of the
FCC rules. These limits are designed to provide reasonable protection against harmful interference in a residential
installation. This equipment generates, uses, and can radiate radio frequency energy and, if not installed and used in
accordance with the instructions, may cause harmful interference to radio communications. However, there is no guarantee
that interference will not occur in a particular installation. If this equipment does cause harmful interference to radio or
television reception, which can be determined by turning the equipment off and on, the user is encouraged to try to correct
the interference by one or more of the following measures:
Reorient or relocate the receiving antenna.
Increase the separation between the equipment and the receiver.
Connect the equipment into an outlet on a circuit different from that to which the receiver is connected.
Consult the dealer or an experienced radio/TV technician for help.
This equipment complies with Canadian and FCC radiation exposure limits set forth for an uncontrolled environment. This
transmitter must not be co-located or operating in conjunction with any other antenna or transmitter.
Part 15.21 Caution: Changes or modifications not expressly approved by Printek, LLC could void the user’s authority to
operate the equipment.
Canadian Department of Communications Radio Interference Statement
i www.printek.com | P: 888.211.3400 | F: 269.925.8539 | E: info@printek.com
Page 3

RF Exposure Warning Statements:
This equipment complies with FCC radiation exposure limits set forth for an uncontrolled environment. This
equipment shall be installed and operated with minimum distance 20cm between the radiator & body.
Acknowledgments:
Printek is a registered trademark of Printek, LLC
Zebra, CPCL and ZPLare registered trademarks of Zebra Technologies
Wi-Fi is a registered trademark of the Wi-Fi Alliance
Windows is a registered trademark of Microsoft Corporation
All other trademarks are the property of their respective owners.
© 2015 By Printek LLC, 1517 Townline Road, Benton Harbor, MI 49022. All rights reserved.
Read all set up and operating instructions before proceeding with operation. Do not operate in an enclosure unless properly
ventilated. Do not operate near a heat source.
Lesen Sie vor der Inbetriebnahme die Aufbau- und Bedienungsanleitung Betreiben Sie den Drucker nicht in einem kleinen,
geschlossenen Raum, es sei denn dieser wird ordnungsgemäß belüftet. Nehmen Sie den Drucker nicht in der Nähe einer Wärmequelle in
Betrieb
No user-serviceable parts inside. Refer service or repairs to a qualified service professional. Use of genuine Printek replacement
parts is required to warrant proper, safe operation. Any alteration or modification of this device voids the user warranty and may make the
product unsafe to operate. The print head and motors get hot during use. Wait until they cool before touching them. Make certain the printer
is disconnected from AC power before removing any covers or performing any required cleaning or maintenance. Connecting this printer
to an ungrounded receptacle can result in electrical shock. Never place the printer near inflammable or explosive substances. Do not
operate near liquid or spill liquid into the printer at any time.
Enthält keine Teile, die vom Bediener instandgesetzt werden können. Bitte wenden Sie sich bei Instandsetzung oder Reparatur an
qualifiziertes Kundendienstpersonal. Die Verwendung von echten Printek Ersatzteilen ist notwendig, um ordnungsgemäßen, sicheren
Betrieb zu gewährleisten. Änderungen oder Modifikationen dieses Geräts machen die Garantie ungültig und können den sicheren Betrieb
des Produkts gefährden. Während des Druckens werden Druckerkopf und Motoren heiß. Warten Sie, bis sich die Teile abgekühlt haben,
bevor Sie sie berühren. Vergewissern Sie sich, dass der Drucker nicht mehr an die Stromquelle angeschlossen ist, bevor Sie Abdeckungen
abnehmen oder das Gerät reinigen bzw. warten. Schließen Sie diesen Drucker nicht an eine ungeerdete Steckdose an; dies kann zum
Elektroschock führen. Setzen Sie den Drucker niemals in die Nähe von feuer- oder explosionsgefährlichen Stoffen. Betreiben Sie den
Drucker nicht in der Nähe von Flüssigkeiten und lassen Sie keine Flüssigkeiten in den Drucker gelangen.
Specifications are subject to change without notice.
ii www.printek.com | P: 888.211.3400 | F: 269.925.8539 | E: info@printek.com
Page 4

Table of Contents
Introduction.................................................................................................................................................. 1
Printer Features ........................................................................................................................................... 3
Quick Start Instructions .............................................................................................................................. 4
A. Paper Load ........................................................................................................................................ 4
B. 9 Pin D-Connector Pin Out ................................................................................................................ 5
C. Power On ........................................................................................................................................... 5
D. Control Panel ..................................................................................................................................... 5
E. Performing a Printer Self-Test ........................................................................................................... 6
Configuration ............................................................................................................................................... 7
A. Connectivity Parameters .................................................................................................................... 9
WI-FI Config: .............................................................................................................................................. 11
B. Image Parameters ........................................................................................................................... 14
C. Device Config ................................................................................................................................... 16
D. Fonts ................................................................................................................................................ 17
E. Graphics ........................................................................................................................................... 19
F. Update Printer Firmware, Upload Files to Printer Memory .............................................................. 20
G. Reset Printer Configuration to Factory Defaults (Safe Mode) ......................................................... 20
Printing Modes .......................................................................................................................................... 21
A. ASCII Based Print Jobs ................................................................................................................... 21
B. Graphic Based Print Jobs ................................................................................................................ 21
Integrating the Printer into your Business Applications ...................................................................... 22
Step by Step – Creating a Link from Host to Printer ............................................................................. 22
A. Windows Desktop Computers ......................................................................................................... 22
Print Drivers ............................................................................................................................................. 22
I. SERIAL ....................................................................................................................................... 22
II. USB ............................................................................................................................................. 22
III. Wi-Fi ............................................................................................................................................ 23
B. Windows Tablets and Smartphones ................................................................................................ 23
C. Android Tablets & Smart phones ..................................................................................................... 24
I. Wi- Fi ........................................................................................................................................... 24
D. Apple™ Tablets & Smartphones ..................................................................................................... 24
I. Wi-Fi ............................................................................................................................................ 24
Media .......................................................................................................................................................... 25
A. Standard Media ................................................................................................................................ 25
B. Black Mark Media Position............................................................................................................... 25
Maintenance and Troubleshooting .......................................................................................................... 26
A. Cleaning ........................................................................................................................................... 26
B. Troubleshooting ............................................................................................................................... 26
I. General Error Conditions ............................................................................................................ 27
II. Fault Description and Resolution ................................................................................................ 27
C. Obtaining Service ............................................................................................................................. 27
APPENDIX .................................................................................................................................................. 28
A. Appendix A – FieldPro 530si Printer Specifications ........................................................................ 28
Glossary of Terms ..................................................................................................................................... 29
Index ........................................................................................................................................................... 31
Introduction
1 www.printek.com | P: 888.211.3400 | F: 269.925.8539 | E: info@printek.com
Page 5

Thank you for purchasing the Printek FieldPro 530si Series mobile thermal printer. The FP530si series
prints on special thermal media supplied in roll form up to 3.125 inches wide. All models are equipped
with a USB port which supports printer configuration. All models support an optional internal Wi-Fi
interface. Complete specifications may be found in Appendix A – FieldPro 530si Printer Specifications.
The remainder of this manual focuses on preparing the printer for initial use and performing tasks that will
be encountered during daily use.
Maintenance and Troubleshooting describes how to maintain the printer for optimal performance and has
information on how to diagnose any problems that may occur.
Printek recommends using genuine Printek supplied media and accessories. For detailed lists and
contact information, please see Appendix B – Supplies and Accessories & Appendix C – Media.
2 www.printek.com | P: 888.211.3400 | F: 269.925.8539 | E: info@printek.com
Page 6

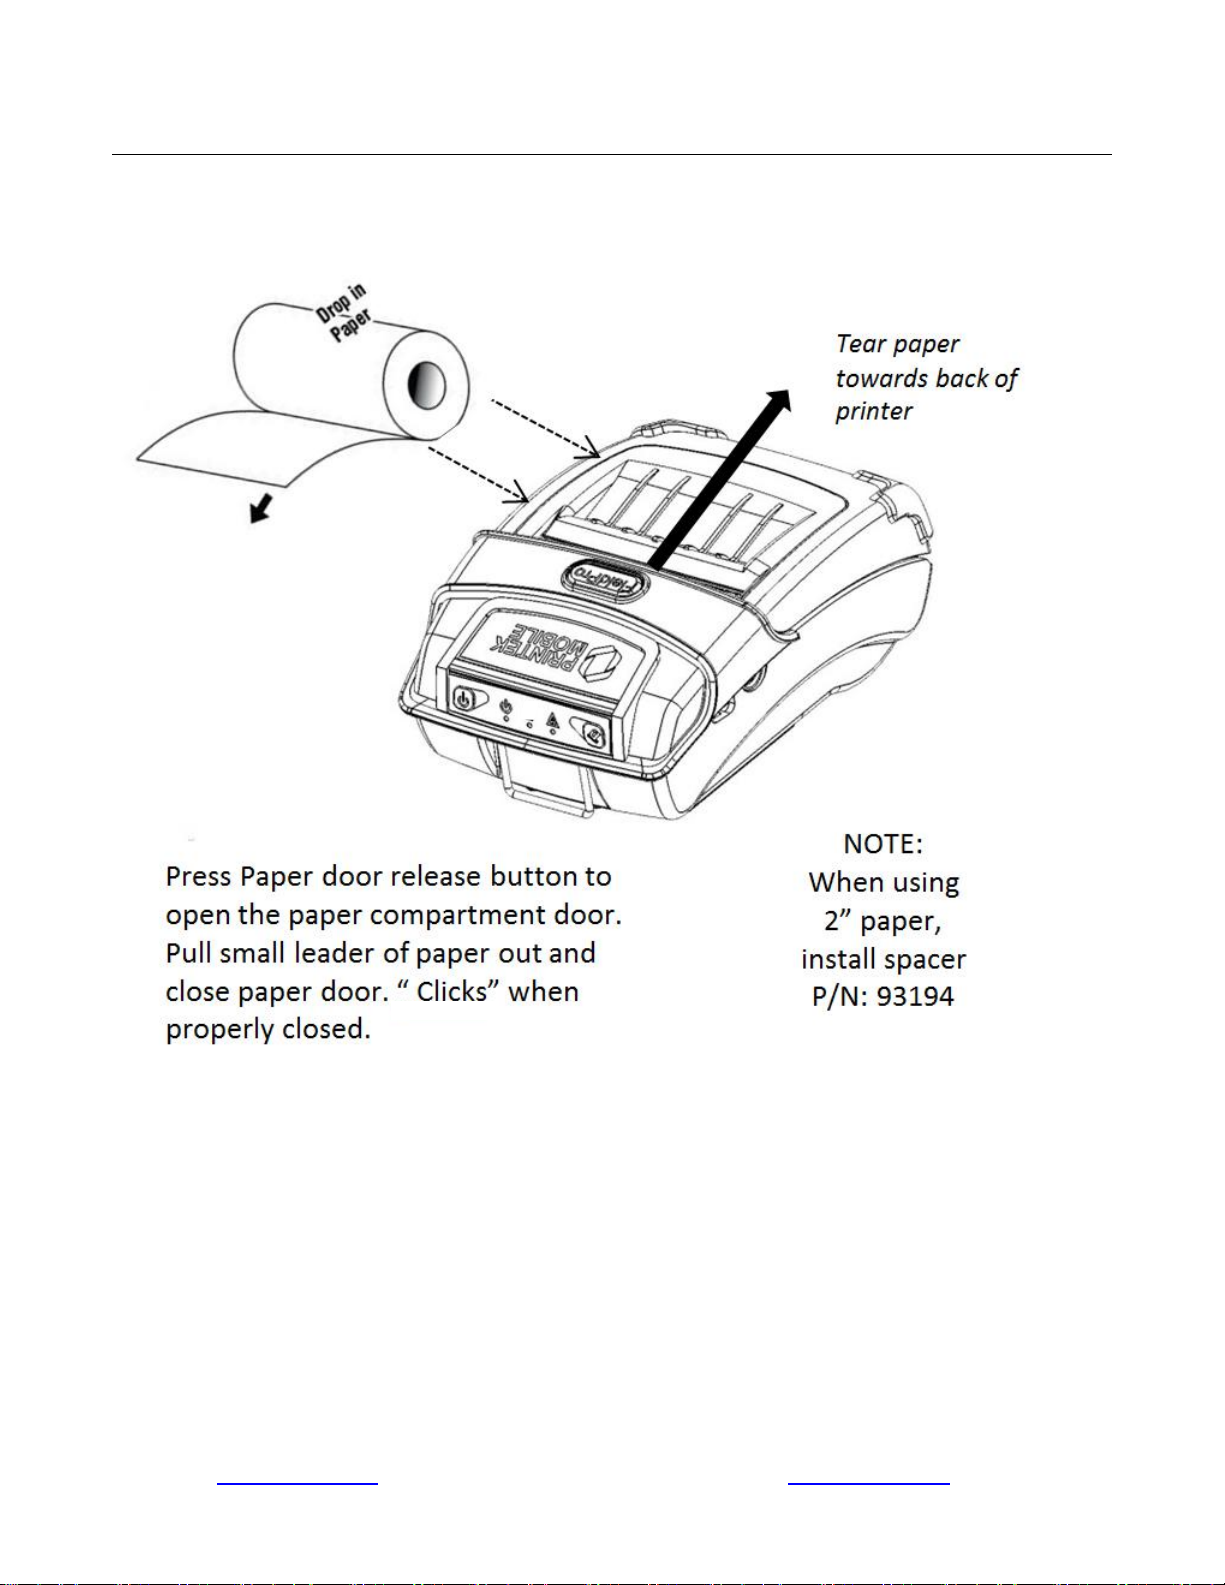
Printer Features
Paper Door
Paper door release button
USB connector under I/O cover
Control Panel
Your FieldPro 530si features:
Easy-to-read control face and simple drop-in paper loading
Serial I/O and Power Connector
Quickly prints a wide variety of tickets, receipts, and labels.
IP54 rated for water and dust resistance... plus rated for repeated 6-foot drops to concrete
Print speeds up to 5 ips
Extensive fonts, character sets, bar codes and graphic capabilities
Printer configuration is quick and easy with a web based interface
Compatible with Windows, Windows Mobile and Android
Emulations that allow the printer to be a drop-in replacement for nearly any mobile printer
For detailed specifications reference Appendix A – FieldPro 530si Printer Specifications.
3 www.printek.com | P: 888.211.3400 | F: 269.925.8539 | E: info@printek.com
Page 7
Quick Start Instructions
A. Paper Load
4 www.printek.com | P: 888.211.3400 | F: 269.925.8539 | E: info@printek.com
Page 8
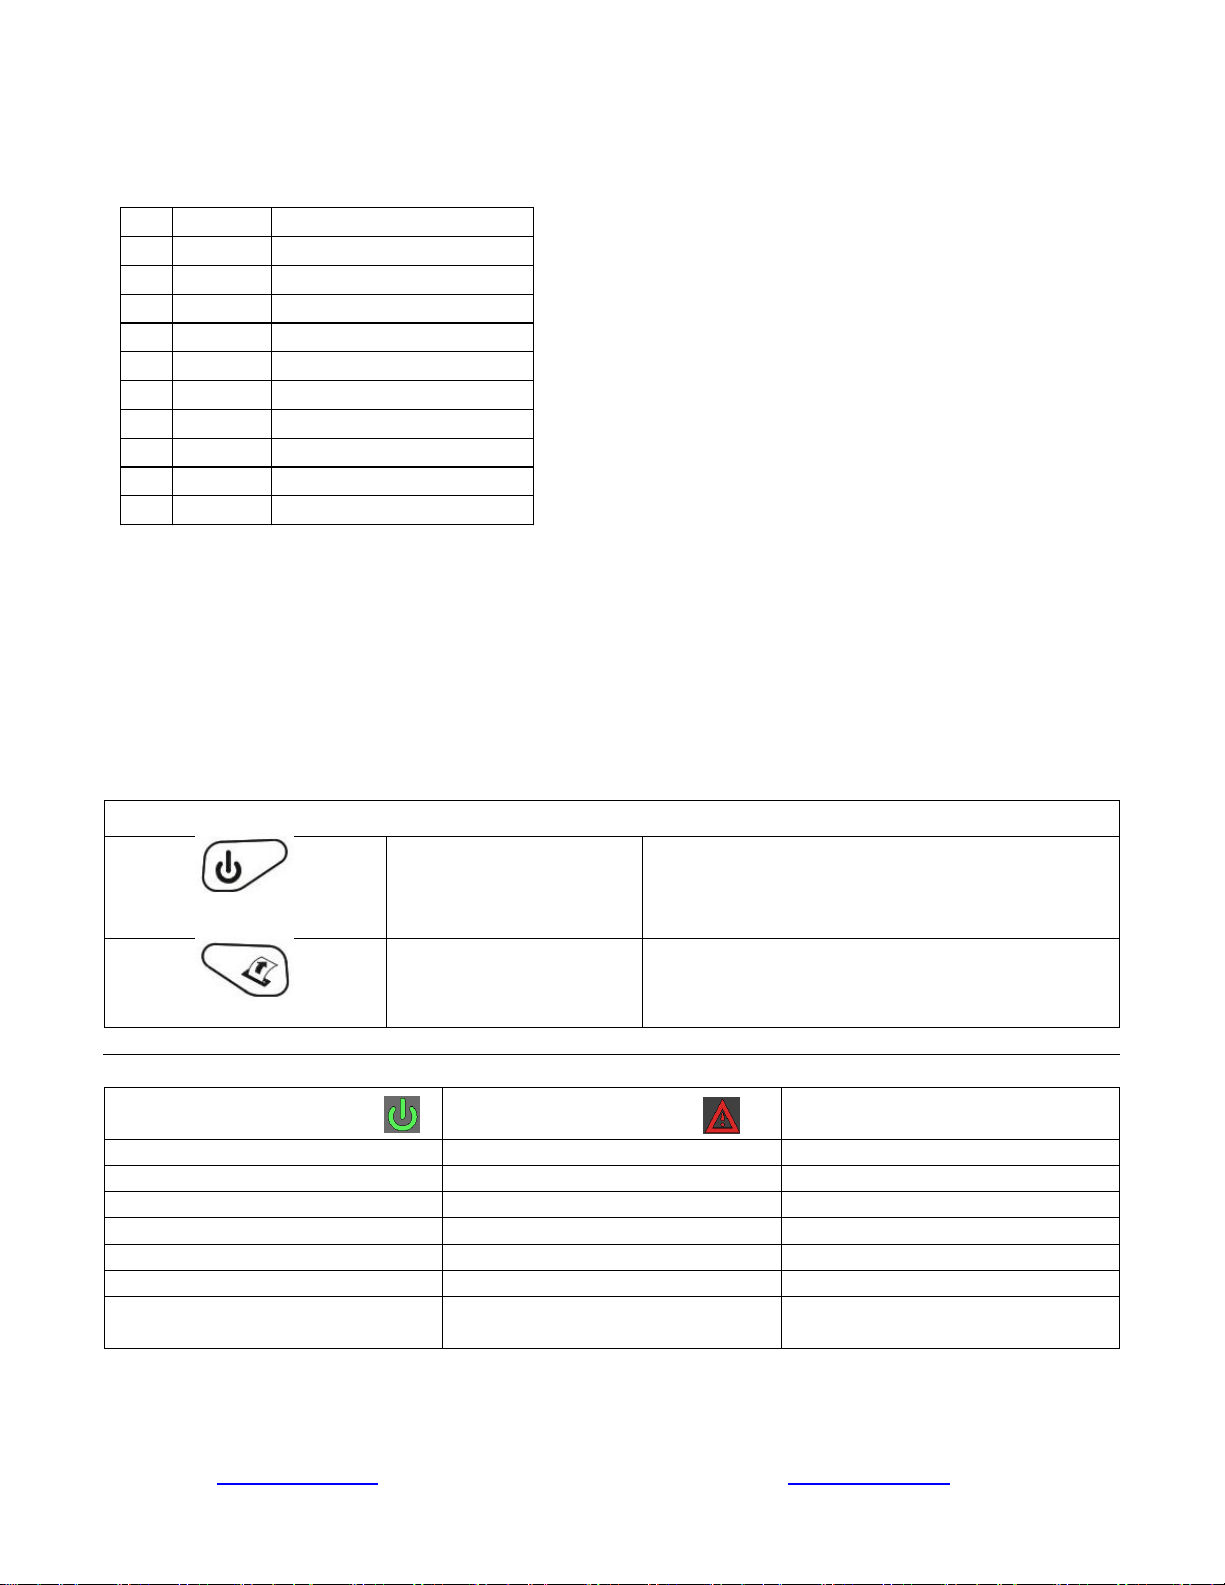
Pin Color Description
1 - NC
2 White Receive data (From Host)
3 Green Transmit data (From Printer)
4 - NC
5 Black Ground
6 - NC
7 - NC
8 Red Power (8-32 VDC)
9 - NC
Shell Drain wire
Control Panel
Power Button
Power Up
Power Down
Toggle IP over USB
on/off
Press & Release
Press & Hold
Press twice
Paper Feed Button
Advance paper
Print Setup Report
Press once
Press twice
Power & Status
(Green/Red)
Alert
(Red)
Indication
On
On
Booting up
On
Off
Ready
On
Flashing
Paper Error/Lid Open
Flashing
Off
Job is arriving
Flashing
Off
Job is printing
Flashing
Flashing
IP over USB active
Solid, Flashes Off Every 2
Seconds
Off
Wireless Personal Area Network
active
B. 9 Pin D-Connector Pin Out
Use table to connect Power and RS232 serial communication:
C. Power On
Printer automatically turns on when power is applied.
D. Control Panel
5 www.printek.com | P: 888.211.3400 | F: 269.925.8539 | E: info@printek.com
Page 9

E. Performing a Printer Self-Test
With power on, press the paper feed button twice quickly.
6 www.printek.com | P: 888.211.3400 | F: 269.925.8539 | E: info@printek.com
Page 10
Configuration
Configuration of the FP530si printer is done through a built-in web page. This allows you to configure
the printer from any device that has a browser and is compatible with your FP530si communication
capabilities.
1. Turn the printer ON.
2. Connect a USB cable between the printer and a PC.
3. To access the FP530si web page, push the Power button twice rapidly. This will put the printer
into Configuration mode.
4. When the printer is in Configuration mode the POWER and FAULT LEDs will flash together.
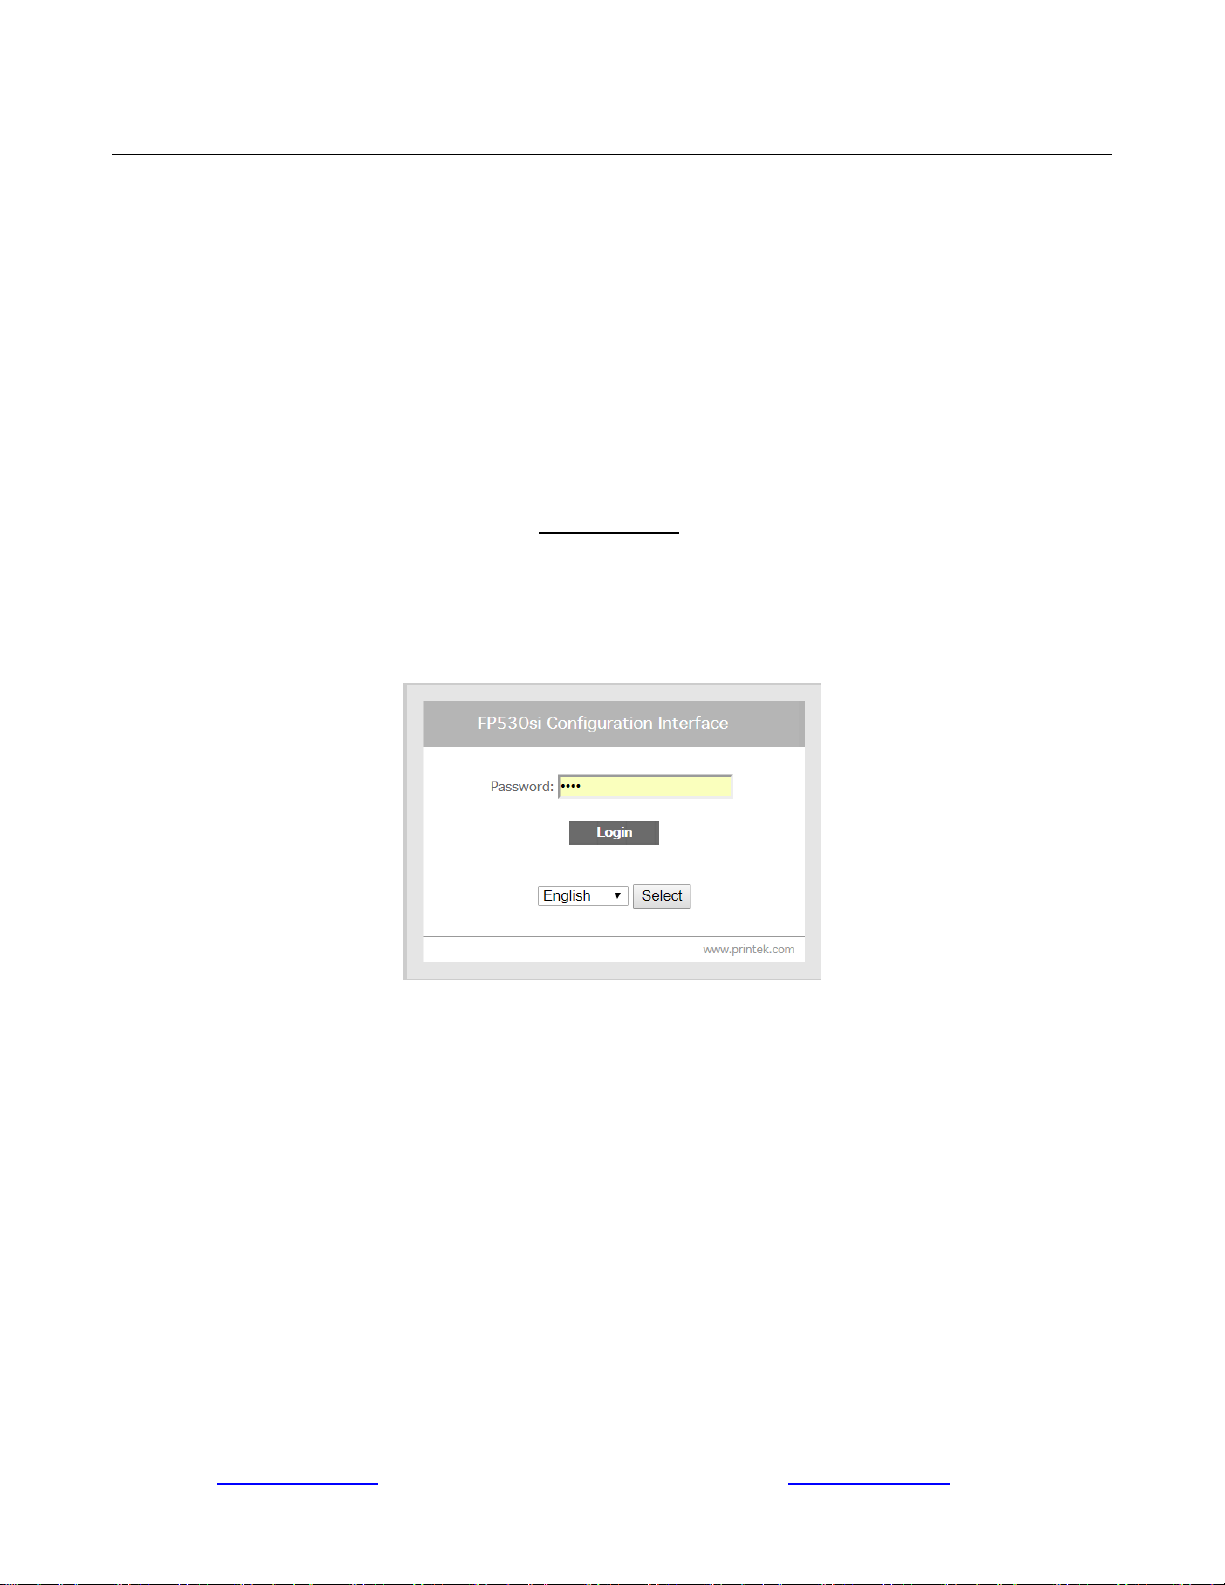
a. Open browser on your PC and type 169.254.200.1 into the address bar of the browser and hit
Enter - A login box should appear:
b. Use the dropdown box to select a language other than English.
c. Type “0000” and hit Enter- you should now be at the home page for FP530si Configuration.
7 www.printek.com | P: 888.211.3400 | F: 269.925.8539 | E: info@printek.com
Page 11
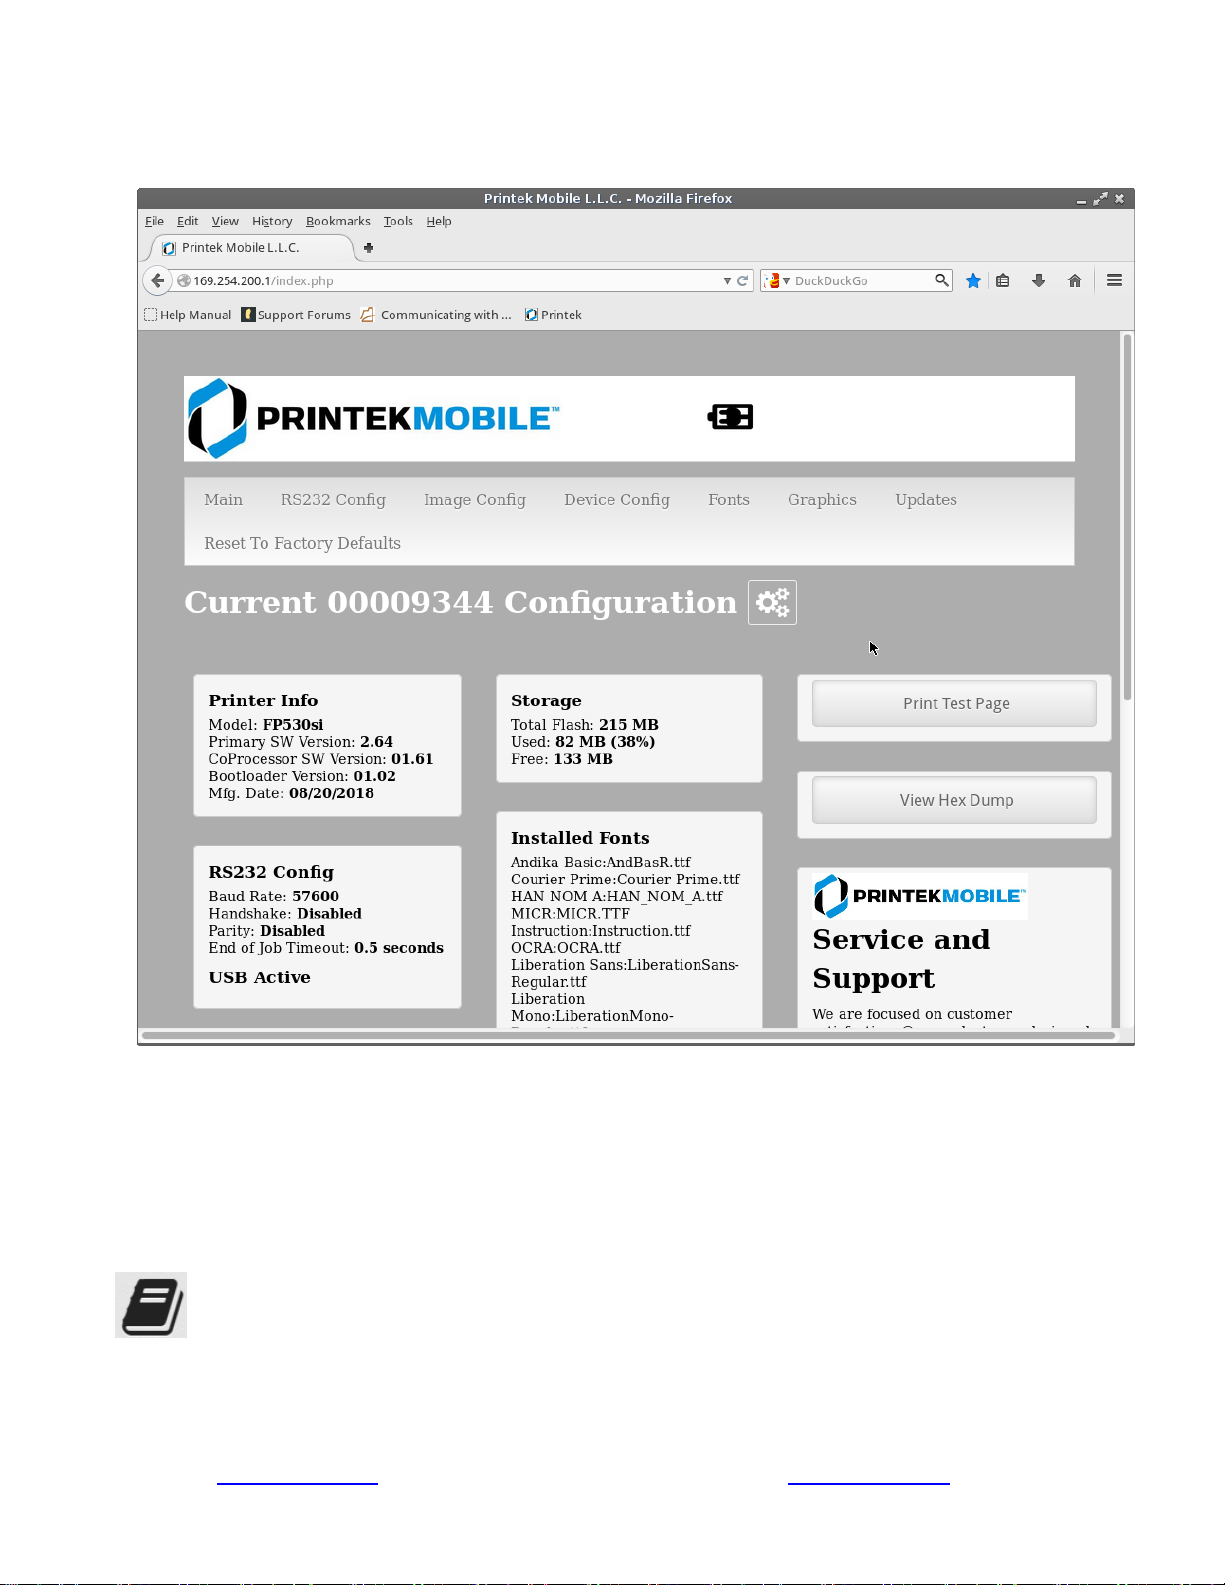
5. The main configuration screen of the FP530si:
This is an overview of the printer configuration. An AC plug will appear in the battery icon when the
printer is plugged into an external power source.
To return the printer to normal operating mode, double-click the Power button. The POWER LED will
be returned to a solid light.
At the top of the Main Page are selections to access the sub-menus.
Wherever the book icon appears in the printer configuration pages, click it to access the user
manual pages for help.
8 www.printek.com | P: 888.211.3400 | F: 269.925.8539 | E: info@printek.com
Page 12

A. Connectivity Parameters
This page allows you to setup the connection to your printer. Depending on the optional interface
installed, you will see either Bluetooth Config or WI-FI Config. In the detailed descriptions, an asterisk
(*) indicates the factory default value.
RS-232 Config:
Note: these values must match the host system serial port interface.
Baud Rate:
Possible values: 9600, 19200, 38400, 57600*, 115200
Sets communication speed between the printer and host.
9 www.printek.com | P: 888.211.3400 | F: 269.925.8539 | E: info@printek.com
Page 13

Handshake:
Possible values: Disabled*, Xon/Xoff
Sets the handshaking protocol.
Parity:
Possible values: Disable*, Even, Odd
Sets the Parity bit.
End of Job Timout:
Possible values: 0.5 through 9.5 seconds at .5 intervals
Sets the time the printer will wait to receive data betore considering the print job complete.
10 www.printek.com | P: 888.211.3400 | F: 269.925.8539 | E: info@printek.com
Page 14

WI-FI Config:
Wireless Configuration
This will display the current Wi-Fi configuration:
IP Address – user defined. If Static Address Method is selected, type in the address the printer will use on the
network.
SubNetMask – user defined. If Static Address Method is selected, type in the subnet mark of the network.
GateWay – user defined. If Static Address Method is selected, type in the gateway address of the network.
WiFi Port – user defined. Type in the IP port to be used by the printer. (default value = 8023)
Address Method – user selectable
Static – printer will always connect to the network using the IP address defined.
DHCP – printer will acquire an IP address from your network DHCP server
Personal Area Network –The printer will broadcast itself as a network connection. The Power LED will
flash off every two seconds while in this mode. The SSID will be the serial number of the printer.
When connecting to the printer, the passphrase is the printer’s serial number.
Personal Area Network mode can also be activated outside of the printer web page.
To enter Personal Area Network mode, press and hold the Power and Paper Feed buttons until the
Power and Alert LEDs light. Release both buttons, and the printer will restart in Personal Area Network
mode. To exit Personal Area Network mode, press and hold the Power and Paper Feed buttons until
the Power and Alert LEDs light. Release both buttons, and the printer will restart in normal WiFi mode.
11 www.printek.com | P: 888.211.3400 | F: 269.925.8539 | E: info@printek.com
Page 15

Available Networks – access points detected by the printer will be displayed. Select Add/Connect to use one
of these access points.
Previously Connected Networks – access points detected by the printer or added through Add/Edit
Network will be displayed. Select Connect to use one of these access points, or Remove to delete it from
printer.
Currently Configured Networks – access points added through Add/Edit. They may not have been
connected yet. Select Remove to delete access point from printer.
Set Date – Some Enterprise network connections require this setting. Simply enter the current year.
Add/Edit Network
Enter the SSID of a network connection. If authentication is used select the authentication type. Click Next.
The following form will change depending on the authentication type:
WPA-PSK
Enter the password for the network connection.
12 www.printek.com | P: 888.211.3400 | F: 269.925.8539 | E: info@printek.com
Page 16

WPA-EAP or IEEE8021X
These are Enterprise network settings. Consult your server manual for recommended settings.
Upload Digital Certificate
If your enterprise network uses digital certificates as another form of authentication, you can upload the
certificates here.
13 www.printek.com | P: 888.211.3400 | F: 269.925.8539 | E: info@printek.com
Page 17

B. Image Parameters
This page allows you to make selections about the image to be printed.
Current Emulation:
Possible Values: PRINTEK*, ZPL, CPCL, ESCPOS, IPL, AUTOIMAGE, PDF, POSTSCRIPT, IMAGE
The FP530si printer is capable of using several different emulation modes. This feature sets the family of printer
commands that may be used by a host application program to control the various capabilities of the printer. The
printer will only respond to commands valid for the currently selected emulation. For more information, please
refer to the Integrator’s Guide.
Besides the popular printer languages to choose from, the following selections allow the FP530si to print many
other file formats directly, without the need for a driver.
AUTOIMAGE – selected when mixed PDF and POSTSCRIPT images are sent to the printer. The printer will
determine which type of file has been sent. This can increase printer response time.
PDF – When in this mode the printer will directly print Portable Document Files (PDF).
POSTSCRIPT – When in this mode the printer will directly print Postscript formatted files (.ps). You can also
use a generic Postscript driver to print when in this mode.
IMAGE – selected if just image files are being sent to the printer. When in this mode the printer will directly print
the following file types: .png, .jpg, .bmp, .pbm, .svg, .tiff
Default Font:
The FP530si has the ability to use True Type Fonts. All True Type Fonts loaded into printer memory are listed
here. When using emulations that do not specify the font for each line of text, select the font you would like to
use as the default font. All print jobs will use the default font unless a command is sent to the printer to use
another font.
14 www.printek.com | P: 888.211.3400 | F: 269.925.8539 | E: info@printek.com
Page 18

Chars Per Inch and Default Text Line Spacing:
NOTE: These settings only function in Printek Emulation
This determines how large the characters are and how many characters will print in a one inch space. The
higher the number, the greater the number of lines per vertical inch of print.
Line Wrapping:
Possible Values: OFF*, ON
Determines how a line of text is handled.
OFF – data that is longer than the line length will be truncated
ON – data that is longer than the line length will be printed on the next line.
Input File Size:
Possible values: 3 inch*, 4 inch
If your print job was originally written to print to 4” printer, select 4 inch and the printer will automatically scale
the print job to print on the 3” printer.
15 www.printek.com | P: 888.211.3400 | F: 269.925.8539 | E: info@printek.com
Page 19

C. Device Config
This page allows you to set certain hardware parameters on the printer.
Login Password
This allows the printer webpage password to be changed.
Units
Select between inches or millimeters. If you change units, do so before entering other settings.
Max Paper Speed
Possible values: 1.0 to 5.5 ips, Default = 5.0
When using labels or heavy paper stock, you may need to decrease the paper speed to prevent paper jams.
Mark Seeking
Possible values: Off*, Front, Rear, Gap. (Note: Rear and Gap are available only on 530siL models).
Set the value when using regular or label media with black alignment marks or label media with gaps between
the labels
16 www.printek.com | P: 888.211.3400 | F: 269.925.8539 | E: info@printek.com
Page 20

Sensor Brightness
Possible values 0-100%. This displays the reflectivity or light transmission of the media, depending on the
setting for Mark Seeking. This value is updated once per second.
Note: Before adjusting black mark thresholds, set Mark Width to match the width of the black mark or
label gap on your media.
Front Paper Sensor Threshold
When using paper with a black on the front adjust this setting to insure the paper stops at the black mark.
1. With the lid closed and the black mark not over the front paper sensor, note the Sensor Brightness.
2. Open the paper lid and hold the paper against the front paper sensor so that the black mark is over the
sensor. Note the Sensor Brightness.
3. Set Threshold = black mark brightness + ((paper brightness – black mark brightness) / 2) and click Submit
Changes. Example: black mark brightness = 10%, paper brightness = 80%.
Threshold = 10% + ((80% - 10%) / 2) = 45%.
4. Close lid and press paper feed. The paper should stop with the bottom of the form at the tearbar.
Rear Paper Sensor Threshold (FP530siL models only)
This is set the same as the front paper threshold, but using the rear (in lid) paper sensor and the Rear Sensor
Brightness.
Gap Paper Sensor Threshold (FP530siL models only)
When using labels without a Black Mark, adjust this setting to insure the label stops at the gap in between labels.
1. Remove 2 labels from the backing paper, and close the lid so the backing is over the paper sensor. Note
Sensor Brightness for Gap.
2. Open the lid and close it so a label is over the paper sensor. Note Sensor Brightness for Gap.
3. Set Gap Threshold = label brightness + ((backing brightness – label brightness) / 2) and click Submit
Changes.
4. Close lid and press paper feed. The paper should stop with the bottom of the form at the tearbar.
Backup Distance Before Printing
Used with Mark Seek. User defined. This is the distance the printer will pull in the paper before starting to print.
Max Mark Search Distance
Used with Mark Seek. User defined. This is the distance the printer will advance paper to seek the mark before
displaying a Paper Out condition.
Stop Distance after Mark
Use with Mark Seeking. User defined. This is the distance the printer will advance the paper after the mark is
detected.
Left Margin
Setting this value will tell the printer how far from the left edge of the paper to start the print job.
Contrast
Possible values 0 – 10. Default value is 5
The lower the value the lighter the print. The higher the value the darker the print.
Paper Energy Values
This is a locked value. These settings are supplied by the paper manufacturer. The default settings cover most
grades of paper. If you are using non-standard paper consult the paper manufacturer for recommended settings.
17 www.printek.com | P: 888.211.3400 | F: 269.925.8539 | E: info@printek.com
Page 21

Auto Off Timer
Possible values 0 – 1440 minutes. Default value is 60.
This timer will turn the printer off if it has not been used for the time set. Disable this feature by setting the time
at 0. The printer will give a 1 minute warning before shutting off.
D. Fonts
Upload Font File
Truetype Fonts (.ttf, .otf, .ttc and .bdf) can be uploaded here.
Languages like ZPL and CPCL can use the fonts by referring to them by their Font Family Name.
Printek emulation uses the Index value when selecting a font.
Font Aliases
Languages like ZPL and CPCL can use an uploaded Font Alias Table so legacy jobs can have their font names
mapped to other uploaded fonts. Contact Printek Technical Support at (800) 368-4636 for more information.
18 www.printek.com | P: 888.211.3400 | F: 269.925.8539 | E: info@printek.com
Page 22

E. Graphics
This menu will allow you to load a graphics file into printer memory for use in creating your output. For instance,
logos can be stored for recall and use by your host program (see Integrator’s Guide for more details).
Upload File
Select the graphics file to load into printer memory. Acceptable graphics formats
are .jpeg, .pbm, .pcx, .bmp, .png and .svg.
Set Width
Select the width you want to use to display your logo: full width, half width, or quarter width.
Set index
Depending on the Index value used, you can automatically print the graphics file as a header (prints at the
beginning of the print job), footer (prints at the end of a print job) or use the graphics print command to print
anywhere on your receipt or label. See Integrator’s Guide for more information on graphics commands.
When selecting header, the graphics file will automatically print the logo at the beginning of each print job.
When selecting footer, the graphics file will automatically print the logo at the end of each print job.
You must set each of these values before selecting Upload Logo or the default values will be associated with
your image.
Current Logo Mapping
Once uploaded into the printer memory, your image and settings will be displayed here.
19 www.printek.com | P: 888.211.3400 | F: 269.925.8539 | E: info@printek.com
Page 23

F. Update Printer Firmware, Upload Files to Printer Memory
Printer Application Updates, OEM information and Manuals and more can be uploaded here. Contact Printek
Technical Support at (800) 368-4636 for more information.
G. Reset Printer Configuration to Factory Defaults (Safe Mode)
Printer settings can be restored to factory configurations.
Note that WIFI network configurations will be lost when Network Config to Factory Defaults is checked.
20 www.printek.com | P: 888.211.3400 | F: 269.925.8539 | E: info@printek.com
Page 24

Printing Modes
There are two fundamental printing modes with mobile printers.
A. ASCII Based Print Jobs
The host sends the print job as a series of lines of characters, some of which represent the
text to be printed, while other portions are command codes which tell the printer which font
to use, where to locate the text, what barcodes to use, etc. These text-based files are
encoded in a print language specific to the target printer.
The FP530si understands ASCII based jobs in several different print languages. Refer to
the Appendix or the Integrator’s Guide for the list of print languages supported.
B. Graphic Based Print Jobs
The host assembles the printed image as a series of lines of dots, and transmits this image
as a sequence of data bytes that represent the dot patterns assembled. Often these jobs or
files have some control characters on the front end and / or rear end of the dot pattern bytes
to define their format, help control pagination, etc.
Windows drivers in particular encode the image as a graphic based print job before it is
passed along to the printer.
In addition to accepting graphic jobs from its Windows driver, the FP530si can accept and
print directly many other graphic image file types. This opens up the option to print job
images from a variety of devices for which drivers or print utilities don’t exist, such as some
tablets and smartphones.
Please see the Integrator’s Guide or your system integrator for more details.
21 www.printek.com | P: 888.211.3400 | F: 269.925.8539 | E: info@printek.com
Page 25

Integrating the Printer into your Business Applications
Step by Step – Creating a Link from Host to Printer
A. Windows Desktop Computers
Print Drivers
You may download the appropriate Windows driver from our website. Install the printer driver by the
standard method for your version of Windows.
I. SERIAL
a) Install the printer driver onto your host before connecting the printer. Follow prompts
displayed during installation.
b) Plug the printer into a serial port on your host system using data/power cable.
c) Using the “Add Printer” wizard, install the printer using the driver file obtained from Printek
and the serial COM port number that the printer is connected to.
d) After the printer driver installs, the printer will appear as “Printek 3-inch printer” under the
“Printers and Faxes” heading of your Windows “Devices and Printers” screen.
II. USB
e) Install the printer driver onto your host before connecting the printer. Follow prompts
displayed during installation.
f) Plug the printer into a USB port on your host system using a mini-USB cable.
g) The printer will appear in the “Unspecified” devices section. Right click on the icon.
h) In the popup window, select the Hardware tab. Note the USB port number displayed.
i) Using the “Add Printer” wizard, install the printer using the driver file obtained from Printek
and the USB port number noted above.
j) After the printer driver installs, the printer will appear as “Printek 3-inch printer” under the
“Printers and Faxes” heading of your Windows “Devices and Printers” screen.
a) Install the printer driver. Using the “Add Printer” wizard, install the printer using the driver
file obtained from Printek and the COM port number noted above.
b) After the printer driver installs, the printer will appear as “FP530si-serial #” under the
“Printers and Faxes” heading of your Windows “Devices and Printers” screen.
III. Wi-Fi
Note: The following instructions are fundamentally the same for an Infrastructure or Wi-Fi Direct (peer
to peer) setup. They also assume that you have already configured your Wi-Fi interface via the
FP530si printer web page (see the section on Configuration).
a) Perform a configuration printout to verify the printer Wi-Fi setup and to record the IP
address assigned and the Port number.
b) Install the printer as a local printer using the USB instructions above.
c) In the “Devices and Printers” screen, right click the printer icon representing your mobile
printer.
d) Under Printer Properties, select the Ports tab, then select “Add a Port”
22 www.printek.com | P: 888.211.3400 | F: 269.925.8539 | E: info@printek.com
Page 26

e) In the new dialog box which appears, select “Standard TCP/IP ports”; this will open the
Standard TCP/IP Printer Port wizard.
f) Follow the on-screen prompts in this wizard. You’ll use the IP address recorded above to
set up the port. In the same screen you can also name the port something familiar and
relevant, and this will appear as the name of the printer to the user.
g) After the port is detected, it will be displayed as a “generic network card” – accept this by
clicking Next / Finish.
h) After you are finished adding the port, Windows will report it as a “Standard TCP/IP port”;
click OK to accept this.
i) Close the Printer Port window.
j) Now in the Printer Properties dialog box your IP address (or the familiar name you
assigned above) will appear in the list of ports available. Select it to configure the port.
k) Windows defaults standard TCP/IP ports to port number 9100. The FP530si Wi-Fi port
number is internally set to 8023. Change the port number to 8023 in the Windows screen
and click OK.
l) Click “Apply” in the Printer Properties box.
m) Your FP530si printer driver should now be properly coupled to the Wi-Fi parameters you
have chosen.
B. Windows Tablets and Smartphones
This feature and/or specific directions for use were not available as of this printing.
C. Android Tablets & Smart phones
I. Wi- Fi
This feature and/or specific directions for use were not available as of this printing.
D. Apple™ Tablets & Smartphones
I. Wi-Fi
This feature and/or specific directions for use were not available as of this printing.
23 www.printek.com | P: 888.211.3400 | F: 269.925.8539 | E: info@printek.com
Page 27

Media
A. Standard Media
Printek offers a variety of media types. See Appendix D for detailed descriptions and ordering
information. You may also visit our website or contact your PrintekMobile sales representative for a
complete and up to date description of our consumables and accessory products.
B. Black Mark Media Position
For automatic ticket printing, the Black Mark should be positioned as shown in the figure below.
When using Mark Sensing mode (see Configuration, earlier in this document), FieldPro printers will
automatically position the output for tear-off and printing following a Form Feed command or by
pressing the Paper Feed button.
For non-automatic paper positioning, refer to the Integrator’s Guide for sensing and positioning
commands.
24 www.printek.com | P: 888.211.3400 | F: 269.925.8539 | E: info@printek.com
Page 28

Maintenance and Troubleshooting
A. Cleaning
In normal environments, the printer should be cleaned after printing a few rolls of paper or if there are
voids in the printout. For optimum performance and life, you should clean the Print Head and Platen
Roller whenever you load new paper.
To clean the printer areas as described below, use a Thermal Head Cleaning Pen and MCR Cleaning
Card available from Printek, or you may use cotton swabs moistened with isopropyl alcohol.
Turn the printer off. Open the Paper Door and remove the paper.
Using a Thermal Head Cleaning Pen, clean the white ceramic surface on the Print Head.
Caution: Do not use sharp objects to clean the print head. This may damage the printer and
require service. Such damage is not covered under warranty.
Clean the Black Mark Sensor below the print head.
Clean the Tear Bar.
Clean the Platen Roller. Turn the Platen Roller with your finger to clean the entire surface.
If a Magnetic Card Reader is installed, pass and MCR Cleaning Card through the MCR slot to
clean the head.
You may also experience a buildup of paper dust in the printer. This may be removed using a can of
compressed air or by vacuuming.
To clean the exterior of the printer, turn the printer off and use a soft cloth moistened with a mild
detergent.
B. Troubleshooting
When encountering problems, the cause may be the printer or may sometimes be due to other
problems with your system. Please review the following tables to solve common problems you may
encounter with your printer. You may also visit www.printek.com for additional “FAQ’s” that may
assist you.
If you are still unable to solve your problem, please contact the company from whom you purchased
your printer since they are most familiar with your systems. If they are unable to help you, please
contact Printek Technical Support at (800) 368-4636.
25 www.printek.com | P: 888.211.3400 | F: 269.925.8539 | E: info@printek.com
Page 29

Error Indicator
Possible Cause
Solution
Flashes
Paper Out or Paper Door not fully
closed
Make sure the door is fully
closed by opening the door
and closing it again until the
door “clicks” closed. Check
the platen roller for damage.
Stays On, With Alarm
Print job too large for printer
memory
Divide long documents into
individual pages.
Printer power must be cycled
to clear error.
Problem
Possible Cause
Solution
Printer will not turn on.
D-connector not plugged in
Remove and reinstall the 9pin D-connector on the side
of the printer
No power
Check pin 8 of the D-connect
for positive voltage.
Printer turns itself off.
Not enough power is being
supplied to the printer.
Check pin 8 of the Dconnector for positive
voltage.
Electrostatic discharge
May occur in extreme low
humidity conditions. Turn
printer back on with power
button.
Poor print quality.
Print head dirty
Clean print head. Refer to
“Maintenance” section of this
document.
Poor quality or “old” paper
Verify paper from approved
source. Try new roll of
paper.
Obstruction in paper path, or
paper improperly installed
Check paper path and
reinstall paper (see “Quick
Start Instructions”).
Paper not feeding.
Poor quality paper
Verify paper from approved
source.
Paper Door not fully closed
Verify door is closed.
Dirty Black Mark/Paper
Sensor
Clean Sensor as described
in “Maintenance” section of
this document.
I. General Error Conditions
Whenever the printer detects an error condition the Alert (red) Indicator will either flash or stay on. In
some cases the audible alarm will also sound. Please refer to the following table for a list of what
causes these conditions and how they may be corrected.
II. Fault Description and Resolution
26 www.printek.com | P: 888.211.3400 | F: 269.925.8539 | E: info@printek.com
Page 30

Problem
Possible Cause
Solution
Paper does not advance to
black mark reliably.
Black Mark density/contrast
Adjust Mark Sensitivity as
described in Device Settings
Menu .
Poor quality paper
Verify paper from approved
source.
Paper not feeding reliably or
print is compressed vertically
Heavy or thick forms;
specialty paper with slick
finish
Lower the Max Paper Speed
as described in Device
Config Menu .
Paper Door not fully closed
Verify door is closed.
Print Garbled.
Improper Interface
configuration
Verify printer and host
settings match.
Paper Door not fully closed
Verify door is closed.
Printer will not print.
Paper not loaded correctly
Check paper path and
reinstall paper (see “Quick
Start Instructions”).
Improper Interface
configuration
Verify printer and host
settings match. Print a selftest to verify printer settings
and to verify printer is
functioning properly.
C. Obtaining Service
If service is required for your printer, please contact the company where you purchased your printer.
If they are unable to assist you, contact Printek Customer Service at (800) 368-4636 to obtain a
Return Authorization Number. Printers without Return Authorization will not be accepted.
27 www.printek.com | P: 888.211.3400 | F: 269.925.8539 | E: info@printek.com
Page 31

Printing Specifications
Printing Method: Direct thermal.
Printing Resolution: 203 dpi (8 dots per
mm).
Printing Speed: Up to 5 ips.
Printing Width: Up to 2.8 inches (72
mm).
Fonts/Characters/Bar Codes
Fonts: Virtually all TrueType fonts, from
6 cpi to 34 cpi depending on emulation
chosen, plus scaling.
International Characters: Most common
sets available.
Unicode support.
Bar Codes: Virtually all 1D and 2D
codes supported, depending on
emulation chosen.
Downloadable firmware, fonts,
graphics, and logos.
Connectivity
Standard (All Units): USB 2.0 PNP, (pin serial connection.
Wireless Options:
Wi-Fi 802.11b/g/n compatible
Software
Drivers and Utilities: Drivers for XP,
WIN 7, WIN 8, WIN 10.
Compatible with Windows CE/Pocket
PC, Windows Mobile and Android.
Print utilities and SDK’s for all
platforms. Native App and Web printing.
Printer Setup via internal web page,
access with browser from any host
(tablets and smartphones included).
Emulations: Emulates many popular
printer brands and languages including:
Zebra CPCL and ZPL, and ESC POS.
Firmware can be upgraded as new
emulations become available.
Supports direct printing of Postscript,
PDF, PBM, JPG, PNG, BMP, SVG, &
TIFF files.
Print Media
Paper Type: Direct Thermal Roll.
Roll Size: Maximum roll diameter 2.0”
(51 mm), roll widths up to 3.125” (80
mm).
Roll Capacity: Approx. 94’ 28.6 m),
creating 188 6” long receipts.
Core Size: 0.75” Recommended (19
mm).
Physical Specifications
L x W x H: 6.1” x 4.6” x 3.6” (15.5 x 11.7
x 9.3 cm).
Weight: 21.9 ounces
Environmental Specifications
Operating Temp: 0° to 122°F (-18° to
40°C).
Storage Temp: -4° to 140°F (-20° to
60°C).
Humidity: 10% to 90% RH (noncondensing).
Rated IP54 per IEC 529
Operator Controls and Indicators
3 LED indicators for general fault,
power status indication. Buttons for
power and paper feed. Sensors for
paper out, black mark detection, and
door open. “Gas gauge” on battery
door.
Memory Capacity
256 MB Flash, 512 MB DDR2.
Standard memory supports large and
graphic intensive print jobs.
Durability and Reliability
Survives multiple 6 foot drops to
concrete (each face) per IEC 68-2.
MTBF: 10,000 hours in normal use.
Regulatory Approvals
FCC Class B, CE mark, RoHS, UL
listed AC adapters, e-mark.
Warranty
2-year printer warranty on the entire
printer—case and print head included.
Options and Accessories
Universal Port, 3-Track
Simultaneous Read MCR,
barcode scanners, biometrics,
RFID.
In-Vehicle Power Adapter, 12 to
24 VDC
Shoulder Strap
Data Cables; USB
Media in Case Quantities
Popular Mounting Systems
o In-Vehicle Systems
o Cart Mounting Systems
APPENDIX
A. Appendix A – FieldPro 530si Printer Specifications
28 www.printek.com | P: 888.211.3400 | F: 269.925.8539 | E: info@printek.com
Page 32

802.11
Wireless networking communication standards created by IEEE.
Ad-Hoc
A Wi-Fi network consisting of only stations (no access point). Same as Peer-toPeer.
authentication
The process a Wi-Fi station uses to identify itself to another station.
baud rate
The rate at which characters are transmitted over a serial interface. This is also
often referred to as bits per second.
Bluetooth
A definition for short range radio frequency communications.
client
Any node on a network that requests services from another node (server).
character pitch
The horizontal spacing of characters. Measured in cpi.
cpi
Characters per inch.
default
Value or configuration assumed when the printer is powered on or reset.
DHCP
Dynamic Host Configuration Protocol. A method used to centrally control the
assignment of IP addresses on a network.
dpi
Dots per inch. Generally used to refer to graphics density or resolution.
font
A group of characters of a given shape or style.
infrastructure
A Wi-Fi network consisting of stations connecting to a wired network or other
stations via an access point.
interface
The connection between the printer and the host computer.
IP
Internet Protocol. A specification for packets, or datagrams, of data and an
addressing method to allow the exchange of data with another system. Must be
combined with another protocol such as TCP to create a complete connection
with the other system.
LAN
Local Area Network.
LED
Light emitting diode.
lpi
Lines per inch.
margin
An area along any edge of a form where data may not be printed.
Peer-to-Peer
A network consisting of only stations (no access point or central server). Same
as Ad-Hoc.
Glossary of Terms
29 www.printek.com | P: 888.211.3400 | F: 269.925.8539 | E: info@printek.com
Page 33

reset
Initialization of various operating features of the printer to the value or state
assumed when the printer is powered on.
server
Any node on a network that provides services to another node (client).
SSID
Service Set Identifier. An identifier attached to packets on a Wi-Fi network that
identify the particular network the packets are intended for.
TCP
Transmission Control Protocol. A specification that controls the connection
between systems on a network.
top of form
The vertical position where the first line is printed on the paper. Also the position
the paper is advanced to when a form feed (FF) character is received from the
host or the Form Feed button is pressed on the printer's control panel.
USB
Universal Serial Bus.
WAN
Wide Area Network. Refers to connections that allow one LAN to communicate
with another LAN(s).
WEP
Wired Equivalent Privacy. A security protocol for wireless LANs designed to
provide data security similar to a wired LAN.
Wi-Fi
Refers to any of the IEEE 802.11 standards.
WLAN
Wireless Local Area Network. A LAN made up of wireless nodes.
30 www.printek.com | P: 888.211.3400 | F: 269.925.8539 | E: info@printek.com
Page 34

Index
802.11, 28
Add Enterprise Network, 9
Add Personal Network, 9
Address Method, 9
Ad-Hoc, 28
Alert, 6
Android, 3, 17
Android Tablets & Smart
phones, 17
Apple, 3, 18
authentication, 28
Available Networks, 9
Backup Distance Before
Printing, 12
battery, 3, 5, 7, 20, 21, 22,
23
Battery Care, 20
Battery Disposal, ii
Battery Installation, 5
baud rate, 28
Bluetooth, ii, 2, 8, 9, 16, 17,
18, 28
Canadian Department of
Communications Radio
Interference Statement, i
character pitch, 28
Charge Battery, 5
Charging the Battery, 20
Cleaning, 20, 27
client, 28
Com Port, 16
Configuration, 7, 19, 28
Connectivity Parameters, 8
Contrast, 12
Control Panel, 6
CPCL, ii, 10
cpi, 28
Current Emulation, 10
Current Logo Mapping, 13
Current Printer Config, 9
default, 28
Default Font, 10
Default Text Line Spacing,
10
Device Config, 11
DHCP, 28
discover name, 16, 18
Discoverablity, 9
dpi, 28
driver, 16
Drivers, 16
Fault Description and
Resolution, 22
FCC Part 15 Class B, i
features, 29
form, 29
Front Paper Sensor
Threshold, 11
Gap Paper Sensor
Threshold, 12
GateWay, 9
General Error Conditions, 22
Graphics, 13
IMAGE, 10
Image Parameters, 10
infrastructure, 28
interface, 28
IP Address, 9
IP54, 3
LAN, 28
LED, 28
Left Margin, 12
lpi, 28
Maintenance, 2, 20, 23, 24
margin, 28
Mark Seeking, 11, 12
Max Mark Search Distance,
12
Max Paper Speed, 11, 23
Maximum Battery Life, 20
Media, 2, 19, 25, 26, 27
Mounting Options, 27
MT3, 10
Obtaining Service, 24
Paired Mode, 8
pairing code, 16
Paper Energy Values, 12
Paper Feed Button, 6
Paper Load, 4
passkey, 16, 18
PDF, 10
Peer-to-Peer, 28
PIN, 8, 9
POSTSCRIPT, 10
power, i, ii
Power Button, 6
Power On, 5
Quick Start Instructions, 4
Rear Paper Sensor
Threshold, 12
reset, 29
Role Policy, 8
Safety Information, 21
Security, 8
Self-Test, 6, 21
server, 29
Set index, 13
Set Width, 13
Specifications, 2, 3, 25, 26
SSID, 29
Stop Distance after Mark, 12
SubNetMask, 9
Supplies and Accessories, 2,
27
TCP, 29
Testing the Power Adapter
and Battery, 21
Troubleshooting, 2, 20, 21,
22
Units, 11
Upload Digital Certificate, 9
Upload File, 13
USB, 16, 29
USB port, 2, 16
WAN, 29
web page, 7
WEP, 29
Wi-Fi, ii, 2, 17, 28, 29
WI-FI Config, 8, 9
Wifi Port, 9
Windows, ii, 3, 15, 16, 17
WLAN, 29
31 www.printek.com | P: 888.211.3400 | F: 269.925.8539 | E: info@printek.com
 Loading...