


With User to Create Better Product
This manual is only for JGMAERK Magic desktop 3D printer
Magic USER MANUAL
Version:A0

With User to Create Better Product
1
Content
Introduction
1, Attention
1.1 User Safety Issue
1.2 Power Requirements
....................................................................................................................
........................................................................................................................
.........................................................................................................................
..................................................................................................................
1.3 Printer Environmental Requirements
1.4 Filament Usage and Storage
1.5 Important Announcement
2, Product information
2.1 Machine specs
2.2 Machine parts
2.3 Tool box list
3, Machine Assembly
.............................................................................................................................
.............................................................................................................................
.................................................................................................................................
........................................................................................................
......................................................................................................
..........................................................................................................
.........................................................................................
.......................................................................................................
3
4
4
4
4
5
5
6
6
6
7
8
3.1 Machine Parts
3.2 Assembly step
3.2.1 remove packaging
3.2.1 Assembly
3.2.1 cable assembly
.............................................................................................................................
.............................................................................................................................
................................................................................................................................................
4, Printing Instruction
4.1 Main Menu Introduction
4.1.1 Control Panel
4.1.2 Function Introduction
4.2 Operating procedures
4.3 Operating Instructions
4.3.1 Input Power Voltage Adjustment
4.3.2 Leveling
4.3.3 Filament loading
4.3.4 Model printing
4.3.5 Filament Change
4.3.6 Power Failure Recovery Printing
..................................................................................................................................................
...................................................................................................................................
.......................................................................................................................................
......................................................................................................
..........................................................................................................
.........................................................................................................................................
............................................................................................................................
...............................................................................................................
..............................................................................................................
..........................................................................................................
....................................................................................................................................
.......................................................................................................................................
....................................................................................................................................
...........................................................................................................
8
9
9
10
16
18
18
18
18
20
21
21
22
23
24
24
25
5, slice software
...............................................................................................................
26

With User to Create Better Product
2
5.1 software install
..........................................................................................................................
26
5.2 soft instruction
..........................................................................................................................
6, Common Problems and Solutions
7, 3D Printer Maintenance
7.1. Daily maintenance
7.2. Basic maintenance
7.3. Maintenance of Moving Components
8, Supports and service
..............................................................................................
...................................................................................................................
...................................................................................................................
...................................................................................................
..............................................................................
.....................................................................................
27
31
32
32
32
33
34

With User to Create Better Product
3
Introduction
This manual includes detail information of JGMAKER 3D printer Magic use procedure, notice and
maintenance.for user’s safety and make the good use of printer,please this manual carefully before use printer.
Please keep this manual in place, if you lose it you can find it in below two place:
1、In the SD card we had stored a electronic version manual;
2、In our official website (www.jgaurora3d.com) you find the user manual;
Thanks for choice JGMAKER 3D printer, we pledge to provide quality product and service. When in use have
any question, please contact US.
Notes:every printer had been tested before sent out,So there is filament residue on nozzle or sightly scrape
on platform, it would not affect use.

With User to Create Better Product
4
1.1 User Safety Issue
Forbidden to somewhere near flammable gas, liquid and dusty area;
Forbidden for children or untrained people to use the machine alone;
When machine running,forbidden to touch model and nozzle, to avoid scald;
When machine running,forbidden to hands inside machine to avoid pinch;
If machine running over 96 hours, must stop for 1-3 hours;
Make sure connect to ground, don’t modify the plugin, to avoid any damage, electric shock and fire
accidence;
Please the cable we provided, can’t use unqualified power cable;
Spare machine for a long time, please disconnect the cable;
Please in ventilated dry area, to avoid humid and sun cause plastic aging;
When remove support material, high recommend to wear goggle;
Before turn on machine, make sure SD card is removed to avoid any malfunction.
Avoid remove SD to frequently,before insert SD card,must cut off the power for 10 second ,then turn on
machine and insert SD card.
Please keep the package intact,for maintenance purpose.
power plugin should connect to ground.don’t modify the plugin, to avoid any damage, electric shock and fire
accidence.
working voltage is AV 110~230V with 50HZ AC,;
Note:①before machine assembly,please check the machine power voltage is suitable for power supply voltage in
your area.(how to check:through observe hole at the bottom of base, can the voltage switch, if voltage is 220V, it
will show 230V, if it is 110V, it will show 115V. the operation detail is in 3.1 Input Power Adjustment; ②turn off
and on should have time interval over 5 second.
temperature:5℃~40℃,humidity:20%~50%。
attend:under this range machine can work well;if over,might affect the printing result!
If temperature is too low or high, can adjust the hot bed temperature, or slice temperature to reach good
printing result.
1, Attention
1.2 Power Requirements
1.3 Printer Environmental Requirements

With User to Create Better Product
5
1.4 Filament Usage and Storage
Filament Usage : when using machine , please JGMAKER filament. If use third party filament, and cause
damage, will not under our warrant。
Filament Storage:filament should be stored in seal. If not need to use filament, please tear the package,
and store in dry place without dust.
If not obey instruction of any clause in this manual, and cause damage, hurt or accident, we have no
responsible to the result.
This manual’s copyright below to JGMAKER, will no allow any non authority copy.
different batch might slightly different in outlook,some detail improvement might not be informed, contact
our after sales service for detail information.
1.5 Important Announcement

With User to Create Better Product
6
2.1 Machine specs
⑥LCD screen
③filament holder
④Heated bed
① Filament break
⑦USB port
⑧feeding suite
⑨x motor
②extruder suite
⑪SD card slot
⑩leveling nut
⑫ Z axis motor
⑤Rotary button
Model:Magic
Machine size:443*450*472mm
Layer thickness: 0.05~0.3mm
Machine weight:8kg
Print speed:10~150mm/s
(recommend 30~60mm/s)
Packing size:550*465*175mm
Nozzle Temp.:Room temp to 240’C
Packing weight:9.6kg
Nozzle diameter:0.4mm
Build volume:220*220*250mm
Hotbed temp.:Room temp. To 110’C
Platform material:FA special made platform
Filament:PLA/ABS/Wood ect.
LCD screen:blue rotary button
Filament Diameter :1.75±0.05mm
Print:SD card /USB cable
Software language : English, Spanish,France ect.
File format:STL、OBJ、G-Code
Environment : temp.5’C-40’C , humidity
20~50%
Operation system:Windows7/Windows10/XP
Power specs:AC 110/220 for choice
Slice software:Cura/JGcreat(64bit)
2, Product information
2.2 Machine parts

With User to Create Better Product
7
2.3 Tool box list
Reader
SD card
Wrench 7
Wrench 8-10
Allen wrench
Power cable
Screw
钉
T nut
钉
USB cable
Blade
Mark:The others are spare parts or gift
With User to Create Better Product
8
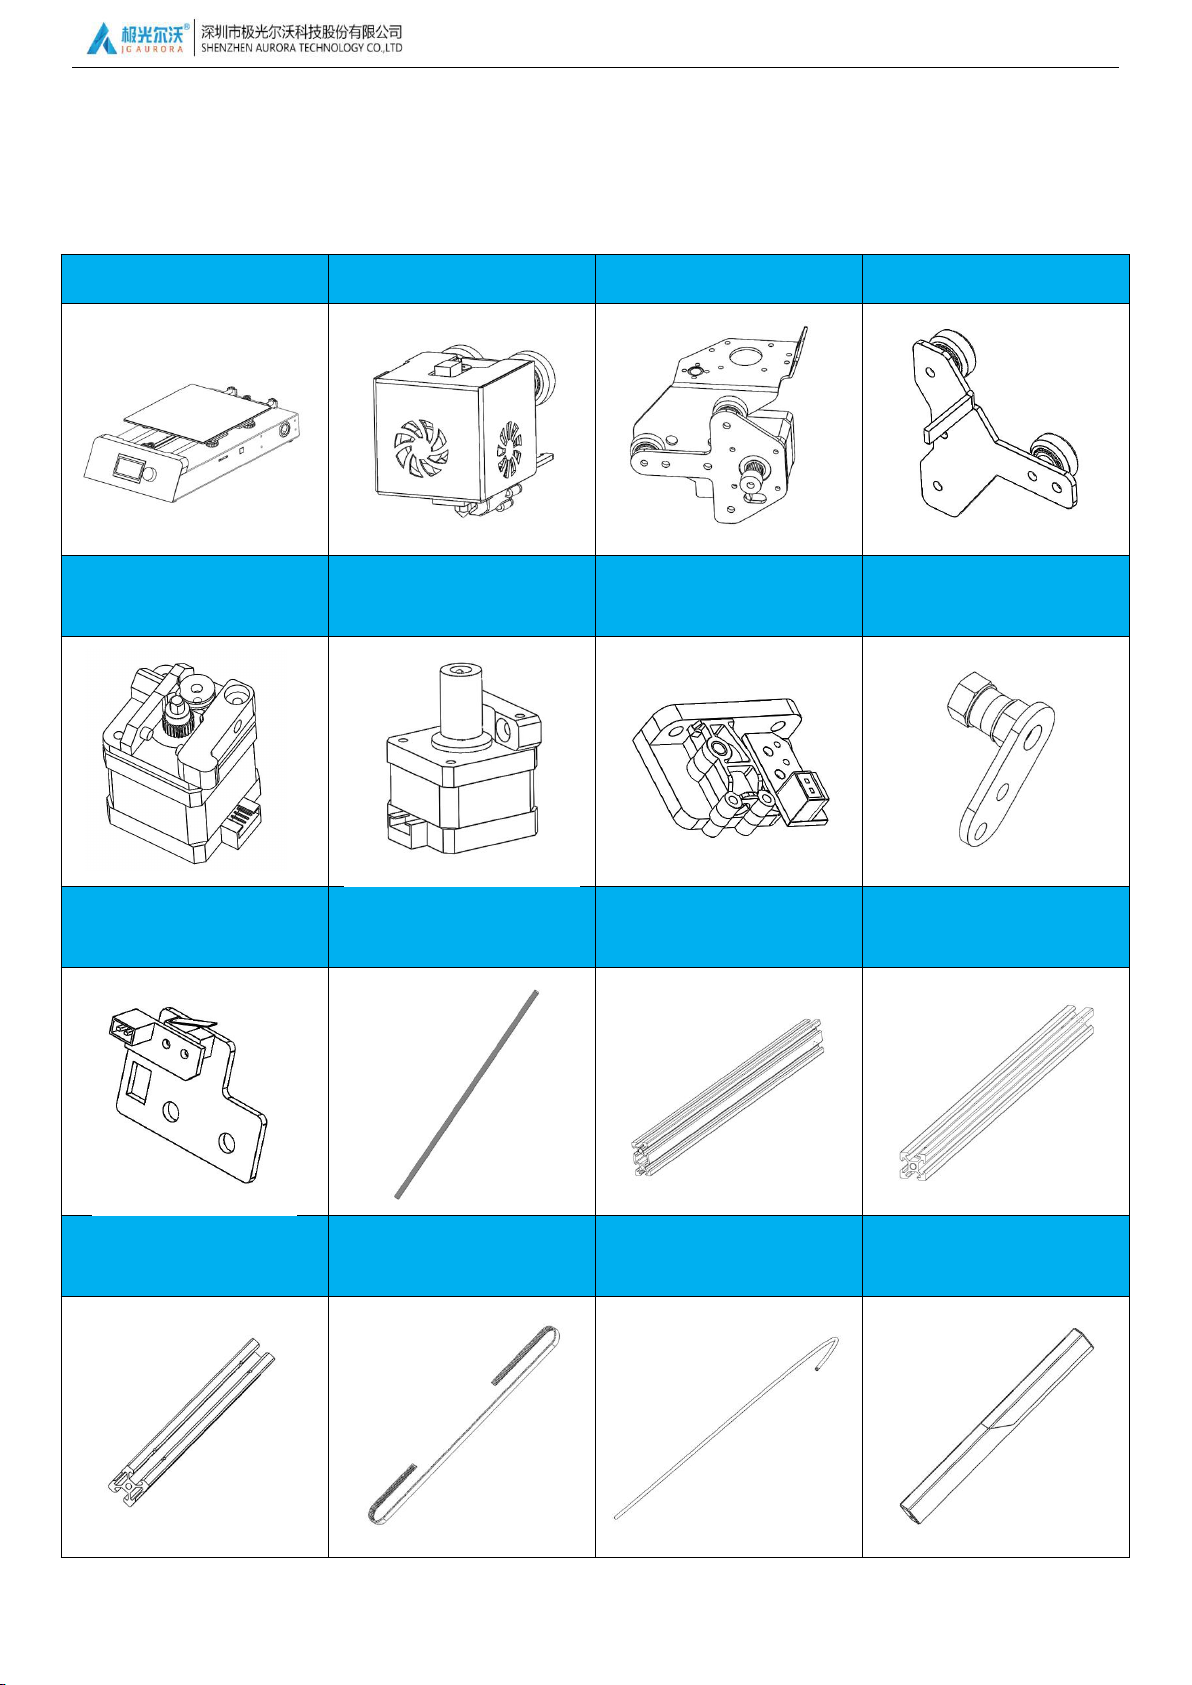
3.1 Machine Parts
1.Y box
2.Extruder suite
3.X right module
4.X left module
5. Feeding motor module
6.Z motor module
7 Filament break detection
module
8.Idler module
9.Z limited witch seat
10.T Lead Screw
11.2040 aluminium profile
12.2020
aluminium profile-340
13.2020aluminium profile-3
50
14.Timing belt
15.Feeding pipe( for
extruder)
16.Top decoration panel
3, Machine Assembly

With User to Create Better Product
9
17.Filament stand
18.User manual
Note :different batch
might slightly different
in outlook,some detail
improvement might not
be informed,Thank
you!
3.2 Assembly step
Step 1:Taking out all parts from box;
Step 2:checking list,pls reference 3.1 machine parts for list&pics;
Step 3:Checking tool and screw list, details as followin listing;
Item
Name
quanitty
pic
①
Hexagon socket bolt with semicircular head M5*8
6pcs
②
Hexagon socket bolt with cylindrical headM5*40
4pcs
③
Hexagon socket bolt with cylindrical head M5*25
4pcs
④
Hexagon socket bolt with cylindrical headM3*8
2pcs
⑤
T nut M5
2pcs
⑥
Wrench 8-10
1pc
⑦
Wrench 7
1pc
⑧
Allen wrench
4pcs
⑨
Reader
1pc
⑩
Memory card
1pc
⑪
Power cable
1pc
⑫
USB cable
1pc
⑬
Blade
1pc
3.2.1 remove packaging

With User to Create Better Product
10
3.2.1 Assembly
For more detail, you can contact our after sales.
suite
step
Assembly process
detail
parts
X
axis
1st
2nd
long
short
4. X left module
3. X right module
13. 2020aluminum
profile-350
2. Extruder module
14. Timing belt
8. Idler module
Note: put the timing belt into the
profile groove first, then,assemble
the extruder module
Note:long or short
means distant of
install hole position。

With User to Create Better Product
11
Suite
Step
Assembly process
Detail
Accessories
Z
axis
1st
2nd
6.Z-axis Motor Suite
9. Z-axis Limit
switch Base
11. 2040 aluminum
profile
11. 2040 aluminum
profile
1. Printer Base
Note : The profile side with the
counterbore is placed on the
outside of the machine.
Cheese head
M5*40
Note:1. The profile side
with the counterbore is
placed on the outside of
the machine.
To easy install the Z-axis
limit swithc base, the
coupling can be remove
first
Couple

With User to Create Better Product
12
Suite
Step
Assembly process
Detail
Accessories
print
er
1st
2nd
12. 2020 aluminum
profile-340
Note: If the installation
holes is not correct, you
can loosen the two
screws in the right
picture and re-lock after
installation.
①
②
screw M5*25

With User to Create Better Product
13
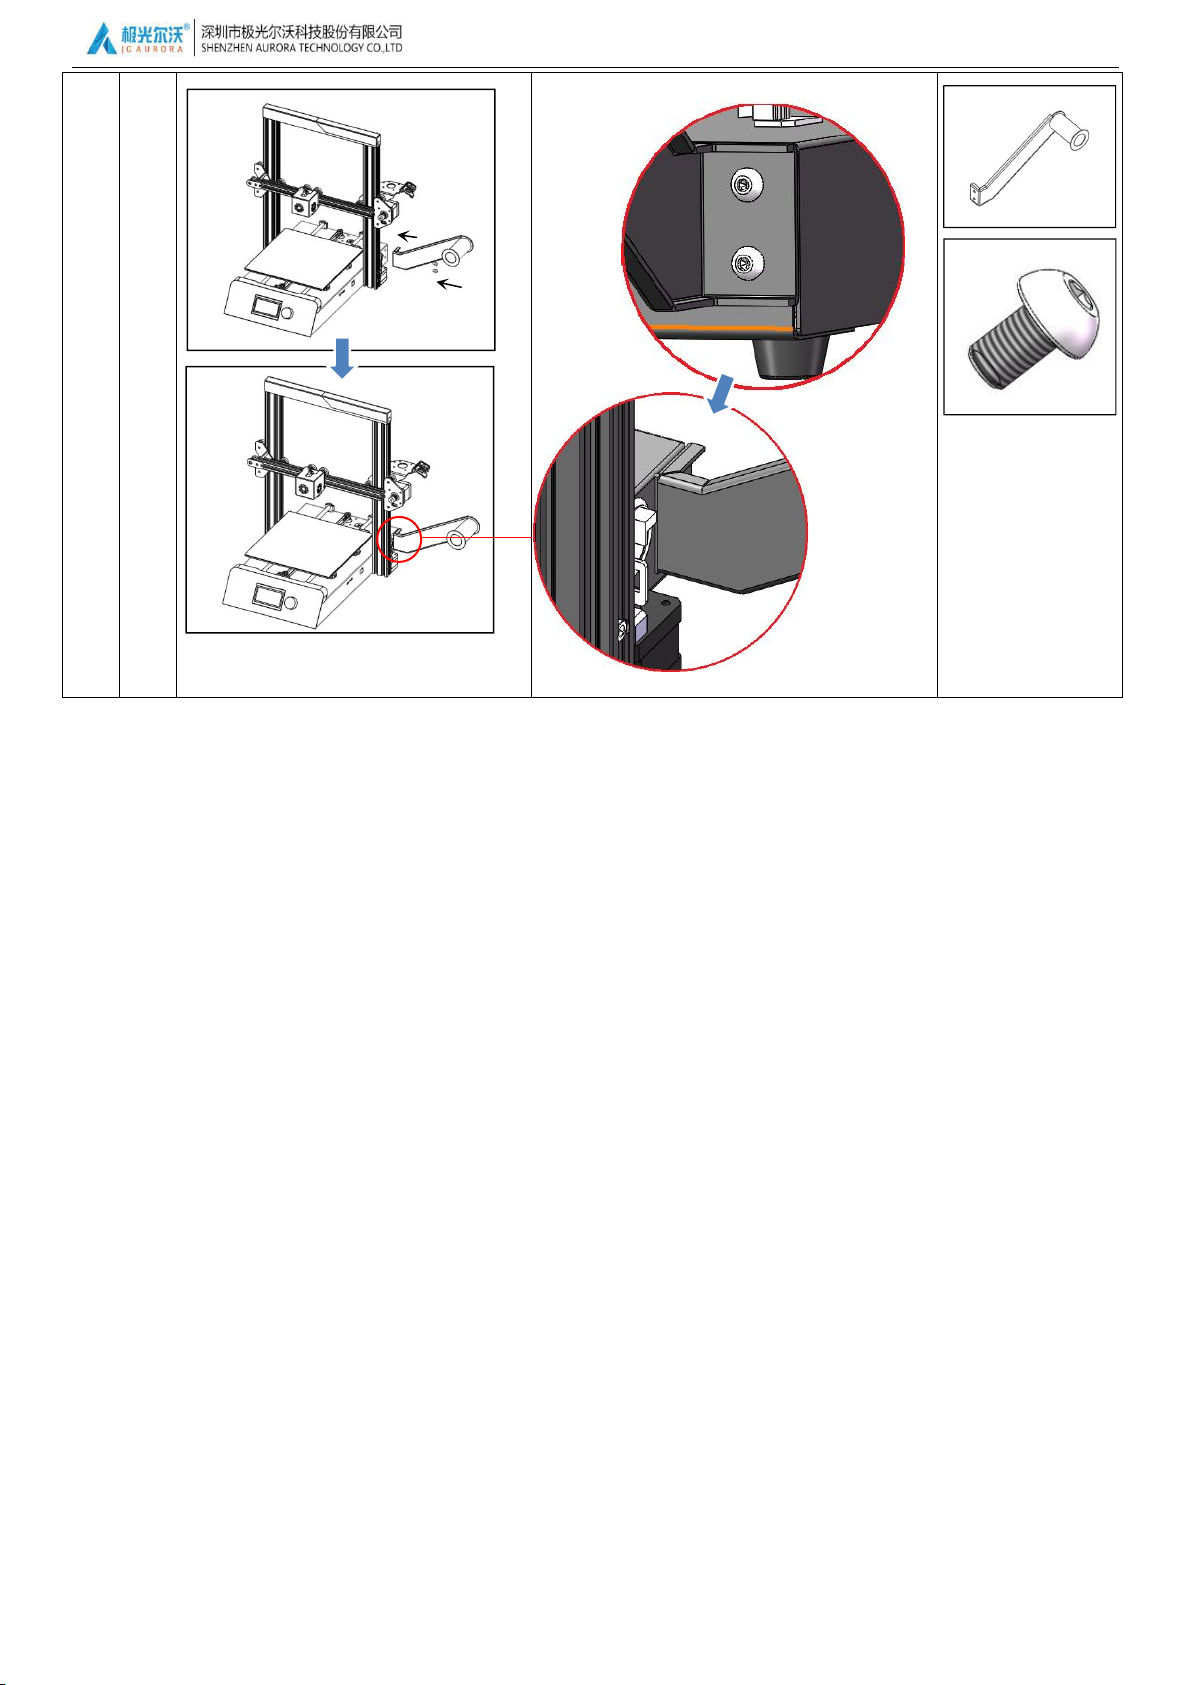
print
er
3rd
4th
10. T type screw rod
Note: After the T-type screw
rod is installed in the
coupling, please tighten the
screws to ensure that the
machine is properly driven.
16. Top decoration
Button-headed
M5*8
Screw position

With User to Create Better Product
14
print
er
5th
6th
7. Filament Sensor
Base
screw M3*8
5. Feeding Suite
Note:When installing, the 3pcs screw on
the component should be unscrewed, the
feeding device and the motor should be
loaded from the top and bottom of the
mounting sheet metal, then reinstall the
Place the other end of the white
guide tube into the feed motor
in the direction of the arrow.
With User to Create Better Product
15
print
er
7th
17. Filament Holder
Button-headed M5*8
With User to Create Better Product
16
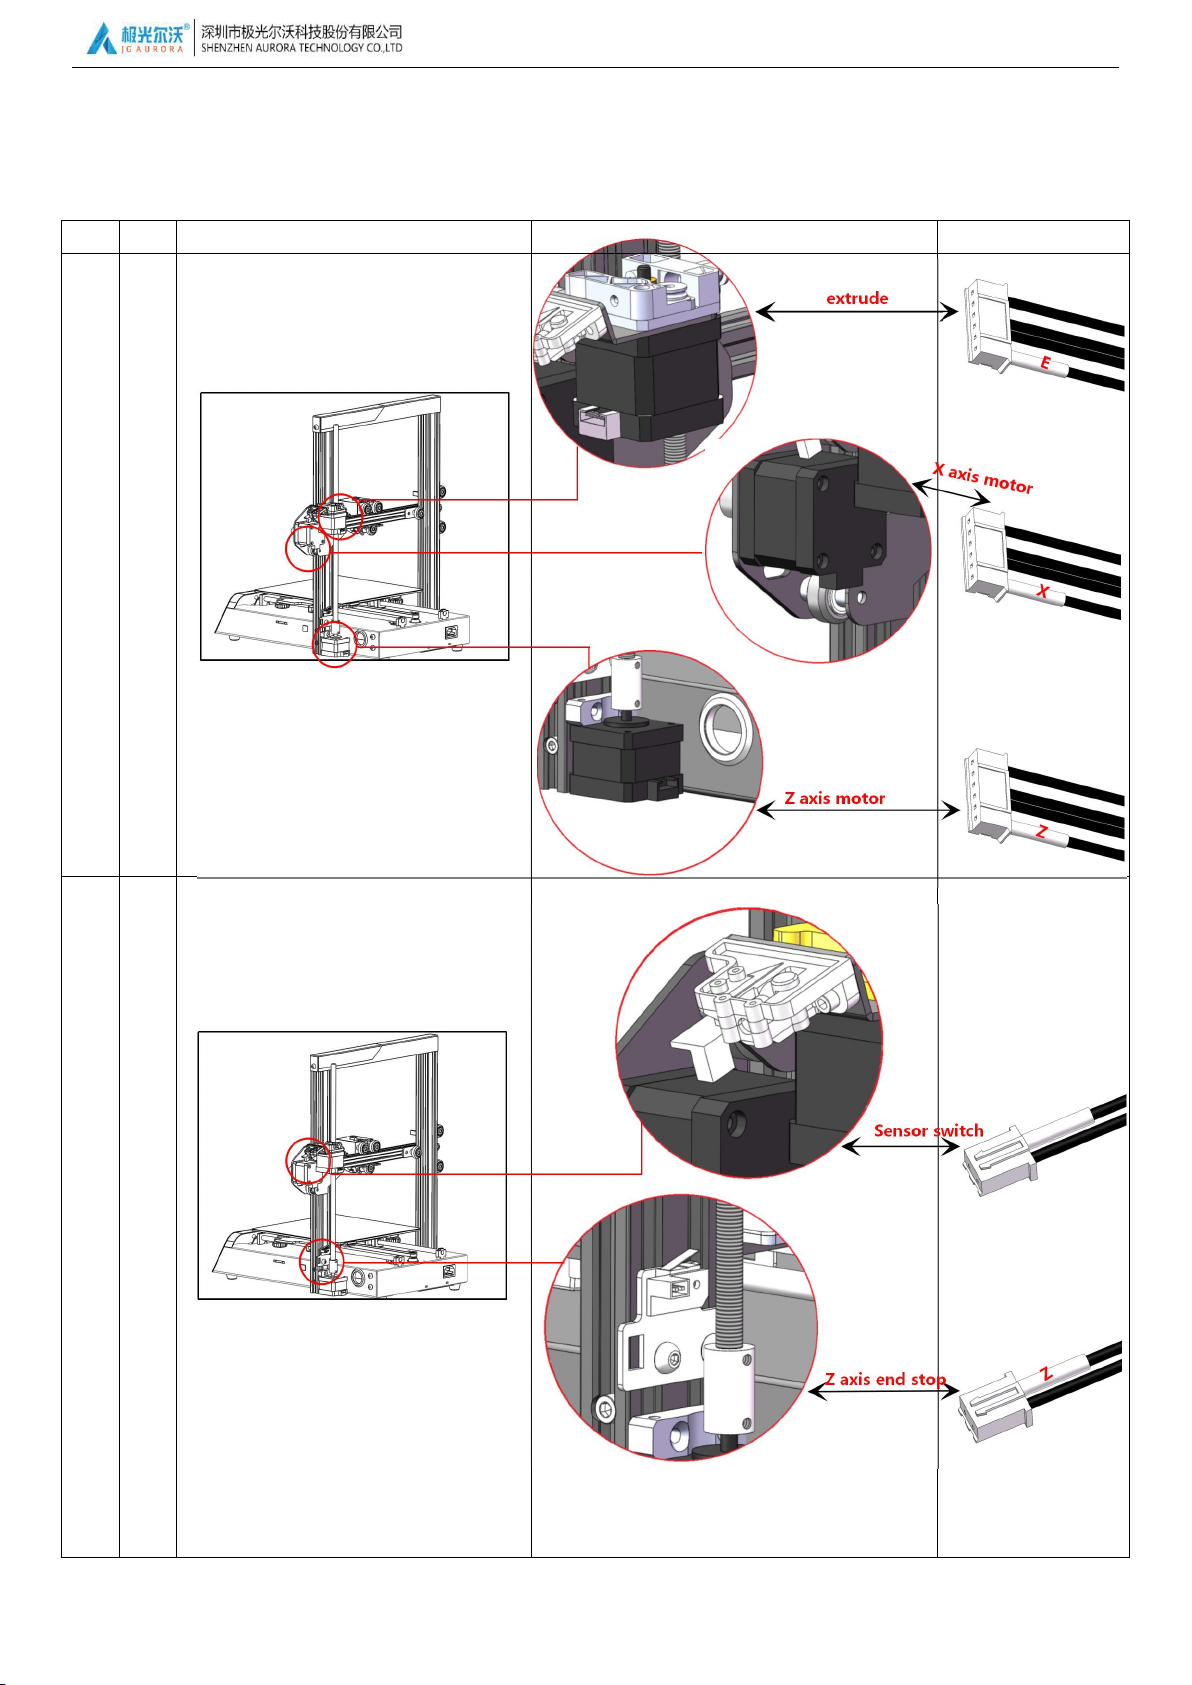
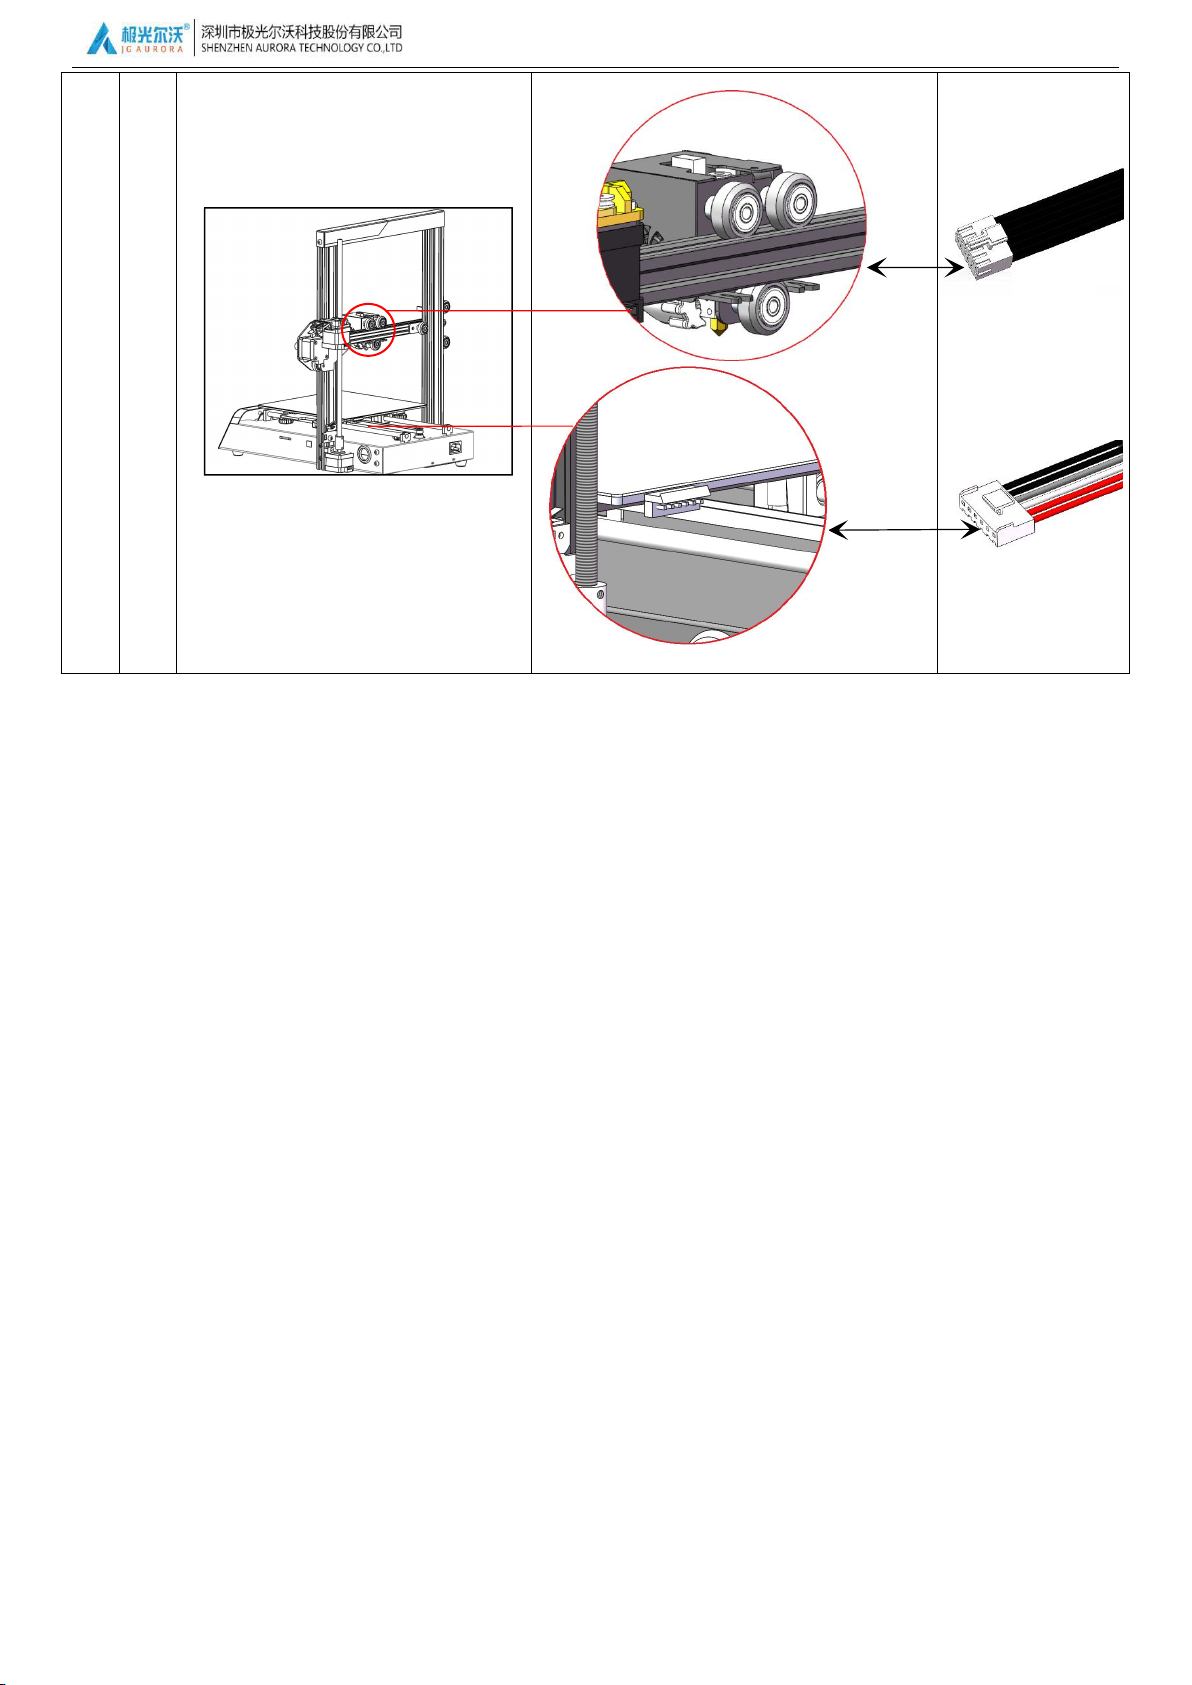
3.2.1 cable assembly
Please refer to the table below or see the installation video of the SD card for the specific process of plugging the cable. If
you do not understand, please contact our after-sales service at the end of this manual.
suite
step
Assembly process
detail
cable
接
线
第
一
步
接
线
第
二
步
With User to Create Better Product
17
第
三
步
eturder
Heated bed

With User to Create Better Product
18
4, Printing Instruction
(1)Main Menu:
(2)Preheat:Preheat PLA\Preheat ABS
⑧Adjustment knob
(Rotate Select, Press Ok)
④Speed Adjustment Ratio
⑦Hotbed Actual Temp.
⑨
Fan speed
③X/Y/ZAxis Coordinate
②Nozzle Actual Temp.
⑥
Hotbed Setted Temp.
①Nozzle SettedTemp.
⑩Print Progress
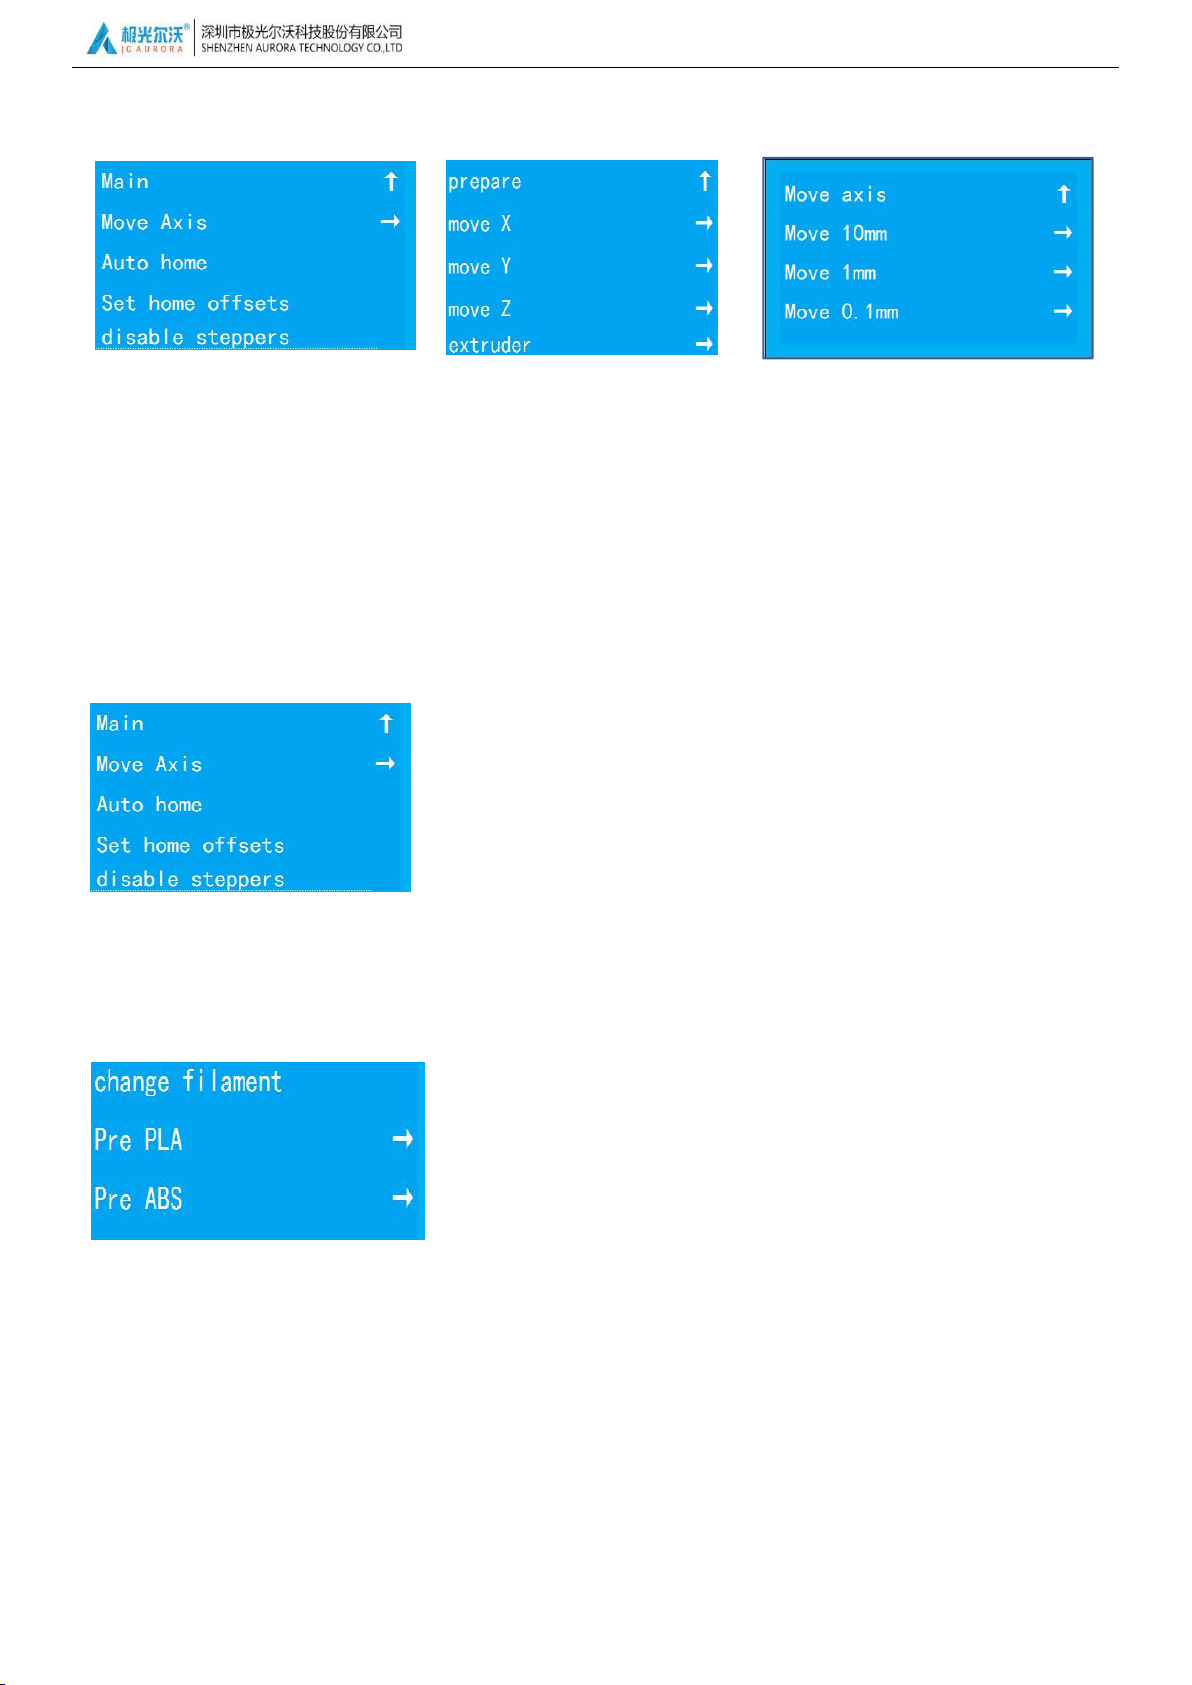
【Prepare】:Prepare works before printing,Include Move axis、Auto home、
Preheat、Cooling、Disable steppers、change filament etc.;
【Control】:Advanced settings,Include Temperature、Motion、Filament etc.;
【Print from SD】:Print model menu( Shown as Print from SD Card after
insert SD Card or shown as No SD Card after SD Card removed.);
【Preheat PLA\ABS】:Both preheat nozzle and hotbed,the corresponding temperature has been set in 【Control】;
【Preheat PLA\ABS END】:Preheat nozzle only;
【Preheat PLA\ABS Bed】:Preheat hotbed only;
⑤SD Card Status
4.1 Main Menu Introduction
4.1.1 Control Panel
4.1.2 Function Introduction
With User to Create Better Product
19
(3)Move axis:Move X\Y\Z\ axis.
(4)Auto Home:Nozzle go back to original place.
(5)Others:Disable steppers\change filament\Cooling
【Move X】:The nozzle moves along the X axis,X+ is away from the original point,X- is close the original point;
【Move Y】:The hot bed moves along the Y axis,Y+is away from the original point,Y-is close the original point;
【Move Z】:The nozzle moves along the Z axis,Z+ is up,Z- is down;
【Extrude】:Load or Remove Filament by hand;
【Move 10\1\0.1mm】:Rotate Knot;
【Disable steppers】:after setted Auto Home and Move axis,the motor is
locked,when you need to move the nozzle and hotbed
by hand,please Disable Steppers first;
【change filament】:change filament now or after print;
【Cooling】:Cancel preheat;
【Auto Home】:Nozzle and Hotbed go back to original place.
With User to Create Better Product
20
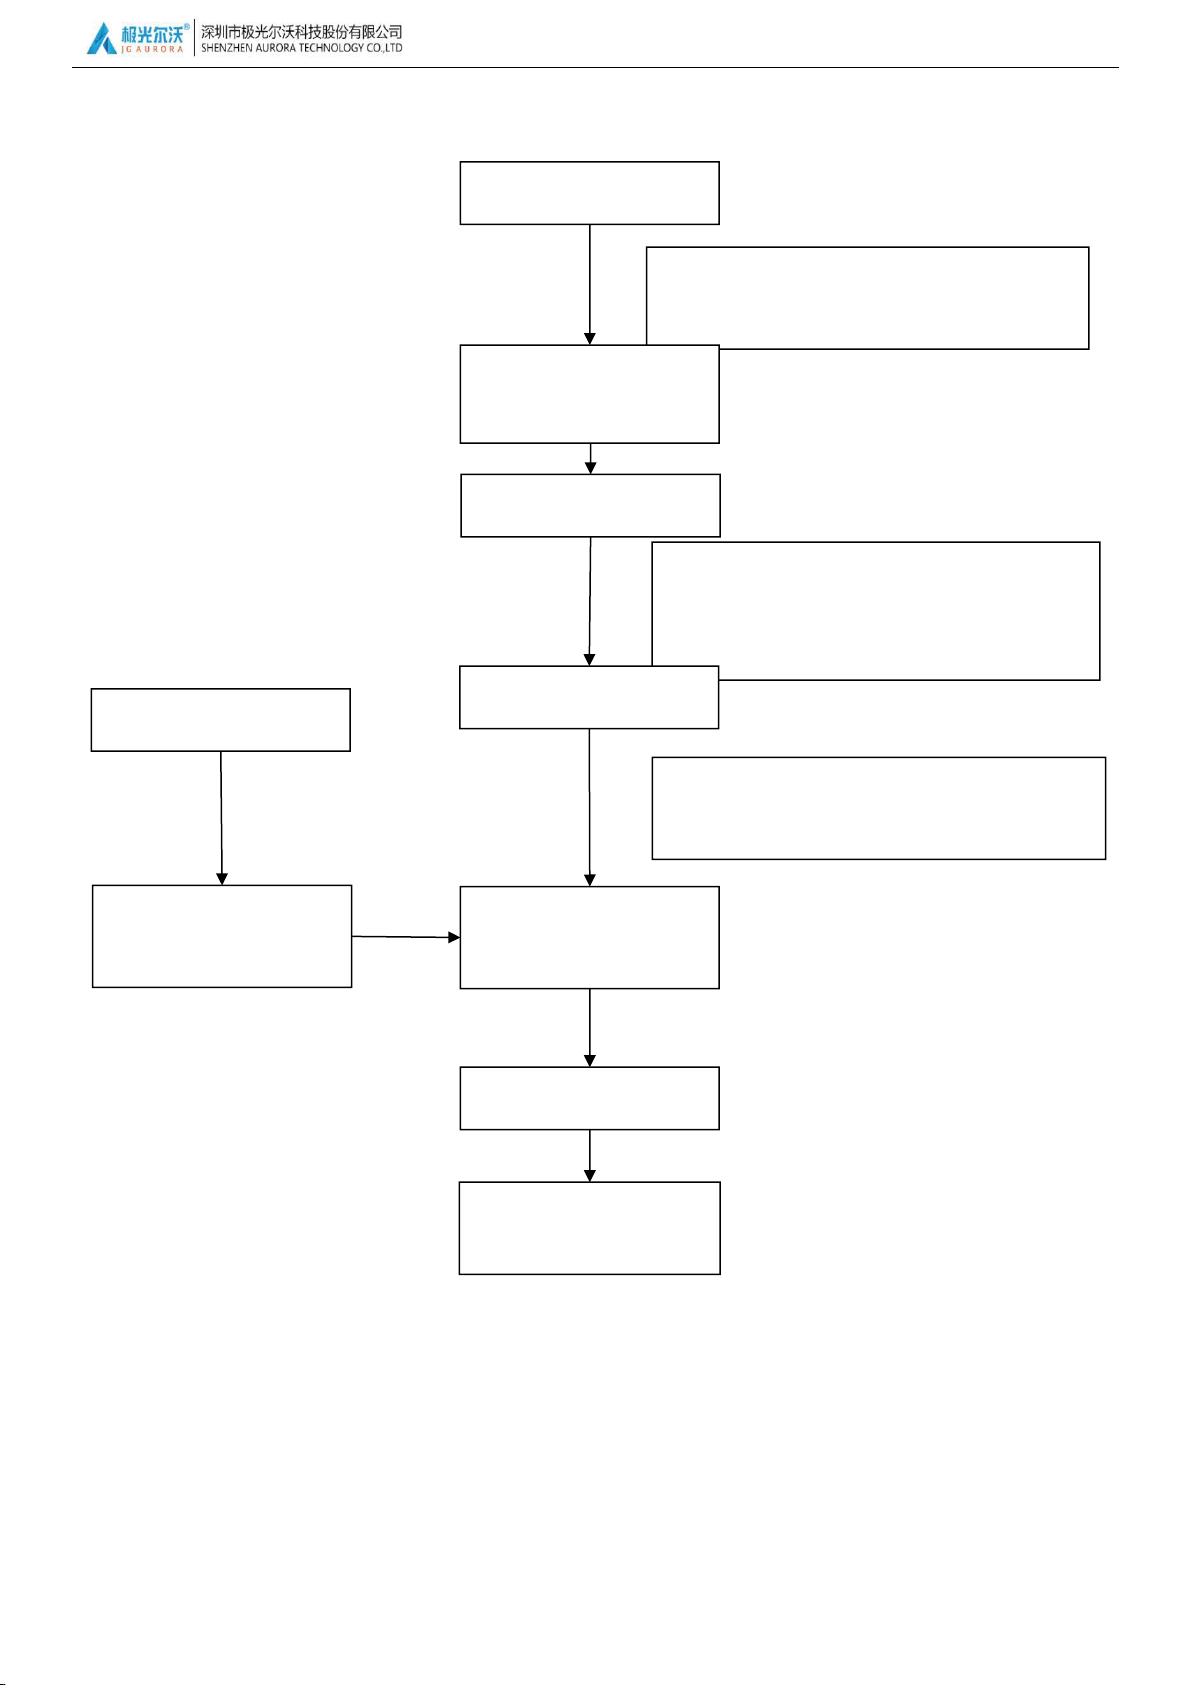
4.2 Operating procedures
The filament comes out smoothly.
More details to check【4.3.3 Filament Loading】
Check Power Voltage
Platform leveling
Install software
Slice model and copy to
SD card
Insert SD card
choose G Code file
Printing
Printing finish,Remove
model
Check the display voltage fit for your local
voltage standard or not?
After leveling,you will feel a little friction when
you move A4 Paper,without scratch on it,more
details to check【4.3.2 Platform Leveling】
Connect power cable,
Power On
Filament loading
With User to Create Better Product
21
4.3 Operating Instructions
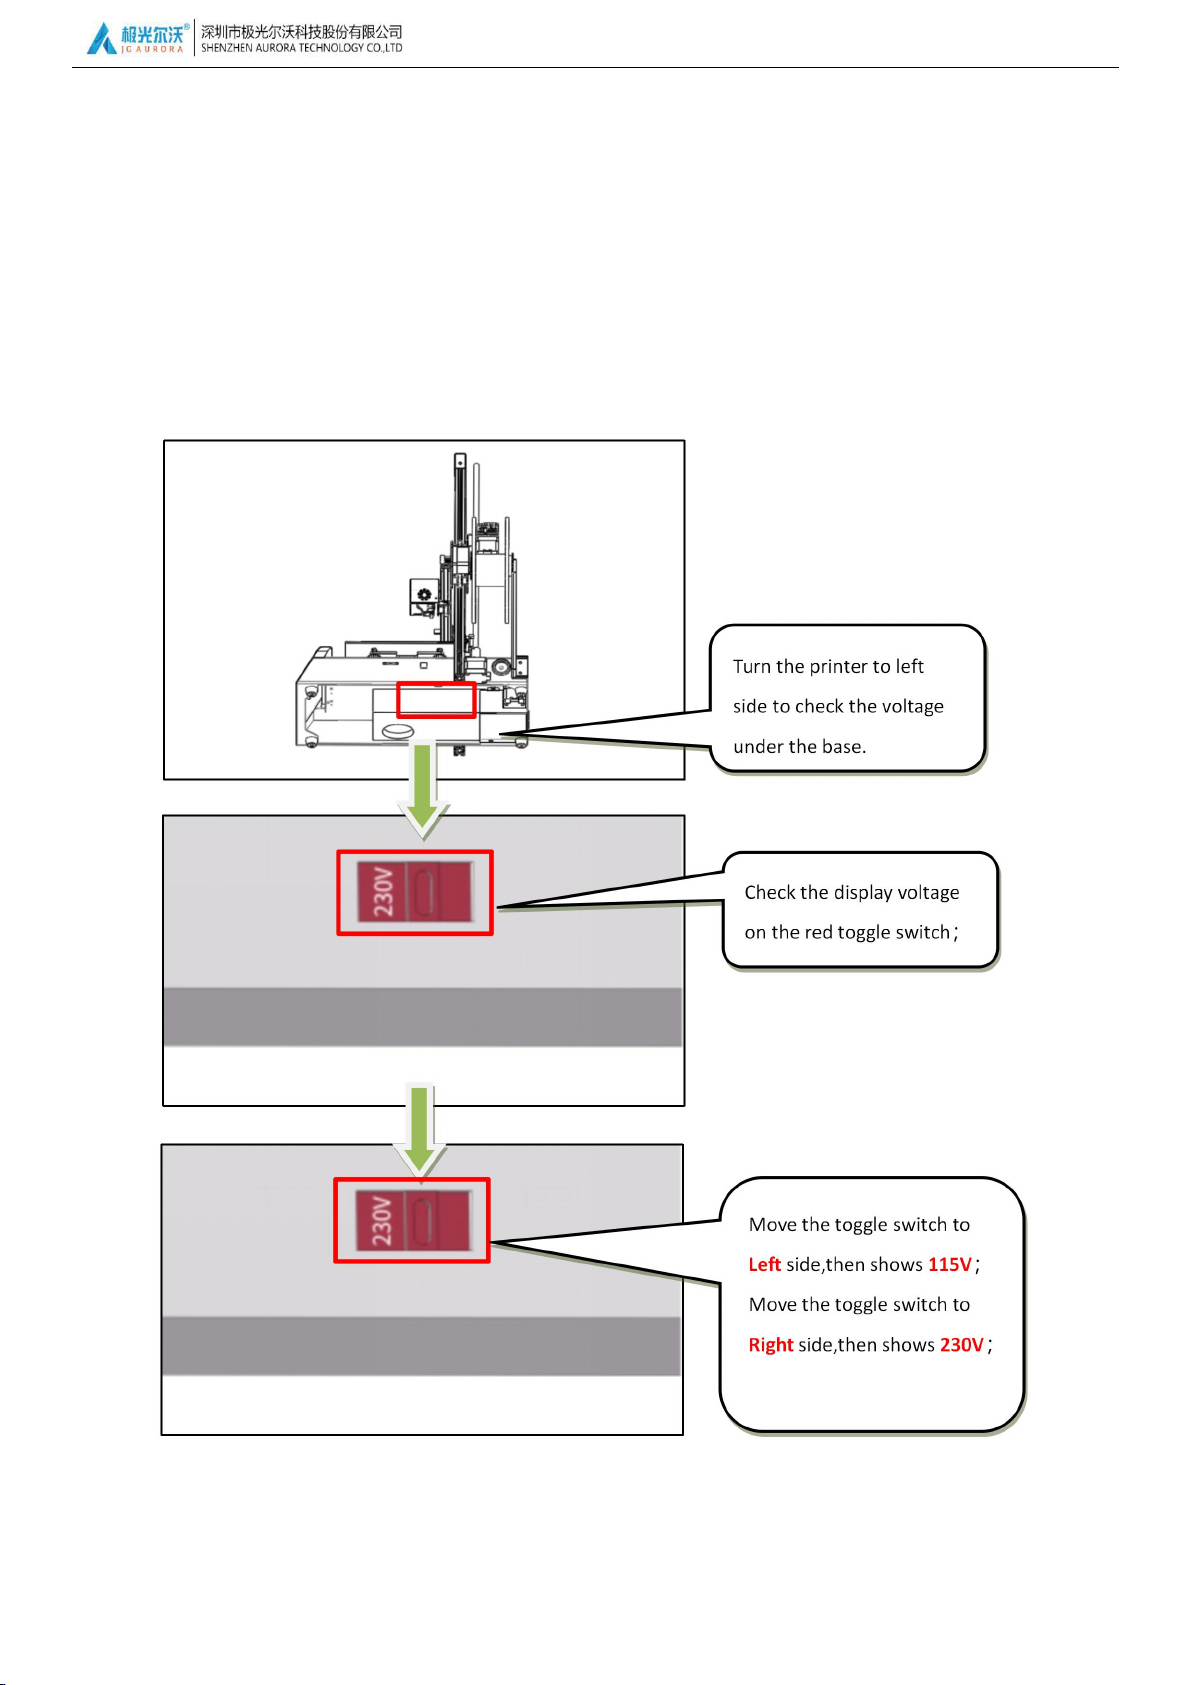
The input power of Magic is select-able AC 115/220,please adjust it according to your local voltage standard as below:
Check the voltage through the hole under the base. (115V means input power is 110V , 230V means input power is
220V),adjust it with red toggle switch to you local voltage standard;
4.3.1 Input Power Voltage Adjustment

With User to Create Better Product
22
4.3.2 Leveling
The first step: Firstly, we should screw all the four leveling nuts counterclockwise, then make leveling.
The second step: Press the control button into the main menu, select “Prepare” → “HOME”, press the button, the
extruder will go to the home place, find “ Disable steppers” in the same menu, now you could move the extruder and hot
bed manually.
The third step: After steppers stopped working, move the extruder to the four corners, then finish leveling.
When the extruder move to the relevant point, place an A4 paper on the platform, move the A4 paper and see the
distance, if the A4 paper is very loose and easy to move, then rotary the nut clockwise to close the gap, on the contrary,
if the A4 paper is quite tight to move, then rotary the nut counterclockwise to increase the gap, until the A4 paper has
a little scratch but no damage when moving, which means leveling finished.
Attention: Any question, please watch the video in SD CARD or consulting our engineers via email.
FOUR POINTS LEVELING
With User to Create Better Product
23
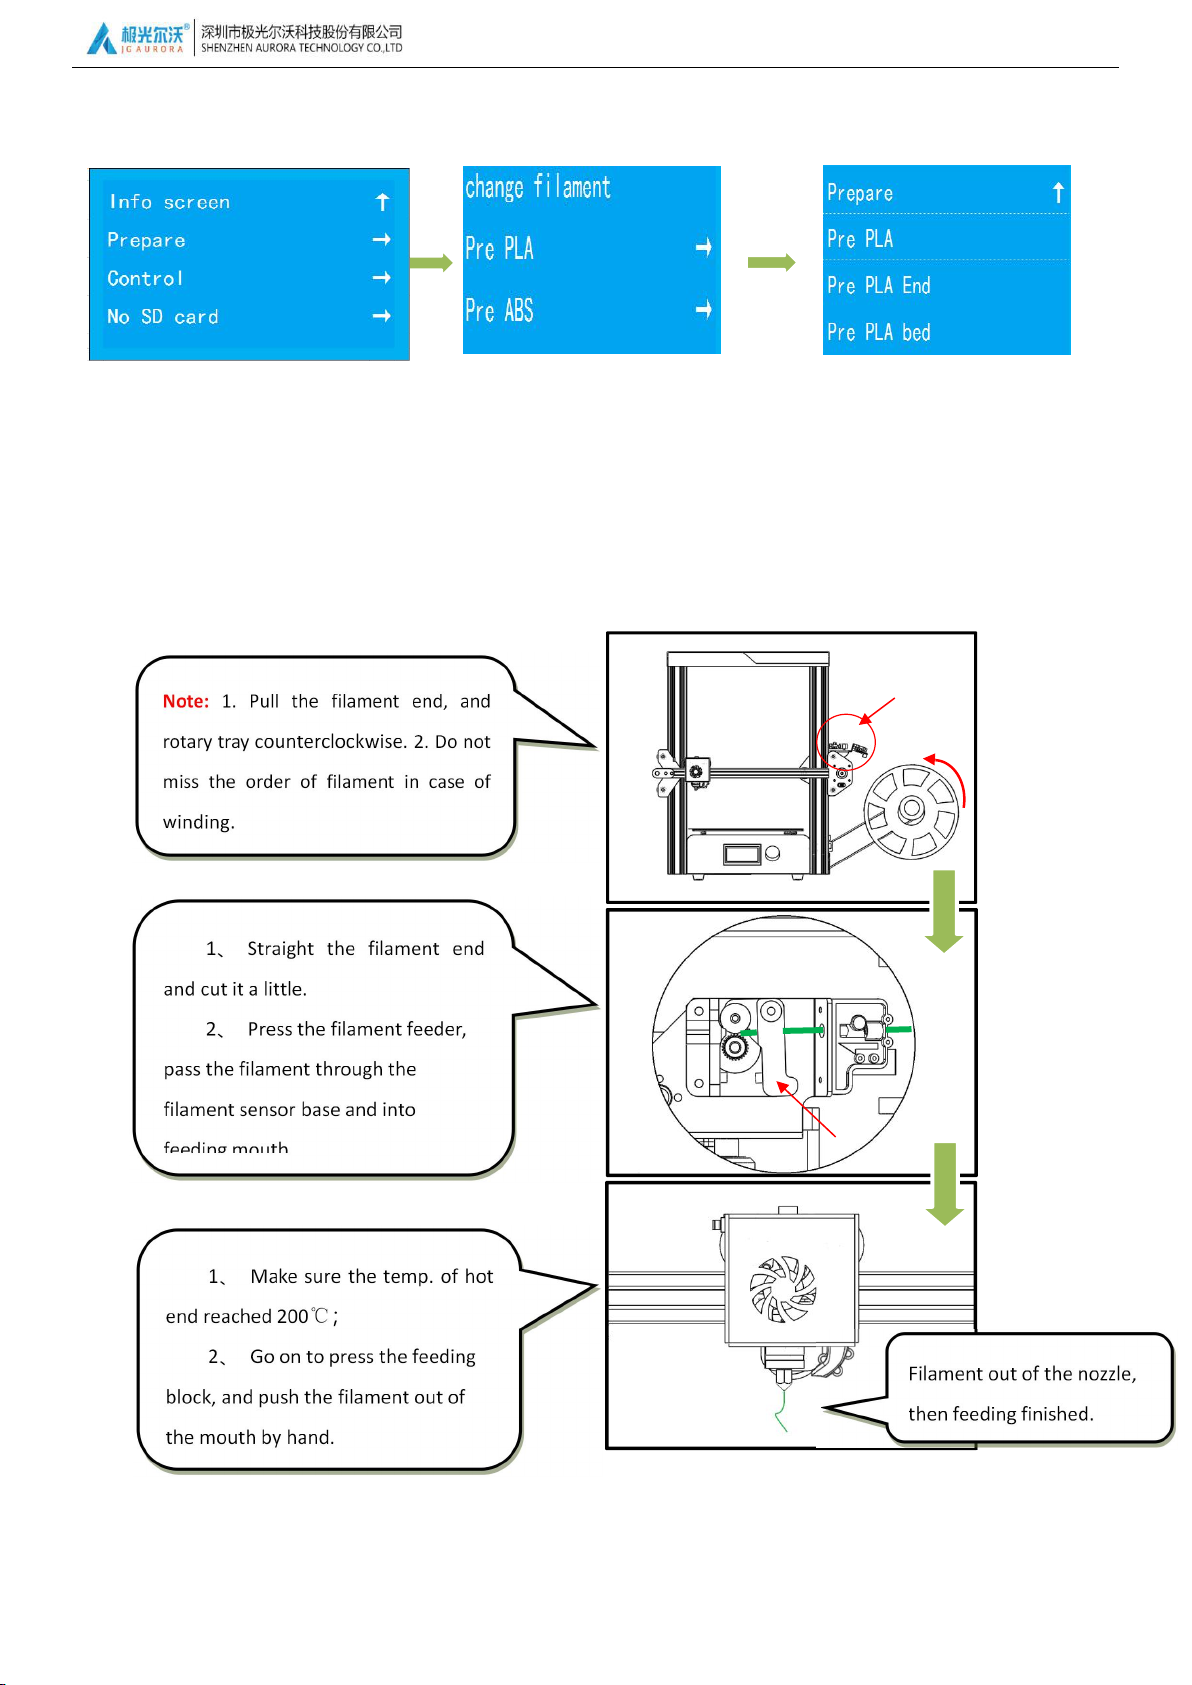
4.3.3 Filament loading
The first step:Press the button into the main menu, select “ Prepare” → “Preheat PLA”→ “Preheat PLA”, press the button
then extruder and hot bed begin heating.(Temp. in reference:PLA≈200 ℃,ABS≈240 ℃). Attention: We take the PLA as
an example in this manual.
he second step: When preheating, you could place the filament to the filament holder, press the feeding block in the left
side, load the filament into the filament feeder and lock the filament there.
The third step: After preheating finished, go on to load the filament to the nozzle part until filament out of the nozzle.
Feeding suite
Feeding suite enlarged view
Feeding block
With User to Create Better Product
24
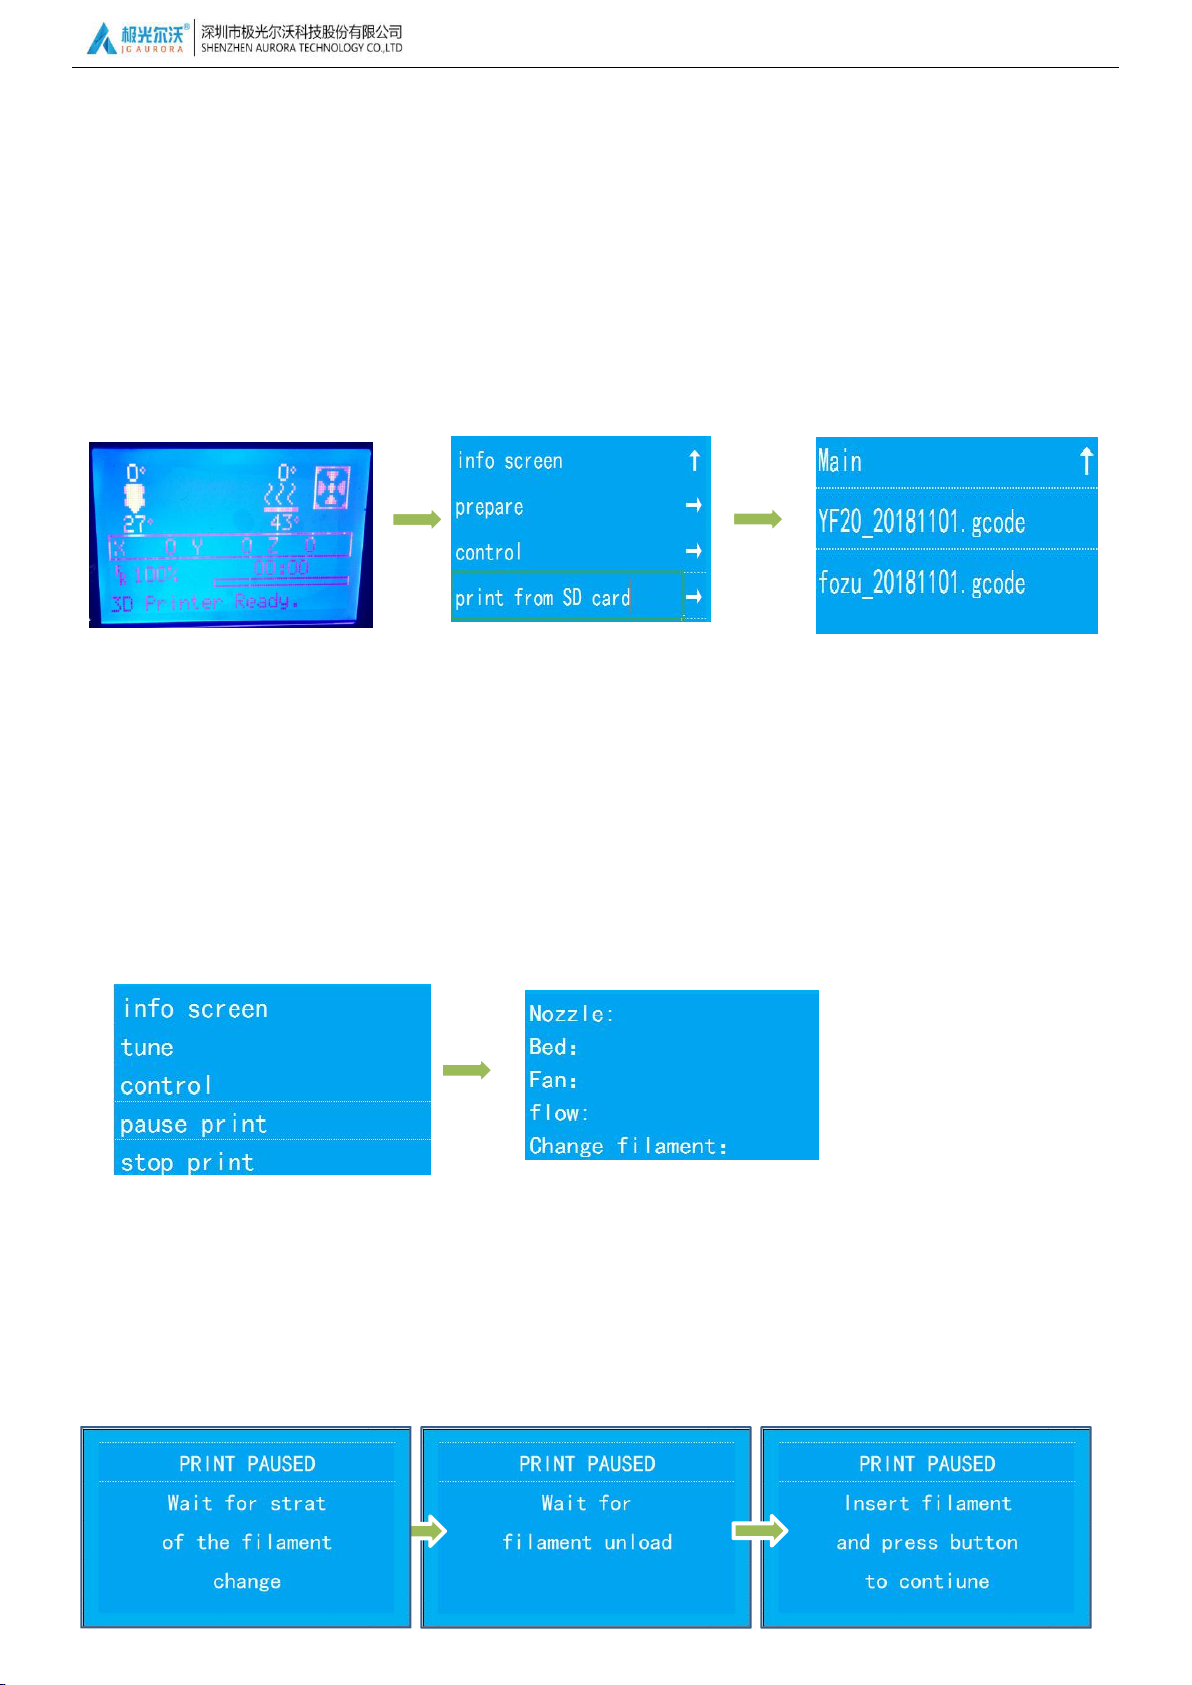
4.3.4 Model printing
The first step: Save the gcode file into the sd card of root directory(Details of slicing, please see the chapter 5).
The second step: Insert the sd card into the port of printer, when shows “ card inserted”, press the button and choose
the file you’d like to print, and make sure of it.
The third step: When temp. reached, printer will start to work automatically.
The fourth step: When model finished, display will show the tips of finished.
The fifth step: Take off the model, please keep in mind to take off the model when printer cooling down.
Attention: At the begging of printing, if the filament cannot paste on the bed, please make leveling again according to the
Chapter 4.3.2.
When printing, filament will be used up, it will need to change the filament as below:
(1)Press the button, select “tune”→ “change filament”, and confirm, wait the printer to pause printing.
(2)After printer paused, it will unload the filament, and shows “Wait for filament unload”.
(3)When unloading finished, display shows “Insert filament and press button to continue”, then insert the new
filament into the mouth and press the button to loading.
(4)When press load, display will shows“Wait for filament load”, until filament out of the nozzle, then select
“Continue” to quit filament change.
4.3.5 Filament Change

With User to Create Better Product
25
Model finished to change filament, should do as below:
(1)Press the button,select “Prepare”→ “change filament”→ “Preheat PLA”.
(2)When press the button to confirm preheating and pause printing, display will shows“ Heating nozzle ,please
wait...”, steps is the same as change in printing. Please do not pull the filament hardly in case of damage to the nozzle.
4.3.6 Power Failure Recovery Printing
In the process of printing, printer stopped printing in sudden, we could use the function of power loss recovery to continue
printing.

With User to Create Better Product
26
5.1 software install
first:copy the file in SD card to computer;
second:Double click software icon, enter setup iterface, setup procedure as below:
5, slice software

With User to Create Better Product
27
Note:because difference of computer system, it might need to repair, before install success!
Third:press finish,then run the software.
first : Double click software
icon,enter into the software interface;
5.2 soft instruction

With User to Create Better Product
28
second:choice printer model,start software,automaticlly come out model choice;
third:software interface instruction
;

With User to Create Better Product
29
fourth:upload model,choice the printing quality you want,in the right corner will show“slicing”,means Gcode is
generating;

With User to Create Better Product
30
fifth:after slice,press right corner【save】button;
sixth:save Gcode or copy it to the SD card,and insert it into SD card slot,then can start print.
Note:for the detail of slice software please check the document in SD card.
With User to Create Better Product
31
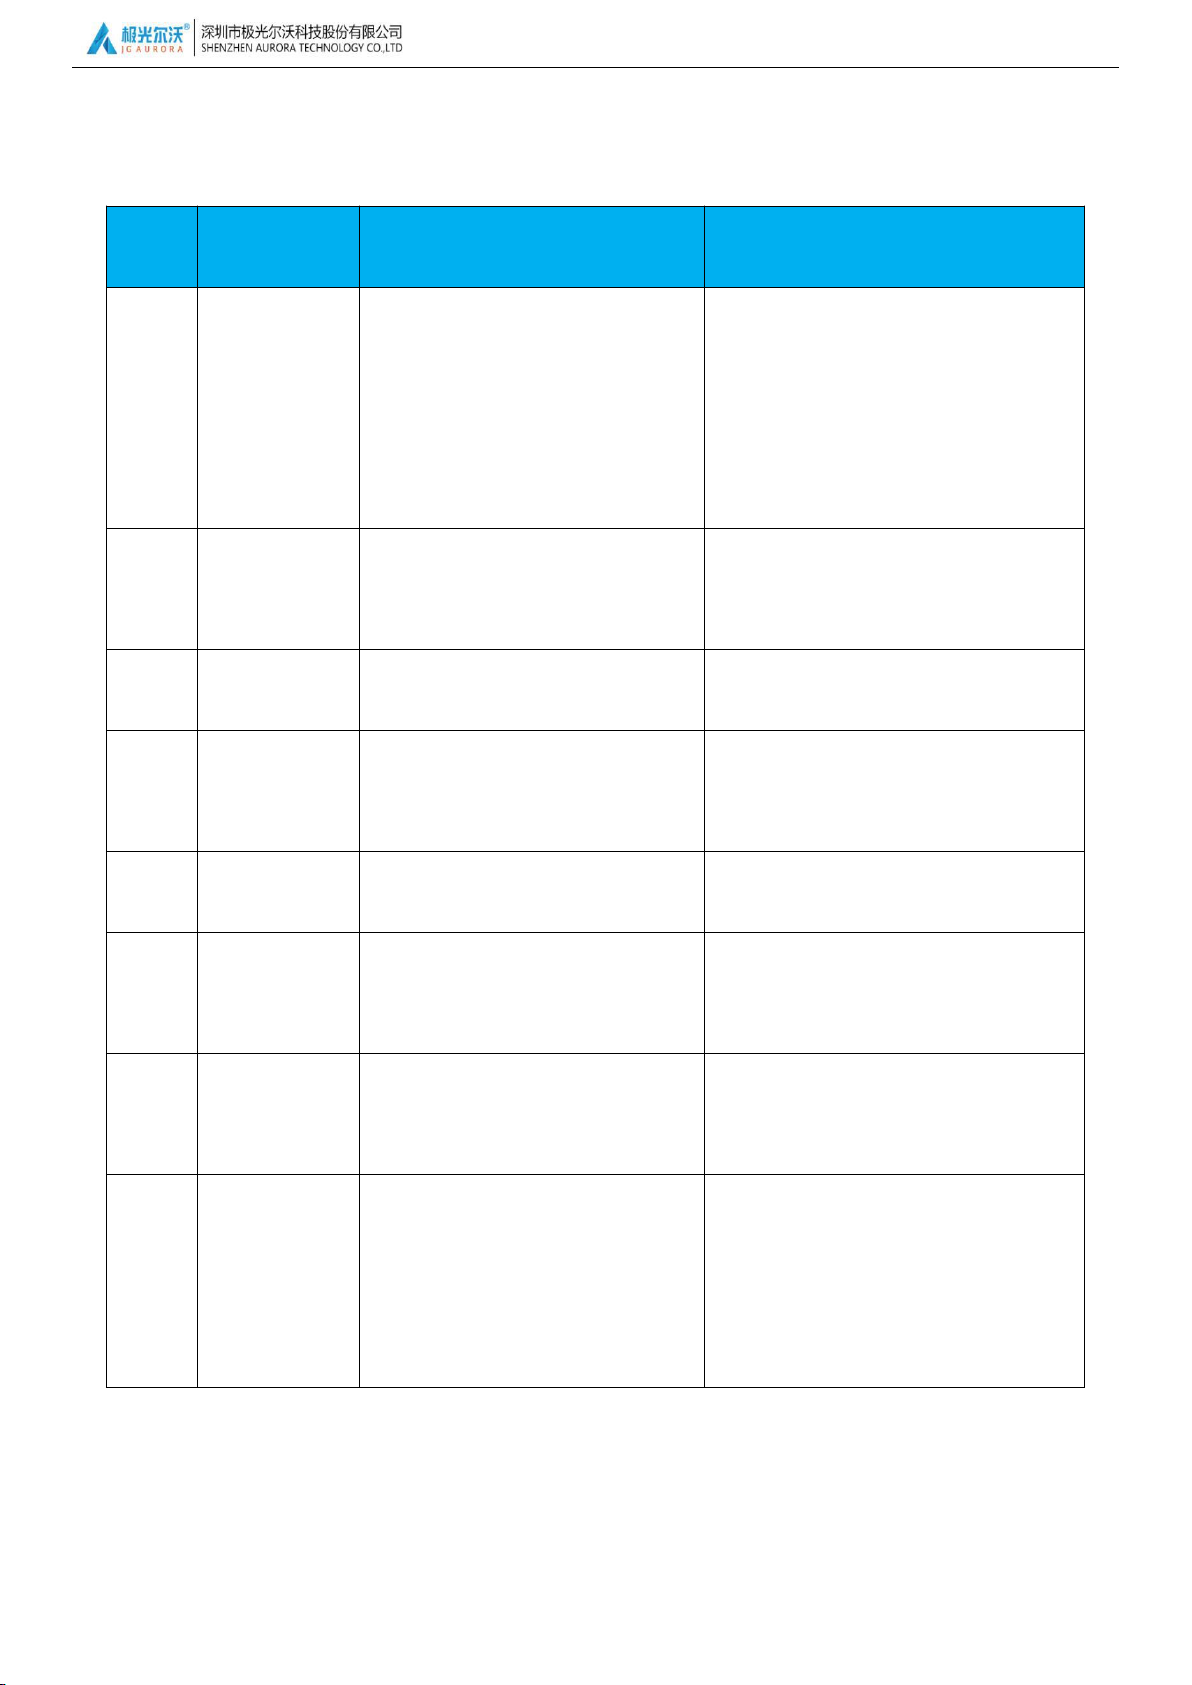
6, Common Problems and Solutions
item
Problems
description
Reasons
Solution
1
Filament breaks
at the top of
extruder mouth
A. Filament has run out .
B. Filament was exposed to moisture,
and has become brittle..
C. Filament was plugging the throat.
A. Replace filament before its gone
B. Store filament in air-tight container
when finished printing.Replace with fresh
filament spool.
C. Clean the throat. Refer to video on the
USB stick for instructions.
2
Filament slips in
extruder
Filament is too thin, or has been
ground down by
extruder gear .
Retract filament and cut out the thin
filament section.
3
Temperature is
incorrect.
Temperature sensor is
malfunctioning.
Contact support for advice or
replacement of temperature sensor .
4
Model is
malformed
Timing belts may be too
loose. Timing belt pulley
may be loose.
Check and tighten the screw and belts.
5
Model is
warped
The print bed is not level
Relevel print bed, and retry print.
6
G-code
generation
failed
A、 Incorrect setting or wrong
B、 save path
Choose the correct machine type and
select the correct save path
7
Software
Installation
failed
OS may not be supported
Install only on compatible OS
8
SD card can’t
read
A、 SD card not readed
B、 SD card broken
A、 Take out SD card,turn off printer and
wait for 10 second, then turn on and
insect SD card
B、 Format SD card,and recopy model to
SD card
Note:if no clear about the cause of malfunction, please contact our after sales for technique support.If printer be
cleaned,should relevel the platform,avoid damage during second time printing

With User to Create Better Product
32
7, 3D Printer Maintenance
7.1. Daily maintenance
1) Before using the machine to print, make observe the safety recommendations.
2) Regularly clean and maintain the equipment. Clean the surface of the nozzle, print bed, moving parts
and other parts, to help prevent wear caused by excessive dust.
3) After each repair and maintenance, ensure all disassembled parts have been put back in their original
place to avoid mechanical failures that may be caused by missing parts or incorrect re-assembly.
7.2. Basic maintenance
1) Before operating the 3D printer, it is necessary to inspect the printer, and perform maintenance before
use:
Inspect the nozzle for blockage or damage
Check the printing platform is calibrated and clean.
Check the printer is on a flat surface and is stable.
Check that screws and nuts are tight, and that no parts of the printer are loose or wobbly.
Check whether motion rails require cleaning or lubrication with oil.
When parts or lines are damaged or worn out, you should replace them before printing.
2) In the operation of the 3D printer, ensure not only that the design of each print model does not exceed
the actual printable volume of the device, but also do not allow the machine to work in too high a
temperature or under too much load. Otherwise, not only will it not print the object, but it can also
damage the machine because of overloaded work.
3) For best print results, please remove the filament remaining in the extrusion head after finishing
printing. Seal filament in air-tight containers to prevent material from absorbing moisture, which can
cause filament to become brittle and break during printing.

With User to Create Better Product
33
7.3. Maintenance of Moving Components
oil within the bearings and to lubricate the entire length of the guide rails and polished rods.
If you notice the printer has become noisy, or vibrates excessively, you may need to clean the rail rods
and add some lubricating oil to reduce friction.
To Clean and Lubricate: first, with a clean dust cloth, clean the grease or dust from the moving parts.Then
apply 3-5ml (about 5-8 drops) lubricating oil along the motion rails. Brush the oil along the respective
parts or rail axis, and move the moving parts along the rails back and forth, in order to distribute

With User to Create Better Product
34
8, Supports and service
1. Please see theWarranty Card for details on our policies for repair and support.
2. If your printer is malfunctioning or damaged, for your safety, and to avoid further damaging the printer,
please contact the after-sale service center or our support team for advice first, before attempting
any repair.
Shenzhen Aurora Technology Co., Ltd
Headquarter Address: 5F Building 1 Longquan Technology Park, Tongsheng community,
Dalang street Longhua district, Shenzhen, China 518109
Company homepage: www.jgaurora3d.com
Tel of after sales service center/support team: 0755-29735649 / 66607459
Email of support: support@zgew3d.com or after-sales@3derwo.com
Official website Official Facebook
 Loading...