

High Definition Dual Solar Panel Digital Video Camera
User’s Manual
Solar Panel as battery charger works anywhere when it is
opened, even if camera power is not turned on!!

Table of Contents
1. Introducing the Camera
(a) System requirements………………………………………….01
(b) Features…………………………………………………..........01
(c) Unpacking the video camera…………………………………01
(d) About the camera………………………………………..........02
(d1) Front View…………………………………………………...02
(d2) Top View……………………………………………………..02
(d3) Bottom View…………………………………………………03
(d4) Back View……………………………………………………03
(d5) Rear View……………………………………………………04
(d6) LTPS View…………………………………………………...04
(d7) Button description…………………………………………..05
2. Getting started..........................................................06
(a) Inserting an SD Card……………………………………........06
(b) Inserting the batteries...............................................................06
(b1) Open the battery compartment…………………………….07
(b2)
Insert the batteries as shown………………………………..07
(c) Experiences new feature ………………………………........08
(d) Turning on the video camera………………………………09

(e) Changing modes………………………………………….09
3. Snapshot Mode.........................................................10
3a.) List of Function……………………………………………....11
4. Snapshot Mode Tool Menu….…………………….12
4a.) List of Function………………………………………………12
5. Video Recording Mode
………………………………...13
5a.) List of Function……………………………………………....14
6. Video Recording Tool Menu………………………15
6a.) List of Function………………………………………………15
7. Playback Mode (SET Mode)……………………...16
7a.) List of Function………………………………………………17
8. Playback Mode Tool Menu…………..……………18
8a.) List of Function………………………………………………18
9. Setup Mode………………………………………...19
9a.) List of Function………………………………………............20
10. Connecting to Computer, TV and HDTV.............21
11. Mass Storage Mode………………………………22
12. Troubleshooting…………………………………..23

1. Introducing the camera
Read this section to learn about the features and functions of the video camera.
This chapter also covers system requirements, package contents, and
descriptions of the hardware components.
(a) System requirements
The video camera requires a PC with the following specifications:
z Windows XP/2000/ME/98SE/Vasta operating system
z Intel Pentium III 500MHz CPU or higher
z Standard USB 1.1 port or higher
z 4x speed CD-ROM drive or higher
z At least 200MB of available disk space
(b) Features
The video camera offers a variety of features and functions including:
z Digital camcorder, 720P (1280 x 720P)
z Digital camera (max 12 Mega pixels)
z Dual Solar Panel as battery charger
z HDMI connection
z 3” LTPS Screen(16:9)
Additionally, the camera also features 8X digital zoom, USB mass storage, and a
SD card reader.
(c) Unpacking the video camera
The following items should be present in the package. If any item is missing or
appears damaged, contact your supplier immediately.
Items:
Video camera
USB/AV/HDMI cable
User Manual
Battery Charger
Lithium Battery
Camera bag
01
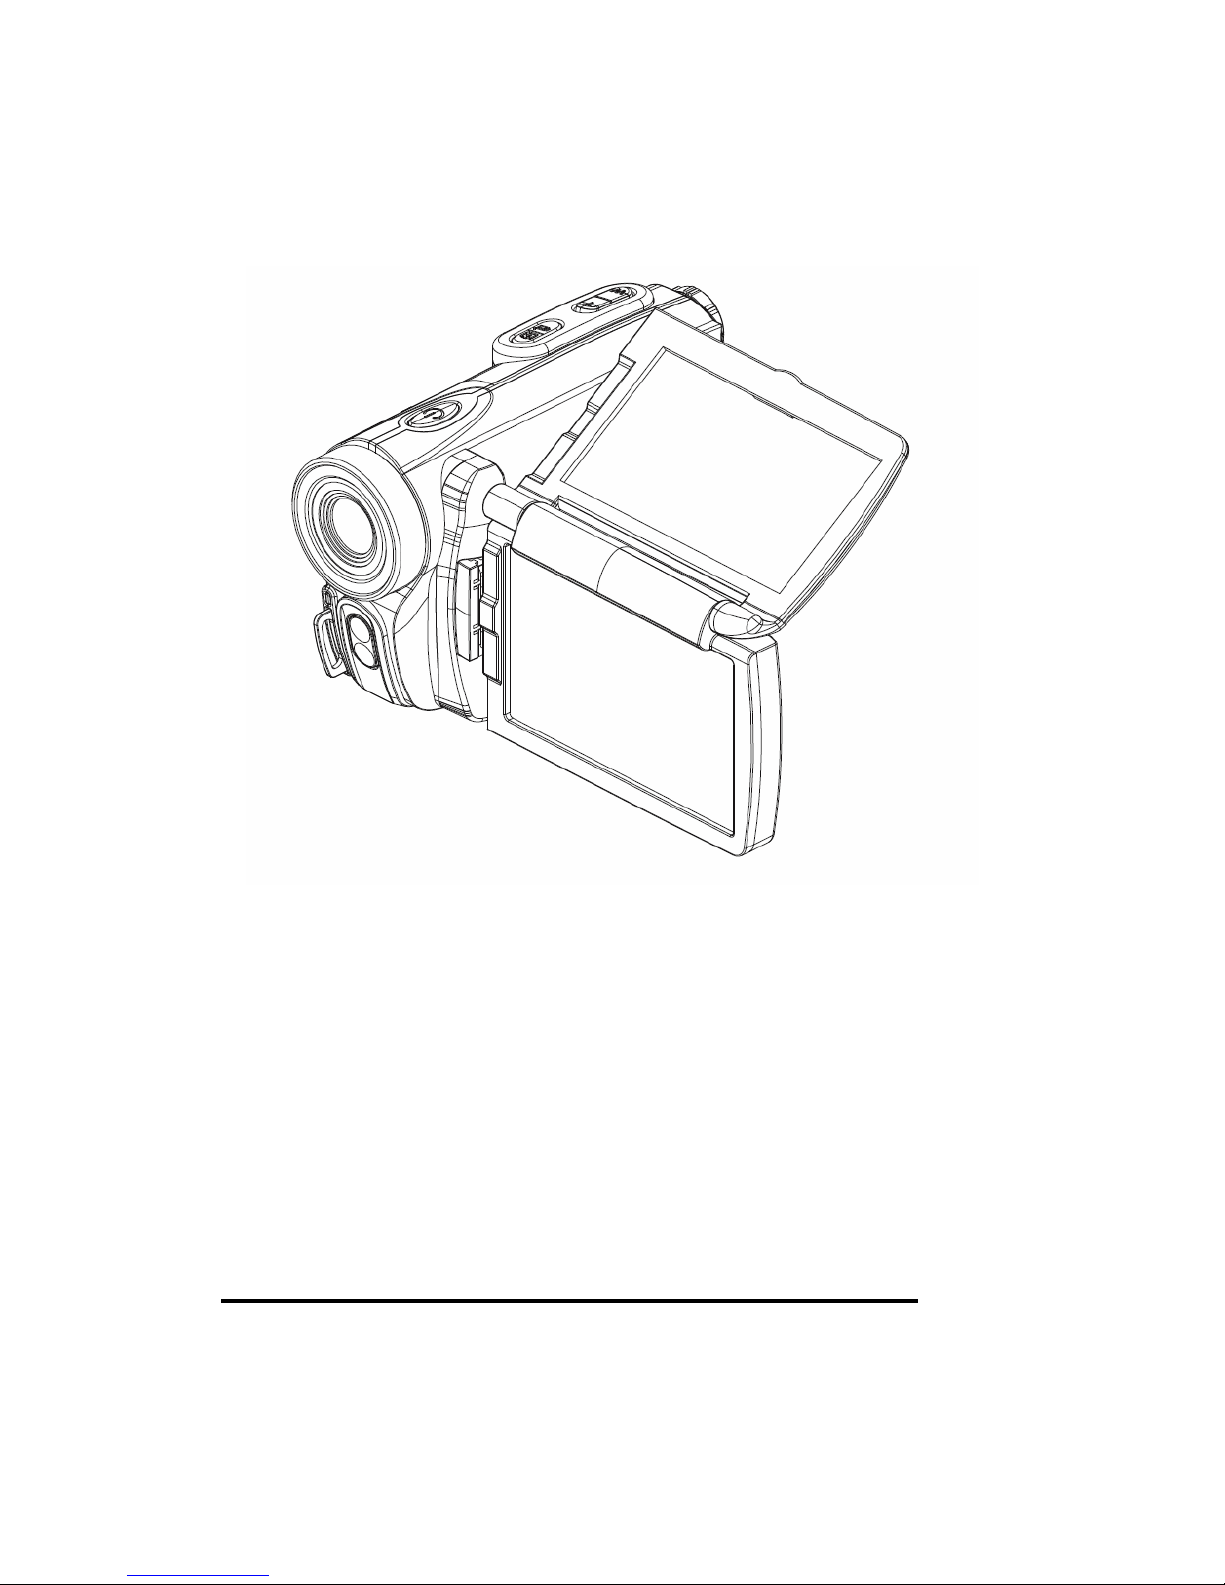
(d) About the camera
Refer to the following illustrations to familiarize yourself with the buttons and
controls of this video camera.
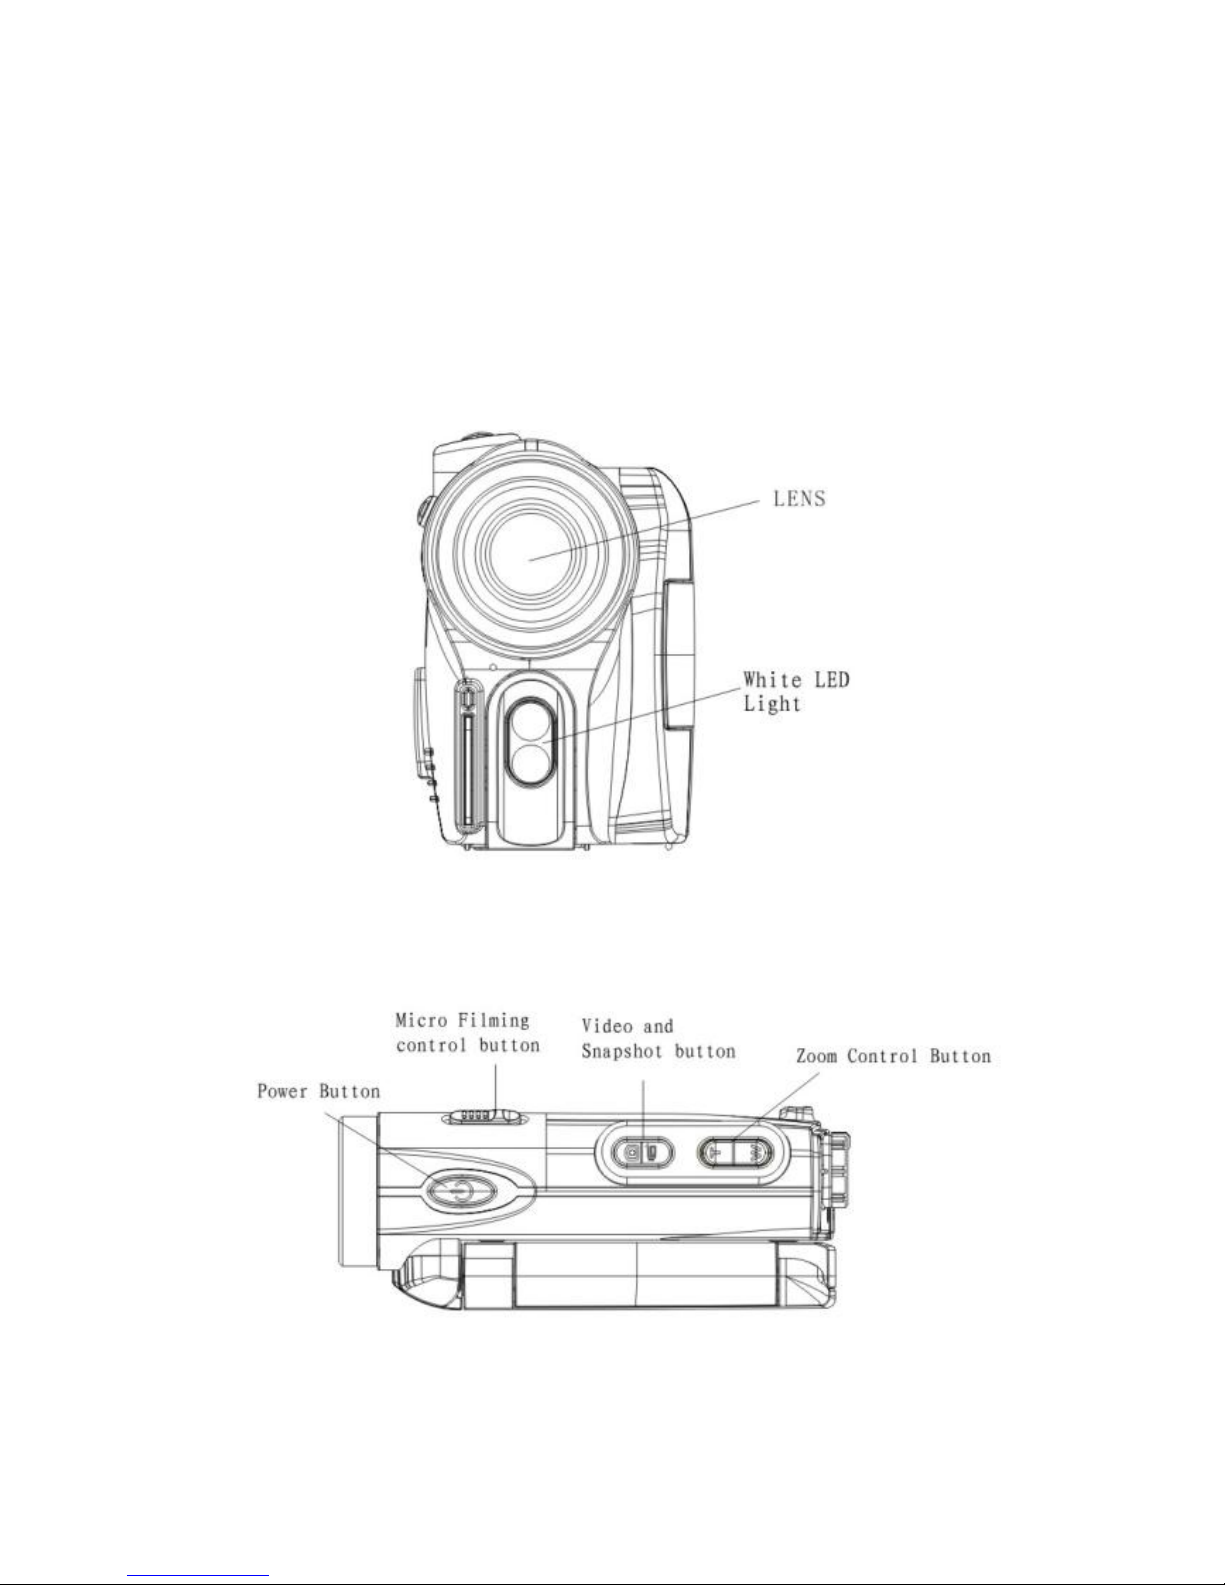
(d1) Front V iew
(d2) Top View
02

(d3) Bottom View
(d4) Back View
03

(d5) Rear View
(d6) LTPS View
04
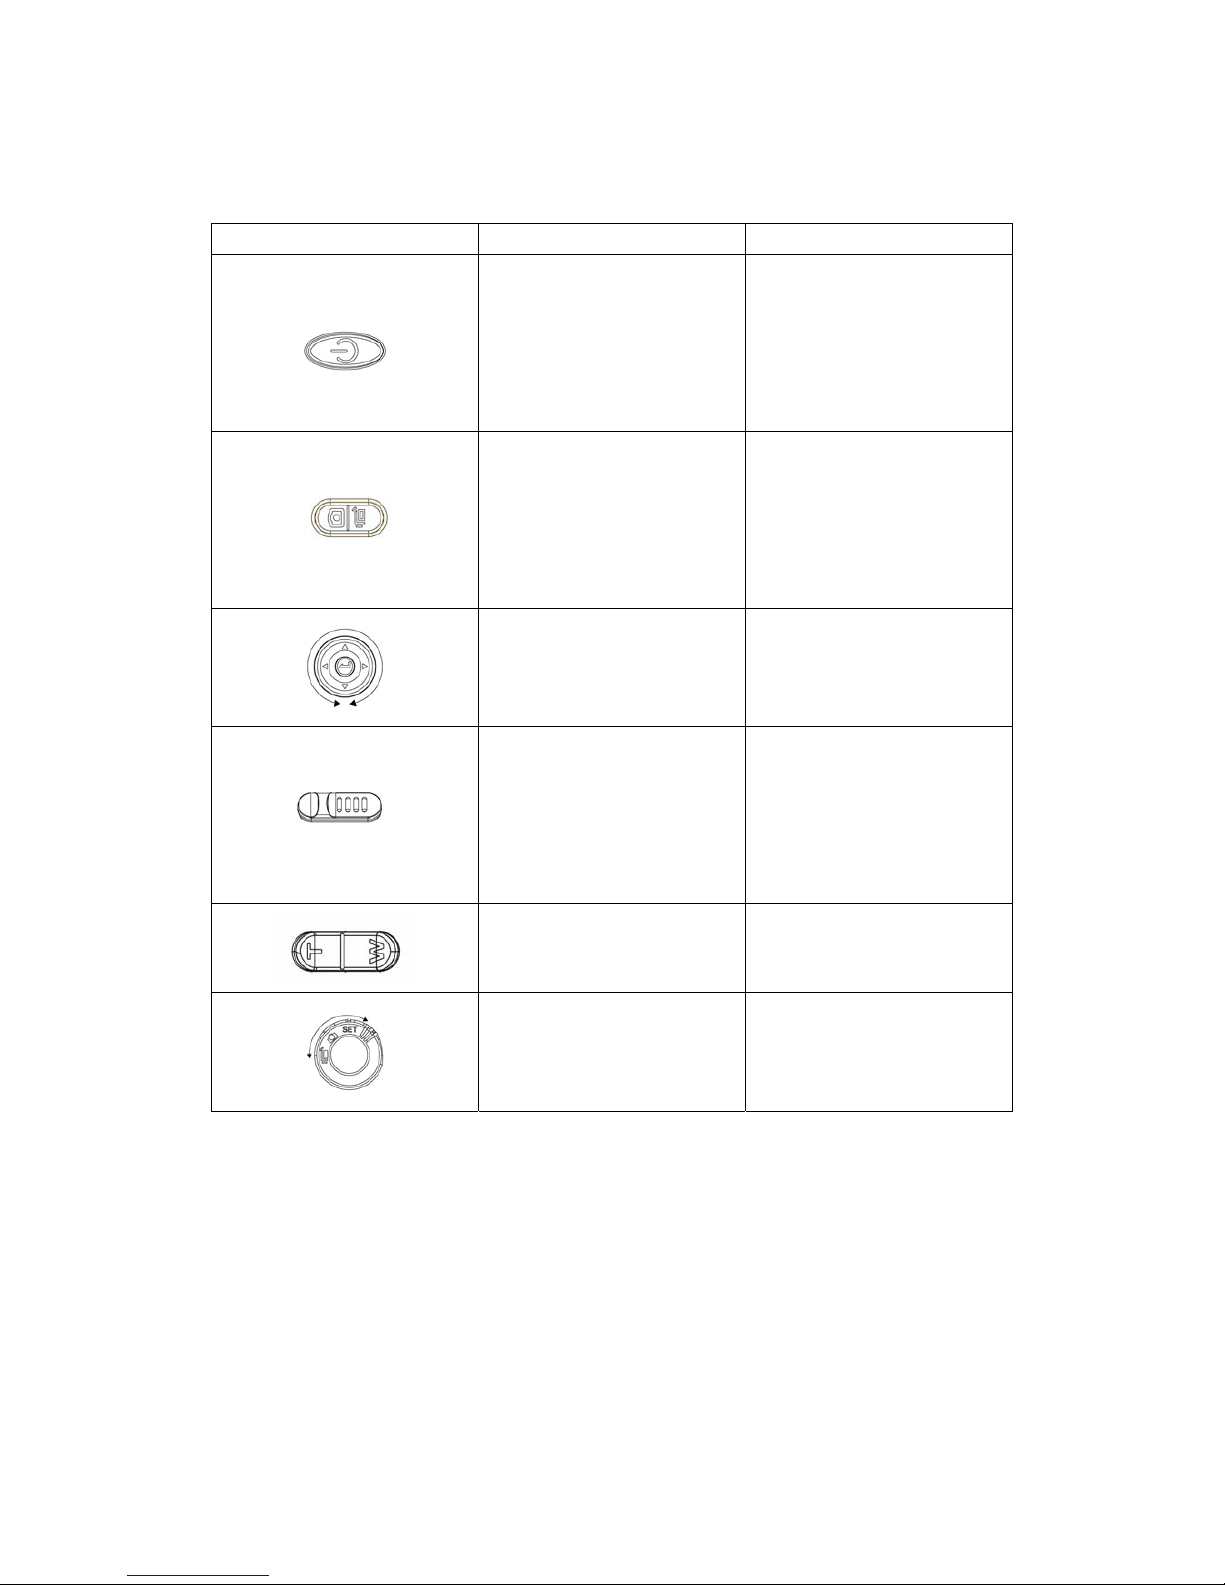
(d7) Button description
Button Name Function
Power button Press and hold to turn power
on/off
Video and Snapshot button Press to take picture or video
Four directional navigation key Left, Right, Up, Down and OK
Micro Filming button Switch to Micro Filming mode
Zooming Control Press for Digital Zooming, Max
at 8X
Control Button Rotate for Picture, Video and
Playback mode
05

2. Getting started
Read this section to learn how to start using the video camera. This section
covers basic functions such as switching on, inserting the battery and memory
cards, and configuring preliminary settings. See later chapters for advanced
functions.
(a) Inserting an SD Card
(a1) Open the Socket compartment
(a2) Insert an SD card as shown. Make sure the gold contacts are facing away
downwards.
(Take note of the camera direction)
(b) Inserting the batteries
This video camera is designed to use four AAA batteries or Lithium Battery.
Only use the battery supplied or similar battery recommended by the
manufacturer or your dealer.
Note: Install the batteries exactly as described here. Ensure that the polarity of
the batteries is correct. Installing the batteries incorrectly could cause damage to
the camera and possibly start a fire.
06
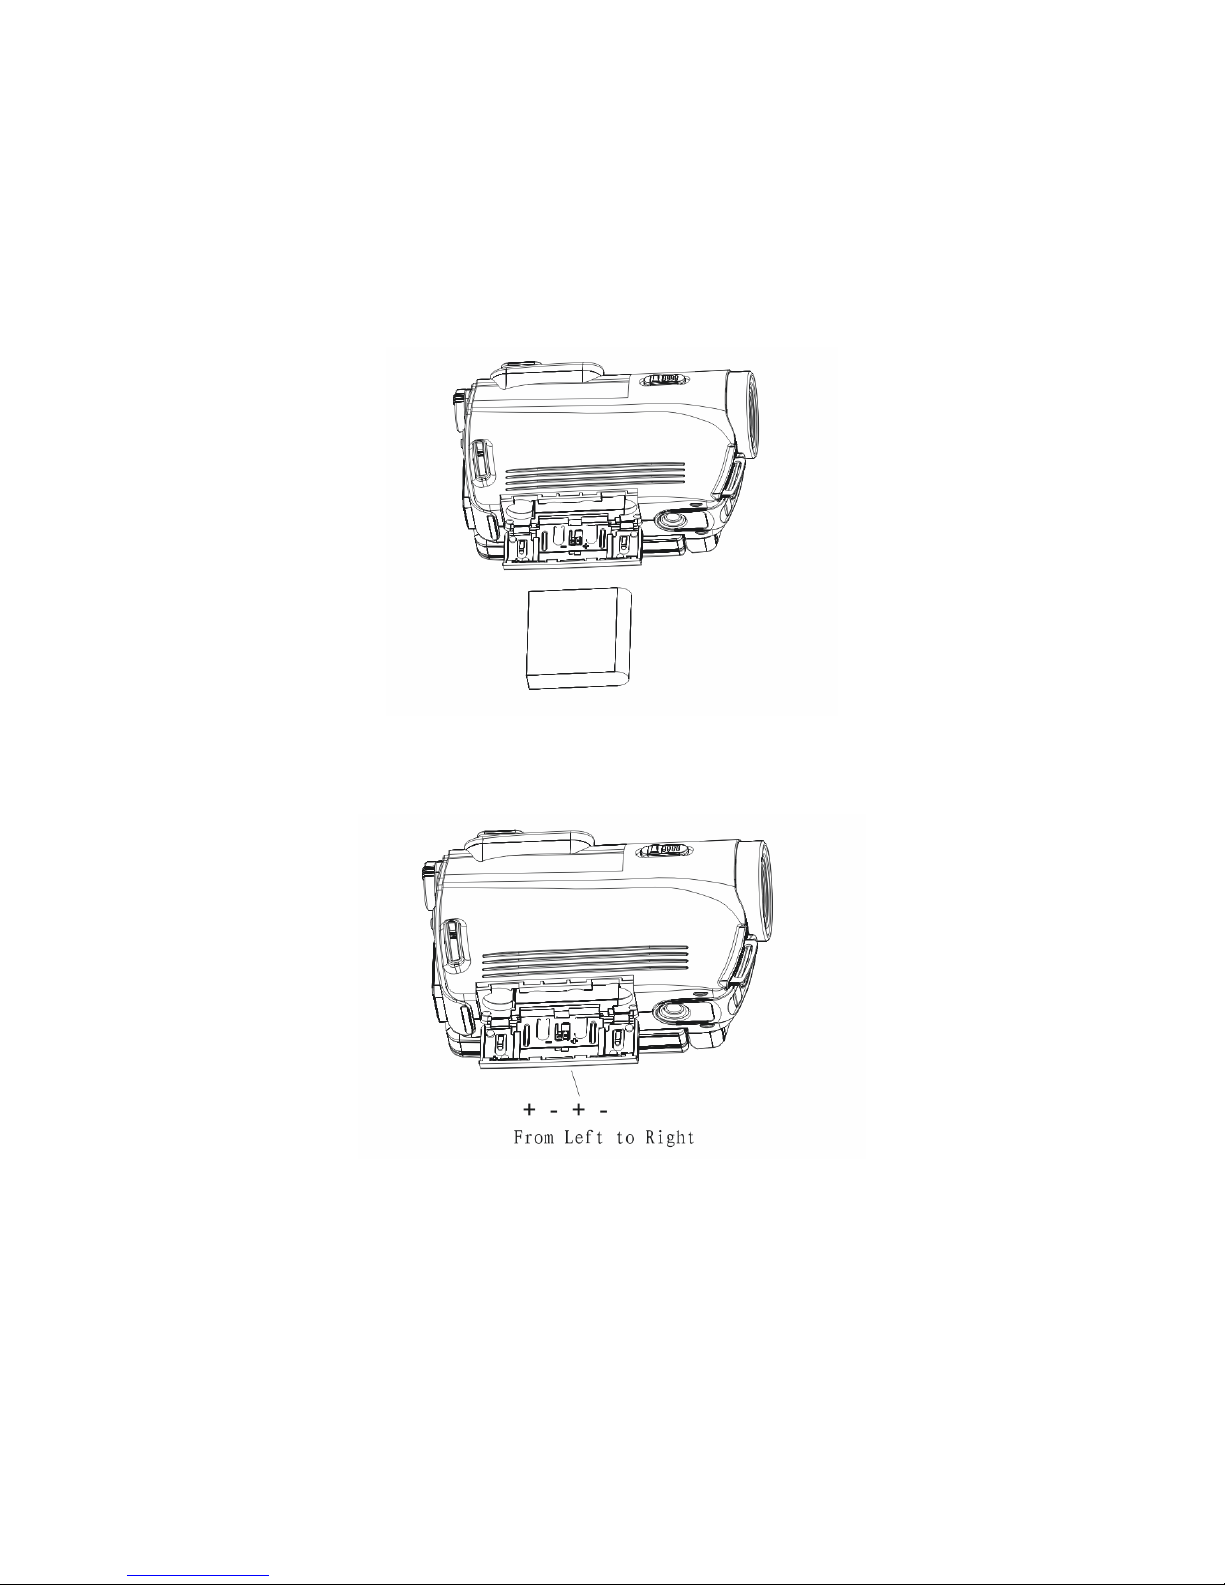
(b1) Open the battery compartment.
(Take note of the camera direction)
(b2) Insert the batteries as shown.
(Take note of the camera direction)
Lithium Battery
Normal AAA Batteries
07
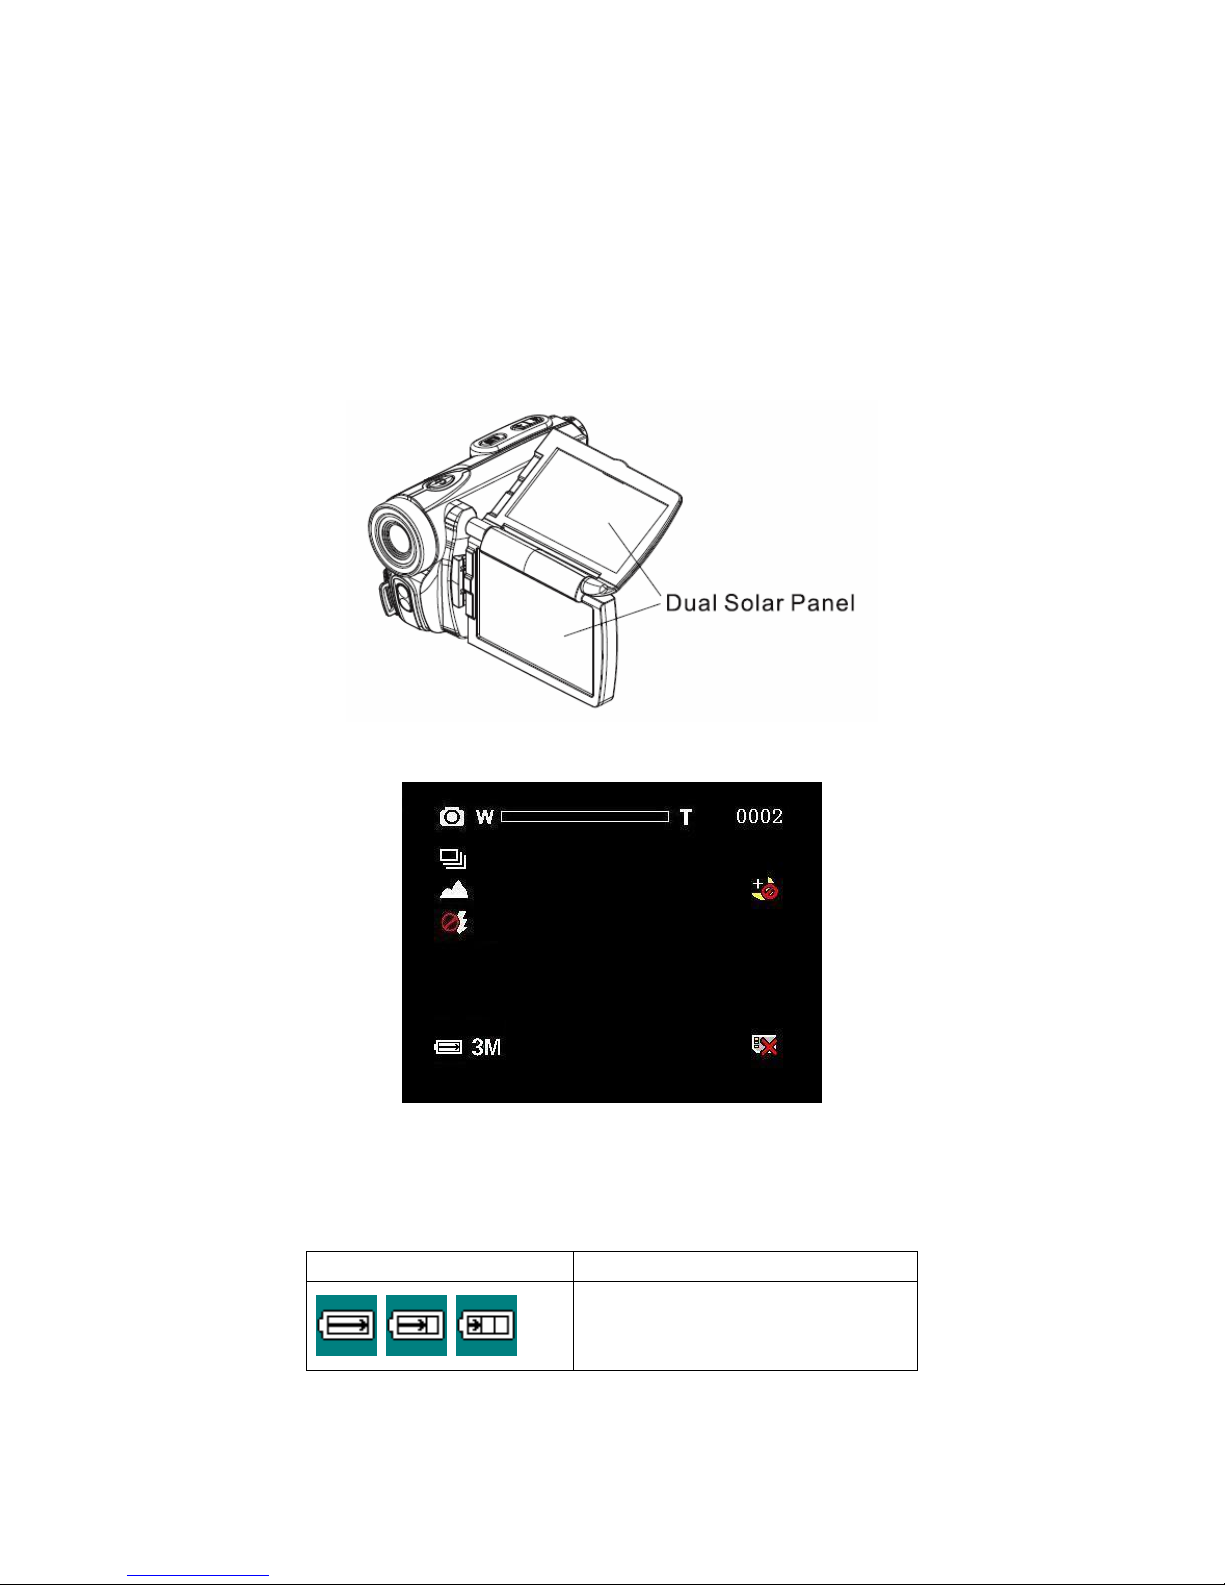
(c) Experiences new featur e
A Solar Panel attached to LTPS Screen is one of the unique features; this section
is to describe how to make use of Solar Panel.
Note: Do not expose the camera under Sunlight for too long, it might damage the
camera.
(c1) Flip Solar Panel as shown below:
(c2) There will be a status bar as shown below:
Remarks: Dual Solar Panel provides Max current of 120mA under any light
sources. Power charging only works with Lithium Battery.
Below shown solar charging status:
Logo Function
Empty, half, full
08

(d) Turning on the video camera
Press and hold the power button to turn the video camera on/off.
(e) Changing modes
There are total of three modes:
Logo Mode Function
Snapshot Rotate to the mode and take
still image
Video Rotate to the mode
and record video
Playback Video or Still Images Rotate to the mode
for Playback or
other different settings
Rotate Control button to enter different modes.
09

3. Snapshot Mode
Read this section to learn all function for Snapshot Mode:
Rotate Control Button to Snapshot Mode (See diagram from Changing Mode)
To take still image:
1. Open Display Screen and press power button
2. Locate your subject using the Display Screen.
3. Press the Video and Snapshot button to start image taking.
4. Below Diagram shows each logo and list of functions
10

3a.) List of Function
Logo Mode Function
Snapshot Press Video and Snapshot Button to
Take still images.
,
Driver Mode
(Self-Timer 10S, Burst)
Press Navigation “Right” key
for Self-Timer and Burst Mode
,
Micro Filming Mode Change Mode by switching
Micro Filming Control
, , ,
White LED light Press Navigation “Left” key to enter
different mode for White LED light
Zoom in and out Press “W” or “T” button for Digital
zooming
Number of photo storage Display number of photo that can be
stored
,
Night mode On or Off Night mode
, , ,
Battery status No power, Little power, Half power,
Full power
, ,
SD card indicator SD card not found, SD card normal,
SD card locked
, , ,
Resolution
4000 x 3000
3200 x 2400
2592 x 1944
2048 x 1536
Press Navigation “Up” key to Choose
different Resolution for Still Image
Note:
Press Navigation “Down” key the camera will go into standby mode
11
4. Snapshot Tool Menu
Read this section to understand Snapshot Tool Menu functions:
To go in Snapshot Tool Menu:
1. Rotate Control Button to Snapshot Mode (See diagram from Changing Mode)
2. Open the Display Screen and press the Power button
3. Press Navigation “OK” to enter Tool Menu
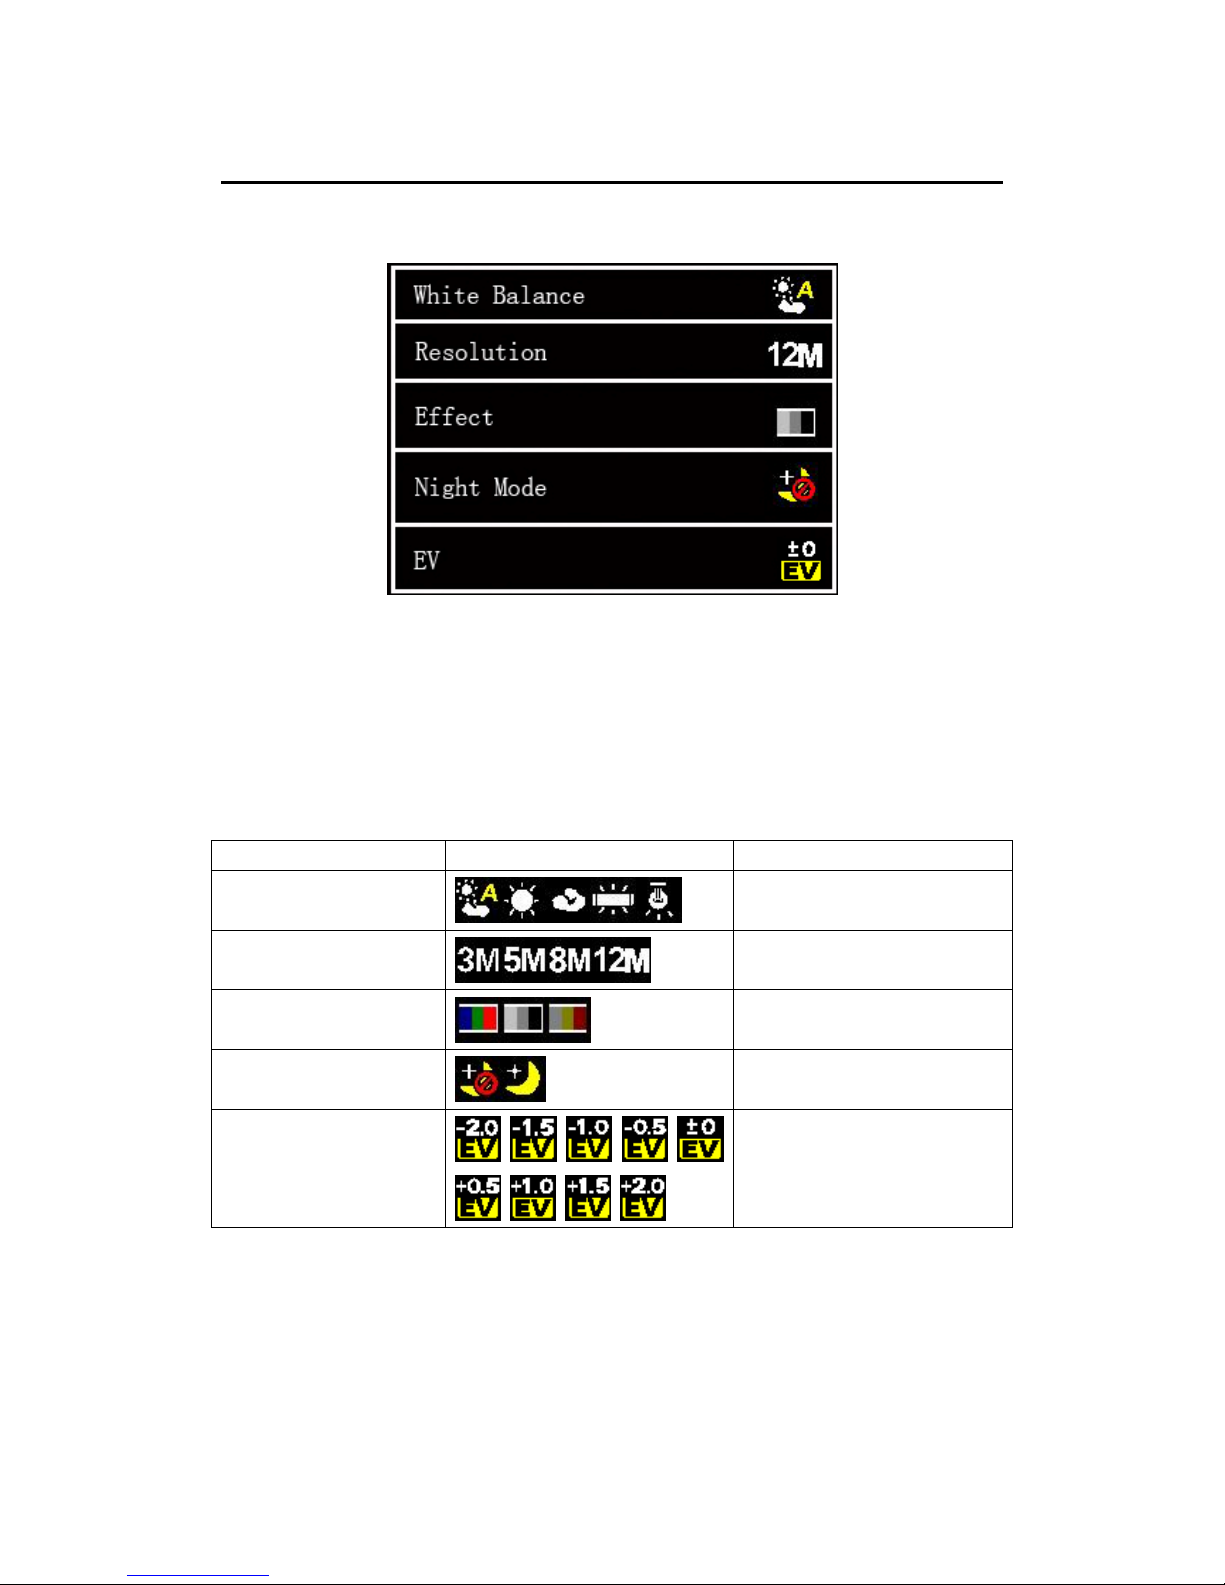
4a.) List of Function
Name Selection Function
White Balance
Press Navigation key “OK” to
select different environment
Resolution
Press Navigation key “OK” to
select different Resolution
Effect
Press Navigation key “OK” to
select different Effect
Night Mode
Press Navigation key “OK” to
select Night Mode
EV
Press Navigation key “OK” to
select Brightness
Note:
Press Video and Snapshot button to Exit Snapshot Tool Menu
12

5. Video Recording Mode
Read this section to learn all function for Video Recording Mode:
Rotate Control Button to Video Mode (See diagram from Changing Mode)
To do Video Recording:
1. Open the Display Screen and press the Power Button to turn on the camera.
2. Locate your subject using the Display Screen
3. Press the Video and Snapshot button to start Video Recording.
4. Below Diagram shows each logo and list of functions
13

5a.) List of Function
Logo Mode Function
Video Recording Press Video and Snapshot Button to
Start Video Recording
Zoom in and out Press “W” or “T” button for Digital
zooming
Driver Mode
(Self-Timer 10S)
Press Navigation “Right” key
for Self-Timer Mode
,
Micro Filming Mode Change Mode by switching
Micro Filming Control
, ,
Light (Off, Auto, On) Enable White LED light
,
Night mode On or Off Night mode
, , ,
Battery status No power, Little power, Half power,
Full power
, ,
SD card indicator SD card not found,
SD card normal,
SD card locked
, , , , ,
, , , , ,
,
SD memory indicator Indicating capacity of memory card
, , ,
Selecting Resolution Press Navigation “Up” key to select
different Video Resolution
Note:
Press Navigation “Down” key the camera will go into standby mode
14
6. Video Recording Tool Menu
Read this section to understand Video Recording Tool Menu functions:
To go in Video Recording Tool Menu:
1. Rotate Control Button to Video Mode (See diagram from Changing Mode)
2. Open the Display Screen and press the Power button
3. Press Navigation “OK” to enter Video Recording Tool Menu
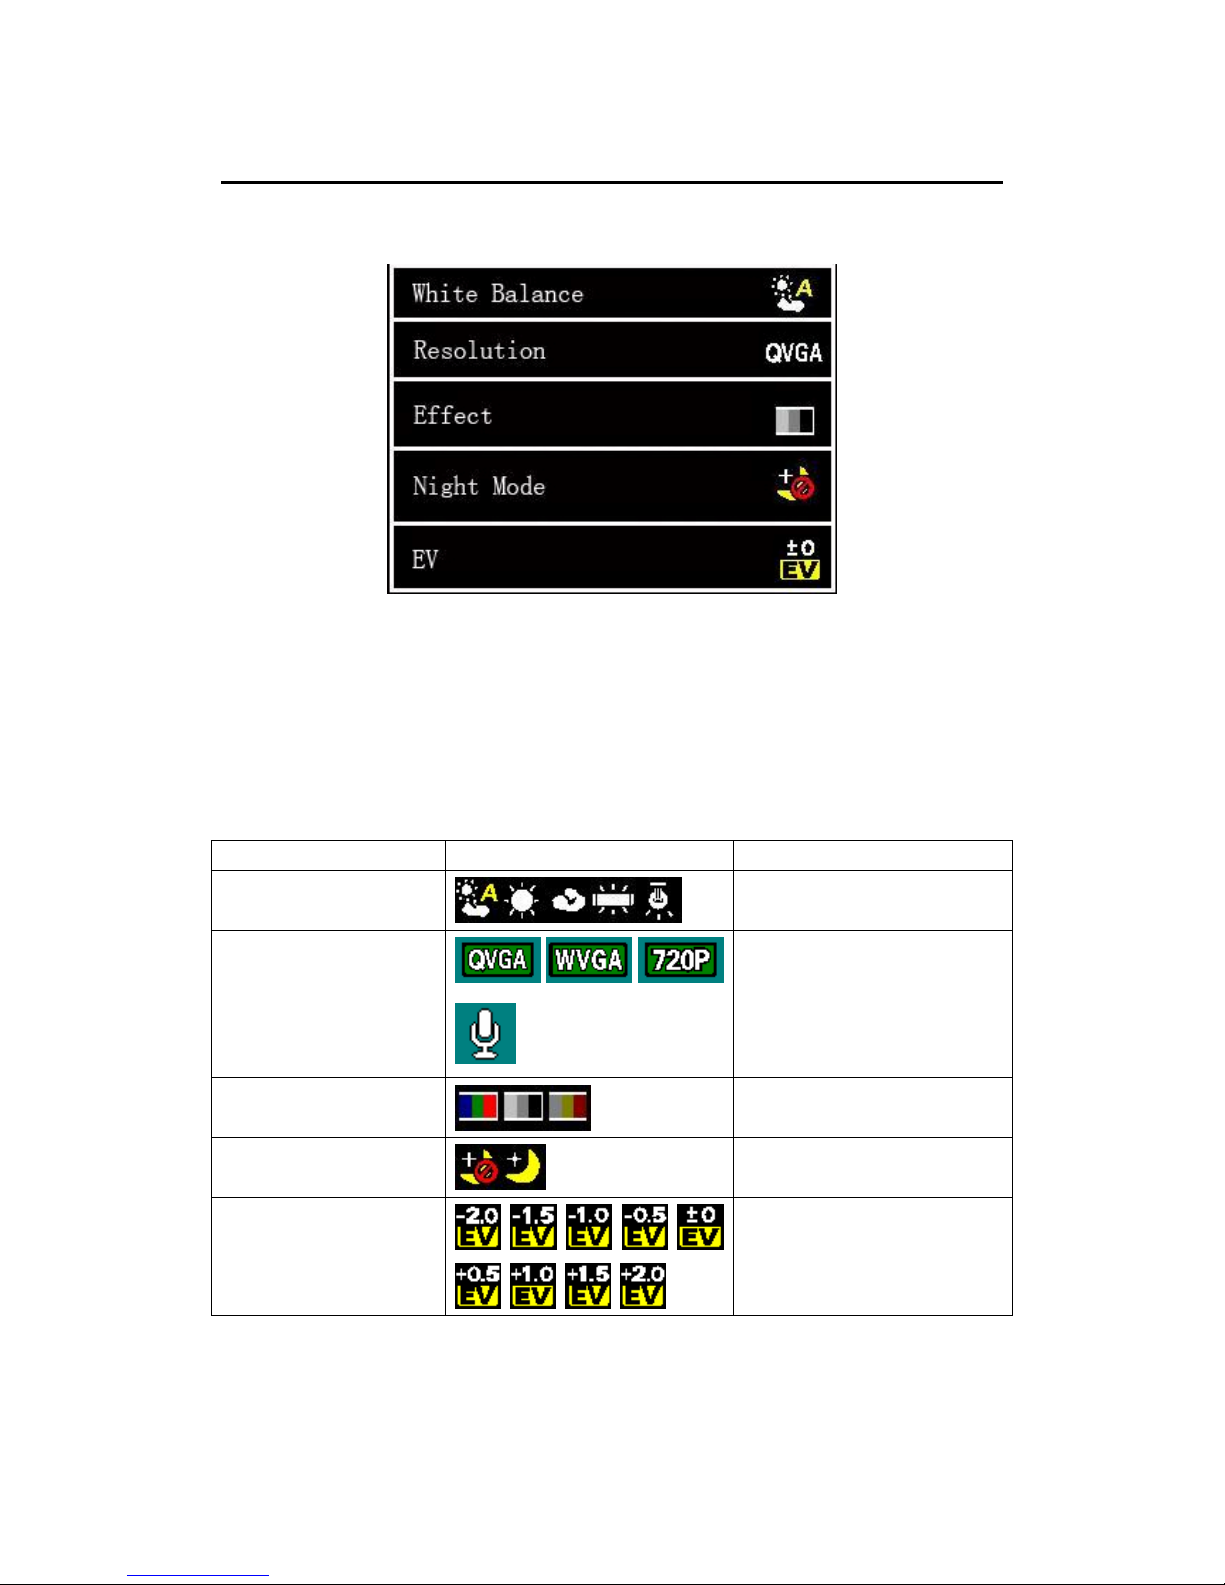
6a.) List of Function:
Name Selection Function
White Balance
Press Navigation key “OK” to
select different environment
Resolution
Press Navigation key “OK” to
select different Resolution
Effect
Press Navigation key “OK” to
select different Effect
Night Mode
Press Navigation key “OK” to
select Night Mode
EV
Press Navigation key “OK” to
select Brightness
Note:
Press Video and Snapshot button to Exit Video Recording Tool Menu
15

7. Playback Mode (SET Mode)
Read this section to learn all function for Playback Mode:
Rotate Control Button to Playback Mode (See diagram from Changing Mode)
To Playback:
1. Open the Display Screen and press the Power Button to turn on the camera.
2. Below Diagram shows each logo and list of functions
During Video file playback:
z Press “OK” then Navigation “Up” key to playback Video file
z Press Navigation “Up” or “Down” key to control sound
z Press Navigation “Left” key twice during playback to Rewind video
z Press Navigation “Right” key twice during playback to Fast forward video
16
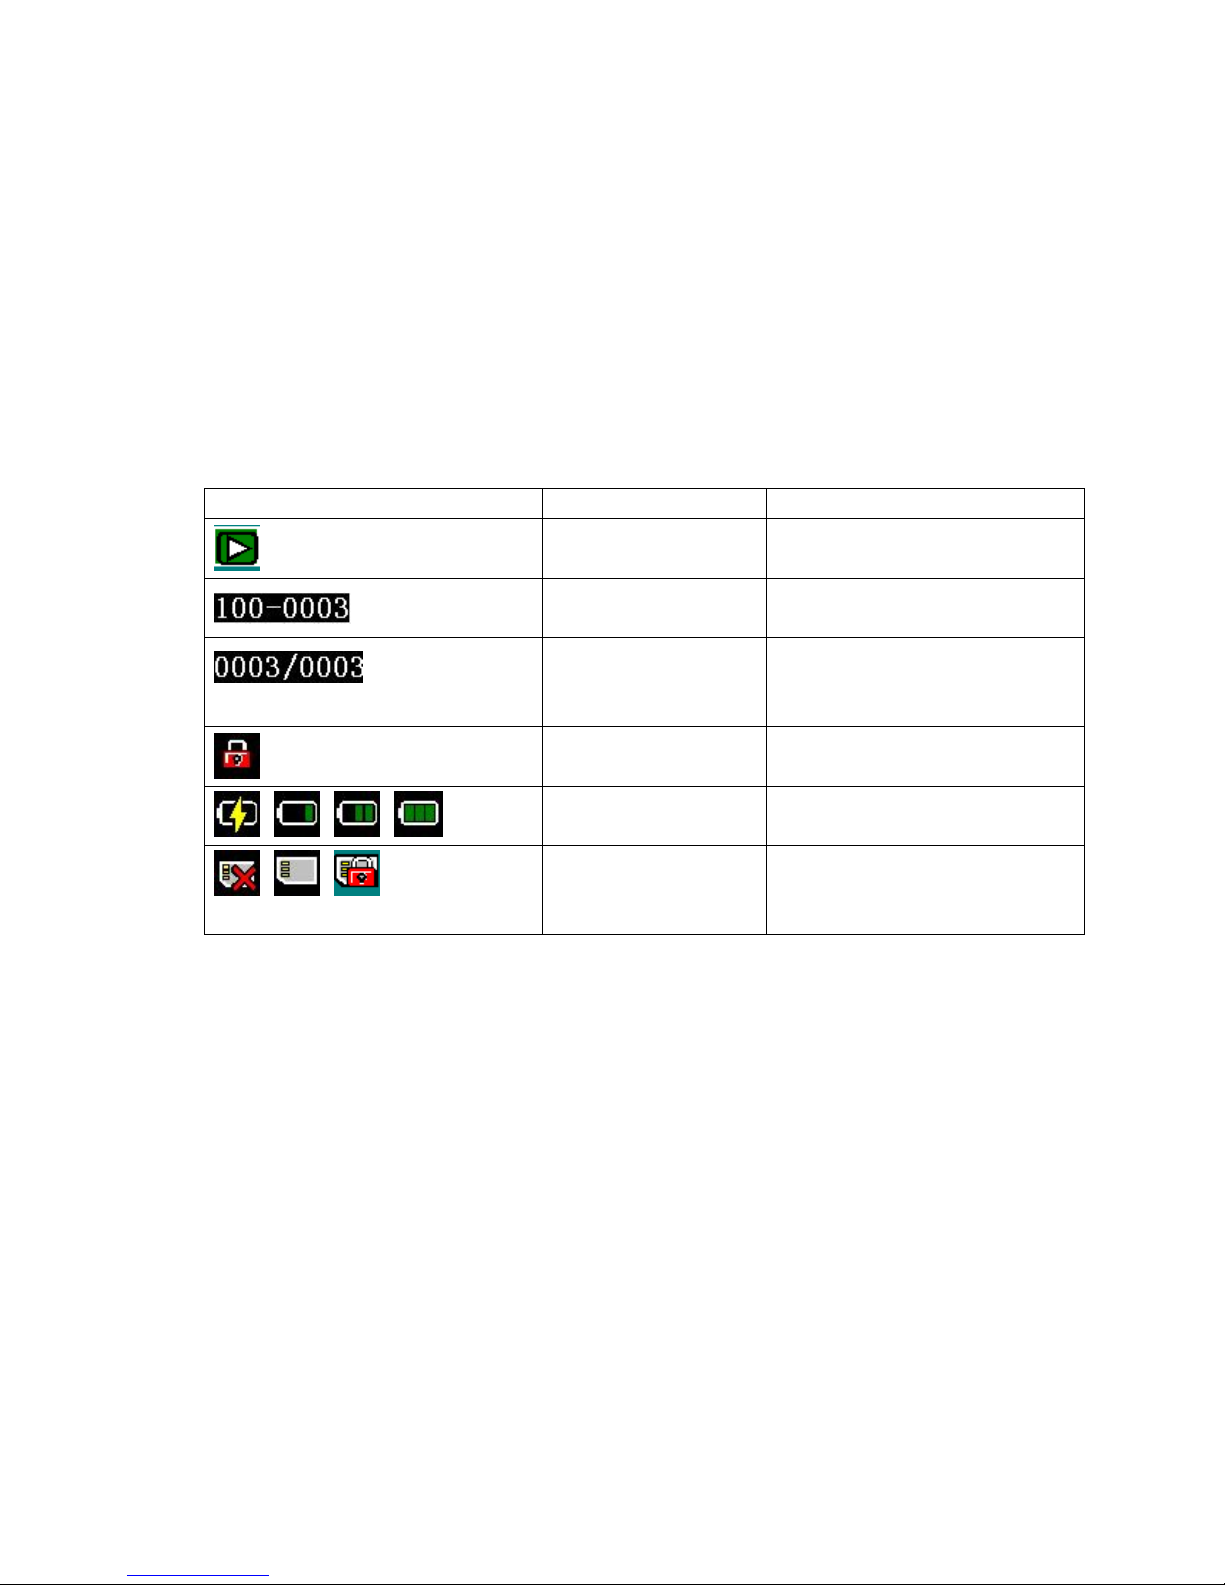
7a.) List of Function
Logo Mode Function
Playback Images and Video playback
Number Display The file number of the photo
Storage display Display the number of current
images / the total number of saved
images
File protect indicator Protect file from deletion
, , ,
Battery status No power, Little power, Half power,
Full power
, ,
SD card indicator SD card not found,
SD card normal,
SD card locked
17
8. Playback Mode Tool Menu
Read this section to understand Playback Mode Tool Menu functions:
To go in Playback Mode Tool Menu:
1. Rotate Control Button to SET Mode (See diagram from Changing Mode)
2. Open the Display Screen and press the Power button
3. Press Navigation “OK” twice to enter Playback Tool Menu
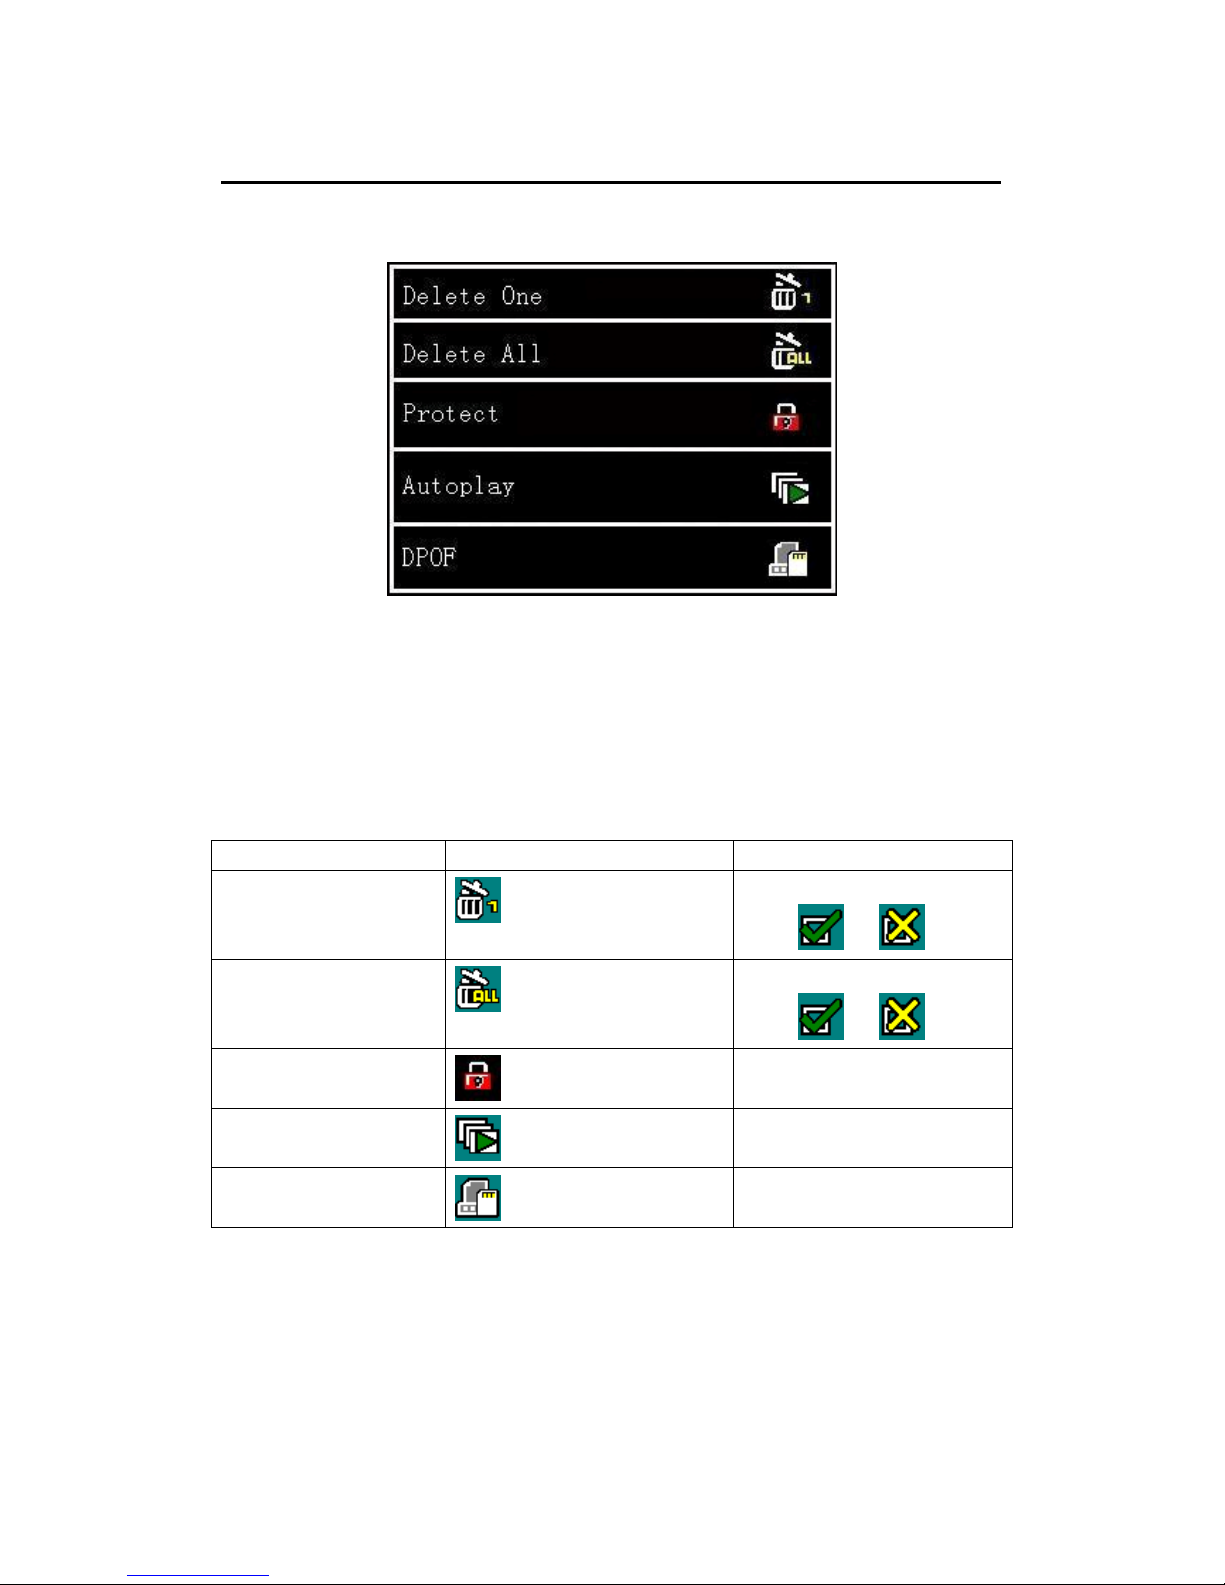
8a.) List of Function
Name Selection Function
Delete One
Press Navigation key “OK” to
select
or
Delete All
Press Navigation key “OK” to
select
or
Protect
Press Navigation key “OK” and
Select or Set
Autoplay
Press Navigation key “OK” to
Play automatically
DPOF
Press Navigation key “OK” to
activate
Note:
z Press Video and Snapshot button to Exit Playback Tool Menu
z Please make sure there are photo taken before entering Playback Tool Menu
18
9. Setup Mode
Read this section to understand Setup Mode:
To go in Setup Mode:
1. Setup Mode will be available for all three modes
(Snapshot, Video and Playback)
2. Open the Display Screen and press the Power button
3. Press Navigation “OK” at any Mode, Press Navigation “Right” to go in
19

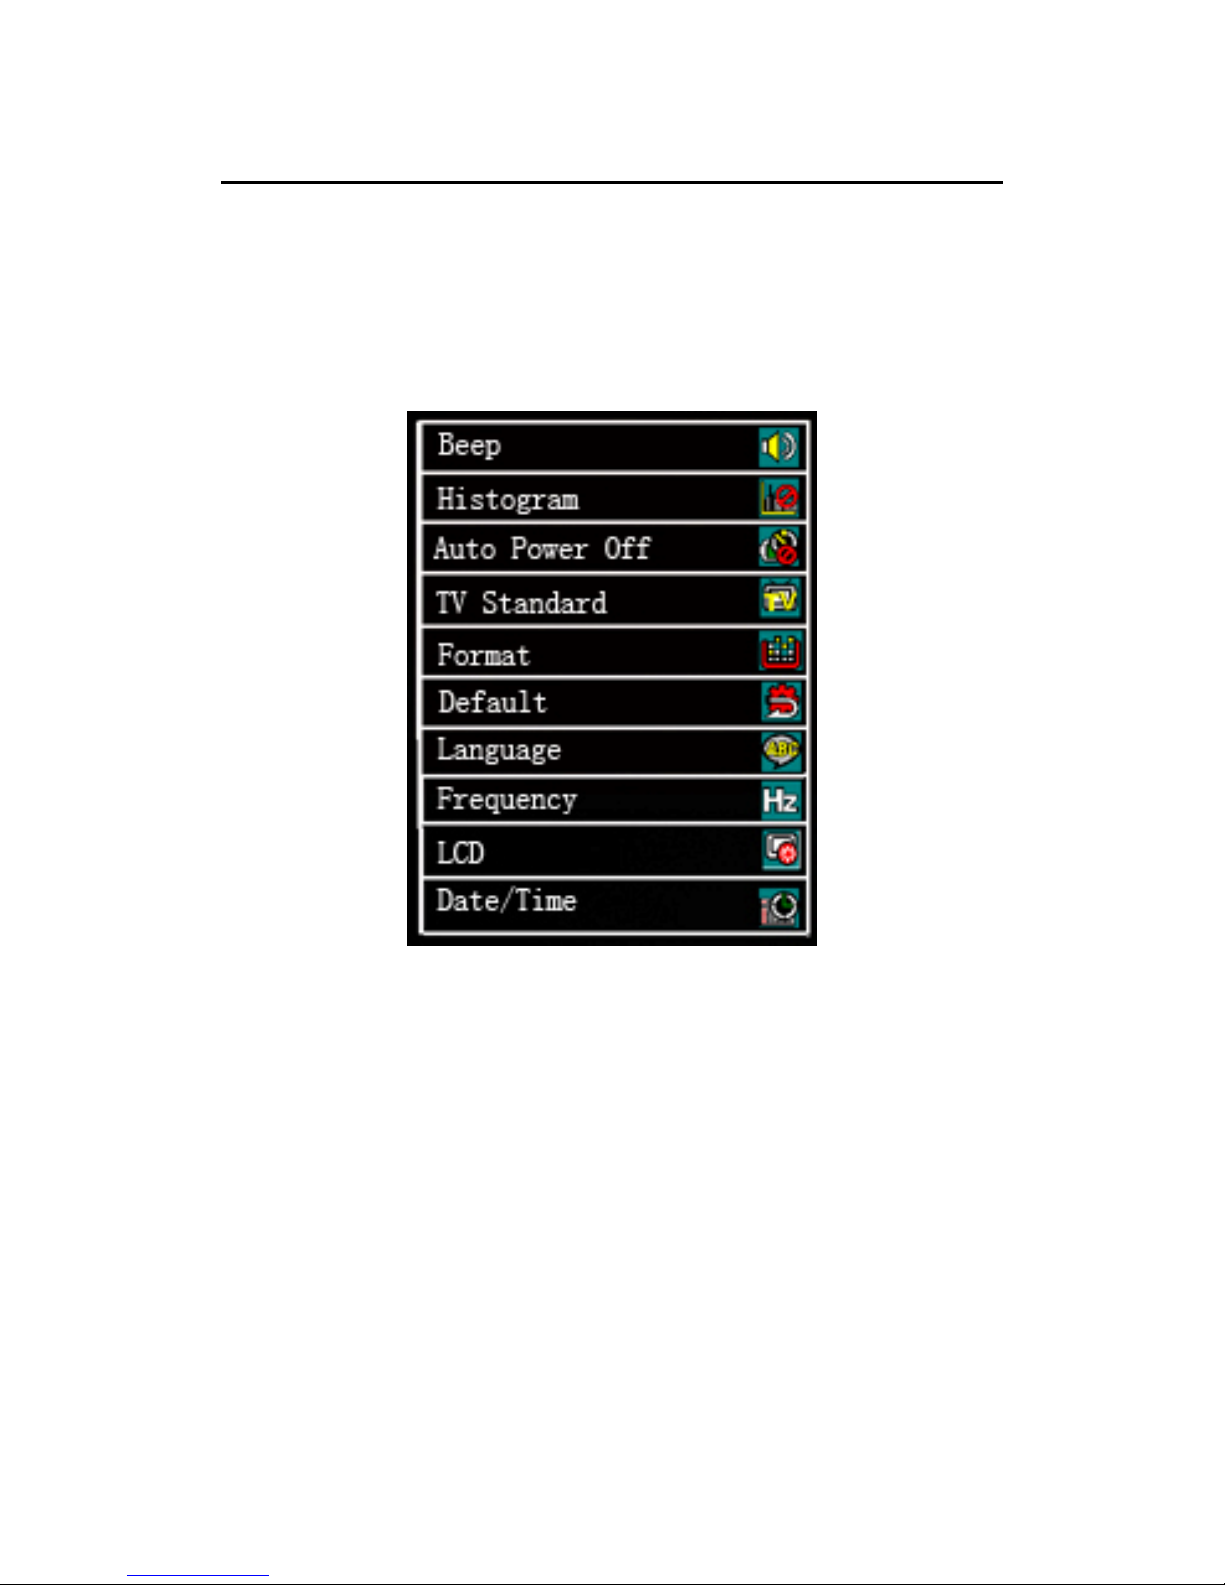
9a.) List of Function
Name Selection Function
Beep
Press Navigation key “OK” to
select
or
Histogram
Press Navigation key “OK” to
select
or
Auto Power Off
Press Navigation key “OK” to
select
, or
TV standard
Press Navigation key “OK” to
select NTSC or PAL
Format
Press Navigation key “OK” to
select
or
Default
Press Navigation key “OK” to
select
or
Language
Press Navigation key “OK”
to select English, Traditional
Chinese or Simplified Chinese
Frequency
Press Navigation key “OK” to
select 50Hz or 60Hz
Date / Time
Press Navigation key “OK” to
set Date / Time
Note:
Press Video and Snapshot button to Exit Setup Mode
20

10. Connecting to Computer, TV and HDTV
Read this section to understand connection to Computer, Normal TV or HDTV
Connect the video camera to a computer with the USB/AV/HDMI cable
provided.
Find suitable socket for USB/AV/HDMI cable as above.
21

11. Mass Storage Mode
Read this section to learn how to use Mass Storage Mode function.
How to use Mass Storage Mode:
1. Mass Storage Mode is available under any mode
2. Plug camera to PC via USB, An icon as below will be shown on your Display
Screen:
3. Mass Storage Mode is enable now, you can use the memory to store pictures or
videos.
22

12. Troubleshooting
Read this section to learn how to troubleshoot the camera.
Question: My camera does not respond when I pressed the Power button. 1
Answer: Check your batteries; see if it is inserted with correct position. If it is
inserted correctly, please change new batteries.
Question: My camera suddenly shut down. 2
Answer: Check if Auto shutdown function is enabled. If not, please change
new batteries.
Question: My camera is not able to take still images or video recording. 3
Answer: Check if SD card memory is fully occupied, if not please format your
SD card on PC before inserting to camera.
Question: Blur image appeared when using this camera 4
Answer: This camera does not support Anti-shake function. It is often not
advisable to shake the camera when image is taken.
Question: My SD card is not workable with this camera 5
Answer: Write protect key on the SD card is enable, please unlock it before
inserting. Always format the SD card on PC before using.
Question: Solar panel does not charge power 6
Answer: Power charging is only available to lithium battery, n ot w or k in g f o r
normal battery
Question: Duration for Solar charging is too long 7
Answer: Charging is available under any light sources, it is suggested to turn
off the camera when charging
Question: Traveler charger is not functional 8
Answer: Please make sure lithium battery is inserted co rrectly
23
 Loading...