

Page 1

JetPad User’s Manual
www.jetway.com.tw
Manual Vision: 1.6
Release Date:August, 2011
Page 2

User’s Notice
Copyright of this manual belongs to the manufacturer. No part of
this manual, including the products and software described in it
may be reproduced, transmitted or translated into any language in
any form or by any means without written permission of the
manufacturer. This manual contains all information required for the
utilization of this product to meet the user’s requirements. But it
will change, correct at any time without notice. Manufacturer
provides this manual “as is” without warranty of any kind, and will
not be liable for any indirect, special, incidental or consequential
damages (including damages for loss of profit, loss of business,
loss of use of data, interruption of business and the like).
Products and corporate names appearing in this manual may or
may not be registered trademarks or copyrights of their respective
companies, and they are used only for identification or explanation
and to the owner’s benefit, without intent to infringe.
Package Contents
Power Adapter
USB Cable
OTG Cable
Earphones
User’s Manual
Warranty Card
Page 3

Safety Instruction
Operate the product according to the correct installation steps
and with great care to make sure safety and comfort using
experience. Please refer to the following safety instruction
guide to avoid danger of electric shock or fire. Abide by the
previous safety instruction guide to use and maintain the
product and the hard disk to make sure of safe operating
environment.
Please follow the instruction manual for operation guide.
The appropriate operating temperature ranges from 0 °C–35
°C (32 °F–95 °F).
The operation humidity for this product is 5% to 80% RH.
To avoid high temperature, please DO NOT overload the
maximum power of the external power supply while the
system is consuming high voltage. Be aware of the maximum
temperature allowance of the power supply.
See to it that the product is not working near the water.
Always unplug power cable and other hardware cables from
the system before cleaning.
Apply only dry cloth for cleansing the product.
Make sure that there is no heat source nearby when the
product is working.
Page 4

Make sure that the thermal louver of the product is not
blocked.
Make sure to remove the power plug from the product when
there is a thunder storm.
Please remove the power plug from the product when you are
not going to use the product for a long time.
Make sure to set up or use the product on a stable surface.
Make sure not to drop the product or strike it by any means.
Make sure not to move the product when the device is
charging power.
Make sure not to step on the power cables and other cables or
rest anything upon them.
Please contact qualified technician for maintenance or repair.
Use only accessories and parts that are made by the qualified
manufacturer.
Page 5

CHAPTER 1: BRIEF INTRODUCTION ........................................................... - 2 -
1.1 PRODUCT OVERVIEW................................................................................................. - 2 -
1.2 BUTTONS & CONNECTORS....................................................................................... - 3 -
CHAPTER 2: PREPARATION BEFORE USING THE PRODUCT................ - 4 -
2.1 HOW TO POWER ON THE DEVICE ............................................................................. - 4 -
2.2 HOW TO POWER OFF THE DEVICE ........................................................................... - 5 -
2.3 HOW TO CONNECT THE DEVICE TO PC OR NOTEBOOK.................................... - 5 -
2.4 HOW TO USE TF CARD............................................................................................... - 6 -
2.5 BATTERY MANAGEMENT AND CHARGE ................................................................ - 6 -
2.6 USER’S INTERFACE..................................................................................................... - 7 -
2.7 FUNCTION LIST ............................................................................................................ - 9 -
CHAPTER 3 OPERATION GUIDE ................................................................- 11 -
3.1 LANGUAGE & KEYBOARD SETTINGS...................................................................- 11 -
3.2 WI-FI SETTINGS......................................................................................................... - 14 -
3.3 STATIC IP ADDRESS SETTINGS AND CONNECTION...........................................- 21 -
3.4 USB HOST FUNCTION ...........................................................................................- 27 -
3.5 3G NETWORK FUNCTION ........................................................................................- 28 -
3.6 APK INSTALLER........................................................................................................- 32 -
3.7 EXPLORER................................................................................................................... - 36 -
3.8 SOUND RECORDER...................................................................................................- 39 -
3.9 BROWSER....................................................................................................................- 41 -
3.10 ANDROID MARKET ....................................................................................................- 44 -
CHAPTER 4: HARDWARE CONFIGURATION......................................... - 51 -
TABLE OF CONTENT
Page 6
- 2 -
Chapter 1: Brief Introduction
1.1
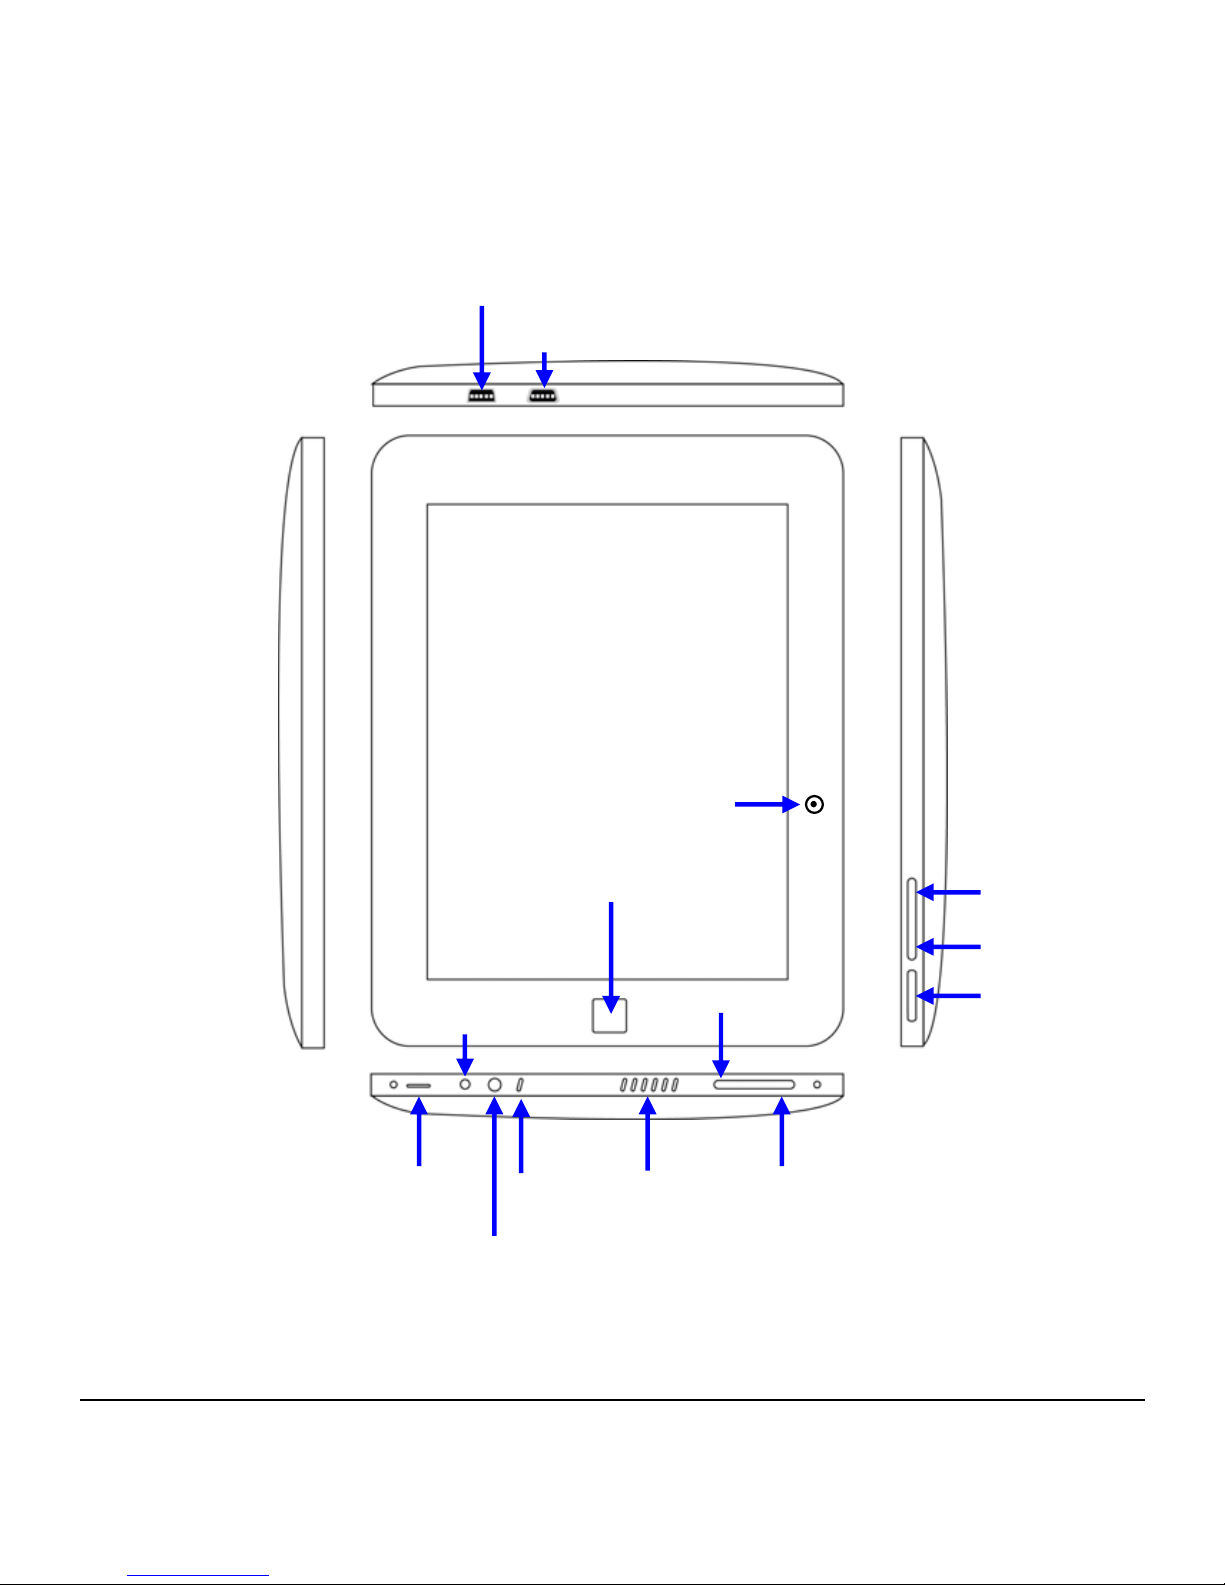
Product Overview
OTG connector
Volume-
Power button
Menu Button
Escape
TF card reader
Speaker
MIC
Earphone
Power connector
Volume+
Camera
USB connector
Option Menu
Page 7
- 3 -
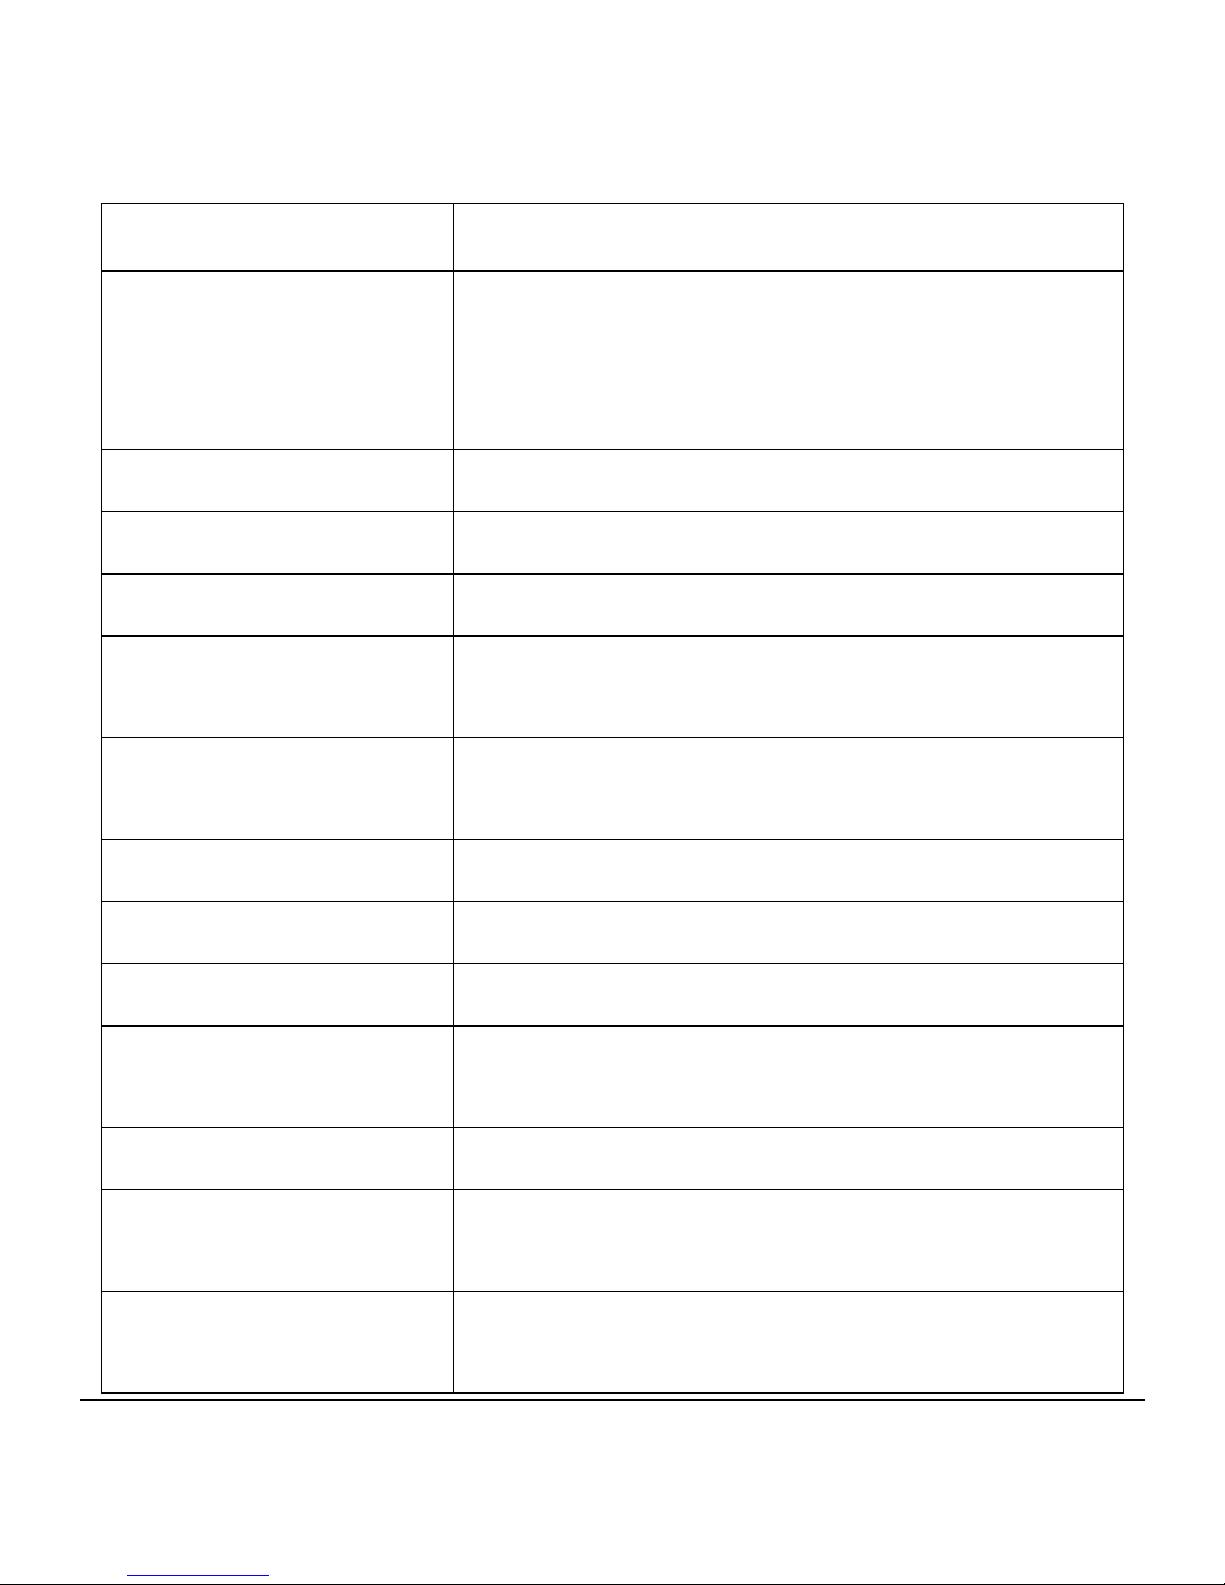
1.2 Buttons & Connectors
Name Function
Power button
Press for a long time to power on/off;
Press for a short time to lock the screen
or wake up the screen
Volume +
Press to increase the volume
Volume -
Press to decrease the volume
Escape
Escape: Press to return to upper menu
Option Menu
Option Menu: Press to view optional
menu items of application
Main menu
Press to return to desktop; Press for a
short time also to pop up relative menu
Speaker
Speaker output
MIC
Microphone for sound recording
Earphone
3.5’’ earphone connector
Power connector
2.5 mm DC5V/2A battery charging
connector
TF card reader
External TF card slot
OTG
OTG connector to external USB
Disk/Mouse/Keyboard/LAN/3G Doogle
USB
USB connector to computer (PC or
Notebook)
Page 8
- 4 -
Chapter 2: Preparation before Using the
Product
2.1
How to power on the device
The device will automatically power off when connected with power
adapter.
When the device is off, press Power button for 3 seconds long for
system to enter Android Start-up Status Bar. It takes about 30
seconds for the desktop to show up.
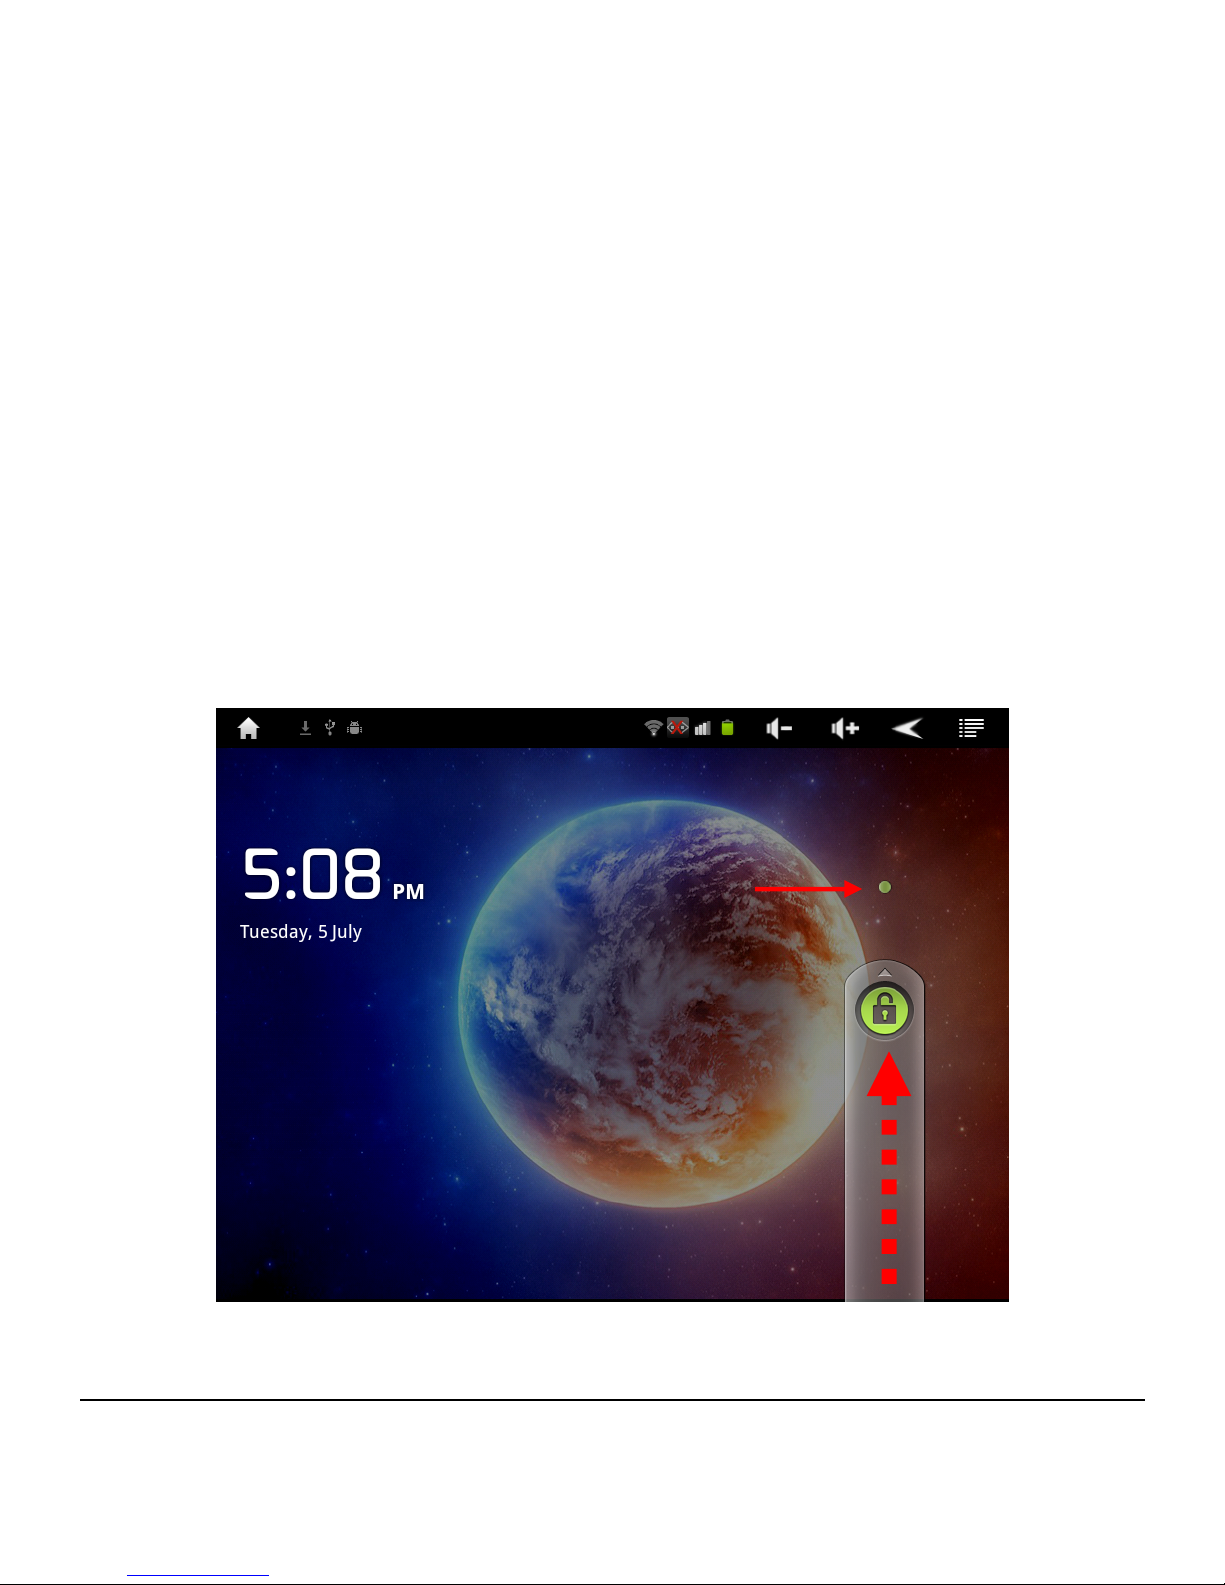
The screen is on Lock status. User needs to hold Lock icon
upwards to the green point for the device to Unlock automatically
as the following photo shows:
Connect the device with PC, system will start automatically (only
Hold Lock icon upwards to the
g
reen point to unlock the screen
Green Point
Page 9

- 5 -
to power the device, not to charge it).
Power Saving Mode and Screen Lock: Press Power button
slightly after system starting-up to enter Sleep power-saving mode.
Press Power button again and to light the screen in 1 second.
Notice:
In power-saving mode the previous operations are still valid and
will continue, e.g. music or video is still playing but the screen is
black.
2.2 How to power off the device
When the device is on, press Power button for 3 seconds long
for Power off Confirmation Interface to show up. The system will
power off automatically after you confirm to power off.
The device will give off warning beeps when battery is low and
power off automatically if it is not charged. If the device fails to
boot up, please charge it for 5 minutes before starting it up
again.
2.3 How to connect the device to PC or Notebook
Start up the computer and connect the device to PC with
specialized USB cable to realize data transmission between the
device and PC. Open the device as a USB storage device and
you can copy or delete the files of the device on the PC.
Notice: Files of the device are not allowed to be opened or
played when the device is connected to PC.
The company is not
responsible for abnormal performance of the device or PC resulted
from such operations.
Page 10

- 6 -
2.4 How to use TF card
User will find two removable disks after connecting the device to
PC. The first one being the memory card of expansion slot and
the latter being internal memory disk of the device. User can not
access to the first disk if no memory disk is inserted in card
reader.
Notice:
The device only support TF card (up to 32GB at most).
Please disconnect the device from computer before
uninstalling TF card.
How to insert/remove the expansion card
a) To insert TF card: Place the device with the screen side up.
Push the TF card (the side with metal contacting pins
downwards) into the card reader slot. The device can read
files inside the TF card only under such condition.
b) To remove TF card: Push the card inside slightly and the
card will spring back. Pick out the card.
2.5 Battery Management and Charge
Charge the battery for 8~12 hours to ensure enough
power at the first time you are using the device.
Connect the micro part of power adapter to DC
power-in connector of the device and the other end to power
supply connector. Battery icon will scroll on desktop to
indicate
Page 11
- 7 -
the device is in charging status. Please wait until the device is fully
charged before unplugging charger. Charging LED indictor will turn
light blue when charging process is completed. The battery icon will
stay still on desktop as well.
Notice:
Please contact your local dealer for specialized charger (5V-2A
output).
9V charge is not allowed to charge the device. The company is
irresponsible for damage caused to device by using 9V charger.
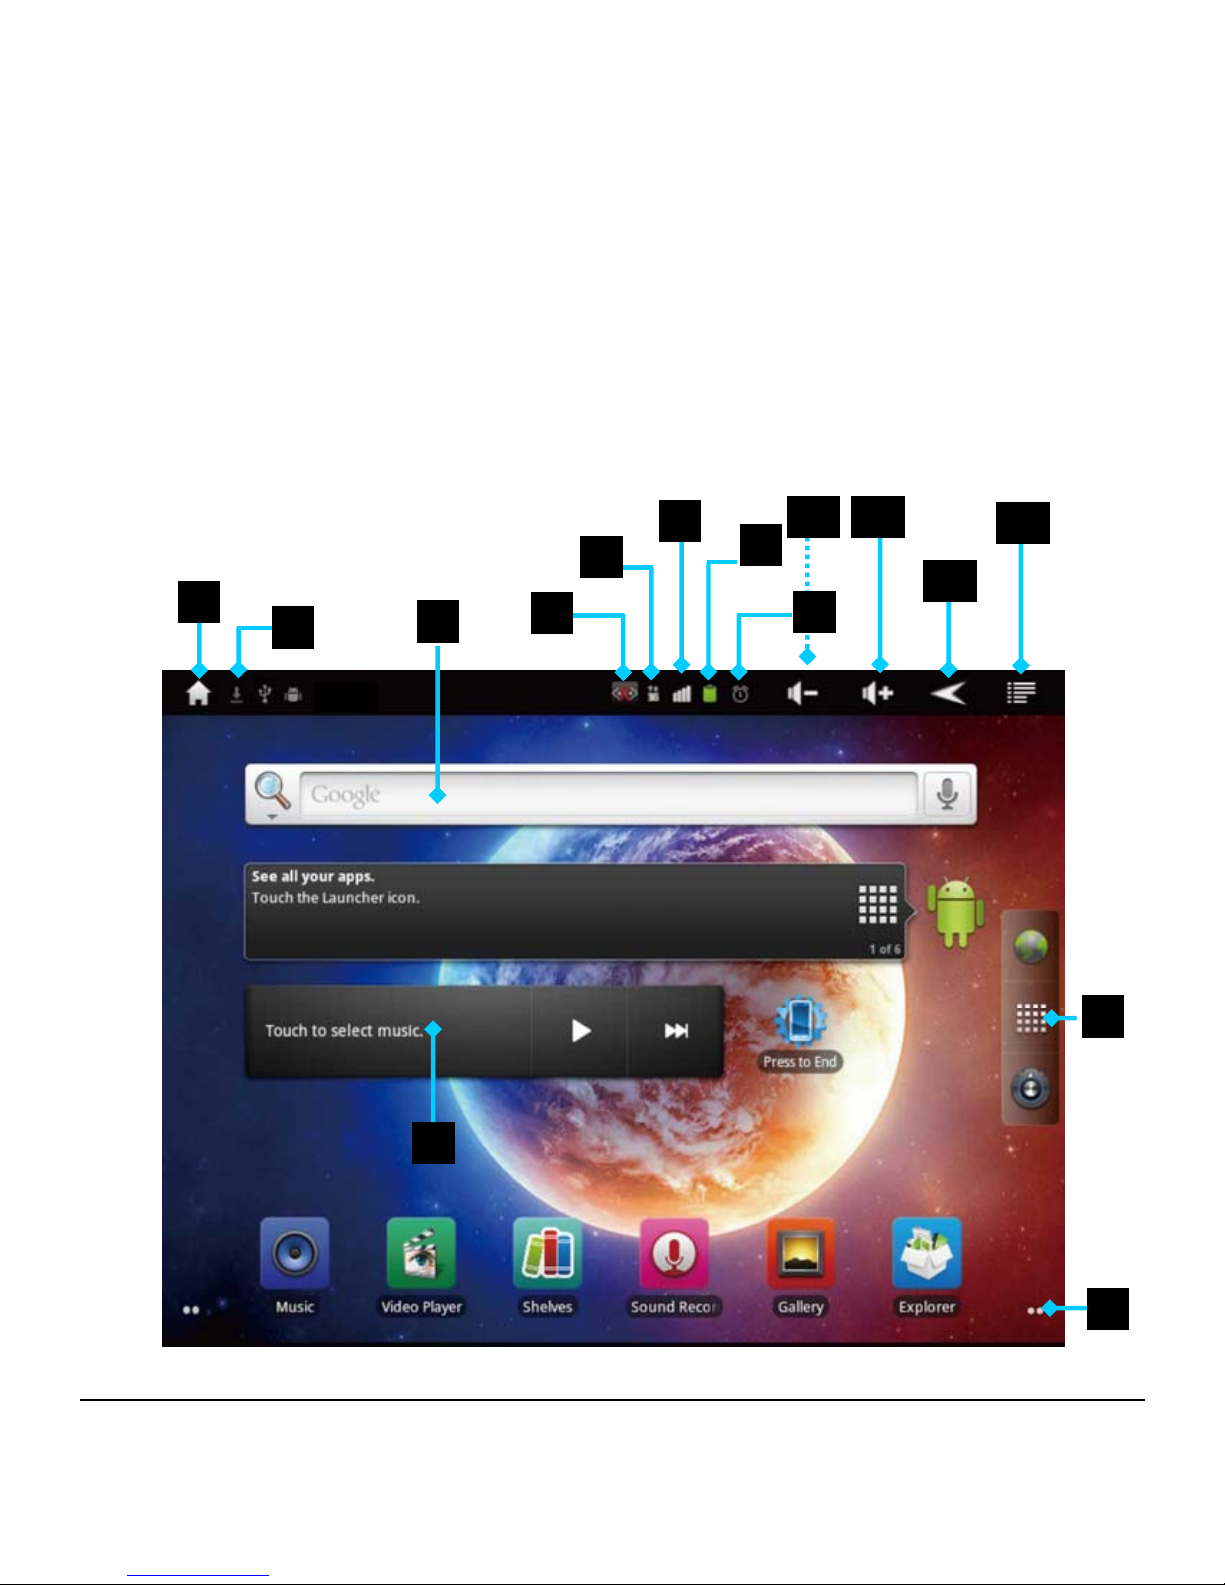
2.6 User’s Interface
1
2
3
4
5
9
10
11
12
13
14
15
16
17
18
Page 12

- 8 -
Notice:
Some function logo only appears when application is
enabled.
User’s Interface may look different if you rearrange the
icons.
8
7
6
Page 13
- 9 -
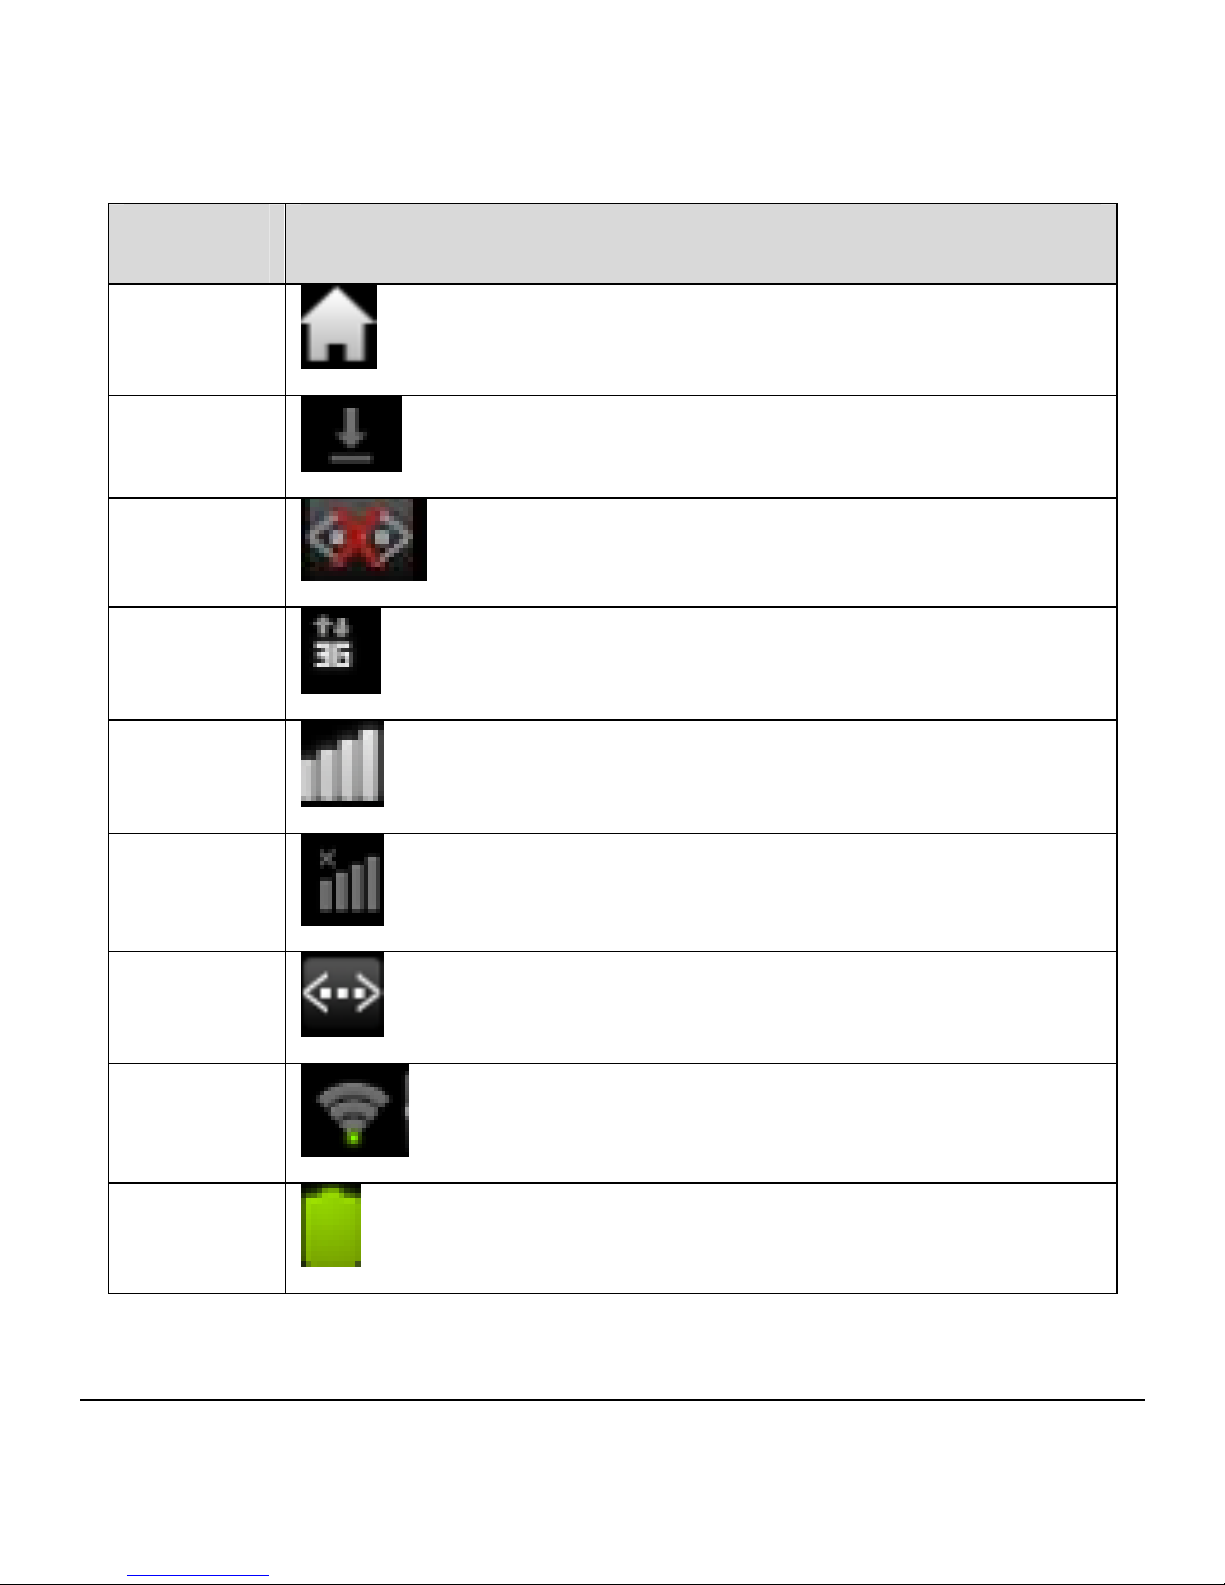
2.7 Function List
No. Icon & Function
1
Click to return to home page
2
System is downloading item
3
Ethernet Connection is off
4
3G network is on
5
3G signal strength
6
3G network is off
7
Ethernet Connection is on
8
WIFI signal strength
9
Battery icon to show remaining battery power
Page 14
- 10 -
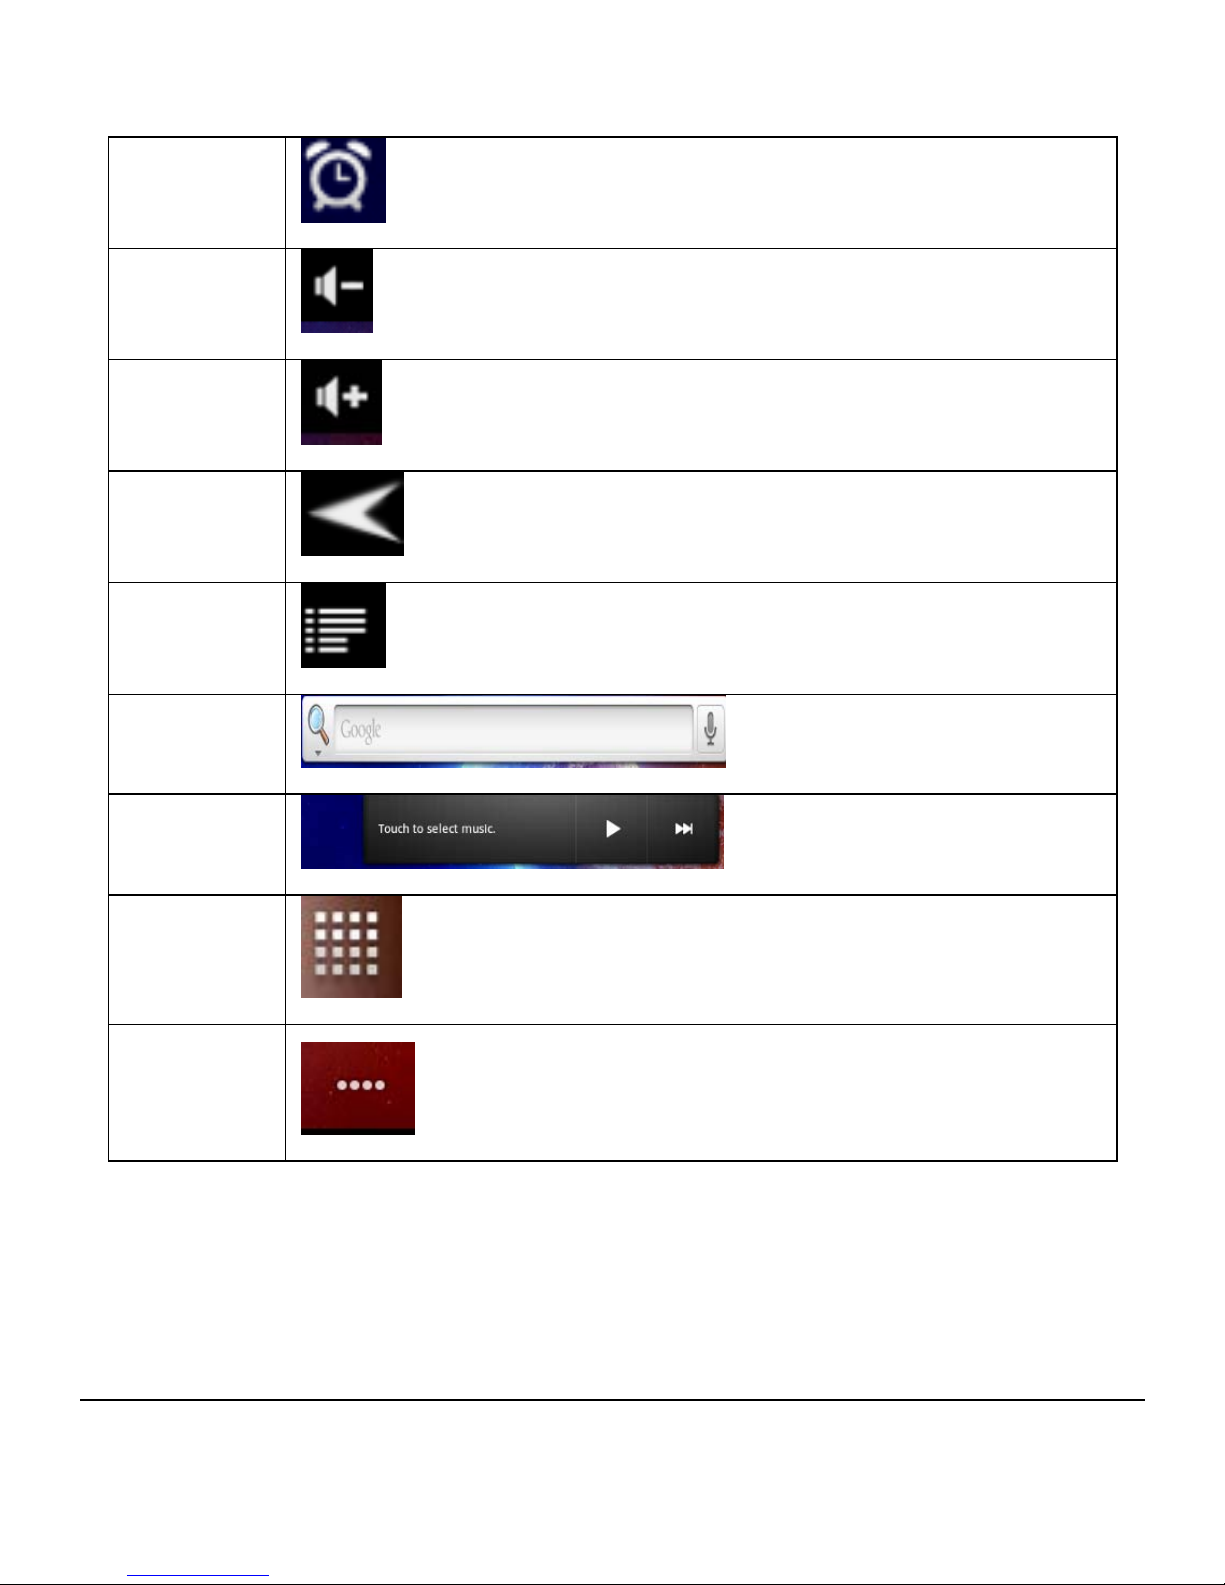
10
Alarm clock is set
11
To decrease volume
12
To increase volume
13
Escape icon to return to previous page
14
Settings
15
Google Engine
16
Music play bar
17
Function module menu
18
To switch from desktops
Page 15
- 11 -
Chapter 3 Operation Guide
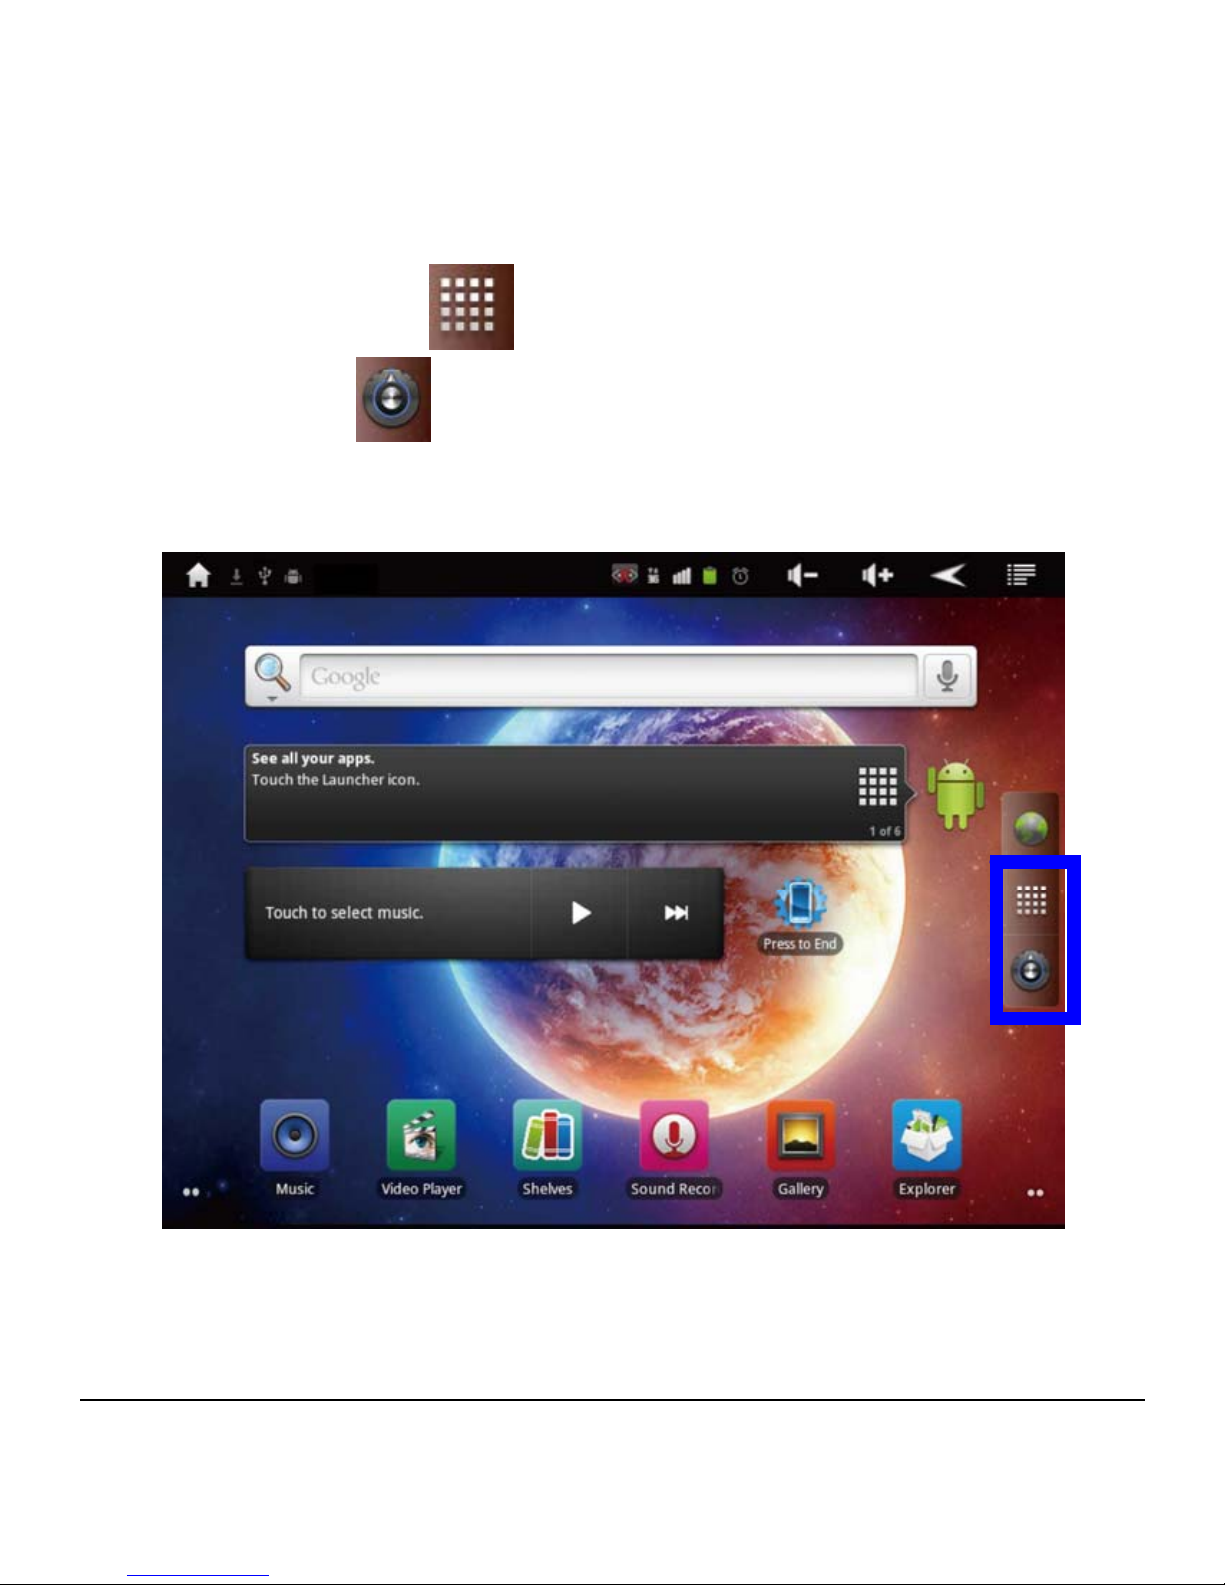
3.1
Language & Keyboard Settings
Click ‘Menu’ icon to enter function menu, or click
‘Settings’ icon
upon desktop, then click ‘Settings’
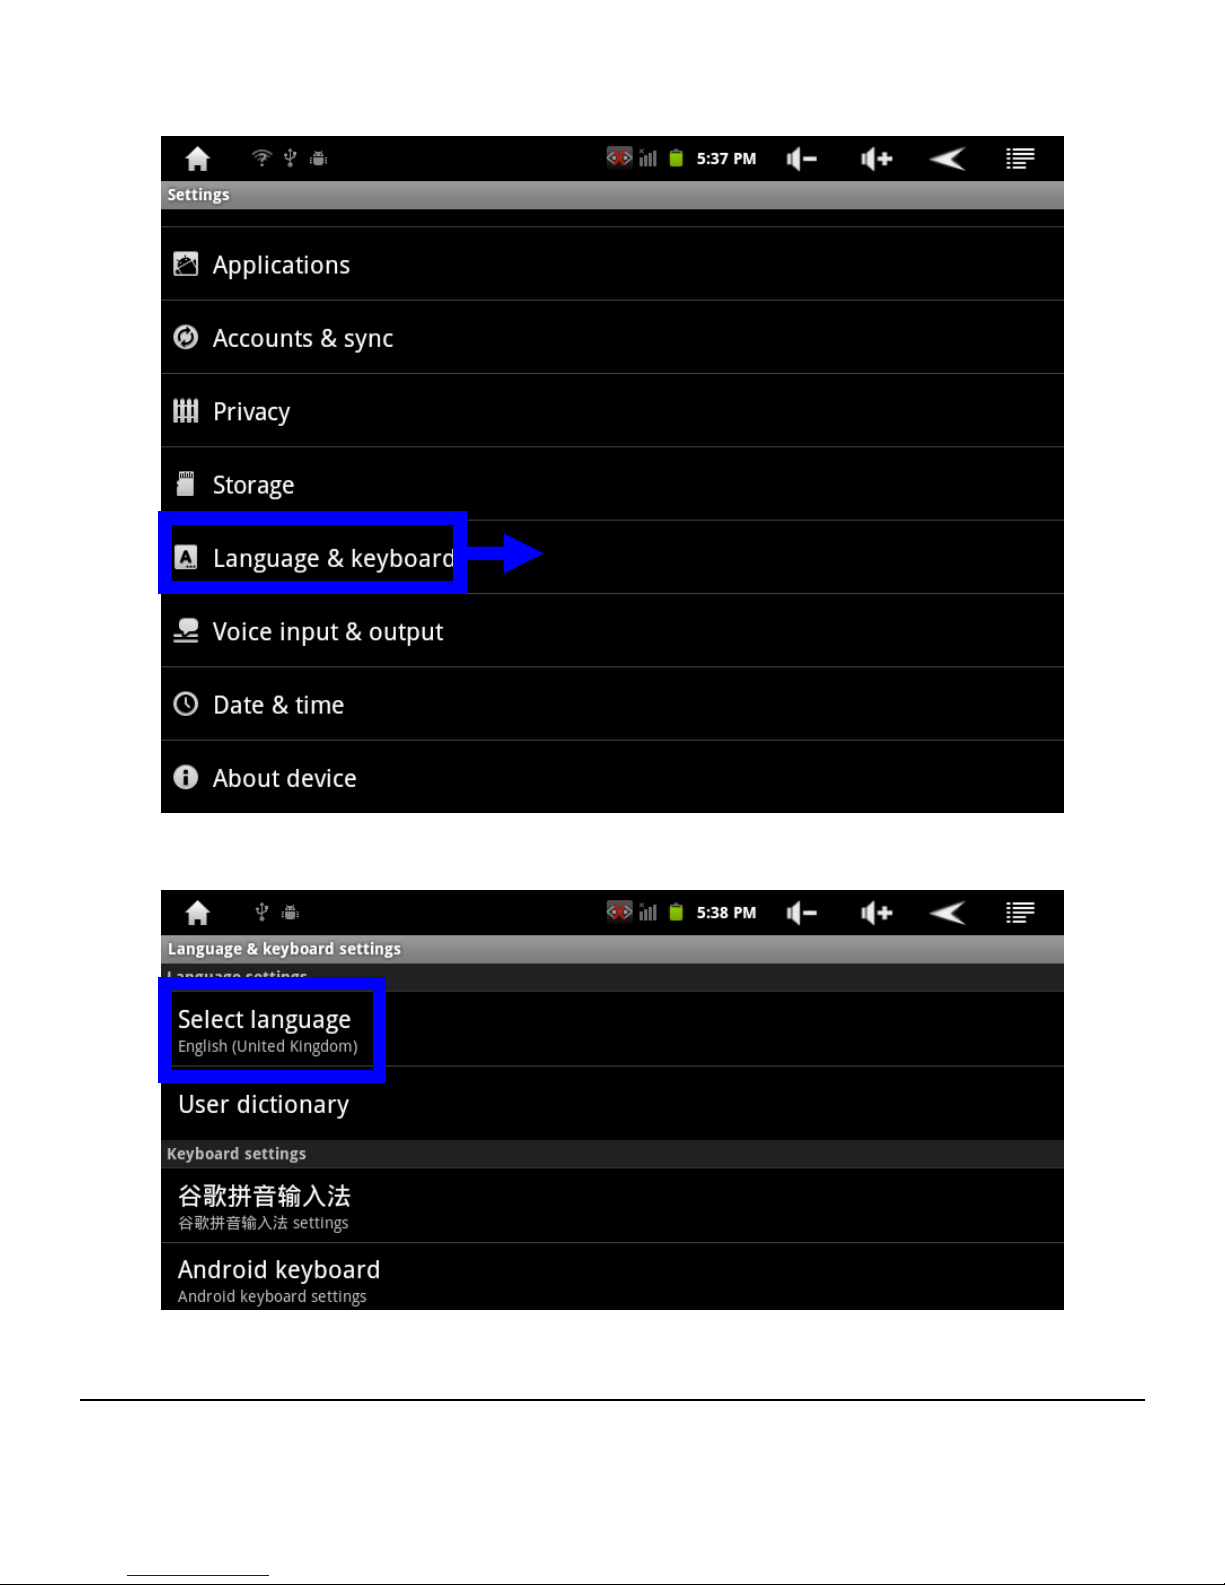
→‘Language & keyboard’ →‘Select language’ to find and
select device interface language.
Click ‘Setting’ to enter Settings page.
Page 16
- 12 -
Find and click ‘Language & keyboard’ on ‘Settings’ menu.
Click ‘Select language’.
Click ‘Language & keyboard’.
Page 17
- 13 -
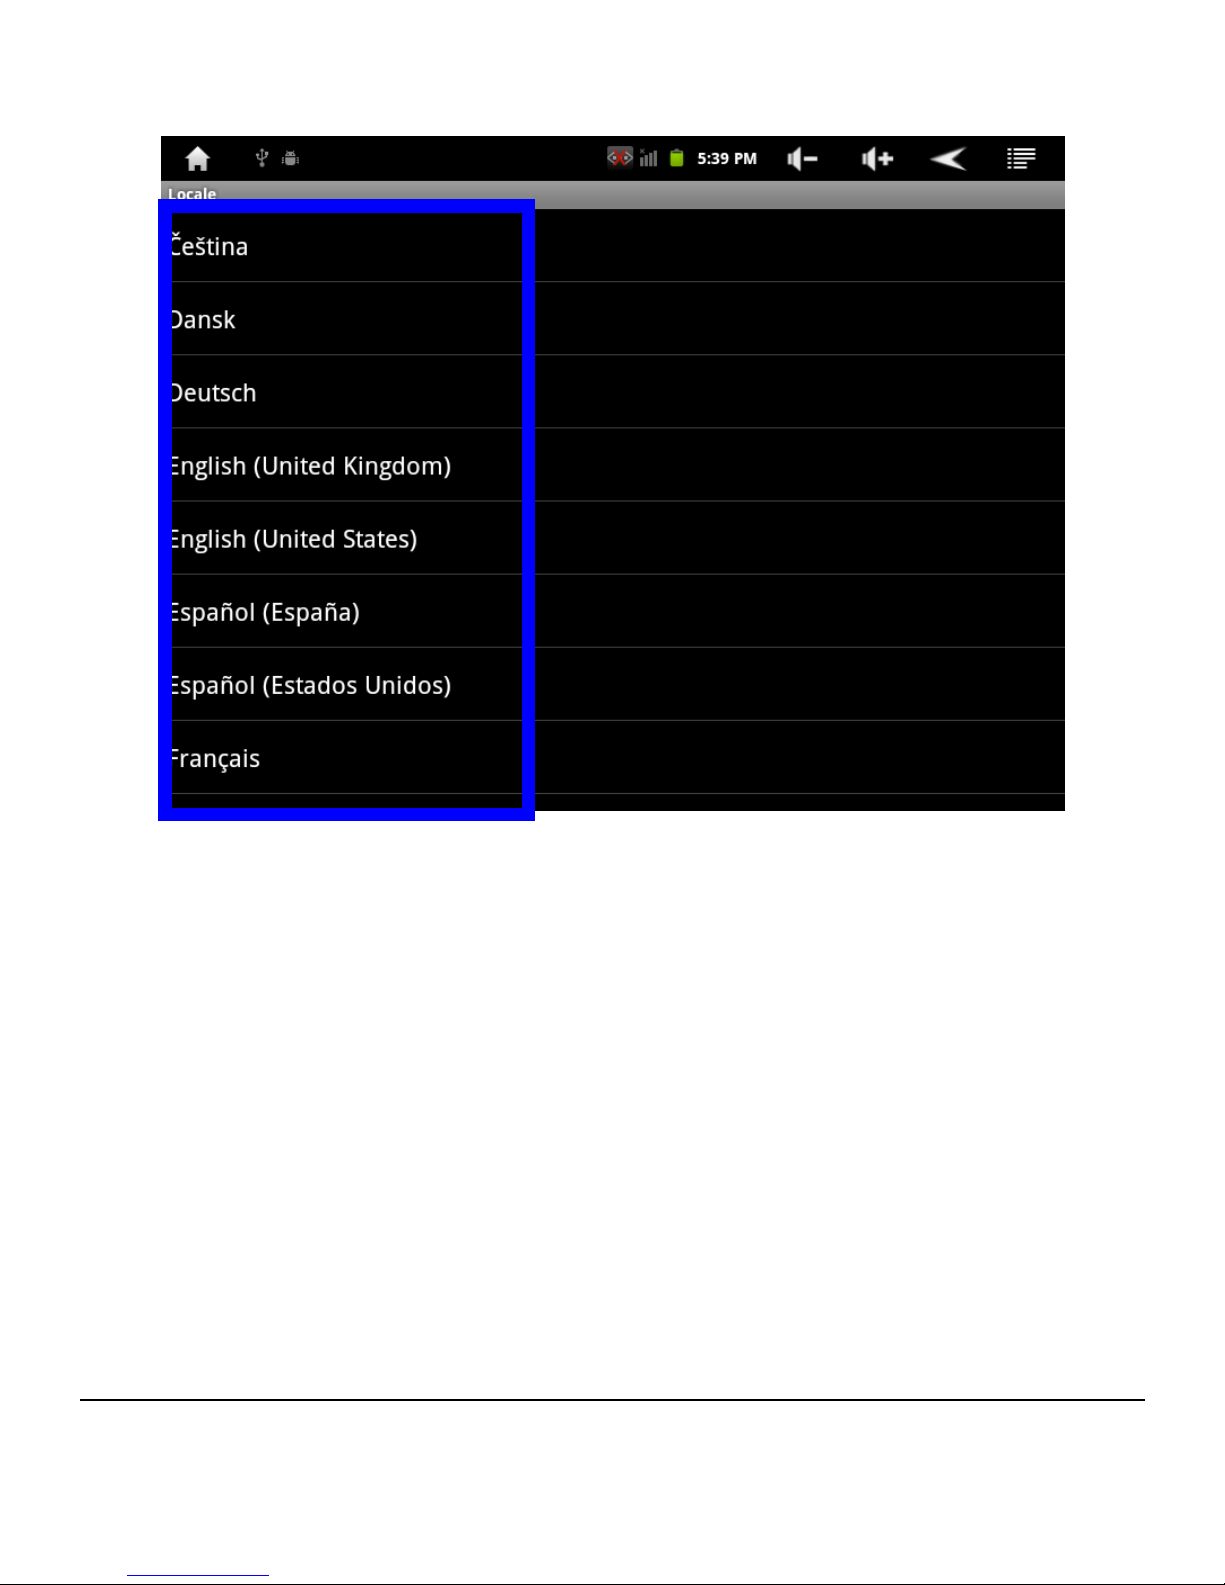
User can pull up or pull down to view available language options
and click to select specific language for device user interface
language.
Page 18
- 14 -
3.2 Wi-Fi Settings
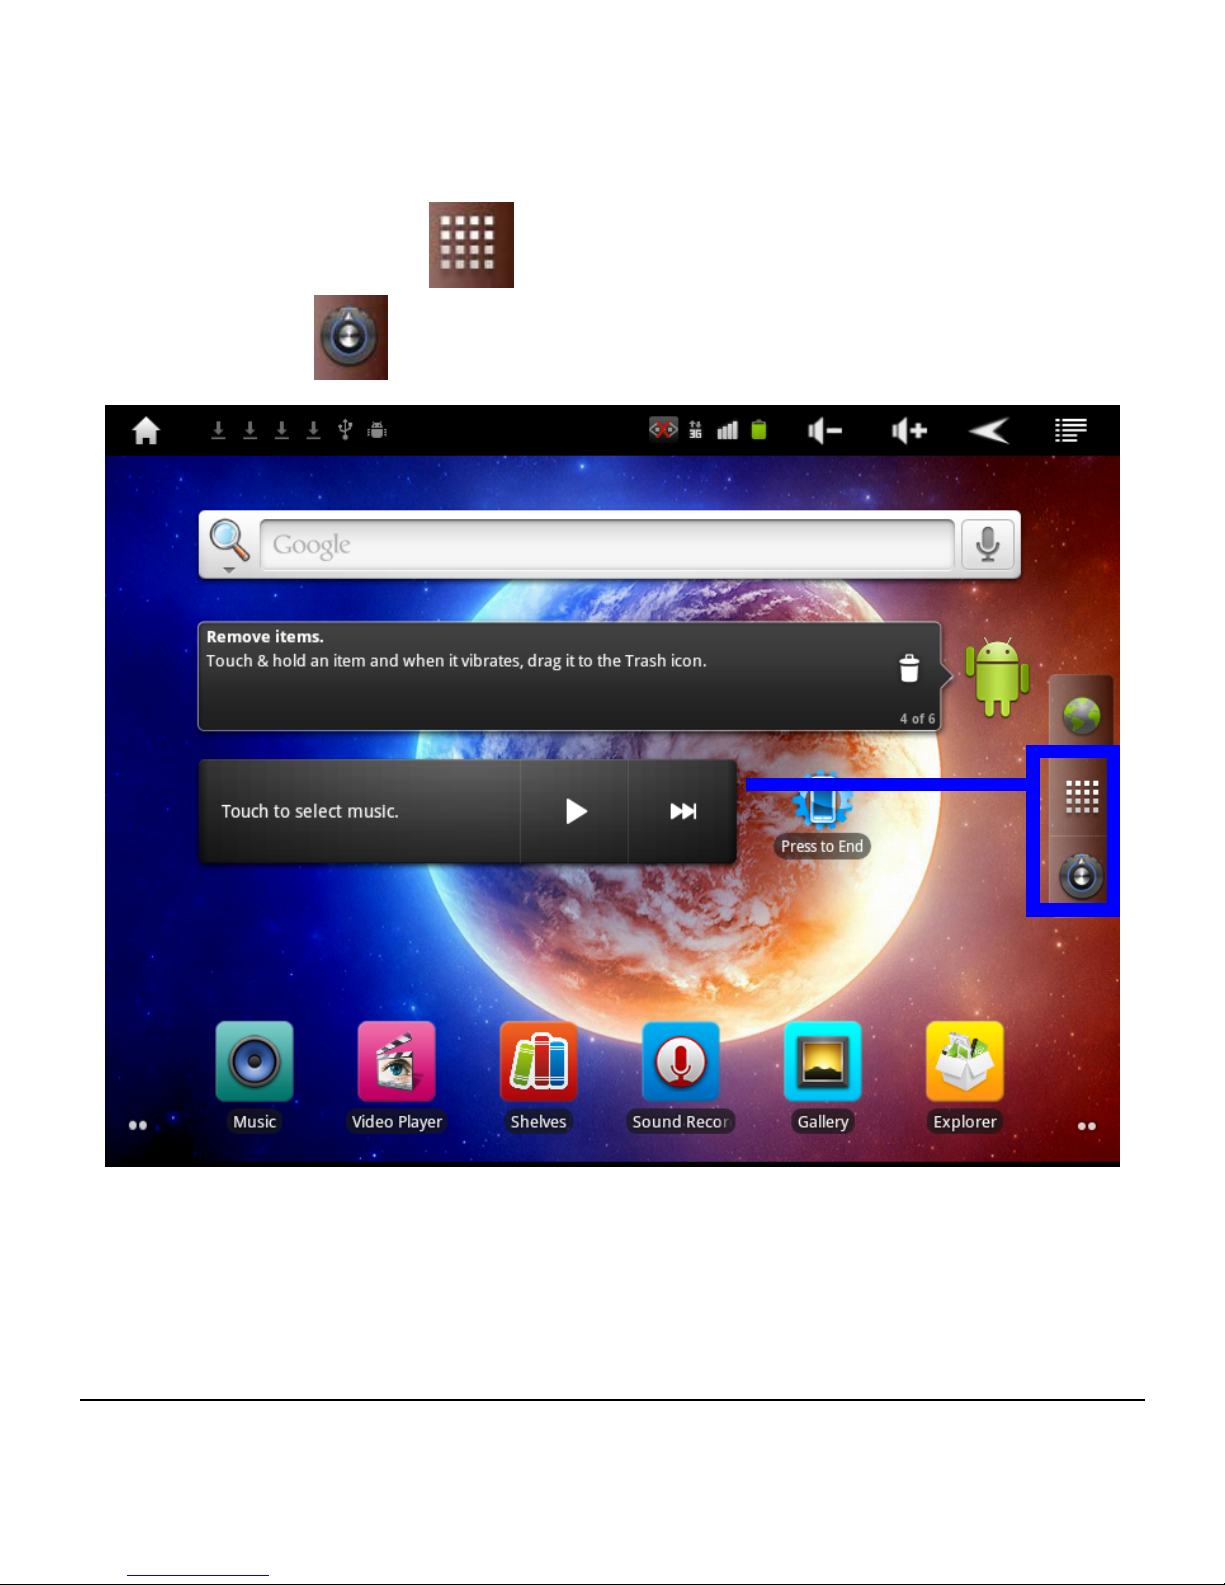
Click ‘Menu’ icon to enter function menu, or click
‘Settings’ icon
upon desktop.
Click ‘Menu’ or
‘Setting’ logo to
enter user’s interface
Page 19
- 15 -
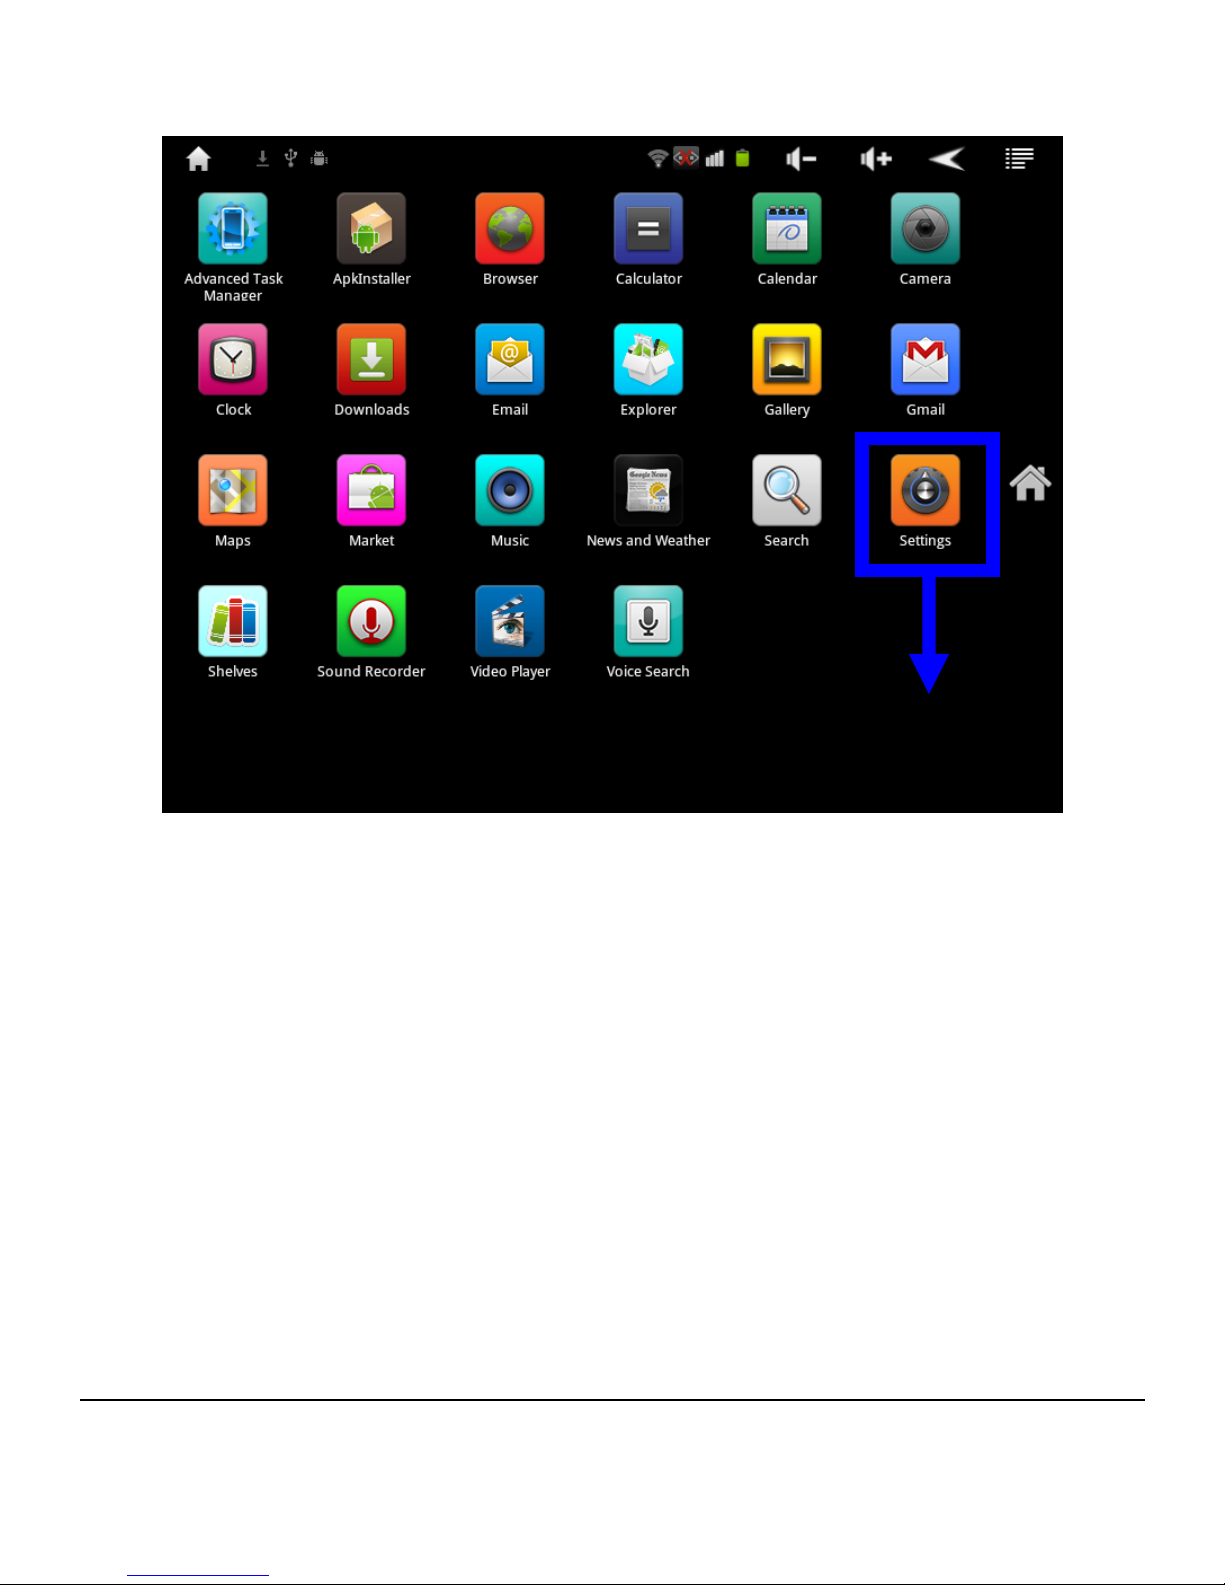
Click ‘Setting’ to enter Settings page.
Click ‘Setting’ to enter Settings page.
Page 20
- 16 -
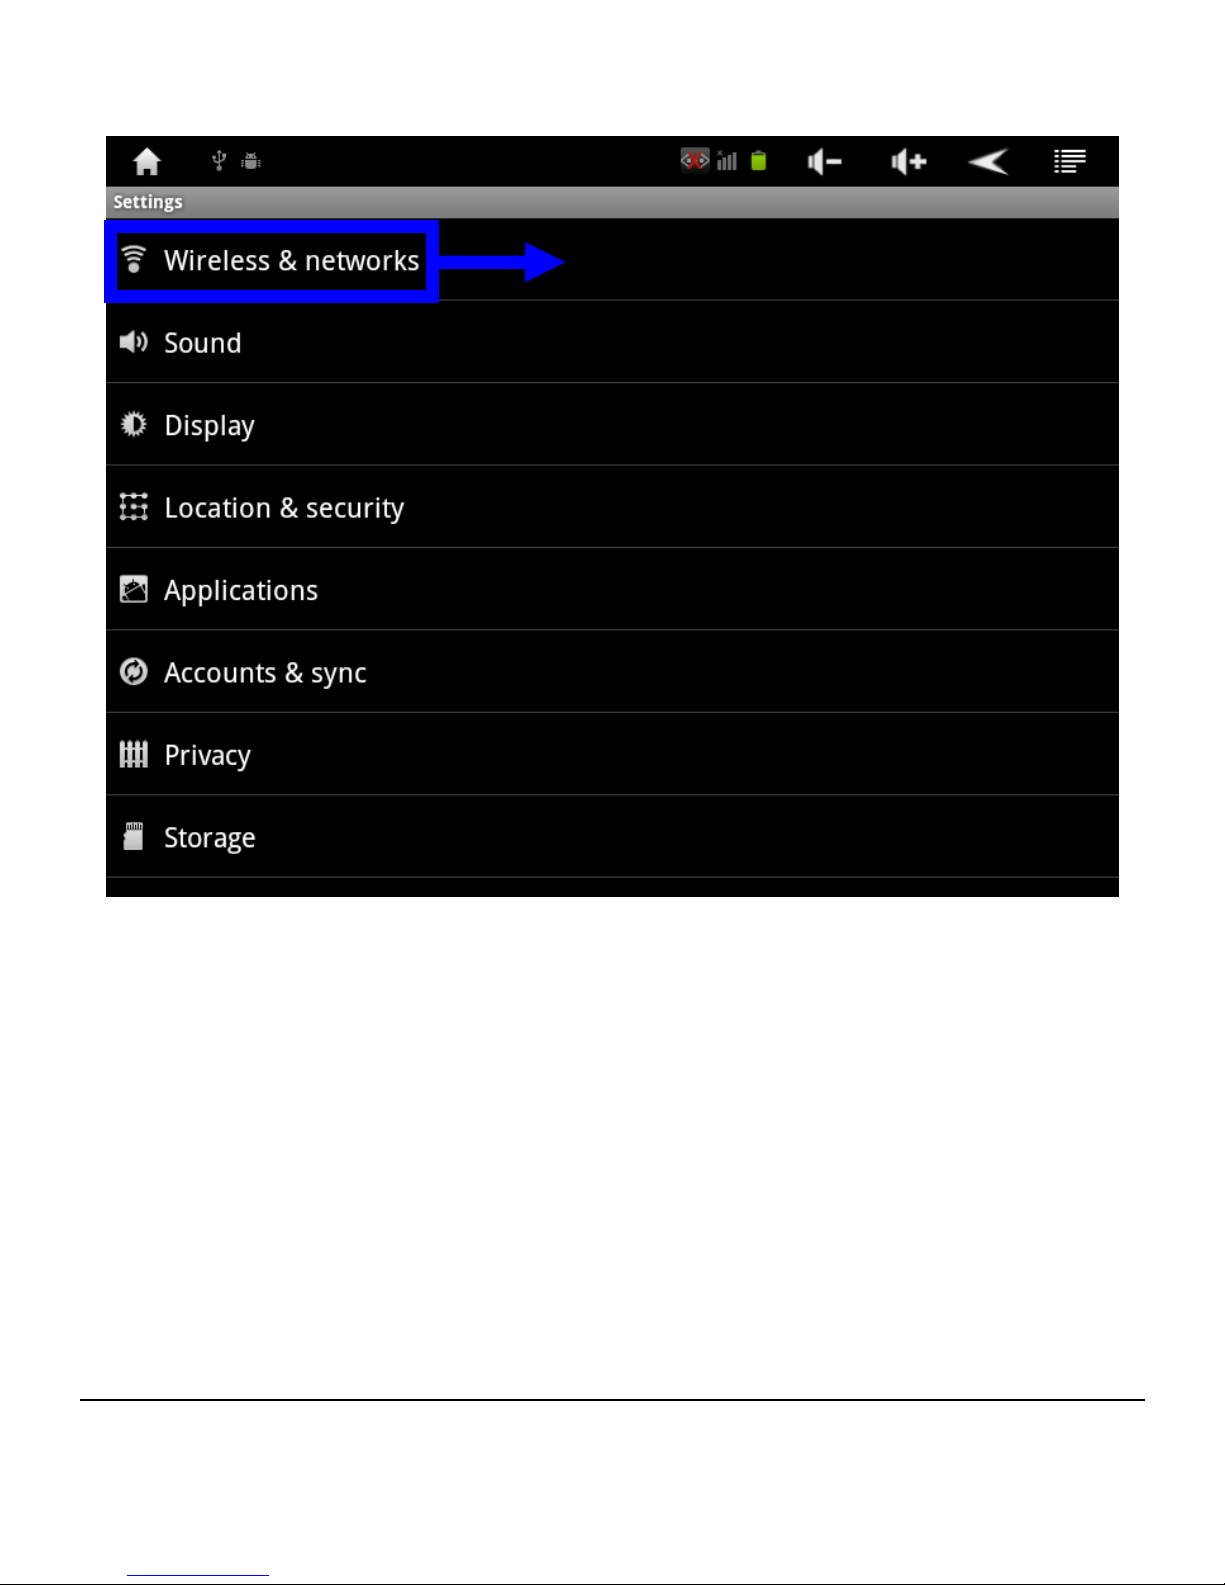
Click ‘Wireless & networks’.
Click ‘Wireless & networks’.
Page 21
- 17 -
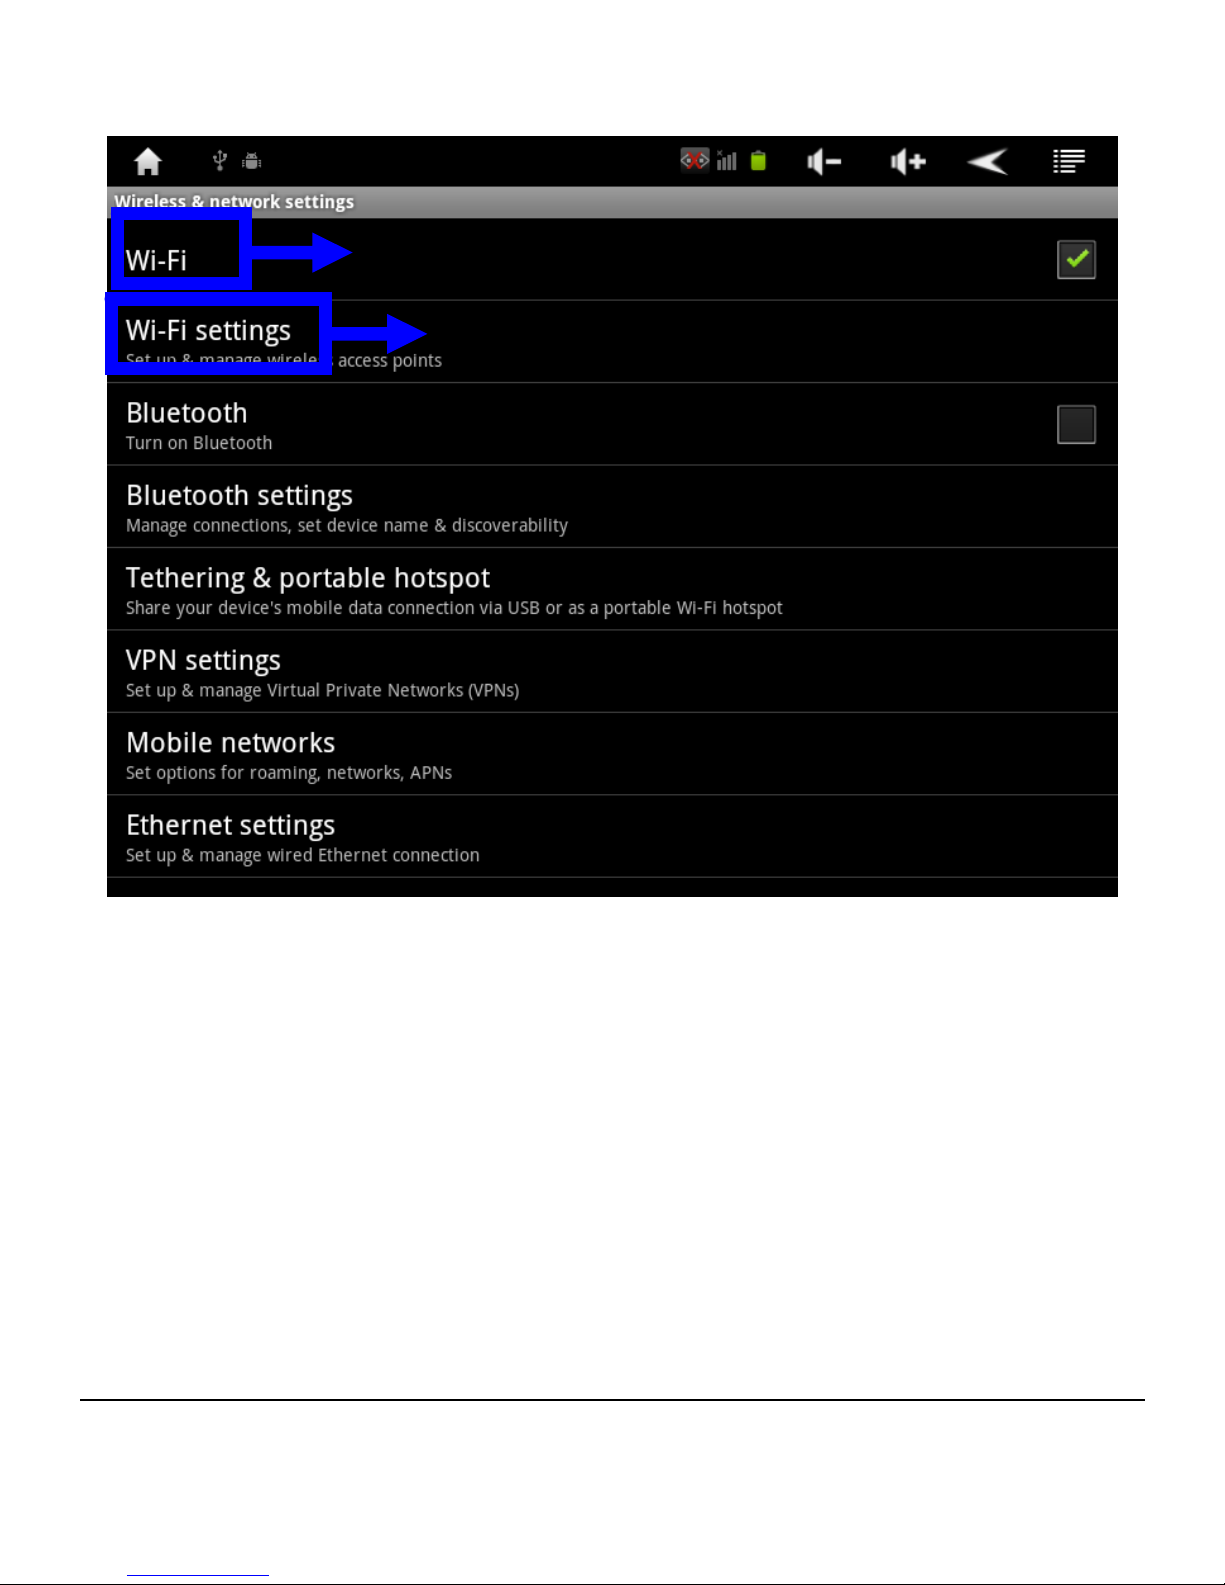
Click “Wi-Fi” to enable WIFI function.
Click ‘Wi-Fi settings’.
System will auto search WIFI network. As the following photo
shows one network has been found:
Click “Wi-Fi” to enable WIFI function
Click “Wi-Fi settings” to further
set Wi-Fi function
Page 22
- 18 -
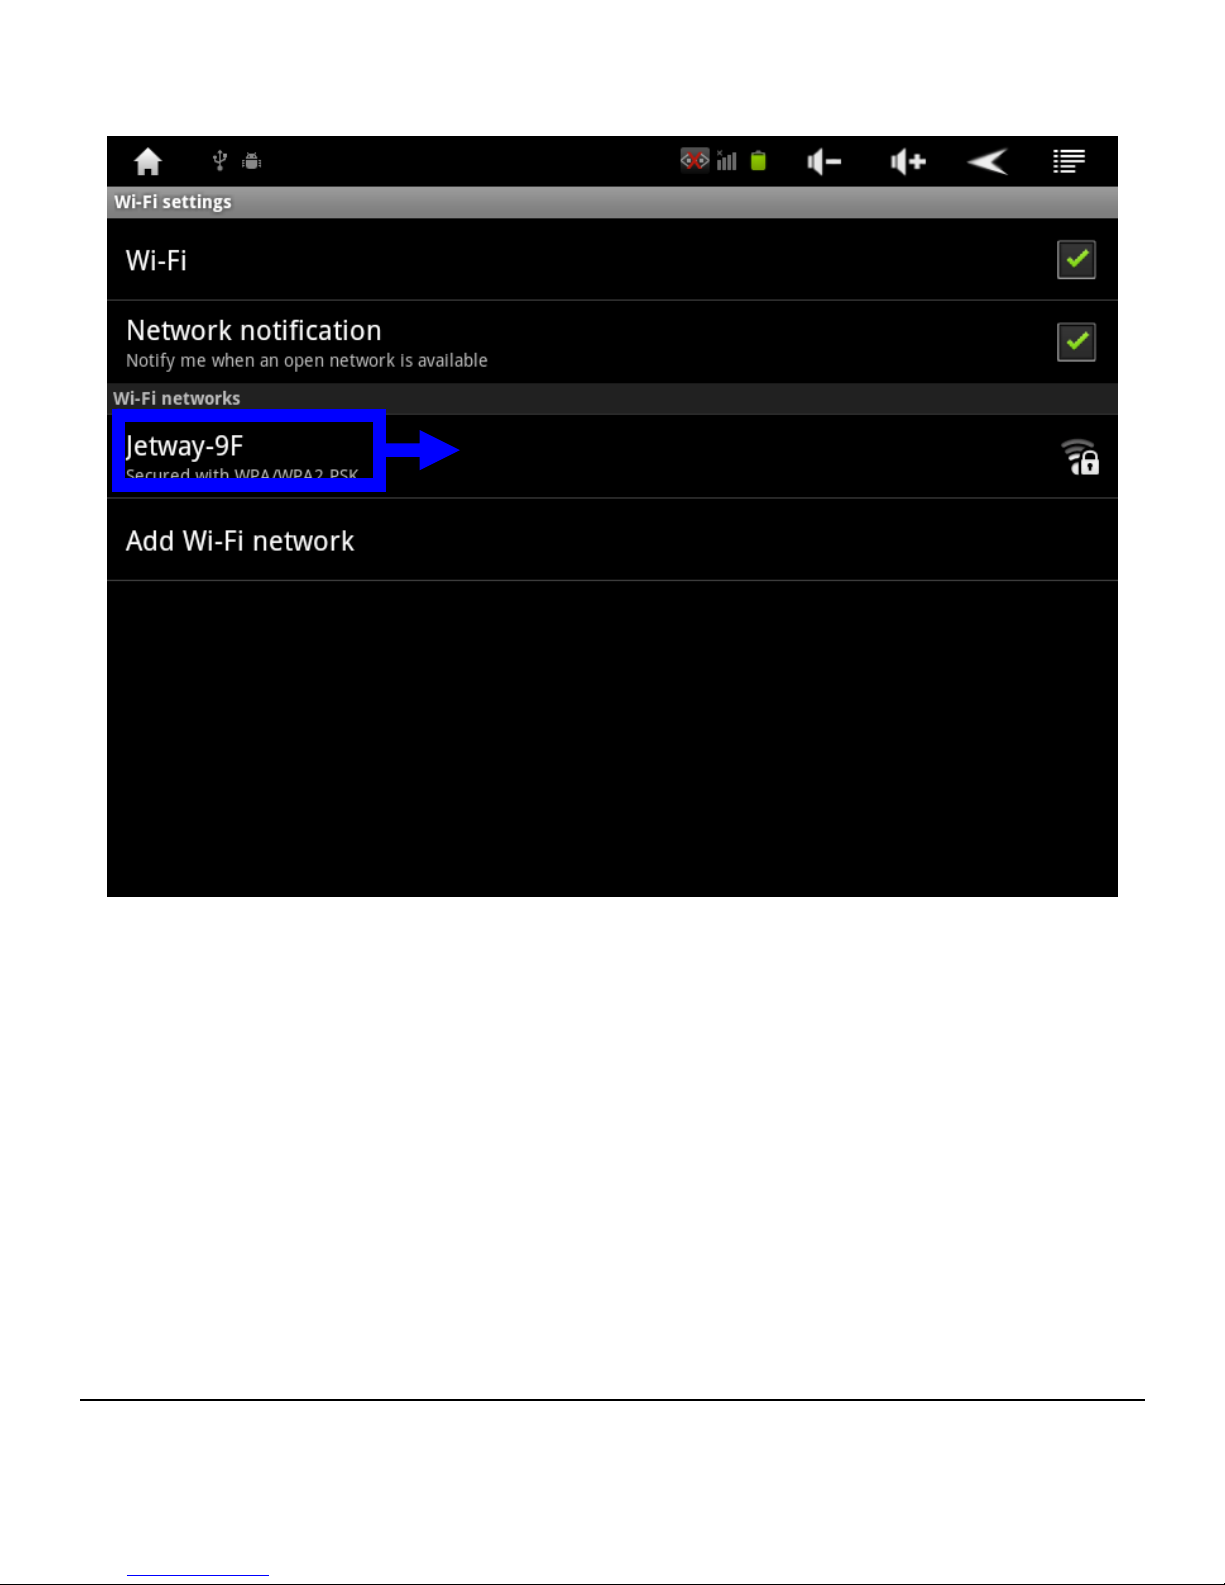
Click the WIFI network name to connect, e.g., click ‘Jetway-9F’
and a notification page will show up to inform you to enter WIFI
password.
Click available Wi-Fi
network name
Page 23
- 19 -
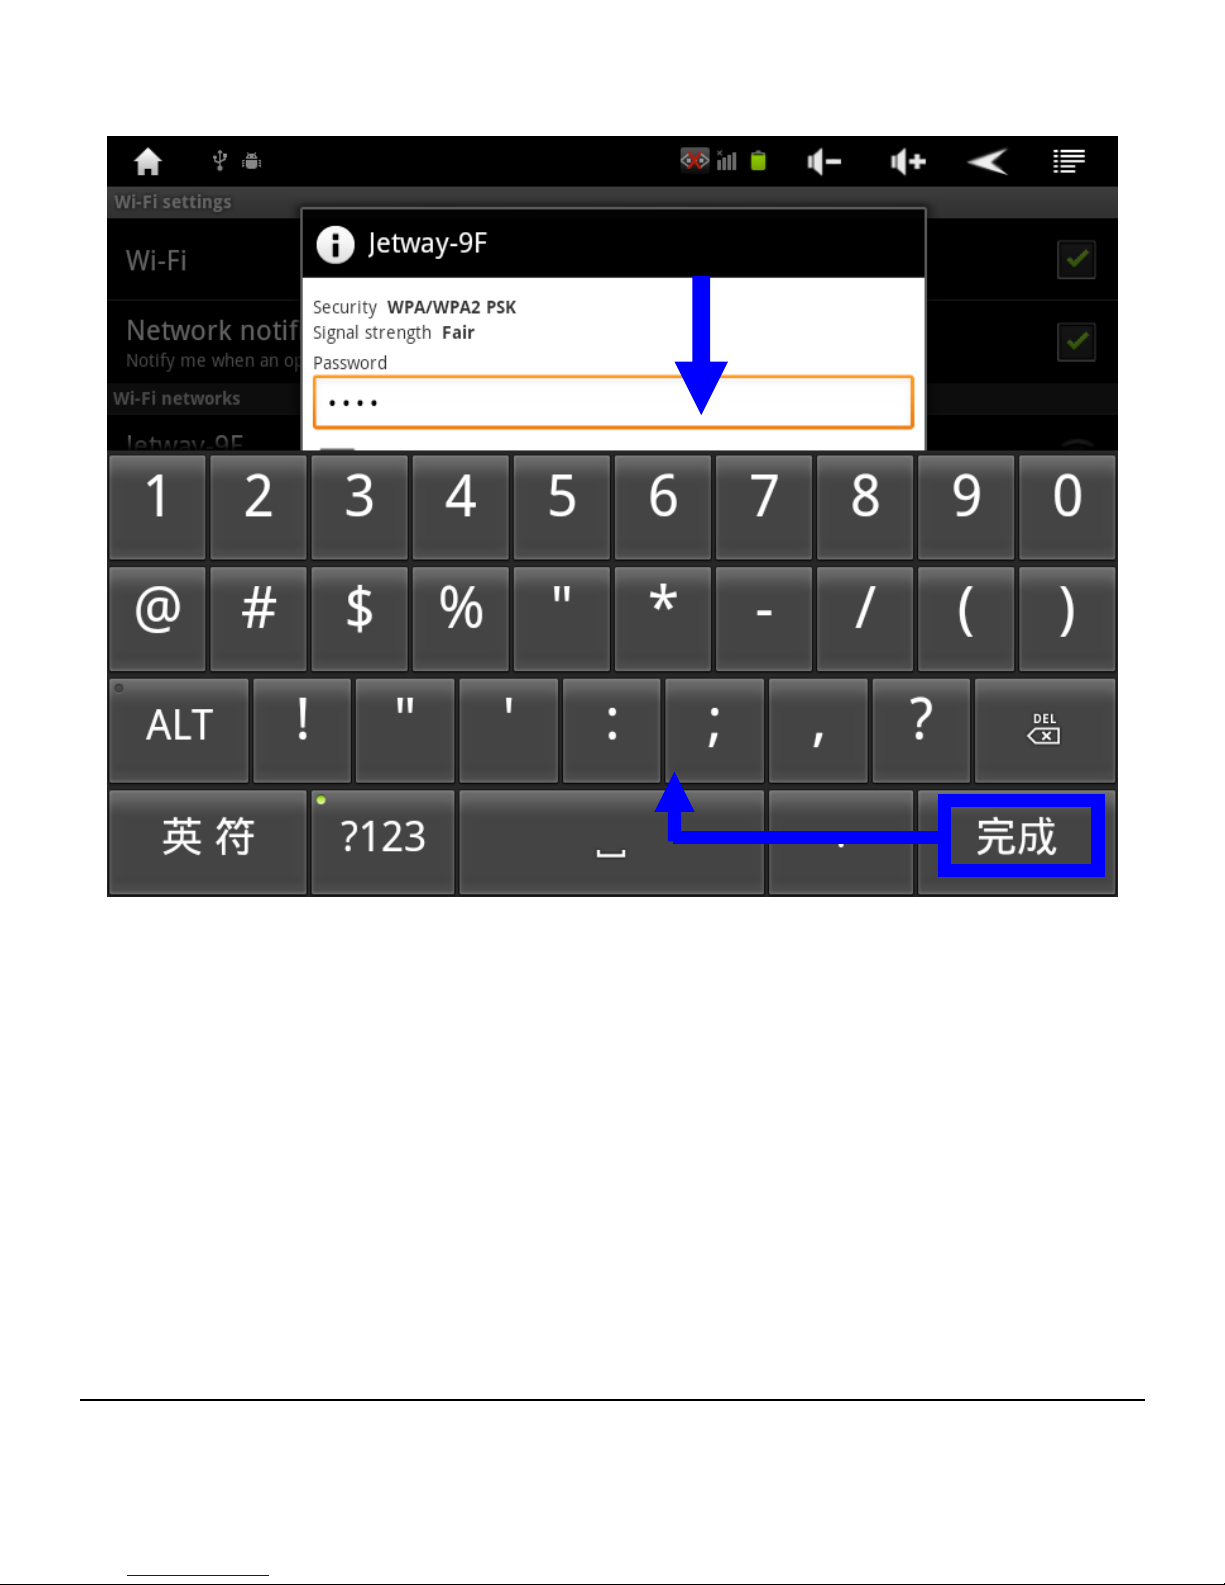
Click ‘完成’ after correct password entered. System will auto
connect network.
Put in Wi-Fi network password
Click ‘
完成’(
Finished)after putting in password
Page 24
- 20 -
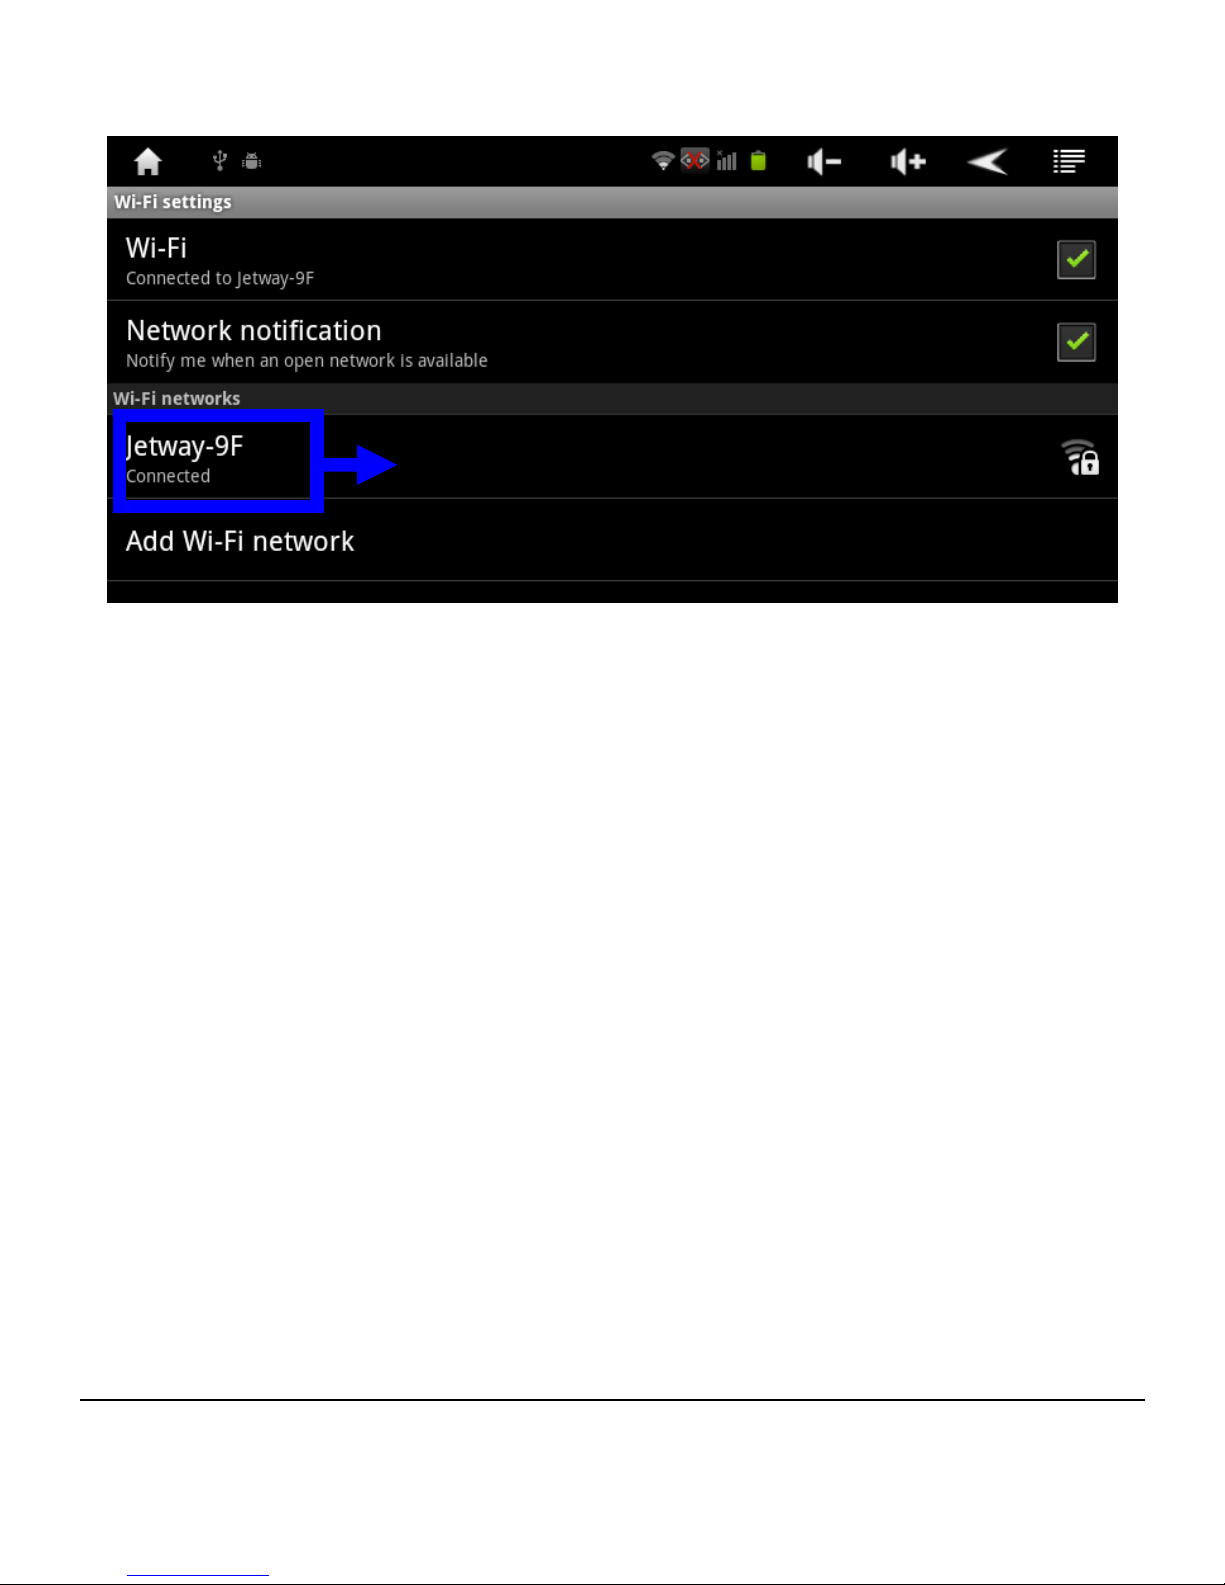
Message ‘Connected’ will show up if connection is made.
Connecting status information will show up when clicked, as the
above photo shows.
Connecting status: ‘Connected’
Page 25
- 21 -
3.3 Static IP address settings and connection
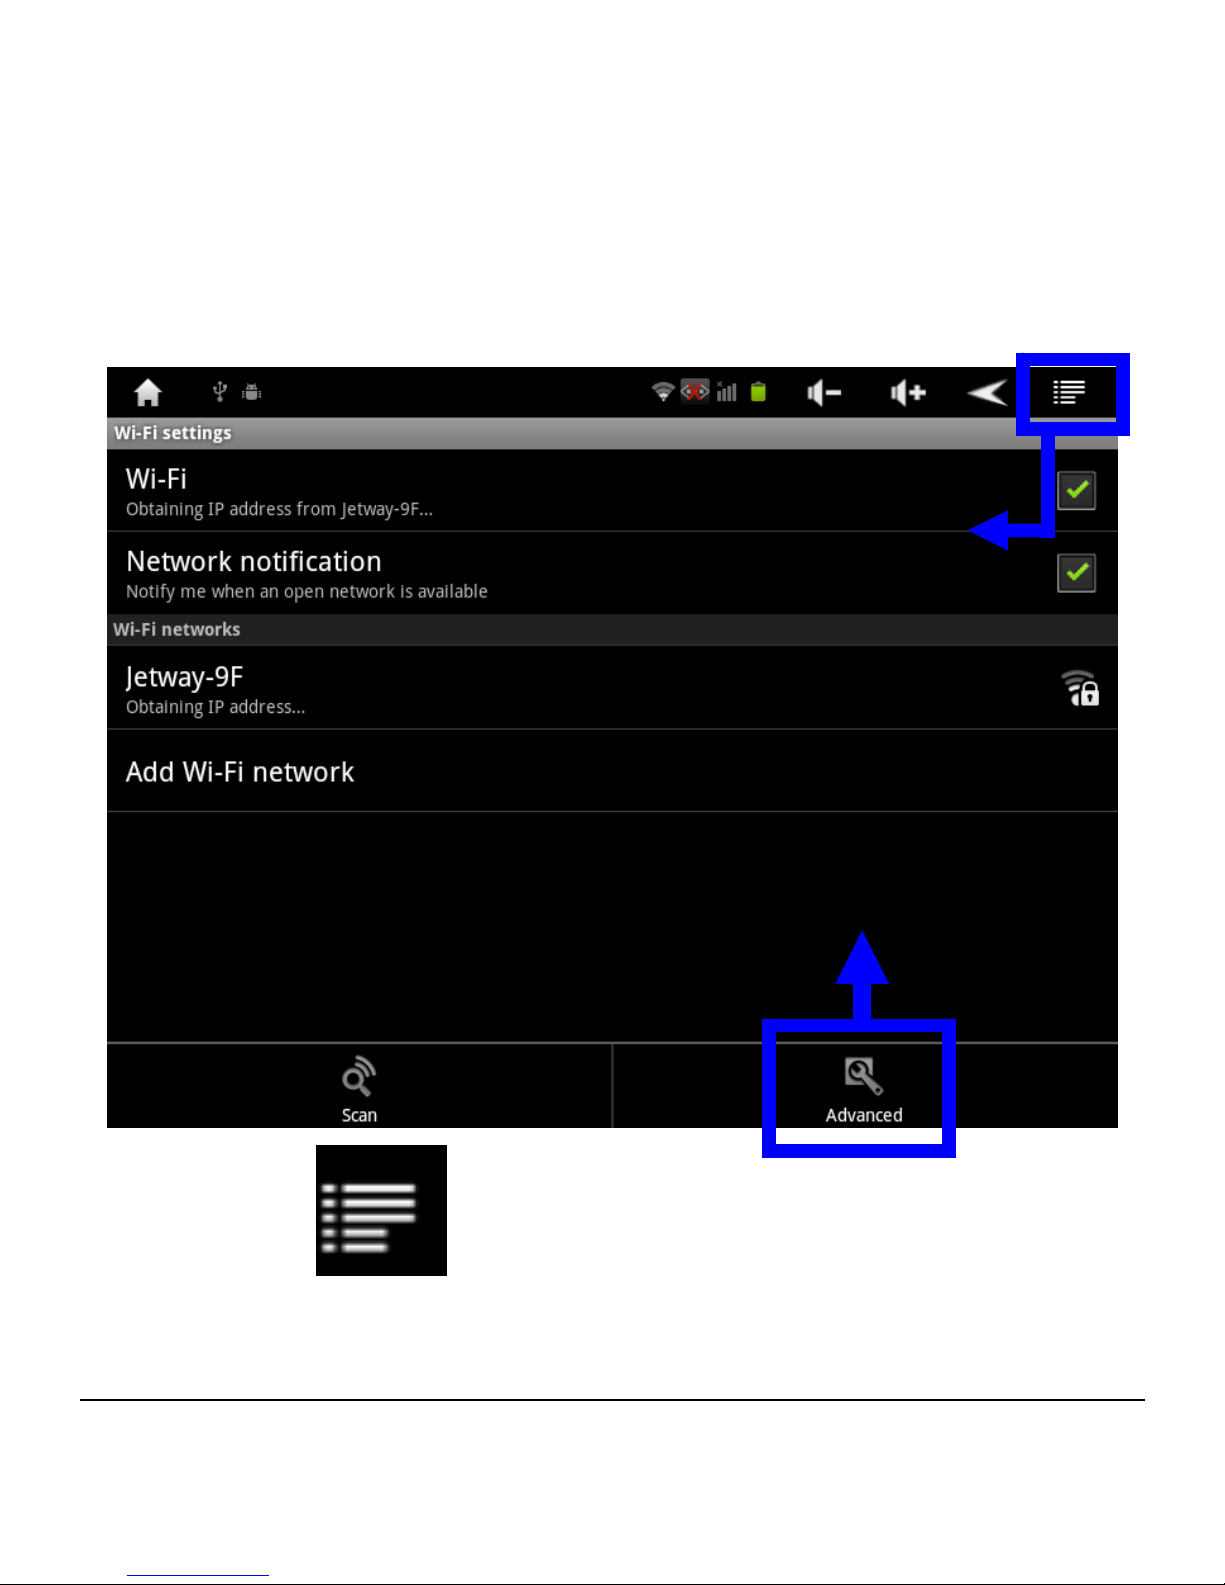
If the AP router can’t support DHCP service, user needs to
set the IP address for this device.
Click icon
on the top right corner of the screen.
Click ‘Advanced’.
2. Click ‘Advanced’
1. Click setting icon
Page 26
- 22 -
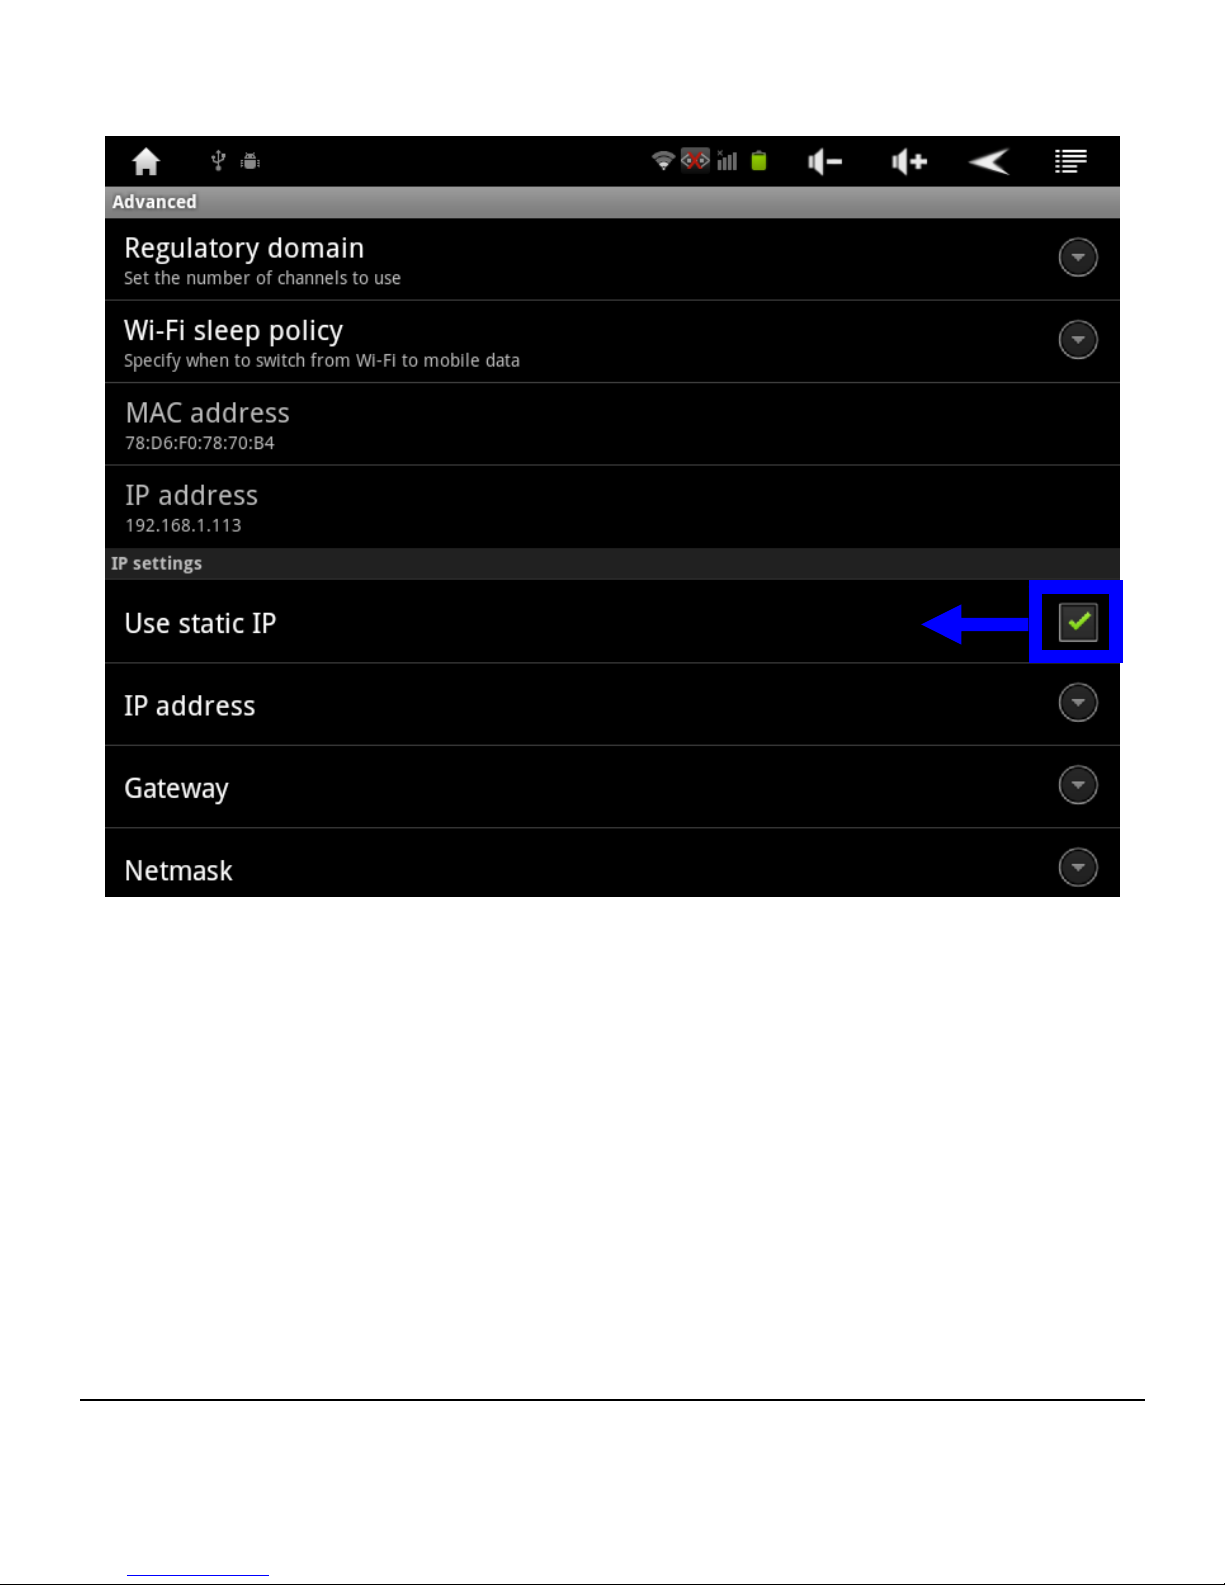
Click ‘Use Static IP’.
Input Static IP address.
For example:
IP Address: 192.168.1.200
Gateway: 192.168.1.255
Netmask: 255.255.255.0
Click to use static IP
Page 27
- 23 -
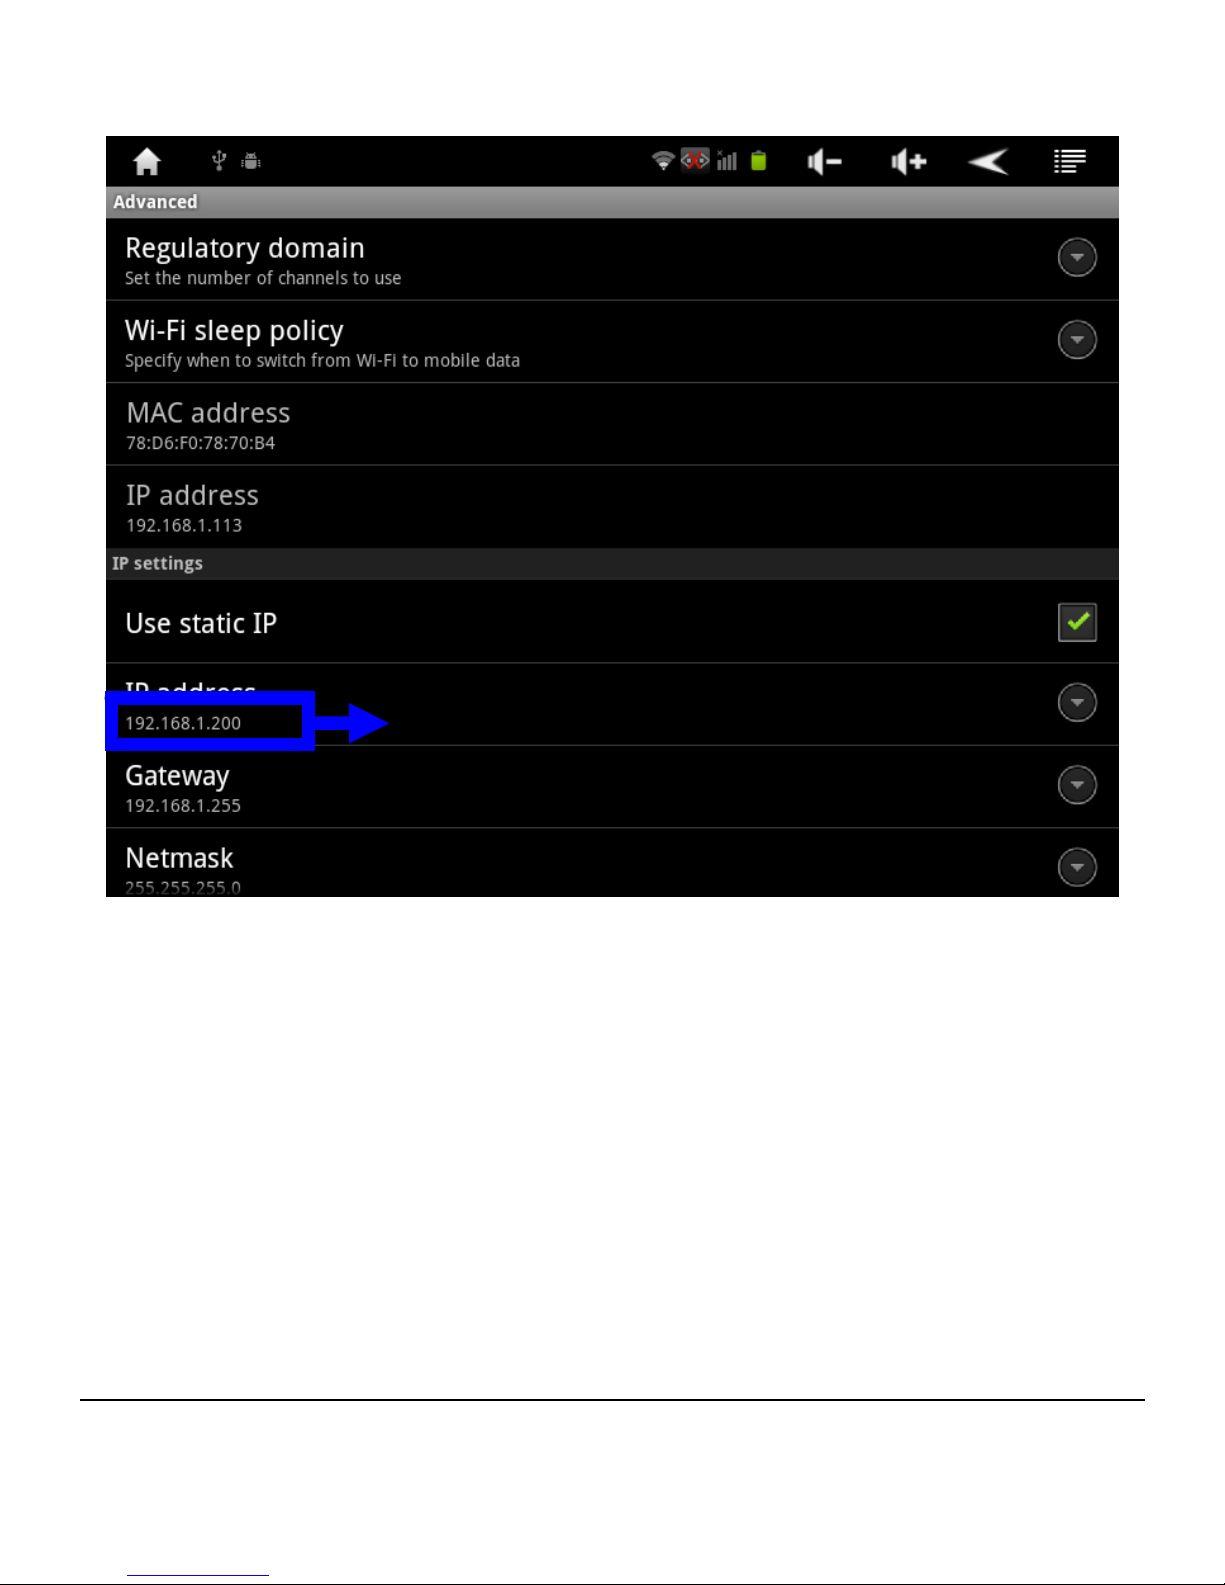
Information will show after static IP are made successfully, as
the above photo shows.
Static IP information
Page 28
- 24 -
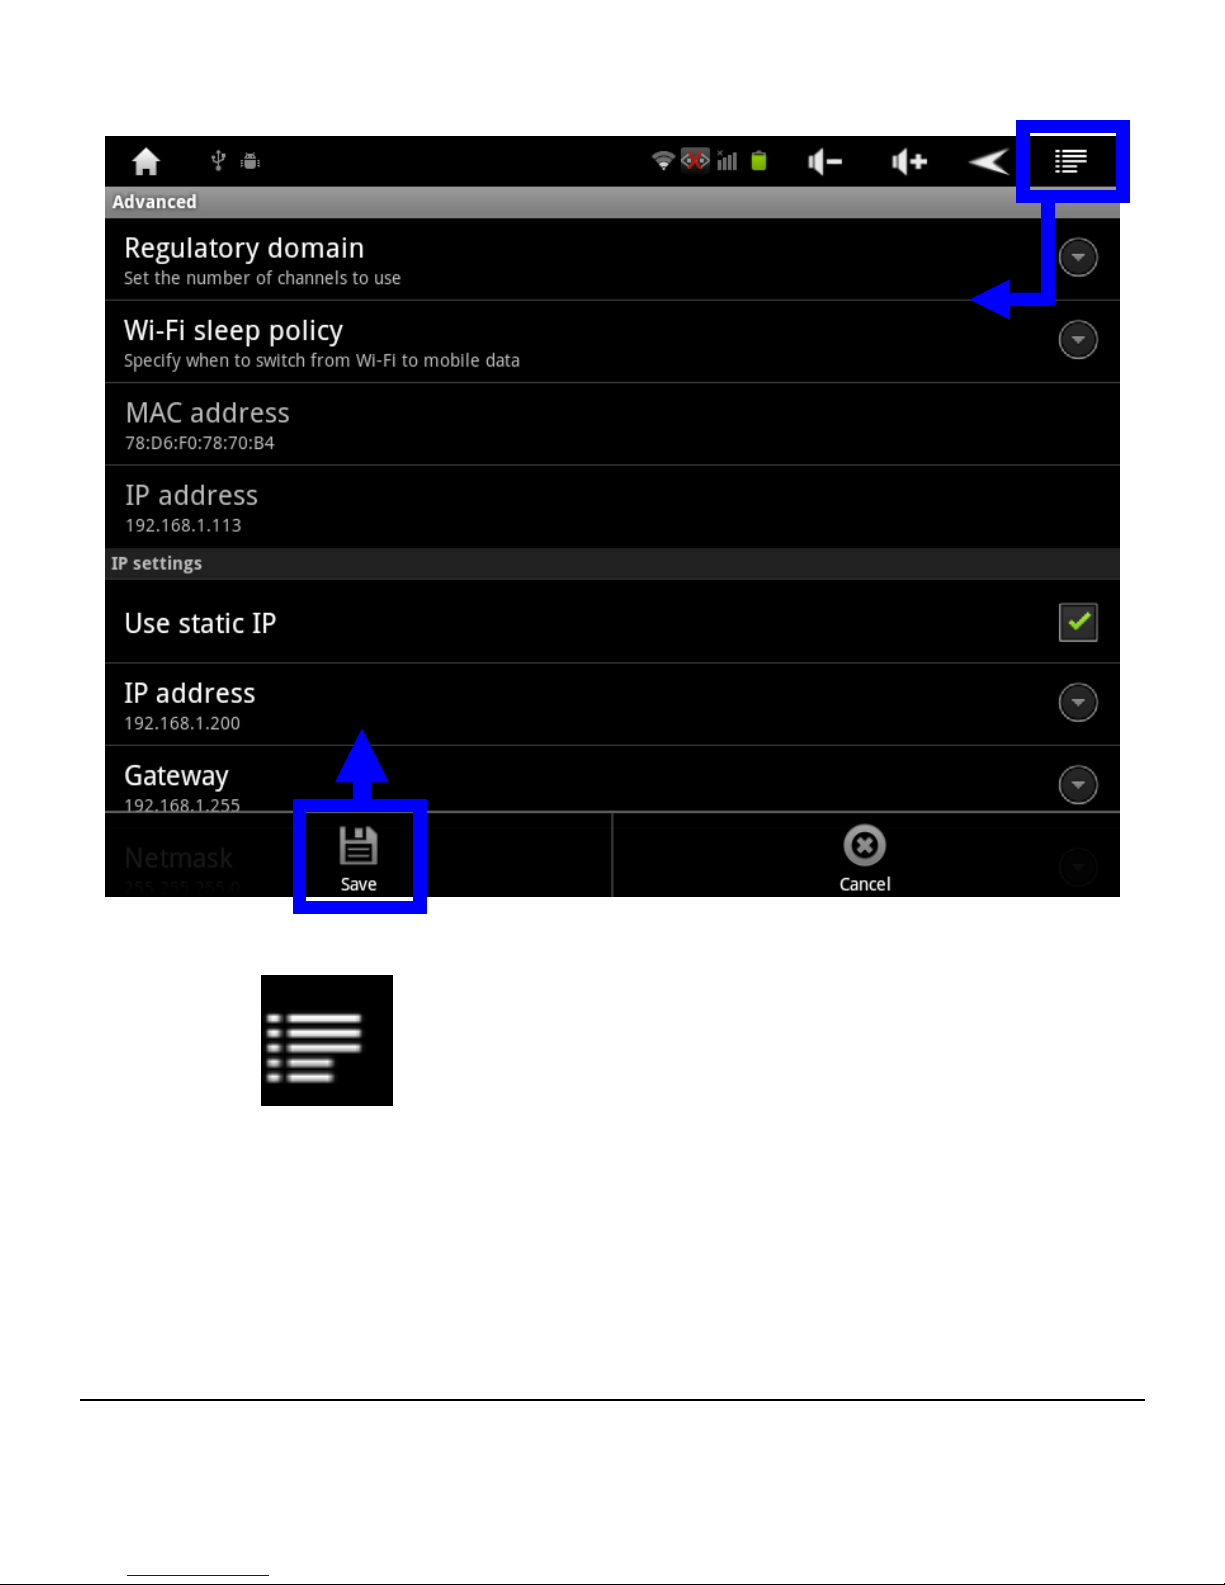
Save Static IP address setting:
Click icon
on the top right corner of the screen then click
‘Save’, as the following photo shows:
1. Click setting icon
2. Click ‘Save’
Page 29
- 25 -
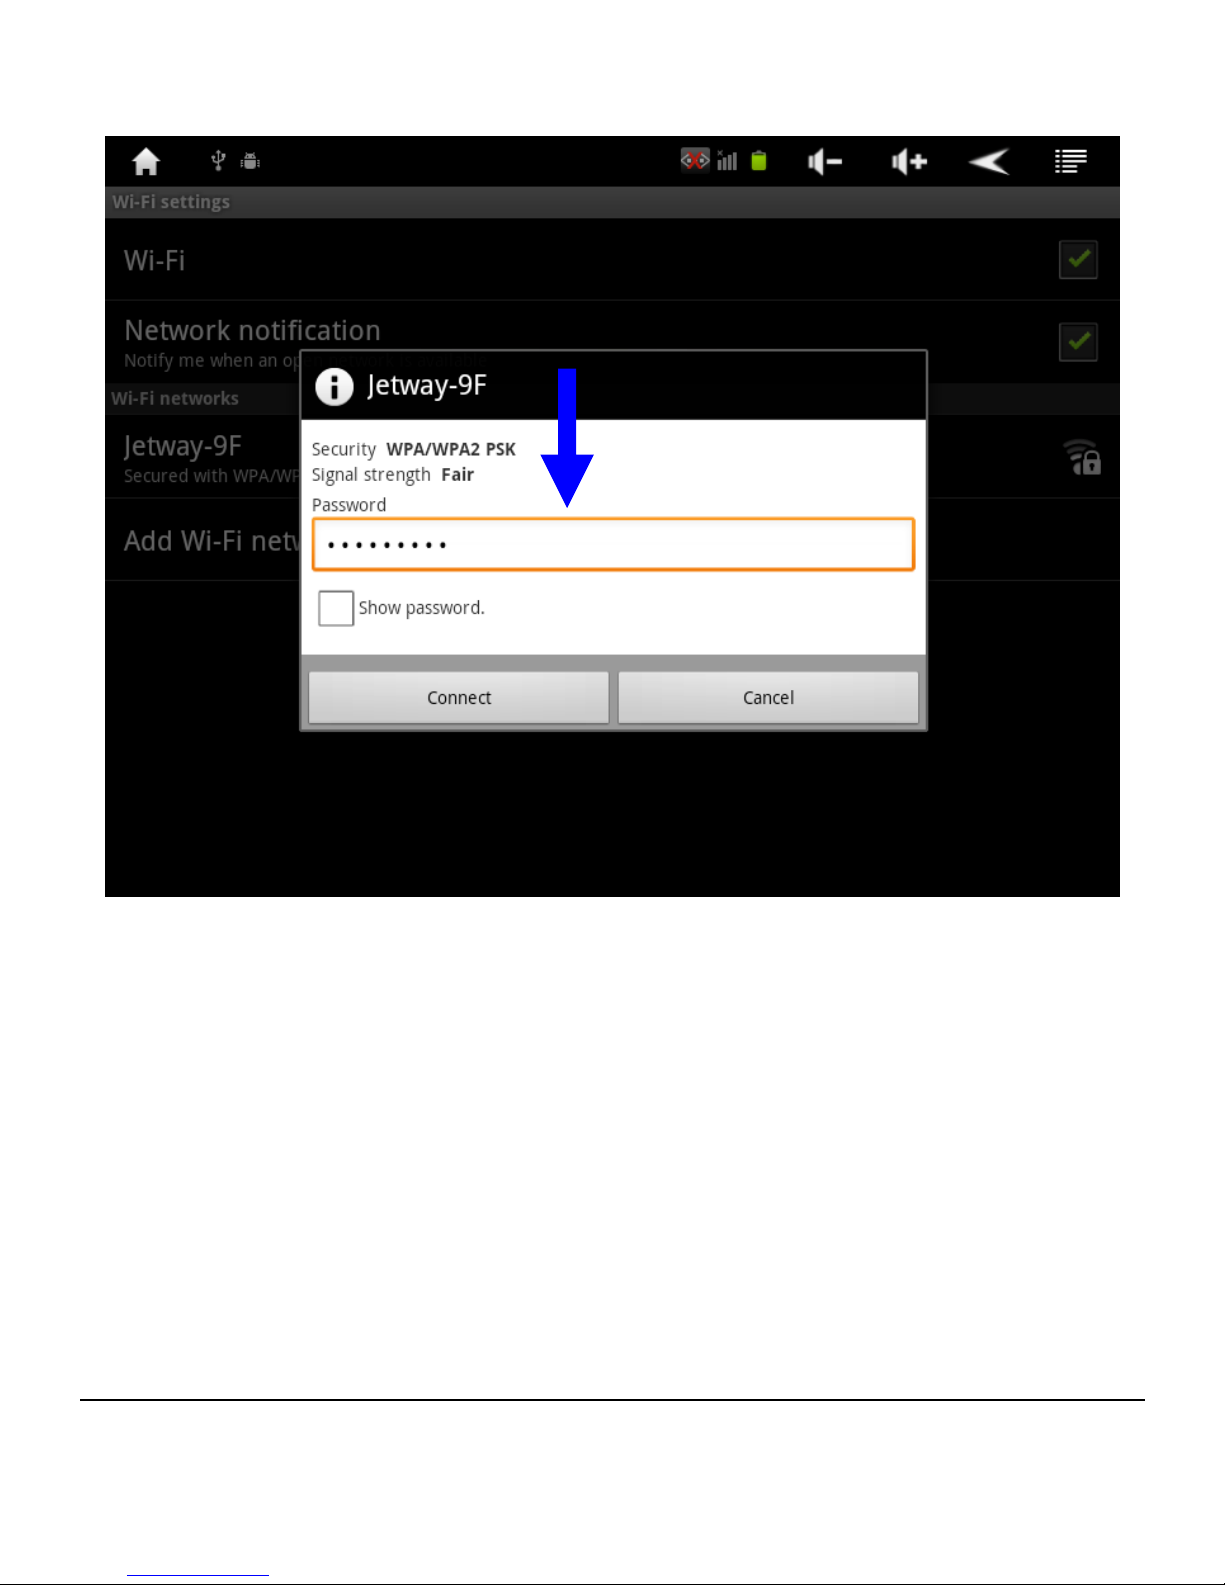
After all settings made please return to click the WIFI network
name to connect, e.g., click ‘Jetway-9F’ and a notification page
will show up to inform you to enter WIFI password.
Click ‘完成’ after correct password entered.
Put in Wi-Fi network password
Page 30
- 26 -
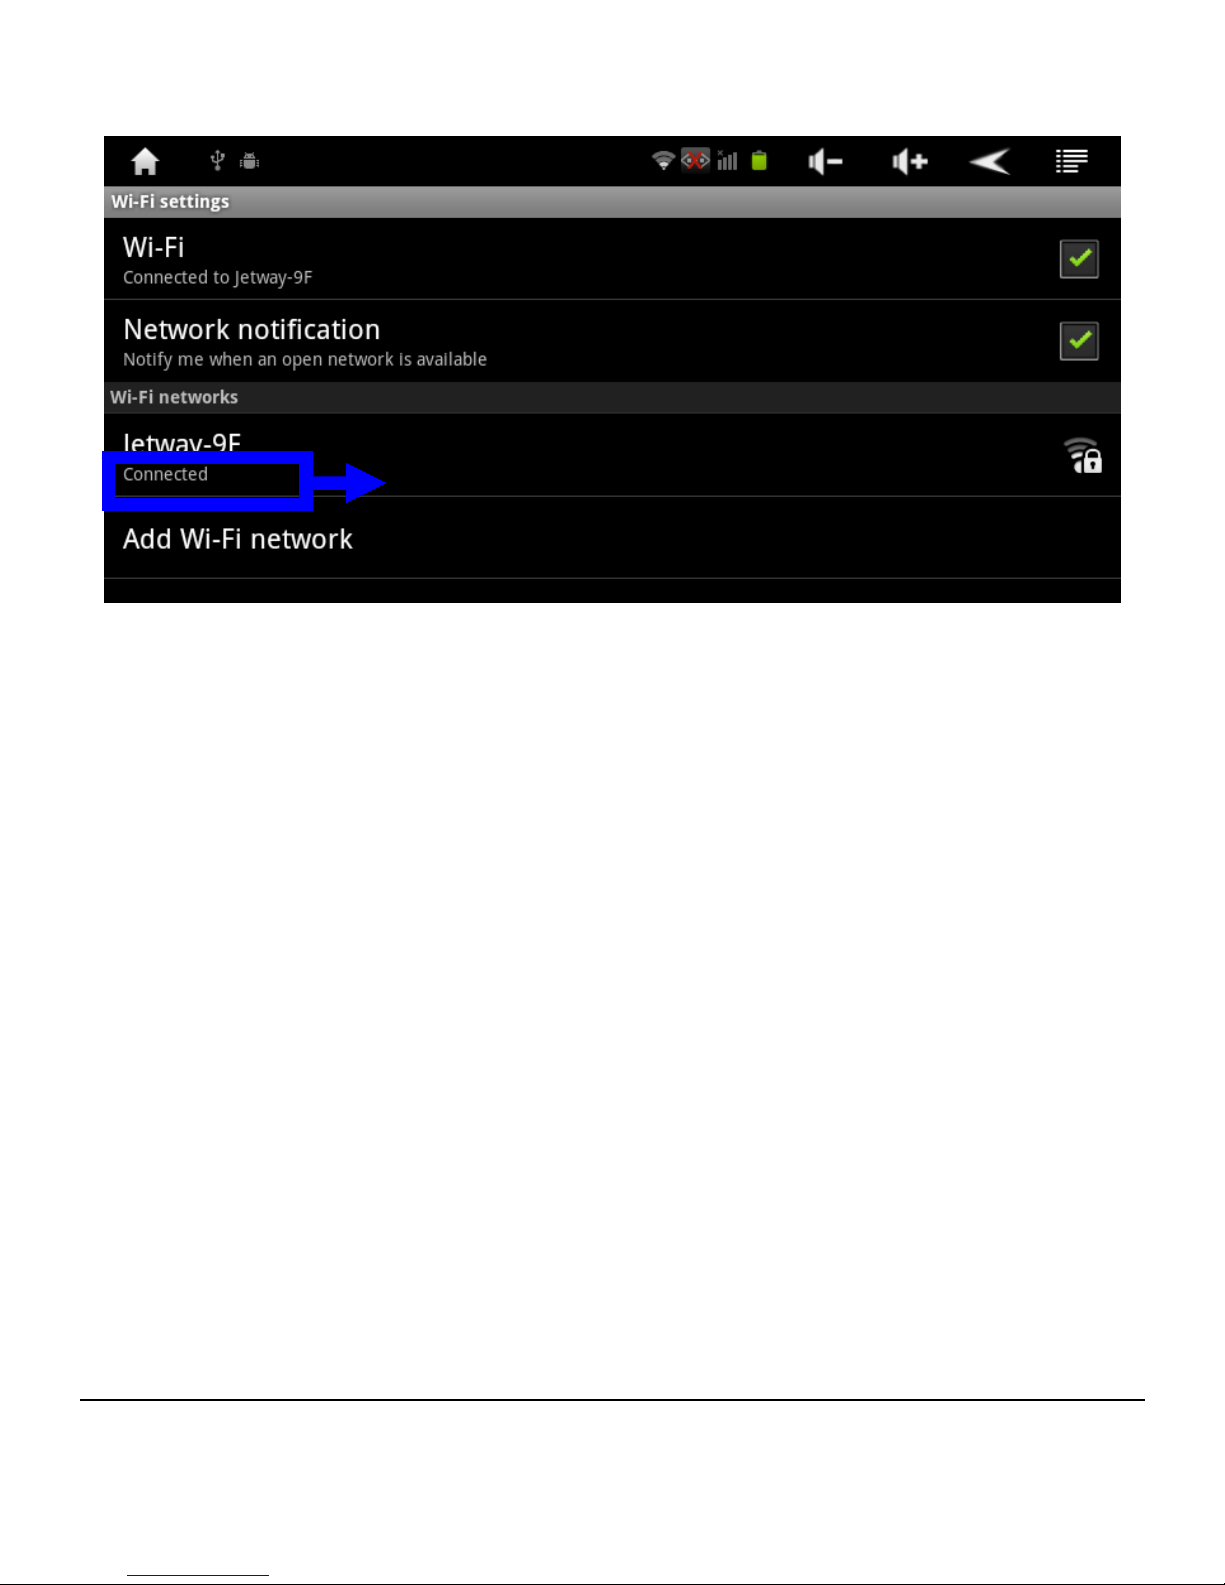
Click ‘Connect’, system will auto connect network. Message
‘Connected’ will show up if connection is made. Connecting
status information will show up when clicked, as the above photo
shows.
Connecting status: ‘Connected’
Page 31
- 27 -
3.4 USB HOST Function
The tablet PC comes with an OTG (On-The-Go) connector to
realize data transmission between digital devices with HOST
function. User just needs to connect the smaller end of OTG
cable to OTG connector of tablet PC and the other end
functions as USB connector to connect with compatible USB
devices (such as USB disk, keyboard, mouse, 3G wireless
card dongle, USB to Fast Ethernet Adapter, etc.).
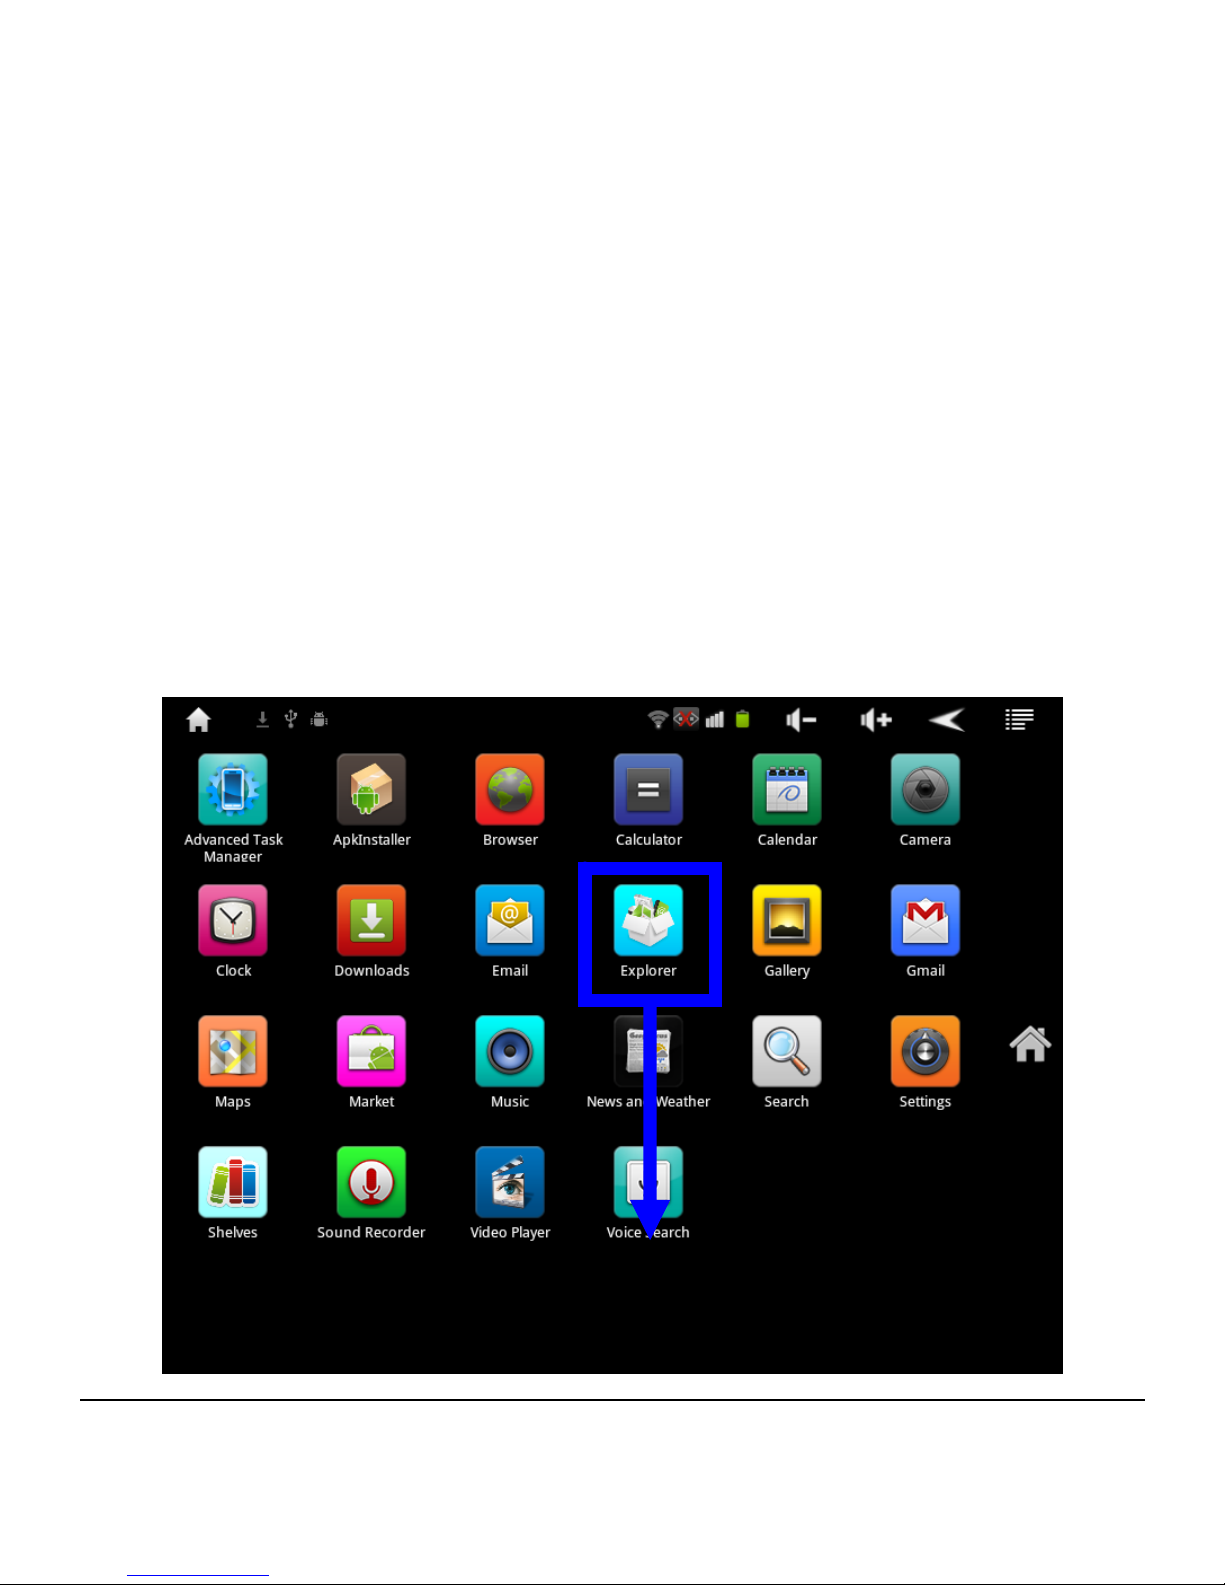
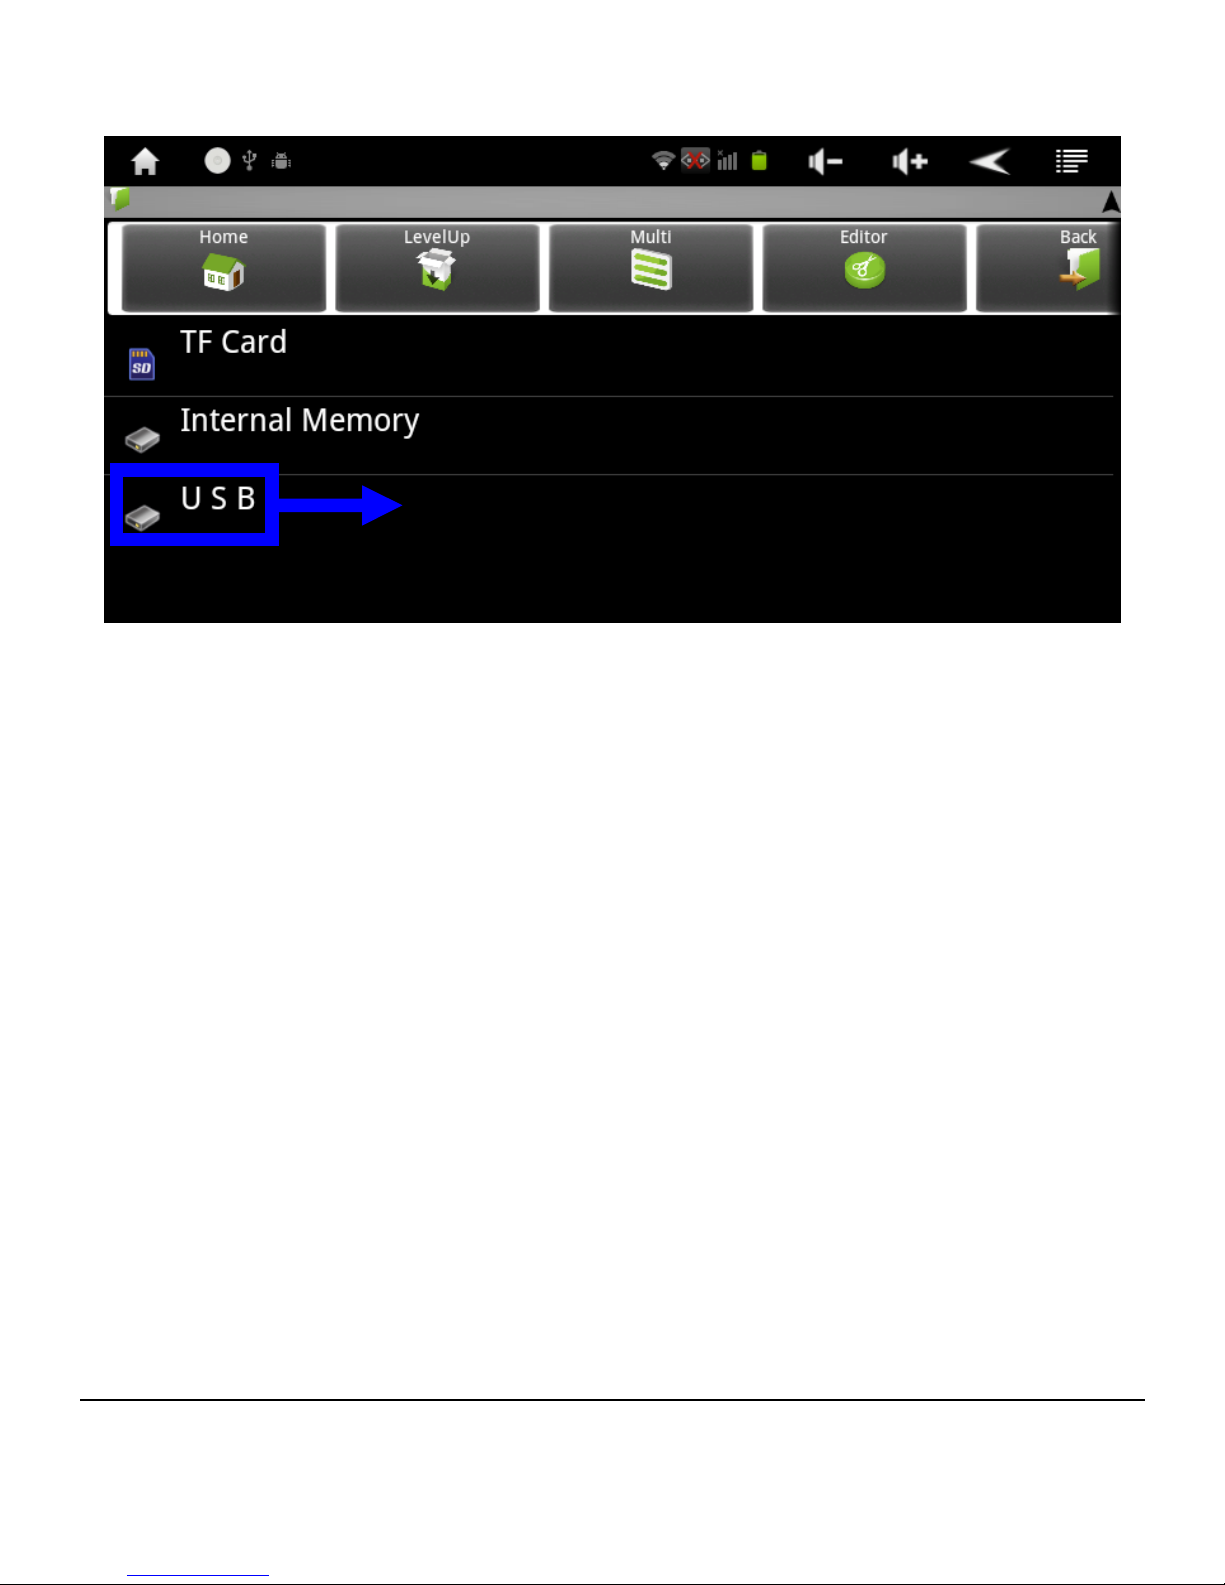
3.4.1To read USB disk: Connect USB disk to OTG connector
with OTG cable and click ‘Explorer’ on home page, then
click ‘USB’ to access to USB disk and play files in the
disk, as the following photo shows:
Click ‘Explorer’
Page 32
- 28 -
3.5 3G Network Function
Notice: User needs to disable Wi-Fi function before using 3G
network function.
3.5.1Plug-in 3G USB Dongle: Connect 3G wireless card
Dongle to OTG connector with OTG cable for network
connection.
3.5.2Plug-in Ethernet Adapter: Connect USB to Fast Ethernet
Adapter with OTG cable for fast Ethernet network
connection.
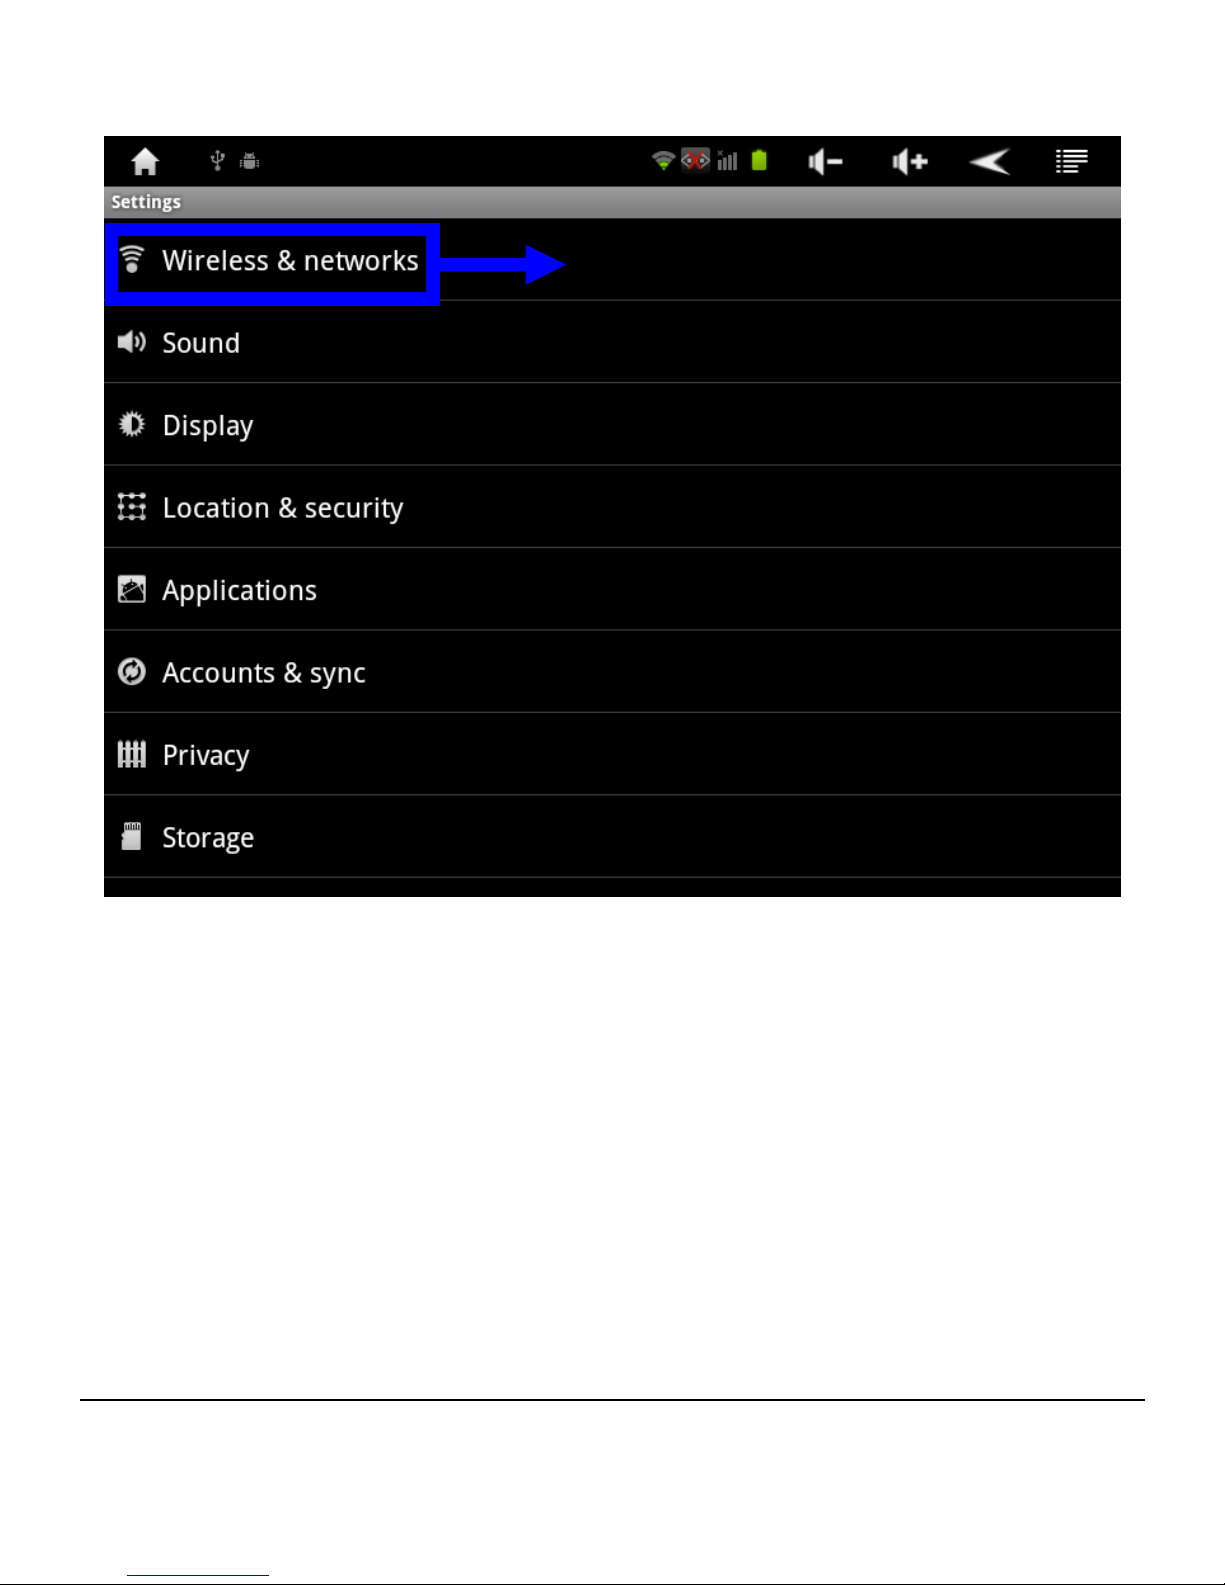
Notice: User needs to go to Wireless & network in ‘Settings’ to
turn on Ethernet settings.
Click ‘USB’ to access to
USB disk.
Page 33
- 29 -
Click ‘Wireless & networks’.
Click ‘Wireless & networks’.
Page 34
- 30 -
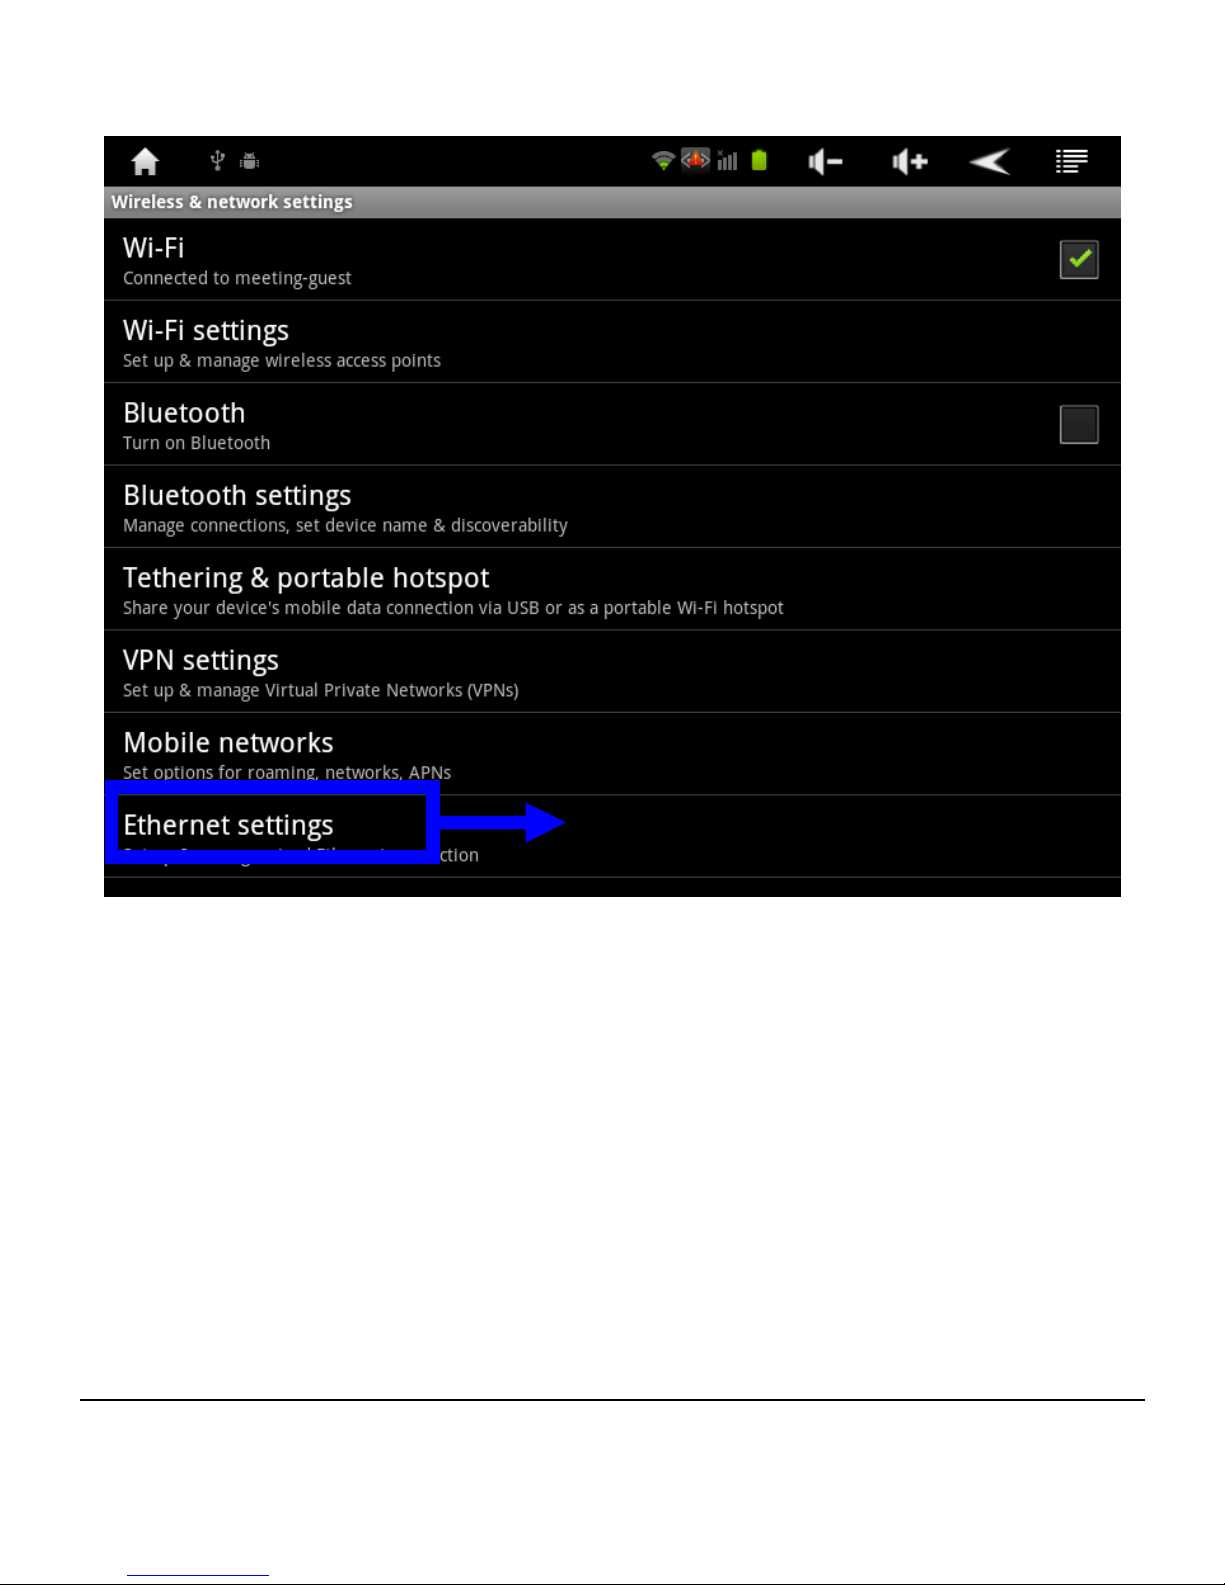
Click ‘Ethernet settings’.
Click ‘Ethernet settings’.
Page 35
- 31 -
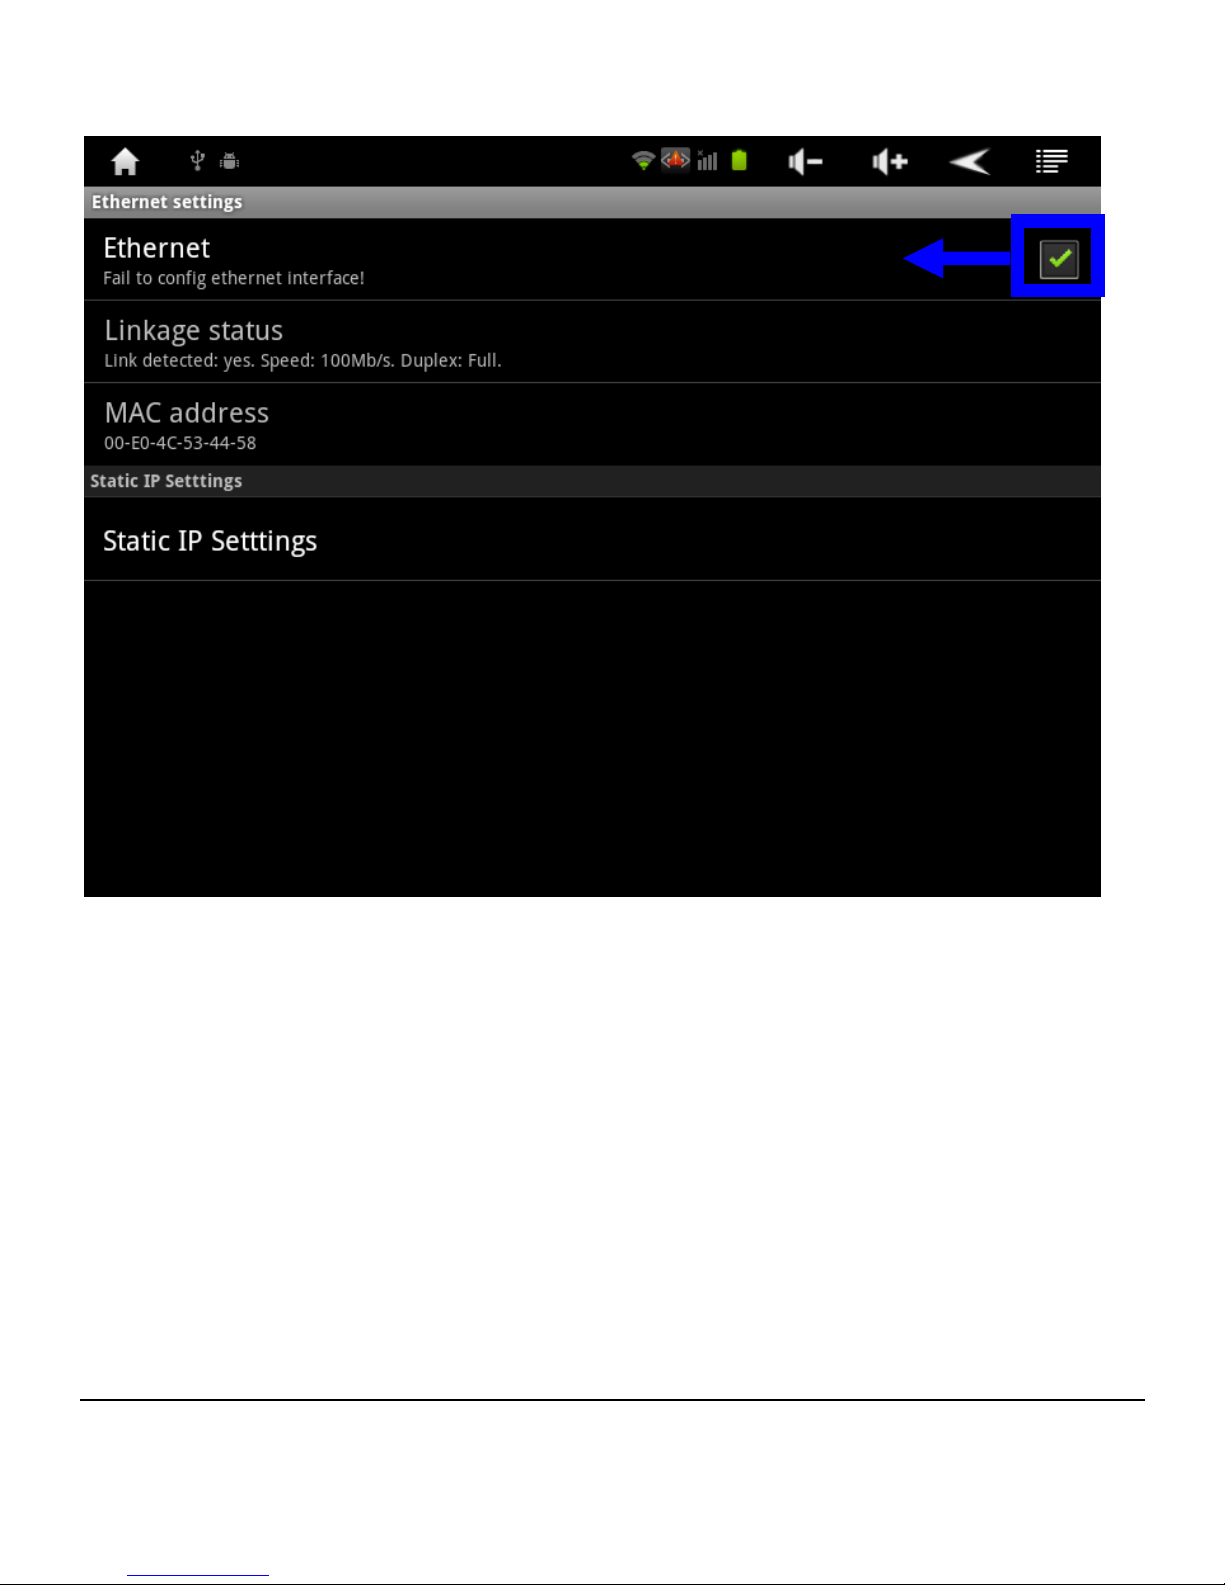
Click to enable Ethernet function.
Click to enable Ethernet function
Page 36
- 32 -
3.6 APK Installer
User can install third party programs developed on Android
2.3 operating system through ‘APK Installer’. User only
needs to store them in ‘Internal Memory’ of the device or
T-Flash card /External USB storage device and install them,
or install programs directly automatically through ‘Android
Market’ (refer to Chapter 3.10).
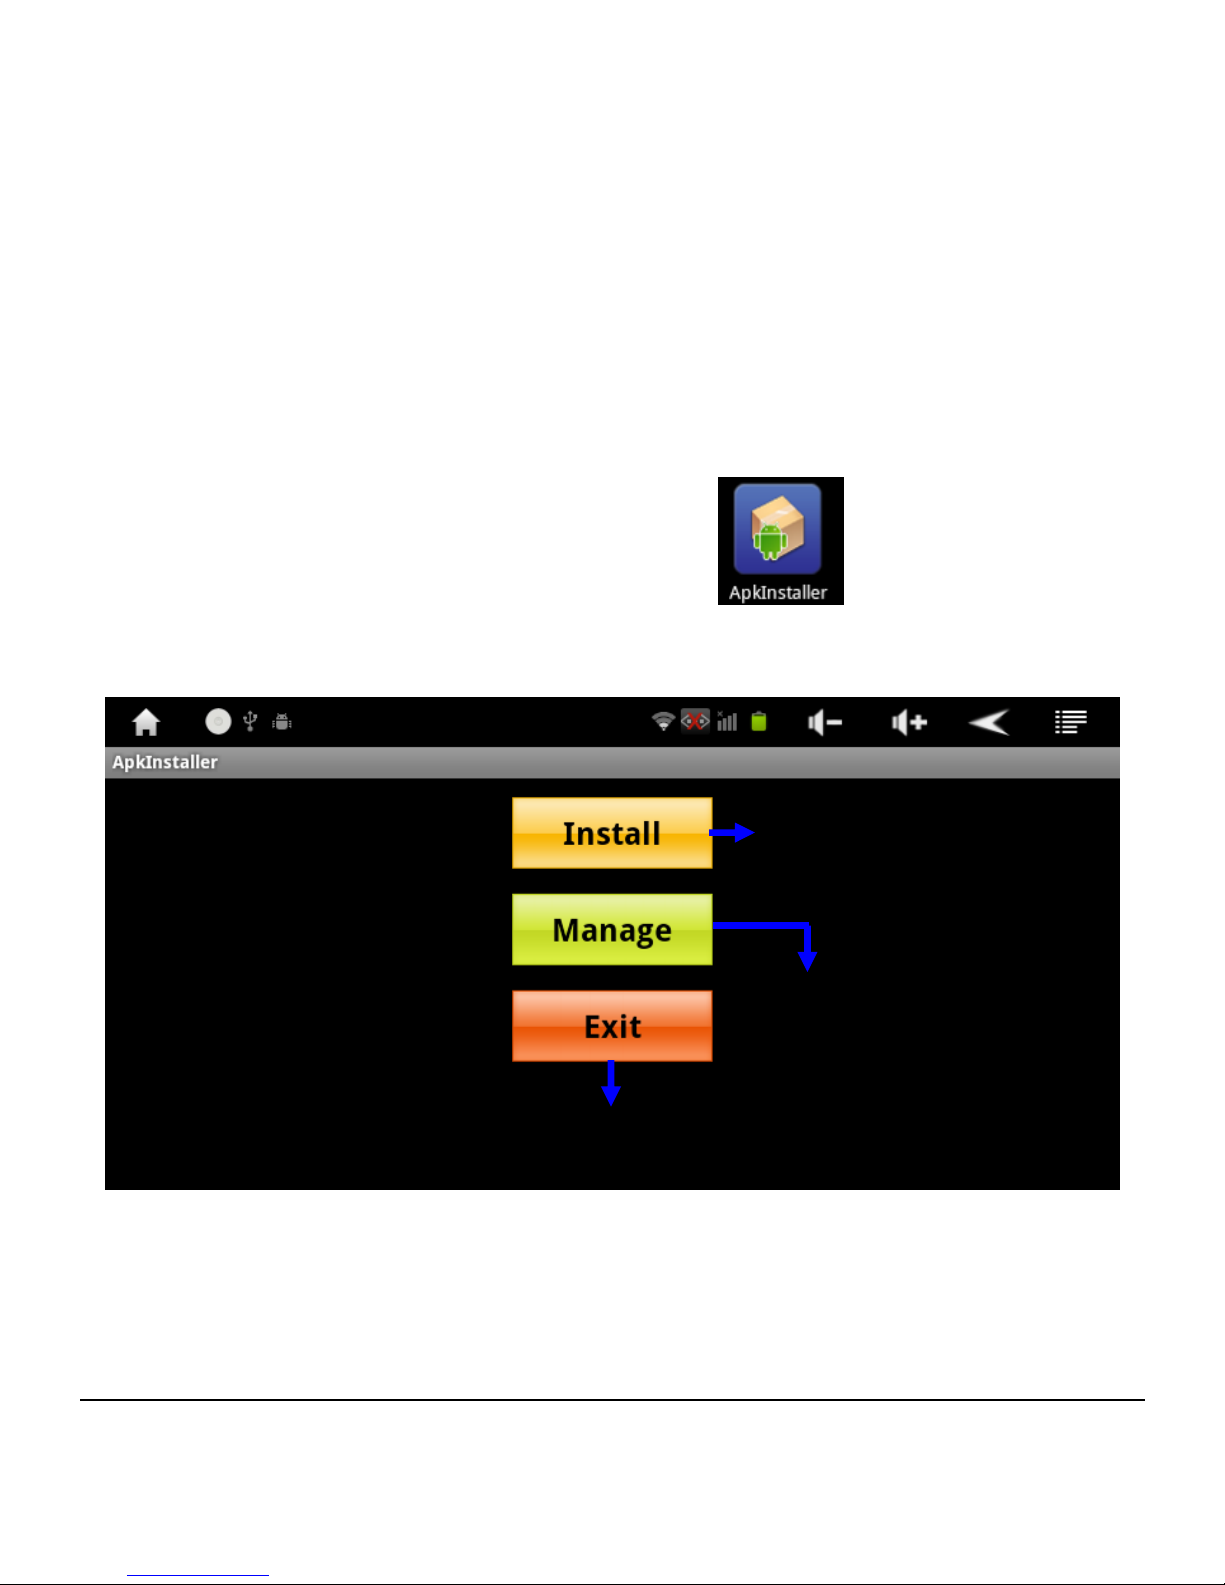
3.6.1Click the icon of APK Installer
for APK installer
interface to show up. There are 3 items available:
[Install], [Manage], and [Exit].
3.6.2To install programs: Click [Install] to enter APK
installation interface.
Click to install program
Click to exit from APK installer
Click to manage program
Page 37
- 33 -
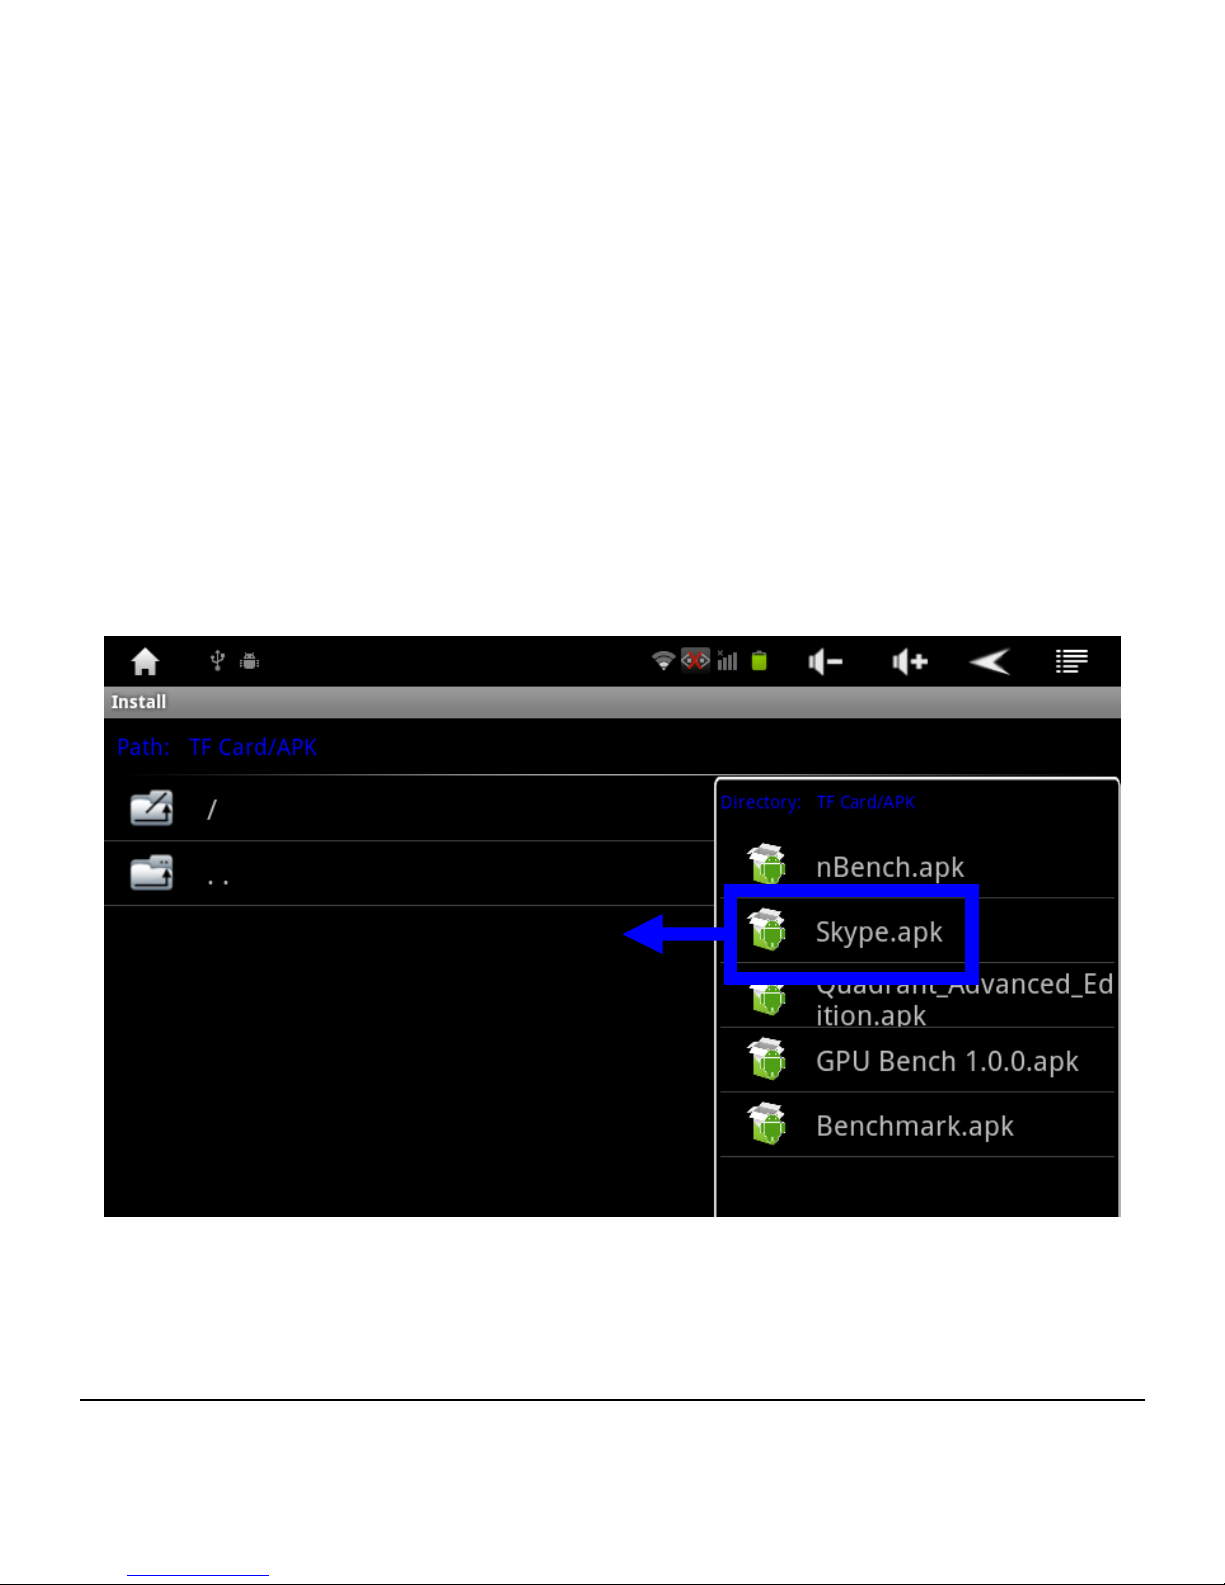
Internal Memory: Embedded flash memory disk of the
device;
SD Card: T-Flash memory card.
Choose APK programs in the right frame of the interface,
click to install. Return to main interface when installation
finished. Corresponding program will show as well.
Click to select in the right
frame the program you wish
to install
Page 38
- 34 -
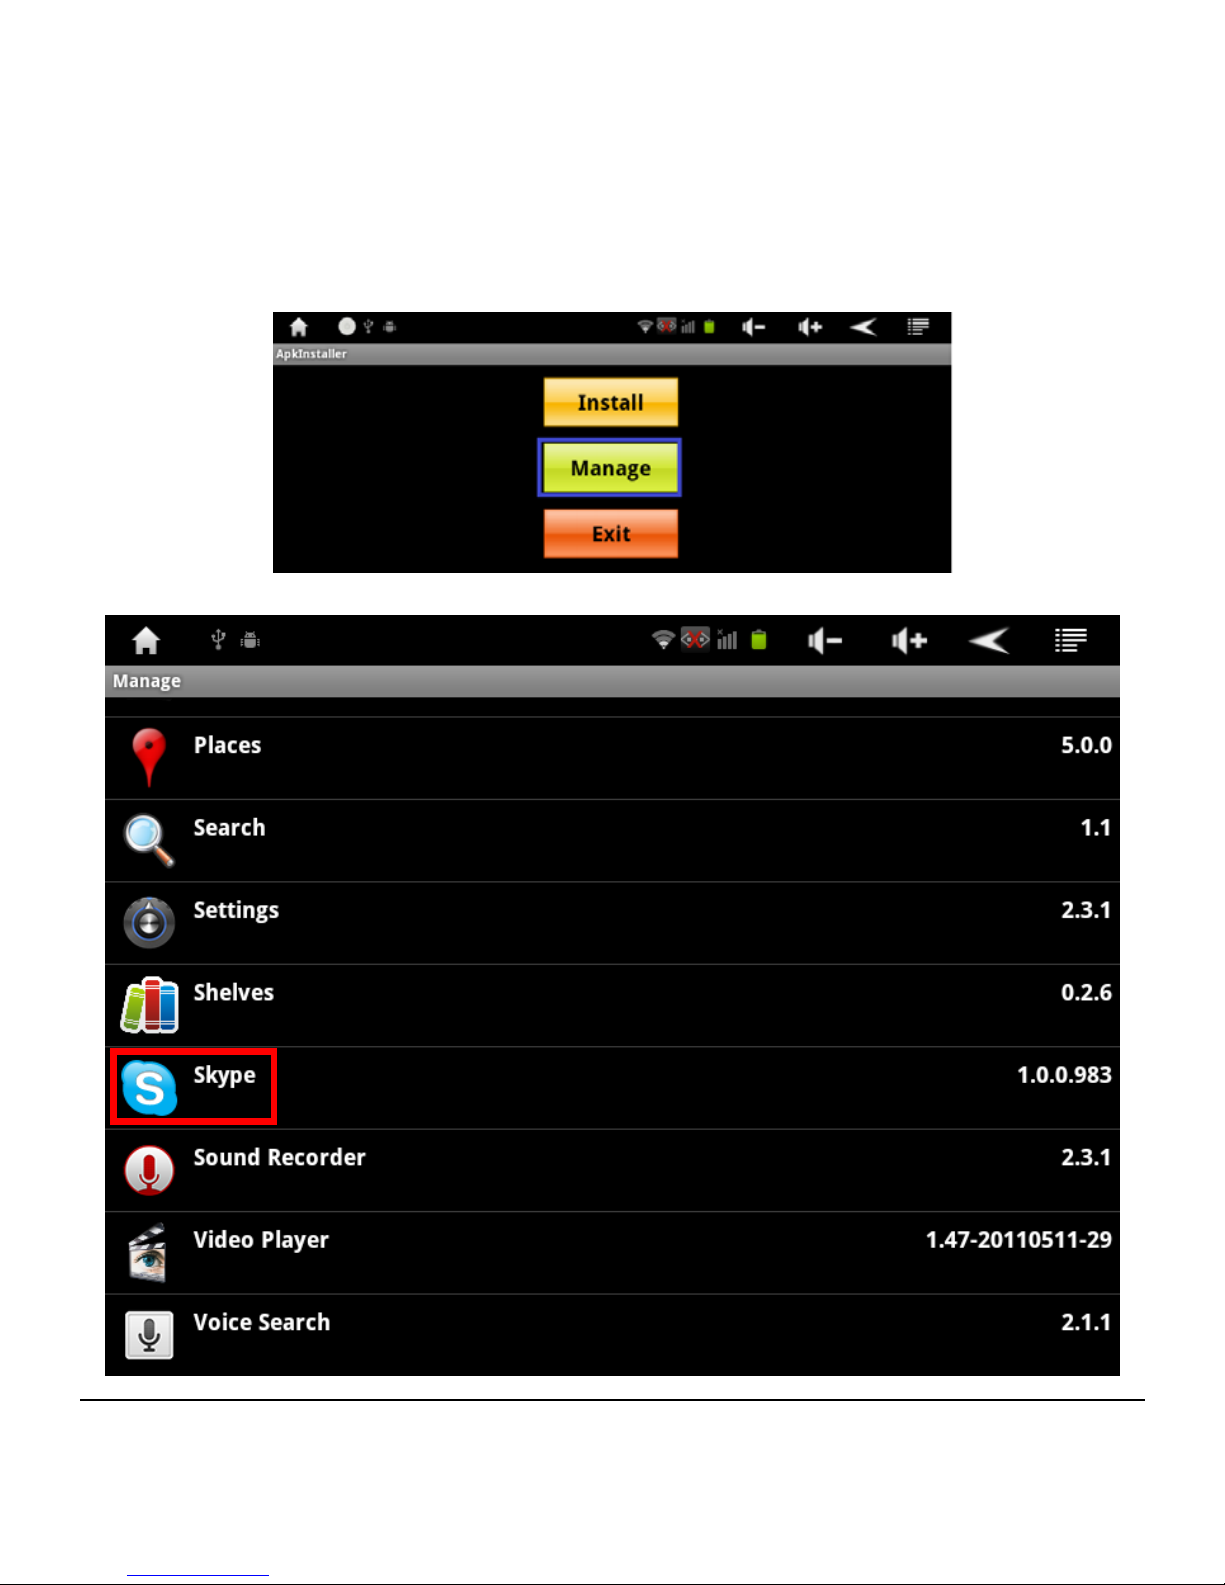
3.6.3To manage programs: Return to ‘APK Installer’ and click
[Manage], then click third party program to enter
interface.
For example: Skype 1.0.0.983
Page 39
- 35 -
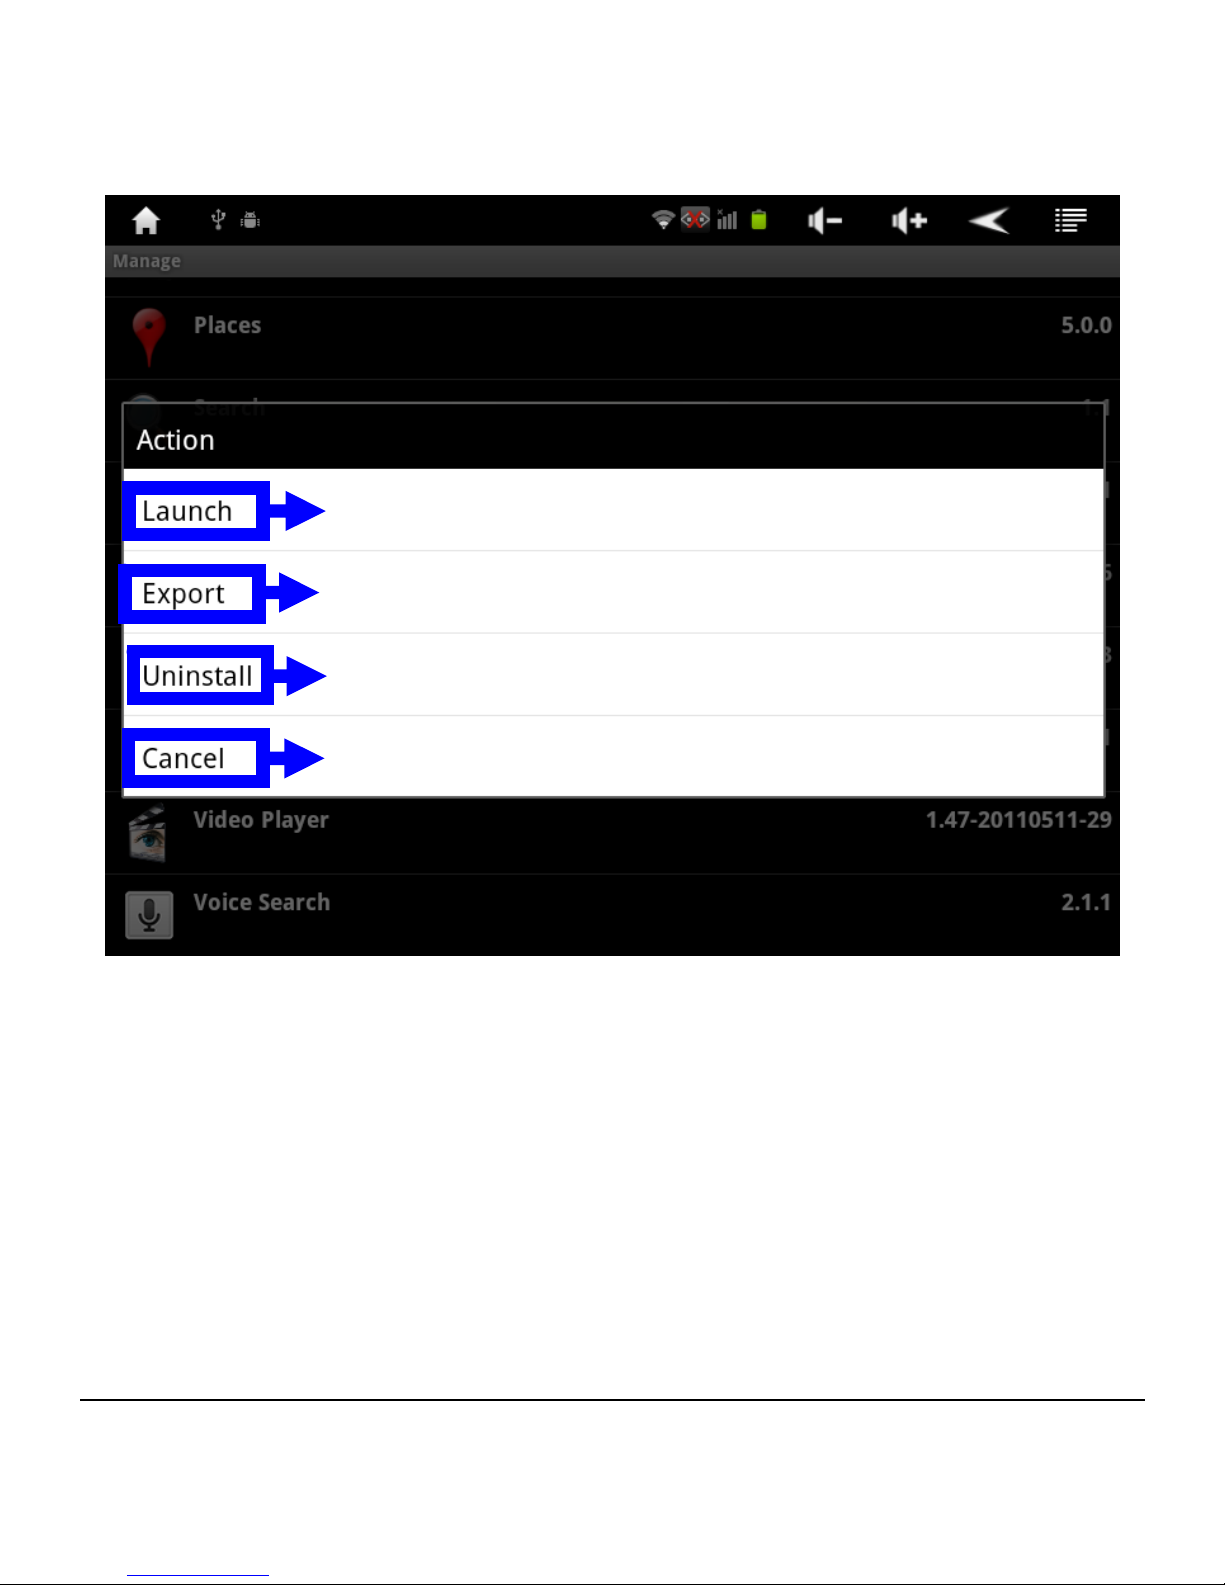
Launch: to run the program.
Export: to export the program to T-Flash card.
Uninstall: to uninstall the program.
Cancel: to cancel operation.
Click to cancel operation
Click to uninstall the program
Click to export the program to T-Flash card
Click to run the program
Page 40
- 36 -
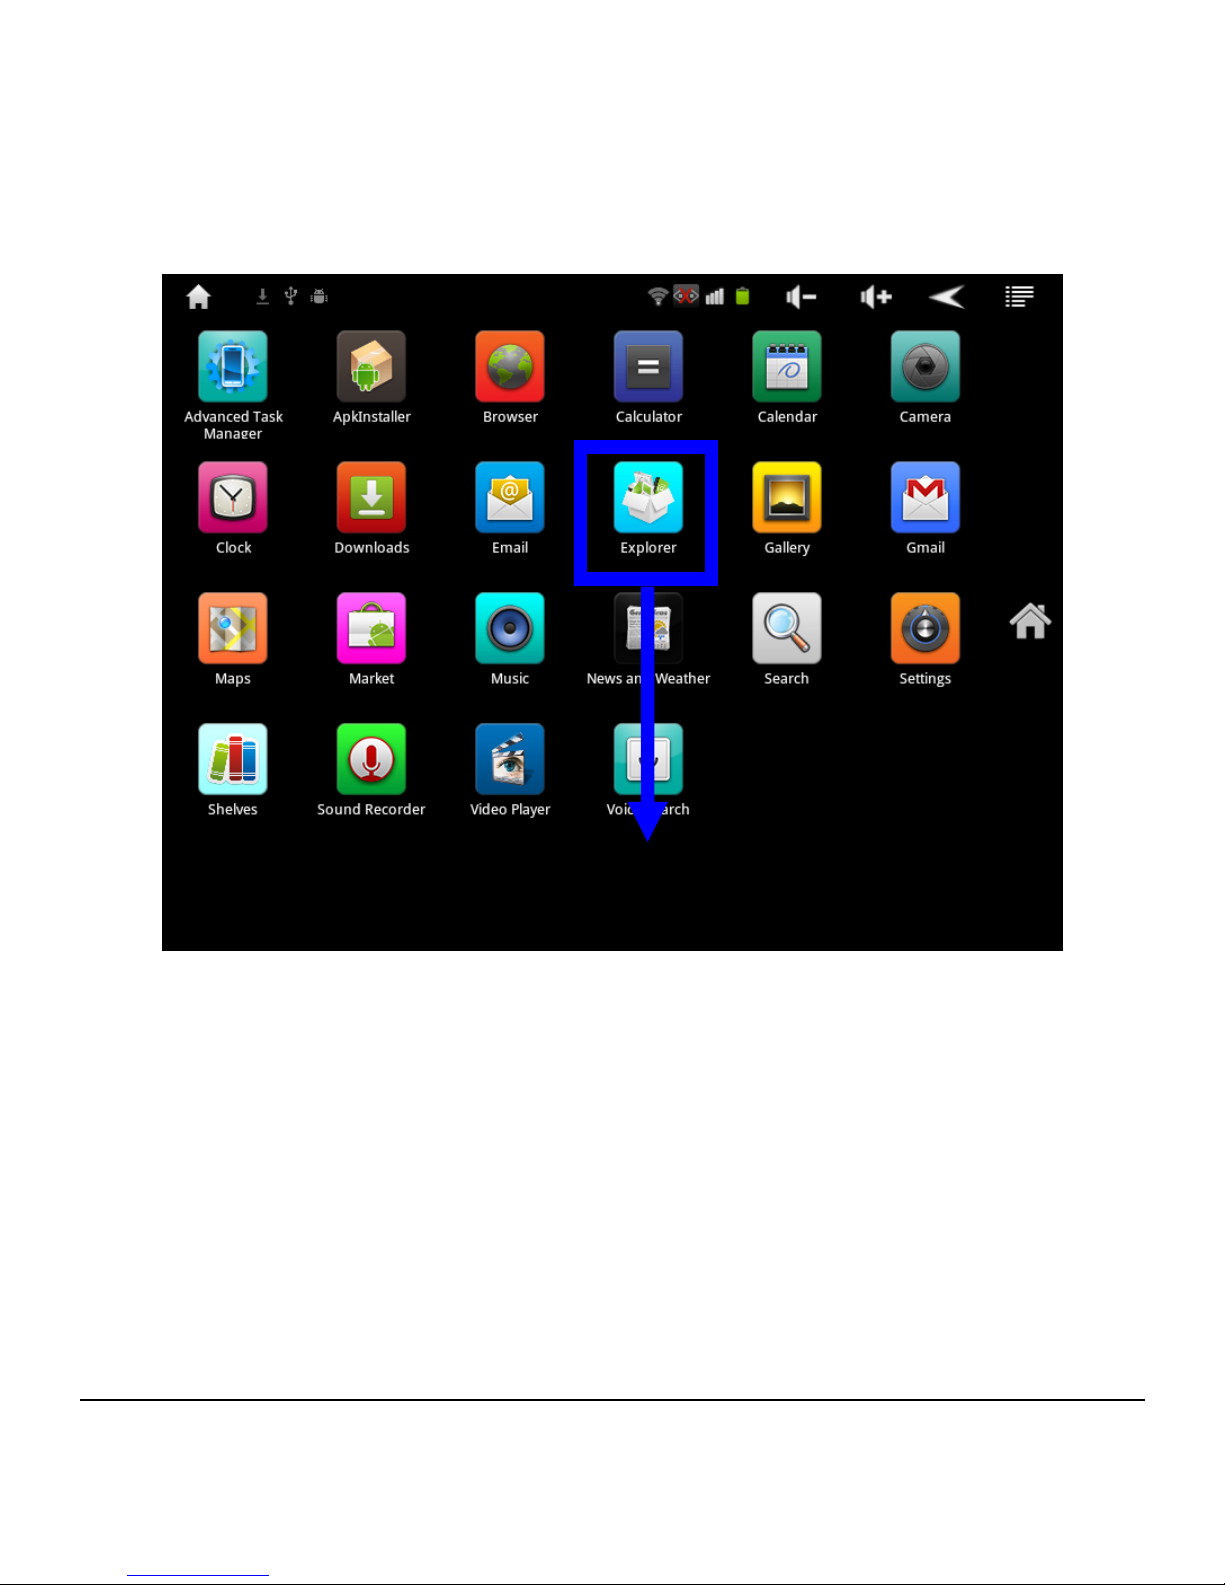
3.7 Explorer
Click ‘Explorer’ icon on main menu or desktop to enter
management interface.
Click ‘Explorer’.
Page 41
- 37 -
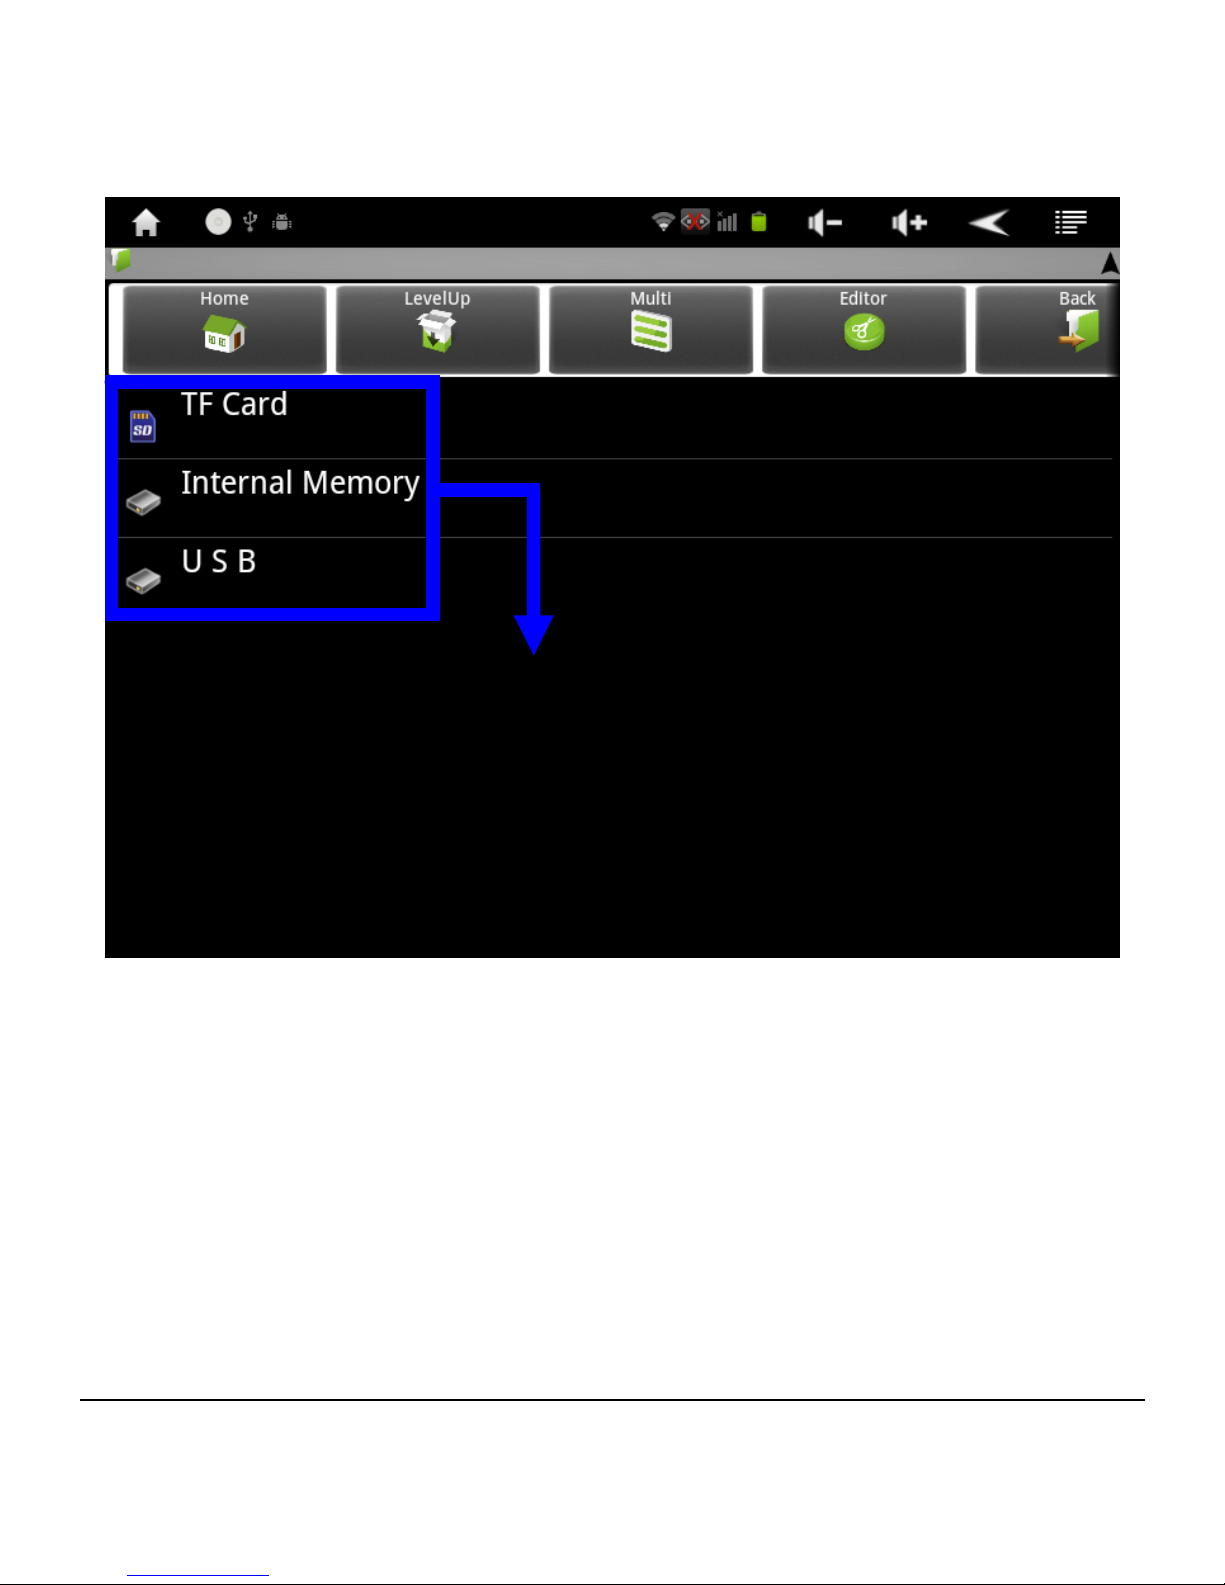
Click [TF Card] / [Internal Memory] / [USB] to unfold and view
pull-down folders or files.
Click one of them to unfold pull-down folders/files
Page 42
- 38 -
User can press upon a folder or file and hold for a while, or
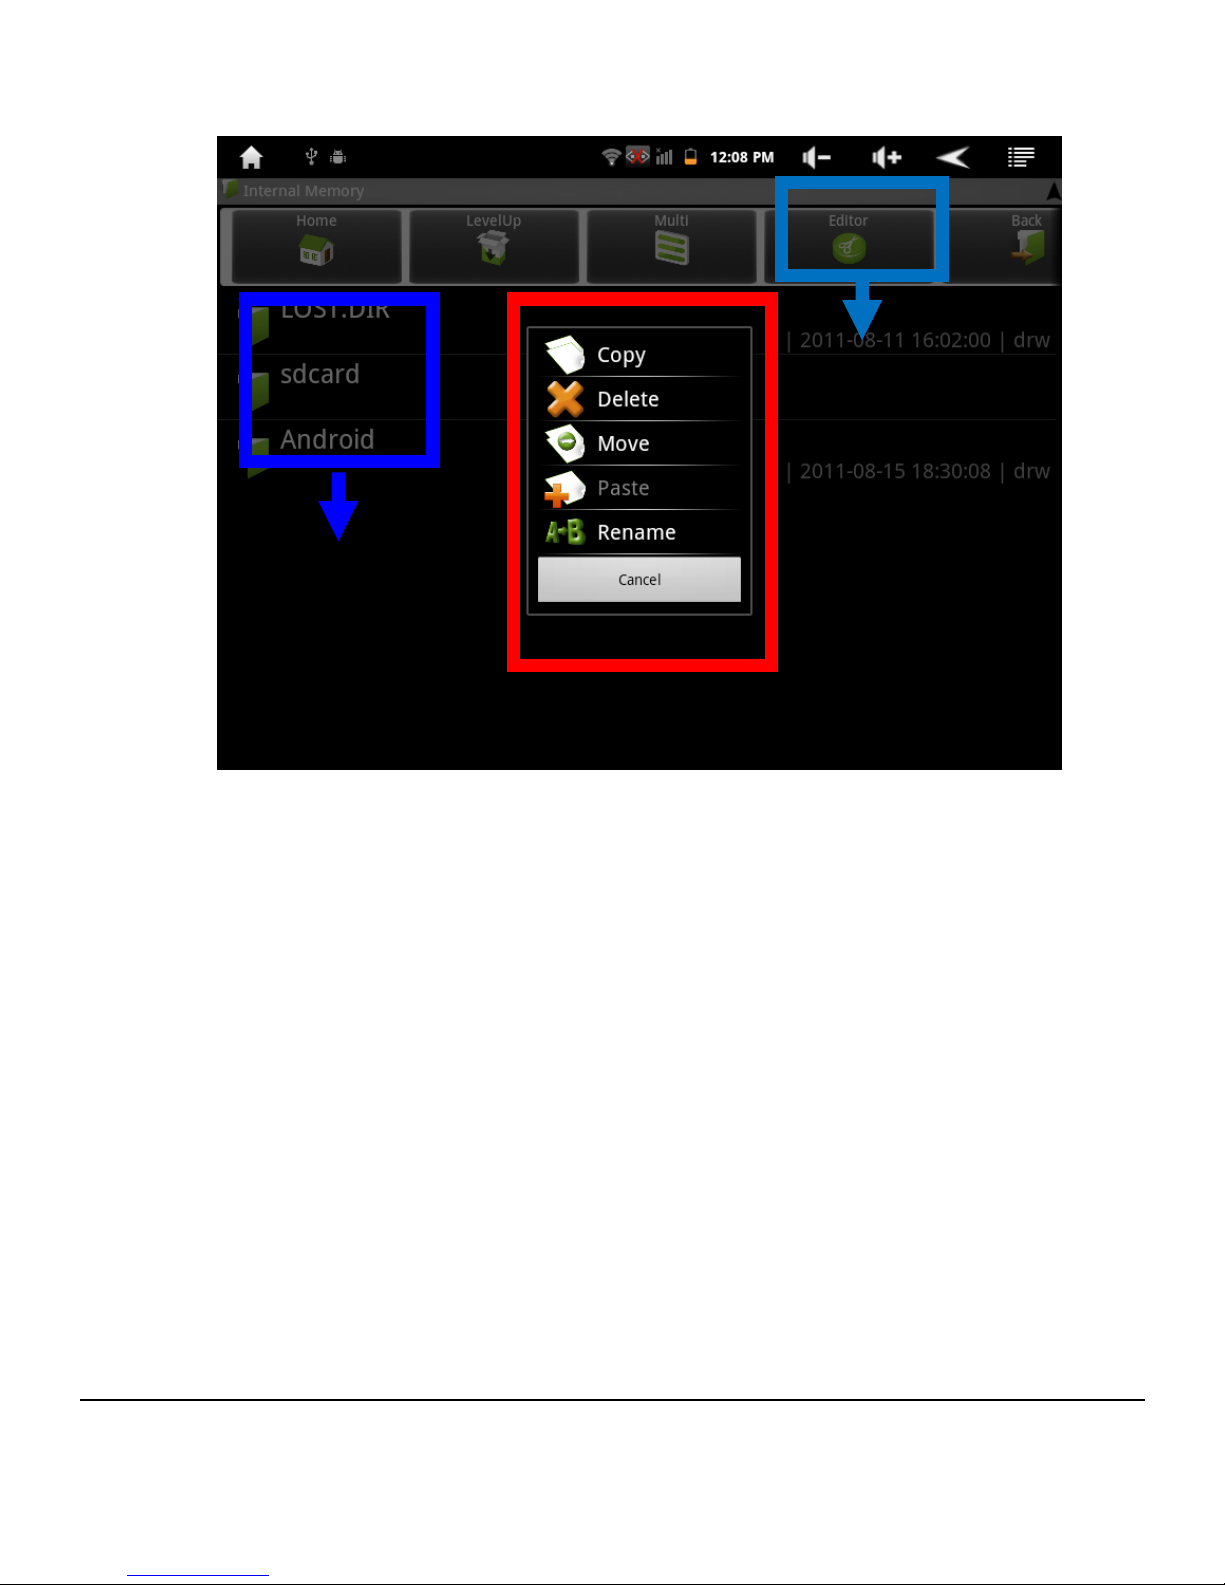
click ‘Editor’ to edit the file. Some operations like ‘Copy’,
‘Delete’, ‘Move’, , ‘Paste’ or ‘Rename’ can be made,
depending on folder/file proprieties.
2. Press & hold a
file/folder for a
while for ‘Editor’
menu to pop up.
1. Click ‘Editor’
can also edit
selected
file/folder.
Page 43
- 39 -
3.8 Sound Recorder
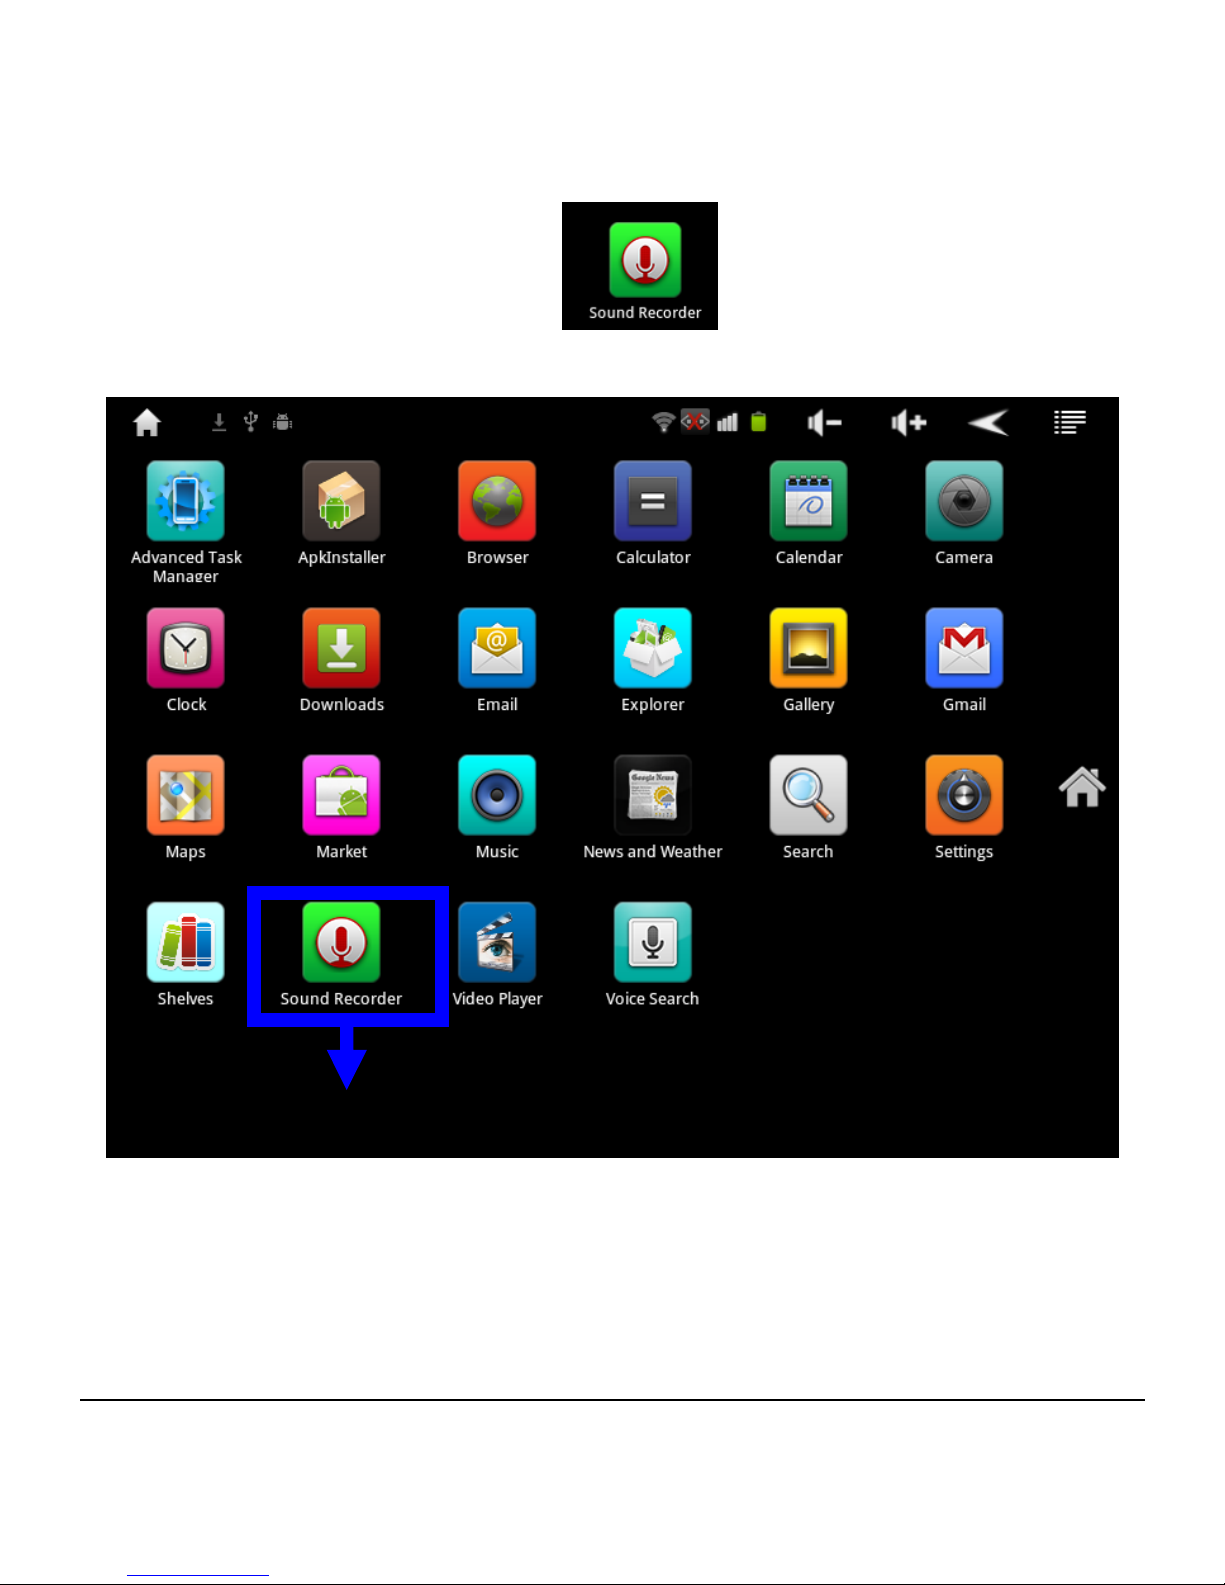
Click ‘Sound Recorder’ icon on main menu or desktop
to enter sound recording interface.
Click ‘Sound Recorder’
Page 44
- 40 -
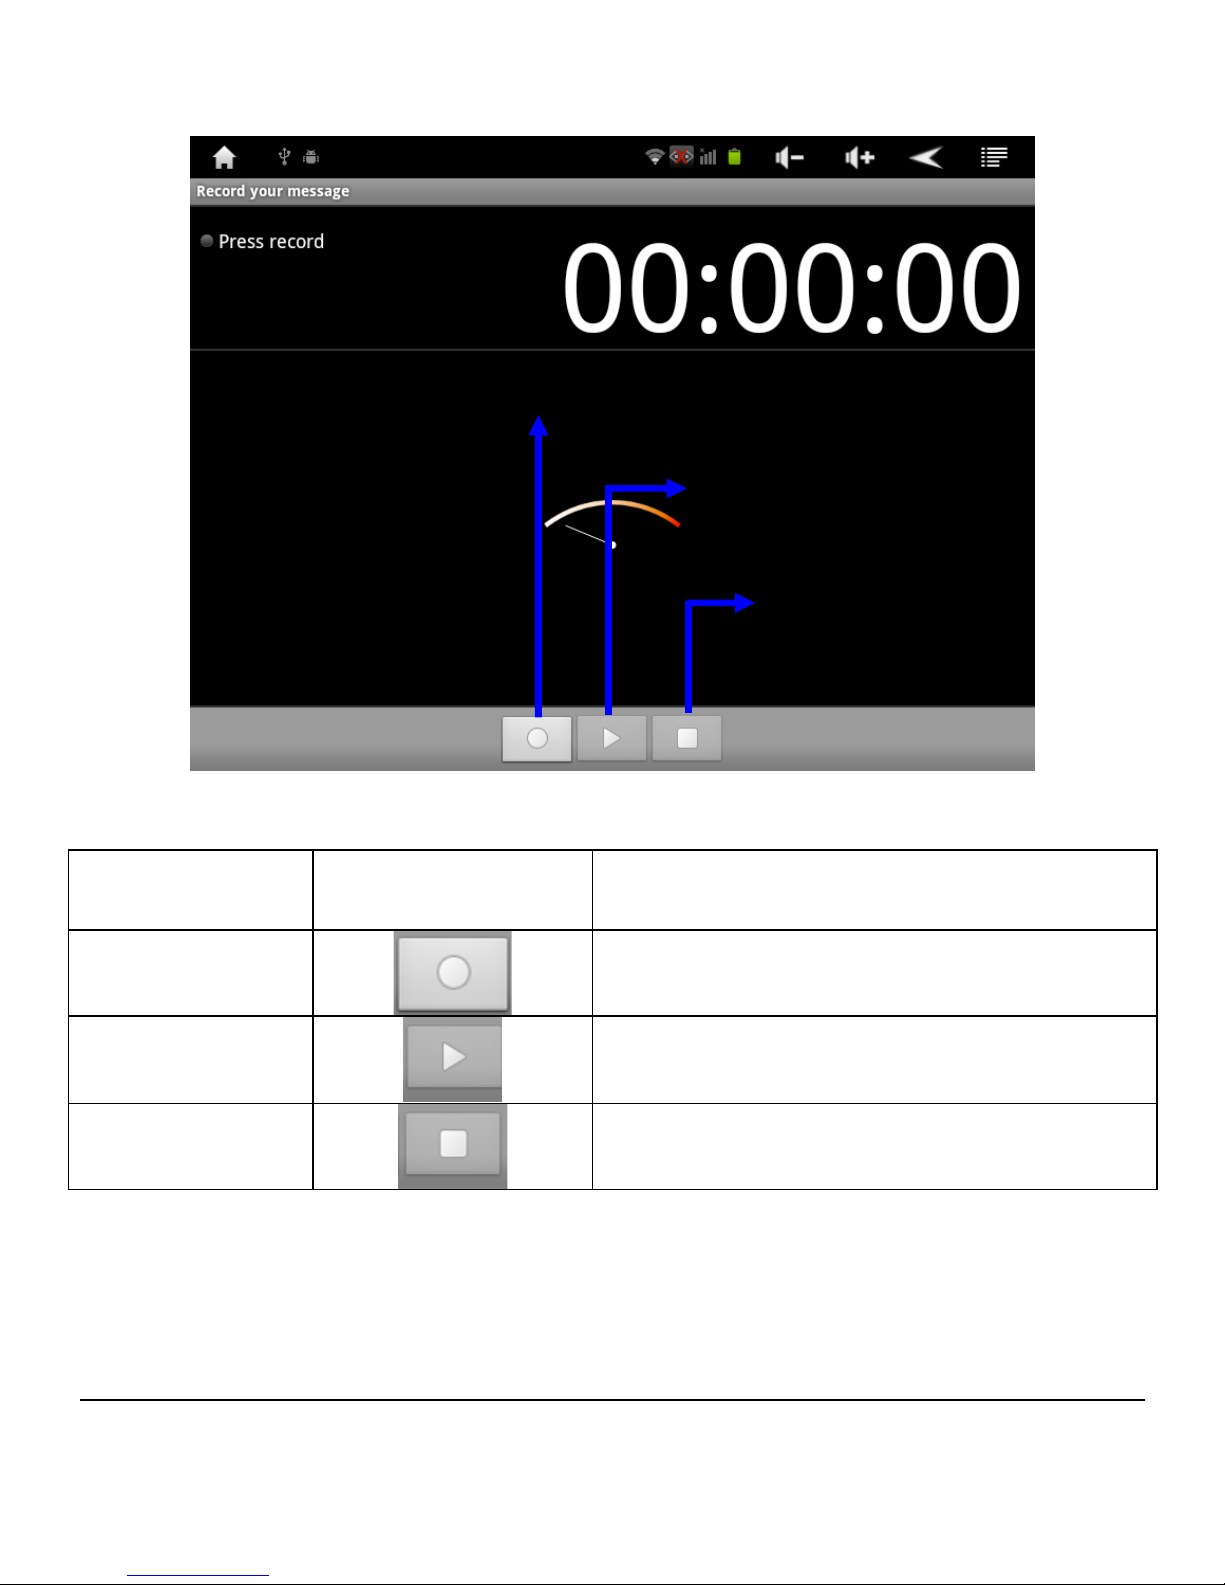
Sound Recording Interface
No. Icon Function
1
Click to start recording sound
2
Click to play sound just
recorded
3
Click to stop recording sound
Before exit, system will ask if you wish to ‘Use this recording’ or
‘Discard’. User need to confirm by selecting the option manually.
How to play the recording: Use the recorded sound file in
selected category of Explorer, and then click to play.
3. Click to stop
2. Click to play
1. Click to start
Page 45
- 41 -
3.9 Browser
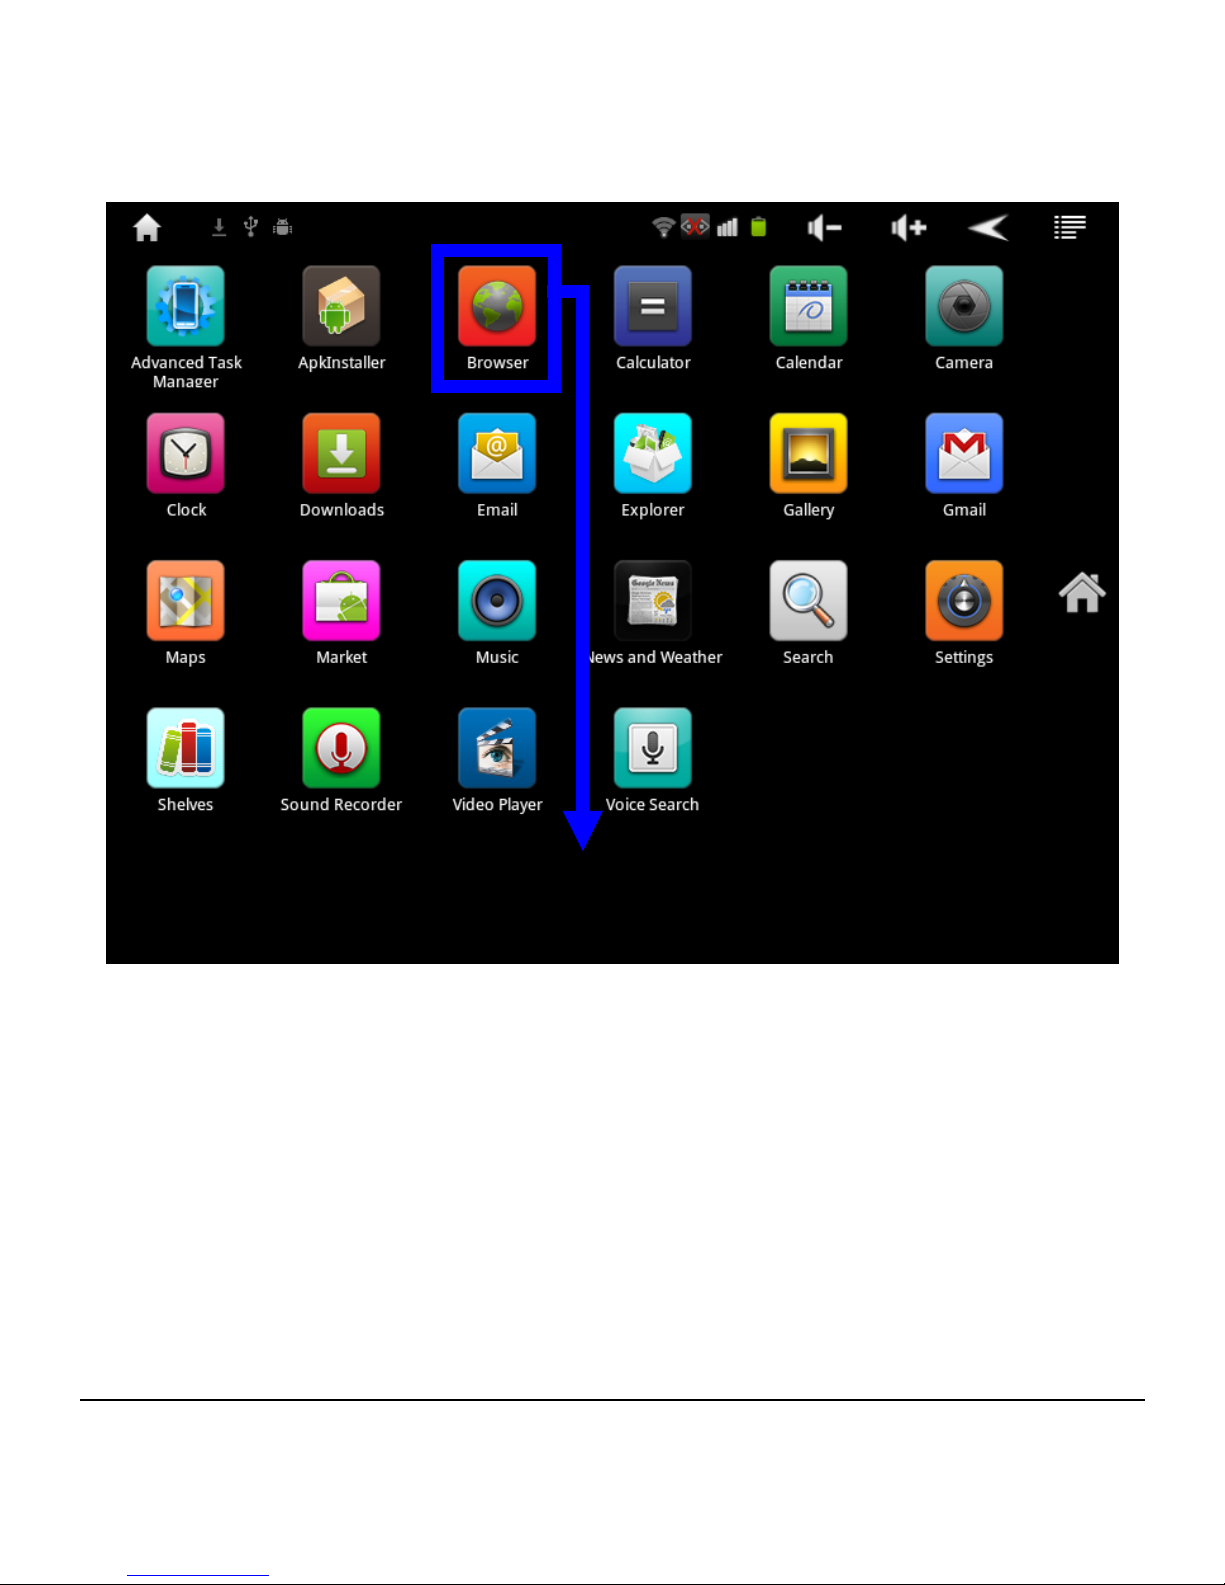
When WIFI connection is working properly (refer to WIFI
settings), click ‘Browser’ to enter Internet Explorer interface.
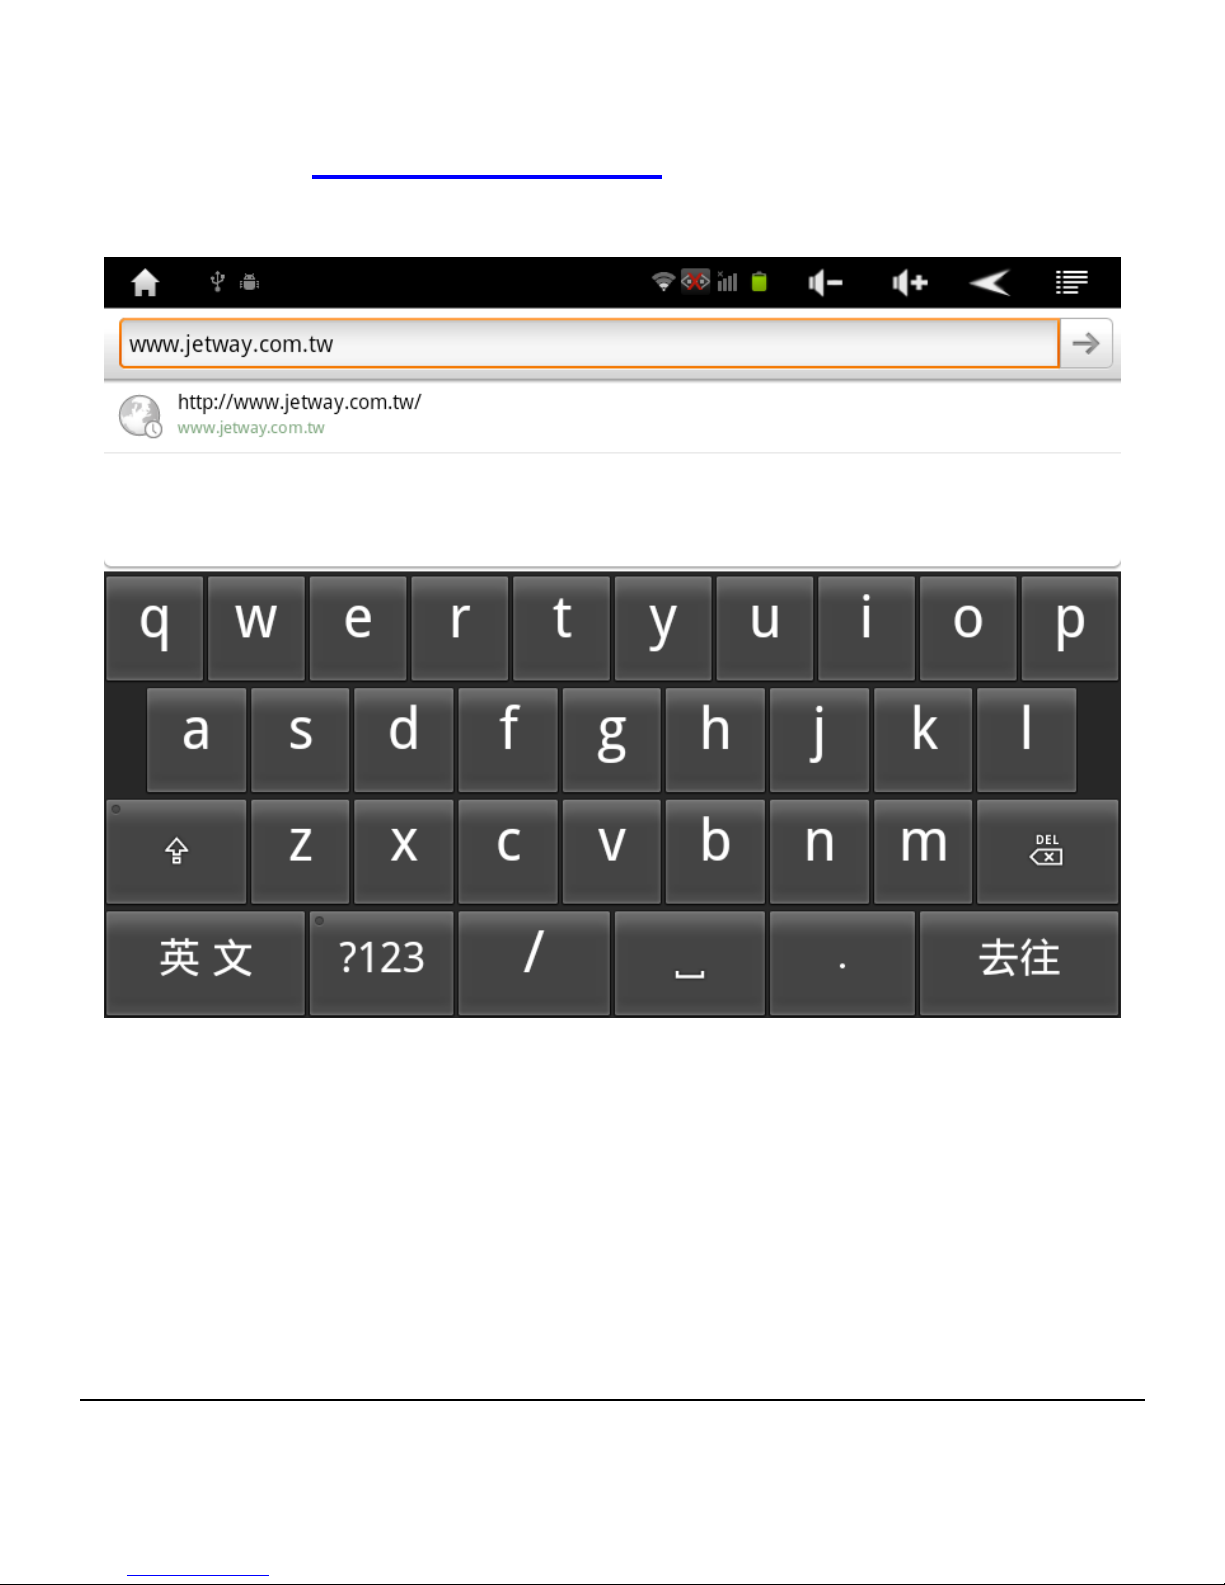
Enter web address in
Address Bar, and then click ‘Go to’ to enter
webpage to browse information of the page.
Click ‘Browser’
Page 46
- 42 -
For example: www.jetway.com.tw
Page 47

- 43 -
Page 48
- 44 -
3.10 Android Market
User can install third-party programs compatible with Android
2.3 OS through APK Installer, or download & install them from
‘Android Market’.
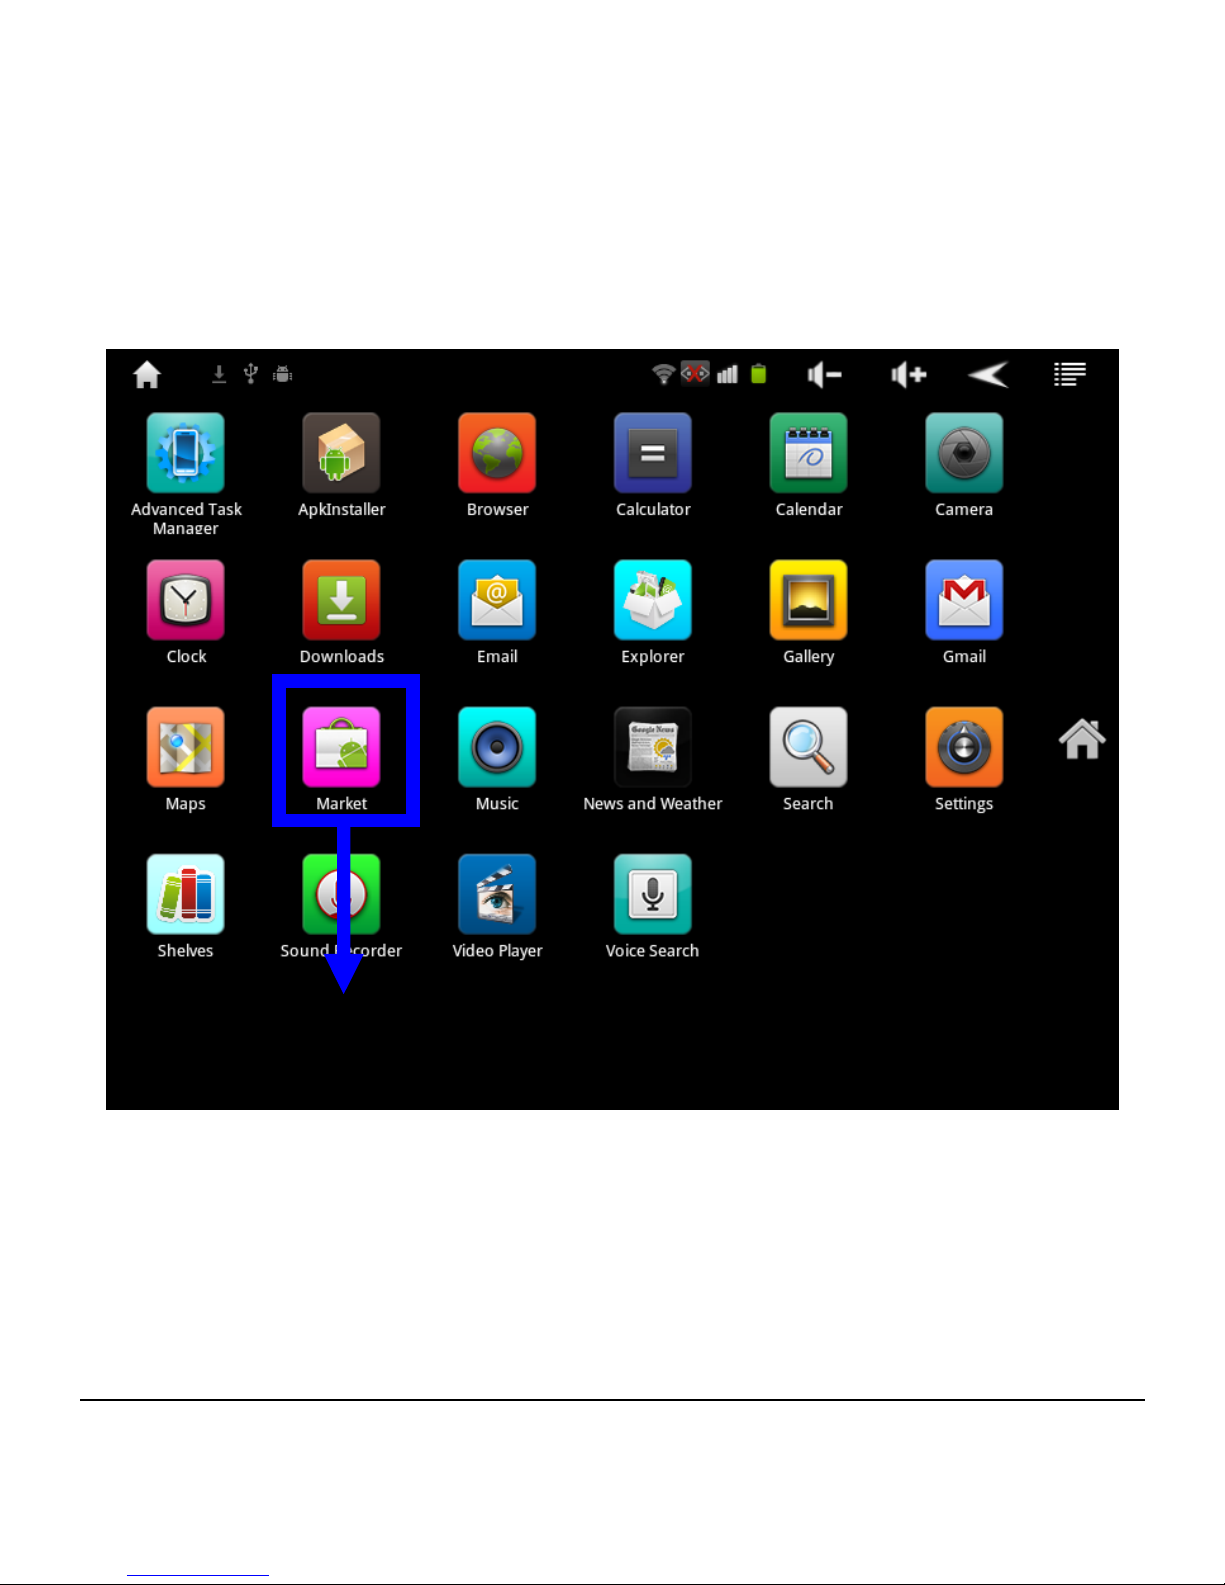
When WIFI connection is working properly (refer to WIFI
settings), click ‘Market’ to enter Android Market interface.
Click ‘Market’
Page 49
- 45 -
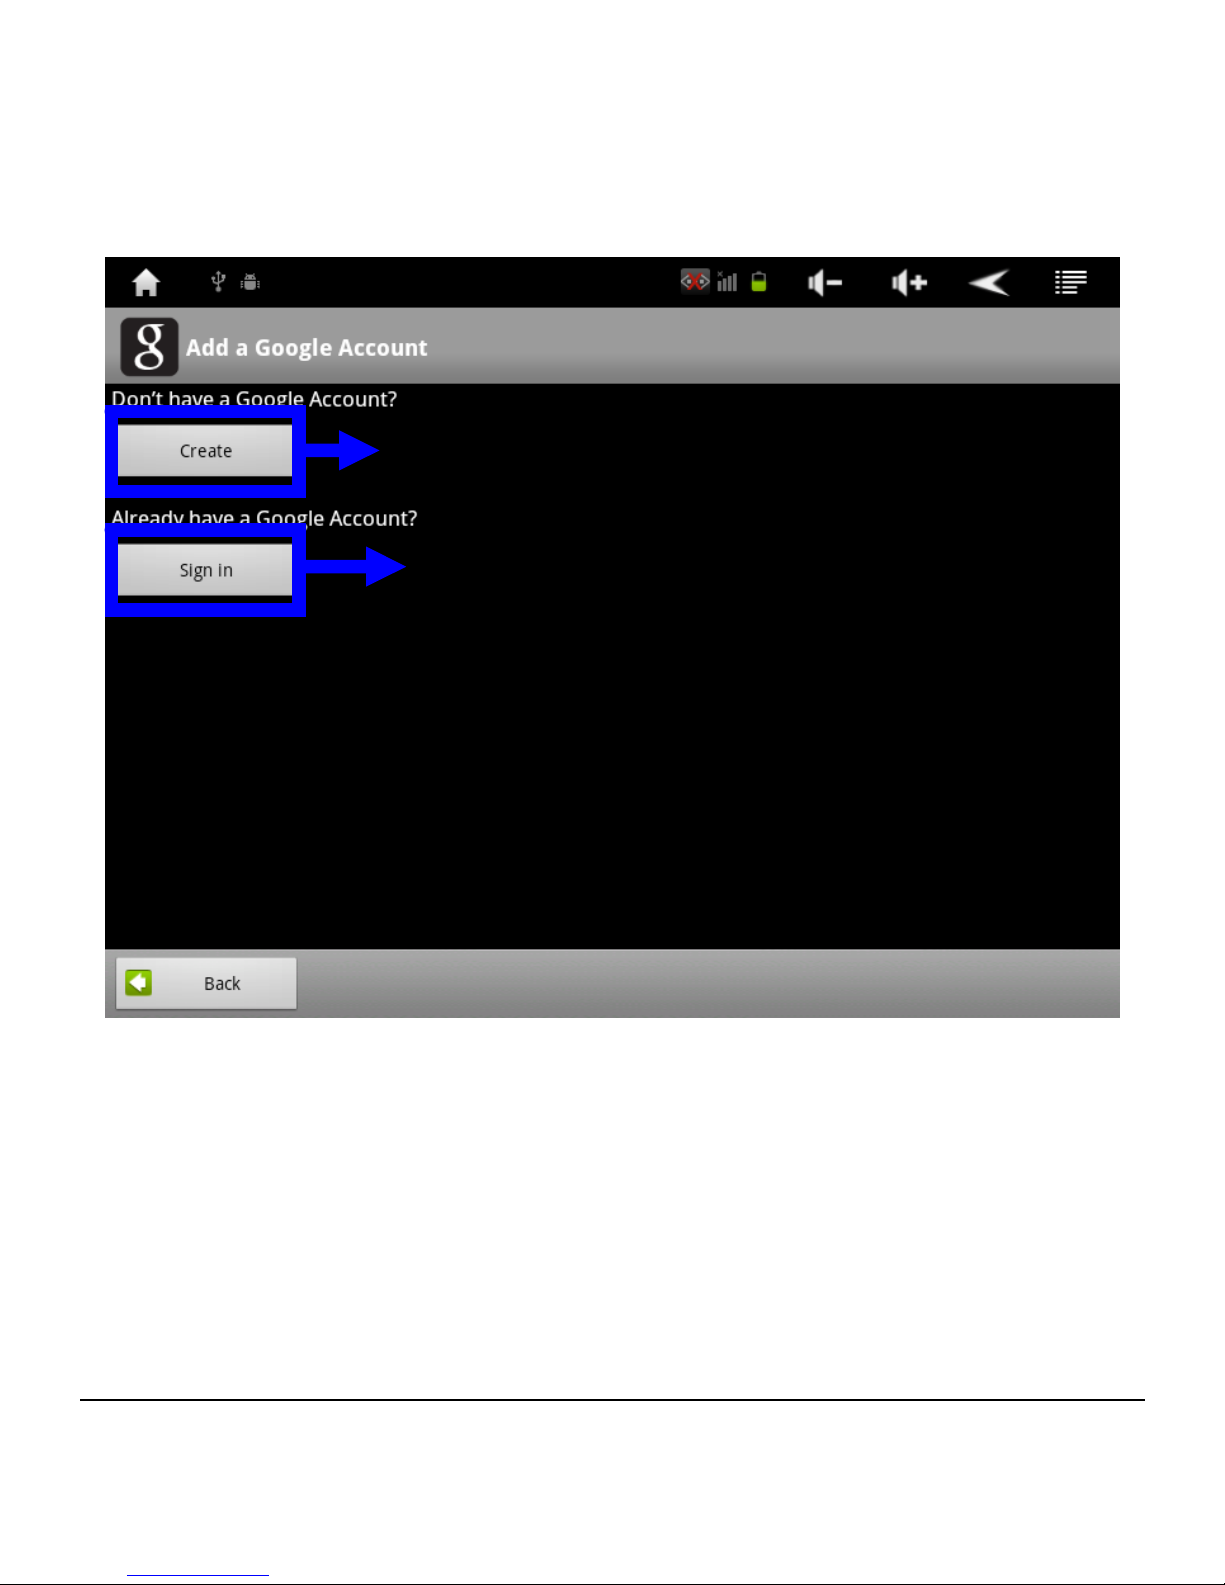
The first time you enter Android Market, you need to add a
Google account. If you do not have one, you can click ‘Create’
and follow onscreen instructions to create one and sign in with
the new account. If you already have one, you can click ‘Sign in’
directly. When you finish the setup, the following screen shall
appear:
Option1. Click ‘Create’ to create a
Google Account if you don’t have one.
Option2. Click ‘Sign in’ to sign
in with your Google Account if
Page 50
- 46 -
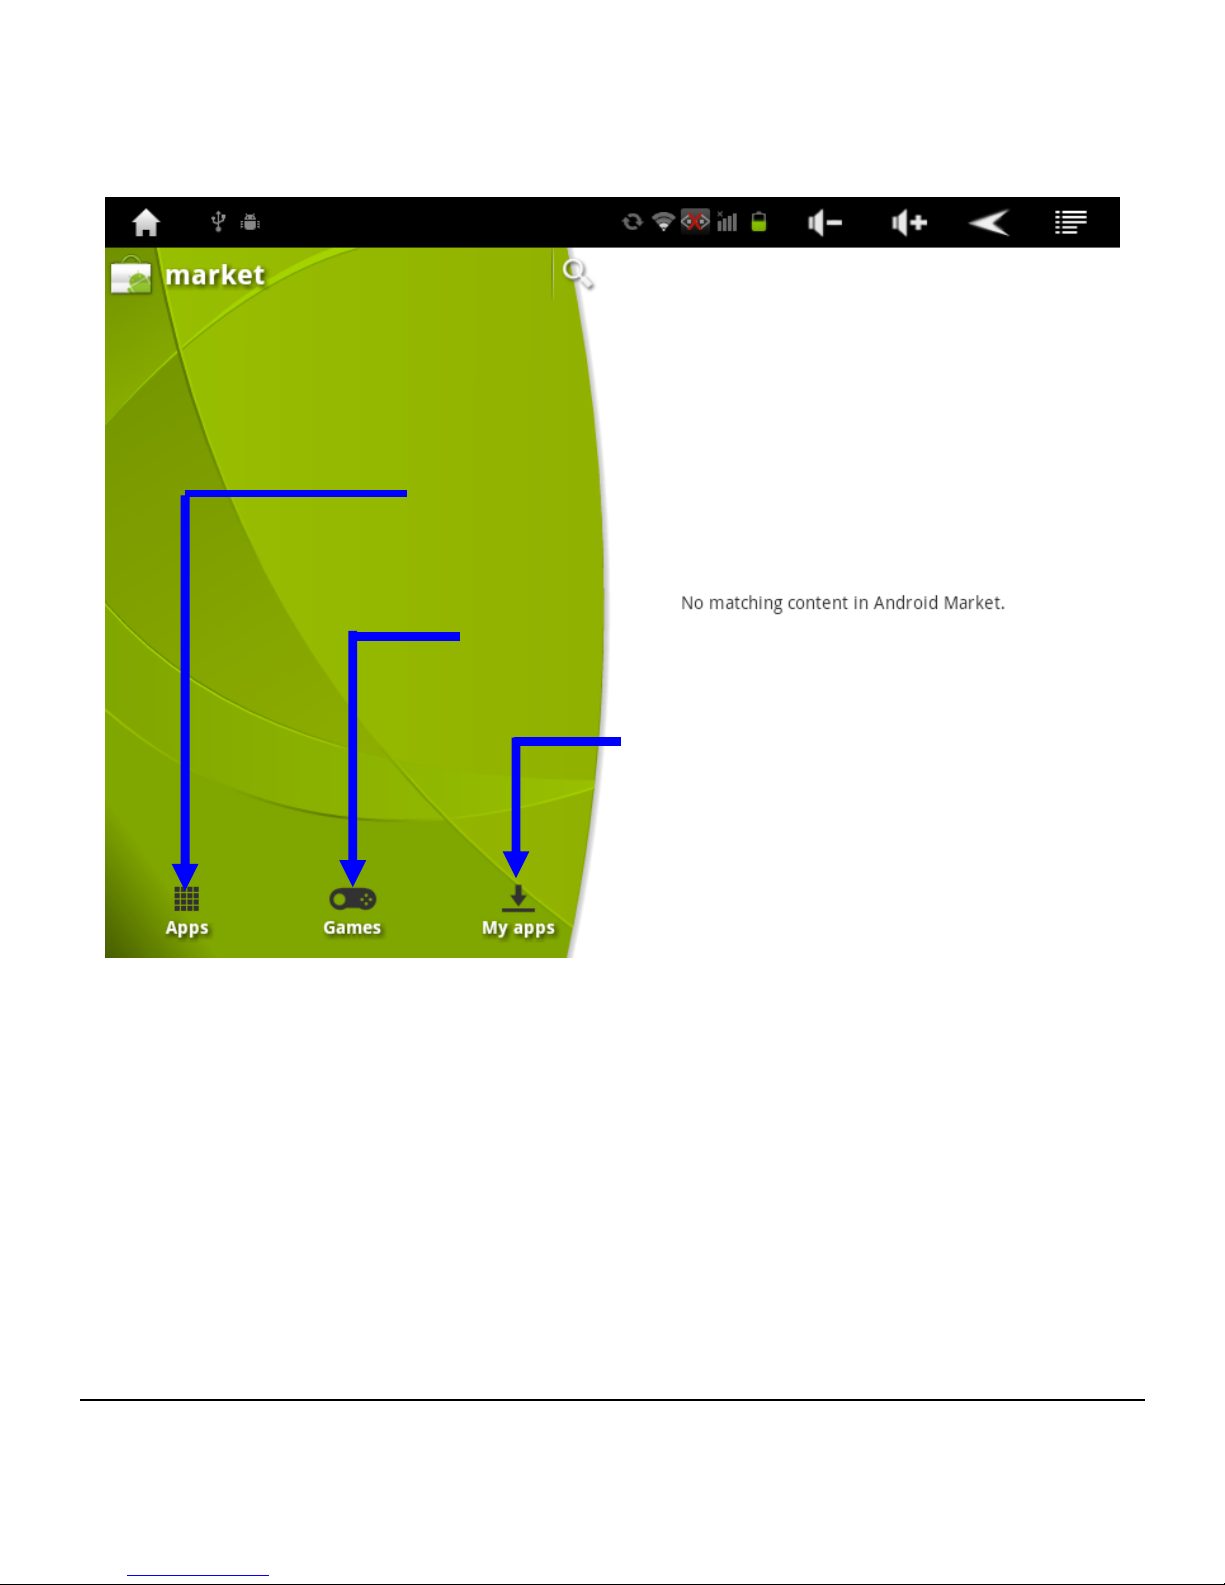
There are three options on the screen:
Apps: Click ‘Apps’ to view and download applications.
Games: Click ‘Games’ to view and download games.
My apps: Click ‘My apps’ to view downloaded items status.
The procedure to download an application or game is
basically the same. Take the example of downloading
‘Reversi Free’.
Click ‘Apps’ to view and download
applications.
Click ‘Games’ to view and
download games.
Click ‘My apps’ to view
downloaded item status.
Page 51
- 47 -
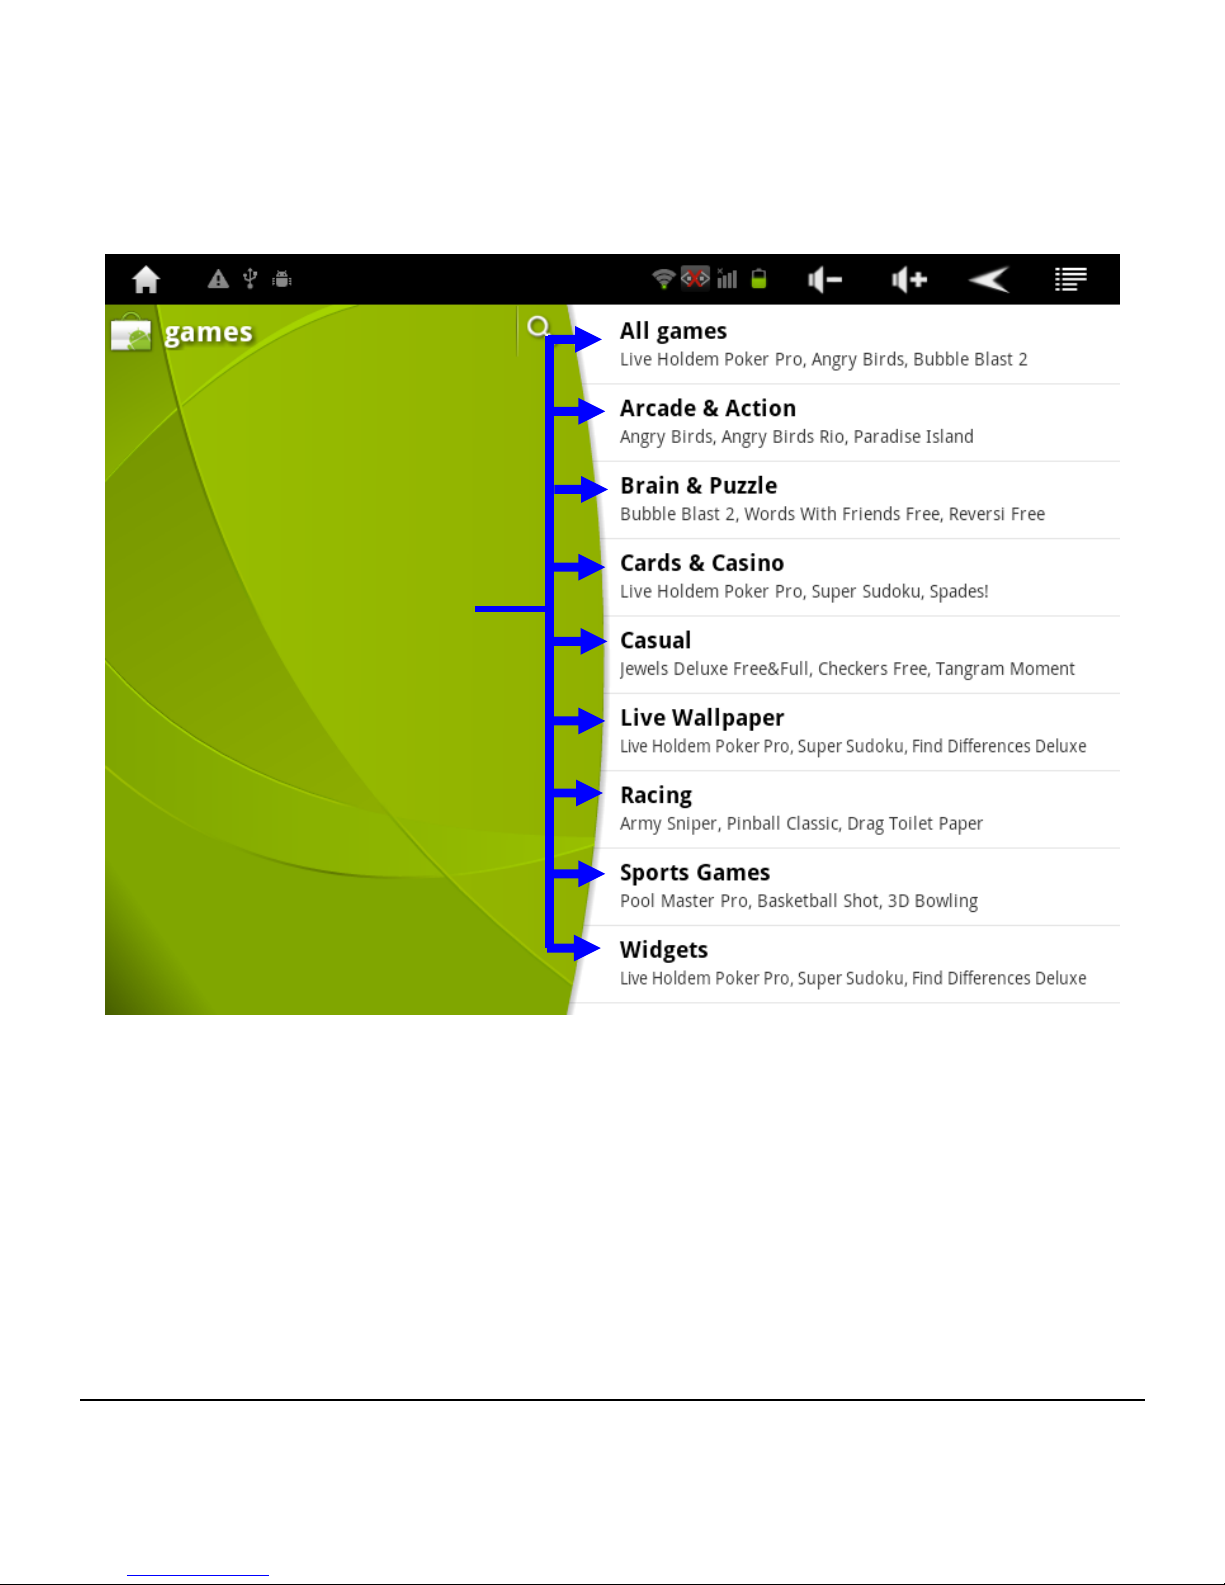
Click the category of the application/game you wish to download.
In the case of ‘Reversi Free’, click ‘All Games’.
Click to
select the
category
of the
application
/game you
wish to
download.
Page 52
- 48 -
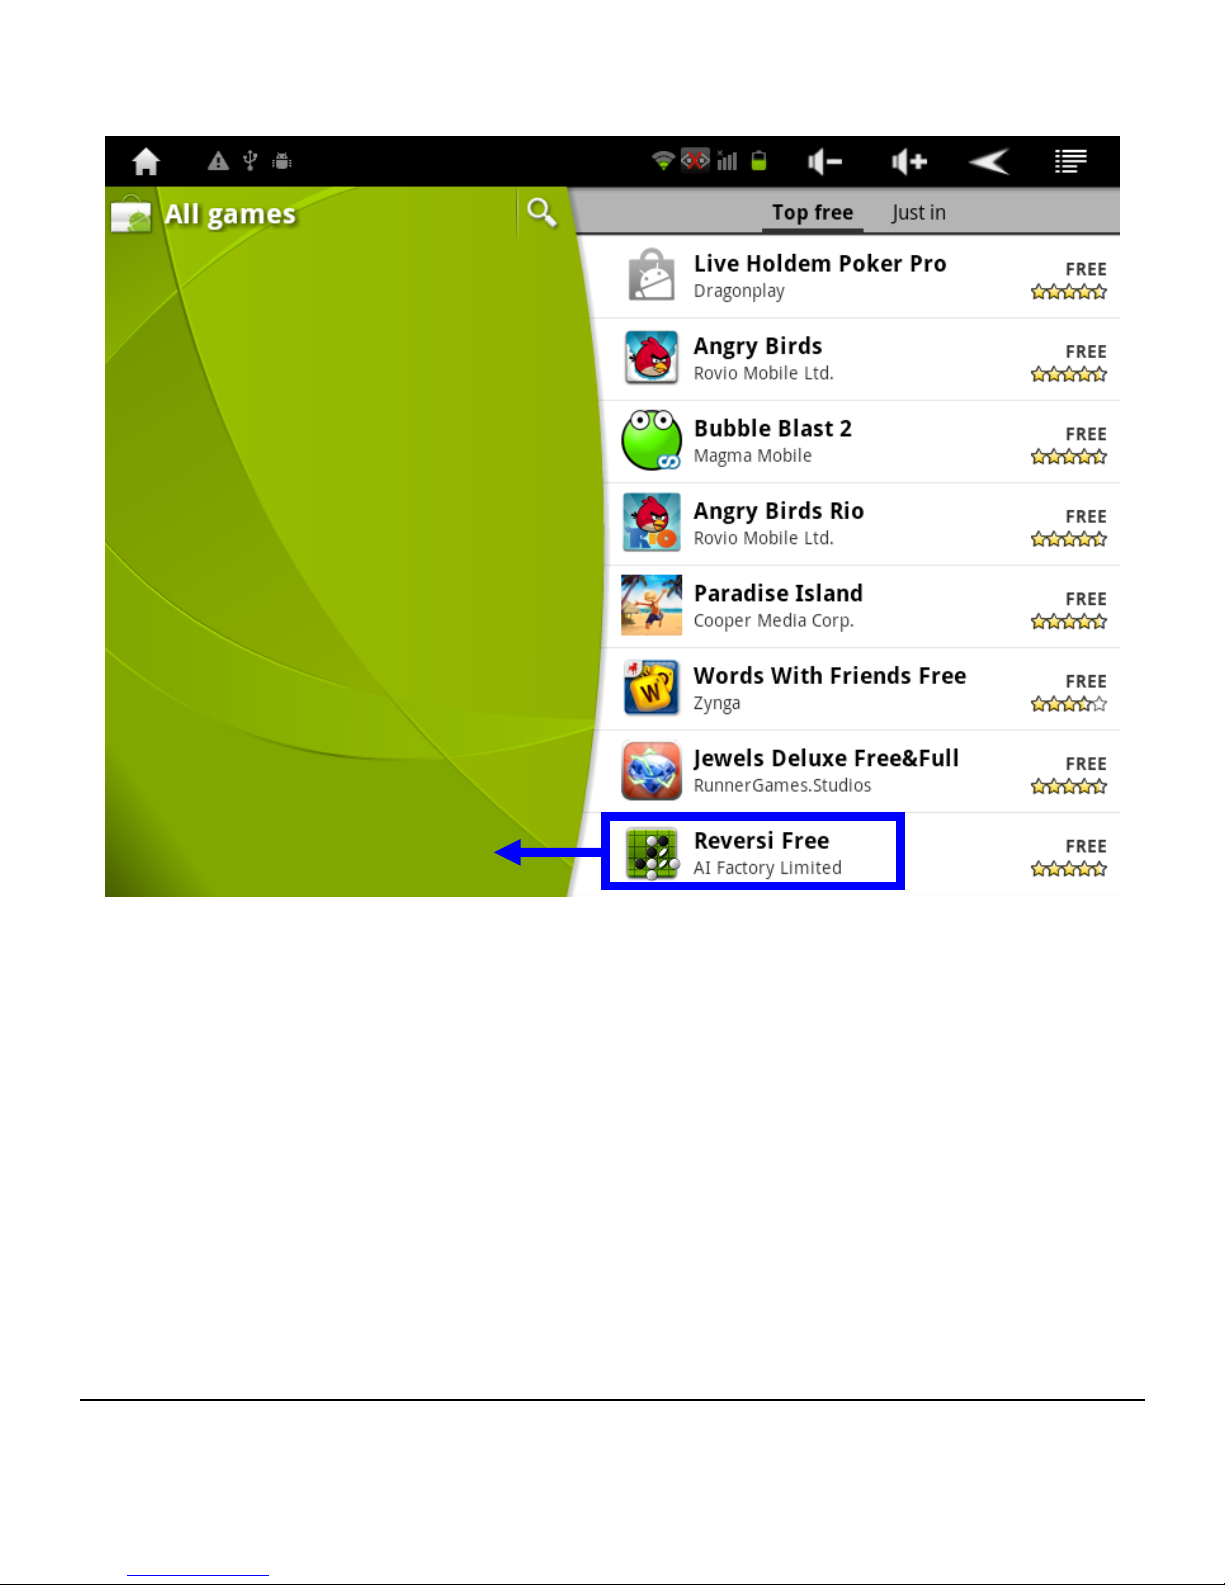
Click ‘Reversi Free’.
Click to select the
game/application
Page 53
- 49 -
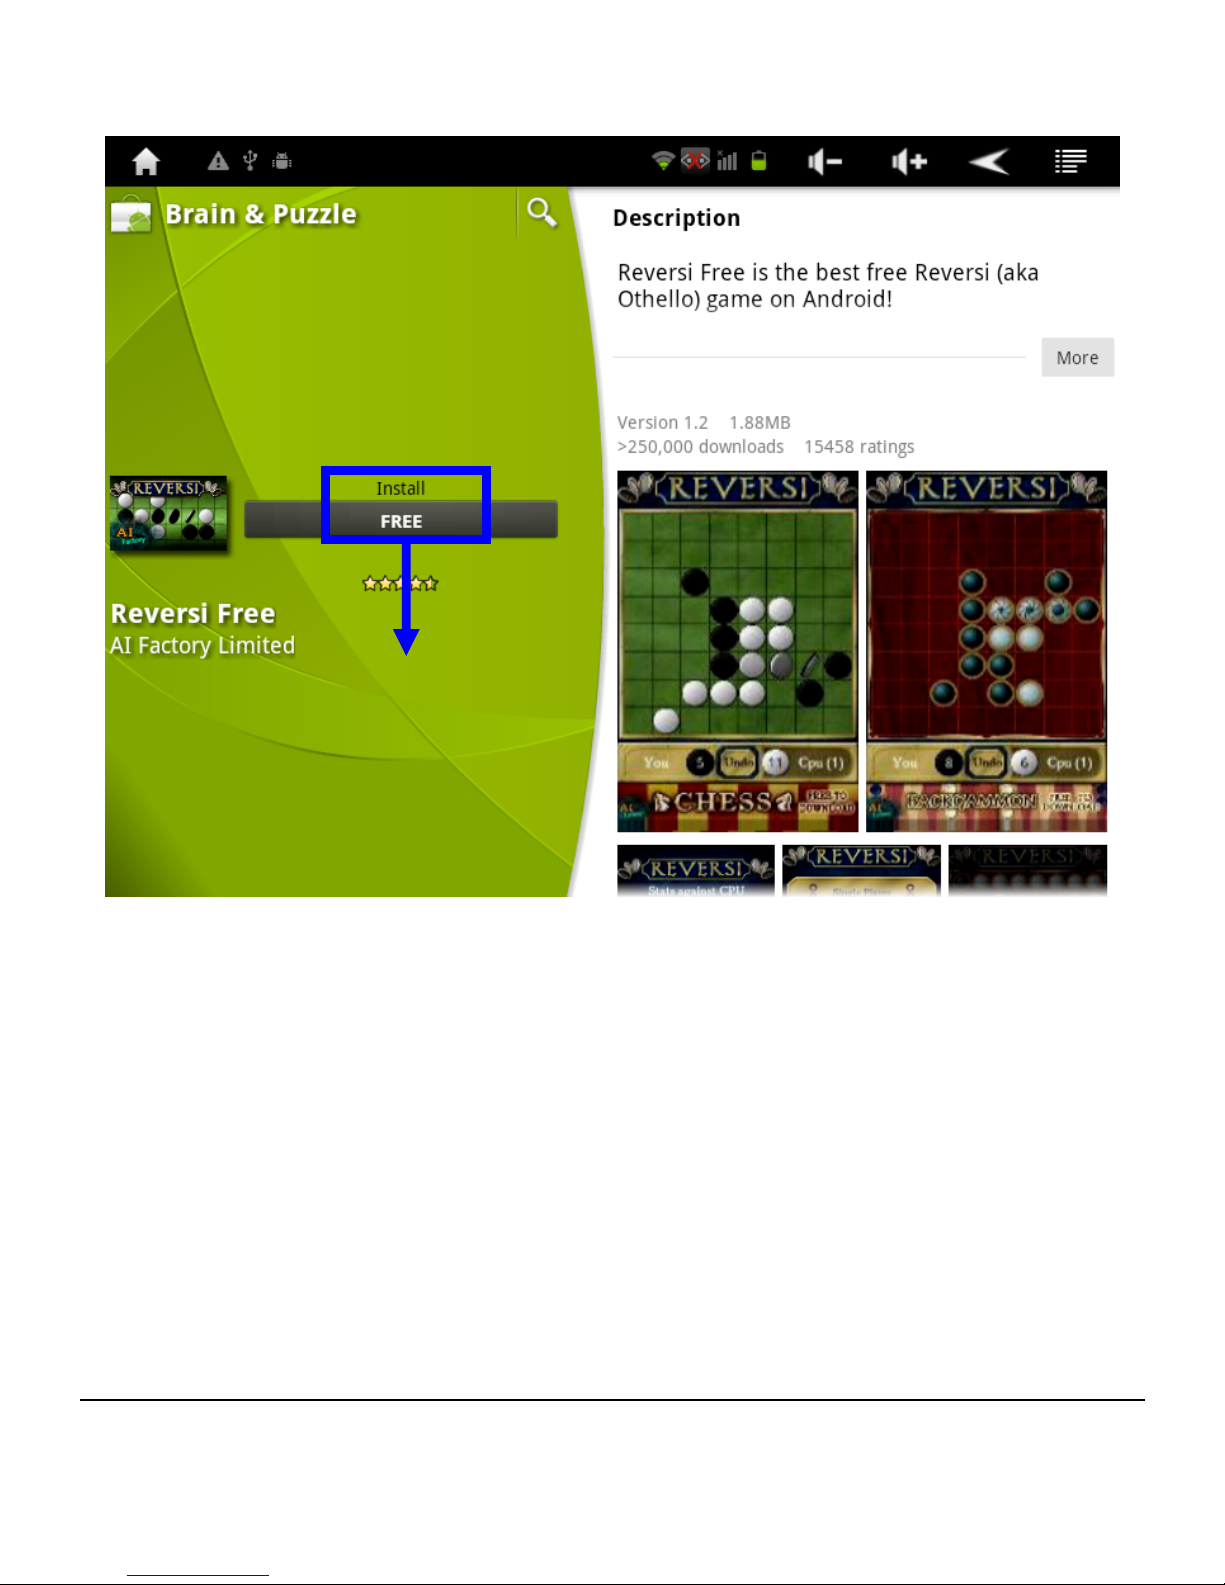
When the above installation page show up, click ‘Install’. To
accept permissions, click ‘OK’. System will remind you ‘Your
item will be downloaded’.
Click ‘Install’ to begin
installing process.
Page 54
- 50 -
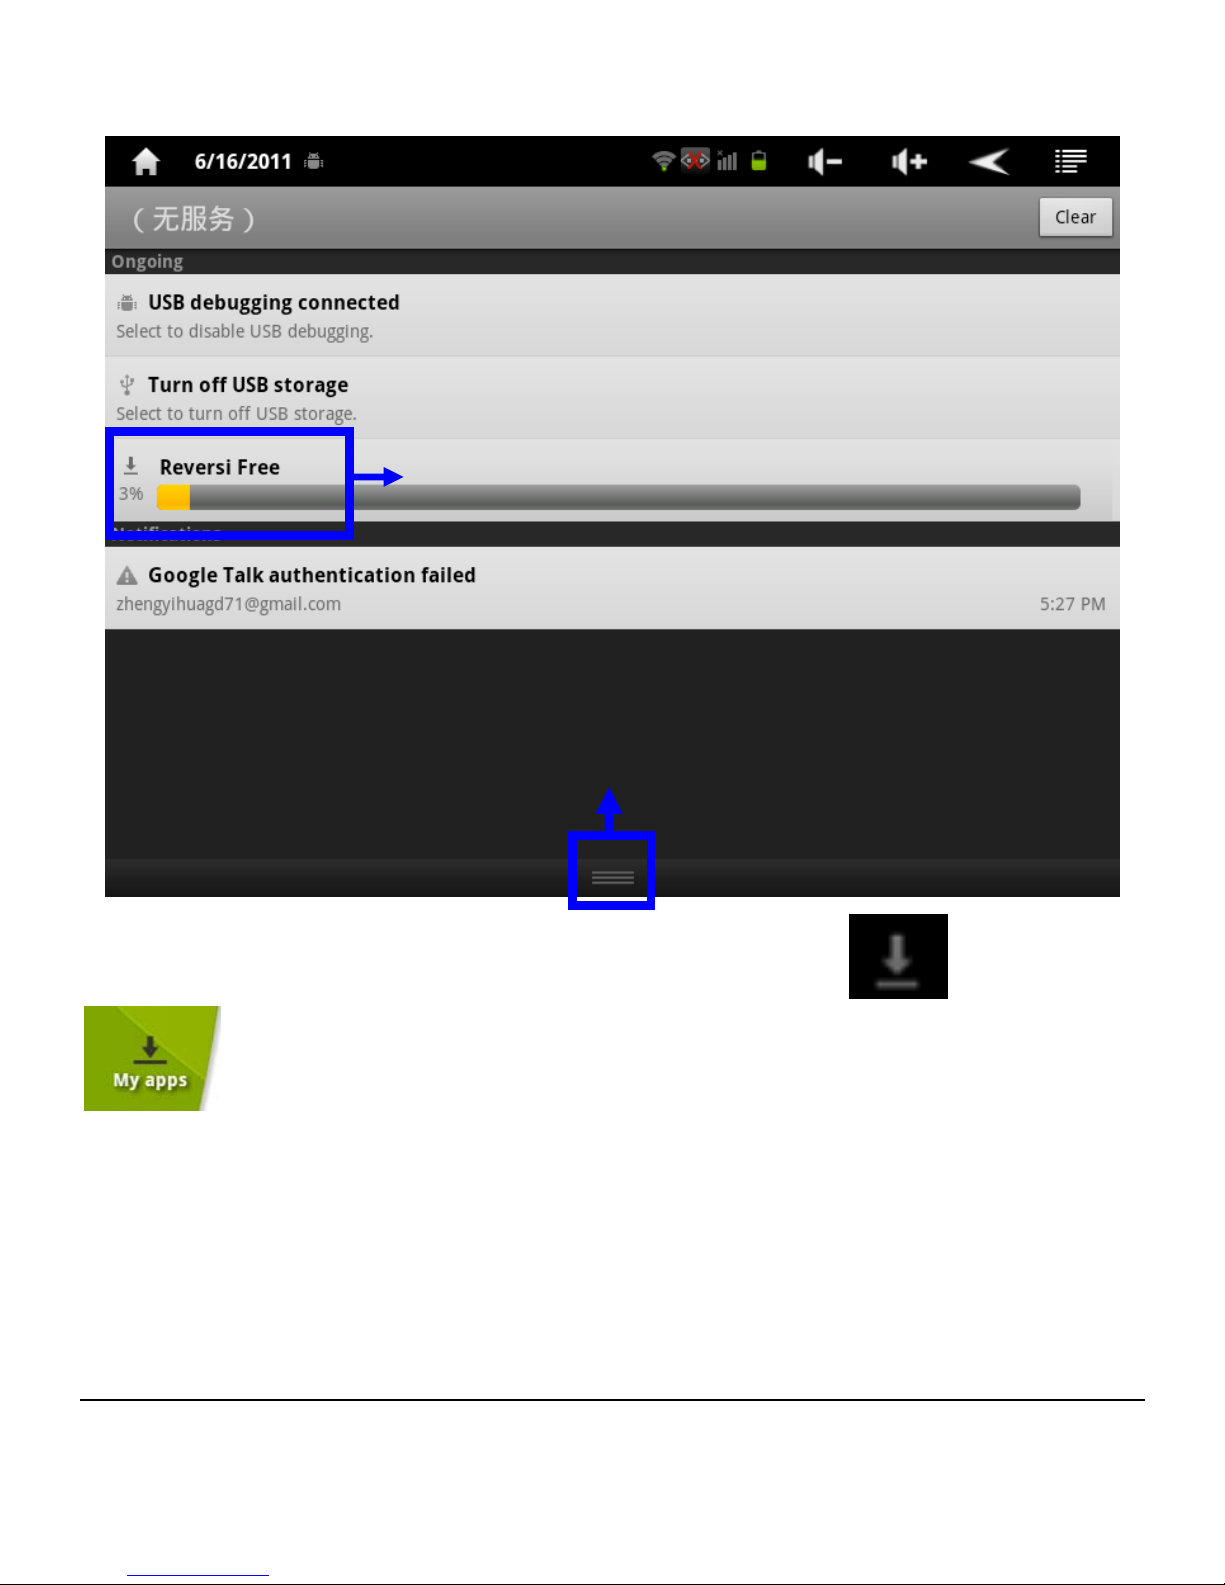
User can drag down the download item , or click
icon on Android Market interface page to view
download status.
Download Status
Pull up to exit from download status page
Page 55
- 51 -
Chapter 4: Hardware Configuration
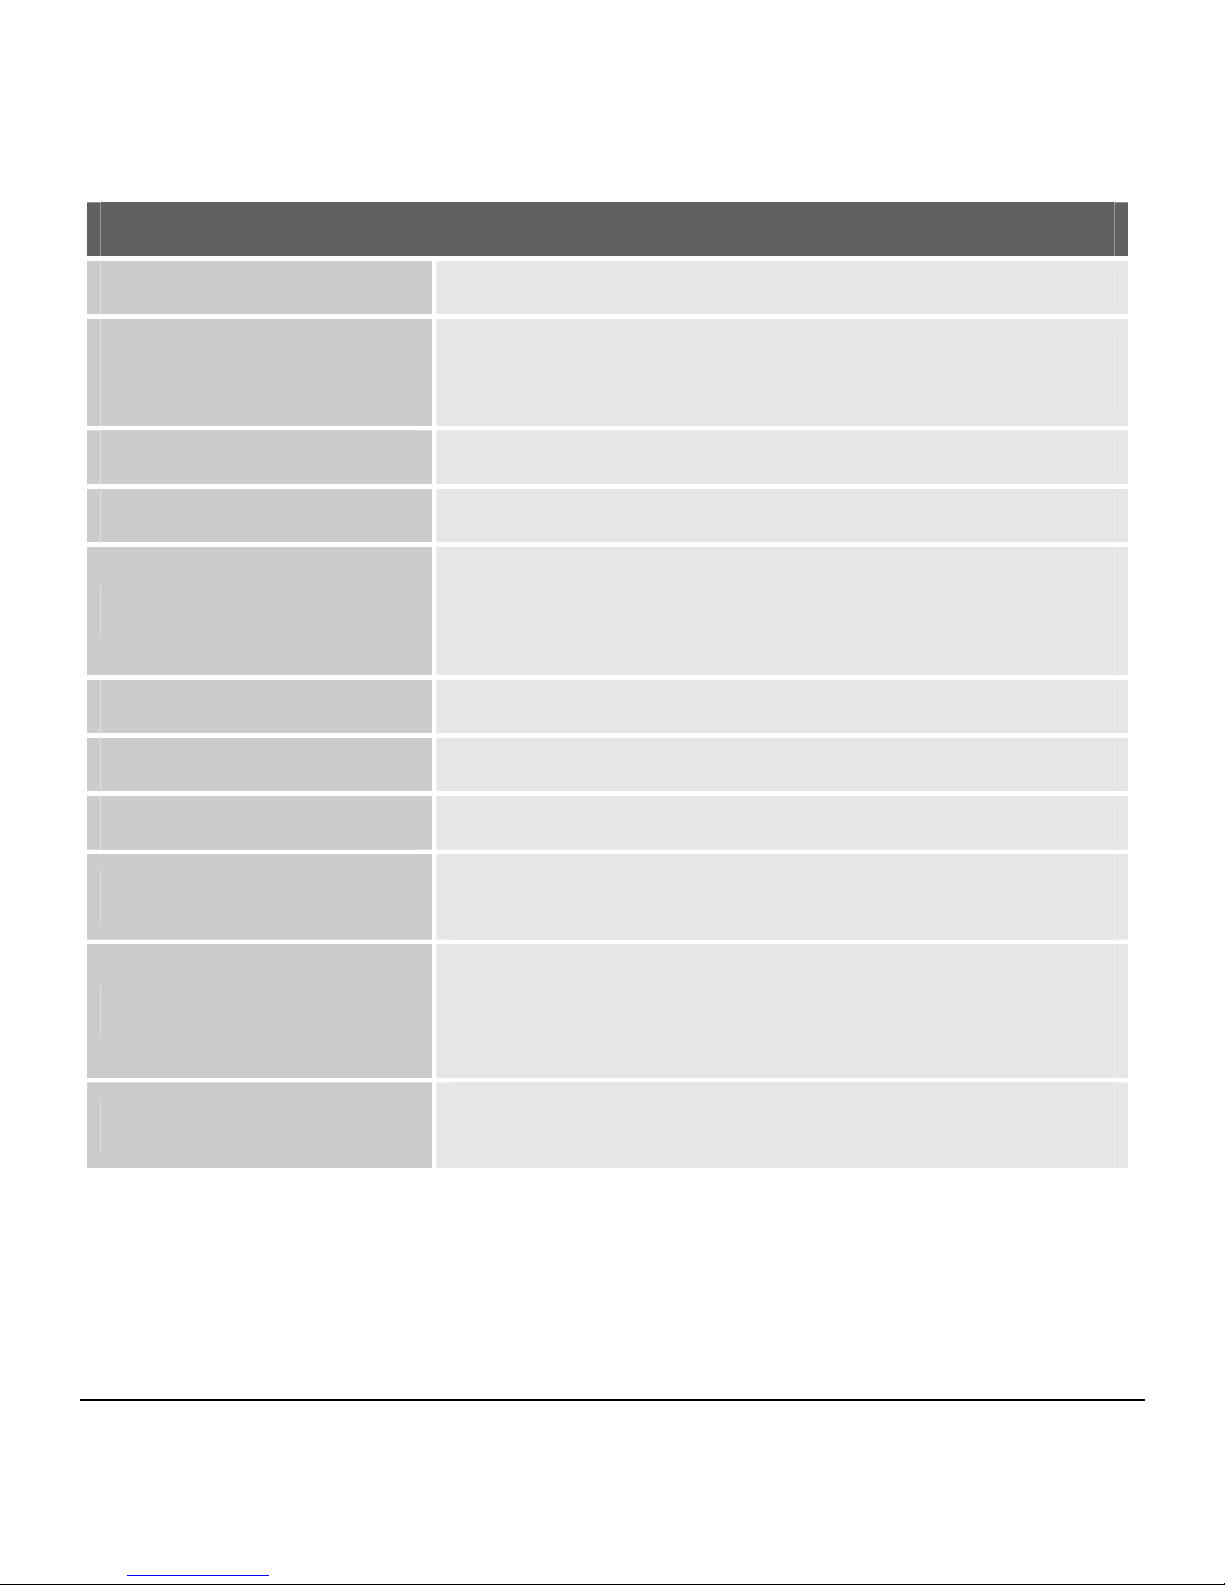
Hardware Specification
Processor
Rockchip RK2918 Cortex A8 1.2GHz
Hardware
Decoding
1080P video decoding for H.264, VP8,
RV, WMV, AVS, H.263, MPEG 4 etc.
Memory
DDR3 512MB
Hard Disk
4GB/ 8GB NAND Flash (OPTION)
Display
7'' 800×600 resolution (aspect ratio
4:3 ), Capacitive touch panel, 5 point
Multi Touch
OS
Google Android 2.3
Camera
VGA 640x480 resolution
Speaker
D class embedded Speaker
I/O Port
USB 2.0 x1 ,OTG x1, Micro SD support
32GB Micro SD (TF), Earphone jack
Communication
Wi-Fi 802.11 b/g/n, Bluetooth 2.1+ EDR,
Support 3G Dongle (WCDMA, EVDO,
TD)
Power
Battery 4,000mAh 3.7V, Charger
100~240VAC 5V/2A
Page 56
- 52 -
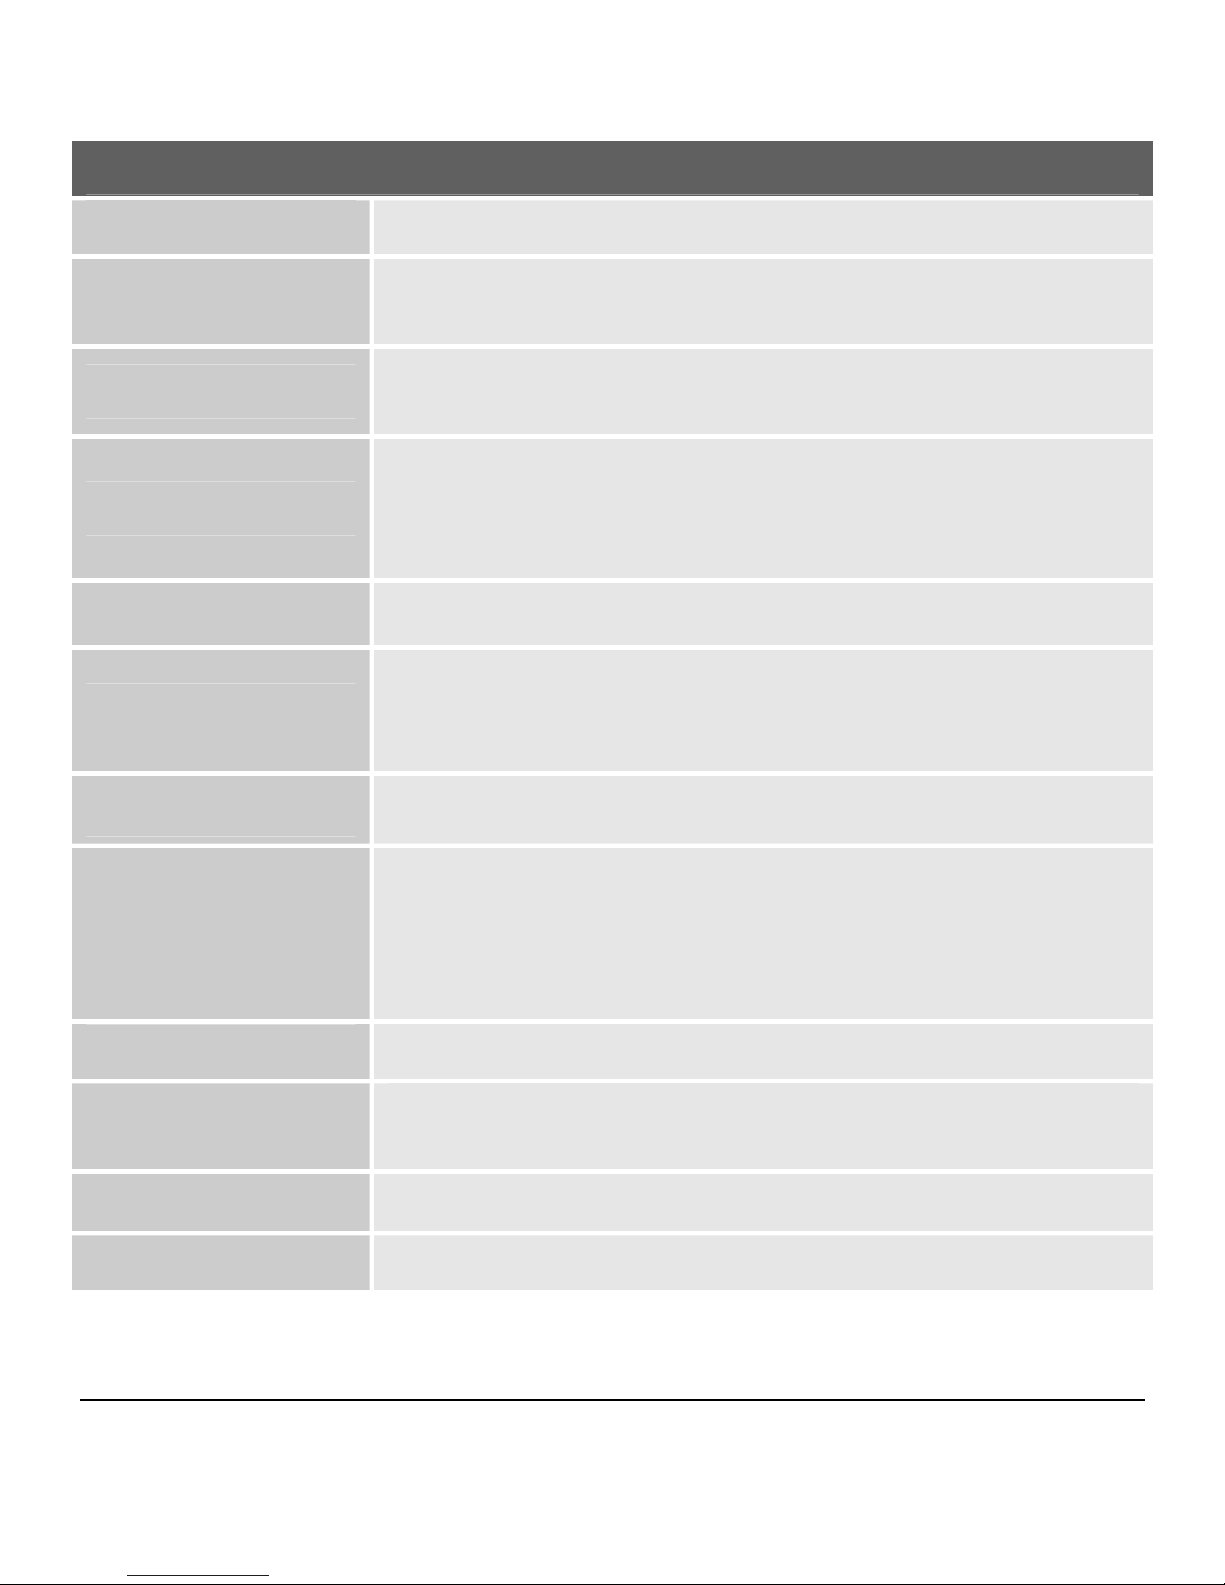
Features
Mobile Storage
Can be used as USB Storage
OTG
Support USB mouse, Keyboard, Pen driver,
3G dongle, USBLAN
Audio Format
MP3, WAV, WMA, OGG, FLAC, AAC, 3GPP,
APE
Video Format
1080P Decoding,YouTube 720P Decoding,
HTML5, Flash 10.2,AVI, WMV, MP4, M4V,
RV, RMVB, VP8, MKV, VOB, FLV, DAT, 3GP
Picture Format
JPG, BMP, PNG, GIF
3D Accelerator
2D/3D Graphic processor, support OpenGL
ES 2.0 & Open VG
G-Sensor
Support 3D game, Picture, eBook
Other Features
Browser, Internet Chat, Email, eBook,
Resource management
Clock, Alarm, Calculator, Recorder, Android
Market
Recorder
Embedded Mic.
Battery Time
Audio Playback: 10Hr , Video Playback:
4.5~5Hr, Web Browsing: 7Hr
Dimension
185.2 Lx 144.5 W x 12.8 H mm
Weight
432 g
 Loading...