

Page 1

Electric Surfboard
(USER MANUAL)
VERSION 19-JW001
CAUTION
RISK OF EXPLOSION IF BATTERY IS REPLACED BY AN INCORRECT TYPE.
DISPOSE OF USED BATTERIES ACCORDING TO THE INSTRUCTIONS.
PLEASE KEEP THIS MANUAL AT A SAFE PLACE AND HAND IT OVER TO A NEW OWNER IF YOU SELL THE VESSEL.
Copyright 2019, All rights reserved
Page 2

User's Guide
INTRODUCTION
Copyright 2019, All rights reserved
In addition to our passion for technology, the JETWAKE ™ team constantly pursues perfection to ensure that all products are new and fun.
"Pleasure for users", this is our vision.
We are not afraid to try new ideas and overcome the limitations in order to experience the greatest joy.
By changing our common sense as an innovative product, we will create a new culture of marine leisure sports.
JETWAKE ™ Electric Surfboard designs and manufactures all parts in Korea.
We use JETWAKE ™ to produce the best quality production technology using only the best materials and parts currently produced in
Korea.
Due to its own production, JETWAKE ™ ensures maximum precision and efficient production.
It is eco-friendly product because it does not pollute by using battery and motor.
With cutting-edge expertise, engineers have been putting the JETWAKE ™
We developed a stable mechanical battery that does not explode and a BLDC motor with efficiency of 90% or more.
The boards use BLDC motors to keep quiet and rechargeable batteries easy to replace and continue to use.
It is composed of three modules of battery pack, board and water jet propulsion, and is very convenient for A / S.
Self-repair is possible through easy operation and basic knowledge.
The greatest benefit of JETWAKE ™ is that the software can be upgraded continuously, and we promise to continually improve and
improve the product after purchase.
Check the website (www.jetwake.co.kr) regularly.
In order to enjoy JETWAKE ™ for a long time, we provide the following information.
Page 3

INTRODUCTION
This manual will help you to operate the JETWAKE ™ electric surfboard 'B200' safely and easily.
The B200 provides information on the name of each part, its description, precautions, how to use it, system and operation, maintenance,
and maintenance.
Please read it carefully before you use it and familiarize yourself with a lot of information about 'B200'.
Never use the product at high waves and low depths (50cm or less), and be sure to wear protective gear (helmets, life jackets, etc.) for
safe use.
This user's guide does not contain detailed maintenance or repair instructions. If you experience a problem with the product, stop using
it.
Contact your JETWAKE ™ manufacturer (headquarters) or your dealer. If you have a maintenance manual, do the following:
Maintenance and repair of JETWAKE ™ electric surfboards can only be done by qualified and trained personnel.
JETWAKE ™ assumes no liability for any problems caused by disassembly, maintenance or repair.
Use the product safely through periodic safety checks.
You should be aware that parts will wear out over time.
In particular, some parts, such as battery packs and impellers, need to be replaced at least once a year.
In addition, it may be severely damaged depending on the wrong operation and handling.
It is not compatible with other products. Do not use parts manufactured arbitrarily.
Always use it in a safe place and at a safe speed and course according to correct usage.
You must comply with all national laws while using JETWAKE ™.
Keep this manual in a safe place. If you are an existing owner, please hand over the manual to the new owner.
JETWAKE ™ Electric Surfboard 'B200'
JETWAKE Co., Ltd.
Page 4
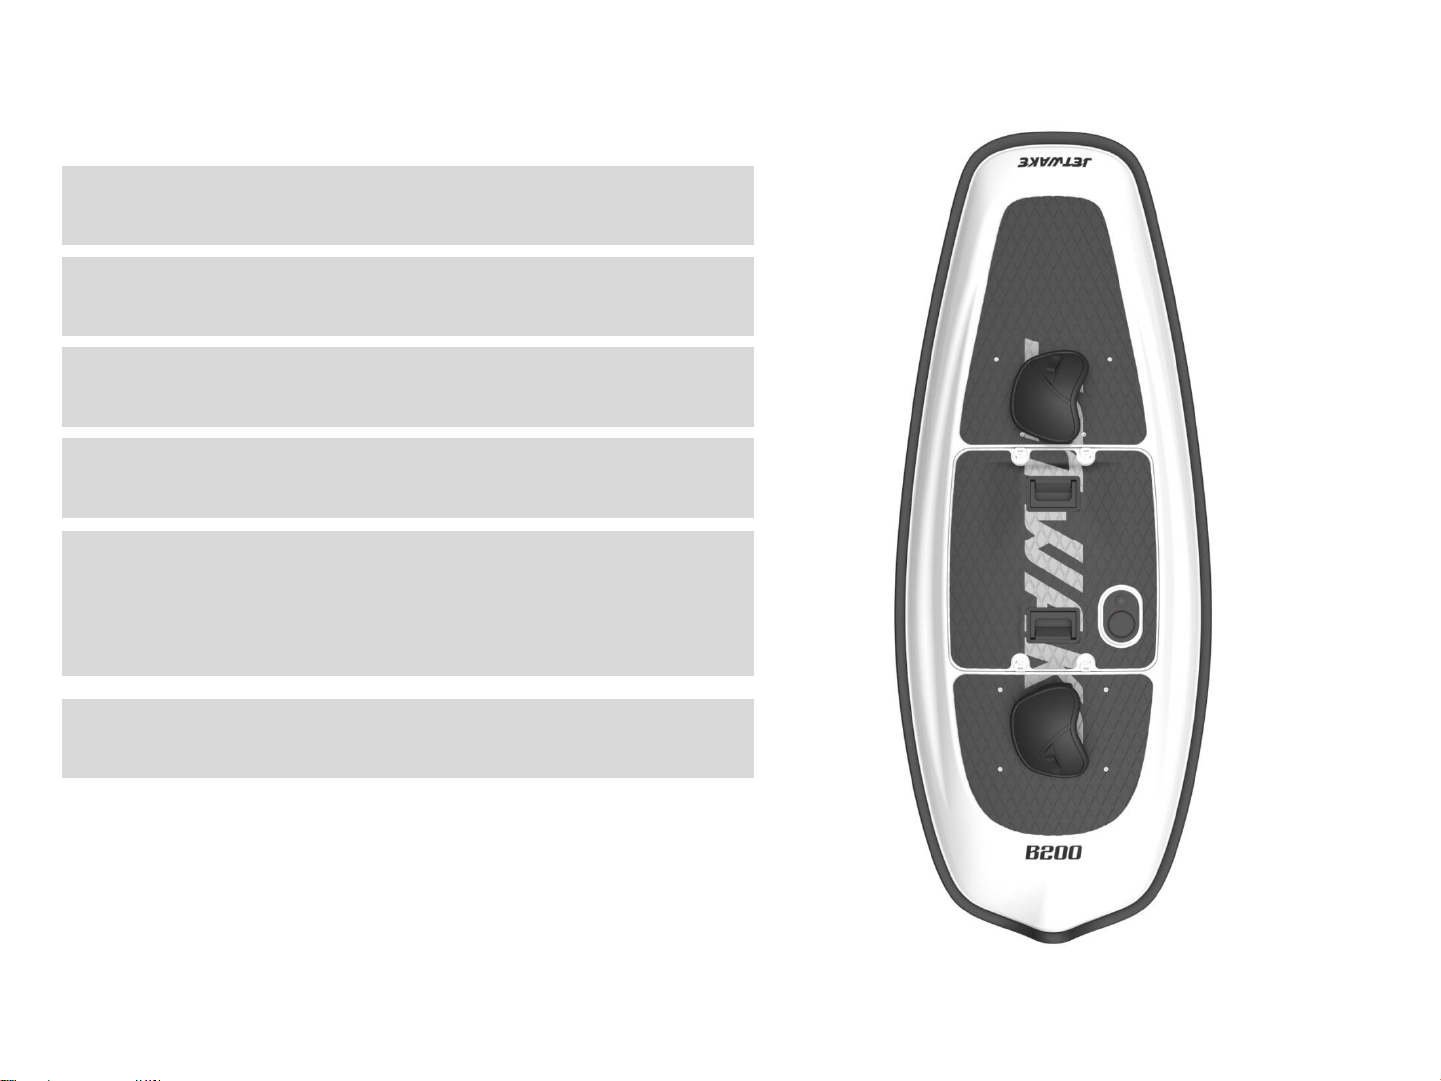
Electric Surfboard
Model : B200
Size : 1800 x 700 x 130 mm
Weight : Board 15 kg/Controller10 kg/Battery 20kg
Run time: 30~45 min
Operating temperature : 5~35℃
Storage temperature : 0~40℃
Speed: 25~40 km/h
* Test rider : height 184cm, weight 80kg -> speed 30kmh
* Test rider : height 170cm, weight 64kg -> speed 40kmh
* Change speed and use time based on user's weight
* The operation of the product is only required when the board
controller and the battery pack are combined, and the charge
of the product is possible when the battery pack and the
charger are connected.
Page 5
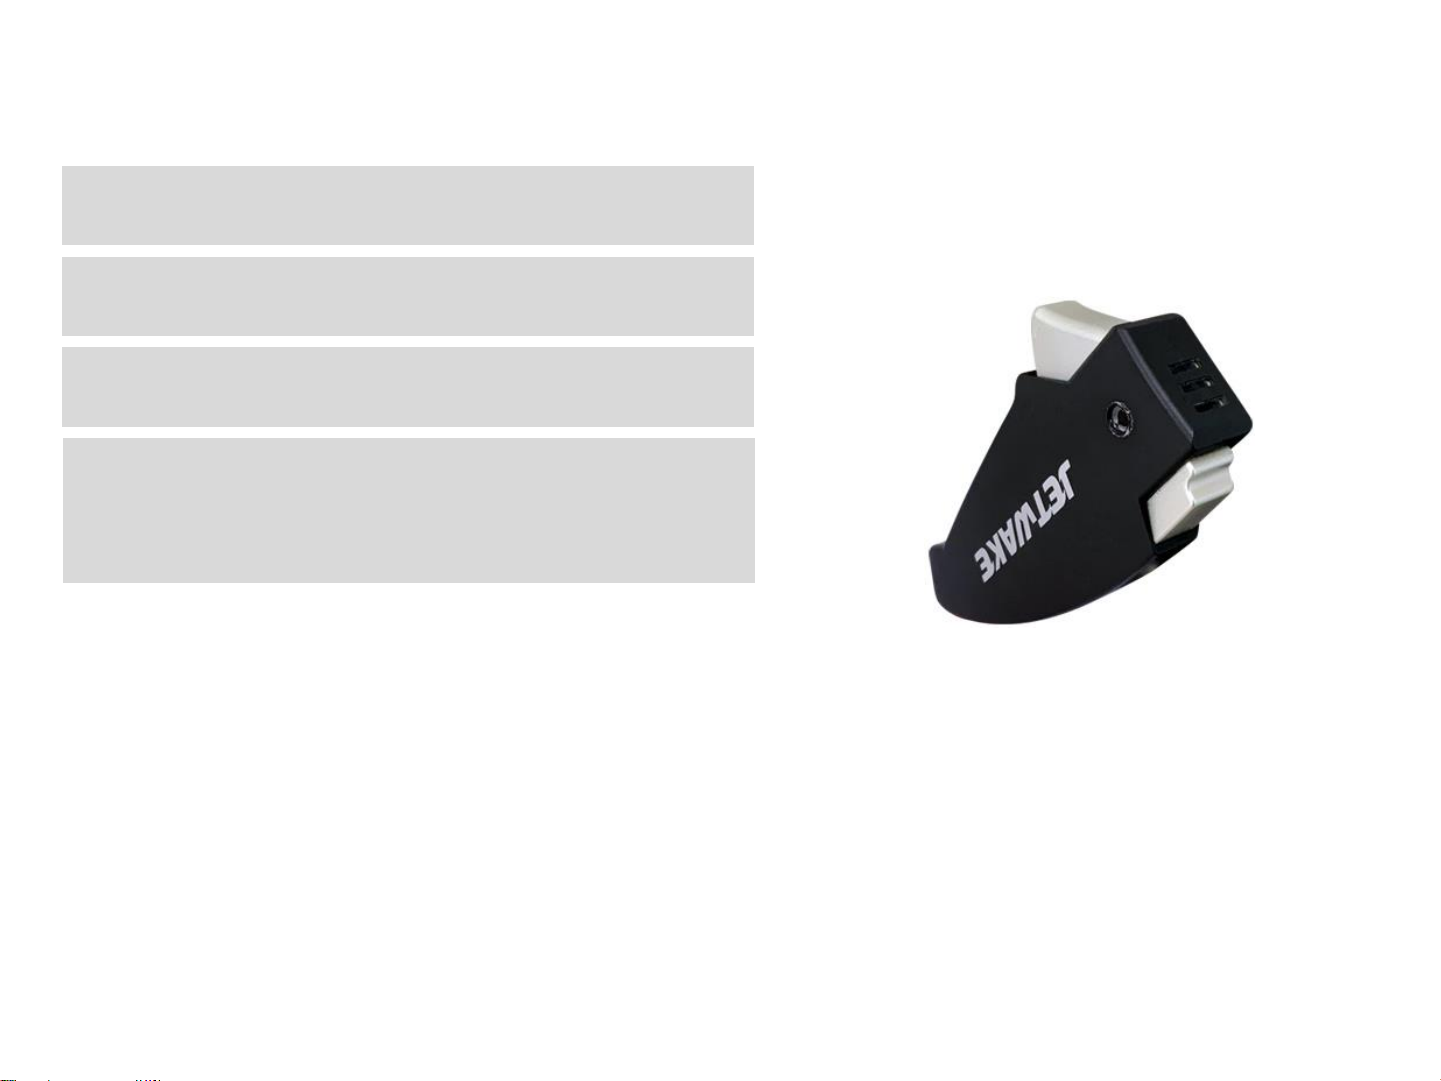
Wireless Controller
Model : B200-C1-AB
Size : 118 x 67 x 22 mm
Weight :122g
Operating temperature : 5~35℃
Storage temperature : 0~40℃
Page 6
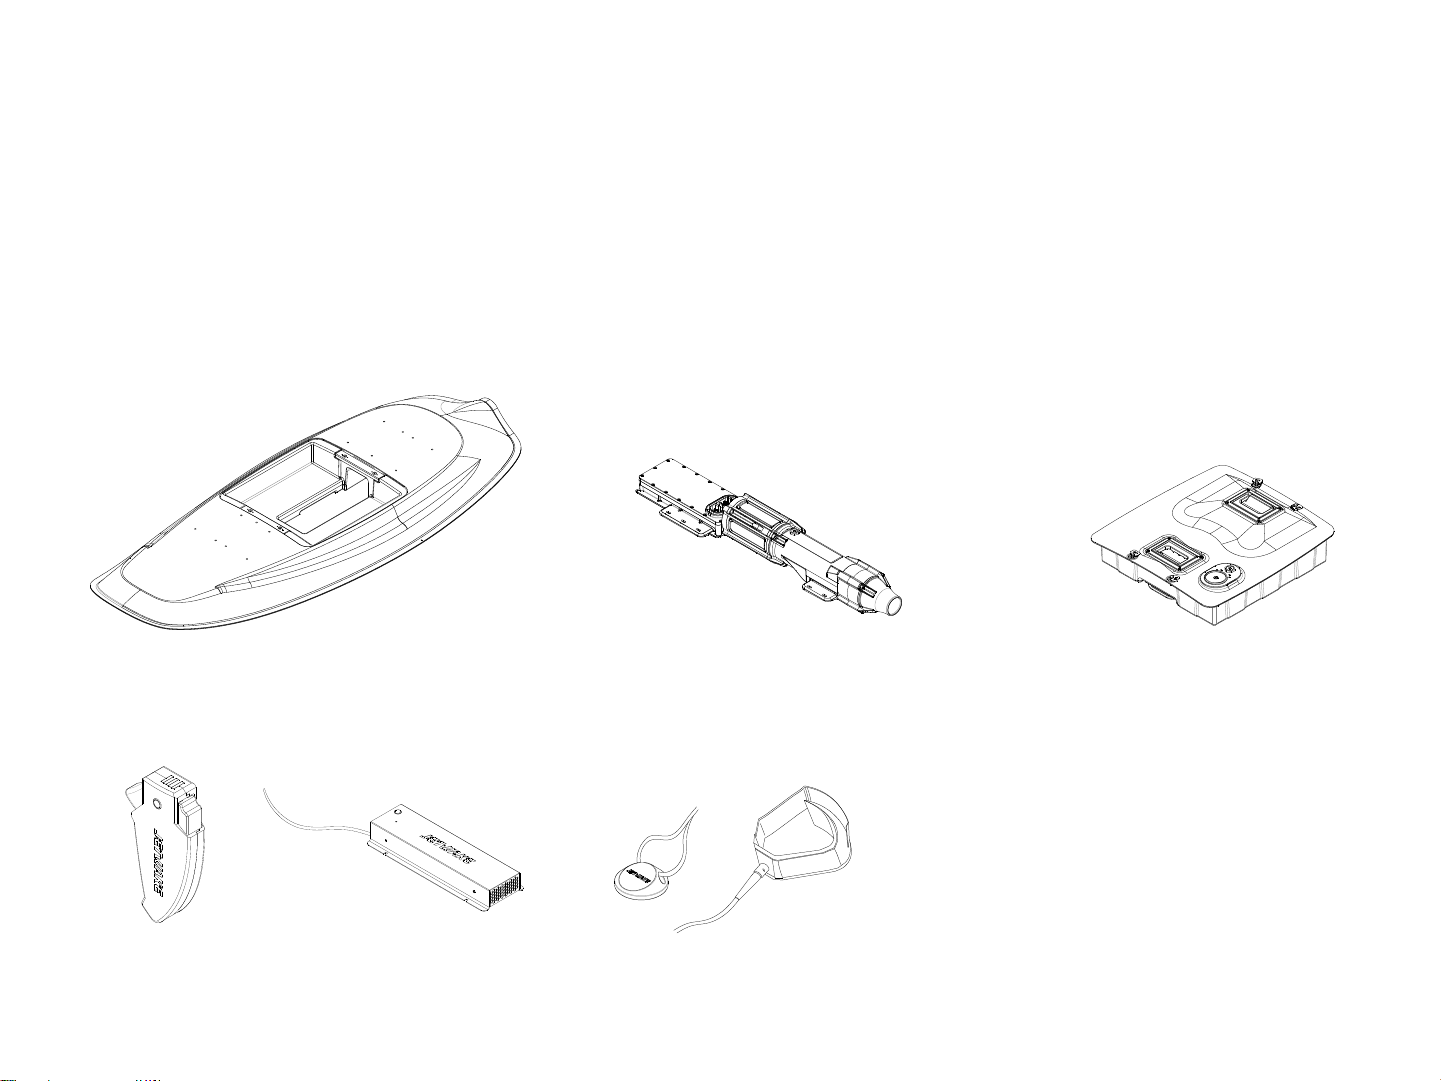
B200 SET
1 2
1. Board
2. Propellent
3. Battery Pack
4. Wireless Controller
5. Power Charger
6. Magnet Switch (with leash)
3
1 PC
1 PC
1 PC
1 PC
1 PC
1 PC
4
5
6
Page 7
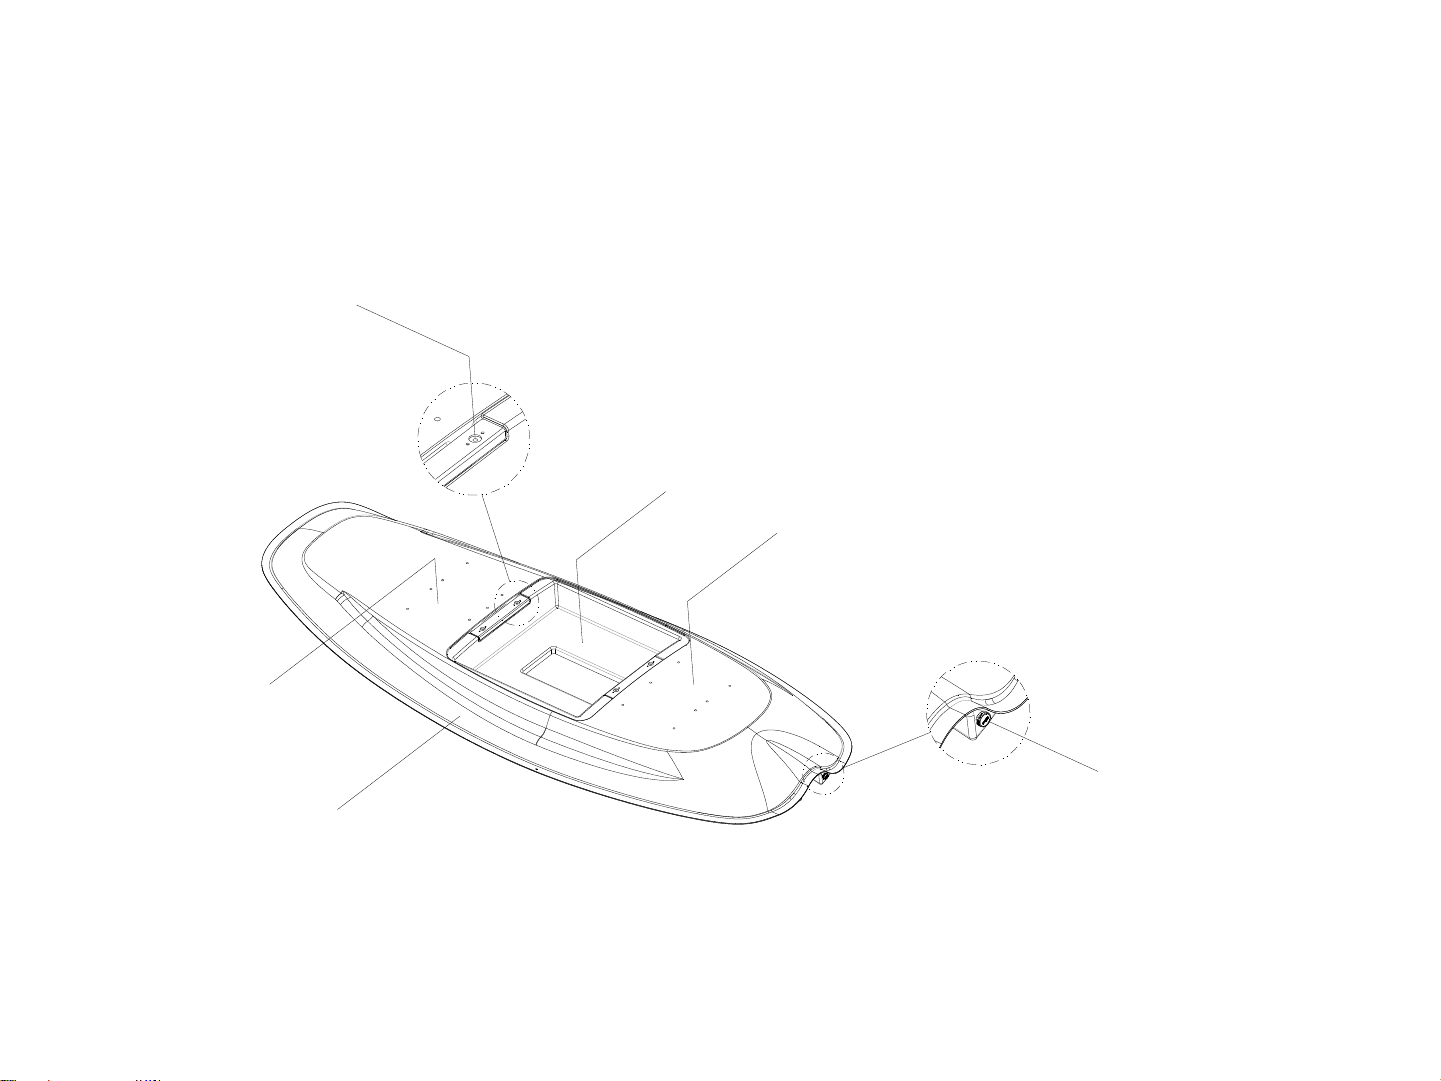
1. Board
1-6
1-3
1-1. Board body
1-2. Battery Room
1-3. Fasteners – Locking Receptacle
1-4. Drain Plug
1-5. Foot strap1
1-6. Foot strap2
1-2
1-5
1-1
1-4
Page 8
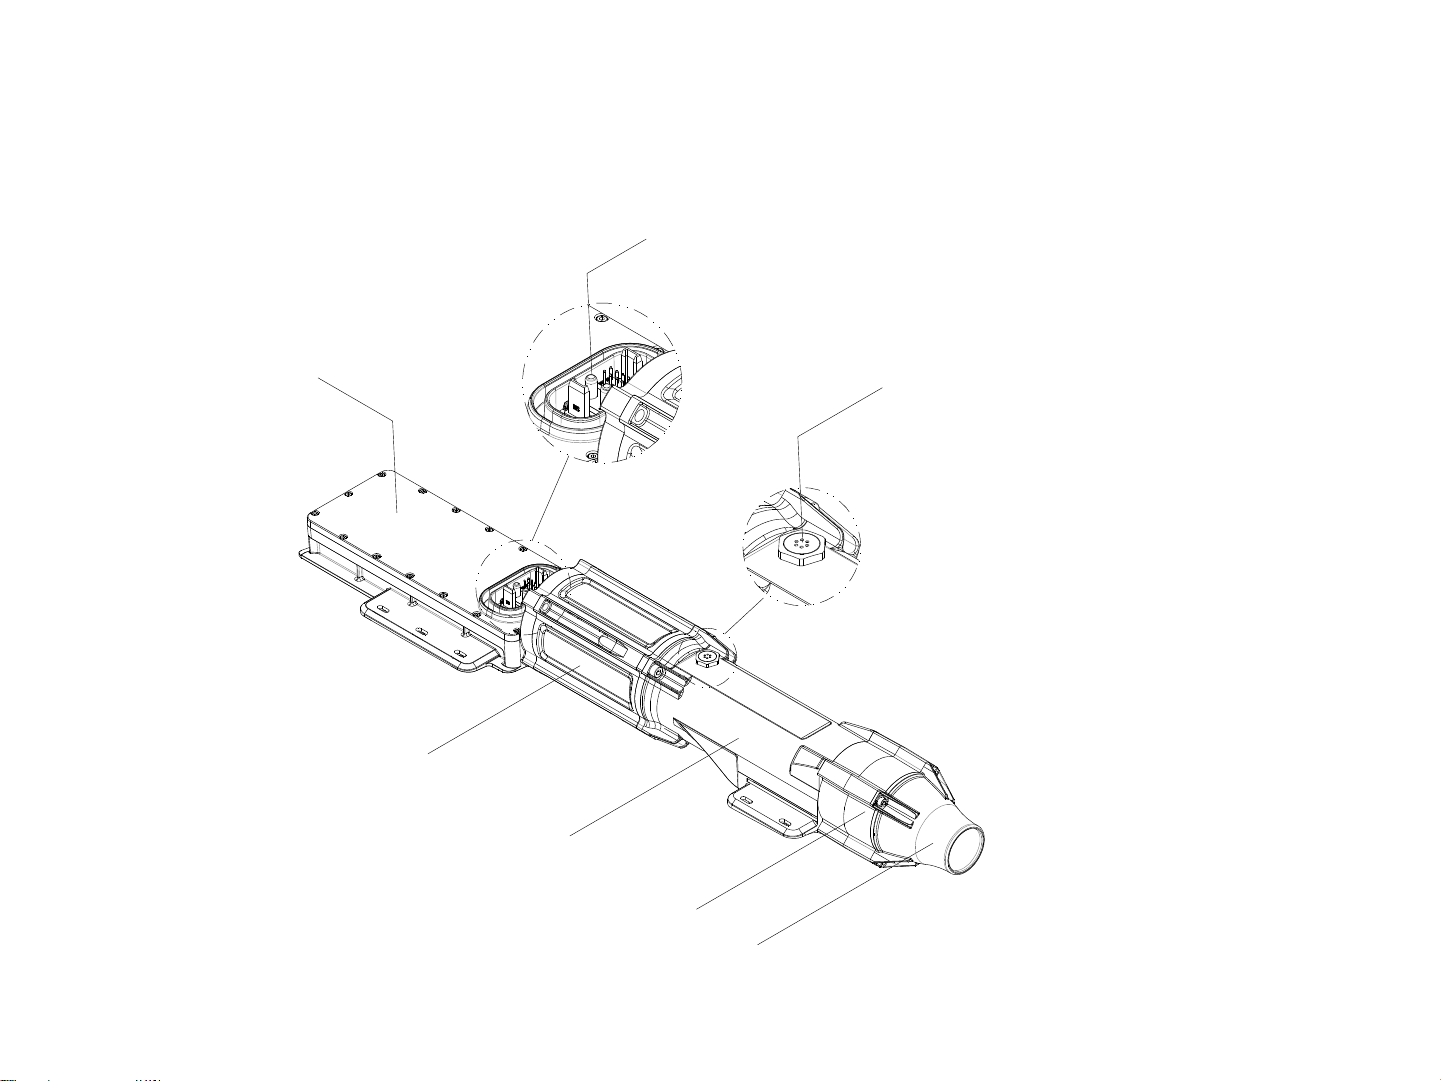
2. Controller
2-5
2-6
2-1. Jet Nozzle
2-2. Guide Vane
2-3. Jet Tunnel
2-4. BLDC Motor
2-5. Main Controller
2-6. Connector (+)
2-7. Liquid Tight Threaded Vent Plug
2-7
2-4
2-3
2-2
2-1
Page 9
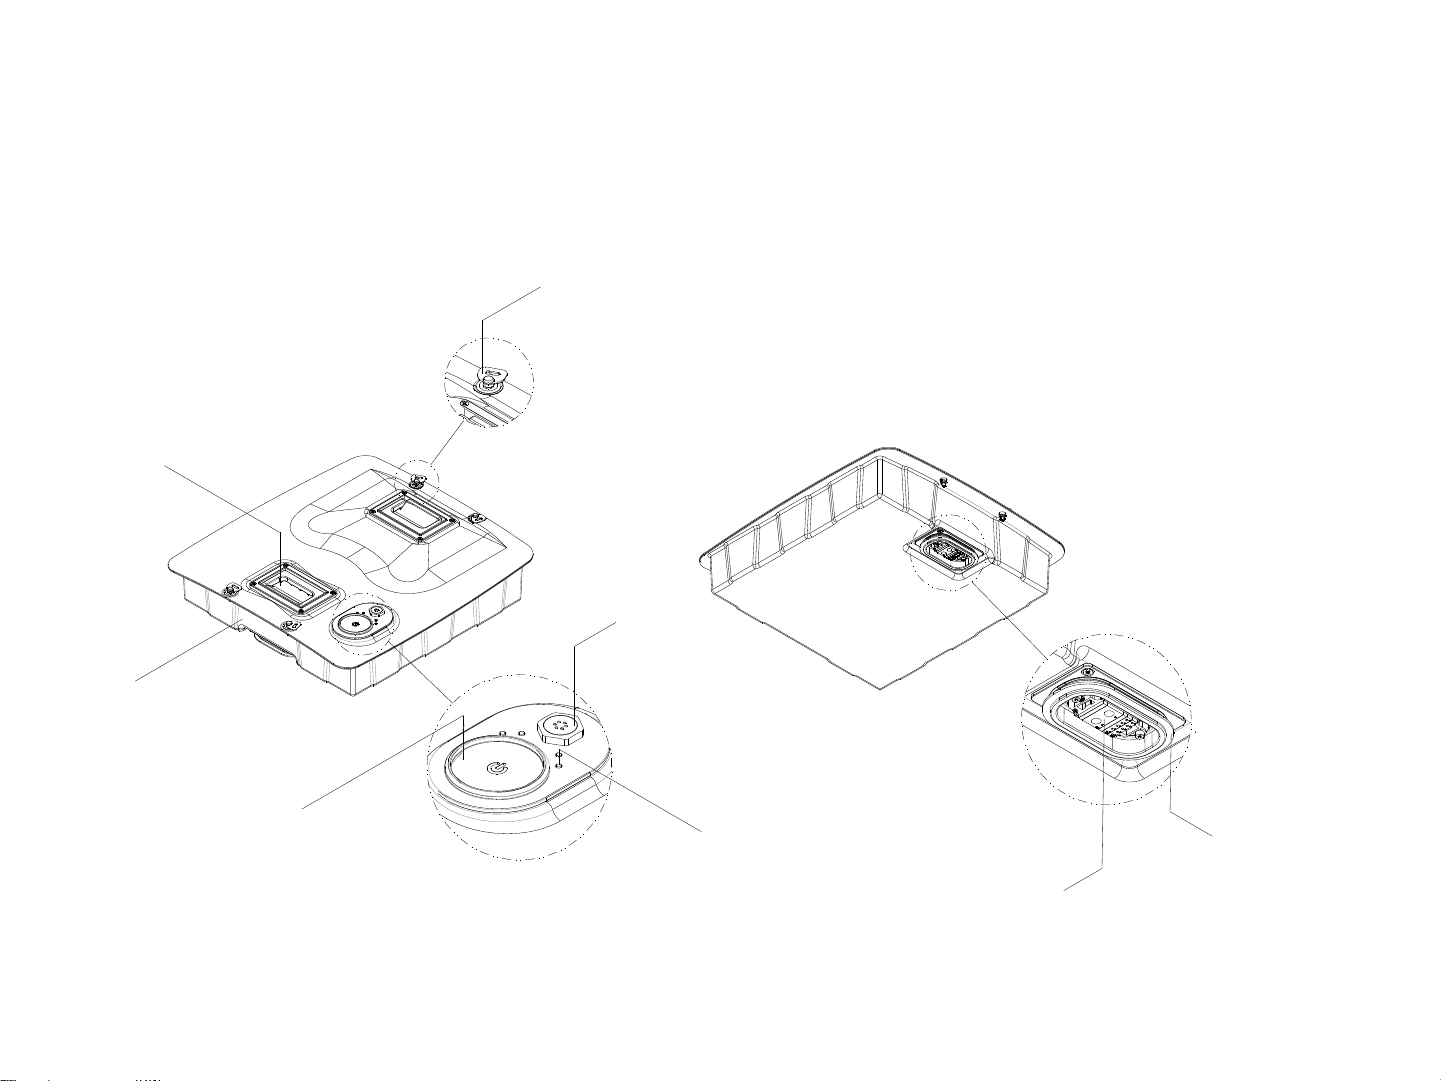
3. Battery Pack
3-5
3-1
3-6
3-1. Battery body
3-2. Magnet Switch Holder
3-3. Liquid Tight Threaded Vent Plug
3-4. LED
3-5. Tray handle
3-6. Fasteners – Stud
3-7. Connector (-)
3-8. Connector Waterproof Seal
3-3
3-2
3-4
3-8
3-7
Page 10
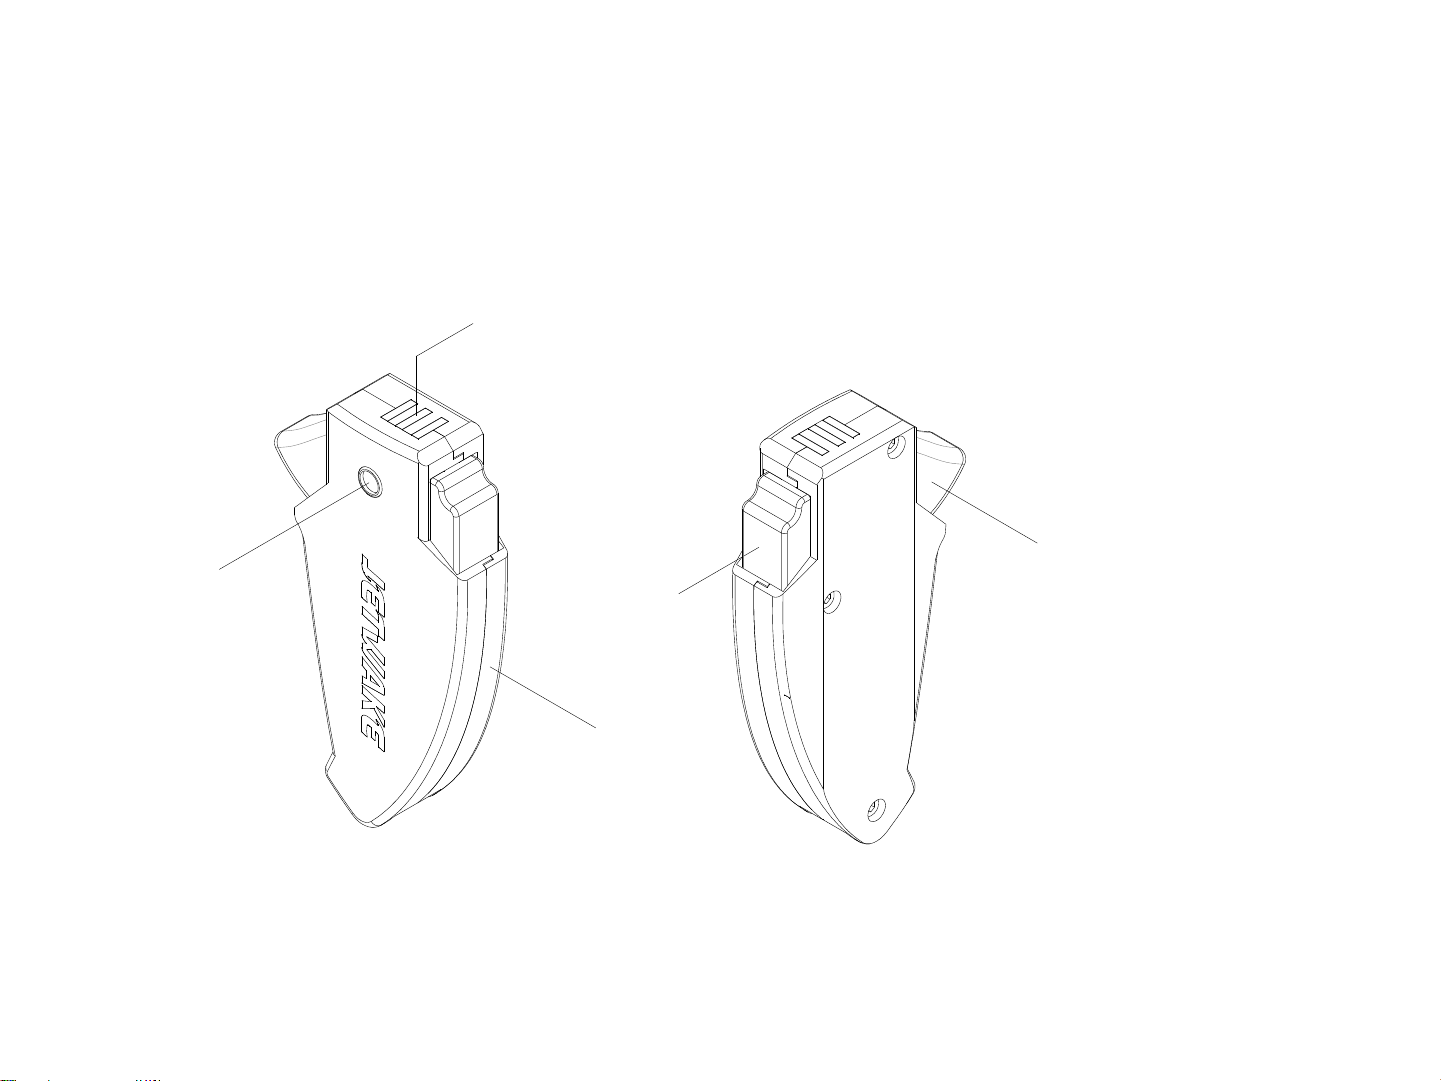
4. Wireless Controller
4-4
4-1. Wireless Controller body
4-2. Power
4-3. Trigger
4-4. Power Lamp Window
4-5. LED
4-5
4-3
4-2
4-1
Page 11
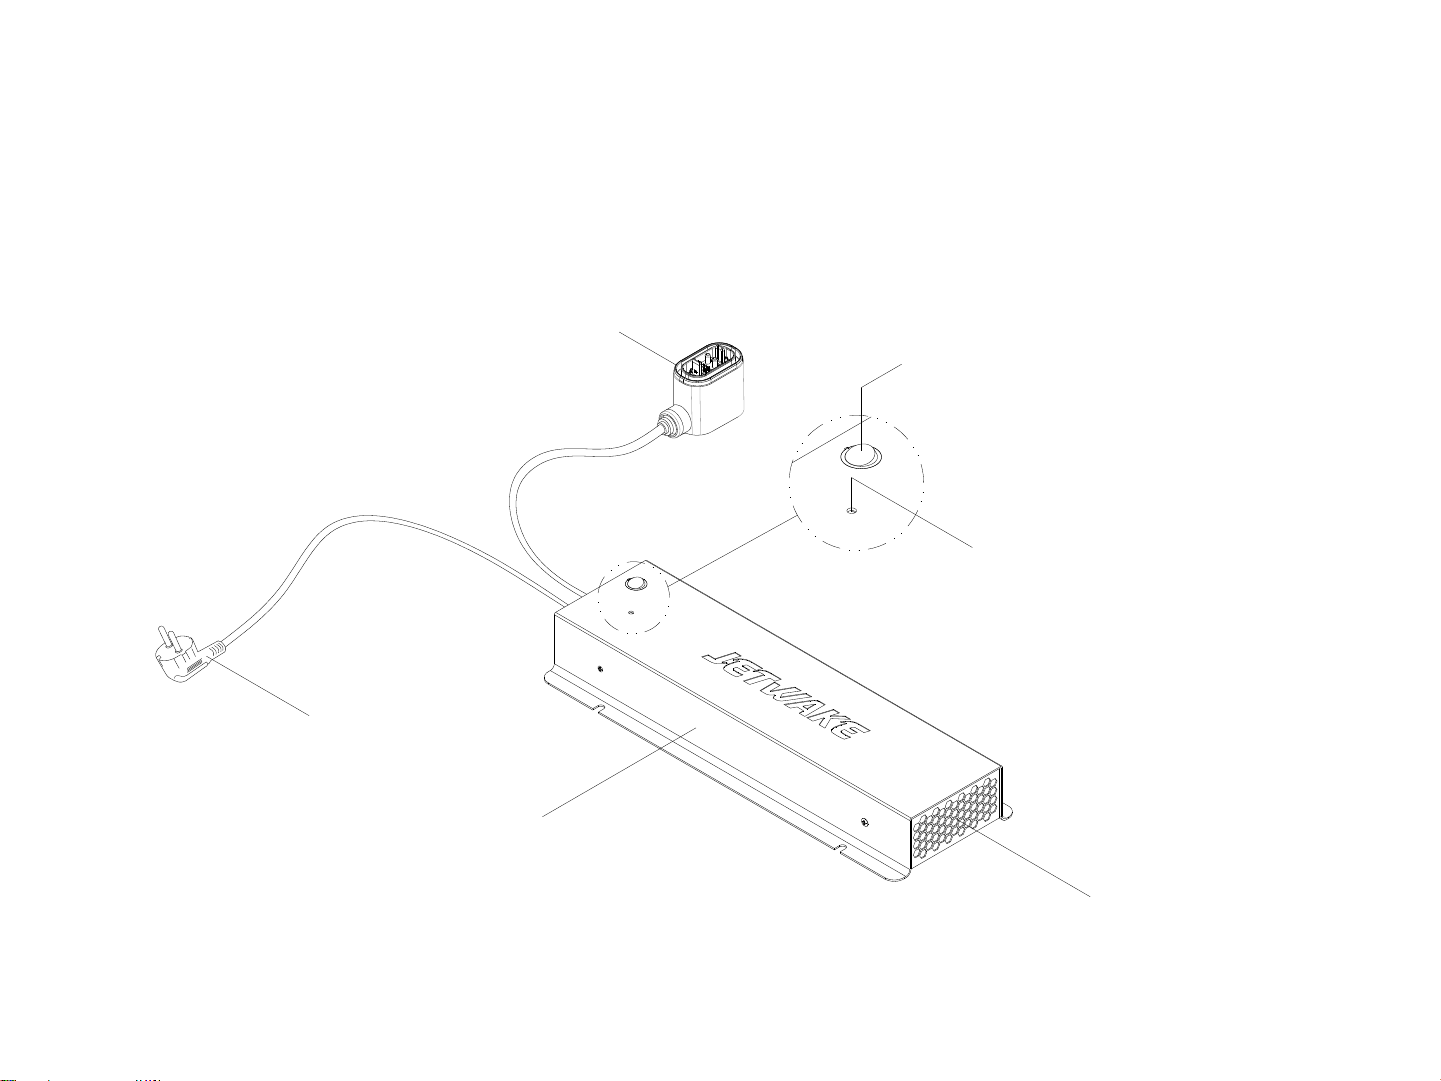
5. Power Charger
5-6
5-5
5-1. Power Charger Body
5-2. Switch
5-3. LED
5-4. Cooler
5-5. Connector (+)
5-6. 110V / 220V Plug
5-2
5-3
5-1
5-4
Page 12

Electric Surfboard ‘ B200’ Special Safety and Handling Precautions
* Please read the following information carefully before handling and operating the B200. As
stated in the user manual There is an immediate risk of injury to persons, property and
products if not handled properly.
* JETWAKE will not be liable for damages caused by ignoring warnings or warnings.
* It is not possible to perform all A/S when disassembling and assembling B200, Power Pack,
and other parts.
- Suitable for people who are good at swimming more than 16 years!
- Do not disconnect or connect the Power Pack when the B200 is near water or water.
- Do not use B200 in the presence of floating debris because there is a risk of B200 or user injury.
- After using the B200, remove the Power Pack.
- Do not expose the Power Pack to heat or direct sunlight.
- Power packs should always be water-tight and disconnect power pack only where there is no water.
- Always make sure the Power Pack is correctly and firmly fastened to the board before use.
- When transporting the B200, always remove the Power Pack.
- Always make sure that the power magnetic and wireless controllers are working before using the B200.
- Always store the B200 in a storage bag.
- Do not connect the Power Pack when the connector is exposed to water. (For example, when it has been exposed
to water, it has been exposed to rain, or when there is water inside the Power Pack mount)
- Always wear a life jacket and helmet with safety certification when using the B200!
- Always keep distance and low speed when people or obstacles are nearby. (Minimum 20M maintenance, low
speed maintenance)!
- Always wear the correct swimsuit or suit when using the B200!
- Always wear a swimming cap and hair net if your head is over your shoulder!
Page 13

- Always check the battery level with the wireless controller and return to safe land with plenty of battery power left!
- Always observe local laws and regulations!
- Use only in protected areas where boats can be rescued in case of emergency.
- Be careful not to let your body parts and other objects get into the water inlet of the water jet propulsion!
- Do not use in a place where the environment is bad, such as high current, bad visibility, floating debris!
- Do not use it for safety in a swimmer or a diver!
- Do not store the product in direct sunlight or in an enclosed vehicle!
- The B200 can not be used as a swimming aid!
- The B200 incorporates mechanical, electrical and software safety systems.
Page 14

Power Pack Special Safety and Handling Precautions
* JETWAKE will not be liable for damages caused by ignoring warnings or warnings.
* It is not possible to perform all A/S when disassembling and assembling B200, Power Pack,
and other parts.
- Read the user manual carefully before handling, preparing, charging and operating the B200 and Power Pack!
- If there is an error LED display (● ○ ○ ○) in the Power Pack, stop using it and call A / S!
- Use prohibited temperature 60 ° C (warning LED is displayed in Power Pack when it is 60 ° C or more)
- Use only at suitable operating temperature 5 ~ 35 ℃
- Do not store in a car or in a place with high temperature and humidity, near direct sunlight or fire!
- Do not short circuit!
- Never open or disassemble the Power Pack!
- Do not throw or drop the Power Pack to damage it!
- Do not immerse the Power Pack in water or other liquids!
- Do not allow water or liquid to enter the connector!
- Always remove the Power Pack from the B200 when storing the product!
- When transporting the B200, always remove the power pack and install it only when it is used!
- Always disconnect the power pack from the charger and turn it off when not charging!
- When disconnecting the power pack from the charger, first turn off the charger!
- Do not disconnect or connect the Power Pack when it is near water or liquid.
- Only charge the Power Pack in a safe environment from water or liquid!
- Only charge the Power Pack with the official JETWAKE charger that comes with the product!
- Power Pack integrates mechanical, electrical and software safety systems.
Page 15
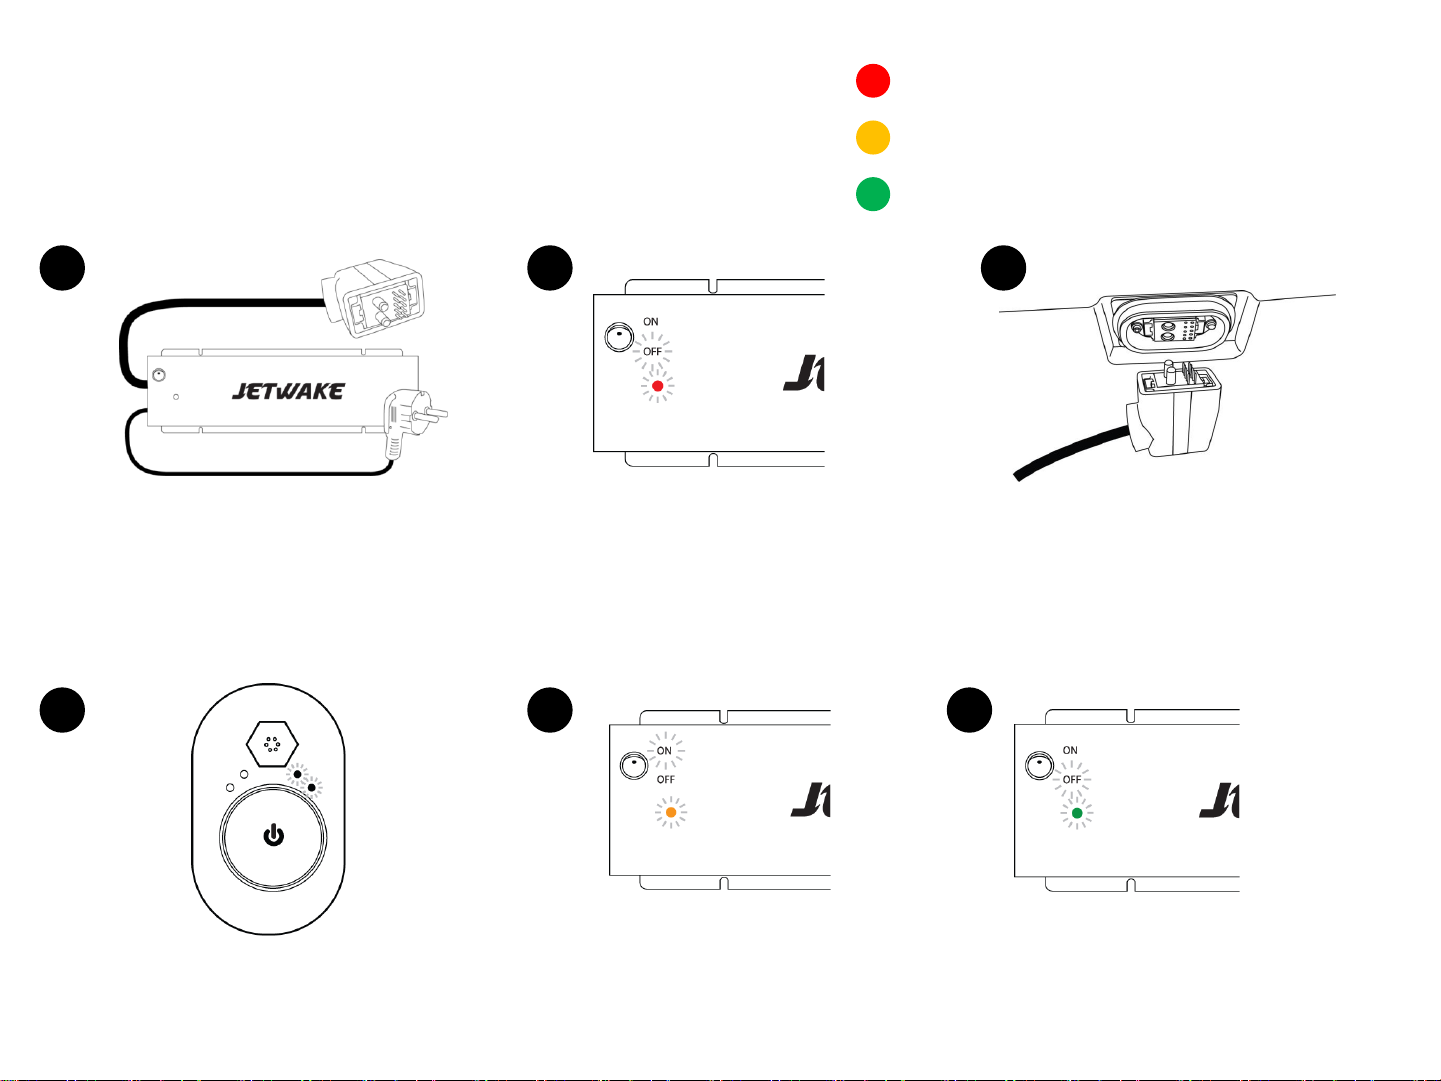
How to charge the battery pack
Red: waiting for charging
- Please observe the charging sequence of the charger.
Orange: charging
Green: Charging complete
1 2 3
Plug the power plug into a 220V outlet.
* 110V specification is requested separately
Check power switch 'OFF' position
* Red: Charging standby
4 5 6
Battery pack (bottom connector)
Connecting the charge connector
to the battery pack
2 LEDs on battery pack auto on Power switch 'ON' Start charging!
Press 'OFF' button after charging
is completed
Page 16
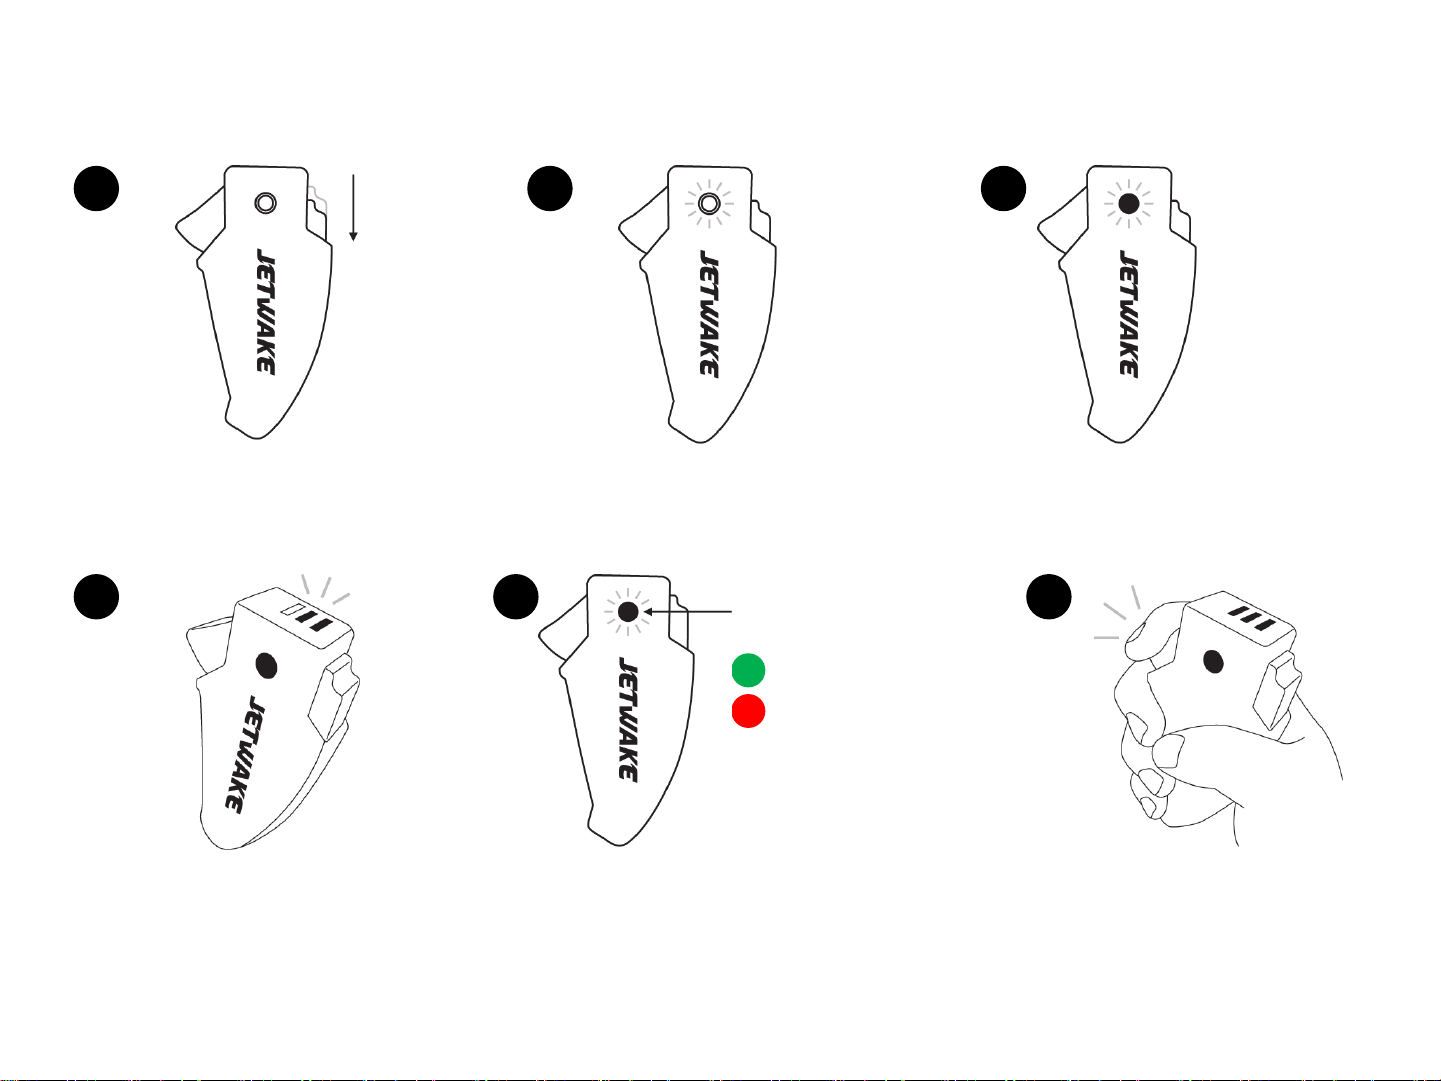
How to use the wireless controller
1 2 3
Press the power lever once. No wireless connection (LED blinking)
4 5 6
Check the board battery level
3 level : Battery remaining 100%
2 level : Battery remaining 50%
1 level : 30% of battery capacity (use by charging)
Check the battery level of
the wireless controller
Green or Red
Green : Available
Red : Requires charging
Wireless connection (LED steady)
* Magnetic power switch on board
Use lever to adjust speed
Page 17
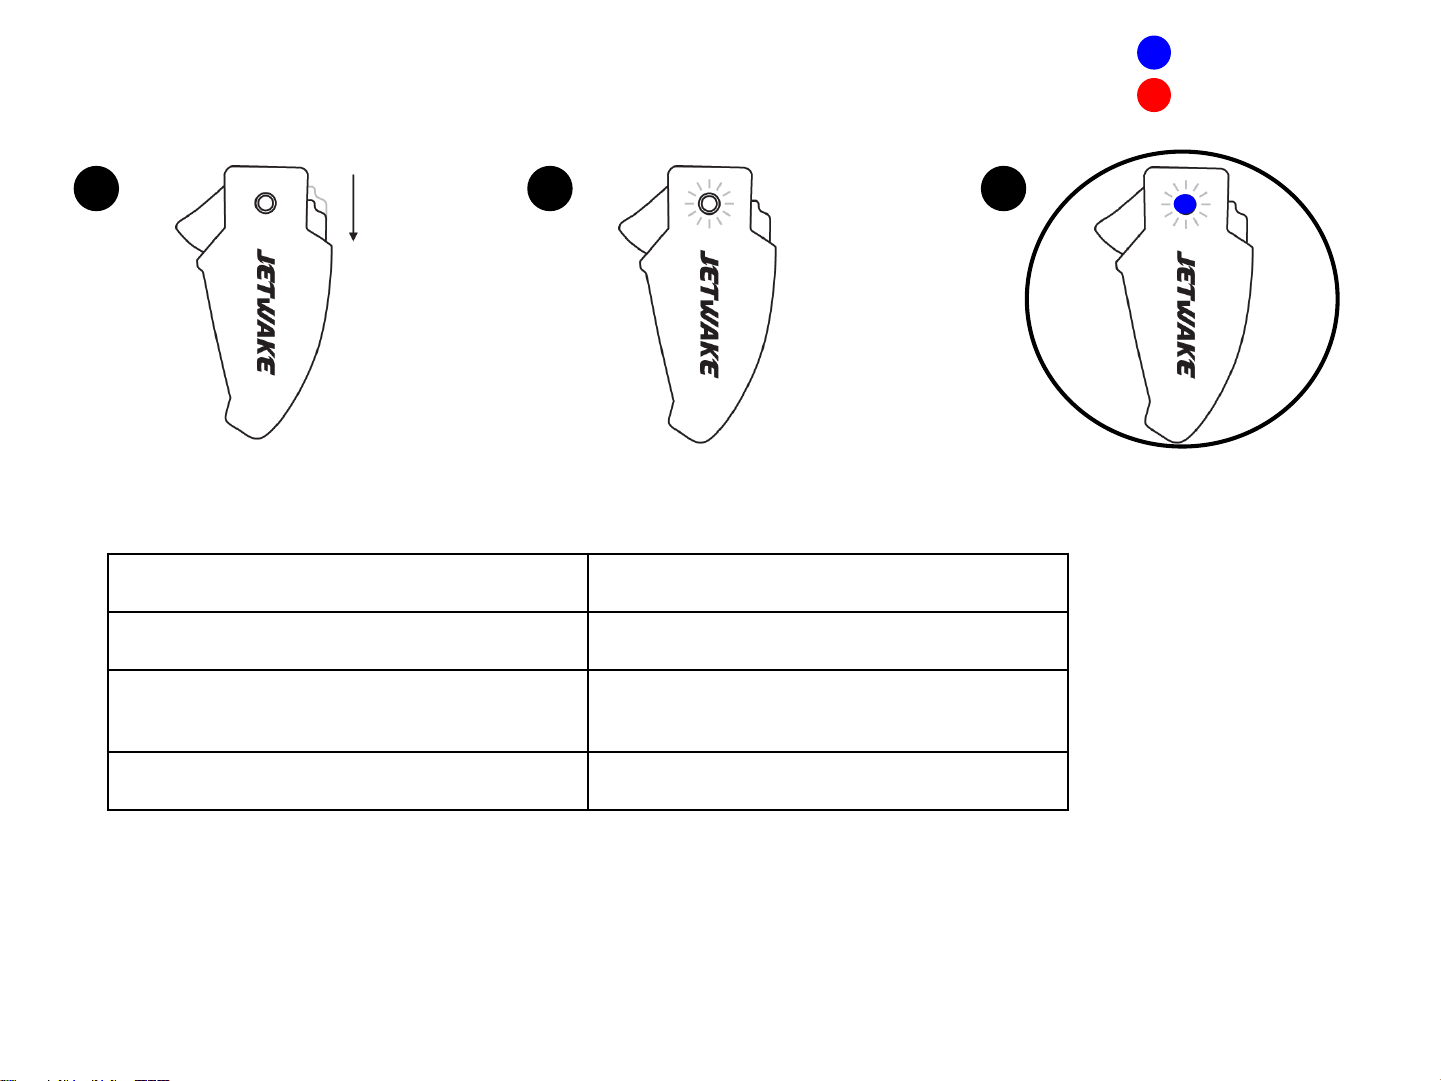
Charging the wireless controller
Green or Red Flashed
Standby
Blue Fixed
Charging in progress
Blue Flashed
Wireless
inappropriately
OFF
Charging complete
1 2 3
Green : Available
Red : Requires charging
Press the power lever once.
* Operating Frequency : 120 ~ 220 kHz (Only Controller receiver)
* Controller must be placed within 3mm of the wireless charging PAD.
* Controller is charged with PAD and it only receives (Rx), the charging PAD
is optional.
Standby
(Green or Red Flashed)
charger operates
Charging (Blue LED steady)
* Magnetic power switch on board
Page 18
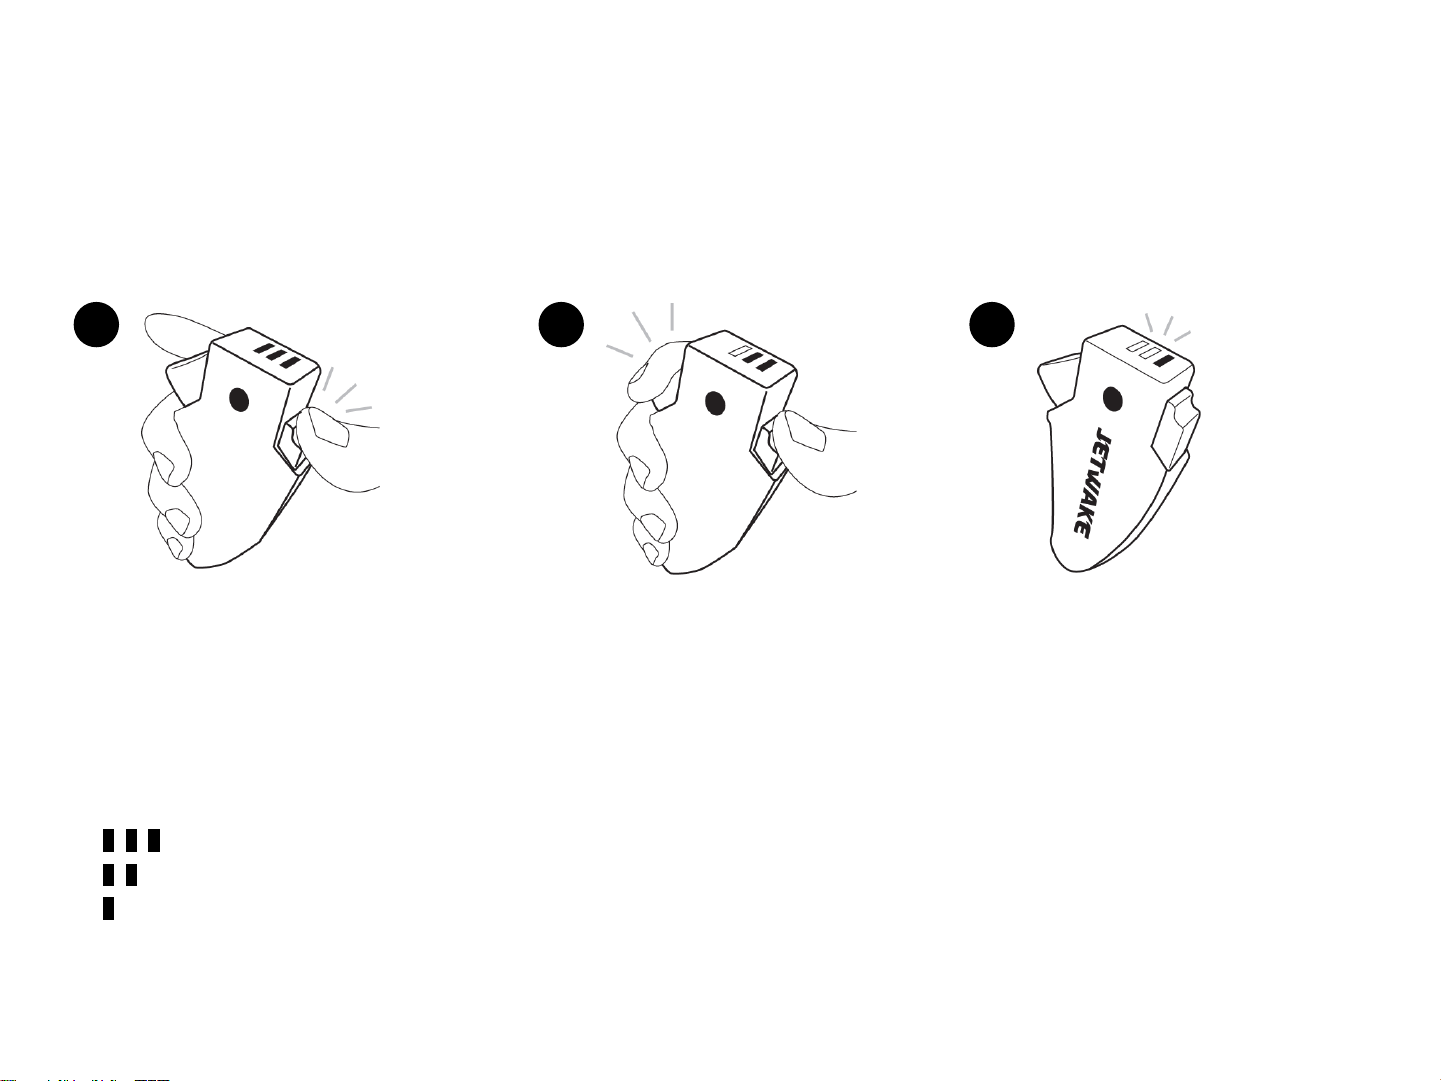
3 Setting the speed of the wireless controller
While holding down the power lever Press the trigger to adjust the step.
After adjusting the power,
press the power lever Release the
trigger.
Level 3 : Maximum speed
Level 1 : Low speed
Level 2 : Medium speed
Explanation by 3 levels
- Since the level setting is one time, set the level when using it.
- Set the level before riding the B200 and use it.
1 2 3
Page 19
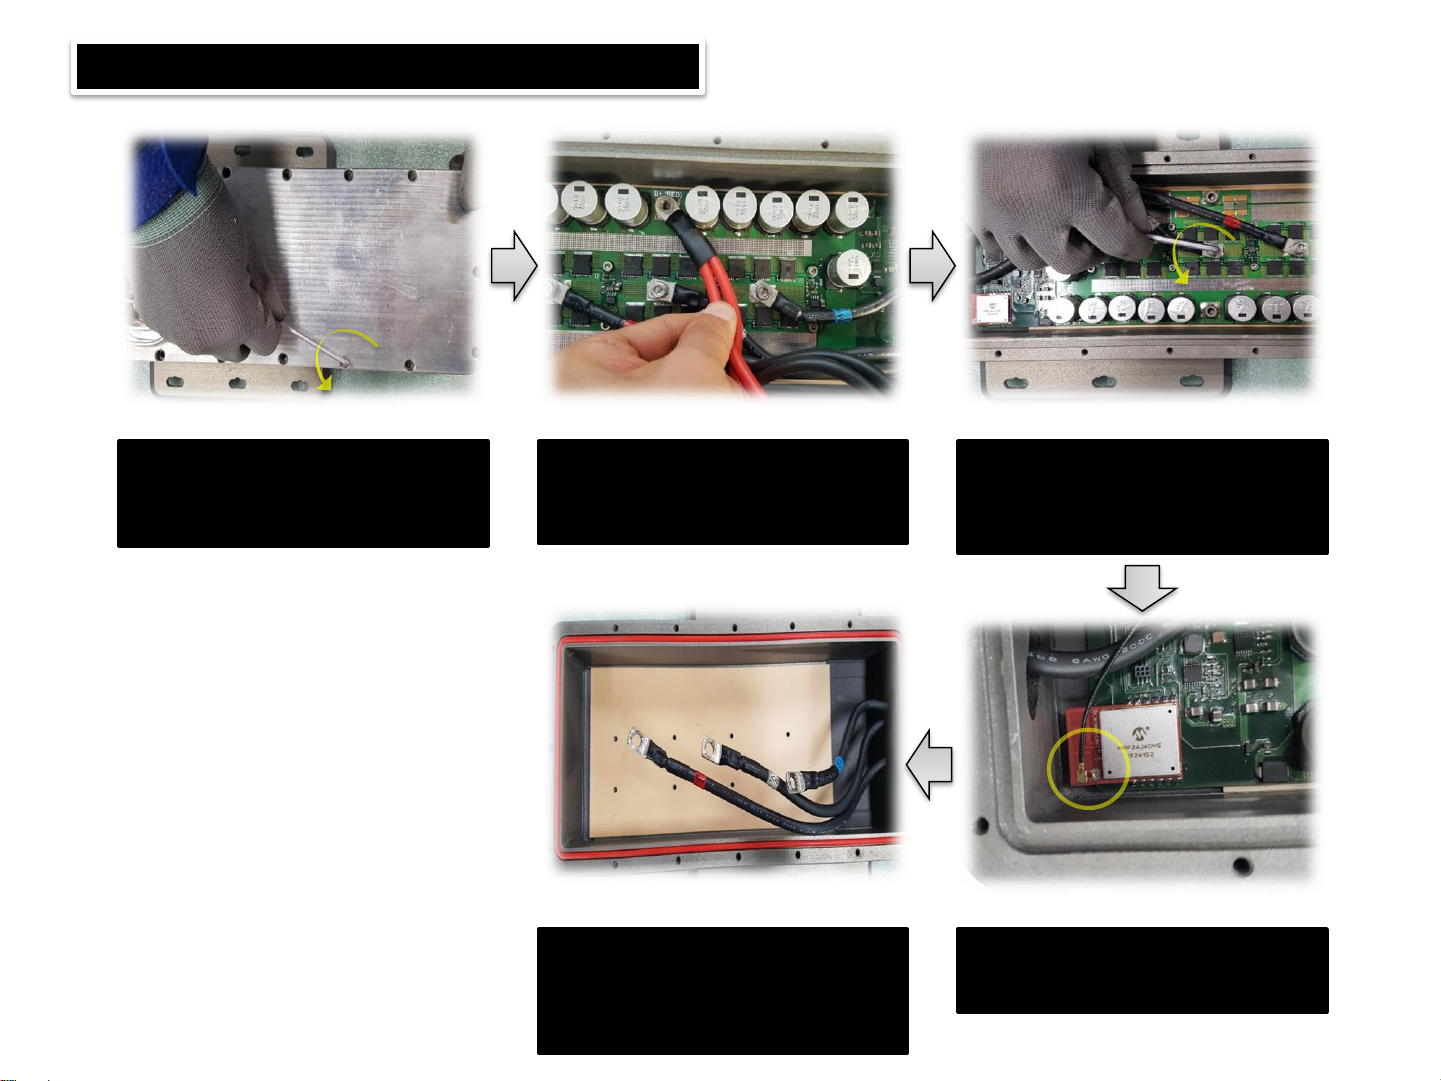
Replacement of the main control PCB
① Please remove the cover of main
control using the hex keys wrenches
in a counterclockwise direction .
② Please seperate the bolts(M5) which
are connected with red line(+) and
black line(-) in a counterclockwise
direction
Using the hex keys wrenches in a
counterclockwise direction , separate
the bolts(M4) which is clamped with
U,V, and W-lines.
⑥ Before closing the cover, you should
put a rubber packing. Please remove
the original PCB and replace a new
PCB. For assembling, Do it in reverse
order
④ Plz pull out the antenna connector
by the hands.
Page 20
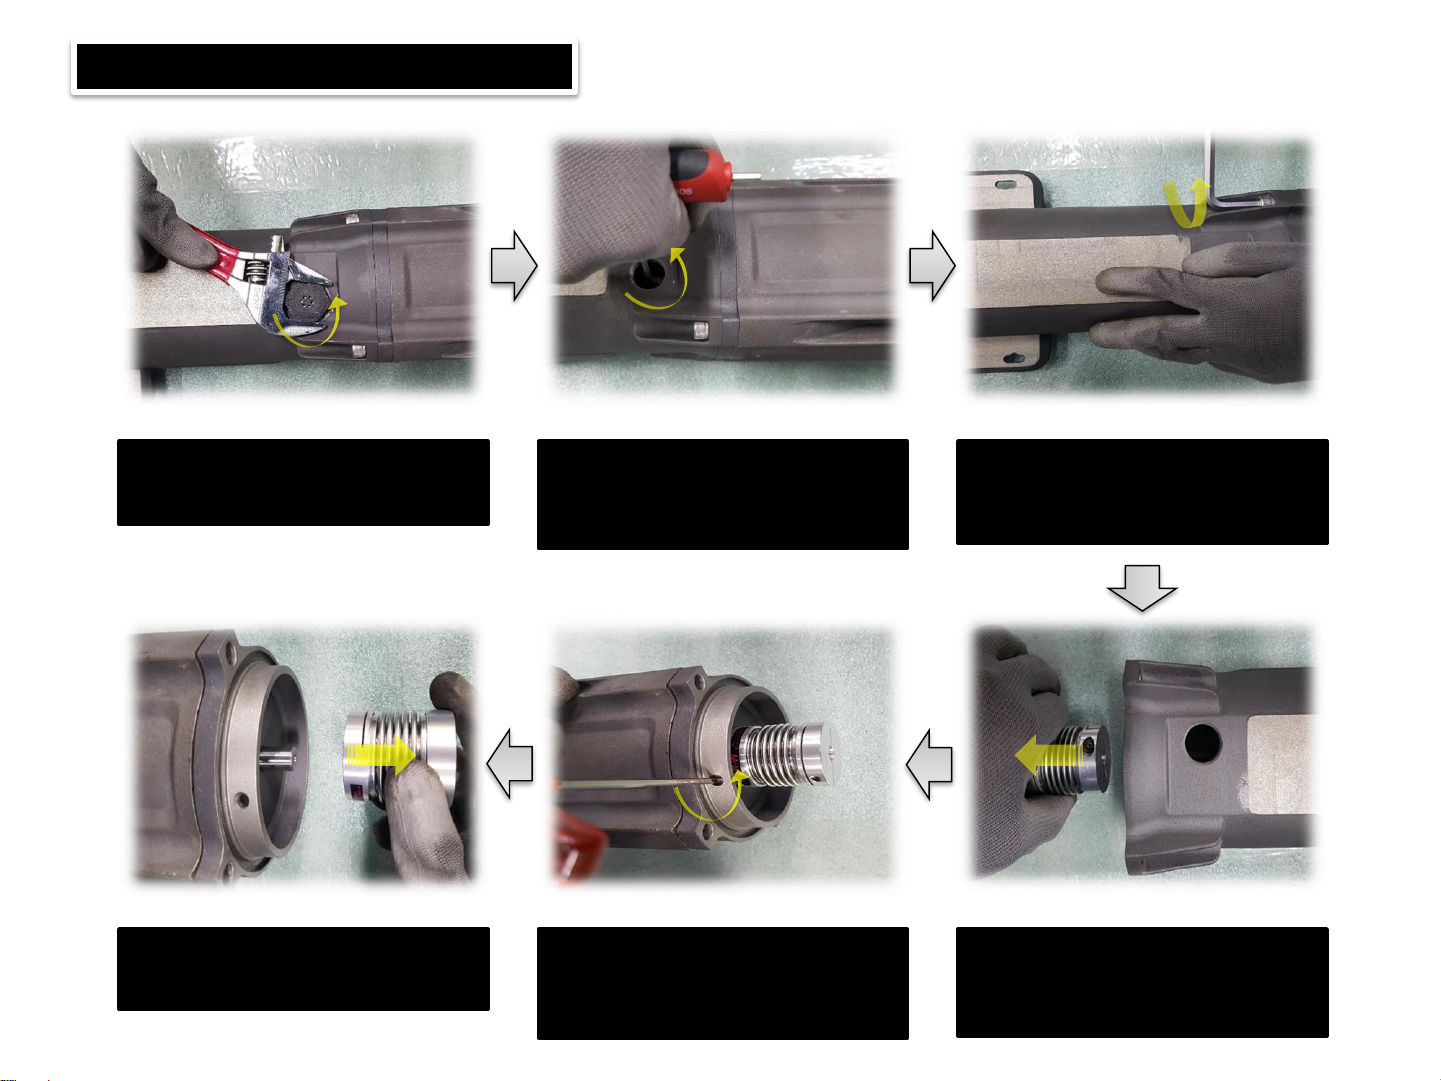
Replacement of the coupling
① Please remove the vent-plug using a
spanner.
② Please remove the setscrew(M4)
which is clamped with the coupling
using the hex keys wrenches in a
counterclockwise direction
③ Please remove the bolts(M8) which is
clamped with BLDC Motor and Jet
Tunnel using the hex keys wrenches in a
counterclockwise direction.
⑥ After pulling out the coupling by
hands, For assembling new one, do
it in reverse order
⑤ Remove the setscrew(M4) which is
clamped with the motor using the
hex keys wrenches in a
counterclockwise direction
④ Please pull out and seperate the
coupling from the shaft of Jet
Tunnel by hands
Page 21
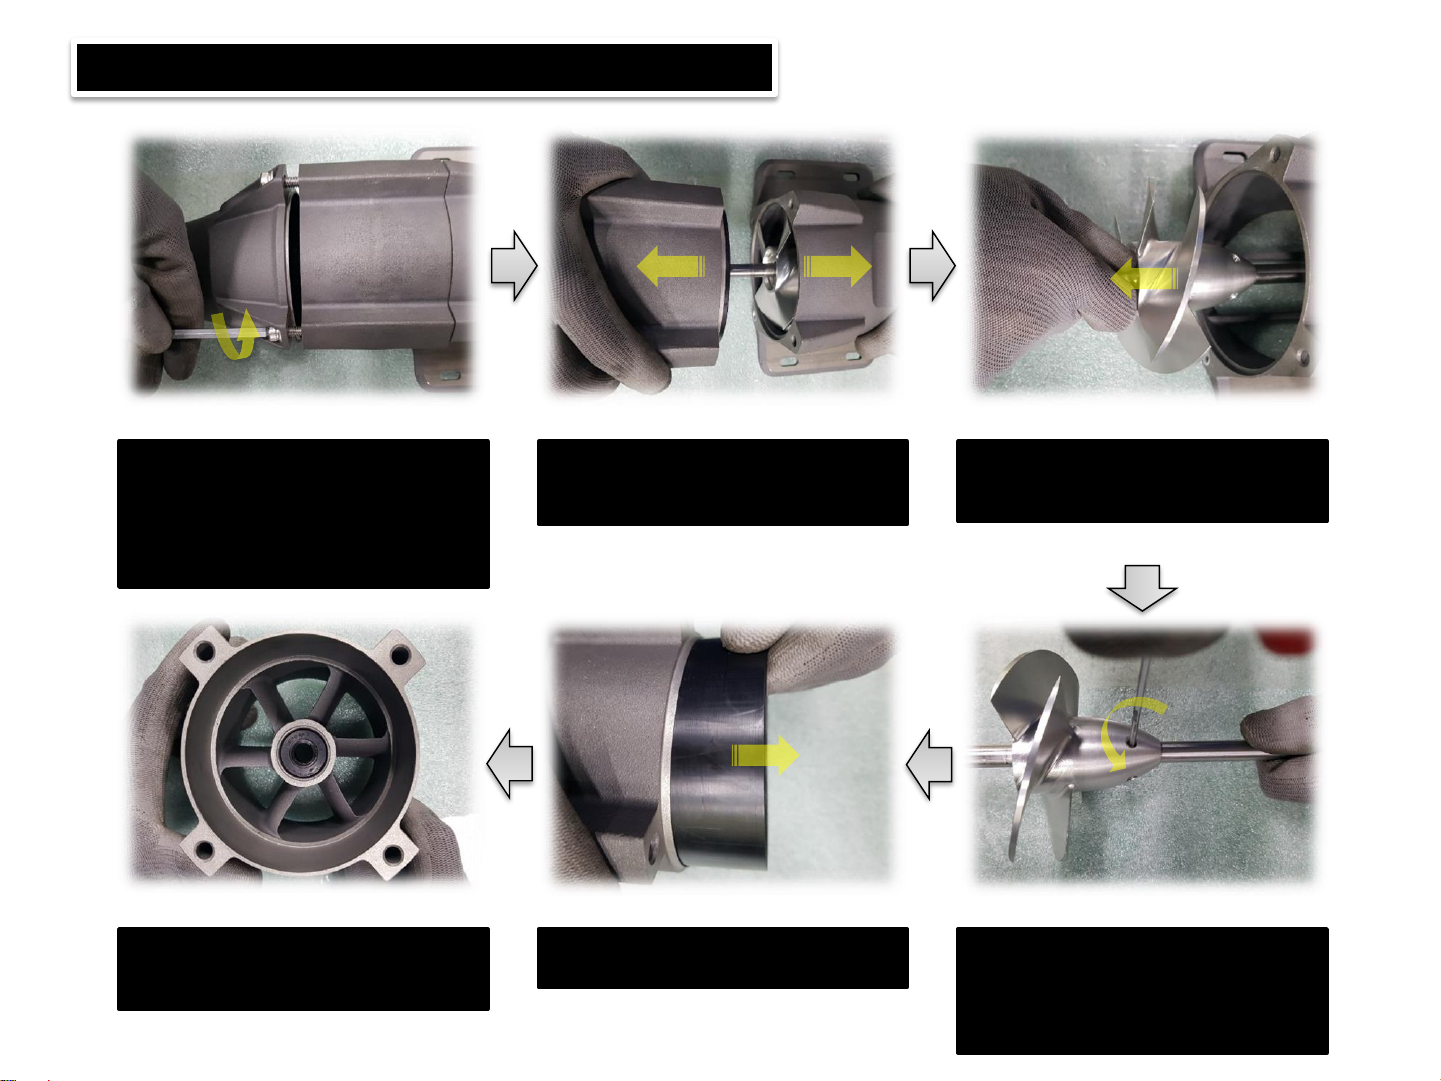
Replacement of the bushing and impeller
① Please follow the replacement of the
coupling ① to ④, remove the
bolts(M6) which is clamped with Jet
nozzle and guide vane using the hex
wrenches in a counterclockwise
direction.
② Please pull out the Jet nozzle and
guide vane in a horizontal direction
③ Please pull out a shaft and impeller
from the Jet tunnal in a horizontal
direction by hands.
⑥ Please replace new ones and than
for assembling new one, do it in
reverse order.
⑤ Pull out a bushing at the edge of
guide vane.
④ Remove the setscrew(M5) using hex
keys wrenches in a counterclockwise
direction and than, the pull out the
shaft in a horizontal direction by
hands.
Page 22
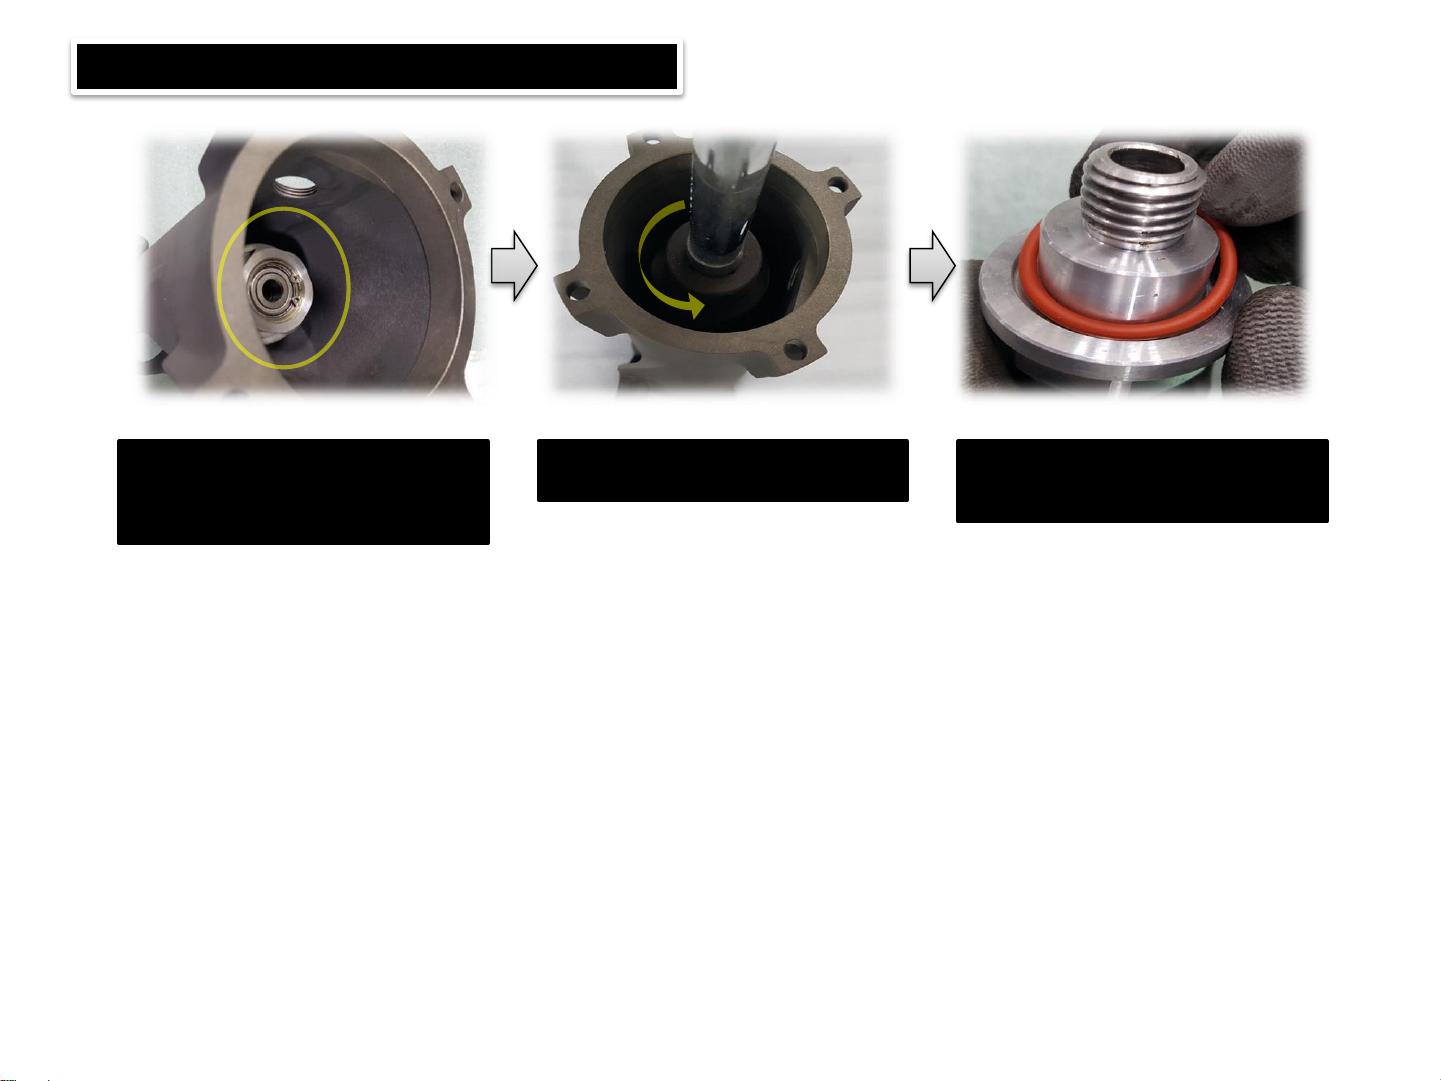
Replacement of the Bearing module
Please follow the replacement of
the coupling ① to ④, and than
follow replacement of the bushing
and impeller ① to ③.
② Using the box wrench(M20), remove
the bearing module.
③ Please replace new ones and than
for assembling new one, do it in
reverse order
Page 23
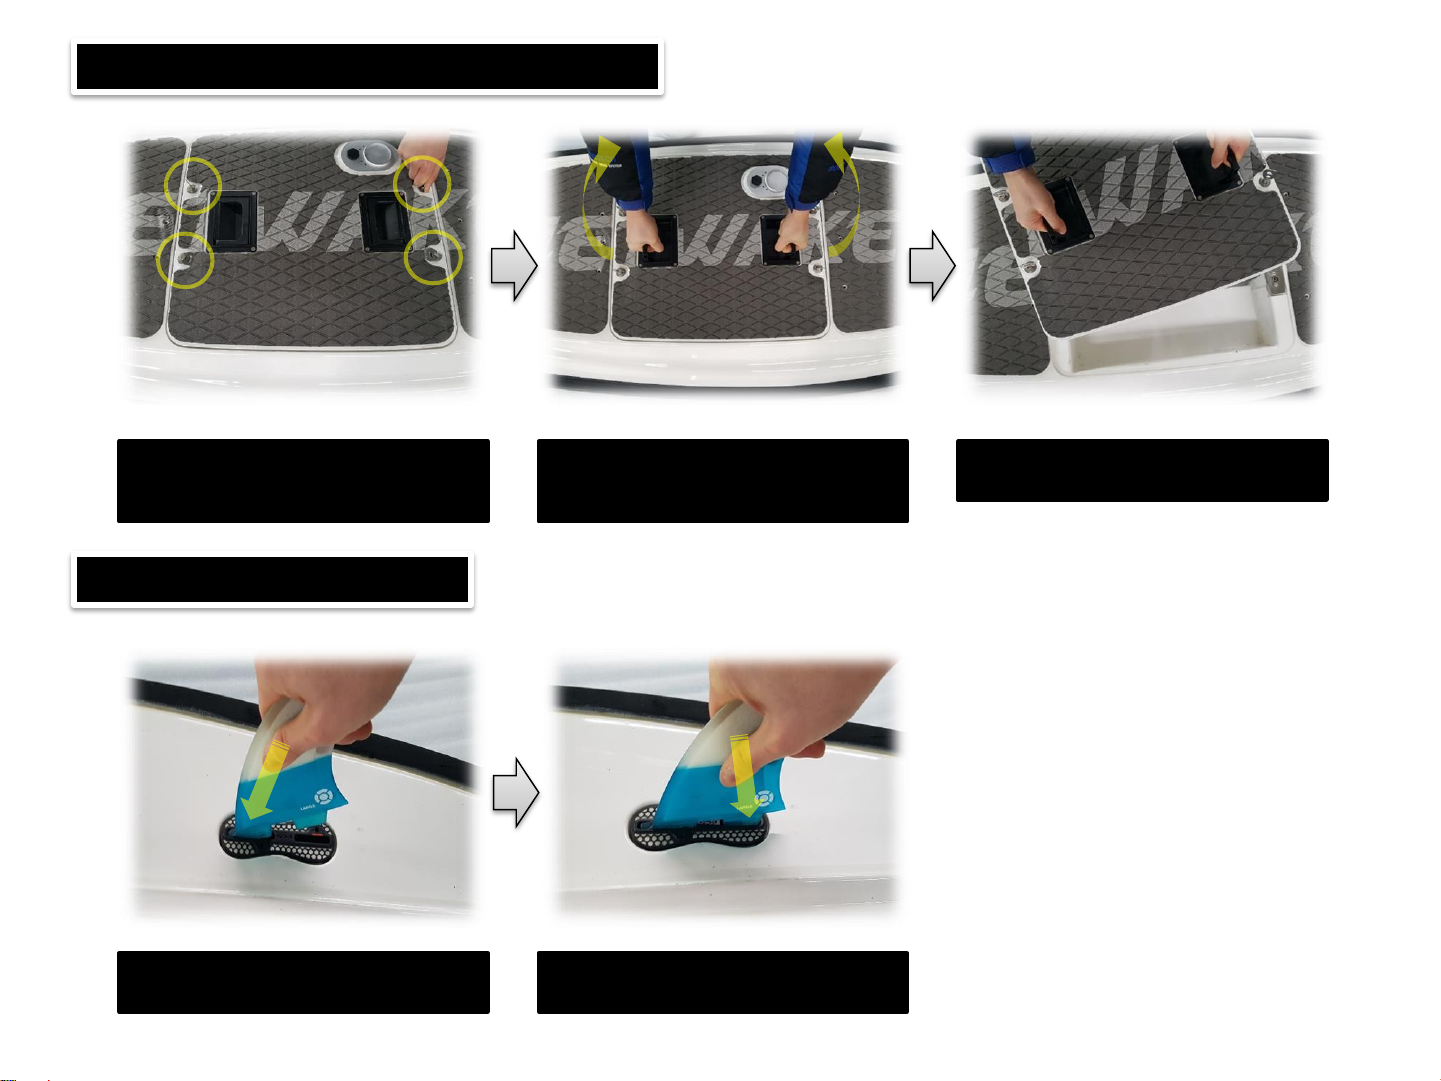
The separation of the battery pack
① To unlock them, please turn 4
Fasteners at 180 degrees in a
counterclockwise direction.
② Please hold the two handles by
hands.
③ To seperate battery pack from the
board, softly lift up it.
① Firstly, put the forward direction of
pin in the pinbox.
② And than put the backward of pin in
the pinbox.
Installation of the pin
Page 24
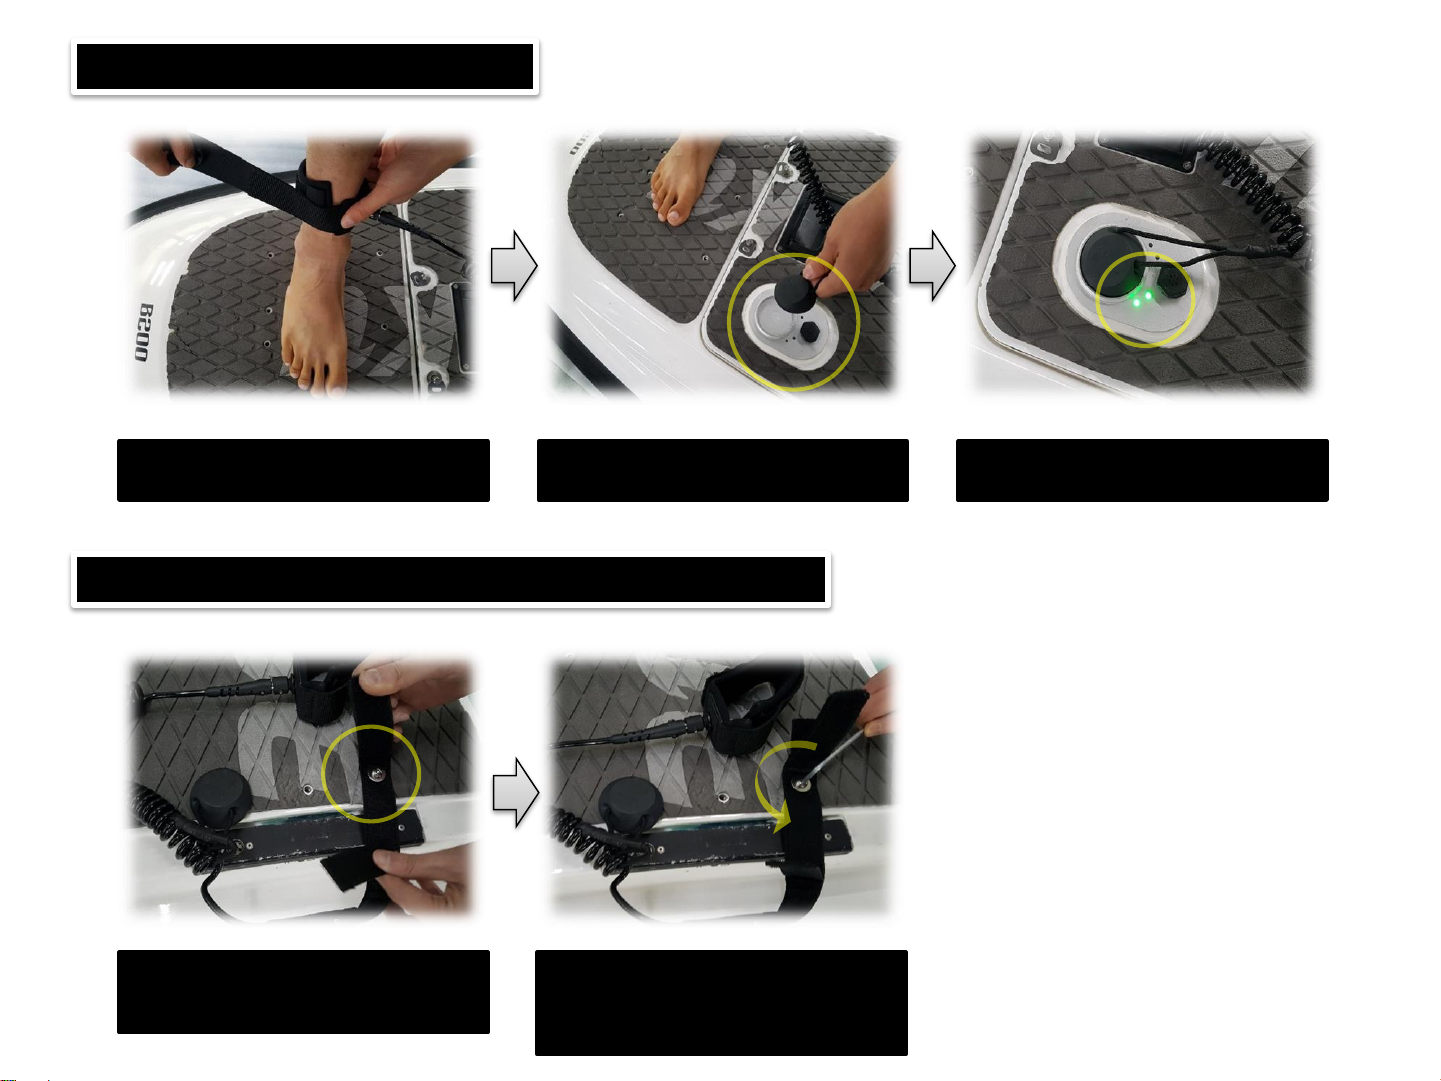
Magnet switch and Leash
① Please properly fasten the leash to
axis of the back of the ankle.
② Please put magnet switch on the
magnet switch holder.
③ Please check the light of magnet
switch holder.
Replacement of the magnet switch and leash
① Please remove the leash of velcro
on the forward board
② Please replace the magnet switch
and Leash using the hex keys
wrenches in a counterclockwise
direction.
Page 25
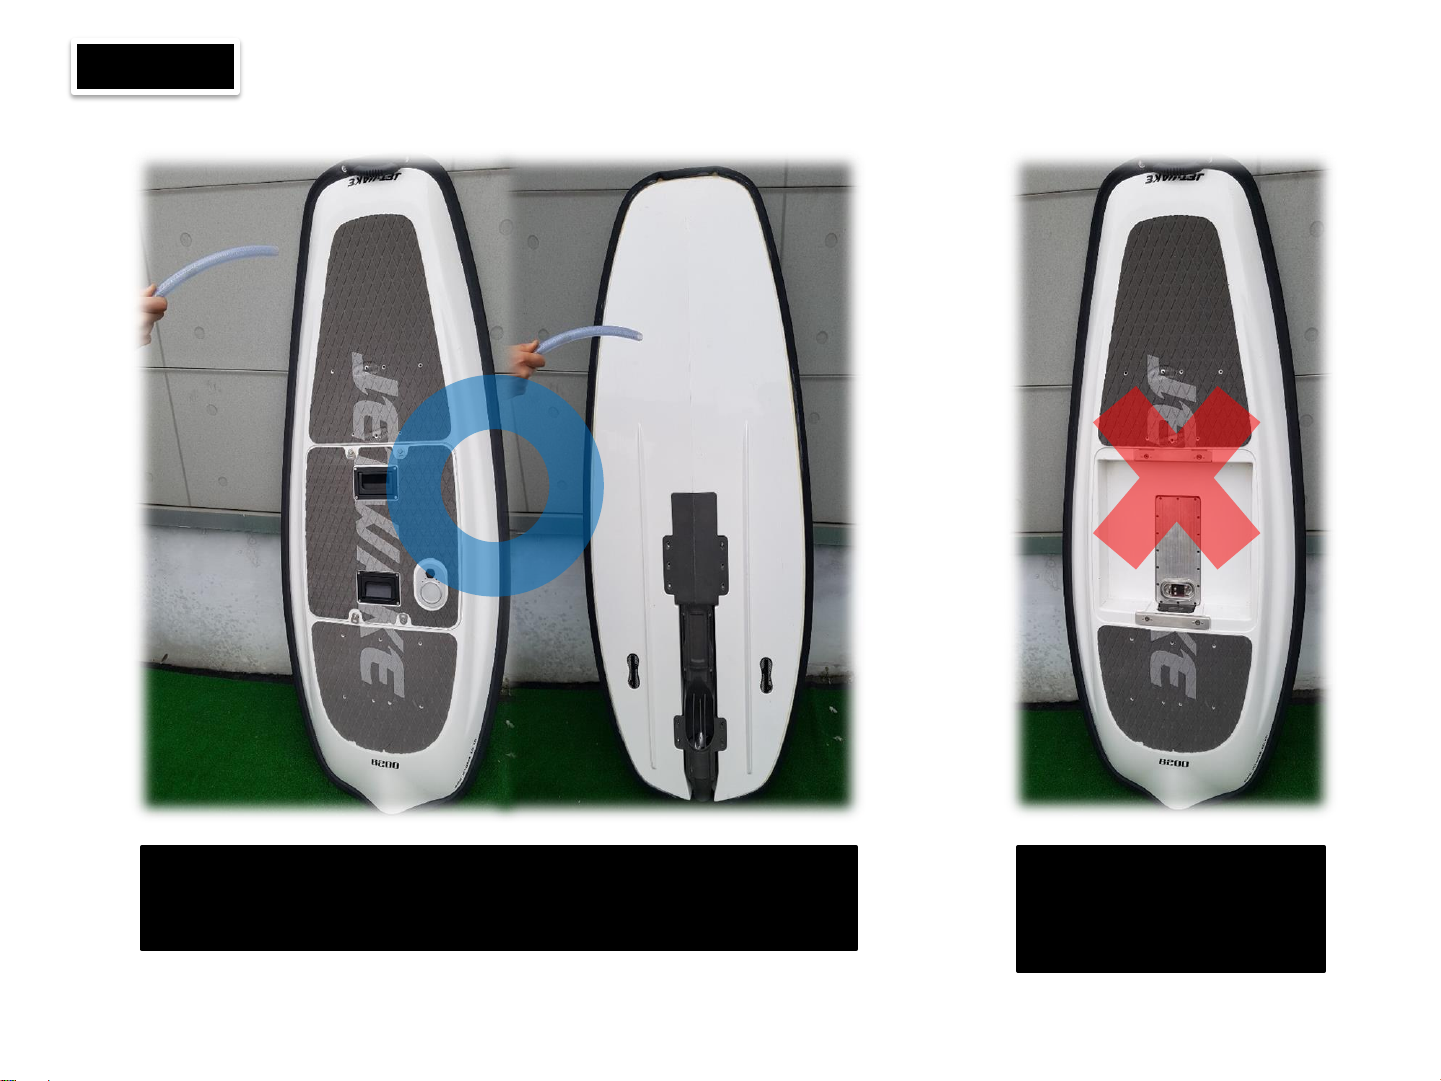
Clean
Caution> Please do not wash
with the separation of battery
pack.
Please sprinkle freshwater on the board without the separation of battery pack.
Caution> If your board meet the salt water, it`s going to cause corrosion.
So please after using board, you should clean yours in freshwater.
Page 26

FCC Compliance information
This device complies with part 15 of the FCC rules. Operation is subject to the following two
conditions: (1) This device may not cause harmful interference, and (2) this device must accept any
interference received, including interference that may cause undesired operation.
This equipment has been tested and found to comply with the limits for a Class B digital device,
pursuant to part 15 of the FCC Rules. These limits are designed to provide reasonable protection
against harmful interference in a residential installation. This equipment generates, uses and can
radiate radio frequency energy and, if not installed and used in accordance with the instructions,
may cause harmful interference to radio communications. However, there is no guarantee that
interference will not occur in a particular installation. If this equipment does cause harmful
interference to radio or television reception, which can be determined by turning the equipment
off and on, the user is encouraged to correct the interference by one of the following measures:
-Reorient or relocate the receiving antenna.
-Increase the separation between the equipment and receiver.
-Connect the equipment into an outlet on a circuit different from which the receiver is connected.
-Consult the dealer or an experienced radio/TV technician for help.
Any changes or modifications not expressly approved by the party responsible for compliance could
void the user's authority to operate this equipment. This transmitter must not be co-located or
operating in conjunction with any other antenna or transmitter. - Consult the dealer or an
experienced radio/TV technician for help.
Caution : Any changes or modifications in construction of this device which are not expressly
approved by the party responsible for compliance could void the user's authority to operate the
equipment.
This equipment complies with RF exposure requirements set forth for an uncontrolled environment.
 Loading...