

Page 1

OWNER'S MANUAL
JOVS-10 Oscillating Spindl e Sander
WMH TOOL GROUP
Consumer/Light Industrial Products Division
P.O. BOX 1349
Auburn, WA 98071-1349
▪
Ph: 1-800-274-6848
E-mail: jet@wmhtoolgroup. co m
www.wmhtoolgroup.com M-708411 11/02
Copyright © WMH Tool Group
Fax: 1-800-274-6840
Page 2

2
This manual has been prepared f or the owner and operators of a JOVS-10 Sander. Its purpose, aside
from machine operation, is to promote safety through the use of accepted correct operating and
maintenance pr ocedures. Complet ely read the saf ety and maint enance instructions bef ore operati ng or
servicing the mac hine. To obtain maximum lif e and efficiency from your JET Sander, and to aid in using
the machine safely, read this manual thoroughly and follow instructions carefully.
Warranty & Service
The WMH Tool Group warrants ever y pr oduc t it sells. If one of our tools needs service or repai r, one of
our Authorized Repair Stations located throughout the United States can give you quick service.
In most cases, any one of these WM H Tool Group Repair Stations can authorize warranty repair, assist
you in obtaining parts, or perform routine maintenance and major repair on your JET, Performax, Wilton,
or Powermatic tools.
For the name of an Authorized Repair Station in your area, please call 1-800-274-6848, or visit
www.wmhtoolgroup.com
More Information
Remember, the WMH Tool Group is consistently adding new product s to the line. For complete, up-todate product information, check with your local WMH Tool Group distributor, or visit
www.wmhtoolgroup.com
WMH Tool Group Warranty
The WMH Tool Group (including Performax, Wilton and Powerm atic brands) makes every eff ort to assure
that its products meet high quality and durability standards and warrants to the or iginal retail
consumer/purc haser of our products that each pr oduc t be free from defects in materials and workm anshi p
as follow: 1 YEAR LIMITED WARRANTY ON ALL PRODUCTS UNLESS SPECIFIED OTHERWISE.
This Warranty does not apply to defects due directly or indirectly to misuse, abuse, negligence or
accidents, normal wear-and-tear, repair or alterations outside our facilities, or to a lack of mai ntenance.
THE WMH TOOL GROUP LIMITS ALL IMPLIED WARRANTIES TO THE PERIOD SPECIFIED ABOVE,
FROM THE DATE THE PRODUCT WAS PURCHASED AT RETAIL. EXCEPT AS STATED HEREIN,
ANY IMPLIED WARRANTIES OR MERCHANTIBILITY AND FITNESS ARE EXCLUDED. SOME
STATES DO NOT ALLOW LIMITATIONS ON HOW LONG THE IMPLIED WARRANTY LASTS, SO THE
ABOVE LIMITATION MAY NOT APPLY TO YOU. THE WMH TOOL GROUP SHALL IN NO EVENT BE
LIABLE FOR DEATH, INJURIES TO PERSONS OR PROPERTY, OR FOR INCIDENTAL,
CONTINGENT, SPECIAL, OR CONSEQUENTIAL DAMAGES ARISING FROM THE USE OF OUR
PRODUCTS. SOME STATES DO NOT ALLOW THE EXLUSION OR LIMITATION OF INCIDENTAL OR
CONSEQUENTIAL DAMAGES, SO THE ABOVE LIMITATION OR EXCLUSION MAY NOT APPLY TO
YOU.
To take advantage of t hi s warranty, the product or part must be returned for examination, postage
prepaid, to an Authorized Repair Station desi gnated by our office. Proof of purchase date and an
explanati on of the complaint must accompany the merchandise. If our inspection discloses a defect, we
will either repair or replace the product, or ref und the purchase price if we cannot readily and quickly
provide a repair or r eplac em ent, if you ar e willing to accept a refund. We will return r epair ed pr oduc t or
replacement at J ET’S ex pense, but if it is determined there is no defect, or that the defect resulted from
causes not within the scope of JET’S warranty, then t he user m ust bear the cost of storing and returning
the product. This warranty gives you specific legal rights; you may also have other rights which vary from
state to state.
The WMH Tool Group sell s thr ough distr ibutors only. Members of the WMH Tool Group r eserve the right
to effect at any time, without prior notice, those alterations to parts, fit tings, and accessory equipm ent
which they may deem necessary f or any r eason what s oever.
Page 3

3
WARNING
Wear eye protection .
Always keep guards in pl ace and in p rop er operati ng condition. Do not operate the machine
without the guards for an y reason .
This sander is intended to be used with wood and wood products only. Use of this sander and a
dust collector with metal products is a potential fire hazard.
Support the workpiece adequately at all times during operation; maintain control of the work at all
times.
This sander is designed and intended for use by properly trained and experienced personnel only.
If you are not familiar with the proper and safe operation of a sander, do not use until proper
training and knowledge has been obtained.
• REMOVE ADJUSTING KEYS AND WRENCHES. Form a habit of chec ki ng to see that keys and
adjusting wrenche s are removed from the machine before t ur ning it on.
• KEEP THE WORK AREA CLEAN. Cluttered areas and benches inv ite accident s.
• DON’T USE IN A DANGEROUS ENVIRONMENT. Don’t use power tools in damp or wet loc ations,
or expose them to rain. Keep work area well lighted.
• KEEP CHILDREN AWAY. All visitors should be kept a safe distance from the work area.
• MAKE THE WORKSHOP KIDPROOF with padlocks, m aster swatche s, or by removing starter keys.
• DON’T FORCE THE MACHINE. It will do the job bett er and saf er at t he rate for which it was
designed.
• USE THE RI GHT TOOL. Don’t force a machine or attachment to do a job for which it was not
designed.
• USE THE PROPER EXTENSION CORD. Make sure your extension cord is in good condition. When
using an extensi on c or d, be sure to use one heavy enough to carry the current your m ac hine will
draw. An undersized cord will cause a drop in the line voltage resulting in power loss and
overheating. The table following shows the correct size to use depending on the cord length and
nameplate amper e r ating. If in doubt, use the next heavier gauge. Remember , t he smaller the gauge
number, the heavier the cord.
Volts Total Length of Cord in Feet
120V 25 50
16 14
• WEAR PROPER APPAREL. Do not wear loose clothing, gloves, neck ties, rings, bracelets, or other
jewelry which may get caught in moving parts. Nonslip footwear is recommended. Wear protective
hair covering to contain long hair.
• ALWAYS USE SAFETY GLASSES. Also use face or dust masks if the cutting operation is dusty.
Everyday eyeglasses only have impact resistant lenses; they are not safet y gl asses.
• DON’T OVERREACH. Keep proper f ooting and balance at all times.
• MAINTAIN TOOLS WITH CARE. Keep tools sharp and clean for best and safest performance.
Follow instructions for lubricati ng and changing accessories.
AWG
Page 4

4
• ALWAYS DISCONNECT THE MACHINE FROM THE POWER SOURCE BEFORE SERVICI NG.
• REDUCE THE RISK OF UNINTENTIONAL STARTING. Make sure the switc h is in the off position
before pluggi ng i n.
• USE RECOMMENDED ACCESSORIES. The use of accessories and attachments not
recommended by JET may cause hazards or risk of injury to persons.
• NEVER STAND ON A MACHINE. Serious injury could oc c ur if t he m ac hine is ti pped.
• CHECK DAMAGED PARTS. Before further use of the mac hine, a guard or other part that is
damaged should be carefully checked to determine that it will operate properly and perform its
intended function - check for alignment of moving parts, binding of movi ng parts, br eak age of parts,
mounting, and any other conditions that may aff ect its operation. A guard or other part that i s
damaged should be properly repaired or replaced.
• NEVER LEAVE THE MACHINE RUNNING UNATTENDED. TURN POWER OFF. Don’t leave the
machine until it com es to a c om plete stop.
• SOME DUST CREATED by power sanding, sawing, gr inding, drilling and other construction activ ities
contains chemicals known to cause cancer, birth defects or other reproductive harm. Some
examples of these chemicals are:
• Lead from lead based paint
• crystalline silica from bricks and cement and other masonry products, and
• arsenic and chromium from chemically-tr eated lumber.
• Your risk from those exposures varies, depending on how often you do this type of work. To reduce
your exposure to these chemicals: work in a well ventilated area, and work with approved safety
equipment, such as those dust masks that are specificall y desi gned to filter out microscopic par ticles
• DO NOT operate tool while under the influence of drugs, alcohol or any medication.
• AVOID kickback by sanding in accordance with directional arrows.
• DO NOT sand pieces of material that are too small to be safely supported.
• WHEN sanding a lar ge workpiece, provide addit ional support at table height .
• ADDITIONAL INFORMATION regarding the safe and proper operation of this product is available
from the National S afet y Council, 1121 Spring Lake Drive, Itasca, IL 60143-3201, in the Accident
Prevention Manual for Industrial Operati ons and al so i n the safety Data Sheets provided by the NSC.
Please also refer to the American National Standards Institute ANSI 01. 1 Safety Requirements for
Woodworking M ac hiner y and the U. S. Depar tment of Labor OSHA 1910.213 Regulati ons.
• SAVE THESE INSTRUC TIONS refer to them often and use them to instruct others.
Page 5
5
Grounding Instructions
Caution: This tool must be ground ed while in use to protect the operator fro m electric shock.
In the event of a malfunction or breakdown, grounding provi des a path of least resistance for elec tric
current to reduce t he ri sk of elec tric shock. This tool is equipped with an electric cord having an
equipment-gr ounding conductor and a grounding plug. The plug must be plugged into a matching outlet
that is properly installed and grounded in accor danc e wi th all local codes and ordinances.
Do not modify the plug provided. If it will not fit the outlet, hav e the proper outlet installed by a qualified
electrician.
Improper connection of the equipment- gr ounding conductor can result in a risk of electric shock. The
conductor, with insulation having an outer surface that is green with or without yellow stripes, is the
equipment-gr ounding conductor. If repair or replacement of the electric cord or plug i s necessary, do not
connect the equi pm ent- gr ounding conductor to a live t erminal.
Check with a qualified electrician or service per sonnel if t he grounding instructions are not c om pletely
understood, or if i n doubt as to whether t he tool is properly grounded. Use only t hree wire extension
cords that have thr ee- pr ong gr ounding plugs and three-pole r ec eptacles that accept the tool ’s pl ug.
Repair or replace a dam aged or worn cord im mediately.
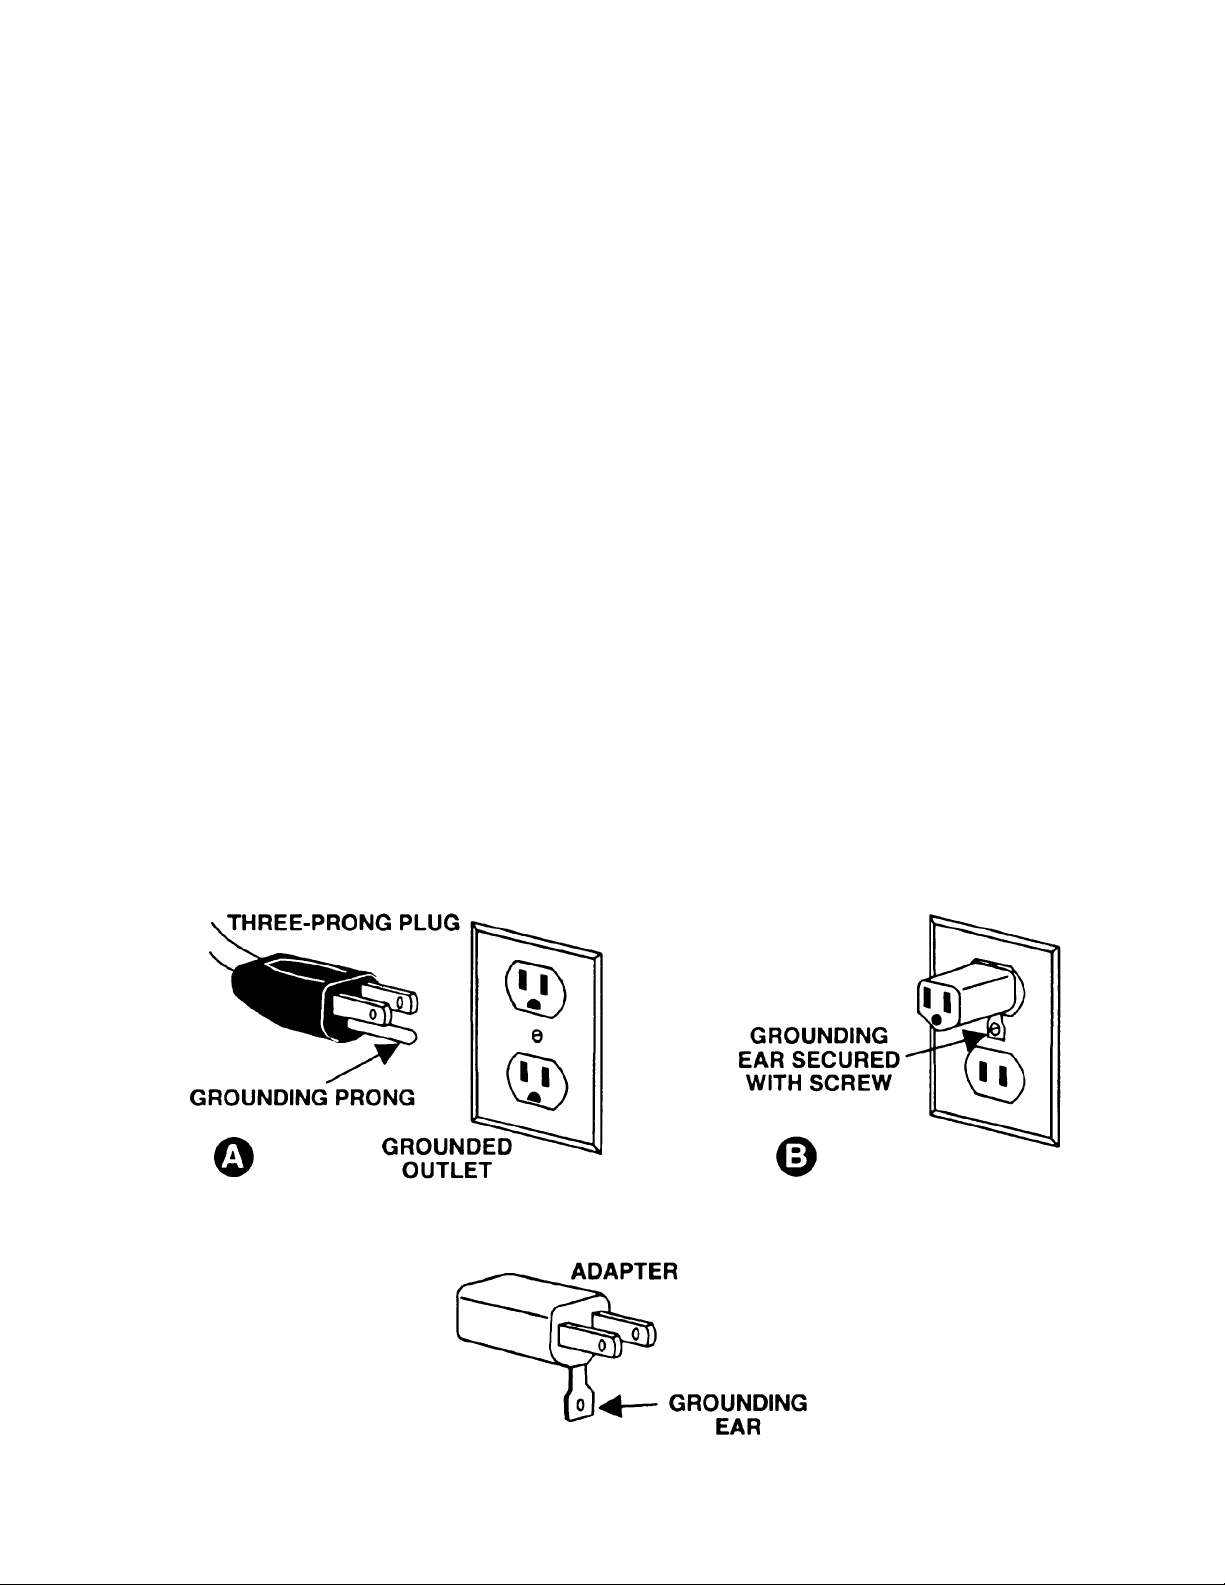
115 Volt Operation
As received fr om the factory, your sander is ready to run at 115 volt oper ation. This sander, when wired
for 115 volt, is int ended for use on a circuit that has an outlet and a pl ug that look s li k e the one illustrated
in (A). A temporary adapt er , which looks like the adapter as ill ustr ated in (B), may be used to connect
this plug to a two-pole receptacle, as shown in (B) if a properly gr ounded outlet is not available. The
temporary adapt er shoul d only be used until a properly grounded outlet can be installed by a qualified
electrician. This adapter is not applic a ble in Ca nada. The green colored rigid ear, lug, or tab,
extending fr om t he adapter, must be connected to a permanent ground such as a properly grounded
outlet box, as shown in (B ).
Page 6

6
Specifications JOVS-10
Stock Number................................................................................................................................ 708411
Table Size..............................................................................................................................24”W x 24”L
Table Til t (do wn)...................................................................................................................................45°
Dust Chute Diameter..............................................................................................................................4”
Spindle Speed (RPM) .......................................................................................................................1,725
Oscillations Per Minute..........................................................................................................................75
Length of Oscillation .........................................................................................................................1-1/2”
Motor (TEFC)..............................................................................................................................1HP, 1Ph
................................................................................................................................................. 115V Only
Net Weight (approx.).....................................................................................................................298 Lbs.
Table of Contents Page No.
Warranty..................................................................................................................................................2
Warnings ....................................................................................................................... .......................3-4
Grounding Instructions.............................................................................................................................5
115V Operation .......................................................................................................................................5
Specifications..........................................................................................................................................6
Table of Contents....................................................................................................................................6
Contents of the Shipping Container..........................................................................................................7
Tools Required for Assembly & Adjustments............................................................................................7
Unpacking ...............................................................................................................................................7
Mounting Sanding Sleeves ......................................................................................................................8
Installing S anding Assemblies..................................................................................................................8
Removing Sandi ng Assemblies................................................................................................................8
Table Insert .............................................................................................................................................9
Sanding Assembl y 90° to Table...............................................................................................................9
Replacing Sanding Sleeves...................................................................................................................10
Dust Collection......................................................................................................................................10
Maintenance..........................................................................................................................................10
Troubleshooting.....................................................................................................................................11
Breakdown and Parts List.................................................................................................................12-17
Wiring Diagram......................................................................................................................................18
The specifi cations in this manual are given as general i nformation and are not bi nding. The WMH Tool
Group reserv es the right to effect, at any time and without pri or notice, changes or alt erations to parts,
fittings, and acc essory equi pment deemed necessary for any r eason whatsoever.
Page 7

7
Contents of the Shipping Container
1. Sander
3. Table Insert Rings
2. Spindle Wrenches
1. 2mm Hex Wrench
10 Removable Spindles
1/4” x 5” Steel and Sanding Sleeve
3/8” x 6” Steel and Sanding Sleeve
1/2” x 6” Steel and Sanding Sleeve
5/8” x 6” Steel and Sanding Sleeve
3/4” x 9” Steel and Sanding Sleeve
1” x 9” Rubber and Sanding Sleeve
1-1/2” x 9” Rubber and Sandi ng Sl eeve
2” x 9” Rubber and Sanding Sleeve
3” x 9” Rubber and Sanding Sleeve
4” x 9” Rubber and Sanding Sleeve
1 Owner's Manual
1 Warranty Card
Tools Required for Assembly &
Adjustments
1. 26mm Wrench or Large Adjustable Wrench
1. 6mm Hex Wrench
1. Square
WARNING
Read and understand th e entire contents of
this manual before attempting assembly or
operation of the sander!
Failure to compl y may cause seri ou s in ju ry!
Unpacking
1. Remove all cont ents from shipping carton.
2. Report any damage to y our di stri butor.
3. Do not discard any shipping material until
the sander has been assembled and is
running properly.
4. With help from another person move the
sander off of the pall et and into the desired
position.
5. Remove the protective coati ng found on the
table with a putty knife and a cleaning
solvent that will not damage painted
surfaces.
Note: Now is a perf ect time t o set your sander
up on a mobil e base. It will make lif e easier in
the woodshop. JET has a Heavy Duty Univ er sal
Mobile Base that will fit this sander. JET also
has a variety of Dust Coll ector s and Air Filt ration
Units that will work nicely with your new sander.
Page 8

8
Mounting Sanding Sleeves
1. Thoroughly cl ean the arbors (A, Fig. 1) on all
of the spindle assemblies. Also clean the
arbor housing on the sander.
2. Sli p the sanding sleev e (B, Fig. 1) over the
spindle and hold in place by tightening the
set screw (C, Fi g. 1) with the supplied 2mm
hex wrench.
3. Repeat for all of the steel spindle
assemblies.
4. To protect the sanding assemblies place
them in the holders found on the sides of the
sander, see Figur e 2.
Installing Sanding Assemblies
WARNING
Disconnect the sander f rom the power
source when instal li ng or remo ving sand in g
assemblies.
Failure to compl y may cause seri ou s in ju ry!
1. Thoroughly clean the arbor and arbor
housing before installing the sanding
assemblies.
2. Thread the arbor (A, Fig. 3) into the arbor
housing (B, Fig. 3).
3. Use the provided wrenches to hold the lower
arbor housing nut (C, Fig. 3) while turning
the arbor nut (D, Fi g. 3) cl ockwise.
Removing Sanding Assemblies
1. Disconnect the sander form the power
source, unplug.
2. Use the provided wrenches to hold the
upper arbor housing nut (E, Fig. 3) while
turning the arbor nut (D, Fig. 3) counterclockwise.
Page 9

9
Table Insert
1. Disconnect the sander form the power
source, unplug.
2. Choose the insert (A, Fig. 4) that most
closely matches the di ameter of the sanding
drum.
3. Line up the notch in the insert with the
spring pin i n the table (B, Fig. 4), and press
in place.
4. Remove the insert by pressing up from
underneath. Note: Keep the opening in the
table clean so that the insert can be easily
put in place, and remov ed.
Sanding Assembly 90° to Table
1. Loosen the lock knobs (C, Fig. 5) on
trunnions and position the table so that it
rests against the 90° stop (D, Fig. 6).
Tighten lock knobs.
2. Place a square (E, Fig. 5) on the working
side of the table, and mak e sure t he sanding
drum is perpendic ular to the table.
3. If an adjustment needs to be made loosen
the hex nut (F, Fig. 6).
4. Loosen lock knobs.
5. Rotate the 90° stop in the appropriate
direction until the table rests 90° to the
sanding drum.
6. Tighten the hex nut while holding the stop.
7. Adjust poi nter (G, Fig. 6) so that it indicates
the “0” position on the scale.
Page 10

10
Replacing Sanding Sleeves
1. Loosen hex nut (A, Fig. 7) with a 26mm
wrench, or large adjustable wrench.
2. Slide the sanding sleeve (B, Fig. 7) off the
drum and replace with a new sanding
sleev e. Note: If the sanding sleev e is not
easily rem oved cut the sleev e off and clean
the drum before rei nstalling a new sleeve.
3. If you are repl acing the sanding sl eeves on
the steel spindles loosen the set screw
found on the arbor nut.
4. Remove sanding sleeve from the spindle
and replace with a new sanding sleeve.
Note: If the sanding sleeve is not easily
removed cut the sleeve off and clean the
drum before reinstalling a new sleeve.
5. Tighten the set screw.
Dust Collection
In order to collect wood dust; attach a dust
collection hose to the dust port. JET has a
variety of dust collectors, air filtration units,
hoses and adaptors, etc. that will work nicely
with your new sander. Contact your local JET
Distributor for more information.
Maintenance
The manufactur er recommends replaci ng the 90
SAE gear lube at 800 hours of use.
1. Open the door on the back side of the
machine to access the drai n plug (C, Fig. 8).
Use a 6mm hex wrench to remov e the drain
plug.
2. Refil l oil through t he oil cap (D, Fi g. 9). The
oil capacity is two quart s.
3. The oil sight glass (E, Fig. 8) should read
between the “high” and “low” marks.
Keep the machine and all att ac hm ents clean.
All bearings are permanently lubricated and
require no further service.
Page 11

11
Troubleshooting
Trouble Possible Cause Solution
Sander wi ll not start
Sandin g dr um doe s not come
up to speed
Machine vibrates excessi vely
Sanded edge not square
Sandi ng marks on wood
1. Sander unplugged from wall
or motor
2. Fuse blown or circuit breaker
tripped
3. Cord damaged
4. Starting capacitor bad
1. Extension cord t oo li ght or
too long
2. Low current
1. Stand or base on uneven
surface
1. Table not square to sanding
drum
1. Wrong grit sanding sl eeve
2. Feed pressure too great
1. Check all plug connections
2. Replace fuse or reset circuit
breaker
3. Replace cord
4. Replace starting capacitor
1. Replace with adequat e si z e
and length cord
2. Contact a qualified electrician
1. Adjust stand or base so that
it rests evenl y on the floor
1. Use a square to adjust table
to sanding drum
1. Use coarser grit for stoc k
removal and fi ne grit for
finish sanding.
2. Never force workpiece
Page 12

12
Breakdown for the JET Oscillating Spindle Sander
Page 13

13
Parts List for the JET JOVS-10
Oscillating Spindle Sander
Index Part
No. No. Description Size Qty.
7..........OVS10-007..................Power Cord ........................................... ...............................................1
11........KEY5525...................... Key ........................................................ ...............................................1
18........OVS10-18 .................... Oil Indicator........................................... ...............................................1
20........OS-30628 .................... Oil Seal.................................................. ...............................................1
21........BB-6206ZZ................... Ball Bearing...........................................6206ZZ ...................................1
22........OVS10-022.................. C-Ring...................................................RA63.......................................1
22A......OVS10-022A................ C-Ring...................................................RA62.......................................1
26........OVS10-026.................. Sleeve................................................... ...............................................1
27........OVS10-027.................. Guide Rail Shaft..................................... ...............................................1
28........BB-6205ZZ................... Ball Bearing...........................................6205LU...................................2
29........OVS10-029.................. Locking Nut........................................... ...............................................1
30........OVS10-030.................. Worm..................................................... ...............................................1
31........OVS10-031.................. Spring Pin..............................................5x30........................................1
32........OVS10-032.................. Main Shaft............................................. ...............................................1
33........KEY5550...................... Key ........................................................5x5x50....................................1
34........OVS10-034.................. Set Screw..............................................M3x12.....................................2
35........OVS10-035.................. Spur Gear.............................................. ...............................................1
36........OVS10-036.................. Brass Bushing ....................................... ...............................................2
37........TS-0208061................. Socket Head Cap Screw........................5/16”-18x1”............................16
38........OVS10-038.................. Transmission Rod Shaft......................... ...............................................2
39........OVS10-039.................. Transmission Rod.................................. ...............................................2
40........TS-0640091................. Hex Nut, Nylon Lock..............................3/8”-16....................................4
47........OVS10-047.................. Switch Cord........................................... ...............................................1
52........OVS10-052.................. Locking Nut...........................................5/8”-11....................................1
55........OVS10-055.................. Rear Trunnion Bracket........................... ...............................................2
56........TS-0208082................. Socket Head Cap Screw........................5/16”-24x1-1/2”......................10
64........OVS10-064.................. Oil Lid.................................................... ...............................................1
66........OVS10-06 6.................. Hex Socket Ca p Sc re w..........................3/8”-1 6 x3/4 ”.............................4
67........TS-0680042................. Flat Washer...........................................3/8”.........................................8
86........OVS10-086.................. Angle Pointer......................................... ...............................................1
87........OVS10-087.................. Pan Head Machine Screw......................10-24x1/4”...............................1
88........OVS10-088.................. Cap ....................................................... ...............................................1
89........OVS10-089.................. Nut ........................................................15/16”-24 R.H .........................2
134......JOVS10-134 ................ Oil Plug.................................................. PT1/4”.....................................1
135......JOVS10-135 ................ Brass Bushing Bracket........................... ...............................................1
136......JOVS10-136 ................ Shaft Brass Bushing .............................. ........................................... ....4
137......JOVS10-137 ................ Knob......................................................5/16”-18x3/4”...........................1
139......JOVS10-139W............. Bracket Base......................................... ...............................................2
140......TS-0680032................. Flat Washer...........................................5/16” .....................................24
141......TS-0051021................. Cap Screw.............................................5/16”-18x5/8”...........................6
142......JOVS10-142 ................ Switch Box............................................. ...............................................1
143......JOVS10-143 ................ Pan Head Machine Screw......................3/16”-24x1-1/2”........................2
143A....JOVS10-143A..............Hex Nut.................................................3/16”-24..................................2
144......JOVS10-144W............. Vent Cover............................................ ...............................................1
145......JOVS10-145W............. Base...................................................... ...............................................1
146......JOVS10-146 ................ Motor Bracket........................................ ...............................................1
147......JOVS10-147 ................ Motor..................................................... ...............................................1
............ JOVS10-147MF ........... Motor Fan (not shown)........................... ...............................................1
............ JOVS10-147MFC......... Motor Fan Cover (not shown)................. ...............................................1
............ JOVS10-147CC ........... Capacitor Cover (not shown).................. ...............................................1
Page 14

14
Index Part
No. No. Description Size Qty.
............ JOVS10-147RC ........... Running Capacitor ( not shown)..............45uf, 250V ..............................1
............ JOVS10-147SC............ Starting Capacitor (not shown)...............300MFD, 125VAC...................1
148......JOVS10-148 ................ Strain Relief Bushing ............................. ...............................................1
149......TS-0720081................. Lock Washe r..........................................5/16”.....................................20
151......JOVS10-151 ................ Coupling Head....................................... ...............................................1
152......JOVS10-152 ................ Tank...................................................... ...............................................1
153......TS-0267041................. Set Screw..............................................1/4”-20x3/8”.............................2
154......JOVS10-154 ................ Tank Lid ................................................ ...............................................1
155......JOVS10-155 ................ Switch Push Button................................ ...............................................1
156......JOVS10-156W............. Sandi ng A ssembly Rack........................ ...............................................2
158......JOVS10-158W............. Rear Trunnion........................................ ...............................................2
159......JOVS10-159 ................ Locking Knob.........................................3/8”-16x3/4”.............................2
160......JOVS10-160W............. Dust Cover ............................................ ...............................................1
161......TS-0051061................. Hex Bolt.................................................5/16”-1 8 x1- 1 /4 ”........................2
162......TS-0561021................. Hex Nut................................................. 5/16”-18..................................6
163......JOVS10-163W............. Working Table ....................................... ...............................................1
164......JOVS10-164 ................ Scale..................................................... ...............................................1
169......JOVS10-169 ................ Fixed Rod.............................................. ...............................................1
170......TS-0561031................. Hex Nut................................................. 3/8”-16....................................2
171......JOVS10-171 ................ Rubber Feet .......................................... ...............................................4
172......JOVS10-172 ................ Sinking Head Screw...............................5/16”-18x3/4”...........................4
174......JOVS10-174 ................ JET Logo............................................... ...............................................1
177......JOVS10-177 ................ Pan Head Screw....................................3/16”-24x3/8”...........................2
178......JOVS10-178 ................ Switch.................................................... ...............................................1
179......JOVS10-179 ................ Spring Pin..............................................3x22........................................1
180......JOVS10-18 0................ Fiber Was h e r.........................................3/8” .........................................2
181......TS-0720091................. Lock Washe r..........................................3/8”.........................................4
182......TS-0271071................. Set Screw..............................................3/8”-16x3/4”.............................1
183......JOVS10-183 ................ Warning Label ....................................... ...............................................1
184......JOVS10-184 ................ I.D Label................................................ ...............................................1
185......JOVS10-185 ................ Motor Label ........................................... ...............................................1
186......JOVS10-186 ................ Rivet...................................................... ...............................................4
187......TS-0267041................. Set Screw..............................................1/4”-20x3/8”.............................1
188......JOVS10-18 8................ Star Washer ..........................................3/16” .......................................2
189......TS-0680011................. Flat Washer...........................................3/16” .......................................1
190......TS-0267021................. Set Screw..............................................1/4”-20x1/4”.............................4
Page 15

15
Sanding Assemblies
Page 16

16
Sanding Assemblies
Index Part
No. No. Description Size Qty.
93........OVS10-093.................. Wrench.................................................. ...............................................2
94........OVS10-094A................ Arbor.....................................................3/4”.........................................6
95........OVS10-095.................. Hex Nut................................................. ...............................................6
96........OVS10-096.................. Spring Pin..............................................3.5x25.....................................3
97........30105000J ................... P.V.C.....................................................4”............................................1
98........OVS10-098.................. Washer.................................................. 4” ............................................2
99........OVS10-099.................. Nut ........................................................3/4”-16”...................................6
100......575834......................... Sanding Sleev e (60 Grit)........................4” ..............................................
............ 575835......................... Sandi ng S leeve (80 Grit)........................4”..............................................
............ 575836......................... Sandi ng S leeve (100 Grit)......................4”..............................................
101......30105000I.................... P.V.C.....................................................3” ............................................1
102......575830......................... Sanding Sleev e (60 Grit)........................3” ..............................................
............ 575831......................... Sandi ng S leeve (80 Grit)........................3”..............................................
............ 575832......................... Sandi ng S leeve (100 Grit)......................3”..............................................
103......OVS10-103.................. Washer..................................................3”............................................2
104......30105000H .................. P.V.C.....................................................2”............................................1
105......575826......................... Sanding Sleev e (60 Grit)........................2” ..............................................
............ 575827......................... Sandi ng S leeve (80 Grit)........................2”..............................................
............ 575828......................... Sandi ng S leeve (100 Grit)......................2”..............................................
106......OVS10-106.................. Washer..................................................2”............................................2
107......30105000G .................. P.V.C.....................................................1-1/2”......................................1
108......575822......................... Sanding Sleev e (60 Grit)........................1-1/2”........................................
............ 575823......................... Sandi ng S leeve (80 Grit)........................1-1/2”........................................
............ 575824......................... Sandi ng S leeve (100 Grit)......................1-1/2”........................................
109......OVS10-109.................. Washer..................................................1-1/2”......................................2
110......30105000F................... P.V.C.....................................................1”............................................1
111......575818......................... Sanding Sleev e (60 Grit)........................1” ..............................................
............ 575819......................... Sandi ng S leeve (80 Grit)........................1”..............................................
............ 575820......................... Sandi ng S leeve (100 Grit)......................1”..............................................
112......OVS10-112.................. Washer..................................................1”............................................2
113......575814......................... Sanding Sleev e (60 Grit)........................3/4” ...........................................
............ 575815......................... Sandi ng S leeve (80 Grit)........................3/4”...........................................
............ 575816......................... Sandi ng S leeve (100 Grit)......................3/4”...........................................
114......OVS10-114A................ Arbor.....................................................5/8” .........................................1
115......OVS10-115.................. Hex Nut.................................................5/8” .........................................1
118......575810......................... Sanding Sleev e (60 Grit)........................5/8” ...........................................
............ 575811......................... Sandi ng S leeve (80 Grit)........................5/8”...........................................
............ 575812......................... Sandi ng S leeve (100 Grit)......................5/8”...........................................
............ 575813......................... Sandi ng S leeve (120 Grit)......................5/8”...........................................
119......OVS10-119A................ Arbor.....................................................1/2” .........................................1
120......OVS10-120.................. Hex Nut.................................................1/2” .........................................1
122......575806......................... Sanding Sleev e (60 Grit)........................1/2” ...........................................
............ 575807......................... Sandi ng S leeve (80 Grit)........................1/2”...........................................
............ 575808......................... Sandi ng S leeve (100 Grit)......................1/2”...........................................
............ 575809......................... Sandi ng S leeve (120 Grit)......................1/2”...........................................
124......OVS10-124A................ Arbor.....................................................3/8” .........................................1
125......OVS10-125.................. Hex Nut.................................................3/8” .........................................1
127......575802......................... Sanding Sleev e (60 Grit)........................3/8” ...........................................
............ 575803......................... Sandi ng S leeve (80 Grit)........................3/8”...........................................
............ 575804......................... Sandi ng S leeve (100 Grit)......................3/8”...........................................
128......OVS10-117.................. Set Screw..............................................3/16”-24x1/4”........................... 4
129......OVS10-129.................. Arbor..................................................... ...............................................1
Page 17

17
Index Part
No. No. Description Size Qty.
130......575800......................... Sanding Sleev e (100 Grit)......................1/4” ...........................................
............ 575801......................... Sandi ng S leeve (120 Grit)......................1/4”...........................................
133......OVS10-133A................ Spindle.................................................. ...............................................1
165......JOVS10-16 5................ Table Insert (medium)............................ ...............................................1
166......JOVS10-16 6................ Table Insert (sma ll)................................ ...............................................1
167......JOVS10-16 7................ Table Insert (Larg e )............................... ...............................................1
191......JOVS10-191 ................ Spring Pin..............................................5x25........................................6
192......JOVS10-192 ................ Spring Pin..............................................3x25........................................1
Page 18

18
Wiring Diagram
 Loading...