

Page 1
RUNNER
ELECTRIC BIKE
Page 2

TABLE OF CONTENTS
What’s in the Box 1
Diagram 2
Features & Specs 3
Attaching the Handlebar 4
Attaching the Front Wheel 5
Attaching the Seat 6
Attaching the Pedals 7
Attaching the Fenders and Reflectors 8
Charging the Battery 9
Operating the Runner 10
Riding the Runner 11
Care and Maintenance 12
Safety Warnings 13
Page 3
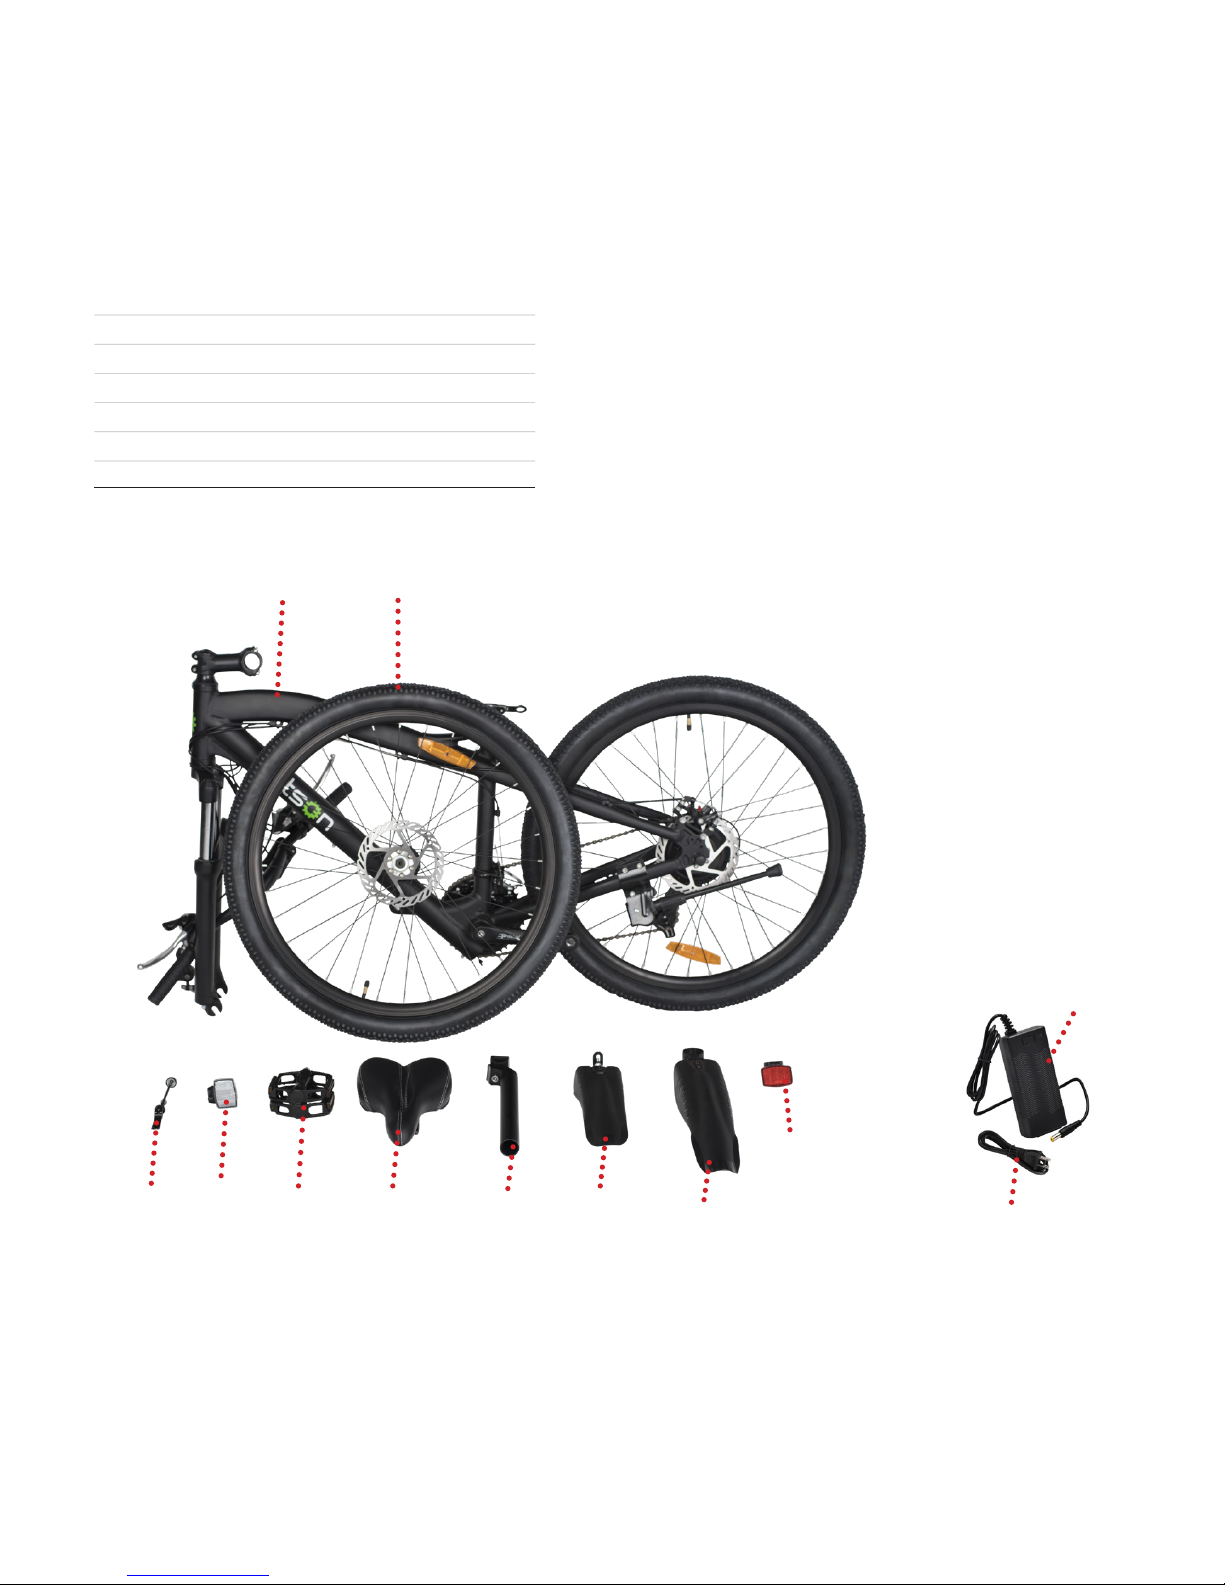
1. WHAT’S IN THE BOX
1. MAIN FRAME
2. FRONT TIRE
3. QUICK RELEASE
4. FRONT REFLECTOR
5. PEDALS
6. SEAT
7. SEAT POST
8. FRONT FENDER
9. REAR FENDER
10. REAR REFLECTOR
11. CHARGER
12. CHARGING CABLE
1 2
3
4
5 6
7
8
9
10
12
11
Assembling the Runner
should take between 30-35
minutes (including unboxing).
Page 4
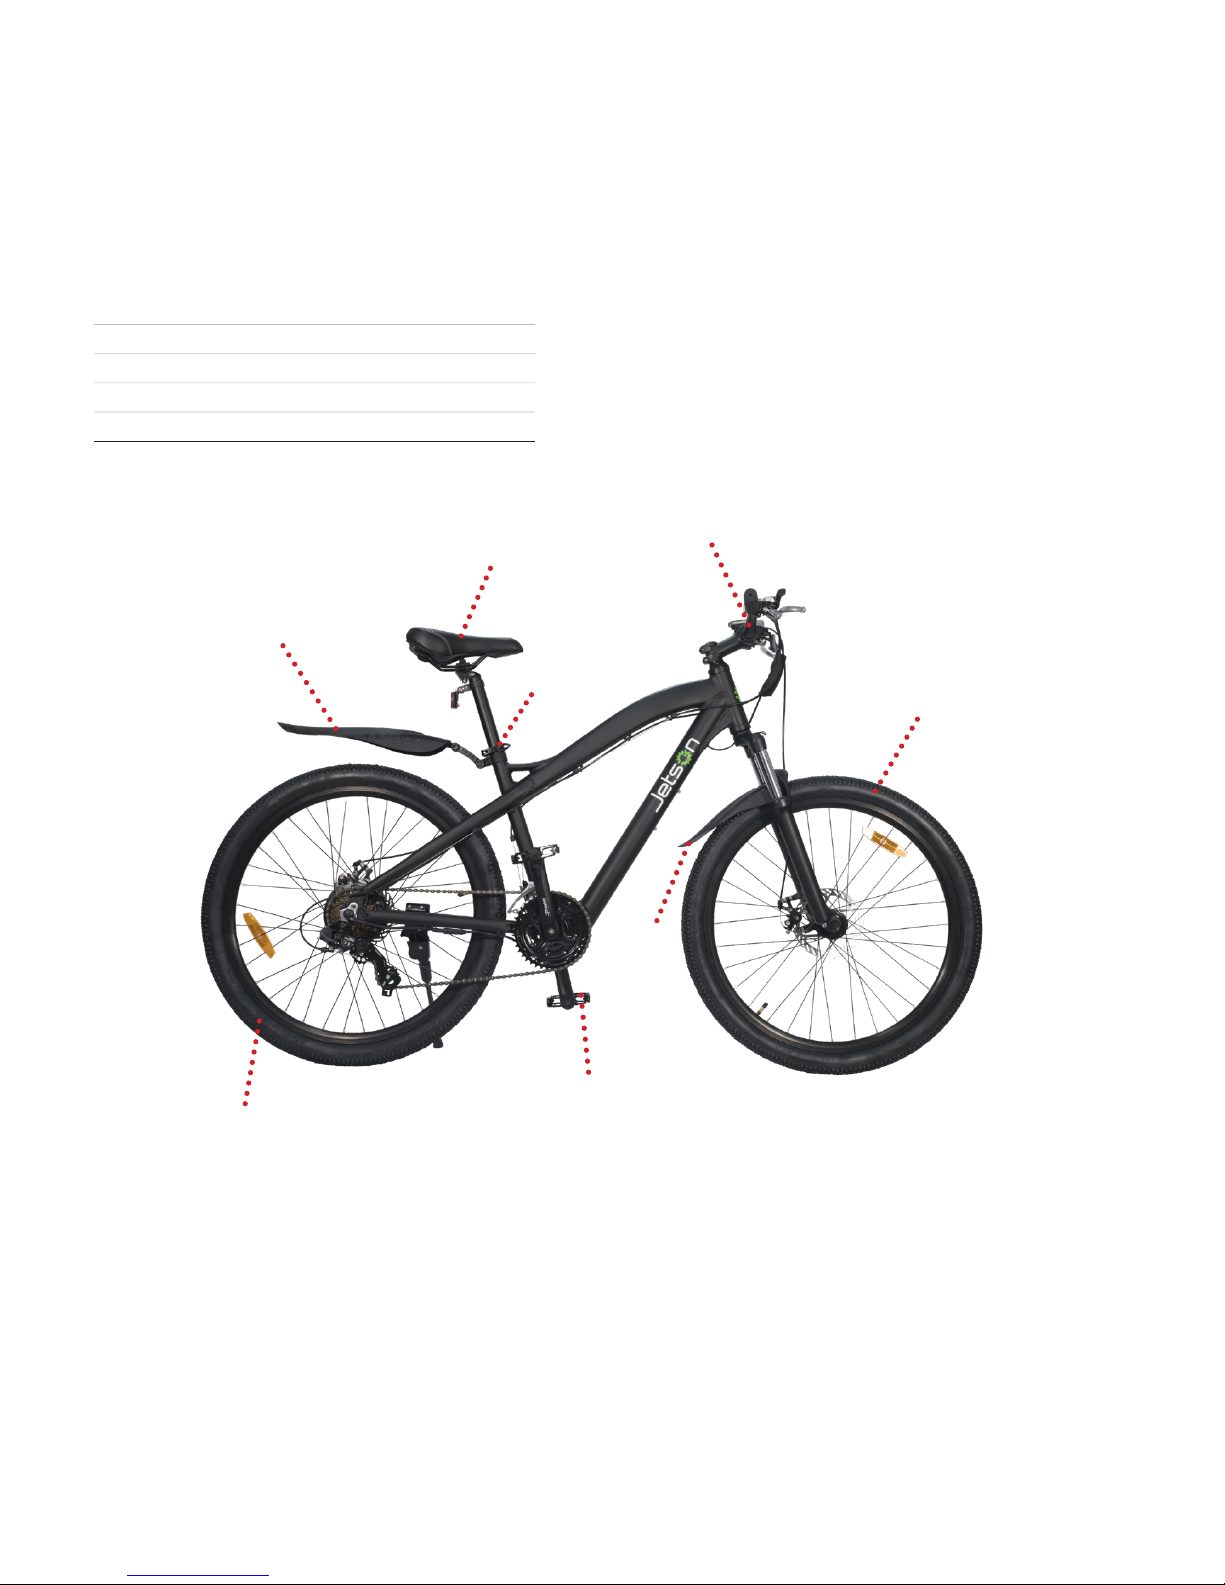
2. DIAGRAM
1
2
3
4
5
8
7
6
1. REAR FENDER
2. SEAT
3. SEAT CLAMP
4. HANDLEBAR
5. FRONT TIRE
6. REAR TIRE
7. PEDAL
8. FRONT FENDER
Page 5

3. FEATURES & SPECS
• Product Dimensions: 57.5” x 9.65” x 32.7”
• Weight Limit: 300 lbs./ 136 kg
• Product Weight: 38 lbs./ 17 kg
• Recommended Age: 13+
• Tire Size: 26”
• Max Speed: Up To 20 mph/ 32 km/h
• Max Range: Up To 30 miles/ 48 km
• Battery: 36V, 5.2Ah Lithium-Ion
• Motor: 250W Hub Motor
• Charger: 110-240V
• Charge Time: Up To 3 Hours
• Climbing Angle: Up To 20°
• Frame Material: Aluminum Alloy
RUNNER
Page 6
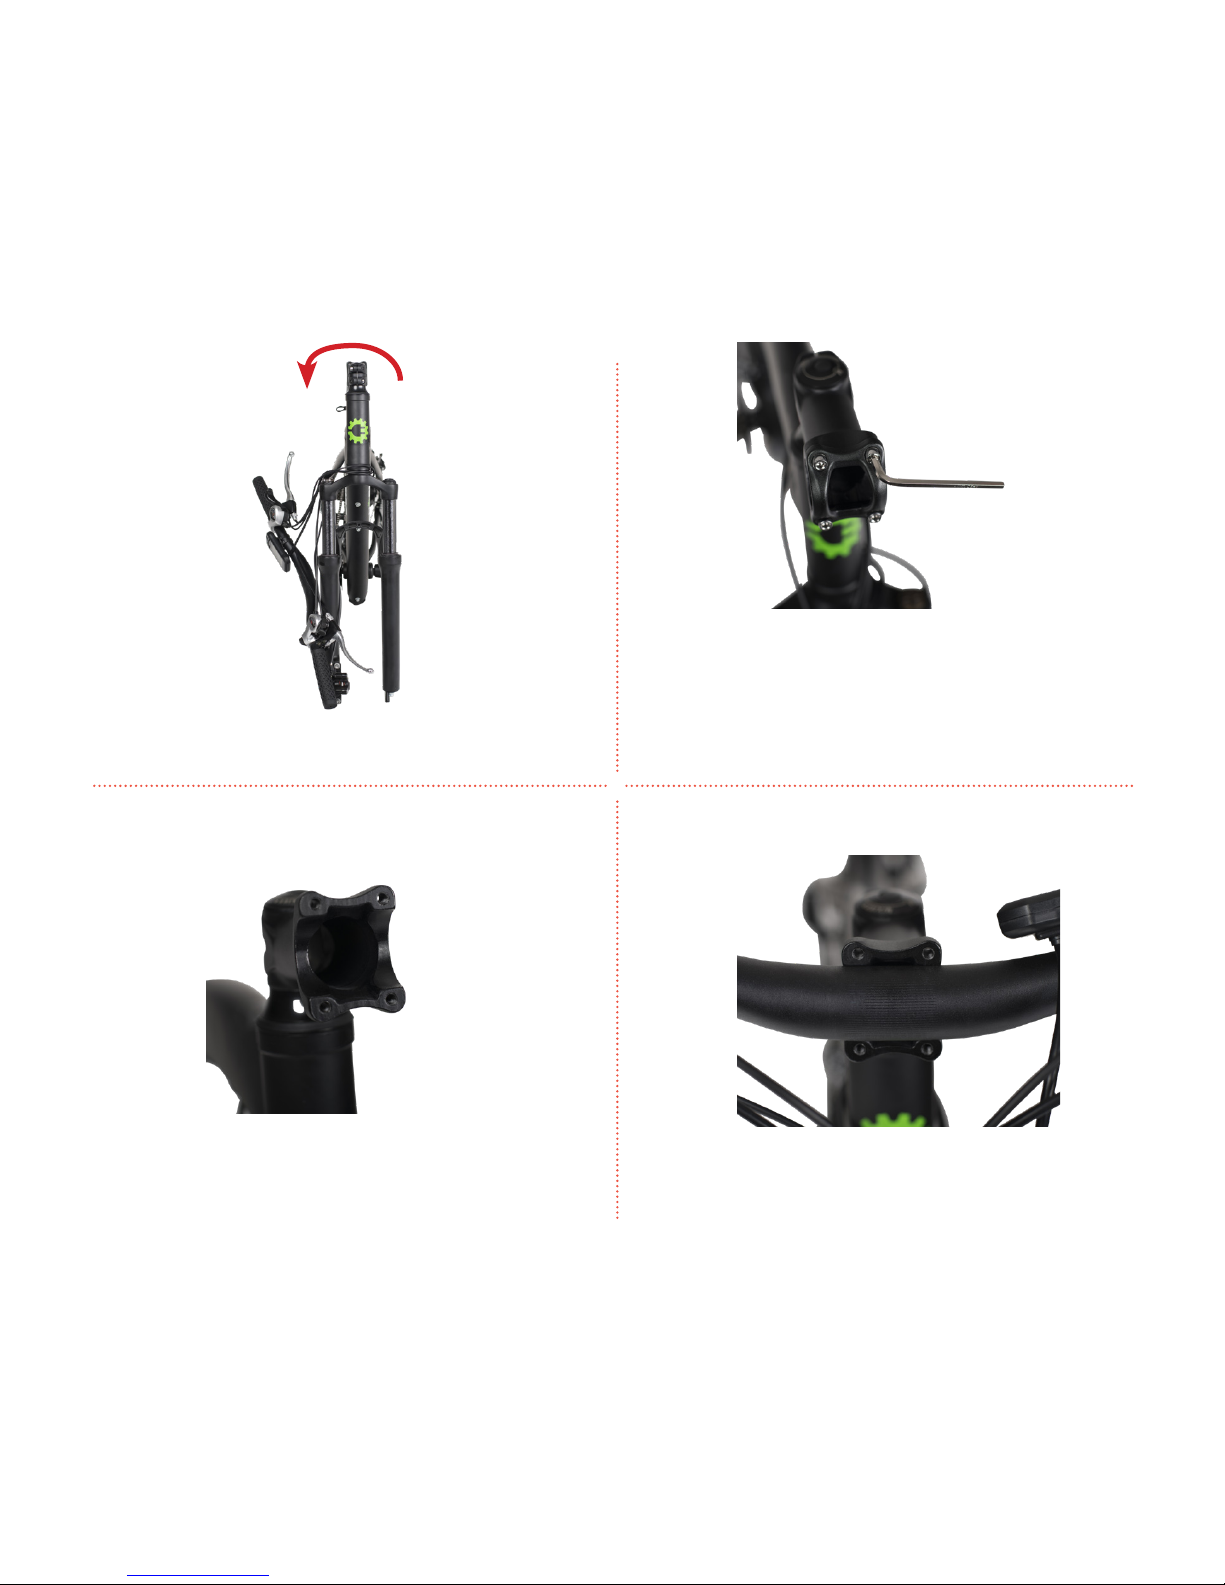
4. ATTACHING THE HANDLEBAR
4.1 4.2
4.3 4.4
Remove the 4 bolts from the
Metal Guard. Then, remove the
Metal Guard.
First, turn the Handlebar Stem.
Remove the Metal Guard.
Place the Handlebar into the
Handlebar Stem. Make sure the
markings on the Handlebar are
centered.
Page 7

4.5 4.6
Replace the Metal Guard by
tightening the 4 bolts.
Tighten Velcro Cover around
the Handlebar wires.
Page 8

5. ATTACHING THE FRONT WHEEL
5.1 5.2
5.3 5.4
Remove the plastic protector
from the Fork. Then, lift the
Fork up.
Slide the Front Tire between the
Fork.
Disc
Brake
Disc
Hook the Fork onto both sides of
the tire and slide the Disc Brake
into the Disc.
Quick Release
Spring
Cap
Remove the Cap and one Spring
from the Quick Release.
Page 9

5.5 5.6
Slide the Quick Release through
the Front Tire. Then, place the
Spring and Cap back onto the
Quick Release.
Tighten the Cap and Lever. Close
the Lever to lock.
Lever
Page 10

6. ATTACHING THE SEAT
6.1 6.2
6.3
Loosen the Bolt at the bottom of the
Seat post and remove the top plate
and lock nut.
Align the Seat Post with the bars of
the Seat and replace the top plate
and lock nut. Tighten the bolt to lock
the Seat.
Slide the Seat Post into the Seat
Tube. Close the Seat Clamp to secure
the Seat.
Seat Clamp closed
Page 11

7. ATTACHING THE PEDALS
Please look at the inside of each Pedal and see which is labeled Right (R)
and Left (L). Tighten by turning the Pedals toward the Front Tire. Use a
wrench to make sure the Pedals are tight and secure.
Page 12

8. ATTACHING THE FENDERS AND REFLECTORS
8.1 8.2
8.3 8.4
Use the small bolt and nut to connect
the Front Fender. Make sure the small
bolt is tight.
Remove the Bolt from the Rear Fender
using a screw driver. Wrap the plastic
ring around the Seat Tube. Tighten the
Bolt to secure the Rear Fender.
Bolt
Remove the Bolt from the Front
Reflector. Wrap the plastic ring
around the Handlebar. Tighten the
Bolt to secure.
Remove the Bolt from the Rear
Reflector. Wrap the plastic ring
around the Seat Post. Tighten the
Bolt to secure.
Bolt
Bolt
Page 13

9. CHARGING THE BATTERY
A few must-do’s:
• Only use the included charger
• Plug the charger into the wall before the Charging Port
• Don’t turn on the Runner while it’s charging (it needs its rest)
• Charge the battery until it is fully charged - up to 3 hours
• Replace the cover over the Charging Port when done
• Remember to have fun!
CHARGING INDICATOR ON THE CHARGER:
Red Light: Battery is charging
Green Light: Charging is complete
Charging
Port
Page 14

10. OPERATING THE RUNNER
1. HANDBRAKES - Squeeze the Handbrakes to come to a stop (apply the
brakes slowly to avoid stopping abruptly or losing control).
2. FRONT GEAR SHIFTER - Controls the Front Derailleur which shifts the
chain between the larger and smaller chainrings.
3. LCD DISPLAY - Shows Battery Level, Speedometer, Odometer, and
more.
4. REAR GEAR SHIFTER - Controls the Rear Derailleur which moves the
drive chain from one gear sprocket to another.
5. PUSH BUTTON FOR REAR GEAR SHIFTER - Press the Push Button to shift
to a higher gear. Lower the gear by using the Rear Gear Shifter. A higher
gear is faster and harder to pedal. A lower gear is easier to pedal.
Please Note: The rider must be pedaling forward to switch gears.
2
1
1
3
4
5
Page 15

11. RIDING THE RUNNER
• Before each ride, check that the Handlebar and Seat are
secure, the tire pressure is sufficient, and the brake system
works correctly.
• While riding the Runner, keep your feet on the Foot Rests.
• Do not ride with your feet dangling over the sides and
always stay seated while riding.
• Tighten all screws and locking nuts before each ride to ensure
they are tight.
Page 16

12. CARE AND MAINTENANCE
RIDING RANGE
The maximum range is 30 miles. However, a lot of factors will affect how far you can go
per charge:
• Driving Surface: A smooth, flat surface will increase driving distance.
• Weight: More weight means less distance.
• Temperature: Ride and store the Runner above 50°F.
• Maintenance: Timely battery charging and maintenance will increase driving distance.
• Speed and Driving Style: Frequent starting and stopping will reduce driving distance.
CLEANING THE RUNNER
To clean the Runner, carefully wipe with a damp cloth, then dry with a dry cloth. Do not
use water to clean the Runner, as the electrical and electronic systems may get wet,
resulting in personal injury or malfunction of the Runner.
BATTERY
• Keep the Runner away from fire and excessive heat.
• Do not subject the Runner to intense physical shock, severe vibration, or impact.
• Protect from water or moisture.
• Do not disassemble the Runner or its battery.
• If there are any issues with the battery, please contact Jetson Customer Support.
We’d love to help!
STORAGE
• Fully charge the battery before storing. The battery should be fully charged once
a month after this.
• To protect against dust, cover the Runner.
• Store the Runner indoors, in a dry place and at a suitable temperature.
• You should bring the Runner into a warm environment for charging.
Page 17

13. SAFETY WARNINGS
• For your safety, please read the user manual and safety warnings carefully, and
make sure you understand and accept all the safety instructions. The user will be
responsible for any loss or damage caused by improper use.
• Children, the elderly, pregnant women, and those with heart conditions should not
use this product.
• The rider should not exceed 300 lbs.
• Do not ride at night.
• Do not use near motor vehicles.
• Do not ride after drinking or taking prescription medication.
• Do not ride this product if you have had any head, back, or neck ailments, or prior
surgeries to those areas.
• Persons with any mental or physical conditions that may make them
susceptible to injury or impair their dexterity or mental capabilities should
recognize, understand, and perform all of the safety instructions and be able to
assume the hazards inherent in using this product.
• Do not carry items when riding.
• Always wear shoes, a helmet, and appropriate safety gear.
• Prior to each ride, inspect each part of the product to ensure it has been
maintained correctly and is functioning properly.
• Always give way to pedestrians.
• Always comply with local traffic laws and regulations.
• Be alert to things in front and far away from you.
• Make sure your feet are always placed securely on the deck.
•The product cannot be ridden by more than one person.
• When you ride this product along with other riders, always keep a safe distance to
avoid a collision.
• When turning, be sure to maintain your balance.
• Do not allow distractions when riding, such as answering the phone or engaging in
any other activities.
• Avoid riding in the rain or on smooth surfaces such as snow or ice.
• Do not ride on roads with obstacles (such as litter, small stones, etc.).
• Avoid riding in narrow spaces or on steep slopes.
• Avoid riding around flammable gas, steam, liquid, or dust that could cause fire.
• Never operate this product barefooted and keep shoelaces tied.
• Riding with improperly adjusted brakes is dangerous and can result in serious injury
or death.
Page 18

• Applying brakes too hard or too suddenly can lock up a wheel, which could cause
you to lose control and fall. Sudden or excessive application of the brake may result
in injury or death.
• Do not ride without proper training. Do not ride at high speeds, on uneven terrain, or
on slopes. Do not perform stunts or turn abruptly.
• The area that this product is to be operated should be safe and suitable for safe
operation.
• Check whether all safety labels are in place and understood before riding.
• The owner shall allow the use and operation of the unit after a demonstration that
such operators can understand and operate all components of the unit before use.
• Operators shall adhere to all of the manufacturer’s recommendations and
instructions, as well as comply with all laws and ordinances.
• Only ride the product with adequate daylight conditions for visibility.
• We encourage you to highlight the product, for visibility, by using lighting,
reflectors, and signal flags on flexible poles.
CALIFORNIA PROPOSITION 65
WARNING: This product contains chemicals, including lead, which are known to the
state of California to cause cancer, birth defects, and other medical conditions.
MODIFICATIONS
Do not attempt to disassemble, modify, repair, or replace the unit or any
components of the unit without instruction from Jetson Customer Support. This will
void any warranty, and can lead to malfunctions which may cause injury.
ADDITIONAL OPERATION CAUTIONS
Do not lift the product off the ground while it is on and the wheels are in motion.
This can result in freely spinning wheels, which may cause injury to yourself or others
nearby. Do not jump on or off the product, and do not jump while using it. Always
keep your feet firmly planted on the deck while in operation. Always check the
battery charge before using.
This device complies with Part 15 of the FCC Rules. Operation is subject to the
following two conditions: (1) This device may not cause harmful interference, and (2)
this device must accept any interference received, including interference that may
cause undesired operation.
Page 19

US 1-(888) 976-9904
help@ridejetson.com
www.ridejetson.com
 Loading...