

Page 1
QUEST
ELECTRIC FOLDING SCOOTER
Page 2

TABLE OF CONTENTS
What’s in the Box 1
Features & Specs 2
Assembling the Handlebar 3
Assembling the Handles 4
Charging the Battery 5
Unfolding the Quest 6
Operating the Quest 7
Battery Indicator 8
Speed Settings 9
Riding the Quest 10
Using the Thumb Throttle 11
Using the Handbrake 12
Adjusting the Handbrake 13
Using the Kickstand 14
Folding the Quest 15
Connecting to Bluetooth® 16
Care and Maintenance 17
Safety Warnings 18
Page 3
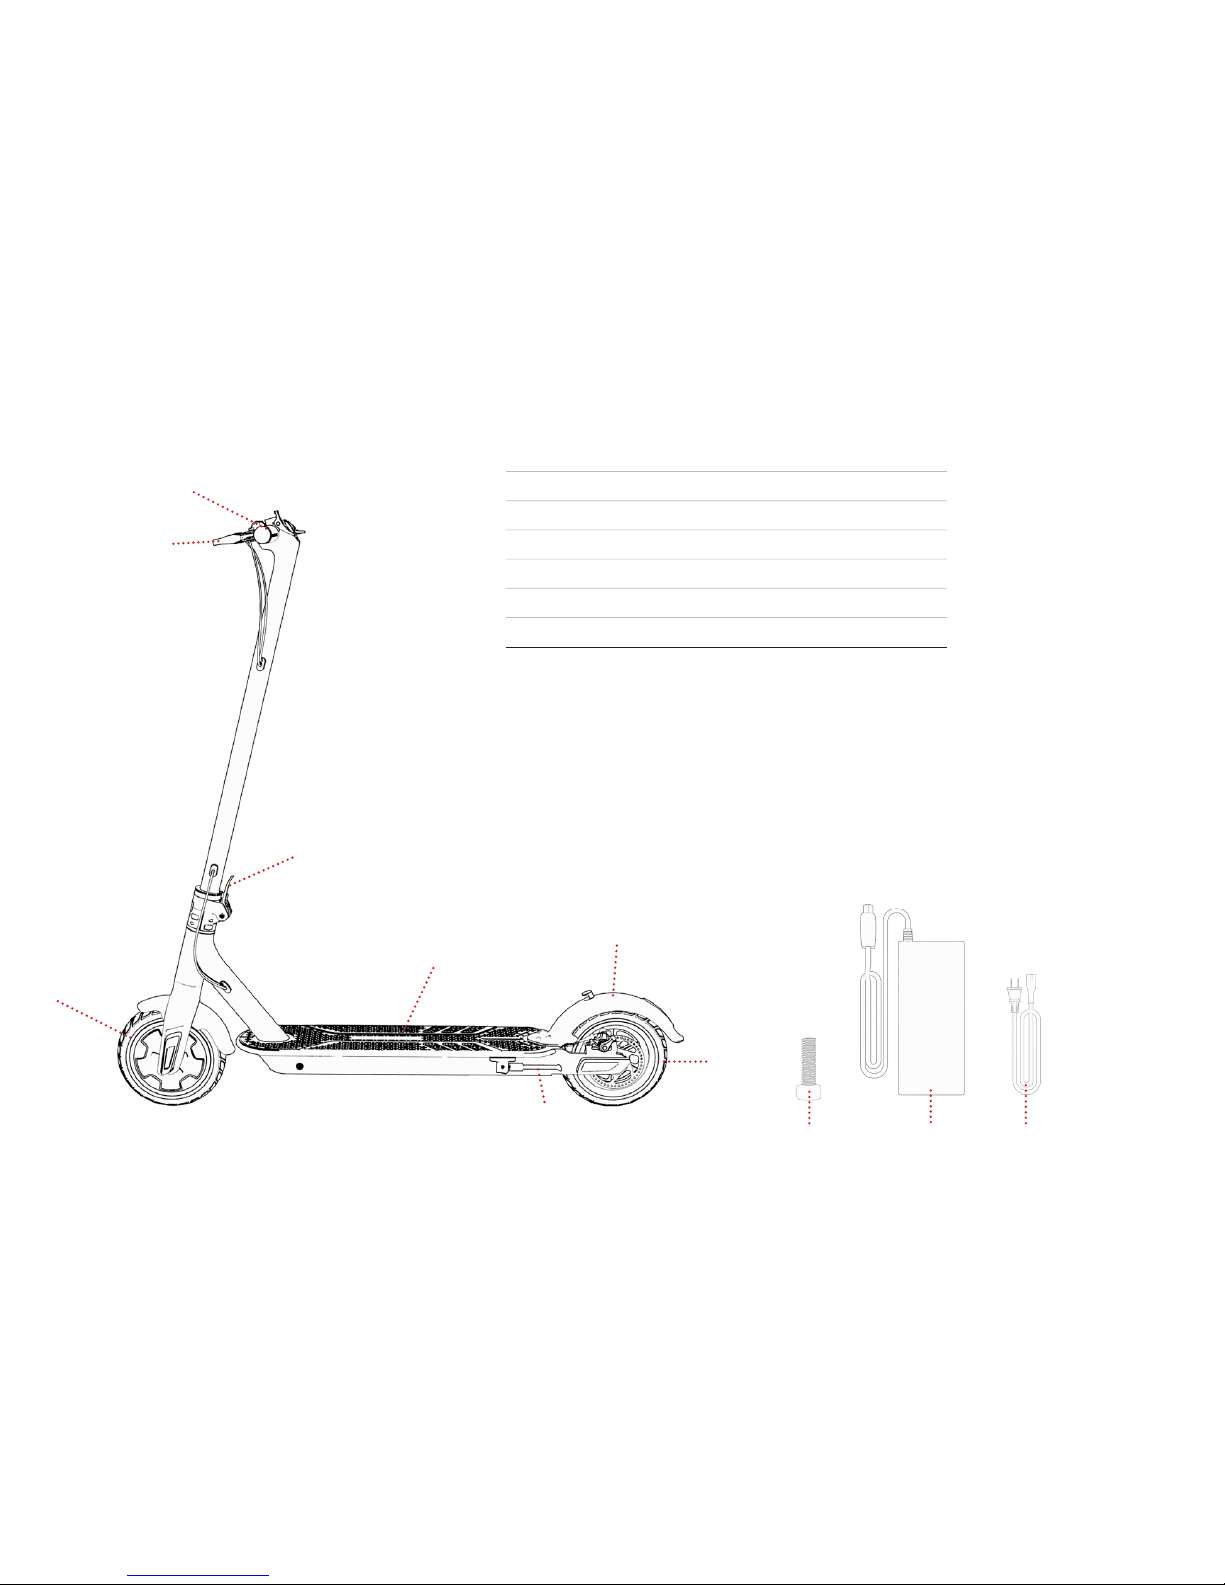
1. WHAT’S IN THE BOX
1
3
5
7
8
10 11
1. FRONT TIRE
2. HANDBRAKE
3. HANDLEBAR
4. RELEASE LEVER
5. DECK
6. REAR FENDER
7. REAR TIRE
8. KICKSTAND
9. SMALL SCREW (X4)
10. CHARGER
11. CHARGING CABLE
4
2
6
Please Note: Illustrations may not reflect exact appearance of actual product.
9
Page 4

2. FEATURES & SPECS
• Product Dimensions: 47.24” (L) x 21.65” (W) x 46.45” (H)
• Weight Limit: 220 lbs.
• Product Weight: 28.4 lbs.
• Recommended Age: +13
• Tire Size: 8.5”
• Max Speed: Up To 15 mph
• Max Range: Up To 18 Miles
• Battery: 36V, 7.5Ah Lithium-Ion
• Motor: 500W Hub Motor
• Charger: 100-240V
• Charge Time: Up To 6 Hours
• Climbing Angle: Up To 15°
• Frame Material: Aluminum Alloy
QUEST
Page 5
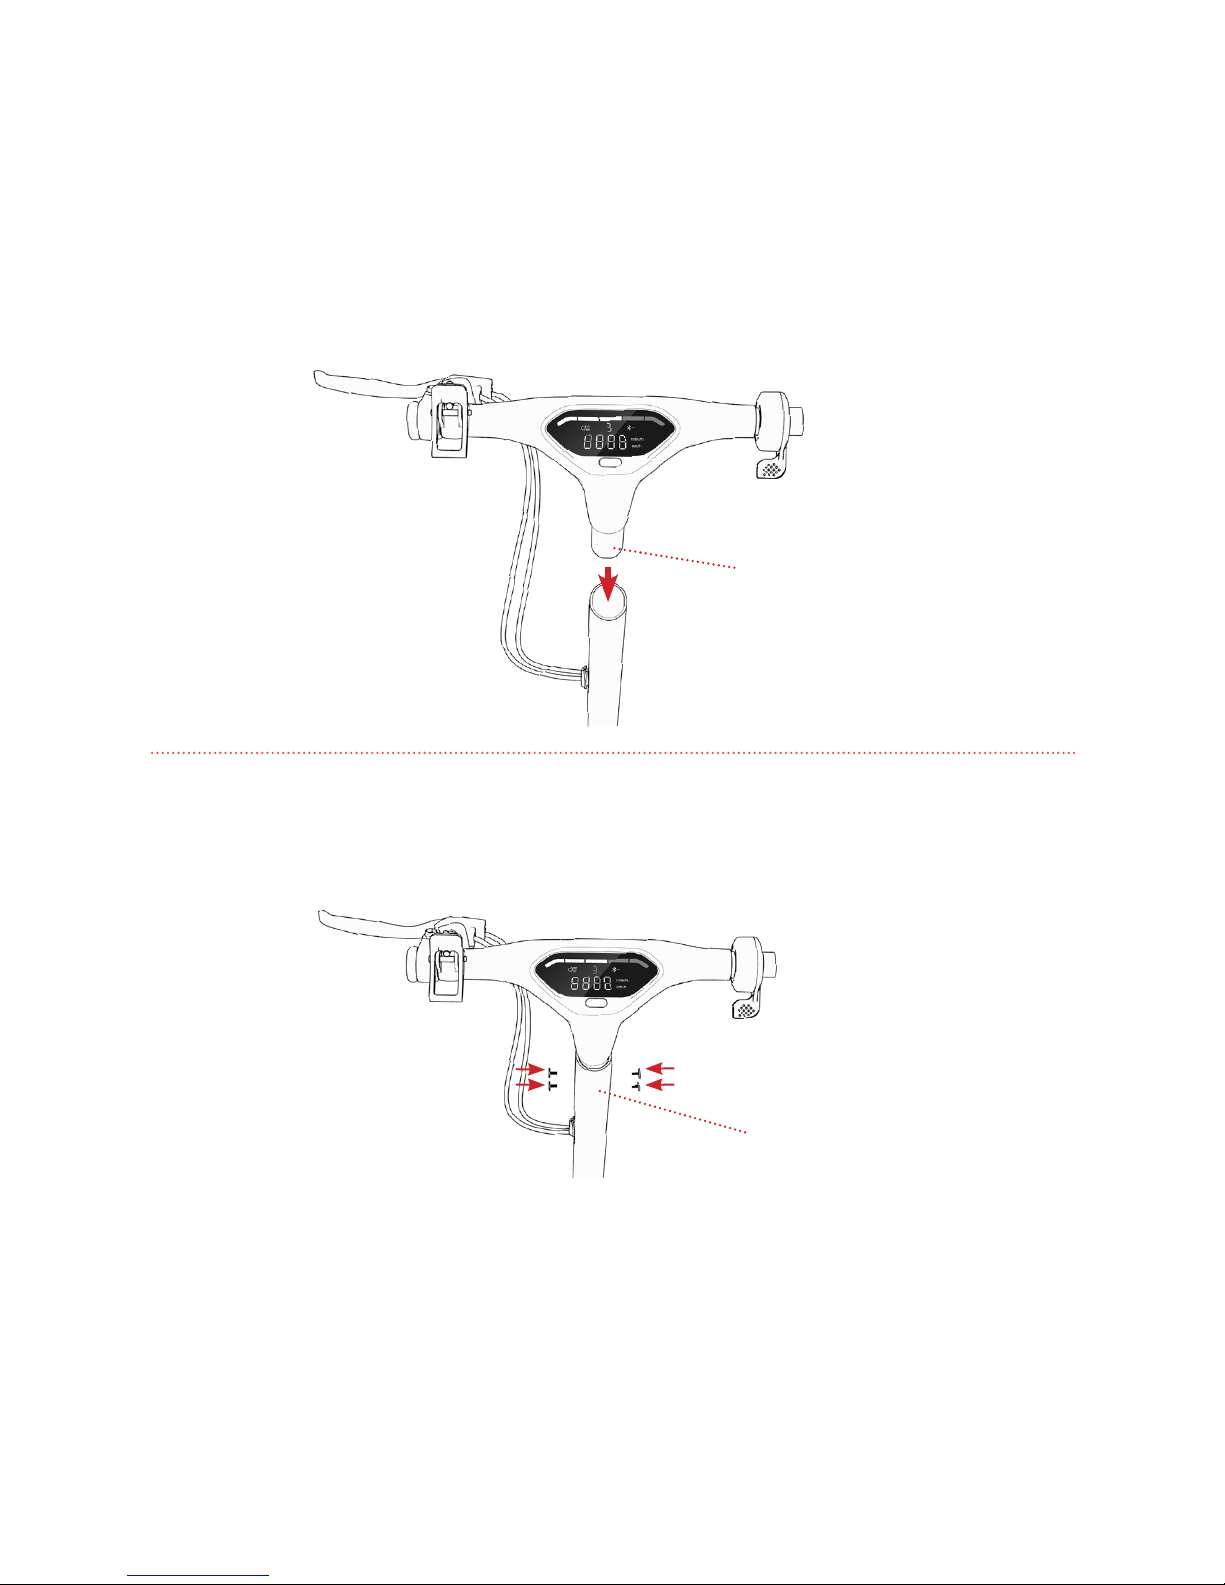
3. ASSEMBLING THE HANDLEBAR
Slide Handlebar
into Stem Tube
Tighten using
the 4 small
screws
Make sure the screws are tight and the Handlebar is secure.
Page 6
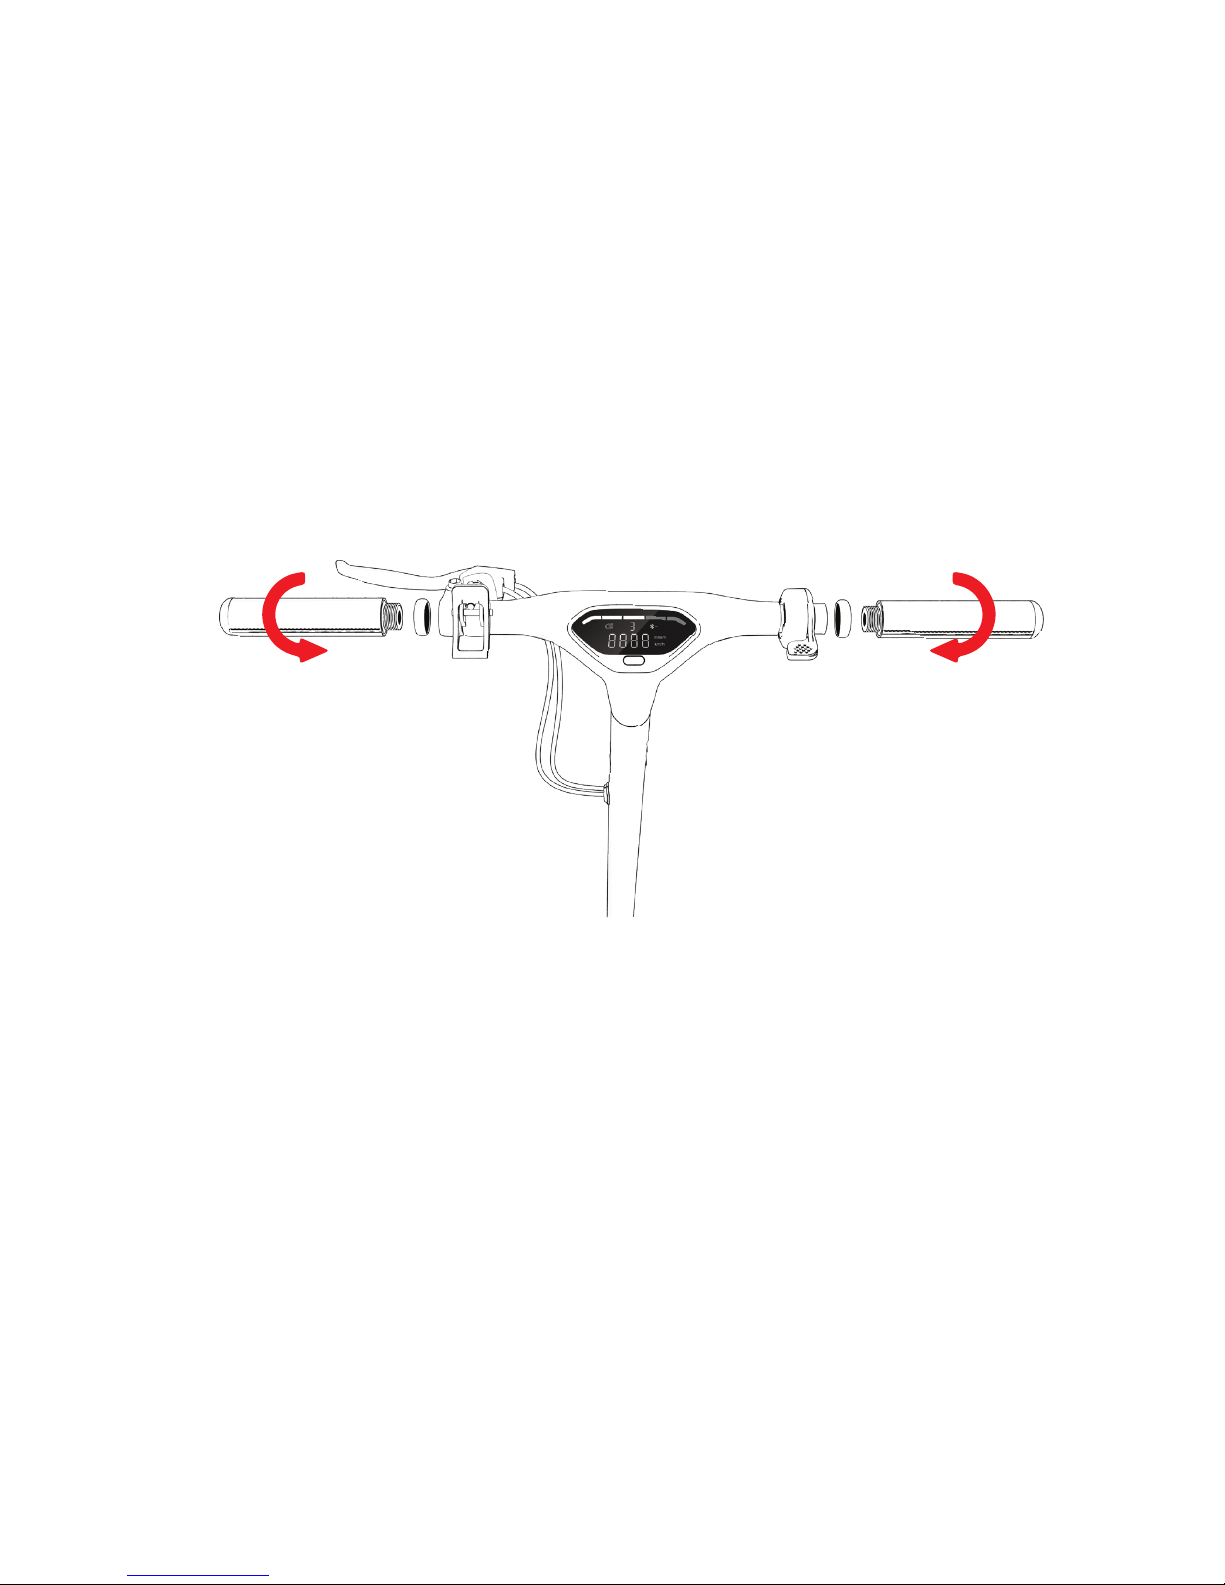
4. ASSEMBLING THE HANDLES
Connecting the Handles:
• Starting on the rider left side, take one handle and twist it
towards the rider 3-4 times until it catches. If it does not catch,
try the other handle on the same side. Tighten until the handle
no longer turns.
• Repeat on the rider right side by twisting the handle towards
the rider until it no longer turns.
Page 7
5. CHARGING THE BATTERY
A few must-do’s:
• Only use the included charger
• Plug the charger into the wall before the Charging Port
• Don’t turn on the Quest while it’s charging (it needs its rest)
• Charge the battery until it is fully charged - up to 6 hours
• Replace the cover over the Charging Port when done
• Remember to have fun!
CHARGING INDICATOR ON THE CHARGER:
Red Light: Battery is charging
Green Light: Charging is complete
Charging Port
Page 8
6. UNFOLDING THE QUEST
6.1
6.2 6.3
Unclip
Unclip the Handlebar from
the Rear Fender
Lift Handlebars away from Deck
Close the Release Lever by lifting it
up until it clicks
Release
Lever
Page 9

6.4 6.5
Make sure the Release Lever and
Handlebars are secure.
6.6
Lock the Release Lever
Turn to
lock
Page 10

7. OPERATING THE QUEST
LED Display
• Powering On/Off - Hold the Power Button for 3 seconds to turn the Quest
on or off.
• LED Display - Shows current speed, speed mode, and battery life
remaining.
• Light Function - Once the Quest is on, press the Power Button twice to
turn on the headlight and taillight. The light symbol will show on the LED
Display.
• Odometer - Press the Power Button 3 times to show the Odometer. Press
it another 3 times to return to the Speedometer.
Power
Button
Page 11

8. BATTERY INDICATOR
BATTERY LEVELS:
• 5 Lights - 81-100% Power
• 4 Lights - 61-80% Power
• 3 Lights - 41-60% Power
• 2 Lights - 21-40% Power
• 1 Light - 1-20% Power (please charge the Quest immediately!)
Battery
Indicator
Page 12

9. SPEED SETTINGS
Press the Power Button once to cycle through the speed settings.
• 1 - Max speed up to 4 mph
• 2 - Max speed up to 8 mph
• 3 - Max speed up to 15 mph
Speed mode
Page 13

10. RIDING THE QUEST
• Place one foot in front.
• Place the other foot in back, at a 70-90° angle.
• Turn the handlebar to the left or right to make turns.
Page 14

11. USING THE THUMB THROTTLE
Quick Note: The Quest is motion activated, you will need
to push forward with one foot before using the Thumb
Throttle. Also, please try to take it easy on the throttle
until you get used to it.
Page 15

12. USING THE HANDBRAKE
Quick Note: Squeeze the Handbrake slowly to avoid stopping
abruptly or losing control.
Page 16

13. ADJUSTING THE HANDBRAKE
BRAKE ADJUSTMENT
• Twist the barrel adjuster counterclockwise about a quarter to half turn
to tighten the brake.
• Twist the barrel adjuster clockwise about a quarter to half turn to
loosen the brake.
• Please test the brake again before riding.
Twist
Barrel
Adjuster
Hold nut in
place
Page 17

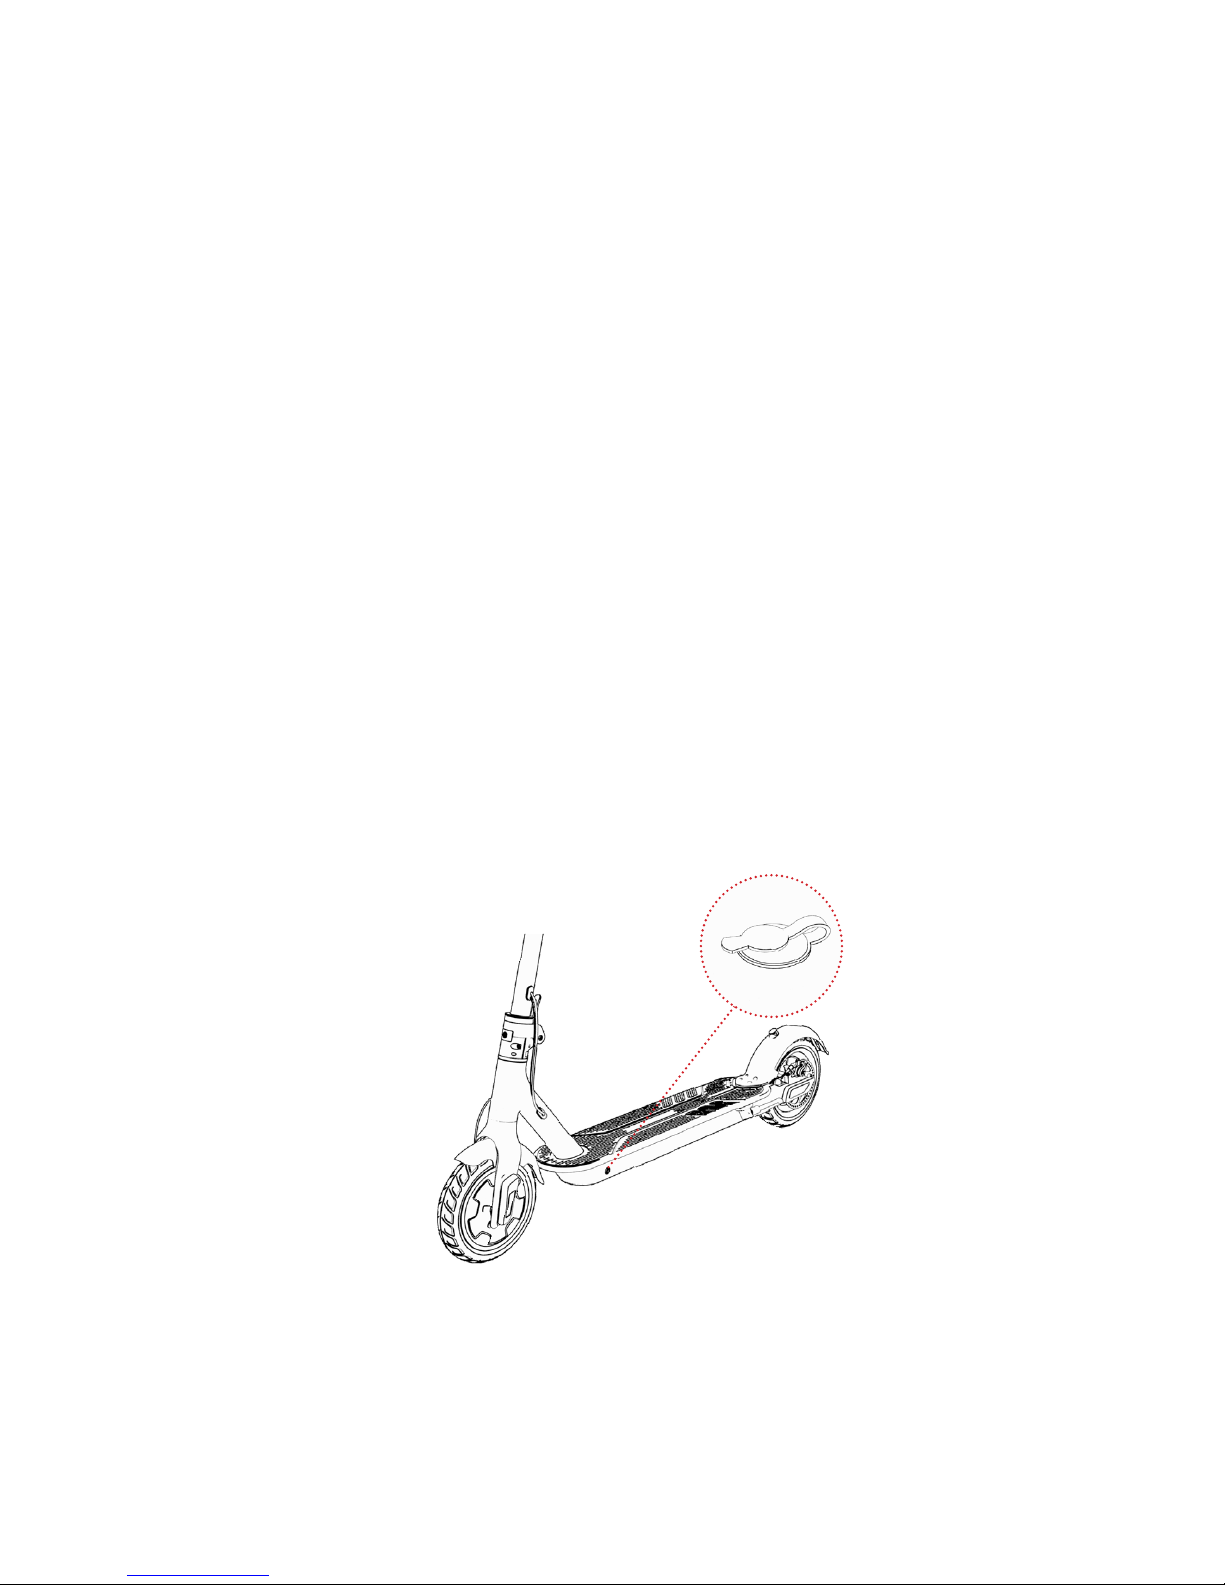
14. USING THE KICKSTAND
14.1
14.2
Page 18

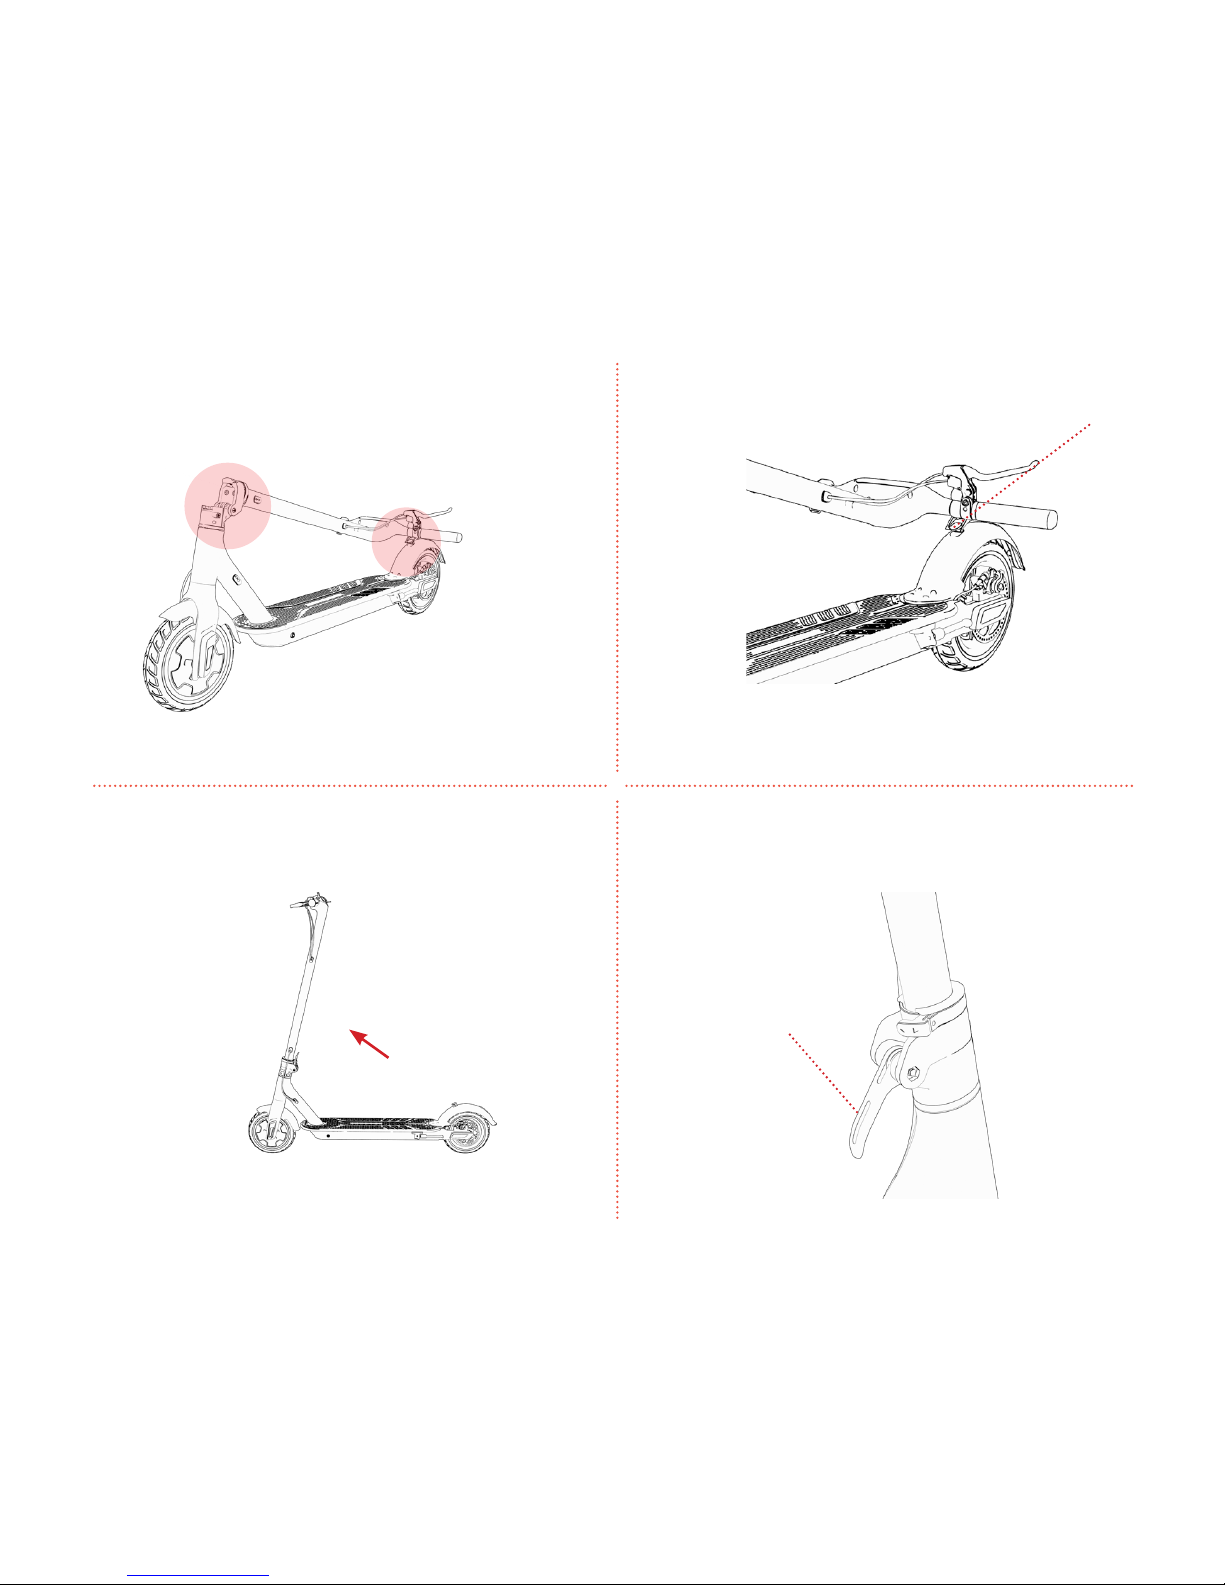
15. FOLDING THE QUEST
Release
Lever
15.1
15.2 15.3
Unlock the Release Lever
Turn to
unlock
Lower the the Release Lever
Page 19

15.4 15.5
Connect the hook to the Rear
Fender
Lower the Handlebar towards
the Deck
15.6
Page 20

16. CONNECTING TO BLUETOOTH®
Your Jetson Quest is Bluetooth® 4.0 enabled, so you can pair it with the
Ride Jetson app on your personal Bluetooth® enabled device. The Ride Jetson
app is available for download from the App Store and the Google Play Store,
and it’s free!
1. Turn on the Quest.
2. Open the Ride Jetson app on your handheld device.
3. Tap the Bluetooth® symbol in the top left corner of the app. (If you have not
activated your Bluetooth® on your handheld device, the app will remind you).
4. Select your Quest.
5. The default Bluetooth password is 000000. If you would like to customize your
password, go to the Settings in the app.
If you are having issues connecting to Bluetooth®, follow these steps…
1. Try restarting the Quest by turning it off and then on.
2. Click the Scan button to refresh.
3. Restart the Ride Jetson app.
4. Contact Jetson Customer Support for assistance.
Extra features available with the Ride Jetson app:
• Turn your Headlight on or off.
• Keep track of your travel time and distance.
Page 21

17. CARE AND MAINTENANCE
RIDING RANGE
The maximum range is 18 miles. However, a lot of factors will affect how far you can go
per charge:
• Driving Surface: A smooth, flat surface will increase driving distance.
• Weight: More weight means less distance.
• Temperature: Ride and store the Quest above 50°F.
• Maintenance: Timely battery charging and maintenance will increase driving distance.
• Speed and Driving Style: Frequent starting and stopping will reduce driving distance.
CLEANING THE QUEST
To clean the Quest, carefully wipe with a damp cloth, then dry with a dry cloth. Do not
use water to clean the Quest, as the electrical and electronic systems may get wet,
resulting in personal injury or malfunction of the Quest.
BATTE RY
• Keep the Quest away from fire and excessive heat.
• Do not subject the Quest to intense physical shock, severe vibration, or impact.
• Protect from water or moisture.
• Do not disassemble the Quest or its battery.
• If there are any issues with the battery, please contact Jetson Customer Support.
We’d love to help!
STORAGE
• Fully charge the battery before storing. The battery should be fully charged once
a month after this.
• To protect against dust, cover the Quest.
• Store the Quest indoors, in a dry place and at a suitable temperature.
• You should bring the Quest into a warm environment for charging.
Page 22

18. SAFETY WARNINGS
• For your safety, please read the user manual and safety warnings carefully, and
make sure you understand and accept all the safety instructions. The user will be
responsible for any loss or damage caused by improper use.
• Children, the elderly, pregnant women, and those with heart conditions should not
use this product.
• The rider should not exceed 220 lbs.
• Do not ride at night.
• Do not use near motor vehicles.
• Do not ride after drinking or taking prescription medication.
• Do not ride this product if you have had any head, back, or neck ailments, or prior
surgeries to those areas.
• Persons with any mental or physical conditions that may make them
susceptible to injury or impair their dexterity or mental capabilities should
recognize, understand, and perform all of the safety instructions and be able to
assume the hazards inherent in using this product.
• Do not carry items when riding.
• Always wear shoes, a helmet, and appropriate safety gear.
• Prior to each ride, inspect each part of the product to ensure it has been
maintained correctly and is functioning properly.
• Tighten all screws and locking nuts before each ride to ensure they are tight.
• Always give way to pedestrians.
• Always comply with local traffic laws and regulations.
• Be alert to things in front and far away from you.
• Make sure your feet are always placed securely on the deck.
•The product cannot be ridden by more than one person.
• When you ride this product along with other riders, always keep a safe distance to
avoid a collision.
• When turning, be sure to maintain your balance.
• Do not allow distractions when riding, such as answering the phone or engaging in
any other activities.
• Avoid riding in the rain or on smooth surfaces such as snow or ice.
• Do not ride on roads with obstacles (such as litter, small stones, etc.).
• Avoid riding in narrow spaces or on steep slopes.
• Avoid riding around flammable gas, steam, liquid, or dust that could cause fire.
• Never operate this product barefooted and keep shoelaces tied.
• Riding with improperly adjusted brakes is dangerous and can result in serious injury
or death.
Page 23

• Applying brakes too hard or too suddenly can lock up a wheel, which could cause
you to lose control and fall. Sudden or excessive application of the brake may result
in injury or death.
• Do not ride without proper training. Do not ride at high speeds, on uneven terrain, or
on slopes. Do not perform stunts or turn abruptly.
• The area that this product is to be operated should be safe and suitable for safe
operation.
• Check whether all safety labels are in place and understood before riding.
• The owner shall allow the use and operation of the unit after a demonstration that
such operators can understand and operate all components of the unit before use.
• Operators shall adhere to all of the manufacturer’s recommendations and
instructions, as well as comply with all laws and ordinances.
• Only ride the product with adequate daylight conditions for visibility.
• We encourage you to highlight the product, for visibility, by using lighting,
reflectors, and signal flags on flexible poles.
CALIFORNIA PROPOSITION 65
WARNING: This product can expose you to a chemical such as Cadmium that
is known to the State of California to cause cancer or birth defects or other
reproductive harm. For more information go to www.p65warnings.ca.gov/product
MODIFICATIONS
Do not attempt to disassemble, modify, repair, or replace the unit or any
components of the unit without instruction from Jetson Customer Support. This will
void any warranty, and can lead to malfunctions which may cause injury.
ADDITIONAL OPERATION CAUTIONS
Do not lift the product off the ground while it is on and the wheels are in motion.
This can result in freely spinning wheels, which may cause injury to yourself or others
nearby. Do not jump on or off the product, and do not jump while using it. Always
keep your feet firmly planted on the deck while in operation. Always check the
battery charge before using.
This device complies with Part 15 of the FCC Rules. Operation is subject to the
following two conditions: (1) This device may not cause harmful interference, and (2)
this device must accept any interference received, including interference that may
cause undesired operation.
Page 24

1 Rewe Street, Brooklyn, NY 11211
help@ridejetson.com
US 1-(888) 976-9904
www.ridejetson.com
 Loading...