

USER MANUAL
MODEL #: JHUM90 | VERSION #: 1
FAT TIRE
ELECTRIC BICYCLE

1
Model #: JHUM90 | Version #: 1
Congratulations on your new Jetson Fat Tire Electric Bicycle! Before
your rst ride, please check whether the wheels are damaged, or
parts are loose. If there are any abnormalities, please contact Jetson Customer Support at 1-(888) 976-9904, or email
customerservice@jetsonbike.com.
This product manual can help you understand, assemble, use, and maintain
your Jetson Fat Tire. In order to avoid danger caused by collisions, falls, and
loss of control, please use caution and learn how to ride the Jetson Fat Tire
safely. Jetson and authorized dealers cannot be held liable for injury or damage caused from riding the Jetson Fat Tire. Falling, losing control, and collisions (including failure to obey the Jetson Fat Tire manual) may cause injury.
In order to minimize the risk, ensure you read the Jetson Fat Tire manual
carefully. Users ride at their own risk.
The user is responsible for consequences caused by violating warnings, local
laws, or improper operations.
If for any reason you want to return this product, please call us at 1-(888)
976-9904 or email us at customerservice@jetsonbike.com before returning
it to the store.
SPECIFICATIONS:
• Wheel Size: 27.5 inches
• Motor Power: 350W
• Battery Voltage: 36V
• Net Weight: 54.5 pounds
• Weight Limit: 265 pounds
• Maximum Speed: 20 mph

2
Model #: JHUM90 | Version #: 1
FOR YOUR SAFETY:
• This product is intended for riders ages 13 and up. Always drive defensively, and watch out for potential obstacles that may catch your wheel or
cause you to swerve suddenly.
• Always check any local laws or regulations which may aect where the
Jetson Fat Tire may be used.
• Ride at your own risk and use common sense. Any rider that is unable to t
comfortably on the vehicle should not attempt to ride it. All decisions on who
is allowed to ride the Jetson Fat Tire should be made based on their maturity, skill, and ability to follow the rules.
• Keep this product away from small children. It is intended for use by people
who are, at a minimum, comfortable and competent when operating the
Jetson Fat Tire.
• The Jetson Fat Tire is designed for one rider. Never carry passengers, and
do not attach the Jetson Fat Tire to other objects.
• This product was manufactured for performance and durability, but is not
impervious to damage. Jumping and aggressive riding can over-stress and
damage the Jetson Fat Tire. The rider assumes all responsibility and risk
associated with high-stress activity.
• Keep your ngers and other body parts away from the drive chain, steering
system, wheels, and all other moving components when operating the Jetson Fat Tire. Keep your hands on the handlebars at all times. Only activate
the speed control when you are on the Jetson Fat Tire and in a safe environment suitable for riding.
• Do not wear headphones or use a cell phone while operating the Jetson Fat
Tire.
• Do not operate the Jetson Fat Tire in wet or icy weather, and never immerse
the product in water. The electrical components can be damaged by water
and create other unsafe conditions.
• Avoid excessive speeds when riding downhill, as it increases the risk of
accident and injury. Avoid wet, slick, bumpy, uneven or rough surfaces while
using the Jetson Fat Tire. Never risk damaging surfaces such as carpet and
ooring by using the product indoors.
• Do not ride at night, or when visibility is limited.
• Always wear proper protective equipment, such as a helmet, elbow pads,
and knee pads. Athletic shoes with rubber soles are best for riding the Jetson Fat Tire.
• Never operate the product barefooted or in sandals, and keep shoelaces
tied and out of the wheels, motor, and drive system.
3
Model #: JHUM90 | Version #: 1
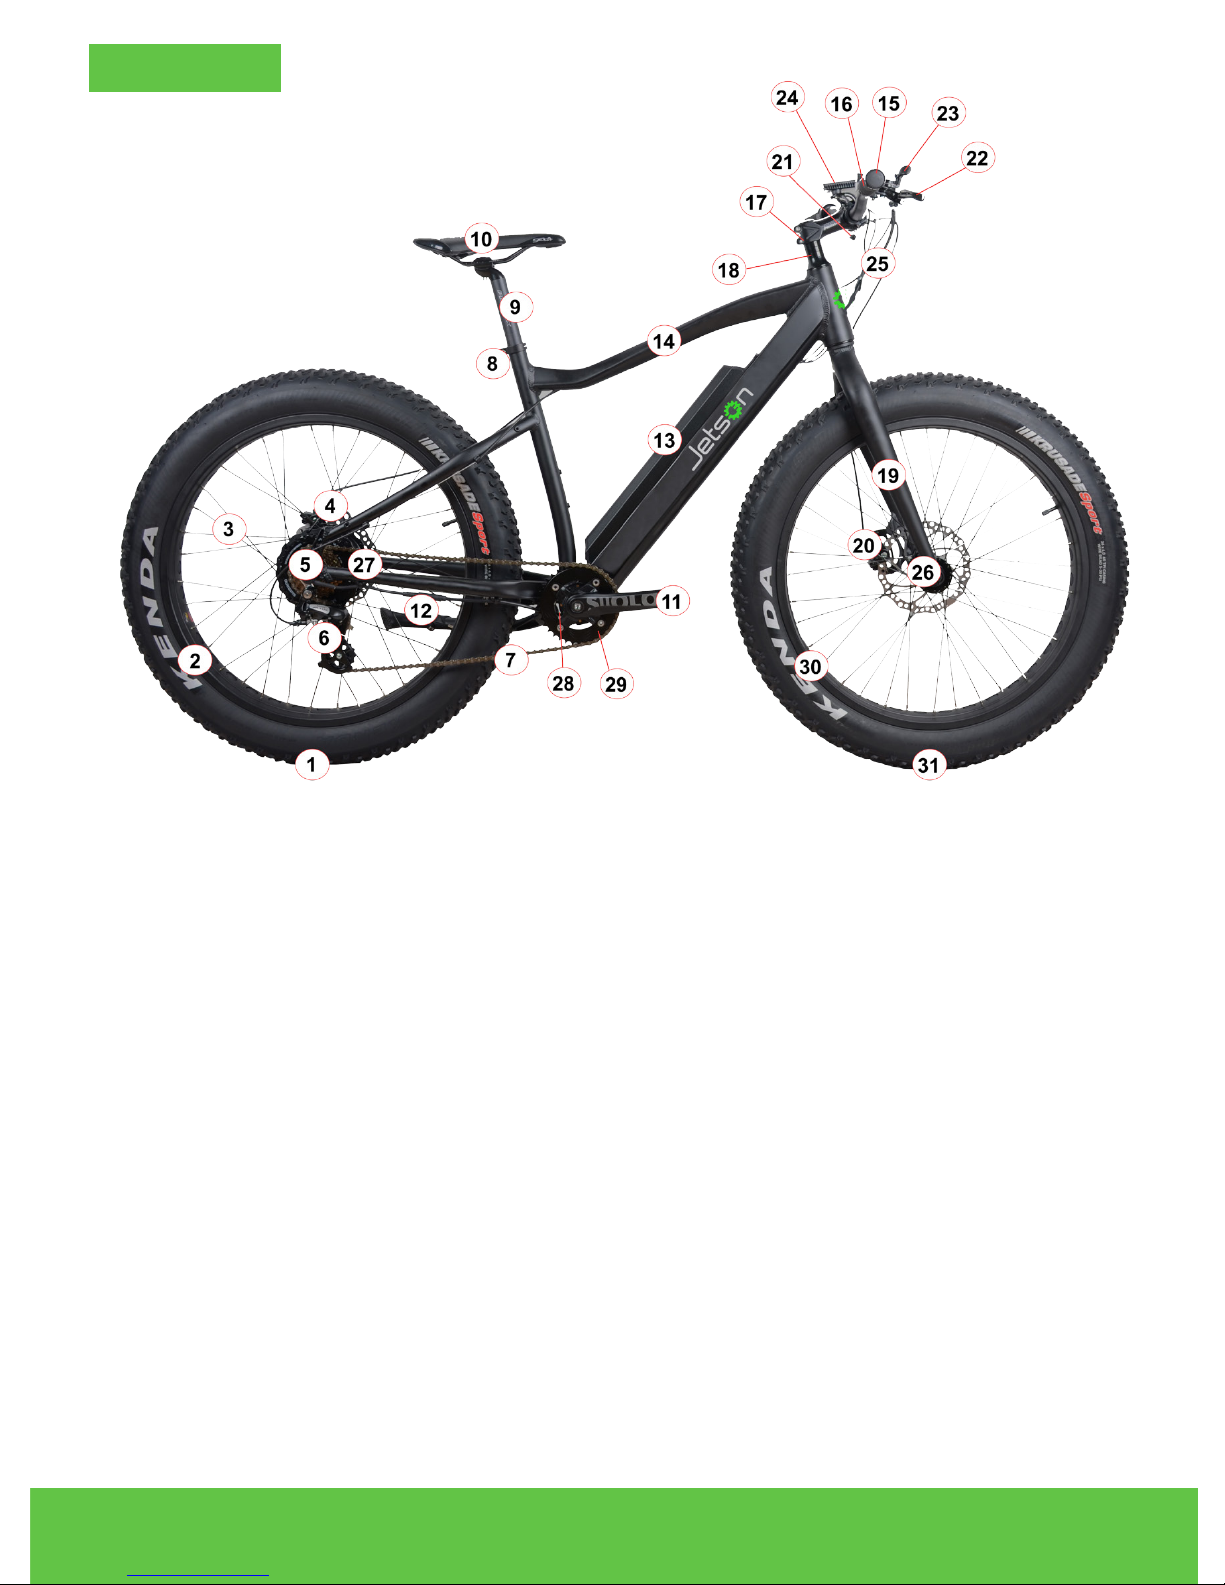
1) Rear Tire/Tubes
2) Rear Wheel
3) Spoke
4) Rear Disc Brake
5) Freewheel
6) Derailleur
7) Chain
8) Seat Clamps
9) Seat Tube
10) Saddle Seat
11) Pedal
12) Wheel Stand
13) Battery Pack
14) Frame
15) Handle
16) Bar End Grips
17) Stand Pipe
18) Headset
19) Front Fork
20) Front Brake
21) Left Brake Lever
22) Right Brake Lever
23) Shifter
24) LED Meter
25) Shift Cables
26) Front Hub
27) Rear Motor
28) Sensor
29) Chain Wheel and Crank
30) Front Wheel
31) Front Tire/Tube
OVERVIEW:
4
Model #: JHUM90 | Version #: 1
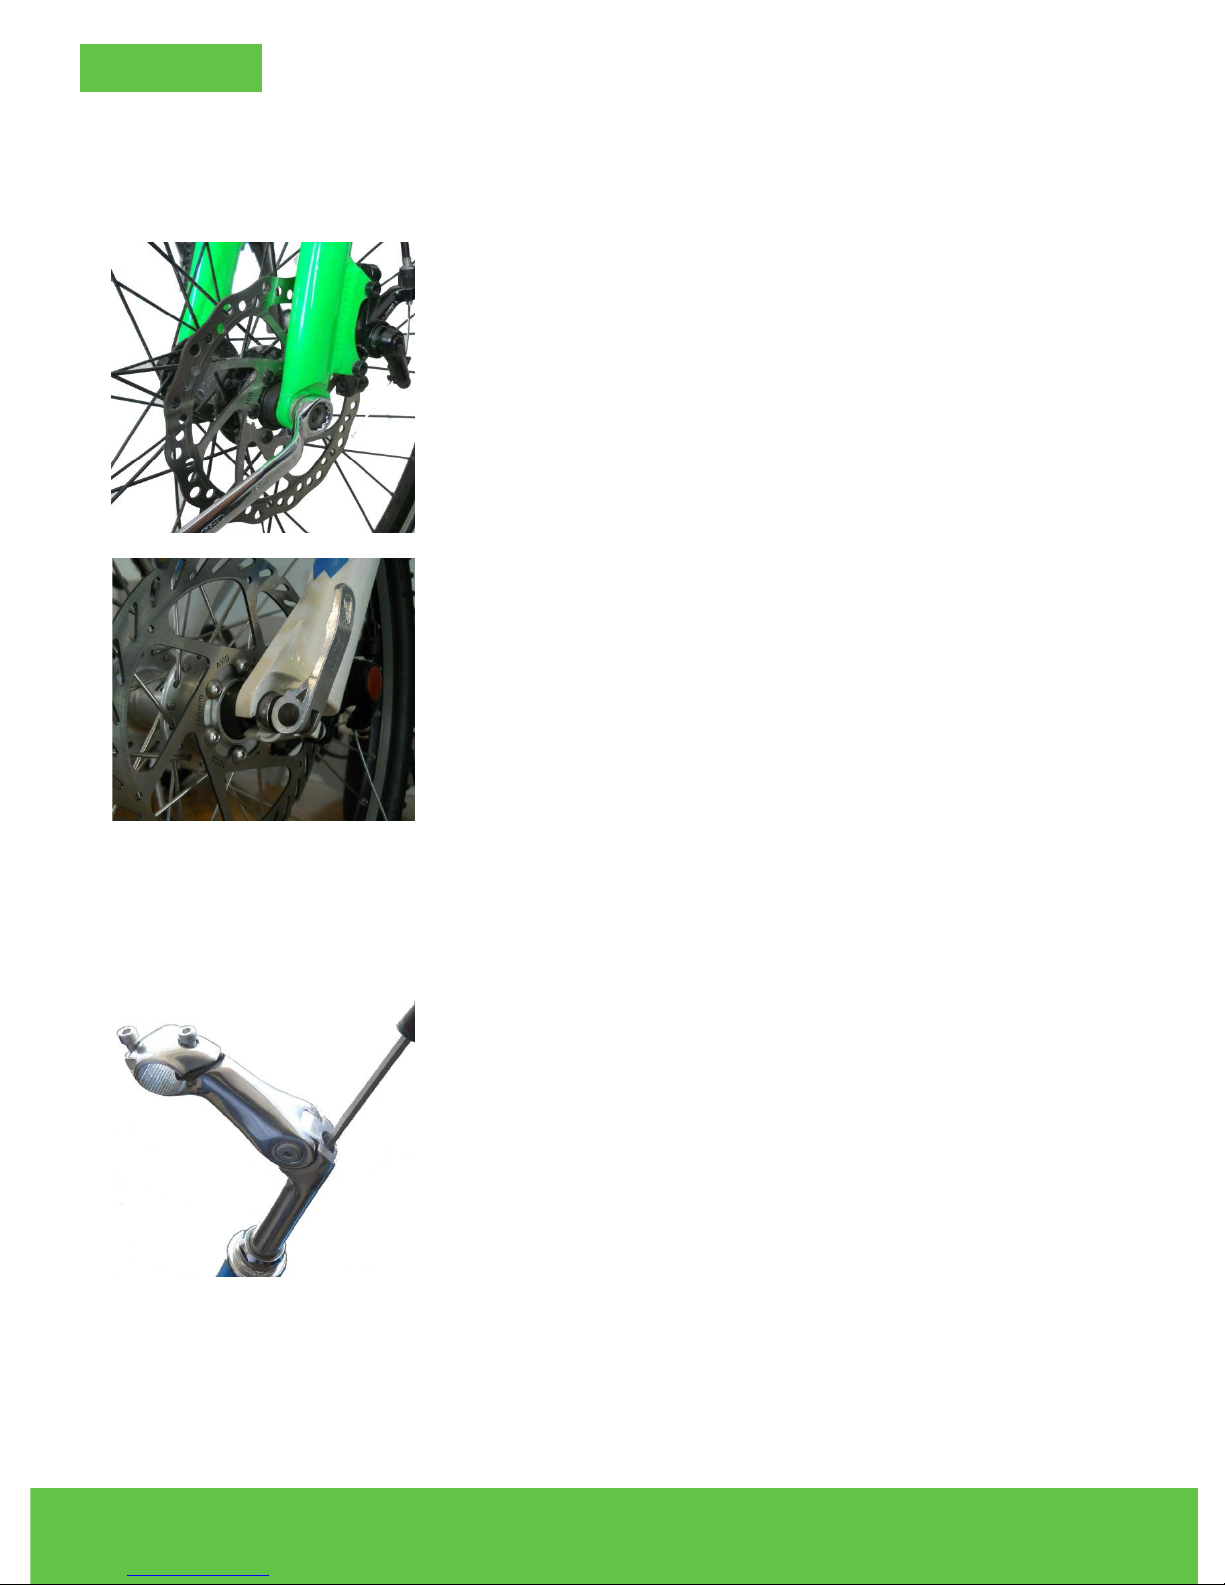
ASSEMBLY:
ATTACHING THE WHEELS
There are two types of tire hubs: nut-type and quick-release type. A #15 wrench
or spanner is necessary to attach the wheels to the nut-type hub, while the
quick-release type can buckle and unbuckle without additional tools.
To Attach to a Nut-Type Hub: Align the wheel into
the center of the fork, and make sure that the center of
the wheel is aligned with the frame of the bike. Tighten
into place using the wrench or spanner, as seen in the
picture on the left.
To Attach to a Quick-Release Type Hub: Release the
buckle on the hub. Align the wheel into the center of
the fork, and make sure that the center of the wheel is
aligned with the frame of the bike. Tighten into place by
securing the buckle, as seen in the picture on the left.
ASSEMBLING THE STEM
There are two types of bike stems: tooth-type and non-tooth-type. A M6 hexagon tool will be needed for the tooth-type stem, while a M5 hexagon and M4
hexagon tool will be needed for the non-tooth-type stem.
To Attach a Tooth-Type Stem: Insert the stem into the
front fork of the frame. Make sure that the stem is facing the proper direction (and is in line with the frame),
then tighten into place using the M6 hexagon tool.
NOTE: Be sure to check the safety line on the stem, and make sure that it is
not visible. If the safety line is visible, adjust the stem down to the point that
the line is no longer visible.

5
Model #: JHUM90 | Version #: 1
To Attach a Non-Tooth-Type Stem: Insert the stem
into the front fork of the frame. Make sure that the stem
is facing the proper direction (and is in line with the
frame), then tighten into place using the M5 hexagon
tool.
Once the stem is securely in place, tighten the two
screws on the front side of the stem using the M4 hexagon tool.
ASSEMBLING THE HANDLEBAR
Use the M4 and M5 hexagon tools to attach the handlebar to the stem. When attaching the handlebar, make
sure that you can grip it comfortably, that it is parallel
with the ground, and that it is centered on the stem.
ATTACHING THE SEAT
Unbuckle the quick-release handle. Insert the seat tube
into the frame, as pictured on the left. Adjust the saddle
so that you can sit comfortably, and make sure the seat
tube is in line with the tube of the frame.
Check the safety line on the seat tube, as pictured on
the left. If the safety line is exposed, lower the seat
until the safety line is fully covered. Then, buckle the
quick-release handle, locking it in the closed position.

6
Model #: JHUM90 | Version #: 1
ATTACHING THE REFLECTORS AND BELL
To attach the reectors and bell, you will need a Phillips head screwdriver. Align
the accessory onto the proper place on the frame: usually, the red reector is on
the rear, the white reector is on the front, and the bell is on the left side of the
handlebar. Once the accessory is in the proper location, tighten into place using
the Phillips head screwdriver.
ATTACHING THE PEDALS
To attach the pedals, you will need a #15 wrench or spanner.
The two pedals will be labeled with R (for Right) and L (for Left).
Line up the #15 wrench or spanner, as seen above, then twist the pedals toward
the front of the bike until they are securely attached.
WHEEL RIM MAINTENANCE
There is a safety line etched into the wheel rim, about 3mm above the lip of the
rim. If the rim has been worn down close to the depth of the safety line, please
replace the rim. A rim that has been worn down that drastically is a danger and
increases the likelihood of an unnecessary accident.
Adjust the spokes every 3 months to avoid distorting the rim in this way.

7
Model #: JHUM90 | Version #: 1
ADJUSTING THE BRAKES
There are two types of brakes: the V Brake and the Disc Brake. You will need a
M5 hexagon tool to adjust both.
To Adjust the V Brake: Align the brake pads in the
middle of the wheel, and maintain a distance of about
3mm between the wheel and the brake pads. Adjust if
necessary using the nut seen on the left.
Make sure that the brake pads are in line with the curve
of the wheel, and that they can make full contact with
the surface of the steel rim. Use the nut seen on the left
to adjust the alignment.
Test to make sure that both sides of the brakes work. If
only one side makes full contact, use the nut seen on
the left to adjust the brakes.
To Adjust the Disc Brake: Fix the brake line onto the
disc brake. Maintain a distance of more than 1mm between the brake disc and the brake pad. If there is any
friction, adjust the nut using the M5 hexagon tool.

8
Model #: JHUM90 | Version #: 1
For Both Brakes: Cut the extra part of the brake line, and enclose the end. This
prevents the brake line from spreading apart, which is a potential hazard.
Thread the brake line through the brake handle, and take it out from the hole of
the bolt. The end of the brake line should be folded into the hole of the bolt, as
seen above and to the left. When assembled properly, it should look like the picture above and to the right.
BATTERY:
To uninstall the battery, turn the key clockwise to unlock
the battery pack. Lift the battery pack up to remove it.
When reinstalling the battery, put the bottom right of the
battery in place rst, then align the top of the battery to
the lock and press into place. Turn the key to lock the
battery in place.
The Battery Indicator shows how much charge is left.
When it is green, the battery is full. When it is orange,
the battery is declining but still holds enough charge
to use. When the light is red, only 20% is left, and it
is recommended that you connect the battery to your
charger.

9
Model #: JHUM90 | Version #: 1
CHARGER:
WARNING: Your electric bike comes with an UL Certied charger. The working voltage for the charger is 100 ~ 240V, please only use the provided char-
ger when charging your battery. When you are nished charging, always
cover the charging port on the battery. Failure to use the provided charger
will void the warranty.
To charge the electric bike, plug the charger into the charging port, located on the
side of the battery compartment. Plug the other side of the charger into the outlet.
When the LED on the charger is red, the battery is charging. Once the LED turns
green, charging is complete. In order to optimize the performance of your electric
bike, charge the battery fully before its rst use, and be sure to fully charge the
battery once a month.

Model #: JHUM90 | Version #: 1
10
LCD METER:
To turn on your motor and LCD Meter, press and hold
the Power Button for two seconds.
Use the + and - Buttons to adjust the speed between 0
and 5, with 0 being no speed assist from the motor and
5 being a maximum speed of 20 mph.
Press and hold the + Button to turn on the backlight for
the screen.
Press and hold the - Button to activate Walk Assist,
which propels the bike at a safe walking speed. Release the - Button to stop the Walk Assist.
Press and hold both the + and - Buttons to change
between miles per hour and kilometers per hour.
• Keep the battery out of extreme temperatures.
• Operating temperature when charging: 32° - 113° F
• Operating temperature when discharging: -4° - 113° F
• Do not short circuit the discharge/charge terminals of the battery.
• Do not leave the battery charging overnight, or for long periods of time.
• To avoid damage to the battery, do not subject it to intense physical shock,
severe vibration, or strong impacts.
• Do not expose the battery to water or other moisture. Protect the discharge/
charge terminals from water logging.
• Keep the battery away from children.
• When the battery is not in use for an extended period of time, remove the
battery and store it safely.
• Do not disassemble the battery.
• If you have any questions about this battery or its usage, contact the Customer Service department.
BATTERY CARE AND MAINTENANCE:

Model #: JHUM90 | Version #: 1
11
TO QUALIFY FOR WARRANTY SERVICE:
1. You must present a copy of the sales receipt from an approved retail partner
within 90 days of purchase.
2. This product can not be used for rental or commercial use.
3. This product can not be used for competition.
LIMITATIONS OF LIABILITY
• This Limited 1 Year Warranty is non-transferable after the Product’s initial sale.
• No unapproved modications can be made to the Product, its performance or
otherwise, in order for this Limited 1 Year Warranty to remain in effect.
• No reimbursement is provided for towing, loss of time, loss of use, inconvenience,
incidental or consequential damages.
• Warranty is void if weather related water damage is determined. Owner is
responsible for storage and protection from weather.
• Jetson® makes no warranty with respect to products or trade accessories not
made by Jetson®, including, but not limited to, motors, tires, wheels and batteries,
such products or trade accessories, such items being subject to the original
manufacturer’s warranty, if any.
• This Limited 1 Year Warranty does not cover minor surface blemishes, rips, tears,
or other cosmetic damages due to normal use, or other intentional or unintentional
damage to the Product.
• This Limited 1 Year Warranty will not cover any damage which results from the
application of improper cleaners, solvents or chemicals to the Product, water
damage, smoke or soot, or from exposure to salt-water, sea breeze or salt.
• This Limited 1 Year Warranty will not cover any damage which results from aging,
such as fading of paint, deterioration of plated surfaces, deterioration of rubber
or plastics, or rusting.
• This Limited 1 Year Warranty does not cover improper repair or misdiagnosis of
problem.
• This Limited 1 Year Warranty covers only parts and labor due to manufacturer
defect.
• Damage due to misuse or neglect, use other than as specied in the Owner’s
Manual, or use under abnormal conditions are not covered by this Limited 1 Year
Warranty.
OWNER’S WARRANTY RESPONSIBILITIES
As the vehicle owner, you are responsible for the performance of the required
maintenance. You should maintain a record of all maintenance performed your
vehicle and retain all receipts covering maintenance on your vehicle. You may be
denied a warranty claim solely because of your failure to ensure the performance
of all scheduled maintenance or lack of maintenance records or receipts. As the
vehicle owner, you should be aware that you may be denied your warranty coverage
if your vehicle or a part has failed due to abuse, neglect, improper maintenance, or
unapproved modications. For any issue regarding your Jetson® product, call toll
free 1-(888) 976-9904.
LIMITED 1 YEAR WARRANTY

Please complete and mail this card within 10 days of purchase.
Name: _____________________________________________________________________
Age: _______________________________________________________________________
Address: ___________________________________________________________________
City, State, Zip: _____________________________________________________________
Email: _____________________________________________________________________
Home Phone: __________________ Work Phone: ________________________________
Purchase Date: ___________ Purchased from: _________________________________
Serial Number: _____________________________________________________________
Product: ___________________________________________________________________
Gender: _______________ Occupation: ________________________________________
Is this your rst Jetson product? _____________________________________________
Other similar product owned before: _________________________________________
How did you hear about the Jetson® Fat Tire?
____________________________________________________________________________
____________________________________________________________________________
Complete this form and mail it to:
Attention: Product Registration
Jetson Electric Bikes
1 Rewe Street
Brooklyn, NY 11211
PRODUCT REGISTRATION

A LEADER
IN ELECTRIC TRANSPORTATION
888-976-9904
CUSTOMERSERVICE@JETSONBIKE.COM
WWW.JETSONBIKE.COM
IF YOU LIKE THIS PRODUCT, PLEASE CHECK OUT THE
OTHER PRODUCTS ON OUR WEBSITE, INCLUDING OUR:
• ELECTRIC BICYCLE
• FOLDING ELECTRIC SCOOTER
• ELECTRIC MOPED
• ELECTRIC SKATEBOARD
...AND MORE!
 Loading...