

Page 1
1
BOLT
-MANUAL-
Page 2

2
TABLE OF CONTENTS
Introduction 3
Included in the Box 4
Features and Specs 5
Assembly 6
Operating the Bolt 8
Charging the Battery 10
Unfolding the Bolt 11
Folding the Bolt 12
Safe Riding 13
Care and Maintenance 14
Safety Warnings 15
Warranty 17
Product Registration 18
Page 3

3
Congratulations on your new Jetson Bolt! The Bolt is an innovative and
fun personal transportation device, ready to take on everyday use.
Before your rst ride, check whether the wheels are damaged, or parts
are loose. If there are any abnormalities, please contact Jetson
Customer Support at +1-(888) 976-9904 or email us at
help@ridejetson.com.
This product manual can help you understand, use, and maintain your
Bolt. In order to avoid danger caused by collisions, falls, and loss of
control, please use caution and learn how to ride the Bolt safely.
Jetson and authorized dealers cannot be held liable for injury or
damage caused from riding the Bolt. Users ride at their own risk.
The rider is responsible for consequences caused by violating warnings
or improper operations.
If you want to return this product for any reason, be sure to rst call or
email us before taking it back to the store so we can assist you.
INTRODUCTION
Page 4
4
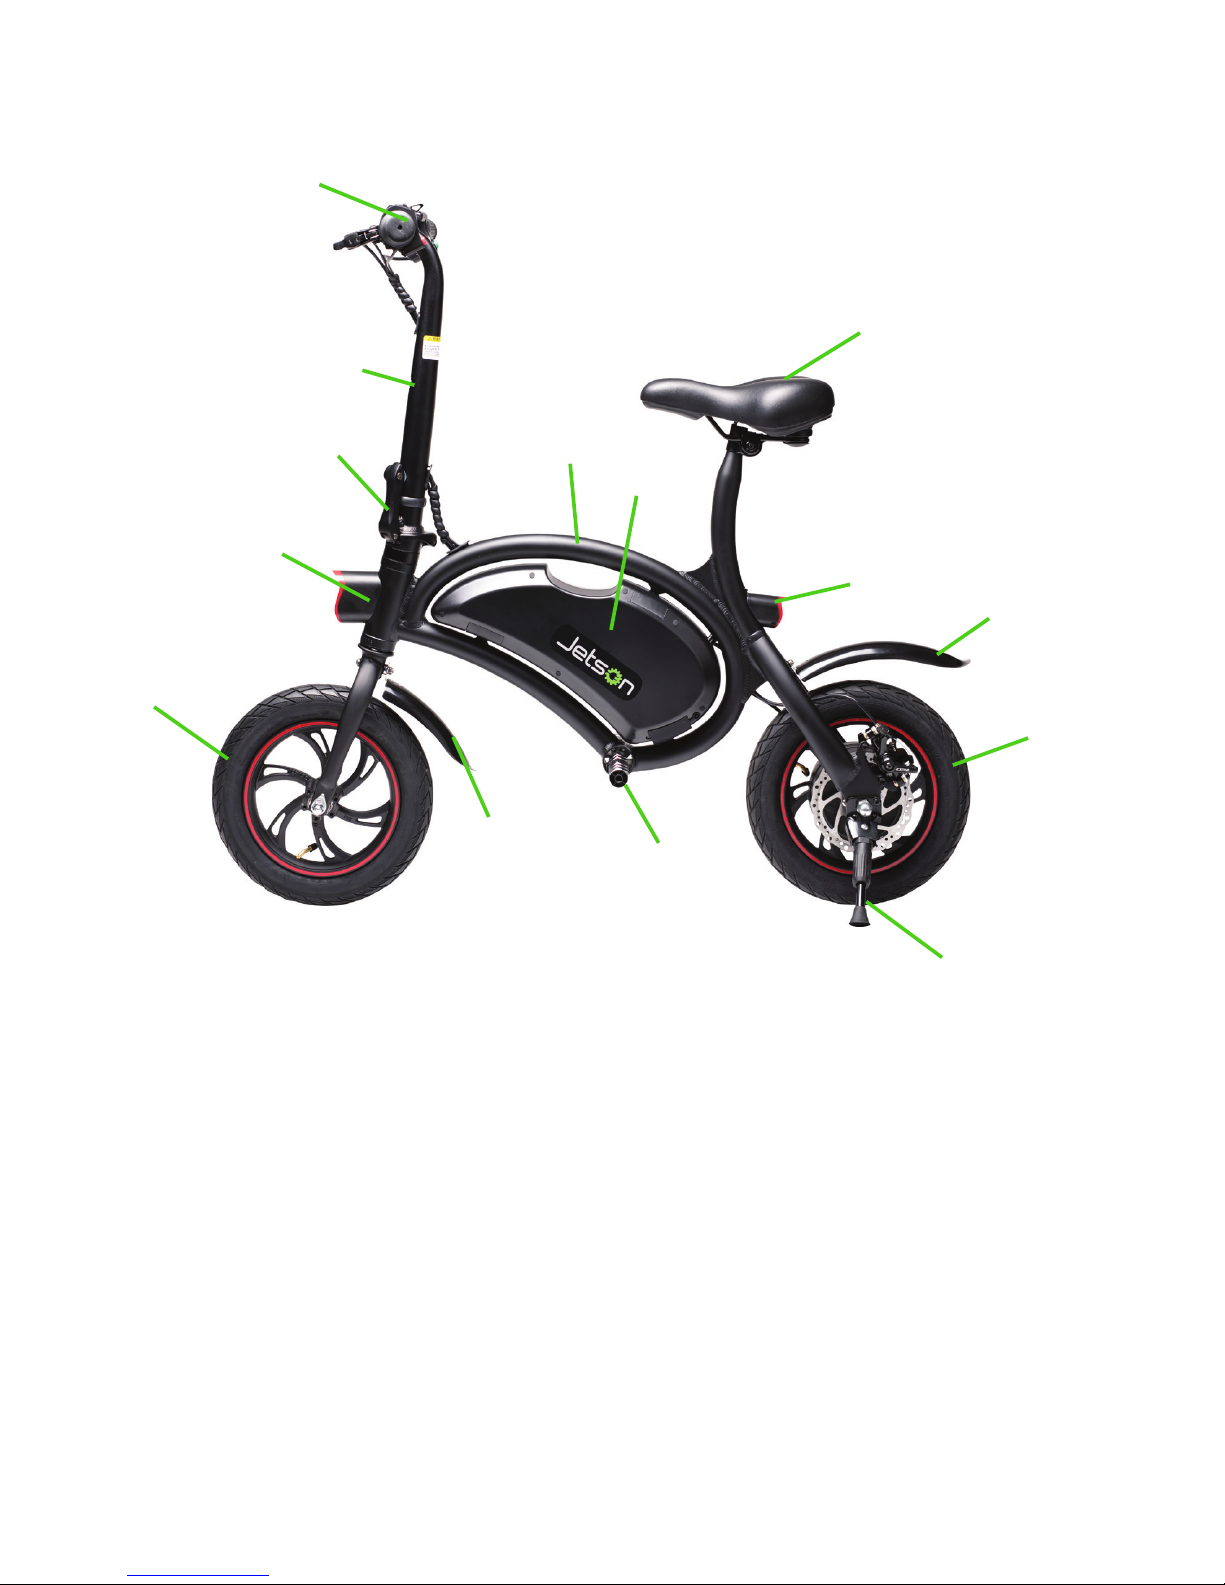
INCLUDED IN THE BOX
1. Front Tire
2. Headlight
3. Stem Quick Release
4. Stem
5. Handlebar
6. Frame
7. Battery
8. Saddle
9. Taillight
10. Rear Fender
11. Rear Tire
12. Kickstand
13. Foot Rest
14. Front Fender
1
2
3
4
5
6
8
9
10
11
12
13
14
7
Page 5

5
FEATURES AND SPECS
MODEL: BOLT
MOTOR: 250W
MOTOR TYPE: HUB
BATTERY: 36V, 5.2 AH LITHIUM ION
CHARGER: 110V - 240V
CHARGE TIME: 3-5 HOURS
WHEEL DIAMETER: 14"
PRODUCT WEIGHT: 34 LBS
WEIGHT LIMIT: 250 LBS
MAX SPEED: 16 MPH
MAX RANGE: 35 MILES
CLIMBING ANGLE: 15°
RECOMMENDED AGE: 13+
FRAME: ALUMINUM ALLOY
PRODUCT DIMENSIONS: L: 40” x W: 20” x H: 37”
Page 6
6
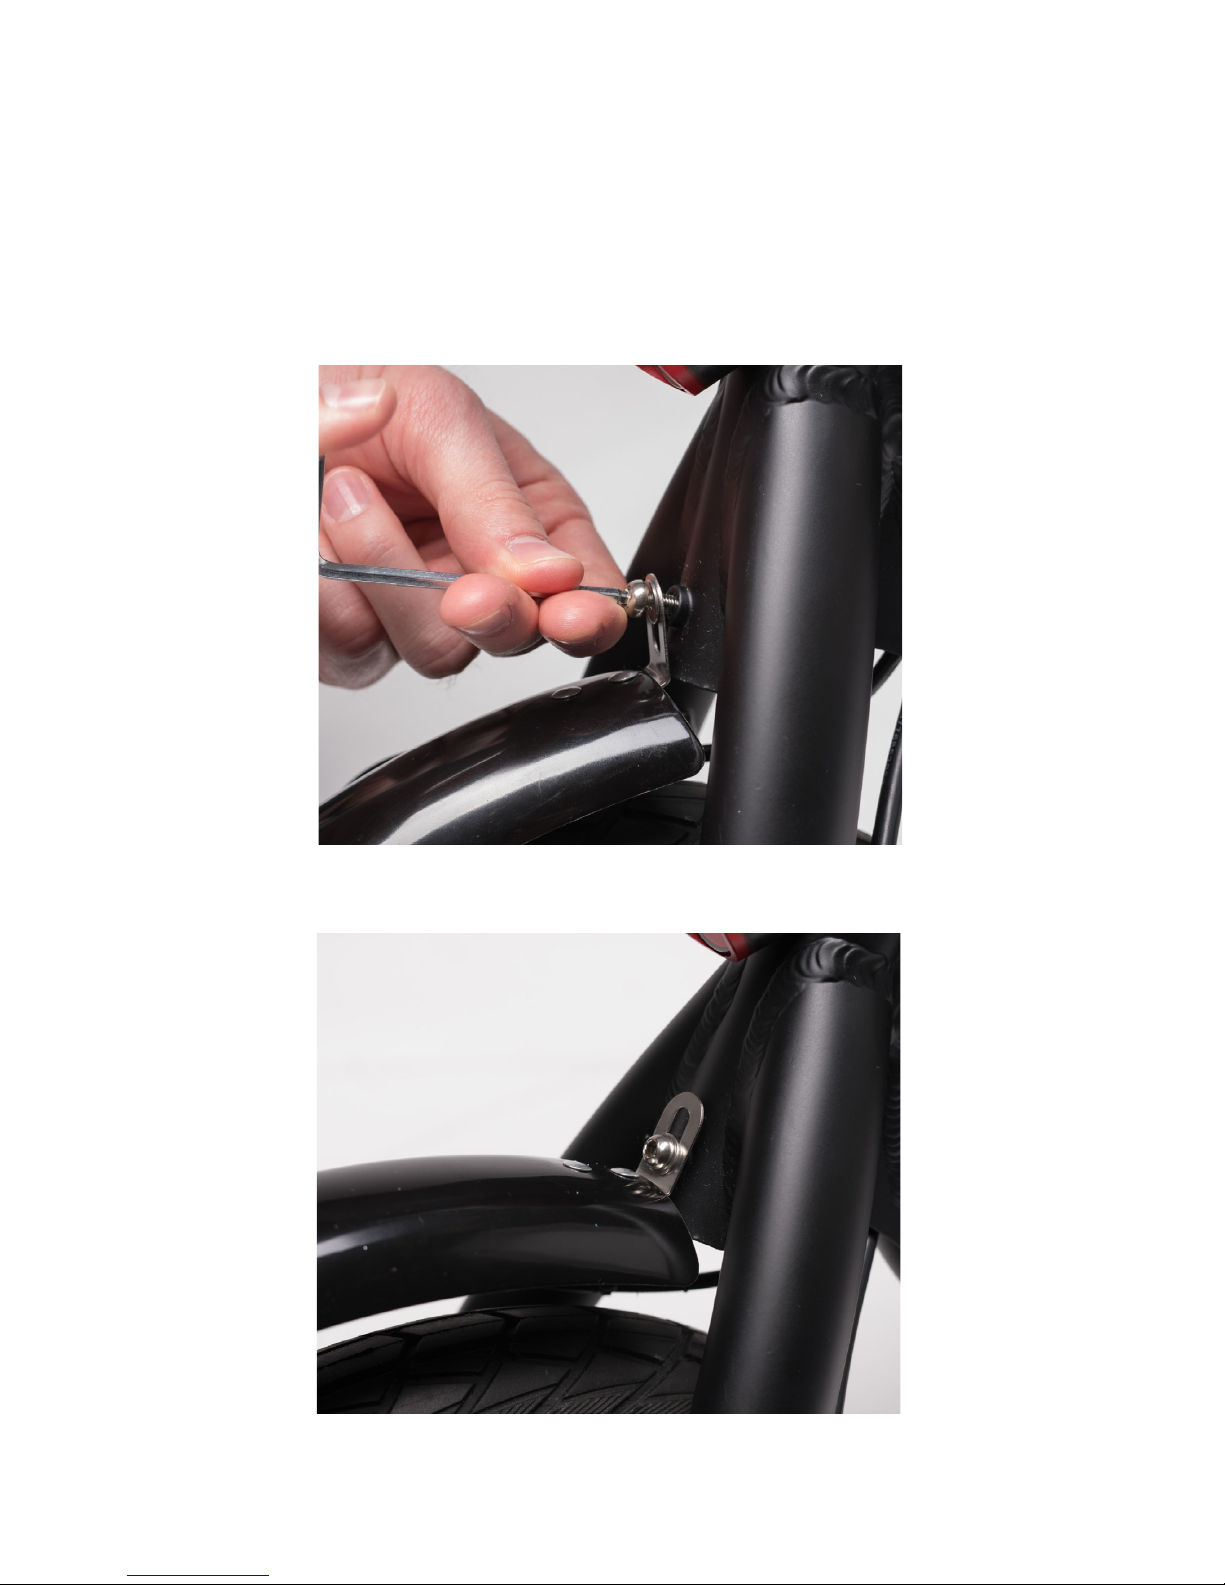
ASSEMBLY
The Bolt comes mostly assembled, you will need to attach the Rear
Fender and the Foot Rests.
To attach the Rear Fender, remove the screw above the Rear Tire using
the provided Allen Key. Then, attach the Rear Fender using the Screw.
Make sure the screw is tight and the Rear Fender is secure.
Page 7

7
To connect the Foot Rests to the Bolt, place each Foot Rest onto the
tube and turn it until it is secure.
Page 8

8
OPERATING THE BOLT
TURNING THE BOLT ON AND OFF
To turn the Bolt on, push the Power Switch up to "ON." To turn the Bolt
off, push the Power Switch down to "OFF."
Power
Switch
On
BATTERY INDICATOR
The Bolt has a Battery Indicator on the Handlebar. When all four lights
are on, the Bolt is fully charged. When only one bar remains, the Bolt
needs to be charged.
Battery
Indicator
Page 9

9
CRUISE CONTROL SETTINGS
To use the cruise control feature, press the Cruise Button when you have
reached the speed you would like to maintain. Apply the brake to turn
off cruise control.
Press to
activate
cruise
control
TURNING THE LIGHTS ON AND OFF
To turn the Headlight and Taillight on, hold down the Horn Button for
3 seconds. Turn off the lights by holding the Horn Button down for 3
seconds again.
Hold
down for 3
seconds
Page 10

10
1. Plug one end of the power cord into a grounded AC outlet and
the other into the Bolt’s Charging Port. The red charging light on the
charger unit will turn on.
2. The red light will turn green once fully charged. Recharge the Bolt
after each use.
(Please note: Always plug the charger into the wall rst before the
device. If the wall outlet doesn’t have power and you plug the charger
into the device rst, it will light green, even if the battery is not full. So
always plug into the wall rst to make sure there is power.)
THE CHARGER OFFERS A CHARGING STATUS ON THE TOP OF THE
CHARGER:
CHARGING LIGHT RED: Battery is charging.
CHARGING LIGHT GREEN: Charging is complete.
Don’t use the Bolt if the battery emits strange odors, overheats, or
begins leaking. If the battery does leak, do not touch any leaking
materials, as the battery contains dangerous substances. Do not open
the battery and do not insert anything into the battery.
Do not charge the battery if it has over-discharged. It should be
discarded for your safety. Do not turn on the Bolt while it is charging.
Your Bolt comes with a built-in rechargeable lithium ion battery. Always
use the provided charger only. Please remember to cover the Charging
Port when you are done charging. Before your rst ride you must fully
charge the Bolt - charge for 6 hours for the rst 3 times you use it.
For every ride after, charge your Bolt until it is fully charged, and NOT
LONGER. Do not leave any chargers plugged in overnight, or leave it
plugged in past the charge time.
CHARGING THE BATTERY
Page 11

11
UNFOLDING THE BOLT
Lift
Handlebar
Lift the Handlebars up until it is aligned with the Stem. Then, lock the
Stem Quick Release.
Lock the
Stem Quick
Release
Page 12

12
FOLDING THE BOLT
Unlock the Stem Quick Release and lower the Handlebars slowly so you
do not scratch the Frame.
Unlock
the Stem
Quick
Release
Lower
Handlebar
Page 13

13
SAFE RIDING
Helmet: Most serious injuries that occur while riding are head injuries.
This could be prevented by wearing a helmet.
Before each ride, check whether the Frame, Handlebar, and Saddle are
secure, the Fenders are properly aligned, the tire pressure is
sufcient, and the brake system works correctly. Make sure you can
reach and squeeze the Brake Levers.
Foot Position – While riding the Bolt, keep your feet on the Foot Rests.
Do not ride with your feet dangling over the sides. Remain seated while
riding the Bolt.
To start riding, turn the Twist Throttle slowly. Get accustomed to the
acceleration of the throttle.
Make your turns slowly and cautiously, and give yourself stopping
distance. It is recommended you practice your rst ride on the
Bolt in an open space with no obstacles in your way.
Practice shifting the gears while riding. Only shift gears while in motion.
Avoid putting your body weight on the handlebars.
Braking – To come to a stop, squeeze the Brake Levers. Be careful not to
squeeze the Brake Levers too fast, as it may cause too sudden a stop or
jerking motion.
PLEASE NOTE: Riding, like most sports, involves risk of injury and
damage. By choosing to ride the Bolt, the responsibility and all inherent
risk is on you. It is crucial that you know, understand, and act according
to safety rules.
Page 14

14
CARE AND MAINTENANCE
WEIGHT LIMIT
The maximum load is 250 lbs. Going above the maximum weight limit
can cause injury or damage the bicycle.
CLEANING THE BOLT
To clean the Bolt carefully wipe with a damp cloth, then dry with a dry
cloth. Do not use water to clean the Bolt, as the electrical and electronic
systems may get wet, resulting in personal injury or malfunction of the
bicycle. Lube the chain every so often to keep it smooth.
BATTERY
• Keep the bike away from re and excessive heat.
• To avoid damage to the battery, never subject the Bolt to intense
physical shock, severe vibration, or impact.
• Protect the bike from water or moisture.
• Never disassemble the bike or its battery.
• If there are any issues with the battery, please contact Jetson
Customer Support.
STORAGE
• If you plan on storing the Bolt for a substantial period of time, please
make sure you fully charge the battery before storing. The battery
should be fully charged once a month after this.
• To protect against dust, cover the Bolt.
• Store the Bolt indoors, in a dry place and at a suitable temperature.
• You should bring the Bolt into a warm environment (above 50
degrees Fahrenheit) for charging.
• Do not leave the Bolt plugged into the charger for long periods of
time.
TIRE PRESSURE
The recommended tire pressure is 35-45 psi.
Page 15

15
SAFETY WARNINGS
Here are some useful tips to make sure you always have a safe ride:
• Children, the elderly, and pregnant women should not use the Bolt.
• Do not ride after drinking or taking prescription medication.
• Do not carry items when riding.
• Prior to each ride, inspect each part of the Bolt to ensure it has been
maintained correctly and is functioning properly.
• Always give way to pedestrians.
• Always comply with local trafc laws and regulations.
• Be alert to things in front and far away from you.
• Make sure your feet are always placed securely on the Foot Rests.
• The Bolt cannot be ridden by two or more people. Only one person
can ride at a time.
• When you ride the Bolt along with other cyclists, always keep a safe
distance to avoid a collision.
• When turning, be sure to maintain your balance.
• Do not allow distractions when riding, such as answering the phone or
engaging in any other activities.
• Avoid riding in the rain or on smooth surfaces such as snow or ice.
• Do not ride on roads with obstacles (such as litter, small stones, etc.).
• Avoid riding in narrow spaces or on steep slopes.
• Avoid riding around ammable gas, steam, liquid, or dust that could
cause re.
• Never operate the product barefooted and keep shoelaces tied.
• Riding with improperly adjusted brakes is dangerous and can result in
serious injury or death.
• Applying brakes too hard or too suddenly can lock up a wheel,
which could cause you to lose control and fall. Sudden or excessive
application of the front brake may pitch the rider over the handlebars,
which may result in injury or death.
Page 16

16
CALIFORNIA WARNING
This product contains chemicals, including lead, which are known to
the state of California to cause cancer, birth defects, and other medical
conditions.
MODIFICATIONS
Do not attempt to disassemble, modify, repair, or replace the Bolt or
any components of the unit. This will void any warranty, and can lead to
malfunctions which may cause injury.
ADDITIONAL OPERATION CAUTIONS
Do not lift the Bolt off the ground while it is in operation and the wheels
are in motion. This can result in freely spinning wheels, which may cause
injury to yourself or others nearby. Do not jump on or off the Bolt, and
do not jump while using it. Always keep your feet rmly planted on the
Foot Rests while in operation.
Page 17

17
LIMITED 1 YEAR WARRANTY
TO QUALIFY FOR WARRANTY SERVICE:
1. You must present a copy of the sales receipt from an approved retail partner.
2. This product cannot be used for rental or commercial use.
3. This product cannot be used for competition.
LIMITATIONS OF LIABILITY
• This Limited 1 Year Warranty is non-transferable after the product’s initial sale.
• No unapproved modications can be made to the product, its performance
or otherwise, in order for this Limited 1 Year Warranty to remain in effect.
• No reimbursement is provided for towing, loss of time, loss of use, inconvenience, incidental or consequential damages.
• Warranty is void if weather related water damage is determined. Owner is
responsible for storage and protection from weather.
• Jetson® makes no warranty with respect to products or trade accessories
not made by Jetson®, including, but not limited to, motors, tires, wheels, and
batteries, such products or trade accessories, such items being subject to the
original manufacturer’s warranty, if any.
• This Limited 1 Year Warranty does not cover minor surface blemishes, rips,
tears, or other cosmetic damages due to normal use, or other intentional or
unintentional damage to the product.
• This Limited 1 Year Warranty will not cover any damage which results from the
application of improper cleaners, solvents or chemicals to the product, water
damage, smoke or soot, or from exposure to saltwater, sea breeze or salt.
• This Limited 1 Year Warranty will not cover any damage which results from
aging, such as fading of paint, deterioration of plated surfaces, deterioration of
rubber or plastics, or rusting.
• This Limited 1 Year Warranty does not cover improper repair or misdiagnoses
of problems.
• This Limited 1 Year Warranty only covers parts due to manufacturer defect.
• Damage due to misuse or neglect, use other than as specied in the Owner’s
Manual, or use under abnormal conditions are not covered by this Limited 1
Year Warranty.
OWNER’S WARRANTY RESPONSIBILITIES
As the device’s owner, you are responsible for the performance of the required
maintenance. You may be denied a warranty claim solely because of your
failure to ensure the performance of all scheduled maintenance. As the owner,
you should be aware that you may be denied your warranty coverage if your
device or a part has failed due to abuse, neglect, improper maintenance, or
unapproved modications. For any issue regarding your Jetson® product, call
toll free +1-(888) 976-9904 or email help@ridejetson.com.
Page 18

18
PRODUCT REGISTRATION
Please complete and mail this card within 10 days of purchase or go to
https://www.ridejetson.com/product-registration.
Name: _____________________________________________________________________________
Address: ____________________________________________________________________________
City
, State,
Zip: ______________________________________________________________________
Email: ______________________________________________________________________________
Home Phone: ___________________________ Gender: _____________________________
Pu
rchase Date: _________________________ Purchased Fr
om: __________________________
Serial Number: ______________________________________________________________________
Is this your first
Jetson pr
oduct?: ______________________________________________________
Other similar pr
oduct owned befor
e: _________________________________________________
How did you hear about the Jetson Bolt?: _____________________________________________
_
_____________________________________________________________________________________
Co
mplete this form and mail it to:
Attention: Product Registration
Jetson Electric Bikes
1 Rewe Street
Brooklyn, NY 11211
Why did you buy this pr
oduct?: For myself
For my child
For my grandchild
Gift for someone else (adult)
Gift for someone else (child)
Page 19

19
Page 20

20
BOLT
 Loading...