


Bolt Folding
Electric Ride-On.
A guide for your ride.
IMPORTANT, RETAIN FOR FUTURE REFERENCE: READ CAREFULLY
ITM. / ART. 1266814
Made in China


Table Of Contents
Safety Warnings 2
What’s in the Box 4
Features & Specs 5
Attaching the Seat 6
Attaching the Foot Rests 7
Attaching the Bell 7
Attaching the Fenders 8
Charging the Battery 9
Unfolding the Handlebar 10
Operating the Bolt 11
Riding the Bolt 12
Connecting to Bluetooth® 13
Care and Maintenance 14
Manuel Utilisateur 16
Manual de Usuario 33
1

Safety Warnings
• For your safety, please read the user manual and safety warnings carefully, and make
sure you understand and accept all the safety instructions. The user will be responsible
for any loss or damage caused by improper use.
• Children, the elderly, pregnant women, and those with heart conditions should not use
this product.
• The rider should not exceed 113 kg / 250 lb.
• Do not ride at night.
• Do not use near motor vehicles.
• Do not ride after drinking or taking prescription medication.
• Do not ride this product if you have had any head, back, or neck ailments, or prior
surgeries to those areas.
• Persons with any mental or physical conditions that may make them susceptible to
injury or impair their dexterity or mental capabilities should recognize, understand, and
perform all of the safety instructions and be able to assume the hazards inherent in
using this product.
• Do not carry items when riding.
• Always wear shoes, a helmet, and appropriate safety gear.
• Prior to each ride, inspect each part of the product to ensure it has been
maintained correctly and is functioning properly.
• Always give way to pedestrians.
• Always comply with local traffic laws and regulations.
• Be alert to things in front and far away from you.
• Make sure your feet are always placed securely on the deck.
•The product cannot be ridden by more than one person.
• When you ride this product along with other riders, always keep a safe distance to
avoid a collision.
• When turning, be sure to maintain your balance.
• Do not allow distractions when riding, such as answering the phone or engaging in any
other activities.
• Avoid riding in the rain or on smooth surfaces such as snow or ice.
• Do not ride on roads with obstacles (such as litter, small stones, etc.).
• Avoid riding in narrow spaces or on steep slopes.
• Avoid riding around flammable gas, steam, liquid, or dust that could cause fire.
• Never operate this product barefooted and keep shoelaces tied.
• Riding with improperly adjusted brakes is dangerous and can result in serious injury or
death.
• Applying brakes too hard or too suddenly can lock up a wheel, which could cause you
to lose control and fall. Sudden or excessive application of the brake may result in injury
or death.
• Do not ride without proper training. Do not ride at high speeds, on uneven terrain, or on
slopes. Do not perform stunts or turn abruptly.
• The area that this product is to be operated should be safe and suitable for safe
operation.
• Check whether all safety labels are in place and understood before riding.
• The owner shall allow the use and operation of the unit after a demonstration that
such operators can understand and operate all components of the unit before use.
• Operators shall adhere to all of the manufacturer’s recommendations and
instructions, as well as comply with all laws and ordinances.
• Only ride the product with adequate daylight conditions for visibility.
• We encourage you to highlight the product, for visibility, by using lighting,
reflectors, and signal flags on flexible poles.
2

California Proposition 65
Warning: This product can expose you to a chemical such as Cadmium that is known
to the State of California to cause cancer or birth defects or other reproductive harm.
For more information go to www.p65warnings.ca.gov/product
Modifications
Do not attempt to disassemble, modify, repair, or replace the unit or any
components of the unit without instruction from Jetson Customer Support. This will void
any warranty, and can lead to malfunctions which may cause injury.
Additional Operation Cautions
Do not lift the product off the ground while it is on and the wheels are in motion.
This can result in freely spinning wheels, which may cause injury to yourself or others
nearby. Do not jump on or off the product, and do not jump while using it. Always keep
your feet firmly planted on the deck while in operation. Always check the battery charge
before using.
This device complies with Part 15 of the FCC Rules. Operation is subject to the following
two conditions: (1) This device may not cause harmful interference, and
(2) this device must accept any interference received, including interference that may
cause undesired operation.
Remember to be safe and
most importantly, have fun!
3

Whats in the Box
1. Front Tire
2. Headlight
3. Stem Quick Release
4. Handlebar
5. Carrying Handle
6. Seat
7. Seat Clamp
8. Taillight
9. Rear Fender
10. Rear Tire
11. Kickstand
12. Foot Rest
13. Front Fender
14. Charging Cable
15. Charger
16. 5 MM Allen Key (Included)
Screw × 1
Bolts × 2
Nuts × 3
4
16
6
15
14
3
5
2
1
13
12
7
8
9
11
Tools needed but not included: Screw Driver, Ratchet + 12mm Socket
Please Note: Images may not reflect exact appearance of actual product.
4
10

Specs & Features
• Product Dimensions:
101.6 cm × 50.8 cm × 94 cm | 40 in × 20 in × 37 in
• Weight Limit: 113 kg | 250 lb
• Product Weight: 15.4 kg | 34 lb
• Recommended Age: 13+
• Tire Size: 30.4 cm | 12 in
• Max Speed: Up To 25 km/h | 15.5 mph
• Max Range: Up To 24.1 km | 15 miles
• Battery: 36V, 6.0Ah Lithium-Ion
• Motor: 250W Hub Motor
• Charger: 110-240V
• Charge Time: Up To 5 Hours
• Climbing Angle: Up To 15°
5
1. Get Started
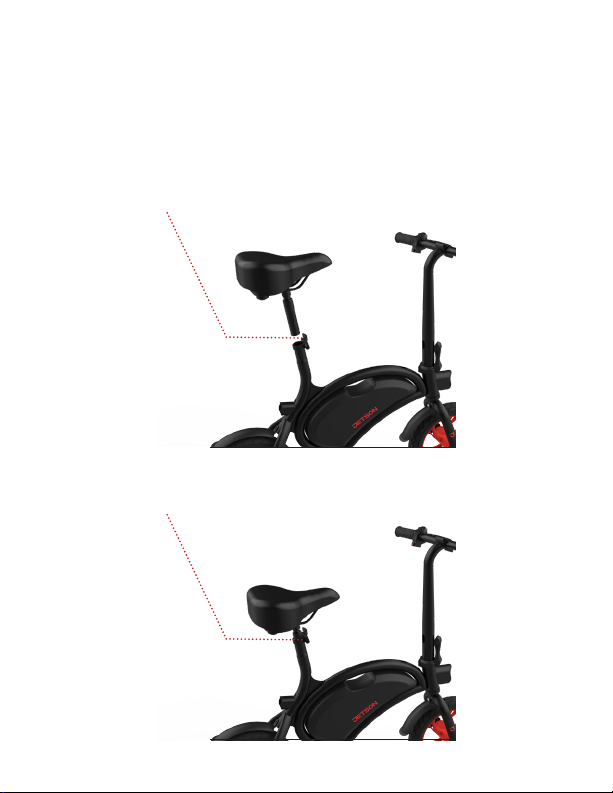
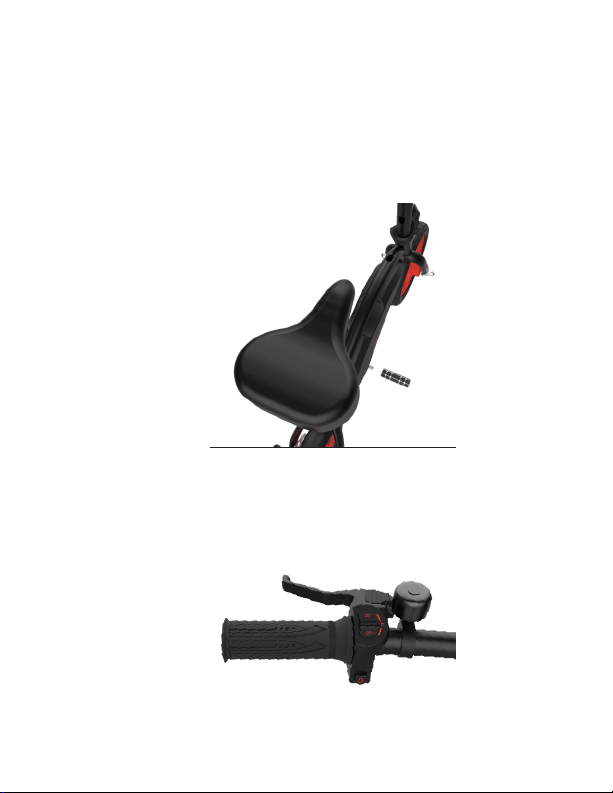
Attaching the Seat
Open the Seat Clamp. Slide Seat into Stem Tube.
Turn the Knob clockwise to tighten Seat Clamp. Close the Seat Clamp.
6
Attaching the Foot Rests
Place each Foot Rest onto the tubes and turn it towards the rear
tire until it is secure.
Attaching the Bell
Attach the Bell using the included screw and nut.
7
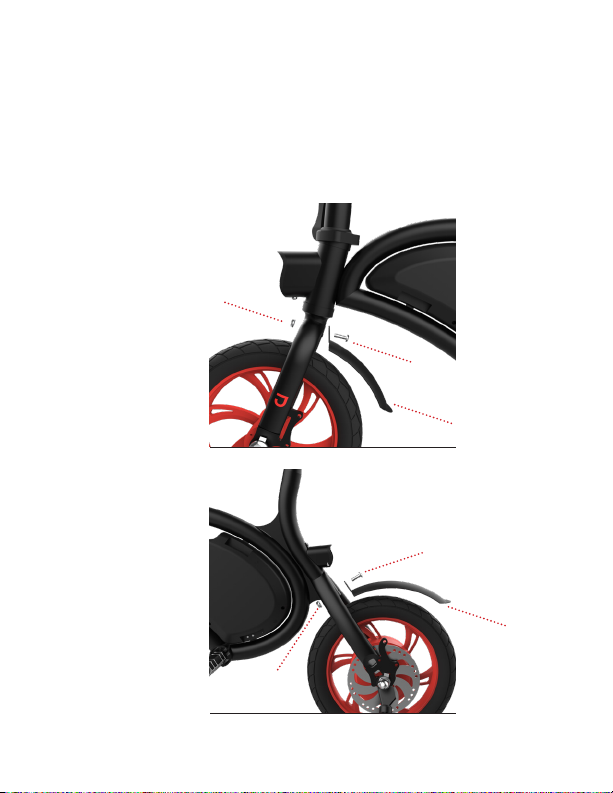
Attaching the Fender
Remove Bolt and Nut from the frame. Run the Bolt through the Fender and
frame, and secure using the Nut.
Nut
Bolt
Front Fender
Bolt
Rear Fender
Nut
8

2. Stay Charged
Charging the Battery
• A few must-do’s:
•
• Only use the included charger
• Plug the charger into the wall before the Charging Port
• Don’t turn on the Bolt while it’s charging
• Charge the battery until it is fully charged - up to 5 hours
• Replace the cover over the Charging Port when done
•
• Charging Indicator On The Charger:
•
• Red Light: Battery is charging
• Green Light: Charging is complete
Charging Port
9

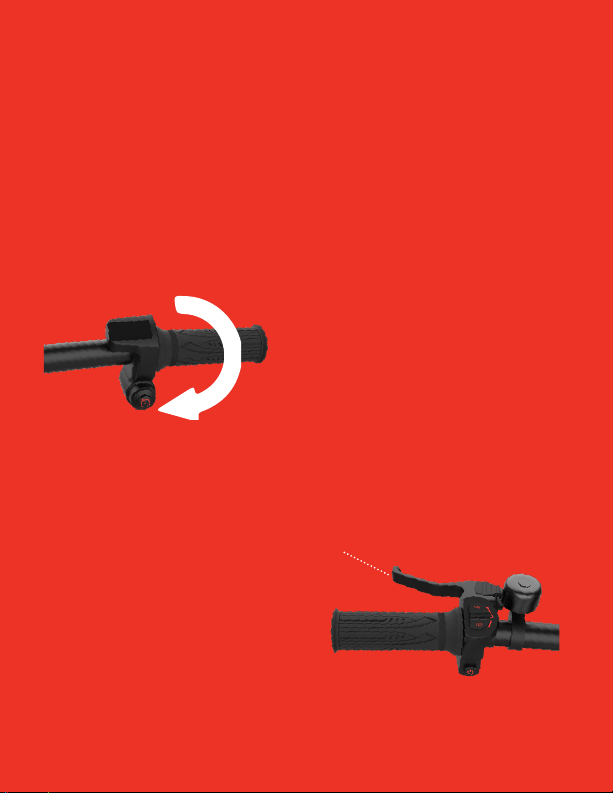
3. Make Moves
Unfolding the Handlebar
Slowly lift the Handlebars up.
Press the Stem Quick Release in to lock position.
To fold, unlock the Stem Quick Release.
10
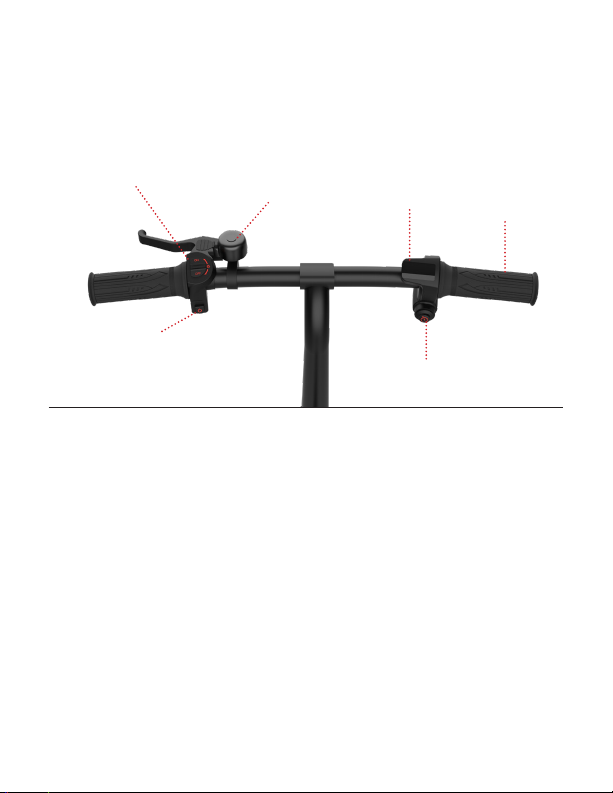
Operating the Bolt
Light Switch
Power Button
Power Button: Turns the Bolt on and off.
Light Switch: Turns the headlight and taillight on and off.
Cruise Control Button: Press when you have reached the speed
you would like to maintain. Apply the brake to turn off Cruise Control.
Battery Levels:
4 Lights: 76-100% Power
3 Lights: 51-75% Power
2 Lights: 26-50% Power
1 Light: 1-25% Power (Please charge the Bolt immediately!)
Please Note: If the Cruise Control feature is not working, it may be
locked. Unlock the Cruise Control by connecting to the Ride Jetson App
and disabling Walk Mode.
Bell Battery Indicator
Cruise Control
Twist Throttle
11
Riding the Bolt
Before each ride, check that the Handlebar and Seat are secure, the tire
pressure is sufficient, and the brake system works correctly.
Keep your feet on the Foot Rests. Do not ride with your feet dangling over the
sides and always stay seated while riding.
Twist Throttle
Try to take it easy on the
throttle until you get used
to it.
Handbrake
Squeeze the Brake slowly to
avoid stopping abruptly or
losing control.
Handbrake
12

Connecting to Bluetooth®
Your Jetson Bolt is Bluetooth® 4.0 enabled, so you can pair it with the Ride
Jetson app on your personal Bluetooth® enabled device. The Ride Jetson app
is available for download from the App Store and the Google Play Store.
1. Turn on the Bolt.
2. Open the Ride Jetson app on your handheld device.
3. Tap the Bluetooth® symbol in the top left corner of the app.
4. Select your Bolt.
5. The default Bluetooth password is 000000. The default Lock password is
123456. Customize the passwords in the Settings of the app.
If you are having issues connecting to Bluetooth®, follow these steps…
1. Try restarting the Bolt by turning it off and then on.
2. Click the Scan button to refresh.
3. Restart the Ride Jetson app.
4. Contact Jetson Customer Support for assistance.
For Customer Service please call:
US & Canada 1-(888) 976-9904
UK +44 (0)33 0838 2551
Spain/Portugal +34 952 179 479
Hours of Operation: 7 days a week 10am-6pm EST
help@ridejetson.com
Extra features available with the Ride Jetson app:
1. Turn the Headlight on and off.
2. Adjust the speed settings.
3. Keep track of your travel time and distance.
13

Care & Maintenance
Riding Range
The maximum range is 24.1 km / 15 miles. However, a lot of factors will affect how
far you can go per charge:
• Driving Surface: A smooth, flat surface will increase driving distance.
• Weight: More weight means less distance.
• Temperature: Ride and store the Bolt above 10°C / 50°F.
• Maintenance: Timely battery charging will increase driving distance.
• Speed and Driving Style: Frequent starting and stopping will reduce driving
distance.
Cleaning The Bolt
To clean the Bolt, carefully wipe with a damp cloth, then dry with a dry cloth. Do
not use water to clean the Bolt, as the electrical and electronic systems may
get wet, resulting in personal injury or malfunction of the Bolt.
Battery
• Keep the Bolt away from fire and excessive heat.
• Do not subject the Bolt to intense physical shock, severe vibration, or impact.
• Protect from water or moisture.
• Do not disassemble the Bolt or its battery.
• If there are any issues with the battery, please contact Jetson Customer
Support. We’d love to help!
Storage
• Fully charge the battery before storing.
• The battery should be fully charged once a month after this.
• To protect against dust, cover the Bolt.
• Store the Bolt indoors, in a dry place and at a suitable temperature.
• You should bring the Bolt into a warm (above 10°C / 50°F) environment
for charging.
14

Enjoying your product?
Leave a review on ridejetson.com or share your photos with us online using the
#RideJetson hashtag!
Follow us @ridejetson
#JetsonMakeMoves
15

Vélo électrique
pliable Bolt.
Guide d’utilisation.
IMPORTANT : À LIRE ATTENTIVEMENT ET À CONSERVER
ITM. / ART. 1266814
Fabriqué en Chine


Tables des Matières
Avertissements de sécurité 19
Contenu de la boîte 21
Caractéristiques techniques 22
Fixer la selle 23
Fixer les repose-pieds 24
Fixer la sonnette 25
Fixer les garde-boue 25
Charger la batterie 26
Déplier le guidon 27
Utiliser le vélo 28
Conduire le vélo 29
Connexion Bluetooth® 30
Entretien 31
Manual de Usuario 33
18

Avertissements de sécurité
• Pour votre sécurité, veuillez lire attentivement le manuel de l’utilisateur et les
avertissements de sécurité, et assurez-vous de bien comprendre et de respecter
toutes les consignes de sécurité. L’utilisateur sera responsable de toute perte ou de
tout dommage causé par un usage inapproprié.
• Les enfants, les personnes âgées, les femmes enceintes et les personnes souffrant de
problèmes cardiaques ne devraient pas utiliser ce produit.
• L’utilisateur doit peser moins de 113 kg (250 lb).
• N’utilisez pas le vélo la nuit.
• N’utilisez pas le vélo à proximité de véhicules motorisés.
• N’utilisez pas le vélo après avoir bu ou pris des médicaments sur ordonnance.
• N’utilisez pas le vélo si vous avez déjà eu des douleurs à la tête, au dos ou au cou, ou
avez déjà subi une intervention chirurgicale dans ces régions.
• Les personnes qui souffrent de troubles mentaux ou physiques susceptibles
d’augmenter les risques de blessures ou encore d’altérer leur dextérité ou leurs
capacités mentales doivent prendre connaissance de toutes les consignes de sécurité,
les comprendre et les respecter, ainsi qu’être capables d’assumer les risques inhérents
à l’utilisation de ce produit.
• Ne transportez rien lorsque vous utilisez le vélo.
• Portez toujours des chaussures, un casque et l’équipement de sécurité approprié.
• Avant d’utiliser le vélo, inspectez-en chaque pièce pour vous assurer qu’il est bien
entretenu et qu’il fonctionne correctement.
• Cédez toujours le passage aux piétons.
• Respectez toujours les lois et règlements locaux en matière de circulation.
• Soyez attentif à ce qui se passe devant vous et au loin.
• Veillez à ce que vos pieds soient toujours placés de façon sécuritaire sur les reposepieds.
• Évitez d’utiliser le vélo à proximité de gaz, de vapeurs, de liquides ou de poussières
inflammables susceptibles de causer un incendie.
• N’utilisez jamais le vélo pieds nus, et veillez à ce que les lacets de vos chaussures
soient bien attachés.
• Évitez d’utiliser le vélo si les freins sont mal réglés; c’est dangereux, et vous risqueriez
de vous blesser gravement, voire de mourir.
• Évitez d’appuyer trop fort sur les freins ou de freiner brusquement, car les roues
risquent de se bloquer, ce qui pourrait vous faire perdre la maîtrise du vélo et vous
faire tomber. De plus, l’activation soudaine ou excessive des freins peut causer des
blessures, voire la mort.
• N’utilisez pas le vélo si vous n’avez pas reçu de formation adéquate. Ne roulez pas
à grande vitesse, sur des terrains accidentés, ni sur des pentes. N’effectuez pas
d’acrobaties ni de virages brusques.
• Utilisez le vélo dans un endroit sécuritaire et approprié.
• Vérifiez que toutes les étiquettes de sécurité sont en place et que l’utilisateur les a
bien comprises avant de monter sur le vélo.
• Avant d’autoriser l’utilisation du vélo, le propriétaire doit s’être assuré que l’utilisateur
comprend comment en manœuvrer tous les composants.
• L’utilisateur doit respecter toutes les recommandations et instructions du fabricant,
ainsi que se conformer à l’ensemble des lois et règlements.
• Utilisez le vélo uniquement à la lumière du jour, dans de bonnes conditions de visibilité.
• Nous vous recommandons d’installer des voyants, des réflecteurs et des drapeaux sur
hampe flexible pour augmenter la visibilité du vélo.
19

Proposition 65 de l’État de la Californie
Avertissement : Ce produit peut vous exposer à des produits chimiques tels que
le Cadmium, qui est reconnu par l’État de la Californie pour causer le cancer, des
malformations congénitales ou d’autres problèmes reproductifs. Pour en savoir plus à ce
sujet, consultez le site www.p65warnings.ca.gov/product
Modifications
Ne tentez pas de démonter, de modifier, ni de réparer le vélo ou l’un de ses composants,
ni d’en remplacer l’un des composants, sans d’abord obtenir des instructions auprès du
service à la clientèle de Jetson. Le non-respect de cette consigne rendra la garantie nulle
et risque de causer le dysfonctionnement du vélo, ce qui pourrait entraîner des blessures.
Mises En Garde Supplémentaires Concernant L’utilisation Du Produit
Ne soulevez pas le produit s’il est en marche et que les roues sont en mouvement. Ces
dernières risqueraient de vous blesser ou de blesser les gens à proximité. Ne sautez pas
pour monter sur le produit ou en descendre, ni pendant que vous l’utilisez. Gardez toujours
vos pieds bien ancrés sur les repose-pieds lorsque vous utilisez le vélo. Vérifiez toujours
l’état de charge de la batterie avant d’utiliser le produit.
Ce produit est conforme à la partie 15 des règles de la FCC. Son utilisation est assujettie
aux deux conditions suivantes : 1) ce produit ne doit pas causer d’interférences nuisibles;
2) ce produit doit accepter toute interférence reçue, y compris celles susceptibles de
causer un dysfonctionnement.
Soyez prudent et, surtout,
n’oubliez pas de vous amuser!
20

Contenu de la boîte
1. Pneu avant
2. Phare avant
3. Mécanisme de fixation rapide de
la potence
4. Guidon
5. Poignée de transport
6. Selle
7. Collier de selle
8. Feu arrière
9. Garde-boue arrière
10. Pneu arrière
4
11. Béquille
12. Repose-pieds
13. Garde-boue avant
14. Câble de chargement
15. Chargeur
16. Clé hexagonale de 5 mm
(comprise)
Vis × 1
Boulons × 2
Noix × 3
16
6
15
14
3
5
2
1
13
12
7
8
9
10
11
Outils nécessaires mais non inclus: tournevis, clé à cliquet + douille 12mm
Remarque : Les images peuvent ne pas représenter l’apparence exacte du produit.
21

Caractéristiques Techniques
• Dimensions du produit:
101,6 × 50,8 × 94cm | 40 × 20 × 37 po
• Limite de poids: 113 kg (250 lb)
• Poids du produit: 15,4 kg (34 lb)
• Âge recommandé: 13 ans et plus
• Taille des pneus: 30,4 cm (12 po)
• Vitesse maximale: Jusqu’à 25,7 km/h (16 mi/h)
• Autonomie maximale: Jusqu’à 24,1 km (15 mi)
• Batterie: 36 V, ion-lithium 6,0 Ah
• Moteur: Moteur-roue de 250 W
• Chargeur: 110-240 V
• Temps de charge: Jusqu’à 5 heures
• Angle de montée: Jusqu’à 15 °
22

1. Pour commencer
Fixer la selle
Ouvrez le collier de selle.Glissez la selle dans le tube de selle.
Tournez le bouton dans le sens horaire pour serrer le collier de selle.
Fermez le collier de selle.
23

Fixer les repose-pieds
Insérez les repose-pieds dans les tubes et tournez-les vers le
pneu arrière jusqu’à ce qu’ils soient bien fixés.
Fixer la sonnette
Installez la sonnette à l’aide de la vis et de l’écrou (compris).
24

Fixer les garde-boue
Retirez le boulon et l’écrou du cadre. Insérez le boulon dans le garde-boue
et le cadre, et fixez-le à l’aide de l’écrou.
Boulon
Écrou
Garde-boue avant
Écrou
Garde-boue arrière
Boulon
25

2. Pour charger
Charger la batterie
Voici quelques informations importantes :
• Utilisez uniquement le chargeur fourni.
• Branchez le chargeur à une prise murale avant de le connecter
au port de recharge.
• Ne mettez pas le vélo Bolt en marche pendant son chargement.
• Chargez la batterie complètement (peut prendre jusqu’à 5 heures).
• Refermez le couvercle du port de recharge lorsque le chargement
est terminé.
Voyants lumineux sur le chargeur :
• Lumière rouge : La batterie est en cours de chargement
• Lumière verte : Le chargement est terminé
Port de recharge
26

3. Pour l’utiliser
Déplier le guidon
Soulevez lentement les poignées.
Appuyez sur le mécanisme de fixation rapide de la potence pour le
verrouiller. Pour plier le guidon, déverrouillez le mécanisme de fixation
rapide de la potence.
27

Utiliser le vélo
Indicateur de la batterie
Phare avant
Interrupteur
Interrupteur (alimentation) :
Permet de mettre en marche ou d’éteindre le vélo Bolt.
Interrupteur (phares) :
Permet d’allumer ou d’éteindre les phares avant et arrière.
Bouton du régulateur de vitesse :
Appuyez sur le bouton du régulateur de vitesse lorsque vous avez atteint la
vitesse que vous souhaitez maintenir. Freinez pour désactiver le régulateur
de vitesse.
Niveaux de la batterie :
4 barres lumineuses : autonomie restante entre 76 et 100 %
3 barres lumineuses : autonomie restante entre 51 et 75 %
2 barres lumineuses : autonomie restante entre 26 et 50 %
1 barre lumineuse : autonomie restante entre 1 et 25 % (veuillez charger le vélo
immédiatement!)
Sonnette
28
Accélérateur à la poignée
Régulateur de vitesse

Conduire le vélo
Avant chaque utilisation, vérifiez que le guidon et la selle sont bien fixés, que
la pression des pneus est suffisante et que le système de freinage fonctionne
correctement.
Gardez les pieds sur les repose-pieds. Ne laissez pas vos pieds pendre sur les
côtés et restez toujours assis pendant que vous conduisez.
Accélérateur
à la poignée
Les premières fois que vous
utilisez le vélo, actionnez
doucement l’accélérateur
jusqu’à ce que vous soyez
habitué à son effet.
Poignée de frein
Serrez lentement le frein
pour éviter d’arrêter
brusquement le vélo ou d’en
perdre la maîtrise.
Poignée de frein
29

Connexion Bluetooth®
Votre vélo Bolt de Jetson est compatible avec Bluetooth® 4.0. Il est donc
possible de le connecter à l’application Ride Jetson à l’aide de votre appareil
personnel compatible avec Bluetooth®. Vous pouvez télécharger l’application
Ride Jetson à partir de l’App Store ou du Google Play Store.
1. Mettez le vélo Bolt en marche.
2. Lancez l’application Ride Jetson sur votre appareil mobile.
3. Appuyez sur le symbole Bluetooth® dans le coin supérieur droit de l’écran de
l’application.
4. Sélectionnez votre vélo Bolt.
5. Le mot de passe par défaut pour se connecter au Bluetooth est 000000. Le
mot de passe de verrouillage par défaut est 123456. Personnalisez les mots de
passe en accédant aux paramètres de l’application.
Si vous n’arrivez pas à établir une connexion Bluetooth®, suivez les étapes cidessous :
1. Essayez de redémarrer le vélo en l’éteignant, puis en le remettant en marche.
2. Appuyez sur le bouton « Scan » (analyse) pour rafraîchir.
3. Relancez l’application Ride Jetson.
4. Communiquez avec le service à la clientèle de Jetson pour obtenir
de l’aide.
Pour contacter le service à la clientèle, veuillez composer le :
1 (888) 976-9904 pour les États-Unis et Canada
+44 (0)33 0838 2551 pour le Royaume-Uni
+34 952 179 479 pour l’Espagne et le Portugal
Heures d’ouverture:
Sept jours sur sept, de 10 h à 18 h, heure de l’Est
help@ridejetson.com
30

Entretien
Autonomie
Le vélo a une autonomie maximale de 24,1 km (15 mi). Cependant, de nombreux
facteurs influent sur la distance que vous pouvez parcourir avec une batterie
pleinement chargée :
• Surface : il est possible de parcourir une plus grande distance en roulant sur
une surface plane.
• Poids : un poids plus élevé est synonyme d’une distance plus courte.
• Température : utilisez le vélo et entreposez-le à une température supérieure à
10 °C (50 °F).
• Entretien : le chargement opportun de la batterie permet de parcourir de plus
grandes distances.
• Vitesse et style de conduite : des arrêts et des départs fréquents réduiront la
distance qu’il est possible de parcourir.
Nettoyer Le Vélo Bolt
Pour nettoyer le vélo Bolt, essuyez-le soigneusement à l’aide d’un chiffon
humide, puis séchez-le à l’aide d’un chiffon sec. N’utilisez pas d’eau pour le
nettoyer, car les systèmes électriques et électroniques risqueraient d’être
mouillés, ce qui pourrait entraîner des blessures ou un mauvais fonctionnement
du vélo.
Batterie
• Tenez le vélo à l’écart du feu et de la chaleur excessive.
• Ne soumettez pas le vélo à un choc physique intense, à de fortes vibrations ou
à un impact.
• Protégez le vélo de l’eau ou de l’humidité.
• Ne démontez pas le vélo ni sa batterie.
• En cas de problème avec la batterie, veuillez communiquer avec le service à la
clientèle de Jetson. Nous serons ravis de vous aider.
Entreposage
• Chargez complètement la batterie avant d’entreposer le vélo. Par la suite, la
batterie doit être rechargée complètement une fois par mois.
• Pour protéger le vélo contre la poussière, couvrez-le.
• Rangez le vélo à l’intérieur, dans un endroit sec et à une température
appropriée.
• Pour charger la batterie du vélo, installez-vous dans un endroit chaud, soit plus
de 10 °C (50 °F).
31

Vous aimez votre vélo?
Laissez-nous un commentaire sur ridejetson.com, ou partagez vos photos en
ligne en utilisant le mot-clic #RideJetson!
Suivez-nous @ridejetson
#JetsonMakeMoves
32

Escúter eléctrico
plegable Bolt
Guía para su paseo
IMPORTANTE : CONSERVE PARA REFERENCIA FUTURA. LEA CUIDADOSAMENTE ANTES
ITM. / ART. 1266814
Hecho en China


Índice
Advertencias de seguridad 36
Contenido de la caja 38
Características y especificaciones 39
Cómo colocar el asiento 40
Cómo colocar los soportes para pies 41
Cómo colocar la bocina 41
Cómo colocar los guardabarros 42
Cómo cargar la batería 43
Cómo desplegar el manubrio 44
Cómo utilizar el escúter Bolt 45
Cómo utilizar el Bolt 46
Conectarse a Bluetooth® 47
Cuidado y mantenimiento 48
35

Advertencias de seguridad
• Por su seguridad, lea con atención el manual del usuario y las advertencias de
seguridad y asegúrese de comprender y aceptar todas las instrucciones de seguridad.
El usuario es responsable de cualquier pérdida o daño que se produzca a causa de un
uso inadecuado del producto.
• Los niños, los ancianos, las mujeres embarazadas y las personas que padecen
afecciones cardíacas no deben utilizar este producto.
• El conductor del escúter no debe pesar más de 113 kg / 250 lb.
• No circule de noche.
• No utilice este producto cerca de vehículos motorizados.
• No conduzca si bebió o tomó algún medicamento recetado.
• No utilice este producto si manifestó dolores de cabeza, espalda o cuello, o si le
realizaron cirugías anteriormente en esas zonas.
• Las personas que padecen alguna afección mental o física, que puedan estar
expuestas a sufrir lesiones o que afecten sus destrezas o capacidad mental, deben
aceptar, comprender y cumplir con todas las instrucciones de seguridad y deben asumir
los riesgos que conlleva el uso de este producto.
• No lleve objetos mientras utiliza este producto.
• Siempre use zapatos, un casco y un equipo de seguridad adecuado.
• Antes de cada paseo, inspeccione todas las partes del producto para asegurarse de
que se haya realizado el mantenimiento adecuado y que funcione de manera correcta.
• Siempre ceda el paso a los peatones.
• Siempre cumpla con las leyes y las normas de tránsito locales.
• Esté alerta a los objetos que se encuentren al frente y alejados de su trayecto.
• Asegúrese de colocar siempre con firmeza los pies sobre la base.
• Evite circular cerca de gases, vapor, líquidos o polvos inflamables que podrían provocar
un incendio.
• Nunca utilice este producto descalzo y asegúrese de mantener siempre los cordones
atados.
• Es peligroso circular si los frenos no están ajustados de manera correcta; puede sufrir
lesiones graves u ocasionar la muerte.
• Frenar demasiado fuerte o de forma repentina puede bloquear una rueda, esto puede
provocar que pierda el control y se caiga. Al frenar de forma repentina o en exceso
puede ocasionar lesiones o la muerte.
• No circule sin antes recibir la información adecuada. No circule a velocidades altas,
sobre terrenos desnivelados o en pendientes. No realice acrobacias ni gire de forma
brusca.
• Este producto se debe utilizar en un área segura y adecuada.
• Antes de utilizar este producto, verifique que todas las etiquetas de seguridad se
encuentren en su lugar y que comprenda las indicaciones.
• El propietario debe permitir el uso y el funcionamiento de la unidad después de
demostrar que los operadores comprenden cómo utilizar y cómo funcionan todos los
componentes de la unidad antes de usarla.
• Los operadores deben cumplir con todas las recomendaciones e instrucciones que
indica el fabricante, así como también con todas las leyes y las ordenanzas.
• Utilice el producto solo durante el día de modo que pueda ver de manera adecuada.
• Le recomendamos que, para brindar una mayor visibilidad, coloque luces, reflectores e
indicadores de señal en las varas flexibles para resaltar el producto.
36

Proposición 65 de California
Advertencia: Al utilizar este producto puede estar expuesto a una sustancia química
como el cadmio que, según el estado de California, puede causar cáncer o defectos
congénitos, u otros daños reproductivos. Para obtener más información, ingrese a
www.p65warnings.ca.gov/product
Modificaciones
No intente desarmar, modificar, reparar o reemplazar la unidad ni ningún componente
de esta sin antes obtener instrucciones del servicio de atención al cliente de Jetson.
Si lo hace, anulará cualquier garantía y puede ocasionar fallas en el funcionamiento del
producto que pueden provocar lesiones.
Precauciones Adicionales de Funcionamiento
No levante el producto del suelo si está encendido y las ruedas se encuentran en
movimiento. Esto puede llevar a que las ruedas giren libremente y puede provocar
lesiones personales o a otras personas que se encuentren cerca. No salte para subirse ni
bajarse del producto; tampoco salte mientras lo utiliza. Mientras esté en funcionamiento,
mantenga los pies colocados firmemente sobre la base. Antes de utilizarlo, siempre
verifique la carga de la batería.
Este dispositivo cumple con las disposiciones de la sección 15 de las normas de la
Comisión Federal de Comunicaciones (Federal Communications Commission, FCC). El
funcionamiento de este producto está sujeto a las dos condiciones siguientes: (1) este
dispositivo no puede causar interferencias nocivas, y (2) este dispositivo debe aceptar
cualquier interferencia que reciba, incluidas las interferencias que pueden provocar un
funcionamiento no deseado.
Recuerde cuidarse y lo más
importante, ¡divertirse!
37

Contenido de la caja
1. Rueda delantera
2. Luz delantera
3. Palanca de desacoplamiento
rápido del manillar
4. Manubrio
5. Manija para transportar
6. Asiento
7. Abrazadera del asiento
8. Luz trasera
9. Guardabarros trasero
10. Rueda trasera
4
11. Caballete
12. Soporte para pies
13. Guardabarros delantero
14. Cable para cargar la batería
15. Cargador
16. Allen Key de 5 mm (incluido)
Tornillos × 1
Tornillos × 2
Tuerca × 3
16
6
15
14
3
2
1
5
13
12
11
Herramientas necesarias pero no incluidas:
destornillador, trinquete + zócalo de 12 mm
Nota importante: Las imágenes pueden diferir del producto real.
38
7
8
9
10

Características y especificaciones
• Dimensiones del producto:
101,6 cm × 50,8 cm × 94 cm | 40 in × 20 in × 37 in
• Límite de peso: 113 kg | 250 lb
• Peso del producto: 15,4 kg | 34 lb
• Edad de uso recomendada: mayores de 13 años
• Tamaño de los neumáticos: 30,4 cm | 12 in
• Velocidad máxima: hasta 25,7 km por hora | 16 mph
• Alcance máximo: hasta 24,1 km | 15 millas
• Batería: iones de litio de 36 V; 6,0 Ah
• Motor: motor de cubo de rueda de 250 W
• Cargador: 110-240 V
• Tiempo de carga: hasta 5 horas
• Ángulo de escalada: hasta 15°
39

1. Póngase en marcha
Cómo colocar el asiento
Abra la abrazadera del asiento. Deslice el asiento hacia el tubo
del manillar.
Gire la perilla en sentido horario para ajustar la abrazadera del asiento.
Cierre la abrazadera del asiento.
40

Cómo colocar los soportes para pies
Coloque los soportes para pies sobre los tubos y gírelos en
dirección a la rueda trasera hasta que queden firmes.
Cómo colocar la bocina
Coloque la bocina con el tornillo y la tuerca que se incluyen.
41

Cómo colocar los guardabarros
Retire el tornillo y la tuerca del marco. Pase el tornillo por el guardabarros y
el marco, y ajústelo con la tuerca.
Tuerca
Tornillo
Guardabarros
delantero
Tornillo
Guardabarros
trasero
Tuerca
42

2. Mantenga la carga
Cómo cargar la batería
A continuación, se incluyen algunas indicaciones que debe seguir:
• Utilice únicamente el cargador que se incluye.
• Primero enchufe el cargador en la pared y, luego, en el puerto de carga.
• No encienda el escúter Bolt mientras se está cargando.
• Cargue la batería por completo; puede tardar hasta 5 horas.
• Una vez que finalice la carga, reemplace la tapa del puerto de carga.
Indicador de carga en el cargador:
• Luz roja: la batería se está cargando
• Luz verde: la carga de la batería finalizó
Puerto de
carga
43

3. Comience a conducir
Cómo desplegar el manubrio
Levante lentamente el manubrio.
Presione la palanca de desacoplamiento rápido del manillar para trabar.
Para plegarlo, abra la palanca de desacoplamiento rápido del manillar.
44

Cómo utilizar el escúter Bolt
Indicador de batería
Luces delanteras
Botón de encendido
Botón de encendido: Enciende y apaga el escúter Bolt.
Luz de encendido: Enciende y apaga la luz delantera y la trasera.
Botón de control de crucero: Una vez que alcance la velocidad que
desea mantener, presione el botón. Presione el freno para apagar el
control de crucero.
Niveles de la batería
4 luces: Carga del 76 al 100 %
3 luces: Carga del 51 al 75 %
2 luces: Carga del 26 al 50 %
1 luz: Carga del 1 al 25 % (¡cargue el Bolt de inmediato!)
Bocina
Acelerador giratorio
Control de crucero
45

Cómo utilizar el Bolt
Antes de cada paseo, verifique que el manubrio y el asiento estén seguros, que
los neumáticos tengan la presión suficiente y que el sistema de frenos funcione
de manera correcta.
Mantenga los pies colocados en los soportes para pies. No circule con los pies
colgando por los costados y siempre permanezca sentado mientras conduce.
Acelerador
giratorio
Aplique el acelerador
con calma hasta que se
acostumbre a utilizarlo.
Freno
Apriete el freno lentamente
para evitar detenerse de
forma brusca o perder el
control.
Freno
46

Conectarse a Bluetooth®
El escúter Bolt de Jetson se puede conectar a Bluetooth® 4.0; puede
emparejarlo con la aplicación Ride Jetson a través de su dispositivo personal
habilitado para Bluetooth®. La aplicación Ride Jetson se puede descargar
desde la App Store y Google Play Store de forma gratuita.
1. Encienda el escúter Bolt.
2. Abra la aplicación Ride Jetson desde su dispositivo portátil.
3. Presione el símbolo de Bluetooth® que se encuentra en la esquina superior
izquierda de la aplicación.
4. Seleccione su escúter Bolt.
5. La contraseña predeterminada de Bluetooth es 000000. La contraseña
predeterminada de bloqueo es 123456. Personalice las contraseñas en las
opciones de la aplicación.
Si tiene problemas para conectarse a Bluetooth®, siga los pasos que se
indican a continuación:
1. Apague y encienda de nuevo el escúter Bolt para reiniciarlo.
2. Haga clic en el botón Scan (Buscar) para actualizar.
3. Reinicie la aplicación Ride Jetson.
4. Póngase en contacto con el servicio de atención al cliente de Jetson para
obtener ayuda.
Para comunicarse con el servicio de atención al cliente,
llame por teléfono al:
EE. UU. y Canadá: 1-(888) 976-9904 (Teléfono no válido en México)
RU: +44 (0)33 0838 2551
España/Portugal: +34 952 179 479
Horario de atención: 7 días a la semana 10 am-6pm EST
help@ridejetson.com
47

Cuidado y mantenimiento
Alcance de circulación
El alcance máximo es de 24,1 km / 15 millas. Sin embargo, existen diversos
factores que afectan la distancia en función de la carga:
• Superficie de circulación: circular por una superficie lisa y plana aumentará la
distancia del recorrido.
• Peso: circular con más peso implica recorrer una distancia menor.
• Temperatura: circule y almacene el escúter Bolt a más de 10 °C / 50 °F.
• Mantenimiento: cargar la batería a tiempo permitirá aumentar la distancia del
recorrido.
• Velocidad y forma de conducir: arrancar y detenerse con frecuencia producirá
que disminuya la distancia del recorrido.
Limpieza del escúter Bolt
Para limpiar el escúter Bolt, utilice con cuidado un paño húmedo y, luego,
seque con un paño seco. No lo enjuague con agua, ya que se pueden mojar los
sistemas eléctricos y electrónicos, y podría sufrir lesiones personales o dañar
el escúter.
Batería
• Mantenga el escúter Bolt alejado del fuego y de fuentes de calor muy altas.
• No lo exponga a impactos físicos fuertes, vibraciones fuertes o golpes.
• Evite que el escúter mantenga contacto con el agua o la humedad.
• No desarme el escúter ni la batería.
• Si se presenta algún problema con la batería, comuníquese con el servicio de
atención al cliente de Jetson. ¡Estaremos encantados de ayudarlo!
Almacenamiento
• Antes de almacenar el escúter, cargue la batería por completo. Después de
realizar esto, debe cargar por completo la batería una vez al mes.
• Cubra el escúter Bolt para protegerlo contra el polvo.
• Almacénelo en el interior, en un lugar seco y a una temperatura adecuada.
• Para cargar el escúter, debe colocarlo en un entorno cálido (que se encuentre
a una temperatura superior a 10 °C / 50 °F).
48


¿Disfruta su producto?
¡Deje un comentario en ridejetson.com o comparta sus fotos con nosotros en
línea con el hashtag #RideJetson!
Síganos @ridejetson
#JetsonMakeMoves
50

Distributed by:
Costco Wholesale Corporation
P.O. Box 34535
Seattle, WA 98124-1535
USA
1-800-774-2678
www.costco.com
Costco Wholesale Canada Ltd.*
415 W. Hunt Club Road
Ottawa, Ontario
K2E 1C5, Canada
1-800-463-3783
www.costco.ca
* faisant affaire au Québec sous
le nom les Entrepôts Costco
Importado por:
Importadora Primex S.A. de C.V.
Blvd. Magnocentro No. 4
San Fernando La Herradura
Huixquilucan, Estado de México
C.P. 52765
RFC: IPR-930907-S70
(55)-5246-5500
www.costco.com.mx
Costco Wholesale Australia Pty Ltd
17-21 Parramatta Road
Lidcombe NSW 2141
Australia
www.costco.com.au
Costco Wholesale UK Ltd /
Costco Online UK Ltd
Hartspring Lane
Watford, Herts
WD25 8JS
United Kingdom
01923 213113
www.costco.co.uk
Costco Wholesale Japan Ltd.
3-1-4 Ikegami-Shincho
Kawasaki-ku, Kawasaki-shi,
Kanagawa 210-0832 Japan
0570-032600
www.costco.co.jp
Jetson Electric
1 Rewe St.
Brooklyn, NY 11211
www.ridejetson.com
For Customer Service please call:
US & Canada 1-(888) 976-9904
UK +44 (0)33 0838 2551
Spain/Portugal +34 952 179 479
Hours of Operation
7 days a week 10am-6pm EST
help@ridejetson.com
Costco Wholesale Spain S.L.U.
Polígono Empresarial Los Gavilanes
C/ Agustín de Betancourt, 17
28906 Getafe (Madrid) España
Costco Wholesale Korea, Ltd.
NIF: B86509460
900 111 155
www.costco.es
40, Iljik-ro
Gwangmyeong-si
Gyeonggi-do, 14347, Korea
1899-9900
www.costco.co.kr
Pour contacter le service à la
clientèle, veuillez composer le :
1 (888) 976-9904
pour les États-Unis et Canada
+44 (0)33 0838 2551
pour le Royaume-Uni
+34 952 179 479
pour l’Espagne et le Portugal
Heures d’ouverture:
Sept jours sur sept,
de 10 h à 18 h, heure de l’Est
help@ridejetson.com
US CA AU UK IS
RECYCLABLE
PAPERBOARD BOX
Costco Wholesale Iceland ehf.
Kauptún 3-7, 210 Gardabaer
Iceland
www.costco.is
Costco President Taiwan, Inc.
No. 656 Chung-Hwa 5th Road
Kaohsiung, Taiwan
Company Tax ID: 96972798
449-9909 or 02-449-9909 (if cellphone)
www.costco.com.tw
JP TW
MX ES KR FR ESCN
CA FR
CAJA DE CARTÓN
BOITE EN CARTON
RECICLABLE
RECYCLABLE
Costco France
1 avenue de Bréhat
91140 Villebon-sur-Yvette
France
01 80 45 01 10
www.costco.fr
Shanghai Minhang Costco Trading Co., Ltd
Unit 109, No 388, Lian You Road
Minhang District, Shanghai
China 201107
+86-21-6257-7065
Para comunicarse con el servicio
de atención al cliente,
llame por teléfono al:
EE. UU. y Canadá:
1-(888) 976-9904
(Teléfono no válido en México)
RU: +44 (0)33 0838 2551
España/Portugal: +34 952 179 479
Horario de atención:
7 días a la semana
10 am-6pm EST
help@ridejetson.com
Made in China / Fabriqué en Chine / Hecho en China
 Loading...