

Page 1
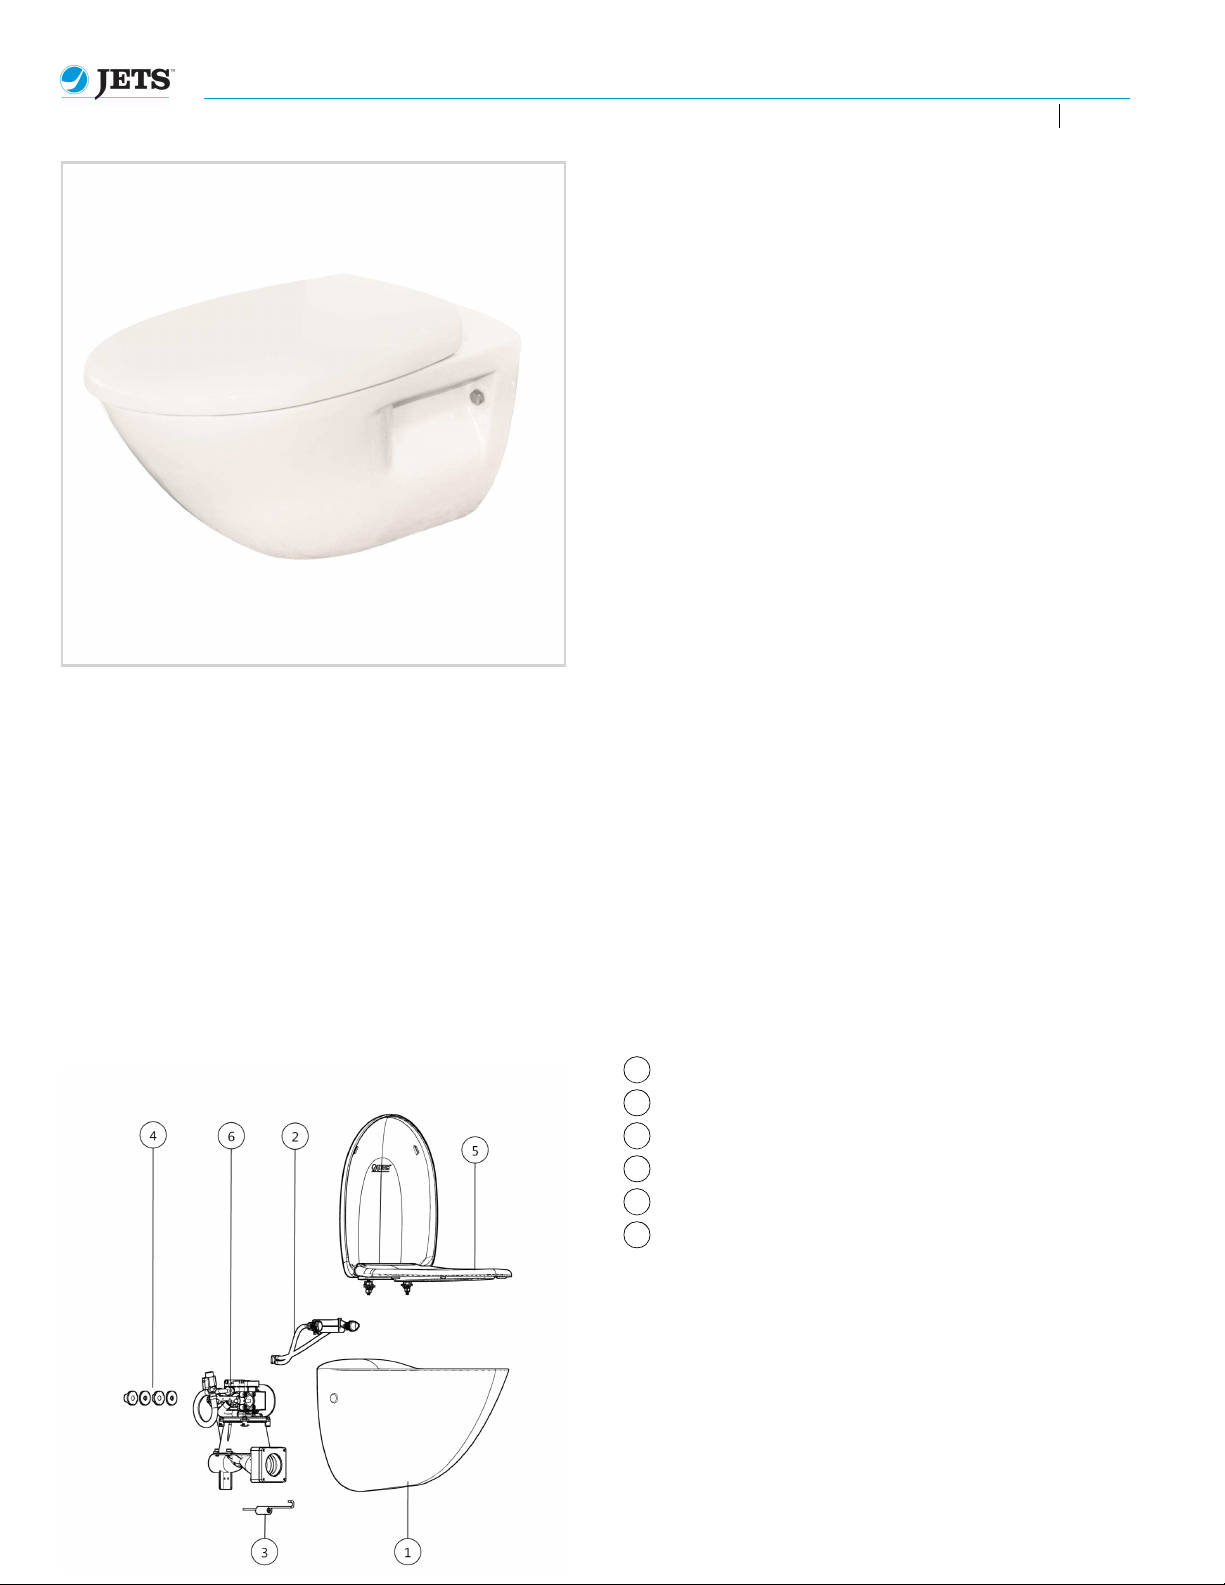
Jets™ Charm Toilet
....................................................................................................
....................................................................................................
....................................................................................................
....................................................................................................
....................................................................................................
....................................................................................................
....................................................................................................
....................................................................................................
....................................................................................................
....................................................................................................
....................................................................................................
....................................................................................................
....................................................................................................
....................................................................................................
....................................................................................................
....................................................................................................
....................................................................................................
....................................................................................................
....................................................................................................
....................................................................................................
....................................................................................................
....................................................................................................
....................................................................................................
....................................................................................................
....................................................................................................
....................................................................................................
....................................................................................................
Product No. TO611PO
Jets™ Charm toilet is a wall model vacuum toilet in a porcelain
design.
Jets™ Charm toilet features low water consumption, reliable flushing
and discharge.
Warranty
All products of the company are sold and all services of the company
are offered subject to Jets Vacuum AS General Sales Conditions
detailing warranty and terms and conditions of sale, copies of which
will be furnished upon request. The information provided herein is for
guidance only; it does not constitute a guarantee of the performance
or specification of any individual product or component.
Tel. +47 70 03 91 00
www.jetsgroup.com
Issued 2013-10-28 Rev 3.0
Technical Data
Outside Dimensions 540 x 370 x 400 mm (LxWxH)
Weight 22.5 kg
Bowl Weight Approx. 19.4 kg
Discharge Valve Outlet Outside diameter Ø 50 mm
Water Connection ½" male BSP
Operating Data
Flushing Time 5 seconds
Discharge Time 2 seconds
Water Pressure 2-7 bar
Operating Vacuum Recommended 30-55 % Vacuum
Air Consumption Approx. 48 liters at 50% Vacuum
Water Consumption 1 liter/s (3 bar) (adjustable)
Note: Values are dependent on product selection.
Patents and Trademarks
Jets™, Vacuumarator™, Helivac™, VC™, VOD™, CVS™ and
Softsound™ are trademarks and/or registered trademarks of Jets. ©
Copyright 2011, Jets AS.
Disclaimer
Product color reproduction is as near to actual color as product
methods allow. All rights reserved. Information is subject to change
without notice. No part of this document may be reproduced in any
form without prior written approval.
Options
Optional functions compatible with this product.
VFD: Vacuum Flush and Discharge
CFD: Central Flush and Discharge
LFD: Local Flush and Discharge
Components
Construction Characteristics
Toilet Bowl JETS Charm
1
Flushing Nozzle Kit
2
Spring
3
Fastening Kit, wall
4
Seat & Cover
5
Valve
6
* Component/s avaliable as replacement parts.
Accessories
Construction Characteristics
Vacuum Breaker Kit
Rubber Elbow w/hose clip
Rubber Sleeve w/hose clip
Rag Hook w/support
Fastening Kit, wall
Cap
Bracket, retrofit toilet
Pipe Packet
Coaming
066607100*
069503157*
053531720*
069606400*
Product Selection
See options listed above
034507320
034505450
034505550
034102902
069606302
069606304
069000300
034399300
037609312
Page 2
Jets™ Charm Toilet
Product No. TO611PO
Issued 2013-10-28 Rev 3.0
Tel. +47 70 03 91 00
www.jetsgroup.com
Important Health and Safety Information
Installation, operation and maintenance must be carried out in strict accordance with this guide andwith all applicable regulations. For your own
protection and the protection of others, it is necessary to familiarize yourself with, and always follow, the contained safety and environmental
precautions for our products.
This manual is an integral part of the product/delivery. Always keep it in a safe place for future reference. It is entirely the owner’s responsibility to
ensure that all safety and environmental measures, in accordance with local, state and federal laws are followed. Jets VacuumAS assumes no
responsibility for equipment damage, personal injury or death and/or delays that result from a lack of respect for the instructions for installation
and/or use as stated in this documentation. Disregarding these instructions may invalidate all warranties.
Safety information references are in accordance with Jets Vacuum AS documentation system. If you do not understand the warnings, stop work
immediately and contact Jets Vacuum AS (citing the safety reference number) for further clarification.
For further information about the included warnings or any other safety concerns please contact JetsVacuum AS.
Safety Warning Symbols
General information to all users. Symbol denotes required personal protective equipment is required.
Symbol denotes required personal protective equipment is required. DANGER: Indicates an imminently hazardous situation which, if not avoided, will result
CAUTION: Indicates a potentially hazardous situation which, if not avoided, may result in
minor or moderate injury or equipment damage.
in death or serious injury or equipment damage.
Important Health and Safety Warnings
1.1 Warning
Jets Vacuum AS recommend qualified person(s) in accordance with all applicable
codes and standards to carry out all installation work, electrical wiring, plumbing and
operate this product. Equipment damage, injury to personnel or death could result
from improper installation/use.
1.3 Warning
Failure to properly lift and support equipment can result in serious physical injury and/
or equipment damage. Lift equipment only at specifically identified lifting points or as
instructed in the current IOM. Note: Lifting devices (eyebolts, slings, spreaders, etc.)
must be rated, selected, and used for the entire load being lifted.
1.5 Personal Protective Equipment - Goggles
Wear safety glasses with side shields at all times when working with equipment.
1.7 Warning
Keep other persons at a safe distance from work area.
2.1 Warning
The safety of the equipment is guaranteed only if it is used in compliance with the
instructions provided by the supplier. The limits indicated must never be exceeded in
any given situation.
1.2 Warning
Be thoroughly familiar with the controls and the proper use of the equipment prior
to installing, starting or using the equipment. Know the equipment application,
limitations and potential hazards.
1.4 Warning
Safety equipment (PPE) necessary for the prevention of accidents at the
installation and operating site must be provided in accordance with local
regulations.
1.6 Warning
Keep work area clean, uncluttered and ensure adequate lighting.
1.9 Personal Protective Equipment - Gloves
Wear suitable protective gloves at all times when working with equipment.
12.5 Notice
Use this equipment only in the manner intended by Jets Vacuum AS. If you have
questions after reading these instructions contact Jets Vacuum AS directly.
Delivery, Receipt of Goods and Transportation
Goods to be protected against shock, dust, humidity and moisture. Suitable adequately dimensioned transporting equipment is to be used. Note
that the equipment may contain components that are easily damaged as a result of inappropriate handling. Jets Vacuum AS is not responsible for
or liable for delivery delays resulting from occurrences outside of Jets Vacuum AS' immediate control. On receipt of goods, check for visual
damage. Any damage detected after dispatch should be reported immediately to Jets Vacuum AS. Damages and/or discrepancies must be
reported in writing no later than eight (8) days after receipt of goods. Commissioning must be postponed until the equipment has been inspected.
Do not dispose of damaged items. Your direct supplier will advise you of the procedure to follow.
Storage
Unless otherwise specified, goods are to be stored in a dry environment between -30°C and +40°C prior to installation. The storage location must
be dust free, low humidity (≤95%) and be free from moisture. Keep clear of foreign objects.
Installation to End Use
Site to be a dry environment between +0°C and +45°C. Use in environments below 0°C requires use of antifreeze in liquids. The site location is to
be low vibration Vrms ˂0.2 mm/s) with vibration resistance to acceleration up to 0.7g. The site is to be dust free and protected from grinding and
welding. During installation, the site is to be protected from water, frost, moisture and humidity. Goods are to be stored as per the instructions for
delivery, storage and transport. A visual inspection is to be carried out on receipt of goods as well as at the time of installation to ensure that
storage and transport conditions after receipt have not compromised the quality of the product/s.
Page 3
Jets™ Charm Toilet
Product No. TO611PO
Issued 2013-10-28 Rev 3.0
Tel. +47 70 03 91 00
www.jetsgroup.com
Installation
Standards and Regulations
To install a Jets™ toilet it is first required that the room be prepared according to all local, state and federal standards and requirements. Industry
specific standards must also be met. Considerations that must be made include but are not limited to:
● Appropriate proportioned drain pipes.
● Water barriers/membrane.
Water Barrier
Note that in some countries, and as per the majority of standards and regulations, it is prohibited to mount toilets directly onto the wall if mounting
requires that the water barrier be compromised. Wall mounted toilets, in these circumstances, are therefore required to be mounted on internally
constructed walls within the water barrier. Check requirements according to local codes and standards before beginning any installation work.
General Disclaimer
Drawings provided in the following examples are for illustration purposes only. Product details may vary from your individual purchase.
Pre-Installation Considerations
It is recommended that items such as wall mounted release buttons, false boxed walls, drainage and piping etc. be installed/constructed, prior to
installation of the toilet.
Connection with Pressurized/Mains Water
To connect pressurized water (i.e. mains water) to the toilet, the water pipe must be installed. The connection required is a 1/2" BSP standard
connection. The water pressure must be a minimum of 1.8kp/2 bar and must not exceed 7 bar.
Installation Instructions
Toilet installation requires the following procedures to be carried out. For more specific technical details, refer to the component products individual
technical data sheet. For documentation that is delivered as a part of a manual or compiled technical document, the contents list contains a listing
of all enclosed documentation. For further information on any of the instructions supplied, any questions regarding installation and or the products,
please contact your local supplier or Jets™ Service Department.
Pre-Installation Wall Preparation
The toilet is a wall mounted model which can be installed in locations where
● a service hatch at the rear is available (see Service Access).
● the toilet bowl is to be removed from the wall for service (see Standard Installation).
For retrofit installations, contact your local approved supplier or Jets Vacuum AS for further information.
Service Access
Optional Service Access:
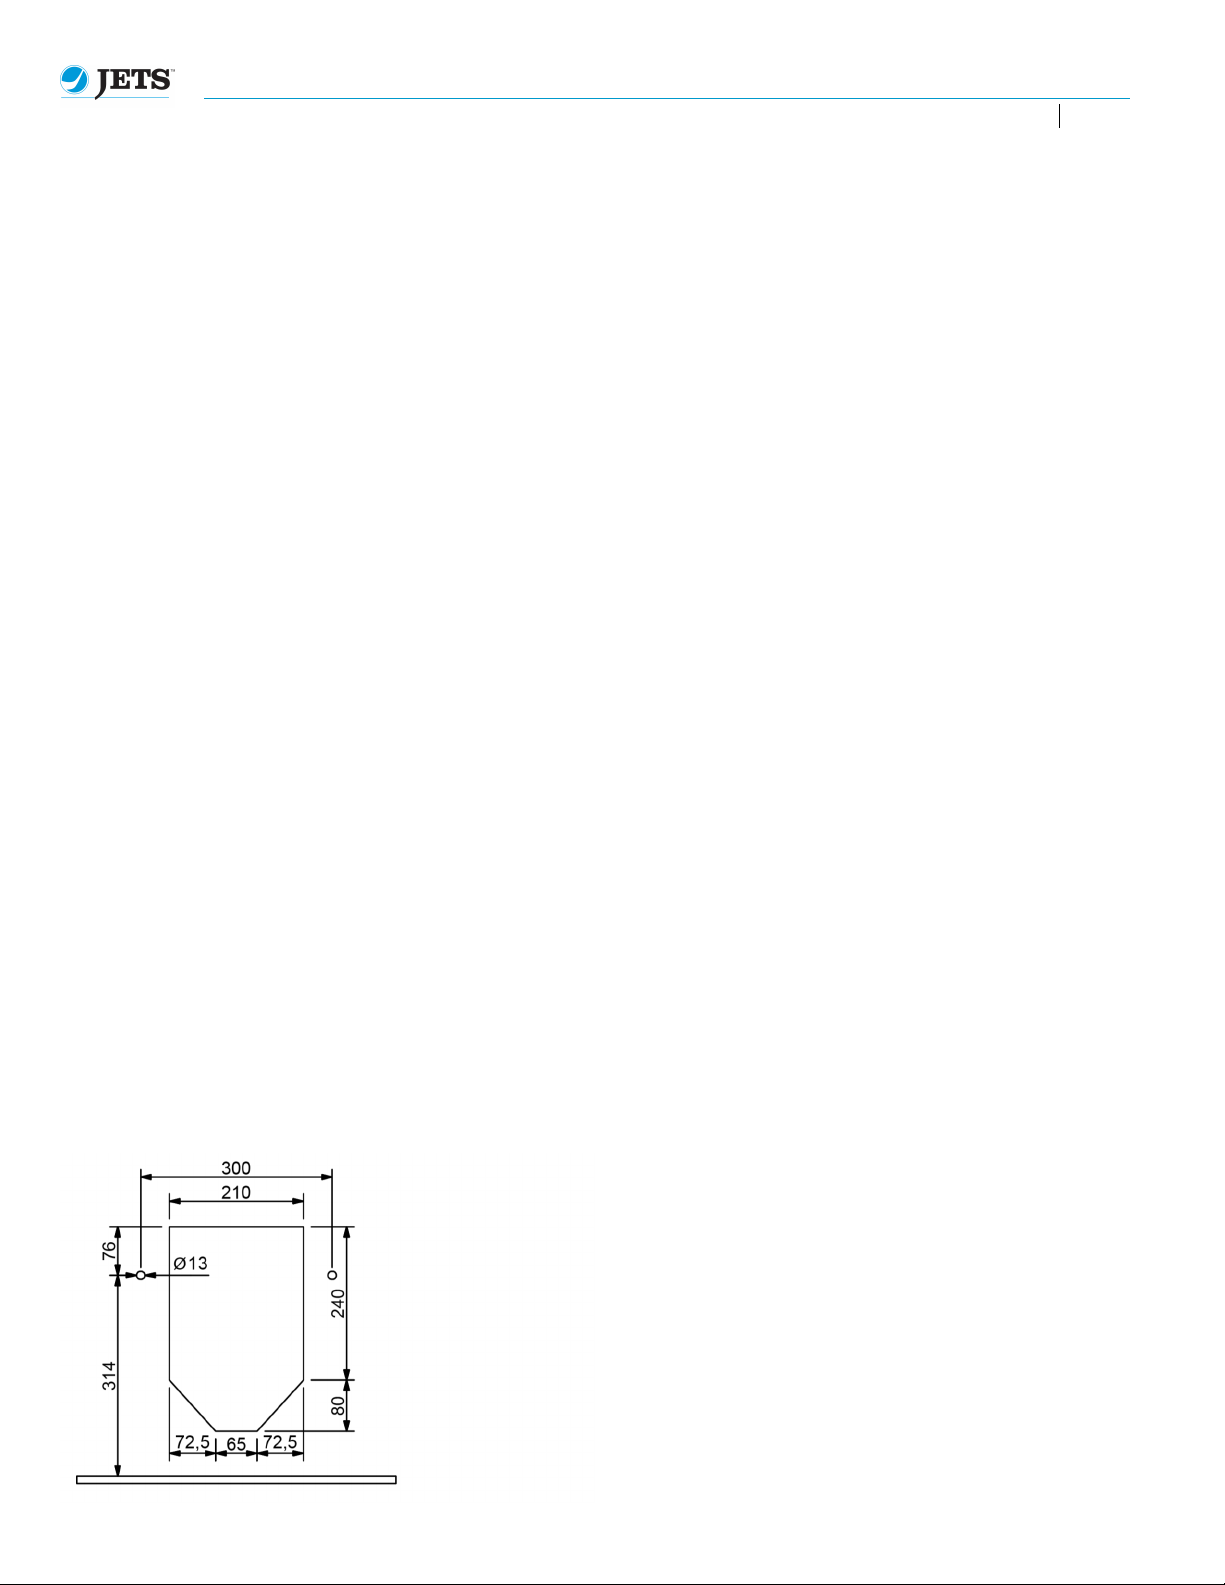
If service access from the rear is available, a cutout in the wall
surface will allow for maintenance to be carried out without removing
the toilet from the wall.
Page 4
Jets™ Charm Toilet
Product No. TO611PO
Issued 2013-10-28 Rev 3.0
Tel. +47 70 03 91 00
www.jetsgroup.com
Standard Installation
The toilet is delivered with a fastening kit aimed at installation on existing wall mounted bolts. Note that the fastening kit is not included in the Toilet
Jets™ Charm delivery. The fastening kit may be purchased through your Jets Vacuum AS supplier.
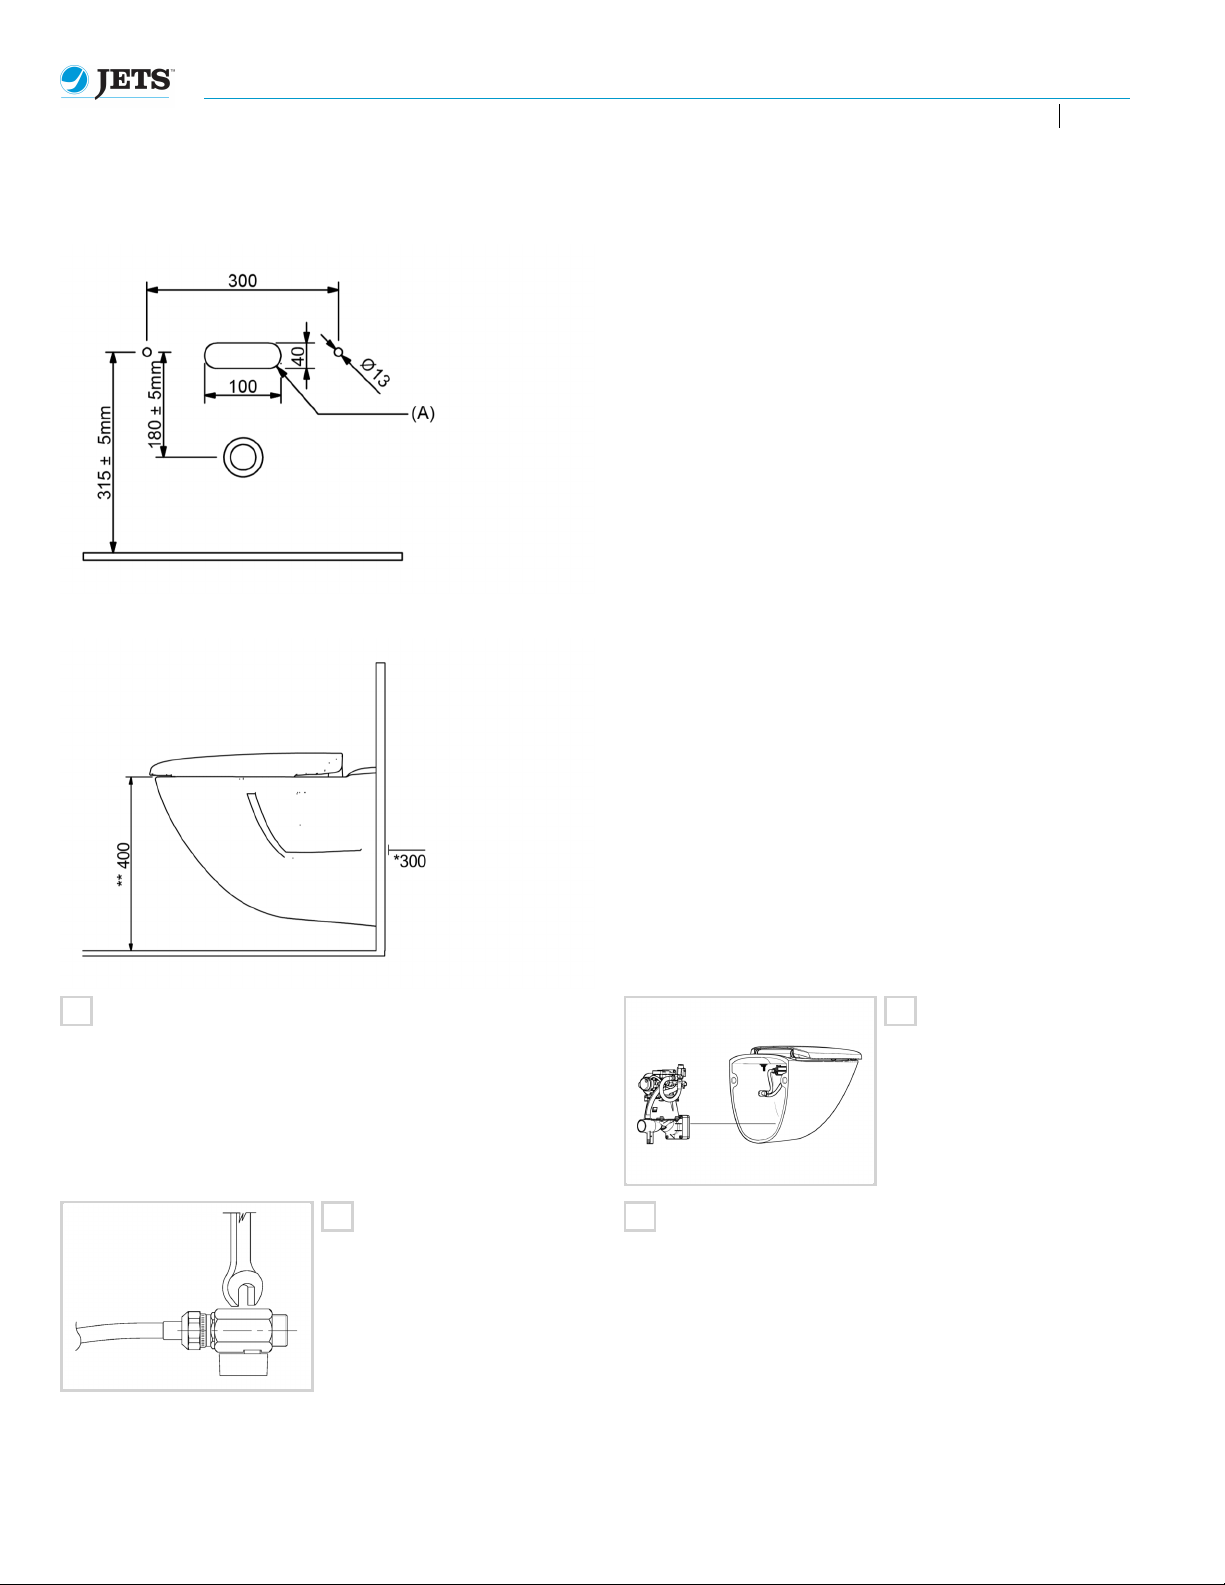
Bolts should be installed on adequately dimensioned weight bearing
studs or a suitable mounting frame. Ensure that mounting bolts are
positioned horizontally 300mm apart.
(A) Water Connection/Vacuum Breaker (Optional)
Maintenance Access and Installation Height
1
Prepare the Wall Mounting
Prepare the wall mounting as per the instructions above. Note that the
toilet may be mounted on appropriately positioned pre-existing mounting
bolts, bolts installed for the purpose of mounting this toilet or an
appropriately dimensioned mounting frame.
3
Connect the ball valve from the valve
to the water main.
Note: Do not over tighten.
* 300mm Cavity
If maintenance is to occur without removing the bowl from the wall
fixture, a 300mm cavity is required.
If maintenance is to occur by removing the bowl from the wall fixture,
no maintenance cavity is required behind the wall.
** 400mm Toilet Height
Seat height is variable. It is recommended that the top of the toilet
bowl be installed at a height of 400mm from the floor surface for
standard installations.
2
Install the valve as per the
products installation instructions
found in the products technical
data. Note: only for deliveries
supplied without a pre-installed
valve.
4
Connect the release button/mechanism hose to the toilet valve.
For connection information see the installation description provided in
the Release Button's technical data sheet.
Page 5
Jets™ Charm Toilet
Product No. TO611PO
Tel. +47 70 03 91 00
www.jetsgroup.com
Issued 2013-10-28 Rev 3.0
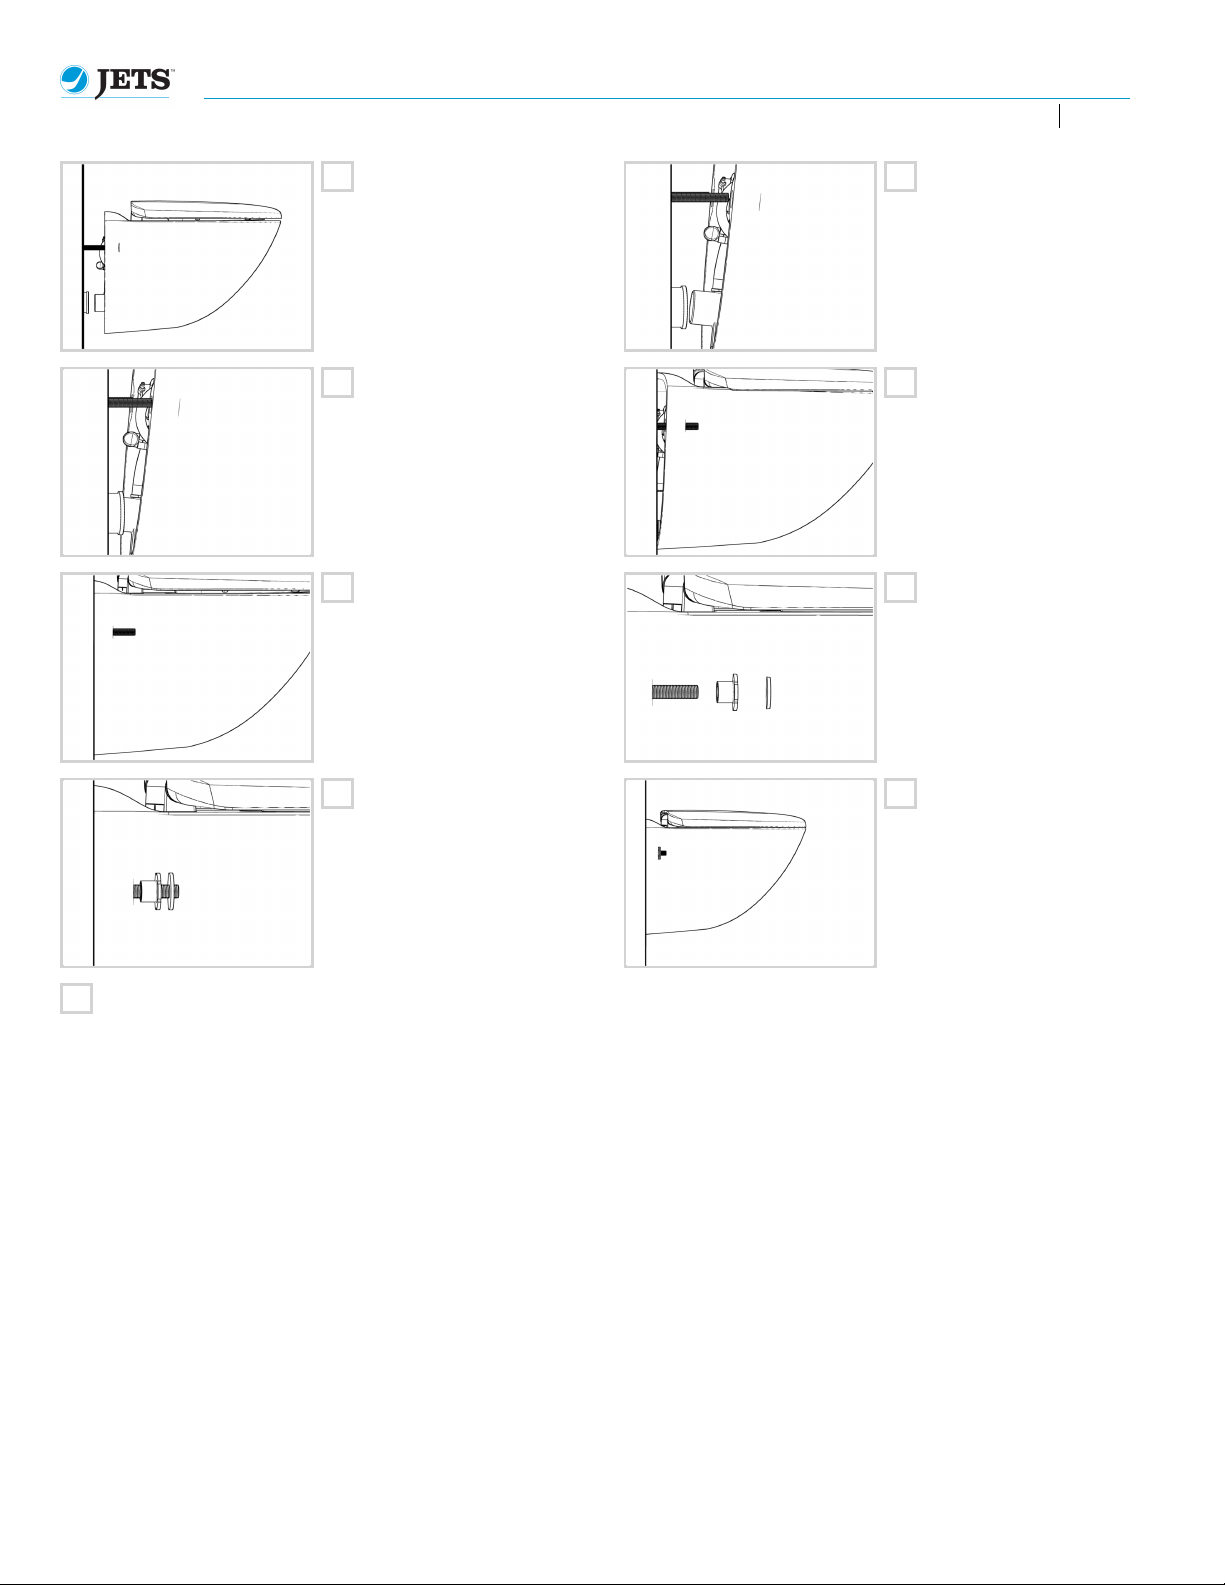
5
The toilet is to be positioned with the
mounting bolts through the mounting
holes in the porcelain bowl.
7
When lowering the toilet bowl into
position on the bolts, ensure that the
valve outlet is securely fitted in the
outlet pipe in the wall.
9
The bowl should be even and aligned
with the wall surface.
6
Position the toilet bowl on the
mounting bolts.
8
Press the toilet firmly into the
outlet pipe to secure the
connection.
10
Fit the Fastening Kit, wall to
secure the toilet to the mounting
bolts.
11
Note that an M12 nut is required to
secure the toilet (not supplied in the
standard delivery). Secure the nut
firmly without over tightening.
13
Function Check to be Completed Prior to Use
1. Clean the bottom of the bowl.
2. Ensure that the discharge valve has been securely connected to the
outlet pipe.
3. Check that the water supply is connected and water pressure is
adequate.
4. Turn on the water supply.
5. Press the release mechanism to activate the valve.
6. Check that the bowl fills with water.
7. Check that sufficient vacuum is created when activating the release
mechanism to release the contents of the bowl.
8. Check that the water level in the bowl is restored.
9. Check that water is dispersed on the bowl surface by the flushing
mechanism.
10. Check that there are no water or air leaks.
12
Completed.
Page 6

Jets™ Charm Toilet
Product No. TO611PO
Issued 2013-10-28 Rev 3.0
Tel. +47 70 03 91 00
www.jetsgroup.com
Service and Maintenance
Out of Use - Not in Regular Use
The following procedures are to be followed if a toilet is to be out of use over a longer period of time (i.e for cabins and recreational houses).
1. Close the water supply valve.
2. Run a flush cycle by activating the release mechanism.
3. Close the toilet seat cover.
4. CAUTION: This toilet is not intended for use in temperatures below freezing without appropriate antifreeze measures being taken. For
locations where frost/freezing may occur, frost protection measures must be taken. For further information contact Jets Vacuum AS or your
nearest supplier for a copy of technical information regarding frost protection measures.
5. CAUTION: Never use automotive antifreeze (ethylene glycol) in the toilet system.
6. Turn off the power.
NOTE: Failure to adequately protect the toilet system from damages may result in void of your warranty coverage.
NOTE: Jets Vacuum AS reserves the right to deny any warranty claim submitted if the claim is caused by frost/freezing damage.
Cleaning Instructions
1. Mild soap or biological cleaners are recommended for cleaning the toilet. See Jets Vacuum AS product range for suitable cleaning solutions.
2. Do not use cleaners that create foam.
3. The toilet is to be cleaned regularly to maintain hygiene.
4. Do not use caustic cleaners (such as drain cleaner) or bleach. These products may damage components in the toilet system.
5. If using abrasive, chlorine or corrosive cleaners, avoid contact with the seat and cover/hinges.
6. For scale buildup, we recommend use of Jets Vacuum AS biological descale products. Contact your Jets Vacuum AS supplier for information.
7. Note that maintaining water in the toilet bowl will prevent odors.
Spare Parts and Accessories
Available spare parts are indicated in the component list for the toilet. Spare parts and accessories can be ordered via your local Jets Vacuum AS
supplier. For multi-toilet installations, a complete recommendation for spare parts is available. Contact your Jets Vacuum AS supplier for details.
Service and Maintenance
Jets Vacuum AS provides all customers with 24 hour worldwide technical assistance. For urgent matters please contact Jets Vacuum AS service
department directly at +47 70039100. For other matters, please contact your nearest Jets Vacuum AS supplier.
1. Disassembly of the toilet must be carried out by a licensed professional.
2. All local, state and fedral regulations regarding water barriers and plumbing must be adhered to.
3. Disassembly of components may void the warranty.
4. Refer to the technical data sheets for specific product information. Refer to the products troubleshooting information for general maintenance.
5. It is recommended that service and maintenance routines be carried out in accordance with the information in this document.
When making enquiries, please have the following information available.
1. Toilet model number.
2. For valve enquiries: Valve serial number (the serial number identification is located on the label applied to the valve).
3. Part number, description, quantity (see the product component list for details).
Locating a Water Leak
To locate the source of a water leak, first thoroughly dry all surfaces. Leaks at room temperature can make it difficult to feel wetness. Using a piece
of soft tissue pat the surface. When the tissue comes in contact with water it will immediately change texture.
Page 7
Jets™ Charm Toilet
Product No. TO611PO
Scheduled Maintenance
Interval Action Note
Tel. +47 70 03 91 00
www.jetsgroup.com
Issued 2013-10-28 Rev 3.0
Regularly - dependent on frequency of
use.
As required. Check for damage to equipment.
Clean the toilet. Clean the toilet as per instructions provided in the products
Replace or repair damaged equipment
and take measures to prevent future
damage to the system.
technical information.
Note that frost and/or freezing may damage sanitary
systems if precautions have not been taken. Contact your
nearest Jets™ supplier for information on Jets™ range of
frost protection products for installations in cold climate
locations.
Troubleshooting
Jets Vacuum AS provides the following troubleshooting information to assist in resolving issues that may arise with your installation. For more
detailed information or assistance, please contact Jets Vacuum AS.
Problem Cause Action
Water is refilled in the
toilet, but the content is not
discharged
The normal water level in the toilet
bowl is reducing/low.
Loss of vacuum in the toilet/pipe
system.
Low water pressure. Increase the water pressure.
Check the vacuum level to ensure that it is adequate.
Check the pipes and any connected equipment including
the valve, pump etc. for foreign objects. Remove any
blockages in the system.
Check the pipe system to ensure there is no air entering the
pipes/damage to the pipe system.
Check the filter in the water connection/ball valve to ensure
that it is not blocked. Replace the filter if required.
The toilet bowl is slow to empty. The pump/pipes are blocked. Check for foreign objects and remove the blockage.
Build up of urine scale in the pipes
and/or pump.
Air bubbles in the toilet bowl. Blocked pipe outlet. Check for blockages and remove. Correct any
Backflow in the installation. Check the pipes have been correctly installed.
The Non-return Valve is not closing. Clean the non-return valve.
If connected to a tank, the tank is full. Empty the tank.
Mist forms from the flushing nozzles. The water pressure/flow needs to be
reduced.
Flushing results in water from the
nozzles spraying outside of the toilet
bowl.
Check for urine scale build-up and descale the affected
areas. See Jets™ selection of cleaning products for this
purpose.
environmental causes. Note blockages may be caused by
frost etc.
Reduce the water pressure/flow by partially closing the ball
valve on the water connection.
 Loading...