

JET OPTOELECTRONICS RYK65000X User Manual
SEAT TOP SERIES
Rear Seat Entertainment System
Owners Manual
Seat Top User Manual 700001 rev 00-11.docx

Contents
Welcome ................................................................................................................. 3
Control Description – Monitor A with DVD Player ........................................................ 5
Control Description – Monitor B without DVD Player ................................................... 6
Functional Verification .............................................................................................. 8
Remote Control Operation ........................................................................................ 9
General Operating Instructions ............................................................................... 13
Monitor A How to use the OSD Menu ...................................................................... 15
Monitor A Playing a CD ........................................................................................... 20
Monitor A Playing Audio Files .................................................................................. 21
Monitor A Playing Image Files ................................................................................. 22
Monitor A Playing Video Files .................................................................................. 23
Monitor A Charging a USB Device ............................................................................ 24
Monitor A Connecting an External A/V Source – 3.5mm ............................................ 24
Monitor A Connecting an External A/V Source – HDMI .............................................. 24
Monitor B How to use the OSD Menu ...................................................................... 25
Monitor B Playing Audio Files .................................................................................. 27
Monitor B Playing Image Files ................................................................................. 28
Monitor B Playing Video Files .................................................................................. 29
Monitor B Charging a USB Device ............................................................................ 30
Monitor B Connecting an External A/V Source – 3.5mm ............................................ 30
Monitor B Connecting an External A/V Source – HDMI .............................................. 30
Troubleshooting ..................................................................................................... 31
Specifications ......................................................................................................... 32
Compliance Information ......................................................................................... 33
Warranty ............................................................................................................... 35
© 2014 INVISION Automotive Systems, Inc. All rights reserved.
This manual, or any portion thereof, may not be reproduced without the express written
permission of INVISION Automotive Systems, Inc.
Seat Top User Manual 700001 rev 00-11.docx Page | 2

Welcome
Thank you for purchasing this Rear Seat
Entertainment System with built-in DVD
player. Before operating this system, read this
manual thoroughly and retain it for future
reference.
Important Notice
It is unlawful in most jurisdictions for a person
to drive a motor vehicle which is equipped with
a television viewer or screen that is located in
the motor vehicle at any point forward of the
back of the driver’s seat, or that is visible,
directly or indirectly, to the driver while
operating the vehicle. In the interest of safety,
the monitors should never be installed where
they will be visible, directly or indirectly, by the
operator of the motor vehicle. If your vehicle is
equipped with a wireless rear seat audio
system or any other wireless infrared device,
make sure it is powered off when operating
the Rear Seat Entertainment System. If both
systems are powered on at the same time, the
two systems may obstruct each other,
possibly creating undesirable audio
interference through the wireless headphones.
Safety Precaution
For safety reasons, when changing video
discs it is recommended that the vehicle is not
in motion, and that you do not allow children to
unfasten safety belts to change discs or make
any adjustments to the system. System
adjustments can be accomplished using the
remote control unit, while safety belts remain
fastened. Enjoy your entertainment system but
remember that safety of all passengers
remains the number one priority.
Caution:
Be sure to run the vehicle engine while using
the system. Using this system without running
the engine can result in battery drain. To avoid
the risk of battery drain, please remember to
turn off the system when the vehicle is not in
use.
Product Features
Monitor A
• 8-inch Color TFT-LCD Panel (800x480)
with 16:9 aspect ratio
• Built-in Top-Loading DVD Player
• Infrared Transmitter for IR Wireless
Headphones
• 3.5mm Audio/Video Input
• USB 2.0 Input with Charging Capability*
• SD Card Input
• Mini HDMI Input
• 3.5mm Stereo Headphone Output
• Remote Sensor on the Front Panel
• Full Function Remote Control
• 5 Control Buttons on the Front Panel:
Power, Source, Play/Pause, Stop,
and Eject
• OSD (On Screen Display)
• Built-in FM Transmitter
Monitor B
• 8-inch Color TFT-LCD Panel (800x480)
with 16:9 aspect ratio
• Infrared Transmitter for IR Wireless
Headphones
• 3.5mm Audio/Video Input
• USB 2.0 Input with Charging Capability*
• SD Card Input
• Mini HDMI Input
• 3.5mm Stereo Headphone Output
• Remote Sensor on the Front Panel
• Full Function Remote Control
• 2 Control Buttons on the Front Panel:
Power and Source
• OSD (On Screen Display)
* Note: Depending on the USB device, it may
or may not charge when connected to the
USB port. Not all devices are able to charge
when connected to the USB port.
Refer the documentation that came with your
USB device for more information.
Seat Top User Manual 700001 rev 00-11.docx Page | 3

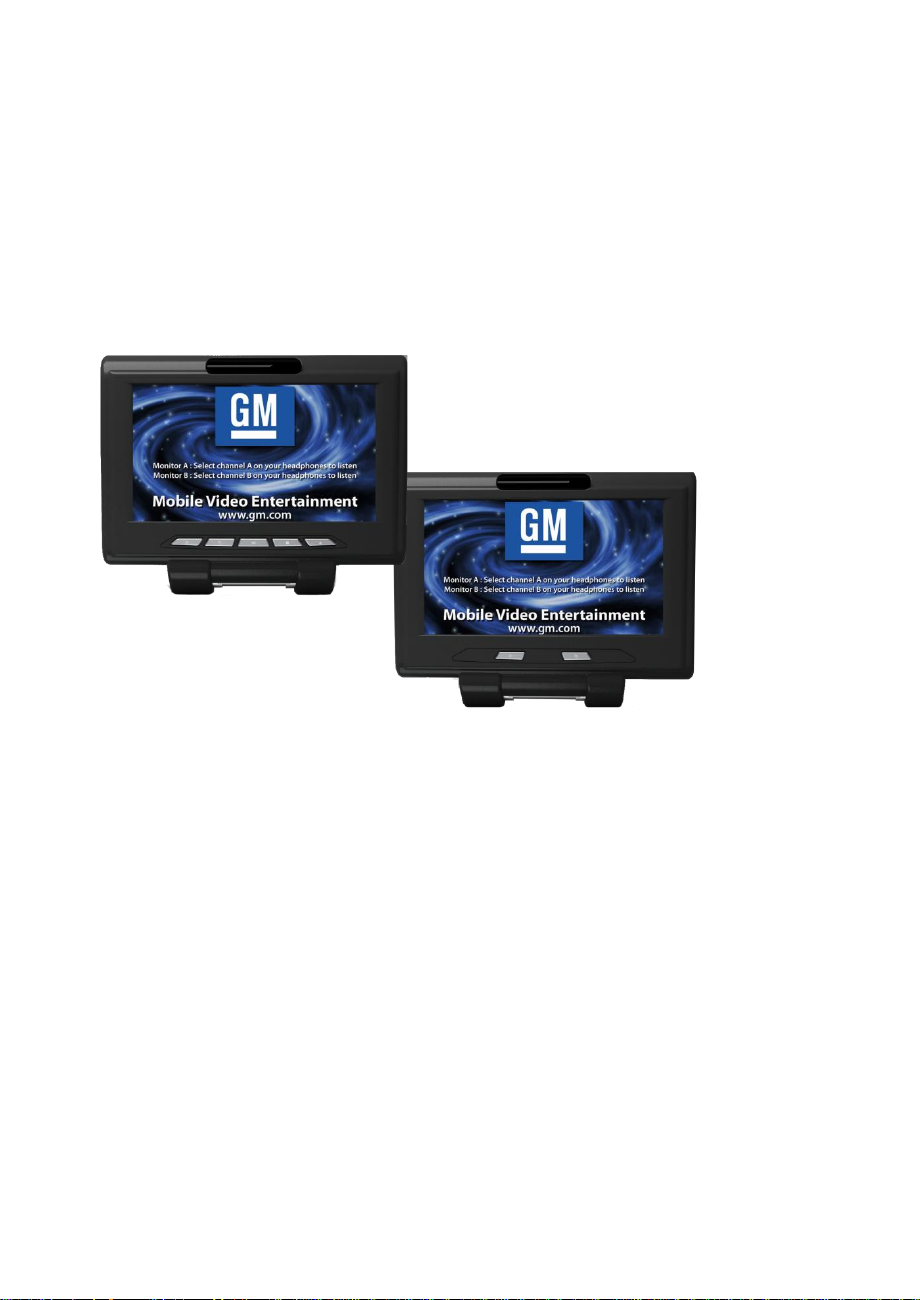
Wireless Headphones
Wireless FM Transmitter
Each monitor includes a built-in dual channel
infrared transmitter for use with wireless
headphones. The wireless headphones must
be used within a line of sight from the
transmitter as infrared transmission, like
visible light, travels only in a straight line.
How to use the Wireless Headphones
When placing the headphones on your head,
make sure to observe the Left and Right
orientation. The headphones must be oriented
correctly (facing forward) in order to receive
the audio signal. Press the power button on
the headphones, then select channel “A” to
listen to monitor A, or channel “B” listen to
monitor B. Adjust the audio level using the
volume control on each headphone.
Wired Headphones
There is a 3.5mm stereo headphone output
jack on each monitor which can be used with
any standard stereo headphone with an in-line
volume control.
Auxiliary Audio/Video Connection
An external A/V source such as a media
player, video game, or other audio/video
device may be connected to the 3.5mm
auxiliary input labeled AUX IN. An optional
adapter (sold separately) may be used to
convert the 3.5mm input to standard RCA
jacks.
Monitor A includes a built-in FM transmitter,
which allows you to listen to the audio signal
through your vehicle’s FM radio. Activate the
FM transmitter by pressing the FM TX button
on the remote control and select the desired
frequency. Whenever the FM transmitter is
active, normal broadcast radio reception may
be poor. Performance may vary based on
geographic location. To resume normal
broadcast reception, turn off the FM
transmitter located on monitor A.
How to use the FM Transmitter
Power up your system and insert a disc in
monitor A. While pointing your remote at the
monitor press the FM TX button on your
remote control. Next, press the FM TX button
again to turn the FM transmitter on or off.
Press the arrow Up/Down buttons on the
remote control to cycle through 98 possible
frequencies for broadcasting the audio to your
FM radio. Once you’ve selected a frequency,
tune your FM radio to the corresponding
frequency. Try several frequencies until you
achieve a clear audio signal.
To deactivate the FM transmitter feature,
press the FM TX button on the remote until
the “FM CHANNEL OFF” is displayed on the
monitor.
Yellow: Video input
Red: Audio - right channel input
White: Audio - left channel input
To display and listen to the audio/video signal
of an external source, connect the external
source to the 3.5mm auxiliary input and select
AUX mode.
Seat Top User Manual 700001 rev 00-11.docx Page | 4
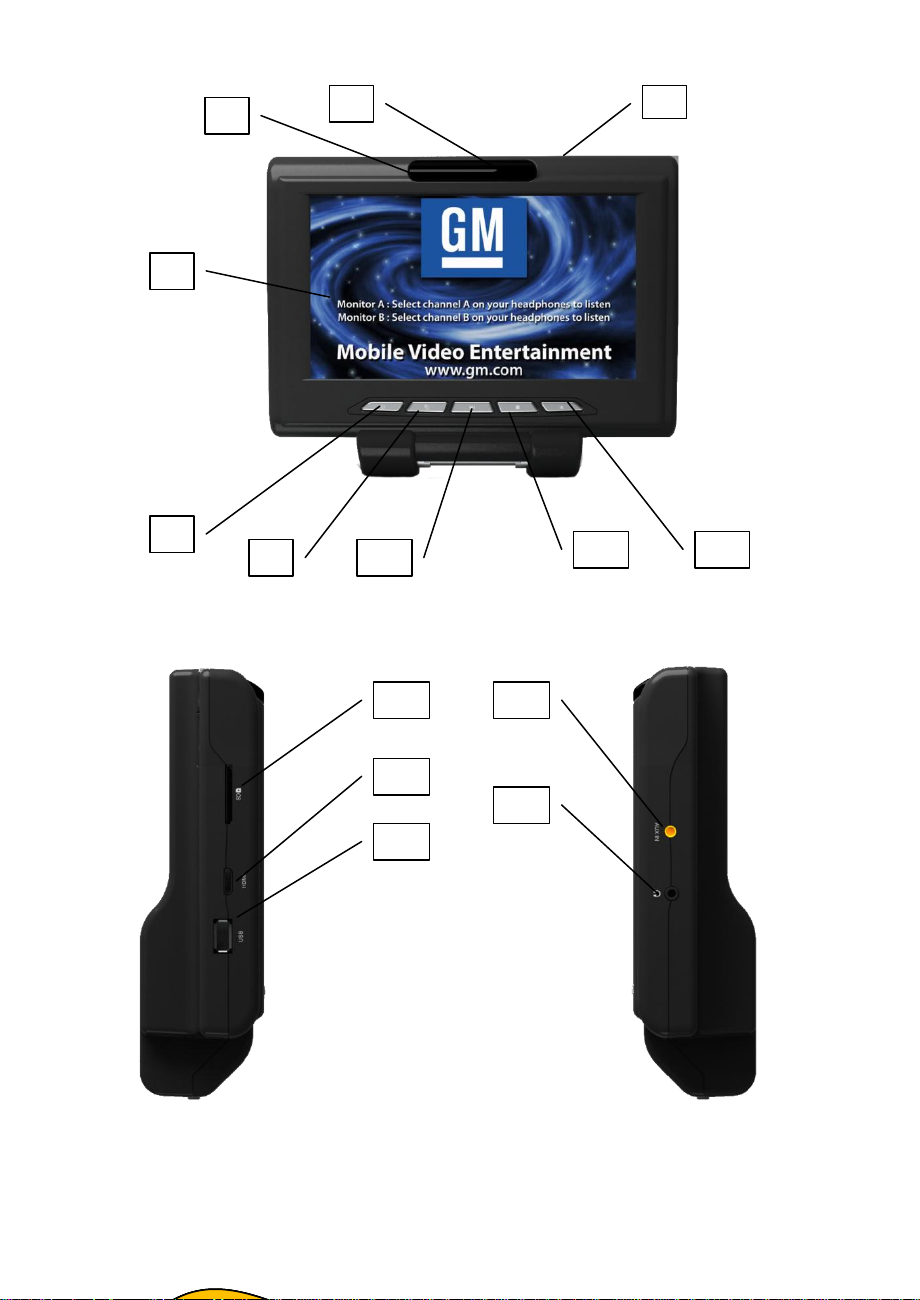
Control Description – Monitor A with DVD Player
2 3 5
10
11
12 6 7
9 8 4
13
14
Seat Top User Manual 700001 rev 00-11.docx Page | 5

Control Description – Monitor B without DVD Player
5
6
10
11
12
13
14
2
3
4
Seat Top User Manual 700001 rev 00-11.docx Page | 6

1. Disc Compartment Slot (Monitor A)
2. Infrared Transmitters These transmit
audio to the wireless headphones.
Warnings
• Do not use any harsh solvents or
chemicals when cleaning the unit.
3. IR Sensor Allows the remote control to
operate the monitor.
4. TFT LCD Panel 8-inch TFT LCD Panel
5. POWER Button Press this button to turn
the monitor on or off.
6. SOURCE Button – Monitor A Press this
button to select between Disc, SD, USB,
AUX, HDMI, or Monitor B inputs.
SOURCE Button – Monitor B Press this
button to select between SD, USB, AUX,
HDMI, or Monitor A inputs.
7. PLAY/PAUSE Button (Monitor A) Press
this button to play/pause the media.
8. STOP Button (Monitor A) Press this
button to stop playing the media.
9. EJECT Button (Monitor A) Press this
button to eject the disc.
10. SD Card Input You can play music,
images and videos stored on most SD
cards.
• Do not use any abrasive cleaners that
may scratch the screen. Use only a
lightly dampened lint free cloth to wipe
the screen if it is dirty.
• Do not put pressure on the screen.
• Caution children to avoid touching or
scratching the screen, as it may become
dirty or damaged.
11. Mini HDMI Input Connect an external
audio/video source using a mini HDMI
connector (sold separately).
12. USB Port You can play music, images,
and videos stored on most USB devices.
13. AUX Input Jack Connect an external
audio/ video source using a 3.5mm A/V
connector (sold separately).
14. Headphone Output Jack Connect wired
headphones using a 3.5mm stereo
connector. Headphones must include
in-line volume control in order to adjust
the volume level.
Seat Top User Manual 700001 rev 00-11.docx Page | 7

Functional Verification
Function Checks:
Look for:
Turn vehicle ignition to ON, press power
button on each monitor.
Monitor should power on and start up
screen should appear.
Insert disc into monitor A, press PLAY
button on the remote control or front
panel.
Disc should begin playing.
Listen with wireless headphones (set to
channel “A” to listen to monitor A and
channel “B” to listen to monitor B.
Audio should be heard through wireless
headphones.
Press SOURCE button on monitor B until
it displays monitor A.
Content playing on Monitor A (except for
HDMI) should be displayed on Monitor B.
Press SOURCE button on monitor A until
it displays monitor B.
Media playing on Monitor B (except for
HDMI) should be displayed on Monitor A.
Press eject button on the remote control
or front panel of monitor A.
Disc should eject.
Activate the FM transmitter located on
monitor A and tune the vehicle’s radio to
the frequency set on FM transmitter.
Audio should be heard through vehicle’s
speakers.
Seat Top User Manual 700001 rev 00-11.docx Page | 8
Remote Control Operation
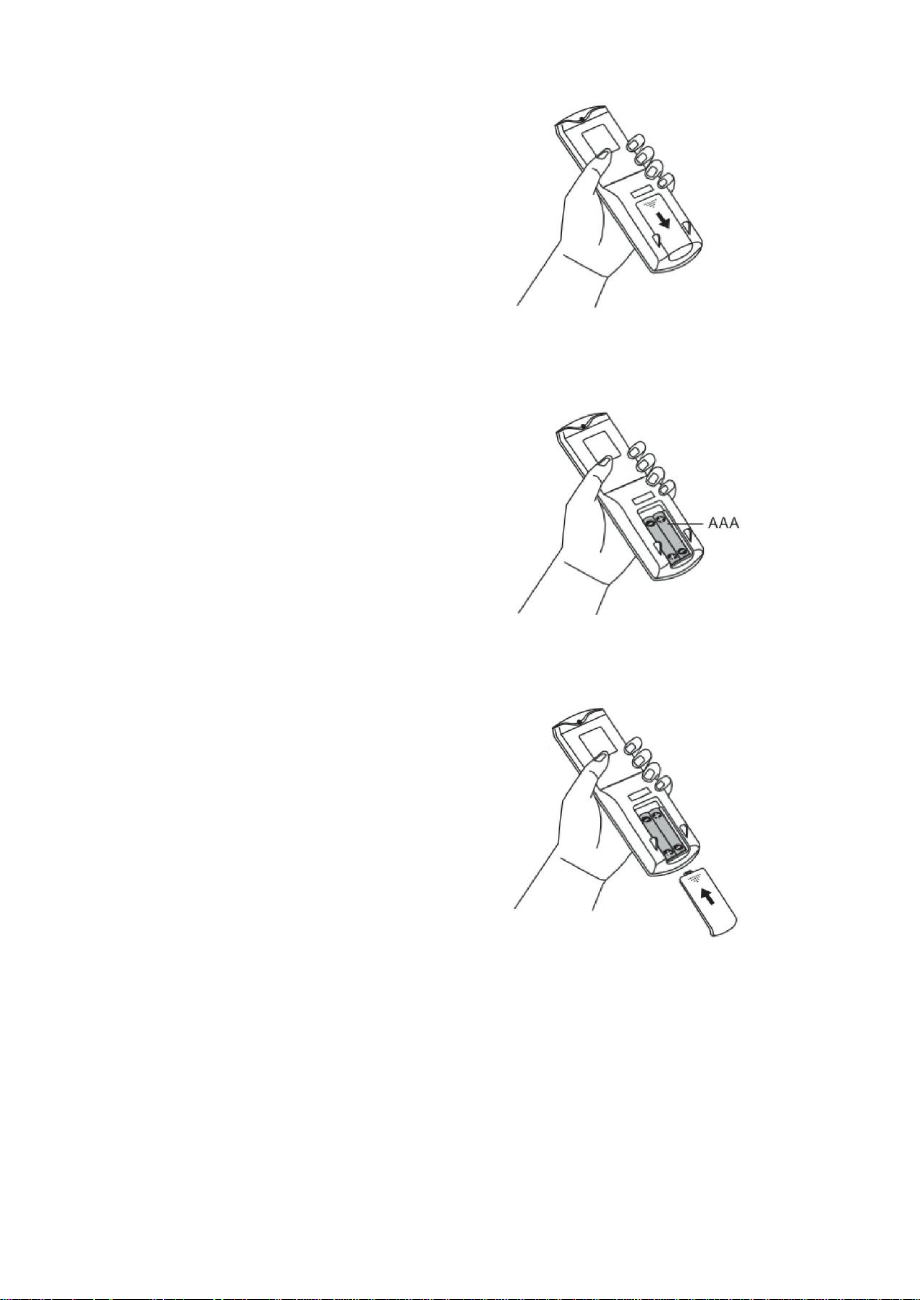
Installing the Batteries
Before attempting to operate your remote
control, install the batteries as described
below.
1. Turn the remote control face down. Press
down on the ridged area of the battery
cover and slide it off.
2. Install two “AAA” batteries as shown. Make
sure that proper polarity (+ or -) is observed.
3. Slide the cover back until it clicks.
The remote control will only operate this
device. It is not a universal remote control and
will not control other equipment.
Warning/Caution on using batteries
• Always ensure that the batteries are
inserted with the positive and negative
terminals in the correct direction as
shown in the battery compartment.
• Different types of batteries have different
characteristics. Do not mix different
types.
• Do not mix old and new batteries. Mixing
old and new batteries will shorten battery
life and/or cause chemical leaks from the
old batteries.
• When batteries fail to function, replace
them immediately.
• Keep the batteries out of the reach of
children. Should the batteries be
swallowed, immediately consult a doctor.
Also, when disposing of used batteries,
please comply with governmental
regulations or environmental public
institution rules that apply in your
country/area.
• Remove the batteries if the remote
control is not used for a month or longer.
Seat Top User Manual 700001 rev 00-11.docx Page | 9
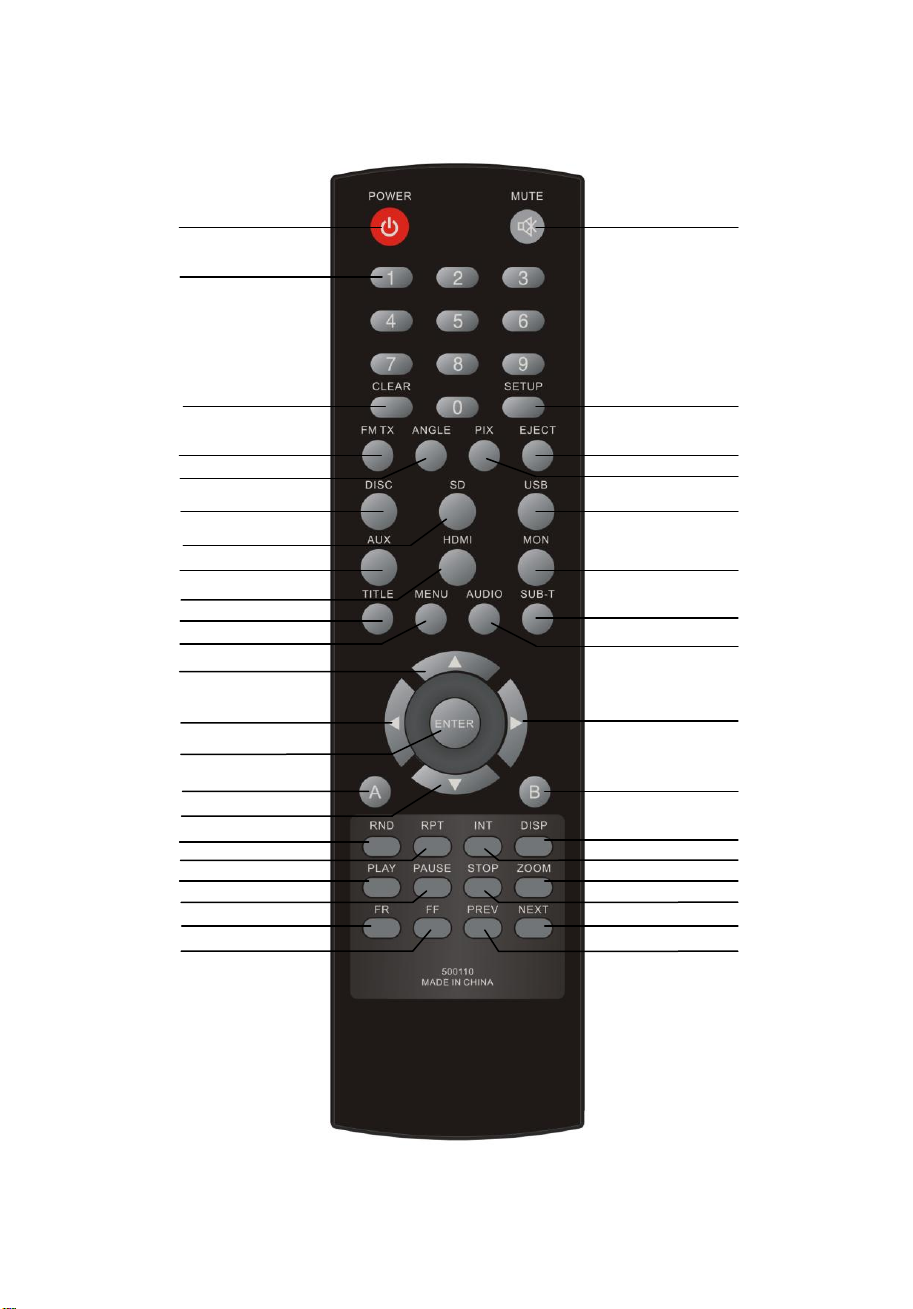
Button Function Descriptions
1 2 4 6 8 3 11
12
13
14
15
17
18
19 9 7 5 10
16
20
21
22
23
24
25
26
27
28
29
30
31
32
37
34
33
36
38
35
Seat Top User Manual 700001 rev 00-11.docx Page | 10

1. POWER Press this button to turn the
monitor on. Press this button again to
turn the monitor off.
2. Number Keys Decimal number: 0 to 9.
19. PLAY Press this button to begin media
playback.
20. PAUSE Press this button to pause media
playback.
3. CLEAR Press this button to clear any
numeric input from the number keypad.
4. FM TX Press this button to turn the FM
transmitter ON/OFF.
5. ANGLE Press this button to select
different viewing angles (this function only
applies to DVD titles that support multiple
angles).
6. DISC Press this button select DISC mode
(Monitor A only).
7. SD Press this button to select SD card
mode.
8. AUX Press this button to select auxiliary
input mode.
9. HDMI Press this button to select HDMI
mode.
10. TITLE Press this button to navigate the
title menu included on the disc.
11. MENU Press the button to go to the root
menu included on the disc.
12. UP Press this button to navigate up when
displaying a menu or file list.
13. LEFT Press this button to navigate left
when displaying a menu or file list.
21. FR (Fast Rewind) Press this button to
search media backward.
22. FF (Fast Forward) Press this button to
search media forward.
23. MUTE Press this button to mute the
audio. Press this button again to resume
audio.
24. SETUP Press this button to navigate the
setup menu. Please refer to pages 15
and 25 for detailed information on each
setup menu.
25. EJECT Press this button to eject the disc
from Monitor A.
26. PIX Press this button to access the
picture adjustment menu and select
between BRIGHTNESS, CONTRAST,
SATURATION, HUE, SHARPNESS, and
RESET. Press the UP/DOWN arrow
buttons to adjust the setting.
27. USB Press this button to select USB
mode.
28. MON Press this button to select Monitor
mode (A or B) as the input.
29. SUB-T (Subtitle) Press this button to
select and display subtitles (this function
only applies to DVD titles that support
subtitles).
14. ENTER Press this button to make a
selection or begin playback of the media.
30. AUDIO Press this button to select and
listen to different audio streams (this
function only applies to DVD titles that
15. A Press this button to transmit the remote
support multiple audio streams).
control codes and functions for monitor A.
31. RIGHT Press this button to navigate right
16. DOWN Press this button to navigate
when displaying a menu or file list.
down when displaying a menu or file list.
32. B Press this button to transmit the remote
17. RND Press this button to play content in
control codes and functions for monitor B.
random order.
33. DISP (Display) Press this button to
18. RPT Press this button to select between
display various information including title,
different repeat modes.
Seat Top User Manual 700001 rev 00-11.docx Page | 11
 Loading...