

Family Entertainment
System
Owner’s manual
MENU
HDMI
SETTINGS
EN
SOURCE
MIRROR
Miracast
HDMI
1

2

FAMILY ENTERTAINMENT SYSTEM
Contents
Welcome 4
Control Description – EVO 5 6
Control Description – EVO 0 7
Remote Control Operation 8
General Operating Instructions 10
Playing a DVD 10
Navigating Menus 12
Playback Controls 13
Context Menu (Viewing Content) 13
USB / SD Card 14
HDMI 17
Mirroring Screens 17
Miracast 18
SmartStream 18
Slingplayer 19
Settings 20
Mobile Application 23
Troubleshooting 27
Specications 28
Compliance Information 29
EN
© 2017 VoxxHirschmann Corporation. All rights reserved.
This manual, or any portion thereof, may not be reproduced without the express written permission
of VoxxHirschman Corporation.
Design and specications subject to change without notice.
3

Welcome
Thank you for purchasing the Family
Entertainment System with built-in DVD
player. Before operating the system, read
this manual thoroughly and retain it for future
reference.
Important Notice
It is unlawful in most jurisdictions for a
person to drive a motor vehicle which is
equipped with a television viewer or screen
that is located in the motor vehicle at any
point forward of the back of the driver’s
seat, or that is visible, directly or indirectly,
to the driver while operating the vehicle. The
monitors should never be installed where
they will be visible, directly or indirectly, by
the operator of the motor vehicle. If your
vehicle is equipped with a wireless rear seat
audio system or any other wireless infrared
device, make sure it is powered off when
operating the Rear Seat Entertainment
System. If both systems are powered on
at the same time, the two systems may
obstruct each other, possibly creating
undesirable audio interference through the
wireless headphones
Safety Precaution
For safety reasons, when changing video
discs, it is recommended that the vehicle
is not in motion, and that you do not allow
children to unfasten safety belts to make
any adjustments to the system. System
adjustments can be accomplished using the
remote control unit, while safety belts remain
fastened. Enjoy your entertainment system
but remember that safety of all passengers
remains the number one priority. Direct
eye contact from protruding HDMI cables
and or USB memory sticks may result in
injury during an accident. To prevent eye
injury, disconnect all HDMI cables and USB
memory sticks when not in use.
Warnings
• Do not use any harsh solvents or
chemicals when cleaning the unit.
• Do not use any abrasive cleaners that
may scratch the screen. Use only a
lightly dampened lint free cloth to wipe
the screen if it is dirty.
• Do not put pressure on the screen.
4
Product Features
EVO 5
• 8-inch Color TFT-LCD Panel
(1024x600) with 16:9 aspect ratio
• Built-in Top-Loading DVD Player
• USB 2.0, SD Card, and MHL-compatible
HDMI Ports
• 3.5mm Stereo Headphone Output
• Power and Eject Buttons on Top of Monitor
• 7 Function Capacitive Touch Buttons
• 11 Function Remote Control
• Infrared Transmitter for IR Wireless
Headphones
• Remote Sensor on the Front Panel
• IP remote control capability (using optional
mobile app)
• Monitor screen sharing
• Miracast wireless display capability
• Media streaming
EVO 0
• 8-inch Color TFT-LCD Panel (1024x600
with 16:9 aspect ratio
• 3.5mm Stereo Headphone Output
• Infrared Transmitter for IR Wireless
Headphones
• Remote Sensor on the Front Panel
• 11 Function Remote Control
• Top Power Button
• 7 Function Capacitive Touch Buttons
• IP remote control capability (using optional
mobile app)
• Monitor screen sharing
Caution
Be sure to run the vehicle engine while
using the system. Using this system without
running the engine can result in battery
drain. To avoid the risk of battery drain,
please remember to turn off the system
when the vehicle is not in use. Do not touch
the inner pins of the jacks on the front
panel. Electrostatic discharge may cause
permanent damage to the system.
Accessories
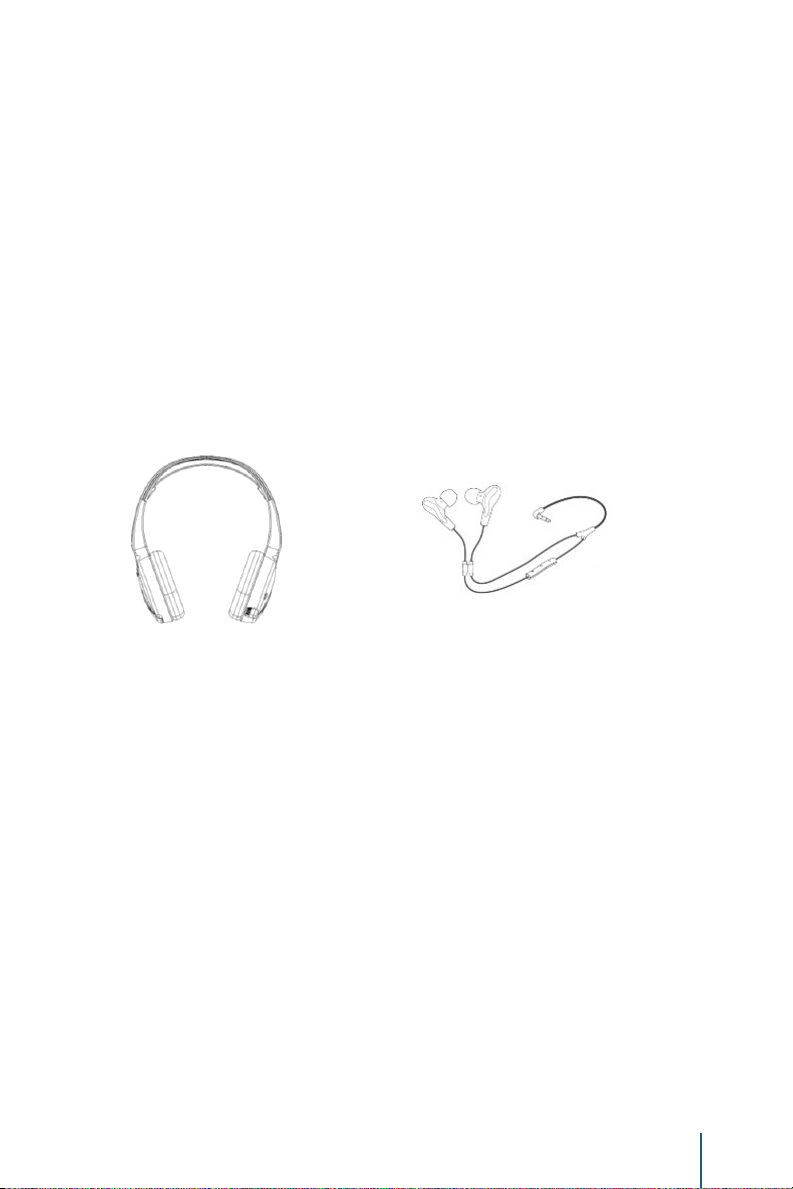
Wireless Headphones
Each monitor includes a built-in dual channel infrared transmitter for use with wireless
headphones. The wireless headphones must be used within a direct line of sight from
the screen. Infrared transmission, like visible light, travels only in a straight line.
How to Use the Wireless Headphones
When wearing the headphones, make sure to observe the “Left” and “Right” labels.
The headphones must be oriented correctly in order to receive the audio signal. Press
the power button located on the right side headphone. To switch between channel
“A” (Driver’s side) and channel “B” (Passenger side), slide the selector switch located
on the right side. Volume can be adjusted by rotating the wheel on the outside of the
channel select button. The headphones are designed to automatically turn off after
approximately 3 minutes of no activity to help prevent battery drain. If the headphones
are not going to be used for an extended amount of time it is recommended to remove
the batteries to prevent damage of the headphones due to battery corrosion.
EN
Wired Headphones
The System will allow you to use your personal headphones to listen to audio content.
There are 3.5mm stereo headphone output jacks located on the front panel of each
monitor which can be used with most standard stereo headphones.
5
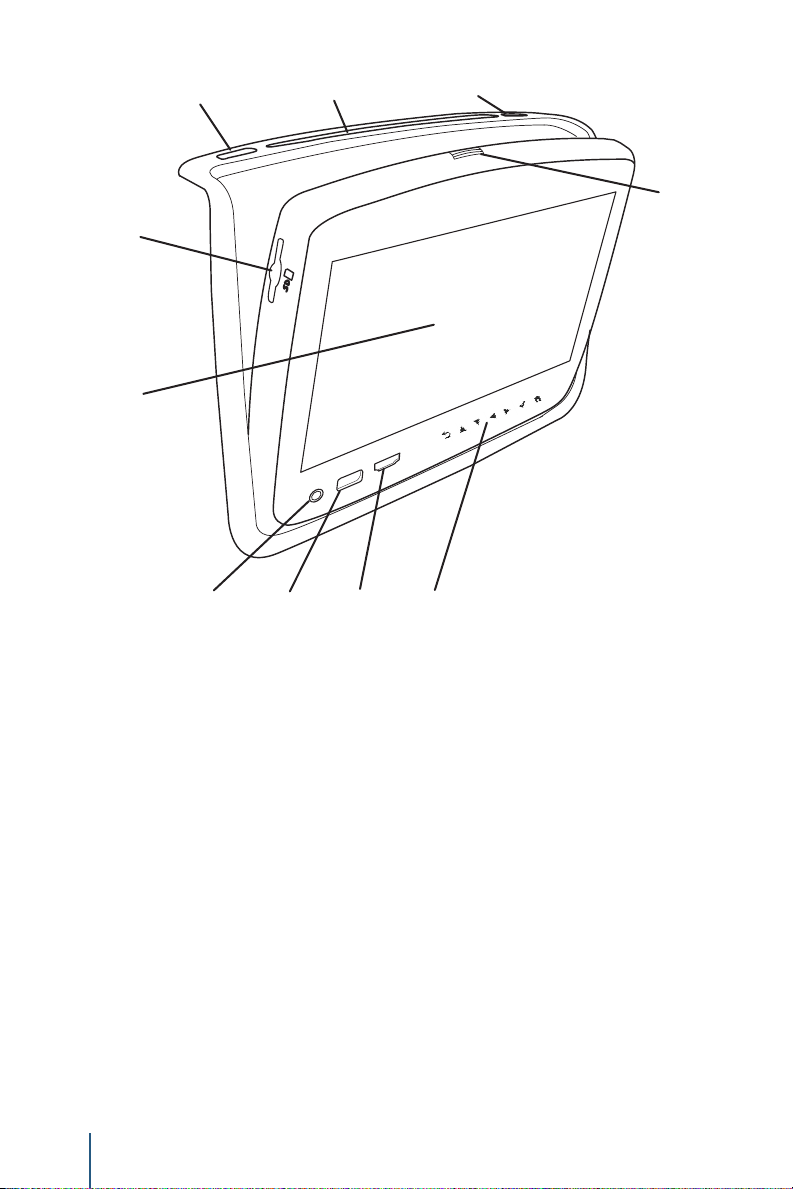
Control Description of the Front Panel - EVO 5
6 7
9
1
2 3 4 5
1. 8-inch TFT LCD Panel.
8
10
2. Headphone Output Jack. Connect wired headphones using a 3.5 mm stereo
connector
3. USB Port. You can play music, images, and videos stored on most USB devices.
4. MHL-Compatible HDMI Port. Connect an external audio/video source using a
MHL or HDMI connector.
5. Capacitive Touch Buttons. Directional arrows, Enter, Return, and Home
functions can be accessed via these touch buttons on the front panel.
6. Eject Button. This button ejects the disc from the DVD loader.
7. Disc Compartment Slot. Insert DVDs and Data Discs to view content.
8. Power Button. This button will turn the monitor on and off.
9. SD Card Slot Insert full size SD Card into the slot located on the left side of the
monitor when opened to view content.
10. Latch Release. Pressing this will release the latch and allow you to adjust the
viewing angle.
6

Control Description of the Front Panel - EVO 0
4
5
1
2 3
1. 8-inch TFT LCD Panel.
EN
2. Headphone Output Jack. Connect wired headphones using a 3.5 mm stereo
connector
3. Capacitive Touch Buttons. Directional arrows, Enter, Return, and Home
functions can be accessed via these touch buttons on the front panel.
4. Power Button. This button will turn the monitor on and off.
5. Latch Release. Pressing this will release the latch and allow you to adjust the
viewing angle.
7
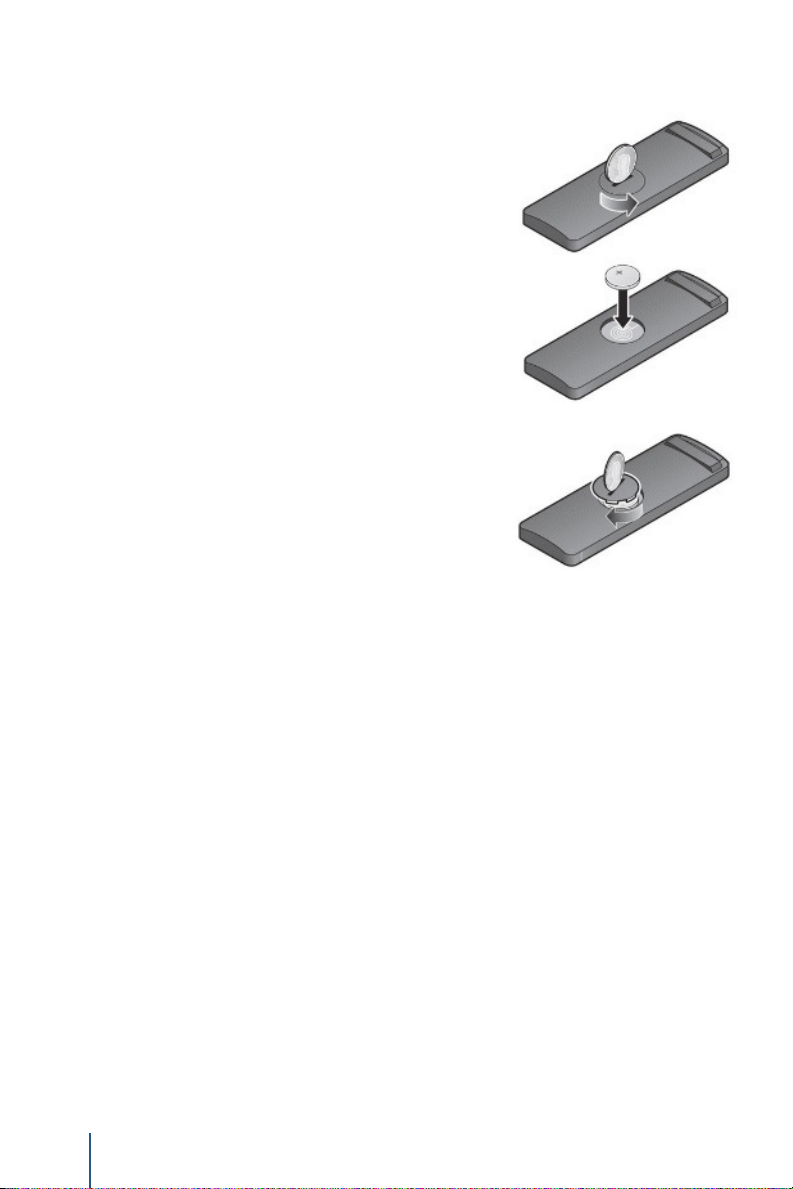
Remote Control Operation
Installing or Replacing the Battery
1. On the rear of the remote control, use a coin to turn the
battery cover slightly counterclockwise and remove the
battery cover.
2. Install one “CR2032” battery as shown. Make sure that
proper polarity (+ or -) is observed. The Positive (+) side of
the battery should be facing upwards.
3. Place the cover back and turn it clockwise until it locks
into place.
The remote control is only designed to operate this device. It is not a universal
remote control and will not operate any other device.
Warning/Caution on using batteries
• Always ensure that the battery is inserted with the positive and negative
terminals in the correct direction as shown in the battery compartment.
• If the remote control fails to function, replace the battery before seeking
repairs at the dealer.
• Keep batteries out of the reach of children. Should the battery be
swallowed, immediately consult a doctor. When disposing of used
batteries, please comply with governmental regulations or environmental
public institution rules that apply in your country/area.
• Remove the battery if the remote control is not used for a month or longer
to avoid corrosion and damage to the remote control.
8
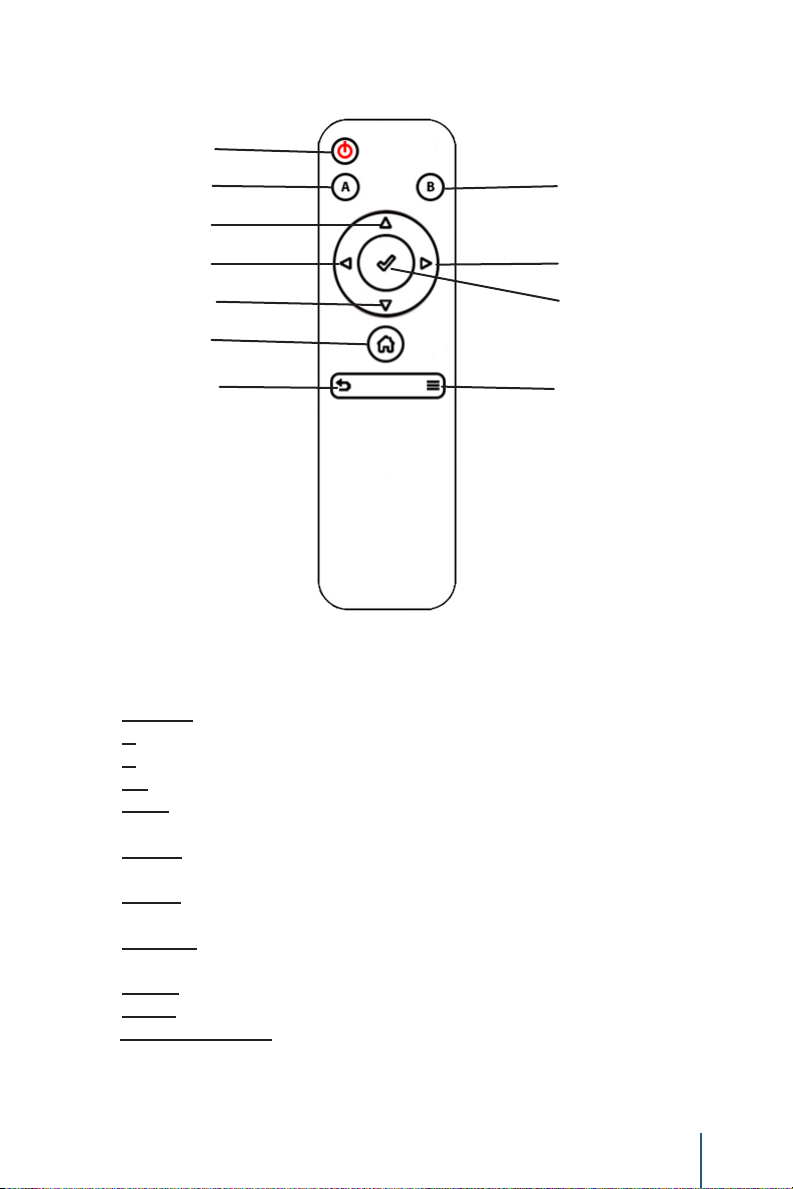
Remote Control Operation (continued)
1
2 3
4
EN
5
6
7
8
9
10 11
1. POWER Press this button to turn the monitor on and off.
2. A Press this button to operate monitor A.
3. B Press this button to operate monitor B.
4. UP Press this button to navigate up when displaying a menu or le list.
5. LEFT Press this button to navigate left when displaying a menu or le
list.
6. DOWN Press this button to navigate down when displaying a menu or
le list.
7. RIGHT Press this button to navigate right when displaying a menu or
le list.
8. SELECT Press this button to make a selection or begin playback of the
media.
9. HOME Press this button to return to the home screen.
10. BACK Press this button to go back to the previous screen.
11. CONTEXT MENU Press the button to go to the open the context menu
options (when available).
9

General Operating Instructions
Turning the monitor ON or OFF
It may be necessary to wait approximately 10-15 seconds after starting the vehicle before
turning the unit on. Press the “Power” button on the top panel or the remote control to turn the
monitor on or off. When the unit is powered on, the panel buttons will illuminate.
Once the monitor has been turned on and is displaying a picture, you can optimize the picture
quality by pivoting the screen to adjust the viewing angle.
It is recommended to turn the monitor off when not in use.
DVD - Basic Overview
To get the most use out of each DVD, make sure you read this section completely.
Regional Coding:
Both the DVD player and discs are coded by region. These regional codes must match in
order for the disc to play. The system is preset to the region code designated for your area by
order of the DVD Copy Control Association. Other regions may not be played in this system.
Types of Discs your monitor will play:
Before you load a disc, make sure that it is compatible with the player.
• DVD-Video: DVD contains video.
• DVD +/- R: DVD contains video.
• CD-DA: CD contains audio.
Known Incompatible Discs:
Note that the following discs CANNOT be used with this system:
• Optical disc- CD-1
• CD-ROM
• DVD-ROM
• Mini disc
• CDG (audio only, not graphics)
(List is not all inclusive and subject to change without notice).
To Load and Play a Disc:
Press the “Power” button to turn the system on. Place the disc about halfway into the disc
compartment slot, with the disc’s label facing the rear of the vehicle. The unit will pull the disc
in the rest of the way. Do NOT insert the disc at an angle or force the disc in. The disc must
be inserted straight into the player. The DVD will automatically play on each monitor if there is
no content already playing. You may also select “DVD” from the source menu to begin DVD
playback mode.
To mirror DVD content on the other monitor, see section in this manual titled “Screen
Mirroring”.
Some discs may start at the root menu, where playback must be selected to start a movie.
Use the remote control or capacitive buttons to navigate through the DVD menu and play the
movie.
10

General Operating Instructions
Notes on Discs:
• To keep a disc clean, do not touch its surface. Handle the disc by its edge.
• Keep your discs in their cases or sleeves when not in use. Also, do not subject disc to
heat/high temperature. Avoid leaving them in a parked vehicle or on a dashboard/rear
tray.
• Do not attach labels, or use discs with sticky ink/
residue. Such discs may stop spinning when used,
causing a malfunction, or may ruin the disc.
Labels may also cause an inability to eject a disc (due to a label or sticker peeling off
and jamming the disc mechanism) or the inability to read data correctly (i.e., playback
skipping, or no playback) due to heat shrinking of a sticker or label causing a disc to
warp.
• Before playing, clean the discs with a commercially available cleaning cloth. Wipe
each disc from the center out. Do not use solvents such as benzene, thinner,
commercially available cleaners, or antistatic spray intended for analog discs.
• Use only normal, circular discs. If you insert irregular, non-round shaped discs they
may not play properly or jam in the DVD player causing damage.
Notes on Media
Compatibility:
This system is compatible
with the following media
formats. Please note:
• The text information of
some audio and video
les may not be correctly
displayed.
• There may be a slight
delay before playback
of les using an SD
card or USB ash drive
with complex folder
hierarchies.
• Some audio, video,
and image les may
be incompatible with
this system due to
le characteristics,
le format, recording
software used, directory
structure, and/or the type
of audio/video encoding
used.
Format Extension Video Codecs
AAC .m4a, .aac
DTS .dts
FLAC .ac
MPEG .mp1, .mp2,
Audio
OGG .ogg
WAV .wav
WMA .wma
ASF .wmv H.264, MPEG-2 Part 2,
AVI .avi H.264, MPEG-2 Part 2,
MP4 .mp4, .m4v,
Video
Matroska .mkv, .mka,
MPEG .mpg, .mp3g,
BMP .bmp
GIF .gif
JPEG .jpg, .jpeg
PNG .png
Image
TIFF .tiff, .tif
WebP .webp
.mp3
.m4a
.mks
.vob, .m2ts
WMV
Xvid, WMV
H.264, MPEG-2 Part 2,
MPEG-4 Part 2, WMV
H.264, MPEG-2 Part 2,
MPEG-4 Part 2, WMV
H.264, MPEG-2 Part 2,
MPEG-4 Part 2
EN
11

General Operating Instructions
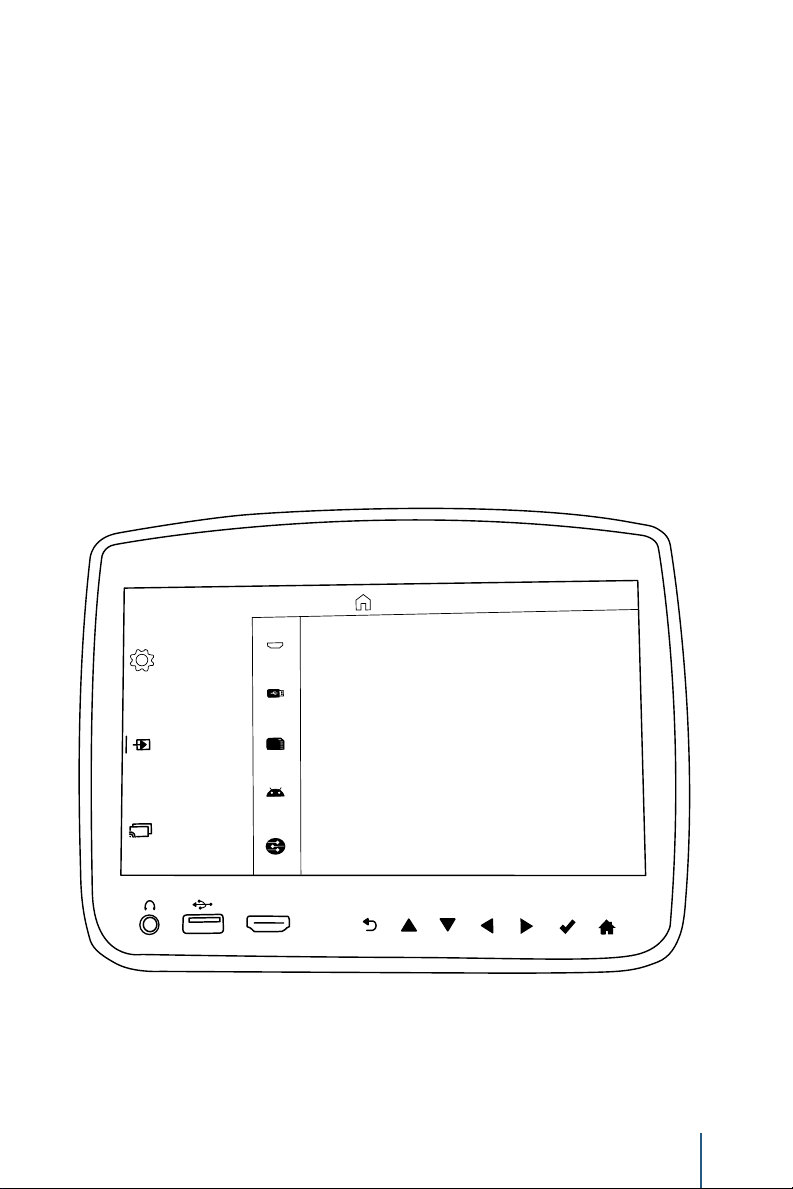
Navigating Menus
The “Home” screen can be accessed at any time
by pressing the “Home” button on the remote
control, or the capacitive touch buttons found on
the front display of the rear seat entertainment
unit.
The main menu is located on the far left side of the screen and allows users to select a
source, change settings, and mirror the monitor. The menu options will change with each
selection.
To the right of the main menu is a preview menu, which gives a preview of the highlighted
option in the main menu.
Pressing the “Up” and “Down” buttons will scroll through the options in each menu. The
current selection always remains highlighted in the center of the menu when scrolling up and
down. Pressing the “Select” or “Right” buttons when there is an item highlighted on the menu
will select the highlighted menu item. Pressing the “Back” or “Left” buttons will move back one
level in the menu.
In the top left corner of the screen there is a navigation history, which shows the navigational
path of the current menu. For example, from the Home > Source menu > DVD source.
Playing a DVD
Insert a disc into the top slot of the unit with the label facing the rear of the vehicle.
If the disc is supported and there is no content already playing, the DVD will
automatically begin playing on the monitor(s).
When a disc is inserted, the DVD will automatically begin playing on each monitor only if there
is no content already playing. The DVD will not interrupt playback on that monitor but will
automatically play on the other monitor, if it is not in use.
If the disc is already inserted before powering on the rear seat entertainment system, DVD
playback can be accessed by selecting SOURCE from the Home screen then selecting DVD
from the source menu.
12

General Operating Instructions
Playback Controls
Playback Controls allow for navigation and
adjustment of video and music content. Options
includes:
• Previous/Next Chapter or Track
• Rewind/Fast-Forward
• Play/Pause
• Volume
• Shufe/Repeat
• Night Mode toggle
• Eject (DVD-only)
Available options will be different depending on the type of content being played.
To initiate the Playback Controls menu, press the “Select” button on the remote. Use the “Left”
and “Right” buttons to navigate the menu, moving left and right. Use the “Select” button to
select the highlighted option.
The Playback Controls menu will disappear after approximately 5 seconds of no user input.
Rewind and Fast-Forward each have 4 speeds: 2x, 4x, 8x, and 16x. When selecting Rewind/
Fast-Forward, the speed is displayed in the top right corner of the screen. To change the
speed, press “Select” on Rewind/Fast-Forward again and the new speed will be displayed.
Selecting “Stop” from the Playback Controls will stop the movie and return you to the main
screen.
Context Menu (Viewing Content)
EN
Pressing the “Context Menu” button on the remote
while viewing content will bring up the context menu
on the right side of the screen (when available).
When a video is playing, the context menu provides
extra options to adjust the display, audio, aspect
radio, and subtitle settings if they are available.
Pressing the “Select” button will select or toggle the
highlighted item from the menu. Pressing the “Back”
button will navigate to the previous option.
To close the context menu, press the “Context Menu” button on the remote while it is open.
Display Adjustments (from the Context Menu)
Display settings can be found in the Context Menu
under “Display” while a video is playing. These
settings can be adjusted by selecting the setting,
then pressing the “Up” and “Down” buttons.
Pressing the “Select” or “Back” buttons will save
changes to the display settings.
These settings can also be adjusted from the
“Display” menu found under “Settings”.
13

General Operating Instructions
Volume Adjustment
Volume can be adjusted by pressing the “Up” and
“Down” buttons at any time a video is playing,
or by selecting the volume icon in the Playback
Controls menu. Then, press “Up” or “Down” to
adjust the volume.
NOTE: The “Maximum Wired Volume” setting in the “Settings” menu will control ONLY volume
functions of the wired headphones via the 3.5mm jack on the front of the monitor.
USB/SD Card
Operations for accessing les and content stored
on a SD Card, or a USB Drive are identical and
can be used by selecting “SD Card” or “USB”
from the “Source” menu, respectively.
NOTE: When initially loading a storage device
with a large library of content, there may be a
delay before the full library will load.
Basic Video Navigation
When entering the SD Card or USB menu, the contents from the storage device will be
categorized by media type. The three media types available are “Music”, “Videos”, and
“Photos”. Highlighting each option will show a preview of the available les of that media type
on the device. After selecting a media type, you may navigate through the content and select
the desired le.
Alphabetical Search Bar
The Alphabetical Search Bar is a tool
that can be used to quickly scroll through
and navigate a library of content.
After selecting “Music” or “Videos” as a media
type, the Alphabetical Search Bar is available
by pressing “Left” on the remote control. Then
press “Up” or “Down” and highlight the desired letter. Pressing “Select” or “Right”
on a letter will move to and highlight the rst item that starts with that letter in your
library.
14

General Operating Instructions
Navigating Content
When a media item is highlighted, the artwork is
enlarged and there is a white border around the
icon. The highlighted item’s available metadata
(video title, artist, track name, rating, genre,
etc.) will be displayed in the information bar that
appears at the bottom of the screen (if available).
Context Menu (Navigating Content)
Pressing the “Context Menu” button while navigating any content (music, videos, or photos)
will display the Context Menu from the right side of the screen. The Context Menu offers
advanced options such as searching, sorting, and changing the page view.
Selecting “Page View” gives the option to change the view of the displayed content to allow
for easy navigation. For Audio and Video, there are two different views available to choose
from: Grid, and List. Grid view is the default option.
Grid View
EN
List View
15

General Operating Instructions
Navigating Music
Navigating through a music library is identical to
navigating through the video library. Features
such as the “Alphabetical Search Bar,”
“Information Bar,” and “Context Menu” are
available.
The default sorting option for music is “Artist”.
Selecting an artist will then sort by “Album” and
will display all available albums by that artist in
your music library. There is also an option to
“Play All” albums from the selected artist.
Selecting an album will display the songs in the
album. Use the “Up” and “Down” buttons to
move the cursor through the songs. Pressing
“Select” will begin playing the selected track.
Pressing the right arrow will navigate to the
“Now Playing” screen. The “Now Playing”
screen contains Playback Controls including
Previous/Next Track, Rewind/Fast-Forward,
Play/Pause, Shufe, Repeat, Volume
adjustment, and Night mode.
Pressing “Back” will return to the “Song Select”
screen. The audio will continue to play while
navigating back to the Artist select page. During
playback, the system will return to the “Now
Playing” screen after 15 seconds has passed
with no user input.
16

General Operating Instructions
Navigating Photos
Navigating Photos is similar to navigating “Music”
and “Video”. Use the “Left”, “Right”, “Up”, and
“Down” buttons to select a photo.
Selecting the “Photos” media type from the USB
or SD Card source will display any available
images from the storage device.
In “Photos” there are “Page Selector” arrows that allow for quick navigation of a large library of
photos, press the “Left” button to access. Once “photos” is selected, use the “Up” and “Down”
buttons to quickly browse through the photos. After nding the desired page, press “Select” or
“Right” to begin highlighting individual photos.
While navigating a Photo library, pressing the “Context Menu” button will open the context
menu, allowing for additional options such as “Search”, “Sorting”, and “Page View”. You can
additionally select Overview, Slideshow, and Full Screen, Grid, and List as more viewing
options.
HDMI Source
The HDMI Source will display content coming into
the system through the HDMI port located on the
front of the monitor. Many modern devices
contain HDMI outputs, enabling audio and video
to be sent to a separate device.
EN
To access the HDMI source, select “Source” from the Home Screen and navigate to the
“HDMI” option in the menu. When highlighting “HDMI” you will see a preview of the HDMI
input in the preview screen to the right.
Pressing the “Back” button will return to the source menu.
NOTE: HDMI devices are independantly controlled devices and must be controlled from the
source device. You will not be able to control playback on the HDMI device from the monitor.
Mirroring Screens
Selecting “Mirror” from the home menu will copy
the screen of the opposite monitor onto the
selected monitor. This feature is used to display
the same content on both monitors.
17

General Operating Instructions
Miracast
Miracast™ is a technology used to wirelessly
mirror content from a supported mobile device to
a separate monitor.
Selecting “Miracast™” from the “Source” menu
will bring up a “Ready to Connect” screen, which
provides instructions for connecting a mobile
device to the screen. This screen must be active to be able to connect your mobile
device to the monitor.
™
SmartStream
The “SmartStream” source allows for
content that is stored on a mobile device
to be wirelessly streamed to each of the
monitors.
To stream content from a mobile device,
select the “SmartStream” source from
the “Source” menu. A “Ready to Connect”
screen will be visible once selected. From the mobile device’s WiFi settings, connect to the
wireless access point displayed on the “Ready to Connect” screen. The default password is
“123456789” via the “WiFi Settings” menu if desired.
Once connected, launch the Mobile Application and select “SmartStream” to begin sending
content to play. Next, select a monitor to stream to by selecting with Monitor “A” or Monitor “B”
from the list. Note: A monitor will only appear as a streaming destination if the “SmartStream”
source is selected from the monitor. Next, select a source to browse content from. Any
devices that are connected to the wireless access point and using the mobile app in the
vehicle will be available to be browsed.
After selecting a source device, navigate through the folders and select any supported le to
stream to the monitor. Once the le is selected, it will begin playing/displaying on the selected
monitor. Playback Controls are available from the “Now Playing” screen in the app as well as
from the on-screen Playback Controls on the monitor (using the remote).
Note: DRM protected content may not be available to stream wirelessly. To play DRM content
on the FES, a HDMI/MHL adapter for your device may be required. Ensure you are using
an OEM branded (Apple, Samsung, etc.) adapter. Generic adapters may not function
properly with your device.
18

General Operating Instructions
Slingplayer
Note: An active internet connection is required for
the Slingplayer to function. See the WiFi section on
page 21 of this manual to access the “Client Mode”
and connect to an internet source.
The rst use of Slingplayer will prompt you to enter
your Slingplayer login credentials. Using the remote
control to navigate the on-screen keyboard,
enter the e-mail address and password associated
with your Slingplayer account.
Once logged into your account, the main Slingplayer
menu page will be displayed. You have 3 options to
choose from:
• The “Connect” button allows the user to watch
live television from their Slingbox.
• The “Settings” button allows a user to change
settings of the Slingplayer application.
• The “Help” button gives the user information on
how to properly use the Slingplayer application.
Connect for Video Stream.
Pressing the “Select” button on the remote control
will bring up the navigational menu that will display
two sets of Menu Control Bars.
™
EN
The Upper Menu Control Bar will display the type of
controls you would like to use. Pressing “Select” on
the remote control will access that type of control.
Pressing the “Back” button on the remote control will
hide the menus and return to the live stream.
These options would include:
• Main
• DVR
• Directional Pad
• Number
• Miscellaneous
Accessing the Program Guide
Pressing the “Context Menu” button on the remote
control will display the program guide. You can
use the directional arrows on the remote control
to navigate through the programs available, and
pressing the “Select” button will tune to that channel.
Pressing either the “Back” or “Context Menu” button
on the remote control will exit the Program Guide.
19

General Operating Instructions
Exiting Slingplayer
There are 2 ways to exit the Slingplayer
application. Either pressing the “Home” button,
or pressing the “Back” button while on the
main screen will display the “Main Menu” page.
Pressing “Back” again will exit the application.
When exiting the application, you will be prompted
with a conrmation box. “Are you sure you want to
exit Slingplayer? There will be no data usage once exited”. Selecting “Yes” will return you to
the “Home” screen of the Entertainment System. Selecting “No” will return to the stream.
Settings
When entering the “Settings” menu from the
Home screen, there are many available options
to be detailed in the following pages.
Audio
The Audio settings menu allows for adjusting audio settings such as maximum wired
volume, and Bluetooth® audio routing of the system. “Maximum Wired Volume” will
limit the maximum volume of the wired headphones via the 3.5mm headphone jack.
Bluetooth
Bluetooth® connection settings can be accessed
in the “Settings” menu and is used to pair the
system to send audio from a monitor to the
vehicle’s audio system, when desired.
After selecting “Bluetooth®”, turn Bluetooth® on
by highlighting the “Status” button and pressing
“Select”. You will see the button turn green to indicate that Bluetooth has been turned on.
When Bluetooth® is on, the FES system will search for discoverable devices. To pair a
device, make sure the device is in Bluetooth® Discovery Mode (read the device’s manual for
instructions). Once discovered by the system, the device’s name will appear under “Available
Devices”.
Navigate down to the list and select the intended device to pair with the system. Enter the
PIN number provided by the device if applicable. Once pairing is complete, there will be a
message indicating a successful pairing. The system will also remember the last paired
device and automatically connect to the device when Bluetooth® is turned on.
Read Back
Read Back is a text-to-speech aid, and activated
through the “Settings” menu. When enabled,
the FES will read the text items displayed on the
screen to you through the audio system. You can
enable/disable this feature, adjust the speech
volume, and the speech speed settings by
selecting this item from the “Settings” menu.
®
20

General Operating Instructions
WiFi
The WiFi settings menu allows for changing the
name (SSID) and password of the wireless access
point as well as toggling Client Mode.
In the Access Point Mode settings, a user is able
to change the default SSID (network name) and
password for the wireless access point.
Client Mode allows the system to connect to another wireless access point. This is useful for
features that require Internet access, such as “Slingplayer”. To use Client Mode, enter the
“WiFi” settings menu and select “Client Mode”. Turn on the “Status” switch at the top of the
menu by highlighting it and pressing “Select”. The switch will turn green when on. Once on,
the system will begin searching for available wireless access points and display them under
“Available Devices”. Navigate down to this list, highlight, and select the network. Enter the
password for the network (if necessary) and the system will connect. Once connected, the
system will automatically connect to the last connected network until Client Mode is disabled,
as long as it is available and the credentials have not changed.
NOTE: Using client mode will use data from the selected WiFi access point. Use with care
when using with mobile data plans.
Language
The system language can be changed to any
one of the seven available languages. These
languages include: English, Spanish, French,
Arabic, Simplied and Traditional Chinese, and
Hebrew. The “Language” menu is located in the
“Advanced” menu under “Settings”.
EN
To change the language, highlight and select the current language and a drop-down list will
appear containing the available languages. Navigate down the list and select the intended
language. Next, there will be a prompt, select “Yes” to verify the change. The system will
reboot to apply the changes.
Display
The “Display” settings are similar to the settings
found in the “Context Menu” when viewing video
content and can be accessed from the “Settings”
menu. These settings include Backlight,
Brightness, Contrast, and Tint.
To adjust, select one of the settings from the menu then use the “Up” and “Down” buttons to
control the level of adjustment. Each setting has a range of 0 to 100 and can be adjusted in
increments of 5.
Reset
This will reset every item and option in the FES back to all factory defaults. Any user options
and customizations will be lost and reset back to factory default settings.
21

General Operating Instructions
Customize
Changing the Background Image:
The “Background” setting allows a user to
change the background image on each monitor.
To change the background image, select
“Background” from the “Customize” option in the
“Settings” menu. Next, select a source for the
image (USB, SD Card, or Local.)
Select a source then navigate and select the image for the background. A prompt
will conrm the change; select “Yes” to continue. Once complete, press the “Home”
button to view the change. Each monitor can have a separate background image.
Note: The “Local” setting contains up to the last 10 background images that have
been used.
Parental Controls
Parental controls give the ability to lock DVD content with certain ratings. The
Ratings menu provides the ability to toggle between locked and unlocked based
on the selected discrimination level, ranging from 1 (most restrictive) to 8 (least
restrictive). See Page 26 for detailed rating settings. The default setting for
Parental Controls is “off”.
A password will need to be created to access
parental controls. When entering “Parental
Controls” for the rst time, you will be prompted to
set up a password to be used to set the ratings.
Use the “Up” and “Down” buttons on the remote
control to change the numbers, pressing “Select”
to conrm. The system will then prompt you to
verify the password for conrmation.
Write this password down in a secure place. You will need this password to access
“Parental Controls” in the future to make any changes to the settings.
Performing a Factory Reset on the system will reset the Parental Controls to default
settings (off).
Fast-Charge
Fast-Charge is a feature available from the main
menu screen. This will allow you to charge some
compatible devices more quickly. Enabling the
Fast-Charge mode will disable the USB port from
reading data or content from USB drives or other
devices. When Fast-Charge is active, the icon on
the main menu screen turns green.
When selecting “USB” as the content source, the Fast-Charge feature is
automatically disabled.
22

General Operating Instructions
Mobile Application
Mobile App Remote Control
The Mobile App Remote Control is available via the mobile application. This remote control
duplicates all of the functionality of the included remote control through your device. To use
the Mobile App Remote Control, enable Wi-Fi on your device and connect to the Family
Entertainment System’s Wi-Fi Network. Then open the mobile application and select the
“Remote Control” function from the home screen in the mobile application.
11
2
4
5
1
3
6
7
EN
9 10
8
1. POWER Press this button to turn the monitor on and off.
2. A-B Press this button to switch between operating monitor “A” or monitor “B”.
3. UP Press this button to navigate up when displaying a menu or le list.
4. LEFT Press this button to navigate left when displaying a menu or le list.
5. DOWN Press this button to navigate down when displaying a menu or le list.
6. RIGHT Press this button to navigate right when displaying a menu or le list.
7. SELECT Press this button to make a selection or begin playback of the media.
8. HOME Press this button to return to the home screen.
9. BACK Press this button to go back to the previous screen.
10. CONTEXT MENU Press the button to go to the open the context menu options
(when available).
11. APP BACK Returns to the main menu of the mobile application.
There is a toggle on the top of the screen to access “Touchpad” mode. This mode will
allow swipe, drag, and tap gestures to navigate the FES menus instead of the directional
arrows on the standard remote control mode.
23

General Operating Instructions
SmartStream
The SmartStream feature of the mobile application allows you to wirelessly
stream content from your mobile device to the FES. To connect the device,
the FES needs to be on the “SmartStream” source, located in the “Source”
menu.
1. Open the mobile application, and select “SmartStream” from the home
screen.
2. Select the device where you want to view the content.
3. Select the device which contains the content you wish to stream.
4. Navigate through the stored content until you locate and select the le you
wish to stream. The content should automatically begin to play on the device
selected in step 2.
You can control the content from the “Now Playing” screen in the mobile
application, or from the remote control for the FES.
Note for iOS Devices: In order for content to be available on iOS devices, video, music, and
photo les must be transferred to the mobile application through iTunes.
To transfer video les onto your iOS device for SmartStream playback:
1. Connect your mobile device to a computer and launch
iTunes.
after connecting your device to the computer.
3. Under the “Settings” dropdown, select “Apps”.
4. In the main iTunes window, scroll down to reveal “File
Sharing” and select the “Lincoln Play” app.
2. In iTunes, click on the device button that should appear
24

General Operating Instructions
MultiCast
MultiCast is a feature that allows you to select content that is currently
playing on the FES and mirror it to your mobile device.
1. Select “MultiCast” from the home stream of the mobile application.
2. When content is currently playing on the FES, you will be able to view and
select the monitor you wish to stream to your mobile device.
3. Once selected, the content will start to display on the mobile
device. Volume is controlled from your mobile device, not the
FES.
EN
Note: MultiCast is not available from the HDMI or SlingPlayer sources.
Note: To access MultiCast in the DVD source, you must press the “Context” button on the
remote control and scroll down and turn on the “MultiCast” option to enable the function to
be available in DVD mode. This must be performed each time you wish to use MultiCast for
the DVD source.
25

General Operating Instructions
This owner’s manual can be accessed by opening the “Settings” button at the bottom of the
mobile application’s home screen. Tutorial screens can be accessed in the mobile application
by pressing the “Information” button in the upper right hand corner of the mobile application’s
home screen.
DVD Parental Rating Levels
Country
Level
USA Mexico Canada
(Québec)
Canada
(Other)
United
Arab
Emirates
1
G A G G G
2
3 PG
4 PG13 PG15 14
5
6
R B-15 16+ 14A 15+ 16
7
NC17
8
B 13+ PG
C
D R
18+
18A
PG13 12
18+ 18
Note: Setting a Parental Rating Level will allow DVDs with that rating
(and lower) to be played by the system. All ratings that are of a higher
Parental Rating Level will not be allowed until unlocked.
26
Brazil
L
10

Troubleshooting
Symptom Remedy
Monitor does not power on.
Remote control does not
function.
Monitor frozen - does not
respond
Disc will not play.
Disc plays, but stops
intermittently.
No picture.
Distorted picture.
Cannot advance through a
DVD movie.
No sound or distorted sound.
Monitor feels warm.
• Verify the vehicle is in the ON/RUN or ACC position.
• Verify the battery is installed in the remote control and fresh.
• Verify the fuse located in-line is good.
• Verify that the battery in the remote control is fresh.
• Verify that the remote sensor lens is not obstructed.
• Try to reset the monitor. This is done by pressing and holding the power
• Insert the disc with label side facing the rear of the vehicle.
• Check if the disc is defective by trying another disc.
• Check the type of disc being played. This unit only plays DVD (Single, Dual
• Both the unit and DVD discs are coded by region. If the region codes don’t
• The disc may be dirty and need cleaning.
• Condensation may have formed inside the unit. Remove the disc and allow
• The disc may be scratched too badly to play.
• Check that the signal source is connected.
• Check the menu source setting. Match your monitor mode with the source
• Check the disc for ngerprints and clean with a soft cloth, wiping from center
• You cannot advance through the opening credits and warning information
• Some discs may not allow this function. Try another disc.
• Make sure that the external media device is connected properly, and all
• Verify that the batteries in the headphones are fresh.
• If you are using the wireless headphones, make sure you turn on the power
• Verify the volume is turned up on headphones.
• Verify nothing is blocking the path between the monitor IR sensor and
• When placing the headphones on your head, make sure to observe the Left
• When the monitor is in use for a long period of time, the surface will be
EN
button on the top of the monitor for at least 5 seconds. The monitor
should shut o and restart, same as cycling the ignition key o, then back
on.
Layer), DVD-R/+R, DVD+R Dual layer, DVD-RW/+RW, CD, CD-R, and CD-RW.
match, the DVD can’t be played.
unit to dry out.
correctly.
to edge.
that appears at the beginning of DVDs because the disc is programmed to
prohibit these actions.
cables are securely inserted into the appropriate jacks.
and select the correct monitor (A or B).
headphones.
and Right orientation. The headphones must be oriented correctly (facing
forward) in order to receive the audio signal.
warm. This is normal.
Player does not respond to all
commands during playback.
A Parental Setting message is
displayed, prohibiting movie
playback.
• Some operations are not permitted by the DVD. Refer to the specic
instructions included with the DVD for more information.
• Using the remote control, enter your 4-digit Parental Password and then
press Enter. Refer to “Parental Controls” section for more details.
27

Specications
LCD Backlight LED
Resolution 1024x3(RGB) x 600 TFT LCD Panel
DVD Mechanism Slot-In Loader
Supported Disc
Sources
I/O Ports 3.5mm Headphone Jack, SD card, USB port, HDMI
Frequency Response 20Hz ~20kHz
Headphone (Audio Out)
Video Display System NTSC/PAL
HDMI Compliant Version 1.4
Wireless Audio
DVD (Single, Dual Layer), DVD-R/+R, DVD+R Dual layer,
DVD-RW/+RW, CD, CD-R, CD-RW
USB, SD Card, HDMI, DVD, Miracast™, SmartStream,
Slingplayer™.
IR headphones (included), Wired headphones (not
included)
Dual channel infrared audio transmitter,
supports stereo headphone operation
(reception: 0.9 m; 80°, 1.8 m; 50°)
28

Compliance Information
FCC Notice
This device has been tested and found to comply with the limits for a Class B digital device,
pursuant to part 15 of the FCC Rules. These limits are designed to provide reasonable
protection against harmful interference in a residential installation. This device generates,
uses, and can radiate radio frequency energy, and if not installed and used in accordance with
the instructions, may cause harmful interference to radio communications. However, there
is no guarantee that interference will not occur in a particular installation. If this device does
cause unacceptable interference to radio or television reception, which can be determined by
turning the device off and on, the user is encouraged to try to correct the interference by one
or more of the following measures:
• Reorient or relocate the receiving antenna.
• Increase the separation between the device and receiver.
• Connect the device into an outlet on a circuit different from that to which the receiver is
connected.
• Consult your dealer or an experienced radio/TV technician for help.
FCC Warning:
To assure continued FCC compliance, the user must use the provided grounded power supply
cord and the shielded video interface cable with bonded ferrite cores. Also, any unauthorized
change or modications to this device would void the user’s authority to operate this device.
EN
ISED Notice:
This Class B digital apparatus complies with Canadian ICES-003.
Cet Appareil numérique de la classe B est conforme à la narme NMB-003 du Canada.
This device complies with Industry Canada license-exempt RSS standard(s). Operation is
subject to the following two conditions: (1) this device may not cause interference, and (2)
this device must accept any interference, including interference that may cause undesired
operation of the device.
Le présent appareil est conforme aux CNR d’Industrie Canada applicables aux appareils
radio exempts de licence. L’exploitation est autorisée aux deux conditions suivantes : (1)
l’appareil ne doit pas produire de rouillage, et (2) l’utilisateur de l’appareil doit accepter tout
brouillage radioélectrique subi, même si le brouillage est susceptible d’en compromettre le
fonctionnement.
29

Compliance Information
WEEE Notice
Disposal of Old Electrical & Electronic Equipment (Applicable in the European Union and
other European countries with separate collection systems)
This symbol on the product or on its packaging indicates that device shall not be treated
as household waste. Instead it shall be handed over to the applicable collection point for
the recycling of electrical and electronic equipment. By ensuring this device is disposed of
correctly, you will help prevent potential negative consequences for the environment and
human health, which could otherwise be caused by inappropriate waste handling of this
device. The recycling of materials will help to conserve natural resources. For more detailed
information about recycling of this device, please contact your local city ofce, your household
waste disposal service or the shop where you purchased the device. Applicable accessory:
remote control.
Macrovision Notice
This product incorporates copyright protection technology that is protected by method
claims of certain U.S. patents and other intellectual property rights owned by Macrovision
Corporation and other rights owners. Use of this copyright protection technology must be
authorized by Macrovision Corporation, and is intended for home and other limited viewing
uses only unless otherwise authorized by Macrovision Corporation. Reverse engineering or
disassembly is prohibited.
Dolby Audio
Manufactured under license from Dolby Laboratories.
Dolby and the double-D symbol are registered trademarks of Dolby Laboratories.
The Bluetooth® word mark and logos are registered trademarks owned by Bluetooth SIG, Inc.
And any use of such marks is under license. Other trademarks and trade names are those of
their respective owners.
30

ES
31

32
 Loading...