

Page 1

Sensor MULi6s EX
Dimensions
36 x 20 x 5 mm
Weight (with cables)
6 g
Accuracy
0 – 4.4V
Operating Temperature
-10°C +85°C
Input voltage
3.5 – 8.4 V
Current draw
9 mA
The MULi6s sensor is used for monitoring the voltage of lithium based batteries and can measure the
voltage of individual battery cells using the 7-pin balance connection. With the help of this sensor it is
possible to monitor the minimum and maximum cell voltage as well as the total battery voltage. Not only
that, but the Duplex system allows for alert conditions to be defined, in order to sound an audible alarm
when voltages drop below desired levels.
The unit uses the 2.4GHz band to communicate, not only allowing data to be sent from the transmitter to
the receiver, but also allowing the receiver in the model to transmit data back to the user. In this manner,
telemetric data obtained during operation is transferred in real-time and the current state of the system can
be presented on the LCD screen of the Jeti Box.
Parameter settings for MULi6s
All parameter settings and data readouts must be performed through the Jeti Box (available separately).
After connecting, the sensor identification, the number of cells connected to the unit, the lowest cell voltage
and the number (#) of the cell with the lowest voltage are shown on the LCD screen of the Jeti Box. By
pressing the Down button of the Jeti Box, the MULi6s sensor menu is displayed.
MULi6s MENU: Actual Value – Pressing the down button selects between displaying the following actual
measured values:
Individual voltage – By repeatedly pressing the D button, the voltage of each connected cell is shown
MULi6s MENU: MIN / MAX – Navigating the menu of the Jeti Box allows the minimum and maximum
extremes of voltage be viewed. These values are automatically erased from the sensor when the
configured trigger level is next exceeded. Alternatively the values can be erased manually using the the
Setting Erase Data option.
U MIN/MAX – Shows the minimum and maximum voltage of the currently selected cell. Using Up and Down
keys moves between the cells, showing the Min/Max voltage and the cell number (#) for the corresponding
cell.
MULi6s MENU: Setting – Using the ‘down’ button of the Jeti Box, the following options can be accessed
within this menu:
Erase data – By simultaneously pressing the left and right arrow buttons, all measured parameters will be
erased.
Start Trigger – Set the voltage at which monitoring will begin and any existing data will automatically be
erased. Use the Left and Right buttons to set the per-cell voltage.
Beep Alarm – Set the letter of the Morse code to be represented by the alarm from the transmitter, when a
low-voltage condition is encountered.
Beep Error - Set up of a morse code letter representing a battery error. If after an identification sequence
the number of battery cells changes, a battery error will be generated and this error will be announced
acoustically by emitting the above mentioned morse code letter. This function may be deactivated by
pushing and holding of the button L (left).
MULi6s MENU: ALARMS – Using the down button, it is possible here to change settings for individual
alarms.
Low Volt. Alarm – Set the threshold at which an alarm will be generated and your Tx module will emit the
sound specified by the ‘Beep Alarm’ letter specified in ‘Settings’. This value can be Off, or between 0 and
4.4V per cell.
-1-
Page 2
Sensor MULi6s EX
MULi6s MENU: SERVICE – by pressing button D (arrow down) you will change to depiction of the firmware
version and to renewal of the sensor default setting.
Factory Defaults – by simultaneous pressing of arrows R and L (right and left) the factory settings of the
MULI6s are loaded.
MULI6S v. xx.xx ID xxxxx:xxxxx – product marking with firmware version and series number (ID).
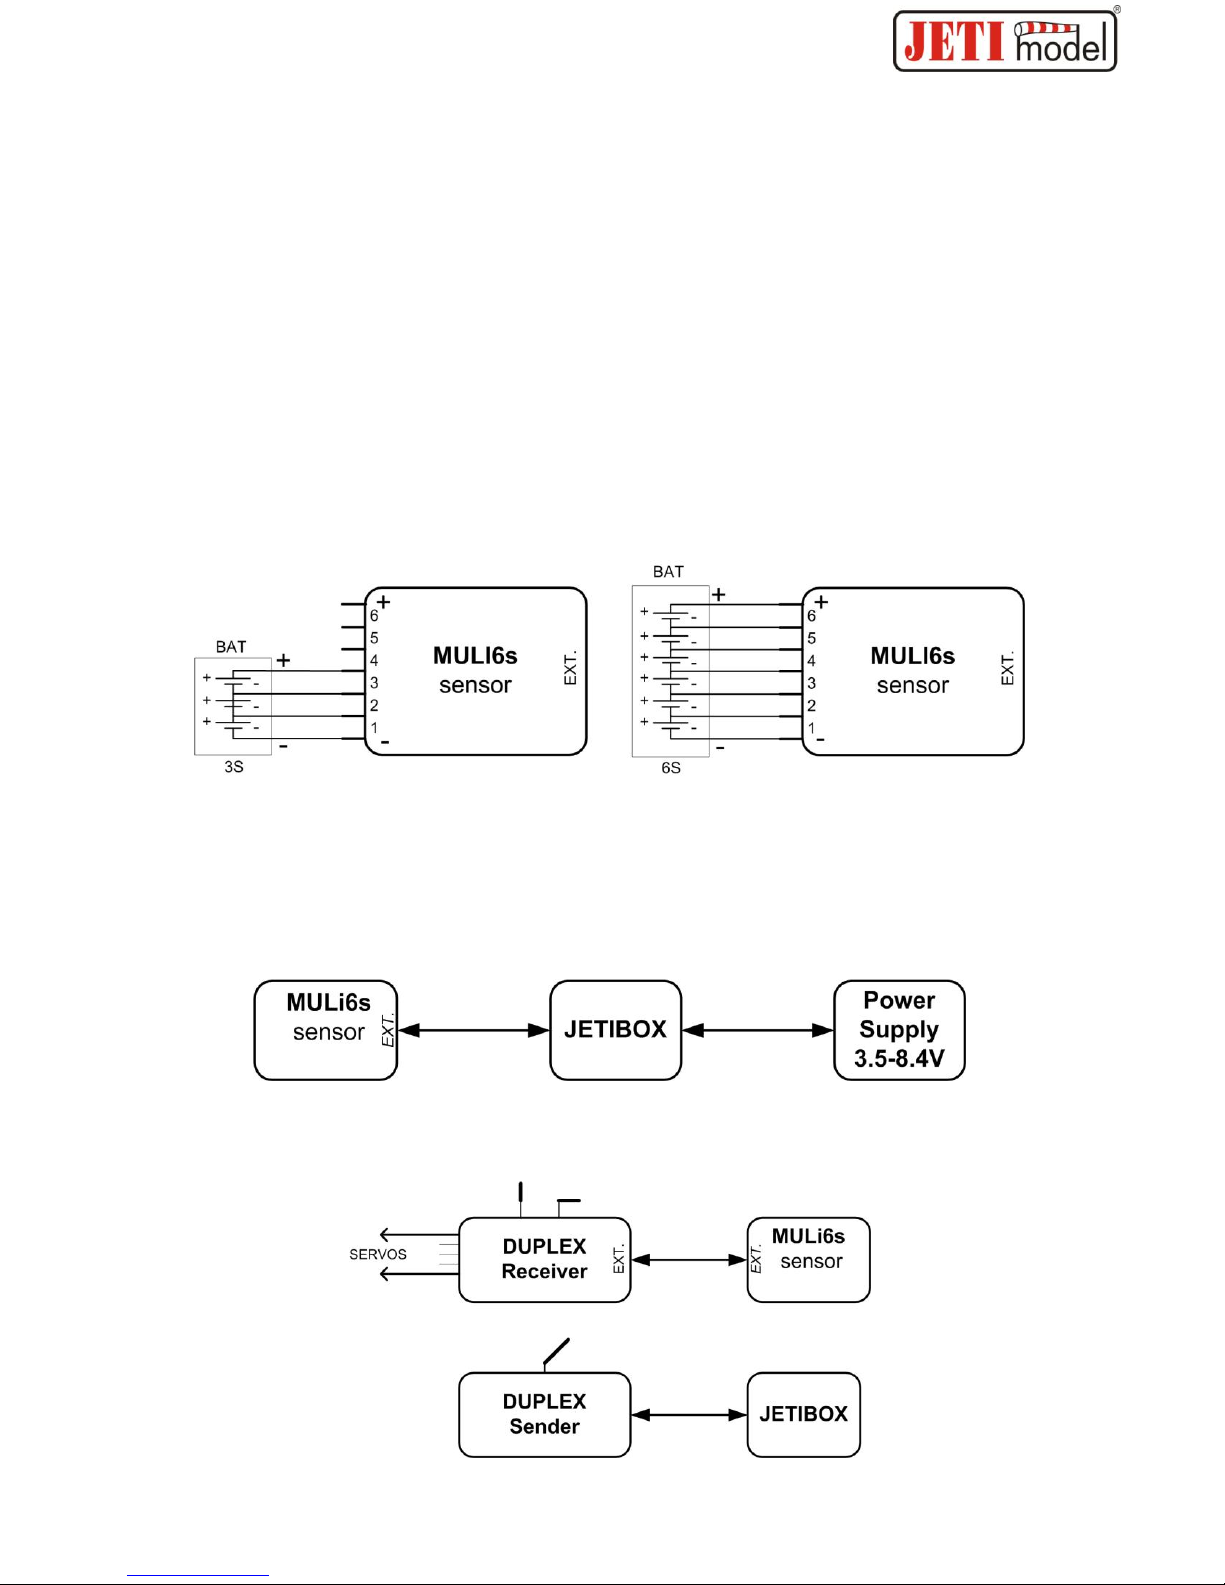
IMPORTANT: Order of connection:
– Connect the sensor to your lithium-based battery via the balance connector (Please note correct polarity)
– Connect the sensor to the receiver or expander
– Connect negative battery terminal to negative ESC/BEC terminal
– Connect positive battery terminal to positive ESC/BEC terminal
Connecting the battery to the sensor
Your lithium-based battery should be connected to the sensor via the balance plug on your battery. Please
observe the correct polarity. After connecting, the sensor requires approximately 2 seconds to determine
the number of cells connected. During this time the screen of your Jeti Box will indicate progress. If a
battery with a different number of cells is connected, the sensor will report an error and must be
disconnected from its power supply.
Connecting the MULi6s sensor
1. The three-wire cable with JR connector may be connected directly to the Jeti Box using the Pulse/+/-
socket. A power source of 3.5-8.4V must be supplied via the Jeti Box using the +/- socket to power the
module. In this configuration the MULi6s sensor can operate as a stand-alone mobile unit, providing
measurements on the screen of the Jeti Box. No alarm signals are generated with this configuration,
because these are provided by the transmitter module, which is not connected. Alerts are displayed only on
the LCD screen.
2. Connect the three-wire cable with JR connector directly to the Ext. socket on the Duplex receiver. In this
configuration the sensor is powered via the receiver. Switching on the transmitter and receiver allows the
sensor to be configured appropriately for your power system and alarm settings to be defined.
-2-
Page 3

Sensor MULi6s EX
3. Connect the three-wire cable with JR connector to the Jeti Duplex Expander module and ensure that the
Expander module is connected to the Duplex receiver. In this configuration the sensor is powered through
the expander, which is powered through the receiver. Switching on the transmitter and receiver allows the
sensor to be configured appropriately for your power system and alarm settings to be defined.
Firmware Update
The equipment firmware may be updated by a PC via the converter unit JETI USB Adapter. In the USB
Adapter instructions you will find a description of the installation procedure of the USB Adapter controller as
well as the update program.
Warranty
This product has a warranty for a period of 24 months from the date of sale under the provision that there is
no physical damage and that the unit has been used in accordance with the operating instructions.
Customer service during the warranty period and therafter is carried out by the manufacturer.
The manufacturer hopes you enjoy these products: Jeti Model S.R.O Pribor, www.jetimodel.cz
-3-
Page 4

Sensor MULi6s EX
Menu navigation via the Jeti Box for MULi6s
-4-
 Loading...