

Page 1
User’s Manual
ver. 1.0 EN
Page 2

2
iAUDIO T2
3
iAUDIO T2
Thanks for purchasing COWON.
We always strive for your complete satisfaction of our product. This manual contains user guide, cautions and other
useful information about your COWON player. Please read this manual thoroughly before using, to take full advantage
of features in your COWON player.
Legal Notice
• COWON is a registered trademark of COWON SYSTEMS, INC.
• This product is intended for personal use only and may not be used for any commercial purpose without the written
consent of COWN SYSTEMS, INC.
• Information in this document is copyrighted by COWON SYSTEMS, INC. and no part of this manual may be reproduced
or distributed without the written permission of COWN SYSTEMS, INC.
• The software described in this document including JetShell and JetAudio are copyrighted by COWON SYSTEMS, INC.
• JetShell and JetAudio may only be used in accordance with the terms of license agreement and cannot be used for any
other purposes.
• The media conversion feature in JetShell and jetAudio may only be used for personal use only. Use of this feature for any
other purposes may be considered a violation of the international copyright law.
• COWON SYSTEMS, INC. complies with the laws and regulations related to records, videos and games. Complying with
all other laws and regulations regarding consumer use of such media is the responsibility of the users.
• Information in this manual including contents of product features and specifications is subject to change without notice as
updates may be made.
• This product has been produced under the license of BBE Sound, Inc. (USP4638258, 5510752 and 5736897). BBE and
the BBE symbol are the registered trademarks of BBE Sound, Inc.
On-line registration and support
• Users are strongly encouraged to complete customer registration at http://www.iAUDIO.com. After filling out our customer
registration form using the CD-Key and serial numbers, you can receive various benefits offered only to official members.
• 1:1 online support, news updates for new products or special events, and other services are available for our registered
customers.
• Each CD-key is unique and will not be re-issued in case of loss.
• Further information regarding the product can be found on the web: http://www.iAUDIO.com
• Users will be able to find the latest information for other COWON products and download the latest updates for firmware
and software.
• Frequently Asked Questions and Answers can be found on the website.
Before Using Your iAUDIO T2
All rights reserved by COWON SYSTEMS, Inc. 2006
Page 3

4
iAUDIO T2
5
iAUDIO T2
iAUDIO T2
Safety Tips
1)Introducing iAUDIO T2
1.1 iAUDIO T2 at a Glance
1.2 Package Contents
1.3 Features and Specifications
1.4 Identifying the Parts
1.5 Description of OLED Display
1.6 Charging iAUDIO T2
1.7 Windows 98 Driver Installation
1.8 Connecting to PC and Transferring Files
1.9 Firmware Upgrade
2)Using iAUDIO T2
2.2 Quick Start Guide
2.2 Basic Controls
3)Using Advanced Features
3.1 Playing Audio Files
3.2 Using FM Radio
3.3 Recording Using Built-In Microphone
21
23
6
7
4)Using Advanced Settings
4.1 Settings Menu List
4.2 Menu Screen
4.3 JetEffect
4.4 Play Mode
4.5 Display
4.6 Timer
4.7 General
4.8 Recording
4.9 FM Radio
4.10 Information
5)Additional Information
5.1 Resetting the Player to Factory Default Settings
5.2 Installation CD Contents
5.3 JetShell Software
Troubleshooting
Table of ContentsTable of Contents
29
37
50
Page 4

6
iAUDIO T2
7
iAUDIO T2
Safety Tips
• Do not use this product for any purpose other than described in this document
• Use caution opening the contents of the package to avoid injuries
• Avoid any exposure to extreme moisture. Damage from moisture constitutes user’s negligence and will not be
covered by manufacturer’s warranty.
• Disassembling or modifying the device will void any warranty.
• Make sure the USB connection is made correctly to avoid any damage to the device or the PC. Avoid extreme
bending or pressuring the connection.
• Avoid any excessive force or impact. If there is an unusual odor such as burning smell or excessive heating dur-
ing use, stop using the device immediately and contact us through www.iAUDIO.com
• Do not use the player with wet hands as it may cause damage and malfunctions.
• Do not listen to the player at excessively high volume for long period of time.
• Avoid using the player at a location where static electricity is frequent
• Before any repair service, you should back up all data from the player. COWON SYSTEMS, INC. shall not be
liable for any loss of data or files during the repair.
• Only use the AC adapter and USB cable provided by COWON SYSTEMS, INC.
• During lightning or thunderstorms, disconnect the player from the PC or AC adapter to avoid a risk of power surge
or fire hazard.
• Store the player away from direct sunlight, excessive heat, fire and extreme cold environments. Excessive
temperature can damage the exterior, interior circuits or the display.
• When using the player as a portable storage device, important data should be backed up as frequently possible.
COWON SYSTEMS, INC. shall not be responsible for any unexpected data loss.
• Price of the player may fluctuate depending on the market condition, COWON SYSTEMS, INC. shall not com-
pensate for any loss caused by price fluctuation.
Introducing iAUDIO T2
1.1 iAUDIO T2 at a Glance
iAUDIO T2 is a unique multimedia player developed and manufactured by COWON SYSTEMS, Inc. It is a
portable ultra-compact digital audio device that plays audio files such as MP3. iAUDIO T2 also offers FM radio
listening/recording, and voice recording through a built-in microphone.
Highly portable, stylish and super-slim design with a neck strap
iAUDIO T2’s ultra-slim size of 1.1 X 2.1 X 0.5 inches(earphone module excluded) provides portability and
convenience.
12 hours of continuous playback with the embedded lithium polymer battery
The ultra power-saving circuit of iAUDIO T2 enables up to 12 hours of continuous playback with a fully charged
battery. (Based on company test results.)
Multiple audio file format support
It supports various popular digital audio formats including MP3, OGG, WMA, WAV and FLAC (Free Lossless
Audio Codec).
Powerful sound output of 46mW
When used with earphones of 16 ohm impedance, the maximum total sound output can reach up to 46mW for
two channels ( 23mW +23mW) producing powerful and yet smooth sound qualities
Voice recording
Voice recording is available using the built-in microphone. This feature is particularly convenient for recording
meetings or lectures.
Listening/recording of FM broadcasts
You can listen to FM radio broadcasts and record them at the same time. You can also save Preset channels for
easy selection of your favorite FM radio stations.
Wide and vivid color OLED display
With 0.9 inch and 65,000 color OLED (Organic Light Emitting Diode), you can conveniently check the operational status of iAUDIO T2. It also supports multiple languages with display capability for over 40,000 different
letters with embedded international fonts.
Page 5

8
iAUDIO T2
9
iAUDIO T2
Introducing iAUDIO T2
World’s most powerful sound effects
iAUDIO T2 provides the most unique, powerful and high quality sound, which is recognized worldwide. Youcan
take advantage of the following sound effects to suit your favorite music:
BBE: Sound effects that provide the clearest music.
Mach3Bass: A bass booster that enhances super low-end bass.
MP Enhance: Sound effects that compensate for missing sound segments in MP3s.
3D Surround: Three-dimensional surround sound effect.
Easily Upgradeable firmware
We may occasionally release firmware upgrades to incorporate improvements to the device and suggestions
that users provide to us. You can easily upgrade your iAUDIO T2 with the firmware download feature.
Convenient features for learning language
iAUDIO T2 provides useful features such as section repeat, section search, bookmarks and playback speed
controls. These convenient features are ideal for learning language
Timer function
T2 also offers convenience of internal timer function with alarm and timed recording.
Portable storage device
iAUDIO T2 is immediately recognized by a PC as a removable drive as soon as it is connected to a PC through
a USB cable. No software installation is required to use it as a storage device.
JetAudio software
World famous integrated multimedia playback software, JetAudio Basic is included in your package.
Introducing iAUDIO T2
1.2. Package Contents
Quick Guide,
Installation CD (with Serial Number)
Earphone module with
integrated neck strap,
iAUDIO T2
USB Cable
- Charge product with the USB connection jack and cable.
- The images of the package components are for your reference only and may differ from the actual item.
AC Adapter (sold separately)Simple USB Connector
Page 6

10
iAUDIO T2
11
iAUDIO T2
Introducing iAUDIO T2
1.3. Features and Specifications
MP3, OGG, WMA,, ASF, FLAC, WAV, FM Radio listening and recording, and voice recording
High Capacity Internal Flash Memory (512MB/1GB/2GB), File Copy/Delete Capability
High-Speed USB 2.0 Interface
0.9 inch OLED display with 96x96 resolution and 65K colors.
Long Contiunous Playback Time: Up to 12hours (Based on company test result. Play time may be shortened if OLED is
used often.)
Multi-language support
Enhanced Integrated file navigator
Play/Pause during Playback, Record/Pause during Recording
Next Track/Previous Track, Fast Forward/Fast Rewind, Infinite Loop
Resume, Fade In, Auto Play feature support
Search Speed, Skip Speed Setting
Digital Volume Control :40 levels
Various EQ and Sound Effects (JetEffect)
- User adjustable 5-band EQ
- Normal, Rock, Pop, Jazz, Classic, Vocal, User
- BBE, Mach3Bass, MP Enhance, 3D Surround Support
Clock, Alarm, Scheduled Recording, Sleep Timer, Auto Power-Off
Auto display off feature to save battery power and screen burnout
Easy firmware download and upgrade
Title Display with ID3Tag or File Name
Display Product Info (Firmware version, Total capacity, Total usage)
USB Data Transfer Support for MAC OS (9.X, 10.X) and Linux (v2.2 and higher)
Software
- JetShell (File Transfer, MP3/WAV/WMA/AUDIO CD Playback)
- JetAudio Basic (Integrated multimedia player software, music conversion feature)
Supported
File Formats
USB Interface
File Transfer Rate
Power Supply
Charging Time
Output Frequency
Dimension
MP3 : MPEG 1/2/2.5 Layer 3, ~320kbps, ~48khz, mono/stereo
WMA : ~256kbps, ~48khz, mono/stereo
OGG : ~q10, ~44.1khz, mono/stereo
FLAC : compression level 0 ~ 8, ~44.1khz, mono/stereo
WAV : ~48khz, 16bit, mono/stereo
Memory
512MB/1GB/2GB
High Speed USB 2.0
Max 35Mbps (Upload Max 40Mbps)
Built-in Rechargeable Lithium Polymer battery(Max. 12 hours of continuous playback based on company test)
About 2 hours (either USB or Adapter)
Buttons
6 Buttons (REC, PLAY FF, VOL+, VOL-, MENU)
Display
0.9 inch 96x96 dots, 65,000 Color OLED
SNR
95dB (A-Weighted)
20Hz~20KHz
Output
16 Ohm earphones : 23mW + 23mW
iAUDIO T2: 1.14 X 2.07 X 0.53 inches (Width x Length x Thickness)
Earphone Module: 0.69 X 0.66 X 0.63 inches (Width x Length x Thickness)
Weight
iAUDIO T2: 0.86 Oz. (including lithium polymer battery)
Earphone Module: 0.23 oz.
Introducing iAUDIO T2
Page 7
12
iAUDIO T2
13
iAUDIO T2
Introducing iAUDIO T2
Introducing iAUDIO T2
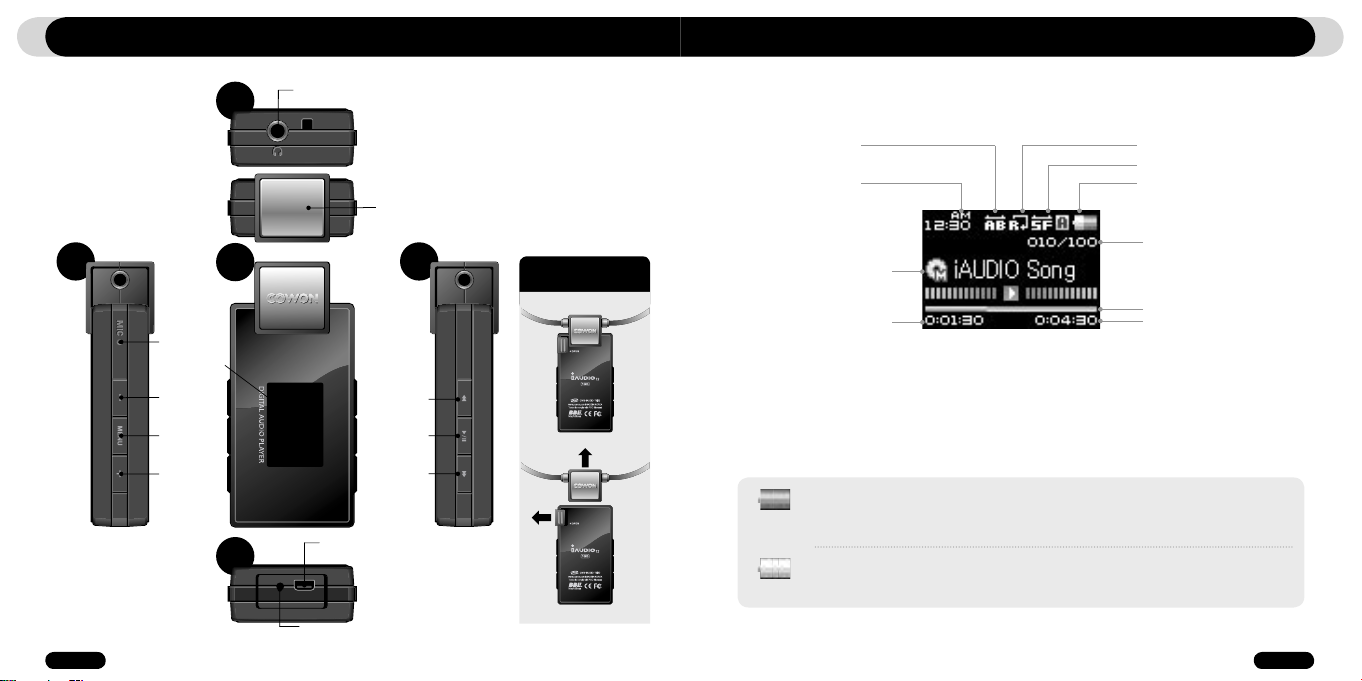
1.4. Identifying the Parts
Top
Left
MIC
- (VOL -)
MENU
+ (VOL +)
Front
r OLED
Colo
Display
Bottom
Earphone Jack
USB Connection
Jack
Reset
Earphone module
with integrated neck strap
Right
◀◀ (REW)
PLAY/STOP
▶▶ (FF)
To remove the earphone
module
2
1
1.5. OLED Display
Section Repeat
Current Time
Song Title
Play Time
The battery status icon indicates how much battery is left. The number of segments in the icon decreases
as the battery discharges. For some batteries or rechargeable batteries, the number of segments in the
battery icon may increase or decrease irregularly when the remaining charge is being measured. This
is normal.
When the battery runs out, the battery icon starts to blink. If this happens, the player will automatically
power off after about 30 minutes.
Boundary
Play Mode
Battery Status
Current Track
/ Total Tracks
Progress Bar
Total Time
Page 8

14
iAUDIO T2
15
iAUDIO T2
Introducing iAUDIO T2 Introducing iAUDIO T2
1.6. Charging iAUDIO T2
• If your player is being used for the first time or if it has not been charged for a long time, make sure player is charged
fully before using it
• To charge iAUDIO T2, connect the player to a PC using a USB cable or connect to the AC provided adapter only.
(b) Using an AC adapter (sold separately)
(a) Using a PC connection
i. Connect the AC adapter to an electrical outlet and the USB jack of the player
ii. Once connected, the player will automatically turn on and start charging
iii. Once the player is fully charged, the charge complete screen will appear as shown.
i. Connect the supplied USB cable to the USB jack of the player and directly to your computer. The connection
to an external USB hub is not supported. The player must be directly connected to the PC via a USB cable.
ii. If the connection is made properly, the player will display an image showing charging status.
iii. To check the charging status, run ‘Safely Remove Hardware’ wizard on your PC. Then iAUDIO T2 will display
charging status on its screen.
iv. Slow charging is recommended for notebooks and other devices that use battery power. See section 4.7 on
changing the charging speed of iAUDIO
- Genuine COWON AC adapter is sold separately and works for both 110V and 220V.
- For your safety, use only the adapter supplied by the manufacturer.
Page 9
16
iAUDIO T2
17
iAUDIO T2
Introducing iAUDIO T2 Introducing iAUDIO T2
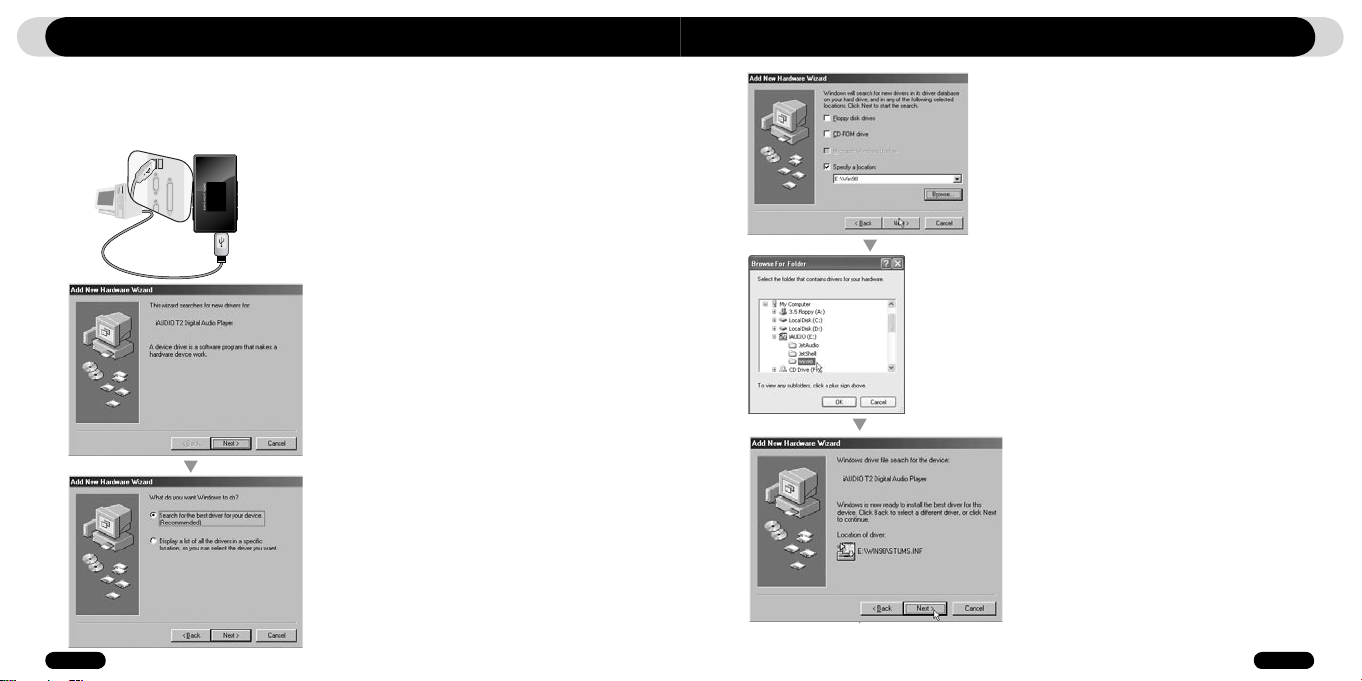
1.7. Windows 98 Driver Setup
When using Windows 98 or 98 SE, you need to install hardware driver for the PC to recognize the player.
•Windows 2000 and later versions automatically recognize the player.
■
Installing the driver
1. Connect the player to your PC using the supplied USB cable
2. “Add New Hardware Wizard” will appear as shown. Click “Next”.
3. Click “Search for the best driver for your device (Recommended)”, and
then click “Next”
4. Click “Specify a location” and click “Browse” button.
5. Select “Win98” folder in the installation CD and then click “Next” button.
Drivers are also available for download from www.iAUDIO.com.
6. Once the drivers are recognized, click “Next”.
Page 10

18
iAUDIO T2
19
iAUDIO T2
Introducing iAUDIO T2 Introducing iAUDIO T2
7. Continue to click “Next”
8. Click the “Finish” button to complete the driver installation. The
newly added drive can be seen in Device Manager or Explorer.
1.8. Connecting to PC and Transferring Files
1. Connect the player to a PC using the supplied USB cable.
4. Launch Windows explorer or JetShell Pro while iAUDIO T2 is connected to the computer to access the iAUDIO drive.
5. You can copy any files including MP 3files to and from “iAUDIO” Drive
6. To disconnect the player from the PC, first make sure that file transfers are complete and then, single-click on icon
on the windows tray.
7. Click on the following pop-up message when it appears
8. When “Safely Remove Hardware” message appears, and the OLED displays a battery you may disconnect the USB
cable.
- The iAUDIO T2 can recognize up to 100 folders and 999 files.
- If iAUDIO drive does not appear in either My Computer or Windows Explorer, check the connection and settings, and then reconnect (Separate driver installation is required for Windows 98).
- If the USB cable is connected after running ‘Safely Remove Hardware’ wizard from the steps listed above, the player stays in the
battery-charging mode. To access its memory, iAUDIO must be disconnected first and reconnected.
- If the device is connected through a USB HUB, the device won’t be charged. The device must be connected directly to a USB
port installed on a PC.
- In Windows 98 and 98 SE, the icon for “Safely Remove Hardware” may not appear. Instead, close the JetShell after file transfers
have been completed, after which the player can be disconnected safely from the PC.
- If the following message appears, run Safely Remove Hardware after a few minutes.
2. When connected, the screen will
show the following screen.
3. The iAUDIO drive will appear as
shown and can be accessed like a
disk drive using Windows Explorer
Page 11

20
iAUDIO T2
21
iAUDIO T2
Introducing iAUDIO T2
Using iAUDIO T2
1.9. Firmware Upgrade
Firmware is a program embedded in the hardware. By upgrading firmware, features of the product can be enhanced and
any bugs be fixed. Performance and menus may change after a firmware upgrade. Some beta versions of firmware may
contain program bugs that will be fixed in the later versions.
You can find the current firmware version of your player by selecting Settings-Information.
Upon upgrading the firmware, any data stored in the player may be lost, so it is recommended that data be backed up before
upgrading the firmware.
The method of installing firmware may vary with each version. Be sure to check out further information regarding firmware on
our website:www.iAUDIO.com.
2.1. Quick Start Guide
1. Connect the earphone/neckstrap module to the player
2. Press the button to turn on the player,
3. After the splash screen and logo is displayed, the standby screen appears. (It may start playback if automatic play is
selected in Settings.)
4. Press the button to play or pause music
5. Pressing the buttons allows selection of previous and next tracks as well as fast forward and rewind the
current track.
6. To turn off the player, press the button and hold it until shutdown starts.
2.2. Basic Controls
iAUDIO T2 has 3 operation modes (Music, FM Radio, Record), in addition to File Navigation and Settings modes.
Pressing button switches to File Navigation mode, Pressing button twice switches to a screen for mode selection.
In the File Navigation mode, use and buttons to navigate between folders and files, and use
buttons for selecting folders and files. To change the values for items in Settings mode, press or buttons and
selected values are applied immediately. To cancel a task in mode selection screen or in Settings mode and return to the standby
screen, press button.
Page 12

22
iAUDIO T2
23
iAUDIO T2
Using iAUDIO T2
Using Advanced Features
File Navigator Mode
Move Up in folders Cancel Move to left Escape the currently
Enter a folder
Play a file
Open a folder Move to the left Select an Item or a folder
Move the cursor up Move the cursor up Move to the left Move cursor up
Switch to Mode Selection Screen
Opens popup
Move the cursor down Move the cursor down Move to the right Move cursor down
-If the player is in Music mode, File navigation mode appears. In FM radio mode, Frequency Preset mode appears.
Preset Search Mode Mode Selection Screen
Open a Pop-Up
Select a Pop-up
Switch to Mode Selection Screen
Select the mode Select an item and apply
Switch to the initial mode Cancel the current value
Settings Mode
selected item
highlighted value
Reduce the value
Return to initial mode
Reduce the value
3.1. Playing Audio Files
■ Playing Audio
1. After turning on the power, change the player mode to either Music
2. Press the button to play music files.
3. Press the button during playback to pause the media files
4. Press the buttons briefly to play previous or next tracks
5. During the playback, press the buttons to rewind or fast-forward the current track.
- If Auto play is enabled in the Settings menu, the player starts the playback upon power on.
- If Resume is enabled in the Settings menu, iAUDIO will resume automatically playback from the position where it was previously
turned off.
- If a large number of files are stored in the player, it may take the player longer time to respond
- The player can recognize maximum number of 999 media files and 100 folders (This limit refers to playable music and does not
include other file types)
■ Using Section Repeat
AB Repeat
Press Long
Page 13

24
iAUDIO T2
25
iAUDIO T2
Using Advanced Features Using Advanced Features
Section Repeat allows you to set a specific part of a track to play repeatedly.
■
Adding tracks to BookMark
1. During a music playback, press and hold the button to initiate a pop-up screen.
2. At the start and end of the section to repeat, press button once. An will appear on the screen and
the selected section of music will repeat.
3. To cancel Section Repeat, touch the button again.
- Minimum 1 second is required for section repeat to work.
- Section repeat function will be cancelled if another track is selected.
■ Using Dynamic Playlist (DPL) and Bookmarks
■
Removing tracks from BookMark
Press Long
Bookmark
iAUDIO song
Bookmark
Bookmark
iAUDIO song
Remove
This function lets you edit a list of favorite music files. By using DPL user can access music files in various folders
without navigating each folder. The bookmark function allows users to set where to start playing in each desired
Press Long
track.
1. To add a track while playback,to DPL or bookmarks, press and hold the button to open a pop-up window.
Then select the “Add DPL” or “Bookmark” from the pop-up menu.
■
Adding tracks to DPL
2. To remove a track from DPL or Bookmark, select the file under DPL or Bookmark folder. Then press and hold
the button to open a pop-up window. And then select the “Remove” from the pop-up menu.
3. To remove all tracks from DPL or Bookmark,” select DPL or Bookmark folder. Then press and hold the
button to open a pop-up window. And then select the “Remove All” from the pop-up menu.
■
Removing tracks from DPL
Dynamic Play
iAUDIO song
Press Long
Press Long
Add to
Dynamic Play
iAUDIO song
Remove
- A track can be added to DPL in navigator, alternatively by opening a popup and selecting “Add to DPL”
- “Dynamic Play List” and “Bookmark” folder do not appear when connected to PC.
- When tracks are removed from the DPL or Bookmarks, only the link will be removed and the actual files are not deleted from the disk.
- If the actual file is deleted from the player, its entry is automatically removed from the DPL.
- Maximum 200 files can be added to DPL or Bookmark
Page 14

26
iAUDIO T2
27
iAUDIO T2
3.2. Using FM Radio
■ Listening to FM Radio
6. In FM Radio tuning mode, pressing button switches to PRESET scanning mode and “PRESET” appears
on the screen.
7. Pressing button in the PRESET scanning mode returns to FM tuning mode. The “PRESET” will disappear
-If there are no frequencies in Preset mode, the tuning frequency will not change.
-Up to 24 frequencies can be stored in Preset Channels.
Using Advanced FeaturesUsing Advanced Features
1. Turn on the player and then select the FM Radio mode.
2. Press buttons briefly to change the tuning frequency at 0.1Mhz step
3. Press and hold buttons scan for the nearest FM radio station with good reception
- If you were listening to FM Radio before turning off the player, the player will automatically start with the FM Radio when turned on.
- Earphone wire works as an antenna for FM Radio signals and thus improves the quality of reception when straightened.
■ Setting and Using Preset Channels
Setting preset channels to favorite stations avoids manual scanning through all frequencies.
Preset List
01 91.90Mhz
02 107.70Mhz
03 None
1. After the player is turned on, select the FM Radio mode.
2. Tune to the favorite station and press button to change to a PRESET list.
3. Press +, - buttons to highlight the desired preset channel and then press and hold button to open a
pop-up window.
4. Select “Save Current Ch” to add the currently selected frequency to the PRESET list.
5. Listen to the preset channels by selecting “Listen Ch” or delete preset channels by selecting “Delete Ch”
Preset List
01 91.90Mhz
Save Current Ch
02 107.70Mhz
03 None
■ Recording FM Radio
Press Long
1. After the player is turned on, select the FM Radio mode.
2. Set the tuning frequency to the desired radio station.
3. Press and hold button to start recording.
4. Press button again to stop recording.
■ Scheduled Recording of FM Radio
Timer
Time setup
Wakeup mode
Wakeup Time
Timer
Time setup
Wakeup mode
Wakeup Time
Time setup
07 : 07 PM
2006 . 5 . 5
Wakeup
Music Alarm
FM Alarm
FM Record
Page 15

28
iAUDIO T2
29
iAUDIO T2
Using Advanced Features
1. Set the correct time on iAUDIO. Refer to section 4.6.
2. In the Settings / Timer menu, select the Wakeup Mode and set it to FM Recording
3. In the Settings / Timer menu, select the Wakeup Time and set it to desired time for recording.
4. The player will turn on automatically at the specified time and starts recording the FM Radio signal
- Recorded files are stored in “RECORD” folder
- During recording, battery consumption is higher than other playback operation.
- Sound quality and capacity of recordings may vary according to reception quality and recording settings. See the section 4.8 for
further information
3.3. Recording Using Built-In Microphone
■ Recording with Built-in Microphone
Press Long
1. Turn on the power using the “PLAY” button and switch to the Record mode by pressing button twice
and then choosing Record icon.
2. Press and hold button to start recording with the built-in microphone
During recording, press the button to pause or resume the recording.
3. Press button to end recording.
4. To play recorded files, press button and listen on the earphones
- Recorded files are stored in “VOICE” folder if recorded via built-in microphone.
- To use JetEffect, Fast-forward and rewinding capabilities, the recorded audio files should be played in Music mode.
- If the player was in Record mode before turning the player off, the player will start with the Record mode when turned on again.
- Sound quality and capacity of recordings may vary according to reception quality and recording settings. See the section 4.8 for
further information
Using Advanced Settings
4.1. Settings Menu List
Menu
JetEffect
Play Mode
Display
Timer
Music
FM Radio
Voice Rec.
Settings
Equalizer
BBE
Mach3Bass
MP Enhance
3D Surround
Pan
Play Speed
JetEffect Preset
Boundary
Repeat
Shuffle
Language
Title
Play Time
Title Scroll
Scrollspeed
Lyrics
Auto Display Off
Brightness
Screen Saver
Time Setup
Wakeup Mode
Wakeup Time
Sleep
Auto Off
General
Recording
FM Radio
Information
- Settings menu may change after a firmware upgrade.
- Display language in the Setting menu is described in section 4.5
- Settings menu operation is described in section 2.1- 2.2
Skip length
Scan speed
Slient Scan
Resume
Auto play
Fade in
Charge
Load Default
Voice bps
FM bps
Mic volume
Stereo
Auto Scan
Region
Page 16

30
iAUDIO T2
31
iAUDIO T2
Using Advanced Settings
4.2. Menu Screen
In this screen, you can select a Music, FM Radio, Recording or Settings mode.
3. JetEffect
1. Equalizer
●
Use the preset settings or manually set 5 Band Equalizers(EQ). Preset EQ settings include Normal, Rock,
Jazz, Classic, Pop, and Vocal. Each preset EQ can be edited to match user’s preference.
2. BBE
●
BBE is the sound effect that provides clear music
3. Mach3Bass
●
Mach3Bass is the base booster that enhances super low-end bass.
4. MP Enhance
●
MP Enhance: Sound effect that compensate for missing sound segments
5. 3D Surround
●
3D Surround provides three dimensional sound effects.
6. Pan
●
Pan adjusts the left and right volume balance.
7. Play Speed
●
Controls the speed of music playback
●
It does not support for files with sampling rate less than 44kHz
8. JetEffect Preset
●
To save current JetEffect settings or load the previous settings, press and hold button to open pop-up
window and select SAVE or LOAD.
- Excessive JetEffect settings may strain sound and generate noise
- For further information regarding JetEffect, refer to BBE MP at our website: www.iAUDIO.com
Using Advanced Settings
4.4. Play Mode
1. Boundary
●
This function sets the various ranges of files and folders.
●
Boundary function is not available for recorded MP3 files.
• All: Plays all tracks in all folders
• Single: Plays only one track.
• Folder: Plays files in the current folder
• Subfolder: Plays files in the current folder including its subfolders.
●
If tracks in DPL or Bookmark are played, boundary will automatically be set to the list. When a track in a
general folder is played while tracks in DPL or Bookmark are being played, it automatically changes to normal
boundary settings.
2. Repeat
●
Within the range specified in the boundary, repeat playback can be set.
3. Shuffle
●
Within the range specified in Boundary, random playback can be set.
●
If enabled, files within the range are randomly played.
Page 17

32
iAUDIO T2
33
iAUDIO T2
Using Advanced Settings
4.5. Display
1. Language
●
Set the display language to use in iAUDIO T2.
2. Title
●
Sets how the player displays file names on the screen.
●
Choose ID3 tag to display tag information (artist, title) while playback.
3. Play Time
●
Sets how it displays time information of current file.
●
Play time shows elapsed playback time and Remaining shows the remaining playback time.
4. Title Scroll
●
Sets how it scrolls titles displayed on the screen.
●
If set to OFF, scrolling will be disabled and if set to One Way, text will scroll starting from the left side.
5. Scrollspeed
●
Sets the scrolling speed for text displayed on the screen.
●
Larger the number, faster the scrolling speed.
6. Lyrics
●
iAUDIO can display lyrics of music files that contain lyric information.
●
When enabled, lyrics of the music file being played is displayed on the screen.
●
Music files without lyrics will not display lyrics even if this feature enabled.
●
For more information on using lyrics, see LDB manager Guide at our website (www.iAUDIO.com).
7. Auto Display Off
●
Sets how long the screen stays on before it turns off.
●
If there is no operation for a specified period of time, the screen will automatically turn off.
8. Brightness
●
Sets the screen brightness
9. Screen Saver
●
By default Screen Saver is on
●
More power is consumed when screen saver is running.
Using Advanced Settings
4.6. Timer
1. Time Setup
●
Sets the current time
●
Sets the correct time setting for alarm and scheduled recording.
2. Wakeup Mode
●
Automatically turns on the player at the specified wakeup time.
●
Music Alarm plays music and for FM Alarm settings, the last station to be listened to will run in Radio mode.
●
For FM recording, it records the last radio frequency from the preset time during the specified time.
- FM Scheduled Recording uses more power than other features. Always make sure that the player is fully charged before using
this feature.
3. Wakeup Time
●
Sets the time to automatically turn the player on.
●
Once sets the alarm for one time use, Daily sets the alarm for daily use.
●
Duration is the period of time during which the alarm will stay on.
4. Sleep
●
Automatically turns off the power after a specified time.
●
After the preset time has passed, the player will automatically turn off even if a file is being played at the time.
5. Auto off
●
When the player is stopped and no action is taken after a specified time has elapsed, this feature will automati-
cally turn off the player.
●
This function does not operate during playback.
Page 18

34
iAUDIO T2
35
iAUDIO T2
Using Advanced Settings
4.7. General
1. Skip Length
●
Sets the length of playback time skipped when the buttons are pressed shortly.
2. Scan Speed
●
Sets the speed of Fast Forward/Rewind when the buttons are pressed and held.
●
The faster the speed, the quicker scanning is possible.
3. Silent Scan
●
Sets the sound during Fast Forward/Rewind operation. When selected, there is no sound during scanning.
4. Resume
●
Saves the location of the music file played at the last power off.
●
If enabled, when the player is turned on, it automatically plays from the last position where it was turned off.
5. Auto play
●
Automatically plays files after the player is turned on.
●
When enabled, the track last played will automatically start.
●
When Resume is enabled, the player automatically plays from the last position.
6. Fade in
●
Gradually increases volume when resuming playback after stop or pause.
●
Sets how long it takes to increase the volume.
7. Charge
●
Can choose charge mode On/Off.
8. Load Default
●
Resets all the settings to default values except language setting.
Using Advanced Settings
4.8. Recording
1. Voice bps
●
Sets the audio quality of the file recorded with the built-in microphone.
●
Files recording through the microphone are set to Mono by default.
●
The higher Kbps, the better the recording quality is, but file size also becomes larger.
2. FM bps
●
Sets the quality of the file being recorded during FM Radio listening.
●
Also sets the quality of scheduled FM recording file.
●
The higher Kbps, the better the recording quality is, but file size also becomes larger.
3. Mic Volume
Page 19

36
iAUDIO T2
37
iAUDIO T2
Using Advanced Settings
4.9. FM Radio
1. Stereo
●
Select from Stereo and Mono when listening to FM Radio.
●
Radio broadcasts that only support Mono will not support the Stereo feature.
2. Auto Scan
●
Automatically scans for FM frequency channels and sets to preset channels.
3. Region
●
Selects the country in which you are listening to FM radio
4.10. Information
●
Version : The current version of Firmware
●
Total Space : Total memory capacity
●
Free Space : Currently available memory capacity
Additional Information
5.1. Resetting the Player to Factory Default Settings
iAUDIO T2’s settings can be deleted and re-initialized to Factory default settings.
1. After the player is turned on, select the Music mode.
2. If a music file plays, pause at the playback screen and do as shown below.
Press Long Press Long
3. When, initialized, the Language setting screen will appear when the player is turned on.
Country Selection
USA
한국
日本
- If the player operates improperly, press the “RESET” button at the bottom of the player and then restart the player. If malfunction
continues, please initialize the player to Factory Default setting.
Page 20

38
iAUDIO T2
39
iAUDIO T2
Additional Information What is JetShell?
5.2. Installation CD-ROM Contents
Inside iAUDIO Installation CD, you will find JetAudio, the world famous multimedia playback software, and
JetShell, a manager program for iAUDIO. (Additional driver files for Windows 98 and 98 SE are also included)
What is JetShell?
JetShell is the iAUDIO manager program providing the following features:
• Downloading/Uploading files from/to iAUDIO.
• File management similar to Windows Explorer
• Playing MP3, MP2, WAV, WMA, ASF, Audio CD, and Playlist (m3u)
• Copying (ripping) MP3 files from Audio CD
• Converting between WAV/MP3/WMA
• Changing bitrate of MP3 files
• Convenient file transfer using Download List
• A wide selection of spectrums, equalizers, and sound effects
• Editing ID3 tags
• Downloading iAUDIO logo
• Formatting the flash memory
Running Environment for JetShell
• Pentium 200 Mhz or higher
• 32 MB or more memory
• 20 MB or more hard disk space
• 256 Color or higher display
• Windows 98/ME/2000/XP (NT is not supported)
• USB Port 1.1 or higher
• CD-ROM drive
• Sound Card, Speaker or Headphone
Page 21

40
iAUDIO T2
41
iAUDIO T2
Connecting iAUDIO and Installing JetShell
Introducing JetShell
1. When you insert iAUDIO installation CD in the CD-ROM drive, the installation program starts
automatically. It may not start automatically depending on the settings of Windows. In this case, run
x:\setup.exe or x:\JetShell\setup.exe. (where x is the letter of your CD-ROM drive)
2. When the installation finishes, Start -> Program -> COWON -> iAUDIO T2 program group is
created.
3. You are now ready to connect iAUDIO to PC (Don’t run JetShell at this time).
Connect the USB ports of iAUDIO to your PC using the provided USB cable.
(We recommend to connect iAUDIO to the PC directly, not using USB hub)
4. As soon as the cabe is connected, the message “Found New Hardware” appears and the USB
driver for iAUDIO is installed automatically. The driver installation message may not appear on the
screen depending on the status of Windows. To make sure that the installation was completed normally, check for the device “iAUDIO” in My Computer as shown below, or “Control Panel -> System
-> Hardware -> Device Manager”.
5. Now you can transfer files by using JetShell or Window Explorer.
The Whole View
Play and MP3
Management
Section
File
Management
Section
Flash Memory
Management
Section
When JetShell is running, it controls the iAUDIO. Make sure to exit JetShell before performing the following tasks:
• Installing iAUDIO's USB driver
• Formatting iAUDIO in Windows Explorer
• Upgrading iAUDIO's firmware
File Management
Window
Download List
Management
Section
Page 22

42
iAUDIO T2
43
iAUDIO T2
Introducing JetShell
Introducing JetShell
Player Section
Double click an MP3, MP2, WAV, WMA, ASF, Audio CD track, or Playlist (m3u) file in the "File Management Window", or drag and drop files on the "Player Window" shown above. You can also select
multiple files and then press the Play button. On the black screen in the middle, various information of
current file is displayed, and two types of spectrum screens appear.
You can start and stop playing the file with the buttons at the right, and adjust the volume with the +
and - buttons. To skip instantly to a specific position of the track being played, click on the position
bar.
File Management Section
The File Management Section of JetShell looks just like Windows Explorer. The left window shows
folders, disks, and CD-ROM drives in a tree structure, and the right window shows the files in current
folder.
Flash Memory Management Section
The bottom part of JetShell consists of "Flash Memory Management Window" and "Download List
Window". When iAUDIO is working normally, the red lamp is turned on with the message "iAUDIO is
working" as shown in the figure. The files in iAUDIO displayed in the middle window. The "Memory
used" bar shown at the bottom right indicates the used memory size of the total flash memory of
iAUDIO. If this bar is almost full, it means that there is almost no free space available in iAUDIO.
Button Function Explanation
Up Move to the upper folder.
Properties Display the properties of the selected file.
Refresh Refresh the contents of flash memory.
Delete Delete the selected file or folder.
New folder Create a new folder.
Cut Cut the selected file or folder.
Copy Copy the selected file or folder.
Paste Paste the cut or copied file.
Transfer to Flash Memory Transfer the selected files or folder from PC to iAUDIO.
Transfer to PC Transfer the selected files or folder from iAUDIO to PC.
Page 23

44
iAUDIO T2
45
iAUDIO T2
Introducing JetShell Downloading Music files to iAUDIO
JetShell displays visually cool spectrums. When you click on the spectrum display area, the screen
changes as follows.
You can also enjoy various equalizers and sound effects.
Various Equalizers
Various Sound Effects
Downloading Music files to iAUDIO
If you want to download secure WMA files (WMA files from online music store) to iAUDIO,
please refer to “Downloading
secure WMA files to iAUDIO”. JetShell does not support downloading secure WMA files.
You can use Windows Explorer or other file management programs to download music files to iAUDIO.
1. Downloading music files to iAUDIO is very simple.
Select files to download from the "File Management
Window" and click down arrow.
2. Or you can also drag and drop the selected files from
the "File Management Window" to the "Flash Memory
Management Window".
3.The following window shows the file downloading
process. Never disconnect the USB cable while
downloading.
Make sure that the LCD status is READY before
disconnecting USB cable.
Page 24

46
iAUDIO T2
47
iAUDIO T2
Downloading Music files to iAUDIO
Converting Audio CD Tracks to MP3 Files and Downloading Them to iAUDIO
4. Another method is to put the files in the "Download List Window" first, and transfer them later.
This is useful when you wish to download files in different folders.
5. You can also download the files existing outside of JetShell by dragging and dropping them onto
the "Flash Memory Window".
Converting Audio CD Tracks to MP3 Files and
Downloading Them to iAUDIO
With JetShell, you can easily convert your Audio CD into MP3 files and download them to iAUDIO.
1. Before getting started, you must choose the quality of the MP3 files to create. Click [Setup] –[MP3
Encoder Option] to set the desired bitrate of the MP3 files. (The files compressed in a high bitrate
have a higher sound quality and a bigger file size.)
Page 25

48
iAUDIO T2
49
iAUDIO T2
Converting Audio CD Tracks to MP3 Files and Downloading Them to iAUDIO
Other Features
2. From the File Management section, select the CD-ROM drive in which the Audio CD is inserted.
Select the audio tracks from the right window and click or [File] –[Convert CD to MP3]
from the menu.
3. Specify the path to save the MP3 files in. Choose a folder in iAUDIO to directly download MP3 files
onto iAUDIO.
3. Editing ID3 Tag
You can edit the ID3 tag of a MP3 file by selecting [Tools] – [Edit MP3 ID3 Tag] from the JetShell menu.
4. Downloading Logo File
You can download a logo file to change the logo screen that appears when iAUDIO powers on.
Select [Download Logo File] from the menu. When the "Open" window appears, select the desired
logo file and click Open. Then the logo file is downloaded and applied.
Page 26

50
iAUDIO T2
51
iAUDIO T2
Troubleshooting
Q
I am still confused even after reading the manual.
&
Our website www.iAUDIO.com provides support for users of iAUDIO products with FAQ (Frequently Asked
A
Questions) and beginner’s guide for our products. Users are strongly encouraged to check out our website for
further information regarding product usages and software upgrades and patches.
For individual inquiries, please contact us on-line as we will try to help you best we can.
Q
I cannot turn on the player.
&
Charge the battery fully in case the battery charge has been drained. If the battery is weak it may take a few
A
seconds to power on. If the player does not respond at all, first disconnect all USB and power cables, and
then press the RESET button located at the bottom of the player. RESET button simply powers off the player
and does not affect the player in any other way.
Q
Buttons do not respond.
&
Check if the power switch is set to HOLD
A
Q
The player is on but there is no sound.
&
Check if the volume is set to 0
A
Check if the player has any music file stored in its disk. Damaged music files may not play or play improperly.
Check the connection of the earphones to the iAUDIO. Loose or blocked connection can cause inadequate
contact between earphone jack and the iAUDIO.
Q
Video won’t play.
&
iAUDIO T2 does not support video
A
Q
FM Radio does not work.
&
iAUDIO does not have a separate antenna. Instead it uses earphone wire to receive FM Radio signals.
A
Stretching the wires may enhance the reception quality. FM radio reception may be poor at locations where
FM radio transmissions are shielded. If FM radio does not work where reception should be possible, please
contact our service center (Note that reception quality of iAUDIO may differ from other FM radio receivers.)
Q
There is too much noise in my recordings.
&
iAUDIO T2 uses ultra-small embedded microphone, so it may be more susceptible to noise during record-
A
ings.
Q
Characters on the display are corrupted.
&
Reset the language using Settings-Display-Language menu and set display format to File name using Set-
A
tings-Display-Title menu.
If the problem continues, reset the player to its Factory Default setting. Some special fonts may not display
perfectly.
Q
Computer cannot recognize the player when connected.
&
When connecting to the PC with a USB cable, please turn the player on before connecting USB cable. If it is
A
still not recognized by the PC, press RESET button next to the USB jack on the bottom of the player.
Connection to an external USB Hub may not be stable due to its low power. iAUDIO should be connected
directly to a PC’s USB port.
iAUDIO may require additional driver installation for Windows 98 users. See section 1.7
Q
Player is not recognized by JetShell and “No iAUDIO found” message appears.
&
Check to see if the player is recognized in Windows Explorer when it is properly connected to PC. iAUDIO
A
must be recognized in the Windows for it to work with JetShell.
Additional driver installation is required for Windows 98 and 98 SE users. See section 1.7.
Within JetShell, set Settings-Device to match your iAUDIO model.
Q
Memory capacity of the player is different or smaller than specified.
&
The memory capacity indicated by Windows Explorer may be different from that indicated by the memory
A
manufacturer. Typically for a 1GB memory will display 954MB as its full capacity.
iAUDIO uses some area in the drive for system operation. Therefore, the actual available capacity is somewhat
reduced after excluding system area.
Q
iAUDIO does not play properly when memory is full.
&
For iAUDIO to function properly, it requires at least 5 MB of space for saving settings and other system files.
A
Troubleshooting
Page 27

 Loading...