

Page 1

jetAudio 5.0 Manual (Beta3)
-Table of Contents -
1. Special Features
2. Installation / Removal
2-1 Installation
2-2 Removal
3. Parts and Functions
3-1 Repeat
3-2 Play back
3-3 Timer Indicator
3-4 Instant Slide Bar
3-5 Album Management
3-6 Selection of Play list
3-7 Selection of Track (quick track)
3-8 Open
3-9 Stop
3-10 Play /Pause
3-11 Speedy Rewind/ Speedy Forward
3-12 Previous Track/Next Track
3-13 Speedy Selection of Album
3-14 Disk/File Mode
3-15 Sound Effect Components
3-16 Graphic Equalizer/Spectrum
3-17 Timer / Alarm
3-18 Ripping CD Data
3-19 Conversion of File Mode
3-20 Recording
3-21 Making Music CD
3-22 Listen to Broadcasting
3-23 System Menu
4. Basic Playback Features
5. Variety of Sound Effect Features
6. Timer
Page 2

7. Album Management
7-1 Addition of file(s) to an album
7-2 Addition of URL
7-3 Making New Album (Folder Selection)
7-4 Upgraded File Management
7-5 Play File in an Album
7-6 Read/Send Data in an Album
7-7 Move file to other Album
7-8 Upgraded features in making new Album
7-9 Search/Mix/File Inspection
8. Setting/Skin
8-1 General Configuration
8-2 CD Configuration
8-3 DVD Configuration
8-4 File Association Mode Configuration
8-5 Advanced Configuration
8-6 Skin Configuration
9. CD Ripping
10. Conversion
11. Recording
12. CD Burning
13. Broadcasting
14. Digital Video Playback
Page 3

1. Special Feature of jetAudio 5.0
New jetAudio 5.0 is an integrated multimedia software which is composed of single
compact rack; the previous version is composed of six separate racks. It not only
plays various music files but also has other major features such as music CD
burning, recording of music files, conversion to other file mode, etc. In addition to
these specialized features you can create your own exclusive broadcasting system
by connecting jetAudio to jetCast which is provided to you along with jetAudio.
Playback features for various Multimedia files
jetAudio 5.0 not only supports the popular audio files such as MP3, OGG and
WMA but also visual files such as AVI, MOV, MPEG, Real Media, DVD VIDEO, etc..
jetAudio is also geared for access to future audio format, MP3 Pro.
jetAudio’s support files:
: WAV file
Mpeg Audio File (MP1, MP2, MP3, MP3U)
MAC Audio File (AIF, AIFF)
Sun Audio File (Au, SND)
Real AUDIO File (RA, RAM,RM, RMM etc)
MIDI File (MID, RIM), IMS File (IMS)
Tracker File
APE File (Monkey’s Audio File Format)
Single-component rack : Made into one simple rack by using new
integrated GUI.
Making Audio CD : Can make audio CD from various multimedia files.
Convenient Conversion Feature : Can convert to most popular file
modes from various media files.
Playback feature for digital audio : Can directly rip data from audio CD
and can select various sound effect.
Various Sound Effect : Variety of Sound Effect Features is available.
Subtitles: Can provide subtitles as SMI. Can adjust location, and time,
and size of subtitle. Can select a specific channel when video CD is on.
This feature is compatible with Karaoke.
Embedded jetMidi : Built-in Software Wave Table Midi Engine.
Skin Support : Can have any kind of skin according to your choice.
Page 4

2. Installation / Removal
2-1 Installation
1. Open up jetAudio 5.0 installation folder. Double click the file (JAD500b1, exe)
and go through general procedure of installation.
2-2 Removal
You can remove jetAudio program in the same way that you remove other
programs.
Start, Installation, Control Panel, Program Addition/Removal and select jetAudio
and click Removal. Then you will see the Figure 2.7. Click removal on this
window and then the program will be removed successfully.
The folder, in which jetAudio has been installed, and the folders such as jetCDP.sdb,
jetWave, JADPlugins.cache file, won’t be removed unless you remove the each
folder respectively.
Page 5
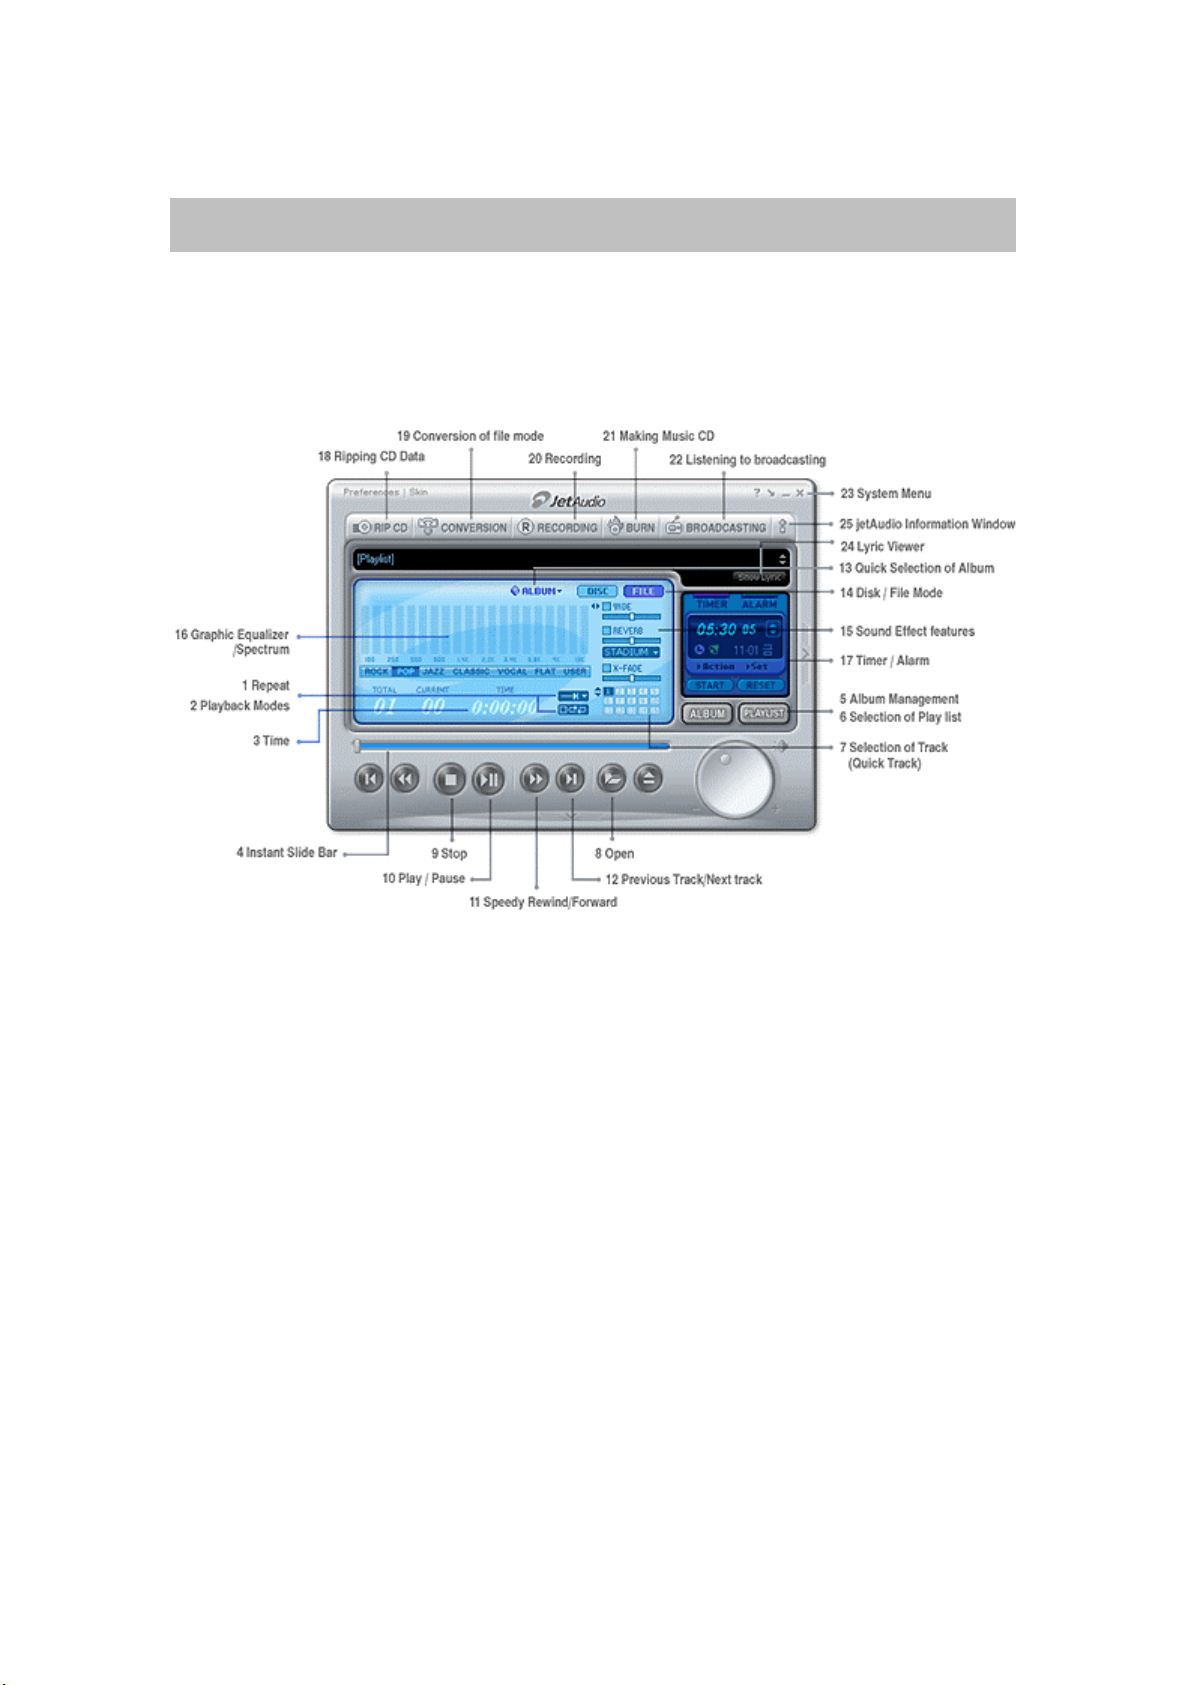
3. Parts and Features
(Note) This explanation is based on the jetAudio’s features on its basic skin (Figure3.1) ; only
the graphic design of jetAudio’s skin can be changed according to your preference; the
features on the skin stays the same.
[Figure3 jetAudio Main Window]
3-1 Repeat
When you click Repeat button, you will see three choices of Repeat mode: Repeat
current song, Repeat at the end of current song and No Repeat.
You can repeat the song which is currently playing continuously..
You can finish the currently playing album and then go back to the
beginning of the current album and play repeatedly.
No Repeat Mode plays all the songs in the album in order and stops after
playing the last song in the album.
3-2 Playback Modes
when you click Play button you will see two choices of Playback Mode: Normal or
Random Play.
Normal Mode: For playing songs of an album in order
Random Mode: For playing songs according to your random choice
Page 6
3-3 Time
When you click Timer button you will see two choices of mode.
Elapsed Time indicates the elapsed time since the beginning of the
playback
Remaining Time indicates the remaining time for the current playback
3-4 Instant Slide Bar
By clicking and dragging the Slide Bar, you can move to any location in the track
which is currently playing
3-5 Album Management
By clicking Album Management button, you can make an album from the
multimedia data of audio CD, MP3, or RA. By clicking the right mouse button you
can have quick access to the song (sampling of the song) of your choice. This
feature makes it much easier for you to manage and make albums.
3-6 Selection of Playlist
This feature can be used when you want to switch the current album to a different
album quickly.
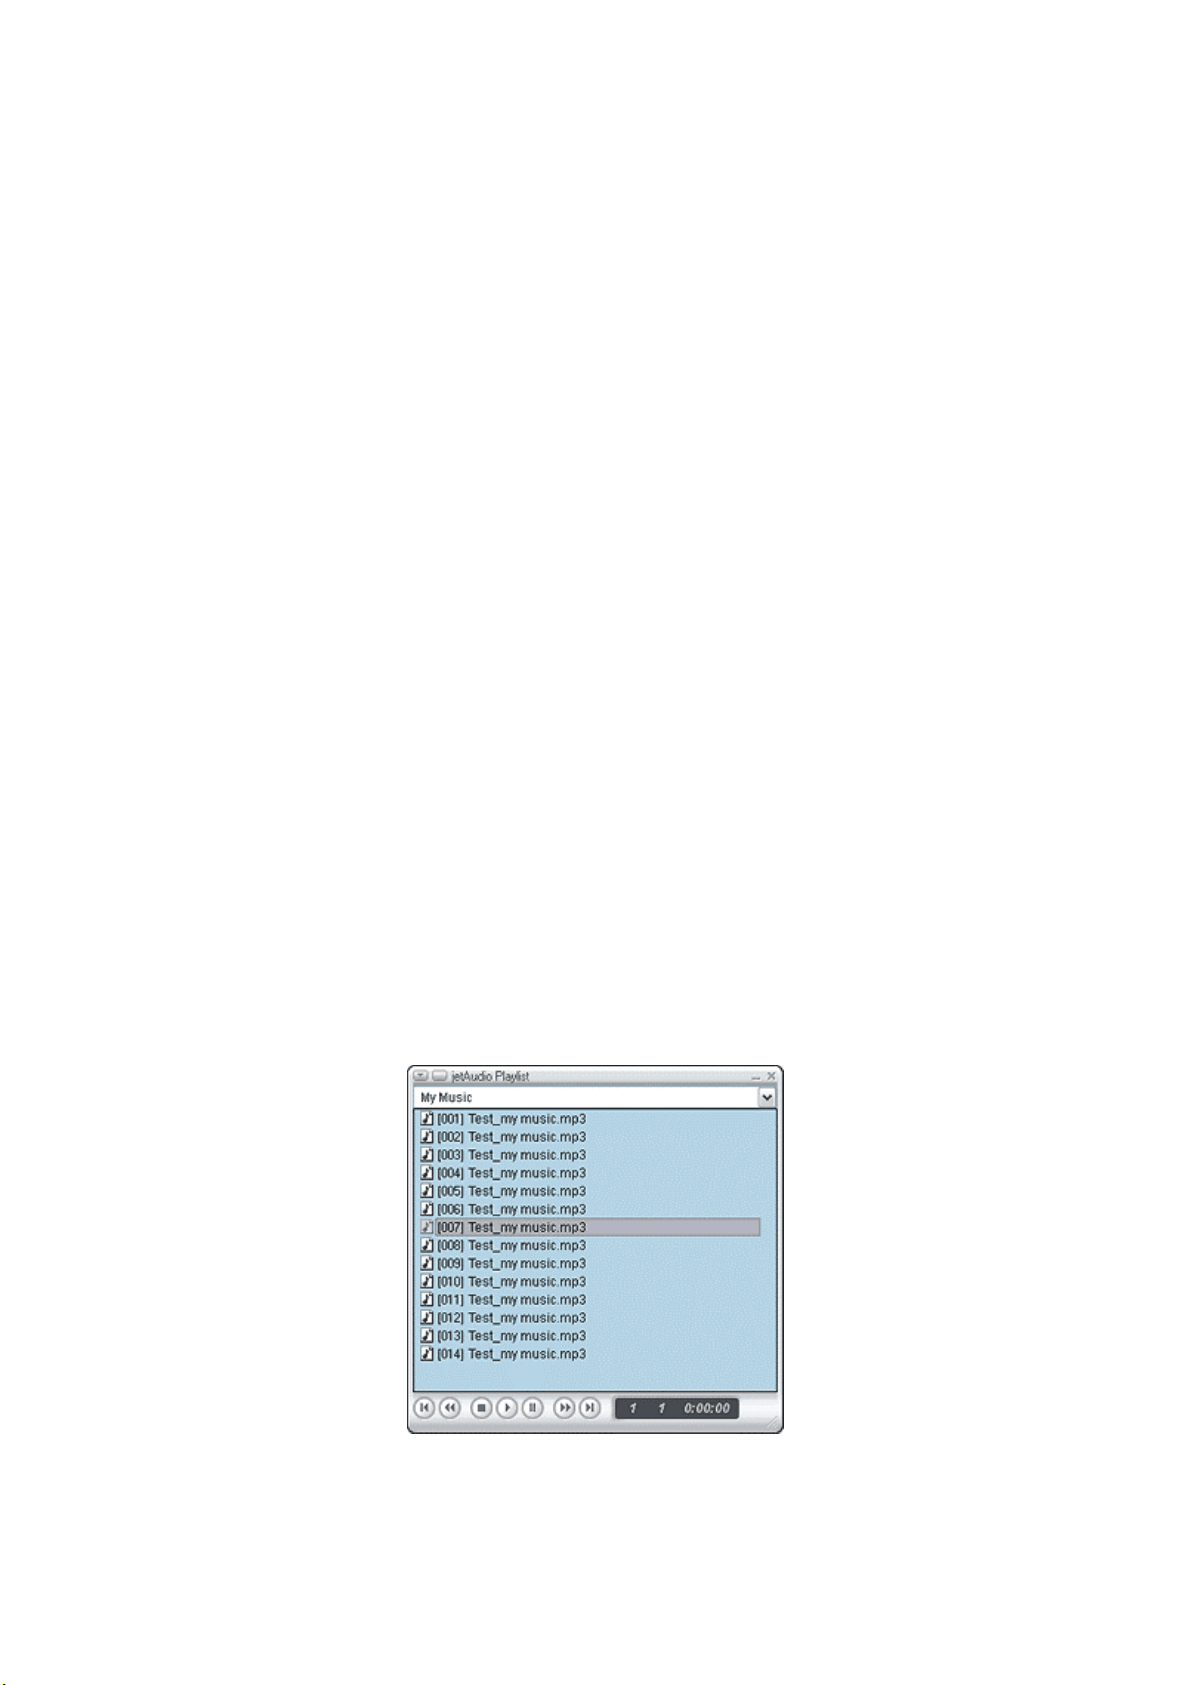
3-7 Selection of Track (Quick Track) / Play List
When you click Quick Track button, you will see the list of songs in the current
album. Then by clicking a song of your choice, the song will be played. Refer to
Chapt 7-10 regarding Playlist.
[Figure 3.2 Playlist Window]
Page 7

3-8 Open
When you click this button, you will see the dialog box in which you can choose a
song.
3-9 Stop
You can stop the currently playing song.
3-10 Play / Pause
You can play the songs in Play list or in an album. When you click again song may
pause for a moment.
3-11 Speedy Rewind/Forward
You can rewind or forward the current song quickly.
3-12 Previous Track/Next track
You can rewind or forward the current song quickly
3-13 Quick Selection of Album
You can switch Album to Album and Album to Play list quickly.
3-14 Disk / File Mode
You can select Play mode. (Disk or File)
3-15 Sound Effect features
jetAudio 5.0 has various sound effect features. Please refer to Sound Effect Section..
3-16 Graphic Equalizer/Spectrum
Spectrum will be displayed when music CD, Mp3, or MIDI is on. User Mode is
available for you to select the sound effects such as rock, pop, Jazz, classic, vocal
and flat. Please refer to Section5 for the detail. Please refer to Section 5 (Various
Sound Effects)
3-17 Timer / Alarm
In general it shows the current time but you can adjust it to activate at a specific
time. Please refer to Section 6.
Page 8

3-18 Ripping CD Data
You can take out the data in a music CD and convert it to a different file mode and
store it. Please refer to Section 9.
3-19 Conversion of file mode
This feature is used to convert the existing file mode to a different mode: for
example, conversion from Mp3 to OGG mode or other WMA mode. Please refer to
Section 10.
3-20 Recording
This feature is used to make MP3, RA, WAV file. Please refer to Section11.
3-21 Making Music CD
You can make music CD from an existing music file. Please refer to Section 12.
3-22 Listening to broadcasting
Move to http://broadcast.jetaudio.com
, which is broadcasted, from jetCast. Please
refer to Section 13.
3-23 System Menu
Exit : Exit from the current program
Minimize : Minimize the size of the program and it will be indicated in
the Task Bar.
Move to Tray : Minimize size of program and the icon will be registered
on the Tray Bar. Refer to Chapter. 4-2.
3-24 Lyric Viewer
Can adjust Lyric Viewer.
(Note) Lyric Viewer will only be activated when there configuration is setting
3-25 jetAudio Information Window
Displays jetAudio’s Information Window. This window also has browser feature.
Page 9
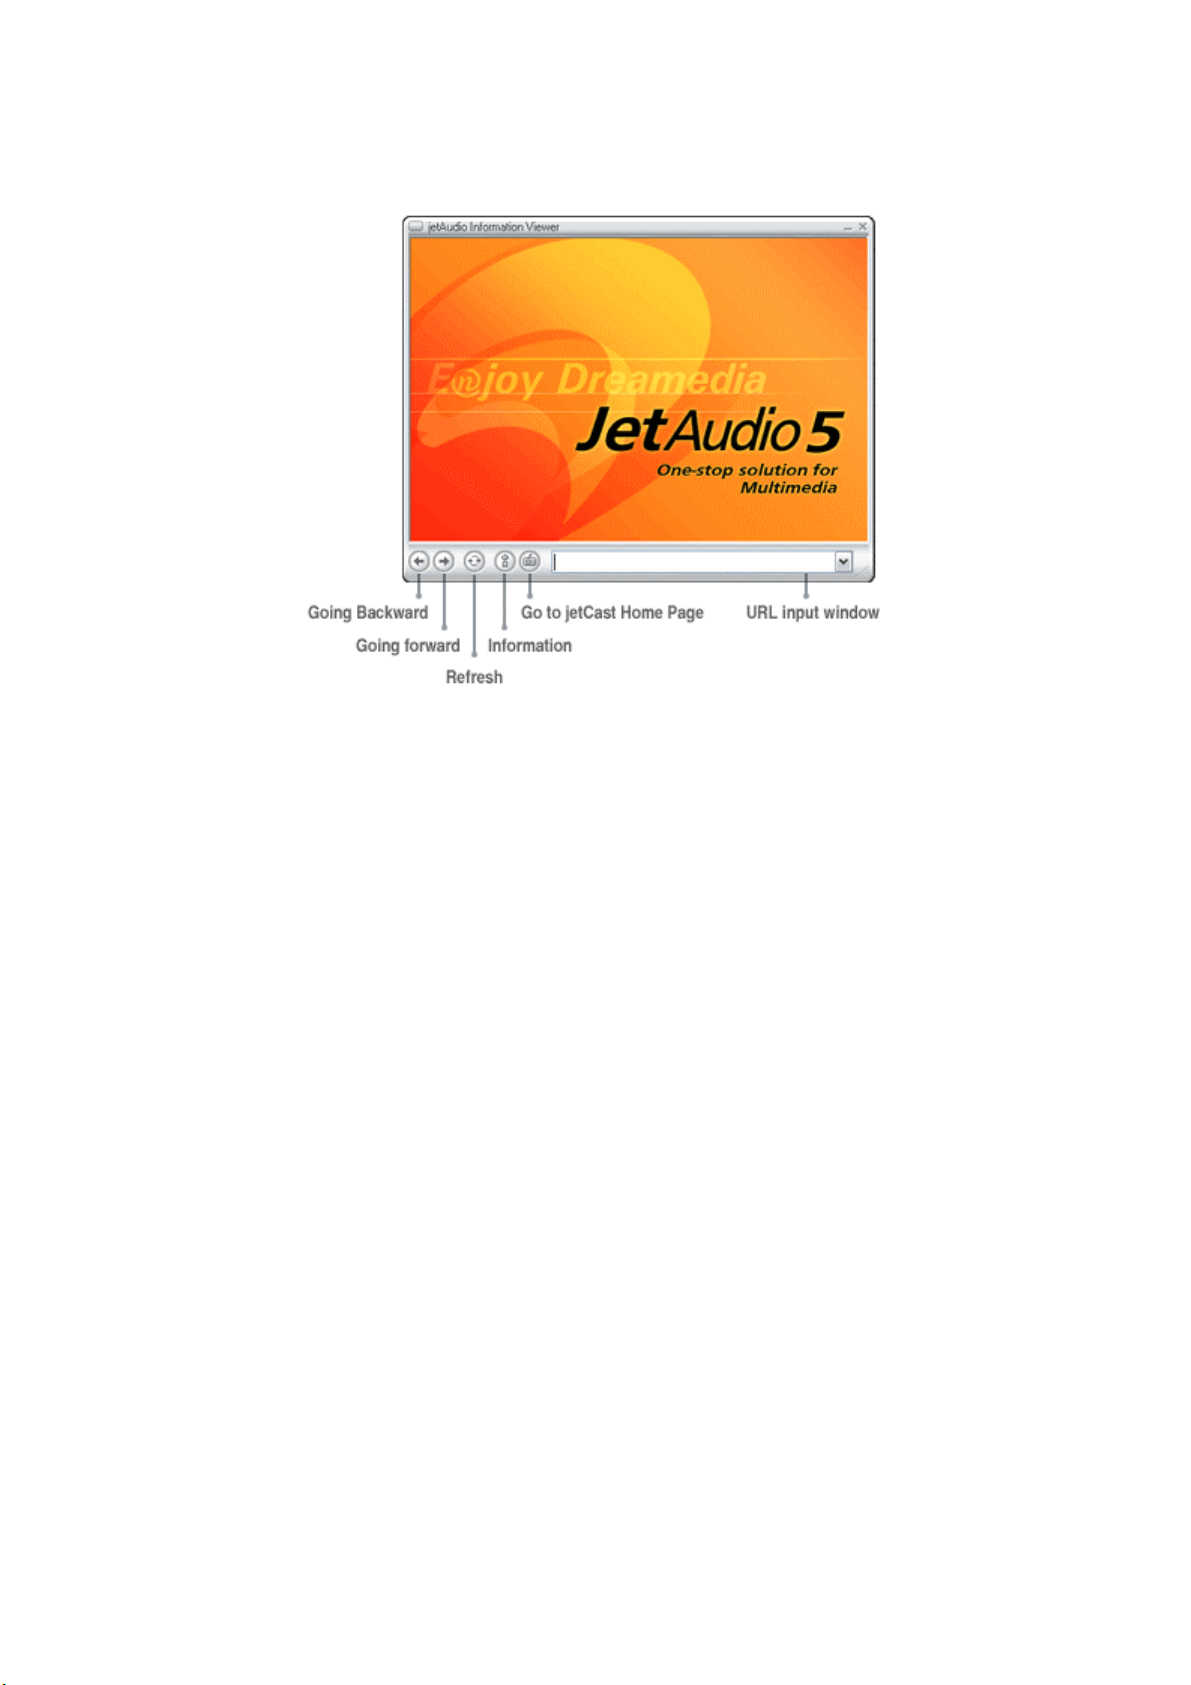
Going Backward : If there is a previous page, goes back to that page.
Going forward :If there is a next page, goes forward to that page.
Refresh : Re-view the current page
Information : Can take a look at the information provided by jetAudio.
Go to jetCast Home Page : Move to jetCast Home page.
URL input window : When you input URL then It will show jetCast Directory
page.
Page 10

4. Basic play mode
Basic playback : There are several basic playback modes.
Simply by double clicking, you can play file of your choice; in order to do
this you need to connect jetAudio and the file type in the Installation
Window (2.5) before you start.
You can click Open Button and select the file of your choice to play.
One of jetAudio’s special features, Album Management Feature, enables you
to play repeatedly or select specific music genre by registering a file in any
album of your choice. The detailed instruction is available at Album
Management Chapter.
* By clicking right mouse button in the browser you can also paly a file.
If you click right mouse button on the media file, Figure 4-1will be
displayed. Click the appropriate menu to play jetAudio.
[Figure4.1 Context Menu for jetAudio]
1. jetAudio icon on the Tray Bar : The below shows the jetAudio on the Tray
Bar.
[Figure 4.2 jetAudio in Try Bar]
Click in jetAudio Icon on the Tray Bar using right mouse button, then the menu
will be displayed. The icon menu on the Tray Bar is summarized version of
jetAudio’s features on the Basic Window.
Page 11
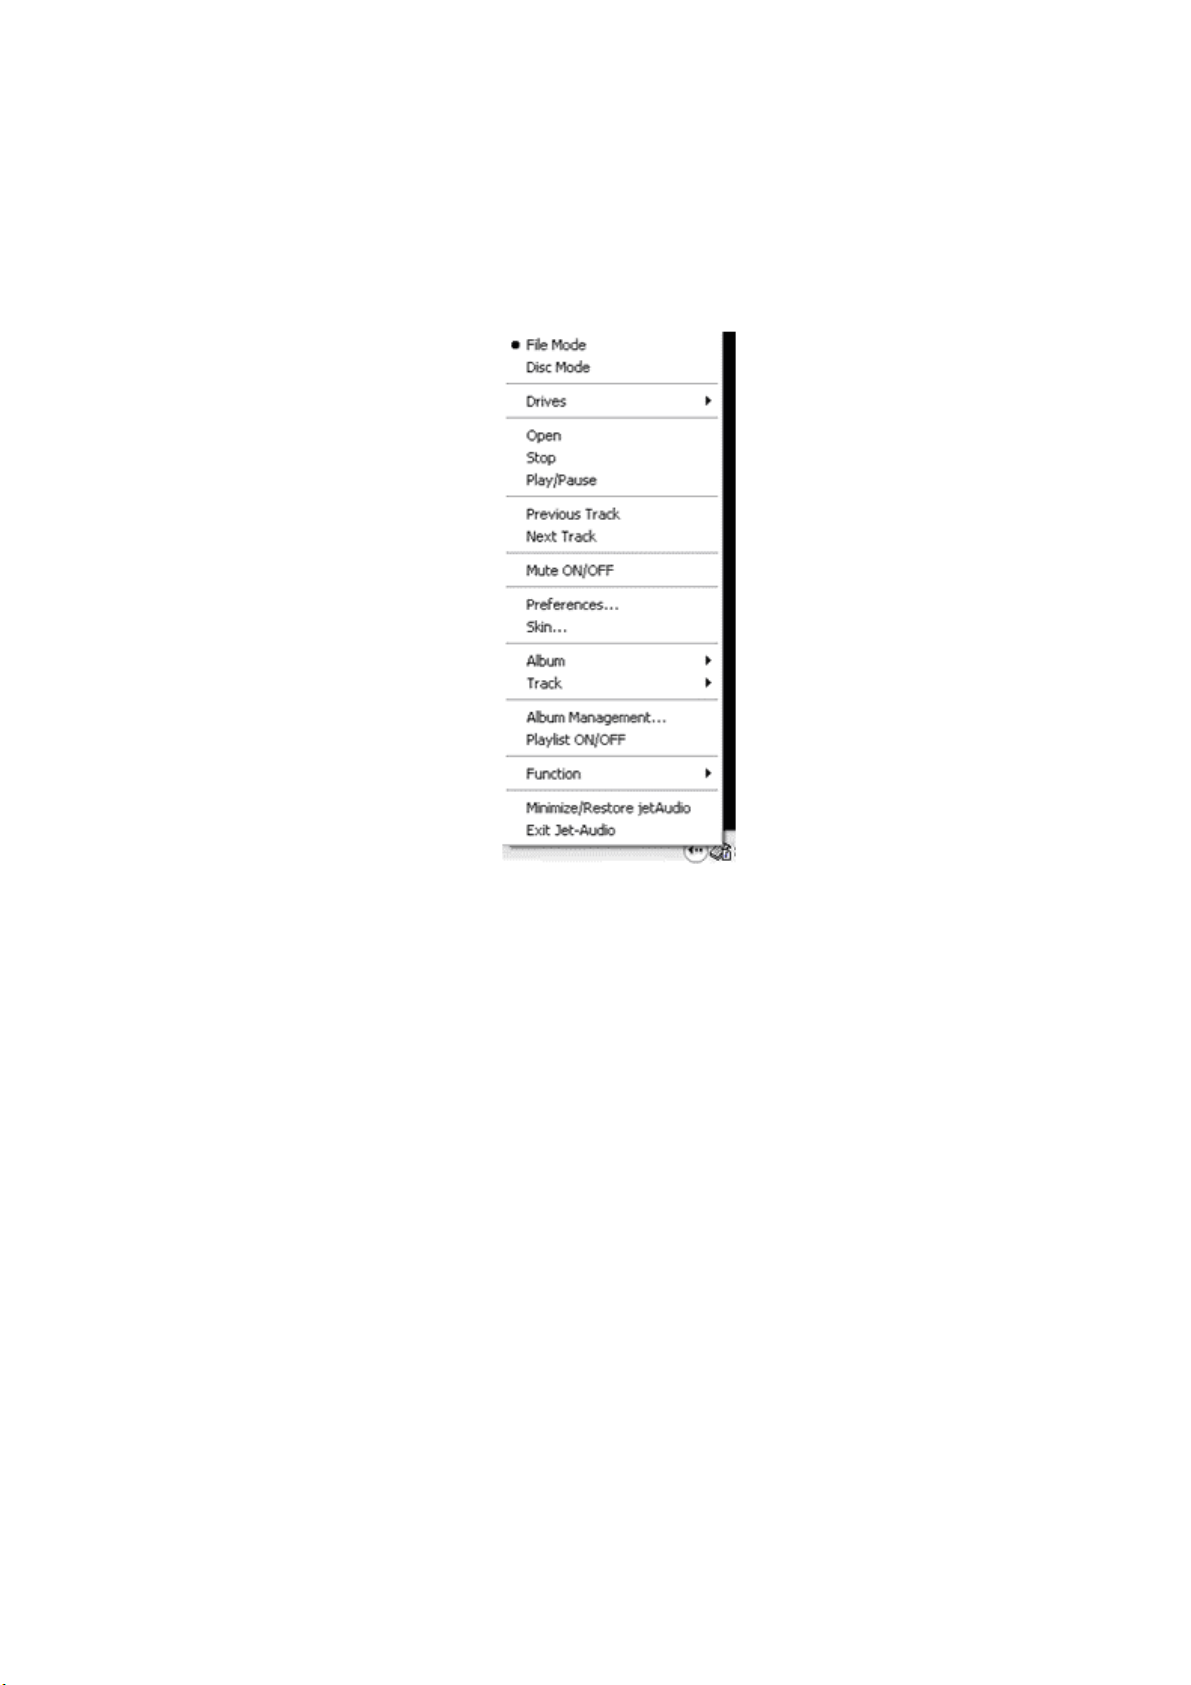
[Figure4.3 Tray Icon Menu for jetAudio]
1. File/Disk Mode: Convert file or disk mode.
2. Driver: If there are multiple CD related drivers, you can select a driver for
playback.
3. Open: Displays the preference window to select a file to be played.
4. Stop: Stops the currently playing file.
5. Play/Pause: Can play and pause
6. Previous Track/Next Track: Moves to previous or Next track.
7. Volume On/Off: Can turn on or off the sound.
8. Preference: Displays jetAudio Preference Window.
9. Skin: Shows Skin Window. Refer to Chapt 8-5.
10. Album: Shows the registered album and the list in that album.
11. Track: Shows the playlist of selected album in the order.
12. Album Management: Shows Album Management Window.
13. Playlist On/Off: Can hide or display playlist.
14. Functions: Ripping CD, File Conversion, Recording, CD Burning.
Page 12

15. Minimie/Restore: Can adjust jetAudio: minimize or return to original state
16. Exit: Exit from jetAudio.
Page 13
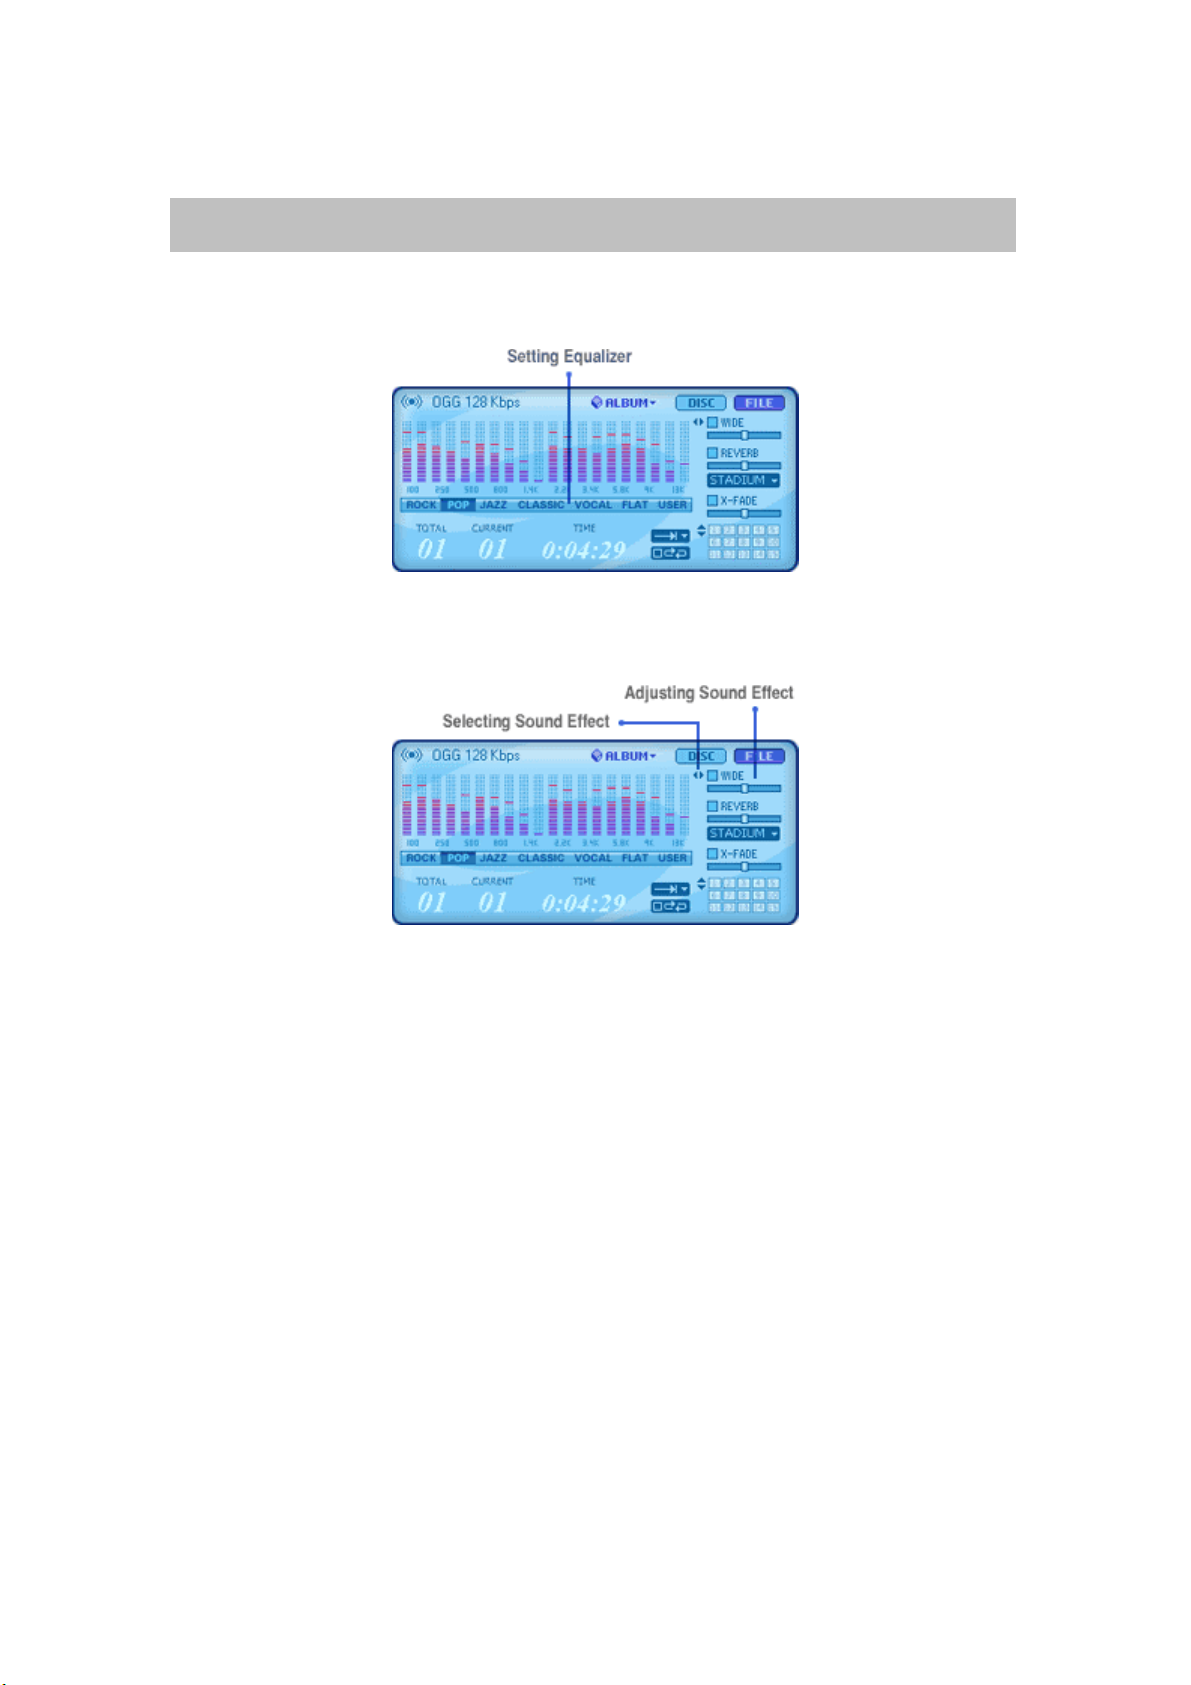
5. Various Sound Effects
You can enjoy various sound effects played from jetAudio 5.0.
[Figure5.1Equalizer Setting Window]
[Figure5.2 Sound Effect Setting Window]
Setting Equalizer: Can be set in six different user modes such as rock,
pop, jazz, classic, vocal, flat.
Wide Effect: Can improve space perception of sound.
Reverb Effect: Provides a rich and full sound and can be selected from
four modes; Hall, Room, Stage and Stadium
X-Bass Effect: Low Frequency sound can be emphasized.
Surround Effect:
X– Fade Effect: Sound can be overlapped to a certain point to avoid
interruption in the flow of music.
5-1 Setting Equalizer
You can set equalizer in the Figure 5.1. Select the mode from six choices. If you
want your exclusive sound, user mode can be used as follows.
Page 14

Select User Mode then you will see a window like Flat Mode.
Adjust the wave level by mouse.
Once you are done with setting, the adjusted level will be memorized there
on; whenever you select User, the adjusted level will be activated.
5-2 Adjusting Sound Effect
In the Figure 5.2, select a check box to activate a specific sound effect and move
the slide bar to adjust the level. When you click #3 button on Figure 5.2, you can
see a window for setting X-bass and Surround Sound Effect.
Page 15
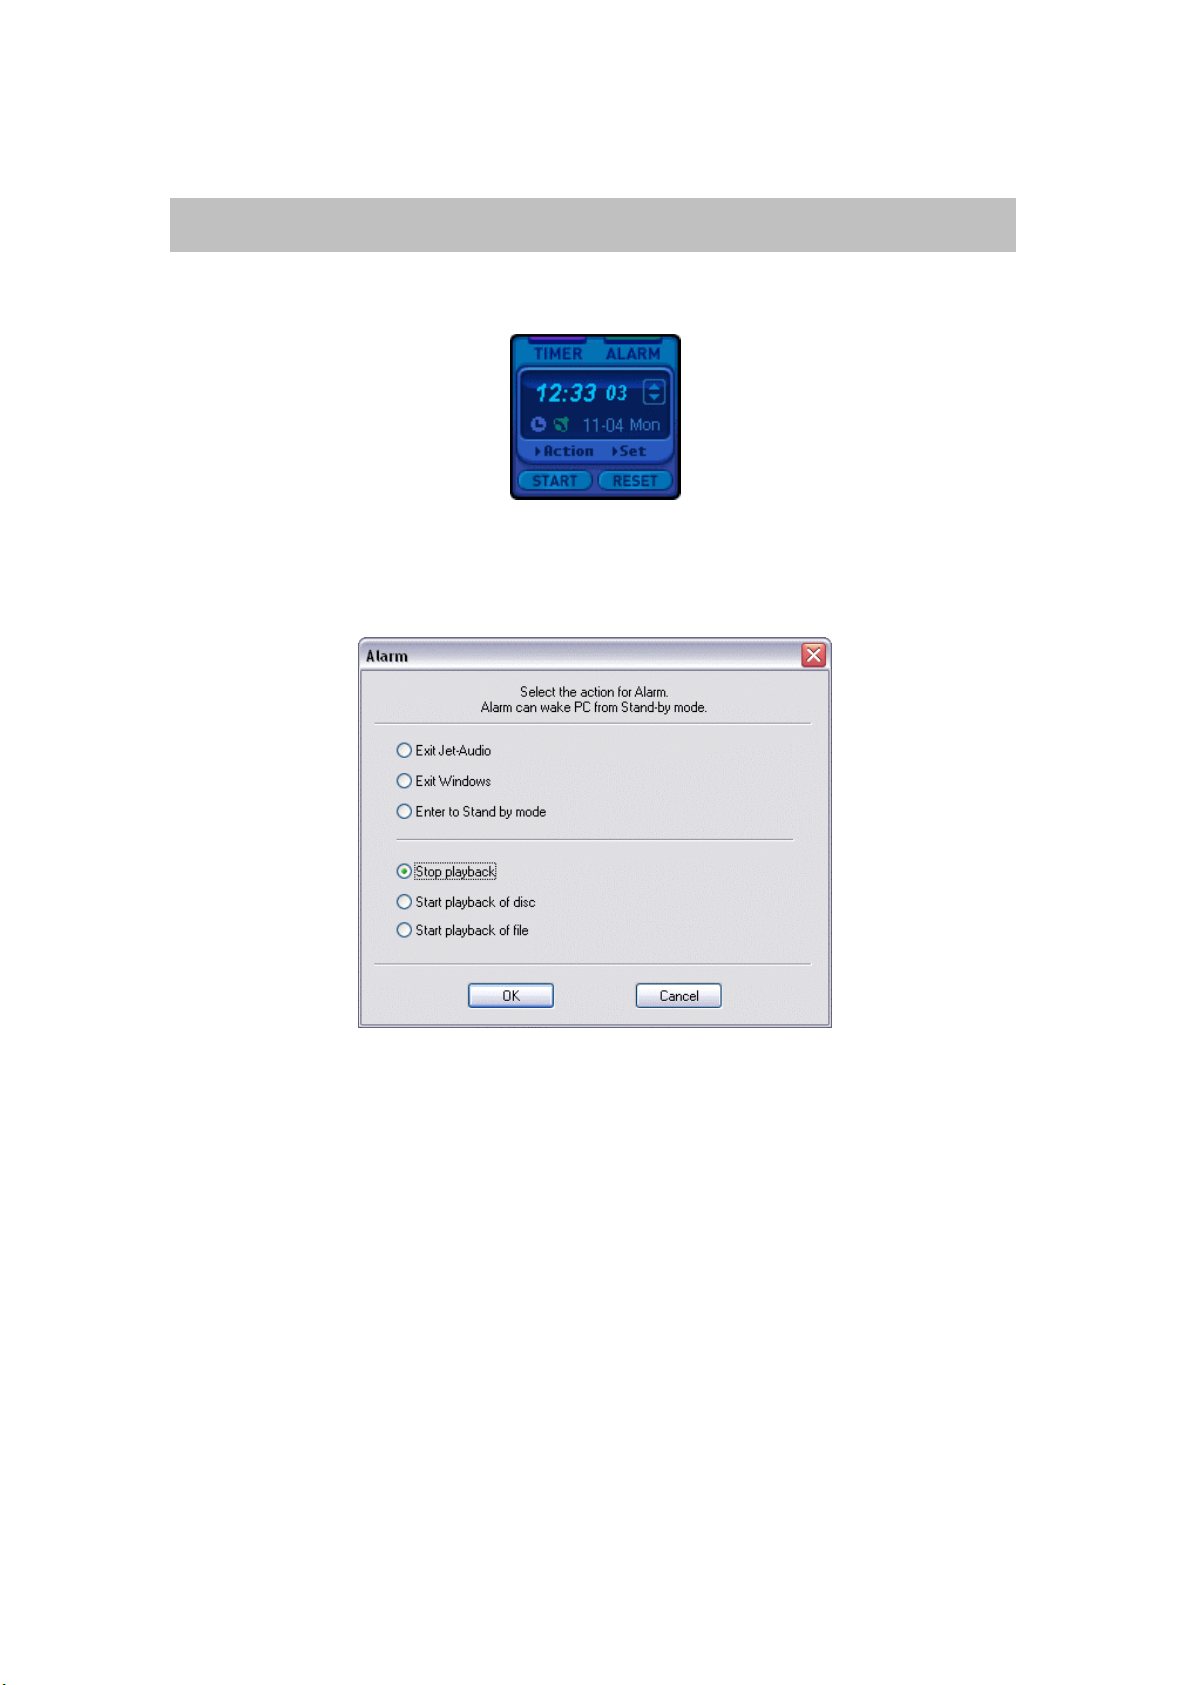
6. Timer/Alarm
By reserving time on Timer or Alarm, you can activate jetAudio at any time.
[Figure 6.1 Timer /Alarm]
Select Timer or Alarm and click Action button then you will see Figure 6.2.
[Figure 6.2 Timer / Alarm Action Window ]
The action window for Timer and Alarm is identical. Selection modes are as
follows
jetAudio Exit
Window Exit: If your PC is not ATX board, this won’t be activated.
Energy Saving Mode
Stop the currently playing song
Play CD or DVD, or play specific file
When you select “Start Playback of File”, the songs in the currently selected album
will be played. If you are done with the selection, click Set button then the selected
time will be indicated. You can also adjust the timer by moving the arrow. For Alarm
setting, you can select the time on Window by clicking Set button. Then Start
Button to activate Alarm at a specific time.
(Note) Some PCs are not equipped with Energy Saving Mode or Automatic Power Off mode;
Page 16

therefore, you need to check this before you activate these modes.
Please be aware that Timer is not as accurate as clock.
Page 17

7. Album Management
[Figure 7.1 Album Management Window]
When you click Album Management, Figure 7.1 will be displayed.; you can see
currently registered albums on the left section of the window and a list of songs in
the selected album on the right section.
7-1 Addition of file to an album
To add a file to an album, click ALBUM and ADD FILES then, start adding files. You
can multi-select files by clicking Shift or Ctrl key. By clicking Add to List button, all
the files in the selected folder can be added.
If you select any file from Windows Explorer and move it to jetAudio’s main window
or Album Management Widow, the file will be automatically registered (drag and
drop function).
Page 18

Add each file: By opening Dialog Box, you can register songs one by one to
make an album
Add All file: All songs in a folder will be registered except the sub-folders
Add all files including the sub-folders: All the songs in a folder and sub-
folders will be registered in an album
7-2 Addition of URL
You can make an album for URL addresses based on the internet stations; you can
listen to broadcasting selectively if you input the appropriate information of the
broadcasting station of your choice beforehand.
7-3 Making New Album (Selection of Folder)
Select Album, New Album (Selection of Folder) then select the folder which will be
made into an album.
7-4 Upgraded File Management
You can Copy, Move, and Cancel any song or data from Album Management
Window. Select songs in album then click right mouse button and click Tool for an
easy start.
7-5 Support Playback of a file from Album
You can listen to a music (sampling) while working on albums; select song or data
and click right mouse button and click Tool.
7-6 Read and Send Album information
You can extract Play list file (*M3U, PLS) from most MP3 player by Read / Send and
make it into a jetAudio album. The reverse mode is also possible; change jetAudio
album file to Play list file and store it. These two features can be activated by
clicking the following buttons: Album, Read or Album, Send.
7-7 Move file to different Album
After Copy or Cut from current album, then open up different album and Paste.
7-8 Upgraded Features in making new album
Can accommodate albums with same name and longs names (32 or longer
characters)
7-9 Search/Mix/File Inspection
Page 19

By clicking Search, you can find a specific word or sentence in the album, and by
clicking Mix, you can change the order of registered files. File Inspection allows
you to inspect the current files and update the data in the file.
7-10 Playlist Window
This window displays a list of songs currently playing. This list will be positioned
on one of the corners of your window from BETA2 version.
Monitor: if you are using more that one monitor, you need to designate one
specific monitor to place a playlist.
Location: Decide where to place playlist in the designated monitor.
Automatic Hide: Automatically hides the playlist.
Time for Hide: Decides how long the plalylist may be hidden.
[Figure7-2 Playlist window position setting]
Page 20

8. Configuration / Skin
This is a general Preference window of jetAudio. As you can see in Figure
8.1, the window can be divided mainly into two; one is file and CD related
and the other is disc related such as DVD. In Disc preference, you can
select Audio CD or DVD and in File preference, you can select file
connecting modes.
8-1 General Preference
[Figure 8.1 General Setting for jetAudio ]
Figure 8.1 is a general preference window of jetAudio
1. General :
Playback: During the playback of a file, if you click Pause the file will be
moved forward or backward slightly so that you can have the feeling of
continuity without interruption.
Wheel Mouse : Can select wheel modes of Mouse wheel
Do Nothing : No selection may be made.
Go FF / Go Backward : By turning the wheel you can move forward
or backward.
Page 21

Change track / Chapter : You can move to previous or next playlist
of the current playlist.
Change Volume: Can adjust the volume by turning wheel.
Miscellaneous : If you install this mode, the playlist of a station will be
displayed on jetAudio’s Information Window.
Display : If you click in Tray icon with right mouse button, the information
on track or album will be displayed..
[Figure 8.1.1 Display Setting for jetAudio]
Track Indication Mode: you can select an indication mode
Page 22

Lyric Viewer
[Figure 8.1.2 Lyric Viewer Configuration]
If the lyric for a song is available, jetAudio will search for the lyric in a
selected folder and will display it.
Auto Update :
[Figure 8.1.3 Auto Update Configuration for jetAudio]
Page 23

This Auto Update function enables you to inspect updated information of
jetAudio.
1. Inspection at every activations of jetAudio: Whenever jetAudio
is activated, the new version information is inspected from
jetAudio’s web site.
2. Reserve Regular Inspection Period: By reserving the regular
inspection period beforehand, you can inspect the updated
information of jetAudio from its web- site on a regular basis.
8-2 Audio CD
Figure 8.2 shows the options for automatic activation when a disk (CD Rom or DVD
Rom) is inserted.
[Figure 8.2 Audio Configuration]
Page 24

[Figure 8.2.1 Audio CD Configuration for jetAudio]
Playback range: can decide the length of silence between tracks. If you
click check box, you can set silence time up to 10 seconds between tracks.
Information: Can select Automatic connection mode to CDDB and ripping
mode for CD text. When loading starts jetAudio will be automatically
connected to CDDB and will start to extract data from CD.
Register/Restore: Registering jetAudio as default CD player. As audio CD
starts loading jetAudio will be activated automatically and start playback.
If you click Restore, jetAudio will resume its original default status
automatically.
Advanced: Can select Ripping mode (Ripping data from CD) and can adjust
jitter level. There are two ripping mode:
Generic SCSI Interface mode
Native NT API : Your computer’s OS must be Windows 2000 or
Windows NT or Windows XP
If you click Jitter Connection, you can minimize the noise level at the time of
ripping.
Page 25

8-3 DVD Setting
[ Figure 8.2.2 Advanced CD Configuration window ]
[Figure 8.3 DVD Configuration Window]
Register: When you click Register button jetAudio will be automatically
activated as DVD Title is loading.
Restore: When you click Restore button default DVD player setting will be
restored.
Advanced: You can select the options for Parental Rating Classification, size
of video screen and language.
Parental Classification for Rating: If necessary you can use a password
to prevent unwanted DVD from playing (Figure 8.5).
Page 26

(Note) If a DVD with a parental classification mode is inserted in the drive, you
will see a window in which you need to input a password. You need to input a
correct password to play DVD.
[Figure 8.3.1 DVD Parental Mode Configuration]
Video Options: Usually DVD screen size is 16:9 but other options for
size are available (Figure 8.6).
[Figure 8.3.2 DVD Video Configuration Window]
Page 27

Pan-Scan: One or both sides of the screen will be blank.
Letter-Box: Wide spread-out screen, blank spaces appear on
top and bottom of the screen.
Language Options: Can select any language from DVD menu. If DVD
menu doesn’t accommodate your choice of language, default language
may be played.
[Figure 8.3.3 DVD Language Configuration]
Page 28

8-4 File Modes
1. Preference Playing File: Add silence between playlist.
[Figure 8.4.1General File Mode Configuration Window ]
2. File Type Association: Shows choice of file modes which are to be
connected with jetAudio 5.0.
Once the file mode selection has been made, you just need to open file
or by double clicking, you can start jetAudio. Next step is to connect
the extension files of your choice to jetAudio in Preference Figure 8.9.
You can select one or all of extension files. However, if you select all files,
there might be some technical problems.
Page 29

[Figure 8.4.2 File Association for JetAudio]
[Figure 8.4.3 Advanced Configuration Window]
Page 30

[Figure 8.4.4 Advanced Configuration for Output]
8-5 Advanced Preference :
You can configuration for playing thread priority. In general, you don’t need to have
this preference if you don’t have any problem in playing file or CD.
If there are sound breaks while playing file or CD, you could prevent them by
making some selection in this preference window. In this window, you could also
set a priority in CD playing, File playing, and CD burning.
Page 31

Output : Selection of filter which is responsible for output
[Figure 8.4.4.1 Configuration window for JwavOut.dll]
For example, in case of JwavOut.dll, a resolution filter, you can make
your selection on Figure 8.4.4.1.
Input: Selection of filter which is responsible for input
[Figure 8.4.5 Configuration for Input Plug-ins]
Page 32

(Note) Preference window for each filter is different. Preference window can also be
used when additional function needs to be
preference windows because there is no need for preference selection.
selected. Some filters may not have
8-6 Skin Selection: You can change design and color of jetAudio’s skin according
to you taste.
[Figure 8.6 Skin Selection window]
You can select the default skin, which is already registered, like Figure 8.6. You
can locate Skin file under Skin folder in *.jsk mode.
Downloading from web: Go to jetAudio Skin page and download any skin of your
choice..
Page 33

9. CD Ripping
The data in audio CD will be ripped and converted to your choice of file
mode and stored. The major file modes are MP3, OGG, Real Media, WAV,
WMA.
[Figure 9.1 CD-Rip window]
By clicking Rip CD button, you can make necessary input in the Figure 9.1.
1. Selection of Drive: Can select CD Rom by pressing arrow sign.
2. Configuration: Can select Ripping mode in the CD
There are two Ripping modes as you can see in Figure 9.2. One is Generic
SCSI Interface and the other is Native API which can only be supported by
Window NT. You can also select Jitter Connection for noise control
Page 34

[Figure 9.2 Ripping method selection window]
3. Album: The name of an album which has been brought from CDDB will be
indicated. If an album can not be brought form CDDB or if there is no data
in the CDDB, just UNKNOWN ALBUM will be indicated.
4. Genre: You can edit genre in an album.
5. Select All : Select all tracks in audio CD (Default Value)
6. Clear Select All : Clear all in the list.
7. File Name Mode/ Selection of folder: Folder and file can be stored according
to your choice.
8. Output file format: Audio CD data can be stored as MP3, OGG,WMA, or Real
Media file mode in jetAudio 5.0. Each file mode has additional sub-
features which can be selected also.
For example, if you select MP3 file mode you will see Figure 9.3, which
shows the file’s additional sub- features.
9. Start: Select audio track of your choice and select the file mode
to store.
Click Start and then a new file will be made in the pre-selected folder.
10. Close: Window will close.
Page 35

[Figure 9.3 Encoding Configuration for MP3]
11. More than one track can be stored in a single file; this function is very
useful when you want to rip a classic music which is divided into several
tracks. For example, if track 1 and track 2 are a single music then you could
select both to store them in a file.
Page 36

10. Conversion
This feature is used to convert a file from current mode to a different mode.
As stipulated previously in Basic Feature Chapter, jetAudio can read and
play various files. Therefore, any kind of file, which is compatible with
jetAudio 5.0, can be converted to MP3, OGG, Real Media, and WAV file
mode.
MP3: File capacity is one tenth of WAVE file and sound quality equals
that of music CD. MP3 format is famous for providing perfect sound:
this format is best for listening to a high quality sound music. The file
sizes are relatively small, one tenth of Wave file.
OGG: Known for having excellent sound quality and a compression rate
similar to that of MP3
Real Media: A Streaming file such as WMA and the file mode of Real
Networks Company. This file mode can be used when you want to
place a sound on a web page or listen to a sound which has small file
size (sampling of sound).
WAV: Not a compressed form of file mode. Therefore, file size is much
greater than some file modes and this could be its drawback. However,
there is no damage as far as its data is concerned since it preserves the
data without compression.
WMA: WMA Stands for Windows Media Audio. This is a streaming file
of Microsoft Co. Compression rate is very high; therefore, the file size
is relatively small. This file mode guarantees the sound quality similar
to that of MP3.
Page 37

[Figure 10.1 File Conversion window]
1. Add file: Can add a file for conversion by selecting a file which needed to be
converted.
2. Remove file: Remove a selected file from conversion list.
3. Clear: Remove everything on the file list.
4. File Name: Can make a name for a converted file. In general, the extension
will be added to default file mode.
5. Selection of Directory: Selecting a directory in which the new converted file
is to be placed.
6. Output Format: Various types of conversion mode are available just like CD
ripping. Depending on the mode, you need to open up a specific
Configuration Window to make selection of mode. For example, Figure
10.2 is a Configuration Window for OGG mode.
7. Start: Select conversion list and mode, then click Start button. The
conversion will start according to your selection. The conversion speed may
vary depending on the respective mode.
Page 38

[Figure 10.2 Configuration window for OGG file Format]
Page 39

11. Recording
Recording is possible from various input sources.
[Figure 11.1 Recording window]
1. Selection of source: Shows the current sound card’s source.
2. Volume Control: Controls the volume of the source.
3. File Name Mode: Decides the name for the file that you want to record.
4. Store/Configuration Mode: Decides the Store mode regardless of source.
jetAudio supports MP3, OGG, Media, WAV, and AMA mode. For example,
Figure 11.2 shows WMA Configuration.
Page 40

[Figure 11.2 Configuration Window for WMA format]
(Note) The source on Figure 11.1 may vary depending on the sound card you are using.
The sound quality may also vary depending on the sound card and systems.
(Note) Due to a low OGG encoding speed of jetAudio 5.0, the recording may not be
smooth in some computers.
(Examples)
Q. How can I record a song played by internet music broadcasting?
A. First you need to click jetAudio’s recording button and select WAV for
source. Then select recording mode. The recording will start according
to your choice of mode..
Page 41

12.CD Burning
You can burn any music CD from any music files.
[ Figure 12.1 Create Audio CD Window]
1. Add File: Selects a file which is to be made into a music CD.
2. Remove: Removes the selected list from the entire list.
3. Remove All: Removes the entire list.
4. Free Gap: Can decide the length of gap between the songs. In general, it is
2 seconds but can be extended up to 4 seconds.
5. Selection/Configuration of Drive: Shows a CD drive list which can burn CD.
By clicking Configuration Button, you can select the mode for burning CD in
respective drive. As you can see in Figure 12.1, if you want to burn track by
track, click Track. If you want to burn the whole disk at once, then click Disk.
Burning speed can be selected as well.
Page 42

[Figure 12.2 Configuration for Drive window]
6. Remove: This button is for removing everything on CD-CW. When you click
the button you will see Figure 12.3. Then you can select Quick Erase or Full
Erase.
[Figure 12.3 CD-RW Erase window]
Page 43

[Figure 12.4 Erasing]
7. Start: When erasing of CD is completed then burning will start.
Page 44

13. Broadcasting
By using jetCast, which is provided along with jetAudio, you can star
t your
own broadcasting station. By clicking Broadcasting button you can ta
ke a look at the broadcasting channels in jetCast home page..
For a detailed information regarding the features please refer to jetCast
Manual.
[Figure 13.1 JetCast Home Page]
Page 45

14. Digital Video Playback
You can play various audiovisual files with jetAudio 5.0. If an audiovisual
file has subtitles, the subtitle can be displayed also. There are two types
of Playback Windows as 14.1 and 14.2.
[Figure 14.1 General multimedia playback window]
[Figure 14.2 DVD playback window]
Page 46

Basic Feature :
1. Play and Stop: Can play and Stop the current file
2. Stop: Can stop the currently playing file
3. Quick FW and RW
4. Move to Next: If there are several play lists, move to previous or next list
5. Timer Window: Can select elapsed time or current proceeding time.
6. Quick Slide Bar: can move to any location
7. Volume Control Bar: Can control volume
8. Mute: eliminate any sound temporarily
9. Selection of Screen size: Adjust the size of screen
General size: Maybe played in the original size of file
Total Screen (general) : Expanded full size screen
Total Screen (width) : Enlargement Based on the width of screen
Total Screen ((height) : Enlargement Based on the height of scree
n
I. File with subtitles
Selection of Font: can select Font.
Selection of letter size: can select letter size.
Subtitle Window: Can select features regarding subtitles.
Screen
I. Hide Subtitle: Hide Subtitle.
II. Vertical Screen Flip: Flips the screen vertically.
III. Subtitle Screen Flip: Flips the subtitle vertically.
IV. Selection of Subtitle File/Language: Regardless of extension, if the
name of the file and the default value are the same, jetAudio will
recognize the file and play it.
V.
Page 47

[Figure 14.3 Subtitle Configuration window]
Font Window
I. Advanced Renderer: Can improve the quality of screen. This may
cause irregularities on the screen since this feature increases CPU.
If this happens, you can cancel this feature to resume its original
state..
II. Selection of Font: Can select Font.
III. Selection of Font Outline: Can select a color for Font Outline.
IV. Selection of color for Font Shadow: Can select a color for Font
Shadow.
Page 48

Figure 14.4 Font Configuration window]
[
Location of Subtitle
I. Location: The location of subtitle can be adjusted based on vertical
and horizontal ratio.
II. Size: The thickness of subtitle can be adjusted.
[
Figure 14.5 Subtitle position configuration window]
Page 49

Timing Control
[Figure 14.6 Subtitle time delay configuration window]
By forwarding (+) and rewinding(-) timing , you can adjust the screen and
subtitle to match properly.
II. DVD Playback
Page 50

Appendix
CDDB: There is ID number for every music CD. By using this ID you can searc
h internet music database. If the database has the data for the music CD, jetA
udio will automatically download this data. This database for music CD is called
CDDB. CDDB has almost all of music data of the world. You can also upload m
usic CD data to CDDB..
MP3: Compresses audio data for downloading. This is part of MPEG1 MPEG2 fe
atures. In general, the size of music file in CD is approximately 30MB to 50MB;
however, by using MP3 technique you can reduce it to one twelfth size of the or
iginal size while maintaining the same level of high sound quality..
OGG : (OggVorbis) is a newly created compressed audio format. It is known for
having better sound quality and bit rate than MP3. This format also is under GPL
Agreement of GNU as Linux..
APE : ( Monkey’s Audio File Format ) The existing compression method is defined
as Loss Compression Method and APE method is defined as a Lossless Compression
Method. Although APE is lossless the size of the file is much larger than other files
and this can be a shortcoming of APE.
 Loading...