

Page 1
User’s Guide
Page 2

2
iAUDIO M3
3
Copyright and Trademarks
Copyright and Trademarks
• iAUDIO is a registered trademark of Cowon Systems, Inc.
• Microsoft, Windows, Windows Media and the Windows logo are trademarks or registered trademarks
of Microsoft Corporation in the United States and/or other countries.
• MMX and Pentium are trademarks or registered trademarks of Intel Corporation.
• IBM and PC/AT are registered trademarks of International Business Machines Corporation.
• BBE is produced by the license of BBE Sound, Inc.
• BBE Sound, Inc. has the license rights for BBE under USP4638258, 5510752 and 5736897.
• BBE and the BBE symbol are the registered trademarks of BBE Sound, Inc.
• All other trademarks are trademarks of their respective owners.
• Copyright laws prohibit reproducing the software or the manual accompanying it in whole or in part,
or renting the software without the permission of the copyright holder.
• The music les created by the software provided with the player is limited to private use only. Use of
the les beyond this limit requires permission of the copyright holders.
• The music les recorded by the player is limited to private use only. Use of the les beyond this limite
requires permission of the copyright holders.
iAUDIO M3
All rights reserved by JetAudio, Inc. 2004
Page 3

Notice for Users
Notice for Users
• The software provided with this player cannot be used with equipment other than that which is so
designated.
• Please note that, due to continued efforts to improve quality, the specications of the player or the
software provided with the player may be changed without notice.
• Operations of this player with software other than that provided is not covered by the warranty.
• In order to receive specialized iAUDIO services, please register this product at http://www.iAUDIO.com.
Various benets are only provided for members who have completed a customer registration.
• The examples, drawings and pictures shown in this User Guide may be changed without notice to
improve product quality.
3
iAUDIO M3
Page 4

4
iAUDIO M3
5
Warranty
Limited Warranty
JetAudio, Inc., is commited to providing you the awless products by using the best materials and the
workmanship available. Our warranty period is one year from the date of purchase.
If these products prove defective during this warranty period, call Customer Support in order to obtain a
Return Authorization Number. BE SURE TO HAVE YOUR PROOF OF PURCHASE AND A
BARCODE FROM THE PRODUCT’S PACKAGING ON HAND WHEN CALLING. RETURN
REQUESTS CANNOT BE PROCESSED WITHOUT PROOF OF PURCHASE. When returning a
product, mark the Return Authorization Number clearly on the outside of the package and include your
original proof of purchase.
All customers located outside of the United States of America shall be responsible for shipping and
handling charges.
IN NO EVENT SHALL COWON's LIABILITY EXCEED THE PRICE PAID FOR THE PRODUCTS
FROM DIRECT, INDIRECT, SPECIAL, INCIDENTAL, OR CONSEQUENTIAL DAMAGES
RESULTING FROM THE USE OF THE PRODUCT, ITS ACCOMPANYING SOFTWARE, OR ITS
DOCUMENTATION. COWON DOES NOT OFFER REFUNDS FOR ANY PRODUCT.
JetAudio makes no warranty or representation, expressed, implied, or statutory, with respect to its
products or the contents or use of this documentation and all accompanying software, and
specicallydisclaims its quality,
performance, merchantabiliy, or tness for any particular purpose. JetAudio reservers the right to revise
or update its products, software, or documentation without obligation to notify any individual or entity.
iAUDIO M3
Page 5

FCC Statement
FCC Statement
These products have been tested and comply with the specications for a Class B digital device, pursuant
to Part 15 of the FCC Rules. These limits are designed to provide reasonable protection against harmful
interference in a residential installation. This equipment generates, uses, and can radiate radio frequency
energy and, if not installed and used according to the instructions, may cause harmful interference to radio
communications.
However, there is no guarantee that interference will not occur in a particular installation.
If this equipment does cause harmful interference to radio or television reception, which is found by
turning the equipment off and on,
the user is encouraged to try to correct the interference by one or more of the following measures:
* Reorient or relocate the receiving antenna
* Increase the separation between the equipment or device
* Connect the equipment to an outlet other than the receiver’s
* Consult a dealer or an experienced radio/TV technician for assistance
5
iAUDIO M3
Page 6

6
iAUDIO M3
7
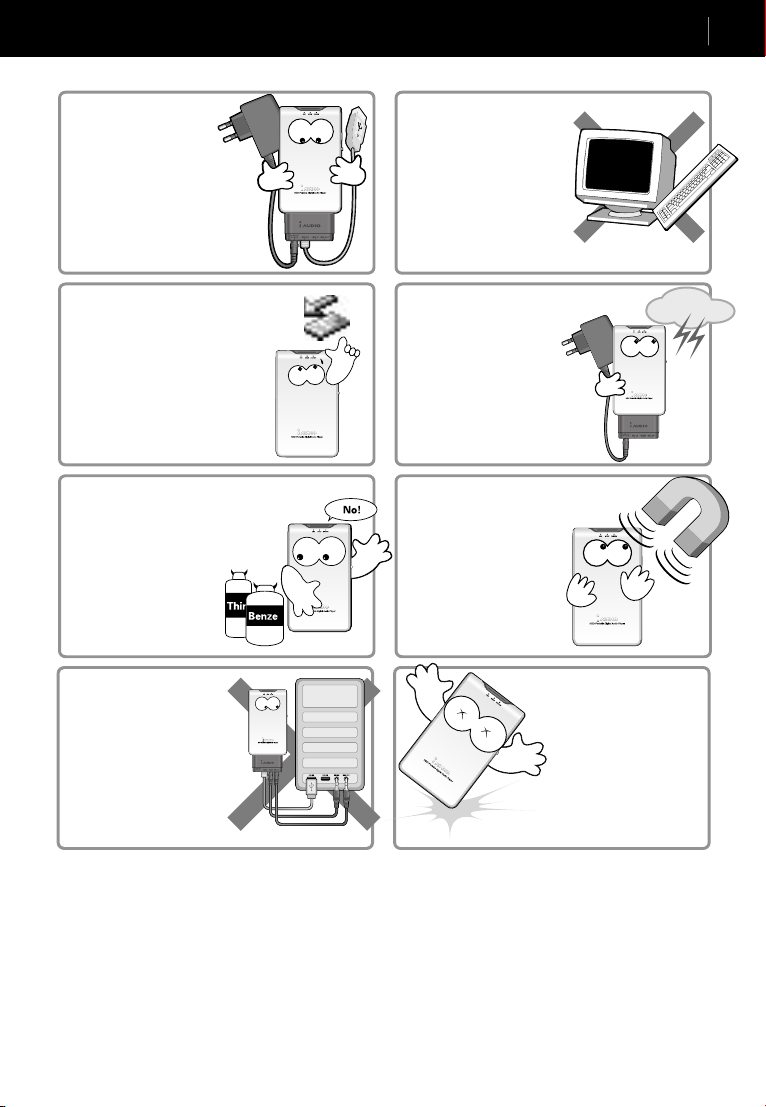
Precautions
Never use the product for
purposes other than those stated
in this User Guide.
Do not leave the product in an
extremely hot or humid place. The
warranty will be voided if this
Pay attention to the USB cable
direction when connecting the
product to PC. The PC or the
product may be damaged if you
connect the USB cable in the wrong
direction.
Never use damaged or worn USB
cable.
Do not use the product near
water. Do not touch this
product with wet hands.
happens.
Use caution when
opening the product to
avoid cuts.
Do not attempt to service
the product yourself as
opening or removing
covers may expose you to
dangerous voltage or other
hazards. The warranty will
be voided if this happens.
If the product emits an unusual
odor or excessive heat, or you
notice anything else that seems
unusual, do not use the product
and contact our Service Center.
Avoid using the player at
high volume. Hearing experts
advise against continuous,
loud and extended play.
Note that malfunctions may
occur if you use the product
in places where static
electricity occurs frequently.
iAUDIO M3
Be sure to back up your data les.
The les on the player may be
deleted while using the product.
We are not responsible for any
damaged or lost les that are not
saved on your PC. Service Center
does not back up your data while
servicing.
Page 7
Use only the AC Power adapter
and USB cable supplied by
COWON SYSTEMS with this
product.
Only use the USB port on the
main board or the USB HOST
card when connecting to a PC.
Using external USB hub may
cause malfunctions.
Precautions
7
When removing iAUDIO while
it is connected to a PC by USB
cable, be sure to use the ‘Safely
Remove Hardware’ or ‘Unplug
or Eject Hardware’ features of
Windows.
Always use a soft and dry
cotton cloth when cleaning
the product.
(Use of water/detergent/
benzene/surfactants as
cleaning agents is strictly
prohibited. The warranty
will be voided if this
happens)
Do not connect the linein/out jacks and the USB
port simultaneously to
a PC. The power of the
product may be turned off.
Connect only the required
jacks or ports.
Be sure to disconnect the
power supply to the PC and
AC adapter during lightning or
thunderstorms, so as to prevent
danger to the user or eliminate
the risk of re.
Do not put the product
near a magnet or magnetic
eld. It may cause
malfunctions.
Do not drop or subject
the product to any hard
impact. This may result in
malfunctions and/or unit
failure. The warranty will
be voided if this happens.
iAUDIO M3
Page 8

8
iAUDIO M3
9
Table of Contents
1. iAUDIO
What you can do with iAUDIO?
Package Components
Features and Specications
Names of Parts
Charging iAUDIO / Connecting USB Cable
LCD Display / LED Lights
Basic Operations
Advanced Operations
Terminology
Troubleshooting
Using Buttons
Menu Table
10
11
12
13
14
15
16
27
33
34
35
37
iAUDIO M3
2. JetShell
Connecting iAUDIO
What is JetShell? and Installing JetShell
Introducing JetShell
Downloading Music Files to iAUDIO
Deleting Files in iAUDIO
Formatting iAUDIO
Converting Audio CD to MP3 Files and Downloading
Converting Files
Other Features
38
40
41
44
45
45
46
48
50
Page 9

Table of Contents
9
Installing and Using JetAudio
Upgrading Firmware
52
53
iAUDIO M3
Page 10

10
iAUDIO M3
11
What you can do with iAUDIO
What you can do with iAUDIO
iAUDIO is a portable digital music player produced by Cowon Systems, Inc. You can easily transfer digital music
les from your computer to iAUDIO, and carry it anywhere to enjoy. It also supports FM radio listening/recording,
as well as voice recording and direct encoding through the built-in microphone and Line-In input jack.
Carry your all music les in your pocket
You can carry upto 5,000 songs with this super-slim iAUDIO. At just over half an inch, iAUDIO ts comfortably
in the palm of your hand and slips easily into your pocket. With iAUDIO's huge hard drive, you can store any les
you want - up to two weeks of music or thousand of digital photos.
Enjoy 14 hours of playback with embedded lithium-ion battery
iAUDIO's ultra power-saving circuit enables upto 14 hours of continuous playback with fully charged lithium-ion
battery. (Based on our company's test environment)
Record your voice memo anywhere anytime
Built-in microphone provides high-quality voice recording, perfect for capturing ideas, dictating memos and
saving reminders anytime, anywhere. You can also save them to your PC for playback later on, and send the
message as an e-mail.
Create MP3 les from analog sources (Direct Encoding)
Create MP3 les directly from your analog audio sources such as tape player, CD player or TV. Simply connect
the iAUDIO's Line-In jack to the output jack of other audio device with a included stereo cable, then start direct
encoding. You can transfer the MP3 les to your PC for playback later on.
Listen to FM stereo radio and Record it at the same time
Listen to FM radio and record it by pressing a button, instantly. Play them back on iAUDIO, or save to your
computer for playback or e-mail. You can preset up to 20 radio stations.
Customize your iAUDIO with wide graphic LCD Remote Controller
The wide LCD with 128 x 96 dots of remote controller displays six lines of information and supports most
international characters including Korean, Japanese, and Chinese using the embedded fonts. You can easily
check the overall operations of the product at a glance. Design your logo or download logos from our web site,
and download it to iAUDIO to customize the start-up image.
Enjoy the powerful sound effects
iAUDIO delivers the highest-quality sound powered by 5-bands EQ, and the following effects:
• BBE: Improves brilliance and clarity of music
• Mach3Bass: Provides deeper and tighter bass
• MP Enhanced: Adds warmth and clarity from compressed music les
• 3D Surround: Creates an authentic and exciting 3D sound effect
Upgrade iAUDIO by downloading latest rmware
You can enjoy the up-to-date features of iAUDIO by downloading latest version of rmware. Please visit our
website to check if a new version of rmware is available.
Store any data
Simply attach iAUDIO to any PC, and share your documents, photos and any other data les between PCs
anywhere. Any separate USB driver is not required because iAUDIO works as USB portable hard disk.
Convert and Transfer MP3 les
JetShell, the most easy-to-use and powerful file transfer software comes with iAUDIO, allows you to easily and rapidly
convert and save music from a CD to MP3 files. Now you can conveniently store your audio CD music in iAUDIO and
listen to them.
iAUDIO M3
Page 11
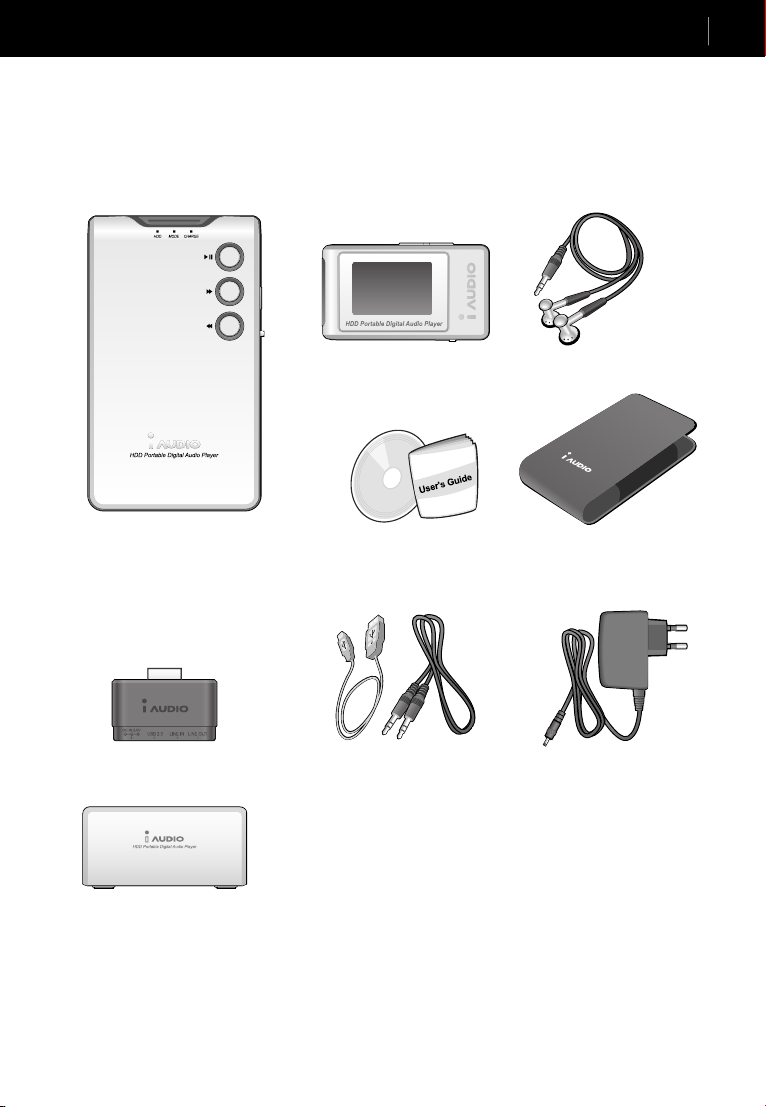
Package Components
Package Components
LCD Remote Controller Earphones
iAUDIO (Player Main Body) Installation CD (JetShell and JetAudio) Carrying Case
User’s Guide
11
Extension Connector USB 2.0 cable / Line-in recording cable AC Power Adapter
Cradle (Option)
iAUDIO M3
Page 12
12
iAUDIO M3
13
Features and Specications
Features
MP3, MP2, WMA *, and WAV ** Playback, Voice Recording. FM Tuner and FM Radio Recording, Direct MP3 Encoding,
USB Portable Hard Drive.
Built-in HDD (20GB ***)
6-Lines, 4-Gray Graphic LCD Remote Controller (Indigo Blue Backlight)
USB 2.0 Interface
Up to 14 hours of playback (Based on our company's test)
(The playing time may be shortened according to settings)
Multi-language Support
Enhanced Navigation
Play/Pause/Stop, Record/Pause during Recording
Next Track/Previous Track, Fast Forward/Rewind
Section Repeat
Resume, Fade In, Auto Play
Adjustable Seeking Speed
Volume (40 levels)
Various EQ and Sound Effects
•Adjustable 5-bands EQ
• Normal, Rock, Pop, Jazz, Classic, Vocal, User modes
• BBE, Mach3 Bass, MP Enhance, 3D Surround
Hold switch
Adjustable Backlight ON Timing, Scroll Speed, Scroll Direction
Auto Off, Sleep Timer
Firmware Download & Logo Image Download
ID3V2, ID3V1, Filename Support
Device Information (Firmware version, HDD Total Capacity/Usage, Total Number of Folders, Total Number of Files)
Mac OS 10.x Support (Only Data Transfer Supported)
Software
• JetShell (File Transfer, MP3/WMA/WAV/Audio CD Playback, MP3 Encoding)
• JetAudio (Integrated multimedia player)
Specications
Playback Format
Recording Format
FM Tuner
Hard disk
PC Interface
Power Supply
Charging Time
Output Frequency
* Secure WMA format is not supported
** PCM format only
*** 1GB means 1 billion bytes. Actual formatted capacity may less
iAUDIO M3
MPEG 1/2/2.5 Layer 3, WMA *, OGG, WAV **
MP3, 64Kbps - 320Kbps
87.5 MHz - 108.0 MHz
20GB ***
USB 2.0 (Up to 480Mbps)
Battery
Rechargeable Lithium Ion battery (Up to 14 Hours of Continuous Playback)
AC Adapter - DC 5.0V, 2A
About 3 hours (When using AC Power Adapter)
Buttons
Remote : PLAY/PAUSE, FF, REW, MENU (NAVI), VOL+, VOL−, MODE, REC
Main Body: PLAY/PAUSE, FF, REW, Mode, VOL+, VOL−, MODE, REC
Switch
Hold
Display
128 x 96 dots, 6-Lines 4-Gray LCD with LED backlight (Multilingual Support)
SNR
95 dB
20Hz~20KHz
Output
16 Ohm Earphones: 20mW+20mW
Size
4.08 X 2.39 X 0.56 inches (103.7 X 60.8 X 14.2 mm)
Weight
4.80 oz (136g) (Including Battery)
Page 13
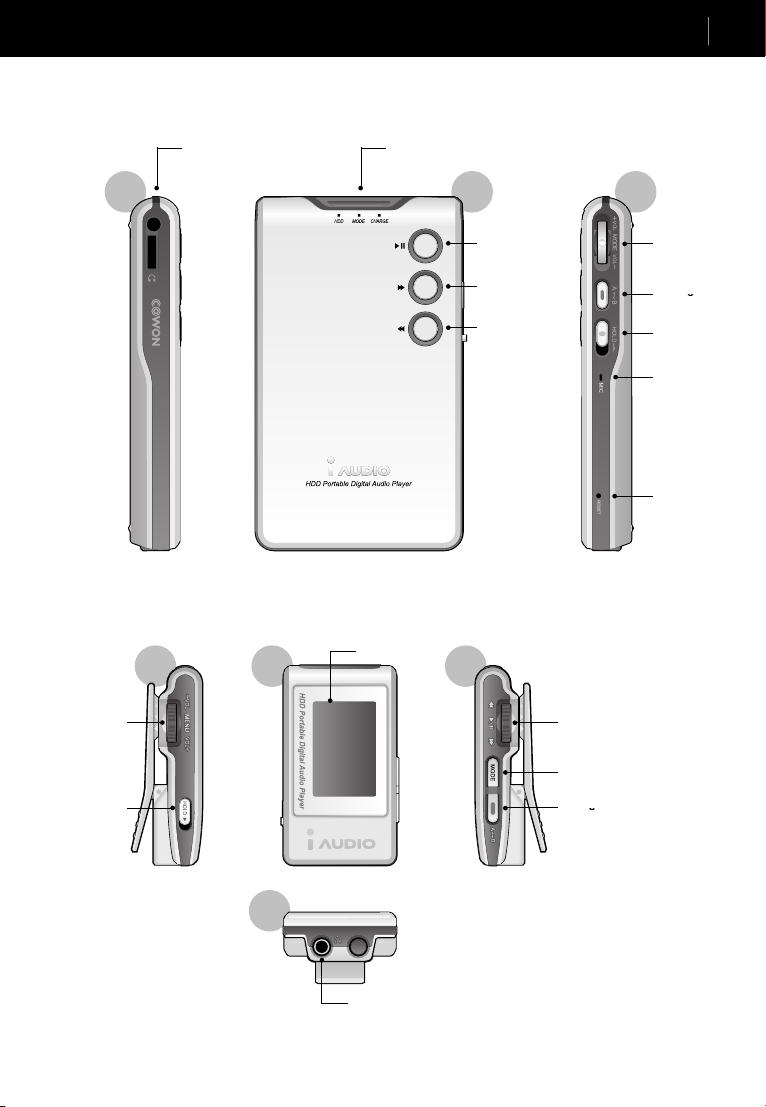
Names of Parts
Names of Parts
13
MENU/
VOL+/VOL-
Button
Left
Remote Controller Jack
(Earphone Jack)
Left
Front
LED Lights (HDD, MODE, CHARGE)
Front
LCD Display
Right
PLAY/STOP Button
FF Button
REW Button
PLAY/STOP/FF/
REW Button
MODE Button
Right
MODE/VOL+/
VOL- Button
B
REC/A
Button
HOLD Switch
MIC
RESET
HOLD Switch
Bottom
Earphone Jack
REC/A
B Button
iAUDIO M3
Page 14
14
iAUDIO M3
15
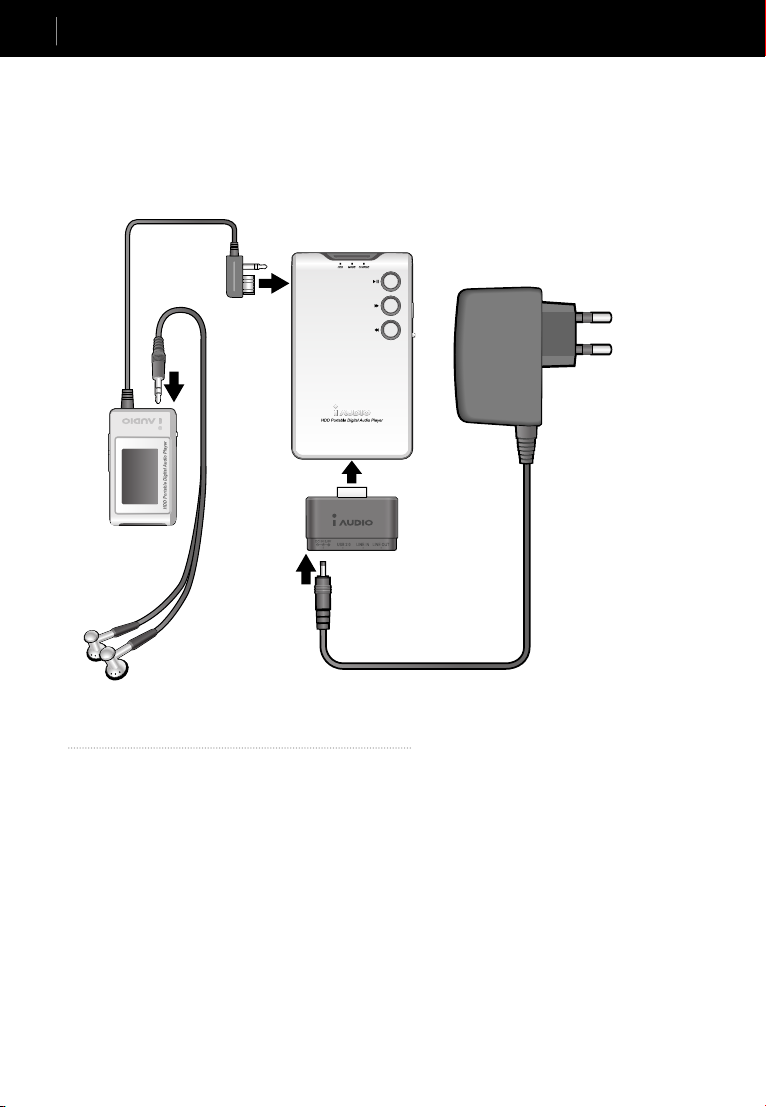
Charing iAUDIO / Connecting USB Cable
Charing iAUDIO
1. Use only the supplied AC power adapter for safety.
2. Connect the AC Adapter to iAUDIO as shown below.
Connecting USB Cable
Precautions
• Use only the supplied USB cable.
• Never use a USB hub.
Connecting with Extension Connector
• Connect the Extension Connector to the the bottom of iAUDIO.
• Connect the USB cable from the PC to the USB port at the bottom of the Extension Connector.
Connecting with Cradle
• Mount the iAUDIO on the Cradle.
• Connect the USB cable from the PC to the USB port at the back of the Cradle.
iAUDIO M3
Page 15

LCD Display
LCD Display / LED Lights
15
Hold (Body, Remote Controller)
JetEffect (BBE,M3B,3D,MP)
Section Repeat
Play Mode
Current Track /Total Tracks
Singer Name, Album Title
Song Title
Progress Bar
Play Time
Bitrate
Sampling Rate
The battery level icon indicates how much longer the battery can be used. Level
decreases as battery is used.
When the battery is low, the battery icon starts blinking. If this happens, connect the AC
power adapter to recharge the battery.
When a tag (ID3V2 or ID3V1) is available, the icon is changed to Disk and the Artist +
Album information is displayed. When the display setting is ‘Filename’, or the tag does
not include the Artist information, the icon is changed to Folder and the folder name is
displayed. When the le is in the root folder, "iAUDIO" is used as the folder name.
Mode
Play Status
Battery Level
Total Time
5 Bands EQ
LED Lights
HDD LED
Lights up GREEN when HDD operates
MODE LED
DIGITAL AUDIO Mode: Blue
FM RADIO Mode: Green
VOICE RECORDER, LINE IN RECORDER Mode: Orange
CHARGE Mode: Bluish Green when fully charged
CHARGE LED
Lights up RED while the battery is being recharged, and goes off when it is fully charged
iAUDIO M3
Page 16
iAUDIO M3
17
Basic Operations
16
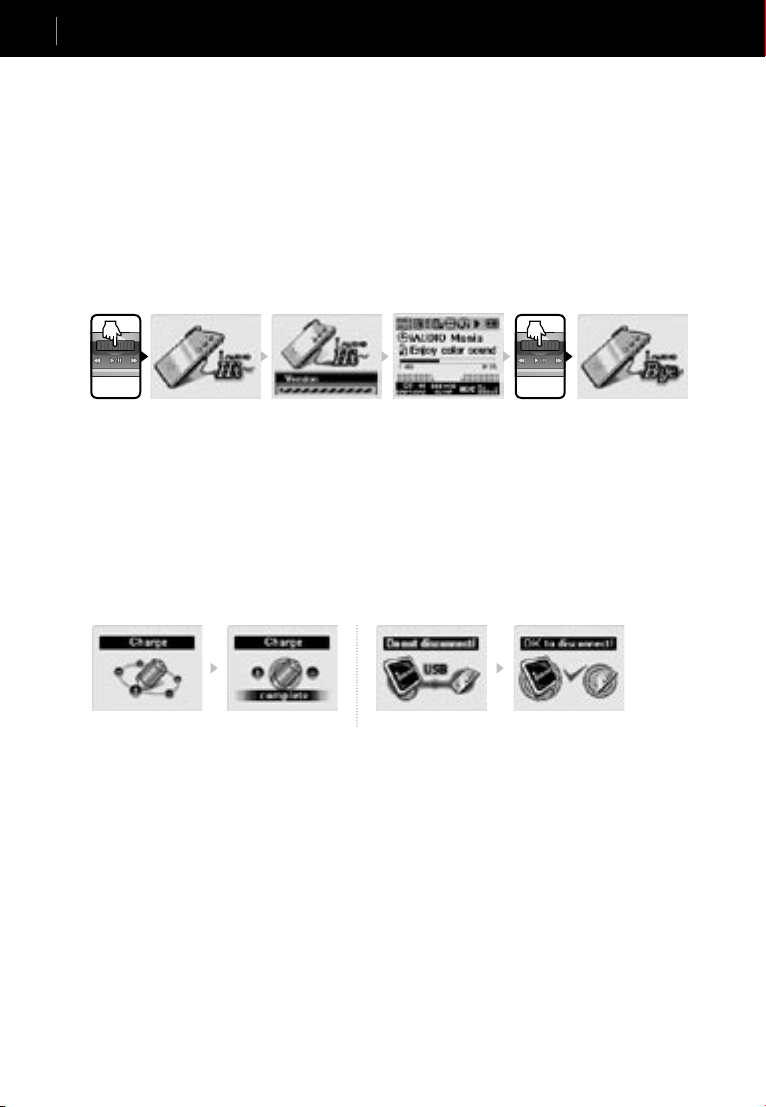
Power On/Off, Charging & Connecting
Basic Operations
1. Power On/Off
• When you connect the power cable or press the "PLAY" button for a few seconds, the "iAUDIO" logo
appears and the power comes on.
• To turn the power off, press the "PLAY" button for a few seconds again. (Power cannot be turned off
during recording or in the USB mode.)
• If the AC Power Adapter is connected when you turn the power off, the charge window is displayed and
iAUDIO goes into Charge mode.
• To use iAUDIO again in the Charge mode, press the "PLAY "button for a few seconds again.
• When you set "Auto Off" or "Sleep Timer", the power automatically turns off.
Press for a few
moments
Press for a few
moments
2. Charging
• To recharge the battery, connect the AC Power Adapter to iAUDIO. (iAUDIO will then turn on
automatically if it was off.)
• The iAUDIO’s "CHARGE" LED lights up while the battery is being charged, and goes off when it is fully
charged.
• If you turn the power off while the AC Power Adapter is connected, the "Charge" window appears and
iAUDIO goes into Charge mode. The battery will recharge to 90% capacity after two hours.
• In Charge mode, when recharging nishes, the "Charge Complete" window appears and the MODE LED
of iAUDIO lights up in bluish green.
• The battery is also charged when the USB cable is connected.
(The charging speed is slower than using AC Power Adapter)
Charge in Progress Charge Completed Connecting to PC via USB cable Safely Disconnect from PC
3. Connecting USB Cable
■ Connecting USB Cable
When you connect the USB cable to the PC while iAUDIO is turned on, used or charged, it enters USB Mode.
(iAUDIO cannot enter USB Mode while recording.)
When the USB cable is connected, the built-in battery is not used and the USB supplies electric power.
When you connect iAUDIO to a USB hub that supplies low current (e.g., a hub installed in the keyboard
or monitor), an error message may appear and iAUDIO may not work normally.
■ Disconnecting USB Cable
• First, run "Safely Remove Hardware" wizard from the Windows tray.
When "OK to disconnect" appears on the LCD window of iAUDIO, disconnect the USB cable.
• If the AC Power Adapter was not connected, iAUDIO automatically powers off.
• If the AC Power Adapter was connected, iAUDIO automatically enters Charge mode.
• When you press the "PLAY" button for a few seconds in the Charge mode, iAUDIO is rebooted.
You should always reboot iAUDIO because the music les in HDD are searched during the rst booting after
the USB cable is disconnected. This takes some time if there are many music les. (20 to 25 seconds if the
HDD is full.)
iAUDIO M3
Page 17
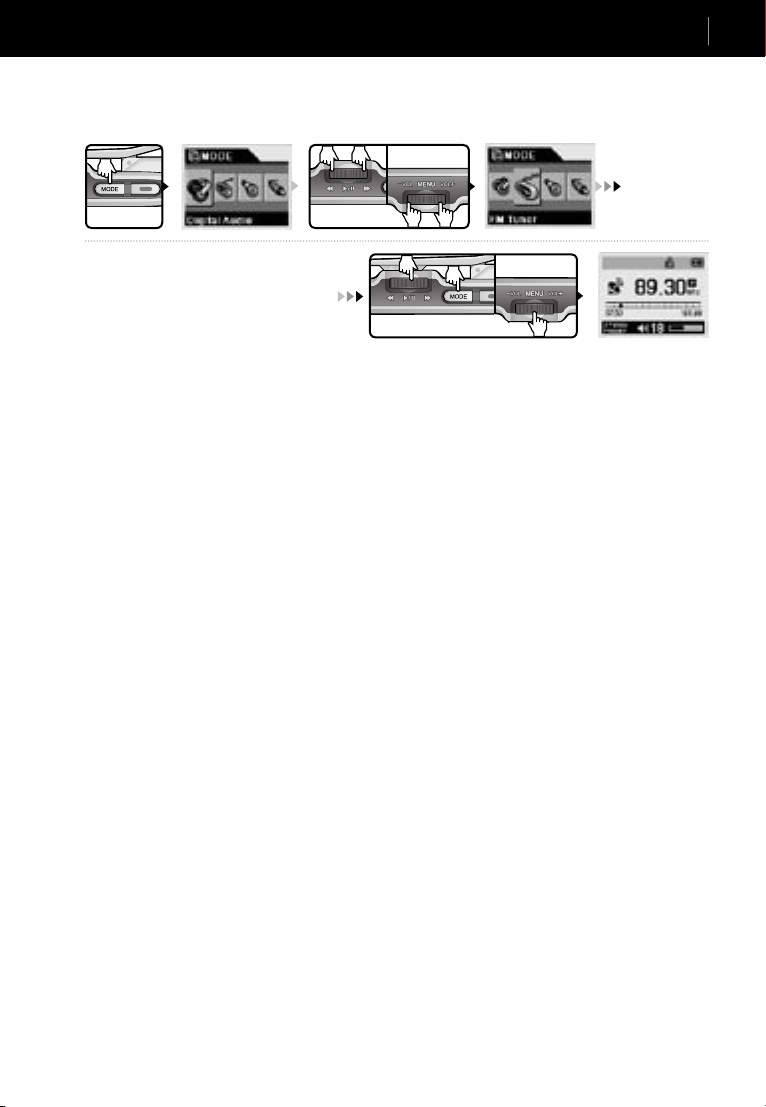
4. Switching Mode: There are four modes: Digital Audio, FM Radio, Voice Recorder, and Line-in Recorder.
Example: Switching from "Digital Audio" to "FM Radio" mode
Basic Operations
Switching Mode
17
Press MODE button.
Move to the desired mode.
Select with PLAY, MODE or
MENU buttons.
■ Opening the Mode Selection Window.
• To switch from one mode to another mode, press the MODE button.
• The Mode window appears for you to select one of the 4 modes.
- This is a function of remote controller. You can only use this feature through the LCD display of the
remote controller.
- You cannot enter the Mode Switching window by pressing the MODE button on main body.
■ Changing Mode
• Using the VOL−/VOL+ button or FF/REW button, change to the desired mode icon among the four
mode icons.
■ Selecting Mode
• After changing to the desired mode icon, select it by pressing the MODE, PLAY, or MENU button.
■ Canceling Mode Switching
• To cancel mode switching and return to the previous mode, press the REC button.
• The mode switching is cancelled and the previous mode window appears.
■ Simple Mode Switching
• When you press the MODE button for a few seconds in any mode, it is immediately switched to the
next mode.
• The mode changes in the following order: Digital Audio →FM Radio →Voice Recorder →Line-in
Recorder.
- The MODE button on main body is activated only when you press it for a few seconds.
(Only Simple mode switching is supported.)
■ 'MODE' LED Status by Mode
• You can easily nd out the operation status of iAUDIO by looking at the ‘MODE ’ LED.
• The LED color changes to blue for Digital Audio Mode, green for FM Radio Mode, and orange for
Recorder Mode.
• When iAUDIO is stopped, paused, or in standby mode for recording, the ‘MODE’ LED blinks at 1
second intervals.
• If there is no user input for some time while the MODE LED is blinking, the Auto Off function
automatically powers off the unit.
iAUDIO M3
Page 18
iAUDIO M3
19
Basic Operation
18
Using Menu
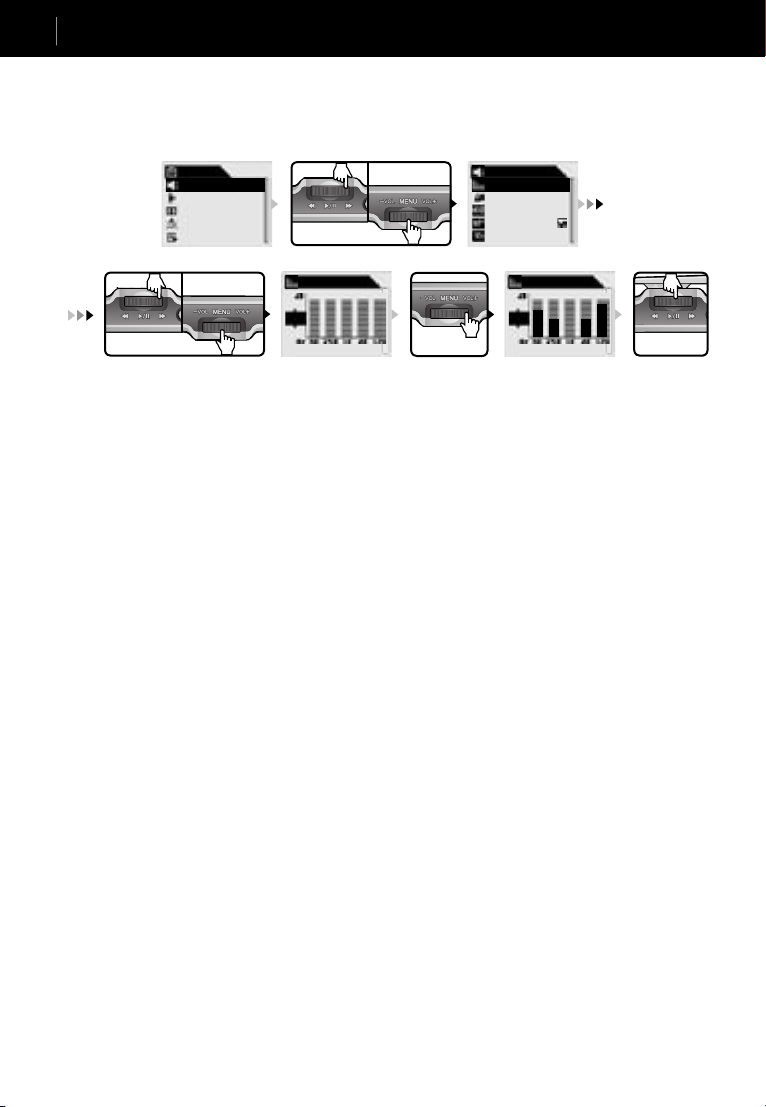
5. Using Menu
Example: Changing the Equalizer of JetEffect from NOR(Normal) to ROC(Rock)
MENU
JetEffect
PlayMode
Display
Timer
General
Select JetEffect Menu
JetEffect
Equalizer
BBE
Mach3Bass
MP Enhance
3D Surround
NOR
ROC
JAZ
Equalizer
9 6 0 6 11
Select with
PLAY button.
Select Equalizer Menu.
USR
NOR
ROC
Equalizer
0 0 0 0 0
Press VOL+
■ Opening Menu Window
• To enter the Menu window, press the MENU button for a few seconds.
• The Menu window appears with various setup items.
- Since there is no Menu button on the main body, you cannot enter the Menu window by using any
button on main body.
- This is a function of remote controller. You can only use this feature through the LCD display of the
remote controller.
■ Changing Menu Item
• Press the VOL−/VOL+ button to change to another menu item.
• To display the sub menu, press the FF or MENU button.
• To return to the higher menu, press the REW button. (If you are viewing the top menu window, the Menu
window is then closed and the previous Mode window appears.)
• To return to the previous Mode window after changing the setting, press the PLAY button.
■ Changing Setting of Menu Item
• Use the VOL−/VOL+ button to change the values.
• Press the MENU button to select the setting.
• The changed setting is immediately applied.
• To return to the Mode window after changing the setting, press the PLAY button.
■ Canceling Setting of Menu Item/Closing Menu Window
• When you press the REC button, the changed setting of the current menu item returns to the previous
value and the Menu window is closed.
• When you press the PLAY button, the current setting is saved and the Menu window is closed.
■ Adjusting Equalizer
• Enter the Equalizer menu.
• Select the predened Equalizer with the VOL−/VOL+ button. (Normal, Rock, Jazz, Classic, Pop, Voice,
Usr)
• Press the FF button to select a specic band in the selected Equalizer.
• Adjust the dB level of the selected band with the VOL−/VOL+ button (0 ~12 dB).
• Return to the previous menu by pressing the REW button, or nish equalizing the sound by pressing the
PLAY button.
iAUDIO M3
Page 19

6. Using Navigator
Example: Choosing and playing "01.MP3" le in the b-2 folder when the iAUDIO folder structure is as follows:
Root
A
B
C
Press MENU
briey.
If you press MENU, select Expand from pop-up menu.
D
E
Basic Operation
Using Navigator
Root
A
B
C
D
Press VOL+.
B
b-1
b-2
E
19
b-1
01.MP3
02.MP3
03.MP3
Press Play, FF, or
MENU button.
If you press MENU, select Expand from pop-up menu.
04.MP3
05.MP3
■ Opening Navigator Window
Press Play, FF, or
MENU button.
If you press Play button:
→ iAUDIO returns to the Digital Audio
Mode and plays "01.MP3."
If you press FF button:
→ "01.MP3" is played in Navigator.
If you press MENU and select PLAY now
from pop-up menu:
→ iAUDIO returns to the Digital Audio
Mode and plays "01.MP3."
• Press the Menu button to display the Navigator window.
• In the Digital Audio, Voice Recorder, or Line-in Recorder Mode, the Navigator window for browsing the
folders/les in HDD opens.
• In the FM Radio Mode, the Navigator window for browsing and setting the preset opens.
- Since there is no Menu button on the main body, you cannot enter the Navigator window by using any
button on main body.
- This is a function of remote controller. You can only use this feature through the LCD display of the
remote controller.
■ Moving between Items in Navigator
• Press the VOL−/VOL+ button to move between items in Navigator.
• To move to the sub-folder, press the PLAY or FF button.
• To move to the parent folder, press the REW button. (If it is the root folder, the Navigator is closed and the
previous Mode window returns.)
■ Selecting Items in Navigator
• When you select a le and press the PLAY or FF button, the le is played.
• When you select a folder and press the PLAY or FF button, the les in the folder are displayed.
■ Navigator Popup Window
• When you press the MENU button, appropriate pop-up window appears.
• Press the VOL−/VOL+ button to move to a desired item in the pop-up window.
• Press the PLAY or FF button to select an item in the pop-up window.
When you select a le and press MENU.
• Press the REC button to cancel the selection and close the pop-up window.
• Items in pop-up window for le: Play Now, Add to List
• Items in pop-up window for folder: Expand, Play Now, Add to List
• Items in pop-up window for le in Dynamic Playlist: Delete, Delete all
• Items in pop-up window for Radio Mode Navigator: Listen Ch, Save Current,
Delete Ch
When you select a folder and press MENU.
■ Closing Navigator
• Press the REC button to close the Navigator window and return to the previous window.
iAUDIO M3
Page 20

iAUDIO M3
21
Basic Operations
20
Digital Audio Player
Digital Audio Player (Listening to music le)
1. Playback
• Press the PLAY button for a few seconds. The iAUDIO logo appears and the power turns on.
• To enter Digital Audio Mode from other modes, enter the Mode Switching window by pressing the Mode
button, and then select "Digital Audio".
• If AutoPlay is set to "ON", play starts as soon as iAUDIO powers on. Otherwise, iAUDIO is on standby.
In the latter case, press the PLAY button to play music.
• If the Resume feature is set, iAUDIO plays from the last stopped position.
• iAUDIO pauses when you press the PLAY button briey during playback, and resumes when you press
it again.
• iAUDIO automatically powers off if the "AUTO OFF" or "SLEEP" is set.
2. Adjusting Volume
• Press VOL+ or VOL−button to adjust volume while iAUDIO is playing.
• The volume changes by 1 level when you press the button briey, and it changes rapidly when you press
and hold the button.
• The volume level can be adjusted between 0 (mute) and 40.
3. Section Repeat:
• Use the REC (A
• When you press the button at the beginning position of the desired section of music, (A
displayed at the top middle of LCD window.
When you press the button again at the end of the desired section, the icon changes to (A
• Now this section is played repeatedly in a loop.
• To exit from Section Repeat, press the REC button again.
• Section should be at least three seconds or longer.
B) button while a track is played in Digital Audio Mode.
) icon is
B).
4. Searching tracks in Playback window
■ Searching tracks in PLAY status
• You can skip to the next track by pressing the FF or REW button briey in PLAY status.
- Unlike ash-type players, a HDD type player should power on the HDD if it is turned off to read tracks.
Therefore, there can be a little delay before a track is played. In this case, the "WAIT" pop-up window
appears, and playback starts after 2 or 3 seconds.
- You can easily nd out the operation status of HDD from the HDD icon at the top of LCD window and
the HDD LED on the main body.
■ Searching tracks in STOP or PAUSE status
• You can skip to the next track by pressing the FF or REW button briey in STOP or PAUSE status as well.
• The next track stays in STOP status unlike the above case.
• When you press and hold the FF or REW button, you can skip through consecutive tracks.
- Since HDD doesn’t have to be accessed in STOP status, previous and next tracks can be searched for
immediately.
5. What is Dynamic Playlist (DPL)?
• There is a special folder named "D-PLAYLIST " under the root folder (it is a virtual folder), in which the
links to user-added tracks are saved.
• You can add your favorite tracks to DPL then listen to tracks in DPL by selecting the "D-PLAYLIST"
folder from Navigator.
iAUDIO M3
Page 21

Basic Operations
Digital Audio Player
■ Adding tracks to DPL
• Select a track in Navigator, open the pop-up menu, and select "Add To Playlist." The track is added to
DPL.
• Select a folder in Navigator, open the pop-up menu, and select "Add To Playlist." The tracks in the folder
will be added to DPL.
• When you press REC button while playing a track not included in DPL, it is added to DPL.
■ Removing tracks from DPL
• Select a track to delete in the "D-PLAYLIST" folder in Navigator, open the pop-up menu, and select
"Delete". Then the track is removed from the list.
• Select any track in the "D-PLAYLIST" folder in Navigator, open the pop-up menu, and select "Delete
All". Then all tracks are removed from the list.
• When you press the REC button for a few moments while playing a track in DPL, the track is removed.
- When you remove a track from DPL, only link to the le is removed and the actual le is not
removed.
- When you play a track in the "D-PLAYLIST" folder, the Boundary is automatically set to DPL.
- When you delete a track you are currently listening to in the DPL Boundary, the next track is automatically
played. If you delete all tracks and there is no track to play, the current track keeps playing, the DPL
Boundary is released, and iAUDIO returns to the boundary setting in Menu. (E.g., if the Menu setting is
Dir, iAUDIO returns to the Dir Boundary based on the currently playing track.)
- If iAUDIO is connected to the PC (enters USB Mode), DPL is automatically cleared.
6. M3U Play-List
There is a "PLAYLIST" folder under the root folder, and m3u les saved in this folder can be played.
■ Adding M3U les
• Connect iAUDIO to a PC with a USB cable and iAUDIO is recognized as a hard disk.
• Using JetAudio or Winamp software, create an M3U le with the tracks in the HDD of iAUDIO.
• Save the created M3U le in the "PLAYLIST" folder under root folder.
• Disconnect the USB cable, power on iAUDIO. You can play the M3U le saved in the "PLAYLIST"
folder in Navigator.
- When you play a M3U le, the Boundary is automatically set to M3U.
■ Deleting M3U les
• Connect iAUDIO to a PC with a USB cable and iAUDIO is recognized as a hard disk.
• Delete M3U les in the "PLAYLIST" folder under root folder.
21
7. DPL, M3U and Boundary
• You can choose one of four boundary modes : All, Single, Dir and SubDir.
• In addition to these 4 boundaries, there are also DPL and M3U Boundaries.
• When you play a track in the "D-PLAYLIST" folder, the Boundary is automatically set to DPL, and only
the tracks in DPL are played.
• When you play a le in the "PLAYLIST" folder, the Boundary is automatically set to M3U, and only the
tracks in the selected M3U le are played.
• If you select a track in other ordinary folders in Navigator, the DPL or M3U Boundary is automatically
released, and iAUDIO returns to the boundary setting in Menu.
iAUDIO M3
Page 22

iAUDIO M3
23
Basic Operations
22
FM Radio
FM Radio (Listening to FM Radio)
Guide to General Operations in FM Radio Mode
Select FM TUNER Mode FM Tuner Mode Change frequency with REW/FF buttons (in 0.1 MHz intervals).
Preset Ch
01 None
02 None
03 None
04 None
05 None
Press MENU button to enter Preset Ch menu. Display pop-up menu. Save the current channel. The current channel is saved. Press REW or PLAY
Switch to FM Pre-set Mode Use REW/FF buttons to change between preset channels.
Preset Ch
01 None
02 None
03 None
04 None
05 None
Preset Ch
01 89.30
02 None
03 None
04 None
05 None
button to return to
FM RADIO Mode.
1. Listening to FM Radio
• Press the PLAY button for a few seconds. The iAUDIO logo appears and the power turns on.
• If you were listening to the radio before turning off iAUDIO, iAUDIO comes on in FM Radio Mode and
you can listen to the radio.
• To change to FM Radio Mode from other modes, press the Mode button. In the Mode Switching window,
select FM Radio.
2. Selecting Station
• When you press the FF/REW buttons while listening to FM radio, the frequency changes by 0.1 MHz (or
0.05 MHz).
• When you press the FF or REW button for over 1 second, the nearest station with good reception is
automatically searched.
• When you press the PLAY button briey while listening to FM radio, iAUDIO switches to Preset mode.
Press the FF/REW button to change between preset channels.
3. Preset Setting
• Press the MENU button for a few seconds. The FM Radio Navigator window appears in which you can
edit the preset channels.
• Select a preset number in Navigator and press the MENU button. When a pop-up menu appears, edit the
preset setting.
- Listen Ch: Listen to the current preset channel.
- Save Current: Set the current frequency to the preset channel.
- Delete Ch: Delete the current preset channel.
• You can save up to 24 preset channels.
iAUDIO M3
Page 23

Basic Operations
4. Recording FM Radio
• Press the REC button for a few seconds to record the FM broadcast while listening to it.
• The le recorded in preset recording quality is saved as ENC***.MP3 in the RECORD folder
(***: a 3-digit serial number).
• Press the PLAY button to pause recording, and press it again to resume recording.
• To nish recording, press the REC button again. "Wait" message appears while the le is saved, and
iAUDIO returns to the Radio window when saving nishes.
- For information on record quality settings, see the relevant page in this Guide.
- The recorded le size cannot exceed 512MB. If the recorded le reaches this size, iAUDIO
automatically saves it and then continues saving in a new recorded le. (Recording time for one le:
Around 10 hours when the quality setting is 128Kbps)
- When free space in HDD is less than 128MB, recording does not start. If free space becomes less than
128MB during recording, iAUDIO automatically stops.
Press REC for a few moments. FM recording starts. Press REC button to nish recording.
FM Radio
23
iAUDIO M3
Page 24

iAUDIO M3
25
Basic Operations
24
Voice Recorder
Voice Recorder
(Recording Voice with Built-in Microphone)
Select Voice Recorder Mode. Press REC button. Voice Recording Starts. Press REC button to nish recording.
Voice Recorder is in
Stand By status.
1. Preparing Voice Recording
• Turn on iAUDIO, press the MODE button and select Voice Recorder.
• iAUDIO enters Voice Recording Mode and stays in STAND BY status.
2. Voice Recording Start/Pause/Stop
• In STAND BY status, press the REC button to start recording.
• Press the PLAY button to pause recording, and press it again to resume recording.
• Press the REC button again to nish recording. A "Wait" message appears while the le is being saved, and
iAUDIO returns to STAND BY status when the saving nishes.
• The recorded le is saved as VOC***.MP3 in the VOICE folder according to the preset recording quality
(***: a 3-digit serial number).
• You cannot turn off iAUDIO, nor change Menu or Mode while recording.
3. Playing Recorded le
• To play the last recorded le, press the PLAY button in STAND BY status.
• You can also press the MENU button briey in STAND BY status to enter Navigator Mode, and then
select a le to play.
• Operating iAUDIO while a le is played is identical to that of Digital Audio Mode.
• When a le nishes playing, iAUDIO automatically returns to STAND BY status.
• Press the REC button any time to stop playing. iAUDIO returns to STAND BY status again.
4. Recording Quality and Capacity
• For information on recording volumes and quality settings, see the relevant page in this Guide.
• The recorded le size cannot exceed 512MB. If the recorded le reaches this size, iAUDIO automatically
saves it and then continues saving in a new recorded le. (Recording time for one le: Around 10 hours
when the quality setting is 128Kbps)
• When free space in HDD is less than 128MB, recording does not start. If free space becomes less than
128MB during recording, iAUDIO automatically stops.
iAUDIO M3
Page 25

Line-in Recorder (Direct Encoding)
Basic Operations
Line-in Recorder
25
1. Preparing Line-in Recording
• Turn on iAUDIO, press the MODE button and select LINE-IN Recorder.
• iAUDIO enters LINE-IN Recorder Mode and stays in Stand By status.
• Connect the headphone jack of CDP and the LINE-IN jack of iAUDIO with a included stereo cable.
2. Line-in Recording Start/Pause/Stop
• Press the REC button in STAND BY status to start recording, and play CDP as soon as recording starts.
• Press the PLAY button to pause recording, and press it again to resume recording.
• Press the REC button again to nish recording. "Wait" message appears while the le is being saved, and
iAUDIO returns to STAND BY status when the saving nishes.
• The recorded le is saved as ENC***.MP3 in the RECORD folder according to the preset recording
quality (***: a 3-digit serial number).
• You cannot turn off iAUDIO, nor change Menu or Mode while recording.
Select Line-in Recorder Mode. iAUDIO is in Stand By. Press REC button. Line-in Recording starts. Press REC button to nish recording.
iAUDIO M3
Page 26

iAUDIO M3
27
Basic Operations
26
Line-in Recorder
3. Playing Recorded le
• To play the last recorded le, press the PLAY button in STAND BY status.
• You can also press the MENU button briey in STAND BY status to enter Navigator Mode, and
then select a le to play.
• Operating iAUDIO while a le is played is identical to that in Digital Audio Mode.
• When a le nishes playing, iAUDIO automatically returns to STAND BY status.
• Press the REC button any time to stop playing. iAUDIO returns to STAND BY status again.
4. Recording Quality and Capacity
• For information on record volumes and quality settings, see the relevant page in this Guide.
• The recorded le size cannot exceed 512MB. If the recorded le reaches this size, iAUDIO
automatically saves it and then continues saving in a new recorded le. (Recording time for one
le: Around 10 hours when the quality setting is 128Kbps)
• When free space in HDD is less than 128MB, recording does not start. If free space becomes less
than 128MB during recording, iAUDIO automatically stops.
iAUDIO M3
Page 27

Advanced Operations
JetEffect
Basic Operations
JetEffect
Due to hardware limitations, EQ and/or other sound effects may not work for some music les.
Currently, EQ is automatically turned off when playing OGG les of high bitrate (>192Kbps) or MP3 les of low sampling rate (<32KHz).
27
1. Equalizer
JetEffect
Equalizer
BBE
Mach3Bass
MP Enhance
3D Surround
Equalizer
9 6 0 6 11
NOR
ROC
JAZ
2. BBE :
BBE
10
3. Mach3Bass :
Mach3Bass
10
4. MP Enhance :
JetEffect
Equalizer
BBE
Mach3Bass
MP Enhance
3D Surround
Equalizer (EQ) allows you to adjust the volumes of frequency bands according to your
taste.
You can choose one of 7 pre-dened equalizer modes :
Normal, Rock, Jazz, Classic, Pop, Vocal EQ and User EQ.
You can also adjust each band in any EQ modes
Changing Band: FF, REW
Changing Band Level: VOL +, VOL -
BBE is the sound effect which improves brilliance and clarity of music.
You can turn this off or select a level between 1 and 10.
Mach3Bass provides deeper and tighter bass sound.
You can turn this off or select a level between 1 and 10.
MP Enhance adds warmth and clarity from compressed music les.
Select On to apply this or Off otherwise.
5. 3D Surround :
3D Surround
10
3D Surround creates an authentic and exciting 3D sound effect.
You can turn this off or select a level between 1 and 10.
6. Pan (Left & Right Balance)
Pan
0
Pan is the feature to adjust the balance between left and right sound volumes.
You can select a level between –20 and +20 from left to right.
iAUDIO M3
Page 28

iAUDIO M3
29
Advanced Operations
28
Play Mode
Play Mode
1. Boundary: All, Single, Dir, SubDir
Boundary
All
Single
Dir
SubDir
You can set which les are played from this menu.
"All" plays all tracks, "Single" plays one track, "Dir" plays all tracks in a folder,
"SubDir" plays al tracks in the folder and subfolders.
The recorded les under RECORD and VOICE folders are excluded.
2. Repeat
PlayMode
Boundary
RepeatE
Shufe
You can set repeat mode for the tracks in the boundary.
Check this to listen to the tracks in the boundary repeatedly.
When you uncheck this, iAUDIO returns to STOP status after playing all tracks
in the boundary.
3. Shufe
PlayMode
Boundary
Repeat
Shufe
This sets whether or not to play tracks randomly within the boundary.
Check this to play the tracks in the boundary in random order
When you uncheck this, the tracks are played in their original order.
iAUDIO M3
Page 29

Display
Advanced Operations
Display
29
1. Play Time
Play Time
Elapsed
Remain
• Select the display time format for the track being played.
• Elapsed: The elapsed time from the beginning of the current track is displayed.
• Remain: The remaining time of the current track is displayed.
2. Scroll Speed
Scroll Speed
1
2
4
8
16
• Set the scroll speed for texts on the LCD display.
• You can select 1, 2, 4, 8, or 16.
3. Scroll Type (for Song Title)
Scroll Type
One way
Two way
• Set the scroll type for texts on the LCD display.
• One way: Texts scroll from right to left.
• Two way: Texts scroll to left and right.
4. Song Title
Song Title
Filename
ID3 tag
• Set the display type for song title.
• ID3 Tag: The ID3 tag information is displayed. If it does not exist, the le name is
displayed.
• FileName: The le name is displayed.
5. Backlight Time
Backlight Time
Off
1
2
4
8
• Set the time for which the LCD backlight is turned on.
• You can select Off, or 1, 2, 4, 8 seconds, or Always.
6. Contrast
Contrast
5
7.Language
Language
Chinese(Simp.)
Chinese(Trad.)
English
Hangul(Korean)
Japanese
• Set the contrast of the LCD window.
• You can select a level between 0 and 10.
• Select a language you want to display for le information such as title, artist and lename.
• If this setting is incorrect, the song information may not be displayed properly.
• You can select Chinese (Simp), Chinese (Trad), English, Hangul (Korean), Japanese, or
Russian.
iAUDIO M3
Page 30

iAUDIO M3
31
Advanced Operations
30
Timer, General
Timer
1. Auto Off
Language
Off
30 sec
1 min
5 min
10 min
2. Sleep
Sleep
Off
10 min
20 min
30 min
40 min
General
1. Skip Length
Skip Length
Track
2 sec
3 sec
4 sec
5 sec
2. Scan Speed
Scan Speed
X4
X7
X10
X20
• iAUDIO turns off if no button is pressed within a preset time while it is stopped.
• You can select Off, 30 seconds, or 1, 5, 10, 30 or 60 minutes.
• iAUDIO turns off after a preset time has elapsed.
• You can select Off, or 10, 20, 30, 40, 50, 60, 90 or 120 minutes.
• Set the skip time when the FF/REW button is pressed once.
• You can select Track, or 2, 3, 4, 5, 10, 15, 20 or 30 seconds.
• Set the scan speed for fast forward/rewind when the FF/REW button is pressed for a few
moments.
• You can select x4, x7, x10 or x20.
iAUDIO M3
3. Resume
General
Skip Length
Scan Speed
Resume
AutoPlay
FadeIn
4. Auto Play
General
Skip Length
Scan Speed
Resume
AutoPlay
FadeIn
• When Resume is On, iAUDIO starts playback from the last played position after it has
been stopped or paused.
• You can select On or Off.
• iAUDIO automatically starts playing after it powers on.
• You can select On or Off.
Page 31

Advanced Operations
Recording
31
5. Fade in
FadeIn
Off
1 sec
2 sec
3 sec
4 sec
• The volume increases slowly when iAUDIO starts playing after it has been stopped or
paused.
• You can set the time period over which the volume increases.
• You can select Off, or 1, 2, 3, 4 or 5 seconds.
6. Load Default
Load Default
Cancel
OK
Recording
• The menu settings are returned to the factory pre-set values at the time when iAUDIO was
shipped from the factory.
• Select OK to apply this.
1. FM Radio bps (FM Tuner)
FM Radio bps
64kbps
96kbps
128kbps
256kbps
320kbps
• Set the quality of MP3 les when FM Radio is recorded.
• You can select 64, 96, 128, 256 or 320 kbps. A higher value means higher quality.
2. Line-in bps
Line-in bps
64kbps
96kbps
128kbps
256kbps
320kbps
• Set the quality of MP3 les when recording with LINE-IN Recorder.
• You can select 64, 96, 128, 256 or 320 kbps. A higher value means higher quality.
3. Line Volume
Line Volume
8
• Set the volume level of the sound coming in from the Line-In jack.
• You can select a level between 1 and 10. A higher value means higher amplication.
4. Voice bps (Builit-in Microphone)
Voice bps
32kbps
48kbps
64kbps
• Set the quality of MP3 les when recording with Voice Recorder.
• You can select 32, 48, 64, 96, 128 kbps. A higher value means higher quality.
5. Mic Volume
Mic Volume
Low
High
• Set the volume level of the sound coming in from the built-in microphone.
• You can select Low or High. When you select High, the recording sound quality may become
poor if the input sound is too loud.
iAUDIO M3
Page 32

iAUDIO M3
33
Advanced Operations
32
FM Radio/Information
FM Radio
1. Stereo
Stereo
Stereo
Mono
• Select Stereo or Mono when listening to FM Radio.
2. FM Region (Country Setting)
FM Region
China/Europe
Japan
Korea
US
Information
• Set the country in which you are listening to FM radio.
• You can select China, Europe, Japan, Korea, Russia or the U.S..
• Version: The version of the rmware currently installed in iAUDIO is displayed.
• HDD Tot: The total capacity of HDD is displayed.
• HDD Free: The free space in the HDD is displayed.
• Dirs: The total number of directories excluding the system directories is displayed.
• Songs: The total number of music les excluding the recorded les is displayed.
iAUDIO M3
Page 33

Terminology
Terminology
BBE
Sound eld effects of high frequency resolution that reinforce treble sound and make music clearer
Mach3Bass
An elaborate bass booster that reinforces super bass of low-frequency bands, creating a richer and denser
bass sound
MP Enhance
Sound eld effects that compensate for lost sound segments of tracks in the device during playback
3D Surround
Three-dimensional sound that gives a sense of spatial separation
Boundary
The range of playback.
You can select Track, All tracks, Folder or Subfolder.
Contrast
A feature to adjust the contrast of the LCD display
Resume
A feature to memorize/recall the last playback position
33
Fade-in
The sound volume increases slowly from the lowest to the set upper volume limit when iAUDIO starts
playing.
DPL
DPL stands for Dynamic Playlist. This feature allows user to create his/her own play list and listen to it.
iAUDIO M3
Page 34

34
iAUDIO M3
35
Troubleshooting
Symptom Remedy Explanation
iAUDIO does not
power on.
You cannot hear
any sound or there
is noise.
FM Radio does not
work.
Characters on LCD
are illegible.
JetShell does not
work and “iAUDIO
IS NOT FOUND”
appears in a window.
The HDD capacity is
displayed incorrectly.
(E.g.: 18GB is
displayed for 20GB
memory)
iAUDIO does not
work or works
abnormally after
hundreds of les are
saved in Root folder.
Check if the ‘Hold’ button is set to ON.
If it is, set the ‘Hold’ button to OFF and
iAUDIO does not work when the Hold button
is set to ON.
try again.
See if the same phenomenon occurs
when you connect the AC adapter.
Make sure that there are music les in
iAUDIO.
If the built-in battery is completely discharged,
charge it with the AC adapter.
iAUDIO does not work if there are no les in
the hard disk.
Check if the volume is set to "0".
Check if the remote controller/earphone is disconnected or if there is any foreign substance
in/on the jacks.
(Noise may be generated if there is foreign substance.)
If data in the audio le is damaged, noise may be generated or the sound may break up.
FM reception sensitivity may be weak and you many not be able to hear FM Radio clearly
depending on where you are, such as inside a building, subway or moving car. In addition,
listening to the radio may become impossible if you are in radio wave shade areas.
If FM radio does not work where you know that radio reception should be possible, there
may be a problem in the reception module. In this case, please contact our service center.
Change the language setting to ‘English’ or appropriate language in the ‘Language’ menu
of iAUDIO.
A separate driver must be installed for Windows 98.
See "Installing USB Driver for Windows 98."
For example, with a 20GB product, about 18.6GB of capacity after FAT32 formatting
is normal. Some of the storage in iAUDIO is used for system area which is essential for
normal operation of iAUDIO. Therefore, the actual displayed capacity of the HDD is
somewhat reduced when you exclude this.
iAUDIO uses FAT32. Owing to the
limitations of FAT32, you are advised
NOT to save many les in the root
There are more limitations for Windows 98.
We recommend that you create subfolders for
saving les.
directory.
iAUDIO M3
When ‘JetShell’ is activated, it controls the iAUDIO. Therefore, you should exit ‘JetShell’ before performing
the following tasks:
• Installing the USB drive
• Formatting in ‘Windows Explorer’
• Upgrading the rmware
Page 35

Digital Audio Mode
Digital Audio Mode / FM Radio Mode
Using Buttons
35
Button Main
Play/
Pause
FF
REW
MENU
MODE
VOL +
VOL -
REC/
B
A
For Operation, indicates pressing the key briey, and indicates pressing the key for more than 1 second.
FM Radio Mode
Key Operation General Mode Preset Mode
Play/Pause
FF
REW
MENU
MODE
VOL +
VOL -
REC/A B
Body
Remote
Controller
Operation During Stop During Play
Play the current
track
Power On Power Off
Skip to the next
track
Fast Forward Fast Forward
Skip to the
previous track
Rewind Rewind
Navigator
Setup menu
Select a mode Select a mode
Increase volume Increase volume
Decrease volume Decrease volume
Enter Preset mode Exit Preset mode
Power ON Power Off
Increase frequency Skip to the next preset
Search the next FM station Skip to the next preset
Decrease frequency Skip to the next preset
Search the previous FM station Skip to the previous preset
Preset mode setting Preset mode setting
Setup menu Setup menu
Select a mode Select a mode
Increase volume Increase volume
Decrease volume Decrease volume
Stop recording Stop recording
Start recording Start recording
Stop the current track
Skip to the next track or move forward by
specied time.
Skip to the previous track or move
backward by specied time.
Navigator
Setup menu
Start or Stop Repeat A
B (Section Repeat)
iAUDIO M3
Page 36

iAUDIO M3
37
Using Buttons
36
Voice Recorder /Line-in Recorder Mode
Voice Recorder /Line-in Recorder Mode
Key Operation During Stop In the Preset Mode
Play/Pause
FF
REW
Play the previous recording le Pause/Continue recording
Power Off
MENU
MODE
VOL +
VOL -
REC/A B
Navigator
Setup menu
Select a mode
Increase volume
Decrease volume
Start recording Stop recording
Navigator
Key Operation When Selecting a File When Selecting a Folder
Play/Pause
FF
REW
MENU
MODE
VOL +
VOL -
The selected le is played and then iAUDIO
changes to MP3 Player mode.
The selected le is played and iAUDIO stays
in Navigation mode.
Go to the parent folder. Go to the parent folder.
Pop-up Menu Pop-up Menu
Move down Move down
Move up Move up
Go to the selected folder.
Go to the selected folder.
iAUDIO M3
REC/A B
Exit Navigator
Page 37

Menu Table
37
JetEffect
Play Mode
Display
Timer
Equalizer
BBE
Mach3Bass
MP Enhance
3D Surround
Balance
Boundary
Repeat
Shufe
Play Time
Scroll Speed
Scroll Type
ID3 Tag
Backlight Time
Contrast
Language
Auto Off
Sleep
: Equalizer
: BBE
: Mach3Bass
: MP Enhance
: 3D Surround
: Pan
: Boundary
: Repeat
: Shuffle
: Play Time
: Scroll Speed
: Scroll Type
: Song Title
: Backlight Time
: Contrast
: Language
: Auto Off
: Sleep
General
Recording
FM
Information
Skip Length
Scan Speed
Resume
Auto Play
Fade- In
Battery Type
FM
Music
Line Volume
MIC
Mic. Volume
Stereo
FM Region
: Skip Length
: Scan Speed
: Resume
: Auto Play
: FadeIn
: Load Default
: FM Radio bps
: Line-in bps
: Line-in Volume
: Voice bps
: Mic Volume
: Stereo
: Region
Firmware Version
HDD Total Capacity
HDD Free Space
Total Directories
Total Track Files (Excluding
recorded les)
iAUDIO M3
Page 38

38
iAUDIO M3
39
Connecting iAUDIO
Connecting iAUDIO
Connecting USB Cable
Precautions
• Use only the provided USB cable.
• Never use a USB hub.
Connecting with Extension Connector
• Connect the Extension Connector to the the bottom of iAUDIO.
• Connect the USB cable from the PC to the USB port at the bottom of the Extension Connect0or.
Connecting with Cradle
• Mount the iAUDIO on the Cradle.
• Connect the USB cable from the PC to the USB port at the back of the Cradle.
For Windows ME/2000/XP
To make sure that the installation was complete, check if a new hard disk has been created in ‘My Computer’
as shown in the following picture.
iAUDIO M3
Page 39

Connecting iAUDIO
For Windows 98SE
1. The E:\ drive shown in the illustration is an example, and it may be different from the actual drive name used by your
PC. It was given for your reference only.
39
2. Connect iAUDIO and PC with a USB cable. In the
normal Windows environment, a message saying that
the iAUDIO M3 Digital Audio Player device was
found will be displayed as shown in the left picture.
Click on the ‘Next’ button.
4. Check "Specify a location" and click on the [Browse]
button.
3. Check "Search the best driver for your device"
and click ‘Next’.
5. From the ‘Browse’ window, select the [Win98] folder
on the iAUDIO Installation CD, and click on the ‘OK’
button. When the model name "iAUDIO M3 Digital
Audio Player" appears on the [Add New Hardware
Wizard] window as shown in the picture, click on the
[Next] button.
6. The driver les are copied and installed from the
Installation CD. When the installation nishes, a
message notifying you of completion appears as
shown in the picture.
7. Finally, make sure that installation of iAUDIO M3 was
completed normally by checking "iAUDIO M3 Digital
Audio Player" displayed under Control Panel →System
→Device Manager → Harddisk Controller.
iAUDIO M3
Page 40

40
iAUDIO M3
41
What is JetShell? and Installing JetShell
What is JetShell?
JetShell is the iAUDIO manager program providing the following features:
• Downloading/Uploading les from/to iAUDIO (some les excluded).
• File management similar to Windows Explorer
• Playing MP3, MP2, WAV, WMA, ASF, Audio CD, and Playlist (M3U)
• Ripping MP3 les from Audio CD
• Converting between WAV/MP3/WMA
• Changing bitrate of MP3 les
• Convenient le transfer using Download List
• A wide selection of spectrums, equalizers, and effects
• Editing ID3 tags
• Downloading iAUDIO logo
• Formatting hard disk
Running Environment for JetShell
• Pentium 200 Mhz or higher
• 32MB or more memory
• 20MB or more hard disk space
• 256 color or higher display
• Windows 98 SE/ME/2000/XP (NT is not supported)
• USB Port 1.1 or higher
• CD-ROM drive
Installing JetShell
1. Insert the iAUDIO Installation CD in the CD-ROM drive. The installation program starts automatically. It
may not start automatically sometimes depending on the settings of the Windows operating system. In this
case, directly run CD-ROM:\Setup.exe or CD-ROM:\JetShell\Setup.exe.
2. When the installation nishes, JetShell is registered in Start → Programs → Cowon → iAUDIO M3
program group.
iAUDIO M3
Page 41

Introducing JetShell
Introducing JetShell
The Whole View
Play and
MP3
Management
Section
File
Management
Section
iAUDIO
Management
Section
When JetShell is running, it controls the iAUDIO. Therefore, you should exit JetShell before performing the following tasks.
• Installing the USB drive
• Formatting in Windows Explorer
• Upgrading the rmware
File
Management
Window
Download List
Management
Section
41
Playing MP3, MP2, WAV, WMA, ASF, Audio CD, and Playlist (m3u)
Double click an MP3, MP2, WAV, WMA, ASF, Audio CD le, or Playlist (m3u) in the ‘File
Management’ Window, or drag and drop the le on the ‘Player’ shown above to play music les. In
addition, you can also select multiple les and then press the ‘Play’ button. On the black screen in
the middle, the progress bar and song names of the selected tracks scroll to the left, and two types of
spectrum screens appear.
You can start and stop playing the le with the buttons at the right, and adjust the volume with the + and
- buttons. To skip instantly to a specic position of the track being played, click on the position bar.
iAUDIO M3
Page 42

42
iAUDIO M3
43
Introducing JetShell
Playing MP3, MP2, WAV, WMA, ASF, Audio CD, and Playlist (m3u)
The File Management Section of JetShell looks just like Windows Explorer. The left window shows
folders, disks, and CD-ROM in a tree structure, and the right window shows the le list in a folder.
iAUDIO Management
The bottom part of JetShell consists of ‘iAUDIO Management Section’ and ‘Download List.’ When
iAUDIO is working normally, the red lamp ashes with the message ‘iAUDIO is working’ as shown in
the gure. The les transferred from PC to iAUDIO by the user are displayed in the middle window. The
"Memory used" bar shown at the bottom right indicates the used memory size of the total ash memory of
iAUDIO. If this bar is almost full, it means that there is almost no free space available in iAUDIO.
iAUDIO M3
Button Function Explanation
Up Move to the upper folder.
Registration Info Display the properties of the selected le.
Refresh Refresh the contents of iAUDIO.
Delete Delete the selected le or folder.
New folder Create a new folder.
Cut Cut the selected le or folder.
Copy Copy the selected le or folder.
Paste Paste the cut or copied le.
Transfer to Memory Transfer the selected les or folder from PC to iAUDIO.
Transfer to PC Transfer the selected les or folder from iAUDIO to PC.
Page 43

Introducing JetShell
JetShell displays visually cool spectrums. When you click on the spectrum display area, the screen
changes as follows.
You can also enjoy various equalizers and effects.
Various Equalizers
43
Various Effects
iAUDIO M3
Page 44

44
iAUDIO M3
45
Downloading Music les to iAUDIO
Downloading Music les to iAUDIO
1. Downloading music les to iAUDIO is very
simple. Select les to download from the ‘File
Management Section’ and click on the down
arrow.
2. Or you can also drag and drop the selected
les from the ‘File Management Section’ to
the window at the bottom as if you were using
Windows Explorer.
3. The following window shows the le
downloading process.
The backlight turns on during le download.
Never disconnect the USB cable while the
backlight is turned on.
4. Another method is to put the les in the
‘Download List’ window as shown below before
downloading.
This is useful when you wish to download les in
different folders. Add les with the + button and
then download them all at once.
5. You can also download the les existing outside
of JetShell by dragging and dropping them onto
the ‘Memory’ Window.
iAUDIO M3
Page 45

Deleting les in iAUDIO / Formatting iAUDIO
Deleting Files in iAUDIO
You can delete les in iAUDIO in the same manner as in Windows Explorer.
Select the les to delete and click on the button. Then the conrmation window "Delete from ash
memory?" appears. Click ‘Yes’ to delete them.
You can also delete les from the pop-up menu that appears when you right click your mouse after selecting a
le in the memory window.
Formatting iAUDIO
Normally you don't need to format iAUDIO. Format iAUDIO only when you have critical problems, and need
to initialize iAUDIO. Be careful when formatting iAUDIO since all data in iAUDIO will be deleted.
1. Select Format Device Memory from File menu. When the following window appears, select ‘FAT32’. If
you select a format other than ‘FAT32’ and format, iAUDIO is recognized as just a USB storage media and
will not function normally as an MP3 Player. Therefore, be sure to format as ‘FAT32’ only, and never use the
NTFS le system supported by Windows 2000 and XP.
45
You can also format by right clicking your mouse on the iAUDIO drive in Windows Explorer.
iAUDIO M3
Page 46

46
iAUDIO M3
47
Converting Audio CD to MP3 les and Downloading
Converting Audio CD to MP3 Files and Downloading Them to iAUDIO
With JetShell, you can easily convert your Audio CD into MP3 les and download them to iAUDIO.
1. Before getting started, you must choose the quality of the MP3 les to create. Click [Setup] –[MP3
Encoder Option] to set the desired bitrate of the MP3 les. (The les compressed in a higher bitrate
have a higher sound quality and a bigger le size.)
2. From the ‘File Management’ section, select the CD-ROM drive in which the Audio CD is inserted.
Select the audio tracks from the right window and click or [File] –[Convert CD to MP3]
from the menu.
3. Specify the path to save the MP3 les in. Choose a folder in iAUDIO to directly download MP3 les.
iAUDIO M3
Page 47

Converting Audio CD to MP3 les and Downloading
4. The converting process is displayed as shown below.
47
iAUDIO M3
Page 48

48
iAUDIO M3
49
Converting Files
Converting WAV le to MP3 le
You can convert WAV les PC to MP3 les.
Select File menu in JetShell and click on the "Convert WAV to MP3" button.
The conversion window appears.
Converting WMA le to MP3 le
You can convert WMA les to MP3 les.
Select File menu in JetShell and click on the "Convert WMA to MP3" button.
iAUDIO M3
Page 49

The conversion window appears.
Converting MP3 le to WAV le
You can convert MP3 les to WAV les.
Select File menu in JetShell and click on the "Convert MP3 to WAV" button.
Converting Files
49
The conversion window appears.
iAUDIO M3
Page 50

50
iAUDIO M3
51
Other Features
1. Ripping Enhanced CD
For some enhanced CDs, you cannot directly select the tracks on the CD.
In this case, you can right click your mouse and select a track to convert to le as shown in the picture
below. However, for some Audio CDs for which copy protection technology is applied, this ripping method may not
work.
What is an enhanced CD?
This is an audio CD that contains video or data for a PC.
The tracks appear when you right click your mouse.
2. Accessing Internet CD Database
When you press the button, the information on the CD, such as the singer and song title can be acquired
through the Internet.
To use CD database, the Internet connection must be enabled. You may not be able to use this feature depending on
the status of the network or the proxy server.
When incorrect data is included in the CD database, the texts may appear abnormally on your PC. This is not an error
of JetShell but the information stored in CD database.
iAUDIO M3
Page 51

Other Features
3. Editing ID3 Tag
You can edit the ID3 tag of a MP3 le by selecting [Tools] – [Edit MP3 ID3 Tag] from the JetShell menu.
4. Changing MP3 Bitrate
You can change the bitrate of MP3 les by selecting ‘MP3 Bitrate Conversion’ from the menu.
51
5. Downloading Logo File
You can download a logo le to change the logo screen that appears when iAUDIO powers on.
Select ‘Download Logo File’ from the menu. When the ‘Open’ window appears, locate the desired logo le and
click ‘Open’. Then the logo le is automatically downloaded and applied.
iAUDIO M3
Page 52

52
iAUDIO M3
53
Installing and Using JetAudio
Installing and Using JetAudio
The worldwide renowned integrated multimedia playing program ‘JetAudio’ is included in the
iAUDIO Installation CD. To install ‘JetAudio’, run the le "CD-ROM:\JetAudio\setup.exe."
For detailed information on using JetAudio, please visit "http://www.jetaudio.com."
iAUDIO M3
Page 53

Upgrading Firmware
Upgrading Firmware
A. What is Firmware?
Firmware is a program embedded in the hardware, which activates various features.
By upgrading the rmware, you can enhance the features of the product and eliminate the bugs.
B. Notice for Legal Limitations and Responsibilities Regarding Firmware
• The performance and menu of iAUDIO may change without prior notice through rmware upgrades.
• When you upgrade the rmware, all data in the hard disk may be deleted.
Therefore, make sure to back up music les and data in iAUDIO PC before upgrading the rmware.
• All rmware upgrades are intended for overall enhancement of performance.
• We recommend not to upgrade rmware if you don't have any problems.
• Upgrading rmware is at your own risk.
C. Conditions for Firmware Upgrade
• Firmware upgrade can only be possible when iAUDIO is properly working and JetShell can
communicate with iAUDIO without any problems.
• Check if "iAUDIO" icon exists in ‘My Computer’ on Windows 98 /ME /XP.
For Windows 2000, "Mobile Disk" may be displayed instead of ‘iAUDIO’.
• Either ‘iAUDIO’ or ‘Mobile Disk’ must be displayed for a rmware upgrade to be possible.
D. Downloading and Installing Firmware
• You can download the latest rmware from iAUDIO.COM site free of charge.
1. Connect iAUDIO to your PC.
2. Copy the downloaded rmware le (cowon_m3.bin) in the "Firmware" folder in iAUDIO.
3. Run "Safely Remove Hardware" or "Unplug or Eject Hardware" wizard.
4. Disconnect the USB cable.
5. Connect the AC adapter after conrming that iAUDIO has powered off.
6. When you connect the AC adapter, iAUDIO powers on and the rmware is upgraded.
53
iAUDIO M3
Page 54

54
iAUDIO M3
55
Memo
iAUDIO M3
Page 55

Memo
55
iAUDIO M3
Page 56

56
iAUDIO M3
57
Memo
iAUDIO M3
Page 57

Memo
57
iAUDIO M3
Page 58

58
iAUDIO M3
59
Memo
iAUDIO M3
Page 59

Memo
59
iAUDIO M3
Page 60

JetAudio, Inc. Customer Service Center
Address: 20 fairbanks, Suite 171, Irvine, CA 92618
Tel : 1-888-453-8283
Homepage : www.jetaudio.com
Email : techsupport@jetaudio.com
 Loading...