


Pneumatic Impact Wrench
#505120, JAT-120
#505121, JAT-121
#505122, JAT-122
#505123, JAT-123
JAT-120 shown
Operation & Parts Manual
M-505120
Edition 2
06/2015
JET
427 New Sanford Road
LaVergne, T N 37086
Ph.: 800- 274- 6848
www.jettools.com
Copyright © 2015 JET

Warranty and Service
–
JET warrants every product it sells against manufacturers’ defects. If one of our tools needs service or repair, please contact
Technical Service by calling 1-800-274-6846, 8AM to 5PM CST, Monday through Friday.
Warranty Period
The general warranty lasts for the time period specified in the literature included with your product or on the official JET branded
website.
• JET products carry a limited warranty which varies in duration based upon the product. (See chart below)
• Accessories carry a limited warranty of one year from the date of receipt.
• Consumable items are defined as expendable parts or accessories expected to become inoperable within a
reasonable amount of use and are covered by a 90 day limited warranty against manufacturer’s defects.
Who is Covered
This warranty covers only the initial purchaser of the product from the date of delivery.
What is Covered
This warranty covers any defects in workmanship or materials subject to the limitations stated below. This warranty does not cover
failures due directly or indirectly to misuse, abuse, negligence or accidents, normal wear-and-tear, improper repair, alterations or
lack of maintenance. JET woodworking machinery is designed to be used with Wood. Use of these machines in the processing of
metal, plastics, or other materials outside recommended guidelines, may void the warranty. The exceptions are acrylics and other
natural items that are made specifically for wood turning.
Warrant y Limitations
Woodworking products with a Five Year Warranty that are used for commercial or industrial purposes default to a Two Year
Warranty. Please contact Technical Service at 1-800-274-6846 for further clarification.
How to Get Technical Support
Please contact Technical Service by calling 1-800-274-6846. Please note that you will be asked to provide proof of initial
purchase when calling. If a product requires further inspection, the Technical Service representative will explain and assist with
any additional action needed. JET has Authorized Service Centers located throughout the United States. For the name of an
Authorized Service Center in your area call 1-800-274-6846 or use the Service Center Locator on the JET website.
More Information
JET is constantly adding new products. For complete, up-to-date product information, check with your local distributor or visit the
JET website.
How State Law Applies
This warranty gives you specific legal rights, subject to applicable state law.
Limitations on This War ra nt y
JET LIMITS ALL IMPLIED WARRANTIES TO THE PERIOD OF THE LIMITED WARRANTY FOR EACH PRODUCT. EXCEPT AS
STATED HEREIN, ANY IMPLIED WARRANTIES OF MERCHANTABILITY AND FITNESS FOR A PARTICULAR PURPOSE ARE
EXCLUDED. SOME STATES DO NOT ALLOW LIMITATIONS ON HOW LONG AN IMPLIED WARRANTY LASTS, SO THE
ABOVE LIMITATION MAY NOT APPLY TO YOU.
JET SHALL IN NO EVENT BE LI A B L E FOR DEA TH, INJURI E S TO PERSONS OR PROPERTY , OR F OR INCIDE NTA L ,
CONTINGENT, SPECIAL, OR CONSEQUENTIAL DAMAGES ARISING FROM THE USE OF OUR PRODUCTS. SOME STATES
DO NOT ALLOW THE EXCLUSION OR LIMITATION OF INCIDENTAL OR CONSEQUENTIAL DAMAGES, SO THE ABOVE
LIMITATION OR EXCLUSION MAY NOT APPLY TO YOU.
JET sells through distributors only. The specifications listed in JET printed materials and on official JET website are given as
general information and are not binding. JET reserves the right to effect at any time, without prior notice, those alterations to parts,
fittings, and accessory equipment which they may deem necessary for any reason whatsoever. JET
sold in Canada by JPW I ndustries, Inc.
Product Listing with Warranty Period
90 Days
1 Year – Motors; Machi n e Accesso r i e s
2 Year – Metalworking Machinery; Electric Hoists, Electric Hoist Accessories; Woodworking Machinery used for industrial
or commercial purposes
5 Year – Woodworking Machinery
Limited Lifetime – JET Parallel clamps; VOLT Series Electric Hoists; Manual Hoists; Manual Hoist Accessor i e s;
Shop Tools; Warehouse & Dock products; Hand Tools; Air Tools
NOTE: JET is a division of JPW Industries, Inc. References in this document to JET also apply to JPW Industries, Inc., or any of
its successors in interest to the JET brand.
Parts; Consumable items
®
branded products are not
2 JAT-120,121,122,123 Impact Wrenches

Safety warnings
General air tool warnings
1. Read and understand this entire manual
bef ore attempti ng assembl y or op erat i on .
2. Read and un derstan d all warn ings post ed on
the tool and in this m anual . Fai lure t o c ompl y
with all of th ese warni ngs may caus e seri ous
injury.
3. Replace warning labels if they become
obscured or remo ved.
4. Do not use this tool for other than its intended
use. If used for other purposes, JET disclaims
any real or implied warranty and holds itself
harmless from any injury that may result from
that use.
5. Al ways wear app roved saf ety gl ass es or fac e
shield while using this tool. (Everyday
eyeglasses only have impact resistant lenses;
they ar e not safet y glas ses.)
6. Wear ear protectors (plugs or muffs) if the
noise exceeds safe levels.
7. Wear gloves and protective clothing if
oper ation pr oduces sparks or fl ying p articles.
Gloves should be tight-fitting, withou t frayed
fing ers or hanging threads . Keep han ds and
body aw ay from the work ing area of to ol.
8. Some dust created by power sanding, sawing,
grinding, drilling and other construction
acti viti es c ontai ns c hem ic als know n t o c aus e
cancer, birth defects or other reproductive
harm. Some examples of these chemicals
are:
• Lead from lead based paint.
• Crystalline silica from bricks, cement and
other m as onry prod uc ts .
• Arsenic and chromium from chemically
treated lumber.
Your risk of exposure varies, depending on
how often you do this t yp e of w ork. To reduc e
your e xposure to t hese chemic als, wor k in a
well-ventilated area and work with approved
safety equipmen t, such as face or dust masks
that are specifically designed to filter out
microscopic particles.
9. Do not operate an air tool continually at full
throttle withou t a w ork l oad on the tool .
10. The air tool must be properly lubricated before
oper atin g.
11. Never start a percussion type air tool (chipper,
breaker, buster, etc.) without securing the
tooling in the retainer and placing the tip
against the work surface.
12. Do not operate air tool without its guards in
place. Do not modify the tool.
13. Do not operate this tool whi le tired or und er
the influence of drugs, alcohol, or any
medication.
14. Adopt a comfortable posture with proper
balance, and maintain secure footing at all
times. Non-slip footwear or anti-skid floor
strips ar e recommend ed.
15. Do not wear loose clothing or jewelry. Confine
long hair.
16. Excessive air pressure and too much free
rotati on may decr eas e lif e of th e tool an d may
caus e a haz ar d ous sit u at i on.
17. Check air hoses for wear, and keep them
away f rom heat and s harp ed ges. R epair or
replace damaged air hose immediately. Do
not carry tool by the air hose.
18. Air hose may cause tripping hazards; keep
hose away from traffic areas.
19. D o not us e this tool n ear flammabl e objects,
or in potentially explosive environments. Do
not use near live electrical wires.
JET 3

20. Do not use power tools in damp or wet
locat ion, or expose t hem t o rain. Keep w ork
area well lighted.
21. Do not leave a connected tool unattended.
When not in use, disconnect tool from air
source.
31. Maint ain t ools with care. Keep air t ool clean
and oiled for best and safest performance.
32. Do not use combustible gases, carbon
dioxide, oxygen or any bottled gas as an air
source f or the tool. Th es e can present r isk of
explosion and serious injury.
22. Shut off air supply and discharge any residual
pressure from tool before removing hose,
making adjustments, changing accessories,
or storing tool.
23. Make sure tool is switched off, and your finger
off the trigger, before connecting to air supply.
24. Remo ve adj ustin g keys and wr ench es bef or e
turnin g on t ool.
25. Keep visitors a safe distance from the work
area. Keep children away.
26. Give your work undivided attention. Looking
around, carrying on a conversation and
“horse-play” are careless acts that can result
in serious injury.
27. D o not forc e a tool or att achm ent to do a job
for which it was not designed. The righ t tool
will do the job better and more safely.
28. Repetitive motions and/or exposure to
constant vibration can be harmful to hands
and arms. Take frequent breaks and relax
hands during extended operation. Change
posture to avoid dis comf ort or f at ig u e.
29. Compressed air can be harmful if directed
toward s ensiti ve ar eas of the bod y, and may
propel small particles caught in the air stream.
Exerc ise proper c auti on.
30. Use only recommended accessories;
impr op er access ories may be haz ar d ous .
33. Do not lubricate the tool with combustible
liquids, such as kerosene, diesel or jet fuel.
34. Do not dispose of this tool with normal
household waste. Never dispose of the air tool
into fire.
Specific warnings for Impact Wrench
35. This im p act wrenc h is des ign ed f or rem ovi ng
and ins talling thread ed fasteners. If you are
not familiar with the proper and safe operation
of a pneumatic impact wrench, do not use until
proper training and knowledge have been
obtained.
36. Use only impact sockets in good condition.
Socket s in poor c onditi on may r educ e imp act
power, and could break, creating a safety
hazar d.
37. Use only sockets designated for use with
impact wrenches. Never use hand tool
sockets, as they can shatter.
38. Never hold socket, drive or drive extension
with your hand dur in g op eration.
39. Make sure workpiece is secure and will not
shift while operating impact wrenc h. Do not
hold workpieces with your hand.
40. Make sure fastener can withstand rated
torque of impact wrench.
Familiarize yourself with the following safety notices used in this manual:
Th is means t hat if preca utions are not he eded, it may resu lt in serio us, or ev en
fatal, injury.
This means that if precautions are not heeded, it may result in minor injury and/or
possible tool damage.
4 JAT-120,121,122,123 Impact Wrenches

About this manual
This manual is provided by JET, covering the safe operation and maintenance procedures for a JET Model
JAT-120, JAT-121, JAT-122, and JAT-123 Pneumatic Impact Wrench. This manual contains instructions on
safety precautions, general operating procedures, maintenance procedures and parts breakdown. Your tool
has been des ign ed and c ons truct ed t o pr ovi de c onsist ent , lon g-t erm oper ation if us ed i n acc ord anc e wit h
the instructions set forth in this document.
The instructions and warnings in this manual may not encompass all possible workplace environments. The
operator is expected to take appropriate precautions and exercise common sense. As with any tool
oper ati on, safet y of op erator and b yst an d ers sh ou ld be fir s t priority.
If th ere are ques ti ons or comments, pl eas e contact you r local su pp lier or J E T . J E T can also be reac h ed at
our web site: www.jettools.com.
Record the serial number and purchase information of your tool on the cover of this manual for quick access.
Retain this manual for future reference. If the tool transfers ownership, the manual should accompany it.
JET 5

Tool speci fications
Model number JAT-120 JAT-121 JAT-122
Stock number 505120 505121 505122 505123
Square drive 3/8 in. 1/2 in.
Bo lt capacity 9/16 in. 3/4 in. 3/4 in. 1-1/16 in.
Anvil retainer type Hog ring Hog ring Hog ring Hog ring
Impact mechanism Twin hammer Twin hammer Twin hammer Twin hammer
1/2 in.
(2in. ext ension)
JAT-123
3/4 in.
Maximum torque
Working torque
Free speed 13,500 RPM 8500 RPM 8500 RPM 6000 RPM
Blows per minute 1400 1200 1200 900
Aver ag e air
consumption
Air inlet 1/4 in. NPT 1/ 4 in. NPT 1/4 in. NP T 3/8 in. NPT
Air hose inside
diameter
Required air
pressure
Vibration val u e 10.4 m/s2 10.6 m/s2 9.43 m/s2 7.36 m/s2
Nois e lev el 1 104 dB(A) 107 dB(A) 108 dB(A) 109 dB(A)
Power setting
Grip Pistol style Pistol style Pistol style Pistol style
Overall Length 6.0 in. (152.4 mm) 7.2 in. (182.9 mm) 8.8 in. (223.5 mm ) 8.7 in. (221 mm)
400 lbf•ft
(542.3 N•m)
25-230 lbf•ft
(33.9-311.8 N•m)
5.9 CFM 6.7 CFM 6.7 CFM 7.3 CFM
3/8 in. 3/8 in. 3/8 in. 1/2 in.
90 psi (62 1 kP a) 90 psi (621 kPa) 90 psi (621 kPa) 90 psi (62 1 kP a)
4-position forward
1-position reverse
750 lbf•ft
(1016.9 N•m)
50-550 lbf•ft
(67.8- 74 5.7 N•m)
4-position forward
1-position reverse
750 lbf•ft
(1016.9 N•m)
50-550 lbf•ft
(67.8- 74 5.7 N•m)
4-position forward
1-position reverse
1300 lbf • f t
(1762.6 N•m)
300-1000 lbf•ft
(406.8-1355.8 N•m)
4-position forward
1-position reverse
Housing material Composite Composite Composite Composite
Net weight 2. 6 7 lb. (1.21 kg) 4. 0 8 lb. (1.85 kg) 4. 3 5 lb. (1.97 kg) 8 .16 lb. (3.70 kg)
Shipping weight 2. 6 9 lb. (1 .2 2 kg) 4.10 lb. (1.86 kg) 4.37 lb. ( 1.98 kg) 8.99 lb. (4.08 kg)
1
The specif ied val ues ar e emiss ion l evels an d ar e not nec ess aril y to be seen as s afe oper atin g levels . As
workpl ac e condit i ons var y, this informat ion is int end ed to al low the us er to mak e a better esti mati on of th e
hazards and risks invo lved only.
Specifications were current at time of publication, but because of our policy of continuous improvement, JET
reserves the right to change specifications at any time and without prior notice, without incurring obligations.
6 JAT-120,121,122,123 Impact Wrenches

Setup an d A ss em bly
Any missing parts or damage should be reported
immediately to your JET
damaged tool. Read this instruction manual
thorou g hl y for oper at i on , m ai ntenance and s afety
instructions.
Box contents :
1 Impact wrench
1 Operat i on and p ar ts m anu al
1 Warranty card
®
distr ibutor. Do not use a
4. Rotat e regul ator dial (Fig ure 1) to pr eferr ed
setti ng. R eg ulat or s etti ngs ar e f or r efer enc e
only and do not indicate specific power
setti ngs .
5. Select rotation direction by pushing
Forw ard/R evers e kn ob – push left t o loos en
a nut, right to tighten.
Make sure nut or bolt can
withstand rated torque of impact wrench.
To loosen nut or bolt:
1. Select reverse rotation.
Operation
The impact wrench must be
properly lubricated before operation. See
“Lubricati on” se ctio n.
Figure 1
1. Remove protecti v e cap from air i nl et (Figur e
1). If an in-line oil er is not bei ng used, add 4
or 5 dr ops of air t ool oil ( not i nclud ed) i n to
the air inl et.
2. Blow out air line to remove any dirt or
moisture, then connect air supply hose to
tool. Set air pressure to 90 psi.
IMPORTANT: Connecting a quick-change
coupling directly to the tool is not
recommended, as vibration may cause the
connection to fail. Instead, add a leader hose
and install any quick-change couplings
farther down the line.
3. P ush dri ve sock et (not includ ed) ont o anvil
until it clicks into position.
2. Place socket over nut, hold grip firmly, and
place other hand over top of hous ing. Gently
squeez e tr i gg er .
Important: If tool cannot loosen nut, DO
NOT raise air pressure above 90 psi. If tool’s
air regulator is in low setting, raise setting
and r etry. If tool’s regulator is already at
maximum, do not continue attempts to
loosen nut with t his i mpact wrenc h. Use
other methods or tools to loosen nut.
3. Release trigger to stop impact wrench.
To tighten nut or bolt:
1. I ns t all nu t as far as possib le by hand.
2. Select forward rotation.
3. Place socket over nut, hold grip firmly, and
place other hand over top of hous ing. Gently
squeez e tr i gg er .
Important: If tool s talls wh il e tight eni ng , D O
NOT raise air pressure above 90 psi. If tools’
air regulator is in low setting, raise setting
and retry. If nut will not tighten on
maximum setting, do not continue
attempts to tighten nut with this impact
wrench. Use other methods or tools to
tight en nu t.
4. Release trigger to stop impact wrench.
NOT E: Do not overt ig hten. F ast eners with cri tic al
torque settings should be fully tightened with a
torqu e wr enc h.
JET 7

Maintenance
Lubrication
The impact wrenc h sh ould be lubric ated daily (or
before each use) with air tool oil through the air
inlet. Durin g conti nual op erati on, it s hould b e reoiled every 1 to 2 hours. This can be done with an
in-line oiler, or manually. If done manually,
proc eed as f oll ows :
1. D is c onn ec t air h os e f r om tool.
2. P l ac e 4 or 5 dr ops of air tool oil into air inlet.
NOTE: Air tool oil not provided; it is available
at most major hardware and tool stores. SAE
#10 oil or s ewing mach ine oil may b e us ed
as a substitute. Do not use detergent oil.
Excess air pressure
and/or un clean air will sh orten the tool’ s
life and may create a hazardous situation.
4. Drain water f rom air com press or tan k dail y,
as well as any condens ation from air lin es .
W ater in the air lin e may enter the t ool and
cause damage.
5. C h ang e f ilt ers on th e air syst em on a reg ul ar
basis.
6. Air-line pressure may be increased
accor di n gly to compensate f or extra- l ong air
hoses (usually over 25 feet). Inside diameter
of hos e sh oul d b e mini m um 3/8-inc h .
General Air Tool
3. Re-connect air. Run impact wrench at low
throttle without load for a few seconds to
distri bu te the oil thr oug hout tool.
4. When finished operating impact wrench,
disconnect air hose. Wipe off housing with a
dry cloth. Place 4 or 5 drops of air tool oil into
air inlet; re-connect air and run tool for a few
seconds t o distribut e th e oi l. Dis connect air .
The impact wrench has been pre-greased from
the manufactur er, an d it is g en er al l y unn ec es sary
to grease the tool during its normal life. However,
should th e tool req uir e fut ur e s ervici ng, a gr eas e
fittin g is s u pp lied beneath th e h am m er case. Use
Lithi um C om pl ex M ol y 2 grease or eq ui valent.
Storage
Avoid storing the impact wrench in very humid
locations which promotes rusting of internal
mechan isms. A lways oil t he tool and disc onnect
air hose before storage.
Air system requi rements
1. Use proper air hose size (refer to tool
specifications). The hose should be just long
enough to serve the working area. Excessive
hose len gt h wil l c ause pressur e drop.
2. Make sure air compressor supplies clean,
dry air at correct CFM for the impact wrench.
Information
If the air tool is not performing according to
specif ications , th e foll owing are am ong t he most
common causes. (See also “Troubleshooting”
section.)
• C ontamin ated air suc h as a dirty air system
or water in the system.
• Using wrong size tool for the job.
• P oor main tenanc e pr actic es, suc h as usin g
excess i ve air press ure or air volume.
• Improper or no lubrication.
Rule of Th um b
If it takes more than 8 seconds to tighten or loosen
a bolt or nut with an air impact wrench at
maxim um settin g, the air wrenc h is t oo smal l or
the air compressor CFM is not powerful enough
for the job. Continued use in either capacity will
cause damage to the tool.
Tool Pressure
JET Air Tools oper ate on 70-t o-100 psi ( pounds
per square inch) air pressure measured at the tool
when the tool is operating. Set tool to 90 psi
unless indicated otherwise. Pressure in excess of
100 psi will shorten the life of the tool.
3. Set air pressure to 90 psi.
8 JAT-120,121,122,123 Impact Wrenches

Air System Recommendations
Lubrication
Equip the air compressor intake with a
replaceable air filter that can be easily cleaned.
Use safety shut-off valves so air flow can be
stopped quickly in case of a line break.
W hen using multip le hos es, air hoses shou ld be
larger than leader hose. Join multiple hoses
directly, rather than with quick connect fittings
which m ay caus e pressure dr ops and tool power
reduction.
Use anti-whip devices across hose couplings to
prevent hose from whipping in the event of a hose
failur e or c oup li ng dis connec t.
Always us e m oist ure tr aps at th e c ompr ess or f or
the main distr ib ut ion line. Use mois ture traps an d
in-lin e oilers on eac h down line th at is to be used
for air tools. (See Figure 2). Place oiler as close to
air tool as possible f or best lubric ati on.
Use a lig ht oil contai ning rust in hibitors, such as
SAE #10. Many JET air tools have integral oil
reservoirs, which should be kept filled when in-line
oilers ar e not used.
If greasing is required, use a grease that is highly
water resis tant for f ront c ase c ompon ents on air
impact w renches, gr in d ers and sander s .
Recycling
Protect the environment. Your tool contains
materials which can be recovered or recycled.
W hen its us eful life has expired, please leave tool
at a specialized facility.
Recommended arrangement of air piping and air line system
Figure 2
JET 9

Troubleshooting JAT-120/121/122/123 Impact Wrenches
Any dis ass embly of the tool sh ould be don e by qualif ied servic e personnel. F or problems not ad dressed
below, contact JET technical service at 800-274-6846.
Problem Possible cause Remedy
Tool will not st art . Air valve cl os ed or obs t ruc ted. Open val v e; cl ear an y obstruct i ons .
Dirt or gu m d eposits on
components.
Rotor van es or ot h er c om ponents
are wor n.
Trigg er i n op erable. Clean trigger m ec h anis m to ens ure
Bearin g( s ) w orn. Dis assemble and i ns p ect bearing.
Exc essive or abn orm al
vibration.
Abnormal sound. Loose fasteners. Check tightness of housing and
Loss of power; erratic
action.
Impacts sufficiently, but
will not remove fastener.
Will not impact. Damaged impact mechanism. Replace mechanism.
Housing become s hot
durin g op eration.
Bearin gs w orn. Dis assemble an d ins p ect bearing.
Low air pressure. Verify compressor has proper CFM
Moisture or obstr uction in air
hose.
Impr op er size of air tr ans m is s i on
lines, h oses, fitti ngs , or
couplings.
Dirt or gu m d eposits on
components.
Rotor van es are worn. Repl ac e van es (entir e set ).
Worn socket. Use good condition sockets.
Worn impact mechanism. Replace components.
Insuf f ic i ent lubric ation . Lu bricate wit h air to ol oi l.
Worn components. Replace components as needed.
Flush tool wit h gu m s olvent.
If problem persists, disassemble,
clean and lubricate internal parts.
Repl ac e w orn c om p onents.
(Replace vanes as an ent ir e s et. )
free movement. Replace
mechanism if needed.
Greas e or r eplace as need ed .
Greas e or r eplace as need ed .
external fasteners.
rating for tool.
Che ck compressor regu lator
setting; set air pressure to 90 psi.
Set regulator dial on tool to
maximum setting.
Check for loose connections.
Air supply must be clean and dry.
Clean ou t air h os e(s ) and r em ov e
any ki nks or b ends .
Use appr opriat e-si z ed air
lines/hoses.
Verif y pr op er f itt in gs / couplin gs .
Flush tool wit h gu m s olvent.
Check and cl ean air filt er on
compress or.
Clean e xt er n al areas of tool . If
problem persists, disassemble,
clean and lubricate internal parts.
10 JAT-120,121,122,123 Impact Wrenches

Problem Possible cause Remedy
Sever e air l eak ag e.
(Note: M inim a l escape of
air is oft en n or m al f or air
tools.)
Air valv e obs truct ed or dam aged. Clean or rep l ac e.
Housi ng loose or damag ed. Tighten or replace as n eed ed.
Replac em e nt par t s
Service parts are listed on the following pages. To order parts or reach our service department, call 1-800274-6 848 Mon day thr ough Fr iday, 8: 00 a.m. to 5:00 p. m. CST. P leas e have the st ock num ber an d serial
number of y our t ool available when you c all, so that we m ay s er v e yo u quickly an d acc u r ately.
JET 11

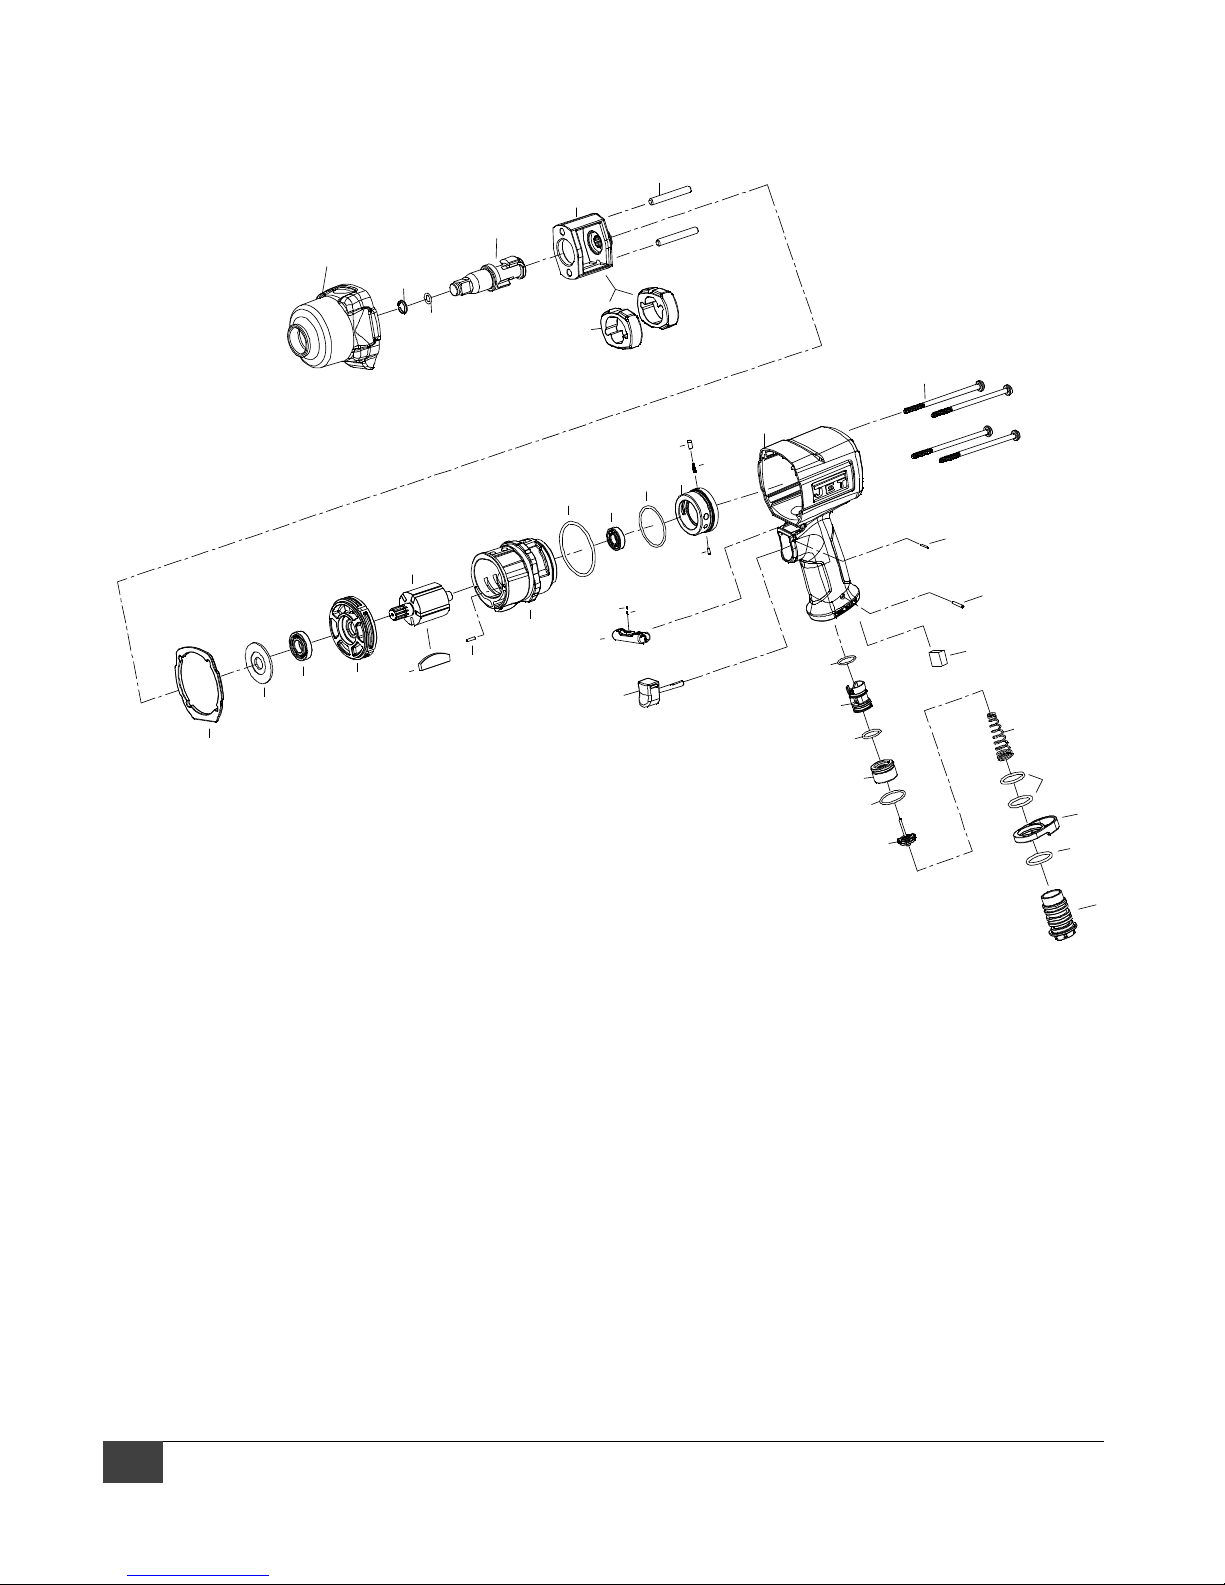
#505120, JAT-120, 3/8-inch Impact Wrench – exploded view
38
36
39
41
34
48
47
30
29
28
31
32
37
21
58
20
26
24
23
43 44
27
42
15
1
22
3
2
4
5
46
14
13
45
8
10
6
7
12
11
12 JAT-120,121,122,123 Impact Wrenches
9

#505120, JAT-120, 3/8-inch Impact Wrench – parts list
Index Part No. Description Qty
1 JAT120-01 Motor housing 1
2 JAT120-02 Reverse valve 1
3 JAT120-03 O-Ring S16 NBR ø15.5x1.5 1
4 JAT120-04
5 JAT120-05 Throttle valve seat 1
6 JAT120-06 O-Ring 1019NBR ø18.8x1.9 1
7 JAT120-07 Throttle valve assembly 1
8 JAT120-08 Spring 1
9 JAT120-09 Air inlet 1
10 JAT120-10 O-Ring P20 NBR ø19.8x2.4 2
11 JAT120-11 O-Ring P22 NBR ø21.8x2.4 1
12 JAT120-12 Exhaust deflector 1
13 J A T120-13 Spr i n g pi n ø3.5x 2 8L 1
14 J A T120-14 Spr i n g pi n ø2x20L 1
15 JAT120-15 Trigger assembly 1
20 JAT312-09 O-Ring S29 NBR ø28.5x2 1
21 JAT120-21 Pin 12L14 1
22 JAT120-22 Spring 1
23 JAT120-23 Spring pin ø2x6L 1
24 JAT120-24 O-Rin g NBR ø34x 2
O-Ri ng AS016 NBR
ø15.6x1.78
1
1
Index Part No. Description Qty
26 BB-R6 Ball be aring EE3 (R6) 1
27 JAT120-27 Cylinder assembly 1
28 JAT120-28 Rotor 1
29 JAT120-29 Rotor vane 6
30 JAT120-30 Spring pin ø2x10 1
31 JAT120-31 Front end plate 1
32 JAT120-32 Ball bearing 6901 1
34 JAT120-34 Gasket 1
36 JAT120-36 Hammer cage 1
37 JAT120-37 Hammer 2
38 JAT120-38 Hammer pin 2
39 JAT120-39 Anvil 3/8in. 1
41 JAT120-41 Hammer case assembly 1
42 JAT120-42 Reverse knob 1
43 SB-1/8 Steel ball 1/8in. 1
44 JAT120-44 Steel ball sp ring 1
45 JAT120-45 Damping material 1
46 JAT120-46 Screw #10-24x80 SCM435 4
47 JAT120-47 O-Ring NBR ø6.6x8.2x1.7 1
48 JAT120-48 Socket retainer 1
58 JAT120-58 Reverse valve 1
JAT120-RPK, Repair Kit, contains 3,4,6,8,10(2),11,20,22,24,29(6),34,43,44,45,47,48
JAT120-RBK, Rebuild Kit, contains 27,30,31,38(2),39
JET 13
#505121, JAT-121, 1/2-inch Impact Wrench – exploded view
38
36
39
41
48
47
28
29
31
32
33
34
30
37
46
1
21
22
58
24
27
20
26
14
23
44
43
42
3
15
2
4
5
6
7
13
45
8
10
12
11
14 JAT-120,121,122,123 Impact Wrenches
9

#505121, JAT-121, 1/2-inch Impact Wrench – parts list
Index Part No. Description Qty
1 JAT121-01 Motor housing 1
2 JAT121-02 Reverse valve 1
3 JAT120-03 O-Ring S16 NBR ø15.5x1.5 1
4 JAT120-04
5 JAT121-05 Throttle valve seat 1
6 JAT120-06 O-Ring 1019 NBR ø18.8x 1.9 1
7 JAT121-07 Throttle valve assembly 1
8 JAT121-08 Spring 1
9 JAT121-09 Air inlet 1
10 JAT120-10 O-Ring P20 NBR ø19.8x2.4 2
11 JAT120-11 O-Ring P22 NBR ø21.8x2.4 1
12 JAT121-12 Exhaust deflector 1
13 J A T120-13 Spr i n g pi n ø3.5x 2 8L 1
14 JAT120-14 Spring pin ø2x20 1
15 JAT121-15 Trigger assembly 1
20 JAT121-20 O-Ring S38 NBR ø37.5x2 1
21 JAT120-21 Pin 12L14 1
22 JAT121-22 Spring 1
23 JAT120-23 Spring pin ø2x6L 1
24 JAT121-24 O-Ring S46 NBR ø45.5x2 1
26 BB-R6
O-Ri ng AS016 NBR
ø15.6x1.78
Ball bearing EE3 (R6)
1
1
Index Part No. Description Qty
27 JAT121-27 Cylinder assembly 1
28 JAT121-28 Rotor 1
29 JAT121-29 Rotor vane 7
30 JAT121-30 Spring pin ø2.5x10 1
31 JAT121-31 Front end plate 1
32 JAT121-32 Ball bearing EE4 CM/5K(R8) 1
33 JAT121-33 Washer 1
34 JAT121-34 Gasket 1
36 JAT121-36 Hammer cage 1
37 JAT121-37 Hammer 2
38 JAT121-38 Hammer pin 2
39 JAT121-39 Anvil 1/2in. 1
41 JAT121-41 Hammer case assembly 1
42 JAT121-42 Reverse knob 1
43 SB-1/8 Steel ball 1/8in. 1
44 JAT121-44 Steel ball sp ring 1
45 JAT121-45 Damping material 1
46 JAT121-46 Screw #10-24x92 SCM435 4
47 JAT121-47 O-Ring P7 NBR ø6.8x1.9 1
48 JAT121-48 Socket retainer 1
58 JAT121-58 Reverse valve 1
JAT121-RPK, Repair Kit, contains 3,4,6,8,10(2),11,20,22,24,29(7),34,43,44,45,47,48
JAT121-RBK, Rebuild Kit, contains 27,30,31,38(2),39
JET 15

#505122, JAT-122, 1/2-inch Impact Wrench – exploded view
38
36
54
41
48
47
28
29
31
32
33
34
30
37
46
1
21
22
58
24
27
20
26
23
44
43
42
3
15
2
4
5
6
7
14
13
45
8
10
12
11
9
16 JAT-120,121,122,123 Impact Wrenches

#505122, JAT-122, 1/2-inch Impact Wrench – parts list
Index Part No. Description Qty
1 JAT121-01 Motor housing 1
2 JAT121-02 Reverse valve 1
3 JAT120-03 O-Ring S16 NBR ø15.5x1.5 1
4 JAT120-04
5 JAT121-05 Throttle valve seat 1
6 JAT120-06 O-Ring 1019 NBR ø15.6x 1.78 1
7 JAT121-07 Throttle valve assembly 1
8 JAT121-08 Spring 1
9 JAT121-09 Air inlet 1
10 JAT120-10 O-Ring P20 NBR ø19.8x2.4 2
11 JAT120-11 O-Ring P22 NBR ø21.8x2.4 1
12 JAT121-12 Exhaust deflector 1
13 J A T120-13 Spr i n g pi n ø3.5x 2 8L 1
14 JAT120-14 Spring pin ø2x20 1
15 JAT121-15 Trigger assembly 1
20 JAT121-20 O-Ring S38 NBR ø37.5x2 1
21 JAT120-21 Pin 12L14 1
22 JAT121-22 Spring 1
23 JAT120-23 Spring pin ø2x6L 1
24 JAT121-24 O-Ring S46 NBR ø45.5x2 1
26 BB-R6
O-Ri ng AS016 NBR
ø15.6x1.78
Ball bearing EE3 (R6)
1
1
Index Part No. Description Qty
27 JAT121-27 Cylinder assembly 1
28 JAT121-28 Rotor 1
29 JAT121-29 Rotor vane 7
30 JAT121-30 Spring pin ø2.5x10 1
31 JAT121-31 Front end plate 1
32 JAT121-32 Ball bearing EE4 CM/5K(R8) 1
33 JAT121-33 Washer 1
34 JAT121-34 Gasket 1
36 JAT121-36 Hammer cage 1
37 JAT121-37 Hammer 2
38 JAT121-38 Hammer pin 2
41 JAT121-41 Hammer case assembly 1
42 JAT121-42 Reverse knob 1
43 SB-1/8 Steel ball 1/8in. 1
44 JAT121-44 Steel ball sp ring 1
45 JAT121-45 Damping material 1
46 JAT121-46 Screw #10-24x92 SCM435 4
47 JAT121-47 O-Ring P7 NBR ø6.8x1.9 1
48 JAT121-48 Socket retainer 1
54 J A T122-54 Ex te nd ed anvil 1/2in. 1
58 JAT121-58 Reverse valve 1
JAT121-RPK, Repair Kit, contains 3,4,6,8,10(2),11,20,22,24,29(7),34,43,44,45,47,48
JAT122-RBK, Rebuild Kit, contains 27,30,31,38(2),54
JET 17

#505123, JAT-123, 3/4-inch Impact Wrench – exploded view
35
33
36
40
38
27
30
32
31
41
58
20
24
25
26
42
28
29
34
45
1
21
22
17
23
44
43
18
8
15
3
2
4
5
6
7
14
9
10
11
47
12
13
18 JAT-120,121,122,123 Impact Wrenches

#505123, JAT-123, 3/4-inch Impact Wrench – parts list
Index Part No. Description Qty
1 JAT123-01 Motor housing 1
2 JAT123-02 Reverse valve 1
3 JAT123-03 O-Ring NBR ø19.8x1.9 1
4 JAT123-04 O-Ring NBR ø21.95x1.78 1
5 JAT123-05 Retainer IRTW-21 (SK 7) 1
6 JAT123-06 Throttle valve seat 1
7 JAT123-07 O-Ring NBR ø17x1.7 1
8 JAT123-08 Throttle valve assembly 1
9 JAT123-09 Throttle valve spri ng 1
10 JAT123-10 O-Ring NBR ø20.5x3 1
11 JAT123-11 Exhaust deflector 1
12 JAT123-12 O-Ring S26 NBR ø25.5x2 1
13 JAT123-13 Air inlet 1
14 JAT123-14 Spring pin ø4x28 1
15 JAT123-15 Trigger kit 1
17 JAT120-14 Spring pin ø2x20 1
18 JAT123-18 Damping material 1
20 JAT123-20 O-Ring S50 NBRø49.5x2 1
21 JAT120-21 Pin 12L14 1
22 JAT123-22 Spring 1
23 J A T123-23 Spr i n g pi n ø2x7 SK 5 1
24 JAT123-24 Ball bearing 6001 C3 /L627
1
Index Part No. Description Qty
25 JAT123-25 O-Ring 1
26 JAT123-26 Cylinder assembly 1
27 JAT123-27 Rotor vane 6
28 JAT123-28 Rotor 1
29 J A T123-29 Spr i n g pi n ø3.5x 1 2 SK5 1
30 JAT123-30 Front end plate 1
31 JAT123-31 Ball bearing 6003 CMSM 1
32 JAT123-32 Hammer case gasket 1
33 JAT123-33 Hammer cage 1
34 JAT123-34 Hammer 2
35 JAT123-35 Hammer pin 2
36 JAT123-36 Anvil 3/4in. 1
38 JAT123-38 Hammer case assembly 1
40 JAT123-40 O-Ring P11 ø10.8x2.4 NBR 1
41 JAT123-41 Retainer 1
42 JAT123-42 Reverse knob 1
43 SB-1/8 Steel ball 1/8 in. 1
44 JAT123-44 Spring 1
45 JAT123-45 Screw M 6x1.0x110 SCM 435 4
47 JAT123-47 O-Ring S24 NBR ø23.5x2 1
58 JAT123-58 Reverse valve 1
JAT123-RPK, Repair Kit, contains 3,4,5,7,10,12,18,20,22,25,27(6),32,40,41,43,44
JAT123-RBK, Rebuild Kit, contains 26,29,30,35(2),36
JET 19

20 JAT-120,121,122,123 Impact Wrenches
427 New Sanford Road
LaVergne, Tennessee 37086
Phone: 800-274-6848
www.jettools.com
 Loading...