


Operating Instruction
JessEm Tool Company, LTD
100 Caplan Ave., Unit 14 & 15
Barrie, ON L4N9J2 Canada
705-726-8233
705-726-7519 Fax
1-866-272-7492
www.jessem.com
jessem@jessem.com
Mast
-R-
Lift
s
and Parts Manual
Models: 02101A and 02102A
Revised: 6/25/09

Thankyou for choosingthis product from JessEmTool Company. Weappreciate your
supportandhopethatourproductservesyouwell. This product is designed to provide
manyyearsof reliableservice provided it is used as intended and takencare of.
This user manualwillassist you inassemblyand general operation of this product. It
is not our intent to teach you about woodworking. Itis assumedthat youare an
experienced woodworkerwith the basic skillsandexperience necessarytousethis
productsafely. If after reading the following instructions, if you are unsure or
uncomfortable about safely using this product we urge you to seek additional
information through widely available woodworkingbooks or classes.
As part of our Continuous Product ImprovementPolicy, JessEm products are
alwaysadvancing in design andfunction.Thereforetheremaybedifferencesbetween
what is shownin our catalogs, websiteor atretaildisplayand what is sold at time of
purchase. We reserve the rightto make positive changes to our products at our
discretion.
Model 02101A – Fits Table Opening 9-1/4” x 11-3/4”
Fits Porter Cable7518/7519RouterMotor
Model 02102A – Fit Table Opening 8-1/4” x 11-3/4”
This unit is for non-JessEm Router Tables
AdapterCollars forModel02101A
Model 02111 – Fits Porter Cable 690/890, Bosch 1617/1618, DeWalt
610/616/618
Model 02113 (3-1/4” diameter) – Fits Makita1101
Model 02115 – Fits Hitachi M12VC and KM12VC
Model 02118 – Fits Milwaukee 5615/5616/5619
Shim Kit Model 02116 – Fits Milwaukee 5625
Important!!
Read and understand the contents of this manual
before assembly or operation of this product.

IMPORTANT SAFETY PRECAUTIONS
Before operating any router, read and understand allsafety instructions inthe
owner’smanual that came with the router.
If you do not have a manual, contact the manufacturerandobtainonebeforeusing
any power tool.
Alwaysweareye protectionin compliancewith ANSIsafetystandards whenoperating
any power tool.
Always use proper guards and safety deviceswhenoperatingpowertoolsand
machinery.
Carefullycheckrouterbitsbeforeeachuse.Do not use if damage or defectis
suspected.
DonotexceedtherecommendedRPMforany router bit.
Donotwearlooseclothingorjewelrythatmay catchon toolsor equipment.
Unplugthetoolormachinewhenmounting or makinganyadjustments to mechanical
performance.
ROUTER SAFETY PRECAUTIONS
Neverforcethebitoroverloadtherouterbeyond theexpectations of the tool.
Be sure that at least3/4 of the shanklength is insertedsecurelyin therouter collet.
Never bottom out the bit in the collet. Allow 1/8” clearance between shank and bottom
of collet.
Alwaysmakesurethefenceonyourroutertable is locked into position before each
use.
Always rout in two or more passeswhen largeamountsofstockmust beremoved.
Usereduced RPM speedsforlargediameterbits.
DO NOT USE A CORDLESS DRILL T
O RAISE
AND LOWER THE LIFT CARRIAGE. THE
AMOUNT OF FRICTION WILL CAUSE
PREMATURE WEAR OF THE THREADS.
CALIFORNIA PROPOSITION 65 WARNING
This product contains lead known to the State of California to cause cancer or
reproductive harm. Components made of brass are known to contain lead. Wash hands
after using this product.

Suggested Router Bit Speeds
BitDiameter Max. Speed
1”(25mm) 24,000 RPM
1-1/4”-2”(30-50mm) 18,000 RPM
2-1/4”- 2-1/2” (55-65mm) 16,000RPM
3”-3-1/2”(75-90mm) 12,000 RPM
JessEm Tool Company Limited Warranty
AllJessEmproductsarewarrantedto be free fromdefectsinmaterial and
workmanship. JessEmwillrepairorreplaceanyproductwhichuponinspection
provestobe defective for a period of (1)yearfromdatedreceipt andproof of
purchase. All warranty claimsshouldbe madedirecttoJessEm ToolCompany.
ContactJessEmfora warrantyclaimreturn authorizationandinstructions to
proceed.Theconsumer is responsiblefor shipping coststo return productto
JessEm Tool Company.We will repairor replace the product at our discretion
and JessEmTool willreturnshipmentto you at nocharge.
Warranty Limitations
This warrantydoes not cover:
Repairs or alterations made or attempted by anyone other than JessEm Tool
CompanyoranauthorizedJessEm serviceprofessional.
Normal wearandtear
Abuse, misuse or neglect.
Impropercare or maintenance.
Continueduse afterpartialfailure.
Products thathave beenmodifiedinanyway.
Productsusedwithimproperaccessories.
Premature thread weardueto adjusting height withelectricor cordlessdrill
CONTENTS:
(1)Mast-R-Lift,(1)Height AdjustmentHandle,(1)InsertRing,(1)InsertRingWrench, (1)Hex
Key,(1)StartPin
TOOLSREQUIREDFORASSEMBLY:
6mmand8mm HexKey
TOOLSREQUIREDFORADJUSTMENT:
10mm Wrench

Figure 1
Placethecrankhandleintothehex holein the
lift’s dialon the top plate. Cranktheliftcarriage
upso thatitjust contacts theO-ringsatthe top of
the carriage shafts. The carriageshould be all
thewaytowardthetopplate. With a 5/16” hex
wrench, loosen the cap screw onthecarriage
clamptoallowthemotortoslideintothecarriage
assembly (Fig.1). The Mast-R-Lift willacceptthe
PorterCable7518out of the box. If you are
using a smaller diameter router motor insertthe
adaptercollar intothe opening.
Installing the Router
(cont’d)
Rotate the router so that when the final
installation is made all router controls will
be positionedforconvenient access.Then
backthe motor off approx. 1/16”from
contactingthe top plateand tighten the
cap screw on the carriage assembly.
InstallingaJessEmLift ina
CustomRouter TableApplication
A JessEmrouter lift is similartousinga
routermountingplate.Yourtabletopmust
haveaportmachined intothetop.JessEm
offerssolidphenolicroutertablestopswith
pre-machinedports for all JessEmrouter
lifts. If you are installingthisLiftina custom
tableapplicationyouwillhavetofabricate
thisopeningyourself.JessEmoffers a
separate templateforthis operation.See
your JessEmdistributorfortheproper
template for yourJessEmrouterlift.
Figure 2
Before installing the router motor, prop the
unit up on blocks of wood (Fig. 2) so the
router’scollet can extend through the center
hole in the top plate. The motor housing
must slide all the way through and contact
the inside back of the center hole on the
plate.
Now slide the router motor into the carriage
so the top of the motor housing just makes
contact with the inside surface of the center
holein the top plate.
Installing the Router
Levelingthe Lift to theTableTop
The Mast-R-
Lift features 8 drilled and tapped
holes around the perimeter of the insert plate
with adjustable set screws (Fig. 4
). Using the
hexwrenchincluded withyour
lift,turntheset
screwsintheclockwise direction to raisethe
insertplate or turnthe setscrewsin the counter
clockwisedirectionto lower the insertplateuntil
theinsertplate is level(flush) withthe routertable
surface. Start at one cornero
f the insert plate
andwork yourwayaroundtheperimeterof the
insertplate untilall set screwshavebeen
adjusted properlysothattheinsertplatedoesnot
rest aboveorbelow the tablesurface. Oncethe
insertplate has beenleveled properly, please
figure4 for adjustingthe insert plateto thetable.
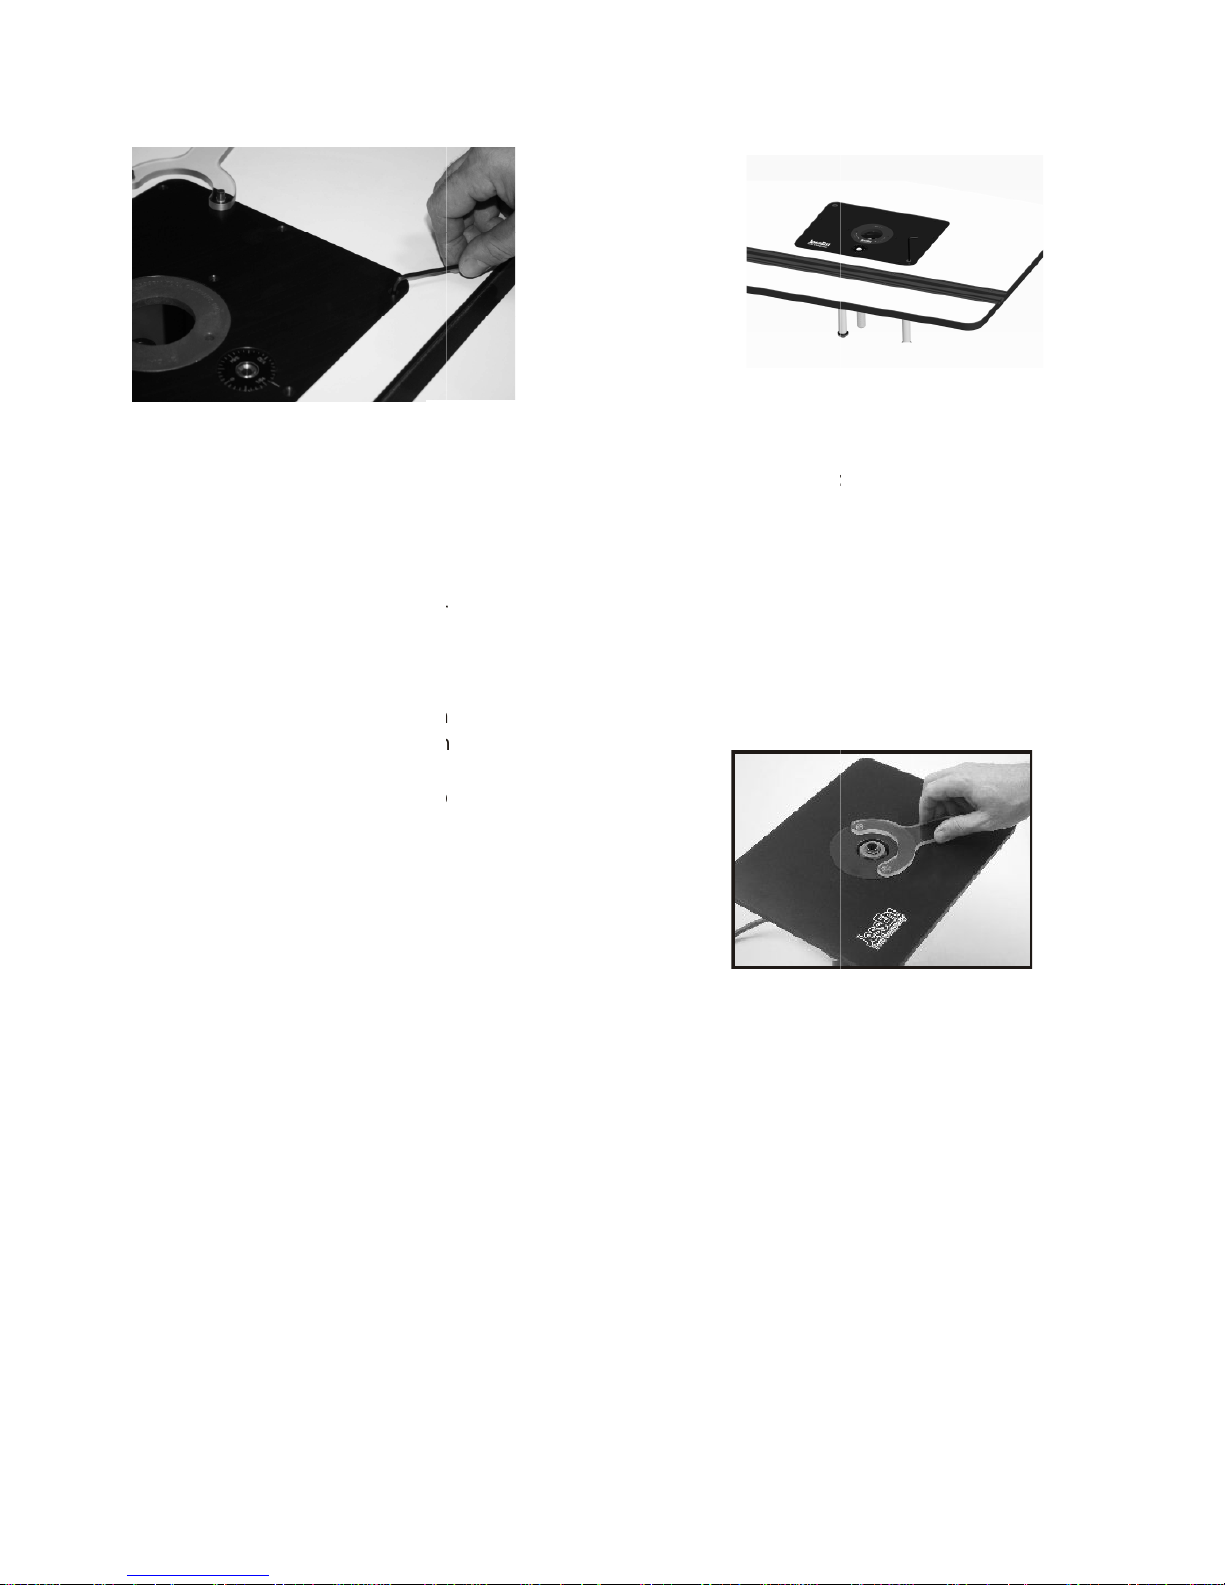
Figure 4
Securingthe Mast-R-
Liftto the Table
After adjusting the levelingscrews and
gettingtheliftplatelevel and flushwiththe
table top,theMast-R-Lift
canbe secured
byinserting a bolt
through the top of the
then screwingtheboltinto the
correspondingcornerhole in thetable
openingusinga hex key (Fig.5
). Thiswill
securetheliftorplatefrom moving during
operation. Refer to the router lift or plate
manualformoredetail
s on levelingthelift
or platetothetable.
see
Tab-Loc InsertRings
The Rout-R-
Lift FX comes with one insert
ring
with a pre
center hole.
Additional ring sets are
available with different diameter pre
holes and/or no pre
creating your own custom center hole
diameters. See your JessEm distributor for
these
and other accessories.
1.
Placethe insertring into the center
holeof
the Lift’s top plate (Fig. 6).
2.
Withtheinsert wrenchprovided,insert
the
prongs of the wrench into the
corresponding
holes in theinsert ring and
turntheinsert ring
tighten.
3.
Turntheinsert wrench clockwise to
loosen
and remove the ring. If the insert
ring becomes
too tight to loosen with hand
pressure, a tap
clockwiseon the insert
wrenchwitha block of
lift
-drilled 1-1/2” diameter
-drilled
-drilled holes for
Figure 6
counter clockwise to
wood will loosen it.
Figure 5

Using the Mast
-R-
Lift
Toraiseyourrouter,turn the heightadjustment
handle clockwise. To lower,turn the handle
counter-clockwise. Keep in mind that one
complete revolutionequals 1/16” of change.
Whenyouradjustmentiscomplete,removethe
handle and place somewhere offthe work
surfacefor safety. Refer to the chart below for
fractional and decimal adjustmentsbased on
amount of revolutions made.
Fraction
Decimal
Number of
Revolutions
1/64”
0.016”
1/4
1/32”
0.031”
1/2
1/16”
0.062”
1 Revolution
1/8”
0.125”
2
1/4”
0.250”
4
1/2” 0.500” 8
Re-Adjustingthe Thread Tensioning
All JessEm Lifts feature ourpatentedthread
tensioning design. This feature is why it is not
necessary to lock therouter into position after
setting the cutting height. The design keeps
tension on the position wherever you set the
height. Thread tension isset at the factory and
depending on the amountof useyoumayhaveto
resetthisadjustment periodically.If the bit height
ever begins to change (or drop) during use,the
threadtensioning likely needs to be reset.
1.
TurntheLiftupsidedownona tablewiththe
threaded height adjustmentrod facingyou.
2.
With an open end wrench, (Fig. 7) loosen
the hex nut that is located on the right side of
the brass post next to the threaded rod. Then
usea hexwrench to backout the set screw that
threadsthrough the nut untilthe brass
tensioning collar can be turned.
Figure 7
Figure 8
3. Then route the brass tensioning
collar (Fig. 8) with vertical grooves, so
it tightens against the rubber washer.
Note: A drop of oil on the rubber
washer eases the rotation of the
brass collar.
4. Make certain the set screw seats
in one of the vertical grooves when
tightening the brass collar.
5. Tighten the nylon lock nut with the
open end wrench again and the
adjustment is complete.

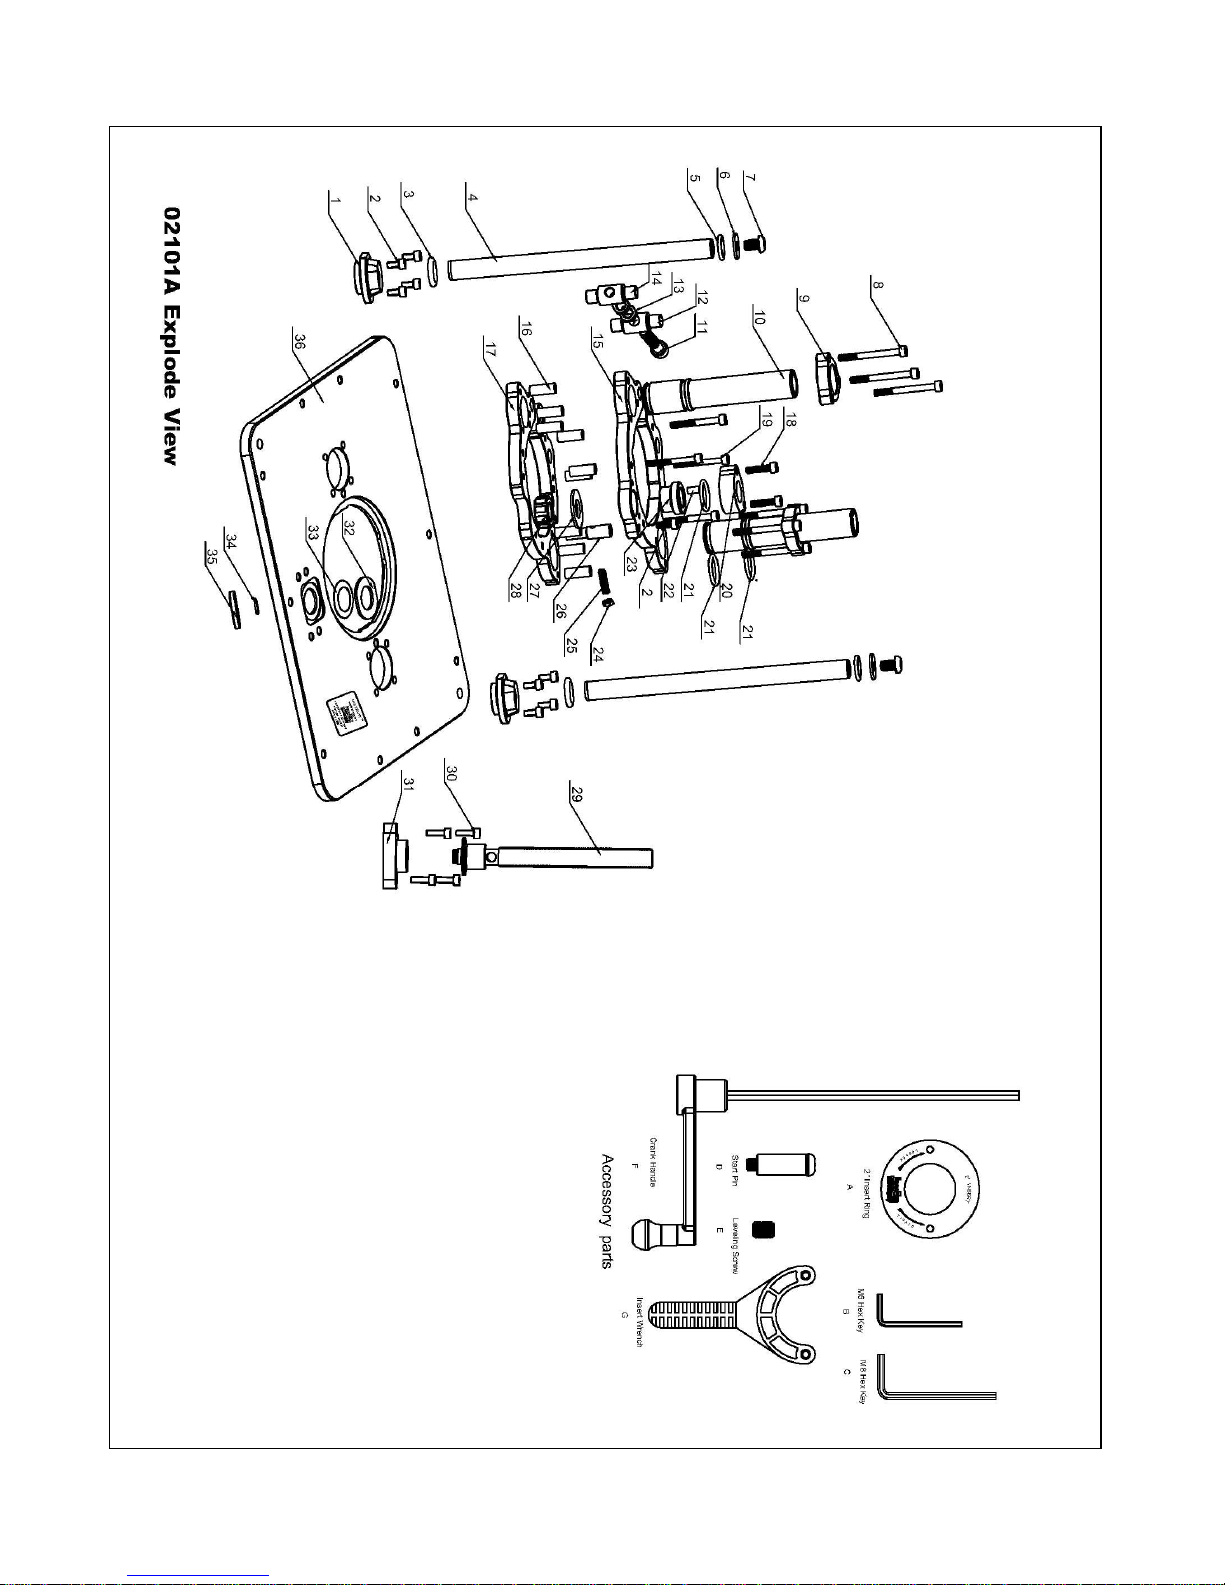
02101A Mast-R-Lift Parts List
Item No. Part No. Description Qty Specification
1 02101A-001 Guide Tube Base 2
2 02101A-002 Shaft Mtg Block Bolt 9 M6X12
3 02101A-003 Rubber O-ring 2 M29.4X18.6X5.4
4 02101A-004 Bearing Tube 2
5 02101A-005 Rubber O-ring 2 M25.4X18.6X3.4
6 02101A-006 washer 2 M8.5X25X2.5
7 02101A-007 Screw 2 M8X16
8 02101A-008 Carriage Bolt long 6 M6X63
9 02101A-009 Carriage Tube Retainer 2
10 02101A-010 Guide Tube 2
11 02101A-011 Carriage Lock bolt 1 M10X60
12 02101A-012 Clamp pin 1
13 02101A-013 Carriage Adjusting Lock Nut 2 M10
14 02101A-014 Clamp pin 1
15 02101A-015 Down carriage plate 1
16 02101A-016 Carriage Spacer 10
17 02101A-017 Upper Carriage Plate 1
18 02101A-018 Retainer Bolt 2 M6X25
19 02101A-019 Carriage bolt short 4 M6X50
20 02101A-020 Retainer 1
21 02101A-021 Rubber O-ring 3 M32X25.2X3.4
22 02101A-022 Pin 1
23 02101A-023 Shaft Bushing 1
24 02101A-024 Backlash Lock Nut 1 M6
25 02101A-025 Backlash set screw 1 M6X25
26 02101A-026 Backlash Pin 1
27 02101A-027 Rubber Washer 1
28 02101A-028 Brass Backlash Nut 1
29 02101A-029 Lead Screw w/spring pin 1
30 02101A-030 Mtg Block Bolt 4 M6X18
31 02101A-031 Spindle Mounting Block 1
32 02101A-032 Brass Washer 1
33 02101A-033 Spring Washer 1
34 02101A-034 Rubber Washer 1
35 02101A-035 Height Dial 1
36 02101A-036 Top Plate 1
A 02101A-A 2" Insert Ring 1
B 02101A-B Hex Key 1 M6
C 02101A-C Hex Key 1 M8
D 02101A-D Starter Pin 1
E 02101A-E Leveling Screw 11 M6X8
F 02101A-F Crank Handle 1
G 02101A-G Wrench 1
 Loading...