

Page 1
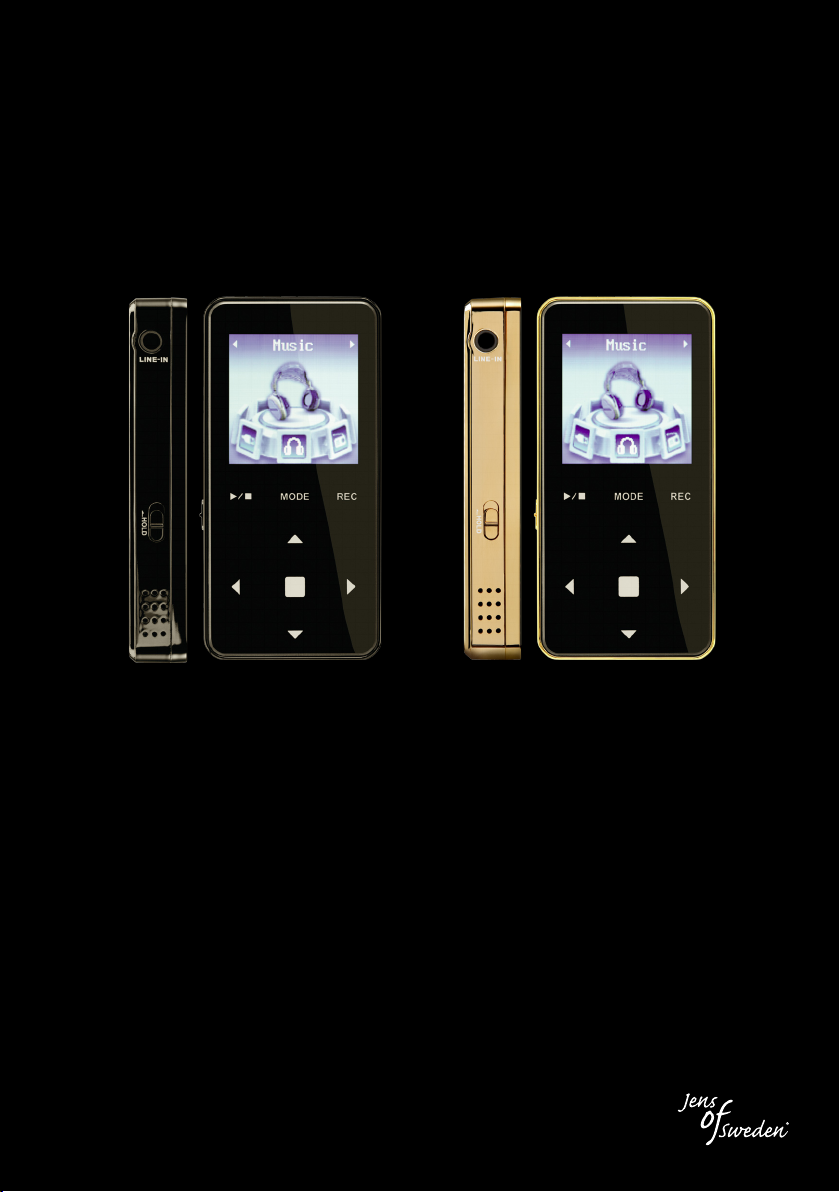
MANUAL MP-500
V E R S I O N 1 . 2
Page 2

ENGLISH
BASIC USE
Before You Start ...............................................................35
Getting Started .................................................................36
TA BL E O F CO NTE N TS
Different File Formats ......................................................37
PRODUCT SPECIFICATIONS
Product Specifications .....................................................38
Buttons and Connections ................................................39
The Display ........................................................................40
Music Mode ...................................................................40
Radio Mode ....................................................................40
Record Mode .................................................................41
Multimedia Mode .........................................................41
THE PLAYER’S DIFFERENT MODES
Player Modes ....................................................................42
Folder Navigation View and the Settings Menu ......43
Navi Mode ......................................................................43
1. MUSIC MODE
Play / Pause ....................................................................44
Fast Forward / Rewind .................................................44
Change the Volume .......................................................44
Repeat Section ..............................................................44
Bookmarks ......................................................................45
Change the Repeat Setting ..........................................45
The Equalizer ..................................................................45
Karaoke / Lyrics .............................................................46
2. RADIO MODE
Manual Tuning and Presets .........................................46
Change the Volume .......................................................46
FM Radio Recording ......................................................47
3. RECORD MODE
Turn Recording On / Off ................................................49
Setting recording Type and Quality .............................49
Bitrate Quality Setting ..................................................49
Record Settings .............................................................50
Timer Recording .............................................................50
4. MULTIMEDIA MODE
Play ..................................................................................51
Change the Volume .......................................................51
5. PICTURE MODE
View JPEG Files .............................................................52
View Next / Previous Image ........................................52
Slideshow .......................................................................52
6. TEXT MODE
Read a Text File ..............................................................53
Scroll the Text .................................................................53
7. USB HOST MODE
Connect the Devices .....................................................54
Copy Files ........................................................................54
PLAYER SETTINGS
Settings Menu Overview ................................................55
General ..............................................................................56
Display ...............................................................................57
Timer ...................................................................................58
Mode ..................................................................................59
Sound .................................................................................60
Record ................................................................................61
System ...............................................................................62
TROUBLESHOOTING / COPYRIGHT / LIMITED
CONSUMER GUARANTEE
Troubleshooting ................................................................63
Copyright ...........................................................................64
Limited Consumer Guarantee .........................................65
34
Page 3
BEFORE YOU START
PRECAUTIONS
Read the following instructions thoroughly before you start using the product.
JoS AB is not responsible for any problems due to incorrect use of the product
before you read these instruction.
- Don’t use the product in other ways than described in this manual.
- Don’t subject the player to any kind of force or shocks, this can seriously
damage the player.
- Avoid extreme heat, shaking or magnetism.
- Keep the player out of any damp environments, which can seriously damage
your player to the extent where it no longer can be repaired.
- Wipe off any possible grease stains and other particles using a polishing
cloth. Never use paper which can give rise to scratches. Never use gasoline,
thinner and similar fluids to clean the player.
- Never take apart your player. This will void your warranty.
- Avoid shaking the player while it’s connected to the USB port.
- Fully charge the built-in battery when charging the player.
- If hold is turned on the player cannot be controlled until hold is turned back
off.
- Protect the player from foreign objects and materials that might harm the
surface of your player.
BAS IC US E
TRAFFIC SAFETY
Do not use the earphones while riding a bike, driving a car or a motorcycle. It
may cause a hazard by impairing your ability to hear what’s going on around
you, in certain areas it’s also a violation of the law. Even walking or using a
pedestrian crossing while wearing the earphones and listening at high volumes
can be dangerous.
HEARING
To protect your hearing, do not use the earphones at high volumes for an
extended time. Health professionals have indicated that it may be dangerous
to be exposed to high levels of volume. If you experience ringing in your ears,
please lower the volume level or stop using the earphones.
REST YOUR EARS
Prolonged listening at high volumes can cause serious damage to your ears,
for example tinnitus or impaired hearing. For questions regarding sound and
hearing contact your local Association of Hard of Hearing People.
35
Page 4
GETTING STARTED
POWER ON
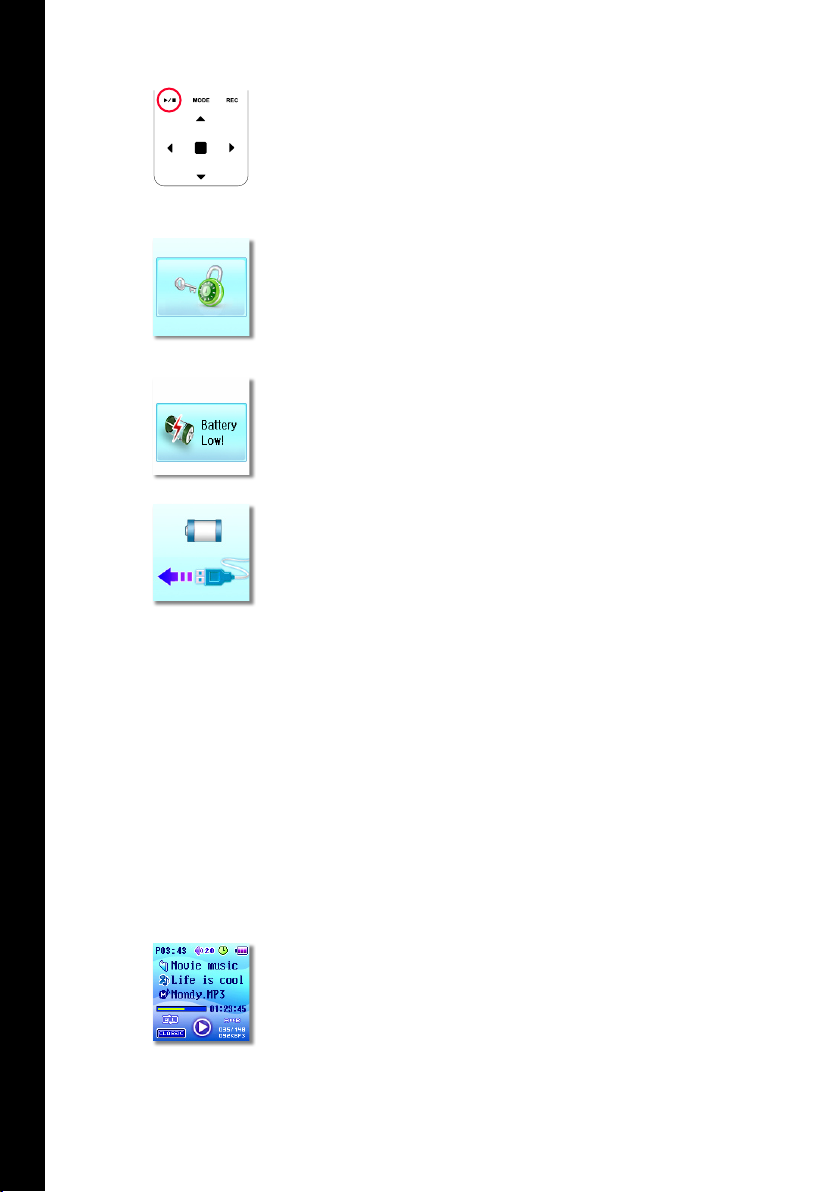
Press and hold the PLAY / PAUSE-button for more then 2 seconds.
BAS IC US E
POWER OFF
Make sure the player is set to Pause. Then press and hold the PLAY / PAUSE
button for more then 2 seconds.
HOLD
When Hold is activated the player will not respond when a button is pressed
until Hold is deactivated.
LOW BATTERY WARNING
This warning screen will show when the battery level is low.
When the battery level becomes to low for the player to operate the player will
turn off after saving any possible data.
CHARGING THE BATTERY
The player will automatically start charging the battery once it’s connected to a
computer or a travel charger through the USB-port.
USB MEMORY FUNCTION
The player functions as a UMS (Universal Mass Storage) which lets you easily
save and transfer files from your computer. The unit will automatically appear
on your computer as a Removable Disk.
1. Connect the player to the computer using the USB cable.
2. Copy the file or folder.
3. If the computer can’t find the player you may need to reinstall the player’s
firmware. (This can happen if there is a disk error on the player, which
can be caused by for example removing the player while file transfer is in
progress) See www.jensofsweden.com for the latest firmware.
PLAYBACK DURING BATTERY CHARGE
It’s possible to play files while charging the battery.
1. When charging the battery through the computer (USB) press the MENU
button. You will then be asked if you wish to exit USB Mode.
2. If you select Yes the file transfer mode will become inactive and the play
mode will become active.
WARNING! Before you switch mode, make sure any possible file transfers
are completed. If you abort a file transfer you may damage the players flash
memory and you may be forced to re-format and re-install the players firmware
in which case you will lose all data stored on the player.
36
Page 5

CHANGE THE LANGUAGE SETTING
The players default language is set to swedish, to change language follow the
instructions below.
1. Turn on the player by holding down the PLAY / PAUSE button.
2. Press and hold the MENU button to enter the SETTINGS MENU.
3. From the SETTINGS MENU choose DISPLAY (“VISNING” in swedish) by
using the NAVIGATE LEFT and RIGHT buttons. Confirm your choise by
pressing the MENU button.
4. Select the menu item LANGUAGE (“SPRÅK” in swedish) by using the
NAVIGATE UP and DOWN buttons. Confirm your choise by pressing the
MENU button.
5. Select language, for example ENGLISH (“ENGELSKA“ in swedish) by using
the NAVIGATE UP and DOWN buttons. Confirm your choise by pressing the
MENU button.
6. Press the REC button to exit the SETTINGS MENU.
DIFFERENT FILE FORMATS
WHAT IS MP3?
MP3 is short for MPEG-1 Audio Layer 3-compressiontechnology. The term
MP3 files usually refers to files containing music of some kind. MP3 files are
compressed to approximately 1/12 of a normal music file that you find on a
Compact Disc. MP3 is used under license from Thompson.
BAS IC US E
WHAT IS WMA?
WMA is short for Windows Media Audio and is a popular alternative to
MP3. WMA gives you the opportunity to compress files harder with out
losing quality. WMA files are compressed to approximately 1/24 of a normal
music file that you find on a Compact Disc. WMA is used under license from
Microsoft.
WHAT IS OGG?
OGG-Vorbis is an open source format with better quality than MP3. It also
produces smaller files then MP3 with equal quality.
37
Page 6

PRODUCT SPECIFICATIONS
PLAYER
Memory: 1GB, 2GB
IMAGES
File Support: JPG
Size: 81 x 40 x 13 mm
Weight: 51 gram
Speakers: Built-in speakers
PR OD UC T S P ECI F IC AT I ON S
Microphone: Built-in microphone
DISPLAY
Size: 1.6 inches
Type: Color TFT LCD
TEXT
File Support: TXT
FM RADIO
Presets: 24 Auto Presets
Frequency: 76 MHz - 108.0 MHz
Antenna: Earphone Antenna
Colors: 260 000 colors
Resolution: 128 x 128
FIRMWARE
Type: Upgradable
SOUND
Languages: English. Swedish.
Sound Enhancement: SRS/TRUBASS/WOW
Equalizer: Normal, Classic, Jazz, Pop, Rock and
5 User EQs
ID3: V1, V2
Headphone Output: 10 mW + 10 mW
Speaker Output: 110 mW + 110 mW
BATTERY
Type: Rechargeable Li-Polymer (built-in)
Life: Audio: 15.5 hours, Video: 8 hours
Charging Time: 2-3 hours (30 min. with charger)
Working Temperature: -5C - 40C
Frequency Range: 20 Hz - 20 KHz
SN Ratio: 90 dB (FM Radio: 50dB)
INTERFACE(S)
Headphones: 3.5 mm Stereo Jack
MUSIC
File Support: MP3, WMA and OGG
Bitrate, MP3: 8 Kbps - 320 Kbps (Supports VBR)
Line-in: 3.5 mm Stereo Jack
USB: USB 2.0 HiSpeed Type B Mini Jack
USB host: USB 1.1
Bitrate, WMA: 32 Kbps - 192 Kbps
Bitrate, OGG: 44 Kbps - 500 Kbps (Q1 - Q10)
REQUIREMENTS
O/S: Windows 98SE/ME/2000/XP/2003, Mac
10.2, Linux 2.4.0 or later.
VIDEO
File Support: MP4 (WMV, AVI, ASF, MPG,
Connection(s): USB port
MPEG) *
* When converted with the provided transcoder
Resolution: 128 x 112
38
Page 7
RESET
LINE-IN
MIC
USB 1.1
HOST
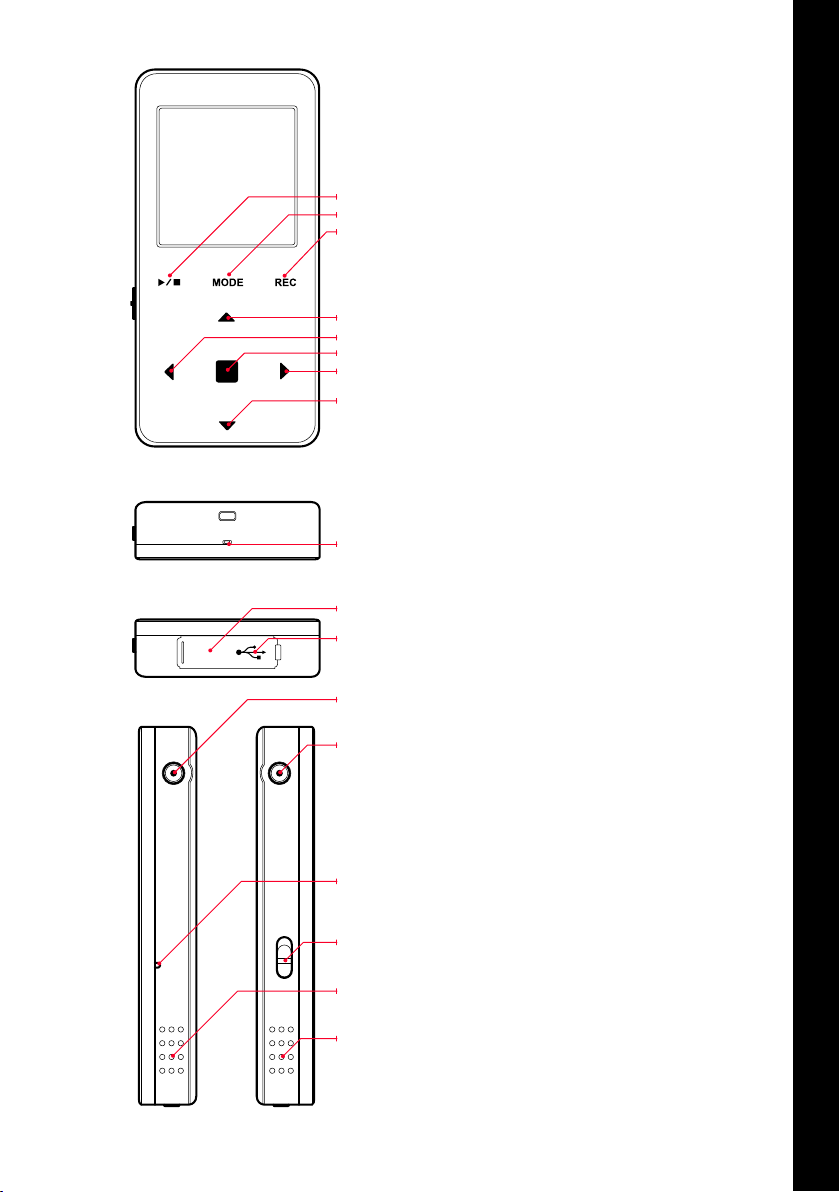
BUTTONS AND CONNECTIONS
1. Play / Pause
2. MODE
1
2
3
4
5
6
7
8
9
10
11
3. REC
4. Navigate Up
5. Navigate Left
6. MENU
7. Navigate Right
8. Navigate Down
9. Built-in microphone
10. USB Host Jack
11. USB Jack
12. Headphones Jack
13. Line-In
14. Reset-button
15. HOLD
16. Built-in Speaker (Right)
17. Built-in Speaker (Left)
PR OD UC T S P ECI F IC AT I ON S
12
13
14
15
16
17
39
Page 8
O
N
M
L
K
J
E
F
G
C
A
B
D
I
H
O
N
M
L
K
J
E
F
G
C
A
B
D
I
H
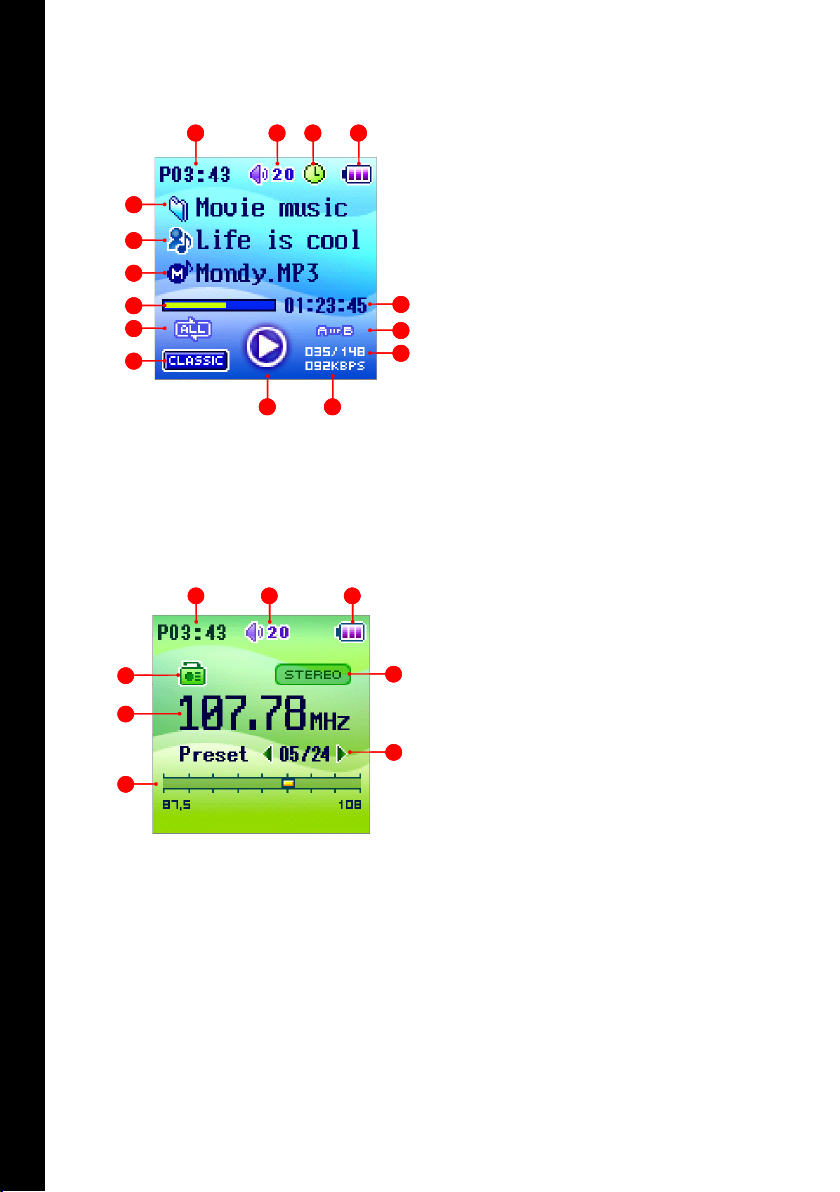
THE DISPLAY
D
H
G
F
E
B
C
A
D
D
H
G
F
E
B
C
A
D
MUSIC MODE
A. Clock
B. Volume Level Indicator
C. Alarm
D. Battery Level Indicator
PR OD UC T S P ECI F IC AT I ON S
E. Play Time
F. Section Repeat / Bookmark
G. File Number / Total Selected Files
H. Quality measured in kbps (Kilobits per second)
I. Play / Pause
J. Equalizer Mode
K. Play Mode
L. Progressbar
M. Track Title
N. Artist
O. Folder
RADIO MODE
A. Clock
B. Volume Level Indicator
C. Battery Level Indicator
D. Mono / Stereo
E. Selected Preset / Total Presets
F. Frequency Indicator Bar
G. Frequency
H. Radio Mode
40
Page 9
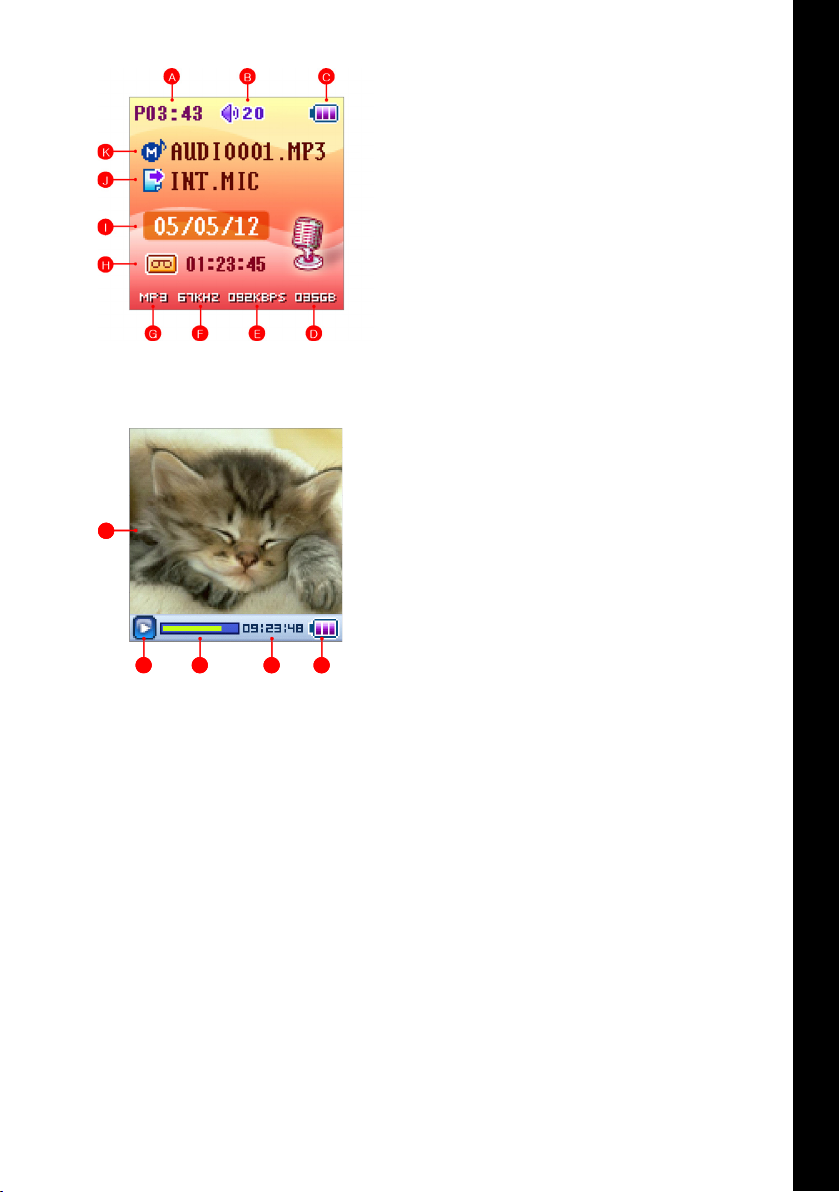
RECORD MODE
A
D
C
E
D
C
B
A
D
C
E
D
C
B
A. Clock
B. Volume Level Indicator
C. Battery Level Indicator
D. Remaining Memory
E. Recording Quality in kbps (Kilobits per second)
F. Frequency in kHz
G. Recording File Format
H. Record Mode
I. Date
J. Recording Source
K. Filename
MULTIMEDIA MODE
A. Movie
B. Play / Pause
C. Progressbar
D. Time
E. Battery Level Indicator
PR OD UC T S P ECI F IC AT I ON S
41
Page 10
PLAYER MODES
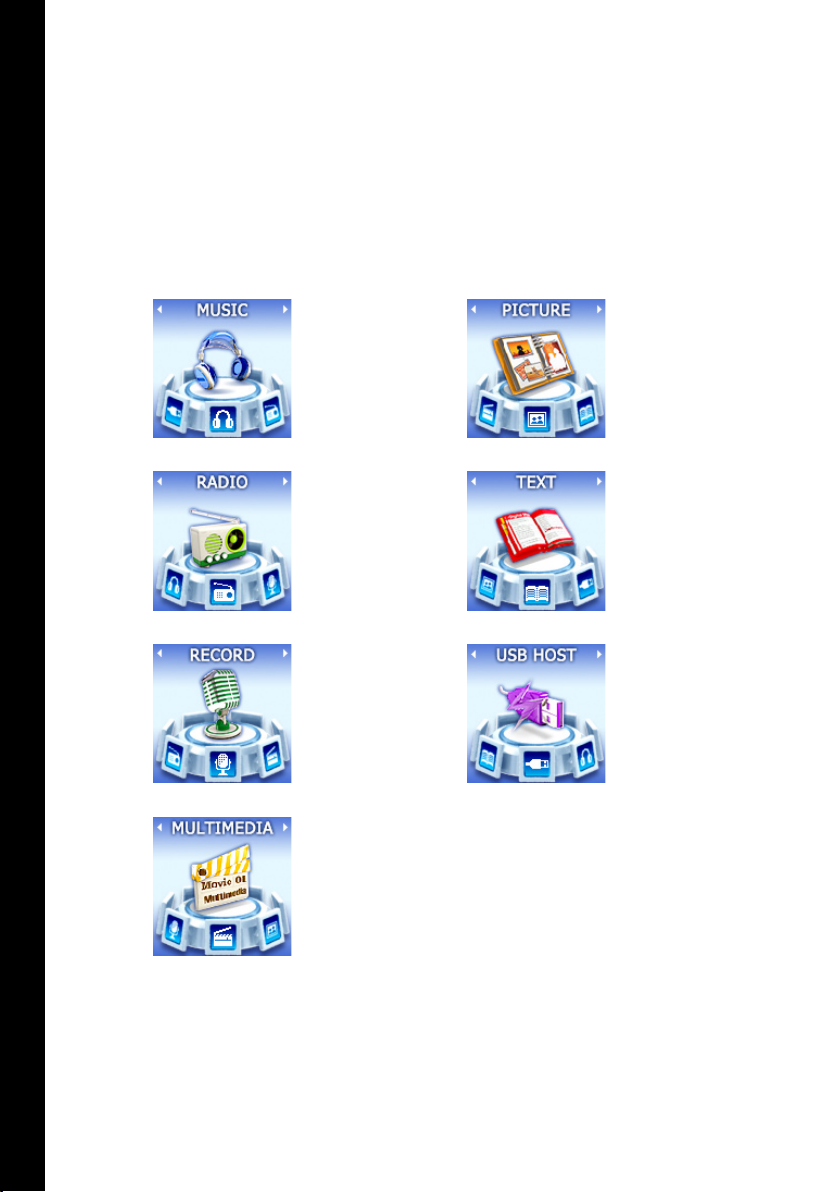
There are seven different modes. These are Music, Radio, Record, Multimedia, Picture, Text and
USB Host.
To switch mode the player must first be set to Pause. When this is done you can access the MODE
MENU by pressing MODE for 2 seconds. Switch between the different modes by using NAVIGATE
RIGHT and LEFT buttons. Confirm your choice with the MENU button.
Music Mode for
TH E PL AYE R’ S D I FFE R EN T M OD ES
playing music files.
FM Radio for
listening and
recording radio
transmissions.
Record through the
built-in microphone,
external microphone
or direct recording
from the Line-in jack.
Multimedia Mode for playing MP4 files. NOTE! Only plays files in MP4
format. To convert your files to MP4 use the supplied transcoder software
available at www.jensofsweden.com.
Picture Mode for
showing images in
JPEG format.
Text Mode. Show
text files in .txt
format.
USB Host for
tranfering files from
another portable USB
device.
42
Page 11

FOLDER NAVIGATION VIEW AND THE SETTINGS MENU
The navigation buttons have the same functions in all folder navigation views
and settings menus.
1. NAVIGATE UP selects previous file or list.
2. NAVIGATE DOWN selects next file or list.
3. NAVIGATE LEFT move one step up in the folder structure.
4. NAVIGATE RIGHT open a folder and play selected file
5. PLAY / PAUSE play selected file.
6. MENU button - short press
When you press the MENU button shortly you’ll enter the player’s folder
navigation.
7. MENU button - hold down (2 seconds).
When you hold down the MENU button you’ll enter the SETTINGS MENU
(read more about the different settings you can make under PLAYER
SETTINGS). To go back to play mode press the REC button.
NAVI MODE
When you are in the folder navigation view you can access NAVI MODE by
pressing the MENU button. When the NAVI mode is active the title in the top
of the screen will change from the active MODE (for example Music, Picture
etc) to NAVI. This mode lets you play other file types than those played by the
current active mode. For example you can play a MULTIMEDIA file when you
are in the TEXT mode. The player will then automatically switch mode once
you select another file type.
This mode helps you to navigate faster between different file formats and
modes.
To exit the NAVI MODE and go back to the play mode press the REC button
Press the MENU button a second time to switch back to the folder navigation
for the current MODE.
.
TH E PL AYE R’ S D I FFE R EN T M OD ES
43
Page 12
1. MUSIC MODE
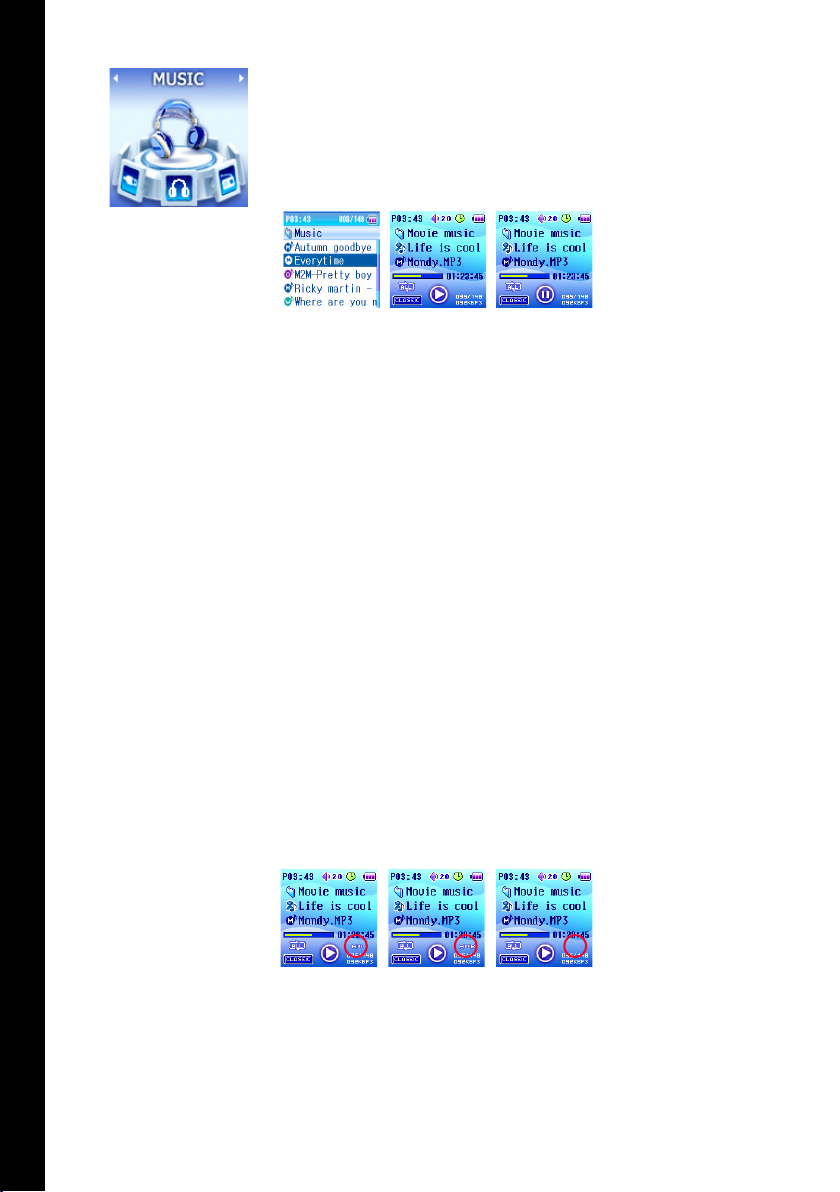
PLAY / PAUSE
1. Choose MUSIC mode.
2. Choose track and confirm your choice by pressing the PLAY / PAUSE button.
3. Press the PLAY / PAUSE button a second time to pause the track.
REWIND / FAST FORWARD
T HE P LAY E RS D IF FE RE NT MO DE S – 1. MU SIC MO DE
1. Press and hold the NAVIGATE LEFT button to rewind.
2. Press and hold the NAVIGATE RIGHT to fast forward
You can set the rewind and fast forward speed in MENU / GENERAL / SCAN
SPEED.
CHANGE THE VOLUME
Change the volume during playback.
1. Press and hold the NAVIGATE UP button to increase the volume.
2. Press and hold the NAVIGATE DOWN button to decrease the volume.
The volume can be set from 0 to a maximum of 40.
REPEAT SECTION
1. Repeat section allows you to repeat a certain section of a track.
2. Press the MODE button once during the playback of a file, an A is shown on
the screen indicating the starting point of the section to repeat.
3. Press the MODE button again to select the end point of the section to
repeat. A-B is shown on the screen.
4. The chosen section will automatically be played until the MODE button is
pressed again.
44
Page 13
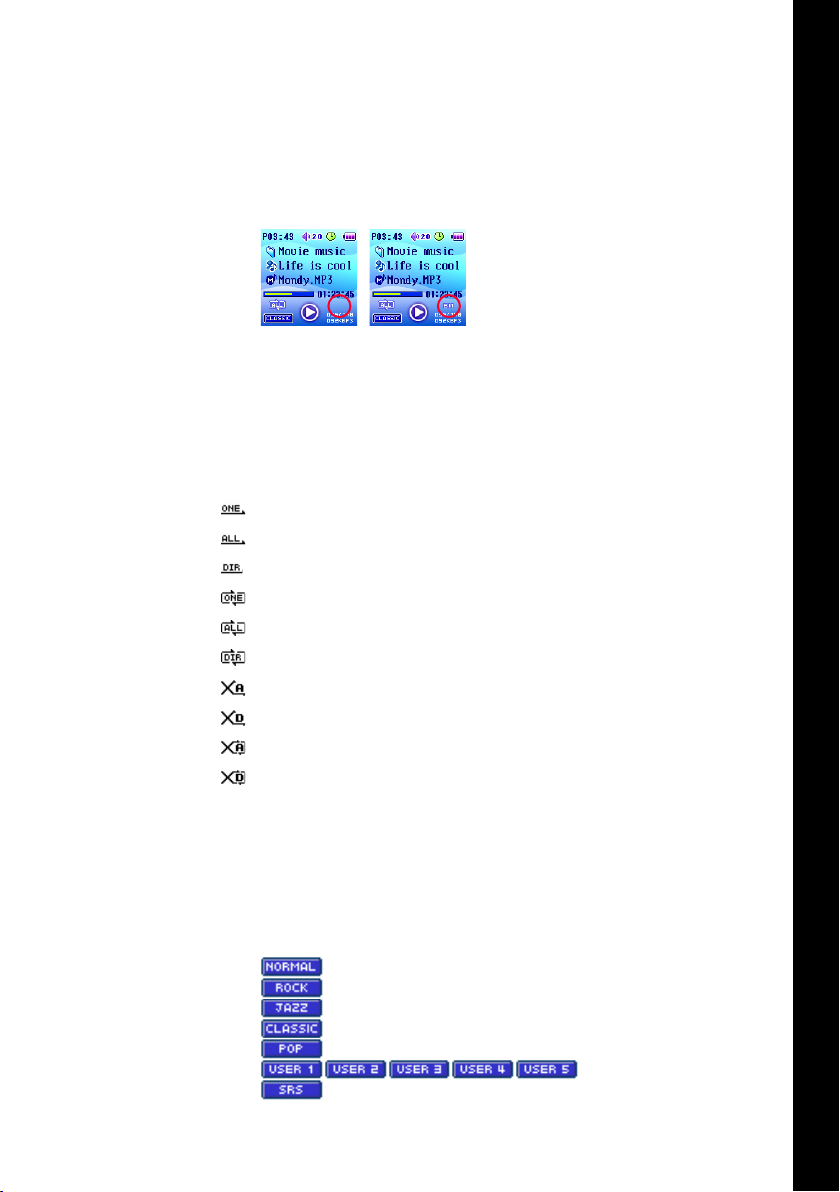
BOOKMARKS
The player allows you to bookmark long files (for example MP3 books) to make
it easier to start where you left of.
1. Press and hold the REC button during playback of a music file.
2. Press and hold the PLAY / PAUSE button during payback to skip to the
bookmark.
.
CHANGE THE REPEAT SETTING
Do the following to change the repeat setting.
1. Press and hold the MODE button during playback.
2. Press the MODE button in standby mode.
The different repeat settings are as follows:
One (Play chosen file once.)
All (Play all files once.)
Dir (Play selected folder.)
Repeat One (Repeat the selected file.)
Repeat All (Repeat all files.)
Repeat Dir (Repeat the selected folder.)
Shuffle All (Play all files in random order.)
Shuffle Dir (Play all files in current directory in random order.)
Repeat Shuffle All (Repeat and play all files in random order.)
Repeat Shuffle Dir (Repeat and play all files in current folder in random order.)
THE EQUALIZER
Do the following to switch equalizer.
1. Press the REC button during playback or standby mode.
The different equalizers are as follows:
NORMAL, ROCK, JAZZ, CLASSIC, POP, USER1~5, SRS
T HE P LAY E RS D IF FE RE NT MO DE S – 1. MU SIC MO DE
45
Page 14

KARAOKE / LYRICS
46
The player supports lyrics of the .lrc format and can therefor function as a
small karaoke machine. The .lrc format contains text and time marks which
states when the text should be shown. There are a large number of applications available on the internet as freeware / shareware for creating, viewing
and/or downloading these files to your computer.
Below follows a few recommendations:
MiniLyrics4 from MiniLyrics is a plug-in that works with the most common
media players like Windows Media Player, iTunes, WinAmp etc.
VividLyrics from VividLyrics Development, EvilLyrics from Evil Laboratories and
Leos Lyrics Plugin from Leo R are some other examples of applications avail
-
able for creating, viewing and downloading lyric files available on the internet.
T HE P LAY E RS D IF FE RE NT MO DE S – 1. MU SIC MO DE
NOTE! JOS AB does not provide any warranties or support for the applications
listed above. All rights and obligations rest on respective publisher.
USE .LRC FILES
1. Use one of the above applications or similar to download a .lrc file (see the
individual applications support for how to do this).
2. Name the downloaded .lrc file exactly the same as the .mp3 file (for
example music.mp3 and music.lrc. If the files don’t have identical names
before the file extension the lyric function will not work).
4. Connect the player to the computer using the USB Cable.
3. Move both files (.mp3 and .lrc) to the same folder on the player. Both files
must be in the same folder for the MP-500 to be able to show the lyrics.
ACTIVATE LYRICS
1. Press and hold down the MENU button to show the SETTINGS MENU.
2. Choose GENERAL / LYRIC.
3. Activate lyrics by choosing YES
4. Play the music file.
NOTE!
To turn off the player or switch to another mode (multimedia, text, radio etc)
you first need to stop any music files from playing.
Page 15
2. RADIO MODE
MANUAL TUNING AND PRESETS
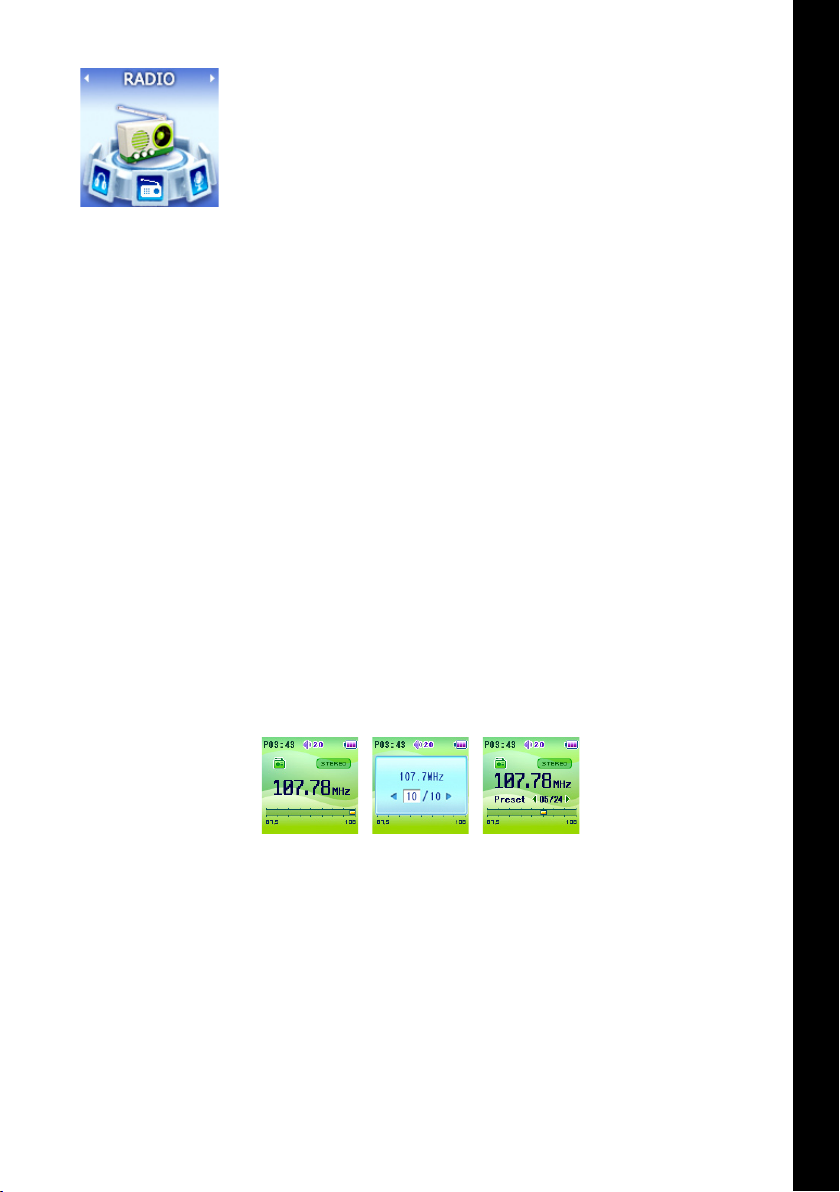
There are two ways to tune in the desired frequency you can either use presets
or manual tuning. To switch between these two modes press the MODE button.
It’s not possible to switch between these two modes until there is a saved
preset available. Until a preset is saved only manual tuning is available.
MANUAL TUNING
Press NAVIGATE LEFT or RIGHT to change the frequency. Continue pressing
until the desired frequency is found.
AUTOMATIC STORING OF PRESETS
1. Press the PLAY / PAUSE button. All frequencies will be scanned and stored
as up to 24 different presets.
2. Press the PLAY / PAUSE button if you wish to abort the search.
3. Once the search is complete use NAVIGATE LEFT and RIGHT to change
selected preset.
MANUAL STORING OF PRESETS
1. Make sure manual tuning is activated.
2. Tune in desired frequency.
3. Press the REC button and confirm the preset number with the MENU button.
4. The player will automatically switch mode to presets.
5. To store another preset press the MODE button to switch back to manual
tuning and repeat steps 2 -5 again.
T HE P LAY E RS D IF FE RE NT MO DE S – 2. RA DIO MO DE
CHANGE THE VOLUME
Change the volume during playback
1. Press and hold NAVIGATE UP to increase the volume.
2. Press and hold NAVIGATE DOWN to decrease the volume.
The volume can be set from 0 to a maximum of 40.
47
Page 16

FM RADIO RECORDING
1. Press and hold REC until the recording starts.
2. Press and hold the REC button to stop the recording
The recorded file will be stored in the RECORD / FM folder and can be
played in the music mode.
NOTE!
T HE P LAY E RS D IF FE RE NT MO DE S – 2. RA DIO MO DE
Your headphones are used as an antenna. If your headphones aren’t
connected to the player you will have difficulties getting an acceptable
reception.
You can set what quality you wish to record in , see SETTINGS / RECORD
Never connect an external source to the line-in jack when listening to the
radio. This can create a sharp distortion.
Turn off the speakers before recording starts to avoid any possible
feedback and distortion.
48
Page 17
3. RECORD MODE
TURN RECORDING ON / OFF
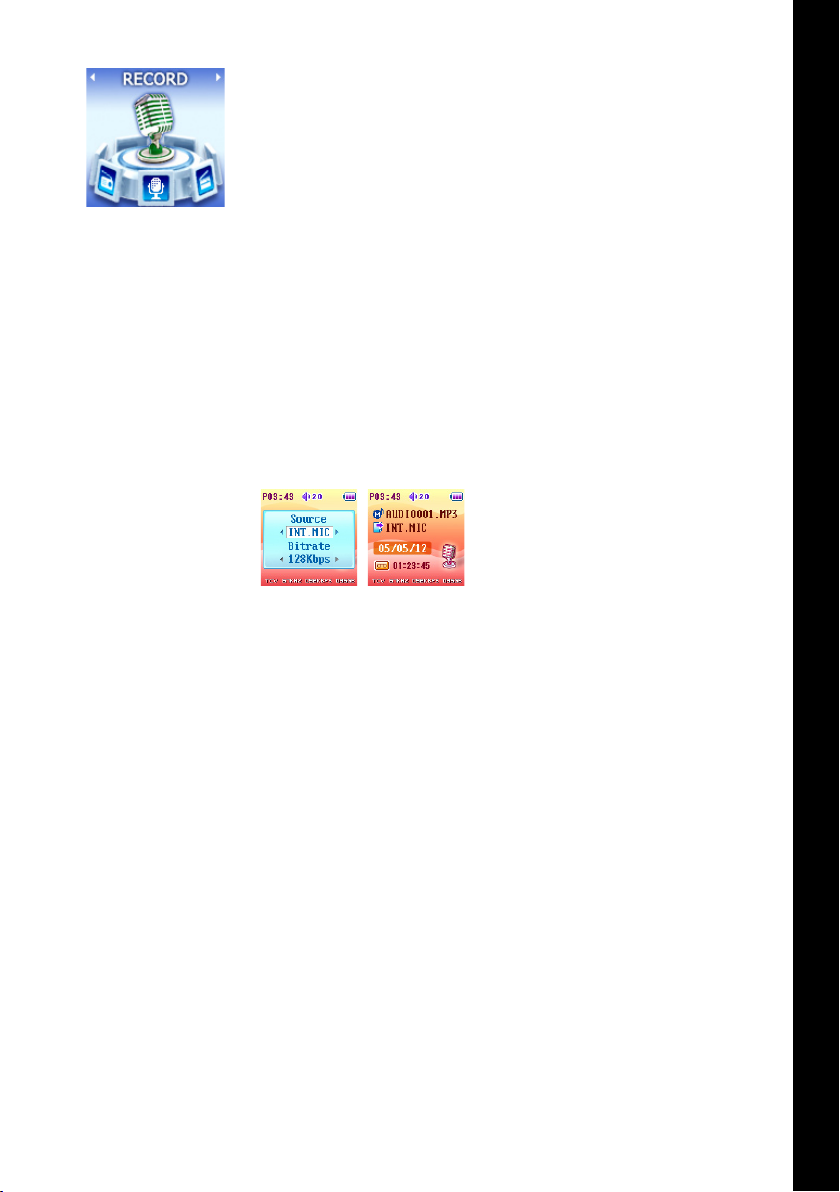
1. Use the NAVIGATE buttons to choose source and recording quality (Bitrate)
2. Confirm the setting and start the recording by pressing the REC button.
3. Stop the recording by pressing the REC button a second time.
4. Depending on selected recording source the files will be stored in the
following catalogs.
- Line-In recordings will be placed in RECORD / LINE IN
- Voice recordings will be placed in RECORD / VOICE
- FM Radio recordings will be placed in RECORD / FM
5. The following information is shown on the screen (example):
- MP3 – File format of the recorded file
- 16kHz – Sampling frequency of the recorded file
- 32kbps – Bitrate quality when recording
- 468MB – Storage left on the player
SETTING RECORDING TYPE AND QUALITY
There are two different types of recording modes to choose from:
1. MUSIC (Line In)
Direct recording from for example a Compact Disc Player. Connect a Line-In
cable from the Line-Out port on the external source to the Line-In port on
your player.
2. VOICE:
INT.MIC – Records through the internal microphone.
EXT.MIC – Records through and external microphone (not included) which is
connected to the Line-In jack.
T HE P LAY E RS D IF FE RE NT MO DE S – 3. RE COR D M ODE
BITRATE QUALITY SETTING
A higher bitrate results in better sound quality and larger file sizes.
There are seven different bitrates to choose from; 32, 48, 64, 96, 128, 160 and
192kbps.
49
Page 18

RECORD SETTINGS
The following settings can be made in the settings menu which you’ll find by
holding down the MENU button, then use the NAVIGATE buttons to select
Record. Once you have entered the Record menu select which recording mode
you wish to change settings for by pressing NAVIGATE RIGHT.
The following settings can be made for each recording mode:
VOLUME IN:
Use the NAVIGATE LEFT and RIGHT buttons to set the volume-in level from 0 to
40. Default setting is 24.
QUALITY:
Use the NAVIGATE LEFT and RIGHT buttons to set the default quality (bitrate)
during recording.
T HE P LAY E RS D IF FE RE NT MO DE S – 3. RE COR D M ODE
TIMER RECORDING
The following settings can be made in the settings menu, hold down the MENU
button to enter the settings menu, select TIMER using the NAVIGATE buttons.
1. Make sure the date and time is correct under the DATE / TIME option.
2. Choose REC. PRESET.
3. Choose between radio or voice recording.
4. Set the date
5. Set start time
6. Set stop time
The player will automatically power on and start the recording at the given
time and automatically turn off once it’s finished.
The latest used radio frequency in the Radio mode will be used when
recording.
Recording can only be set within a 24 hour period.
NOTE!
Don’t subject the player to any vibration during recording, since this can cause
sound distortions.
There must be at least be 1 MB memory available on the player to initiate a
recording.
50
Page 19

4. MULTIMEDIA MODE
PLAY
1. Press PLAY / PAUSE to play the selected file.
2. Press PLAY / PAUSE to pause the selected file.
The equalizer and the MODE button are disabled during playback of video clips.
CHANGE THE VOLUME
1. Press the NAVIGATE UP button to increase the volume.
2. Press the NAVIGATE DOWN to decrease the volume.
The volume can be set from 0 to a maximum of 40.
NOTE!
1. To change to a different mode (Text, Music, Radio etc) you’ll first have to
stop the video playback.
2. The player can only play movies converted with the program JOS
Transcoder available at www.jensofsweden.com.
The Transcoder software will convert the video clip to a MP4-video (Simple
Profile Type) with MP3-audio (33KHz).
The transcoder software supports the file formats; avi, asf, wmv, mpg, mpeg,
mp4. If you can play the video clip in Windows Media Player you will also be
able to convert the video clip using the JOS Transcoder.
PC-system requirements for JOS Transcoder:
- Direct X 9.0 or later.
- The codec used for the movie must be installed before you try to play or
convert the video clip.
- We recommend the codec package K-Lite (http://www.free-codecs.com).
- Windows Media Player 9 or later must be installed to convert WMV files.
T HE P LAY E RS D IF FE RE NT MO DE S – 4. MU LTIM ED IA M ODE
51
Page 20
5. PICTURE MODE
VIEW JPEG FILES
1. Choose PICTURE mode in the Main Menu.
2. Press the PLAY / PAUSE button to show the select image.
3. Press the PLAY / PAUSE button a second time to return to the file browser.
VIEW NEXT / PREVIOUS IMAGE
Press on the NAVIGATE LEFT or RIGHT button to see the next or previous
image.
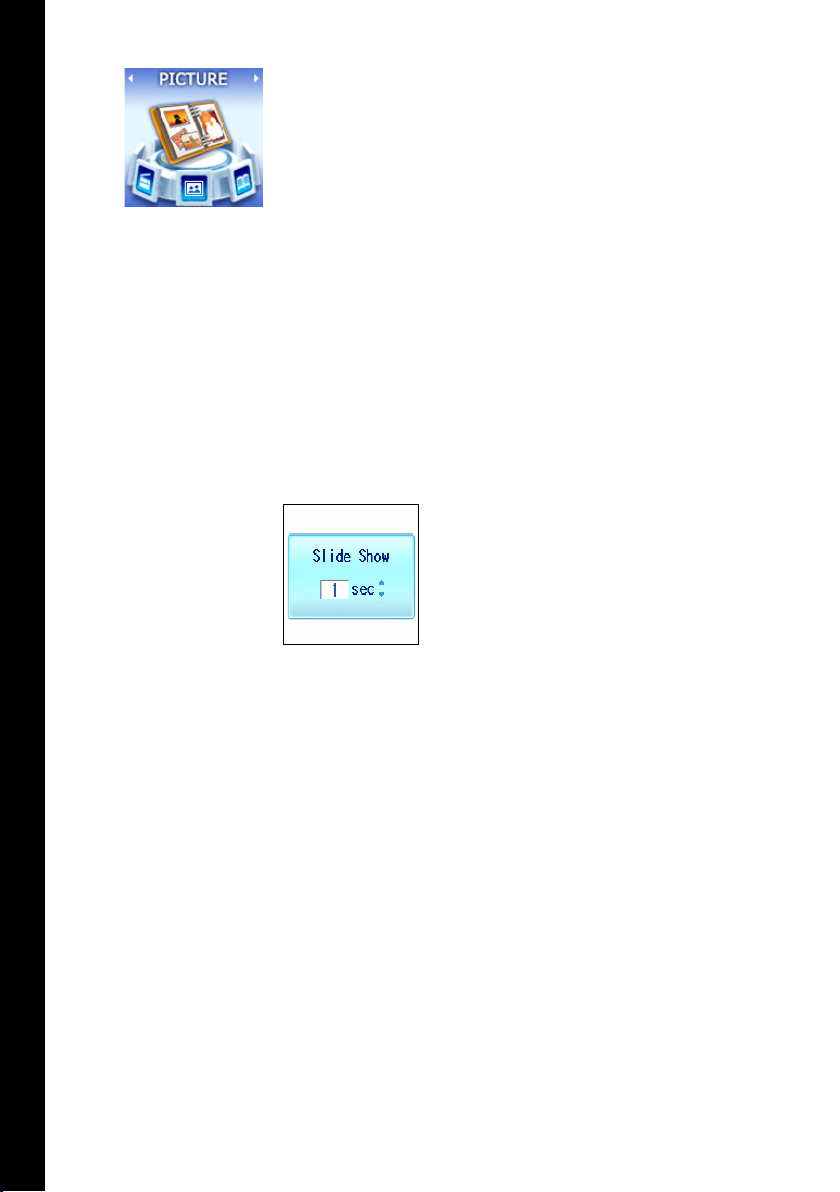
SLIDESHOW
The slideshow function automatically shows the next image after given time.
T HE P LAY E RS D IF FE RE NT MO DE S – 5. PI CTU R E MOD E
1. Press the MODE button to start the slideshow.
2. Set the desired time each image should be shown by using the NAVIGATE
UP and DOWN buttons. The time can be set from 1 to 10 seconds.
3. Press the MODE button a second time to turn off the slideshow function.
NOTE!
To turn off the player or to switch to another mode (Multimedia, Music, FM
Radio etc) you’ll first have to stop the playback of any video clips .
Progressive JPEG images can’t be viewed. (A progressive image is gradually
shown from an empty screen).
Large / High-resolution images can take long time to show, the optimal
viewing size is 180 x 180 pixels in 72 dpi.
52
Page 21

6. TEXT MODE
READ A TEXT FILE
1. Press the PLAY / PAUSE button to show selected file in the file browser view.
2. Press the PLAY / PAUSE button a second time to return to the file browser
view.
SCROLL THE TEXT
Scroll vertically by using the NAVIGATE UP and DOWN buttons.
Skip to next page (screen) by using the NAVIGATE LEFT and RIGHT buttons.
NOTE!
Only .txt files can be viewed.
T HE P LAY E RS D IF FE RE NT MO DE S – 6. TE XT M OD E
53
Page 22
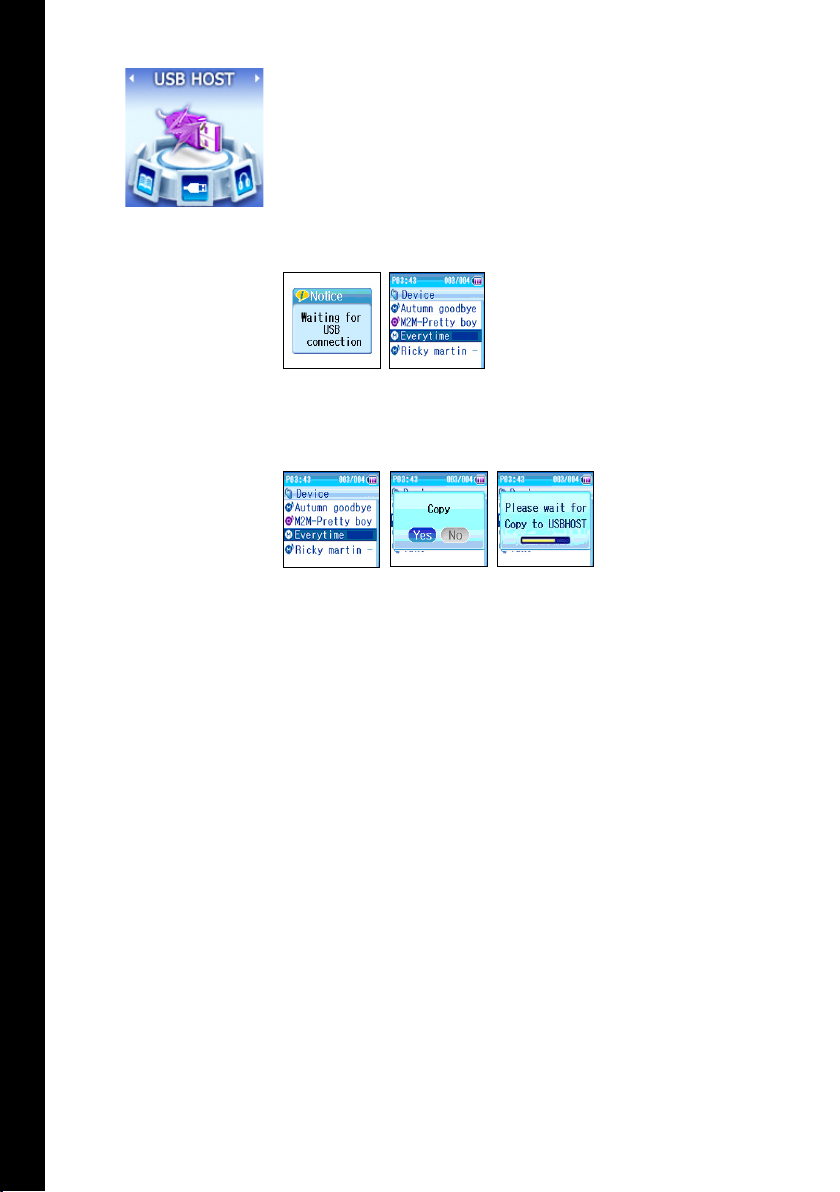
7. USB HOST MODE
The USB Host mode lets you transfer data to your player from any portable
USB device.
CONNECT THE DEVICES
1. Connect the USB Host Cable (not included) to the USB Host port.
2. Connect the other end of the cable to the device you wish to transfer data
from.
T HE P LAY E RS D IF FE RE NT MO DE S – 7. US B H O ST MO D E
COPY FILES
Choose file to transfer from the external device and confirm your choice by
pressing on the MENU button.
A confirmation popup will appear, to confirm the transfer of the selected file to
you player choose Yes.
You can only copy one file at a time. It’s not possible to copy entire folders. All
files will be saved in the folder USB HOST.
NOTE!
If the external device needs power to run make sure to turn it on, otherwise it
will use power from the player’s battery.
To avoid errors make sure the batteries on both devices are charged before you
start.
Most UMS devices (Universal Mass Storage) will be found by MP-500.
54
Page 23
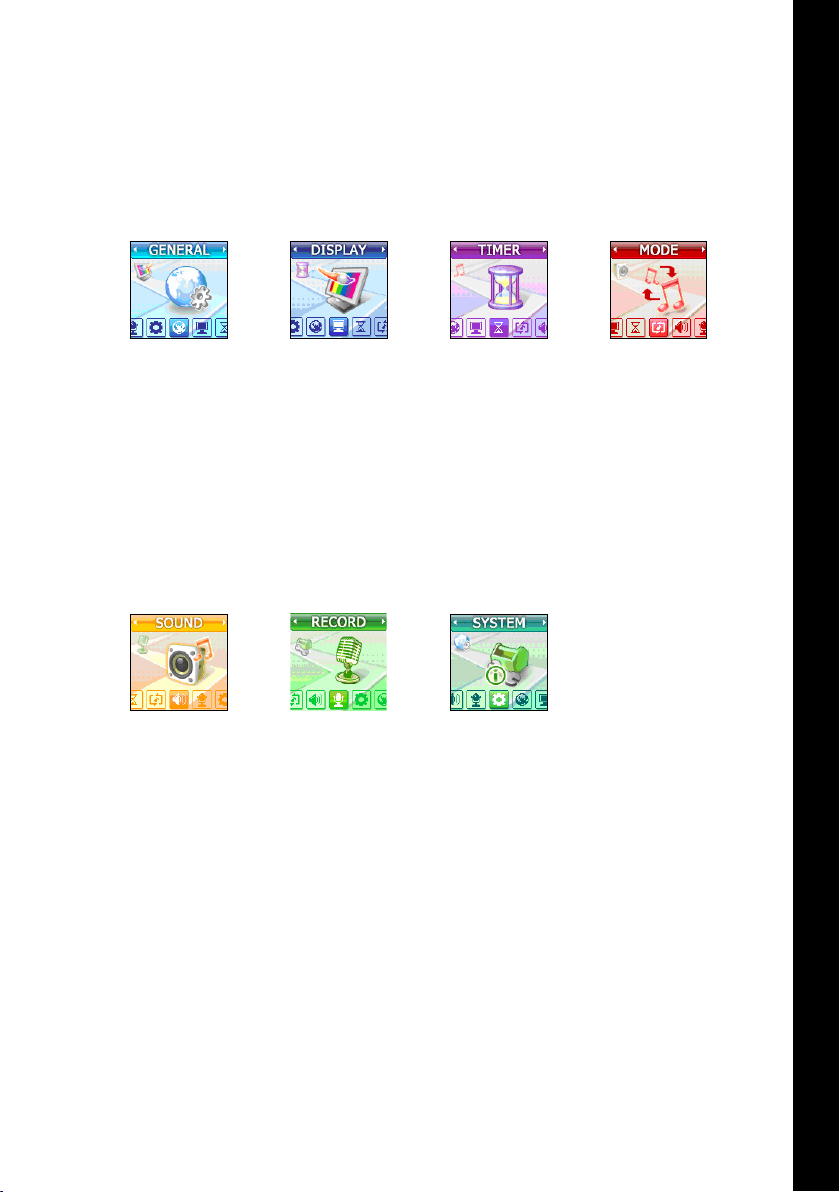
SETTINGS MENU OVERVIEW
55
1. Press and hold the MENU button to enter the SETTINGS MENU.
2. Use NAVIGATE LEFT and RIGHT to choose settings category.
3. Confirm your choice by pressing the MENU button.
4. Press the REC button to exit the SETTINGS MENU.
PL AYER S ETT I NGS
GENERAL
Skip Length
Scan Speed
Play Speed
Resume
FM Region
Lyric
SOUND
EQ / SRS
Bass Boost
Treble Boost
Fade In
DISPLAY
Playback Time
Scroll Speed
Song Title
Light Time
Contrast
Language
RECORD
FM Radio
Line in
Int. Voice
Ext. Voice
V. O. R.
TIMER
Auto Off
Sleep
Date / Time
Alarm
Rec. Preset
SYSTEM
Information
Format
Load Default
MODE
Boundary
Repeat
Shuffle
Page 24
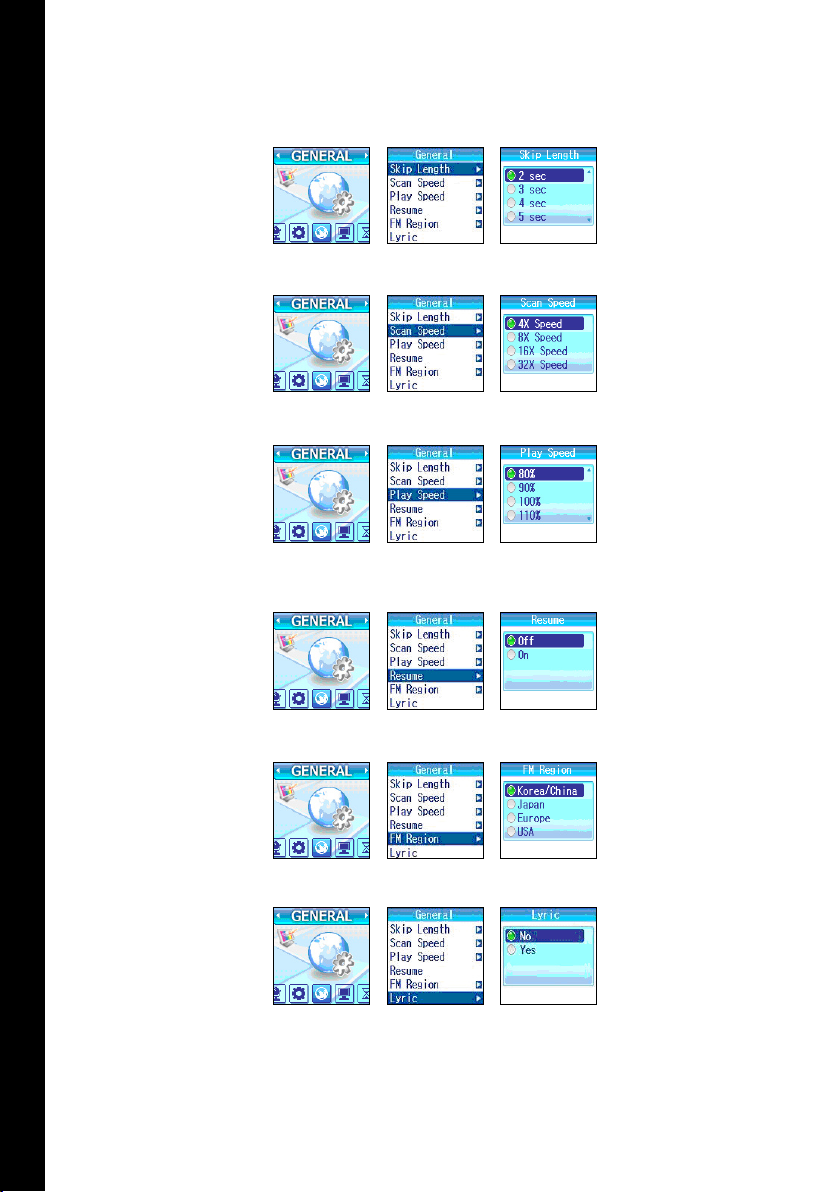
GENERAL
Skip Length: Determines how big steps the player will fast forward /
rewind.
PL AYER S ETT I NGS
Scan Speed: Set the scan speed in a music file
Play Speed: Set the play speed of a music file
Resume: If the player should start playing where it left of when it was
turned off.
FM Region: Select the region you are located in.
Lyric: Show lyrics during playback of music files.
56
Page 25
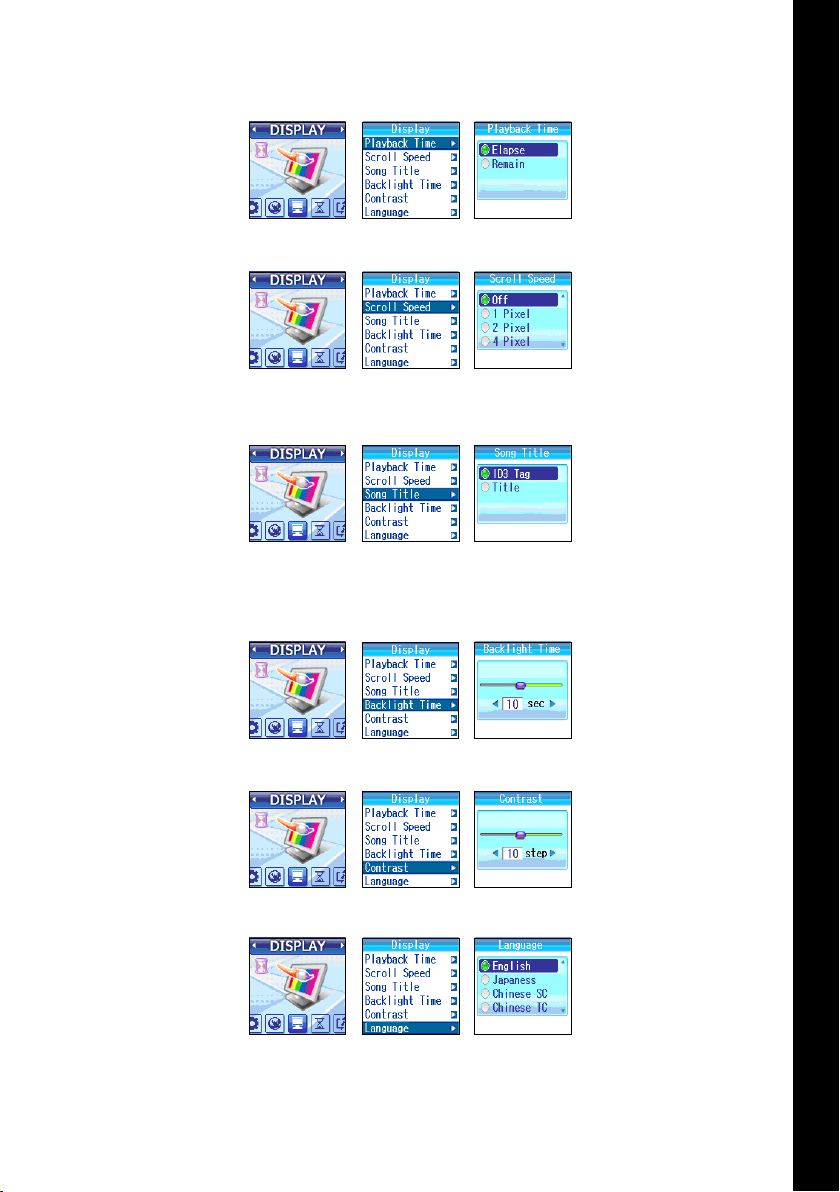
DISPLAY
57
Playback Time: Show elapsed or remaining time.
Scroll Speed: How fast the track title should scroll.
Song Title: Choose between showing the file name or the ID3 tag
information.
PL AYER S ETT I NGS
Light Time:
is pressed (NOTE! The screen consumes a lot of power, if you are
experiencing short battery times, try decreasing the Light Time.)
Contrast: Adjust the screen contrast.
Language: Choose witch language you prefer.
Choose for how long the display should be lit after a buttons
Page 26
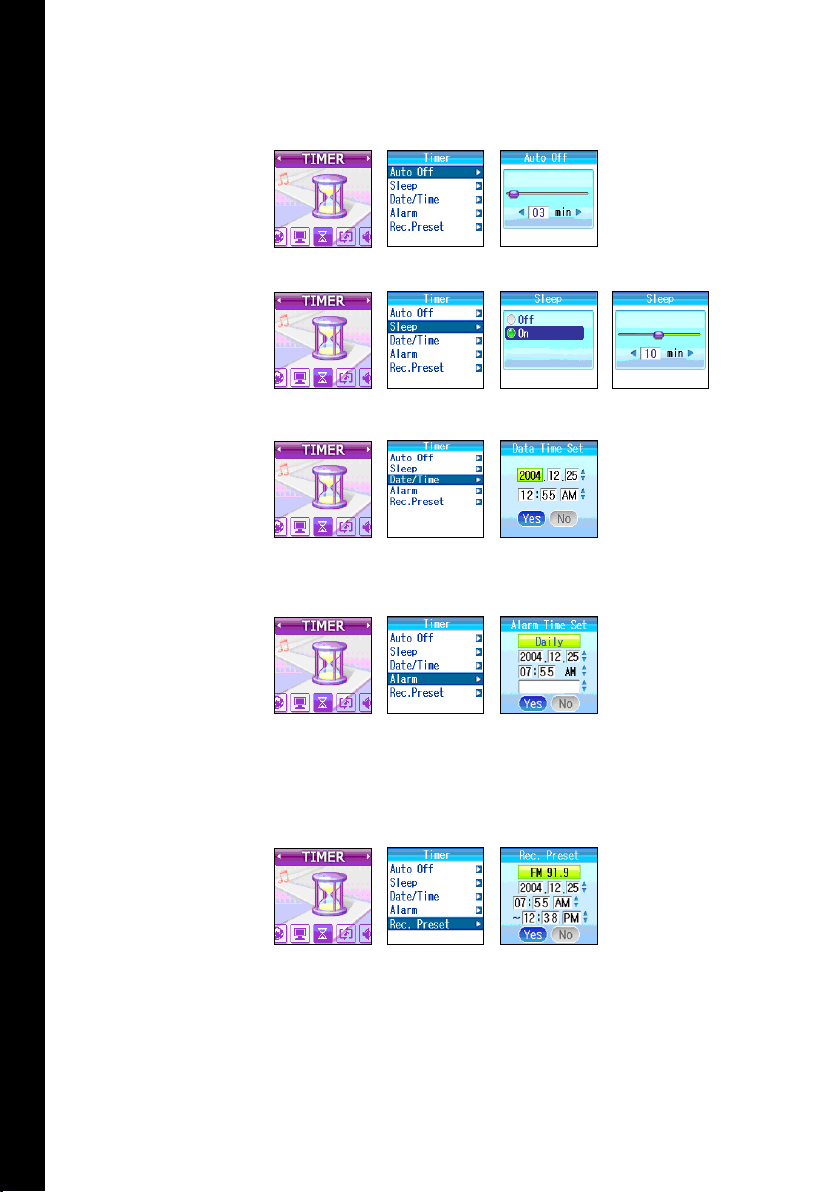
TIMER
58
Auto Off: Set the number of minutes before the player automatically turns
of if no buttons are pressed and no files are playing.
PL AYER S ETT I NGS
Sleep: Turn On / Off the automatic power off function.
Date / Time:
Alarm: Set the time the alarm should start, if it should be a daily alarm as
well as which song should be played.
Rec. Preset: Set the time when you wish to record from a Voice source
or from the FM Radio. This setting can only be during a time span of 24
hours.
The frequency last played in the FM-Radio mode will be the one recorded.
Set the date and time.
Page 27
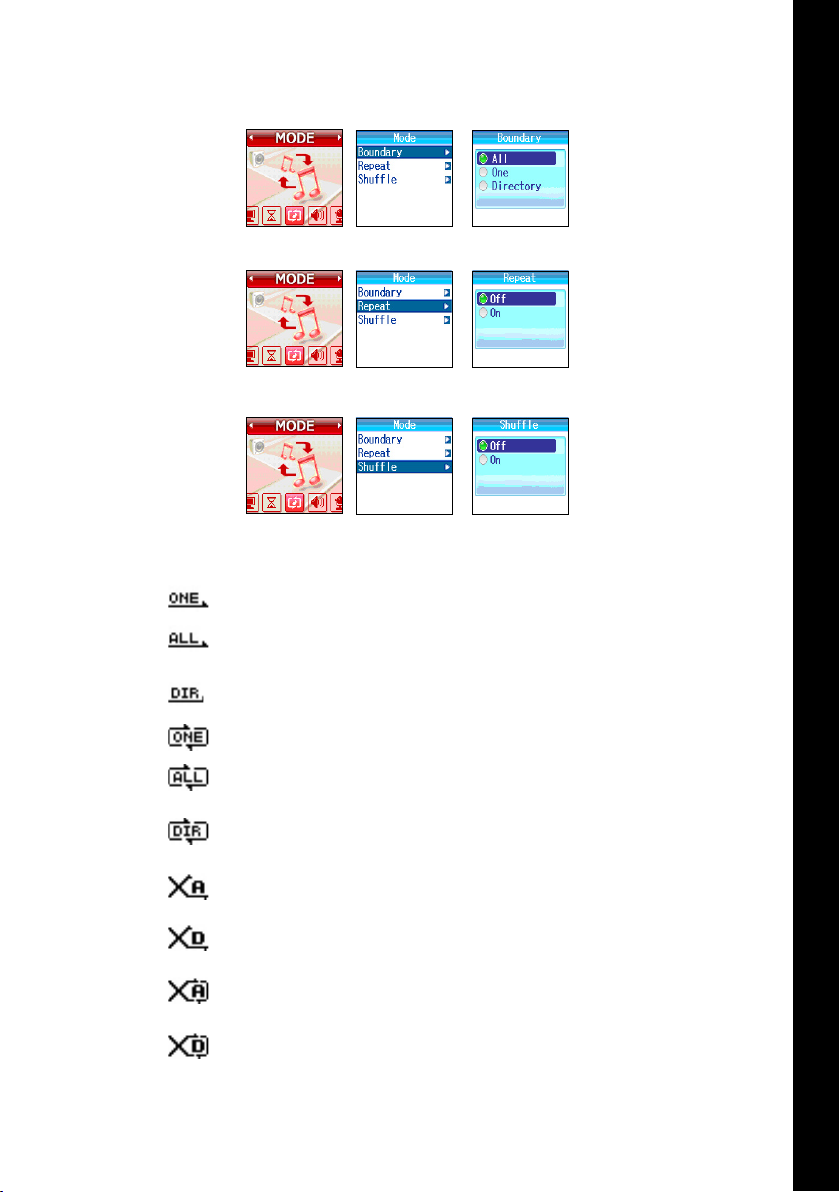
MODE
59
Boundary: Select if you wish to play one file, all files or all files in a folder.
Repeat: Repeat the files within the selected boundary.
Shuffle: Play songs in random order.
KEY TO THE DIFFERENT ICONS IN PLAY MODE
Normal One: Playback is stopped after one files has played.
Normal All Files: Plays all files in order, playback stops after all files has
been played once.
Normal Folder: Plays all files in order, playback stops after all files in the
current folder has played once.
Repeat One: Plays one file until the user stops the playback.
Repeat All: Plays all files in order and starts over once all files has been
played until the user stops the playback.
Repeat Folder: Plays all files in order in the current folder and starts over
once all files has been played until the user stops the playback.
Shuffle All: Plays all files in random order and stops when all files has
been played once.
Shuffle Folder: Plays all files from the current folder in random order and
stops playback once all files has been played once.
Shuffle and Repeat All: Plays all files in random order and starts over
once all files has been played until the user stops the playback.
Shuffle and Repeat Folder: Plays all files in random order in the current
folder and starts over once all files has been played until the user stops
the playback.
PL AYER S ETT I NGS
Page 28
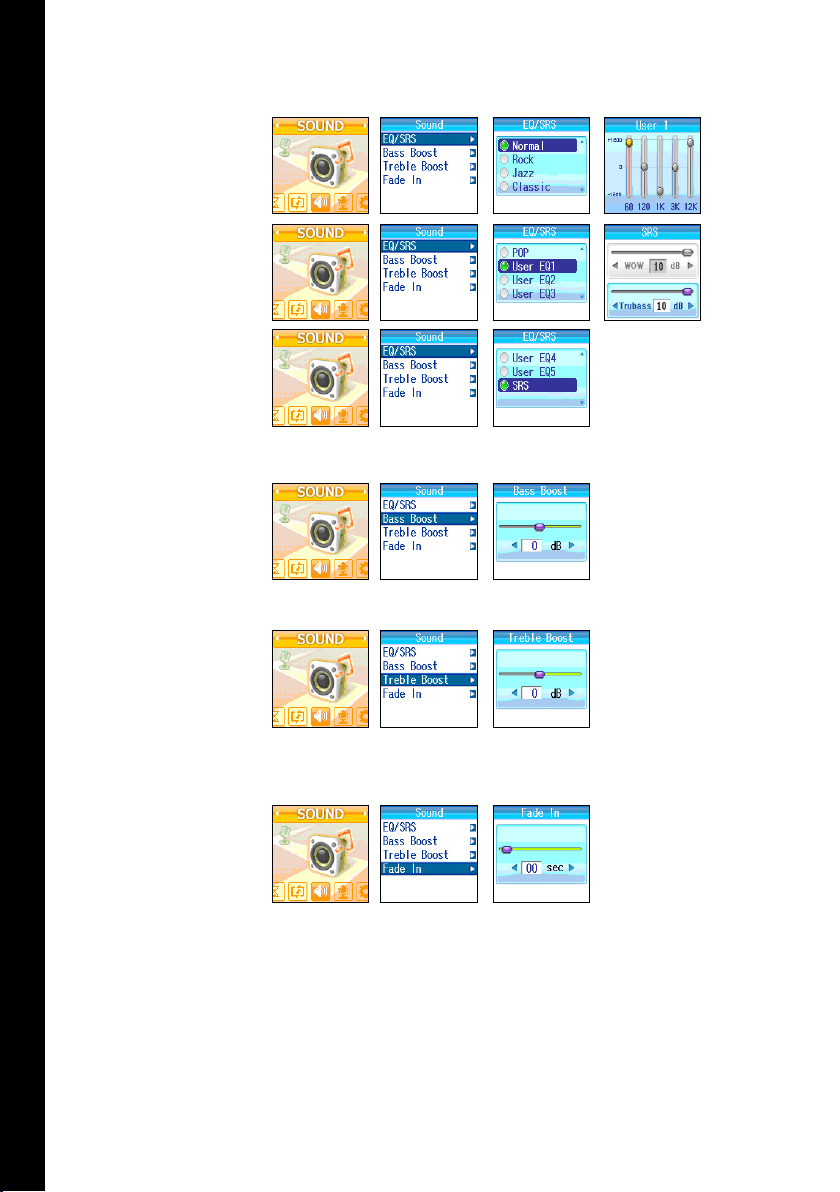
SOUND
60
EQ / SRS: Adjust the players twelve different equalizer modes.
PL AYER S ETT I NGS
Bass Boost: Adjust the bass.
Treble Boost:
Fade in: Fades in a song after the player has been turned off to avoid
unexpected high volumes. Set in seconds.
Adjust the treble.
Page 29
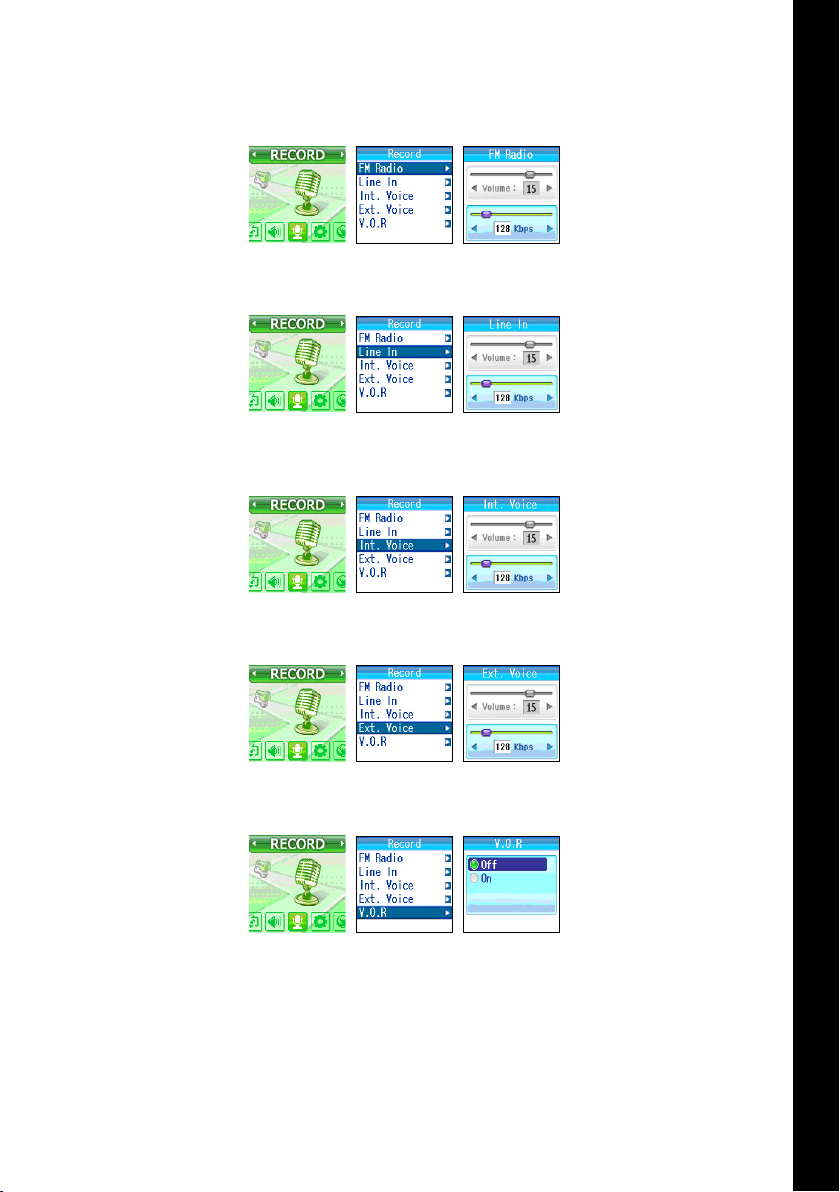
RECORD
FM Radio: Set the volume level and quality (bitrate) in kbps for FM Radio
recordings.
Line-In: Set the volume level and quality (bitrate) in kbps for Line In
recordings.
Built-In Microphone: Set the volume level and quality (bitrate) in kbps
for recordings through the internal microphone.
External Microphone: Set the volume level and quality (bitrate) in kbps
for recordings through an external microphone.
PL AYER S ETT I NGS
V. O. R.: If V.O.R. is activated during voice recording the recording will
automatically stop if no sound is registered by the microphone.
61
Page 30
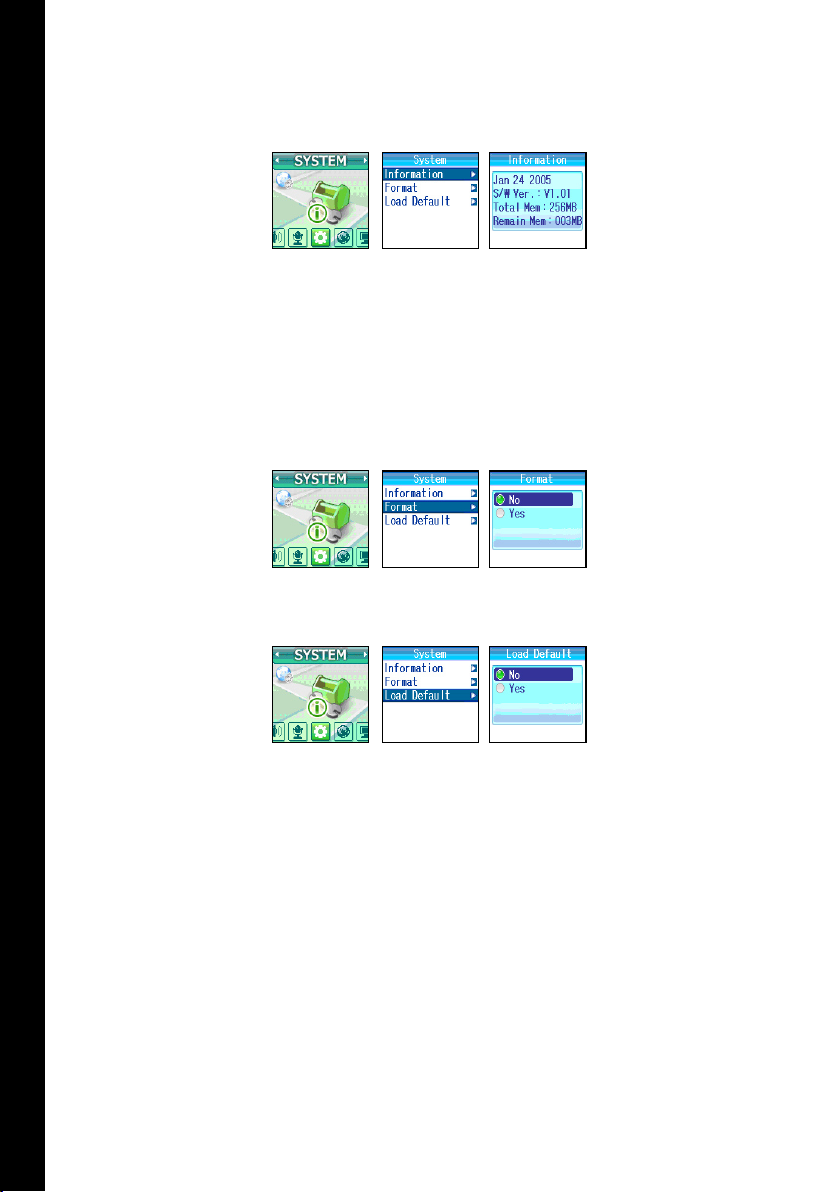
SYSTEM
Information: Shows total memory size, available memory and current firmware
version number.
PL AYER S ETT I NGS
Format: Formats the player memory. NOTE! All data on the player will be erased
when formatting! Check the battery level before a format is initiated. If the
battery runs out during formatting of the memory an unrecoverable error can
occur.
(It’s also possible to format the player using a PC: If you use a PC to format your
player make sure you select FAT 32. NTFS is not compatible with this player.
Never unplug the player while formatting is in progress, unrecoverable damages
may occur.)
Load Default: Reset the player to factory default settings. (Firmware upgrades
will not be affected by this function)
62
Page 31

TROUBLESHOOTING
If the player behaves abnormal (for example doesn’t start even if the battery is fully charged or the
player can’t be found by the computer) there are a few different simple measure that you can take to
restore the player listen below (the listed measures come in no particular order):
1. Press the RESET button then start the player.
2. Reset the player to it’s factory default settings (see previous page).
3. Format the player (see previous page) NOTE! All data will be lost.
4. Update / Reinstall the players firmware. The latest version of the firmware can be found on
www.jensofsweden.com. There are also instructions for how to perform the upgrade.
TRO U B L ES H O OT I N G
63
Page 32

COPYRIGHT
1. JOS AB reserves the right to the content of this publication and the players firmware. All
reproduction, copying or translation of this publication as a whole or in parts without the written
permission from JoS AB will be prosecuted.
2. Files created using this player may only be used for personal use.
3. SRS is a registered trademark under SRS Labs, Inc. The WOW-technology is used under license
from SRS Labs, Inc.
CO PY RI GHT PROT EC TION
64
Page 33

LIMITED CONSUMER GUARANTEE
This limited guarantee applies to purchasers of products from JOS AB. If any party who resells this
product after it has left the ownership of JOS AB issues any guarantee other than this one then
the guarantee that was issued most recently will apply. JOS guarantees that the product is free
from defects in materials, design and workmanship at the time of delivery to the purchaser. The
guarantee is only valid if the conditions specified below are fulfilled:
1) This guarantee is only valid for purchasers who are end customers and who can show a receipt or
guarantee certificate giving details of the place and date of purchase and the serial number. This
guarantee does not restrict the purchaser’s statutory rights under law or the purchaser’s rights
with respect to the seller of the product.
2) This limited guarantee is valid for the main product for a period of 12 months from the date of
delivery of the product to the customer. In the case of accessories that are supplied with the
product or acquired separately, such as earphones, cables, cases, wrist straps and other acces
sories, a guarantee against defects in materials, design and workmanship applies for 3 months
from the date of delivery to the purchaser. If the purchaser transfers ownership of the product to
another person the new owner may make a claim under the terms of the guarantee within the
same time period as the original purchaser on condition that the terms of section 1 are met.
3) If a defect in design, materials or workmanship is found, JOS AB undertakes to rectify the defect
by repairing or replacing the product, whichever it deems appropriate. JOS AB hereby undertakes
to supply the purchaser with a working product during the guarantee period. Parts that are
replaced during repair shall become the property of JOS.
4) This guarantee does not cover deterioration of the product that may be regarded as being due to
normal wear. Nor does the guarantee cover the following situations:
a) any faults that are due to exposure of the product to moisture, liquids, extreme temperatures or
variations in temperature, chemical products, excessive external force, software modification
or force majeure and which are not directly caused by material defects, design defects or faulty
workmanship,
b) if the customer does not inform JOS within 30 days of the discovery of the fault or within the
guarantee period.
c) if the product cannot be identified, by examination of the serial number, as being identical with
the product to which the guarantee applies.
d) if the product has been used in any way that conflicts with its intended purpose or has been
connected to an accessory that JOS AB has advised that the product should not be used with.
-
LIM I T E D C O NS U M ER G UA R A NT E E
When carrying out repairs on a defective product, JOS AB accepts no liability for information that
has been stored in the memory of the product undergoing repair.
65
Page 34

www.jensofsweden.com
 Loading...