

Page 1
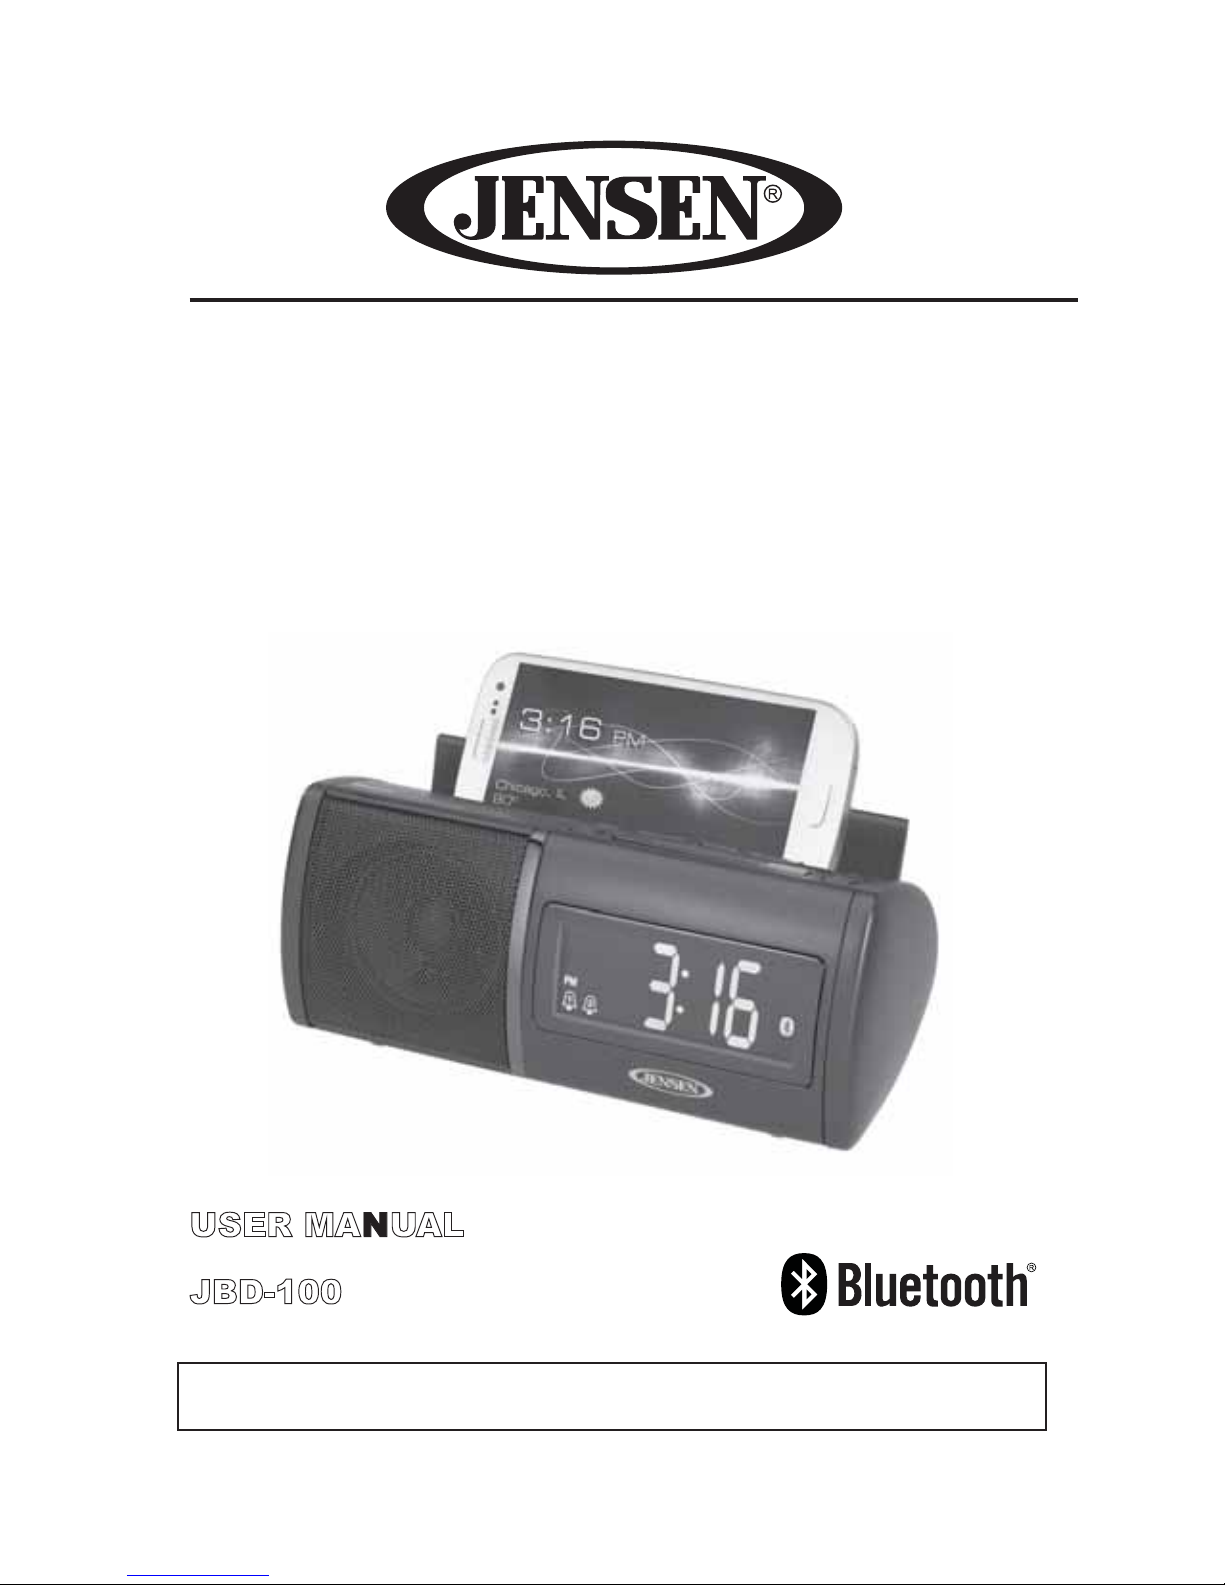
Universal Bluetooth Clock Radio
With Charging for All Smartphones
USER MANUAL
JBD-100
PLEASE READ THIS USER MANUAL COMPLETELY BEFORE OPERATING THIS
UNIT AND RETAIN THIS BOOKLET FOR FUTURE REFERENCE.
Page 2
E-1
DEAR JENSEN® CUSTOMER
Selecting fine audio equipment such as the unit you've just purchased is only the start
of your musical enjoyment. Now it's time to consider how you can maximize the fun
and excitement your equipment offers. This manufacturer and the Electronic
Industries Association's Consumer Electronics Group want you t o get the m ost out of
your equipment by playing it at a safe level. One that lets the sound come through
loud and clear without annoying blaring or distortion and, most importantly, without
affecting your sensitive hearing. Sound can be deceiving. Over time your hearing
"comfort level" adapts to higher volumes of sound. So what sounds "normal" can
actually be loud and harmful to your hearing. Guard against this by setting your
equipmentatasafelevelBEFOREyourhearingadapts.
To establish a safe level:
• Start your volume control at a low setting.
• Slowly increase the sound until you can hear it comfortably and clearly, and
without distortion.
Once you have established a comfortable sound level:
• Set the dial and leave it there.
Taking a minute to do this now will help to prevent hearing damage or loss in the
future. After all, we want you listening for a lifetime.
We Want You Listening For a Lifetime
Used wisely, your new s
ound equipment will
provide a lifetime of fun and enjoyment. Since
hearing damage from loud noise is often
undetectable until it is too late, this manufacturer
and the Electronic Industries Association's
Consumer Electronics Group recommend you
avoid prolonged exposure to excessive noise.
Customer's Record:
The serial number of this product is found on its bottom cover. You should note the
serial numb er of this unit i
n the space provided as a permanent record of your
purchase to aid in identification in the event of theft of loss.
Model Number: JBD-100 Serial Number:
IMPORTANT SAFETY INSTRUCTIONS
When used in the directed manner, this unit has been designed and manufactured to
ensure your personal safety. However, improper use can result in potential electrical
shock or fire hazards. Please read all safety and operating instructions carefully
before installation and use, and keep these instructions handy for future reference.
Take special note of all warnings listed in these instructions and on the unit.
1. Read these instructions.
2. Keep these instructions.
3. Heed all warnings.
4. Follow all instructions.
5. Do not use this apparatus near water.
6. Clean only with dry cloth.
7. Do not block any ventilation openings.
8. Do not install near any heat sources such as radiators, heat registers, stoves, or
other apparatus (including amplifiers) that produce heat.
9. Only use attachments / accessories specified by the manufacturer.
10. Unplug the ac adaptor of this apparatus during lightning storms or when unused
for long periods of time.
Page 3

11. Refer all servicing to qualified service personnel. Servicing is required when th e
apparatus has been damaged in any way, such as ac adaptor is damaged, liquid
has been spilled or objects have fallen into the apparatus, the apparatus has been
exposed to rain or moisture, does not operate normally or has been dropped.
12. This appliance shall not be exposed to dripping or splashing water and that no
object filled with liquids such as vases shall be placed on the apparatus.
13. Power Sources – The appliance should be connected to a power supply only of
the type described in the operating instructions or as marked on the appliance. Do
not overload wall outlet.
14. Do not attempt to dismantle, open or repair this product yourself. If a fault occurs,
seek advice from your local qualified service technician or contact the distributor
via the telephone number at the back of this instruction manual.
15. Nameplate is located on bottom of the product.
• Places subject to constant vibration.
IMPORTANT NOTES
Avoid installing the unit in locations described below:
• Dusty, humid or moist places.
COMPLIANCE WITH FCC REGULATIONS
This device complies with Part 15 of the FCC Rules. Operation is subject to the following two
conditions:
(1) this device may not cause harmful interference, and
(2) this device must accept any interference received, including interference that may
cause undesired operation.
NOTE: This equipment has been tested and found to comply with the limits for a Class B
digital device, pursuant to Part 15 o
f the FCC Rules. These limits are designed to provide
reasonable protection against harmful interference in a residential installation. This equipment
generates, uses and can radiate radio frequency energy and, if not installed and used in
accordance with the instructions, may cause harmful interference to radio communications.
However, there is no guarantee that interference will not occur in a particular insta
llation. If
this equipment does cause harmful interference to radio or television reception, which can be
determined by turning the equipment off and on, the user is encouraged to try to correct the
interference by one or more of the following measures:
- Reorient or relocate the receiving antenna.
- Increase the separation between the equipment and receiver.
- Connect the equipment into an outlet on a circuit different from that to which the receiver is
connected.
- Consult the dealer or an experienced radio / TV technician for help.
CAUTION: Changes or modifications not expressly approved by the party
responsible for compliance could void the user’s authority t o
operate the equipment.
PROTECT YOUR FURNITURE
This product is equipped with non-skid rubber 'feet' to prevent the product from moving when
you operate the controls. These 'feet' are made from non-migrating rubber material specially
formulated to avoid leaving any marks or stains on your furniture. However certain types of oil
based furniture polishes, wood preservatives, or cleaning sprays may cause the rubber 'feet'
to soften, and leave marks or a rubber
residue on the furniture. To prevent any damage to
your furniture we strongly recommend that you purchase small self-adhesive felt pads,
available at hardware stores and home improvement centers everywhere, and apply these
pads to the bottom of the rubber 'feet' before you place the product on fine wooden furniture.
E-2
Page 4
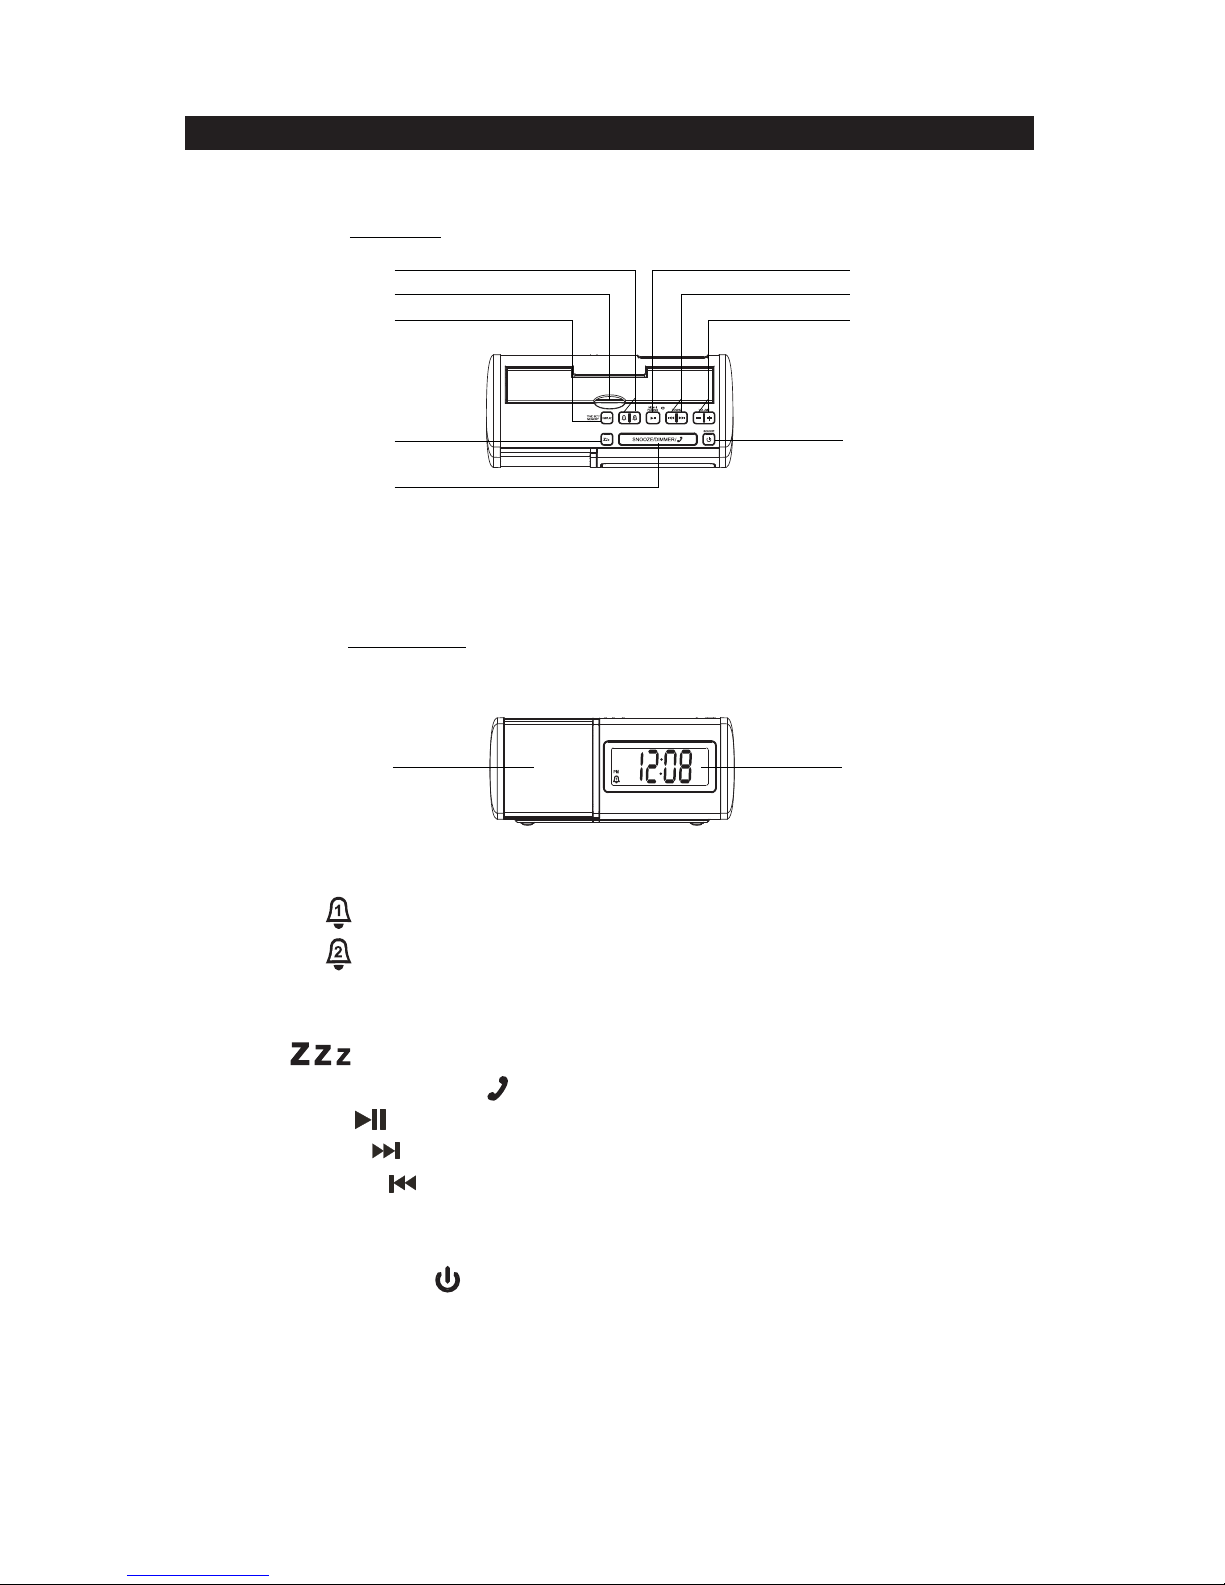
LOCATION OF CONTROLS
1. Alarm 1
Button
Alarm 2 Button
2. Access Opening for Top Compartment
3. Time Set/ Memory/ Display Button
4. Sleep Button
5. Snooze/ Dimmer/ Phone Button
6. Play/ Pause / Memory / Pairing Button
7. Skip Forw ard / Tuning Up Button
Skip Backward / Tuning Down Button
8. Volume + (Up) Button
Volum e - (Down) Button
9. Power On/ Standby / Source Button
10.Speaker
11.LCD Display
16
7
8
9
2
3
4
5
10 11
TOP SIDE
FRONT SIDE
E-3
Page 5
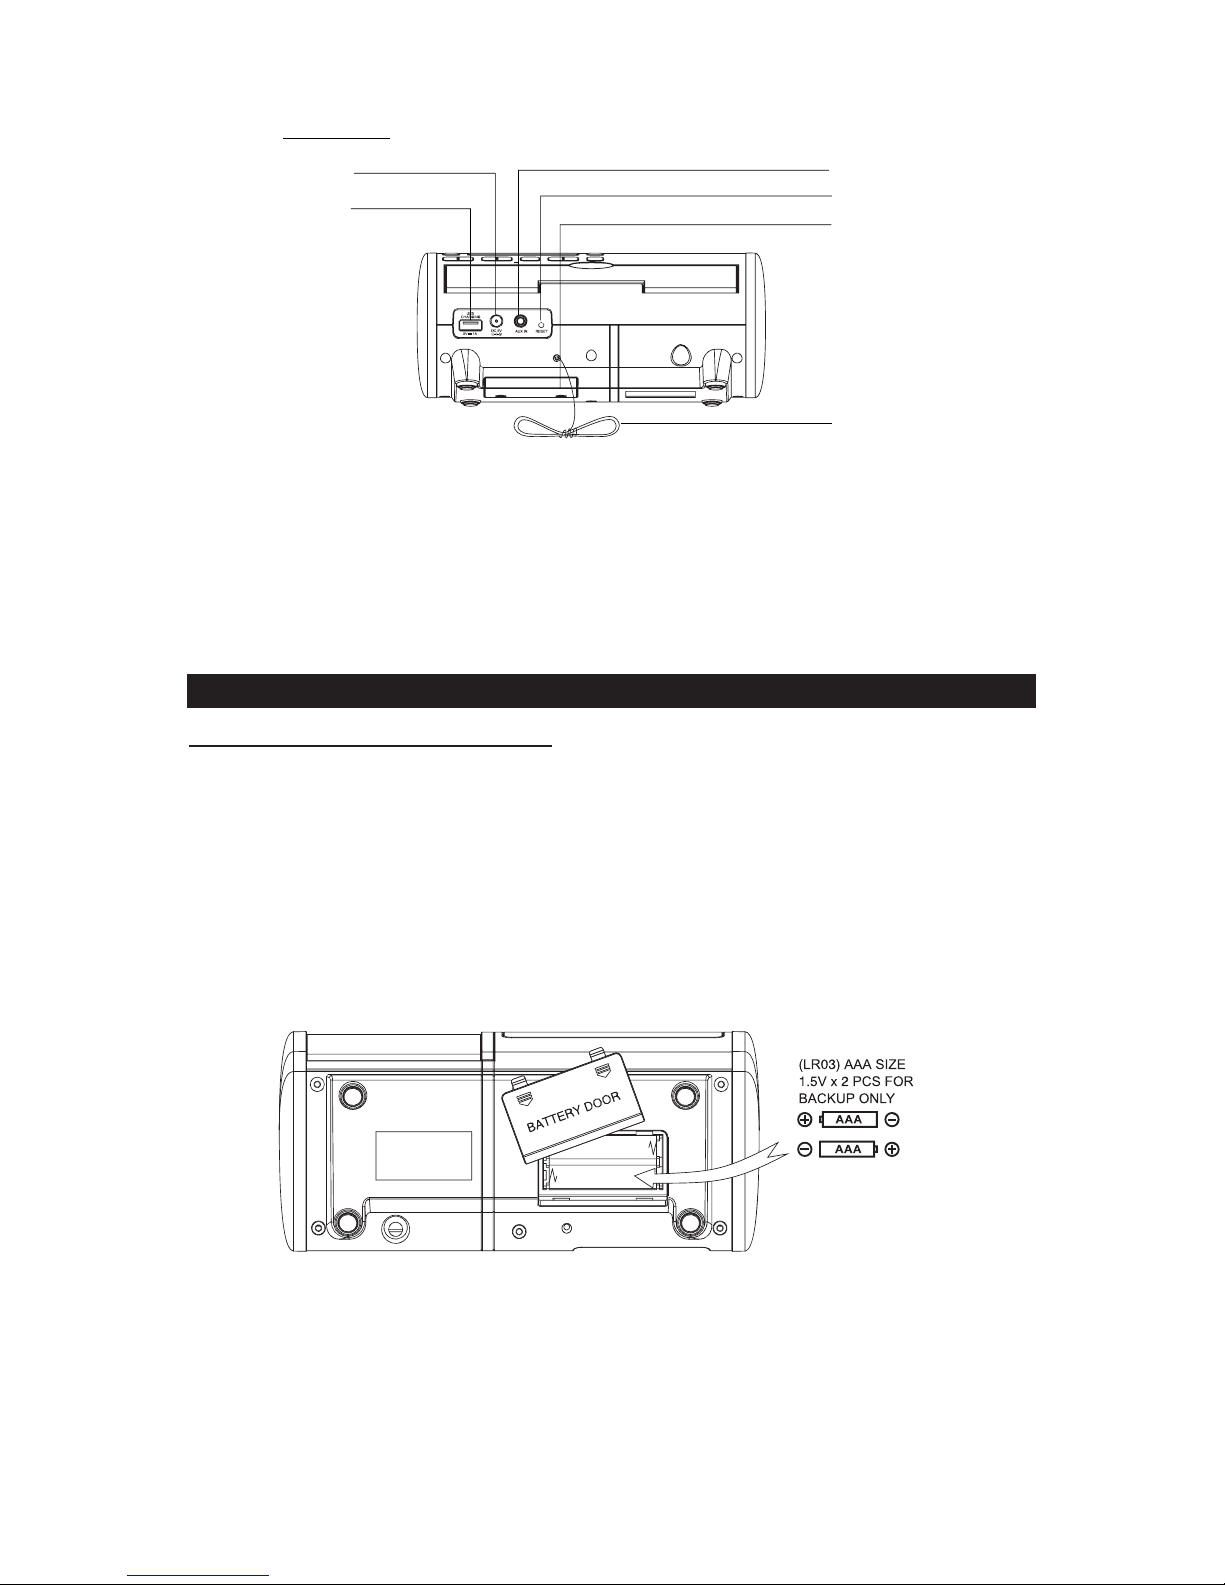
12. USB Charging Port
13. DC IN Jack
14. AUX IN Jack
15. Reset Button
16. Battery Compartment (bottom of un it)
17. FM Wire Antenna
GETTING STARTED
1. Remove the battery compartment cover.
Clock Back-up Battery Installation
2. Install 2 “AAA” (UM-4) batteries (not included) in the battery compartment following
the polarity markings shown on it.
3. Replace the battery compartment cover.
Note: The unit will still operate without the batteries installed, but the time, alarm
and radio preset settings will be lost and have to be reset in the event of a power
interruption or failure.
Warnings:
- Batteries shall not be exposed to excessive
heat such as direct sunlight, fire or the
like.
- Be sure that the batteries are installed correctly. Wrong polarity may damage the
unit.
- Do not mix old and new batteries.
13 14
15
16
17
12
REAR SIDE
E-4
Page 6
- Do not mix alkaline, standard (carbon-zinc) or rechargeable (nickel- cadmium)
batteries.
- Only batteries of the same or equivalent type as recommend are to be used.
- If the unit is not to be used for an extended period of time, remove the batteries. Any
old or leaking battery can cause damage to the unit and may void the warranty.
- Do not dispose of batteries in fire, battery may explode or leak.
- Do not try to recharge a battery that is not intended to be recharged; the battery can
overheat, rupture and leak (Follow the battery manufacturer’s directions).
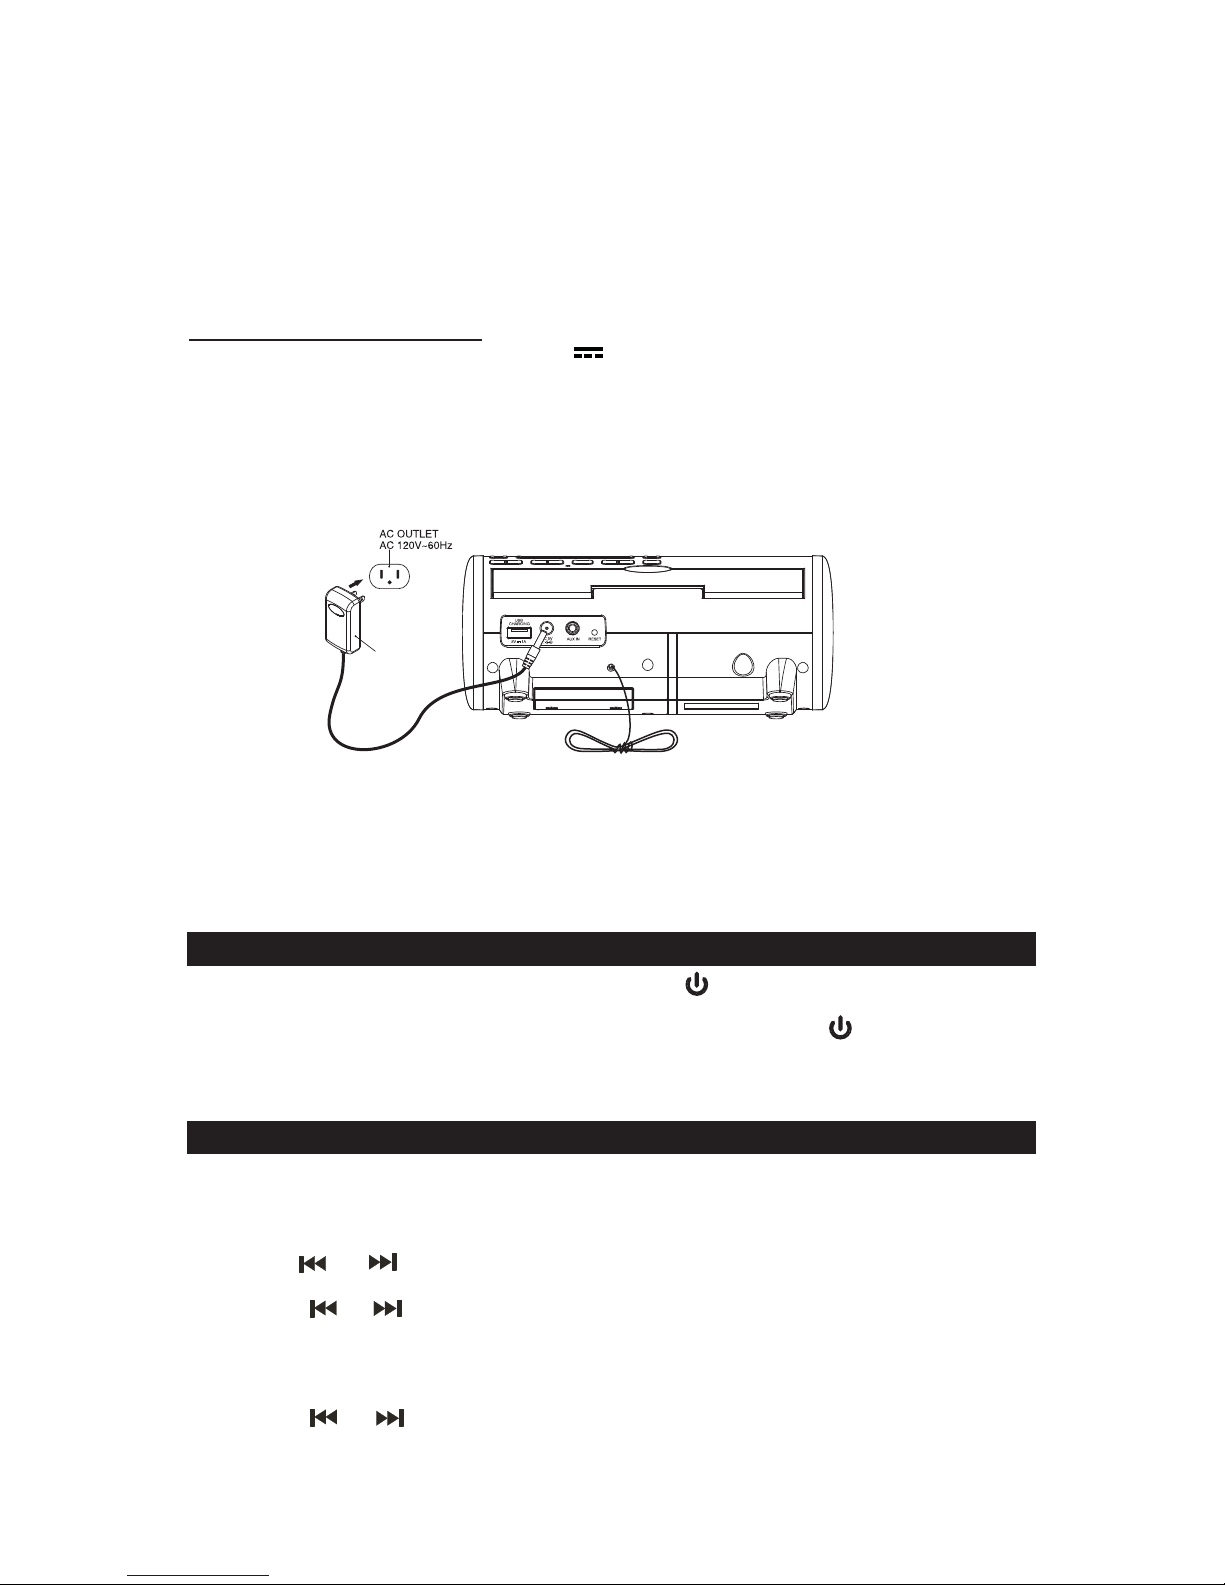
AC-DC Adaptor Connection
An AC-DC Adaptor with the output 5V 1500mA (Included) is required for
operating the main unit. To connect the AC-DC Adaptor to the unit and 120V~ 60Hz
AC Outlet:
1. Firmly and securely insert the DC plug of the adaptor into the DC IN Jack on the
back of the unit.
2. Plug the adaptor’s AC plugs into a power outlet rated at 120V~ 60Hz.
NOTE: This unit is not magnetically shielded and may cause color distortion on the
screen of some TVs or video monitors. To avoid this, you may need to move
the unit further away from the TV or monitor if unnatural color shifts or image
distortion occurs.
TURNING THE UNIT POWER ON/OFF
1. In Standby mode, tap the Power On/ Standby Button to turn the unit ON. The
last selected input mode icon will show on LCD display.
2. To turn the unit OFF, press on hold the Power On/ Standby Button for 1 to 2
seconds in Power On mode to turn the unit OFF. The “OFF” will show on LCD
display before the unit go to Standby mode.
CLOCK SETTING
After plugging in the AC adaptor, “12:00” will appear and start blinking on the LCD
display.
1. In Standby mode, press and hold the Time Set / Memory Button of the unit,
“12 Hr” will blink.
2. Tap the or button to set the unit to the 24-hour mode or 12-hour mode.
3. Press the Time Set / Memory Button then the hour digits will blink.
4. Tap the or button to adjust the hour. Press and hold the button for fast
advance / reverse setting.
Note: Make sure the hour is set so that the PM indicator is displayed correctly.
5. Press the Time Set / Memory Button to confirm the hour setting, the minute digits
AC ADAPTOR
E-5
will flash to prompt for input.
6. Tap the or button to adjust the minute. Press and hold the button for fast
advance / reverse setting.
7. Press the Time Set / Memory Button again to complete the setting.
Page 7
ALARM SETTING
1. Tap the Alarm 1 or Alarm 2 Button once to check the alarm time and
wake up option (Radi o , Beeping Alarm, Bluetooth ).
2. In standby mode, press and hold the or button for 3 seconds when the
alarm time is showing. T he hour digits will blink.
3. Tap the
or button to adjust the hour. Press and hold the button for fast
advance / reverse setting.
4. Press the or button t o confirm the hour setting, the minute
digits will flash
to pr ompt for input.
5. Tap the or button to adjust the minute. Press and hold the button for fast
advance / reverse setting.
6. Press the or button to confirm the minute setting, the alarm sound icons
will flash.
7. Tap the or button to select the wake up option (Radio , Beeping Alarm,
Bluetooth ).
8. Press the or button again to complete the alarm setting. The alarm
indicator or will appear to indicate it is enabled.
9. To disable the alarm, in Standby mode, tap the or button twice for the
alarm you want to disable, relative alarm indicator will disappear from display. Tap
the or button twice again will enable the alarm.
Note:
• The alarm will automatically switch to the beeping alarm if you selected wake to
Bluetooth but do not have a Bluetooth-enabled device connected.
• If you select wake to Radio, make sure your rad
io station is set to the one y ou want
to be woken up to. The unit will play the last radio station you were listening to
when the wake time is reached.
• The unit features a crescendo wake up for the beeping alarm, radio or Bluetooth.
When the alarm time is reached, the sound will increase gr adually from a very low
level to a louder level. When waking to radio and Bluetooth, the preset volume
level will be the loudest level and it will be reached after about 30 seconds.
Wake to Radio
1. The Radio will automatically turn on when the alarm time is reached. The
respective or indicator will blink.
2. The sound starts softly and gradually becomes louder until preset volume level is
E-6
reached.
3. The radio alarm will sound for 60 minutes and then turn off automatically if the
snooz e button is not pressed.
4. To stop the radio sound immediately, tap the or respective alarm button.
Page 8
Wake to Beeping Alarm
1. The Beeping Alarm will automatically turn on when the alarm time is reached. The
respective or indicator will blink.
2. The sound starts softly and gradually becomes louder and louder until its
maximum leve
lisreached.
3. The beep alarm will sound for 60 minutes and then turn off automatically if the
snooz e button is not pressed.
4. To stop the beep alarm sound immediately, tap the
respective alarm button.
Wake to Bluetooth-Enabled Device (if available on your Bluetooth device)
1. The Bluetooth-enabled device will automatically turn on when the alarm ti me is
reached. The respective or indicator will blink.
2. The sound starts softly and gradually becomes louder until preset volume level is
reached.
3. The Bluetooth-enabled device alarm will sound for 60 minutes and then turn off
automatically if the snooze button is not pressed.
4. To stop the Bluetooth-enabled device immediately, tap the
respective alarm
button.
Note:
• Make sure the JBD-100 has been linked to your Bluetooth Enabled device
and is shown on Bluetooth list on the device.
• This feature is phone dependent.
• The song or playlist you want to wake to must be selected and played
prior to turning off the device. If you choose to SLEEP to your Bluetooth
device, the song will pause when the Sleep Time expires and will resume
playi ng once the alarm t ime is reached.
Snooze Function
1. When the alarm sounds, it can be temporarily stopped by pressing the Snooze
Button. The display will show the “SNOOZE” indicator and the relative alarm
indicator or will be flashing.
2. The alarm will be delayed for 9 minutes and then come again.
3. This manual snooze operation can be repeated again and again.
LISTENING TO RADIO
1. Press the Power Button to turn on the unit.
2. Tap the Source Button to select Radio mode, radio icon appears on display.
3. To manually tune the radio station, tap the or button repeatedly. Use the
manual tuning method to tune in weaker stations that are bypassed during
E-7
Automatic Tuning.
4. To automatically tune to the next available radio, press and hold the or
button f or 1-2 seconds until frequency readout on the display begins t o scan and
then release the button. The tuner will stop scanning when it receives the next
broadcasting station of adequate signal strength.
5. Adjust the volume control to the desired volume level.
6. If no button is pressed for 5 seconds in radio mode, the display will change to
show current time. You can tap the Display Button to check the radio station you
are listening after the channel no. shown.
Page 9
HINTS FOR BEST RECEPTION:
The receiver has a build-in FM wire antenna hanging from the back cabinet. This wire
should be totally unwrapped and fully extended for the best reception.
NOTE: Automatic tuning depends on the signal strength of the broadcasting station,
so weak stations may be skipped. You can manually tune to find the weak
stations if a station gets skipped. With strong signals, the tuner may stop
before it reaches the actual broadcast frequency, so you may need to
manually tune for the best reception.
PRESET RADIO STATIONS
This unit has 10 preset memories for the FM radio.
1. Press the button to turn on the unit.
2. Tap the Source Button to select Radio mode.
3. Tune to the desired radio station either by “manually” or “automatically” tuning
method.
4. Press the Time Set / Memory Button to enable the program function and the
preset channel number “P01” indicator will show on the LCD and flashing for 5
seconds.
5. Tap the or button to select the preset number you want to assign the station
to.
6. Press the Time Set / Memory Button to confirm the setting.
7. Repeat above steps 3-6 to store other stations.
Note: The unit can automatically search and store the preset memories. Press and
hold the Time Set / Memory Button for 4~5 seconds to activate auto preset
mode and the total number of stations can be stored depends on the signal
strength of broadcasting stations.
LISTENING TO A BLUETOOTH ENABLED DEVICE
RECALLING PRESET MEMORY CHANNELS
In radio mode, recall the pre-set channels by pressing the Memory / Pairing Button
on the top of the unit repeatedly.
1. If the JBD-100 has never been paired with a Bluetooth device before, you need to
follow the pairing instructions below to link the JBD-100 with your Bluetooth
device.
E-8
• Press the button to turn on the unit.
• Tap the Source Button to select Bluetooth mode. The unit will search the
paired device with the icon flashing slowly on the LCD display.
• Press and hold the Pair Button for 4~5 seconds. Then the icon will be
flashing rapidly on the LCD display and 2 short beep will heard, the unit will goes
into Pairing/Discoverable mode.
• Turn on the Bluetooth function of your Bluetooth device and enable the
search or scan function to find the unit.
• Select "JBD-100" from the device list when it appears on your device screen.
If required, enter the pass code “0000” to pair (link) the unit with your device.
• After successfully pairing (linking) the Bluetooth enabled device the icon
will light steadily and a short beep will heard.
Note: If you can’t pair the JBD-100 with your Bluetooth enabled dev
ice, you can try to
turn Off & On the power of your unit to solve the problem.
Page 10
2. Turn on the unit and tap the Source Button to select Blu etooth mode, Bluetooth
icon will be flashing slowly on display. The unit is searching the last paired
device. Once it is found, the icon will light steadily.
3. After successfully pairing (linking), you can begin playing music from your
Bluetooth enabled device wirelessly to the speaker.
4. Press th e Volume +/ Volume - Button on the speaker to adjust to the desired
volume level.
5. After selecting your favorite song, press Play / Pause Button on the unit to
play or pause the playback song.
6. Press or button to skip to the previous or next song.
7. Press and hold the or button for fast reverse or fast forward during
playback.
8. If the unit need to pair with another Bluetooth device. Press an
dholdthePair
Button for 4~5 seconds. The icon will be flashing rapidly on the LCD display
and 2 short beep will heard, the unit will goes into Pairing/Discoverable mode
again. Repeat last 2 steps on point 1 above.
Notes:
1. Refer to the manual of your cell phone, tablet PC, computer or other Bluetooth
enabled devices for Bluetooth operation since it may vary from model to model.
2. If your Bluetooth enable
d device does not support A2DP profile, it will not pl ay
the music through the speaker, even if paired (linked).
3. If you are pairing (linking) your computer to the unit using Bluetooth, you m ay
need to set the speaker as your computer’s default sound device.
Using the unit as a Hands-free Bluetooth Speakerphone
1. Link your cell phone to the unit via Bluetooth as described above.
2. When receiving an incoming call on your cell phone, tap th e Phone Button on
the unit to switch the incoming c all from c ell phone to the unit. A short beep tone will
be heard confirming the call is being answered. Complete your call using the built-in
microphone and speaker on the unit.
3. Press the Volume +/ Volume - Button on the unit to obtain the desired sou nd level.
4. To end the call, just tap the Phone Button on th e unit again. A short beep
E-9
sound will be heard and the call will end. If you are playing music from your cell
phone to the unit before answering the call, the music will automatically resume
playing when you hang up.
5. To ignore an incoming call, simply press and hold the Phone Button on the
speaker for about 3 seconds, a short b eep tone will be heard and the call will be
reject ed.
Hang up with the JBD-100
Aquickpresson thePhone Button will end the c all in progress. A short beep tone
will be heard from the speaker confirming the c all has ended.
Redialing the last number with the speaker
The speaker will automatically redial the last number you have dialed by pressing &
holding the Phone Button on the speaker for about 3 seconds a long beep will
heard.
Note: This feature is phone dependent.
Page 11

CHARGING YOUR SMART PHONE OR PORTABLE DEVICE
This unit features a USB port for charging your portable device (iPod, iPhone, Android
phone, etc.) when used with the USB charging cord that came with your device.
1. Plug one end of the USB cable (not included) into the USB Charging Port
located on the back of the unit. Plug the other end of the cord into the device you
wish to charge.
2. Observe the battery ch arge indicator on your device to make sure the ch arging
process starts normally.
3. Unplug the cable when your device is fully charged.
CAUTION:
Before charging, please refer to the user manual of the device you wish to charge to
make sure the charging current requested does not exceed 1A (1000mA).
Overloading the charging circuit may damage the unit permanently and void the
warranty.
1. The USB charging port of this unit supplies a DC 5V output at 1000mA maximum
current to charge your smart phone or portable device battery and it cannot
support any other voltage range.
2. Make sure the device you want to charge has a battery charge rating of DC 5V
only.
3. The USB port of this unit is designed for smart phone or portable device battery
charging only and it cannot support d ata transfer or connect to computer.
4. Do not connect the USB port of this unit to other external power charger USB
ports, it may damage both units and void the warranty.
Note:
1. Some smart phones and portable devices use proprietary USB connections
and circuitry, so they may not charge when plugged into the USB port. Please
refer to your device user manual before you attempt to ch arge them.
2. It is normal if the unit gets warm while the USB port is in use and charging your
smart phone or portable device.
3. Do not ch arge your sm art phone over 12 hours continuously. Disconnec t your
smart phone or other portable device from the USB cord once it is fully
charged.
DIMMER
Press the Snooze / Dimmer Button to adjust the LCD backlight intensity to obtain the
E-10
best clarity of LCD Panel readout.
Note:
• Every time you turn on the unit, the LCD backlight will revert to highest intensity to
let y ou operate the unit easily.
• After adjusting the LCD backlight intensity in standby mode, the intensity level will
be stored and there is no need to adjust every time.
Page 12

SLEEP TIMER OPERATIONS
1. In Radio, Bluetooth or AUX mode, when you press the Sleep Button once,
the “SLEEP” indicator will appear on the LCD display.
2. Tap the Sleep Button repeatedly to select the desired sleep time. The
sleep timer can be chosen from 10 - 120 minutes in 10 minute step. After sleep
timer has been selected, wait for 5 seconds to confirm. The “SLEEP” indicator
remains on the LCD. The unit will stop and go into Standby m ode automatically
when the selected sl eep time has expired.
3. To check remaining sleep time, simply press the Sleep Button.
4. Press and hold the button to switch off the unit before the selected sleep time
expires.
Note:
• If you press the Sleep Button once and the “SLEEP “ indicator appears on
theLCDdisplay,theunitwillgointoStandbymodeautomaticallywhenthe
selected time has expired.
• If you have chosen to sleep to music from an external device connected to AUX
input, the sleep timer will shut off the power to this unit only but it will not turn off
power to the external device.
• If you choose to SLEEP to your Bluetooth device, the song will pause when
the Sleep Time expires and will resume playing once the alarm time is
reached.
AUXILIARY INPUT
This unit provides an auxiliary audio signal input jack for connecting external audio
devices like MP3 players, CD players and listen to them through the speakers of this
unit.
1. Use an audio cable (not included) with one 3.5 mm stereo plug on each end of the
cable.
2. Plug one end into the AUX-IN Jack on the main unit and the other end of the cable
into the Line-out Jack or Headphone Jack of your external audio device.
3. Turn on the unit and external audio device.
4. To select auxiliary audio input, tap the Source Button to select AUX mode. “AUX”
icon appears on display.
5. The volume level can now be controlled through the main unit. Op erate all other
functions on the auxiliary device as usual.
Note:
• If you connect this unit to the Line-Out Jack of your external device then you only
need to adjust the volume control of this unit. If you connect the Headphone Jack
of your external device then you may need to adjust both the volume controls of
your external device and this unit to obtain the desirable volume setting.
• Press and hold the
button to turn off the unit when you have finished listening.
E-11
Don't forget to switch off the power of your external device as well.
Page 13
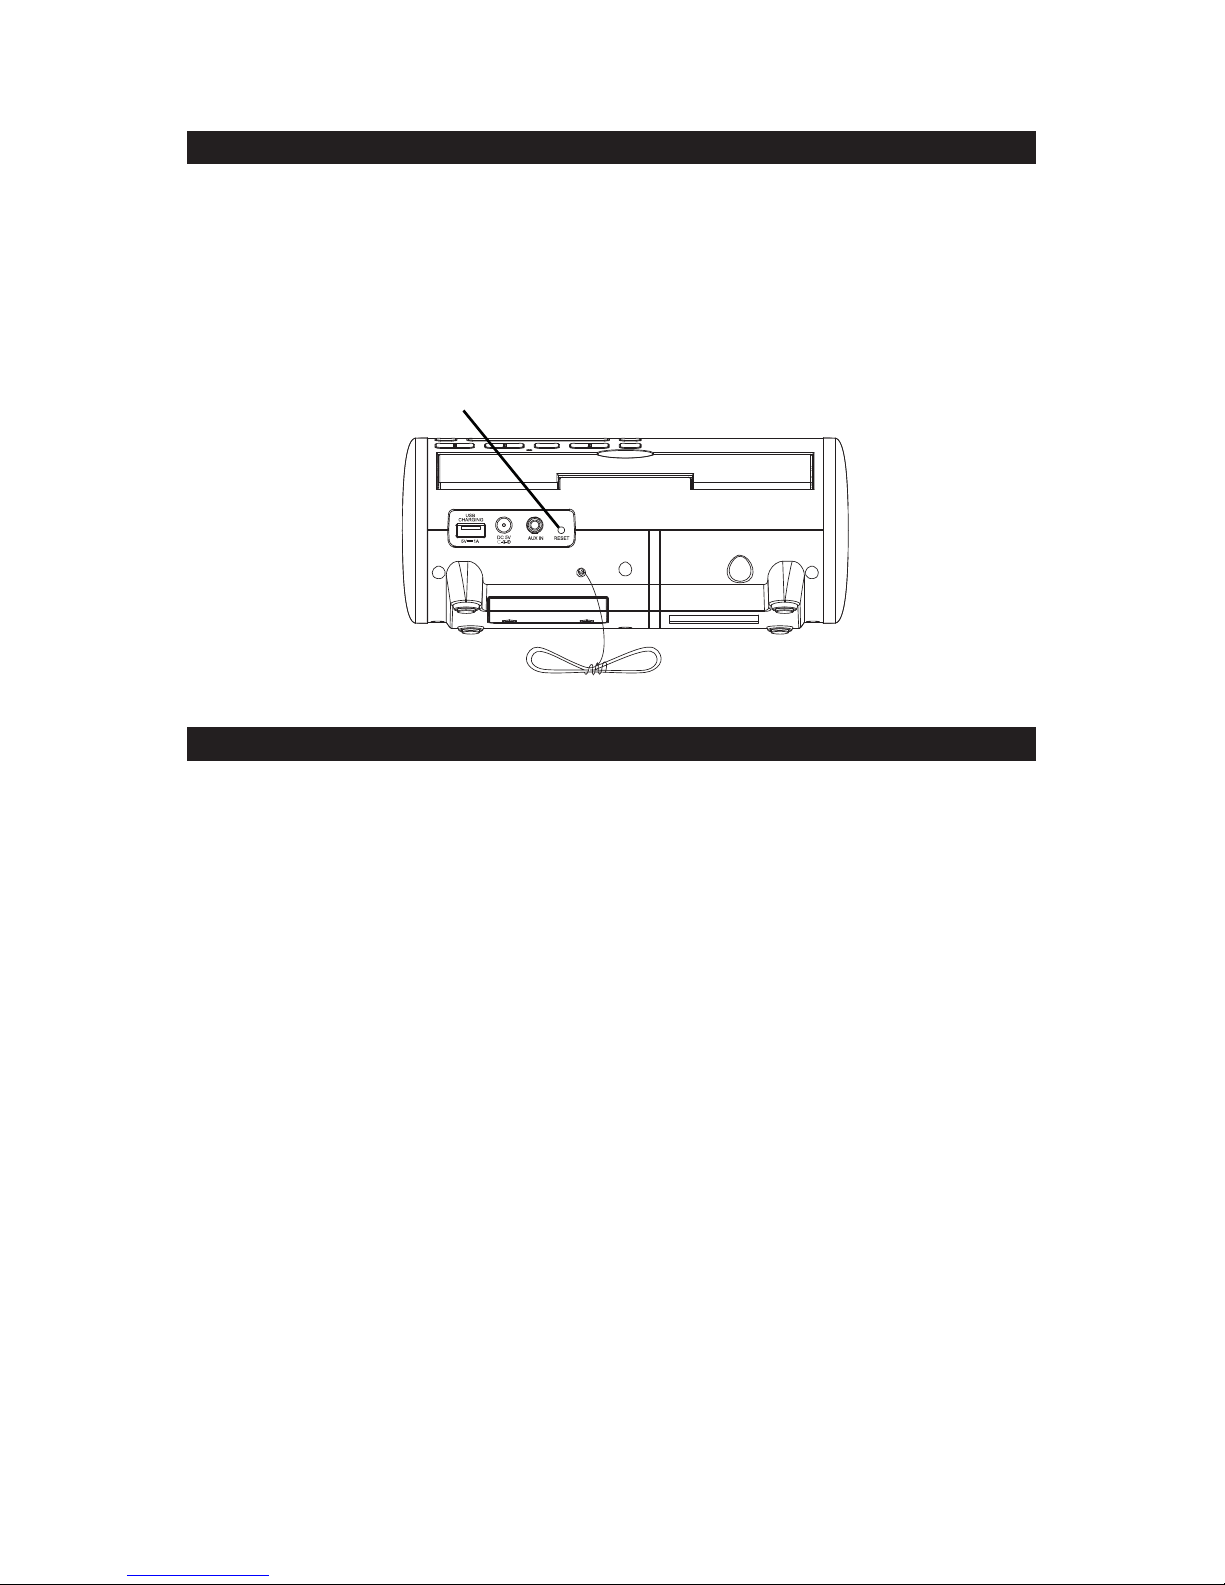
RESETTING THE UNIT
If the unit experiences a power surge or electric shock, it is possible that the internal
micro-controller may lock up and the unit will not respond to any commands from the
panel controls. In this event, use a straightened paper clip, toothpick or similar objects
to pr ess the RESET button located at rear of the unit (see the below figure). The
reset operation clears the sys tem memory and all of your previous settings will be
erased.
CAUTION: DO NOT USE A SHARP OR POINTED OBJECT TO PRESS THE
RESET BUTTON. IT MAY DAMAGE THE RESET SWITCH INSIDE THE UNIT.
CARE AND MAINTENANCE
1. Do not subject the unit to excessive force, shock, dust or extreme t emperature.
2. Do not tamper the internal components of the unit.
3. Clean y our unit with a dry cloth. Solvent or detergent should never be used.
4. Avoid leaving your unit in direct sunlight or in hot, humid or dusty places.
5. Keep your unit away from heating appliances and sources of electrical noise such
as fluorescent lamps or motors.
CLEANING THE UNIT
• To prevent fire or shock hazard, disconnect your unit from the AC power source
when cleaning.
• The finish on the unit may be cleaned with a dust cloth and cared for as other
furniture, Use caution when cleaning and wiping the plastic parts.
• If the cabinet becomes dusty wipe it with a soft dry dust cl oth. Do not use any wax
or polish sprays on the cabinet.
• If the front panel becomes dirty or smud
gedwithfingerprintsitmaybecleaned
with a soft cloth slightly dampened with a mild soap and water solution. Never use
abrasive cloths or polishes as these will damage the finish of your unit.
CAUTION: Never allow any water or other liquids to get inside the unit while cleaning.
RESET BUTTON
E-12
Page 14
No Sound
The unit is not linked with
Bluetooth enabled device.
Go through “LISTENING TO
BLUETOOTH ENABLED DEVICE”
process to link the unit.
The unit placement out of
range.
Relocate the unit within Bluetooth
operating range (30 Feet).
Volume set too low .
Press Volume + Button to turn the
sound level up.
Cell phone will not
charge
Cell phone is not installed
properly.
Remove your cell phone from the
charging cord and check for
obstruction on the connectors.
Cell phone is locked up or
frozen.
Cell phone battery has
problem.
Please make sure your cell phone
is working properly before
plugging into the unit. Please refer
to your cell phone manual for
details.
Noise or sound
distorted on FM
broadcast
Station not tuned properly for
FM.
The FM wire antenna is not
fully extended.
Retune the FM broadcast station.
FullyextendtheFMwireantenna.
Sound is distorted
Volume level is set too high. Decrease the volume.
Sound sou rce is distorted.
If the cell phone original sound
source is of poor quality , distortion
and noise are easily noticed with
high-power speakers. Try a
different audio source such as a
music CD.
Ifyouareusinganexternalsound
source like older generation of
iPod, try reducing the output
volume on the device itself. Also
try turning bass boost OFF or
change the EQ setting.
Unit gets warm after
extended play at
high volume
This is normal.
Turn the unit off for a period of time
or lower volume.
E-13
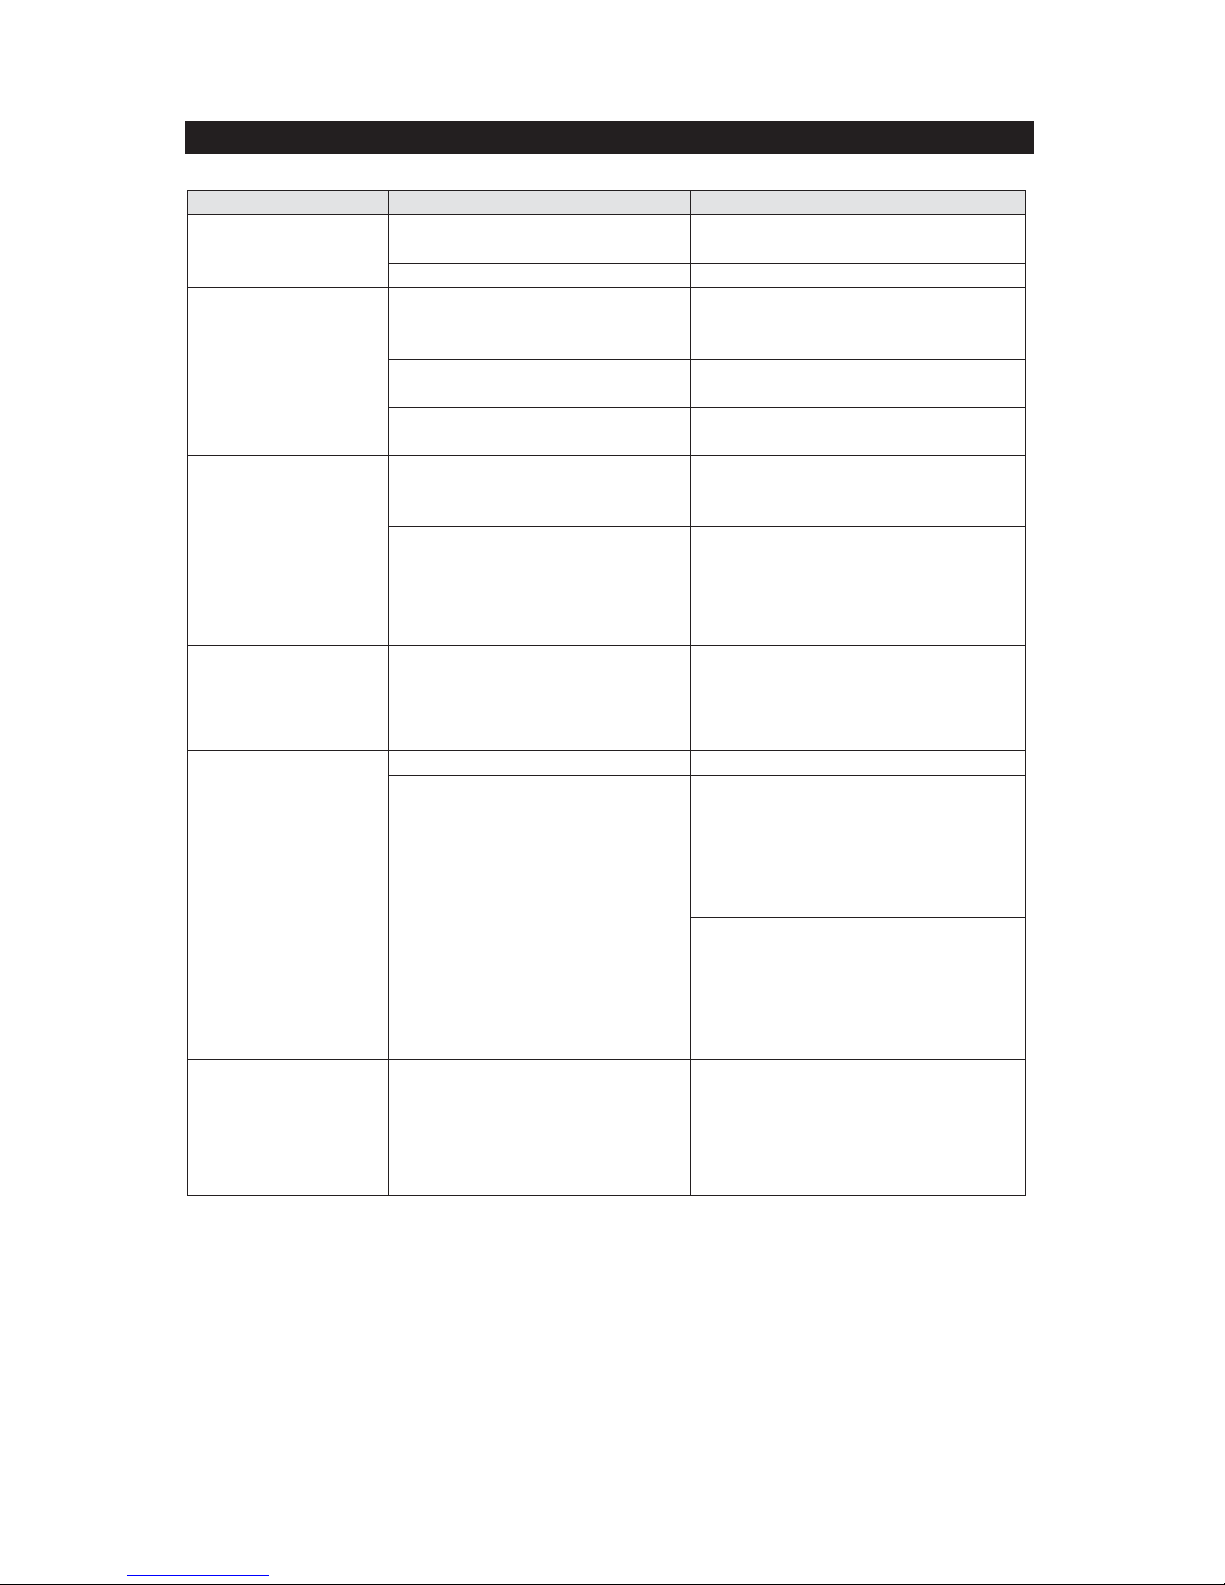
TROUBLESHOOTING GUIDE
Symptom Possible Problem Solution
The unit does not
respond (no power)
The unit is disconnected from
the AC outlet.
Reconnect to the AC outlet.
The AC outlet has not power. Try the unit on another outlet.
Page 15

P
The Bluetooth
®
word mark and logos are registered trademarks owned by Bluetooth
SIG, Inc. and any use of such marks by Spectra Merchandising International, Inc. is
under license. Other trademarks and trade names are those of their respective
owners.
lease visit us at http://www.spectraintl.com/green.htm
for more information on
Spectra’s green initiatives or to find a recycler in your area.
E-14
SPECIFICATIONS
Power requirement:
AC-DC adaptor: Input: AC 120V ~ 60Hz
Main Unit: DC input: DC 5V 1500mA
Backup Battery for Clock: 2 x AAA (UM-4) Batteries (not included)
Frequency Range
Radio Band: FM 87.5 ~ 108 MHz
At Spectra, environmental and social responsibility is a
core value of our business. We are dedicated to
continuous implementation of responsible initiatives
with an aim to conserve and maintain the environment
through responsible recycling.
Page 16

90 DAY LIMITED WARRANTY AND SERVICE
VALID IN THE U.S.A. ONLY
SPECTRA MERCHANDISING INTERNATIONAL, INC. warrants this unit to be free from
defective materials or factory workmanship for a period of 90 days from the date of original
customer purchase and provided the product is utilized within the U.S.A. This warranty is not
assignable or transferable. Our obligation under this warranty is the repair or replacement of
the defective unit or any part thereof, ex
cept batteries, when it is returned to the SPECTRA
Service Department, accompanied by proof of the date of original consumer purchase, such
as a duplicate copy of a sales receipt.
You must pay all shipping charges required to ship the product to SPECTRA for warranty
service. If the product is repaired or replaced under warranty, the return charges will be at
SPECTRA’s expense. There are no other express warranties other than those stated herein.
This warranty is valid only in accordance with the conditions set forth below:
1. The warranty applies to the SPECTRA product only while:
a. It remains in the possession of the original purchaser and proof of purchase is
demonstrated.
b. It has not been subjected to accident, misuse, abuse, improper service, usage outside
the descriptions and warnings covered within the user manual or non-SPECTRA
approved modifications.
c. Claims are made within the warranty period.
2. This warranty does not cover damage or equipment failure caused by electrical wiring not
in compliance with electrical codes or SPECTRA user manual specifications, or failure to
provide reasonable care and necessary maintenance as outlined in the user manual.
3. Warranty of all SPECTRA products applies to residential use only and is void when
products are used in a nonre
sidential environment or installed outside the united States.
This warranty gives you specific legal rights, and you may also have other rights which vary
from state to state. TO OBTAIN SERVICE please remove all batteries (if any) and pack the
unit carefully and send it freight prepaid to SPECTRA at the address shown below. IF THE
UNIT IS RETURNED WITHIN THE WARRANTY PERIOD shown above, please include a
proofofpurchase(d
ated cash register receipt) so that we may establish your eligibility for
warranty service and repair of the unit without cost. Also include a note with a description
explaining how the unit is defective. A customer service representative may need to contact
you regarding the status of your repair, so please include your name, address, phone number
and email address to expedite the process.
IFTHEUNITIS OUTSIDETHEWARRANT
Y PERIOD, please include a check for $25.00 to
cover the cost of repair, handling and return postage. All out of warranty returns must be sent
prepaid.
It is recommended that you contact SPECTRA first at 1-800-777-5331 or by email at
[email protected]
for updated information on the unit requiring service. In some
cases the model you have may be discontinued, and SPECTRA reserves the right to offer
alternative options for repair or replacement.
E-15
SPECTRA MERCHANDISING INTERNATIONAL, INC.
4230 North Normandy Avenue,
Chicago, IL60634, USA.
1-800-777-5331
To register your product, visit the link on the website below to enter your information.
http://www.spectraintl.com/wform.htm
0315
Printed in China
 Loading...