

Page 1
Safety & Operating Instructions for PROGRES GRYPHAX Microscope Cameras
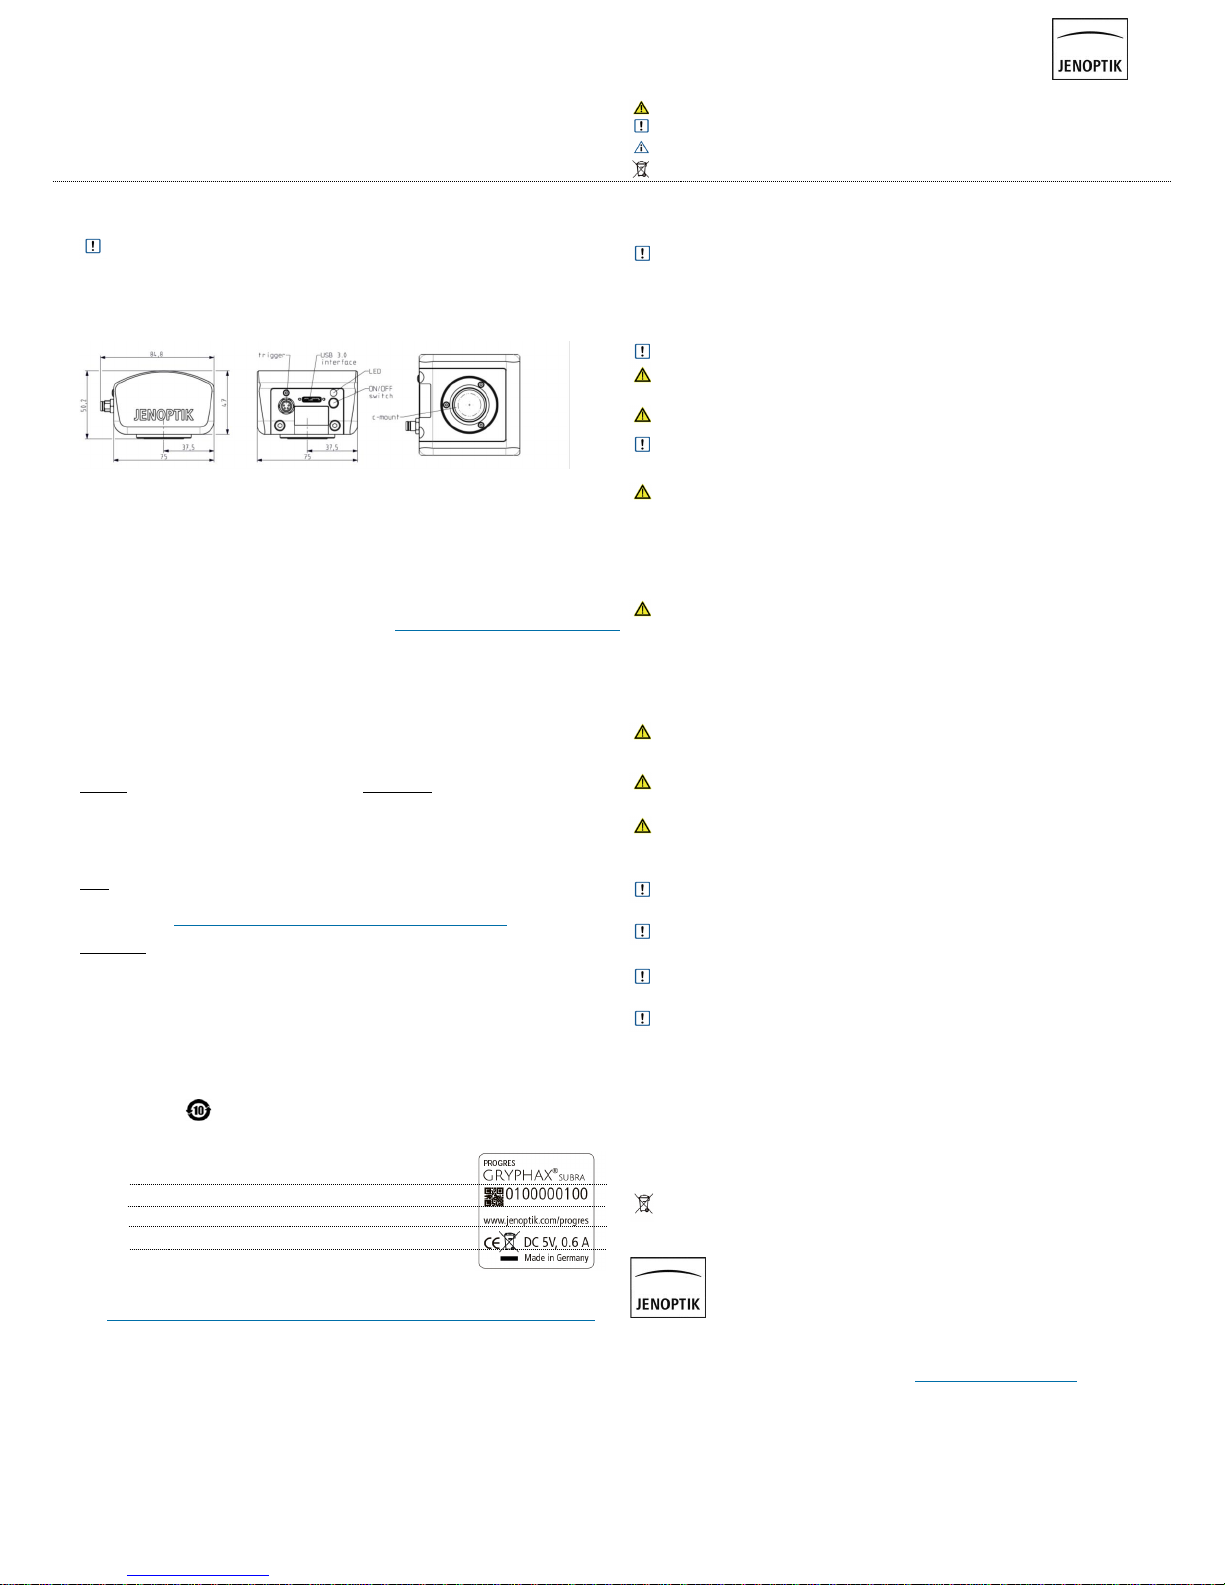
Type Label
Note: Please observe the information on the type label when installing the camera.
The following information is printed on the type label: (e.g. PROGRES GRYPHAX SUBRA)
1. Camera type:
2. Serial number (written and in code format):
3. Manufacturer’s website:
4. CE mark / WEEE mark / Voltage / Power:
5. Country of origin:
Service & Support
In the first instance, please have a look into our software manual or watch video tutorials to find a solution to your
issue: https://www.jenoptik.com/products/cameras-and-imaging-modules/microscope-cameras/faq-progres-gryphax
Should you need further support please contact your local dealer for questions regarding PROGRES GRYPHAX cameras.
Your local dealer can provide you with detailed information about the product, accessories, and applications in
microscopy. If a solution cannot be found, please contact Jenoptik’s technical support team at: progres@jenoptik.com
The manufacturer data of each product is encoded into the product´s serial number. Contact the support team to
obtain the manufacture date of your specific product.
If you need to return your camera for repair,
please send it to the following address: JENOPTIK Optical Systems GmbH
Attn. Steffen Derbsch / HC Service & Repair Centre
Pruessingstrasse 41
D-07745 Jena, Germany
Dear PROGRES GRYPHAX user,
Welcome to the PROGRES GRYPHAX community! Please read the safety & operating instructions carefully before
using your PROGRES GRYPHAX camera. By observing the advice on this page, you can make optimum use of the functions
and avoid causing damage or injuries resulting from operating errors. The safety & operating instructions
apply for all PROGRES GRYPHAX cameras in connection with PROGRES GRYPHAX imaging software.
Intended Use
PROGRES GRYPHAX cameras are intended for the use on a microscope.
They can be adapted via c-mount adaption to the microscope and via USB3.0-cable to a computer or laptop.
Power Supply
For PROGRES GRYPHAX cameras, power supply and data communication are carried out using the USB3.0 (USB3.1 Gen 1)
interface. Additional power supply connections are not necessary.
Technical Drawing / Dimensions
Instructions for Use
Our separate user manual and the video tutorials contain all necessary information for the installation and operation of
PROGRES GRYPHAX cameras. They help you to capture and process your microscope images in the easiest way. You will
find the manual and video tutorials at: www.jenoptik.com/en-progres-gryphax-software as well as on the USB memory
card included with your camera.
Contents
1. PROGRES GRYPHAX microscope camera
2. PROGRES GRYPHAX software - available: • on USB-memory card – item 5,
• to download at www.jenoptik.com/en-progres-gryphax-download
• on request by e-mail at progres@jenoptik.com
3. USB3.0 cable
4. Safety and Operating Instructions & Quick Start Guide
5. USB memory card containing manuals, video tutorials & PROGRES GRYPHAX software
Disposal
Manufacturer Information
Editorial Information
Editorial deadline: September 2017
Documentation number: 014102-202-98-01-en-007-213-1501
Revision status: Revision 07, Release 001
Important note: This instruction manual or parts of this manual must not be reproduced in any form (either print,
photocopy, microfilm, or otherwise) without prior written permission from Jenoptik, nor must its contents be used,
reproduced, processed, or distributed electronically.
These safety & operating instructions were produced with due care. No liability will be accepted for damages
resulting from non-compliance with the advice contained herein.
We reserve the right to make improvements and changes to the device and to this instruction manual at any time
without prior notice.
System Requirements
Operating System
For Windows PC: OS Microsoft Windows 7 SP1 / 8.1 / 10 - 64 bit
For Apple Macintosh: OS X 10.11 (El Capitan) & 10.12 (Sierra)
For Linux: OS Ubuntu 16.04 LTS - 64 bit
Hardware
Minimum: Recommended:
• USB3.0 - PCI Express from V1.1, • USB3.0 - PCI Express V2.0
• Processor: i5 Dual core (or comparable), 4 GB RAM • Processor: i7 Quad core (min. 3 GHz), 8 GB RAM
• Monitor resolution 1280x720 • Monitor resolution: 1920x1080 for SUBRA & KAPELLA & RIGEL
• Graphic card equipped with on-board memory
• Graphic card equipped with on-board memory
Recommended PCI Boards
For PC: PCI Express Card, item # Jenoptik order number: 567069;
Technical requirement: PCI Express 2.0 (Important: never use PCI Express 1.0!)
Driver requirement for Windows 7: USB 3.0 host controller driver - Freeware
http://www.station-drivers.com/index.php/downloads/Drivers/Renesas-Nec
For Windows 8.1: no drivers are needed; support is already built into the OS. Just plug in and reboot.
For Notebooks: Express Card, item # Jenoptik order number: 576563
Disclaimer
Exemption from warranty: Jenoptik shall be exempt from warranty during the warranty period in the event that
the safety regulations are not observed.
Safety & Operating Instructions
PROGRES GRYPHAX cameras are intended for the use on a microscope and for operation and control with
PROGRES GRYPHAX microscopic imaging software. The PROGRES GRYPHAX microscope camera is an optical and
fine mechanical device. Please handle it with due care.
Operating temperature: +10 °C ... +35 °C
Relative humidity: 5 % ... 80 %, non-condensing
Storage and transportation temperature: -20 °C ... +70 °C
Advice for transportation and storage: Protect the camera against impact. Store and transport the camera in a dry
and cool place, e.g., in its case or the packaging in which it was delivered. Please use the supplied C-mount cover
during transportation and storage.
Conformity to CE / WEEE / ROHS / China RoHS
PROGRES GRYPHAX microscope cameras comply with:
• CE in accordance with EMC Directive 2014/30/EU
• WEEE
• ROHS / China RoHS
Cleaning and Maintenance
Cleaning the camera casing: If the camera casing is only slightly soiled, clean it with a soft, slightly moistened piece of
cloth. Make sure that no water enters the camera and risks becoming in contact with any internal components.
Do not use any aggressive substances or solvents to clean your camera.
Cleaning the filter glass: Cleaning the filter glass by yourself is not recommended. If the filter glass is severely soiled,
please contact your expert dealer or the manufacturer for assistance.
Trigger Operation
Some PROGRES GRYPHAX cameras support trigger operation (connection to an external trigger device, which delivers
the signal (Trigger In) to the camera and which will react, e.g. by capturing an image. After image capture, the camera
delivers a signal to the device (Trigger Out) to signal the completion of the function. Trigger Out does not require any
additional power supply; for Trigger In, power supply must be set up for the external device. Connect the cable shield
with the casing of the external device. Only use shielded cables.
The sign Caution warns against possible health dangers at risk if the advice is not observed.
The sign Attention warns against possible damage to the instrument.
The sign Information highlights important information for the operation of your camera.
This symbol highlights that special guidelines have to be followed when disposing of this product.
Every PROGRES GRYPHAX camera has been thoroughly tested and has left the factory in perfect operating
condition.
For your own safety and to keep the camera in good operating condition, please follow all safety and
operating instructions in this document and observe all advice and labels on the unit and on any accessory.
Exemption from statutory liability for accidents: Jenoptik shall be released from statutory liability for
accidents that occur in the event of non-observance of the safety instructions by any operating person.
Expansions and alterations: The camera must be operated in compliance with these safety instructions. Do
not attempt to carry out any expansions, adjustments, alterations, or repairs by yourself. Repairs and
maintenance work may be carried out only by authorized service personnel.
Electric installations: The electric installations of the room where the system is set up must be in
compliance with the IEC requirements.
Voltage supply: 5 V (USB) / Consumption: Variable according to camera type. Please refer to your
camera’s technical data sheet.
Unplug the USB cable to disconnect the camera from the power supply.
Use only cables included with your camera or explicitly recommended by Jenoptik.
• Make sure that the cables are installed so that they do not obstruct persons and do not cause a tripping risk.
• Protect cables against mechanical impact or damage.
Note: Observe the information on the type label when installing the camera.
Caution, fire hazard! To prevent a risk of fire, do not operate or store the camera nearby easily inflammable
materials or gases.
Caution, risk of injury! Operating the camera under the following circumstances risks injury:
• The camera is visibly damaged
• The camera has been stored under adverse conditions over a long period of time
• The camera has been transported under adverse conditions
If any of these circumstances apply, switch off the camera and ensure that it cannot be operated
unintentionally. Please contact your expert dealer or the manufacturer’s technical support team for
assistance.
Caution, risk of damage by unsuitable environment conditions! Do not expose the camera to extreme
environment conditions. Avoid extremely high or low temperatures, and keep the camera away from
high humidity, liquids, chemical gases, dust or high electro-magnetic fields.
Caution, risk of injury or damage by water! If water (or other liquids) enters the camera, there is a risk of
electric shock. Your camera can also be damaged or no longer usable. If water has entered the camera,
switch it off and contact your expert dealer or the manufacturer for assistance.
Caution, risk of damage by static charge! Static charge can damage or destroy the electronic components
of your camera. Before connecting the camera to a computer or a microscope, make sure that it is free of
electrostatic charge. Ground yourself by touching the metallic housing or the reverse side of your computer
or microscope, which both have to be grounded via a power socket.
Caution, risk of malfunction by insufficient ventilation! Some PROGRES GRYPHAX cameras are equipped with
louvers on the rear side. Ensure that the cameras are sufficiently ventilated and that the louvers are not
covered.
Caution, risk of damage and malfunction by overheating! Avoid leaving your camera in direct sunlight and
do not operate the camera near heat sources (e.g., radiators or stoves). Overheating can affect the image
quality.
Advice for handling the IR filter glass: Protect the integrated IR filter glass against mechanic impact such as
scratching or shock and against soiling. Avoid fingerprints on the glass and do not touch the C-mount cover
of the camera.
Caution, risk of damage and image errors by mechanic impact! Protect the camera against impact, especially
during operation. Mechanic impact can affect image quality.
The camera must be disposed of in compliance with the environmental protection guidelines in force.
Contact your expert dealer in case of any questions.
JENOPTIK Optical Systems GmbH
Business Unit Healthcare
Goeschwitzer Str. 25
07745 Jena,
Germany
Phone.: +49364165-2143
E-mail: progres@jenoptik.com
Website: www.jenoptik.com/progres-gryphax
Take care to use only the USB3.0 cables included with your camera or explicitly recommended by Jenoptik.
PROGRES GRYPHAX cameras should be used in clean and dry locations.
3840x2160 for other GRYPHAX
®
cameras
| 40*
* only valid for PROGRES GRYPHAX® PROKYON
Page 2
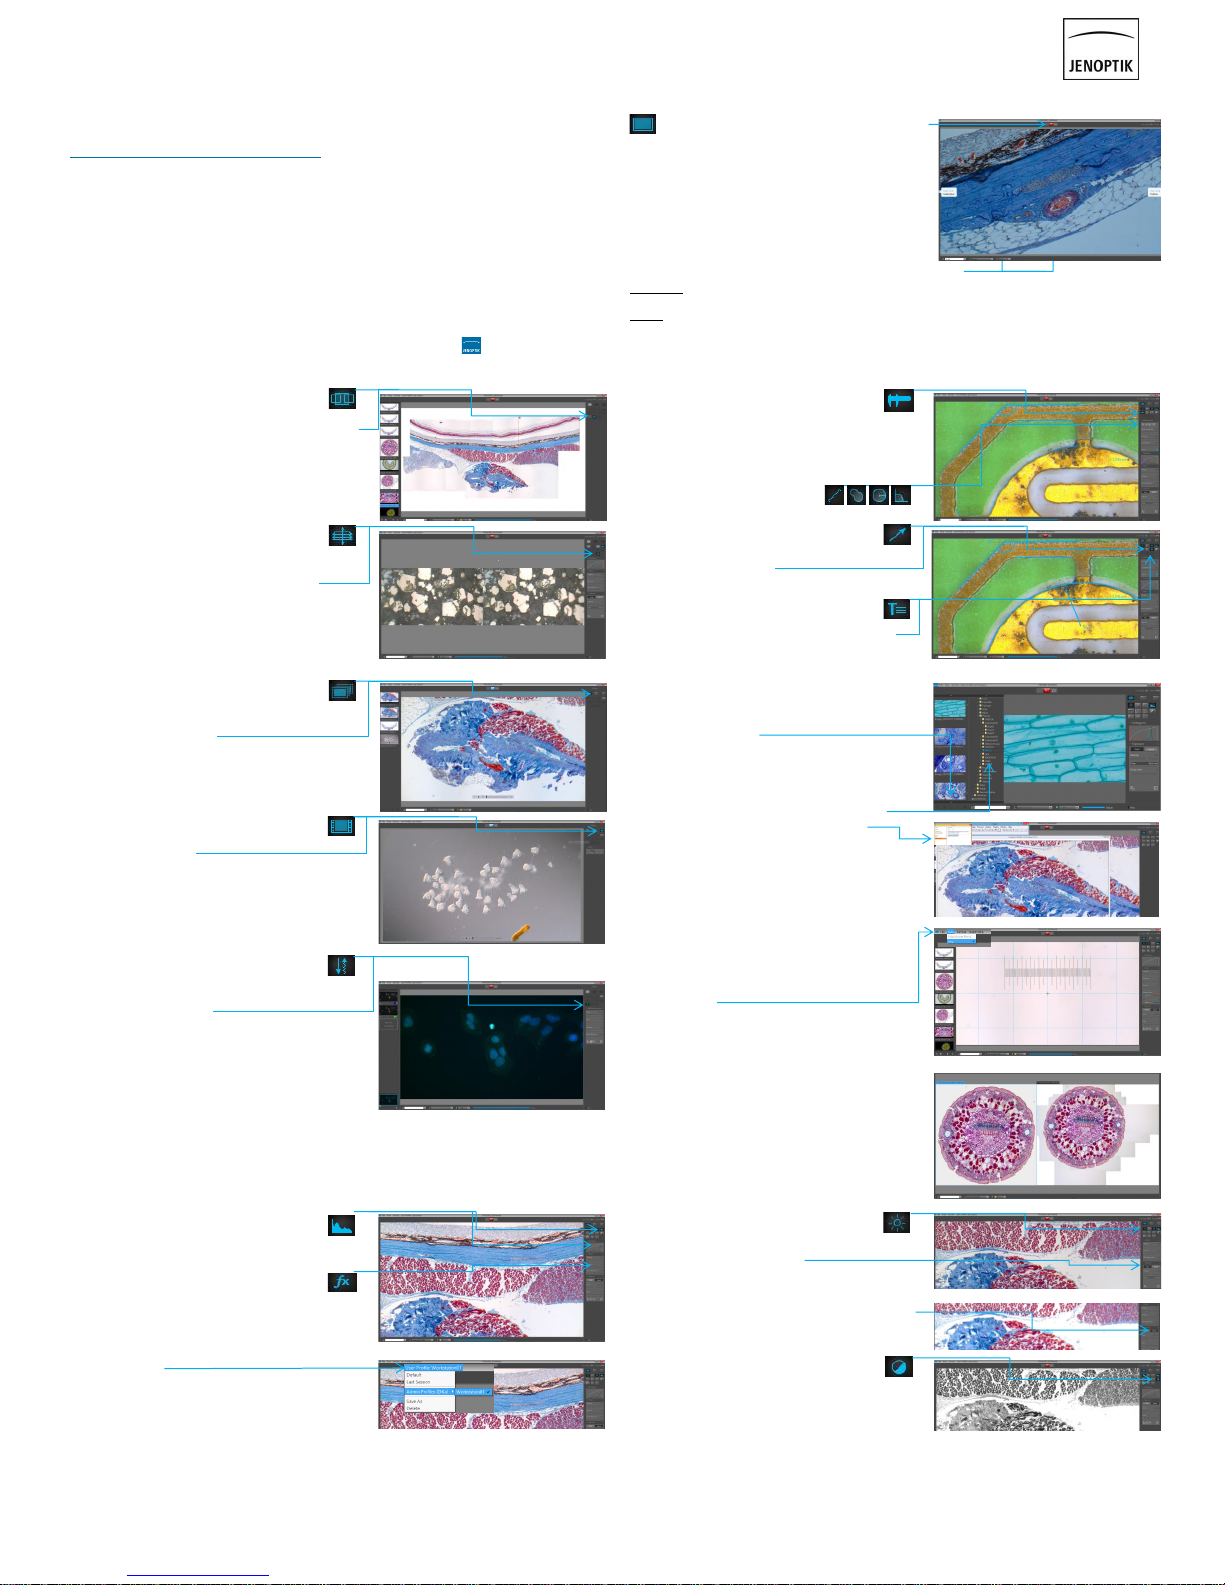
Multi-Fluorescence
… captures single or multi-coloured fluorescent images (through c apturing
and automatic merging of monochrome and bright-field images).
You can activate it by pressing this:
The multi-fluorescence panel and a coloured grey-scaled v ersion of
the live image will be opened and displayed within the I mage window.
Note: You can adjust the current image using tools of Multi Fluoresce nce
widget. You can add and modify your fluorescence filters, with
predefined colours according to the list of emission wavelengths , just press
“Add Filter”. With the colour selector besides each filter, the e mission
wavelengths can be changed. To delete a filter, just select it and click on the
trash icon in the fluorescence tool.
To apply the created filters to the image, click on a blank filter, surrounded
only by a thin red border and the live image gets filled with the selected colour. After pressing “REC” the captured image will be
shown within the filter frame. Repeat the previous steps for all predefined filters. The composite preview image at the bottom of the
filter list will be updated on each filter capture. Please doubl e click on the preview image to display it within the Image window. If you
are satisfied with the composite image, jus t press “REC” to save the final multi-fluorescent image to the Gall ery. After the final version
is saved you can start capture new filter images. The predefined filt ers are available for a new multi-fluorescent capture.
For more details see our software manual.
Quick-Start Guide for PROGRES GRYPHAX Microscope Cameras
Effects / f(x) (in live mode)
… enhances the live image in order to improve the final captured image.
You can individually adjust sharpness, as well as dynamic and noise
characteristics, just by moving the sliders from the left (“off”), over “soft”
and “middle” to the right (“strong”). For more details see our software
manual.
Keyboard Shortcuts
F1 Open help CMD or CTRL + A Select all (all thumbnails from the Gallery)
F2 Start capturing in Capture Mode (single image, time-l apse, video) CMD or CTRL + G Open / Close Gall ery
F3 Go back to Live mode CMD or CTRL + T Open / Close Tools
F5 Live image freeze CMD or CTRL + O Open Preferences storage options
F11 Switch between full screen and standard mode CMD or CTRL + P Print selected image(s) from the Gallery
DEL Delete selected images from gallery or the selected (marked ) from CMD or CTRL + D Open / Cl ose Treeview
(via context menu “Measure“) SPACE BAR activates Magnifier or Hand tool
Z s witch zoom between “1:1” & “fit to screen” view “+” or “-” to zoom IN or OUT while Magnifier is active
G Open / Close Grid
Preferences Your software setting preferences can be adjusted according to your indivi dual needs. (all advanced settings here are
described in our software manual or at the video tutorials) :
Language, Minimiz e gain during capture, GUI scaling, Magnifier zoom factor (“Preferences”>”General”)
Set & Cali brate black shading, Activate cooling (“Preferences”>“Camera”)
Auto Save, Imag e format, Image quality, File name, Destination folder (“Preferences”>“Storage options”)
Image resolutio n, Color temperature, Calibrate Measurement, Calibrate White shading (“Preferences ”>“Device Configuration”)
Settings for t he Status bar, Scale bar unit (“Preferences”>“Status bar”)
Font, Style, Col our, Width, Grid colour (“Preferences”>“Style”)
User Profiles
… users can save your individually created calibrations and settings in order
to make your mic roscopic imaging reproducible / trackable. To do this, just
choose “User Profile” in the menu ba r and press “Save as”. You can protect
your profiles by password. For more details see our software man ual.
Image Comparing / Side by Side mode
… c ompares two images in a split-s creen side-by-side view. During this
mode all tools are disabled. This mode is not available when running a
multi-fluorescence procedure or during any other “R EC” mode (single
capture, video or time-l apse). You ca n either com pare two images from
the Gallery (just drag and drop one image over the ot her) or you can
compare the live image with an i mage from the Gallery. (drag and drop
the ga llery image ov er the live image). The related images are arranged
side-by-side within the Image window.
You can be in either active Live mod e or Offline mode, depending on the
selected image type. For more details see our software manual .
Time-lapse / Image Series (in live mode)
… record s an ima ge series (a fixed number of images during a specified
time-period or within a given timeframe).
You can activate it by pressing this:
Then press “REC” to start recording the time-lapse image seri es.
Recording mode automatically stops after all images of the image series
that were previously defined have been recorded. The image series will b e
stored in a separate sub folder under the used image destinations folder.
For more details see our software manual.
Video (in live mode)
… records a video sequence of images.
You can activate it by pressing:
Then press “REC” to start recording the video sequence.
Clicking “STOP” will end the recording
(The video is saved to the user-defined storage location).
Video playback, to observe the recorded videos, are possible from the
Gallery. For more details see our software manual.
E-mail / Print / Cloud
(in offline mode, when the recorded Gallery image is selected)
You can select one or multiple images from the Gall ery and then activate
“Send via e-mail” or “Print” or “ Save in the cloud” for all selected Gallery
items by pressing these buttons:
Image Analyzing in External Programs
(in offline mode, when the recorded Gallery image is s elected)
You can sel ect one or multiple images from the Gallery and activate
external “Image Analysis” by going to “Preferences”>“Additional
Services” to transfer and further process the selected Gallery items to an
external image anal ysis program. Note: The pre-configured external
software will launch with the files as pre-loaded.
For more details see our software manual.
Text Labeling / Annotations (in live mode)
… i nserts text labels into the live & captured image to highlight or to
comment on points of interest. You can activate it b y pressing this:
You can also select the font size, font style and colour.
For more details see our software manual.
Measurements (in live mode)
… creates different measurements in live and captured imag es.
You can activate it by pressing this:
You can choose which measurement element you would li ke to use
(distance, freeform, radius, diameter, angel) as well as the font, outline
width and colour settings of the measurement elements. The
measurement automatically appears after clicking in the relevant place.
Measurement calibration in advance is necessary!
For more details see our software manual.
Capturing a Microscope Image in just One Step (in single capture mode)
You can easily take a (single shot) image capture by pressing “REC”:
The following image capture parameters are preset using the on e-click
image capture function:
Auto exposure: activated by default. Exposure options can be
individually adjusted using the Exposure tool.
Whit e balance: preset / adjusted to halogen lamp HAL100 (Zeiss).
Shading options can be created via “Preferences”.
Imag e resolution: the settings are preset, but can be adjusted under
“Preferences” >”Device Configuration”
Targe t folder / Image name / File format / Language: these settings
are preset but can be individually set under “Preferences”
Further image enhancements, settings and tools have to be applied
before pressing “REC”. To do this open the Gall ery bar / Tool bar by clicking here:
General note: After clicking “REC”, the “REC ” button instantly changes to “STOP” or “LIVE” to indicate, that the captured image
is saved and the Offline mode is activated. During Of fline mode only a few additional tools can be activated.
Options: You can predefine the following three settings for O ffline mode after pressing “REC”
the captured ima ge is displayed for 3 sec., afterwards it automatically changes back into Live image mode (this option is preset)
you can chang e the length of time that the captured image is displayed
you can pred efine when you will reenter Live mode after pressing the “LIVE” button again and to capture additiona l images
Furthermore, PROGRES GRYPHAX software gives you the opportunity to further im prove or modify the image before capturing it.
See the following instructions or for detailed information r ead software manual available on USB memory card included by camera.
Getting Started
Congratulations on purchasing your PROGRES GRYPHAX microsc ope camera! This Quick-Start Guide will help you to quickly install your
PROGRES GRYPHAX® microscope camera and imaging software, and will give you an overview over their main functions.
For more information and user training, please see our detailed so ftware manual and use our video tutorials:
https://www.jenoptik.com/en-progres-gryphax-software
You can also find these video tutorials and software manual on the USB memory card included with your camera.
For the safe operation of your PROGRES GRYPHAX microscope camera, please obs erve the safety and operating instructions as well as the
hardware requirements described on the reverse of this page.
Important note: Only use accessories which are included with your camera or which are explicitly recommended by Jenoptik.
Easy Installation
• Mount your PROGRES GRYPHAX camera to the microscope using the C-Mount adapter
• Turn on the main power switch
• Open Windows Explorer and run the installation application , by following the USB path (USB memory card included with your camera)
and follow the wizard to install the PROGRES GRYPHAX software. ( Administrator permission are necessary for successful installation)
• Connect the PROGRES GRYPHAX microscope camera to your co mputer using the USB 3.0 cable.
Power is supplied via this cable; so you do not need to connect to any further equipment.
• Ensure that the illumination of your microscope is switched on and the light path is opened
Starting the Software
Click on the Jenoptik application icon on your desktop to launch t he PROGRES GRYPHAX software:
By default, a grey-balanced and well-exposed live image wil l appear in “Fit to screen mode” and you can immediately s tart working with
the application software.
Arrow Marking (in live mode)
… inserts arrow markings into the imag e to highlight points of interest.
You can activate it by pressing this:
You can choose the outline width and colour.
For more details see our software manual.
Z-stacking / Multifocus / EDF (in live mode)
… records a series of single images automatical ly, each in a different
depth of focus, and stitches t hese together to one final image that is
clearly focused in all areas. You can activate it by pressing this :
Then press “REC” to record a z-stacking image. During “REC” mode you
can manually adjust the focus of your specimen in th e z-axis at your
microscope. The single image and the image result preview are compared
and viewed side by sid e. If you are satisfied with the result, just press
“STOP” to save the compound image and the ED F image will appear in
the Gallery.
For more details see our software manual.
Panorama / Image Stitching (in live mode)
… captures multiple i mages and stitches these together automatically
into one single high resolution image. You can activate it b y pressing this:
Then press “REC” to start recording a panorama image. The Image
window shows a ~60% scaled-down image version to help you to adjust
your sample. While you do this and select the area that y ou are interested
in, all single images will be automatically stitched together. If you are
satisfied with the stitched result, just press “STOP” to save the final
stitched image, which will then appear in the Gallery .
For more details see our software manual.
Histogram (in live mode)
… displays the colour and alpha value distribution within the currently
viewed image, in real-time. For more details see our software manual .
Exposure (in live mode)
… offers a choice of two modes: Automatic or Ex pert exposure.
Automatic exposure is activated by default.
You can adjust the auto exposure intensity, “Ocular view” value or set
the grey balance using t he pipette. Use the „Ocular view“ slider to get
on the monitor what you see in the microscope eyepieces.
The exp ert settings “White point”, “Grey balance”, “Black point”,
“Exposure time”, “Gain“ and “ Ocular view” are described detailed in our
software manual.
Treeview
You ca n select media destination folder b y simple double click on the
existing folder. Or you create your own entirely folder structure inside of
GRYPHAX be using “Treeview”. Furthermore, you can rename or delete
existing folder. You can open Treeview by pressing arrow b utton:
Grid Scaling and Crosshair (in live mode)
… offers an overlay-frame / mask over the current view within the
Image window in order to correctly prepare the a lignment of the
specimen. It can also support your Koehler set up. You have a crosshair
in the exact center of the image which can be activated by choosing the
option under “View”:
The grid can be easily adjustable by scrolling in the mouse. A check mark
after the item label within the menu indicates that this mode is
activated. Pressing the “z” button switches back to the previous window
layout. Alternatively, you can close this mode via menu. Grid colour can
be changed under preferences. For more details s ee our sw manual.
Monochrome mode (in live mode)
… enables you to view the current camera live stream in greyscal e
images. If this tool is active all recorded media will be saved in greyscale.
For more details see our software manual.
 Loading...