

JENOPTIK JD C 3.0S User Guide
GETTING STARTED
C 3.0S
3 Megapixels Digital Camera
User’s Guide
User’s Guide
www.jenoptik-camera.com
1

CONGRATULATIONS
Congratulations on the purchase of your new camera. Your camera has
been carefully engineered and manufactured to give you dependable
operation. Read this manual before operating the camera to become
more familiar with it.
This manual has been written and formatted with depth and detail so
that you can easily follow the instructions to maximize the features of
your camera.
1

Table of Contents
GETTING STARTED
Package Contents ............................................................................................................................. 4
System Requirements ...................................................................................................................... 4
Camera Overview ............................................................................................................................ 5
Loading the Batteries ........................................................................................................................ 6
Inserting an SD Card (Optional) ....................................................................................................... 6
Turning the Camera On and Off ....................................................................................................... 7
Turning the LCD/Icons On and Off ................................................................................................... 7
Setting the Camera’s Operational Mode ........................................................................................... 8
TAKING PICTURES AND VIDEO CLIPS
Taking Pictures .................................................................................................................................. 9
Using the Digital Zoom ...................................................................................................................... 9
Setting the Flash ............................................................................................................................... 9
Taking Pictures with Self-Timer ......................................................................................................10
Setting Image Resolution ................................................................................................................ 10
Setting Image Quality ...................................................................................................................... 11
Setting Image Color ........................................................................................................................ 11
Setting Exposure Compensation ............................................................................................. 11
Setting White Balance ............................................................................................................. 12
Setting Image Sharpness ........................................................................................................12
Taking Video Clips .......................................................................................................................... 13
CUSTOMIZING YOUR CAMERA SETTINGS
Setting Auto Power Off .................................................................................................................... 14
Setting Date and Time .................................................................................................................... 14
Setting Anti-Flicker Frequency ........................................................................................................ 15
Setting Language ............................................................................................................................ 15
REVIEWING YOUR FILES
Viewing Files .................................................................................................................................. 16
Magnifying Pictures ....................................................................................................................... 16
Rotating the Pictures ....................................................................................................................... 16
Deleting Stored Files ...................................................................................................................... 17
Deleting One ........................................................................................................................... 17
Deleting All ............................................................................................................................... 17
Protecting Files .............................................................................................................................. 17
Formatting the Internal Memory or SD Card .................................................................................. 17
PRINTING STORED PICTURES
Selecting Pictures for Printing ......................................................................................................... 18
Printing Pictures Directly ................................................................................................................. 18
2

CONNECTING TO PC
Installing Software ........................................................................................................................... 19
Downloading Pictures and Video Clips onto Your Computer ........................................................ 20
Unplugging Your Camera from the Computer ................................................................................ 21
Using the Camera as A Web Camera ............................................................................................. 21
APPENDIX
Troubleshooting ............................................................................................................................. 22
Specifications .................................................................................................................................. 24
Getting Help .................................................................................................................................... 25
Safety Tips and Maintenance ......................................................................................................... 26
Regulatory Information .................................................................................................................... 28
3
GETTING STARTED
GETTING STARTED
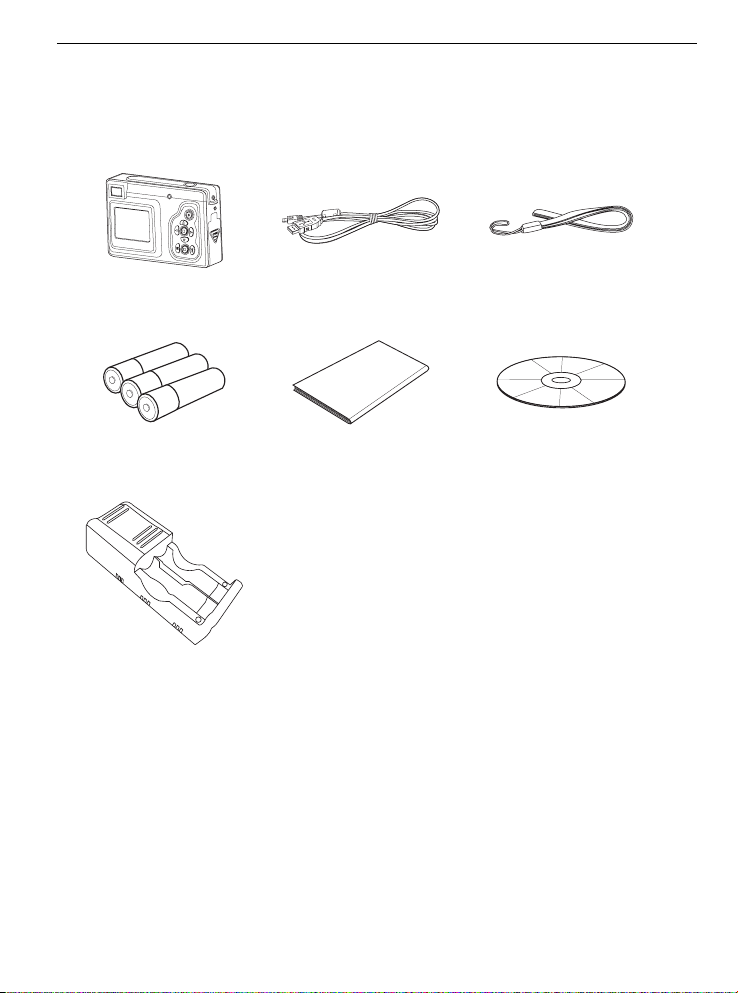
PACKAGE CONTENTS
Check if all of the items shown below are included .
Digital camera USB cable Wrist strap
3x AAA Batteries Quick Start guide CD-ROM (Includes
Camera Driver, Photo
editing software,
multi-lingual User’s
Guide etc.)
Battery charger (Optional)
SYSTEM REQUIREMENTS
Windows:
• PC with processor better than MMX Pentium 266 MHz
• Windows XP/2000/ME/98SE
• Minimum 128 MB RAM
• USB port
• CD-ROM driver
• 1024 x 768 monitor, 24-bit color (true color)
Specifications are subject to change without prior notice.
4
GETTING STARTED
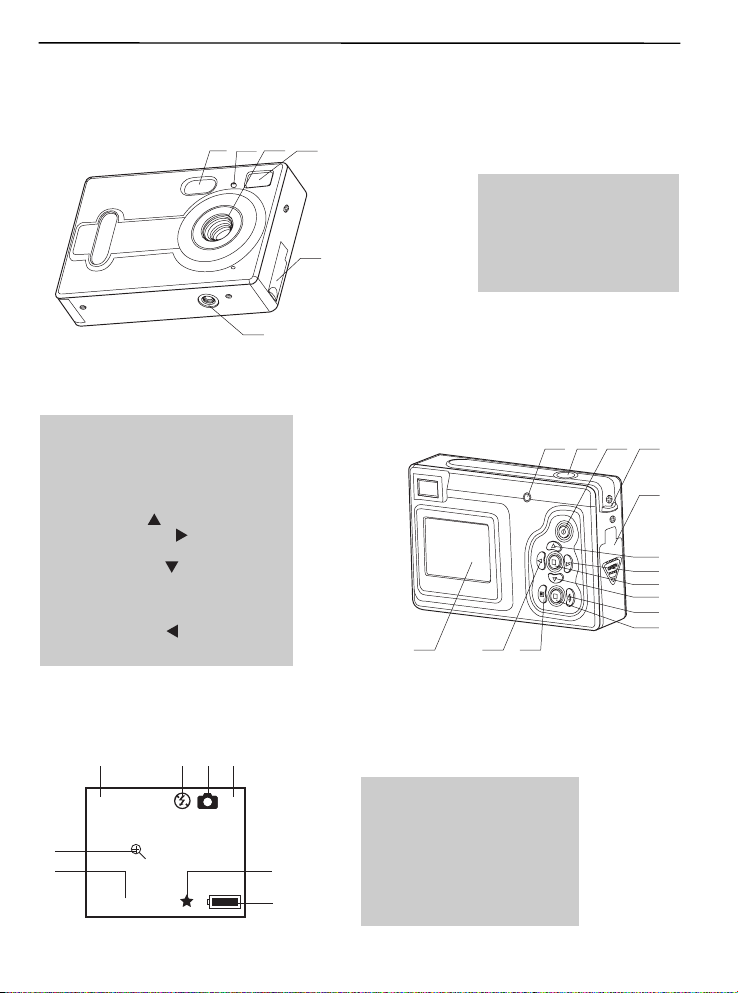
CAMERA OVERVIEW
Front View
123
4
1. Flash
2. Self-Timer LED
3. Lens
5
4. Viewfinder
5. USB port
6. Tripoad Socket
) Button
C
6
1. Frame Counter
2. Flash
3. Camera Mode
4. Memory Card Loaded
5
6
5. Image Quality
6. Battery Level
7. Resolution
8. Zoom Indicator
Back View
7. Flash Ready LED
8. Shutter Button
9. Power Button
10.Wrist Strap Holder
11. Battery/Memory Card Door
12. Move up (
13. Move to right (
14. MENU Button
15. Move down (
16. Flash Button
17. Review Button
18. LCD On/Off Button
19. Move to left (
20. LCD
LCD indications
1234
) Button
) Button
) Button
20
8
7
1.00X
2048X1536
78910
181920
11
12
13
14
15
16
17
5
GETTING STARTED
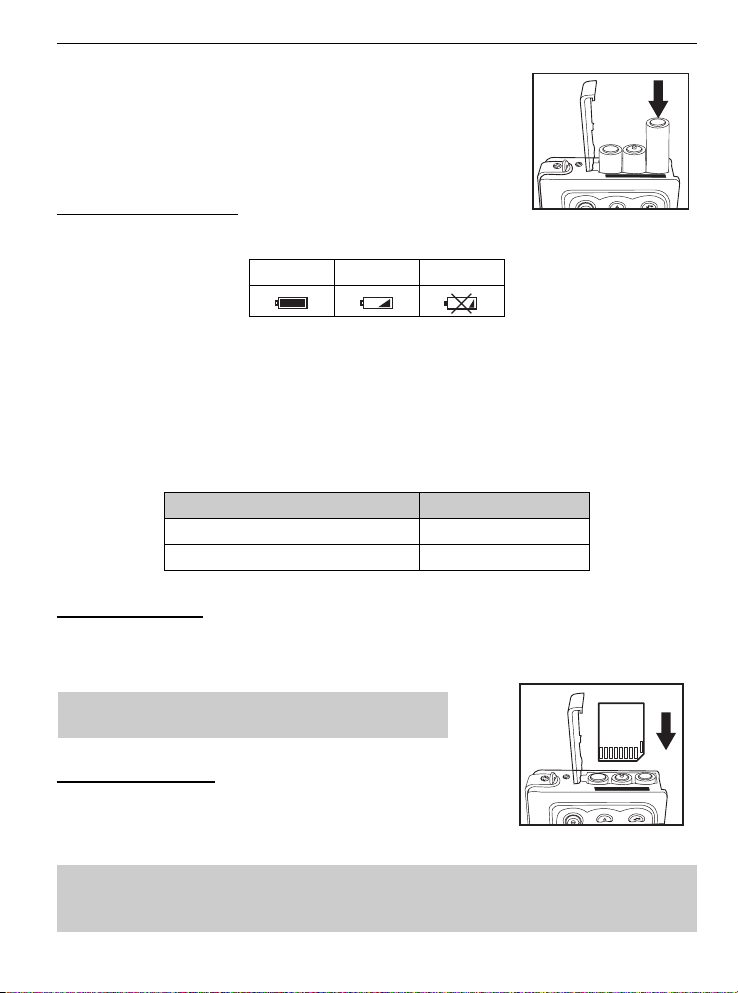
LOADING THE BATTERIES
The camera uses 3x AAA alkaline or rechargeable batteries.
1. Slide the Battery Door and lift it open.
2. Insert the batteries according to the polarity indication engraved on
the battery contact.
3. Close the battery compartment cover.
Checking the Battery Level
The battery level indicates the power of the batteries.
Full Low Empty
INSERTING AN SD CARD (OPTIONAL)
The camera is equipped with 32 MB of internal memory that can be used for storage as soon as
you start taking pictures or recording video clips. Besides, the camera can use a Secure Digital (SD)
memory card to store images and/or video clips. If no SD card is inserted in the camera, all pictures/
video clips recorded by the camera will be stored in the internal memory. When SD card is inserted in
the camera, all files recorded by the camera will be stored on the SD card.
Status Memory in Use
Memory card is not inserted. Internal Memory
Memory card is inserted. Memory Card
To insert the SD card:
Insert the memory card in the direction as shown in figure, then gently but firmly push the SD card into
the SD card slot as far as possible. When the card is fully engaged, a click can be heard.
Note: NEVER forcefully push the card into the camera
to avoid damaging both the card and/or the camera.
To remove the SD card:
Press the memory card into the slot then release. When the card
is partially ejected, pull it out.
Note : If the format of SD card is FAT32 or NTFS, the camera will format this SD card without
any warning and will change the format to FAT16 file format. Existing files or pictures on the card
will be deleted.
6
GETTING STARTED
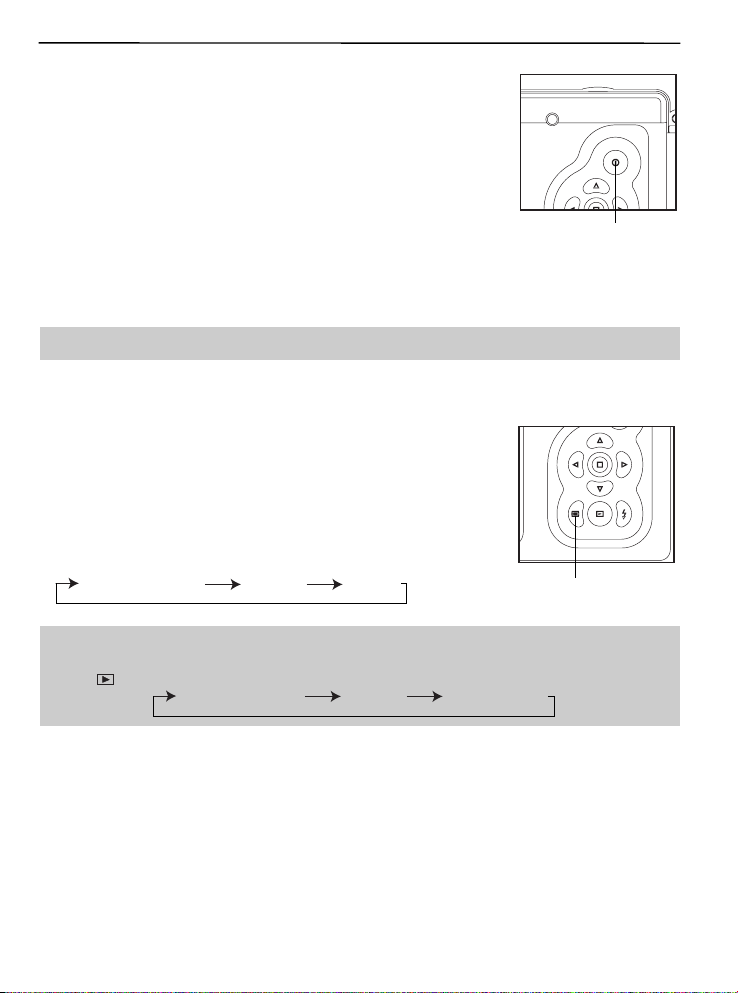
TURNING THE CAMERA ON OR OFF
Press and hold the Power button for a few second to turn the camera
on. The blue Flash Status LED will light up first, and then the LCD will
turn on automatically.
The camera will be turned on at the last set mode. Refer to page 8 to
switch the camera to desired mode.
Power button
The camera will automatically power off after being idled for around 30 seconds by default. To power
off the camera sooner, press and hold the Power button for a few seconds.
Note: Refer to page 14 to adjust auto power off timing.
TURNING THE LCD ON OR OFF
The camera has a 1.5” LCD which can frame subjects for image and
video clip capture, review stored images and video clips and to display
the current camera settings.
Press the LCD On/Off button to toggle the LCD mode. The LCD mode
changes each time the button is pressed.
LCD on with icons
Note:
• To save battery power, you may turn off the LCD display.
) Review Mode, the LCD changes as below when the LCD On/Off button is pressed
• In (
repeatedly: LCD on with icons
Icons off LCD off
Icons off Thumbnail view
LCD On/Off button
7
GETTING STARTED
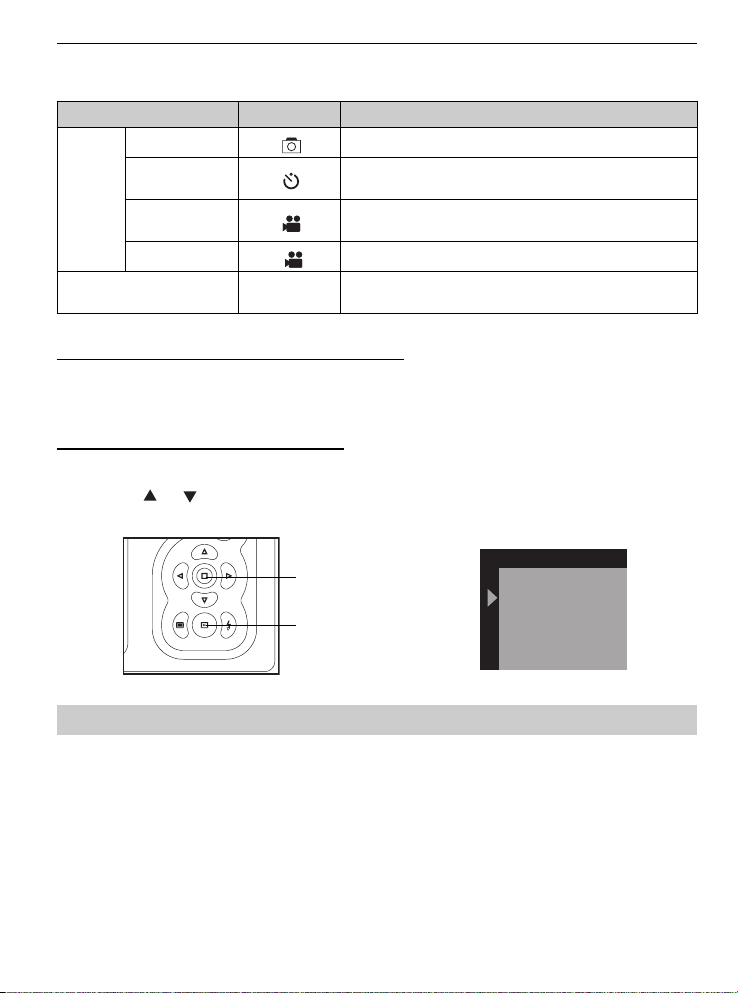
SETTING THE CAMERA’S OPERATIONAL MODE
The camera has four capture modes and a review mode:
Mode Icon Description
Single
Capture
mode
To switch between Capture mode and Review mode
When the camera is powered on, it is at either one of the above capturing modes or at review mode.
You may press the Review button to change the camera mode from capture mode to review mode or
vice versa.
To set the camera to desired capture mode
1. Power on the camera.
2. Press the Menu button.
3. Press the
4. Press the Menu button again to confirm. The icon of the selected mode will be shown on the LCD.
Self-Timer
Video 320x240
Video 192x144
Review mode --
or button to highlight Single, Self-Timer, Video 320x240 or Video 192x144.
Use this mode to take pictures.
Use this mode to take pictures where you want to be
included in the photograph
Use this mode to record video clips in 320x240
resolution.
To record video clips in 192x144 resolution.
Use this mode to playback the pictures and or video
clips.
Menu button
Review button
Note: The setting remains until you change it.
Capture
Cancel
Single
Self Timer
Video 320X240
Video 192X144
8
TAKING PICTURES AND VIDEO CLIPS
TAKING PICTURES AND VIDEO CLIPS
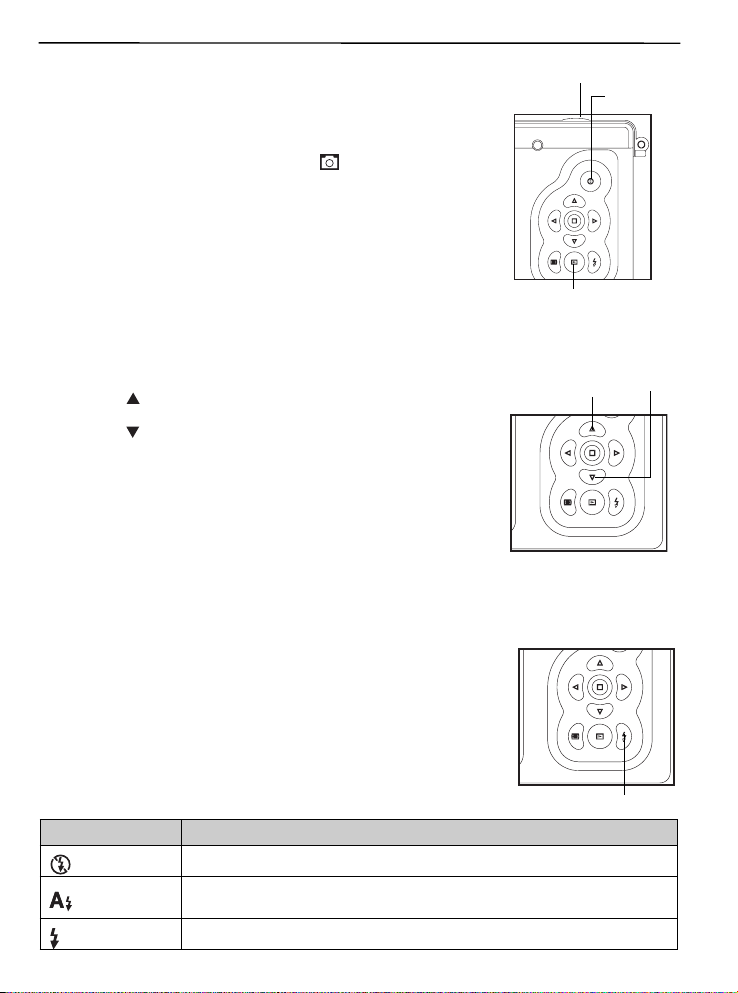
TAKING PICTURES
Shutter button
Power button
1. Power on the camera.
2. Set the camera to Single capture mode (
). (p. 8)
3. Frame your subject with the LCD or viewfinder.
• For better results, stand at least 1.5m away from the subject.
4. Hold the camera still and press the Shutter button to take the
picture.
Review button
USING THE DIGITAL ZOOM
The camera provides up to 4x digital zoom.
1. Press the
shown on the LCD.
2. Press the
button to zoom in. The digital zoom indicator will be
to zoom out or return to the normal mode.
Important:
1. Hold your camera steady when using Digital Zoom to prevent
blurred pictures, caused by jittery movement. It is recommended
to either place your camera on a steady surface or mount it on a
tripod.
2. The image quality may degrade slightly with Digital Zoom.
Zoom In
Zoom out
SETTING THE FLASH
By default, the flash is set at Off mode. When taking pictures at night, indoor, or outdoor in heavy
shadows, you may press the Flash button to turn the Flash on.
Press the Flash button repeatedly until the desired indicator appears
on the LCD.
• When the flash is under charging, the Flash icon on the LCD will
blink and the blue Flash Ready LED will light. When the flash is full
charged, the Flash Ready LED will turn off. Please wait until the
flash stops blinking before proceeding to take pictures.
Flash Mode Flash Fires
Off
Auto Flash
Fill Flash
In this mode, the flash will not fire, regardless of the lighting condition.
The camera judges if a flash is required. If the environment is too dark, the
flash will fire.
Flash will fire in any lighting condition.
Flash button
9
 Loading...