

Page 1
GETTING STARTED
C 3.0C
3 Megapixels Digital Camera
User’s Guide
User’s Guide
www.jenoptik-camera.com
1
Page 2

CONGRATULATIONS
Congratulations on the purchase of your new camera. Your camera has
been carefully engineered and manufactured to give you dependable
operation. Read this manual before operating the camera to become
more familiar with it.
This manual has been written and formatted with depth and detail so
that you can easily follow the instructions to maximize the features of
your camera.
1
Page 3

Table of Contents
GETTING STARTED
Package Contents ............................................................................................................................. 4
System Requirements ...................................................................................................................... 4
Camera Overview ............................................................................................................................ 5
Loading the Batteries ........................................................................................................................ 6
Inserting an SD Card ........................................................................................................................ 6
Turning the Camera On and Off ....................................................................................................... 7
Turning the LCD/Icons On and Off ................................................................................................... 7
Setting the Camera’s Operational Mode ........................................................................................... 8
TAKING PICTURES AND VIDEO CLIPS
Taking Pictures .................................................................................................................................. 9
Using the Digital Zoom ...................................................................................................................... 9
Setting the Flash ............................................................................................................................... 9
Taking Pictures with Self-Timer ......................................................................................................10
Setting Image Resolution ................................................................................................................ 10
Setting Image Quality ...................................................................................................................... 11
Setting Image Color ........................................................................................................................ 11
Setting Exposure Compensation ............................................................................................. 11
Setting White Balance ............................................................................................................. 12
Setting Image Sharpness ........................................................................................................12
Taking Video Clips .......................................................................................................................... 13
CUSTOMIZING YOUR CAMERA SETTINGS
Setting Auto Power Off .................................................................................................................... 14
Setting Date and Time .................................................................................................................... 14
Setting Anti-Flicker Frequency ........................................................................................................ 15
Setting Language ............................................................................................................................ 15
REVIEWING YOUR FILES
Viewing Files .................................................................................................................................. 16
Magnifying Pictures ....................................................................................................................... 16
Rotating the Pictures ....................................................................................................................... 16
Deleting Stored Files ...................................................................................................................... 17
Deleting One ........................................................................................................................... 17
Deleting All ............................................................................................................................... 17
Protecting Files .............................................................................................................................. 17
Formatting the SD Card ................................................................................................................. 17
CONNECTING TO PC
Installing Software ........................................................................................................................... 18
Downloading Pictures and Video Clips onto Your Computer ........................................................ 19
Unplugging Your Camera from the Computer ................................................................................ 20
2
Page 4

Using the Camera as A Web Camera ............................................................................................. 20
APPENDIX
Troubleshooting ............................................................................................................................. 21
Specifications .................................................................................................................................. 23
Getting Help .................................................................................................................................... 24
Safety Tips and Maintenance ......................................................................................................... 25
Regulatory Information .................................................................................................................... 27
3
Page 5
GETTING STARTED
GETTING STARTED
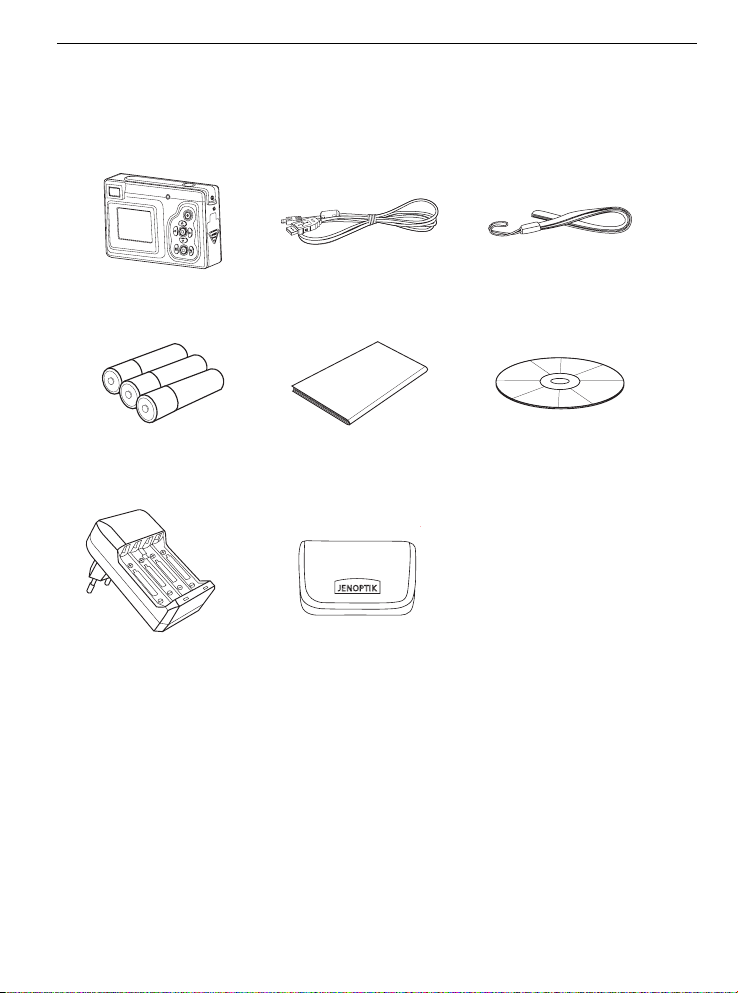
PACKAGE CONTENTS
Check if all of the items shown below are included .
Digital camera USB cable Wrist strap
3x AAA Batteries Quick Start guide CD-ROM (Includes
Camera Driver, Photo
editing software,
multi-lingual User’s
Guide etc.)
Battery charger (Optional) camera case
SYSTEM REQUIREMENTS
Windows:
• PC with processor better than MMX Pentium 400 MHz
• Windows XP/2000/ME/98SE
• Minimum 128 MB RAM
• 310MB of available hard disk space
• USB port
• CD-ROM driver
• 1024 x 768 monitor, 24-bit color (true color)
Specifications are subject to change without prior notice.
4
Page 6
GETTING STARTED
CAMERA OVERVIEW
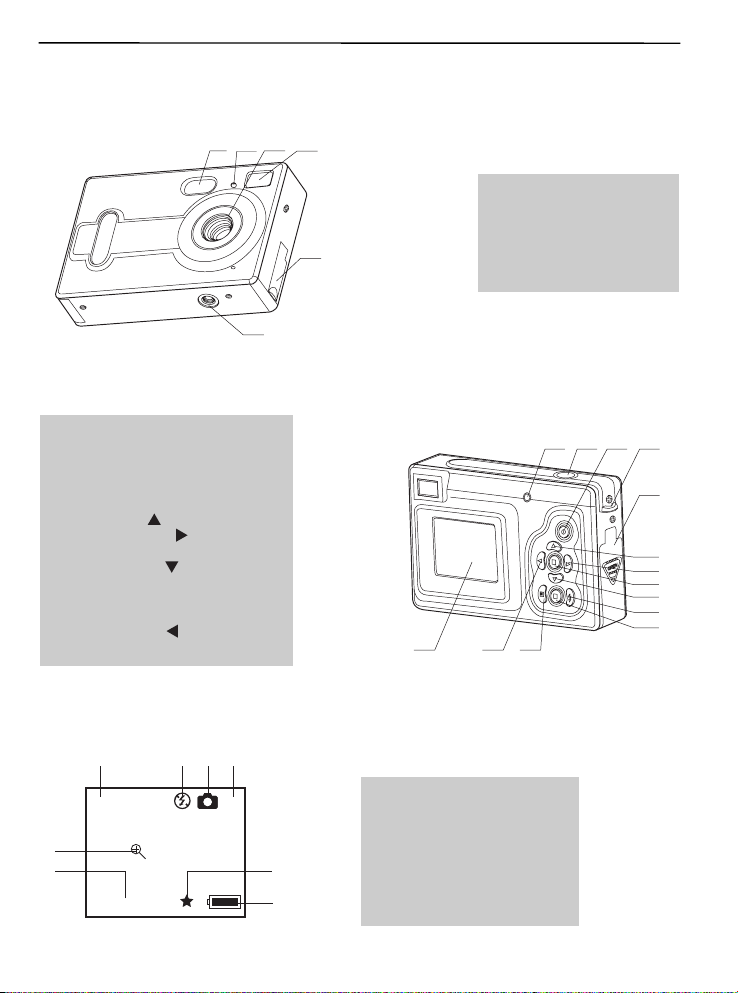
Front View
123
4
1. Flash
2. Self-Timer LED
3. Lens
5
4. Viewfinder
5. USB port
6. Tripoad Socket
) Button
C
6
1. Frame Counter
2. Flash
3. Camera Mode
4. Memory Card Loaded
5
6
5. Image Quality
6. Battery Level
7. Resolution
8. Zoom Indicator
Back View
7. Flash Ready LED
8. Shutter Button
9. Power Button
10.Wrist Strap Holder
11. Battery/Memory Card Door
12. Move up (
13. Move to right (
14. MENU Button
15. Move down (
16. Flash Button
17. Review Button
18. LCD On/Off Button
19. Move to left (
20. LCD
LCD indications
1234
) Button
) Button
) Button
20
8
7
1.00X
2048X1536
78910
181920
11
12
13
14
15
16
17
5
Page 7
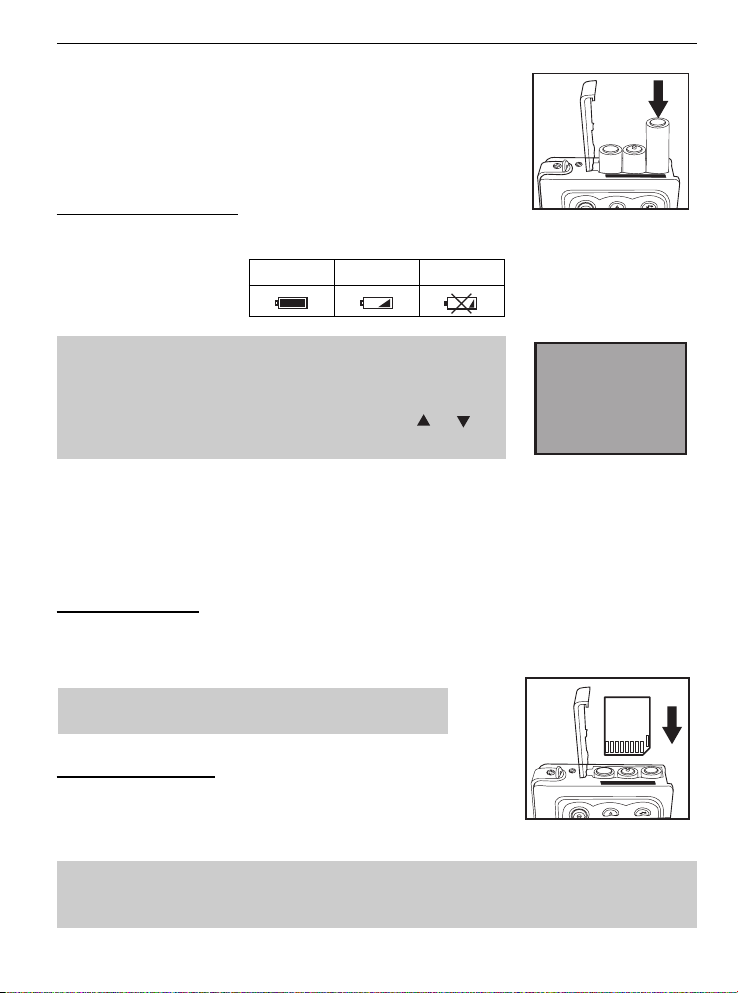
LOADING THE BATTERIES
The camera uses 3x AAA alkaline or rechargeable batteries.
1. Slide the Battery Door and lift it open.
2. Insert the batteries according to the polarity indication engraved on
the battery contact.
3. Close the battery compartment cover.
Checking the Battery Level
The battery level indicates the power of the batteries.
Full Low Empty
GETTING STARTED
Note: When batteries are low, the camera will ask you to input
battery type information. This is because the camera needs
to adjust its working voltage to meet the battery supply as
rechargeable batteries are usually 1.2V while alkaline batteries are
1.5V. Choose the correct battery type by pressing the
button first, and then pressing the Menu button.
or
1. Alkaline
2. Rechargeable
INSERTING AN SD CARD
The camera uses a Secure Digital (SD) memory card to store images and or video clips. Before
proceeding to shoot picture with the camera, you need to buy one SD card.
To insert an SD card:
Insert the memory card in the direction as shown in figure, then gently but firmly push the SD card into
the SD card slot as far as possible. When the card is fully engaged, a click can be heard.
Note: NEVER forcefully push the card into the camera
to avoid damaging both the card and/or the camera.
To remove the SD card:
Press the memory card into the slot then release. When the card is
partially ejected, pull it out.
Note : If the format of SD card is FAT32 or NTFS, the camera will format this SD card without
any warning and will change the format to FAT16 file format. Existing files or pictures on the card
will be deleted.
6
Page 8
GETTING STARTED
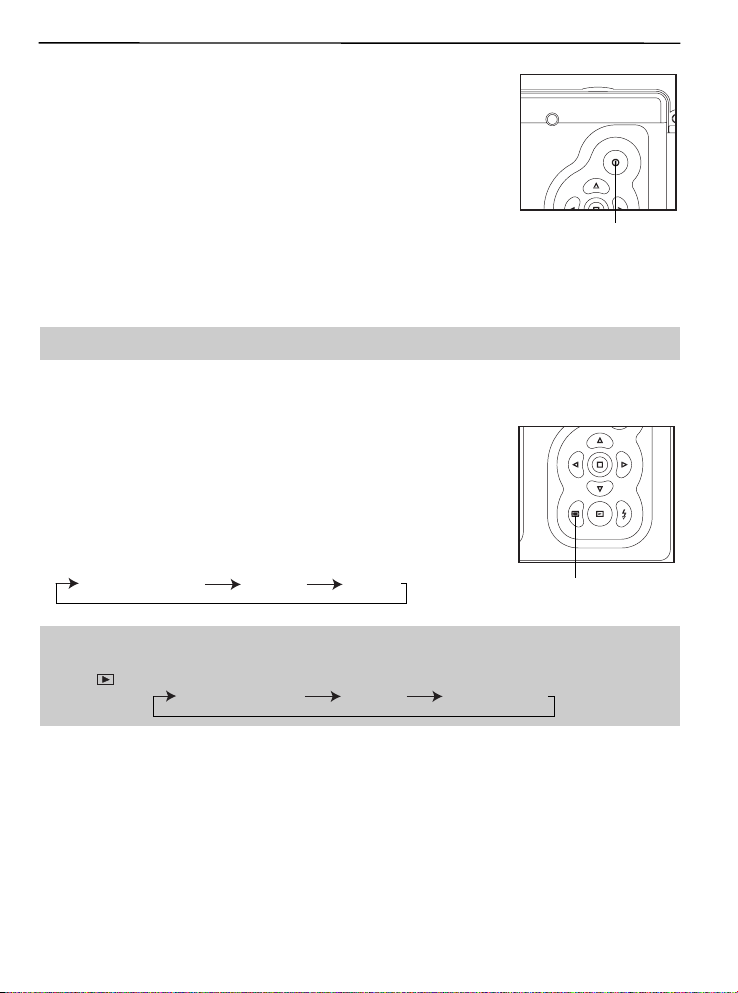
TURNING THE CAMERA ON OR OFF
Press and hold the Power button for a few second to turn the camera
on. The blue Flash Ready LED will light up first, and then the LCD will
turn on automatically.
The camera will be turned on at the last set mode. Refer to page 8 to
switch the camera to desired mode.
Power button
The camera will automatically power off after being idled for around 30 seconds by default. To power
off the camera sooner, press and hold the Power button for a few seconds.
Note: Refer to page 14 to adjust auto power off timing.
TURNING THE LCD ON OR OFF
The camera has a 1.4” LCD which can frame subjects for image and
video clip capture, review stored images and video clips and to display
the current camera settings.
Press the LCD On/Off button to toggle the LCD mode. The LCD mode
changes each time the button is pressed.
LCD on with icons
Note:
• To save battery power, you may turn off the LCD display.
) Review Mode, the LCD changes as below when the LCD On/Off button is pressed
• In (
repeatedly: LCD on with icons
Icons off LCD off
Icons off Thumbnail view
LCD On/Off button
7
Page 9
GETTING STARTED
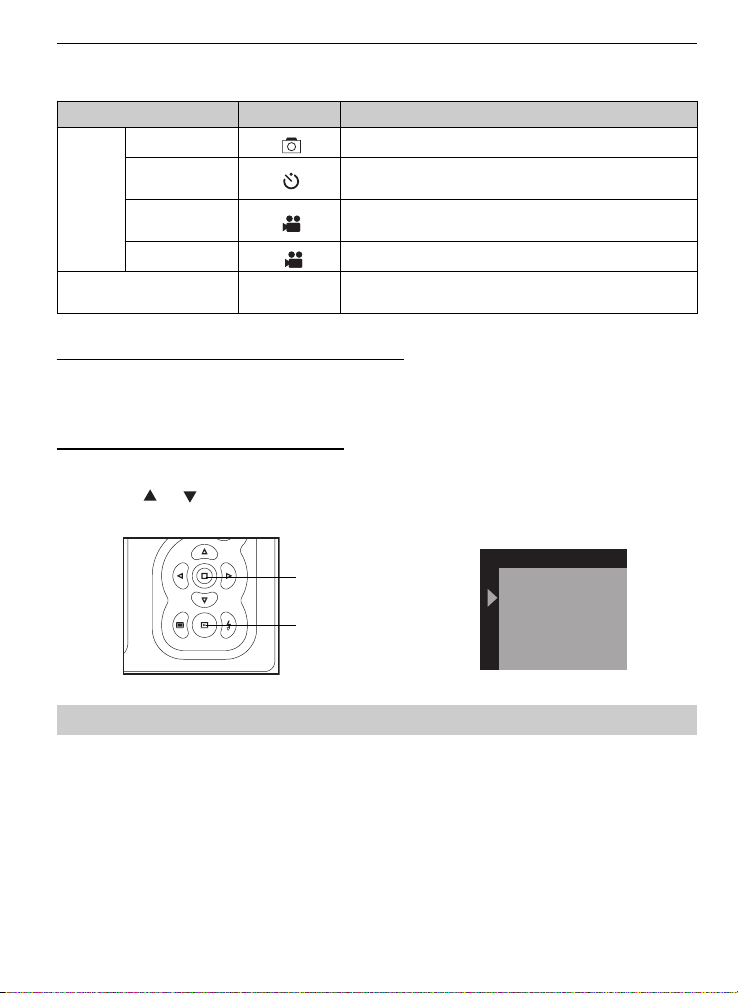
SETTING THE CAMERA’S OPERATIONAL MODE
The camera has four capture modes and a review mode:
Mode Icon Description
Single
Capture
mode
To switch between Capture mode and Review mode
When the camera is powered on, it is at either one of the above capturing modes or at review mode.
You may press the Review button to change the camera mode from capture mode to review mode or
vice versa.
To set the camera to desired capture mode
1. Power on the camera.
2. Press the Menu button.
3. Press the
4. Press the Menu button again to confirm. The icon of the selected mode will be shown on the LCD.
Self-Timer
Video 320x240
Video 192x144
Review mode --
or button to highlight Single, Self-Timer, Video 320x240 or Video 192x144.
Use this mode to take pictures.
Use this mode to take pictures where you want to be
included in the photograph
Use this mode to record video clips in 320x240
resolution.
To record video clips in 192x144 resolution.
Use this mode to playback the pictures and or video
clips.
Menu button
Review button
Note: The setting remains until you change it.
Capture
Cancel
Single
Self Timer
Video 320X240
Video 192X144
8
Page 10

TAKING PICTURES AND VIDEO CLIPS
TAKING PICTURES AND VIDEO CLIPS
TAKING PICTURES
1. Power on the camera.
2. Set the camera to Single capture mode (
3. Frame your subject with the LCD or viewfinder.
• For better results, stand at least 1.5m away from the subject.
4. Hold the camera still and press the Shutter button to take the
picture.
). (p. 8)
Shutter button
Power button
Review button
USING THE DIGITAL ZOOM
The camera provides up to 4x digital zoom.
1. Press the
shown on the LCD.
2. Press the
button to zoom in. The digital zoom indicator will be
to zoom out or return to the normal mode.
Important:
1. Hold your camera steady when using Digital Zoom to prevent blurred
pictures, caused by jittery movement. It is recommended to either
place your camera on a steady surface or mount it on a tripod.
2. The image quality may degrade slightly with Digital Zoom.
SETTING THE FLASH
By default, the flash is set at Off mode. When taking pictures at night,
indoor, or outdoor in heavy shadows, you may press the Flash button
to turn the Flash on.
Press the Flash button repeatedly until the desired indicator appears
on the LCD.
• When the flash is under charging, the blue Flash Ready LED will
light. When the flash is full charged, the Flash Ready LED will turn
off. Please wait until the flash stops blinking before proceeding to
take pictures.
Flash Mode Description
Off
Auto Flash
Fill Flash
In this mode, the flash will not fire, regardless of the lighting condition.
The camera judges if a flash is required. If the environment is too dark, the
flash will fire.
Flash will fire in any lighting condition.
Zoom In
Flash button
Zoom out
Note: The camera will remain at Flash Off mode when battery is low. If flash is needed, please
replace the batteries with fresh ones.
9
Page 11
TAKING PICTURES AND VIDEO CLIPS
TAKING PICTURES WITH SELF-TIMER
This function is useful for taking pictures where you want to be included in the photograph. Fix the
camera securely on a tripod or the flat surface for self-timer shooting.
1. Power on the camera.
2. Set the camera to Self-Timer capture mode (
3. Frame your subject with the LCD or viewfinder.
4. Press the Shutter button to activate the Self-Timer.
While the self-timer is functioning, the self -timer lamp on the front of the camera will blink. As
the time to take the picture is closer, the lamp blinks faster, normally for 7 seconds, fast for the
following 3 seconds, then the image will be captured.
To deactivate the Self-Timer, set the camera mode to other capture mode.
). (p.8)
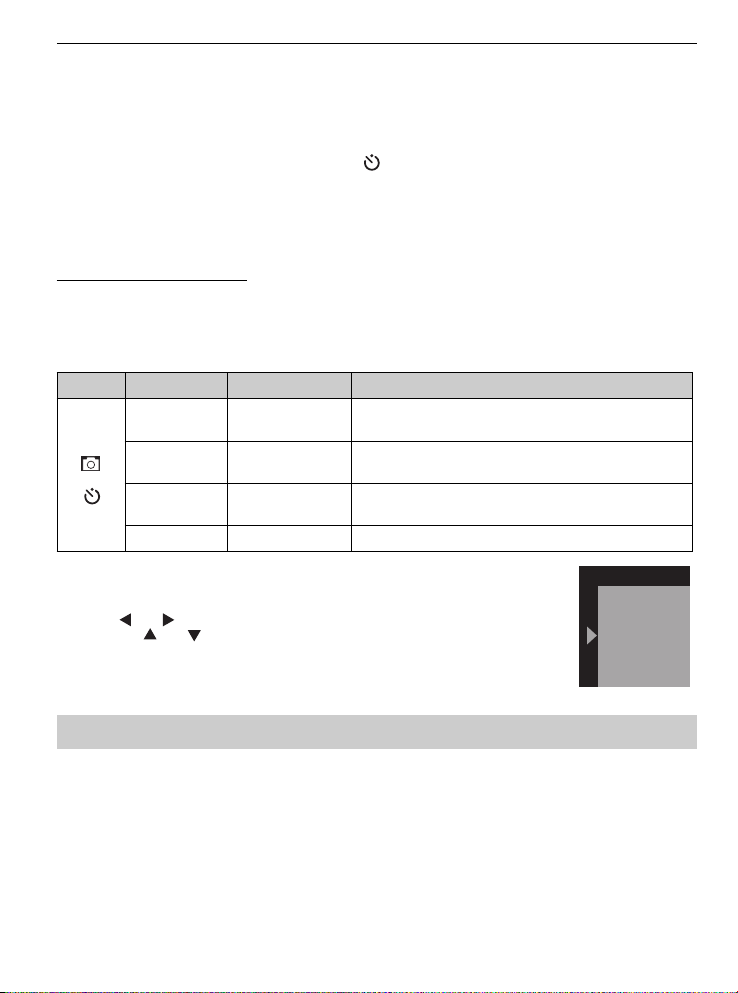
SETTING IMAGE RESOLUTION
The camera provides four image resolutions:
Mode Resolution Indicator Description
Super
or
1. Power on the camera.
2. Make sure the camera to set at Single capture mode. (p.8)
3. Press the Menu button.
4. Press
5. Press the
6. Press the Menu button again to confirm. The selected resolution will be
shown on the LCD.
High 2048 x 1536
Middle 1600 x 1200
Low 1280 x 1024 Even smaller picture size.
or button to highlight Resolution.
or button to highlight Super, High, Middle or Low.
2304 x 1728
(interpolated)
Large picture size: produces higher picture
resolution and larger file size.
Standard picture size: produces normal picture
resolution and moderate file size.
Small picture size: pictures are of lower resolution
and file size is small.
Resolution
Cancel
Super
High
Middle
Low
Note: The setting remains until you change it.
10
Page 12

TAKING PICTURES AND VIDEO CLIPS
SETTING IMAGE QUALITY
The camera provides two image quality settings:
Mode Quality Indicator Description
or
High
Standard
Can be used for printing images
Can be used for general purpose pictures.
1. Power on the camera.
2. Make sure the camera to set at Single capture mode. (p.8)
3. Press the Menu button.
4. Press
5. Press the
6. Press the Menu button again to confirm. The selected resolution will
Note: The setting remains until you change it.
or button to highlight Quality.
or button to highlight High, or Standard.
be shown on the LCD.
Quality
Cancel
High
Standard
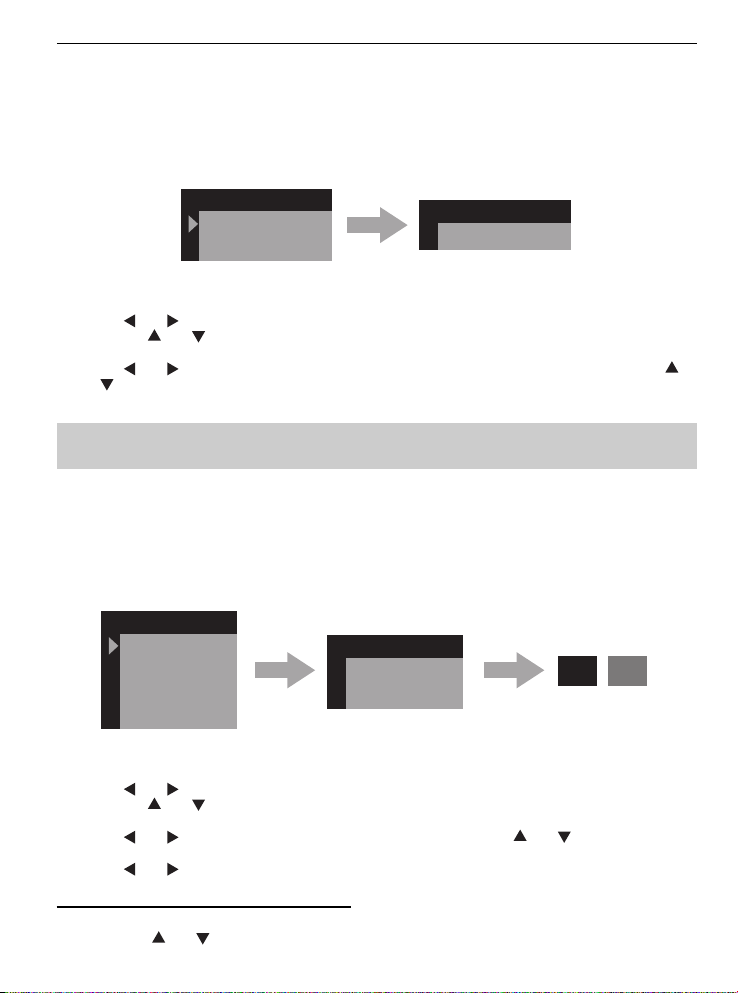
SETTING IMAGE COLOR
By default the camera uses Auto color setting to reproduce best colors under different lighting
conditions. However, you may change image Exposure, White Balance and Sharpness settings to suit
your purpose.
1. Power on the camera.
2. Make sure the camera to set at Single capture mode. (p.8)
3. Press the Menu button.
4. Press
Setting Exposure Compensation
Exposure compensation lets you change the exposure setting (EV value) manually to suit the lighting
condition of your subject. This feature helps to achieve better result when shooting a backlit subject, a
strongly lit subject indoors, or a subject that is against a dark background.
1. Press the
2. Press the
3. Press the Menu button again to confirm.
or button to highlight Color. Then,
submenu is shown on the LCD.
0.6, 0.9, 1.2, 1.5.
or button to highlight Exposure, then press Menu button. The EV setting
or button to select the desired EV setting: -1.5, -1.2, -0.9, -0.6, -0.3, 0.0, 0.3,
Color
Cancel
Auto
Exposure
EV
0.0
White balance
Sharpness
11
Page 13

TAKING PICTURES AND VIDEO CLIPS
Setting White Balance
When the white balance is set to match the light source, the camera can take picture more accurately.
Auto (Default)
Daylight Use when shooting outdoors in sunlight on a clear day.
Dusk Use when shooting outdoors at dusk.
Tungsten For shooting under tungsten lighting.
Fluorescent For shooting under fluorescent lighting.
Sunrise Use when shooting outdoors at sunrise.
The camera sets the white balance automatically according to shooting
conditions.
1. Press the
Balance submenu is shown on the LCD.
2. Press the
3. Press the Menu button again to confirm.
Setting Image Sharpness
You can select whether you want the image to have sharp or soft outlines.
Normal For shooting image without special sharpness processing.
Sharp For shooting image with distinct outline.
Soft For shooting image with soft outline.
1. Press the
submenu is shown on the LCD.
2. Press the
3. Press the Menu button again to confirm.
or button to highlight White Balance, then press Menu button. The White
or button to select the desired setting.
Color
Cancel
Auto
Exposure
White balance
Sharpness
or button to highlight Sharpness, then press Menu button. The Sharpness
or button to select the desired setting.
White balance
Daylight
Dusk
Tungsten
Fluorecent
Sunrise
Color
Cancel
Auto
Exposure
White balance
Sharpness
Normal
Sharp
Soft
Sharpness
12
Page 14

TAKING PICTURES AND VIDEO CLIPS
TAKING VIDEO CLIPS
The camera provides two video resolutions:
Icon Resolution Frame Rate (per second) Description
320 x 240 10 fps Suitable for both view and email.
1. Turn on the camera.
2. Set the camera to one of the two video capture modes ( ). (p.8)
3. Use the viewfinder or camera screen to frame your subject.
4. Press the Shutter button to start recording the video. The elapsed recording time is displayed.
5. Press the Shutter button again to stop recording. Otherwise the camera will keep recording until
the memory is full.
192 x 144 25 fps Best for e-mail.
Shutter button
Power button
Review button
13
Page 15
CUSTOMIZING YOUR CAMERA SETTINGS
CUSTOMIZING YOUR CAMERA SETTINGS
SETTING AUTO POWER OFF
By default the camera will be turned off automatically to save battery power after being idled for 30
seconds. However, you can set the auto-off timing freely.
Auto Power Off
Cancel
Set
1. Power on the camera.
2. Press the Menu button.
3. Press
4. Press the
submenu is shown on the LCD.
5. Press
or
6. When the time is set, press the Menu button to confirm.
Note: The maximum Auto-Power-Off timing is 59:59. However, it is recommended to set Auto-
Power-Off timing to 2 to 5 minutes to save batteries.
or button to highlight Auto Power Off.
or button to highlight Set, and then press the Menu button. The auto-power-off
or to highlight the field (minute or second field) to be changed, and then press
to set the value.
SETTING DATE AND TIME
You may set the Date and Time when you first use your camera or when the batteries are removed
The date and time information will be displayed when the pictures are reviewed if you selected
“Display” while setting date/time.
Date & Time
Cancel
Set
Display
Date & Time
2004 01 01
00:00:00
No Display
Auto Power Off
03:00
Ye s No
1. Power on the camera.
2. Press the Menu button.
3. Press
4. Press the
submenu is shown on the LCD.
5. Press
6. When the date and time is set, press the Menu button to enter its submenu.
7. Press
To display the date/time setting on pictures, please:
1. Follow steps 1-3 above.
2. Press the or button to highlight Display, and then press the Menu button.
or button to highlight Date & Time.
or button to highlight Set, and then press the Menu button. The Date/Time
or to highlight the field to be changed, and then press or to set the value.
or to select Yes and then press Menu button. The date and time is then set.
14
Page 16

CUSTOMIZING YOUR CAMERA SETTINGS
SETTING ANTI-FLICKER FREQUENCY
While taking pictures or recording video clips under indoor florescent lighting, the flicker of the light
source will decrease the image quality. To overcome this phenomenon, you can change the light
frequency setting to suit the light source.
50Hz (Default) Setting the flicker frequency to 50 Hz.
60Hz Setting the flicker frequency to 60 Hz.
1. Power on the camera.
2. Press the Menu button.
3. Press
4. Press the
5. Press the Menu button to confirm.
or button to highlight Frequency.
or button to highlight 50Hz or 60Hz.
SETTING LANGUAGE
The camera provides 10 languages’ LCD display. Select the language you
like by following steps below:
1. Power on the camera.
2. Press the Menu button.
3. Press
4. Press the
English (Default) Setting the language to English.
Français Setting the language to French.
Deutsch Setting the language to German.
Español Setting the language to Spanish.
Italiano Setting the language to Italian.
Nederlands Setting the language to Dutch.
Português Setting the language to Portuguese.
Čeština
Magyar Setting the language to Hungary.
5. Press the Menu button to confirm.
or button to highlight Language.
or button to highlight the desired language.
Setting the language to Czech.
Setting the language to Japanese.
Frequency
Cancel
50Hz
60Hz
Language
Cancel
English
Français
Deutsch
Español
15
Page 17
REVIEWING YOUR FILES
REVIEWING YOUR FILES
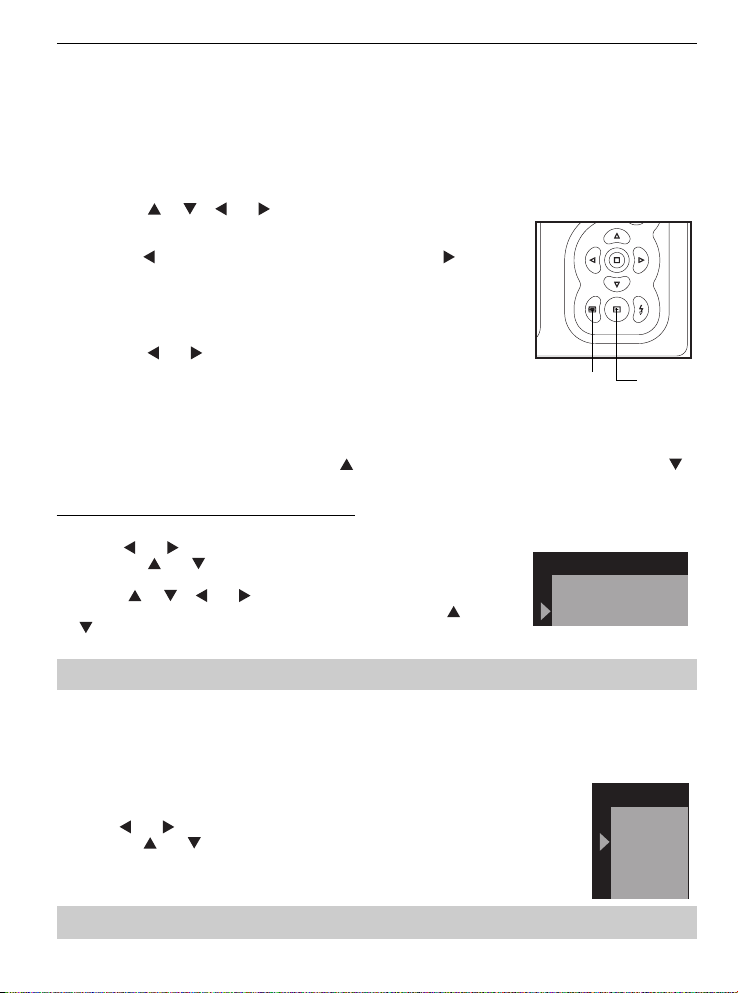
VIEWING FILES
1. Press the Review button to enter playback mode. The LCD will show the stored pictures and or
video clips in Thumbnail View mode by default. The last file will be highlighted with a yellow border.
The file type will be shown on the upper left corner of the LCD:
• JPG = Picture, AVI = Video Clip
2. Press the
3. Press the LCD On/Off button to view the selected picture in full
screen or to playback the selected video clips.
4. Press the
button to skip to the next file.
Note: When video clip is shown, the LCD will show Yes/No
option:
Press the
Menu button to confirm.
5. To switch to Thumbnail view again, press the LCD On/Off button.
MAGNIFYING PICTURES
While reviewing pictures, you can press the button to enlarge the picture and then press the
button to zoom out or return to the normal. The pictures can be enlarged up to 4 times.
To pan through the enlarged picture, please:
1. Press the Menu button.
2. Press
3. Press the
Menu button.
4. Press
5. To exit Pan mode, press the Menu button first, then press
button to select Exit Pan, and then press the Menu button.
, , or button to browse through the files.
button to skip to the previous file, press the
- Yes: To start playing the video clip
- No: Do not play the video clip.
or button to highlight Yes or No and then press
or button to highlight Zoom.
or button to highlight Pan, and then press the
, , or to navigate through the picture.
or
LCD On/
Off button
Review
button
ZOOM & PAN
Cancel
Pan
Note: Video clips cannot be enlarged.
ROTATING THE IMAGES
Stored images can be rotated for better review. The rotated images will not be saved.
1. When the picture to be rotated is shown on the LCD, press the Menu
button.
2. Press
3. Press the
Note: Video clips cannot be rotated.
or button to highlight Rotation.
or button to highlight 90, 180 or 270, and then press the
Menu button. The selected picture will be rotated in 90, 180 or 270 degree
clockwise.
16
Rotation
0
90
180
270
Page 18

REVIEWING YOUR FILES
DELETING STORED FILES
Note: Once file is deleted, it cannot be recovered.
Deleting One File
1. When the file to be deleted is shown on the LCD, press the Menu button.
2. Press
3. Press the
button. The file will be deleted in a few seconds.
Deleting All Files
1. Press the Menu button
2. Press
3. Press the
pictures and video clips will be deleted.
or button to highlight Erase.
or button to highlight One, and then press the Menu
or button to highlight Erase.
or button to highlight All, and then press the Menu button. All unprotected
Erase
Cancel
One
All
Format
Protect
PROTECTING FILES
To prevent important pictures or video clips being accidentally erased, you may lock the file by
following steps below:
1. Find out the file to be protected. (p. 16)
2. Press the Menu button.
3. Press
4. Press the
button. The selected file will be locked. A lock icon will be shown on the
upper left corner of the file.
5. Repeat steps 1-4 above to protect other files.
or button to highlight Erase.
or button to highlight Protect, and then press the Menu
Erase
Cancel
One
All
Format
Protect
FORMATTING THE SD CARD
Caution:
1. Formatting will delete all pictures and video clips from the memory.
2. During the formatting process, never remove the memory card or batteries, as it will damage
the card and/or the camera.
1. In Review mode, press the Menu button
2. Press
3. Press the
or button to highlight Erase.
or button to highlight Format, and then press the Menu
button. The SD card will be formatted in a few seconds. The LCD shows
“No File Exist”. Press the Review button to return to capture mode.
17
Erase
Cancel
One
All
Format
Protect
Page 19

CONNECTING TO PC
INSTALLING SOFTWARE (FOR WINDOWS USERS)
The software CD provided in your camera package contains the following items:
Installation Requirement
Option Function
Enables the camera to become an
Camera Drivers
External drive on your computer.
Enable the camera to be used as PC cam.
Enables you
• to playback and transfer the
Ulead Photo
Explorer 8.0SE
files(pictures and video clips) from
the camera to your computer;
• to enable video playback under
Windows 98SE and 2000;
• to use the camera as PC camera;
• to organize, edit and share photos etc.
Enables you to transform a series of
Ulead Cool 360
photos into a complete 360° panoramic
or wide-angle panoramic scene for an
immersive viewing experience.
Adobe Acrobat
Reader
Enables you to view the electronic
version of the User’s Guide.
Direct link to the electronic version of
User’s Guide
the User’s Guide in different languages.
(All User’s Guides are saved in PDF
format.)
Concord
Support
Website
Direct link to our camera support
website. Ensure that an internet
connection is established before
clicking on the link.
Windows
Required No need No need No need
Required Required Required Required
9 8 S E
Windows
2000
Required Optional
CONNECTING TO PC
WindowsMEWindows
Optional
Optional
---
---
XP
Step 1 Start up the computer, and close any other applications or
software you may be running.
Step 2 Insert the supplied CD-ROM into your computer’s CD-ROM Drive.
Step 3 Select the language. Click [OK].
NOTE: If the installer does not start automatically within 30
seconds after the CD-ROM has been inserted, click on “My
Computer” either on the Desktop or in the Start Menu and locate
the CD-ROM Drive. Double click on the CD-ROM Drive icon for
installation and proceed to Step 4.
18
Page 20

CONNECTING TO PC
Step 4 When the splash screen appears, click the software you want to install to start installing the
software.
Step 5 Follow the on-screen instructions to complete the installation.
Note: To ensure the smooth running of the software just installed, please reboot your computer
even if the computer did not remind you to restart.
DOWNLOADING FILES TO YOUR COMPUTER
Note for Win 98SE user: You must install the driver before proceeding to download files.
1. Plug the larger end of the supplied USB cable into your PC’s USB port.
2. Power on the camera, press the Review mode button to set the camera to Review mode.
3. Plug the smaller end of the USB cable into the USB port of the camera. The camera LCD shows
MSDC.
Note: If it is the first time to connect the camera with your computer, the computer will take a few
seconds to recognize the camera. Please wait until it is completed and then proceed to the next step.
4. Double-click on My Computer.
5. Double-click Removable Disk.
6. Double-click DCIM.
7. Double-click the folder that contains the desired images
to view.
• The stored pictures (JPG) and video clips (AVI) stored
in the memory will be displayed
• To play back the video clips, double click on the
desired video file. For Windows 98SE and 2000,
the movie playback is required for the installation
of Ulead Photo Explorer 8.0 SE Basic which is
bundled with the supplied CD-ROM.
8. Click and drag the files into a directory in your computer
to save them.
• To select all files, click Edit > Select all.
Note: You may also transfer the stored pictures and video clips on your memory card onto your
computer by using a memory card reader (sold separately.)
19
Page 21

UNPLUGGING YOUR CAMERA FROM THE COMPUTER
CONNECTING TO PC
Windows 98SE:
fig.1.1
Unplug the Mini-USB from the camera directly.
Windows ME/2000/XP:
1. Turn the camera off.
2. Click once on the “Unplug or Eject Hardware” icon on the right
hand side of your task bar. (fig. 1.1)
3. Select “Stop USB Mass Storage Device”
4. Click [OK] in the “Safe to Remove Hardware” prompt.
5. Unplug the Mini-USB from the camera. (fig. 1.2)
fig.1.2
USING THE CAMERA AS A WEB CAMERA (FOR WINDOWS ONLY)
Note: You must install the camera driver before using the camera as web cam.
1. Install the camera’s driver (p.18)
2. Plug the larger end of the supplied USB cable into your PC’s USB port.
3. Power on the camera and press the Review mode button to set the camera to Capture mode.
4. Plug the smaller end of the USB cable into the USB port of the camera. The camera LCD shows
PC Camera.
5. Launch the web cam software. For example, you may use the Ulead Photo Explorer 8 bundled in
the supplied CD-ROM to capture live view video by following steps below:
1) Launch the program by clicking Start>Program>Ulead Photo Explorer 8.0 Basic.
2) Click on the capture video icon (
below will appear:
3) Click on Setup to adjust the settings.
4) Click on the red Record button (
video.
) or click Video> Capture Video. A separate window as
) to start record live
20
Page 22

APPENDIX
APPENDIX
TROUBLE SHOOTING
Problem Possible Cause Possible Solution
Camera
Press the Power button to turn the camera
on.
The correct direction to insert the AAA
batteries is indicated on the camera.
Replace with unused alkaline or fully
recharged batteries (three AAA-size
batteries).
Close the cover correctly and securely.
Turn the LCD on, by pressing the LCD On/
Off button repeatedly until the LCD is on.
Set the camera to correct mode. (p.8)
• Obtain a new SD card and insert it.
• Download images to your computer, and
then delete them to free up more space.
• Delete unwanted files.
• Format the SD card with the camera.
• Ask SD card manufacturer for
assistance.
• Use Fill flash during night time.
• Use Auto flash during daytime.
• Adjust the exposure setting. (p.11)
• When shooting picture with flash,
always keep the distance between the
camera lens and the subjects no less
than 1.5m but no more than 2.5m.
Replace the batteries with new ones.
The camera is not
running.
The LCD is not
displaying anything.
Picture/Video clip
Cannot take a picture or
a video clip.
Picture is too dark.
The power is not on.
The batteries were not
loaded properly.
Batteries are depleted.
The battery cover is not
closed properly.
LCD is turned off.
The battery level is low. Replace the batteries.
The camera is in correct
mode.
The flash is charging. Wait until the flash finishes charging. (p.9)
The SD card memory is
already full.
The SD card is not
formatted correctly.
No enough light, while the
flash is at Off mode.
The batteries are too low
to fire flash.
21
Page 23

The pictures are blurred.
Picture is blurred when
looking through the
viewfinder.
Part of the picture/ video
clip is missing.
There is something
wrong with the color of
the photographs.
The pictures show on
the LCD very slowly.
SD card
Cannot take a picture or
a video clip when using
an SD memory card.
The camera does not
recognize your SD card.
Downloading
The computer cannot
download files from the
camera.
Hands were not steady
when taking the picture.
Ensure hands are steady when taking
picture and remain steady one second
after clicking the Shutter button.
The lens is dirty. Clean the lens.
The picture subject was
not in the focus range of
the camera.
Keep a minimum distance of 1.5m (5ft.)
between the picture subject and the
camera lens to stay in the focus range of
the camera.
Clean the viewfinder with a soft cloth
Viewfinder is dirty.
or cotton swab. See the Camera
maintenance section.
Something was blocking
the lens when taking the
picture.
The picture was not
centered correctly in the
viewfinder.
White balance is not
properly.
The picture size is large.
The SD card is locked or
write protected.
The card may not be SD
certified.
The card may be
corrupted. Reformat the
card.
No card is inserted in the
camera.
Keep hands, fingers, etc. away from the
lens when taking a picture.
Leave space around the subject when
centering the picture in the viewfinder.
Reset the white balance feature to Auto, or
for the specific lighting in the surrounding
area.
Select a smaller picture size, M picture
size recommended.
Remove the SD card from the card slot
and slide the lock switch to off.
Purchase a certified SD card.
Caution: Formatting erases all pictures on
the card. (See P.17)
Insert a card into the card slot. (See P. 6)
Camera power is off. Turn on the camera.
USB cable is not securely
connected.
The camera driver isn’t
installed.
The camera isn’t at Review
mode.
Connect cable to camera and computer
port.
Windows 98SE user must install the
camera driver first before proceeding to
transferring files. (p.18)
Set the camera to Review mode. (p.8)
APPENDIX
22
Page 24

APPENDIX
SPECIFICATION
Image Sensor CMOS Sensor, 3 Mega pixel, 4 Mega pixel by interpolation
Lens Specification F 2.8, f = 8.35 mm, 2G2P
Shutter Speed Electronic shutter 1/5000-1/5Sec.
Focus Range 1.5m to Infinity
Flash Range 1.0m to 1.5m
Flash Strobe Auto, Flash On, Flash Off
White Balance Auto / Daylight / Dusk / Tungsten / Fluorescent /Sunrise
Exposure Control Auto / Manual (-1.5EV ~ +1.5EV)
Self-Timer 10 Seconds
Resolution
Compression JPEG / MJPEG (AVI)
Zoom 4x Digital Zoom
Display 1.4” color STN
PC Interface USB 1.1
Storage Type SD Card Slot (Card Not Included)
Power AAA Batteries x 3
Operating System Microsoft Windows 98SE / 2000 / ME / XP
Bundled Software Ulead Photo Explorer 8.0 SE and COOL 360
Image capture: Super (2304x1728), High(2048x1536), Medium
(1600x1200), Low (1280x1024)
Video recording: QVGA (320x240), QCIF (192x144)
• Specifications are subject to change without prior notice.
23
Page 25

APPENDIX
GETTING HELP
You can get help from the troubleshooting section, FAQ or Customer Support on our website.
Troubleshooting Section in this User’s Guide
Please refer to the Troubleshooting section first, as it contains some of the most common problems
that users encounter.
Website FAQ
Please visit our website at www.jenoptik-camera.com to view the Frequently Asked Questions (FAQ).
Website Customer Support
If the problem you are encountering is not listed in the FAQ section, please send us an email through
our web site by clicking on Contact Us.
If you have questions concerning the operation of the camera or software installation, please have the
following information ready before you contact us:
Camera Information: Computer Information:
Name of camera model: Operation System:
Camera Serial Number: Computer Maker and Model:
Exact Error Message Received:
24
Page 26

APPENDIX
SAFETY TIPS AND MAINTENANCE
Cleaning the camera body
Please use a soft dry cloth to clean the camera.
Cleaning the lens and LCD
1. Blow off dirt or dust with a blower or canned air.
2. Gently wipe the lens and/or LCD with a micro-fiber cloth.
3. To remove dirt or residue, moisten the cloth with lens cleaning fluid and gently wipe the lens and/
or LCD.
CAUTION: Do not apply the fluid directly onto the lens or LCD.
Cleaning the battery contacts
As a matter of routine operation and handling, should any debris or foreign contaminant deposit itself
on the battery contacts in the camera and/or on the batteries, follow steps below to clean the battery
contacts to ensure proper electrical operation:
1. Wet the tip of a cotton bud/swab with rubbing alcohol and squeeze the excess alcohol from the
bud/swab.
2. Wipe the battery contacts inside the camera battery compartment and both ends of the batteries
lightly with the damp bud.
3. Allow the contacts to dry before placing batteries in the camera.
Caution:
1) Do not press hard during cleaning, as this will cause damage to the battery contacts.
2) Do not use water to clean the contacts, as this will increase the chance of oxidation.
3) Do not use Acetone or Nail Polish remover to clean the contacts as this may adversely affect
camera operation.
SAFETY TIPS
Precautions for the camera
• Do not attempt to modify this camera in any way. This may cause a fire, electric shock or severe
damage to the camera.
• Do not use the flash in close proximity to people or animals.
• When taking photographs, never point the lens of the camera directly into very strong light.
• Please do not use this product in close proximity to flammable or explosive gases as this could
increase the risk of explosion.
• For safety reasons keep this product and accessories out of reach of children or animals to prevent
accidents.
• Do not swallow batteries or small camera accessories.
• Keep the camera away from water and other liquids, and never let it get wet. Do not use outdoors
when it is raining or snowing.
• Should any form of liquid enter the camera, do not use it. Switch the camera off, and then remove
the batteries. Do not continue to use the camera as this may cause a fire or electric shock.
• Do not insert or drop metallic or inflammable foreign objects into the camera through access points
e.g. card slot and battery chamber. This may cause a fire or electric shock.
• Do not operate this camera with wet hands. This could pose a risk of electric shock.
• Under the environment with electrostatic discharge, the camera may malfunction and require the
user to reset the camera.
• Under the environment with electrical fast transients (EFT), the camera may lose function and
require user to reset the camera.
• Shielded cables must be used with this unit to ensure compliance with the Class B FCC limits.
• Please avoid using the camera in high or low temperature. Operation temperature range 32°F 104°F (0°C - 40°C).
25
Page 27

APPENDIX
• It is normal that the temperature of the camera body rises after being in use for a long period.
• Do not leave this camera in places subject to extremely high temperatures such as in a sealed
vehicle, direct sunlight or other places with extreme variances in temperature. Exposure to extreme
temperatures may adversely affect the camera’s internal components and could cause a fire.
• Always use the camera and its accessories in a well-ventilated area.
• Allowing dust to accumulate in the camera over a long period of time is hazardous and in extreme
circumstances may cause a fire. It is best to clean your camera prior to seasonal periods of high
humidity.
Precautions for batteries
• Dispose of the battery in a manner that complies with applicable laws.
• Leakage, overheating, or burst battery could result in fire or injury.
• Do not short circuit, heat or dispose of batteries in fire.
• Ensure the battery is positioned correctly with regard to polarity.
• Battery may lose power if kept inside the camera for a long time without using. Please remove the
battery while the camera is not in use.
• Batteries may not work normally under 32°F (0°C).
Precautions for SD Memory Cards
• In the event of malfunction or damage, it is possible that data may be lost. Concord Camera is not
responsible in any way for such data loss.
• Do not touch the terminals with hands or metal objects.
• Keep dust, water and foreign objects away from the terminal section.
• Avoid heat, liquid and direct sunlight when using and for when storing.
• Do not open the battery/card cover or remove the SD Memory Card while data is being read or
written.
• Do not dismantle or modify.
• The recorded data may be lost if the card is affected by strong static electricity, electrical shock,
during card repair or malfunction.
• When using SD Memory Cards do not change the attributes (read-only, etc.) of the files (pictures
(JPEG) or video clips (AVI) on the card. Doing so may prevent the camera from working properly
when deleting, etc.
• Do not change the file names or the directory name of the pictures or video clips using a computer
or save files other than pictures or video clips taken by this camera onto the SD memory card.
Pictures or video clips that have been edited or added to the SD memory card with the computer
may not play back and it may cause the camera to malfunction.
• The SD Memory Card includes a write-protect switch. Sliding this switch downward prevents data
from being written to the card and pictures and video clips saved on the card are protected.
• Please note that pictures and video clips cannot be taken or deleted when the write-protect switch
is on.
• When using a large-capacity card, writing, reading and deleting may take some time.
• Do not store the card in places with high humidity, dusty places or where static electricity or
electromagnetic fields are likely to occur.
• Images stored in the memory card may be ruined or damaged if you turn off the camera while it is
in process of reading, writing or formatting etc.
• SD cards are delicate electronic devices. Please do not bend or drop them
• Please do not place the SD card in or near to an environment of strong electronic or magnetic
fields such as loud speakers or TV receivers.
• Please keep the SD card in its bag or case when not in use.
• It’s normal that the SD card is warm after use.
• Please make sure you switch off the camera before you remove the SD card.
• Do not open the battery/memory card door or remove the SD Memory Card while the camera is
reading, writing or formatting the card.
26
Page 28

APPENDIX
REGULATORY INFORMATION
FCC INFORMATION
FCC WARNING: This equipment meets the limits for a Class B digital device, pursuant to Part 15
of FCC rules. Only the cable supplied with the camera should be used. Operation with other cables
is likely to result in interference to radio and TV reception and could void the user’s authorization to
operate this equipment. This device complies with Part 15 of the FCC Rules. Operation is subject to
the following two conditions:
• This device may not cause harmful interference.
• This device must accept any interference received, including interference that may cause undesired
operation.
Tested to comply
with FCC standards
for HOME OR OFFICE USE
Changes or modifications not expressly approved by the manufacturer may void the user’s authority to
operate this equipment.
USER INFORMATION
NOTE: This equipment has been tested and found to comply with the limits for a class B digital device,
pursuant to Part 15 of the FCC Rules. These limits are designed to provide reasonable protection
against harmful interference in a residential installation. This equipment generates uses and can
radiate radio frequency energy and, if not installed and used in accordance with the instructions, may
cause harmful interference to radio communications. However, there is no guarantee that interference
will not occur in a particular installation.
If this equipment does cause harmful interference to radio or television reception, which can
be determined by turning the equipment on and off, the user is encouraged to try to correct the
interference by one or more of the following measures:
• Reorient or relocate the receiving antenna.
• Increase the separation between the equipment and receiver.
• Connect the equipment into an outlet on a circuit different from that to which the receiver is
connected.
• Consult the dealer or an experienced radio/TV technician for help.
- This product is in conformity with Directive 89/336/EEC.
27
Page 29

APPENDIX
DISPOSAL OF ELECTRIC AND ELECTRONIC EQUIPMENT IN PRIVATE HOUSEHOLDS
Disposal of used Electrical & Electronic Equipment (Applicable in the European Union
and other European countries with separate collection systems)
This symbol on the product, or in the in the manual and in the warranty, and/or on its packaging
indicates that this product shall not be treated as household waste.
Instead it shall be handed over to the applicable collection point for the recycling of electrical and
electronic equipment.
By ensuring this product is disposed of correctly, you will help prevent potential negative consequences
for the environment and human health, which could otherwise be caused by inappropriate waste
handling of this product.
If your equipment contains easy removable batteries or accumulators please dispose these separately
according to your local requirements.
The recycling of materials will help to conserve natural resources. For more detailed information about
recycling of this product, please contact your local city offi ce, your household waste disposal service
or the shop where you have purchased the product.
The Jenoptik trademark is used by Concord Camera Corp. and its subsidiaries under license. Concord and the Concord
logo are registered trademarks or trademarks of Concord Camera Corp., in the United States and/or other countries.
Microsoft and Windows are either registered trademarks or trademarks of Microsoft Corporation in the United States
and/or other countries. All other brands and product names are either registered trademarks or trademarks of their
respective owners.
28
Page 30

Visit Concord on the Internet
www.jenoptik-camera.com
JDC 3.0C User’s Guide
Copyright 2006 Concord Camera Corp.
29
Version 1.0
586104-00
R1
 Loading...