

Page 1
6.0z3 EasySho
t
User’s Guide
User’s Guide
www.jenoptik-camera.com
Page 2

ENGLISH
Table of Contents
GETTING STARTED ............................................................................................................3
STANDARD ACCESSORIES ............................................................................................................ 3
Attaching the Wrist Strap ........................................................................................................... 3
Using the Soft Case ................................................................................................................... 4
NAMES OF PARTS ........................................................................................................................... 4
INSERTING THE BATTERIES .......................................................................................................... 5
Low Battery Indicator ................................................................................................................. 5
INSERTING A MEMORY CARD ....................................................................................................... 5
About Camera Memory .............................................................................................................. 6
DCF Protocol ............................................................................................................................. 6
SETTING THE DATE AND TIME ......................................................................................................6
BASIC OPERATIONS ..........................................................................................................7
TURNING THE POWER ON AND OFF ............................................................................................ 7
Power Saving Function .............................................................................................................. 7
SWITCHING BETWEEN RECORD AND PLAYBACK ...................................................................... 7
In Record mode ......................................................................................................................... 7
In Playback mode ...................................................................................................................... 7
USING THE MENUS ........................................................................................................................ 8
Recording Menu / Playback Menu ............................................................................................. 8
ADJ. Menu ................................................................................................................................. 9
Setup Menu ............................................................................................................................... 9
USING THE LCD MONITOR ..........................................................................................................10
LCD Screen Indicator .............................................................................................................. 10
Switching the Screen Display .................................................................................................. 10
RECORDING ...................................................................................................................... 11
RECORDING STILL IMAGES ......................................................................................................... 11
Using the Zoom Function ........................................................................................................11
Using the Flash ........................................................................................................................ 12
Using the Self-timer & Burst .................................................................................................... 12
Using the Macro mode ............................................................................................................ 13
RECORDING MOVIE CLIPS ..........................................................................................................14
VOICES RECORDING .................................................................................................................... 14
SETTING THE RECORDING FUNCTIONS ................................................................................... 14
Using the Scene Mode ............................................................................................................ 14
Setting the Resolution and Quality .......................................................................................... 15
Setting the Movie Size ............................................................................................................. 16
Setting the White Balance ....................................................................................................... 16
Setting the ISO ........................................................................................................................ 16
Setting the Exposure ............................................................................................................... 17
Setting the Metering ................................................................................................................. 17
Setting the Sharpness ............................................................................................................. 17
Setting the Photo Effect ........................................................................................................... 17
Setting Date Stamp .................................................................................................................. 17
PLAYBACK ........................................................................................................................18
PLAYING BACK IMAGES ............................................................................................................... 18
Using the Thumbnail ................................................................................................................ 18
1
Page 3

Magnifying & Trimming Still Images ........................................................................................ 18
Playing Back Movie Clips ........................................................................................................ 18
PLAYING BACK SOUNDS ............................................................................................................. 19
Recording a Voice Memo ........................................................................................................ 19
Playing Back a Voice Memo .................................................................................................... 19
DELETING FILES ........................................................................................................................... 19
Deleting a Single File ............................................................................................................... 19
Deleting All Files ......................................................................................................................20
Protecting Files ........................................................................................................................ 20
EDITING IMAGES ........................................................................................................................... 21
Rotating Still Images ................................................................................................................ 21
Changing the Image Size ........................................................................................................21
Setting Photo Effect ................................................................................................................. 21
SETTING THE DPOF ..................................................................................................................... 22
PLAYING A SLIDE SHOW .............................................................................................................. 23
COPYING THE FILES .................................................................................................................... 23
ADVANCE SETTINGS .......................................................................................................23
ADJUSTING SOUNDS ................................................................................................................... 23
SETTING AUTO REVIEW .............................................................................................................. 24
SETTING THE POWER SAVE ....................................................................................................... 24
SETTING THE LANGUAGE ...........................................................................................................24
RESETTING THE FILE NUMBERS ................................................................................................ 24
About the Folder & File Name ................................................................................................. 24
File Naming .............................................................................................................................. 25
SETTING THE TV OUT .................................................................................................................. 25
SETTING USB PORT ..................................................................................................................... 25
CHOOSING A STARTUP IMAGE ...................................................................................................25
FORMATTING THE MEMORY ....................................................................................................... 26
RESETTING TO DEFAULT SETTINGS .......................................................................................... 26
MAKING CONNECTIONS .................................................................................................26
CONNECTING THE CAMERA TO A TV ......................................................................................... 26
CONNECTING THE CAMERA TO A PC ........................................................................................27
Using the Card Reader ............................................................................................................ 27
Connecting the Camera to a Computer with a USB Cable ..................................................... 27
PRINGTING PICTURES DIRECTLY ..................................................................................28
SOFTWARE INSTALLATION ............................................................................................29
SYSTEM REQUIREMENTS ...........................................................................................................29
USING THE INSTALLER SPLASH SCREEN ................................................................................. 29
INSTALLING YOUR CAMERA DRIVER ......................................................................................... 30
INSTALLING DIRECTX 9 ............................................................................................................... 31
INSTALLING ARCSOFT PHOTOIMPRESSION ............................................................................ 33
INSTALLING ADOBE ACROBAT READER .................................................................................... 35
USING ARCSOFT PHOTOIMPRESSION (WINDOWS ONLY) ...................................................... 38
APPENDIX .........................................................................................................................39
TROUBLESHOOTING .................................................................................................................... 39
SPECIFICATIONS ..........................................................................................................................40
GETTING HELP .............................................................................................................................. 41
SAFETY TIPS AND MANITENANCE ............................................................................................. 42
REGULATORY INFORMATION ...................................................................................................... 44
2
Page 4

GETTING STARTED
GETTING STARTED
STANDARD ACCESSORIES
Camera USB Cable Video out Cable
Soft Case Strap 2 x AA Batteries
Software Installation CD-ROM Quick Start Guide
Attaching the Wrist Strap
Attach the wrist strap to your camera as shown.
Note: Do not swing the camera when carrying by the wrist strap.
3
Page 5
Using the Soft Case
When not using the digital camera, keep it in the soft case for protection.
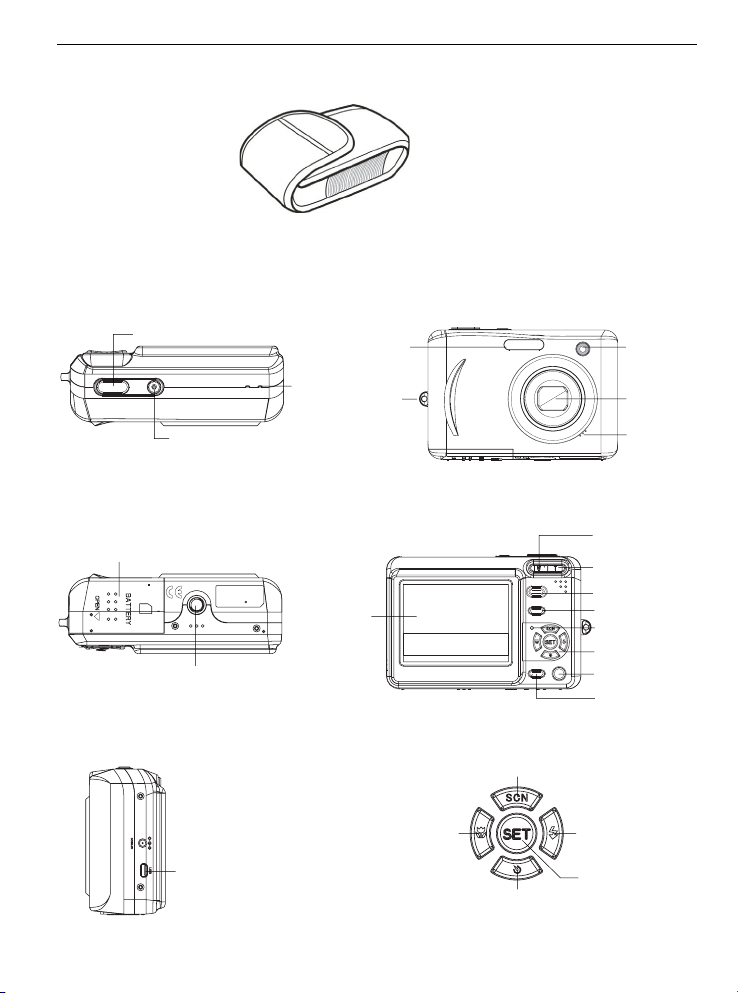
NAMES OF PARTS
Top Front
GETTING STARTED
Shutter button
Power button
Speaker
Flash
Strap ring
Bottom Back
Battery/card
chamber cover
Tripod socket
LCD monitor
Side 5-function button
Macro/Left
button
USB connector
/ AV-OUT
Scene/Delete/
Up button
Self-timer/
Continue/
Down button
Self-timer
lamp
Lens
Microphone
Zoom W button
(Thumbnail)
Zoom T button
(Digital zoom)
Play mode button
MENU button
Operation lamp
5-function button
Mode dial
DISP button
Flash/Right
button
SET/ADJ
button
4
Page 6
GETTING STARTED
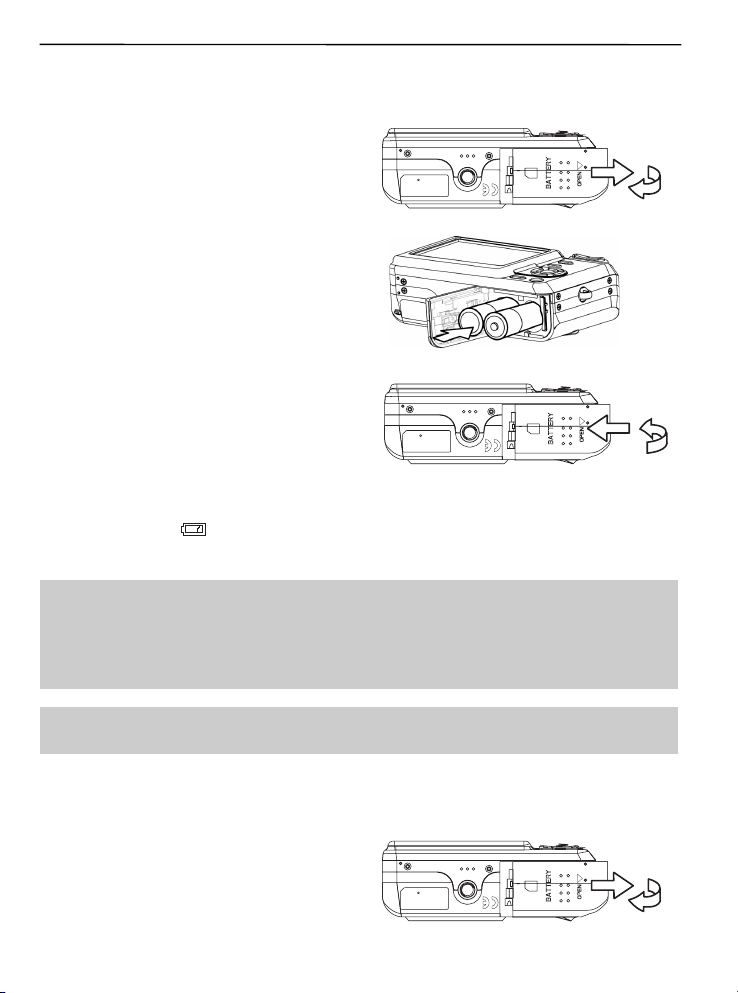
INSERTING THE BATTERIES
The camera is powered by two AA-size alkaline batteries or rechargeable Ni-MH (min. 1000 mAh /
1.2V) batteries.
1. Slide the battery cover open.
2. Insert two AA-size alkaline batteries with the
positive(+) and negative(-) poles matching the
directions indicated inside the battery room.
3. Slide the battery cover closed.
Low Battery Indicator
A low battery indicator
Batteries should be replaced promptly when the low batteries indicator appears.
Note:
• Do not use manganese batteries. Manganese batteries cannot supply sufficient power to
support camera operation.
• Replace all batteries at the same time. Never mix old and new batteries.
• Remove batteries from the camera if you do not plan on using it for more than two weeks.
• The camera body may feel warm after extended use. This is normal.
appears on the LCD screen when the batteries are nearly exhausted.
Important:
Users are not recommended to buy their own adaptor and use it on the camera as power supply.
INSERTING A MEMORY CARD
You can use SD Card with this digital camera. The
memory card slot is located beneath the battery
cover, adjacent to the battery compartment.
1. Be sure that the camera is turned off.
2. Slide the battery cover and open it.
3. Insert the SD card as shown in the diagram.
4. Close the battery cover.
5
Page 7
GETTING STARTED
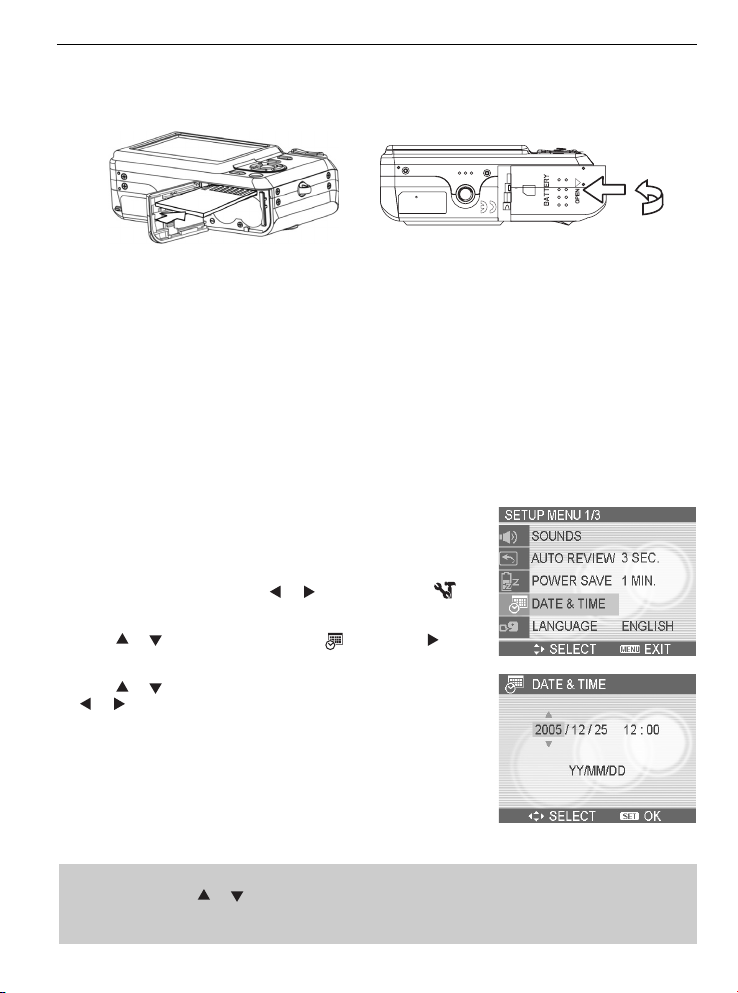
To remove the memory card, gently press on the edge of the card and release it. Pull the card out
and close the battery cover.
About Camera Memory
The digital camera is equipped with internal memory. If the memory card is not inserted in the camera,
all images and movie clips recorded by the camera will be stored in the internal memory. If the
memory card is inserted, images and movie clips are stored on the memory card.
DCF Protocol
The DCF protocol defines the format for image file data as well as the directory structure for the
memory card. Images that are taken by a DCF camera can be viewed on DCF-compatible cameras
from other manufacturers.
SETTING THE DATE AND TIME
When the camera is first turned on, the date and time setting will not
be correct. So before using, be sure to set date and time.
or
1. Press the MENU button, using
and press the SET button.
or
2. Press
SET button to launch the Date & Time screen.
3. Press
or
4. After adjusting the settings, press the SET or the MENU button to
apply the setting.
to select DATE & TIME (
or
tto change the value of the highlighted field. Press
to highlight another field.
to select SETUP (
) then press
)
or the
Note:
• If you hold down
• If the batteries are removed for about two days, the Date & Time setting will be lost. In this
case, make these settings again.
or
, you can change the value quickly.
6
Page 8
640
640
640
640
640
BASIC OPERATIONS
BASIC OPERATIONS
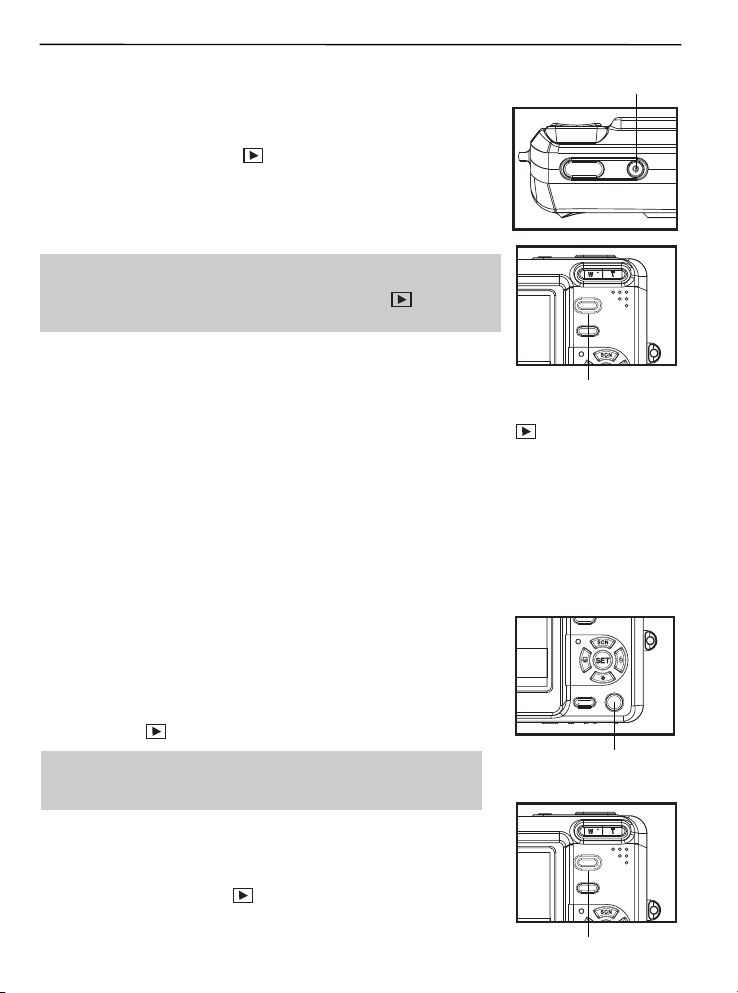
TURNING THE POWER ON AND OFF
1. Press the POWER button to turn on the camera in the Record
mode. Or you can press the
Playback mode.
2. Press the POWER button again to turn the power off.
Hint:
• You can turn on the camera without the start-up and operating
sound by pressing and holding the POWER or the
1.5 seconds.
Power Saving Function
If the camera is turned off by Power Save feature, press the POWER or the
again.
The Power Save feature does not work in the following situation:
• Connecting the camera to a computer or printer with the USB cable.
• Connecting the camera with the AC adapter (sold separate).
SWITCHING BETWEEN RECORD AND PLAYBACK
You can switch between the Record mode and the Playback mode in
following ways:
button to turn on the camera in the
button over
Power button
Play mode button
button to turn it on
In Record mode
• Press the MODE button to cycle through the still image shooting,
voice recording, and movie recording.
• Press the
button to switch to the Playback mode.
Note:
• If you switch to Playback mode, the lens will retract after
approximately 10 seconds.
In Playback mode
• Press the MODE or the
Record mode.
button switch to the previous used
7
Mode dial
Play mode button
Page 9
USING THE MENUS
640
640
320
640
320
160
640
640
320
640
320
160
Recording Menu / Playback Menu
When a menu screen is displayed, the arrow button and the SET button are used to make the desired
settings.
1. Press the MENU button to display the menu.
• The menu displays depends on whether you are in the Record mode or the Playback mode.
or
2. Press
3. Press
• In playback menu, press
confirmation screen or apply the setting.
4. Press the MENU or the SET button to save the settings and close the menu.
• In playback menu, press the MENU button to close the menu.
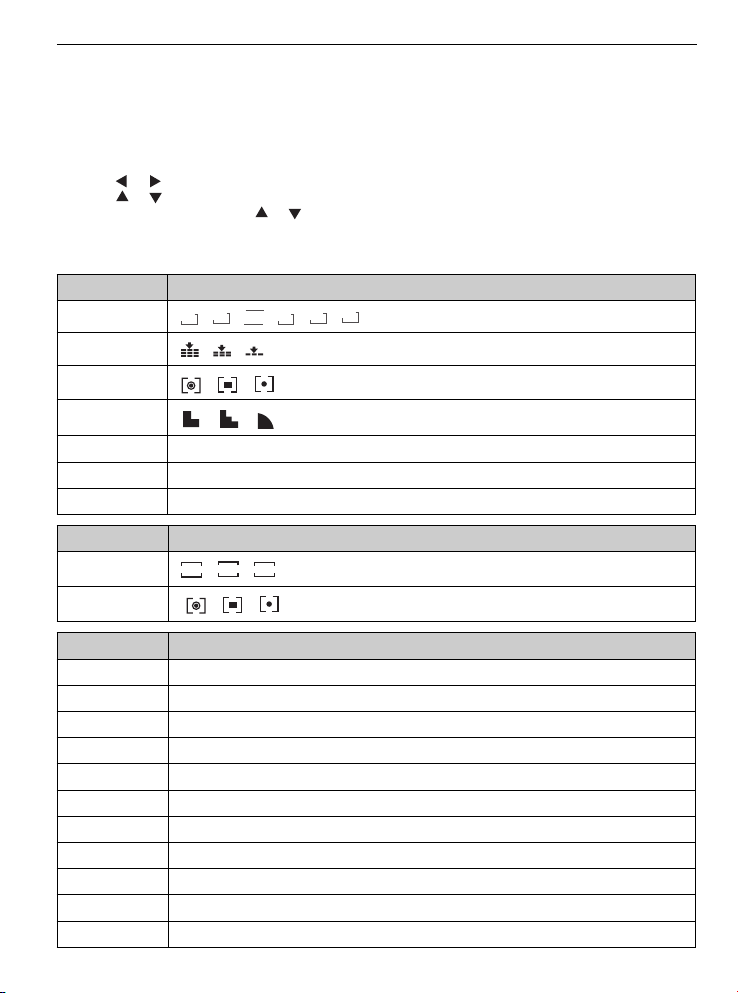
Menu Item Available Setting(for still image)
Resolution
Quality
Metering
Sharpness
Effect Off / B&W / Sepia / Neg. Art
Date Stamp Off / Date / Date & Time
Digital Zoom Off / On
Menu Item Available Setting (for movie)
Movie Size
Metering
Menu Item Available Setting (for playback)
Protect Single / Lock All / Unlock All
Delete Single / All
Slide Show Playing stored images in a slide show.
DPOF Single / All / Reset
Copy to Card Single / All
Effect B&W / Sepia / Neg. Art / Mosaic/ PhotoRite
Rotate Right 90 / Left 90 / Horizontal / Vertical
Resize Reduces image size to smaller.
Sticker Add funny stickers to images.
Voice Memo Recording a voice memo to a stored image.
S.Image User 1 / User 2
to select a menu item.
or
to change the setting.
8M
/6M/
/
/
/
320
320
640
640
/
/
3:2
/
/
/
160
160
/
/
or
to select an option, and then press the SET button to display a
/4M/2M/
VGA
8
BASIC OPERATIONS
Page 10
BASIC OPERATIONS
ADJ. Menu
You can quickly adjust the White Balance “ISO” Exposure in Record mode.
1. Press the SET button to display the menu.
• When movie recording, only White Balance can be adjusted.
or
2. Press
3. Press
4. Press the SET button to confirm the settings and close the menu.
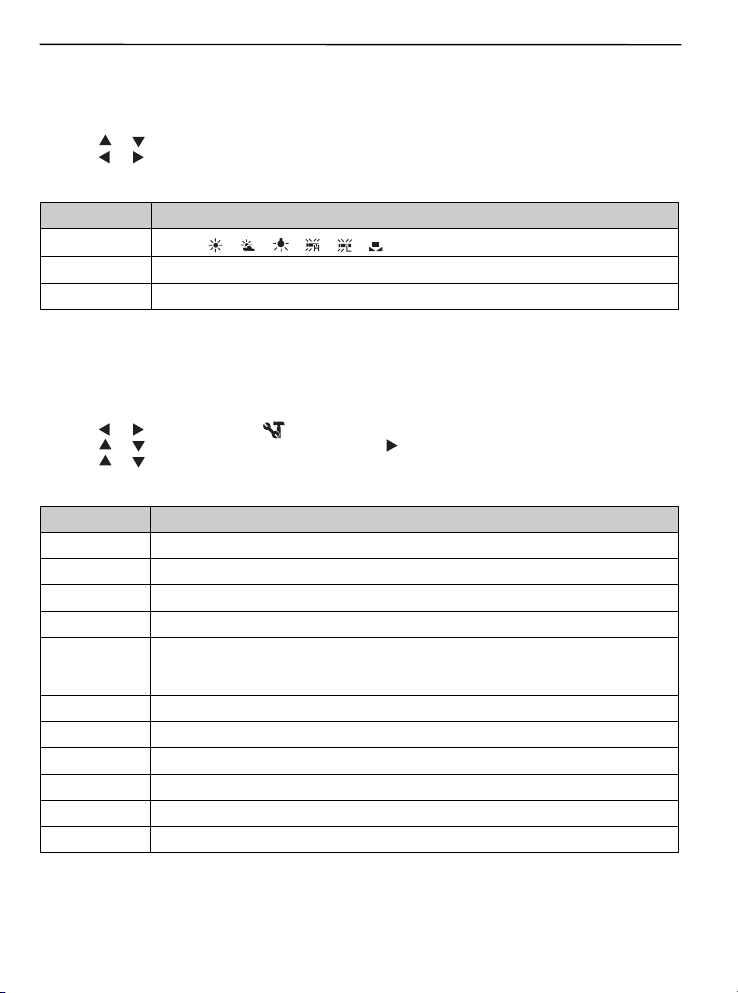
Menu Item Available Setting
White Balance
ISO AUTO / 50 / 100 / 200
Exposure -2.0 to +2.0
to select a menu item.
or
to select an option
/
AUTO
/
/
/
/
/
Setup Menu
You can change the basic settings of the camera in Record mode and Playback mode.
1. Press the MENU button to display the menu.
• The menu displays depends on whether you are in the Record mode or the Playback mode.
or
2. Press
3. Press
4. Press
5. Press the MENU button to close the menu.
Menu Item Available Setting
Sounds Sets the camera sounds and volume.
Auto Review Off / 3 sec. / 5 sec.
Power Save 1 min. / 3 min. / 5 min.
Date & Time Sets the date & time.
Language
File No. Series / Reset
TV Out NTSC / PAL
USB Computer / Printer
S.Image Sets the start-up image.
Format Formats the internal memory or memory card.
Reset All Resets all camera settings to initial default.
to select SETUP (
or
to select a menu item and then press
or
to select an option and press the SET button to apply the setting.
English / Spanish / German / French / Italian / Portuguese / Dutch / Czech
/ Hungarian / Polish / Turkish / Russian / Japanese / Korean / S.Chinese /
T.Chinese
) and then press the SET button to display the Setup menu.
or the SET button to launch the submenu.
9
Page 11
BASIC OPERATIONS
USING THE LCD MONITOR
The LCD monitor is used to compose images while recording, adjust settings and replay images.
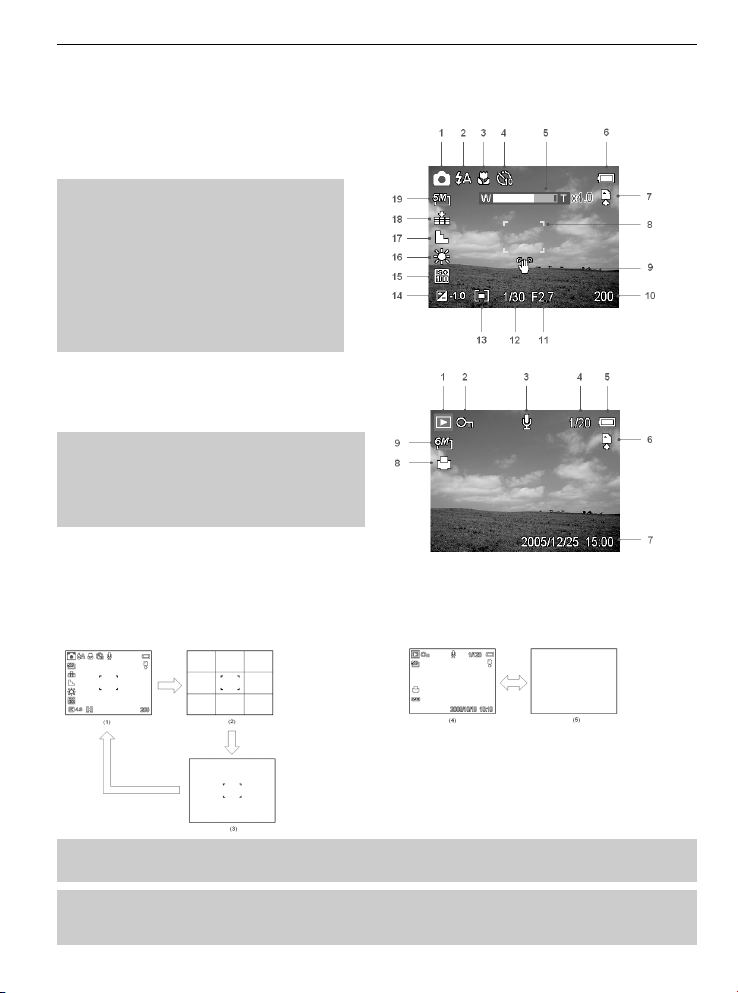
LCD Screen Indicator
In Recording
1 Mode icon 11 Aperture value
2 Flash 12 Shutter speed
3 Macro 13 Metering
4 Self-timer / Burst 14 Exposure
5 Zoom indicator 15 ISO
6 Battery 16 White balance
7 Storage media 17 Sharpness
8 Focus area 18 Quality
9 Shake warning 19 Resolution
10 Shots remaining
In Playback
1 Mode icon 6 Storage media
2 Protect 7 Capture date & time
3 Voice memo 8 DPOF
4 File number / Total 9 Resolution
5 Battery
Switching the Screen Display
Press the DISP button changes the next display mode of the LCD monitor as shown below:
In Record mode In Playback mode
(1) OSD on (2) Guide line (3) OSD off
(4) OSD on (5) OSD off
Hint:
• Use the “Guide line” mode to compose images easily before shooting images.
Note:
• When the LCD display is not in “OSD on”, press Macro, Self-timer, Flash will change the
display mode to “OSD on” automatically.
10
Page 12
RECORDING
RECORDING
RECORDING STILL IMAGES
1. Hold the camera with both hands and make sure the camera is stable.
2. Set the camera to the Record mode.
3. Aim the focus area to the subject that you want to take and press the shutter release button
halfway.
• The focus area on the LCD monitor will light green when the camera is in focus.
• If the shutter speed is slow or the possibility that image may be blurred, the shake warning icon
may appear on the LCD monitor. To avoid it, use a tripod to stabilize the camera when
recording images.
4. Fully press the shutter release button to take an image.
Note:
• Make sure that your fingers or the wrist strap does not block the lens.
• When the shutter release button is pressed halfway down, check the exposure value that
appears on the LCD monitor to make sure that it is appropriate for the lighting conditions.
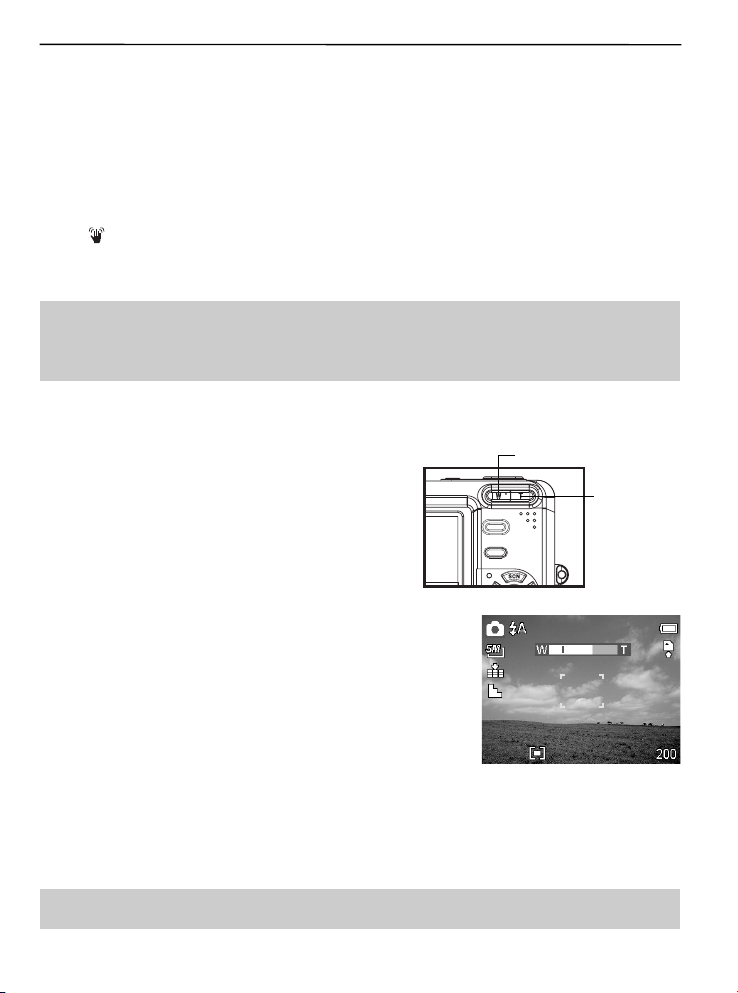
Using the Zoom Function
Your camera has a combination of optical and digital zoom
functions that allow you to zoom in on far away subjects or
zoom out for a wide angle shot.
The optical zoom is achieved by mechanically adjusting
the lens of the camera. The digital zoom enlarges or
shrinks the image using a software process.
Zoom W button
(Thmbnail)
Zoom T button
(Digital zoom)
When the zoom lever is pressed, the zoom bar appears on the LCD
monitor.
Press [W] to zoom out for a wide-angle shot.
Press [T] to zoom in for a telephoto shot.
When the optical zoom factor is at maximum, zooming stops temporarily. Press the [T] again, the
camera switches to the digital zoom automatically and zooming continues.
Digital zoom works by enlarging the center portion of an image through a software interpolation
process. The digital zoom is used to achieve magnification levels up to approx. 4 times.
Note: Digital zoom is unavailable when recording movies.
11
Page 13
RECORDING
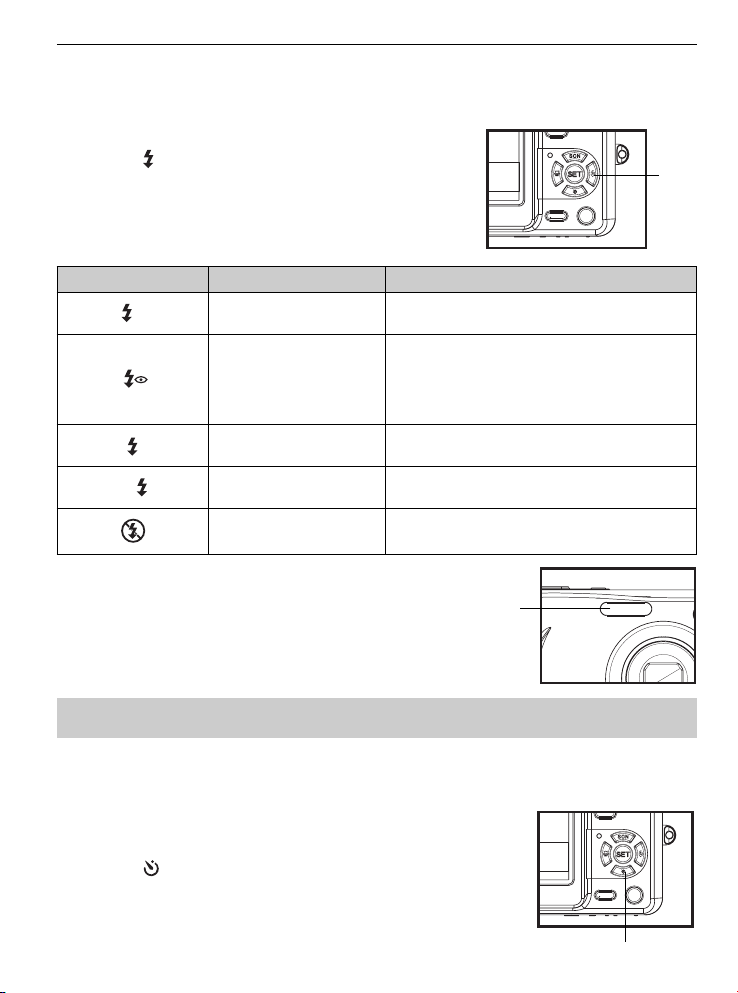
Using the Flash
Press the flash button cycles your camera through the various flash modes. A symbol appears on the
LCD screen to indicate the flash mode. The flash cannot be used when movie recording.
1. Set the camera to the Record mode.
• The flash function only used in still image shooting.
2. Press the
3. Shoot the image.
button to change the flash mode:
Display Option Description
A
S
Auto flash
Red eye reduction
Always on
Slow sync Flash fires with a slow shutter speed.
Always off The flash never fires even in dark situation.
Flash fires automatically when shooting
conditions require extra lighting.
Flash strobes to let the subject’s eyes adjust
to the flash, then fires again to take the actual
image. The digital camera will detect the
subject brightness and use the flash only when
required.
Flash fires every time you take a photo,
regardless of lighting conditions.
Flash
Flash
Note: The flash charging time may increase when the battery is low.
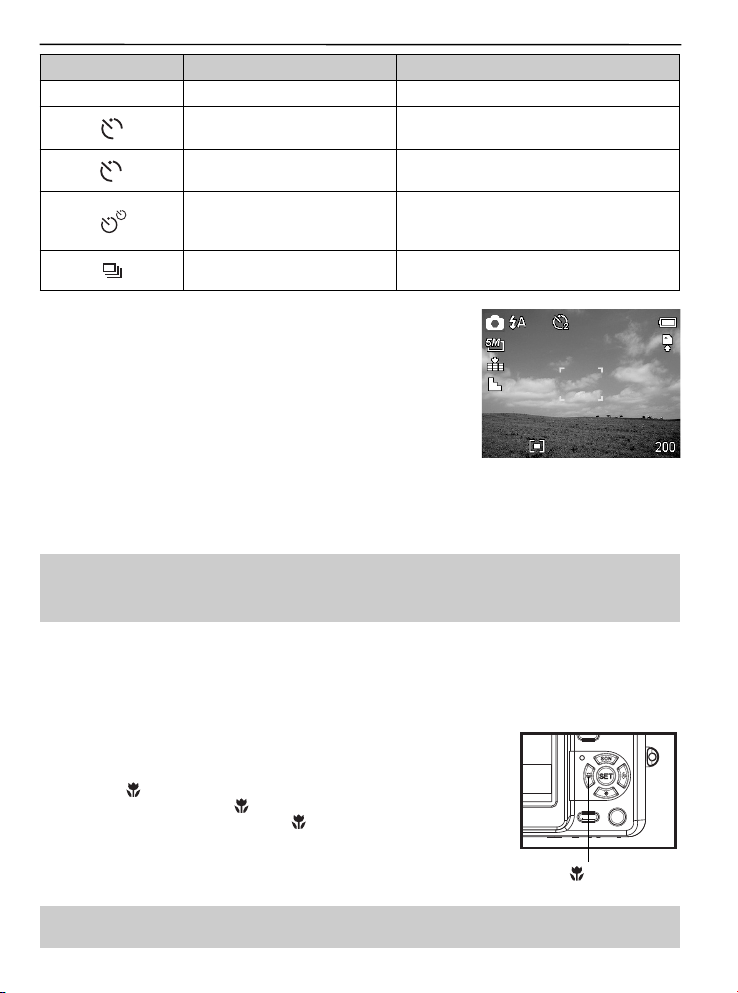
Using the Self-timer & Burst
Use the self-timer to set a delay from the time the shutter button is pressed to the time the image is
shot. Use the burst to record four continuous still images shooting.
1. Set the camera to the Record mode .
• This function only used in still image shooting.
2. Press the
button to change the settings:
Self-timer
12
Page 14
RECORDING
Display Option Description
- Single shot Record a single image.
2
10
2-SEC
10-SEC
The shutter release will be delay for 2
seconds.
The shutter release will be delay for 10
seconds.
Record two images in a shot after
Double
pressing the shutter release button 10 and
12 seconds.
Burst For capturing 4 images in succession.
3. Shoot the image.
Each option automatically switches to single shot in the following situation:
• After each shot.
• When the mode switched.
• When the camera is turned off.
Note:
• When using the self-timer function, be sure to use a tripod or place the digital camera on a
level, stable surface.
Using the Macro mode
Your camera is equipped with a macro function that allows you to focus on very close subjects. In
macro mode you can focus on subjects 5 cm from the lens when in the maximum wide angle (zoomed
out) setting and 50 cm in the maximum telephoto (zoomed in) setting.
1. Set the camera to the Record mode .
• You can use the macro mode in still image shooting or movie
recording.
2. Press the
• The macro mode icon (
3. To leave the macro mode, press the
button to enter the macro mode.
) appears on the LCD monitor.
button again.
Macro
Note:
• Distances referred to measure the distance between the camera lens surface and the subject.
13
Page 15

RECORDING
RECORDING MOVIE CLIPS
Your camera can record movie clips with audio.
1. Set the camera to the Record mode .
• The LCD monitor displays the available recording time.
2. Press the shutter to start recording.
3. Press the shutter again to end recording.
• The camera will stop recording automatically when the
memory capacity has been reached.
Note:
• The voices of the movie clips are recorded from the microphone of the camera. Be careful to
avoid touching the microphone while recording.
• The White Balance is set and locked to the settings of the first frame.
VOICES RECORDING
You can record voices using this camera.
1. Set the camera to the Record mode .
• The LCD monitor displays the available recording time.
2. Press the shutter to start recording.
3. Press the shutter again to end recording.
• The camera will stop recording automatically when the
memory capacity has been reached.
Note:
• The voices are recorded from the microphone of the camera. Be careful to avoid touching the
microphone while recording.
SETTING THE RECORDING FUNCTIONS
Using the Scene Mode
You can select from various scene mode for specific shooting
conditions.
1. Set the camera to the Record mode .
• The scene mode function only used in still image shooting.
2. Press the
3. Use the arrow button to select a desired scene mode and press
the SET button to confirm the setting.
button to show the Scene Mode screen.
14
Page 16

RECORDING
640
640
320
640
320
160
Display Option Description
Program All settings can be changed in this mode.
Portrait Blurring the background to focus on the subject.
Landscape Used for the wide scenic views.
Night Scene
Shooting the subject while keeping the background night
scenery.
Kids Take a still image to capture moving kids.
Beach & Snow Used for the beach or snow scenes.
Backlight Shooting the image of backlight object by changing metering.
Sunset Enhance the red hue for recording sunset images.
Close-up Close-up shooting for small subject.
Text Enhance the black & white contrast.
Sports Fast shutter speed to capture fast moving subjects.
Fireworks Slow shutter speed to take fireworks exploding.
Setting the Resolution and Quality
You can select lower image resolution and quality to decrease the image size to capture more images.
Choose a suitable setting according to the desired image quality and purpose.
Resolution
Option Description
8M
6M
3:2
4M
2M
VGA
3264x2448 - Suitable for printing large size paper.
2816x2112 - Suitable for printing normal size paper.
2784x1856 - Printing in 3:2 ratio.
2304x1728 - Suitable for printing on A4 paper.
1600x1200 - Suitable for printing on A5 paper.
640x480 - Suitable for attaching to e-mails or using in websites.
Quality
Option Description
Stores the image with an extremely low compression.
Stores the image with a low compression.
Stores the image with normal compression.
15
Page 17

RECORDING
640
640
320
640
320
160
Setting the Movie Size
Movie clips can be shot with different size.
Option Description
640
640
320
320
160
160
640x480 - Suitable for viewing on TV.
320x240 - Suitable for viewing on PC.
160x128 - Suitable for attaching to e-mails or using in websites.
Setting the White Balance
Adjust the white balance to match different light sources such as sunlight, incandescent (tungsten)
lighting or, fluorescent lighting.
Option Description
AUTO
/
Note:
• Point the camera at a white piece of paper or similar object under the lighting conditions for
which you want to set the white balance, and then press the SET button.
Automatically corrects white balance. Ideal for general photography.
Adjusts for bright sun conditions, or natural light conditions.
Adjusts for cloudy days or twilight conditions
Adjusts for normal indoor lighting conditions. Corrects the orange hue of
household light bulbs. Ideal for indoor photos under tungsten or halogen
lighting without a flash.
Adjusts for fluorescent lighting. Corrects the green hue of fluorescent lighting.
Ideal for indoor photos under fluorescent lighting without a flash.
For more accurate adjustment or when the light source cannot be specified.
Setting the ISO
With the initial settings, the ISO sensitivity is automatically set according to the brightness of the
subject.
Option Description
Auto Sets the ISO sensitivity automatically.
ISO 50 Sets the sensitivity to ISO 50 equivalent.
ISO 100 Sets the sensitivity to ISO 100 equivalent.
ISO 200 Sets the sensitivity to ISO 200 equivalent.
Note:
• Higher ISO speeds increase the image noise. To take clean images, use as low an ISO speed
as possible.
16
Page 18

RECORDING
Setting the Exposure
Set the exposure value manually to compensate for unusual lighting conditions such as indirect indoor
lighting, dark backgrounds, and strong backlighting.
Setting the Metering
There are 3 different light metering options available on your camera.
Option Description
Light is measured from the entire shooting screen, but gives more importance
to the values near the center.
Selects an exposure based on readings from multiple points in the subject
area
Selects an exposure based on a single reading taken from the center of your
picture.
Setting the Sharpness
You can select whether you want the image to have sharp or soft outlines.
Option Description
The edges of the image are emphasized. The edges will become sharp, but
noise may occur in the recording image.
The edges of the image are sharp. This is suitable for printing.
The edges of the image are softened. This is suitable for editing images on
PC.
Setting the Photo Effect
You can add special effects to your images in Record mode.
Option Description
Off No effect is added to the image.
B&W Convert image to black & white.
Sepia Recorded image will be stored in a sepia tone.
Neg. Art Opposite what they were in the original image.
Setting Date Stamp
The Date Stamp function can be used to add a date to your pictures as you take them.
Option Description
Off Do not add the recorded date & time to printed images.
Date Only add the recorded date to printed images.
Date & Time Add the recorded date & time to printed images.
17
Page 19

PLAYBACK
PLAYING BACK IMAGES
1. Set the camera to the Playback mode .
2. Press
Using the Thumbnail
When in Playback mode, you can view all your stored images in
thumbnail format.
1. Set the camera to the Playback mode .
2. Press the zoom lever [W], a thumbnail screen is displayed.
3. Use the arrow button to select the desired image, and press [T]
Magnifying and Trimming Still Images
1. Set the camera to the Playback mode.
2. Press
3. Press [T] to magnify the image, and the central portion of
4. Press the SET button to set the image trimming.
5. Press the SET button again to trim the selected image and save
to play back the previous image; press
Hint: Holding down
or the SET button to show the selected image in full screen.
or
trimming.
the image is displayed. You can use the arrow button to view
different parts of the magnified image.
• Press the MENU button to return to the normal size.
it as a new one.
• Press the MENU button to cancel it.
Note: Only still images can be magnified and trimmed.
or
scrolls images in a high speed.
to select the image that you want to magnify or
to play back the next image.
PLAYBACK
Playing Back Movie Clips
1. Set the camera to the Playback mode .
2. Press
3. Press the SET button to start the movie.
4. Press the MENU button to stop the movie, or press the SET
or
to select the movie clip that you want to playback.
• The movie clip will play on the LCD monitor.
button to pause the movie.
• When movie clip paused, press the SET button again to
resume.
Hint:
• During movie playing back, press
to rewind it.
• Press the shutter button to capture the still image from the
movie clip while it is paused.
to fast forward or press
18
Page 20

PLAYBACK
PLAYING BACK SOUNDS
1. Set the camera to the Playback mode .
2. Press
3. Press the SET button to start playing the audio clip.
4. Press the MENU button to stop the audio clip, or press the SET button to pause it.
or
to select the audio clip that you want to playback.
• When audio clip paused, press the SET button again to resume.
Recording a Voice Memo
You can add a voice memo to the still images after you record it.
1. Set the camera to the Playback mode .
2. Press
3. Press the MENU button, using
4. Press the SET button to start recording for 30 seconds, or press
5. Press the SET button again to end recording.
or
memo.
(
• If the image already has the voice memo recorded, the
appears on the LCD monitor. The new recording will replace
the previous one.
the MENU button to cancel it.
Note:
• The voice memo cannot be added to a movie clip or a protected image.
• You cannot delete only the voice memo. When you delete the image, the attached voice
memo is also deleted.
to select a still image that you want to add a voice
or
) and press the SET button.
to select VOICE MEMO
Playing Back a Voice Memo
1. Set the camera to the Playback mode .
2. Press
3. Press the SET button to play to voice memo.
4. Press the MENU button to stop the voice memo, or press the
or
recorded.
• The image with a voice memo recorded shows
LCD monitor.
SET button to pause it.
• When voice memo paused, press the SET button again to
resume.
to select the image that has the voice memo
on the
DELETING FILES
Deleting a Single File
Single image can be deleted using the Playback Menu or pressing
the camera button (
1. Set the camera to the Playback mode .
2. Press the MENU button, then press
).
(
3. Press
4. Press
or
or
).
or
to select DELETE
to select SINGLE, and then press the SET button
to select the image you want to delete.
19
Page 21

5. Press the SET button to delete the image or press the MENU button to cancel.
6. Repeat step 4~5 to delete images.
Hint:
• To quickly delete the current display image
1. Select the image you want to delete.
2. Press the
3. Press the SET button to delete the current display image.
button to show a confirmation bar.
Deleting All Files
You can use the Playback Menu to delete multiple files.
1. Set the camera to the playback mode .
2. Press the MENU button, then press
3. Press
4. Press the SET button to delete all images or press the MENU button to cancel.
or
to select ALL, and then press the SET button.
Note: The protect images cannot be deleted with the delete function.
or
to select DELETE (
).
Protecting Files
Files stored on your camera or on a memory card can be protected
to prevent accidental deletion.
1. Set the camera to the Playback mode .
2. Press the MENU button, then press
).
(
or
3. Press
4. Press
5. Press the SET button to protect the file or press the MENU button
to cancel.
• When the file is locked, the
6. Repeat step 4~5 to protect images.
to select SINGLE, and then press the SET button.
or
to select the file you want to protect.
or
to select PROTECT
displays on the LCD monitor.
PLAYBACK
Hint:
• To unlock the file, press the SET button again in step 5. The
unlocked.
• To lock / unlock all files at a time
1. Set the camera to the Playback mode.
2. Press the MENU button, then press
3. Press
• A confirmation message appears.
4. Press the SET button to lock (or unlock) all files, or press the MENU button to cancel.
or
to select LOCK ALL (or UNLOCK ALL), and press the SET button.
or
to select PROTECT (
will disappear and the file is
).
20
Page 22

PLAYBACK
EDITING IMAGES
Rotating Still Images
The still images can be rotated by various degrees.
1. Set the camera to the Playback mode .
2. Press
3. Press the MENU button, then press
4. Press
5. Press the SET button to confirm the change or press the MENU
or
to select the image you want to rotate.
).
(
or
to select an option, and then press the SET button.
button to cancel.
• The rotated image will be saved as a new file name.
or
to select RO TATE
Changing the Image Size
The resolution of still images that had already been recorded can be
changed.
1. Set the camera to the Playback mode .
2. Press
3. Press the MENU button, then press
4. Press
or
to select the image you want to resize.
).
(
or
• The resized image will be saved as a new file name.
Note: Only a large size image can be resize to a smaller one.
to select an option, and then press the SET button.
or
to select RESIZE
Setting Photo Effect
You can change or correct photo effect directly on the camera. The changed/corrected photos can
then be viewed or printed directly without the need to transfer them onto computer for further photo
editing or enhancement.
Photo Effect Description
B&W Convert color photo into black & white photo.
Sepia Add sepia tones to photo to make it looks like old photo.
Neg. Art Convert photo color into its opposite color.
Mosaic Turn photo into a series of mosaic tiles.
PhotoRite is an advanced image processing technology for automatic photo
PhotoRite
enhancement. Photos processed with PhotoRite will have a more well-balanced
color and exposure, and details in the scene can be seen more clearly. Problems
that PhotoRite can fix are backlit, under-expose, poor contrast, uneven-illumination
and color shift.
21
Page 23

PLAYBACK
640
1. Set the camera to the Playback mode (
or
2. Press
3. Press the MENU button, then press
4. Press
to select the photo that you want to change its effect.
or
to select an option, and then press the SET button.
).
or
to select EFFECT.
• The photo with the selected effect will be saved as a new file.
SETTING THE DPOF
The Digital Print Order Format (DPOF) setting allows you to select images on the memory card
for printing and specify the number of print copies in advance using the camera. This is extremely
convenient for sending the images to a photo developing service or for printing on a direct print
function compatible printer.
1. Set the camera to the Playback mode .
2. Press the MENU button, using
3. Press
4. Press
5. Press
or
to select SINGLE, then press the SET button.
or
SET button.
to select the image you want to print out, and the
or
to specify the number of copies.
• The number of copies can be set from 0 to 30.
• To cancel this image DPOF setting, set the number of copies
to 0.
6. Press
and then press
of current image.
7. Press the SET button to apply the setting or press the MENU
button to cancel.
8. Repeat step 4~7 to set other images for printing.
9. After you finished all image settings, press the MENU button to apply it.
or
to select DPOF (
or
to set or cancel the date stamp
) and press the SET button.
Hint:
• To set the DPOF setting for all images in a time, select ALL in step 3 and press the SET
button.
• To reset all DPOF settings to initial default, select RESET in step 3 and press the SET button.
22
Page 24

ADVANCE SETTINGS
PLAYING A SLIDE SHOW
You can set the camera to display images in a slide show.
1. Set the camera to the Playback mode .
2. Press the MENU button, using
) and press the SET button.
(
3. Use the arrow button to set the playback interval (
repeat or not (
• You can set the interval between 1~10 seconds.
4. Press the SET button to start the slideshow, or press the MENU
button to cancel.
• During the slideshow, press the SET button to pause the
slideshow and press the SET button again to resume.
Note: The slideshow function is not available for the movie clips and voice recording.
).
or
to select SLIDE SHOW
) and
COPYING THE FILES
You may want to copy the data from the camera’s internal memory to the memory card for
convenience.
1. Be sure you had inserted a memory card to your digital camera.
2. Set the camera to the Playback mode .
3. Press the MENU button, using
4. Press
5. Press
6. Press the SET button to start copy.
7. Repeat step 5~6 to copy other images.
8. Press the MENU button to complete the setting.
) and press the SET button.
(
or
to select SINGLE, then press the SET button.
or
to select the image you want to copy to a card.
Hint:
• To copy all images to a memory card in a time, select ALL in step 4 and press the SET button.
or
to select COPY TO CARD
ADVANCE SETTINGS
ADJUSTING SOUNDS
You can adjust the sound volume and set different sounds as the
start-up sound.
1. Set the camera to the Setup Menu .
2. Press
3. Use the arrow button to adjust the volume and select a desired
4. Press the SET or the MENU button to apply the setting.
5. Press the MENU button to close the menu.
or
the SET button to enter the sounds screen.
to select SOUNDS (
start-up sound.
) and then press
or
23
Page 25

ADVANCE SETTINGS
SETTING AUTO REVIEW
When Auto Review is enabled, you can view an image for a few seconds after you have taken it.
Option Description
Off The captured image will not automatically display after shooing.
3 sec. The captured image will display for 3 seconds after shooting.
5 sec. The captured image will display for 5 seconds after shooting.
SETTING THE POWER SAVE
For power consumption, you can set your camera to turn off automatically for a period of time.
Option Description
1 min. The power will turn off automatically after 1 minute.
3 min. The power will turn off automatically after 3 minutes.
5 min. The power will turn off automatically after 5 minutes.
SETTING THE LANGUAGE
The camera can display menus and other information in a number of
different languages.
1. Set the camera to the Setup Menu .
2. Press
3. Press
4. Press the MENU button to close the menu.
or
SET button to launch the submenu.
the setting.
to select LANGUAGE (
or
to select a language and press SET button to apply
) then press
or the
RESETTING THE FILE NUMBERS
Use this function if the camera experiences a “Folder cannot be created” error or if you want to restart
numbering, for example, after erasing all files.
Resetting the file number is useful for avoiding the file name duplication when images are downloaded
to a computer.
Option Description
Series
Reset Reset file numbering each time the memory card is changed.
Store the latest used file number no matter deleting files or inserting a new
memory card.
About the Folder & File Name
The digital camera automatically creates a directory of folders in the internal memory or memory card
that it uses to organize still images, movie clips and other information.
24
Page 26

ADVANCE SETTINGS
File Naming
File name are followed by a 4-digit number that increases in sequence. File numbering starts from
0001 when a new folder is created.
If the highest folder number is 999 and highest file number exceeds 9999, the camera will display the
warning message “Folder cannot be created”. When it appears, try one of the following ways:
• Reset the file number and plug in a new memory card.
• Format the memory. The folder number and file number are initialized and renumbered from
100 and 0001 respectively.
Note:
• Do not change the folder and file names in the memory card using your computer. It may be
unable to playback the data using the digital camera.
SETTING THE TV OUT
Your camera can be connected to a TV allowing you to preview images and movie clips on the
television screen. TV Out should be set to either NTSC or PAL depending on your region.
Option Description
NTSC America, Japan, Taiwan, Korea
PAL All of Europe
SETTING USB PORT
You can set USB mode to connect the camera with a printer or computer.
Option Description
Computer To connect your camera to a PC.
Printer To connect your camera to a printer.
CHOOSING A STARTUP IMAGE
You can choose a recorded image as the start-up image.
1. Set the camera to the Playback mode.
2. Press
3. Press the MENU button, then press
4. Press
5. Set the camera to the Setup Menu .
6. Press
7. Press
8. Press the MENU button to close the menu.
or
to select a desired image.
).
(
or
to select an option, and then press the SET button.
or
SET button.
the MENU button to apply the setting.
Note:
• The start-up image will not be deleted even if the original
image is deleted or memory formatted.
to select S.IMAGE (
or
to select a desired image and press the SET or
or
to select S.IMAGE
) then press
25
or the
Page 27

MAKING CONNECTIONS
FORMATTING THE MEMORY
To erase all data stored in the memory card if you are using a card, or all data stored in the internal
memory if there is no card inserted.
1. Set the camera to the Setup Menu .
2. Press
3. Press the SET button to start format, or press the MENU button to cancel it.
or
to select FORMAT (
• A “BUSY...PLEASE WAIT” message displays and the memory card is starting format.
• A “COMPLETED” message displays when finish formatting.
Note:
• All data will be deleted including protected ones. Be sure to download important files to your
computer before formatting.
) then press
or the SET button.
RESETTING TO DEFAULT SETTINGS
You can reset the entire menu and button operation settings to initial default.
1. Set the camera to the Setup Menu.
2. Press
3. Press
or
to select RESET ALL (
or
to select YES then press the SET button to reset all settings.
Note:
The following settings do not change with this procedure:
• Date & Time setting
• Language setting
• TV out setting
) then press
or the SET button to launch the submenu.
MAKING CONNECTIONS
CONNECTING THE CAMERA TO A TV
Images displayed on the camera’s monitor screen can
also be displayed on a television.
1. Use the included audio/video cable to connect the
camera to the TV set.
2. Set the TV input signal to Video In and Audio In.
Refer to the documentation included with your TV
for more information.
3. Everything that would normally appear on the
camera’s LCD screen, such as photo and video clip
playback, slide shows, and image or video capture,
appears on the TV.
Note: The camera LCD screen turns off automatically during video output.
26
Page 28

MAKING CONNECTIONS
CONNECTING THE CAMERA TO A PC
There are two ways to download files from the camera’s internal memory or memory card to a
computer:
• by inserting the memory card into a card reader
• by connecting the camera to a computer using the included USB cable
Using the Card Reader
1. Eject the memory from the camera and insert it in a card
reader that is connected to a computer.
2. Open My Computer or Windows Explorer and doubleclick the removable drive icon that represents the
memory card.
3. Copy images from the card into a directory of your
choice on the computer’s hard disk.
Note:
• If you are using a PC card reader with a notebook computer, first insert the memory card into
the PC card adapter (optional), and then insert the PC card adapter into the computer’s PC
card slot.
Connecting the Camera to a Computer with a USB Cable
1. Install the USB software driver included with the
bundled CD-ROM.
2. Connect the supplied USB cable to the computer’s
USB port.
3. Turn on the camera.
4. The LCD screen turns off when the connection to
the computer has been successfully completed.
5. Open My Computer or Windows Explorer. A
“Removable Disk” appears in the drive list.
6. Double-click the “Removable Disk” icon to view its
contents.
7. Files stored on camera are located in the folder
name “DCIM”.
Note:
• You don’t have to turn off the computer or camera when making this connection.
• Refer to your computer’s manual for information regarding the USB port location.
• The camera will turn off automatically if the USB cable is disconnected.
• Windows 98SE: If this is the first time the camera has been connected to the computer,
Windows detects the camer as an “Unknown device” and automatically completes the required
software installation.
27
Page 29

PRINGTING PICTURES DIRECTLY
PRINGTING PICTURES DIRECTLY
There are two ways to print the stored pictures without the help of computer:
Printing Pictures by Using SD Card
1. Transfer the stored pictures from internal memory to SD card.
2. Set the DPOF ( refer to the section “Setting the DPOF”).
3. Insert the SD card into the SD card slot of the direct printing compatible printer.
4. Refer to the instruction manual of the printer to print the pictures.
Printing Pictures by Using a USB Cable
1. Set the camera to the Playback mode.
2. Press the MENU button, using
3. Press
4. Press
5. Connect the camera to the printer with the supplied USB cable. The camera’s LCD will show
6. Follow the camera’s on-screen display and the printer’s instruction manual to print the pictures.
or
to select USB, then press
or
to select PRINTER and then press the SET button to apply the setting.
PICTBRIDGE MENU.
or
to select SETUP menu and press the SET button.
or the SET button to launch the submenu.
28
Page 30

SOFTWARE INSTALLATION(FOR WINDOWS USERS)
SOFTWARE INSTALLATION(FOR WINDOWS USERS)
SYSTEM REQUIREMENTS
Windows:
• PC with processor better than MMX Pentium 233 MHz
• Windows XP/2000/ME/98SE
• Minimum 32 MB RAM
• USB port
• CD-ROM drive
• 800x600 pixels, 16-bit color display compatible monitor
Macintosh:
• Power Mac G3 or later
• Mac OS 9.0, 9.1, 9.2 and OS X
• Minimum 64 MB RAM
• USB port
• CD-ROM drive
• 800x600 pixels, 16-bit color display compatible monitor
*Specifications are subject to change without prior notice.
Option Description
Camera Driver Enables you to download the files taken with the camera.
Microsoft DirectX 9
Arcsoft Photoimpression 5 Enables you to edit and enhance pictures.
Adobe Acrobat Reader Enables you to view the electronic version of the User’s Guide.
User’s Guide
Concord Support Website
DirectX 9 enables the movie playback applications on your
computer to playback video clips that are captured with the
camera.
Direct link to the electronic version of the User’s Guide in different
languages. (All User’s Guides are saved in PDF format.)
Direct link to our camera support website. Ensure that an internet
connection is established before clicking on the link.
USING THE INSTALLER SPLASH SCREEN
The installer will automatically detect which software applications need to be installed or if they are not
necessary. This will be indicated by the buttons on the splash screen that appears when the CD-ROM
is inserted into the computer:
Color Description
Required or highly
Yellow (
Gray (
)
recommended to install.
Already installed or not
)
necessary to install.
29
Page 31

SOFTWARE INSTALLATION(FOR WINDOWS USERS)
INSTALLING YOUR CAMERA DRIVER
Step 1 Make sure that your camera is not connected to the computer.
Step 2 Make sure the computer is powered on and Windows 98SE/ME/2000/XP is running.
Step 3 Close any other applications or software you may be running.
Insert the supplied CD-ROM into the CD-ROM drive. The installer will pop up
Step 4
Step 5
Step 6
automatically.
Note: If the installer does not appear automatically, double click ‘My Computer’, and then
double click the CD-ROM drive.
Select the language. Click [OK].
The installation screen will appear. Click on Install Camera Drivers.
Step 7
The two warnings will be shown orderly. Please ignore them and click [OK].
30
Page 32

SOFTWARE INSTALLATION(FOR WINDOWS USERS)
Click [Next].
Step 8
Step 9 Install progress bar.
To ensure the complete installation and enable the camera to function well, please do
select “restart your computer”.
Step 10
INSTALLING DIRECTX 9
Step 1 Make sure your camera is powered off and not connected to the computer.
Step 2 Make sure the computer is powered on and Windows 98SE/2000 is running.
Step 3 Close any other applications or software you may be running.
Insert the supplied CD-ROM into your computer’s CD-ROM Drive.
Step 4
Note: If the installer does not start automatically within 30 seconds after the CD-ROM
has been inserted, click on “My Computer” either on the Desktop or in the Start Menu
and locate the CD-ROM Drive. Double click on the CD-ROM Drive icon for installation
and proceed to Step 5.
Select the language. Click [OK].
Step 5
31
Page 33

Step 6
Step 7
Step 8
SOFTWARE INSTALLATION(FOR WINDOWS USERS)
The installation screen will appear, click on Install Microsoft DirectX 9.
The next screen will begin the DirectX setup. Select “ I accept the agreement “ then click
[Next >].
Click [Next >].
Step 9
Click [Finish]. Your computer will automatically restart.
32
Page 34

SOFTWARE INSTALLATION(FOR WINDOWS USERS)
INSTALLING ARCSOFT PHOTOIMPRESSION FOR ALL WINDOWS
USERS(OPTIONAL)
Step 1 Make sure your camera is powered off and not connected to the computer.
Step 2 Make sure the computer is powered on and Windows is running.
Step 3 Close any other applications or software you may be running.
Insert the supplied CD-ROM into your computer’s CD-ROM drive.
Step 4
Step 5
Step 6
Note: If the installer does not start automatically within 30 seconds after the CD-ROM
has been inserted, click on My Computer either on the Desktop or in the Start Menu and
locate the CD-ROM Drive. Double click on the CD-ROM Drive icon for installation and
proceed to Step 5.
Select the language. Click [OK].
The installation screen will appear, Click on Install ArcSoft PhotoImpression 5.
Step 7
Click [Next >].
33
Page 35

Step 8
Step 9
Step 10
SOFTWARE INSTALLATION(FOR WINDOWS USERS)
Click [Yes].
Click [Next >].
Click [Next >].
Step 11 The screen will show the status of the installation
You can choose to install DirectX 9 or not, then click [Finish].
Step 12
34
Page 36

SOFTWARE INSTALLATION(FOR WINDOWS USERS)
INSTALLING ADOBE ACROBAT READER (OPTIONAL)
Step 1 Make sure your camera is powered off and not connected to the computer.
Step 2 Make sure the computer is powered on and Windows is running.
Step 3 Close any other applications or software you may be running.
Insert the supplied CD-ROM into your computer’s CD-ROM drive.
Step 4
Step 5
Step 6
Note: If the installer does not start automatically within 30 seconds after the CD-ROM
has been inserted, click on My Computer either on the Desktop or in the Start Menu
and locate the CD-ROM Drive. Double click on the CD-ROM Drive icon for installation
and proceed to Step 5.
Select the language. Click [OK].
The installation screen will appear, Click on Install Adobe Acrobat Reader 6.
35
Page 37

Step 7
Step 8
SOFTWARE INSTALLATION(FOR WINDOWS USERS)
“Recomposing data ...” status bar appear.
Note for Win 98 SE users: As Adobe Reader 6
requires Internet Explorer 5.01 or greater, you may
see below information:
Note for Win 2000 users: As Adobe Reader 6 need
the support of Win 2000 SP2, you may see below
information:
In this case, please click [OK] to close the message
screen, and then click [Finish] to terminate the
Adobe Reader 6 installation. Then go to www.
microsoft.com website to upgrade your system and
then to install the Adobe Reader 6 again.
If your Internet Explorer is version 5.01 or above, the
installation of Adobe Reader 6 will start. The screen
shows screen as below. Click [Next >].
Step 9
Click [Next >].
36
Page 38

SOFTWARE INSTALLATION(FOR WINDOWS USERS)
Click [Next >]. The files will be saved into C:\Program Files\Adobe\Acrobat 6.0
automatically. You may change the default folder by clicking [Change Destination
Folder...] and selecting a different folder in your computer.
Step 10
Click [Install] to start install the Adobe Reader 6.
Step 11
Click [Finish].
Step 12
37
Page 39

SOFTWARE INSTALLATION(FOR WINDOWS USERS)
USING ARCSOFT PHOTOIMPRESSION (WINDOWS ONLY)
1. Connect the camera to the computer.
2. Launch ArcSoft PhotoImpression software by clicking on Start-Programs-ArcSoft PhotoImpression
5 and choosing PhotoImpression 5 from the application list on your screen.
3. When the application opens, select Get Photo and you will view all the images in the middle
preview area. You also can choose a certain view mode on the right area.
4. You can select other modules such as Enhance, Create, Project to edit and design the desired
photo(s), for the operation in detail please follow the help file in the software.
38
Page 40

APPENDIX
APPENDIX
TROUBLESHOOTING
Problem Cause Solution
Power does not turn
on.
The camera does not
take pictures.
Image is not recorded
when the shutter
button is pressed.
The flash does not
fire
Image is blurry or out
of focus.
Image is not
displayed on the LCD
monitor.
Recorded images are
not saved in memory.
Cannot transfer
images to a computer
after connecting the
USB cable.
Battery is inserted in the wrong
direction.
Batteries are dead. Replace or recharge batteries.
The battery compartment door
is open.
The flash is charging. Wait for the flash to charge.
Memory is full. Insert a new memory card.
Memory card is not formatted
correctly.
The Flash is charge. Wait for the flash to charge.
Memory is full. Insert a new memory card.
Flash is set to OFF. Set the flash to any mode except off.
The camera was moving when
the image was captured.
The subject was beyond the
range within which the camera
can focus.
A memory card with non-DCIF
images (recorded with other
camera) is loaded.
The camera was turned
off/powered down before the
image was stored in memory.
USB driver is not installed.
Reload battery in the correct direction.
Make sure the battery compartment door
is securely closed.
The card may be detective, use a new
card.
Hold the camera steady when shooting
picture.
Turn the Macro mode on it the subject is
within 5 cm (zoom out) or 50 cm (zoom
in). Do not use Macro mode when
shooting distant subjects.
This camera cannot display non-DCIF
images.
If the battery low indicator appears on
the LCD monitor, replace the battery
immediately.
Install the USB driver before you
connect the camera to a computer / turn
the camera on.
39
Page 41

SPECIFICATIONS
Sensor 6.16 Mega Pixels CCD / Size : 1/2.5 inch
Lens
LCD monitor 2.4” TFT color LCD
Focus Range
Aperture F/2.8 ~ 4.8
Shutter 8 ~ 1/2000 sec.
File Format
Resolution
Scene Mode
Sensitivity Auto / ISO 50 / ISO 100/ ISO 200
White Balance
Exposure Control -2EV to +2EV in 1/3 step
Metering Center-weighted / Multi / Spot
Burst 4 shot / snap ( support up to 6M:2186x2112 )
Self-timer 2 sec. / 10 sec. / Double
Flash Auto / Red eye reduction / Always on / Slow sync / Always off
Photo Effect Black & White / Sepia / Negative Art / Mosaic
Storage
TV system NTSC / PAL
Power Supply
Ambient temperature
Microphone Built-in
Speaker Built-in
Dimension 89 x 60.5 x 28.1 ( Max. 32.7, lens ~ LCD ) mm
Weight Camera Body w/o battery : Approx. 140 (g)
*These specifications are subject to change without notice.
Focal Length : f=5.95 ~17.14mm ,
3X optical zoom, 4X digital zoom
Normal: 80cm ~ Infinity
Macro: (W) 5cm ~ 1m / (T) 50cm ~1m
Still Image: JPEG (EXIF 2.2 compatible) , DCF compatible, Support DPOF,
PictBridge available
Video: AVI with Audio / Audio: WAV
Still Image: 3264x2448(Interpolation) / 2816x2112 / 2784x1856(3:2)
2304x1728 / 1600x1200 / 640x480
Video: 640x480 / 320x240 / 160x128(@ 24fps)
Portrait / Landscape / Sunset / Night Scene / Text / Backlight / Kids / Beach
& Snow/ Close up / Sports / Fireworks
Auto / Daylight / Cloudy / Tungsten / Fluorescent (H) / Fluorescent (L) /
Custom
16 MB internal memory
SD slot
AA rechargeable Ni-MH battery X2
AA alkaline battery X2
Operating: 0°C to 40°C
Storage: -20 to 60° C
APPENDIX
40
Page 42

APPENDIX
GETTING HELP
You can get help from the troubleshooting section, FAQ or Customer Support on our website.
Troubleshooting Section in this User’s Guide
Please refer to the Troubleshooting section first, as it contains some of the most common problems
that users encounter.
Website FAQ
Please visit our website at www.jenoptik-camera.com to view the Frequently Asked Questions (FAQ).
Website Customer Support
If the problem you are encountering is not listed in the FAQ section, please send us an email through
our web site by clicking on Contact Us.
If you have questions concerning the operation of the camera or software installation, please have the
following information ready before you contact us:
Camera Information: Computer Information:
Name of camera model: Operation System:
Camera Serial Number: Computer Maker and Model:
Exact Error Message Received:
For ArcSoft Technical Support on Photo Editing Software, please contact:
In the USA and Canada China
ArcSoft, Inc. ArcSoft Beijing Co., Ltd.
46601 Fremont Blvd. No. 6 South Capital Gym Road
Fremont, CA 94538 Beijing New Century Hotel Office
Tel: (510) 440-9901 Building, #1060
Fax: (510) 440-1270 Beijing 100044, China
E-mail: support@arcsoft.com Tel: 8610-6849-1368
Fax: 8610-6849-1367
E-Mail:tech@arcsoft.com.cn
Japan Europe
ArcSoft Japan Unit 14, Shannon Industrial Estate
9F, 1-21-9, Higashi-Gotanda, Shannon, Co. Clare, Ireland
Shinagawa-ku, Tel: +353 (0) 61-702087
Tokyo 141-0022, Japan Fax: +353 (0) 61-702001
Tel: +81-3-5795-1392 E-Mail: europe@arcsoft.com
Fax: +81-3-5795-1397
E-Mail: support@arcsoft.jp
Taiwan Latin America (local call only)
ArcSoft Inc. Taiwan Branch Tel (Brazil): 00817-200-0709
Tel: +886 (0) 2-2506-9355 Tel (Chile): 800-202-797
Fax: +886 (0) 2-2506-8922 E-Mail: latinsupport@arcsoftsupport.com
E-Mail: support@arcsoft.com.tw
41
Page 43

APPENDIX
SAFETY TIPS AND MAINTENANCE
Cleaning the camera body
Please use a soft dry cloth to clean the camera.
Cleaning the lens and LCD
1. Blow off dirt or dust with a blower or canned air.
2. Gently wipe the lens and/or LCD with a micro-fiber cloth.
3. To remove dirt or residue, moisten the cloth with lens cleaning fluid and gently wipe the lens and/or
LCD.
CAUTION: Do not apply the fluid directly onto the lens or LCD.
Cleaning the battery contacts
As a matter of routine operation and handling, should any debris or foreign contaminant deposit itself
on the battery contacts in the camera and/or on the batteries, follow steps below to clean the battery
contacts to ensure proper electrical operation:
1. Wet the tip of a cotton bud/swab with rubbing alcohol and squeeze the excess alcohol from the
bud/swab.
2. Wipe the battery contacts inside the camera battery compartment and both ends of the batteries
lightly with the damp bud.
3. Allow the contacts to dry before placing batteries in the camera.
Caution:
1) Do not press hard during cleaning, as this will cause damage to the battery contacts.
2) Do not use water to clean the contacts, as this will increase the chance of oxidation.
3) Do not use Acetone or Nail Polish remover to clean the contacts as this may adversely affect
camera operation.
Safety Tips
Precautions for the camera
• Do not attempt to modify this camera in any way. This may cause a fire, electric shock or severe
damage to the camera.
• Do not use the flash in close proximity to people or animals.
• When taking photographs, never point the lens of the camera directly into very strong light.
• Please do not use this product in close proximity to flammable or explosive gases as this could
increase the risk of explosion.
• For safety reasons keep this product and accessories out of reach of children or animals to prevent
accidents.
• Do not swallow batteries or small camera accessories.
• Keep the camera away from water and other liquids, and never let it get wet. Do not use outdoors
when it is raining or snowing.
• Should any form of liquid enter the camera, do not use it. Switch the camera off, and then remove
the batteries. Do not continue to use the camera as this may cause a fire or electric shock.
• Do not insert or drop metallic or inflammable foreign objects into the camera through access points
e.g. card slot and battery chamber. This may cause a fire or electric shock.
• Do not operate this camera with wet hands. This could pose a risk of electric shock.
• Under the environment with electrostatic discharge, the camera may malfunction and require the
user to reset the camera.
• Under the environment with electrical fast transients (EFT), the camera may lose function and
require user to reset the camera.
• Shielded cables must be used with this unit to ensure compliance with the Class B FCC limits.
• Please avoid using the camera in high or low temperature. Operation temperature range 32°F 104°F (0°C- 40°C).
• It is normal that the temperature of the camera body rises after being in use for a long period.
• Do not leave this camera in places subject to extremely high temperatures such as in a sealed
vehicle, direct sunlight or other places with extreme variances in temperature. Exposure to extreme
42
Page 44

APPENDIX
temperatures may adversely affect the camera’s internal components and could cause a fire.
• Always use the camera and its accessories in a well-ventilated area.
• Allowing dust to accumulate in the camera over a long period of time is hazardous and in extreme
circumstances may cause a fire. It is best to clean your camera prior to seasonal periods of high
humidity.
Precautions for batteries
• Dispose of the battery in a manner that complies with applicable laws.
• Leakage, overheating, or burst battery could result in fire or injury.
• Do not short circuit, heat or dispose of batteries in fire.
• Ensure the battery is positioned correctly with regard to polarity.
• Battery may lose power if kept inside the camera for a long time without using. Please remove the
battery while the camera is not in use.
• Batteries may not work normally under 32°F (0°C).
Precautions for SD Memory Cards
• In the event of malfunction or damage, it is possible that data may be lost. Concord Camera is not
responsible in any way for such data loss.
• Do not touch the terminals with hands or metal objects.
• Keep dust, water and foreign objects away from the terminal section.
• Avoid heat, liquid and direct sunlight when using and for when storing.
• Do not open the battery/card cover or remove the SD Memory Card while data is being read or
written.
• Do not dismantle or modify.
• The recorded data may be lost if the card is affected by strong static electricity, electrical shock,
during card repair or malfunction.
• When using SD Memory Cards do not change the attributes (read-only, etc.) of the files (pictures
(JPEG) or video clips (AVI) on the card. Doing so may prevent the camera from working properly
when deleting, etc.
• Do not change the file names or the directory name of the pictures or video clips using a computer
or save files other than pictures or video clips taken by this camera onto the SD memory card.
Pictures or video clips that have been edited or added to the SD memory card with the computer
may not play back and it may cause the camera to malfunction.
• The SD Memory Card includes a write-protect switch. Sliding this switch downward prevents data
from being written to the card and pictures and video clips saved on the card are protected.
• Please note that pictures and video clips cannot be taken or deleted when the write-protect switch
is on.
• When using a large-capacity card, writing, reading and deleting may take some time.
• Do not store the card in places with high humidity, dusty places or where static electricity or
electromagnetic fields are likely to occur.
• Images stored in the memory card may be ruined or damaged if you turn off the camera while it is
in process of reading, writing or formatting etc.
• SD cards are delicate electronic devices. Please do not bend or drop them
• Please do not place the SD card in or near to an environment of strong electronic or magnetic
fields such as loud speakers or TV receivers.
• Please keep the SD card in its bag or case when not in use.
• It’s normal that the SD card is warm after use.
• Please make sure you switch off the camera before you remove the SD card.
• Do not open the battery/memory card door or remove the SD Memory Card while the camera is
reading, writing or formatting the card.
43
Page 45

APPENDIX
REGULATORY INFORMATION
INFORMATION
FCC WARNING: This equipment meets the limits for a Class B digital device, pursuant to Part 15
of FCC rules. Only the cable supplied with the camera should be used. Operation with other cables
is likely to result in interference to radio and TV reception and could void the user’s authorization to
operate this equipment. This device complies with Part 15 of the FCC Rules. Operation is subject to
the following two conditions:
• This device may not cause harmful interference.
• This device must accept any interference received, including interference that may cause undesired
operation.
Tested to comply
with FCC standards
for HOME OR OFFICE USE
Changes or modifications not expressly approved by the manufacturer may void the user’s authority to
operate this equipment.
USER INFORMATION
Note: This equipment has been tested and found to comply with the limits for a class B digital device,
pursuant to Part 15 of the FCC Rules. These limits are designed to provide reasonable protection
against harmful interference in a residential installation. This equipment generates uses and can
radiate radio frequency energy and, if not installed and used in accordance with the instructions, may
cause harmful interference to radio communications. However, there is no guarantee that interference
will not occur in a particular installation.
If this equipment does cause harmful interference to radio or television reception, which can
be determined by turning the equipment on and off, the user is encouraged to try to correct the
interference by one or more of the following measures:
• Reorient or relocate the receiving antenna.
• Increase the separation between the equipment and receiver.
• Connect the equipment into an outlet on a circuit different from that to which the receiver is connected.
• Consult the dealer or an experienced radio/TV technician for help.
- This product is in conformity with Directive 89/336/EEC.
Disposal of used Electrical & Electronic Equipment (Applicable in the European Union
and other European countries with separate collection systems)
This symbol on the product, or in the in the manual and in the warranty, and/or on its packaging
indicates that this product shall not be treated as household waste.
Instead it shall be handed over to the applicable collection point for the recycling of electrical and
electronic equipment.
By ensuring this product is disposed of correctly, you will help prevent potential negative
consequences for the environment and human health, which could otherwise be caused by
inappropriate waste handling of this product.
If your equipment contains easy removable batteries or accumulators please dispose these separately
according to your local requirements.
The recycling of materials will help to conserve natural resources. For more detailed information about
recycling of this product, please contact your local city offi ce, your household waste disposal service
or the shop where you have purchased the product.
The Jenoptik trademark is used by Concord Camera Corp. and its subsidiaries under license. Concord and the Concord logo are registered
trademarks or trademarks of Concord Camera Corp., in the United States and/or other countries. Microsoft and Windows are either registered
trademarks or trademarks of Microsoft Corporation in the United States and/or other countries. PhotoRite is a trademark of Zensis Limited.
PictBridge is a trademark.
44
Page 46

Visit Concord on the Internet
www.jenoptik-camera.com
JD 6.0z3 EasyShot User’s Guide
Copyright 2006 Concord Camera Corp.
Version 1.0
586212-00
R1
 Loading...