

Page 1

Table of contents
1 Getting Started
Package Contents............................. 1
System Requirements ...................... 2
Windows .......................................... 2
Macintosh ......................................... 2
Safety Information........................... 3
FCC Compliance and Advisory .......... 4
Camera Components ........................ 5
Front................................................ 5
Rear................................................. 5
Top .................................................. 5
Side .................................................6
Using the Included Accessories........ 6
Attaching the Wrist Strap ................... 6
Using the Soft Case ........................... 6
Operating the Multi-controller ......... 7
2 Preparing the Camera
Installing the Batteries..................... 8
Battery Status Indications .................. 8
Installing an SD Card........................ 9
To remove the SD card ......................9
Formatting Internal or SD Card
Memory ............................................ 9
Turning the Power On / Off............ 10
Using the Camera Mode Button...... 11
Setting the Date and Time.............. 11
Date Stamp..................................... 12
Setting the Language ..................... 12
Selecting Menus and Settings ........ 13
3 Basic Functions
Setting the LCD Display Mode ........ 15
Shooting Mode................................ 15
Playback Mode ................................ 15
Information Displayed on the
LCD Monitor.................................... 16
Shooting Mode................................ 16
Playback Mode ................................ 16
Using the Zoom Feature................. 17
Digital Zoom................................... 17
4 Taking Pictures
Basic Still Image Shooting ............. 18
Replaying an Image after
Shooting Quickly............................ 19
Setting the Image Quality and
Resolution...................................... 19
Using the Flash .............................. 20
Setting the Red-eye Reduction
Function ......................................... 20
Selecting the Metering Mode ......... 21
Macro Mode.................................... 21
Setting the Self-Timer and
Continuous Shooting...................... 22
Shooting in Long Shutter Mode...... 23
Adjusting the Exposure ---EV
adjustment..................................... 23
Adjusting Color Tones ---Setting
the White Balance.......................... 24
Using the Self-Portrait Mirror ........ 24
Movie Mode.................................... 25
5 Replaying Photo & Video Clips
Replaying Pictures ......................... 26
Magnifying Images ........................ 26
Viewing Pictures in Thumbnail
Mode .............................................. 27
Erasing Files From Memory............ 27
Erasing Images Individually.............. 27
Erasing All Unprotected Images........ 28
Protecting Photos and Video
Clips ............................................... 28
Playing a Slide Show (Auto Play)... 29
Page 2

Copying Flash Memory Images
to a Memory Card ........................... 29
Setting USB Mode........................... 29
6 File Names & Printing
About File and Folder Numbers ...... 30
Folder File Capacity ......................... 30
File Number Reset .......................... 31
DPOF Print Settings........................32
Selecting Images for Printing............ 32
Printing still images with a
PictBridge printer ........................... 33
Printing images .............................. 33
Setting Print Size............................ 34
PictBridge Custom Menu ................ 35
7 Making Connections
Downloading Images to a
Computer........................................ 36
Downloading Directly from an SD
Card............................................... 36
Connecting the Camera to a
Computer with a USB Cable.............. 37
Understanding Camera Memory
and Storage.................................... 38
Internal Memory.............................. 38
Optional SD Memory Card ................ 38
DCF Protocol................................... 38
8 Installing Software
Install the Software Driver............. 39
Installing Roxio PhotoSuite 5.0
SE ...................................................40
Using the Roxio PhotoSuite 5.0
SE ...................................................43
9 Appendix
Troubleshooting ............................. 44
Specifications ................................. 45
Page 3
-1-
1 Getting Started
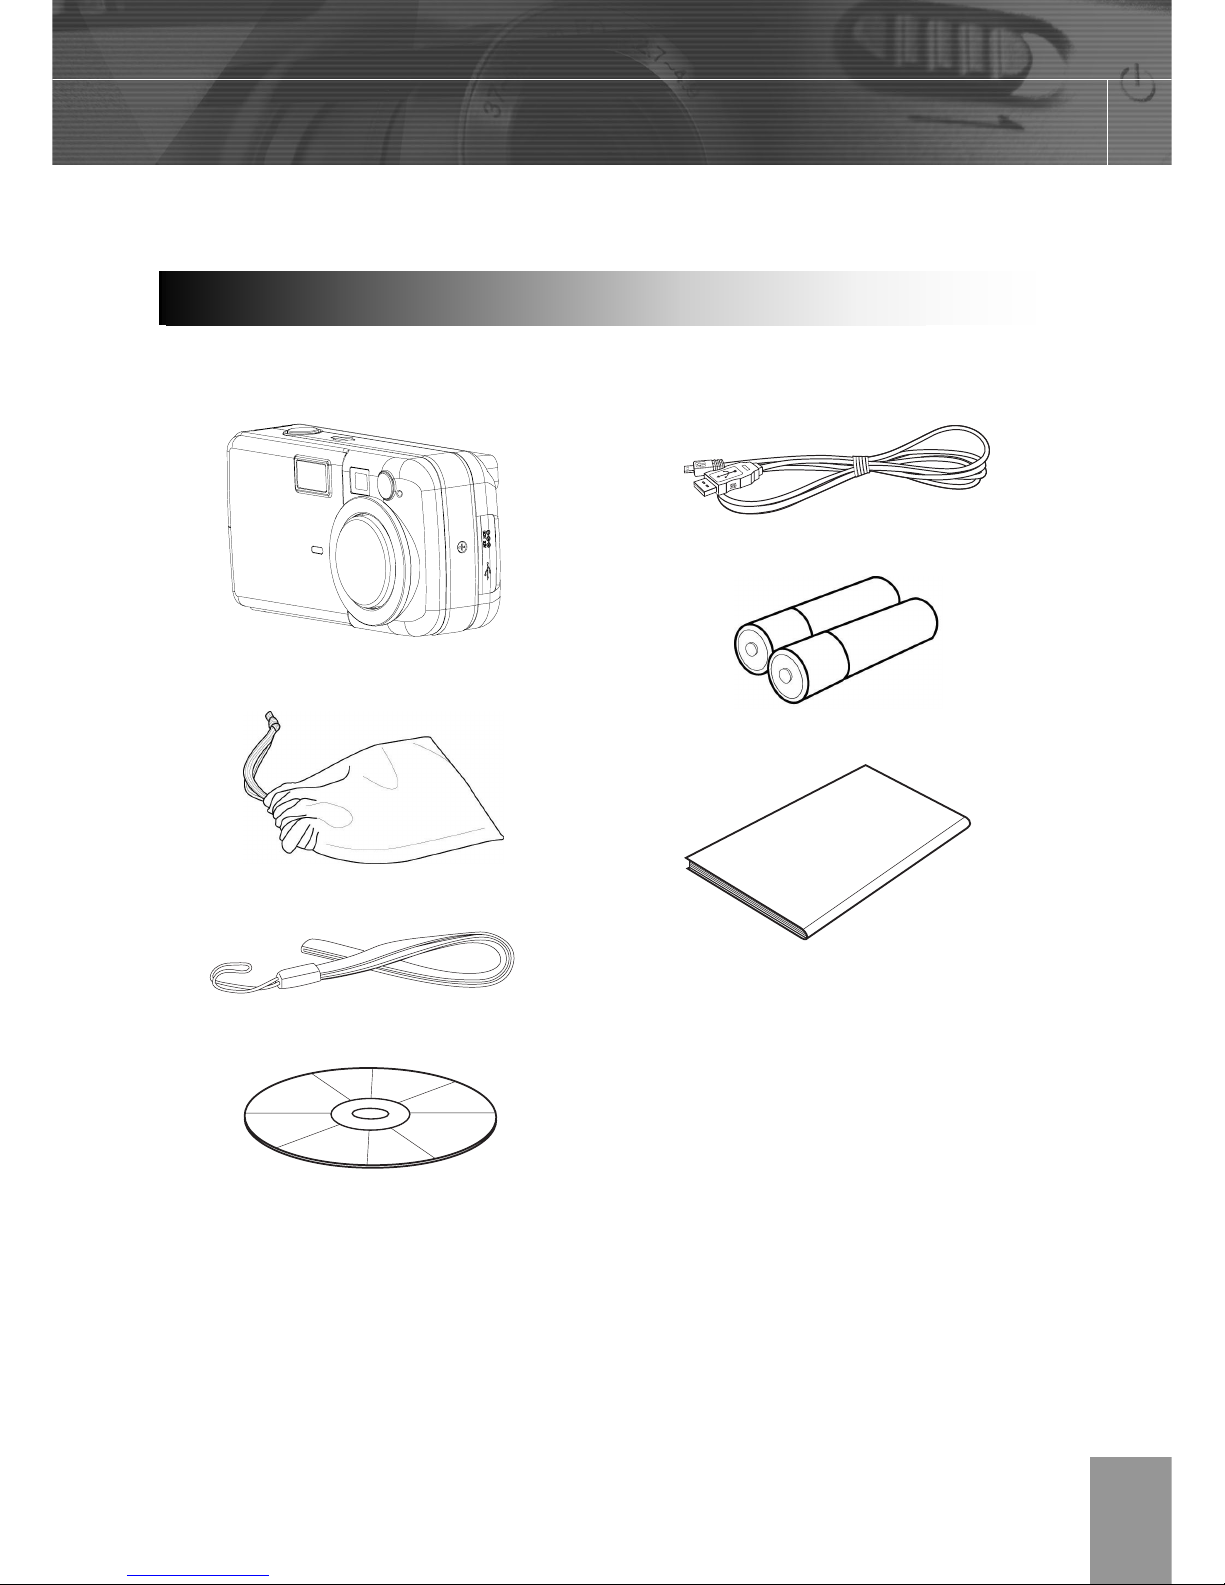
Please contact your dealer immediately if any of the items below are missing or damaged.
Camera
USB Cable
Soft Case
Strap
2 AA Batteries
Software Installation
CD-ROM
User Manual
Package Contents
Page 4

-2-
Windows:
PC with processor better than MMX Pentium 266 MHz
Windows XP/2000/ME/98SE/98
Minimum 128 MB RAM
USB port
CD-ROM drive
800x600 pixels, 16-bit color display compatible monitor
Macintosh:
Power Mac G3 or later
Mac OS 9.0, 9.1, 9.2
Minimum 128 MB RAM
USB port
CD-ROM drive
800x600 pixels, 16-bit color display compatible monitor
Specifications are subject to change without prior notice.
System Requirement
s
Page 5

-3-
Before using the camera, please ensure that you read and understand the safety
precautions described below. Always ensure that the camera is operated correctly.
Do not aim the camera directly into the sun or other intense light sources which could
damage your eyesight.
Do not try to open the case of the camera or attempt to modify this camera in any
way. High-voltage internal components create the risk of electric shock when exposed.
Maintenance and repairs should be carried out only by authorized service providers.
Do not fire the flash too close to the eyes of animals or people, especially for young
children. Eye damage may result. In particular, remain at least one meter away from
infants when using flash.
Keep the camera away from water and other liquids. Do not use the camera with wet
hands. Never use the camera in the rain or snow. Moisture creates the danger of fire
and electric shock.
Keep the camera and its accessories out of the reach of children and animals to
prevent accidents or damage to the camera.
If you notice smoke or a strange odor coming from the camera, turn the power off
immediately and unplug the AC adapter from the power outlet. Take the camera to
the nearest authorized service center for repair. Never attempt to repair the camera
on your own.
Use only the recommended power accessories. Use of power sources not expressly
recommended for this equipment may lead to overheating, distortion of the
equipment, fire, electrical shock or other hazards.
Disconnect the compact power adapter from both the camera and power outlet after
recharging and when the camera is not in use to avoid fires and other hazards.
The compact power adapter of the camera is designed for exclusive use with this camera.
Do not use it with other products. There is a risk of fire and other hazards.
Safety Information
Page 6

-4-
This device complies with Part 15 of the FCC Rules. Operation is subject to the following
two conditions: 1.) this device may not cause harmful interference, and 2.) this device
must accept any interference received, including interference that may cause
unsatisfactory operation.
This equipment has been tested and found to comply with the limits for a Class B
peripheral, pursuant to Part 15 of the FCC Rules. These limits are designed to provide
reasonable protection against harmful interference in a residential installation. This
equipment generates, uses, and can radiate radio frequency energy and, if not installed
and used in accordance with the instructions, may cause harmful interference to radio
communication. However, there is no guarantee that interference will not occur in a
particular installation. If this equipment does cause harmful interference to radio or
television reception, which can be determined by turning the equipment off and on, the
user is encouraged to try to correct the interference by one or more of the following
measures.
Reorient or relocate the receiving antenna.
Increase the separation between the equipment and receiver.
Connect the equipment to an outlet on a circuit different from that to which the
receiver is connected.
Consult the dealer or an experienced radio/TV technician for help.
Any changes or modifications not expressly approved by the party responsible for
compliance could void the user’s authority to operate the equipment. When shielded
interface cables have been provided with the product or when specified additional
components or accessories have elsewhere been designated to be used with the
installation of the product, they must be used in order to ensure compliance with FCC
regulations.
FCC Compliance and Advisory
Page 7
-5-
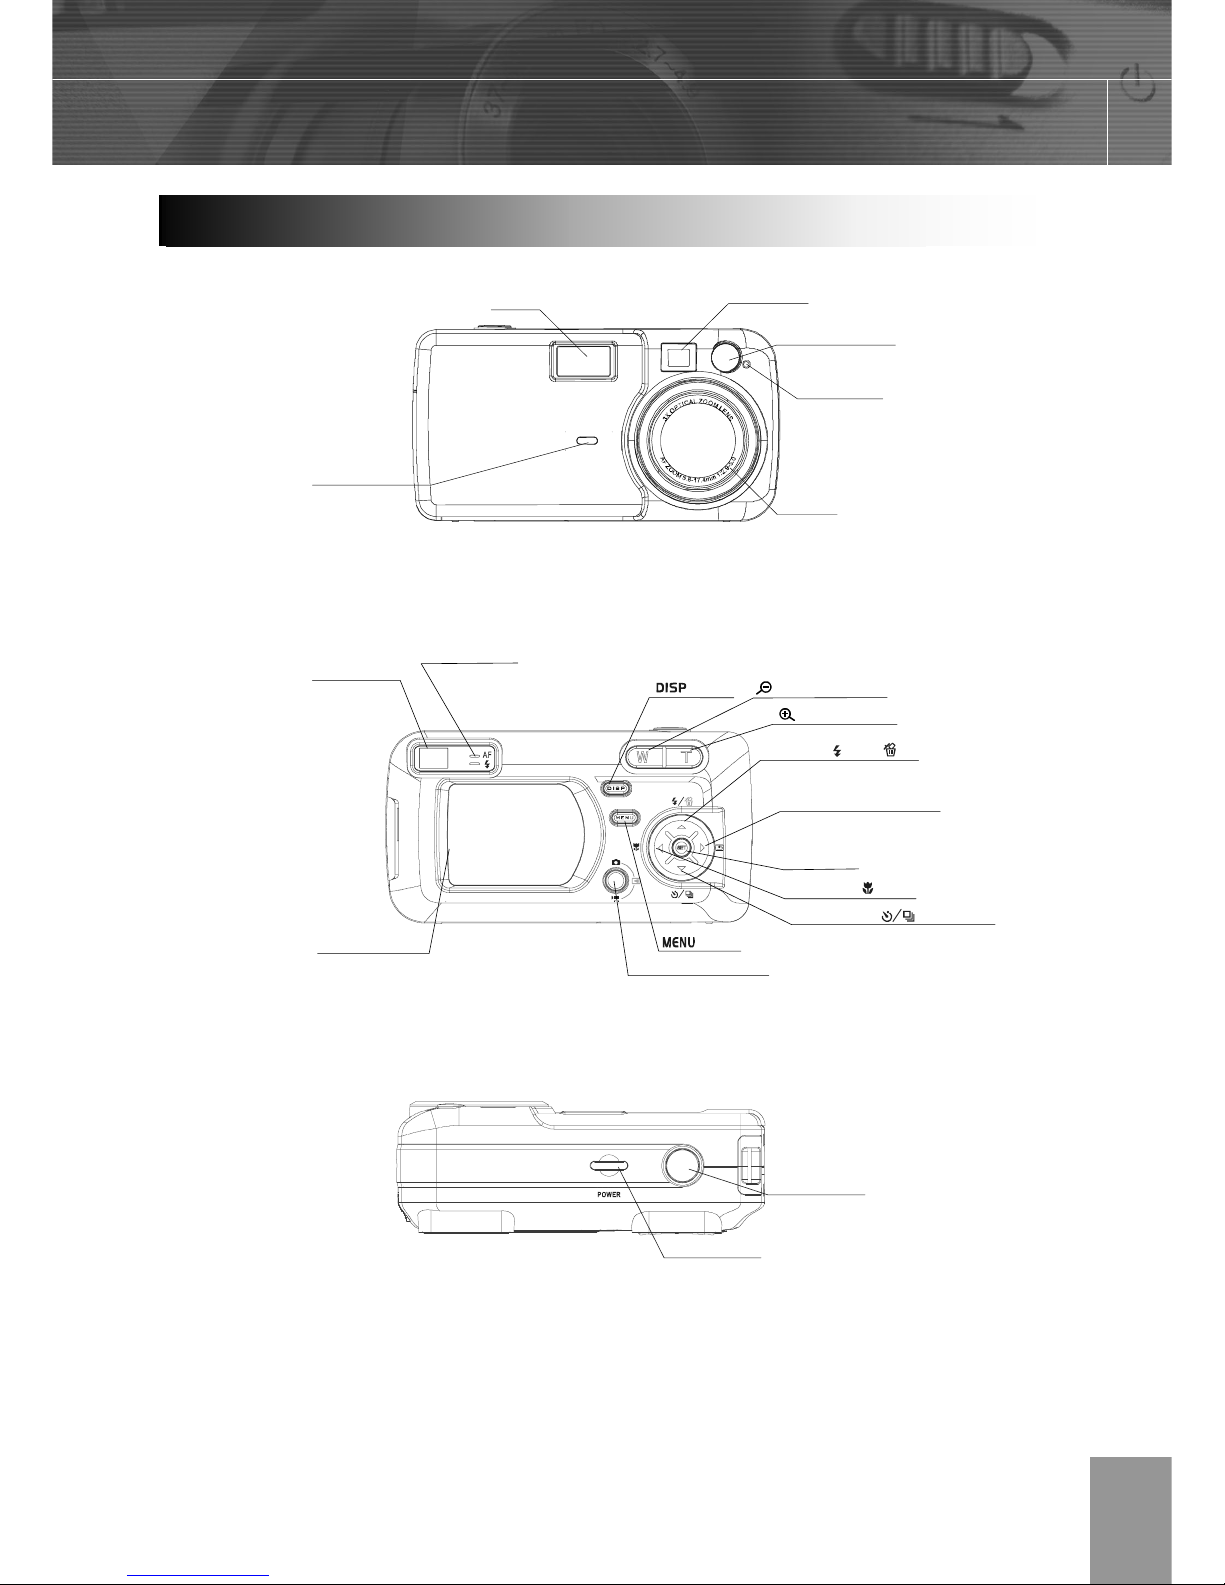
Front
Rear
Top
Camera Component
s
Macro
Drive mode
Operation lamp
Viewfinder
/Zoom Out button
Flash/
Erase
Up button/
Right button/ Quick View
Down button/
Left button/
/Zoom In button
button
button
Camera mode button
LCD screen
SET button
Shutter button
Power button
Microphone
Viewfinder
Self-portrait mirro
r
Flash
Self-timer lamp
Lens
Page 8
-6-
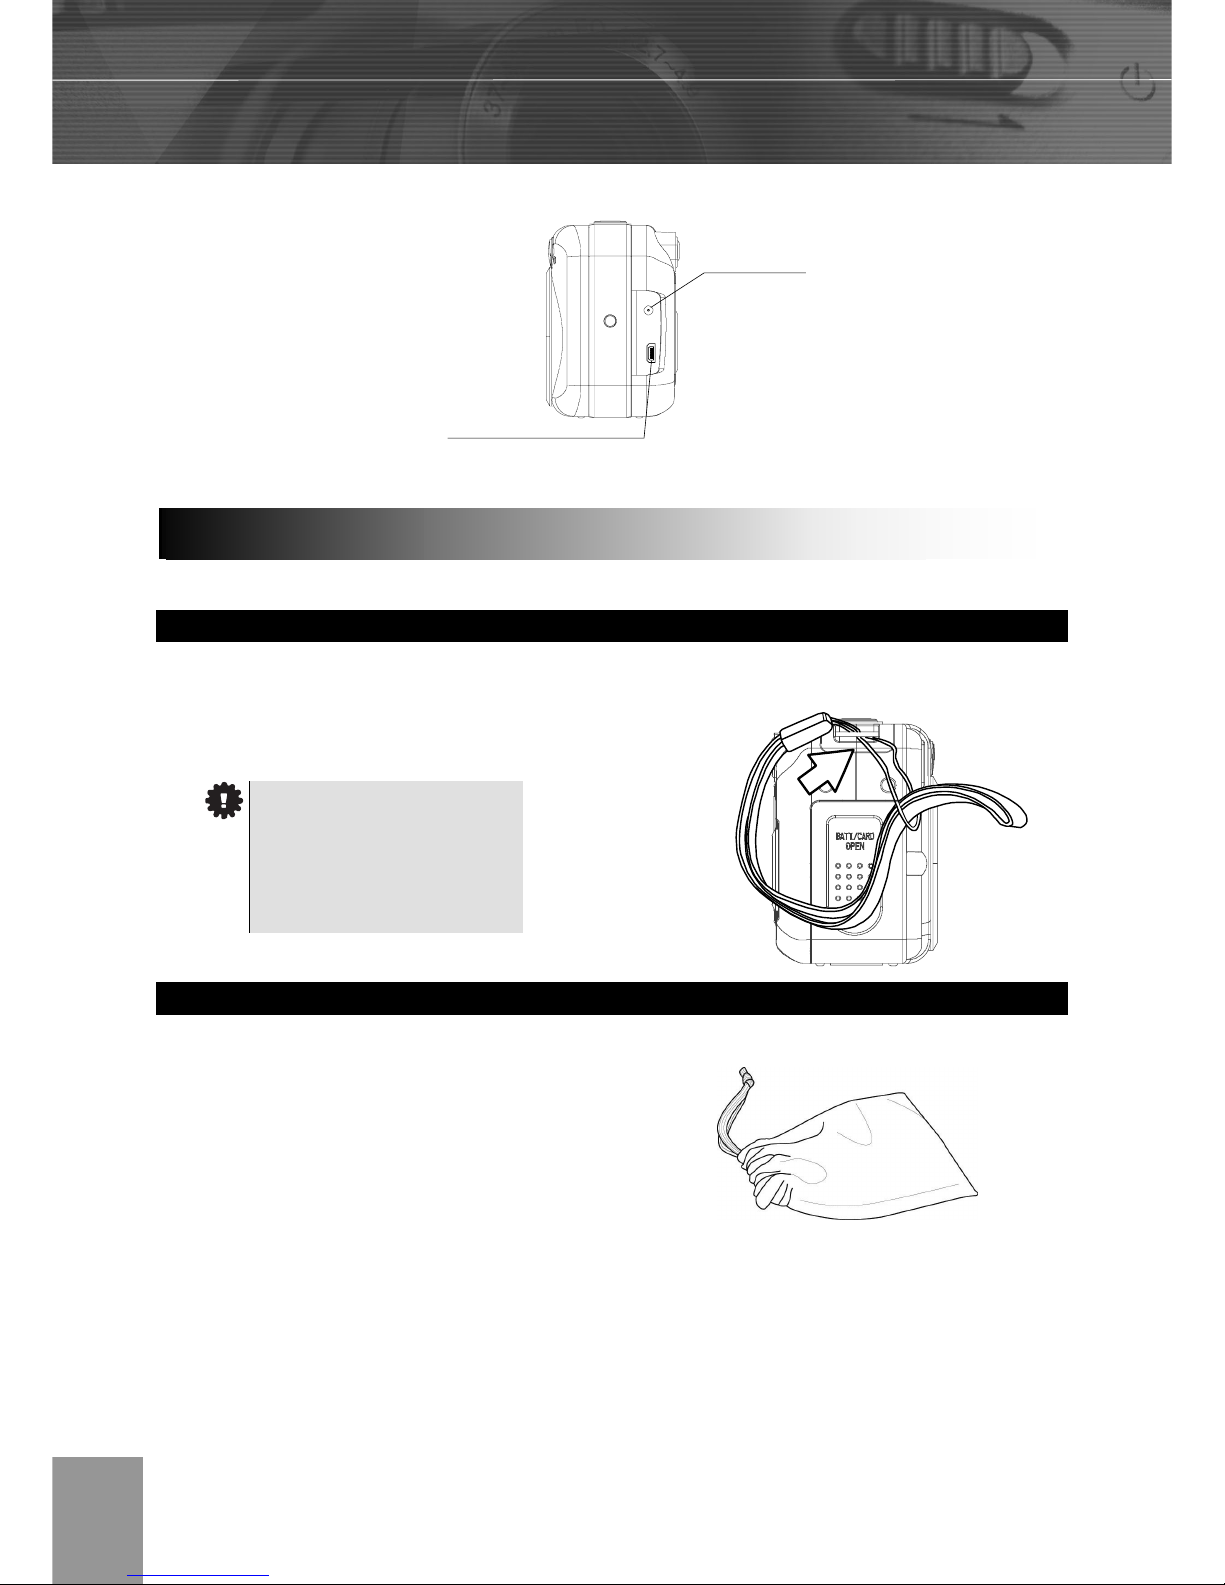
Don’t swing the camera
when carrying it by the
wrist strap.
Side
Attaching the Wrist Strap
The illustration shows how to attach the wrist strap to your camera.
Using the Soft Case
Store the camera in the included soft case
when not in use.
Slide the camera in the case with the LCD
screen facing down as illustrated.
Using the Included Accessorie
s
DC IN terminal
Video out terminal / USB port
Page 9
-7-
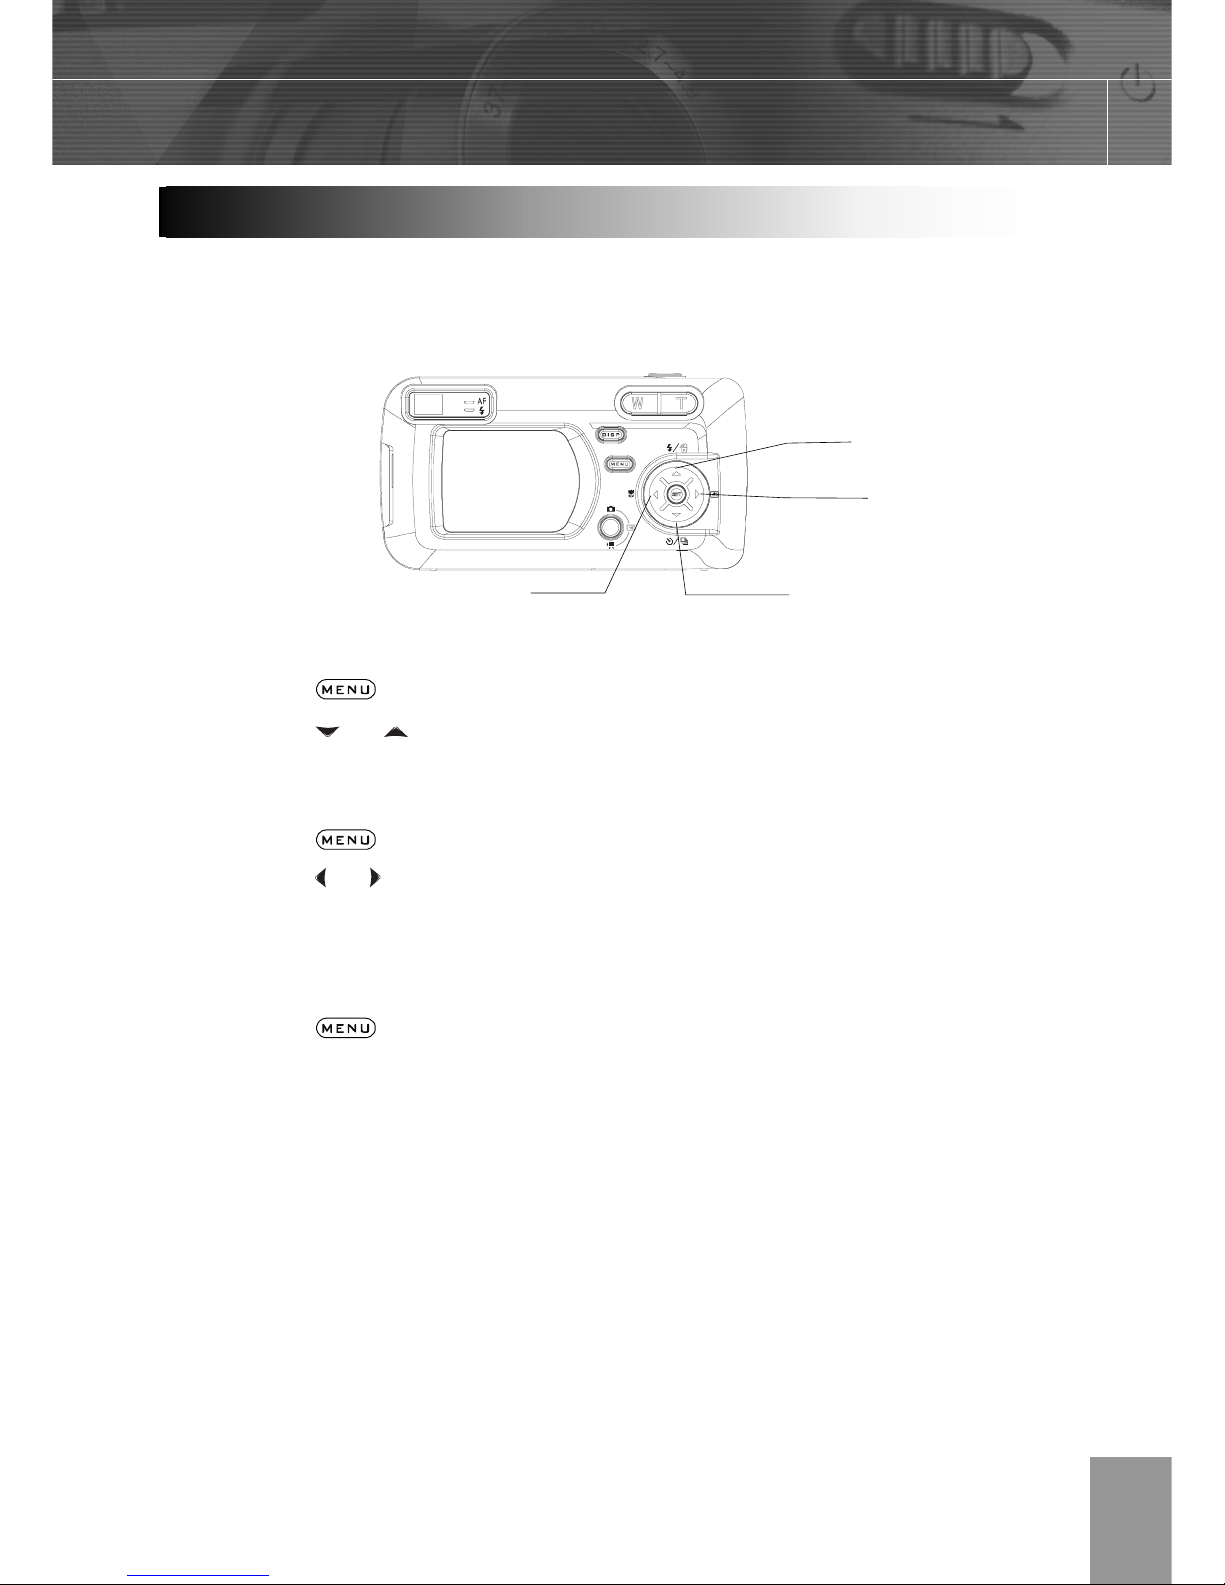
The multi-controller is used to select choices, images and menus on the LCD monitor and
confirm the selection.
Moving the cursor on the LCD monitor up and down.
Press the button.
Press the
or to select a menu item on the LCD monitor.
Moving the cursor on the LCD monitor left and right.
Press the button.
Press the
or to select a menu item on the LCD monitor.
Confirming a menu selection.
Press the SET button.
Press the
button to close the menu window.
Operating the Multi-controlle
r
Up button
Right button
Down button
Left button
Page 10
-8-
When the indicator on the right side of the viewfinder is blinking green, the
SD card is being written to, read, erased or transmitted to. Therefore, never
turn off the camera or open the SD card slot/battery cover while this
indicator is blinking green.
2 Preparing the Camera
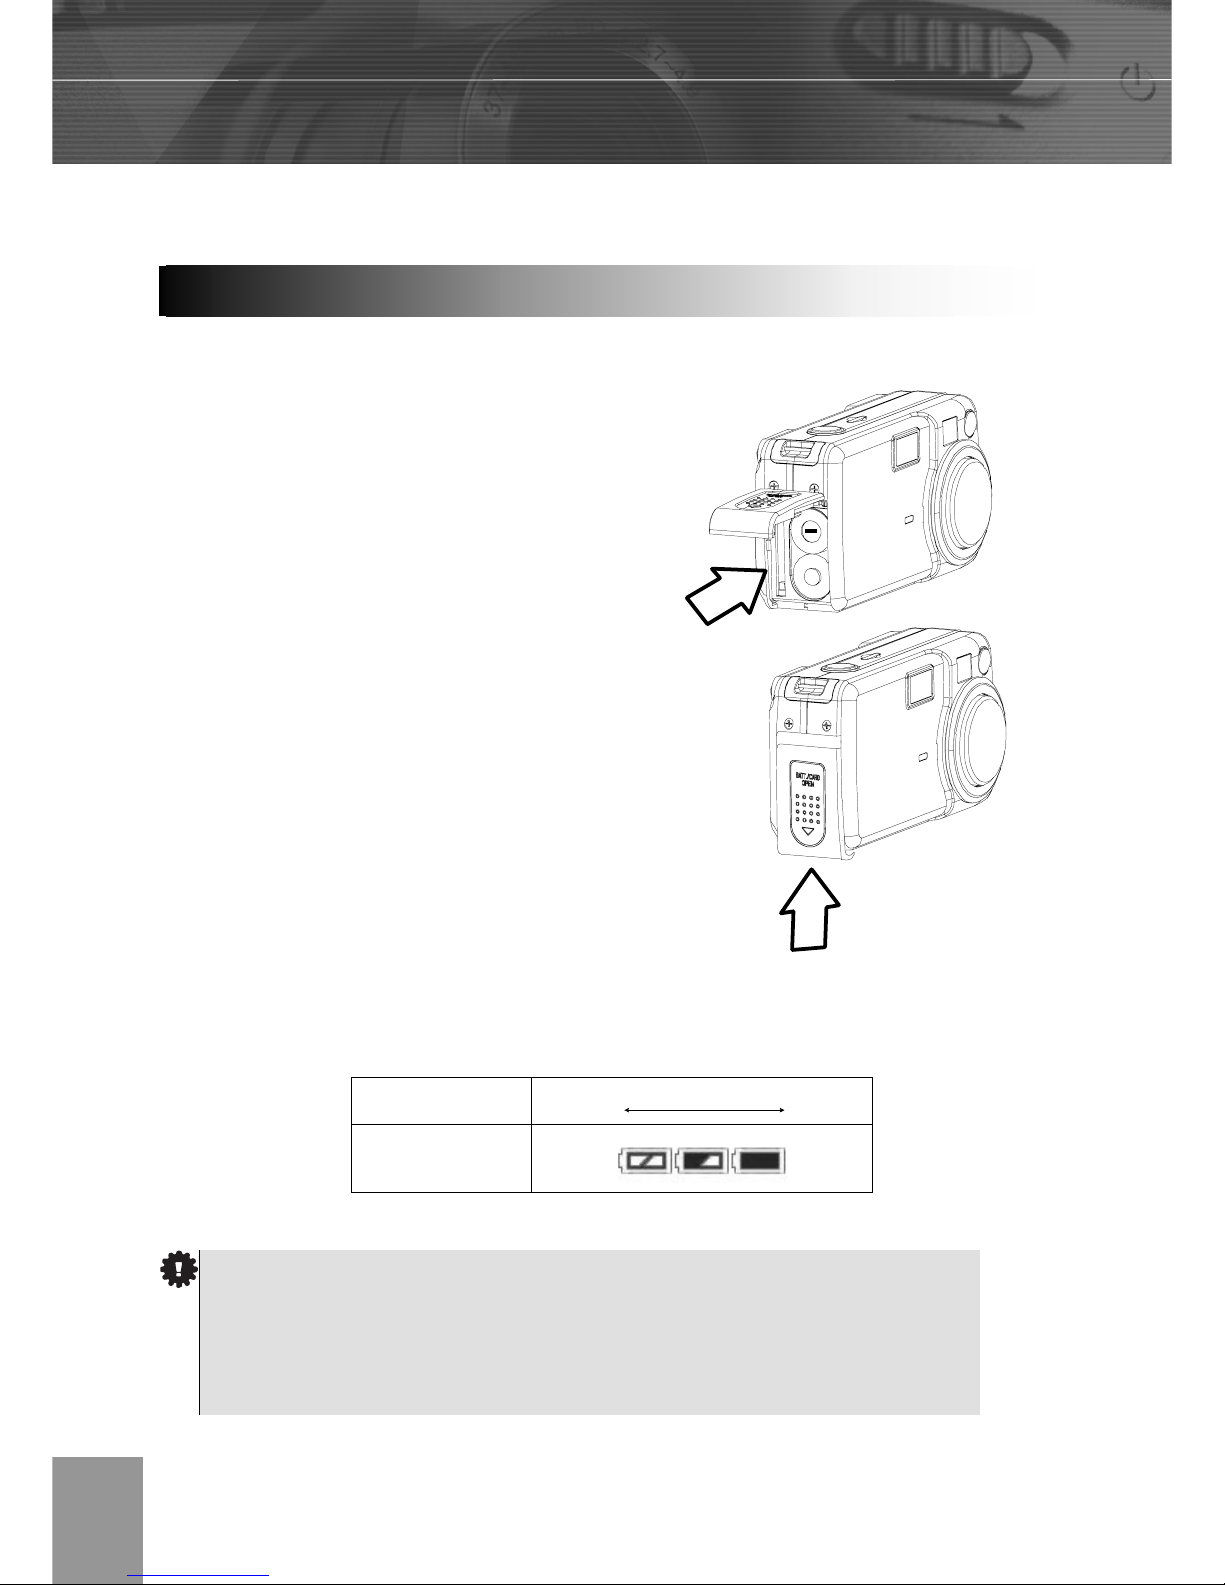
Insert two (2) AA-size alkaline batteries (included with the camera)
1. Be sure that the camera power is off.
2. Slide the SD card slot / battery cover and
open the battery cover.
3. Insert the battery pack with the positive (+)
and negative (-) poles matching the
directions indicated inside the battery cover.
4. Slide the battery cover closed.
Battery Status Indications
The LCD monitor displays an icon or message to let you know when batteries are low or
depleted.
Charge Level High
Low
Indicator
Installing the Batteries
+
Page 11
-9-
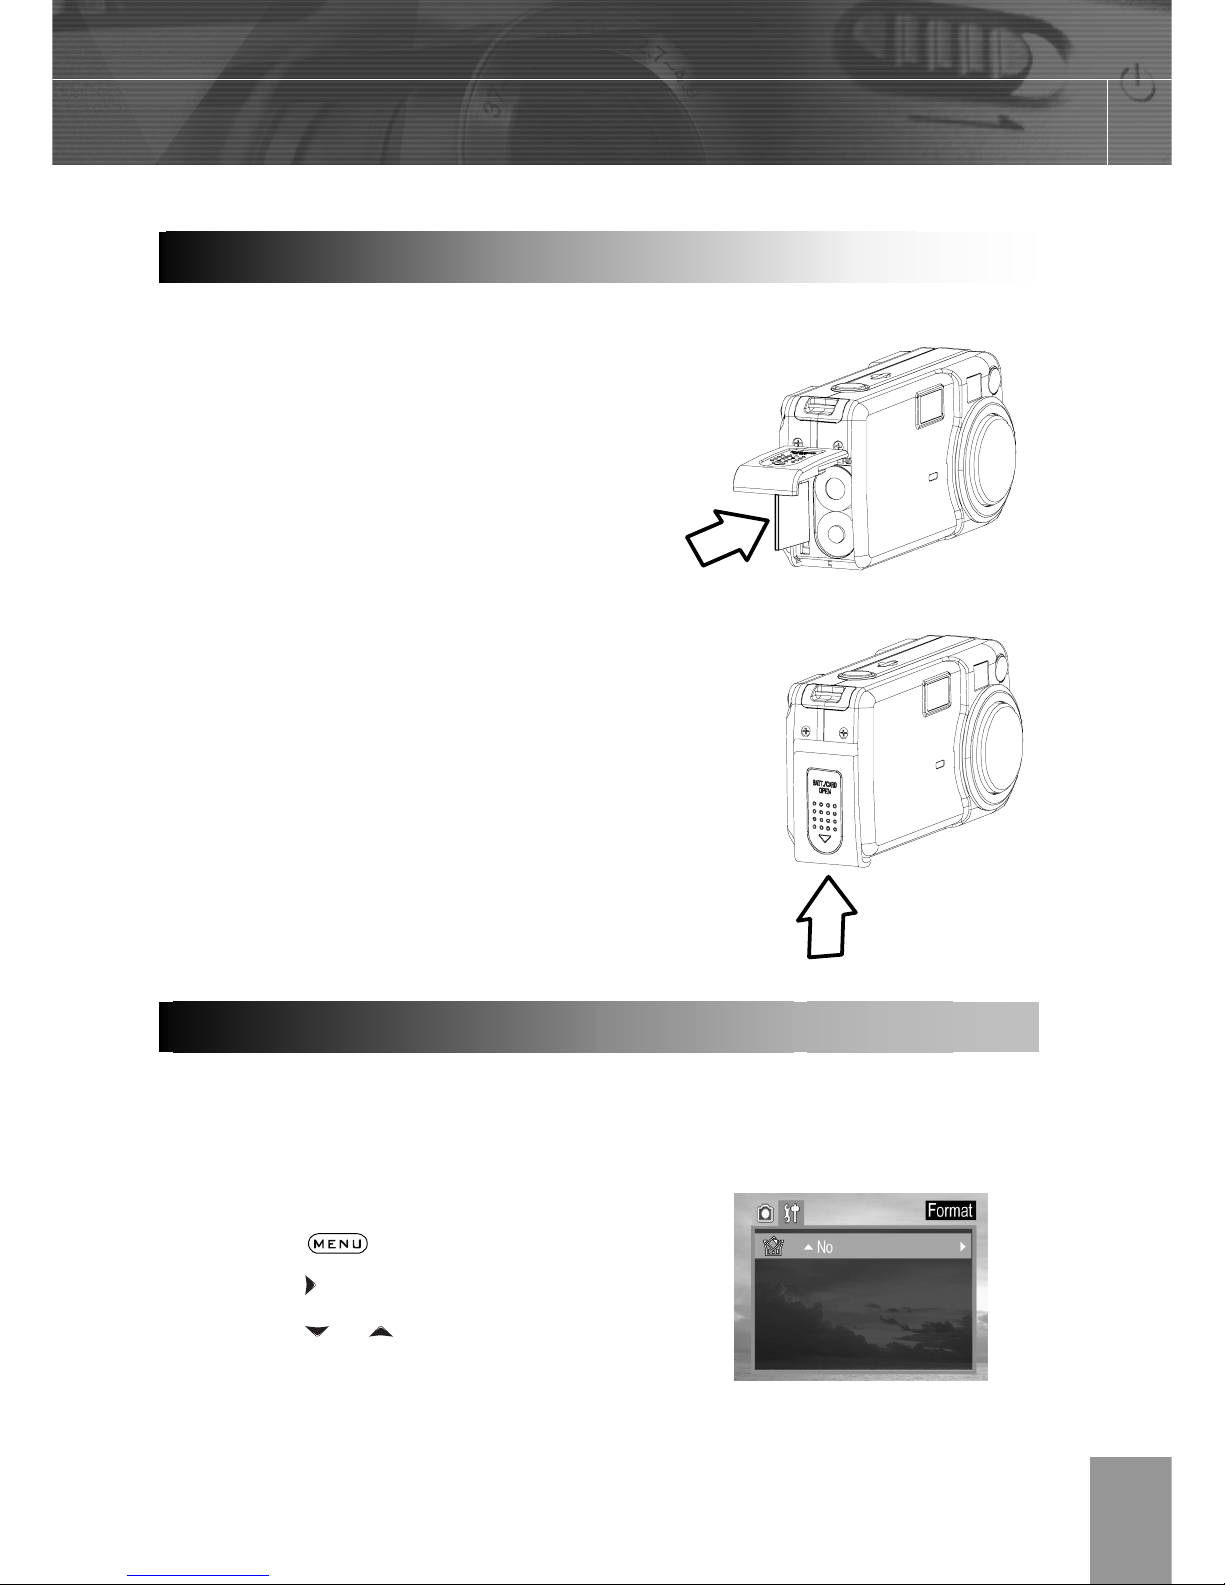
1. Turn off the camera.
2. Slide the SD card slot/battery cover in the
direction of the arrow to open the cover.
3. Insert the SD card with the label facing up
and the arrow pointing in.
To remove the SD card
1. Turn off the camera.
2. Slide the SD card slot/battery cover in the
direction of the arrow to open the cover.
3. Gently press on the edge of the SD card
and release it. Pull the card out and close
the slot/battery cover.
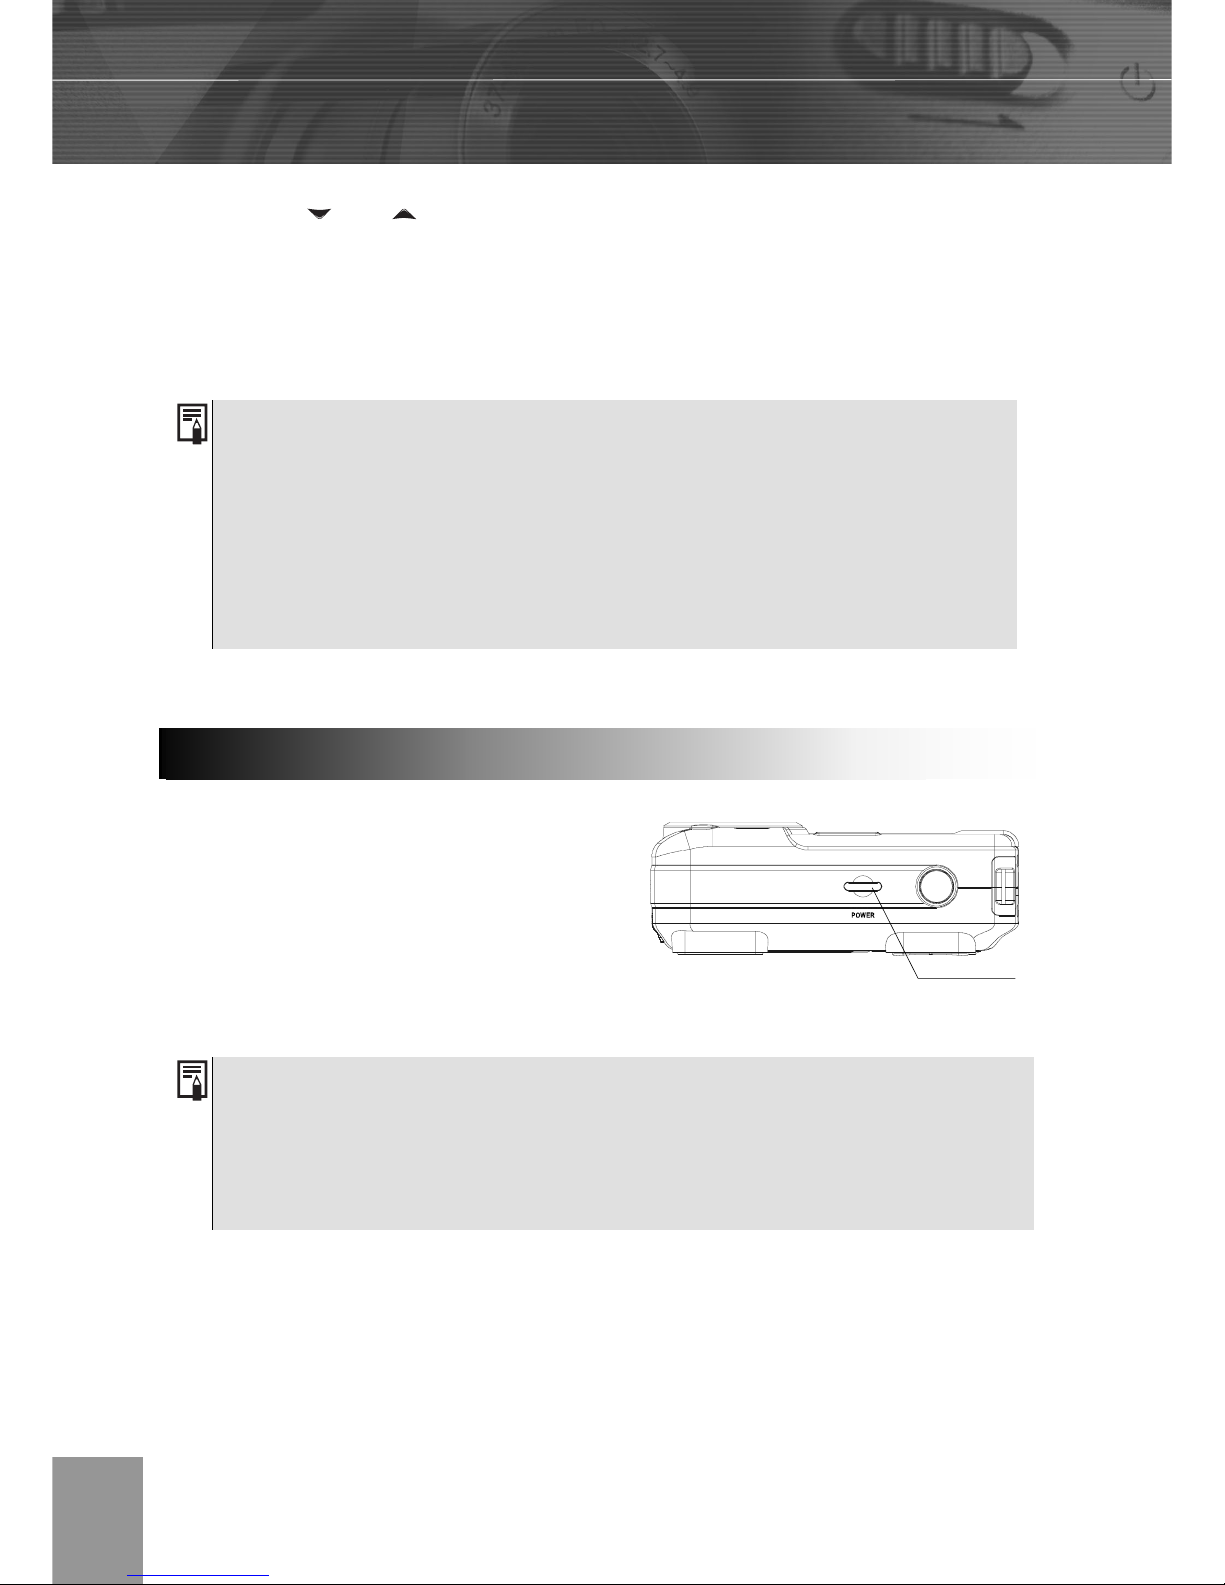
You should format a new SD card or one from which you wish to erase all images and
other data.
1. Turn on the camera.
2. Press the
button.
3. Press the
arrow to select the Setup Menu.
4. Press the
or arrow to select Format
then press the SET button.
Installing an SD Card
Formatting Internal or SD Card Memory
Page 12
-10-
5. Press the and arrow to select Yes
or No.
6. Press the SET button to confirm the
selection.
Press the power button and hold it until the
LCD indicator begins flashing green. It takes
about 1 second to power on the camera.
To turn off the camera
Press the power button to turn off the camera.
1. Please note that formatting an SD card erases all the data it contains,
including protected images and other file types. Please check the contents
of the SD card before formatting it.
2. SD cards formatted in another camera, computer or peripheral device may
not operate correctly. When that happens, reformat the SD card with this
camera.
Turning the Power On / Of
f
Power button
1. If camera power is turned off by the Auto Power Off feature, press the power
button to turn it back
2. Press the camera mode button and hold it could launch the playback mode
directly when power off.
Page 13
-11-
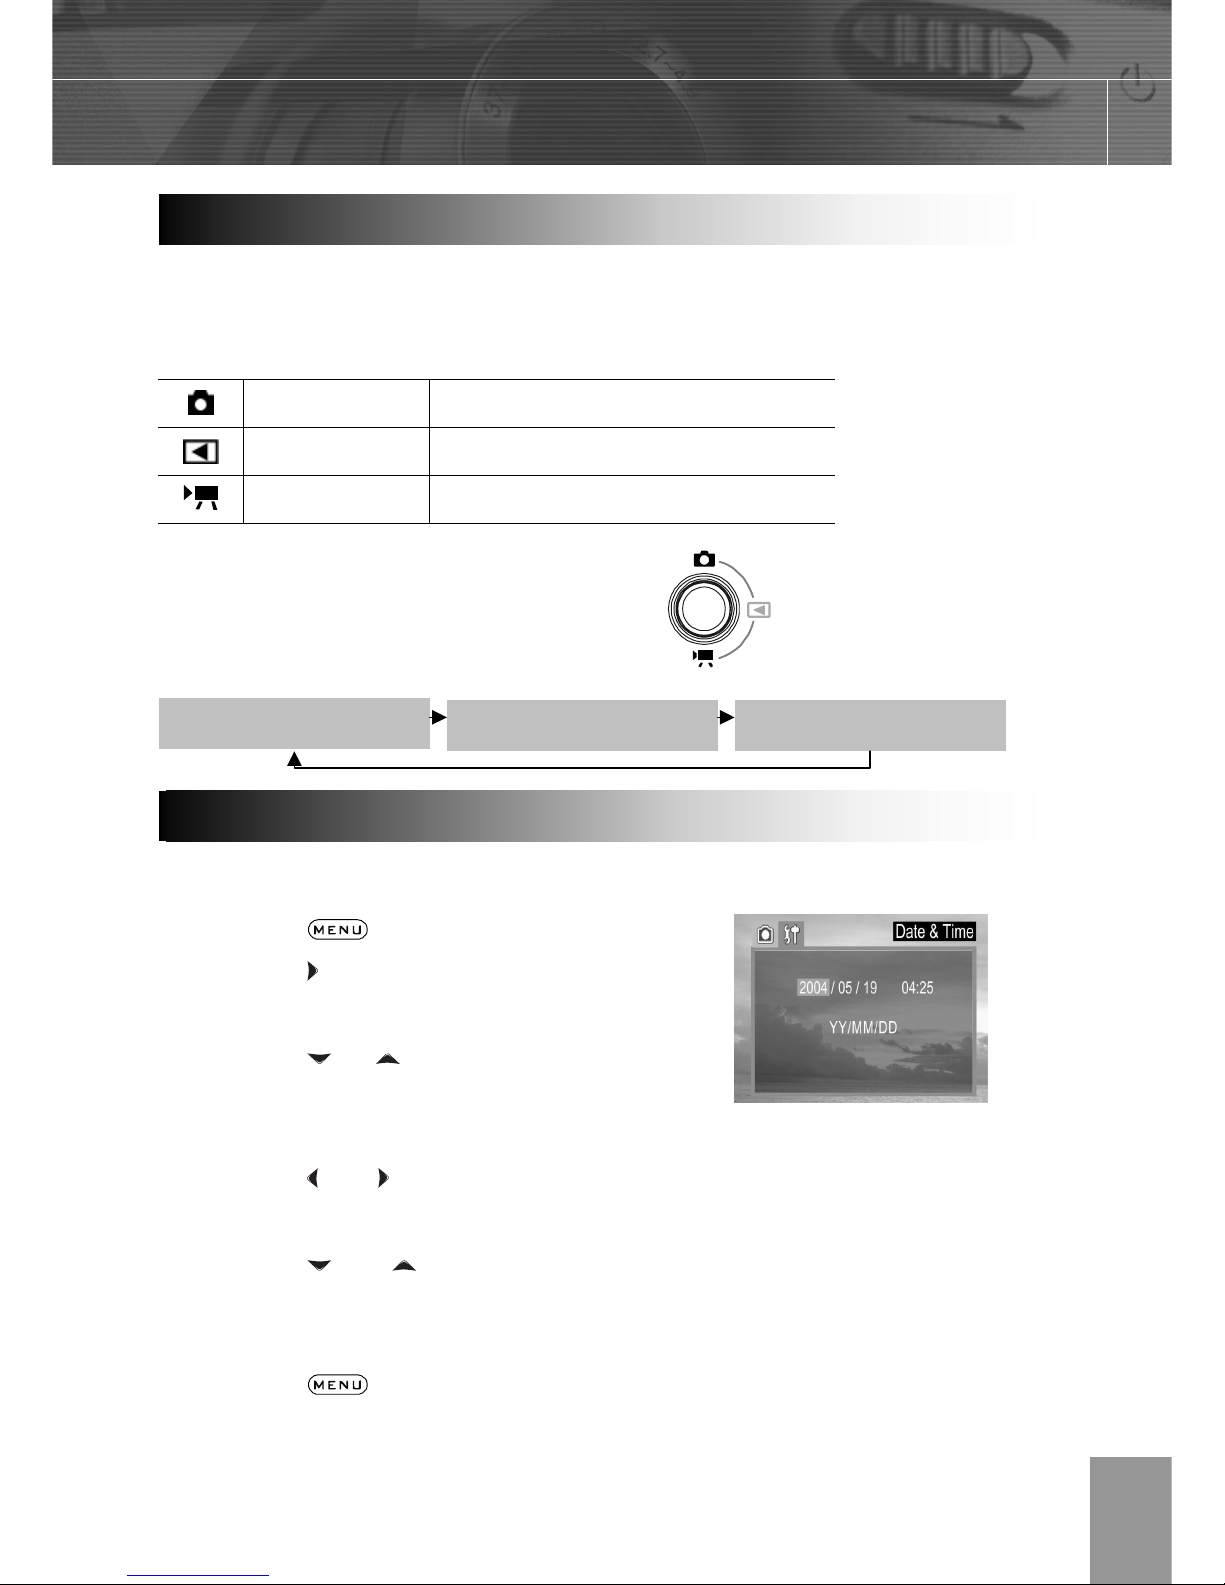
Use the camera mode button to switch between the camera’s available working modes at
any time.
Shooting
Mode
Shooting still images
Play Mode
V
iew recorded images and
movies
Movie Mode For shooting movies
The camera mode changes as shown in the
following diagram when the Camera Mode
button is pressed.
1. Turn on the camera.
2. Press the
button.
3. Press the arrow to select the Setup
Menu.
4. Press the
or arrow to select Date
& Time then press the SET button.
5. Set the date and Time.
6. Press the
and arrow to select a field
to change.
7. Press the and arrow to set the
values.
8. Press the SET button.
9. Press the
button to close the menu
window.
Setting the Date and Tim
e
Using the Camera Mode Button
Shooting Mod
e
Play Mod
e
Movie Mode
Page 14
-12-
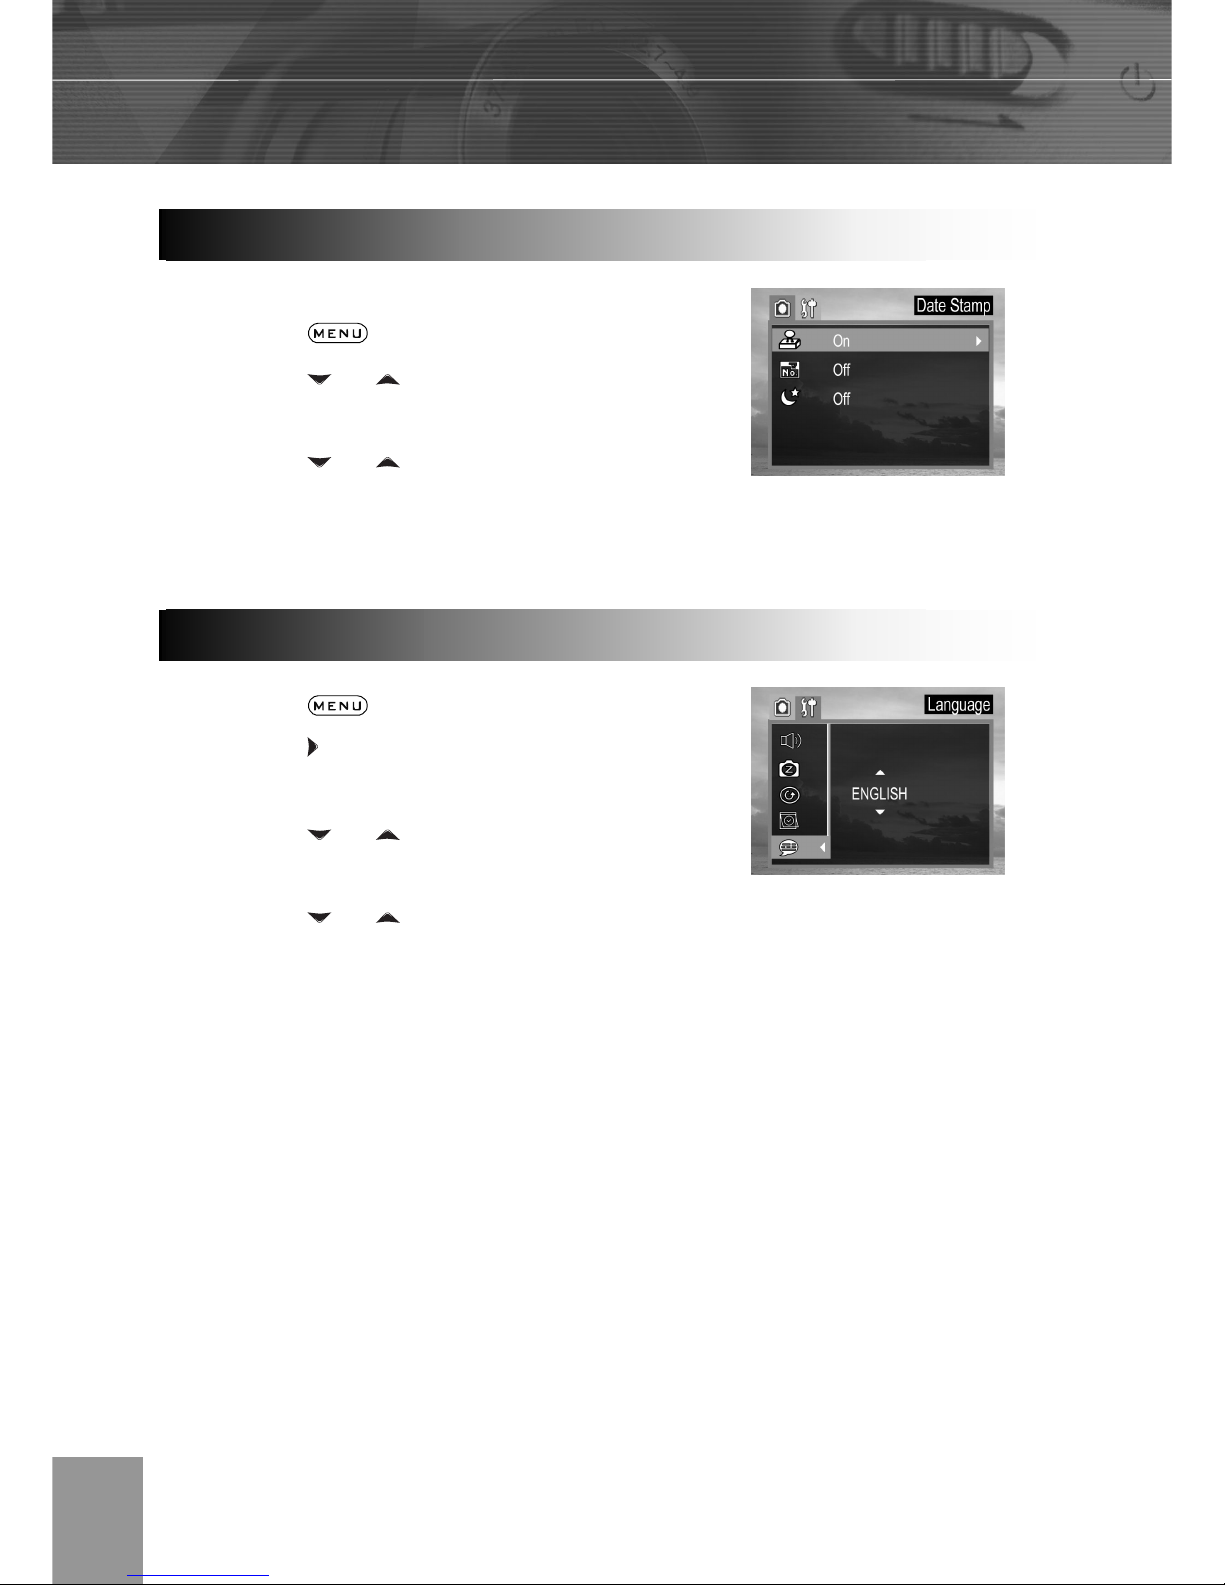
Prints the image’s creation date on the image.
1. Press the button.
2. Press the
or arrow to select Date
Stamp then press the SET button.
3. Press the
or to set Date Stamp
on/off.
4. Press the SET button to close the menu
window.
1. Press the
button.
2. Press the
arrow to select the Setup
Menu.
3. Press the
or arrow to select
Language then press the SET button.
4. Press the
or to select a Language.
5. Press the SET button to close the menu
window.
Date Stamp
Setting the Langua
ge
Page 15
-13-
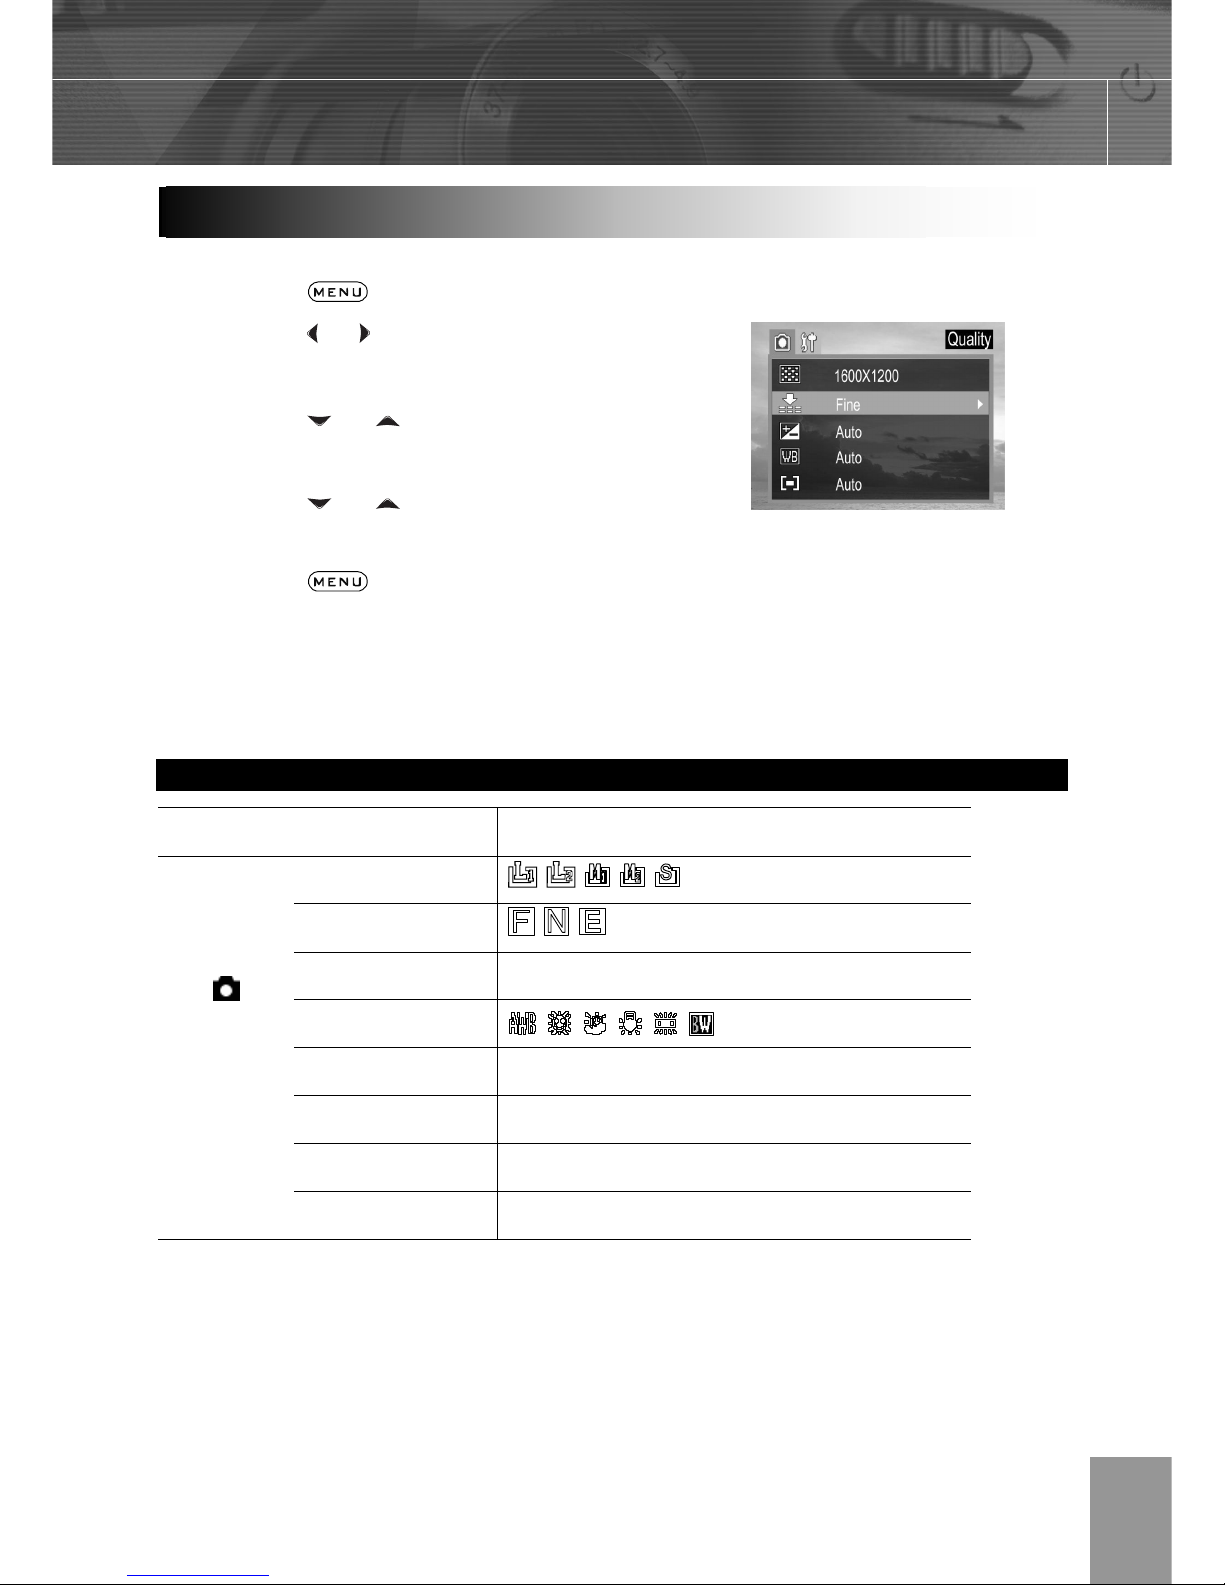
Use the menus as shown below to operate the various shooting and replaying settings.
1. Press the
button.
2. Press the
or arrow to select the REC /
Playback or the Setup Menu.
3. Press the
or arrow to select a
menu item then press the SET button.
4. Press the
or to select the settings
you wish to set then press the SET button.
5. Press the
button to close the menu
window.
This chart shows the options for each menu settings.
Menu Items Selectable with the MENU Button
Menu Item Available Setting
Resolution
Quality
Exposure
+2/+1.7/+1.3/+1.0/+0.7/+0.3/0.0/
-0.3
/
-0.7/-1.0/-1.3/-1.7/-2.0
White Balance
Metering Auto / Multi / Spot
Date Stamp On / Off
File NO. Reset On / Off
Shooting
Mode
REC Menu
Long Shutter Off / 1 sec / 2 sec / 4 sec / 8 sec
Selecting Menus and Settin
gs
Page 16
-14-
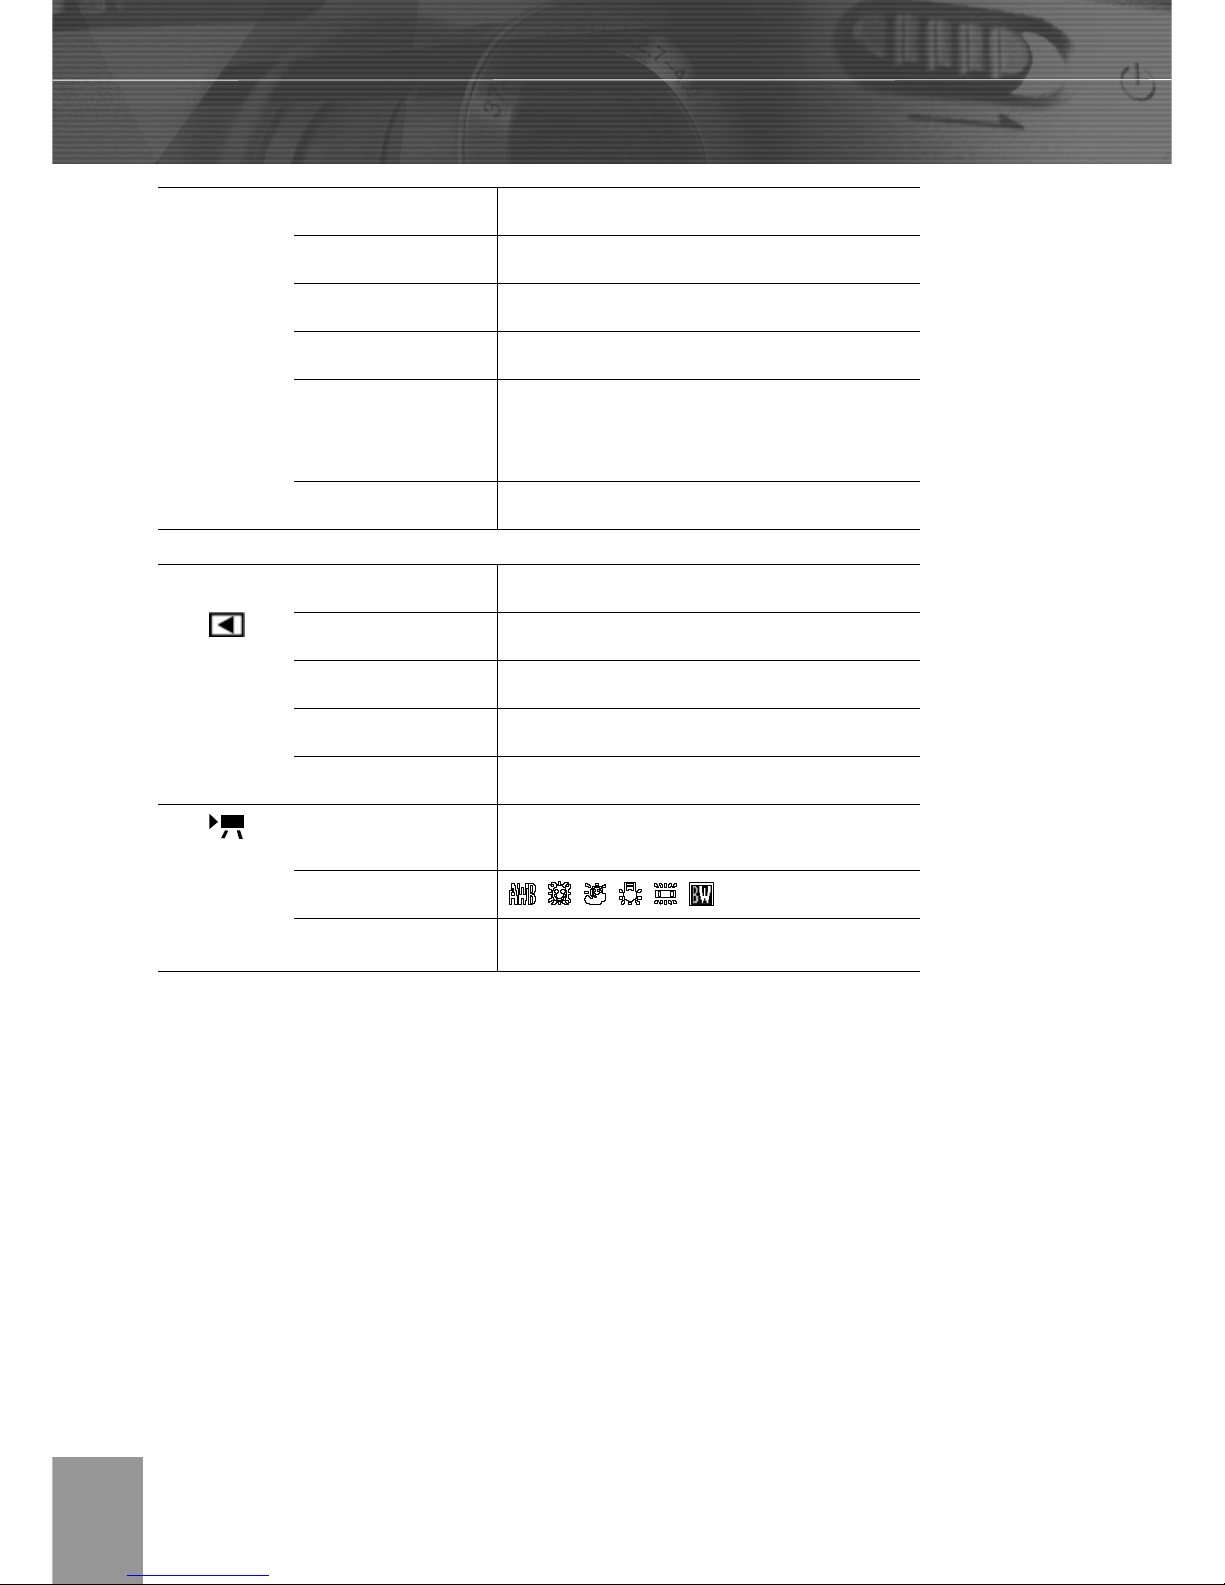
Beep On / Off
Power Save Off / 1 min / 3 min / 5 min
Quick View No / Yes
Date & Time Sets the date and time
Language
English / Traditional Chinese / Simplified Chinese /
Japanese / Korean / German / Franch / Portugese / Italian /
Spanish / Dutch / Russian
Setup
Menu
Format No / Yes
Protect Single / All / Unprotect All
Delete All Single / All
Slide Show Off / 5 sec / 10 sec
Print Order Single / All / Reset
Play Mode
Playback
Menu
Copy To Card No / Yes
Exposure
+2/+1.7/+1.3/+1.0/+0.7/+0.3/
0.0/-0.3/-0.7/-1.0/-1.3/-1.7/-2.0
White Balance
Movie
Mode
REC Menu
File NO. Reset On / Off
Page 17
-15-
3 Basic Functions
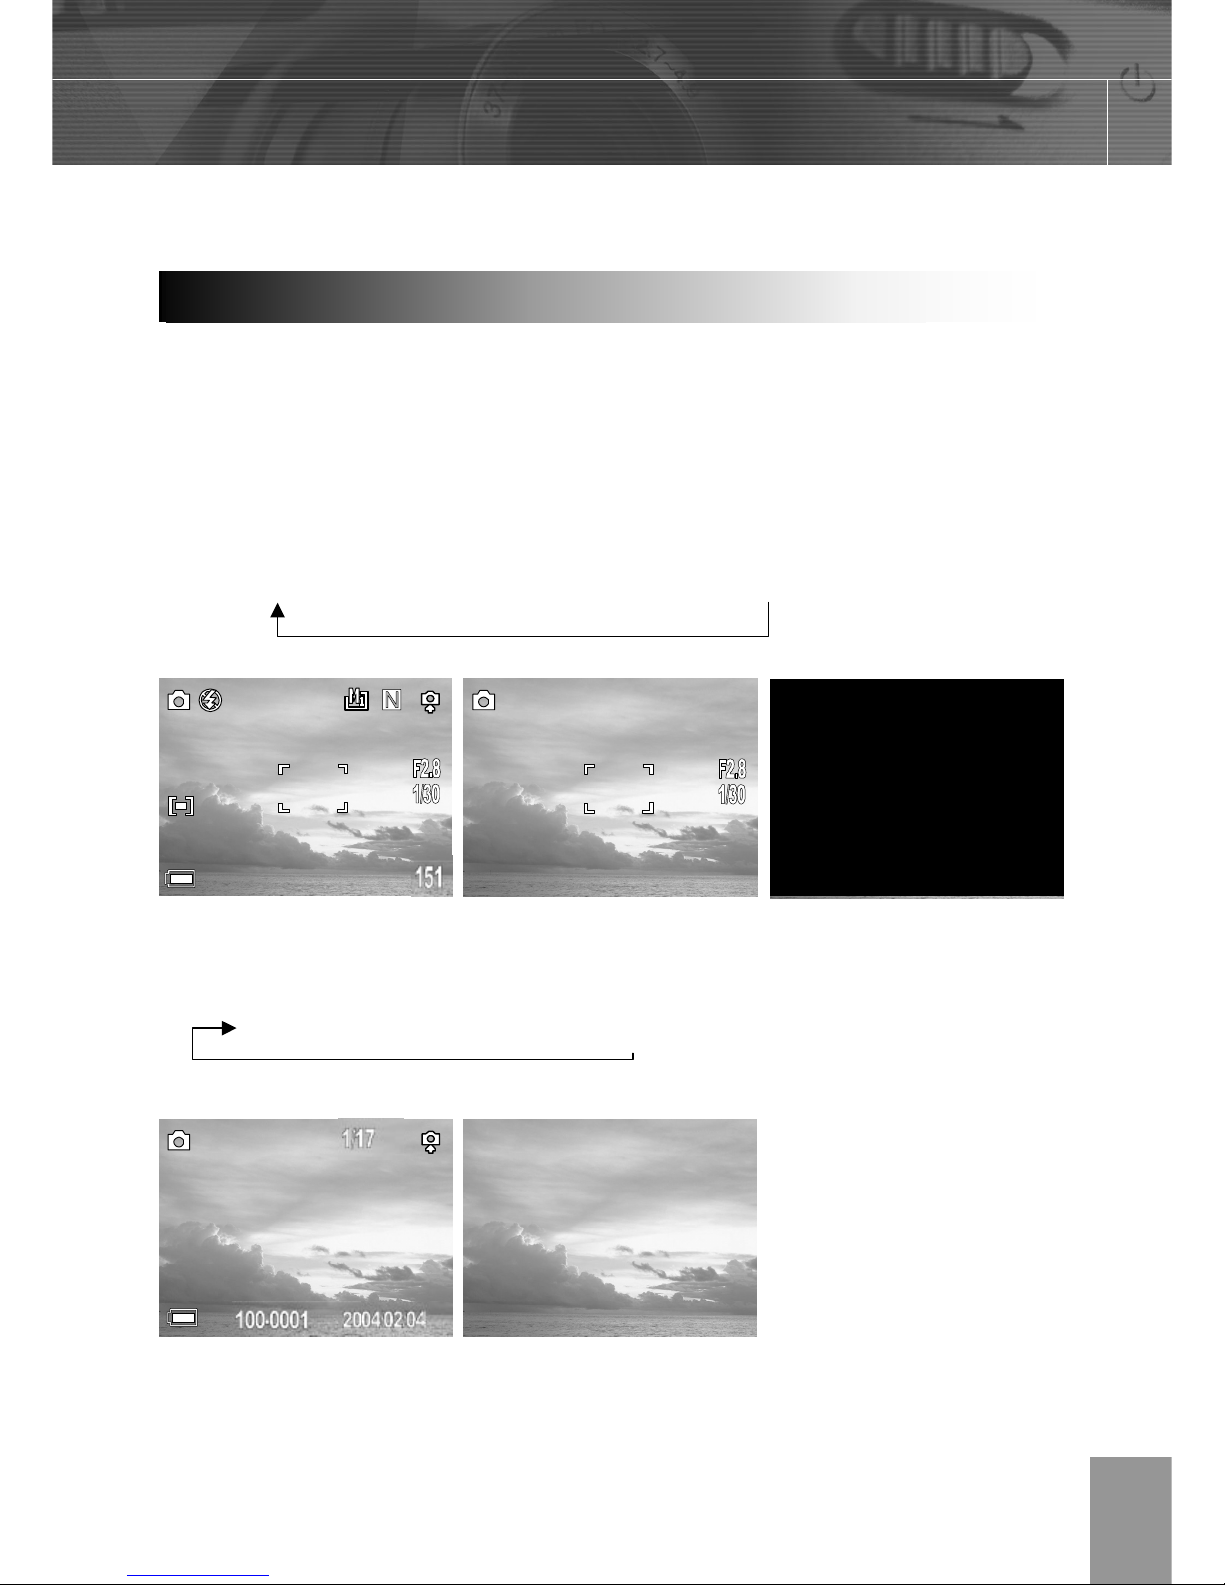
Pressing the DISP button switches the LCD screen display mode.
Pressing the DISP button cycles the LCD screen to the next mode each time the button is
pressed.
Shooting Mode
On (with Information)On (No Information) No LCD monitor display
Playback Mode
Display (Information) Simple Display (No Information)
Setting the LCD Display Mod
e
Page 18
-16-
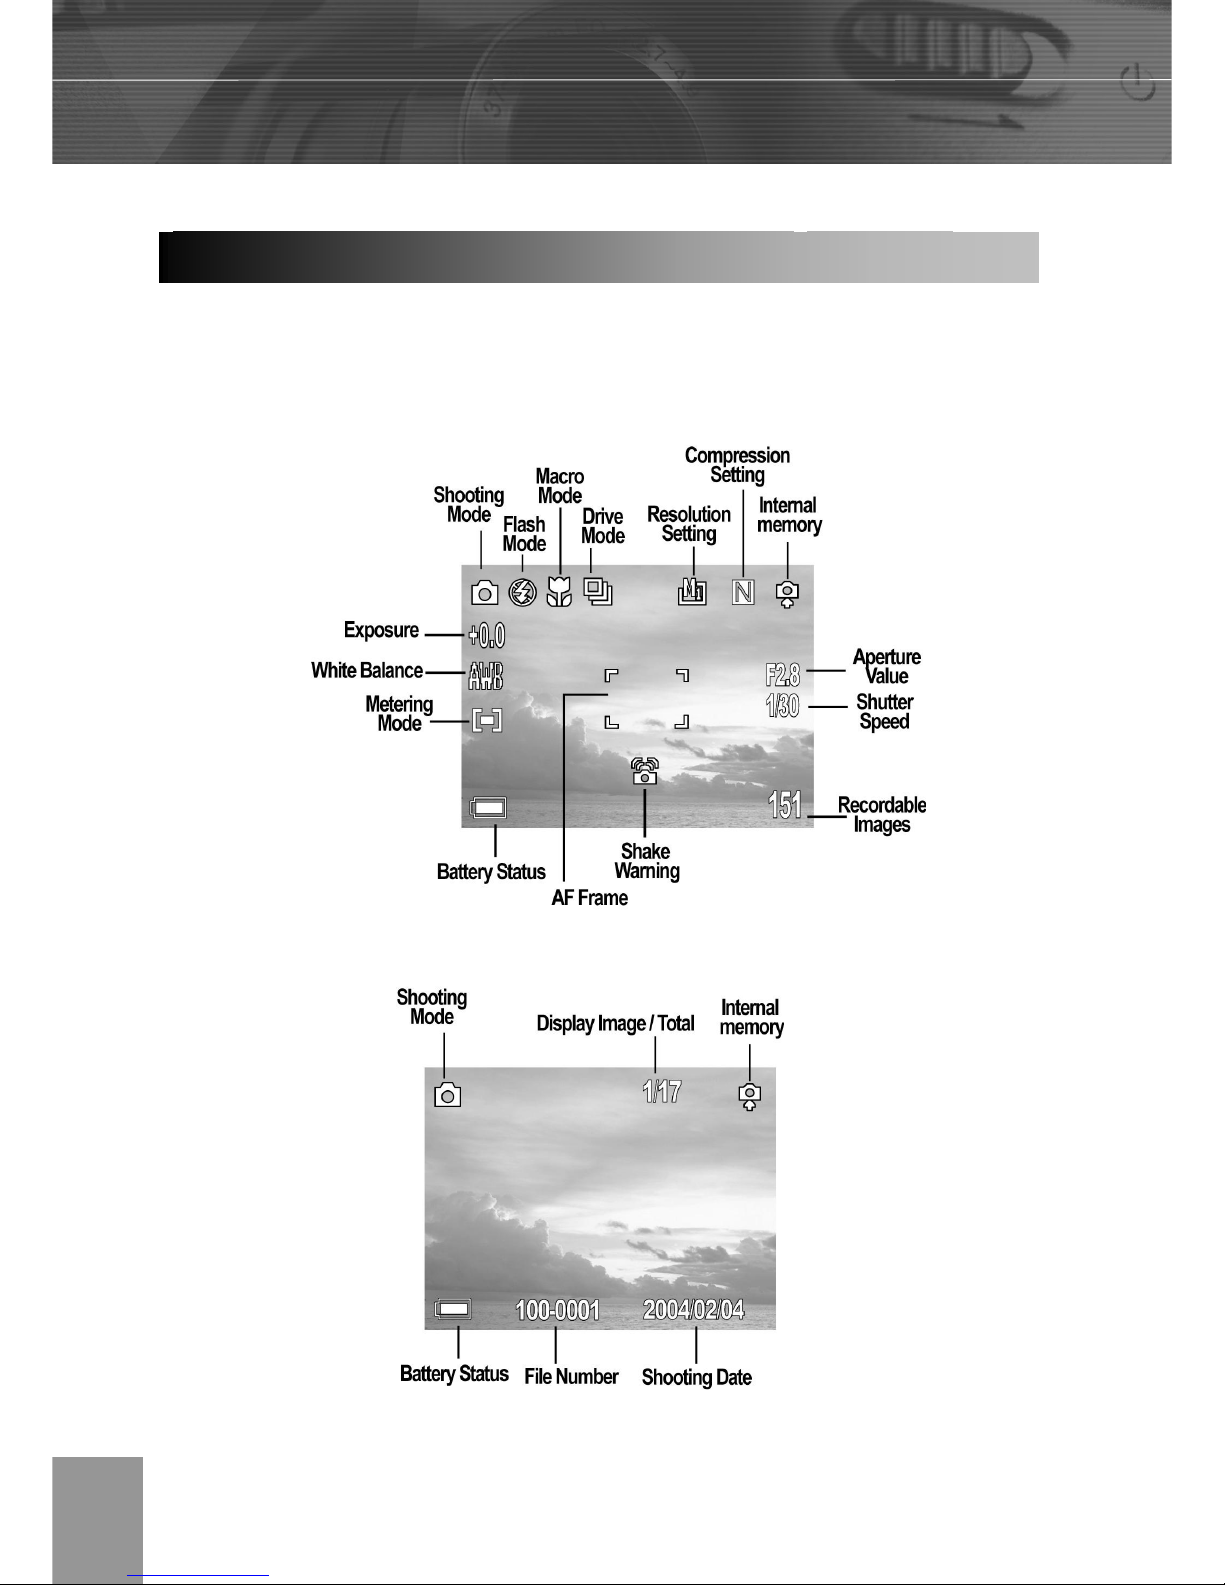
The LCD monitor displays information in Shooting or Playback mode, such as the
camera settings, remaining image capacity and shooting date.
Shooting Mode
Playback Mode
Information Displayed on the LCD Monitor
Page 19
-17-
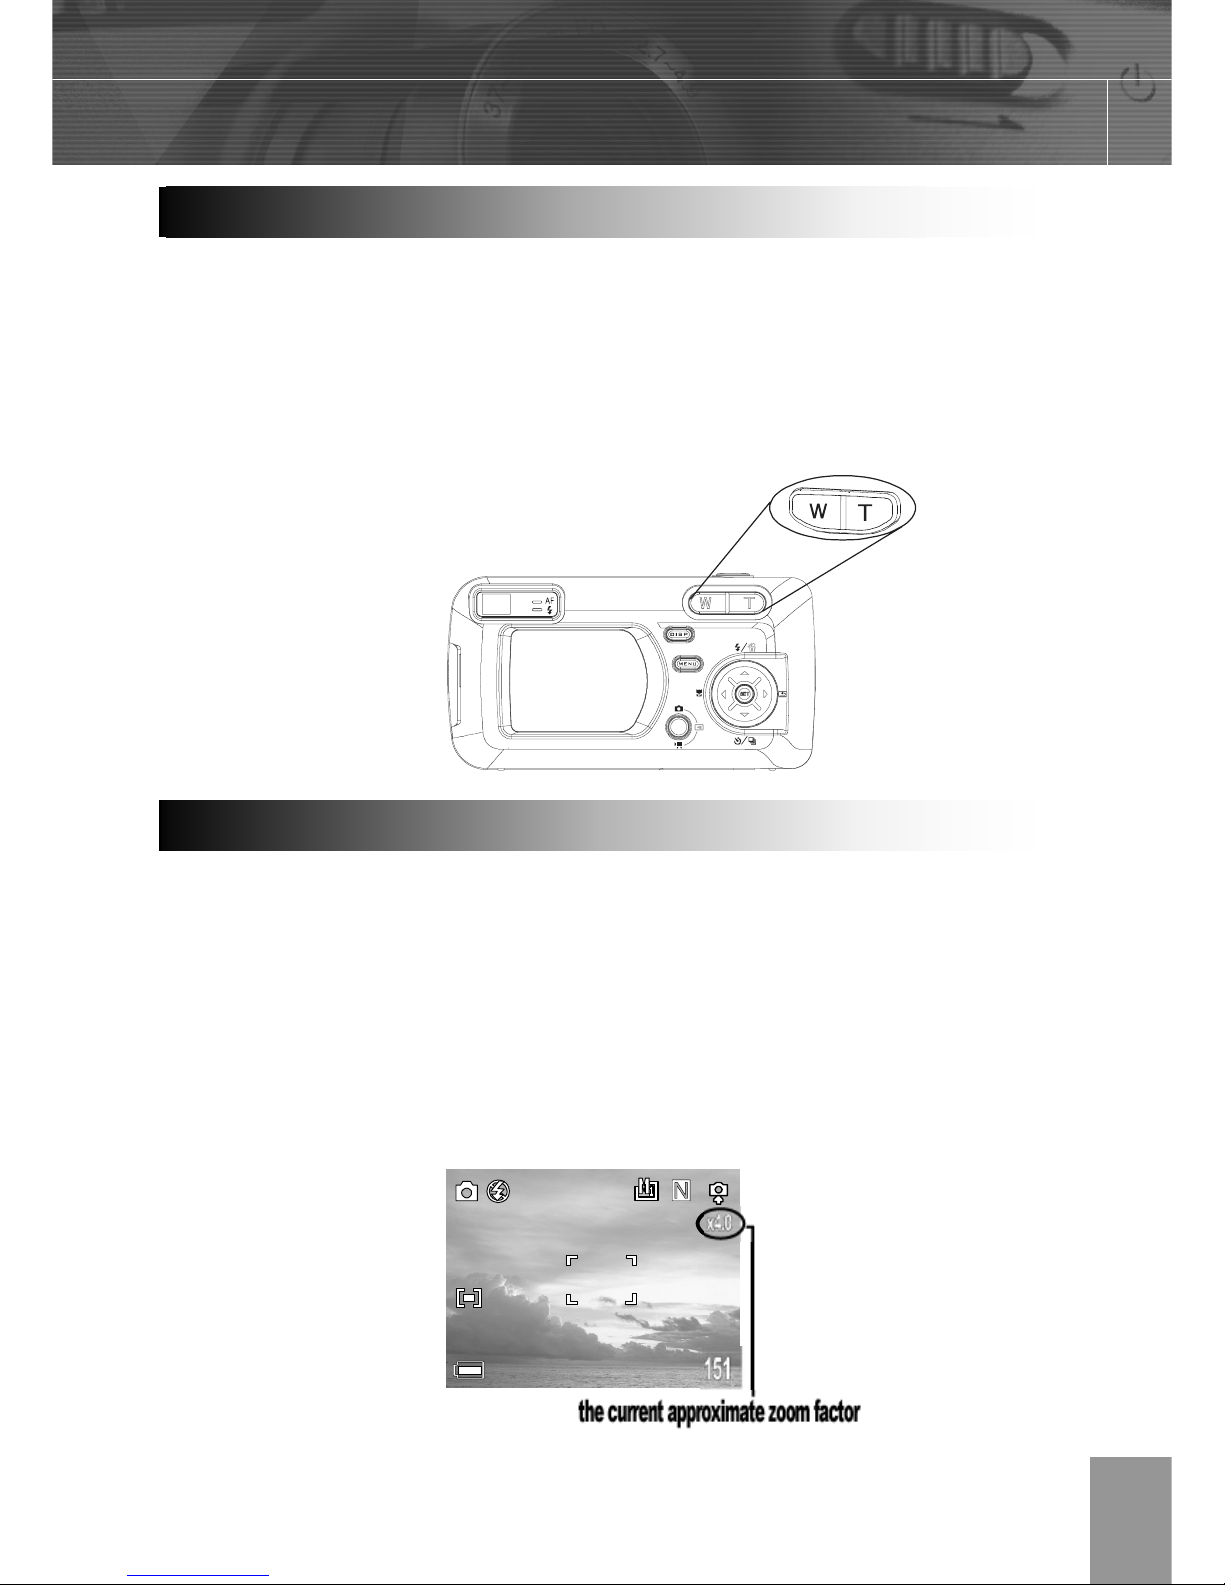
The Zoom can be adjusted from 5.8 ~ 17.4 mm (37 ~ 105 mm when converted to 35 mm
film format).
Telephoto / Wide Angle
Press W to zoom out for a wide angle shot.
Press T to zoom in for a telephoto shot.
When the LCD monitor is on, you can digitally zoom in on a subject. Images can be
zoomed up to 4 times.
Press T to zoom in.
The lens will zoom to the maximum optical telephoto setting and stop. Release the lever
and press it toward again to further zoom the image digitally. The zoom indicator shows
the current approximate zoom factor.
Using the Zoom Featur
e
Digital Zoom
Page 20
-18-
4 Taking Pictures
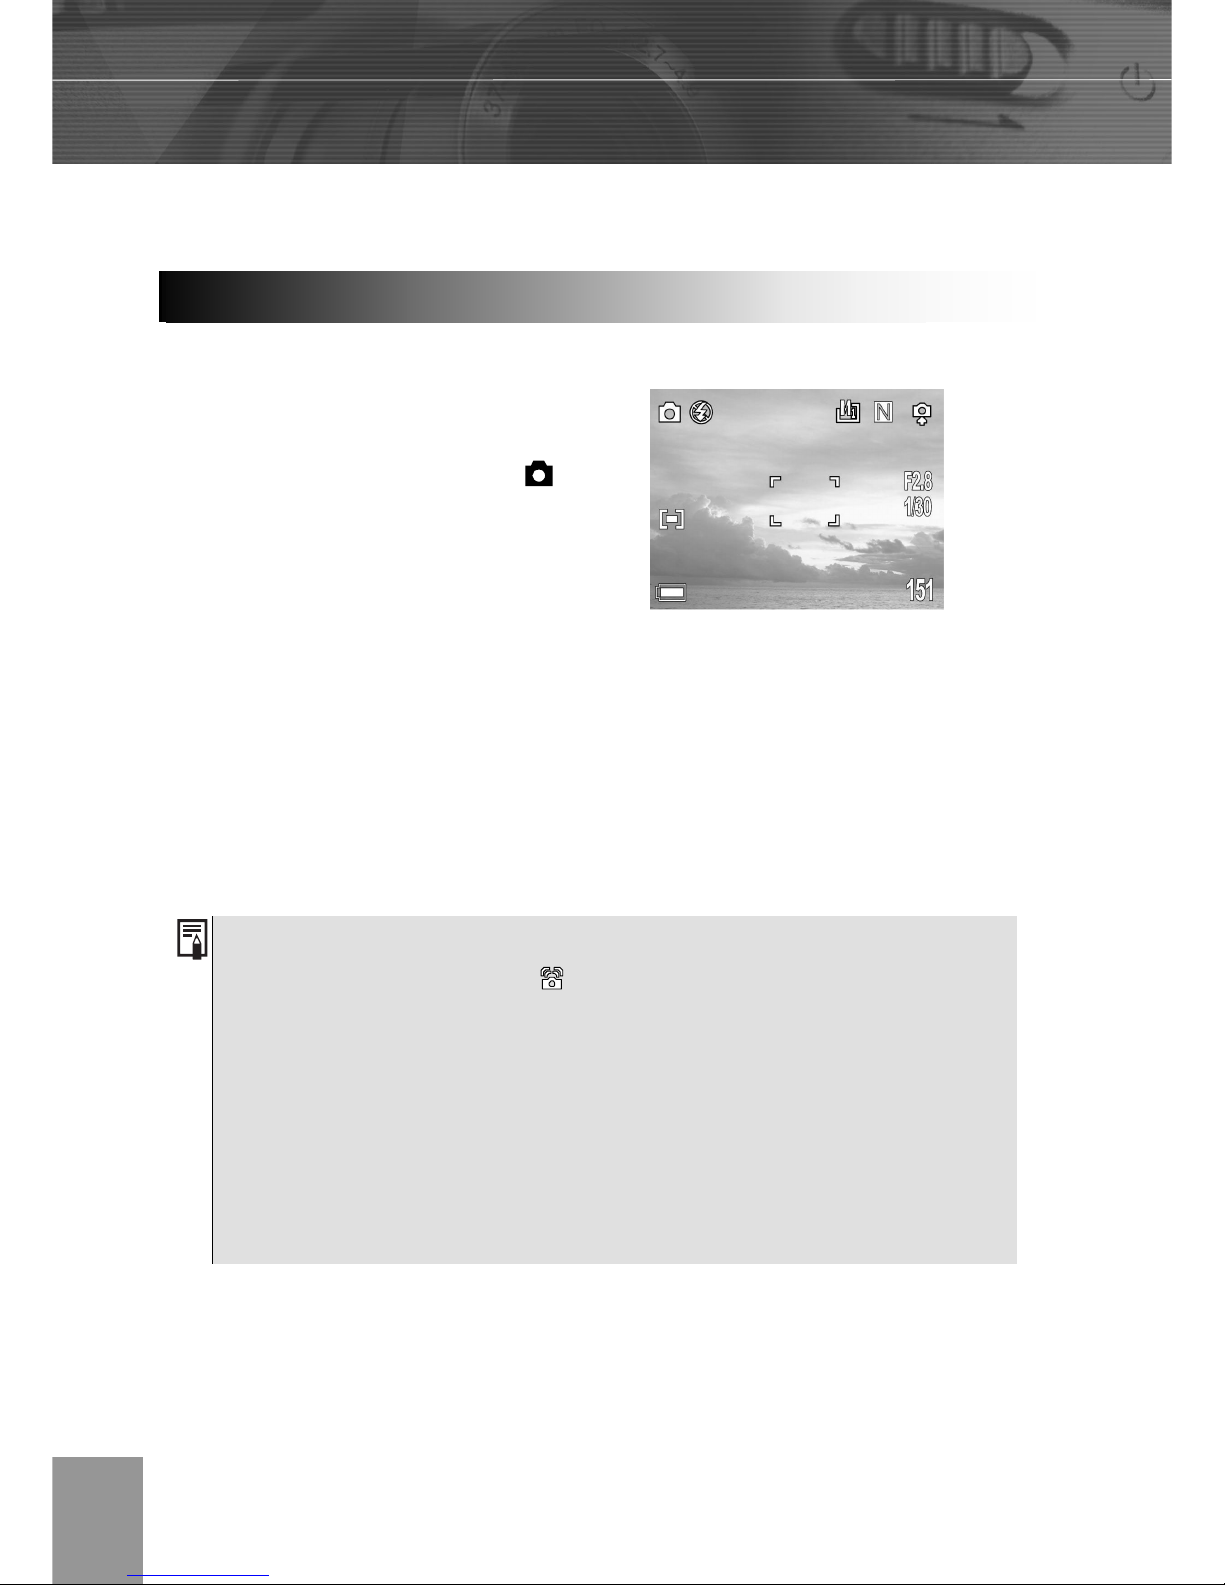
In this mode, all you have to do is press the shutter button and let the camera do
everything else.
1. Set the camera mode button to .
2. Aim the camera at the subject.
3. Use the zoom level to achieve the desired composition.
4. Press the shutter button down halfway.
When the camera has finished adjusting its
settings, the auto focus indicator will appear.
5. Press the shutter button all the way.
1. Please note that camera shake becomes a factor at low shutter speeds. If
the camera shake warning appears on the LCD monitor, secure the
camera to a tripod before shooting.
2. When the shutter button is pressed half way down, check the exposure
value that appears on the LCD monitor to make sure it is appropriate for
the current light conditions.
3. The green auto focus indicator appears on the LCD monitor when the
camera has successfully locked the exposure, white balance, and focus.
Basic Still Image Shootin
g
Page 21
-19-
The quick playback function is available in each shooting mode.
1. Press
to view the captured photo
or video clip.
2. To delete the file, press
.
3. Press and to select YES or NO,
press
SET to confirm the choice.
4. Press
again, return to shooting
mode.
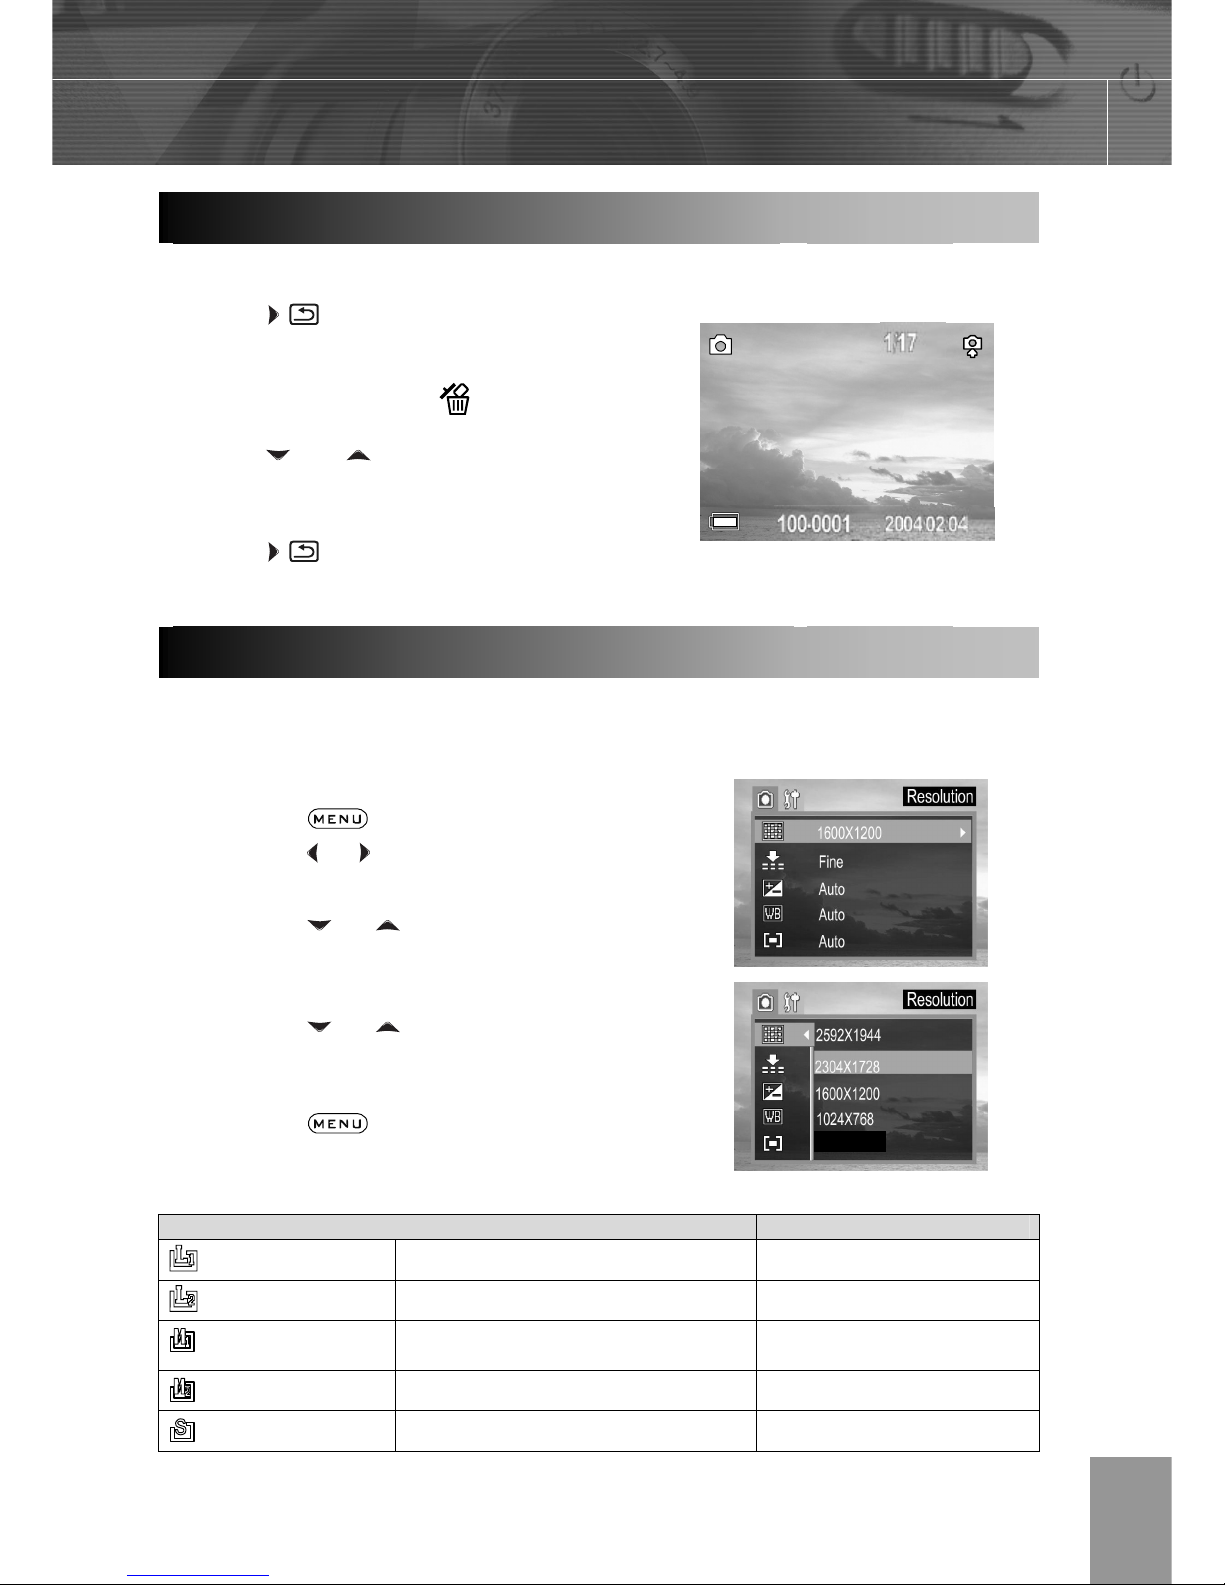
You can change the image quality and resolution settings to suit the purpose of the image
you are about to shoot.
1. Press the
button.
2. Press the
or arrow to select the REC
Menu.
3. Press the or arrow to select
Resolution or Quality then press the
SET button.
4. Press the
or to select the
settings you wish to set then press the
SET button.
5. Press the
button to close the
menu window.
Resolution Purpose
(Large 1)
2592¯1944 (fine, normal) Print large prints
(Large 2)
2304¯1728 (fine, normal) Print large prints
(Medium 1)
1600¯1200 (fine, normal)
Print on small size
paper
(Medium 2)
1024¯768 (fine, normal) Send images by e-mail
(Small)
640¯480 (fine, normal) Shoot more images
Replaying an Image after Shooting Quickly
Setting the Image Quality and Resolution
640X480
Page 22
-20-
Image Quality Purpose
Fine (5¯ compression rate) Shoot fine quality images
Normal (8¯ compression rate) Shoot normal quality images
Economy (12¯ compression
rate)
Shoot more images
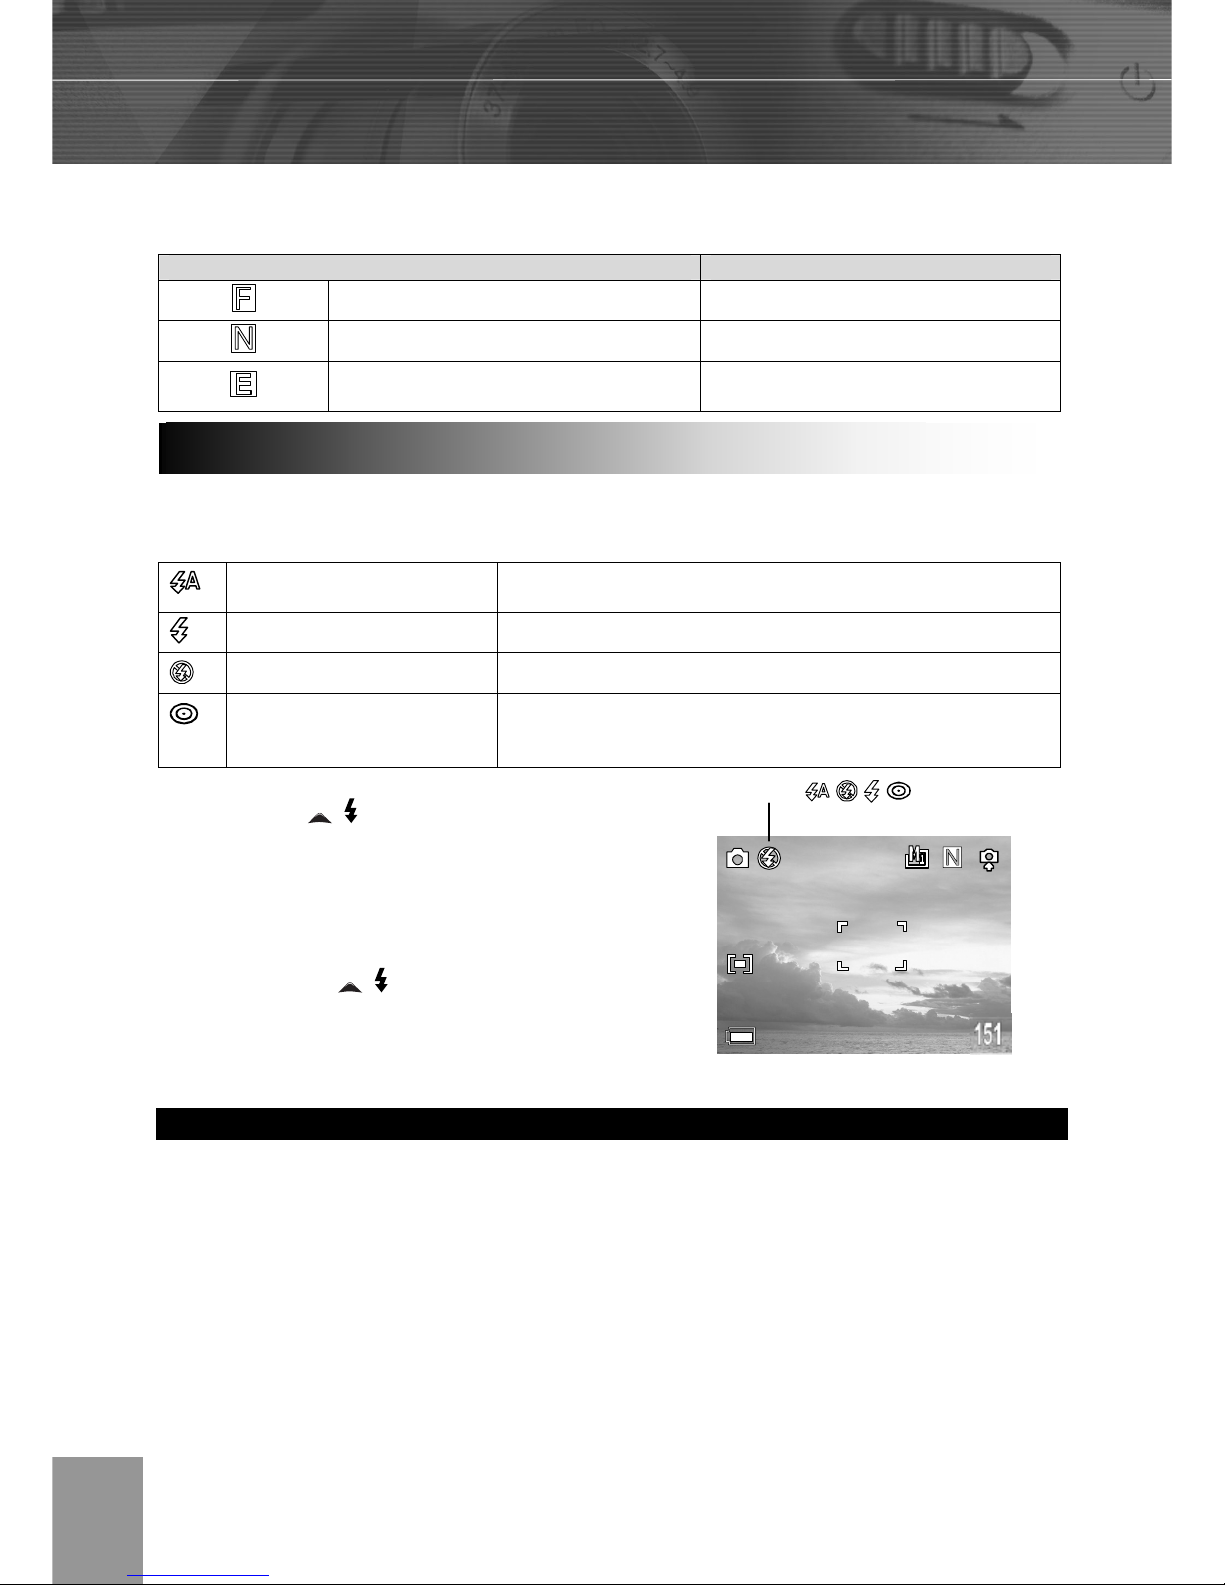
Use the flash according to the guidelines below
Auto The flash fires automatically as required by the
lighting level.
Force On The flash always fires.
Force Off The flash does not fire.
Red-eye reduction,
Auto
The flash fires automatically as required by the
lighting level, and the flash pre-strobes before
shooting to reduce red-eye phenomenon.
1. Press the button to switch
between flash modes.
2. The selected flash mode appears on the
LCD monitor.
3. You can switch between settings by
pressing the
button.
4. Shoot the image.
Setting the Red-eye Reduction Function
The Red-eye reduction function fires when the flash is used in dark areas. This prevents
light from reflecting back from the eyes and making them appear red.
When shooting with the red-eye reduction function, the subjects must look right at the
flash for this mode to be effective. Try asking them to look directly at the flash. Even
better results can be obtained by shooting with the lens set to a wide angle, by increasing
the lighting indoor settings, or by approaching closer to the subject.
Using the Flash
Flash icon
Page 23
-21-
This function enables you to select the metering mode to suit the shooting conditions and
purpose.
Multi-pattern metering
The image is divided into multiple regions and metering is performed for each region. The
camera judges the subject position and background brightness, and determines a well-
balanced exposure.
Center-weighted metering
Averages the exposure from the entire image, but places more weight on the subject at
the center. Use this mode when the subject is backlit or surrounded by bright light.
1. Press the
button.
2. Press the or arrow to select the REC
Menu.
3. Press the or arrow to select
Metering then press the SET button.
4. Press the or to select the
settings you wish to set then press the
SET button.
5. Press the
button to close the
menu window.
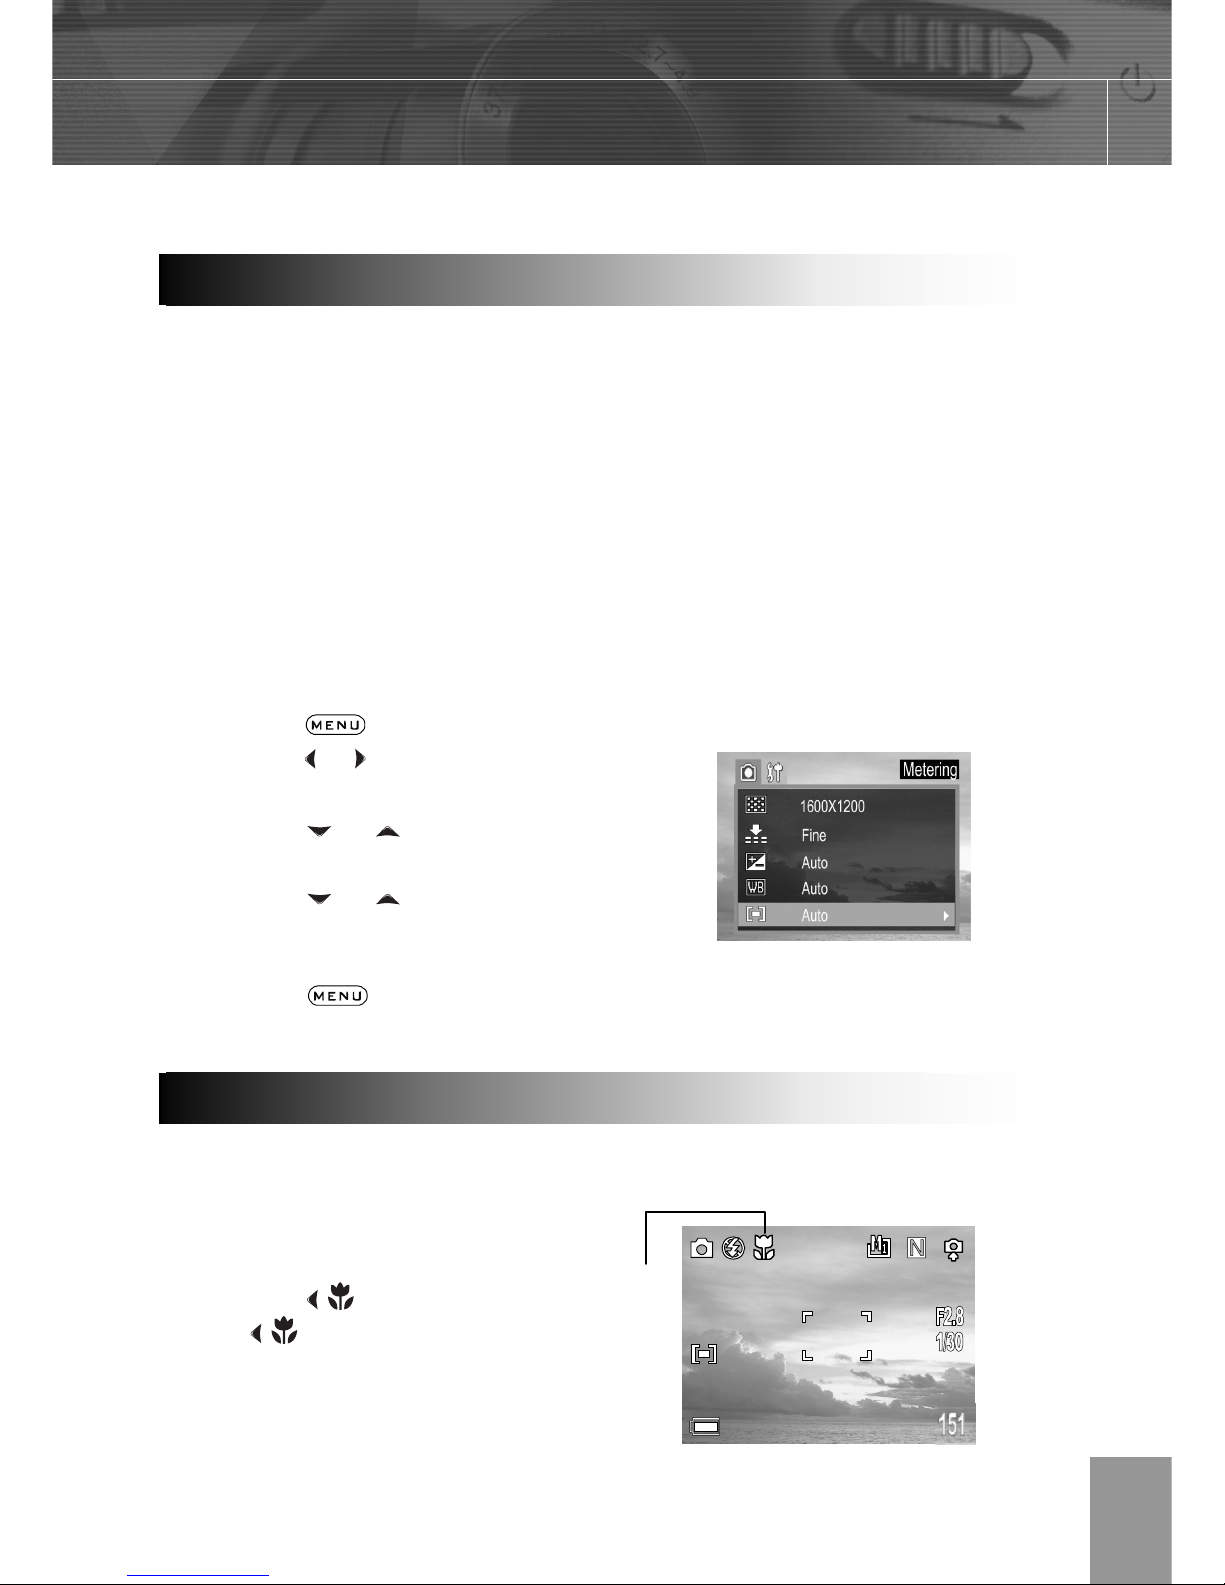
Use the macro mode to shoot close-up of subjects in the range of 10 cm at the wide angle
end and 50 cm at the telephoto end.
1. Press the DISPLAY button to turn the
LCD monitor on.
2. Press the
button.
3. The icon appears on the LCD
monitor.
4. Shoot the image.
Macro Mod
e
Selecting the Metering Mod
e
Macro
icon
Page 24
-22-
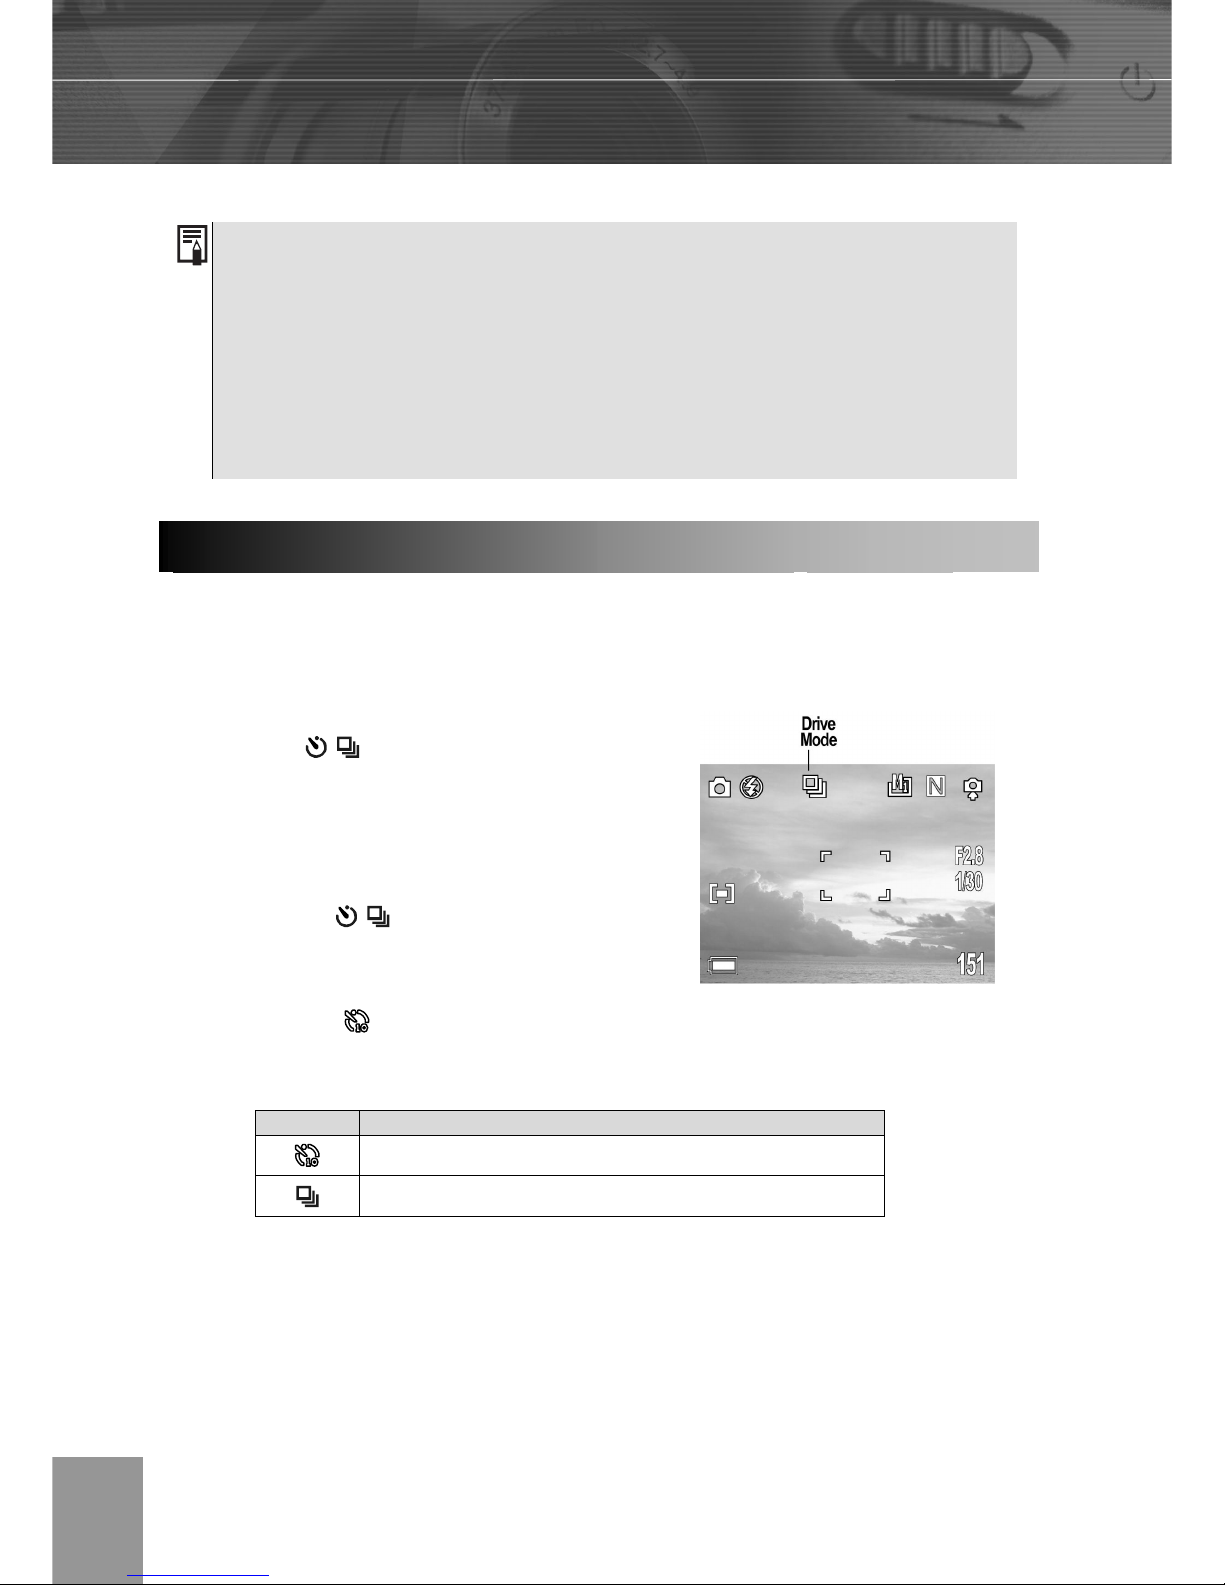
You can take pictures with the self-timer in any shooting mode.
Use the self-timer to set a delay from the time the shutter button is pressed to the time
the image is shot.
1. Press the
/ button to switch
between Drive modes.
2. The selected drive mode appears on the
LCD monitor.
3. You can switch between settings by
pressing the
/ button.
4. Shoot the image.
If you select
, the self-timer starts blinking after the shutter button is pressed all
the way. The self-timer blinking gets faster two seconds before the shutter activates.
Continuous Shooting
Use this mode to shoot successive frames while the shutter button is fully pressed. (3
images at one shoot.)
Setting Description
Ten seconds
3 images at one shot
1. Distances referred to measure the distance between the camera lens
surface and the subject.
2. Any flash setting can be used in macro mode.
3. Always use the LCD monitor to compose images in macro mode. Shooting
with the optical viewfinder is possible, however, the parallax phenomenon
may cause images composed with the optical viewfinder to be off-center.
Setting the Self-Timerand Continuous Shootin
g
Page 25
-23-
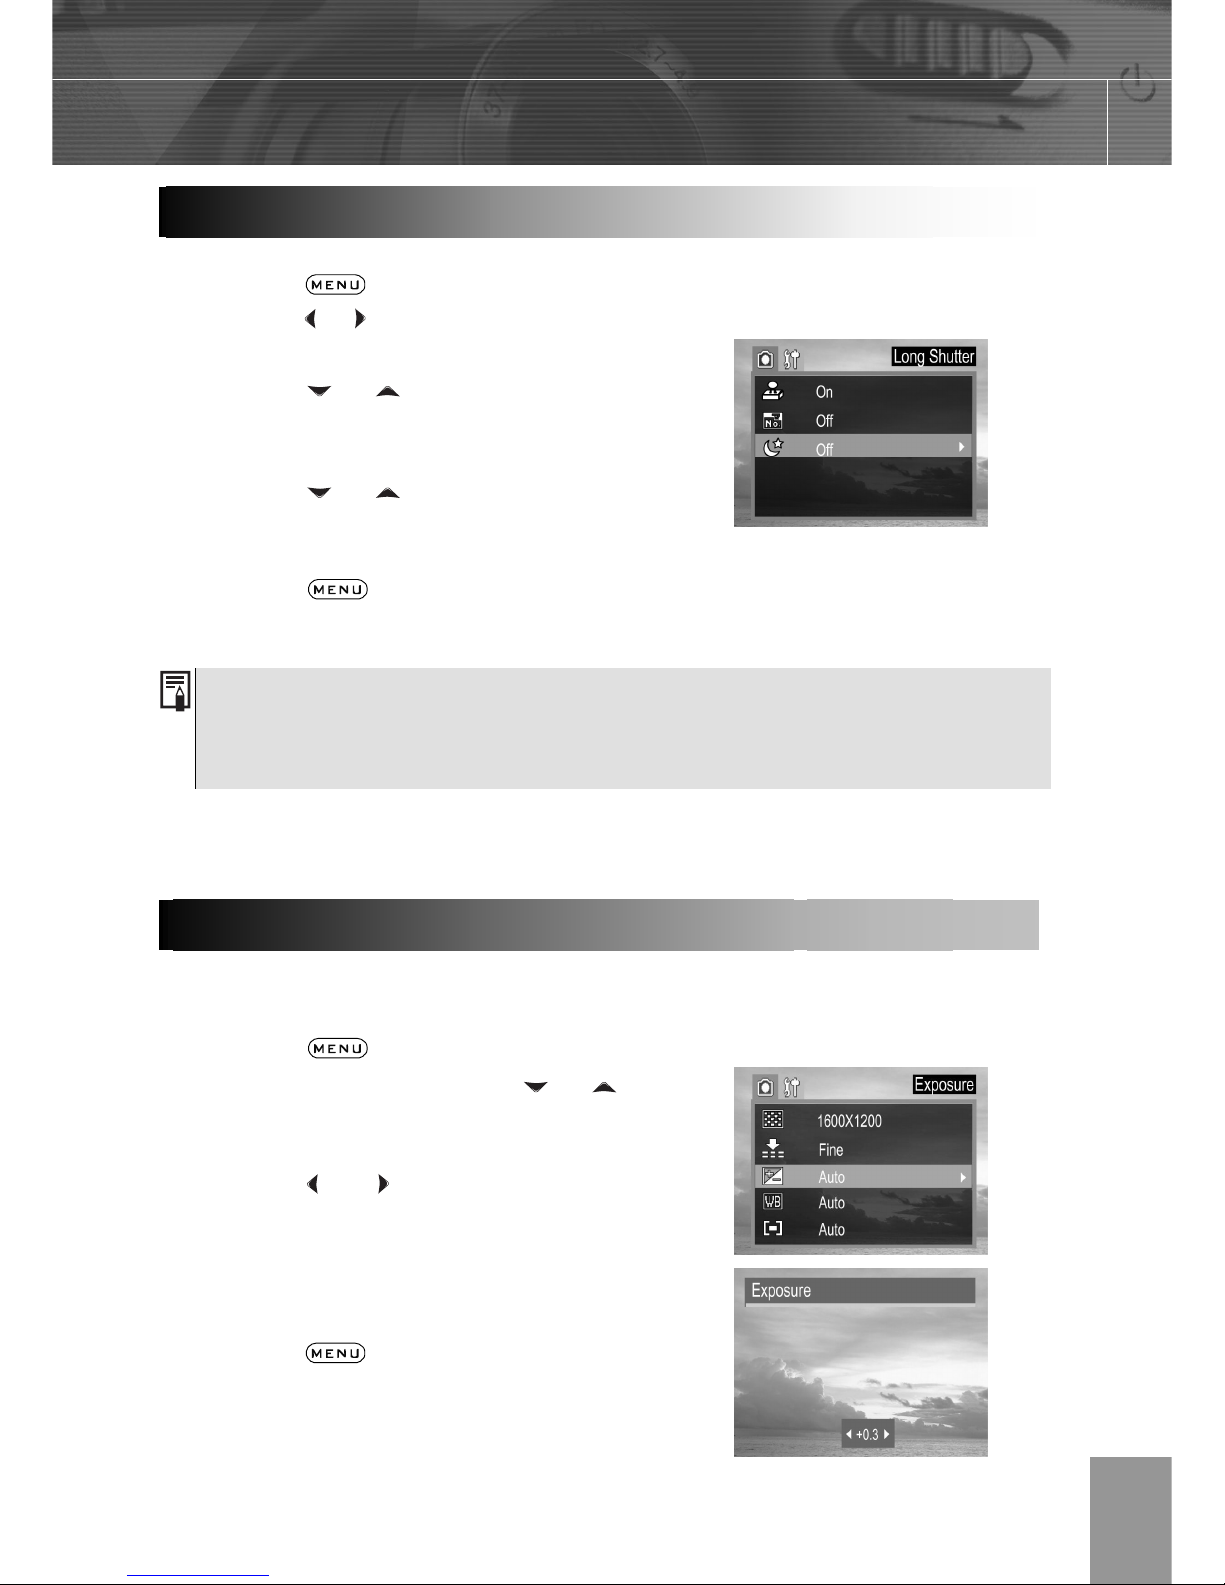
You can set the shutter speed to a slow setting to make dark subjects appear brighter.
1. Press the button.
2. Press the or arrow to select the REC
Menu.
3. Press the or arrow to select
Long Shutter then press the SET
button.
4. Press the or to select the
settings you wish to set then press the
SET button.
5. Press the button to close the
menu window.
Available Shutter Speeds
The following shutter speeds are available:1 sec 2 sec 4 sec 8 sec
Adjust the exposure compensation setting to compensate for certain light conditions
including: backlighting, indirect indoor lighting, and dark backgrounds.
6. Press the
button.
7. In the camera menu, press the or
arrow to select Exposure then press the
SET button..
8. Press the and to set the exposure
compensation value. Available settings
are:-2.0, -1.7, -1.3, -1.0, -0.7, -0.3, 0.0,
+0.3, +0.7, +1.0, +1.3, +1.7, +2.0 then
press the SET button.
9. Press the button to close the
menu window.
10. Shoot the image.
Adj
usting the Exposure ---EV adjustment
Shooting in Long Shutter Mod
e
Please note that camera shake becomes a factor at low shutter speeds. If the
camera shake warning appears on the LCD monitor, secure the camera to a tripod
before shooting.
Page 26
-24-
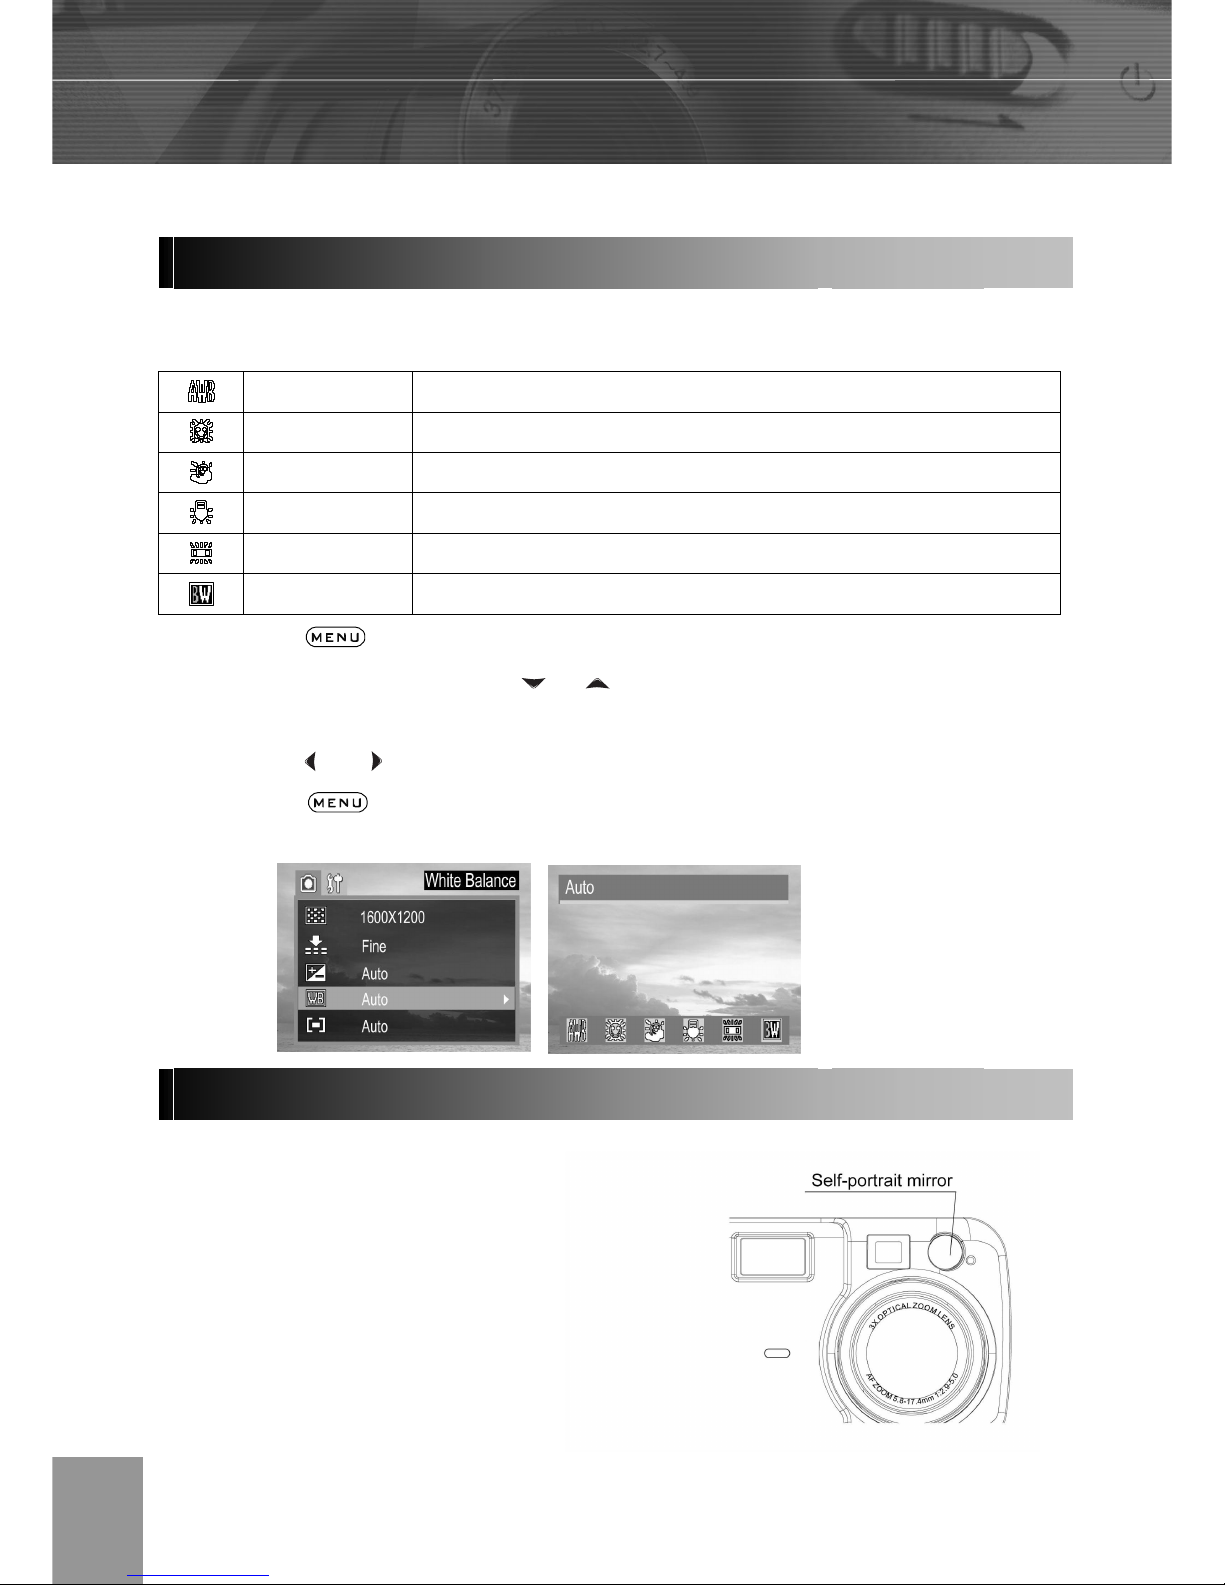
When the white balance mode is set to match the light source, the camera reproduces
colors more accurately.
Auto Settings are automatically set by the camera
Day light For recording outdoors on a bright day
Shade For recording under overcast, shady or twilight skies
Tungsten For recording under tungsten lighting
Fluorescent For recording under fluorescent lighting
Black & white For recording black & white photo
1. Press the button.
2. In the camera menu, press the
or arrow to select white balance then press
the SET button.
3. Press the
and to set the white balance value then press the SET button.
4. Press the button to close the menu window.
Take the self-portraits picture by using the self-portrait mirror on the front of the camera.
1. Look at the self-portrait
mirror on the front of the
camera to confirm the
framing.
2. Press the shutter button
down halfway, the indicator
lamp will glow when the
focus is confirmed.
Adj
usting Color Tones ---Setting the White Balanc
e
Using the Self-Portrait Mirro
r
Page 27

-25-
3. Press the shutter button all
the way down to take the
picture.
Page 28
-25-
Be careful not to touch the microphone while shooting.
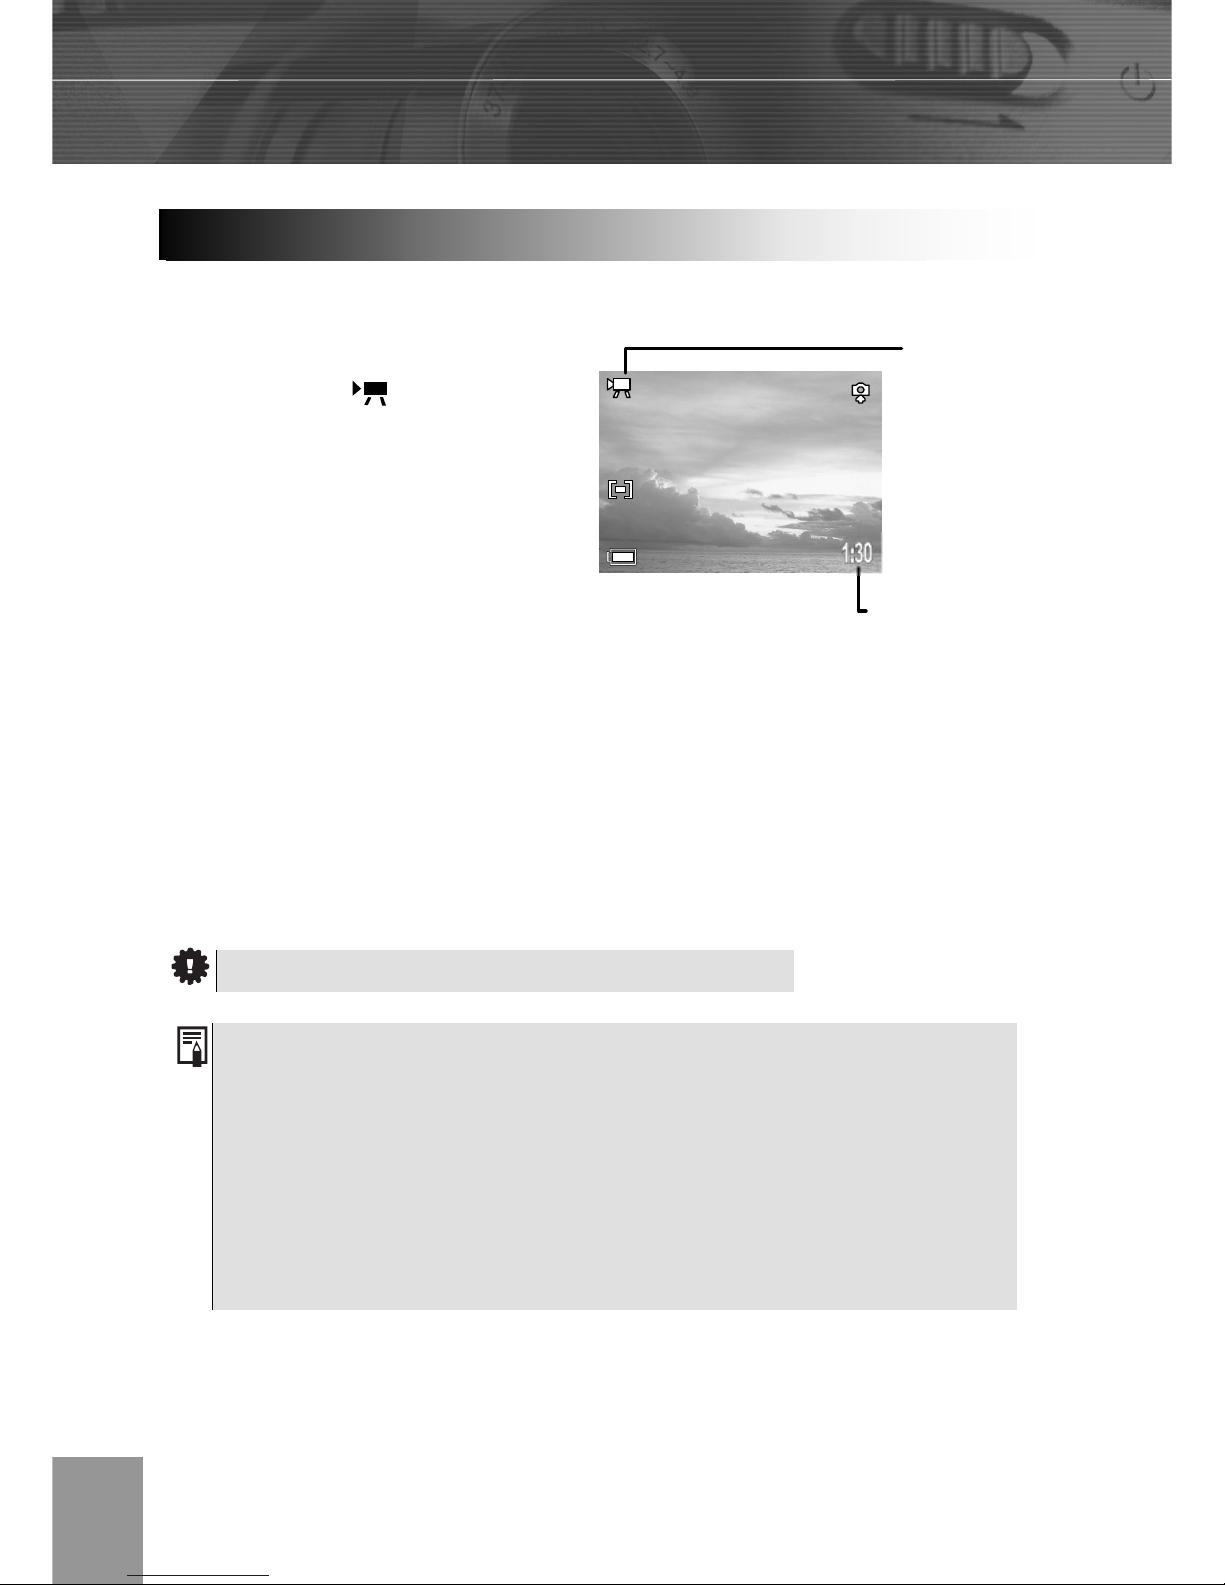
The digital camera can shoot movie clips with audio.
1. Press the camera
mode button to
movie mode
.
2. The LCD monitor
displays the
maximum recording
time (in seconds).
3. Press the shutter
button all the way
4. Press the shutter
button all the way to
stop recording the
movie.
5. The camera stops
recording
automatically when
the memory capacity
has been reached.
1. The resolution is set to 320×240 pixels. Video resolution cannot be
changed.
2. If the indicator on the left side of the viewfinder blinks green after a shot,
this indicates that the movie is being written to the SD card. You cannot
shoot again until it stops blinking.
3. White balance is set and locked to the settings of the first frame.
4. There is no shutter sound in movie mode.
Movie Mode
Movie icon
Maximum
Recording Time
Page 29
-26-
5 Replaying Photo & Video Clips
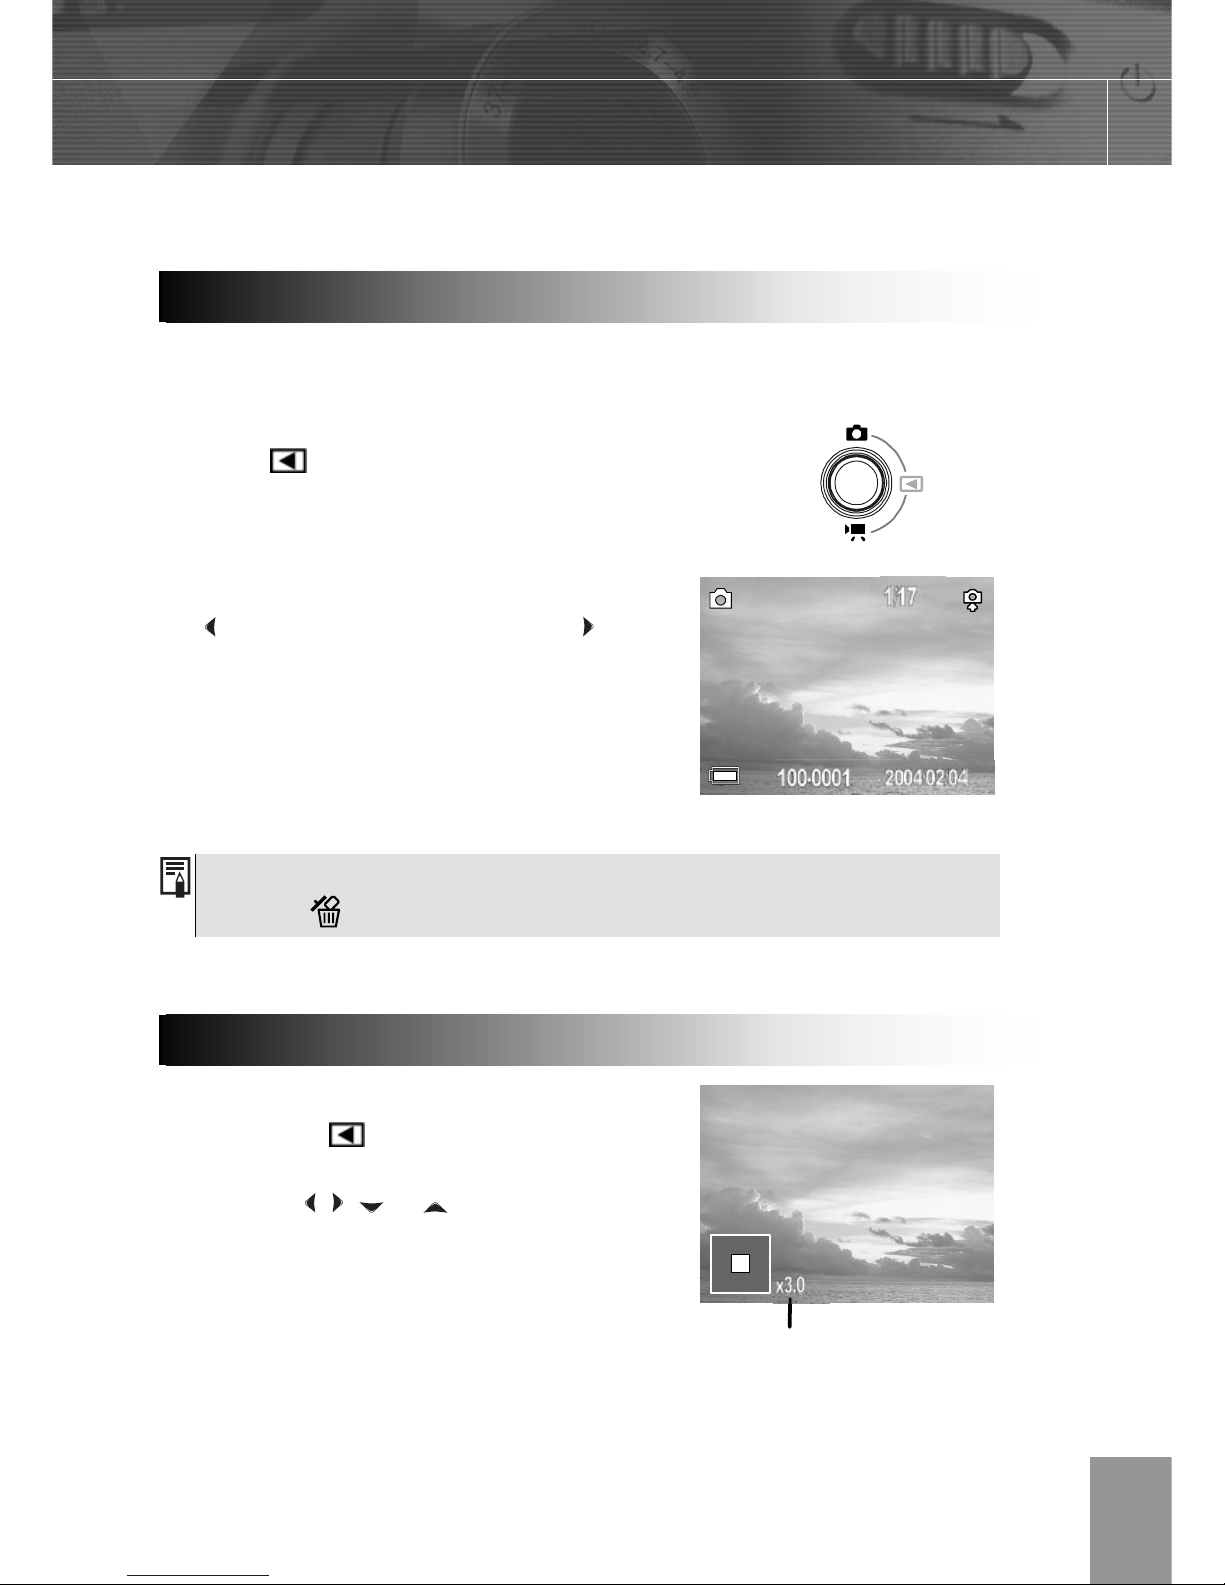
You can view the recorded images and video clips on the LCD monitor.
Press camera mode button, this enters the
play mode
and view the captured photo or
video clip.
The last recorded image or video clip appears
on the LCD monitor.
Use to move to the previous image and to
move to the next image.
Press camera mode button twice, return to
shooting mode.
Images can be magnified up from 1 times to 8 times.
1. In the PLAY
mode.
2. Press T to magnify the image.
3. Press the , , or arrows
to move the magnified area
around the image.
4. Press W to zoom out to the
original full-sized image.
Press the DISP button to show the data for the displayed image.
Press the button to quickly delete the displayed image.
Replaying Pictures
Magnifying Images
The zoom factor is shown
Page 30
-27-
Please note that erased images cannot be recovered. Exercise
caution before erasing a file.
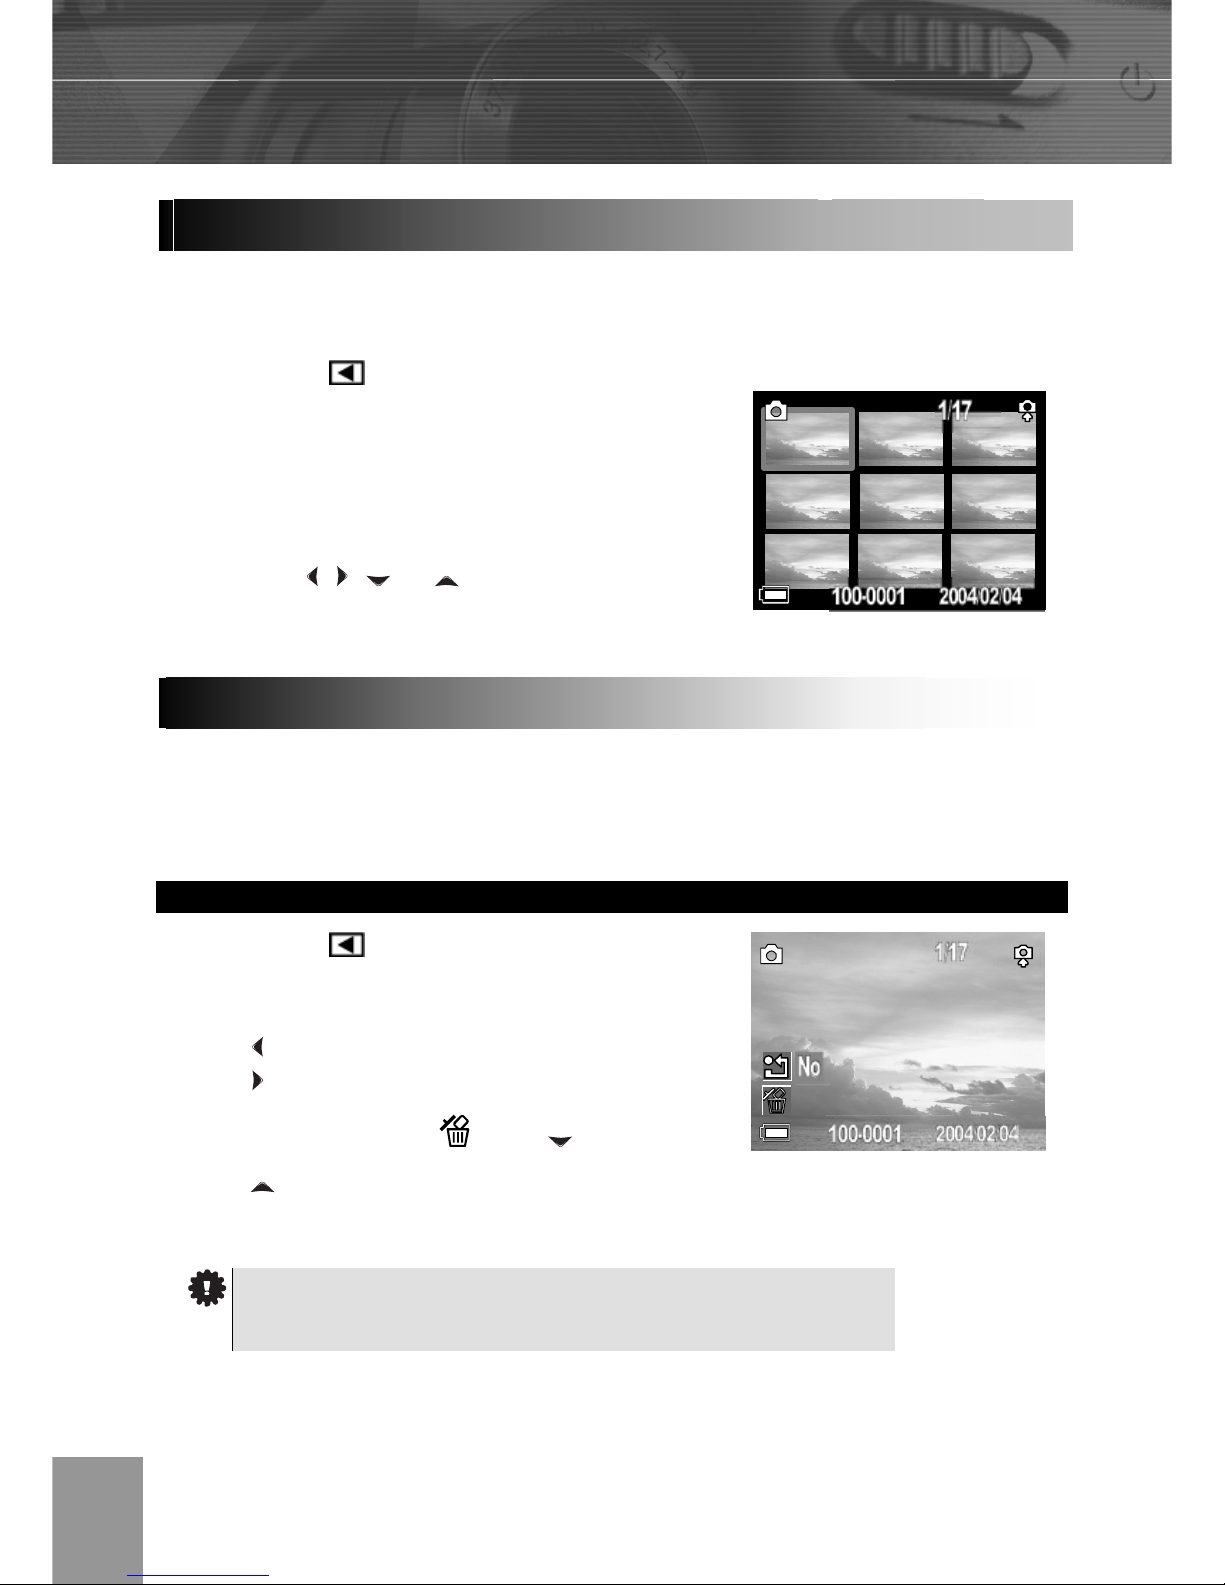
The Thumbnail mode allows you to view up to nine images at a time on the LCD monitor.
The playback function is available in each shooting mode.
1. In the PLAY
mode.
2. The last captured image appears on the
LCD monitor.
3. Press the wide angle W button to view
thumbnail images.
4. The selected image is highlighted.
5. Press the
, , or to select an
image.
6. Press the telephoto T button to display
the selected image in full screen size.
Erase files that you don’t want to keep to make more memory space available. You can
erase individual files or all files when the camera is in playback mode.
Erasing Images Individually
1. In the PLAY mode.
2. The last recorded image or video clip
appears on the LCD monitor.
3. Use
to move to the previous image
and to move to the next image.
4. To delete the file, press
. Press
and to select YES or NO, press SET
to confirm the choice.
Viewing Pictures in Thumbnail Mode
Erasing Files From Memory
Page 31
-28-
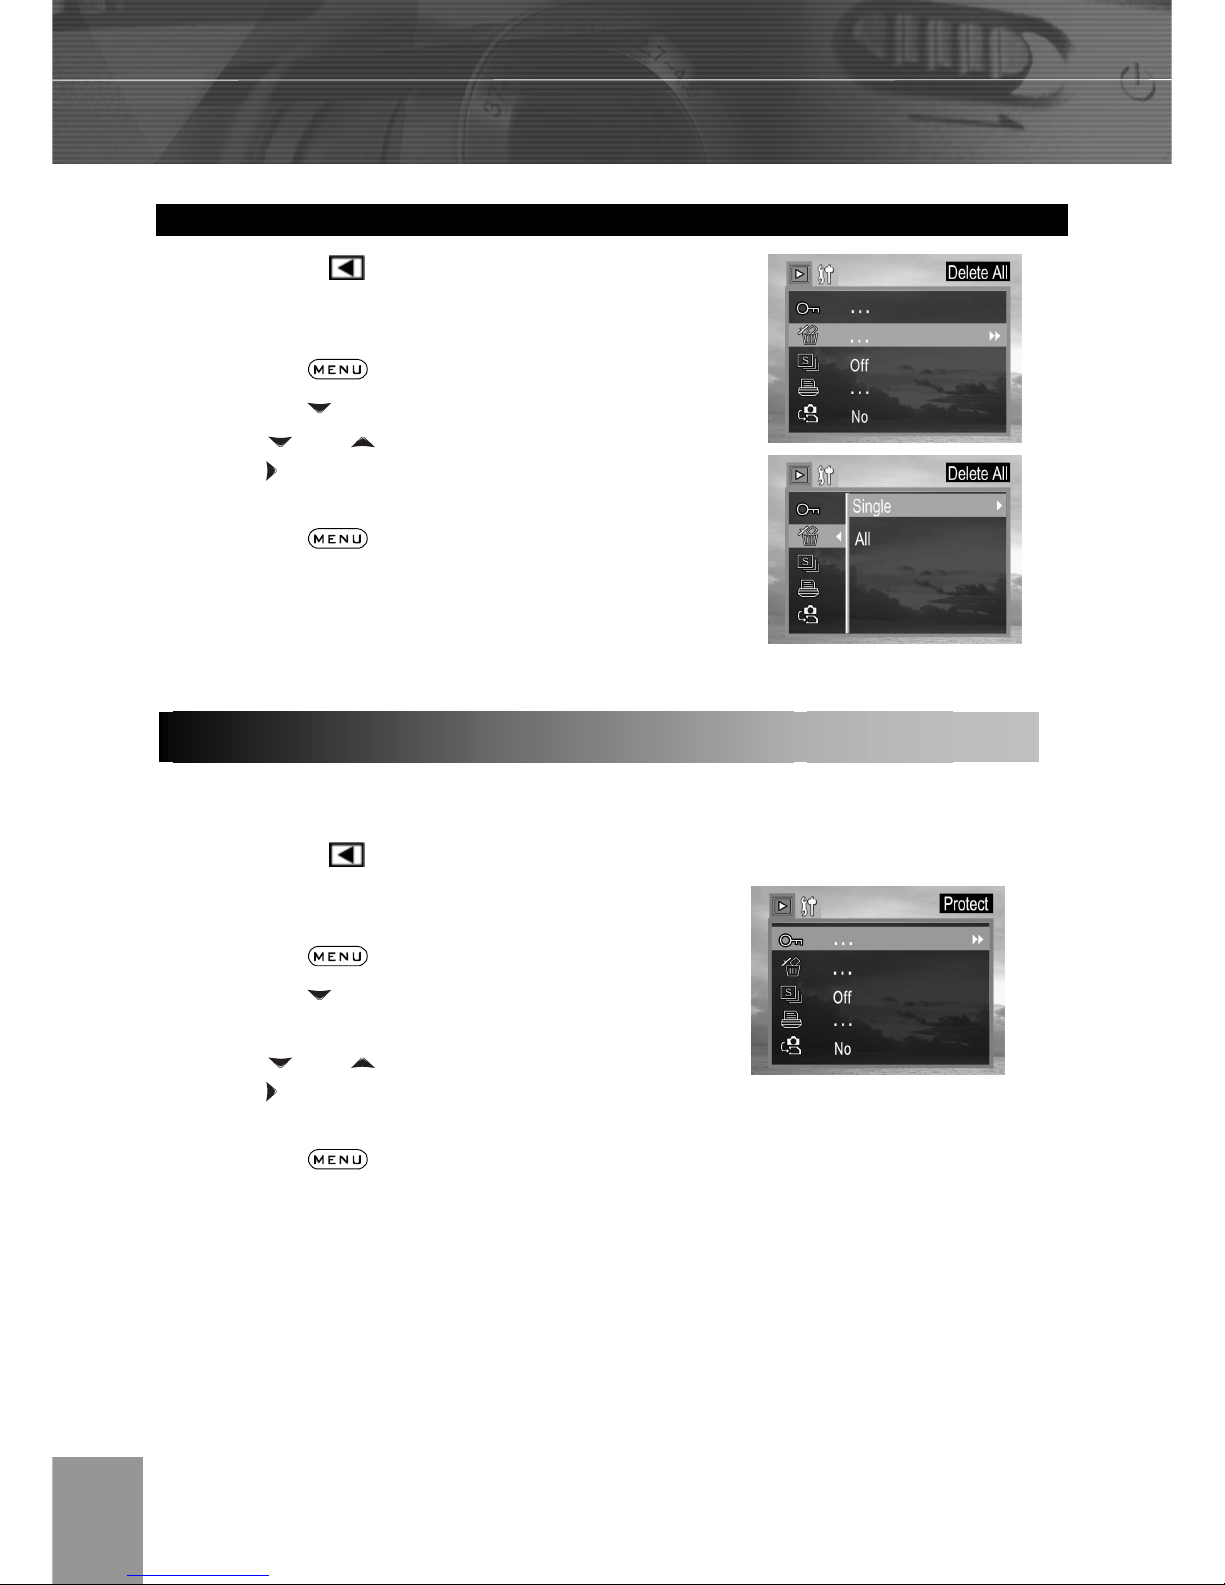
Erasing All Unprotected Images
1. In the PLAY mode.
2. The last recorded image or video clip
appears on the LCD monitor.
3. Press the button.
4. Press the arrow to select Delete
ALL. 5. Press and to select Single or All,
press and then select Yes or No to
confirm the choice.
6. Press the button to close the
menu window.
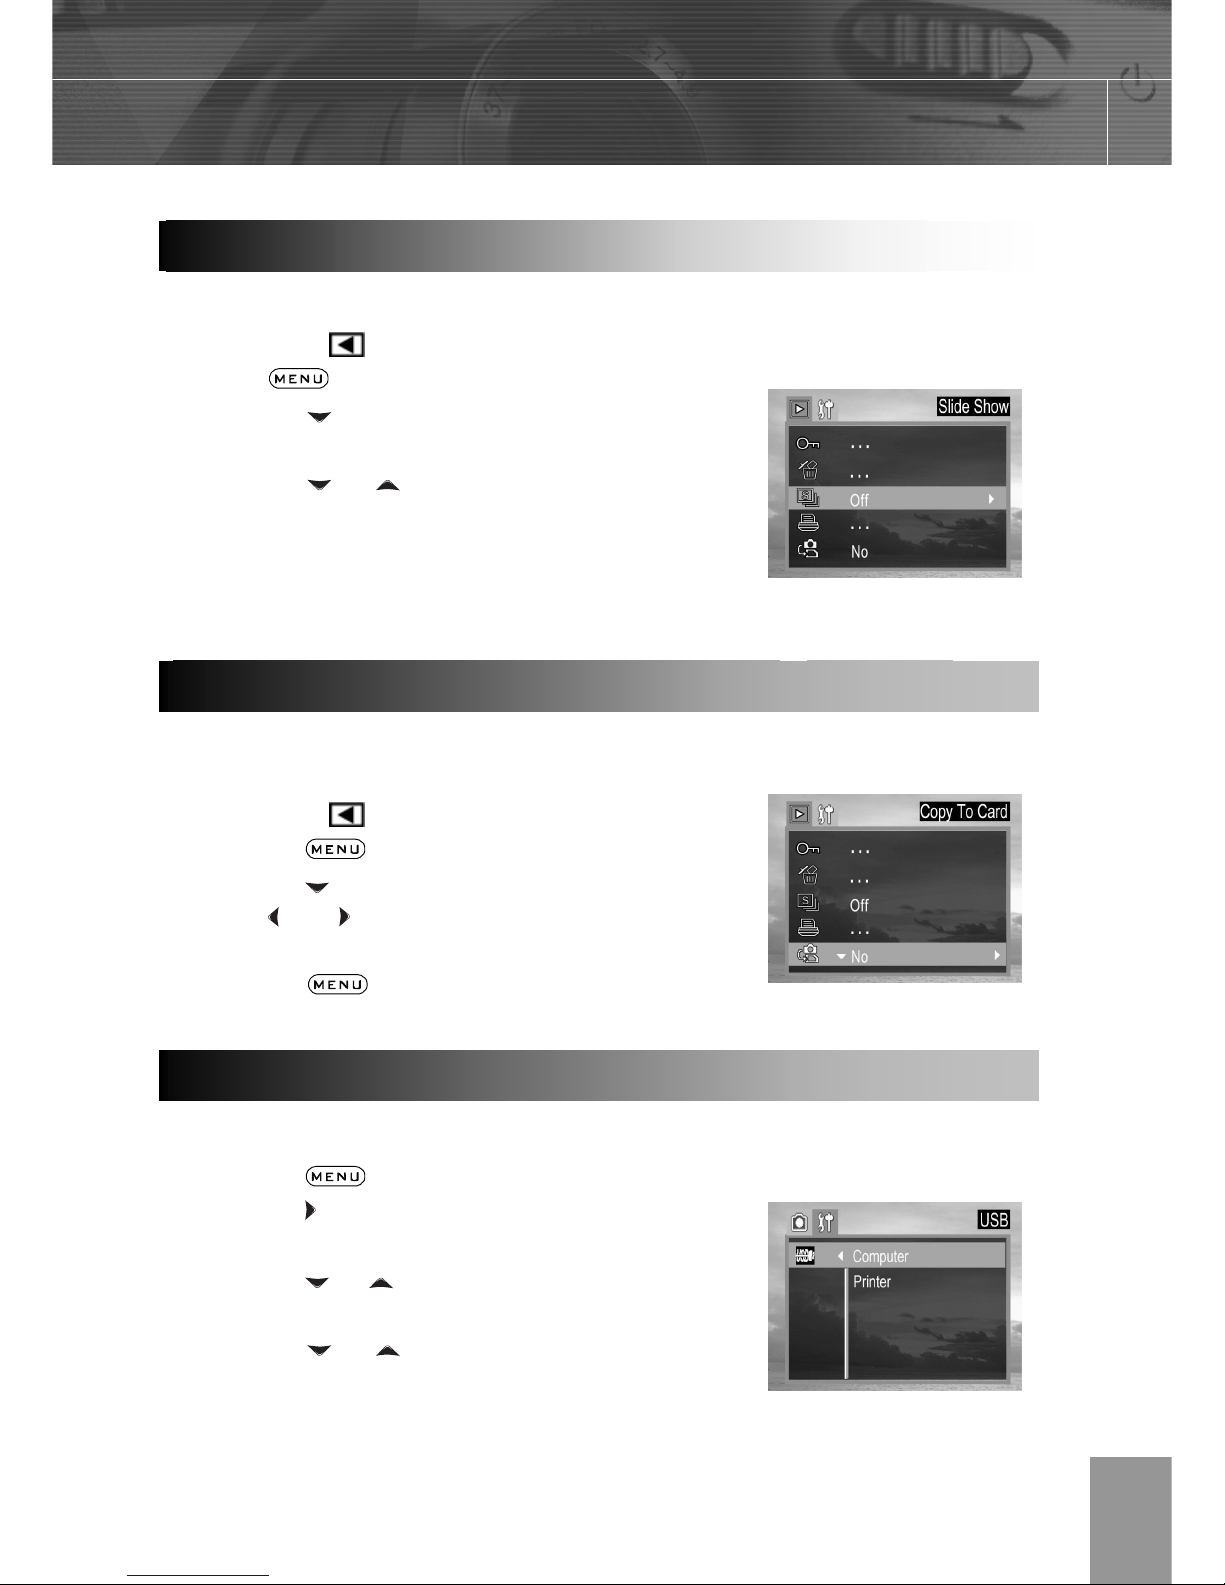
You can protect important images from accidental erasure.
1. In the PLAY
mode.
2. The last recorded image or video clip
appears on the LCD monitor.
3. Press the
button.
4. Press the arrow to select Protect
then press the SET button.
5. Press
and to select Single or All,
press
and then select Yes or No to
confirm the choice.
6. Press the button to close the
menu window.
Protecting Photos and Video Clips
Page 32
-29-
In slide show mode, all images can be displayed one-by-one in an automated slide show.
1. In the PLAY
mode.
2. Press
button.
3. Press the arrow to select SLIDE
SHOW then press the SET button.
4. Press the or to select OFF, 5 sec,
10 sec and then press SET.
The slide show begins automatically, starting
from the current display image.
4. Press SET button to stop the slide show.
The camera allows you to copy all files that are stored in the camera’s internal memory to
an installed SD memory card.
1. In the PLAY
mode.
2. Press the
button.
3. Press the arrow to select Copy card.
4. Press and to select YES or NO,
press SET to confirm the choice.
5. Press the
button to close the
menu window.
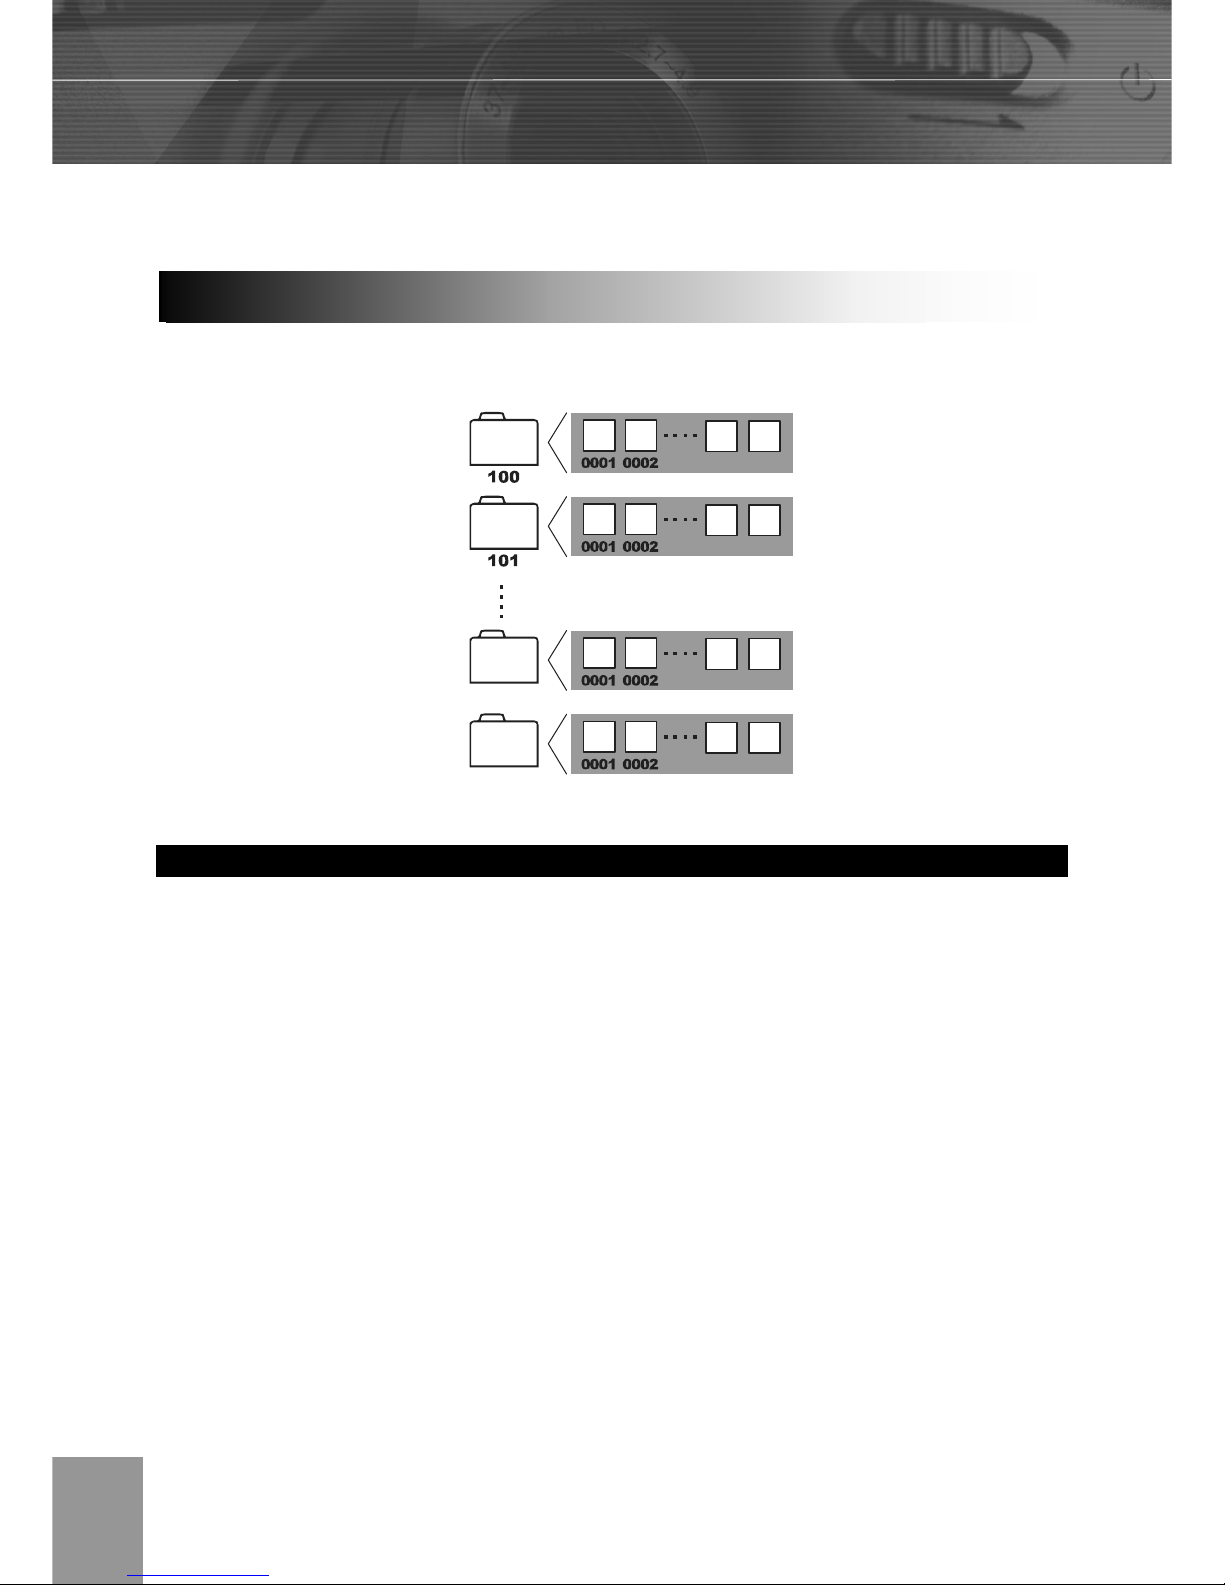
You can set USB mode to connect the camera with a printer or computer.
1. Press the
button.
2. Press the arrow to select the Setup
Menu.
3. Press the
or arrow to select USB
then press the SET button.
4. Press the or to select computer
or printer.
5. Press the SET button to close the menu
window.
Playing a Slide Show (Auto Play)
Copying Flash Memory Images to a Memory Card
Setting USB Mode
Page 33
-30-
6 File Names & Printing
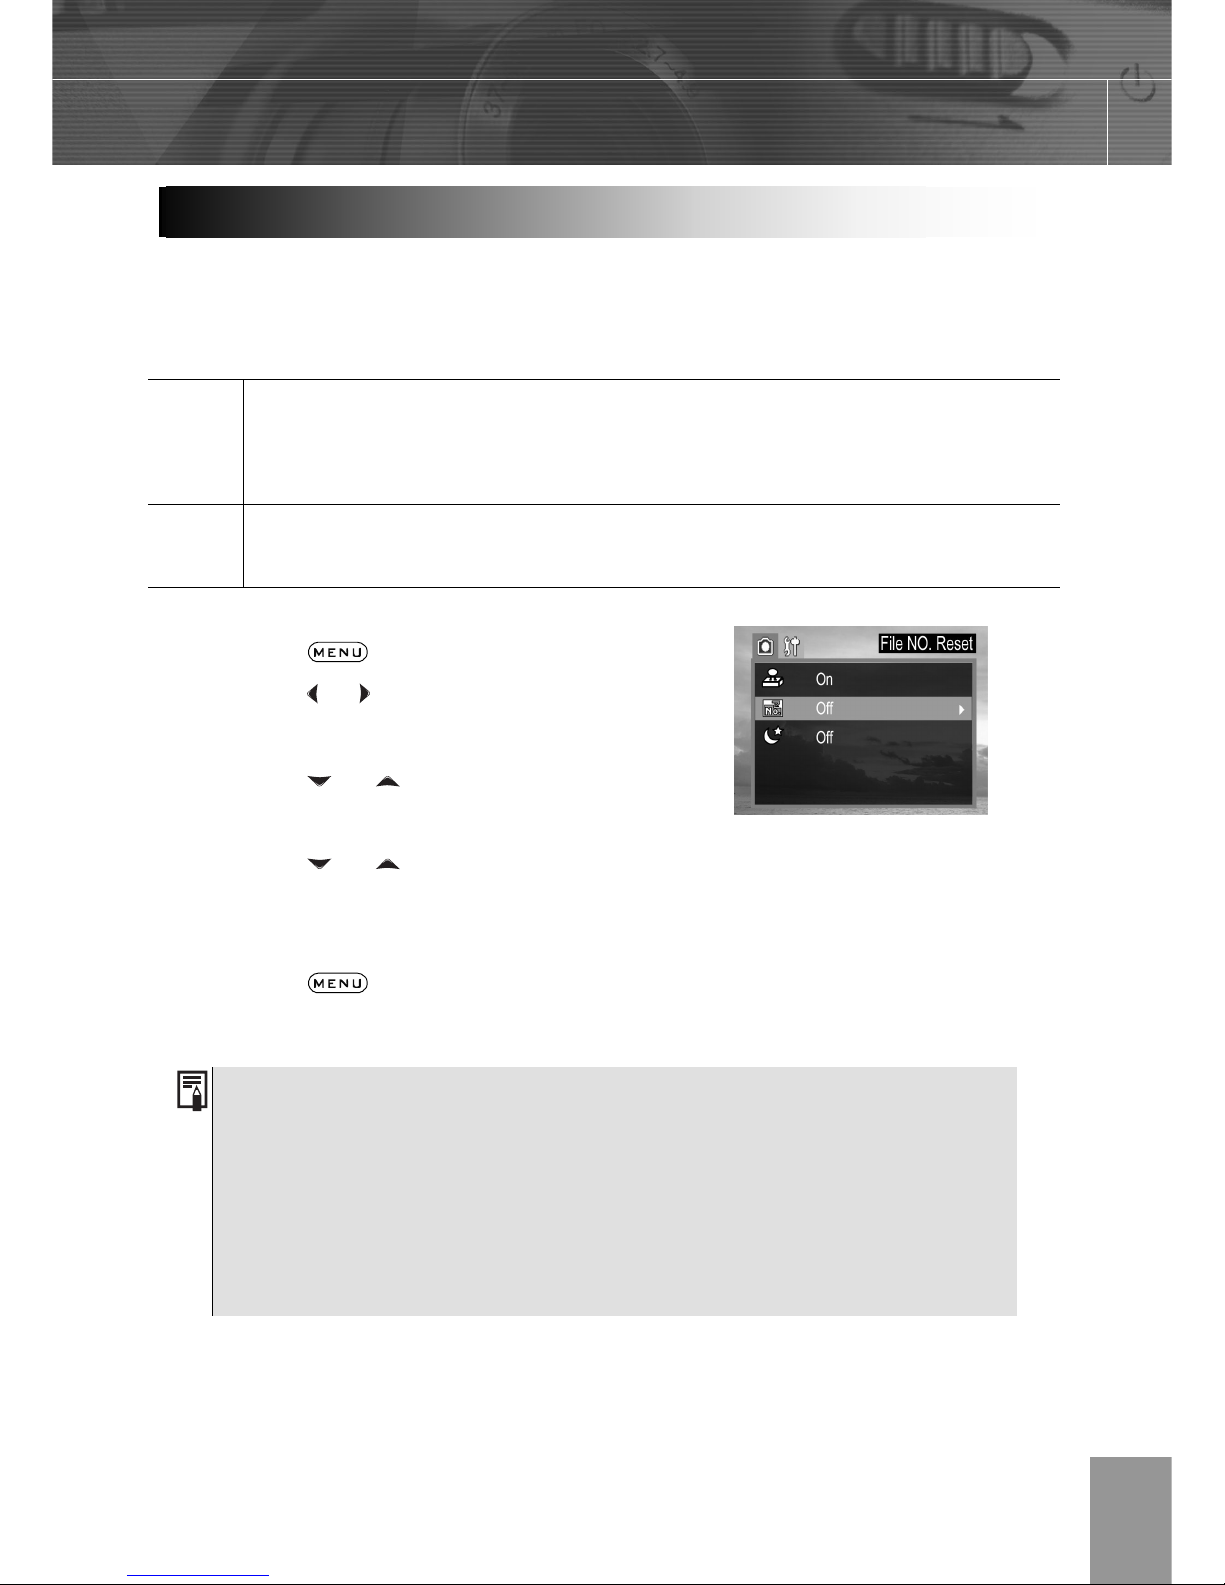
Images or video clips are assigned file numbers from 0001 to 9999, and
folders are assigned folder numbers from 100 to 999
Folder File Capacity
Each folder usually contains up to 9999 images. If a photo is taken when the folder with
highest folder number contains a picture file number equal to or greater than 9999, the
camera creates a new folder by adding one to the current folder number. For example, if
the current folder is “100DICAM” the new folder is named “101DICAM.”
If the highest folder number is 999 and the highest file number exceeds 9999, the camera
will display the warning message “FILE NUMBER OVER.”
If “FILE NUMBER OVER” appears, follow one of the two methods below:
1. Format the memory. The folder number and file number are initialized and renumbered
from 100 and 0001 respectively.
2. Turn on File Number Reset in the camera menu and plug in a new memory card.
About File and Folder Numbers
9998 9999
9998 9999
9998 9999
9998 9999
998
999
Page 34
-31-
Use File Number Reset if the camera experiences a ““FILE NUMBER OVER” error or if you
want to restart numbering, for example, after erasing all files.
On
The file numbers are reset to the start (0001) each time a new SD card is
inserted. New images recorded on SD cards with existing files are assigned the
next available number.
Off
The file number of the last image to be shot is memorized so that images
recorded to a new SD card start from the next number.
1. Press the
button.
2. Press the
or arrow to select the REC
Menu.
3. Press the
or arrow to select File
NO. Reset then press the SET button.
4. Press the
or to select the
settings you wish to set then press the
SET button.
5. Press the
button to close the
menu window.
1. Setting the File No. Reset to OFF is useful for avoiding file name
duplication when images are downloaded to a computer.
2. If the memory card is formatted, the folder number and the file number
are initialized and the count starts from 100 and 0001. If the file Number
Rest is set to OFF, the numbering starts after format with the last file and
folder number stored in the camera.
File Number Reset
Page 35
-32-
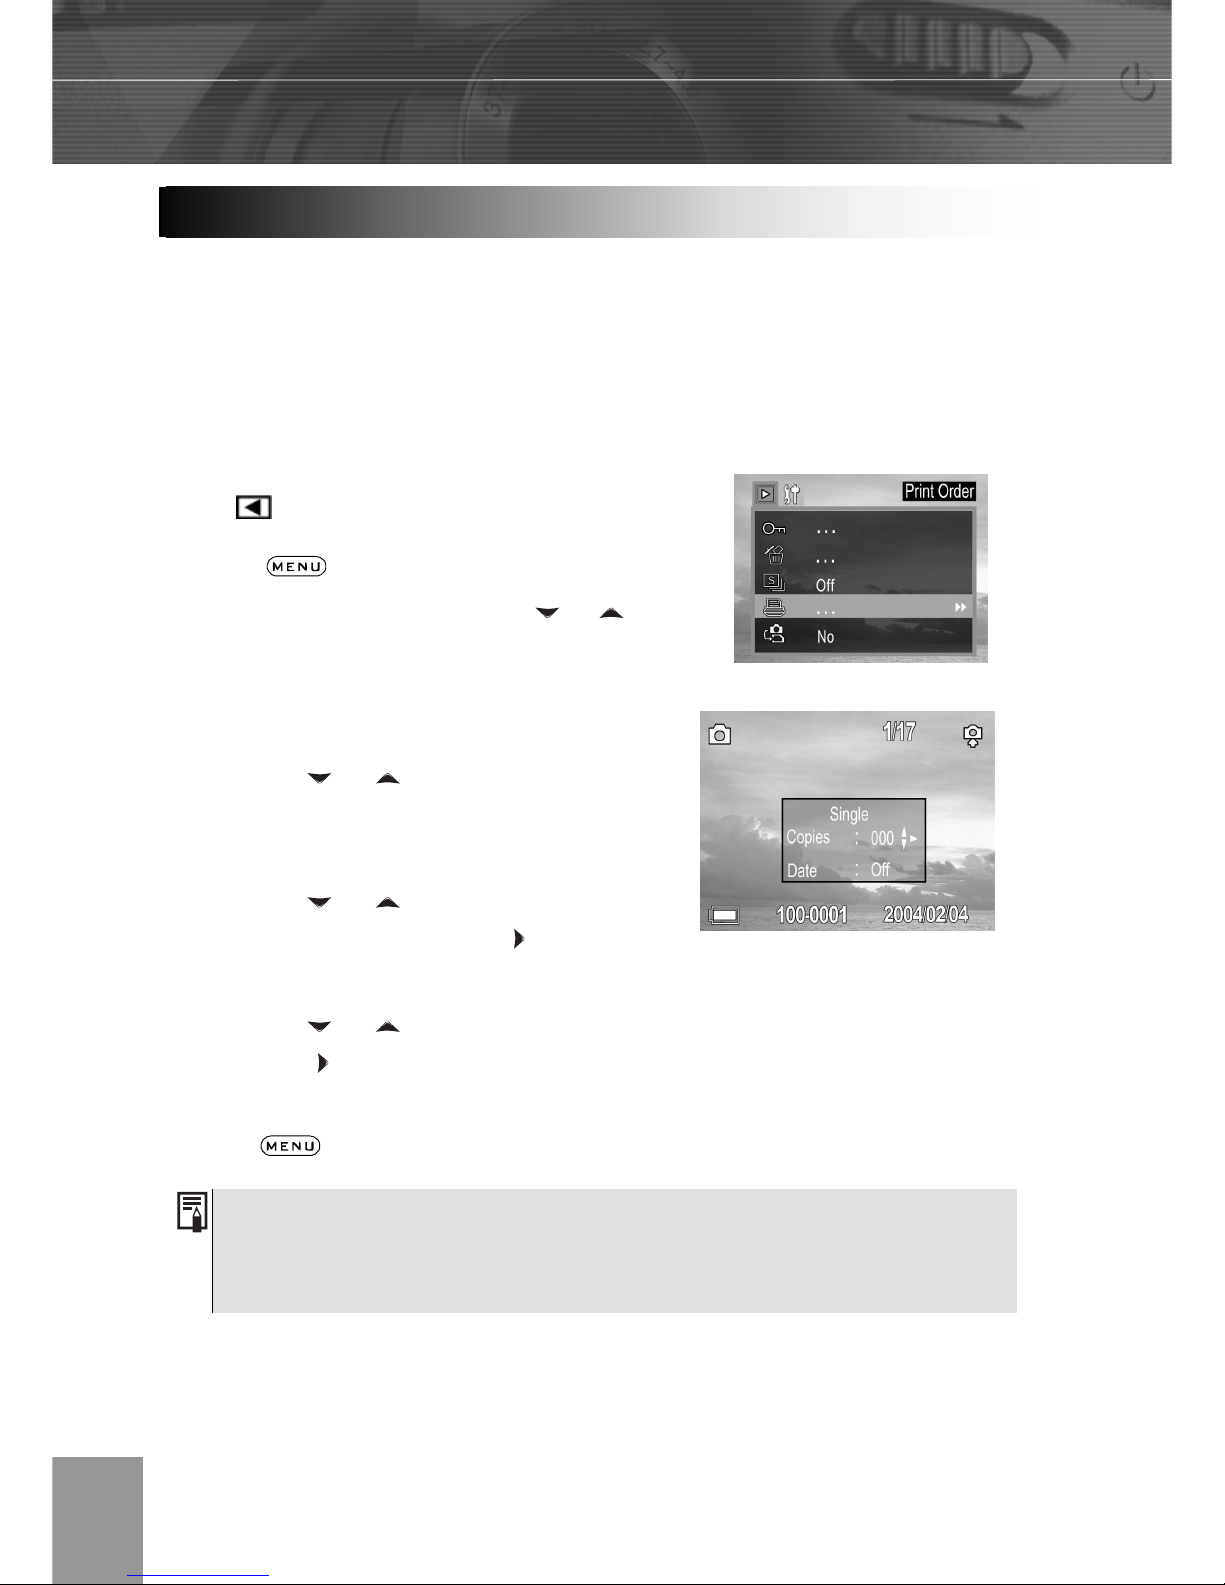
The Digital Print Order Format (DPOF) setting allows you to select images on an SD card
for printing and specify the number of print copies in advance using the camera. This is
extremely convenient for sending the images to a photo developing service or for printing
on a direct print function compatible printer.
Selecting Images for Printing
In play mode.
1. Press
button.
2. In the Playback menu, press the
or
arrow to select Print Order.
3. Press SET to enter the PRINT setting
menu.
4. Press the
or arrow to select
Single, All, Reset then press the SET
button.
5. Press the or to set the number of
copies (up to 999), then press
to confirm
the setting.
6. Press the
or to set date on/off,
then press
to confirm the setting.
Press the
button to close the menu window.
The Digital Print Order Format (DPOF) setting is only supported for photos
stored on an SD card. If you are using internal memory, please copy images
from internal memory to SD card.
DPOF Print Settings
Page 36
-33-
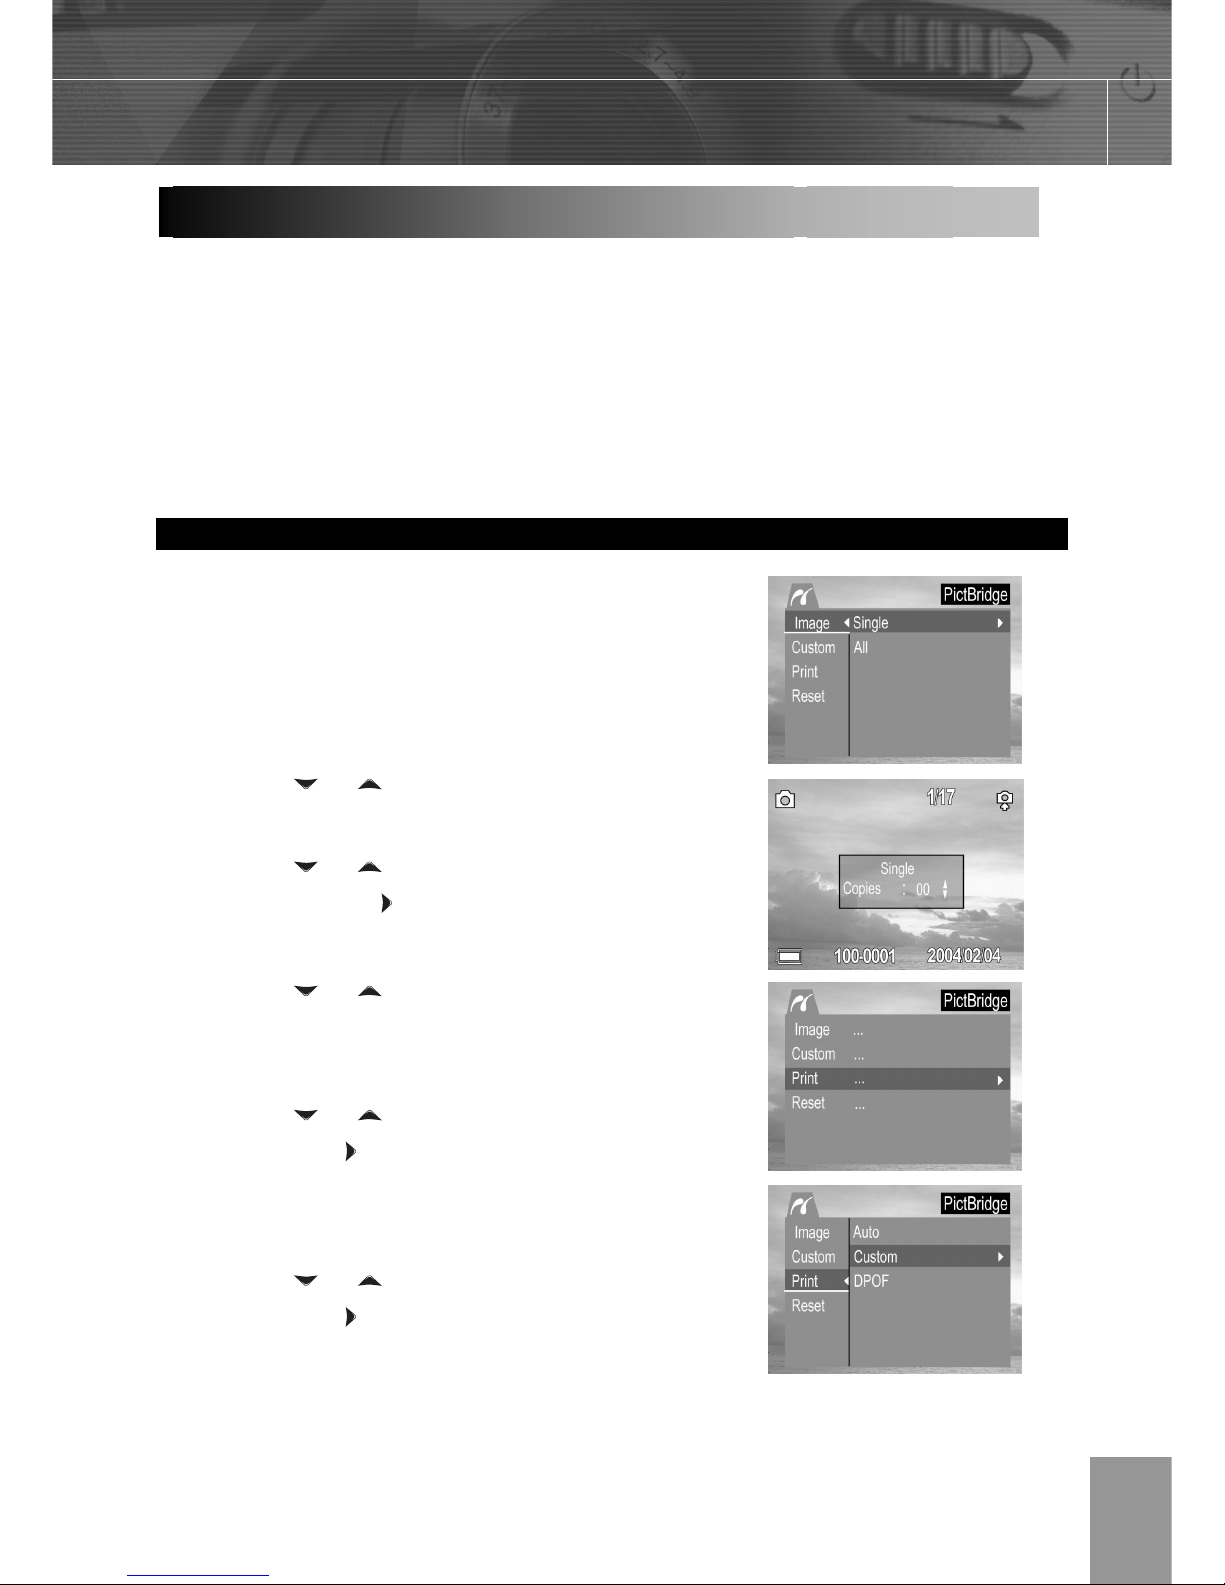
You can easily print images shot with your camera without using a computer by using a
PictBridge-compliant printer.
1. Set the USB mode to connect the camera with a printer. (P.29)
2. Connect the supplied USB interface cable to the printer’s USB port and the camera’s
DIGITAL terminal.
3. Turn on the camera and the printer.
Printing images
The PictBridge menu will be launch
automatically when connecting the camera to a
printer that supports PictBridge.
1. Press the
or arrow to select Image.
Press SET to enter the setting menu.
2. Press the
or arrow to select Single,
All then press the
button.
3. Press the
or to set the number of
copies (up to 30), then press SET to
confirm the setting.
4. Press the
or arrow to select Print
then press the
button.
5. Press the or arrow to select Custom
then press the button.
Printing still images with a PictBridge printer
Page 37
-34-
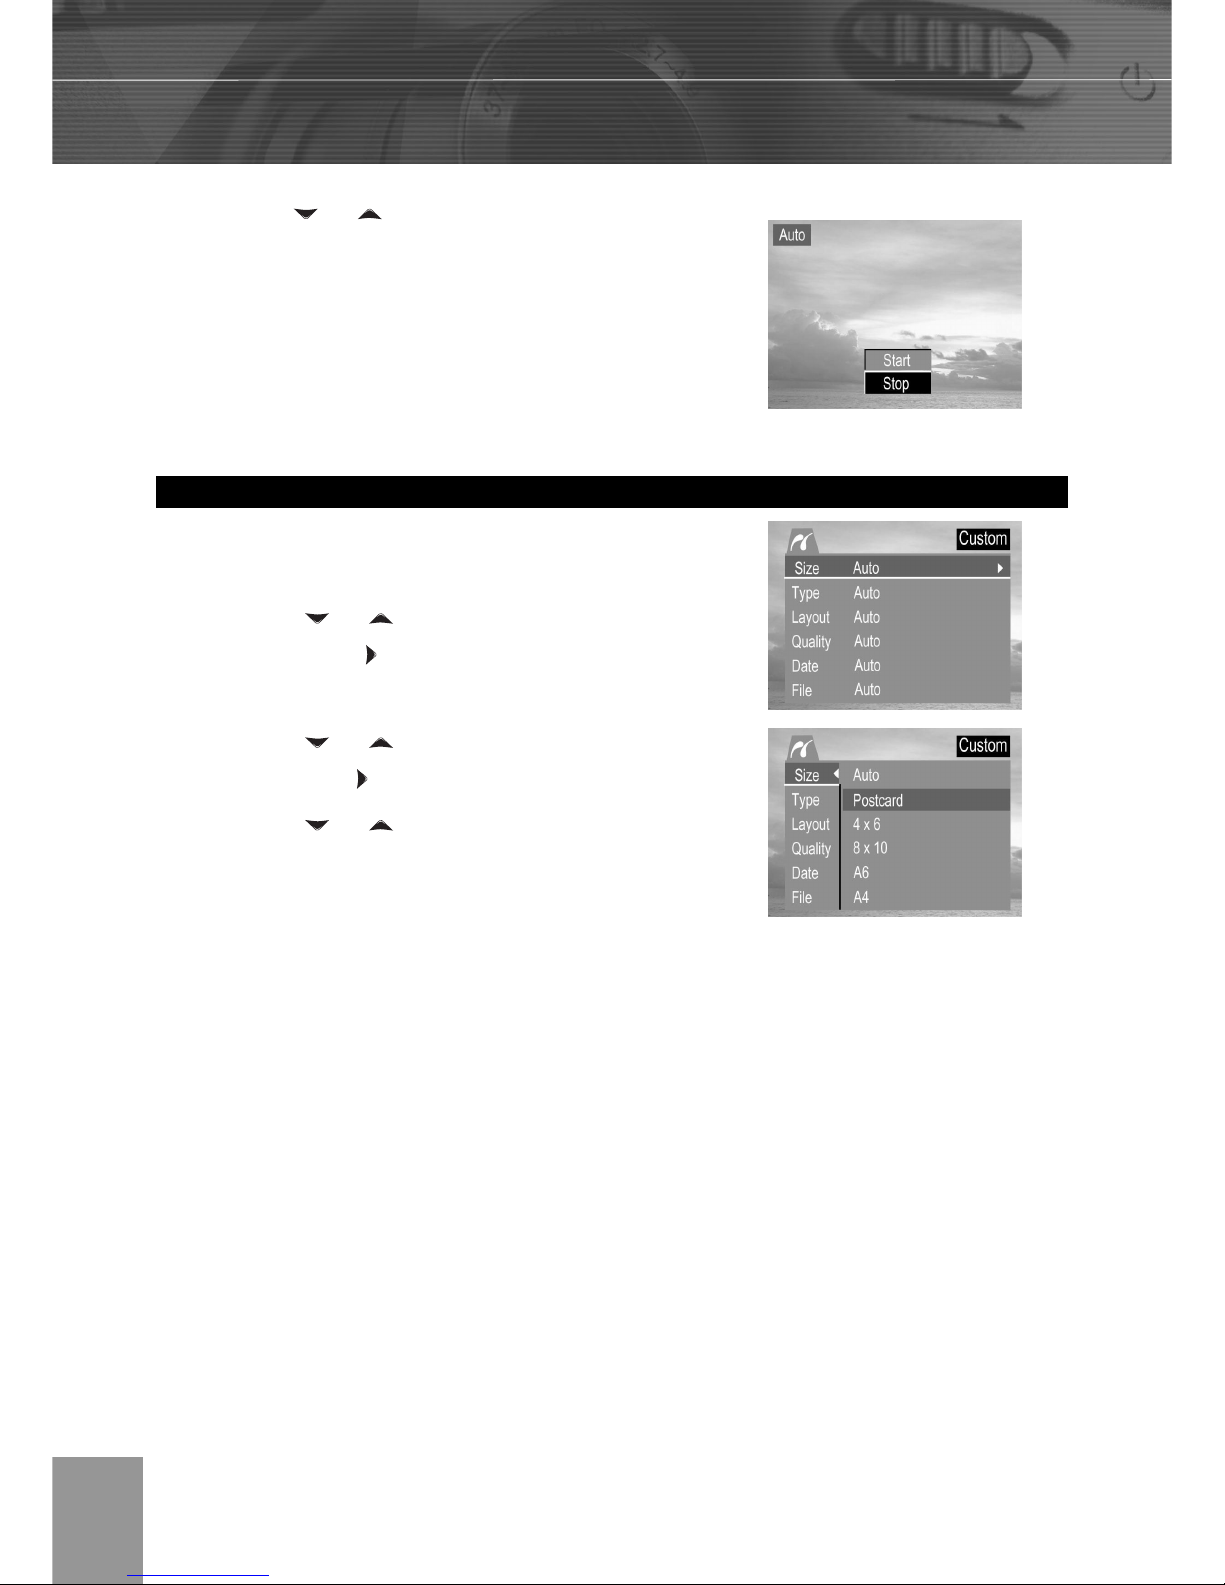
6. Press the or arrow to select Start
then press the SET button.
7. The images is printed.
Setting Print Size
1. In PictBridge menu.
2. Press the
or arrow to select
Custom. Press
to enter the setting
menu.
3. Press the
or arrow to select Size
then press the
button.
4. Press the
or to set the size of print,
then press SET to confirm the setting.
Page 38
-35-
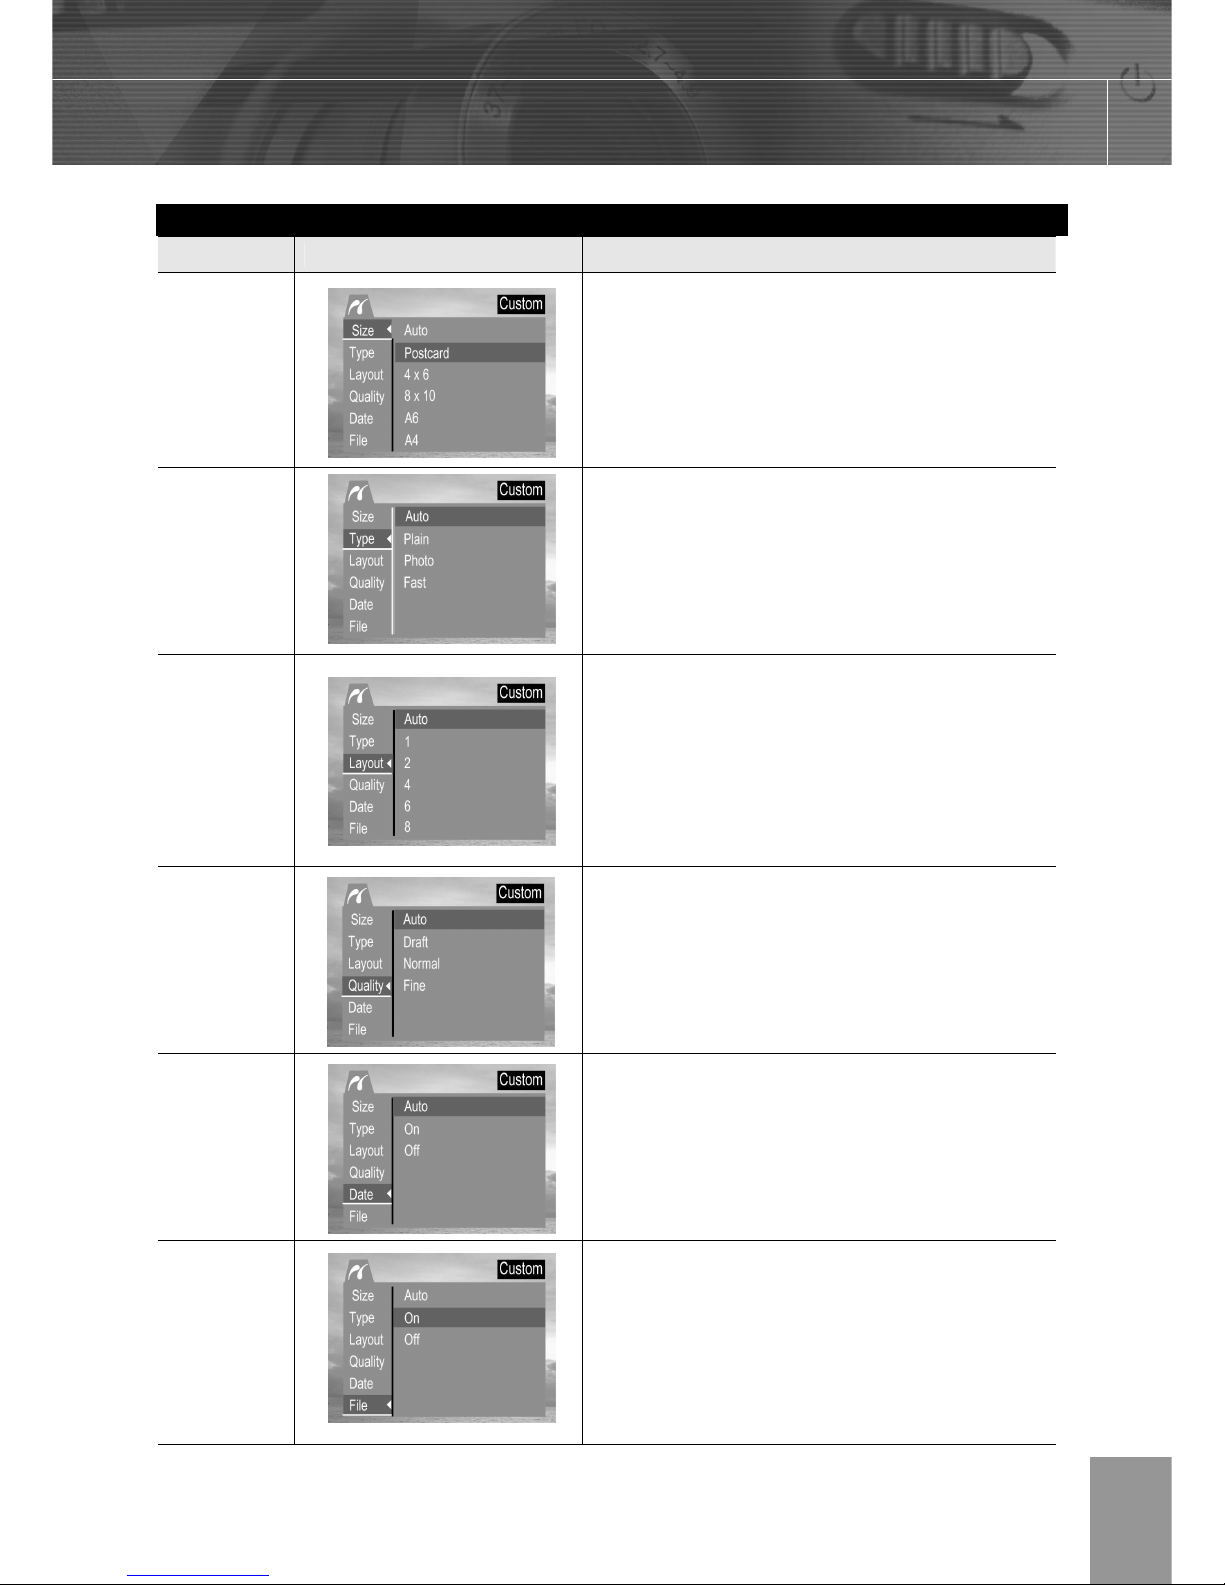
PictBridge Custom Menu
Item Menu Screen Settings Content
Size
• Auto
• Postcard
• 4 × 6
• 8 × 10
• A6
• A4
• B5
Type
• Auto
• Plain
• Photo
• Fast
Layout
• Auto
• 1
• 2
• 4
• 6
• 8
• Index
• Full
Quality
• Auto
• Draft
• Normal
• Fine
Date
• Auto
• On
• Off
File
• Auto
• On
• Off
Page 39
-36-
7 Making Connections
Download images taken with the camera to a computer in one of the following ways:
1. Directly from the SD card.
2. Connect the camera to a computer with the USB cable.
You must install the software and USB driver bundled on the Software Installation
CD-ROM before connecting the camera to the computer.
Downloading Directly from an SD Card
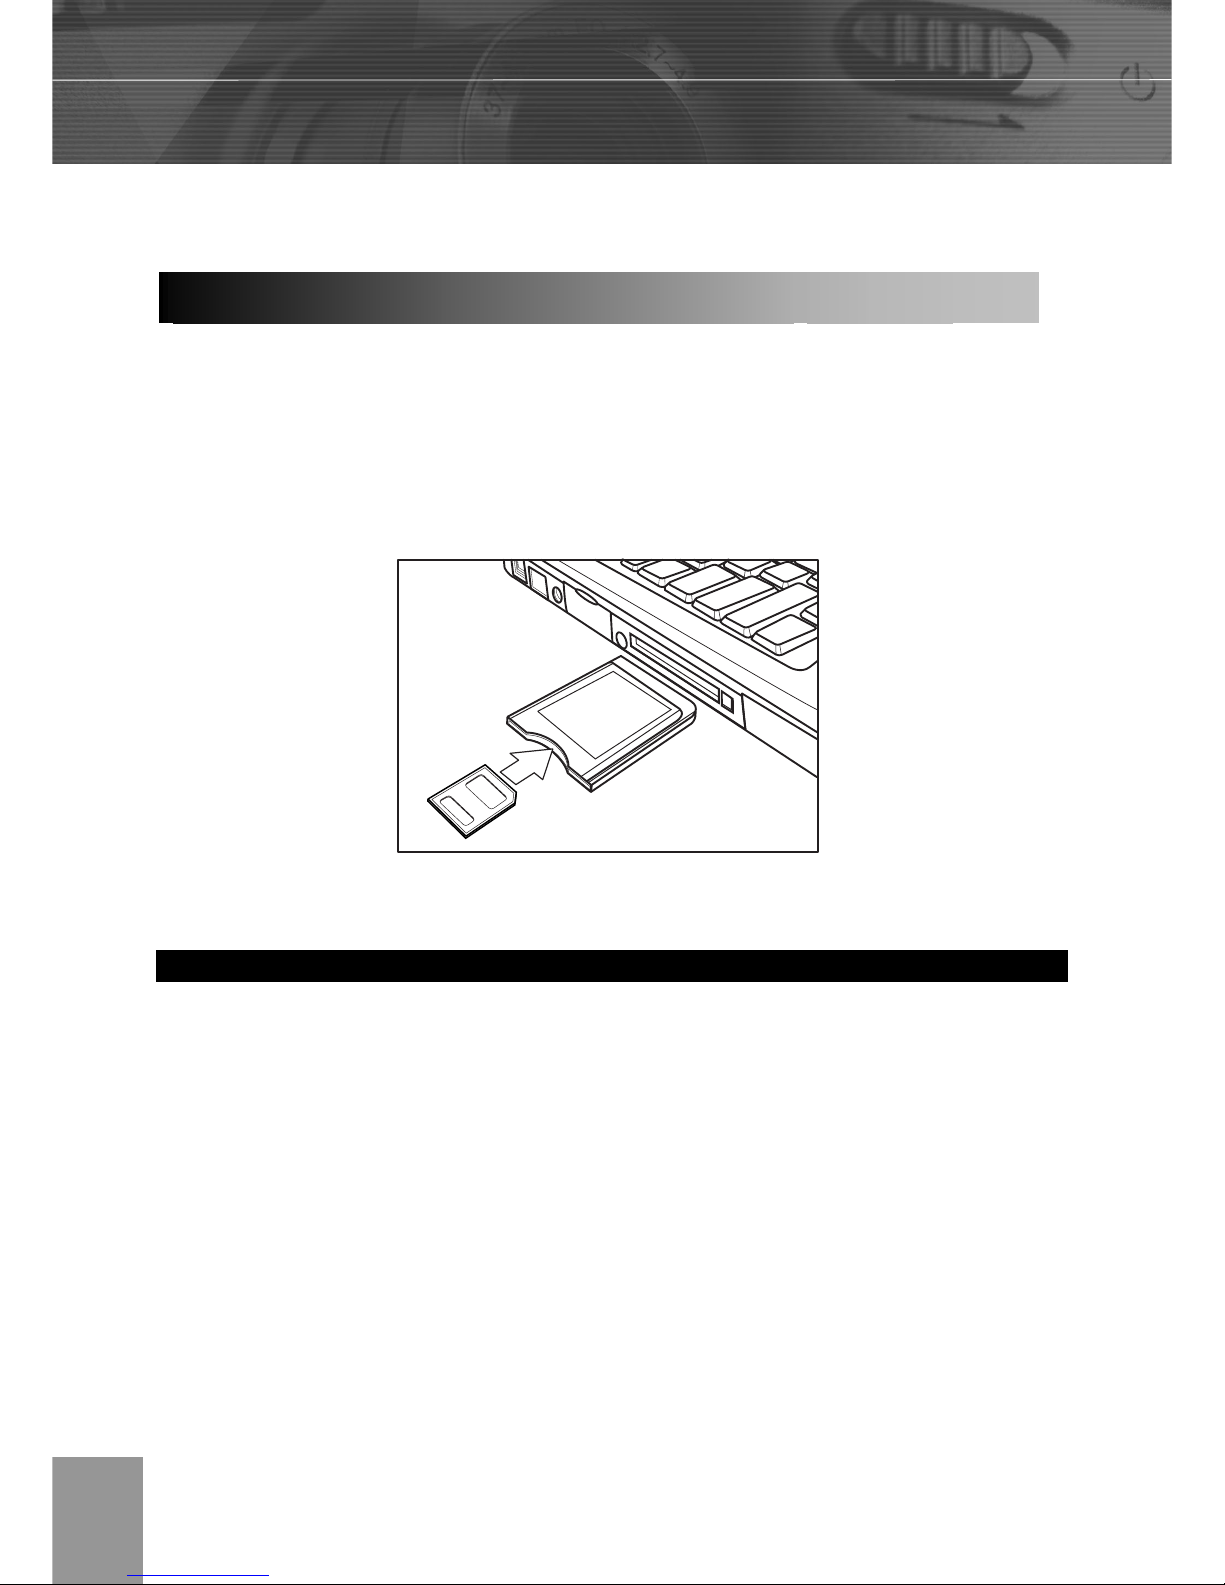
1. Eject the SD card from the camera, and insert it into an SD card reader connected to
the computer.
Note: If you are using a PC card reader, first insert the SD card into a PC card reader
adapter (optional), and then insert the PC card adapter into the computer’s PC card
slot.
2. Double-click the icon of the drive with the SD card.
3. Copy images from the card into a folder of your choice on the hard disk.
Downloading Images to a Computer
Page 40
-37-
You must install the software and USB driver bundled on the Digital Camera
software installation CD-ROM before connecting the camera to the computer.
Connecting the Camera to a Computer with a USB Cable
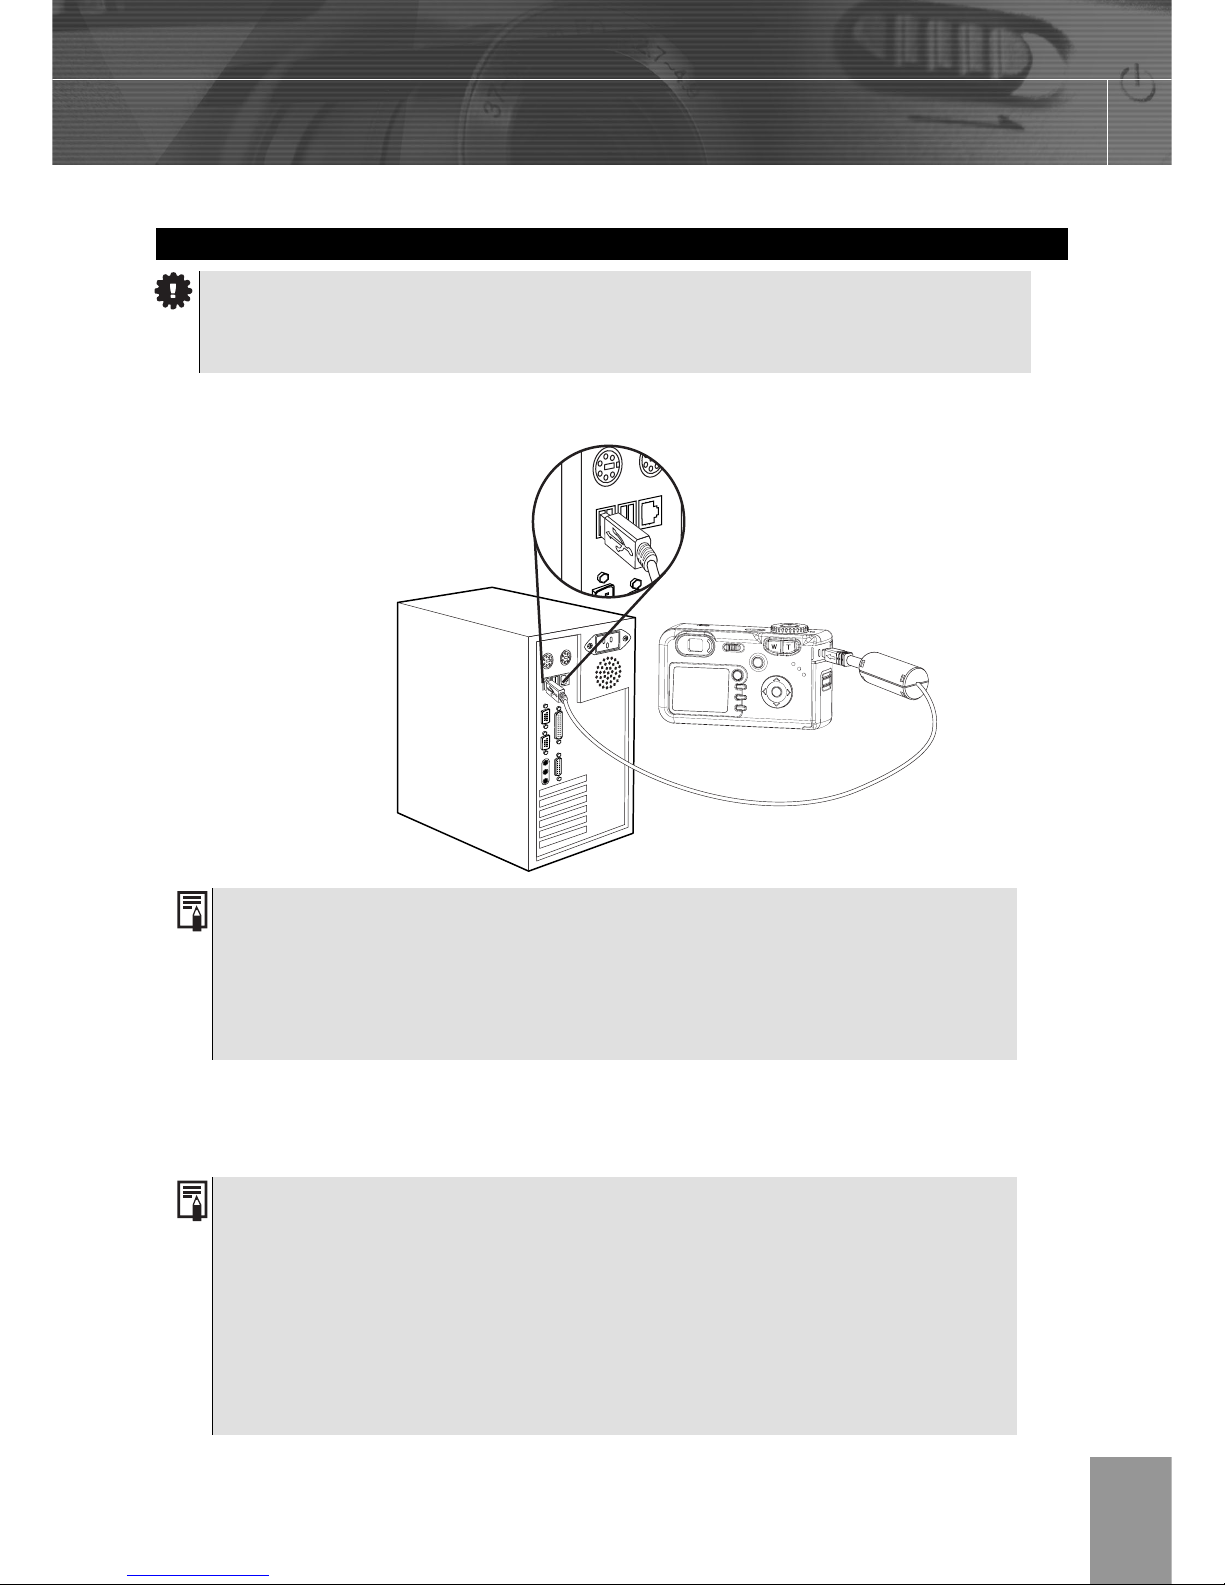
Connect the supplied USB interface cable to the computer’s USB port and the camera’s
DIGITAL terminal.
The LCD monitor turns off when the connection to the computer has been successfully
completed.
1. The camera will turn off automatically if the USB cable is disconnected.
2. Use an optional AC power adapter when connected to a computer to save
battery power.
3. Windows 98/98SE user: If this is the first time the camera has been
connected to the computer, Windows detects the camera as an “Unknown
device” and automatically completes the required software installation.
1. You do not need to turn off the computer or camera when making this
connection.
2. Please refer to your computer manual for information regarding the
location of the USB port.
Page 41

-38-
Open My Computer or Windows Explorer. A “internal” appears in the drive list.
Double-click the “internal” icon to view its contents.
Files stored on camera are located in the folder named “DCIM”
Internal Memory
The digital camera is equipped with internal memory. If an SD card is not installed in the
camera, all photos recorded by the camera will be stored in the internal memory. If an SD
card is installed, photos and video clips are stored on the SD card.
Optional SD Memory Card
Photos, video clips, and other information recorded by the camera are stored on the SD
card using the Design Rule for Camera File System (DCF) protocol. The DCF protocol is
designed to accommodate file and data exchange between digital cameras and other
devices.
DCF Protocol
The DCF protocol defines the format for image file data as well as the directory for the
memory card. Photos that are taken by a DCF camera can be viewed on DCF-compatible
cameras from other manufacturers.
Understanding Camera Memory and Storage
Page 42
-39-
8 Installing Software
Install the Software Driver
You must install the camera software drivers if your operating system is Windows 98 or
Windows 98 SE. Once the USB driver is installed, you do not need to install the USB driver
again.
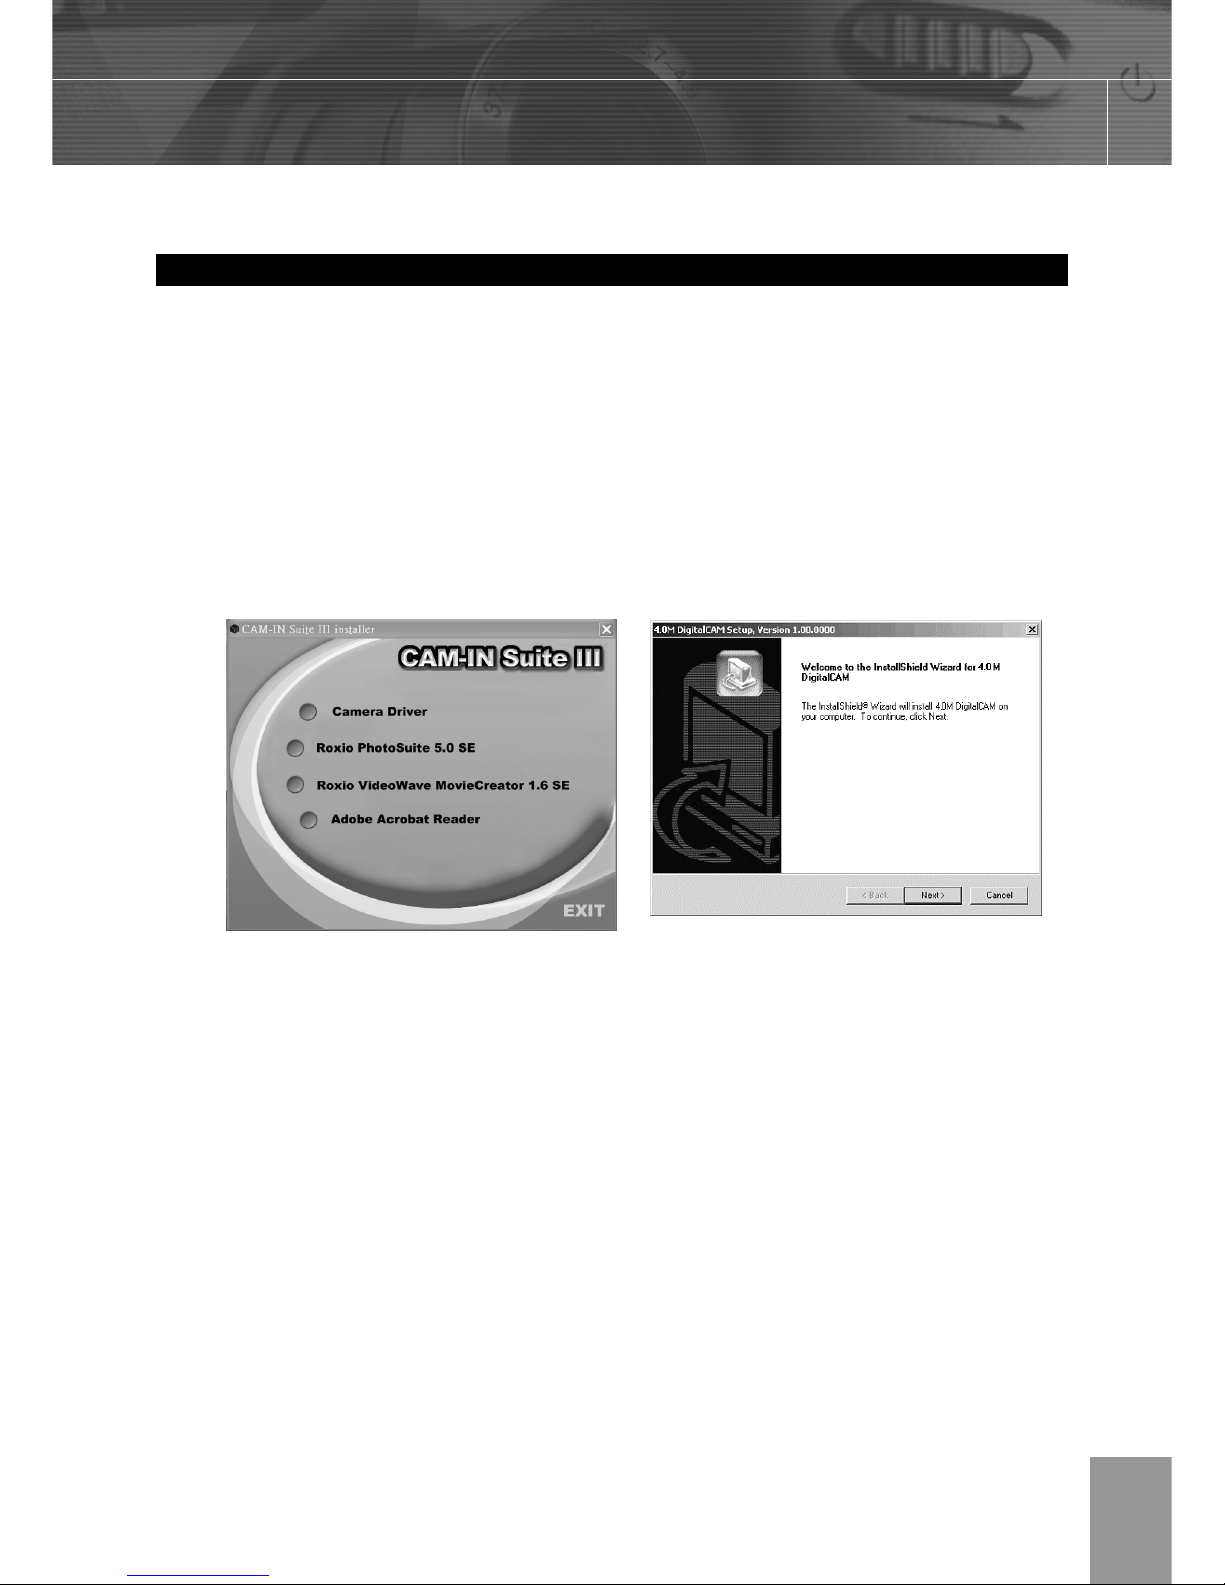
1. Start up your computer, and insert the software installation CD-ROM into the CD-ROM
drive.
2. The model selection screen appears, If it does not appear, double-click My Computer
and find the CD-ROM drive, then double-click the menu.
3. Click Camera Driver on the model selection screen. The “InstallShield Wizard” screen
appears.
4. Click Next.
The USB driver installation starts. When the installation is completed, the screen
informs you of completion.
5. Click “Yes, I want to restart my computer now” then click “Finish”
Your computer restarts. Then, you can establish USB connection.
Page 43
-40-
Installing Roxio PhotoSuite 5.0 SE
Roxio PhotoSuite 5.0 SE is a photo editing application that is included for free in the
software installation CD-ROM. You must use Windows XP/ME/2000/98SE/98 on your
computer to use this software.
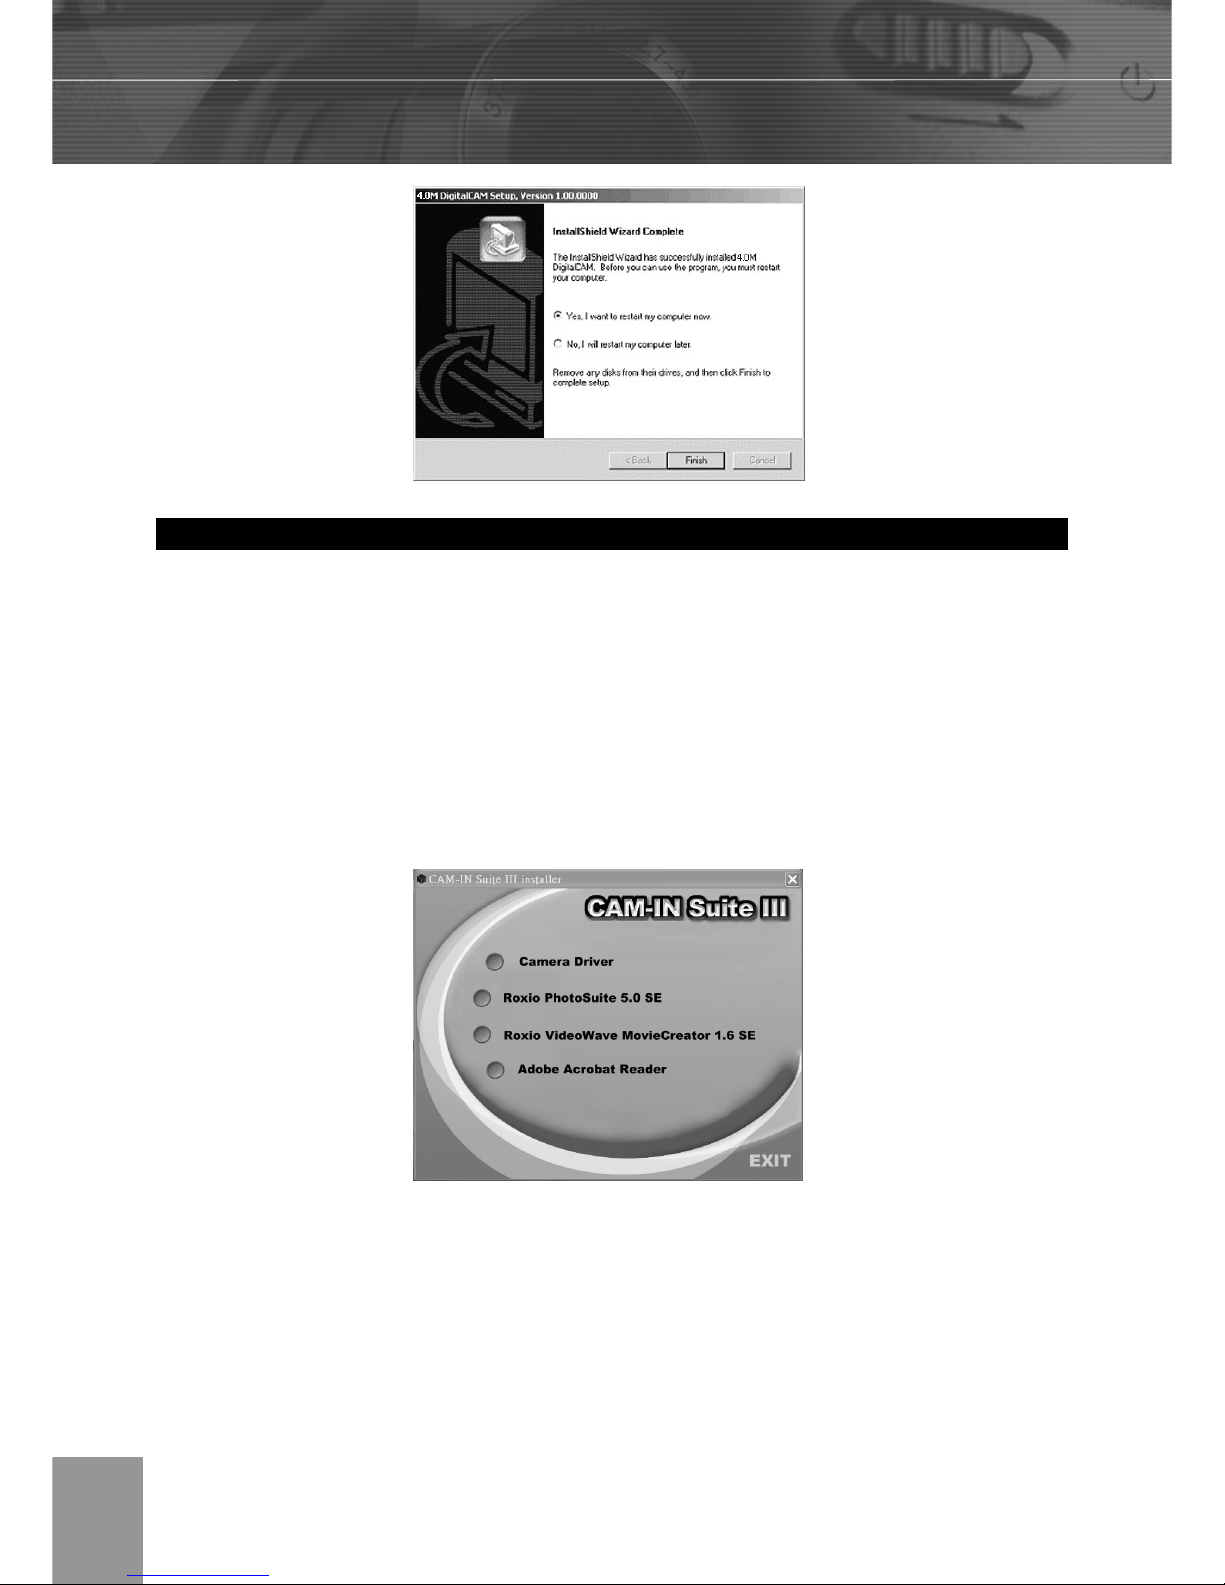
1. Start up your computer, and insert the software installation CD-ROM into the CD-ROM
drive.
2. The model selection screen appears, If it does not appear, double-click My Computer
and find the CD-ROM drive, then double-click the menu.
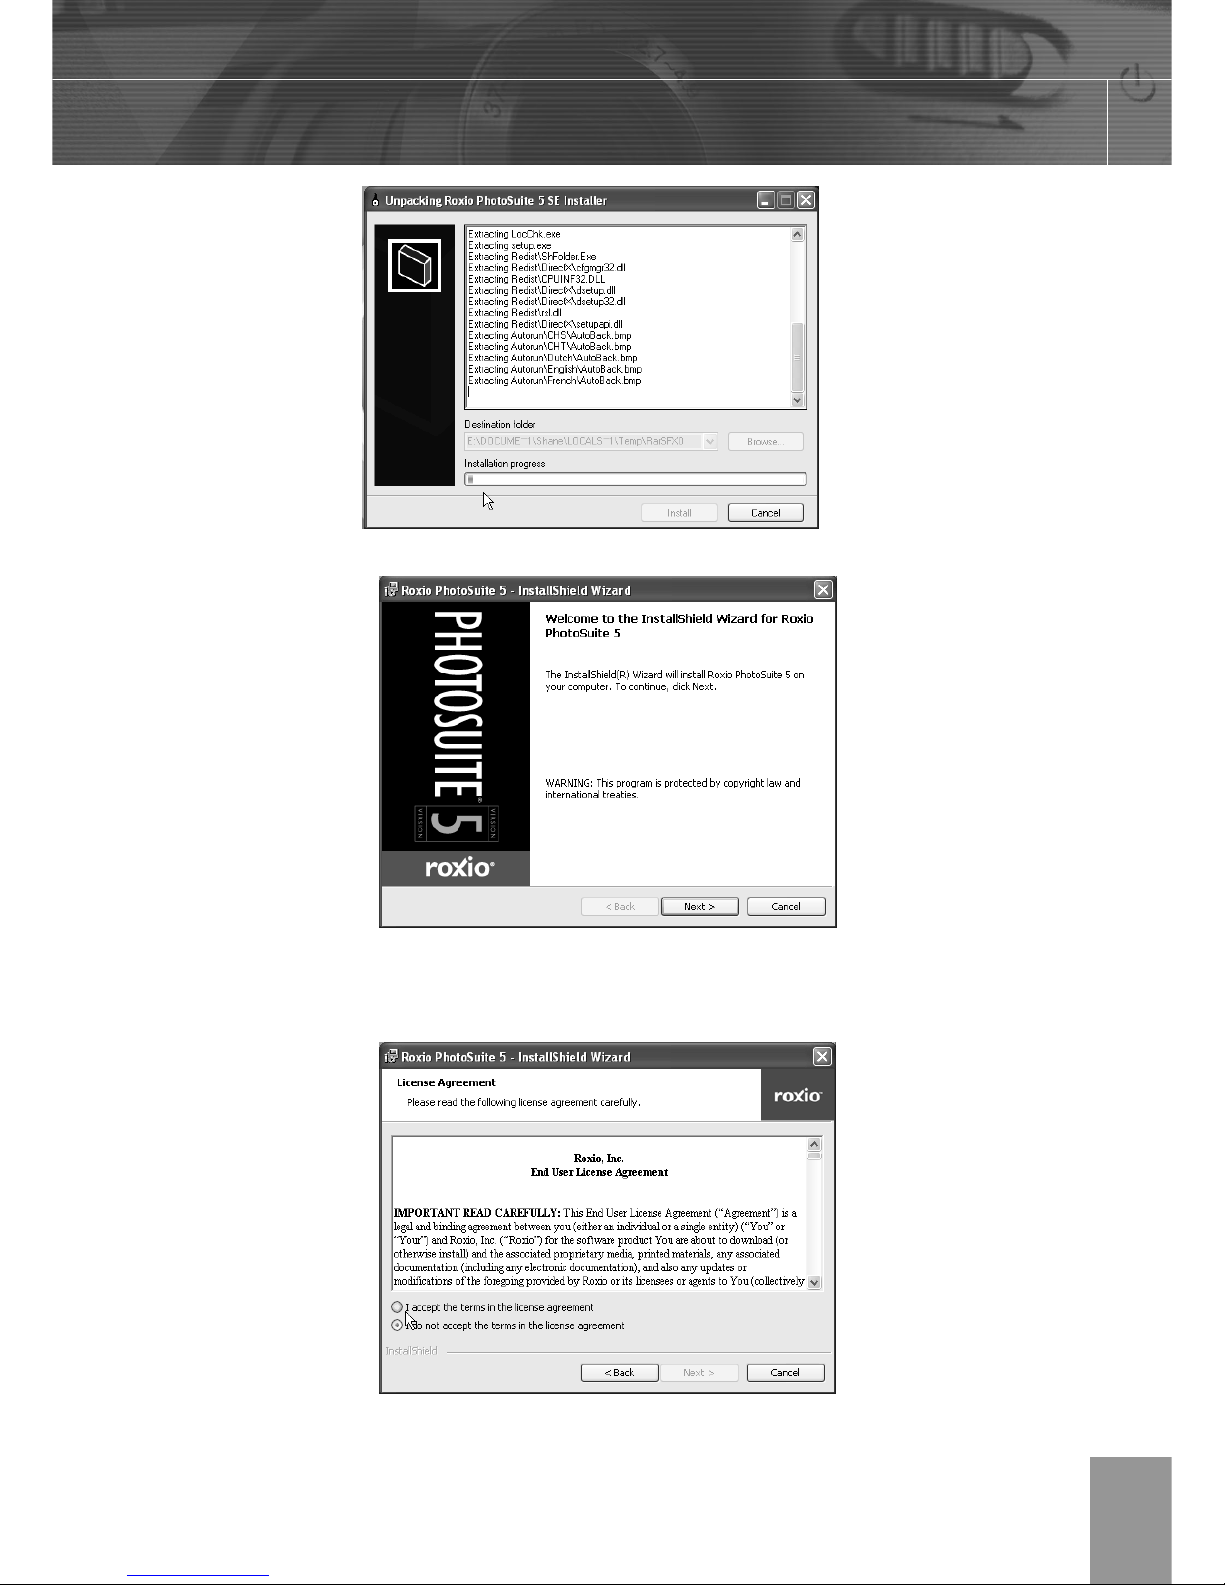
3. Click Roxio PhotoSuite 5.0 SE on the model selection screen. Follow the on-screen
instructions to install the software.
Page 44
-41-
4. A welcome window appears. Click Next to continue with the installation.
5. The Software License Agreement window appears. To accept the license, click Yes to
continue. If you disagree with the terms of the license, click No to exit the installation
program.
Page 45
-42-
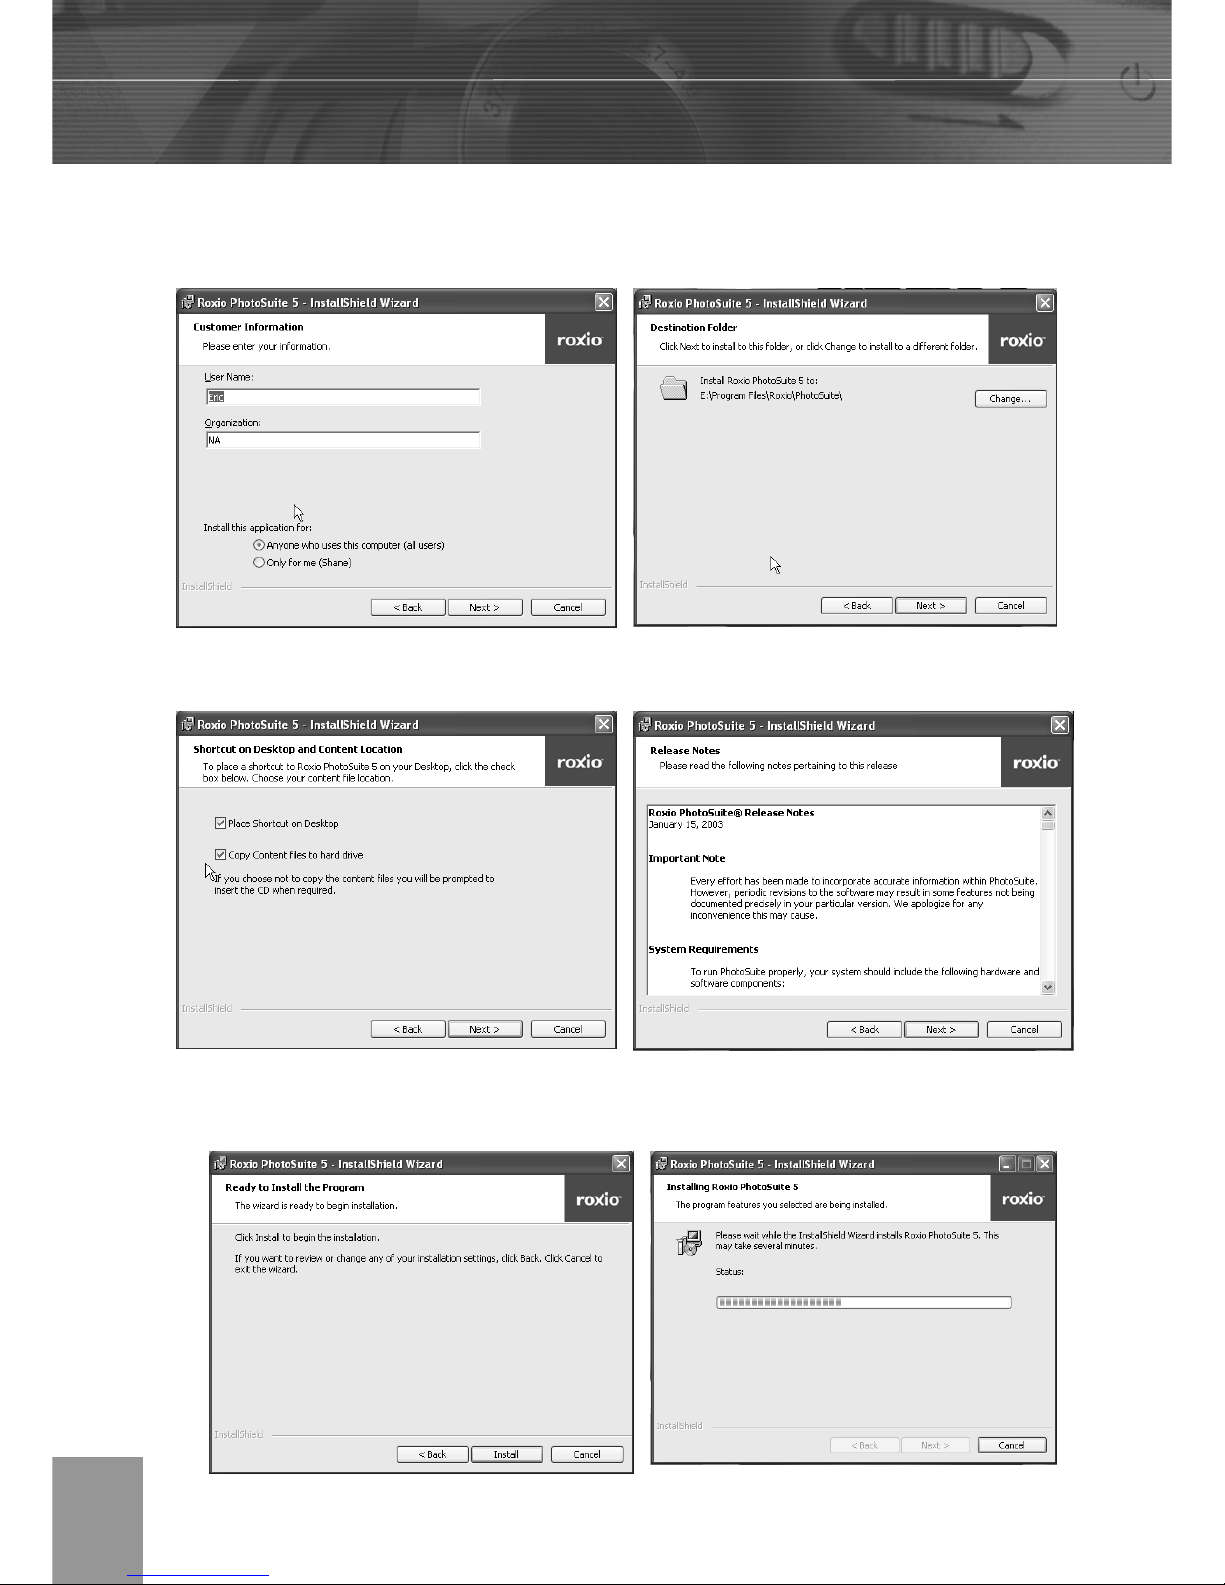
6. Select a destination folder in which the software will be installed. For most users,
C:\Program files\ is the most appropriate choice.
7. Click Next to begin copying f iles from the CD-ROM to the computer hard drive.
8. The Release Notes window appears. Click Next to continue.
9. The Ready to Install the Program window appears. Click Install.
Page 46
-43-
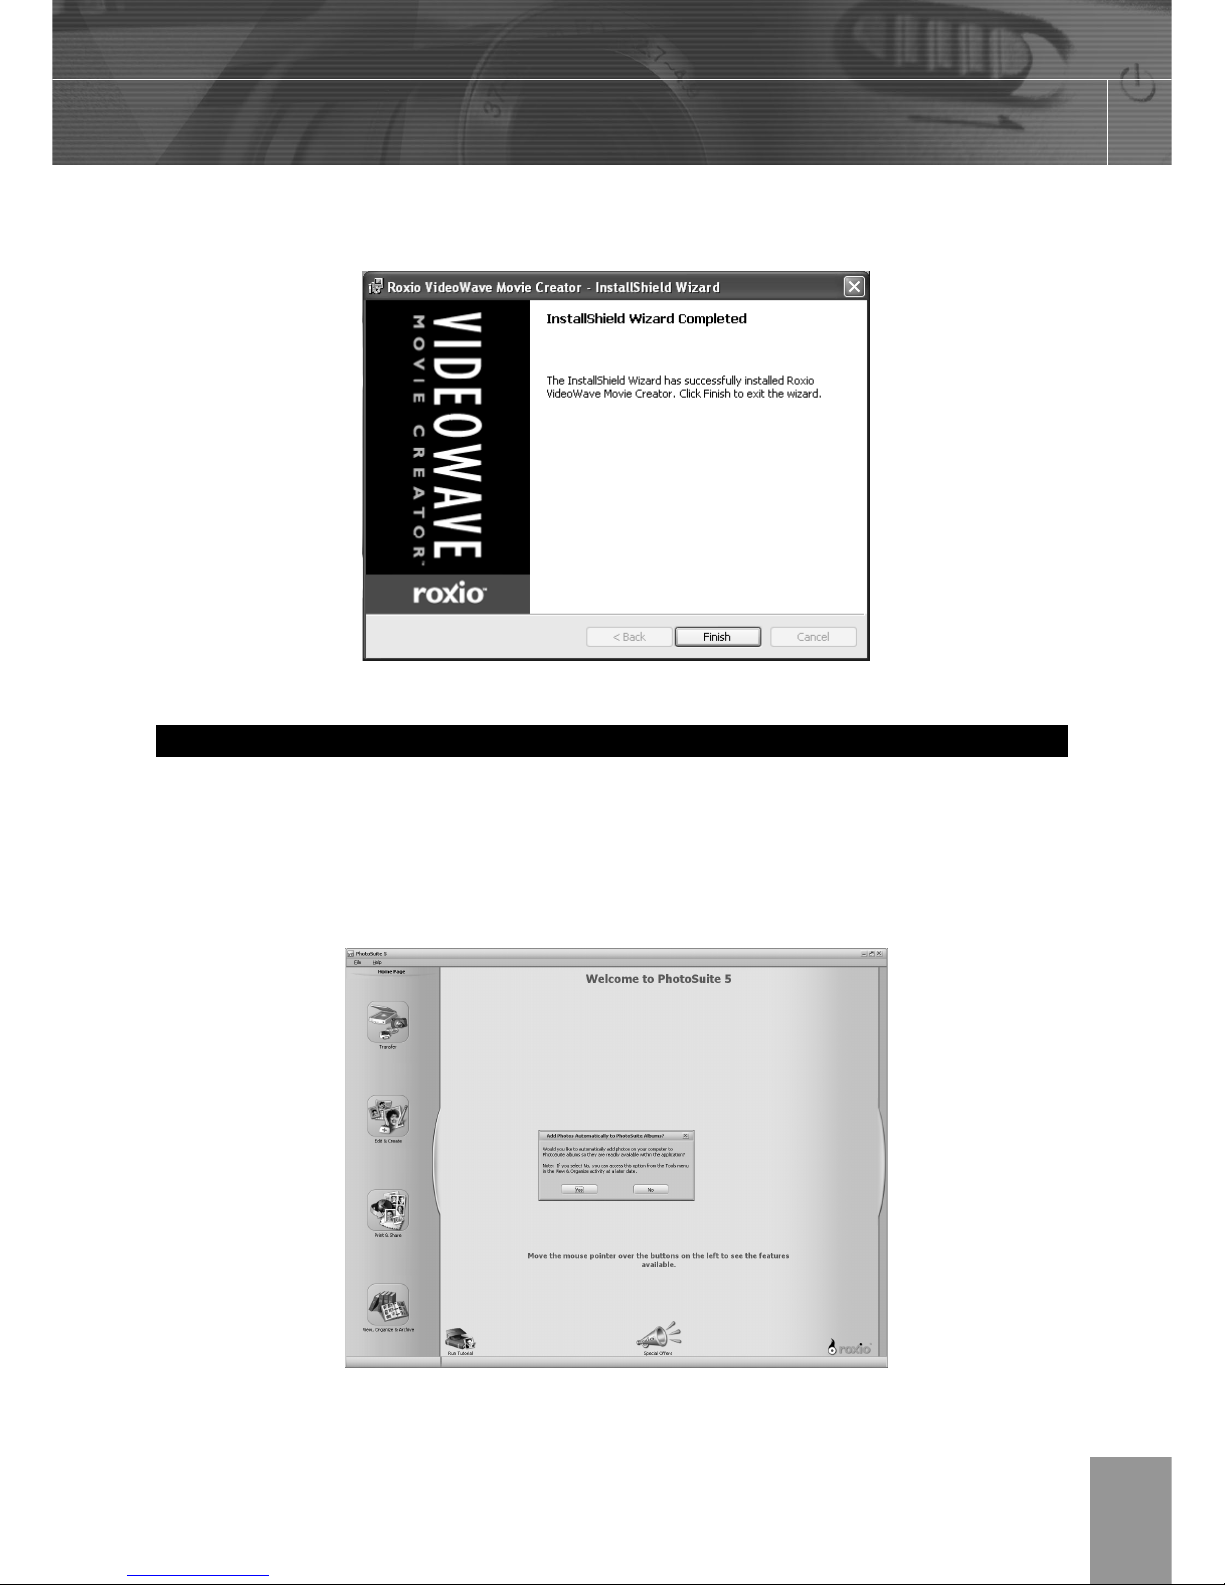
10. When installation is completed, Click Finish to quit the InstallShield Wizard.
Using the Roxio PhotoSuite 5.0 SE
Roxio PhotoSuite 5.0 SE gives you the ability to edit, crop and print the photos you
download to your computer from the digital camera. Refer to the application help
documentation for information on using the software.
To start this program, click Start > Program > Roxio PhotoSuite 5
Page 47
-44-
9 Appendix
Problem Cause Solution
Battery is inserted in the wrong
direction
Reload battery in the correct direction.
Batteries are dead Replace or recharge batteries
Power does not turn on
The battery compartment door is open
Make sure the battery compartment
door is securely closed.
The flash is charging Wait for the flash to charge.
Memory is full Insert a new SD card
SD card is not formatted correctly
The card may be defective, use a new
card.
The camera does not take
pictures
Maximum file number is exceeded
Turn “File No. Reset” on, then format
the card or insert a new card.
The flash is charging Wait for the flash to charge.
Image is not recorded
when the shutter button is
pressed
Memory is full Insert an new SD card
The flash doesn’t fire
Flash is set to OFF Set the flash to any mode except off.
The camera was moving when the
image was captured
Hold the camera steady when
shooting picture.
Image is blurry or out of
focus
The subject was beyond the range
within which the camera can focus
Turn the Macro mode on if the subject
is within 10 cm (zoomed out) or 50 cm
(zoom in) / don’t use Macro mode
when shooting distant subjects.
Image is not displayed on
the LCD monitor
An SD Card with non-DCIF images
(recorded with another camera) is
loaded
This camera cannot display non-DCIF
images.
Recorded images are not
saved in memory
The camera was turned off/powered
down before the image was stored in
memory
If the Battery Low indicator appears
on the LCD monitor, replace the
battery immediately.
Cannot transfer images to a
computer after connecting
the USB cable
USB driver is not installed
Install the USB driver before you
connect the camera to a computer /
turn the camera on.
Troubleshooting
Page 48
-45-
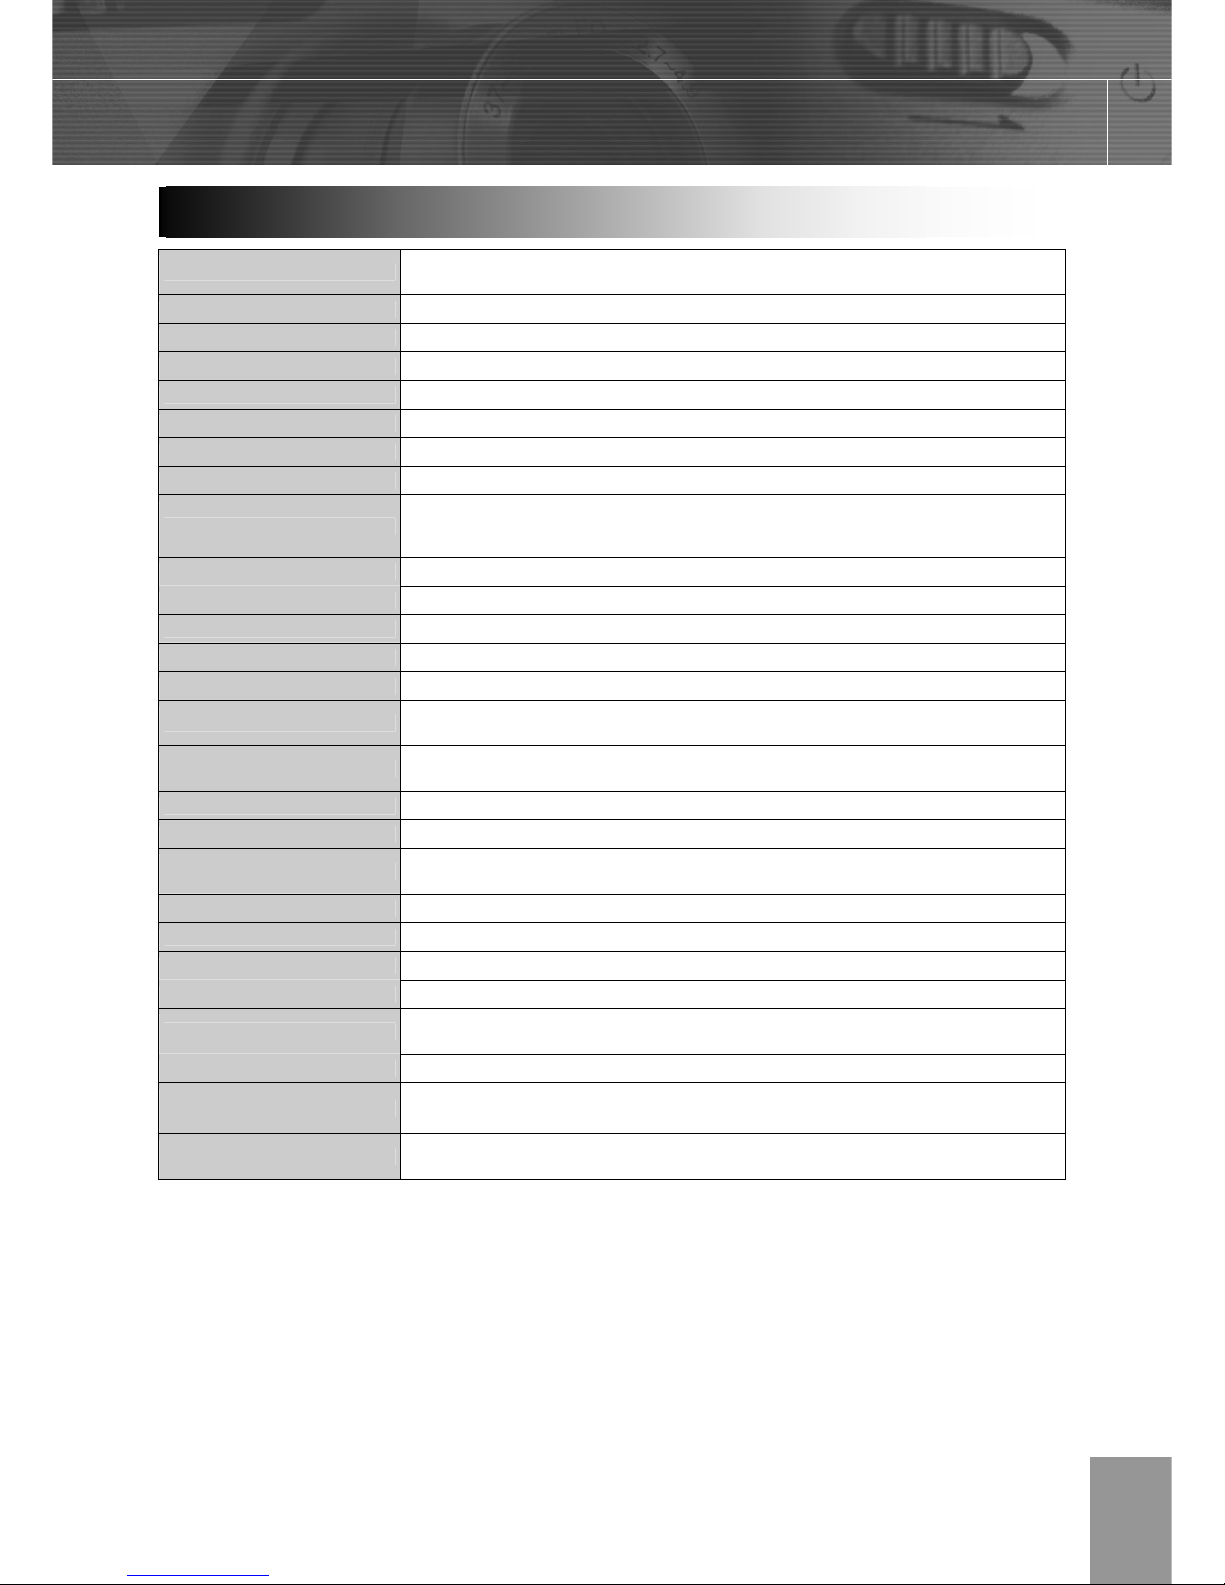
Sensor
4.24 Mega Pixels CCD
Size : 1/2.5 inch
Lens 3× zoom lens
View Finder Optical with real image
Color LCD Display 1.5” TFT LCD Panel
Focus Range 10 cm ~ infinity (W), 50 cm ~infinity (T)
ISO/ASA Sensitivity 100
Still Image Resolution 2592 × 1944, 2304 x 1728, 1600 × 1200, 1024 × 768, 640 × 480
Video Resolution 320 × 240, 20 fps
Still Image quality
Fine : 5 × compression rate
Normal : 8 × compression rate
Economy: 12 x compression rate
Exposure Control Auto & Manual
Exposure Compensation -2EV to +2EV in 1/3 step.
Exposure Meter Auto, Multi, Spot
Shutter Mechanical shutter, 1/2000 ~ 8 sec. with CCD variable electronic shutter
Optical Zoom 3×
Digital Zoom
Preview mode : 4 ×
Playback mode : 8 ×
Image File Format
EXIF 2.2 compatible format (JPEG compression)
DCF compatible. Support DPOF, PIM II, Pictbridge
White Balance Auto, Day light, Cloudy, tungsten, fluorescent, Black & white
Start-up Time Less than 2 sec.
Picture Storage
Internal : 16 MB flash memory
External : SD memory card up to 512 MB
Microphone Built-in
Communication Interface USB 1.1, Compliance with USB 2.0
Self-Timer 10 sec. with beep sound
Playback Mode Single / 9 thumbnails / slide show
Power Supply
Battery : 2 AA alkaline or NiMH Rechargeable Batteries(1800 mAh)
DC input : 3.3V 2.0A DC adapter
Dimensions 105 × 55 ×37 (mm)
Weight 150g (without batteries)
Ambient temperature
Operating : 0 to 40 ˚ C
Storage : 0 to 60 ˚ C
The Jenoptik trademark is used by Concord Camera Corp. and its subsidiaries under license.
Specifications
 Loading...