

Page 1
Page 2
JD 2100f User's Manual
Thank you for purchasing the JENOPTIK JD210F digital
camera.To achieve the best performance and results it
is highly recommended.This instruction manual is carefully read prior to any use or operation.
2
Page 3

Product introduction
1. 2.1 Mega pixel high-resolution (CCD) compact camera.
2. Plug & Play USB interface.
3. NTSC and PAL Video Out (Playback on TV).
4. 2x digital zoom.
5. Large easy-to-use LCD status panel.
6. Compactflash memory expansion.
7. 60 seconds auto power off.
8. High-eye point optical view finder.
Systems Requirement
1. System: Win98/98SE/ME/2000 & Mac: OS 9.x or higher.
2. Pentium 166 MHz CPU or higher.
3. Minimum 16 MB RAM or higher
4. At least 110MB Free hard Disk space.
5. CD-ROM
6. USB interface
3
Page 4
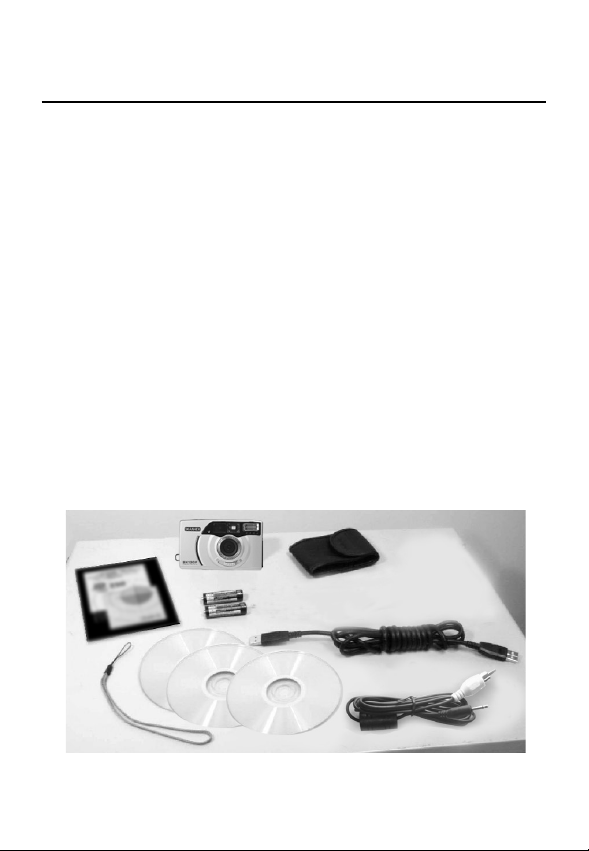
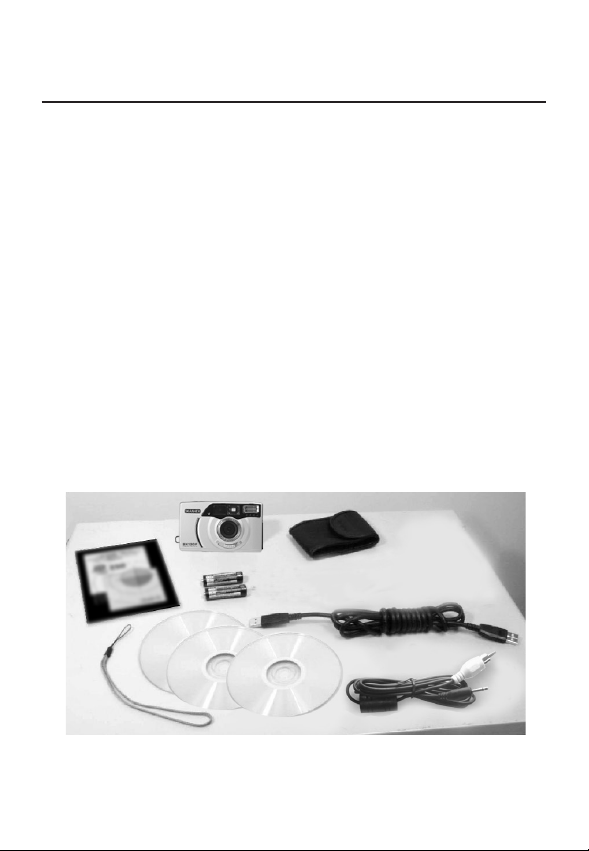
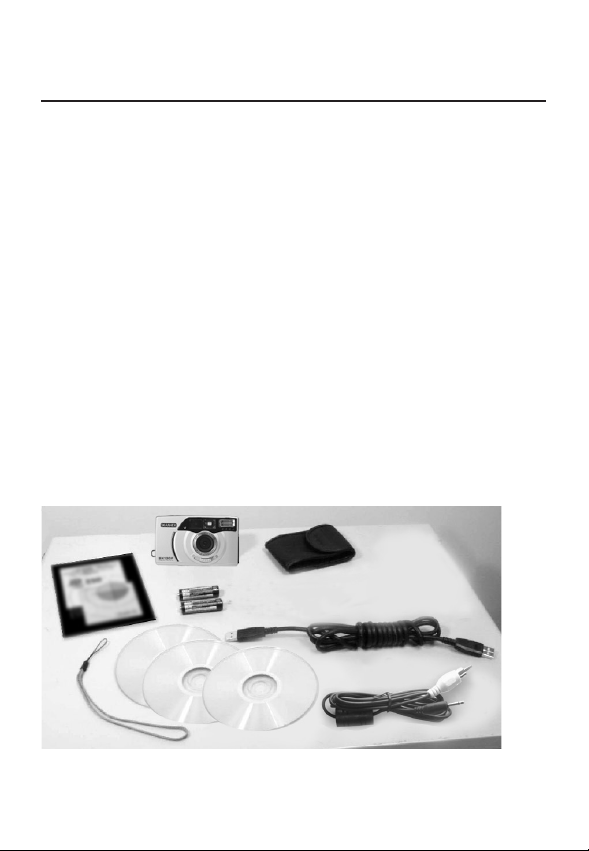
Package contents
Package contents:
1. Digital Camera
2. Storage Driver for win98
3. Adobe Photo Deluxe for Mac
4. Adobe PhotoDeluxe for PC
5. Video cable
6. USB cable
7. Strap
8. Pouch
9. 2 x "AA" Batteries
10. User s manual
1
10
9
2
4
7
3
8
6
5
4
Page 5

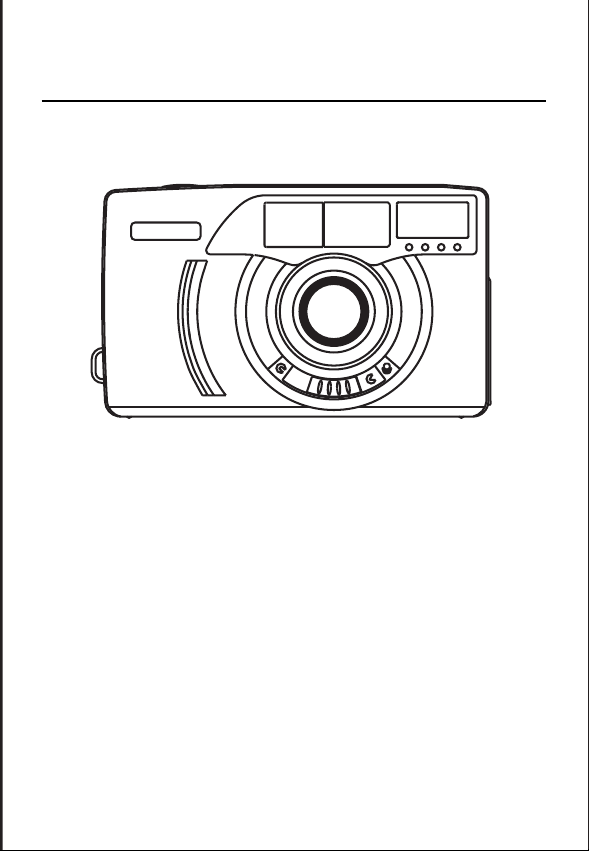
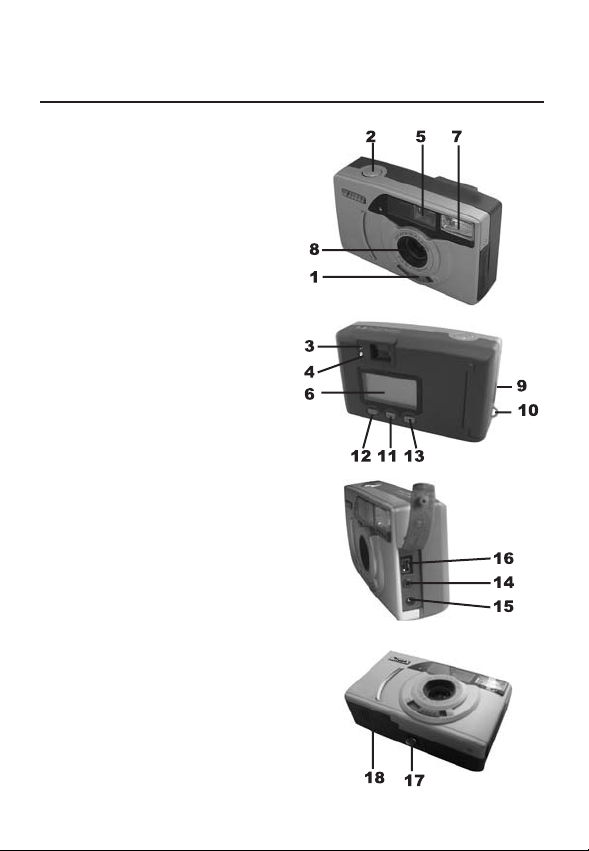
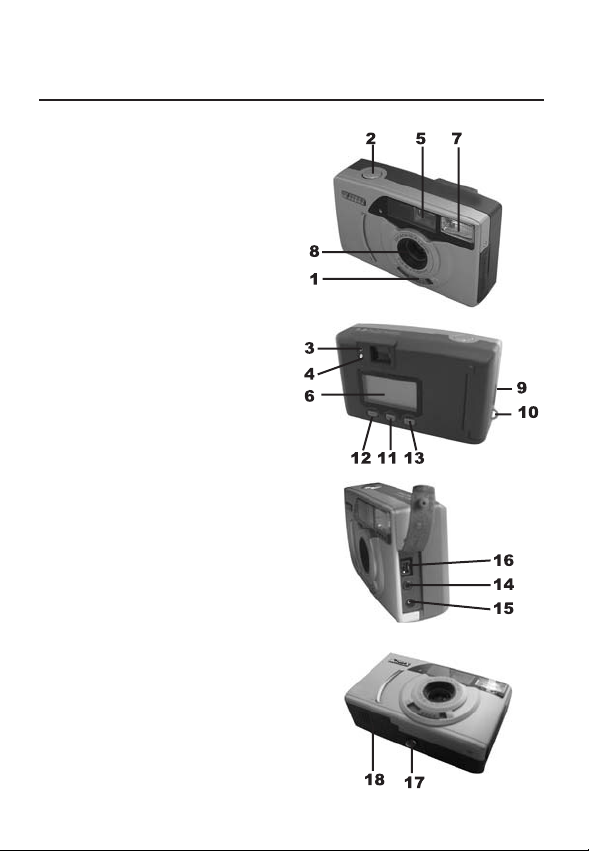
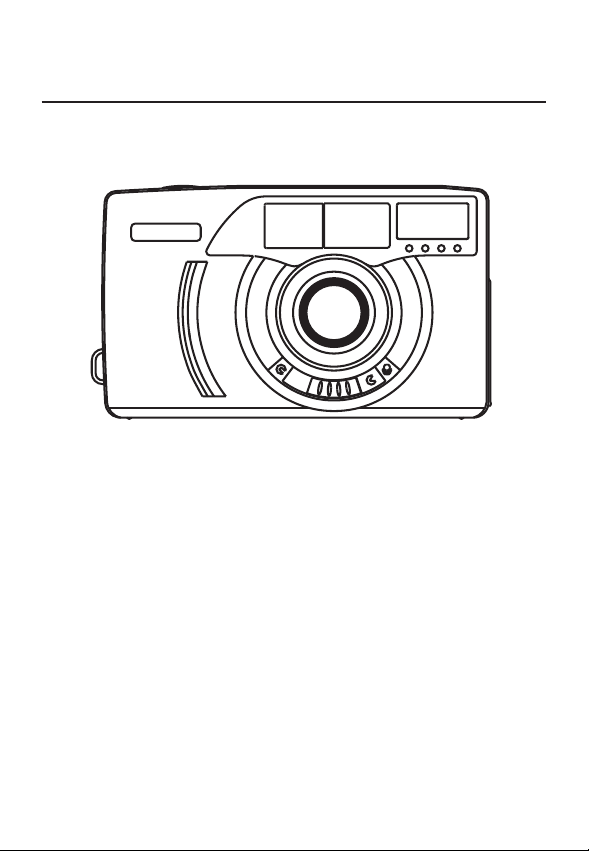
Nomenclature
1. Power, Macro switch
2. Shutter release button
3. Ready lamp (green)
4. Busy lamp (red)
5. View finder
6. LCD Panel
7. Flash
8. Lens
9. Card-slot door
10.Strap eyelet
11. Enter / Confirm button
12. Left selection button
13. Right selection button
14. Video-out terminal
15. DC terminal (adapter
optional).
16. USB connector
17. Tripod socket
18. Battery-chamber door
5
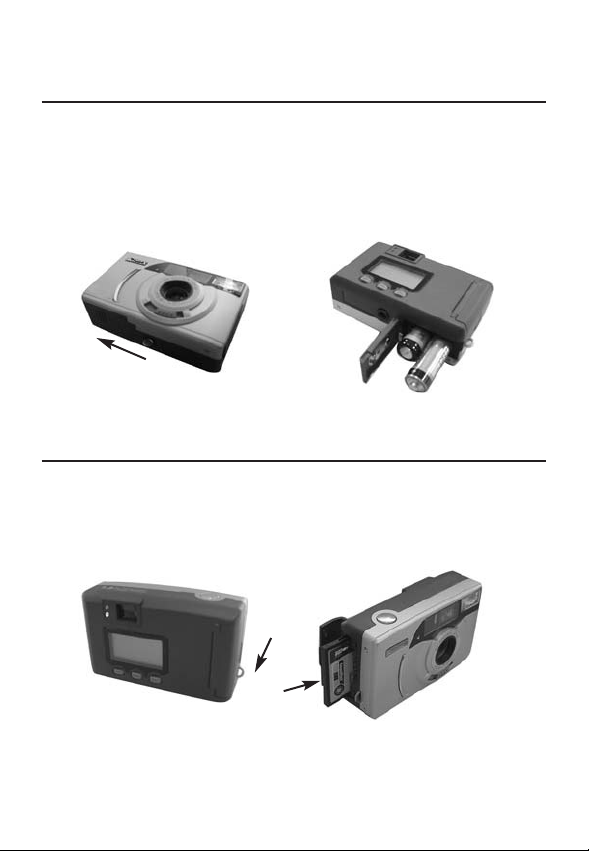
Page 6

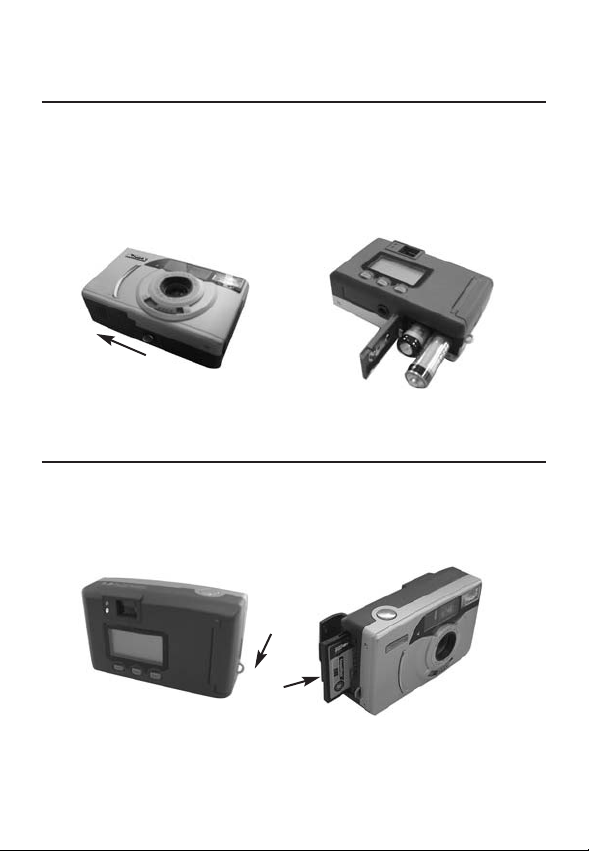
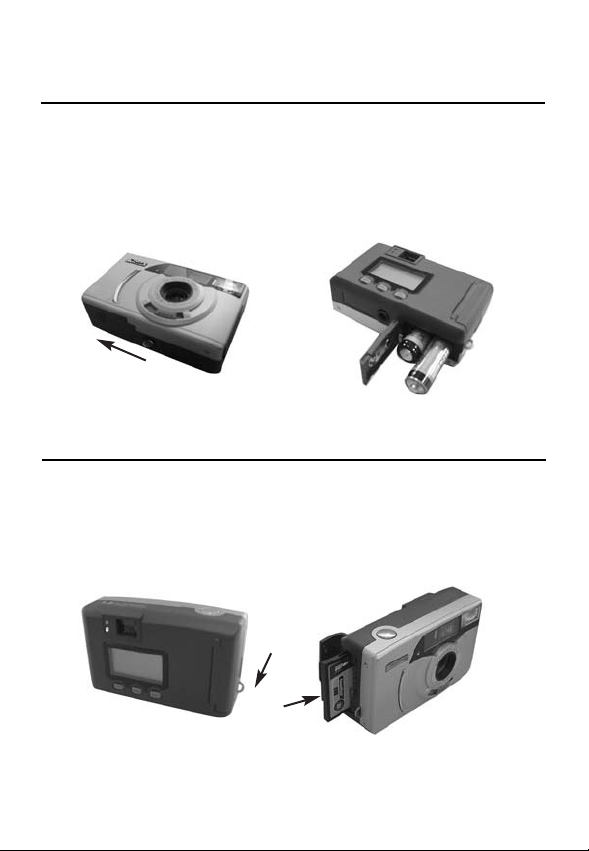
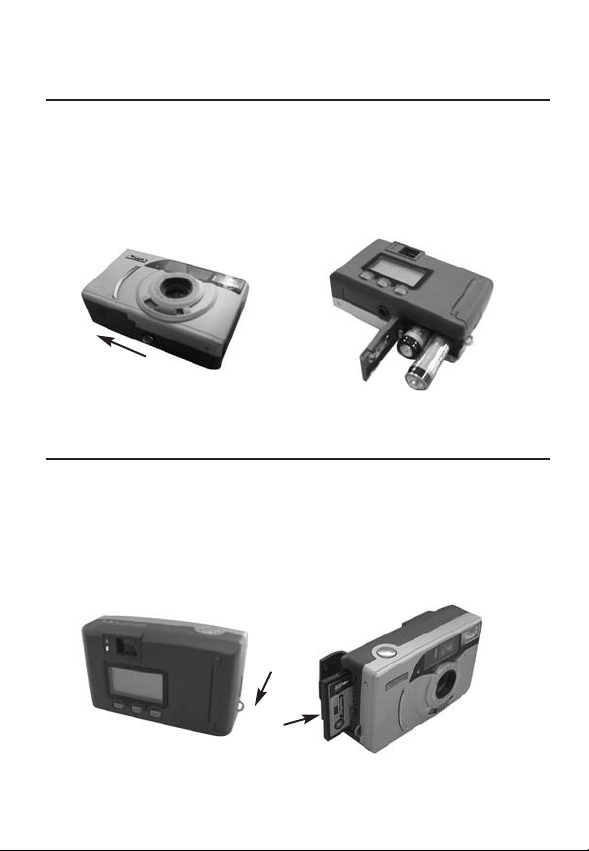
Loading the battery
1. To load the battery: (Refer to figure below)
2. Please note the correct positive (+) and negative (-) polarity
(As shown in figure below)
3. Close the battery cover.
(-)
(+)
Loading the CF card
1. Open the card-slot door as shown in the illustration.
2. Insert the CF card into the card slot.
6
Page 7
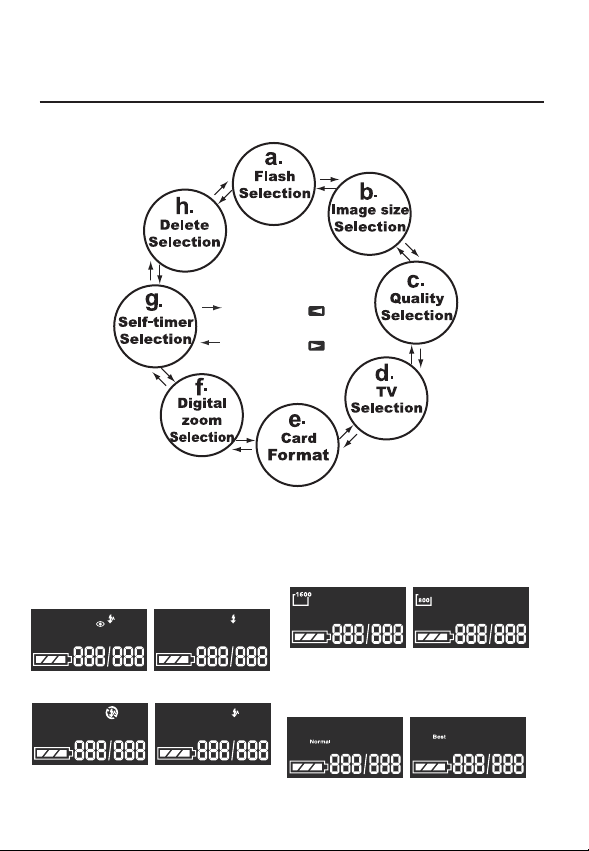
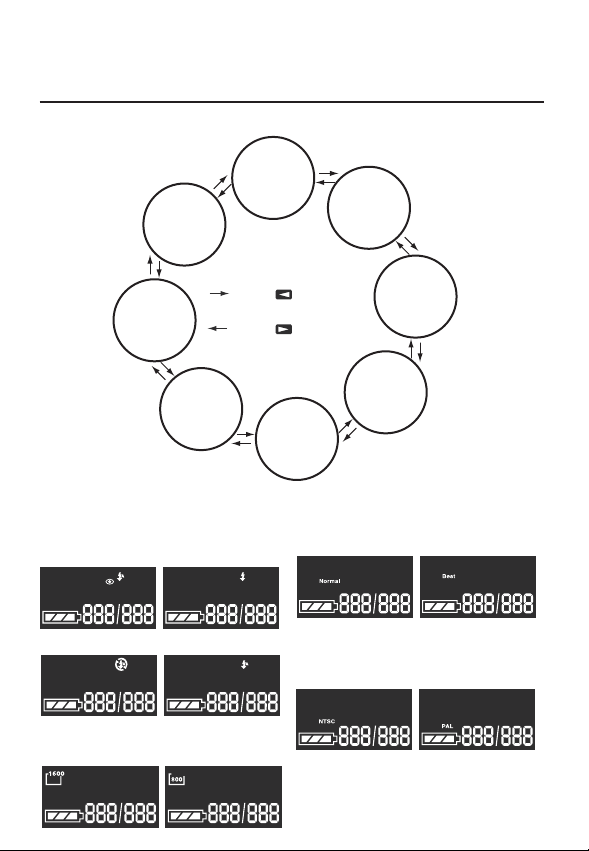
LCD Panel Display
A. Mode button setting
Press the key
Press the key
B. Select button setting
(a.) Flash Selection
Red-eye
reduction
Fill-in flash
(b.) Image size Selection
1600x1200
800x608
Flash-off
7
Auto Flash
(c.) Quality selection
Normal
Best
Page 8
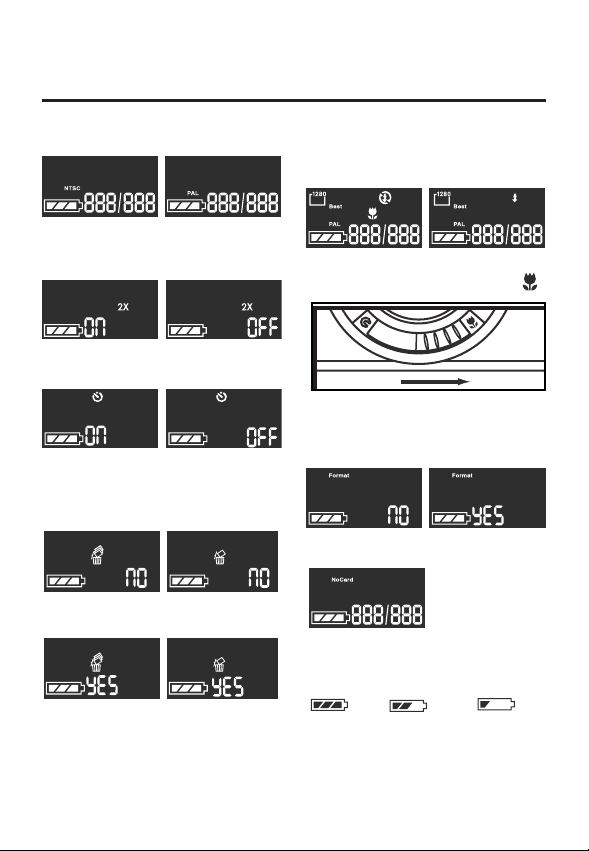
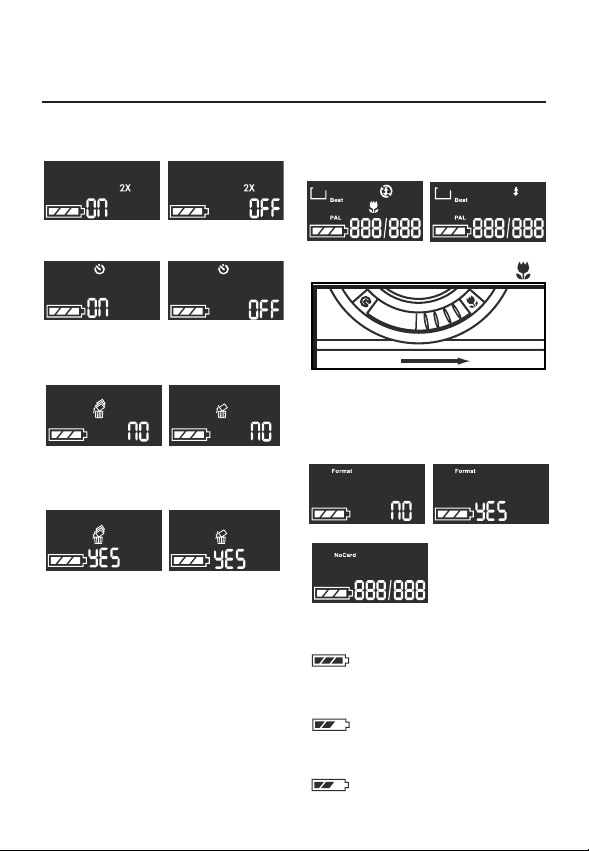
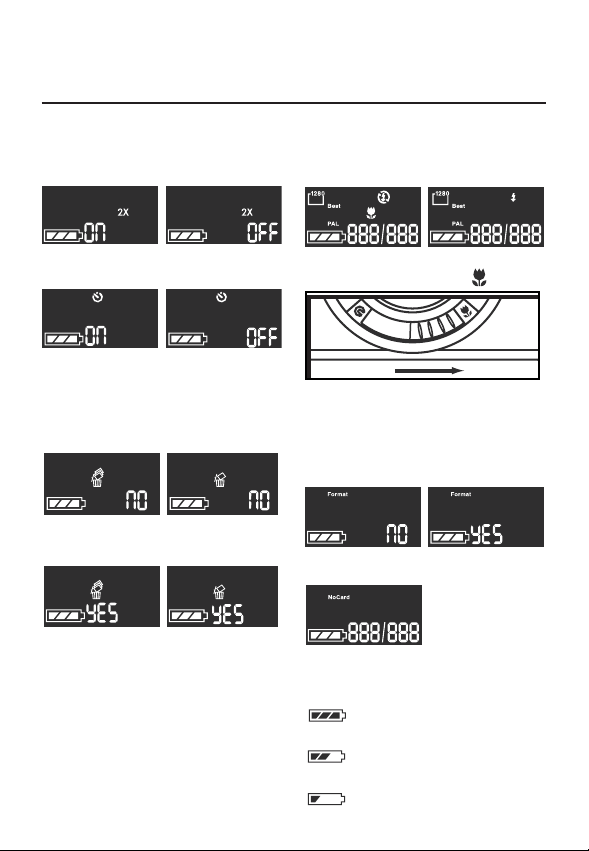
LCD Panel Display
(d.) TV/video Selection
NTSC PAL
(e.) Digital zoom Selection
2x digital zoom on 2x digital zoom off
(f.) Self-Timer Selection
on off
(g.) Delete Selection
Del.All Last One
no no
Del.All Last One
yes yes
C.Other
(h) Macro
on off
Rotate the function dial to
(i.) Card / Format
Format
no yes
No Card
(j)Battery
Full Half Low
8
Page 9

Basic Operations
Taking pictures:
1. Turn power on.
2. Select the image size (1600/800) and the quality (Best/ Normal)
3. Frame the subject in the viewfinder.
4. Make sure the green (camera-ready) lamp is on.
5. Lightly depress shutter release button gently until camera beeps.
(For best results please keep the lens clean and close lens cover
when not in use.)
Delete pictures:
1. Press menu button, use either or left/right button to highlight delete
feature.
2. Press menu button to confirm.
3. Use the Right/Left button to select single image or delete all and
then menu button to confirm.
4. Finally use left or right button to highlight yes and mode to confirm
deletion.
(When connect to TV or Video for play back images may be deleted by
following above steps.)
Flash mode:
The camera has four flash modes:
1. Auto flash->The flash will fire automatically in low light conditions.
2. Fill-in flash>The flash will fire regardless of lighting conditions, this
mode is recommended for back-lit conditions or to fill in shadows.
3. Flash off> Flash will not function in this mode, this mode is useful
for ie, taking pictures through glass, low light landscapes etc.
4. Red eye-reduction> This mode is to reduce the effect of red-eyes
with flash photography in low light.
9
Page 10

Basic Operations
Self-timer mode:
In this mode the user can delay shutter release for approx 10 seconds
for inclusion in photo.
1. Use a tripod or a steady support to avoid camera shake.
2. Press the mode button to display self-timer symbol.
3. Compose the picture through the view-finder.
4. depress shutter release.
5. Red self-timer lamp light will blink for 10 seconds before image is
taken.
TV mode:
1. Turn on power.
2. Choose TV mode for NTSC/PAL by pressing menu and left/right
buttons to select, plug in Video Cable.
3. Choose from one of three options below on the TV Screen. Select
by using the Left/Right button and then press the menu button to
confirm.
3.1 Live view: Instant image capture with preview on TV. Image capture is, as described previously.
3.2 Single image display: To show pictures on TV monitor press
left/right buttons to scroll for the desired time.
3.3 Slide show: In this setting the camera will scroll through one
image at a time automatically, as a slide show.
To revert back to the main menu press the menu button or shutter
release button.
10
Page 11

Software operations
Driver installation:
1.For Win 98 / 98SE
(1) Start Window 98 / 98SE
(2) Insert the CD supplied into the CD-ROM Drive.
(3) Connect the camera to the PC with the USB cable sup
plied.
(4) Follow the instructions shown on the screen.
(5) Disconnect the USB cable and restart the computer.
2. For OS Win 2000 / ME, connect the camera to the PC with
the USB cable supplied, the driver is configured automatical-
ly.
3. To locate images open MY COMPUTER and select remov-
able disc drive. All image files are located within.
11
Page 12

INSTALLING
Adobe PhotoDeluxe
To use the supplied image editing application Adobe Photo Deluxe
Home Edition 4.0 (Windows¤ version) or Adobe Photo Deluxe 2.0
(Macintosh version), the following systems are required.
For the IBM-PC/AT and the compatible unit
CPU
OS
Memory
Hard disk
space
Monitor
CD-ROM
drive
Intel Pentium II processor of 233 MHz or more, or the
computer equipped with the fully compatible processor.
Windows¤95, Windows¤98 Windows2000.
Windows¤ NT 4.0 (Service Pack 5)
16 MB or more of built-in memory (For Windows¤ NT,
32 MB or more of built-in memory).
110 MB or more of available hard disk space.
Resolution 800 x 600/th color monitor for 16-bit color
video display
Necessary (when installing and using the software).
For Apple Macintosh
CPU
OS
Memory
Hard disk
space
Monitor
CD-ROM
drive
68040 or later processor or better, or Macintosh or
Power Macintosh
Mac OS 8.6, OS9
32MB RAM or higher
110 MB or more of available hard disk space.
The color monitor capable of displaying 256 colors
Necessary (when installing and using the software).
12
Page 13

INSTALLING
Adobe PhotoDeluxe
Installing to the IBM-PC/AT and the compatible unit
1. Turn on the computer and start up Windows¤.
2. Insert the Adobe PhotoDeluxe 4.0 CD-ROM into the CD-ROM drive.
3. When the setup program starts up automatically displayed on the
screen.
¥ When the setup program does not start up automatically, select
"Start" "Run" and input "D:\ENGLISH\NSTALL\SETUP.EXE"
in the box of "Open" (when your CD-ROM drive is the D drive) and
click [OK].
Installing to the Apple Macintosh
1. Turn on the computer and start up Mac OS.
2. Insert the Adobe PhotoDeluxe 2.0 CD-ROM into the CD-ROM drive.
3. When the icon of Adobe PhotoDeluxe 2.0 CD-ROM is displayed on
the desktop, double-click its icon.
4. Double-click "English" folder to open it.
5. Double-click "PhotoDeluxeTM Installer" icon.
After that, follow the operations according to the indication displayed
on the screen.
13
Page 14

Basic Operations
* Sensor Resolution : 2.1M Pixel CCD
* Image Resolution : 1600 x 1200 pixels , 24 bit color
: 800 x 608 pixels , 24 bit color
* Image Compression : Best(1/5), Normal(1/10) - External
: Best(1/15), Normal(1/20) - Internal
* File Format : DCF
* Image Storage : External 8M CF card - 10 Pic.
( Best mode) , 20Pic. ( Normal mode)
: Internal - 8 Pic. ( Best mode ) ,
16 Pic. ( Normal mode)
* LCD Display : B/W LCD for functions.
* View Finder : Optical Reflective style View finder.
* Zoom : 2 x digital.
* Lens : Fixed Focus.
Macro 0.1-0.15M.
* Focal Length : f = 5 mm ( 33mm of 135 Camera)
* Focus Range : Normal-0.7M to infinity,
Macro-Up to 0.17M.
* Exposure : Auto ( EV 5-15 )
* Shutter Speed : 1 - 1/250
* Aperture Range : F3.6/11
* ISO Equivalent : 100-400
* Flash : Strobe flash (Auto, Fill, Off, Red-eye),
* Self-Timer : 10 seconds
* Tripod Mount : Standard
14
Page 15

Basic Operations
* Interface : USB , CF card
* Video Out : NTSC / PAL
* Auto power off : 60 seconds
* Power Sources : a) 2 x "AA" Batteries.
b) USB power
c) AC Adaptor (optional)
* Certification : CE, FCC class B
* System requirment : Win 98 /98SE /ME /2000 ,
16M RAM Min.
, 110M Free Disk.CD-ROM
: Mac OS 9.0 or above
Caution
1. Universal main adapter may be used with this camera, how-
ever the correct voltage and out put must be observed to
prevent damage to the camera( 3V 1000 MA).
2. Turn off power before disconnecting camera from mains.
3. After use, please turn off the camera and unplug the AC
adapter from the socket.
4. Keep the camera/mains devices dry and avoid any undue
heat, stress or impact damage.
5. Always remove batteries from the camera when not in use.
15
Page 16

JD 2100f Bedienungsanleitung
Wir beglückwünschen Sie zum Kauf Ihrer Kamera JD2100f.
Sie haben damit eine einfach zu bedienende und
zuverlässige Kamera erworben. Bitte lesen Sie die Bedienungs-
anleitung sorgfältig durch, bevor Sie die Kamera zum ersten
Mal benutzen. Bei genauer Kenntnis der Funktionsweise und
sorgfältigem Umgang mit der Kamera können Sie sich für viele
Jahre an den digitalen Bildern erfreuen, die Sie damit aufnehmen.
1
Page 17

Produktmerkmale
1. CF-Karten Typ I bis 256 MB einsetzbar
2. Plug-und-Play über USB-Schnittstelle
3. Erkennung am PC als Wechseldatenträger
4. Videoausgang für NTSC und PAL
5. Natürliche Bildqualität
6. Einfache und leicht zu handhabende LCD-Anzeige
7. Automatische Abschaltung nach 60 Sekunden
8
. Geringes Gewicht
Systemvoraussetzungen
1. Windows 98/98SE/ME/2000/XP, Mac: OS 9.0.4/9.1/9.2
2. Pentium PC mit 166 MHz oder höher
3. mindestens 32 MB verfügbarer Arbeitsspeicher
4. mindestens 110 MB freie Speicherkapazität
5. CD-ROM-Laufwerk
6. VGA-Farbmonitor
7. USB-Anschluß
2
Page 18
Lieferumfang
1. Digitalkamera inclusive 8 MB CF-Karte
2. Treibersoftware
3. Software Adobe PhotoDeluxe für PC
4. Software Adobe PhotoDeluxe für Mac
5. Videokabel
6. USB-Kabel
7. Kameratragschlaufe
8. Kameratasche
9. 2 Stck. Alkaline Batterien Typ "AA"
10. Bedienungsanleitung
1
10
9
2
4
7
3
8
6
5
3
Page 19
Teile der Kamera
1. Ein-/Aus-Schalter /
Schalter für Nahaufnahme
2. Auslöser
3. Bereitschaftsanzeige (grün)
4. Betriebsanzeige (rot)
5. Sucher
6. LCD-Anzeige
7. Blitz
8. Objektiv
9. Speicherkartenfach
10.Öse für Tragschlaufe
11. Taste Enter/Bestätigung
12. Wahlschalter, links
13. Wahlschalter, rechts
14. Videoausgangsbuchse
15. DC-Buchse
16. USB-Anschluss
17. Stativaufnahme
18. Batteriefachdeckel
4
Page 20
Einlegen der Batterien
1. Einlegen der Batterien entsprechend Abbildung.
2. Beim Einlegen der Batterien auf richtige Polung
entsprechend der Abbildung achten.
3. Batteriefach schließen.
(-)
(+)
Speicherkarte einlegen
1. Speicherkartenfach entsprechend Abbildung öffnen.
2. Speicherkarte einschieben.
3. Speicherkartenfach schließen
5
Page 21

LCD-Anzeige
A. Einstellungen des Mode-Schalters
a) Blitz
b) Bildgröße
h) Löschen
g)
Selbstauslöser
Taste betätigen.
Taste betätigen.
f) digitaler
Zoom
B. Einstellungen
a) Blitz
Rote-AugenReduzierung Blitz an
Blitz aus Automatikblitz
b) Bildgröße
1600x1200 800x592
c) Bildqualität
d) TV-Modus
e)
Speicherkarte
formatieren
c) Bildqualität
Normal Hoch
d) TV-System
NTSC PAL
Page 22
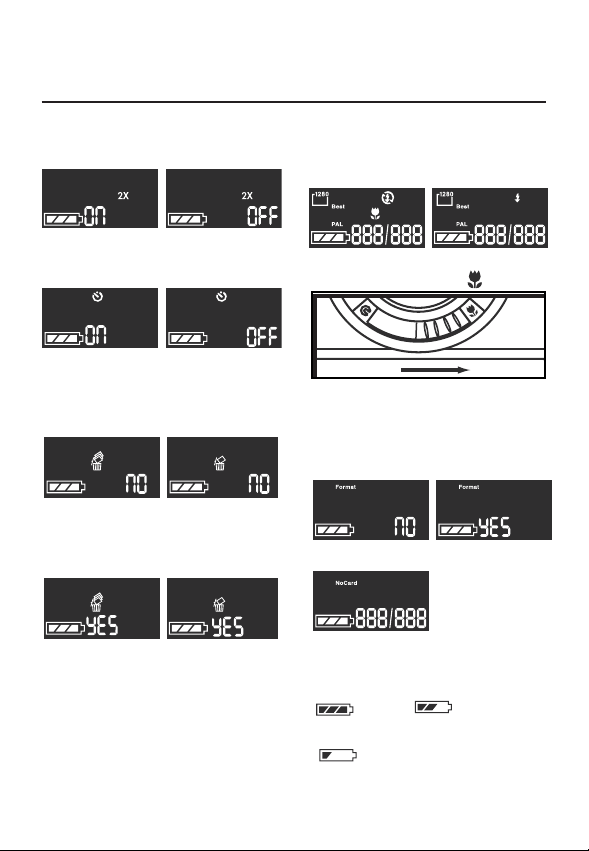
LCD-Anzeige
e) Digitaler Zoom
2x digitaler Zoom Ein 2x digitaler Zoom Aus
f) Selbstauslöser
Ein Aus
g) Löschen
Alle Löschen Einzelbild löschen
nein nein
Alle Löschen Letztes Bild löschen
ja ja
C. Weitere Einstellungen
h) Nahaufnahme
Ein Aus
1600
Einstellen des Wahlschalter auf
i) Speicherkarte formatieren
Format
nein ja
Keine Karte
j) Batteriestatusanzeige
voll
teilentladen
1600
fast leer ( Batterien auswechseln )
7
Page 23

Arbeiten mit der Kamera
Aufnahmen machen
1. Kamera einschalten
2. Bildgröße ((1600/800)) und Qualität (normal/hoch) einstellen.
3. Aufnahme im Bildsucher zusammenstellen.
4. Kontrolle, ob die grüne Bereitschaftsanzeige leuchtet (Kamera auf-
nahmebereit).
5. Auslöser leicht drücken.
Stets auf sauberen Zustand des Objektives achten. Nur so sind einwandfreie Aufnahmen möglich.
Bilder löschen
1. Einzelbild löschen: Im Modus Menü Enter-Taste drücken, mit
Wahlschalter Rechts/Links auf Löschen gehen, Enter-Taste 2x drücken
und mit Wahlschalter Rechts/Links auf JA schalten, Enter-Taste
drücken. Damit ist das Bild gelöscht.
Wollen Sie nicht löschen, dann auf NEIN gehen und Enter-Taste
drücken.
Im TV-Modus können die Bilder auf dem Fernsehgerät betrachtet
werden. Dazu die Kamera mit dem mitgelieferten Videokabel an
das Fernsehgerät anschließen.
2. Alle Bilder löschen: Im Modus Menü Enter-Taste drücken, mit Wahl-
schalter Rechts/Links Löschen einstellen und Enter-Taste drücken.
Mit Wahlschalter Rechts/Links Alle löschen einstellen, Enter-Taste
drücken, mit Wahlschalter Rechts/Links auf JA oder NEIN gehen und
Enter-Taste drücken. Haben Sie JA gewählt, sind alle Bilder gelöscht.
Blitz
Die Kamera verfügt über vier unterschiedliche Blitzfunktionen:
1. Automatikblitz: Mit dieser Funktion werden bei ungünstigen
Lichtverhältnissen alle Aufnahmen automatisch mit Blitz gemacht.
2. Blitz an: Mit dieser Funktion werden generell alle Aufnahmen mit
Blitz gemacht. Es wird empfohlen, mit dieser Funktion zu arbeiten,
wenn wenig Licht vorhanden ist oder das Aufnahmeobjekt hinter-
8
Page 24

Arbeiten mit der Kamera
leuchtet ist.
3. Blitz Aus: In dieser Einstellung wird kein Blitz ausgelöst.
4. Rote-Augen-Effekt: Mit dieser Funktion wird der Rote-Augen-Effekt
bei der Aufnahme reduziert.
Die Einstellung erfolgt über Enter-Taste und Wahlschalter rechts/links.
Selbstauslöser
Mit dieser Funktion wird die Aufnahme nach Betätigen des Auslösers
um ca. 10 Sekunden verzögert. In dieser Zeit können Sie Ihren
Platz in der Aufnahme einnehmen.
1. Mit der Enter-Taste und Wahlschalter Rechts/Links Selbstauslöser betätigen.
2. Die Kamera auf ein Stativ oder eine andere feste Unterlage aufstellen, damit die Aufnahme nicht verwackelt.
3. Bild zusammenstellen und einen Platz für sich selbst vorsehen.
4. Auslöser betätigen.
5. Die rote Lampe blinkt ca. 10 Sekunden, bevor die Aufnahme
gemacht wird.
In dieser Zeit können Sie Ihren vorgesehenen Platz im Bild ein-
nehmen.
TV-Modus
1. Kamera einschalten und Videokabel anschließen.
2. Es bestehen drei Optionen für die Arbeit mit dem Fernsehbildschirm
Wählen Sie die gewünschte Funktion mit der rechts/links-Taste
und drücken Sie auf die Enter-Taste
2.1 Live-Bild: Mit dieser Funktion erfolgt die Darstellung des
aufzunehmenden Bildes direkt auf dem Fernsehbildschirm. Die
Aufnahme wird dann gemacht wie oben beschrieben. Zum
Betrachten des Bildes auf Auswahlmodus gehen und dort TVModus (NTSC/PAL) einstellen. Sie haben die Möglichkeit,
Einzelbilder oder die Aufnahmen als Dias zu betrachten. Mit der
Taste Rechts/Links schalten Sie zurück in den TV-Modus.
2.2 Einzelbildanzeige: Anzeige der Bilder von der Speicherkarte oder
9
Page 25

Arbeiten mit der Kamera
dem internen Speicher. Mit der Taste Rechts/Links wird das
vorherige bzw. das folgende Bild angezeigt. Durch Betätigen der
Enter-Taste bzw. der Taste Auslöser erfolgt Rückkehr in den TVModus.
2.3 Diaschau: Die Bilder werden automatisch nacheinander von der
Speicherkarte oder aus dem internen Speicher angezeigt. Durch
Betätigen der Enter-Taste bzw. der Taste SB erfolgt Rückkehr in
den TV-Modus.
Betriebssoftware
Installation des -Treibers
1. Computer starten.
2. Treiber CD in das CD-Laufwerk einlegen.
3. Kamera mit dem USB-Kabel an den Rechner anschließen. Ein
Ende des Kabels in die USB-Buchse des Rechners, das andere
Kabelende in die USB-Buchse der Kamera stecken.
4. Den Anweisungen auf dem Bildschirm folgen.
Betrieb der Kamera am PC
1. Die Kamera wird vom PC als Wechseldatenträger erkannt.
Sie finden Ihre Kamera als Laufwerk in Ihrem Arbeitsplatz oder
Explorer.
2. Speichern Sie Ihre Bilder bitte zuerst auf die Festplatte.
Nun können Sie die Bilder mit dem Bildbearbeitungsprogramm
bearbeiten oder auch ausdrucken.
3. Sie können mit der Bildbearbeitungssoftware nicht direkt auf die
Kamera zugreifen.
4. Bitte speichern Sie keine veränderten oder bearbeiteten Bilder
von der Festplatte auf Ihre Kamera. Sie vermeiden dadurch
Funktionsstörungen.
10
Page 26

Installation der Software Adobe
PhotoDeluxe
Zur Nutzung der mitgelieferten Bildbearbeitungs-Software Adobe
PhotoDeluxe Home Edition 4.0 (Windows-Version) bzw. Adobe
PhotoDeluxe 2.0 (Macintosh-Version) müssen folgende
Systemvoraussetzungen bestehen:
Für IBM-PC/AT und kompatible Geräte:
Rechner
Betriebssystem
Intel Pentium II Prozessor mit mindestens 233 MHz
oder Rechner mit voll kompatiblem Prozessor
Windows 95, Windows 98, Windows 2000,
Speicher
Festplatte
Monitor
CD-ROMLaufwerk
Für Apple Macintosh
Rechner
Betriebssystem
Speicher
Festplatte
Monitor
CD-Laufwerk
wird ben tigt
mindestens 32 MB Arbeitsspeicher (für Windows NT
mind. 32 MB Arbeitsspeicher)
mindestens 110 MB freie Speicherkapazität
Farbmonitor mit 16-Bit Farbtiefe, Auflösung 800 x 600
wird benötigt (für Installation und Benutzung der
Software)
68040 oder sp terer Prozessor oder h her oder
Macintosh oder PowerMac
Mac OS 9.0.4/9.1/9.2
mindestens 32 MB Arbeitsspeicher
mindestens 110 MB freie Speicherkapazität
Farbmonitor zur Darstellung von 256 Farben
(für Installation und Benutzung der Software)
11
Page 27

Installation der Software Adobe
PhotoDeluxe
Installation auf IBM-PC/AT und kompatiblen Geräten
1. Rechner einschalten und Windows starten.
2. CD-ROM mit der Bildbearbeitungs-Software Adobe PhotoDeluxe
4.0 in das CD-Laufwerk einlegen.
3. Der Beginn des Installationsvorganges wird automatisch auf dem
Bildschirm angezeigt.
- Startet das Installationsprogramm nicht automatisch, auf "Start"
"Ausführen" gehen und im Dialogfeld "öffnen" eingeben: D:\ENGLISH\INSTALL\SETUP.EXE (wenn sich die CD-ROM im Laufwerk D
befindet) und auf OK klicken.
Installation auf Apple Macintosh
1. Rechner einschalten und das Mac-Betriebssystem starten.
2. CD-ROM mit der Bildbearbeitungs-Software Adobe PhotoDeluxe
2.0 in das CD-Laufwerk einlegen.
3. Wenn das Symbol der CD-ROM Adobe PhotoDeluxe 2.0 erscheint,
auf das Symbol doppelklicken.
4. Mit Doppelklick das Verzeichnis "English" öffnen
5. Doppelklick auf das Symbol "PhotoDeluxe TM Installer ".
Von da ab den Anweisungen auf dem Bildschirm folgen.
12
Page 28

Technische Daten
Sensorauflösung :2.1 Millionen Pixel CCD
Bildauflösung :1600 x 1200 Pixel, 24-Bit Farbtiefe
800 x 592 Pixel, 24-Bit Farbtiefe
Bildkompression : Hoch (1/5), Normal (1/10) — extern
Hoch (1/15), Normal (1/20) — intern
Dateiformat : DCF-Format
Bildspeicher :Extern 8 MB Speicherkarte — 10
Aufnahmen (hohe Qualität),
20 Aufnahmen (normale Qualität)
Intern - 8 Aufnahmen (hohe Qualität),
16 Aufnahmen (normale Qualität)
LCD-Anzeige : S/W LCD zur Funktionsanzeige
Bildsucher : optischer Bildsucher
Zoom : 2x digitaler Zoom
Objektiv : Fixfokus.Macro 0.1-0.15m.
Brennweite : f = 5 mm (33 mm bei Kleinbild- Kamera)
Einstellbereich : Normal — 0.7 m bis unendlich
Nahaufnahme 0,1 - 0,15 m.
Belichtung : Auto (EV 5-15)
Belichtungszeit :1 — 1/250 s
Blendenbereich : F3.6/11
ISO-Wert :100 — 400
Blitz : Automatikblitz, Blitz an, Blitz aus,
Rote-Augen-Reduzierung
Selbstauslöser : ca. 10 s verzögert
Stativaufnahme : Standard
13
Page 29

Technische Daten
Schnittstelle : USB, Speicherkarte
Videoausgang : NTSC / PAL
Automatische Kameraabschaltung: nach 60 Sekunden
Stromversorgung: a) 2 x Alkaline Batterien "AA"
b) USB-Versorgung
c) Netzteil (nicht im Lieferumfang)
Input : 100-240V, 50/60 Hz
Output : 3,3V; 1,5A
Certifizierung : CE, FCC Klasse B
Sicherheitshinweise
1. Wenn Sie mit Netzstrom arbeiten, prüfen Sie genau, dass
die Angaben auf dem Typenschild mit den Netzdaten übereinstimmen. Bei Nichtübereinstimmung besteht die Gefahr
von Elektroschock und Feuer.
Vor Anschließen oder Ziehen des Netzkabels zuerst
2.
Stromversorgung der Kamera ausschalten.
3. Nach Benutzung Kamera ausschalten und Netzteil aus der
Steckdose ziehen.
4. Kabel nicht belasten und nicht direkter Wärmebestrahlung
aussetzen.
5. Wenn die Kamera für längere Zeit nicht benutzt wird,
Batterien aus der Kamera entnehmen.
6. Schalten Sie den PC an, bevor Sie das USB-Kabel benutzen.
7. Der USB-Stecker für die Kamera ist unterschiedlich zu dem
Stecker für den PC. Bitte bei Anschluß beachten.
14
Page 30

JD210F Gebruiksaanwijzing
Wij bedanken u voor de koop van de JENOPTIK
JD210F. U heeft daarmee een eenvoudig te bedi-
enen en betrouwbare camera verkregen. Leest u
alstublieft de bedieningshandleiding zorgvuldig
door, voordat u de camera voor het eerst gebruikt.
Bij precieze kennis van de manier van func-
tioneren en bij zorgvuldige omgang met de cam-
era kunt u jarenlang plezier hebben van de digi-
tale beelden die u hiermee kunt opnemen...
30
Page 31

Productkenmerken
1. Hoge geheugencapaciteiten mogelijk
2. Plug-en-Play via USB-interface
3. Video-uitgang voor NTSC en PAL
4. Natuurlijke beeldkwaliteit
5. Eenvoudige en makkelijk te bedienen LCD-display
6. Automatische uitschakeling na 60 seconden
7. Gering gewicht
Systeemvereisten
1. Systeem: Windows 98/98SE/ME/2000, Mac: OS9 of hoger
2. Pentium PC met 166 MHz of hoger
3. Tenminste 32 MB werkgeheugen
4. Tenminste 110 MB vrije geheugencapaciteit
5. CD-ROM-drive
31
Page 32

Inhoud
1. Digitale camera incl. 8 MB
cf-kaart
2. stuurprogramma-software
3. Software Adobe
PhotoDeluxe voor Mac
4. Software Adobe
PhotoDeluxe voor PC
5. Videokabel
6. USB-kabel
7. Camera-draagriem
8. Camera-tas
9. 2 stk. batterijen type "AA"
10. Bedieningshandleiding
1
10
9
2
4
7
3
8
6
5
32
Page 33

Onderdelen van de camera
1. Aan-/uit-schakelaar / schakelaar
voor close-up
2. Ontspanner
3. Gereed-signaal (groen)
4. Bezig-signaal (rood)
5. Zoeker
6. LCD-display
7. Flits
8. Objectief
9. Geheugenkaartvak
10. Oog voor draagriem
11. Knop enter/bevestiging
12. Keuzeschakelaar, links
13. Keuzeschakelaar, rechts
14. Video-uitgangpoort
15. DC-poort
16. USB-aansluiting
17. Statiefopname
18. Batterijvakdeksel
33
Page 34
Plaatsen van de batterijen
1. Plaatsen van de batterijen volgens afbeelding.
2. Bij het plaatsen van de batterijen letten op juiste polenstand
volgens de afbeelding.
3. Batterijvak sluiten.
(-)
(+)
Geheugenkaart plaatsen
1. Geheugenkaartvak volgens afbeelding openen.
2. Geheugenkaart naar binnen schuiven.
3. Geheugenkaartvak sluiten.
34
Page 35
LCD-display
A. Instellingen van de mode-schakelaar
a) Flits
h)
Verwijderen
b)
Beeldgrootte
g)
Zelfontspanner
f) Digitale
knop bedienen
knop bedienen
zoom
Geheugenkaa
rt formateren
B. Instellingen
a) Flits
rode-ogenreductie flits aan
flits uit automatische flits
b) Beeldgrootte
1600x1200 800x608
c)
Beeldkwaliteit
d)
e)
TV-moduse)
c) Beeldkwaliteit
normaal hoog
d) TV-systeem
NTSC PAL
Page 36

LCD-display
e) Digitale zoom
2x digitale zoom aan 2x digitalezoom uit
f) Zelfontspanner
aan uit
g) Verwijderen
alle verwijderen laatste beeld ver
wijderen
nee nee
nee no
alle verwijderen laatste beeld ver
wijderen
ja ja
C. Andere instellingen
h) Close up
aan uit
Instellen van de keuzeschakelaar
op
i) geheugenkaart formateren
formaat
nee ja
geen kaart
j) Batterijstatusindicatie
vol
gedeeltelijk leeg
bijna leeg (batterijen vervangen)
36
Page 37

Werken met de camera
Opnamen maken
1. Camera inschakelen.
2. Beeldgrootte ((1600/800)) en kwaliteit (normaal/hoog)
instellen.
3. Opname in de beeldzoeker samenstellen.
4. Controle of het groene gereed-signaal brandt (camera
opnameklaar).
5. Ontspanner licht indrukken.
Altijd op schone toestand van het objectief letten. Alleen zo
zijn foutloze opnamen mogelijk.
Beelden verwijderen
1. Afzonderlijk beeld verwijderen: in het modus-menu de functie "afzonderlijk beeld verwijderen" selecteren en de menuknop bedienen. Met de knop rechts/links vervolgens JA/NEE
selecteren, ervan afhankelijk of het beeld moet worden verwijderd of de functie weer moet worden verlaten. In de TVmodus kunnen de beelden op de televisie worden bekeken.
Hiervoor de camera met de bijgeleverde videokabel aan de
televisie aansluiten. Voor het verwijderen van het laatste
beeld op de menuknop drukken. Met de knop rechts/links
vervolgens JA/NEE selecteren, ervan afhankelijk of de functie weer moet worden verlaten, of om te verlaten op de knop
ontspanner drukken.
2. Alle beelden verwijderen: In de menu-modus de functie "alle
verwijderen" selecteren en de menuknop bedienen. Met de
knop rechts/links vervolgens JA/NEE selecteren, ervan
afhankelijk of het beeld moet worden verwijderd of de functie
weer moet worden verlaten. Alle beelden worden verwijderd.
Om te verlaten op de knop ontspanner drukken.
37
Page 38

Werken met de camera
Flits
De camera beschikt over vier verschillende flitsfuncties:
1. Automatische flits: met deze functie worden bij ongunstige
lichtverhoudingen alle opnamen automatisch met flits
gemaakt.
2. Flits aan: met deze functie worden algemeen alle opnamen
met flits gemaakt. Het wordt aanbevolen om met deze functie te werken wanneer weinig licht voorhanden is of het
opnameobject van achteren wordt belicht.
3. Flits uit: in deze instelling blijft de flits achterwege.
4. Rode-ogen-effect: met deze functie wordt het rode-ogeneffect bij de opname gereduceerd.
Zelfontspanner
Met deze functie wordt de opname na het bedienen van de
ontspanner ongeveer rond 10 seconden vertraagd. In deze
tijd kunt u uw plaats in het beeld innemen.
1. Met de modus-knop de zelfontspanner selecteren.
2. De camera op een statief of een andere vaste ondergrond
zetten, zodat de opname niet beweegt.
3. Beeld samenstellen en een plaats voor zichzelf uitkiezen.
4. Ontspanner bedienen.
5. Het rode lampje knippert ongeveer 10 seconden voordat de
opname wordt gemaakt.
In deze tijd kunt u uw gewenste plaats in het beeld innemen.
TV-modus
1. Camera inschakelen en videokabel aansluiten.
2. Er bestaan drie opties voor het werken met het televisiebeeldscherm. Kiest u de gewenste functie met de knop
38
Page 39

Installatie van de software
Adobe PhotoDeluxe
Om de meegeleverde beeldbewerkings-software Adobe PhotoDeluxe
Home Edition 4.0 (Windows-versie) resp. Adobe PhotoDeluxe 2.0
(Macintosh-versie) te kunnen gebruiken, moet aan de volgende sys-
teemeisen zijn voldaan:
Voor IBM-PC/AT en compatibele apparaten:
Computer
Besturingss
ysteem
Geheugen
Harde schijf
Intel Pentium II processor met tenminste 233 MHz of
computer met geheel compatibele processor
Windows 95, Windows 98, Windows 2000, Windows NT
4.0 (service pack 5)
tenminste 16 MB werkgeheugen
(voor Windows NT tenminste 32 MB werkgeheugen)
110 MB or more of available hard disk space.
Monitor
CD-ROM
drive
Voor Apple Macintosh
Computer
Besturingss
ysteem
Geheugen
Harde schijf
Monitor
CD-ROM
drive
kleurenmonitor met 16-Bit kleurendiepte, resolutie 800 x 600
is nodig (voor installatie en gebruik van de software)
68040 of actuelere processor of hoger of
Macintosh of PowerMac
Mac OS 8.6, OS9
tenminste 32 MB werkgeheugen
tenminste 110 MB vrije geheugencapaciteit
Kleurenmonitor voor uitbeelding van 256 kleuren
(voor installatie en gebruik van de software) is nodig
39
Page 40

Werken met de camera
rechts/links en drukt u op de menu-knop.
2.1 Live-beeld: met deze functie wordt het op te nemen beeld
direct op het televisiebeeldscherm geprojecteerd. De
opname wordt dan zoals boven beschreven gemaakt. Om
het beeld te bekijken, vervolgens selectiemodus selecteren
en daar TV-modus (NTSC/PAL) instellen. U heeft de
mogelijkheid om afzonderlijke beelden of de opnamen als
dia s te bekijken. Met de knop rechts/links schakelt u terug
naar de TV-modus.
2.2 Afzonderlijk beeld tonen: tonen van de beelden vanaf de
geheugenkaart of vanuit het interne geheugen. Met de knop
rechts/links wordt het vorige resp. het volgende beeld
getoond. Door bedienen van de menu-knop resp. de knop
ontspanner vindt terugkeer plaats naar de TV-modus.
2.3 Diashow: de beelden worden automatisch na elkaar vanaf
de geheugenkaart of vanuit het interne geheugen getoond.
Door bedienen van de menu-knop resp. de knop SB vindt
terugkeer plaats naar de TV-modus.
Besturingssoftware
Installatie van het -programma
1. Computer opstarten.
2. Programma CD in de CD-drive plaatsen.
3. Camera met de USB-kabel aan de computer aansluiten.
Een einde van de kabel in de USB-poort van de computer,
het andere kabeleinde in de USB-poort van de camera
steken.
4. De instructies op het beeldscherm volgen.
40
Page 41

Installatie van de software
Adobe PhotoDeluxe
Installatie op IBM-PC/AT en compatibele apparaten
1. Computer inschakelen en Windows starten.
2. CD-ROM met de beeldbewerkings-software Adobe PhotoDeluxe
4.0 in de CD-drive plaatsen.
3. Het begin van het installatieproces wordt automatisch op het beeldscherm getoond.
- Start het installatieprogramma niet automatisch, dan "Start"
"Uitvoeren" selecteren en in het dialoogvenster "openen" invoeren:
D:\ENGLISH\INSTALL\SETUP.EXE (als de CD-ROM zich in drive D
bevindt) en op OK klikken.
Installatie op Apple Macintosh
1. Computer inschakelen en het Mac-besturingssysteem starten.
2. CD-ROM met de beeldbewerkings-software Adobe PhotoDeluxe
2.0 in de CD-drive plaatsen.
3. Wanneer het symbool van de CD-ROM Adobe PhotoDeluxe 2.0
verschijnt, hierop dubbelklikken.
4. Met dubbelklik de map "English" openen.
5. Dubbelklik op het symbool "PhotoDeluxe TM Installer ".
Vanaf nu de instructies op het beeldscherm volgen.
41
Page 42

Technische gegevens
Sensorresolutie :2.1 miljoen pixel CCD
Beeldresolutie :1600 x 1200 pixel, 24-Bit kleurendiepte
800 x 608 pixel, 24-Bit kleurendiepte
Beeldcompressie : hoog (1/5), normaal (1/10) — extern
hoog (1/15), normaal (1/20) — intern
Bestandsformaat : DCF-formaat
Beeldgeheugen : extern 8 MB geheugenkaart —
20 opnamen (hogekwaliteit),
16 opnamen (normale kwaliteit)
intern - 10 opnamen (hoge kwaliteit),
16 opnamen (normale kwaliteit)
LCD-display : Z/W LCD voor functieaanduiding
Beeldzoeker : optische beeldzoeker
Zoom : 2x digitale zoom
Objectief : fixfocus.Macro 0.1-0.15M.
Brandpuntsafstand : f = 5 mm (33 mm bij kleinbeeldcamera)
Instelbereik : normaal — 0.7 m tot oneindig
lose-up tot 0.17 m
Belichting : auto (EV 5-15)
Belichtingstijd :1 — 1/250 s
Diafragmabereik : F3.6/11
ISO-waarde : 100 — 400
Flits : automatische flits, flits aan,
flits uit.
Zelfontspanner : 10 s vertraagd
Statiefopname : standaard
42
Page 43

Technische gegevens
Interface : USB, geheugenkaart
Video-uitgang : NTSC / PAL
Automatisch
uitzetten camera : na 60 seconden
Stroomverzorging : a) 2 x batterijen "AA"
b ) USB-verzorging
c) netadaper (niet meegeleverd)
Certificering: CE, FCC klasse B
Systemvereisten : Windows 98/98SE/ME/2000
min. 32MB werkgeheugen
110 MB vrije geheugencapaciteit
Mac OS 9.0 of hoger
Veiligheidsinstructies
1. Wanneer u met netstroom werkt, controleert u precies of de
gegevens op het typebord overeenkomen met de net-
gegevens. Wanneer deze niet overeenkomen, bestaat
gevaar voor elektroshock en brand.
2. Voor het aansluiten of uittrekken van de netkabel eerst de
stroomverzorging van de camera uitschakelen.
3. Na gebruik de camera uitzetten en de netadapter uit het
stopcontact trekken.
4. Kabel niet belasten en niet blootstellen aan directe
warmtestraling.
5. Wordt de camera gedurende langere tijd niet gebruikt, dan
de batterijen uit de camera verwijderen.
43
Page 44

JD210F Manuale di Istruzioni
Vi ringraziamo per l’acquisto della JENOPTIK JD210F.
Cos facendo avete acquistato una macchina
fotografica affidabile e facile da usare. Vi preghi-
amo di leggere con attenzione le presenti
istruzioni per l’uso prima di utilizzare per la prima
volta la macchina fotografica. Con una conoscen-
za precisa del funzionamento ed un utilizzo cor-
retto della macchina fotografica,potrete godere
per molti anni delle immagini digitali che ripren-
derete con lei.
44
Page 45

Caratteristiche del prodotto
1. Alta capacit di memorizzazione opzionale
2. Plug-and-Play mediante interfaccia USB
3. Uscita video per NTSC e PAL
4. Qualit naturale delle immagini
5. Display LCD semplice e facile da usare
6. Spegnimento automatico dopo 60 secondi
7. Peso ridotto
Requisiti del sistema
1. Sistema: Windows 98/98SE/ME/2000, Mac: OS9 o superi-
ore
2. Pentium PC con 166 MHz o superiore
3. Almeno 32 MB di memoria RAM
4. Almeno 110 MB di spazio libero sul disco fisso
5. Lettore per CD-ROM
45
Page 46
Contenuto della confezione
1. Macchina fotografica completa di una scheda CF di 8 MB
2. Software con driver
3. Software Adobe PhotoDeluxe per Mac
4. Software Adobe PhotoDeluxe per PC
5. Cavo video
6. Cavo USB
7. Tracolla per il trasporto della macchina fotografica
8. Custodia per la macchina fotografica
9. 2 batterie del tipo "AA"
10. Istruzioni per l’uso
1
10
9
2
4
7
3
8
6
5
46
Page 47

I pezzi della macchina
fotografica fotografica
1. Interruttore d’accensione /
Selettore per riprese da
vicino
2. Pulsante di scatto
3. Spia di segnalazione
"pronta all’uso" (verde)
4. Spia di segnalazione di
esercizio (rossa)
5. Mirino
6. Display LCD
7. Flash
8. Obiettivo
9. Scomparto per la scheda di
memoria
10. Occhiello per tracolla
11. Tasto di conferma Enter
12. Selettore, sinistra
13. Selettore, destra
14. Presa dell’uscita video
15. Presa di alimentazione
DC
16. Collegamento USB
17. Attacco per treppiede
18. Sportellino dello scompar-
to batterie
47
Page 48
Inserire le batterie
1. Inserire le batterie come riportato nell’illustrazione.
2. Nell’inserire le batterie prestare attenzione alla polarit cor-
retta come mostrato nell’illustrazione.
3. Richiudere lo scomparto batterie.
(-)
(+)
Inserire la scheda di memoria
1. Aprire lo scomparto per la scheda di memoria come mostra-
to nell’illustrazione.
2. Infilare la scheda di memoria.
3. Richiudere lo scomparto per la scheda di memoria
48
Page 49

Display LCD
A. Impostazioni del selettore di modo
a) Flash
b)Dimensioni
h) Cancellare
immagine
Premere il tasto
g) Autoscatto
f) Zoom digi-
tale
Premere il tasto
Formattazione
della scheda di
B. Impostazioni
a) Flash
Riduzione Flash acceso
occhi-rossi
Flash spento Flash automatico
b) Dimensioni immagine
1600x1200 800x608
c) Qualit
immagine
d) Modo TV
e)
memoria
c) Qualit immagine
Normale Alta
d) Sistema TV
NTSC PAL
Page 50
Display LCD
e) Zoom digitale
Zoom digitale Zoom digitale
2x acceso 2x spento
(f.) Self-Timer Selection
Acceso(ein) Spento (aus)
g) Cancellare
Cancellare tutto Cancellare singole
no immagini
no
Cancellare tutto Cancellare l’ultima
si immagine si
C. Altre impostazioni
h) Riprese da vicino
Acceso (ein) Spento (aus)
Posizionare il selettore su
i) Formattazione della scheda di
memoria
Formattare
no si
Manca la scheda
j) Segnalazione dello stato di
carica delle batterie
piene
parzialmente cariche
quasi scariche ( sostituire le batterie )
50
Page 51

Lavorare con la macchina
fotografica
Effettuare riprese
1. Accendere la macchina fotografica
2. Impostare dimensioni ((1600/800)) e qualit (normale/alta)
delle immagini.
3. Inquadrare nel mirino il soggetto che si intende riprendere.
4. Controllare se la spia di segnalazione verde accesa
(macchina fotografica pronta a riprendere).
5. Premere leggermente il pulsante di scatto.
Fare sempre attenzione che l’obiettivo sia pulito. Solo cos
possibile effettuare riprese perfette.
Cancellare le immagini
1. Cancellare singole immagini: selezionare sul menu di modo
la funzione "cancellare singole immagini " e premere il tasto
menu. Con il tasto sinistra/destra andare su SI/NO per cancellare l’immagine oppure abbandonare la funzione. In
modalit TV possibile guardare le immagini su di un
apparecchio televisivo. Per far questo, collegare la macchina fotografica all’apparecchio televisivo per mezzo del cavo
video in dotazione. Per cancellare l’ultima immagine premere sul tasto menu. Con il tasto sinistra/destra andare su
SI/NO per cancellare l’immagine oppure abbandonare la
funzione, oppure premere il pulsante di scatto per abbandonare.
2. Cancellare tutte le immagini: in modo menu selezionare la
funzione "cancellare tutto " e premere il tasto menu. Con il
tasto sinistra/destra andare su SI/NO per cancellare l’immagine oppure abbandonare la funzione. Vengono cancellate tutte le immagini. Per abbandonare premere il pulsante
di scatto.
Flash
La macchina fotografica dispone di quattro diverse funzioni
flash:
51
Page 52

Lavorare con la macchina
fotografica
1. flash automatico: con questa funzione in caso di condizioni
di luce sfavorevoli tutte le riprese vengono effettuate con il
flash.
2. Flash acceso: con questa funzione vengono effettuate con il
flash tutte le riprese in generale. Si consiglia di usare questa
funzione quando c’ poca luce disponibile o il soggetto della
ripresa illuminato da dietro.
3. Flash spento: il flash non scatta con questa impostazione.
4. Effetto-occhi-rossi: con questa funzione si riduce l’effettoocchi-rossi mentre si effettua la ripresa.
Autoscatto
Con questa funzione si ritarda di circa 10 secondi il momento
della ripresa da quando si premuto il pulsante di scatto. In
questo intervallo di tempo potete posizionarVi all’interno dell’inquadratura.
1. Posizionarsi su "Autoscatto" con il selettore di modo.
2. Posizionare la macchina fotografica su di un treppiede o su
di un altro solido appoggio, in maniera tale che la ripresa
non risulti mossa.
3. Inquadrare l’immagine e prevedere il posto per s stessi.
4. Premere il pulsante di scatto.
5. La spia rossa lampeggia per circa 10 secondi prima che
venga effettuata la ripresa.
In questo intervallo di tempo potete prendere la posizione pre-
vista nell’inquadratura.
Modo TV
1. Accendere la macchina fotografica e collegare il cavo video.
2. Per il funzionamento con uno schermo televisivo sono
disponibili tre opzioni. Selezionate la funzione desiderata
52
Page 53

Lavorare con la macchina
fotografica
con il tasto sinistra/destra e premete il tasto menu
2.1 Immagine dal vivo: con questa funzione la visualizzazione
dell’immagine da riprendere avviene direttamente sullo
schermo televisivo. La ripresa viene quindi effettuata come
pi sopra descritto. Per osservare l’immagine andare sul
modo selezione e l selezionare il modo TV (NTSC/PAL).
Avete la possibilit di guardare le riprese o singole immagini
come diapositive. Con il tasto sinistra/destra tornate indietro
al modo TV.
2.2 Visualizzazione di immagini singole: visualizzazione di
immagini dalla scheda di memoria o dalla memoria interna.
Con il tasto sinistra/destra viene mostrata l’immagine precedente ovvero la sucessiva. Premendo il tasto menu ovvero il
pulsante di scatto avviene il ritorno al modo TV.
2.3 Dia-show: le immagini vengono visualizzate automaticamente l’una dopo l’altra dalla scheda di memoria o dalla
memoria interna. Premendo il tasto menu ovvero il tasto SB
avviene il ritorno al modo TV.
Software per il funzionamento
Installazione del driver
1. Avviare il computer.
2. Inserire il CD contenente il driver nel lettore per CD.
3. Collegare la macchina fotografica al calcolatore mediante il
cavo USB. Infilare un capo del cavo nella presa USB del
computer, l’altro capo del cavo nella presa USB della
macchina fotografica.
4. Seguire le istruzioni sullo schermo.
53
Page 54

Installazione del Software
Adobe PhotoDeluxe
Per poter utilizzare il software di elaborazione delle immagini in
dotazione Adobe PhotoDeluxe Home Edition 4.0 (versione per
Windows) ovvero Adobe PhotoDeluxe 2.0 (versione per Macintosh)
necessario che i sistemi siano dotati dei seguenti requisiti minimi:
per IBM-PC/AT e apparecchi compatibili
Calcolatore
Sistema
operativo
Memoria
Disco fisso
processore Intel Pentium II con almeno 233 MHz o computer dotato di processore compatibile
Windows 95, Windows 98,
Windows 2000, Windows NT 4.0 (Service Pack 5)
almeno 32 MB di memoria RAM (per Windows NT
almeno 32 MB di memoria RAM)
almeno 110 MB di memoria libera
Monitor
Lettore
CD-ROM
per Apple Macintosh
Calcolatore
Sistema
operativo
Memoria
Disco fisso
Monitor
Lettore CD
monitor a colori con profondit di colore a 16-Bit,
risoluzione 800 x 600
necessario (per l’installazione e l’utilizzo del software)
68040 o processore seguente o superiore oppure
Macintosh o PowerMac
Mac OS 8.6, OS9
almeno 32 MB di memoria RAM
almeno 110 MB di memoria libera
monitor a colori con 256 colori
necessario (per l’installazione e l’utilizzo del software)
54
Page 55

Installazione del Software
Adobe PhotoDeluxe
Installazione su IBM-PC/AT e apparecchi compatibili
1. Accendere il computer e avviare Windows.
2. Inserire il CD-ROM contenente il software di elaborazione immagini
Adobe PhotoDeluxe 4.0 nel lettore CD.
3. L inizio della procedura d installazione viene mostrato automaticamente sullo schermo.
- Se il programma di installazione non si avvia automaticamente,
andare su "Start" "Ausf hren" e immettere nella finestra di
dialogo " ffnen": D:\ENGLISH\INSTALL\SETUP.EXE (de il CDROM si trova nel lettore D) e di seguito cliccare su OK.
Installazione su Apple Macintosh
1. Accendere il computer e avviare il sistema operativo Mac.
2. Inserire il CD-ROM contenente il software di elaborazione immagini
Adobe PhotoDeluxe 2.0 nel lettore CD.
3. Quando compare il simbolo del CD-ROM Adobe PhotoDeluxe 2.0,
fare doppio clic sul simbolo.
4. Aprire con un doppio clic la cartella "English"
5. Fare doppio clic sul simbolo "PhotoDeluxe TM Installer ".
A partire da questo punto seguire le istruzioni sullo schermo.
55
Page 56

Dati tecnici
Risoluzione del sensore: CCD da 2.1 milioni di pixel
Risoluzione immagine : 1600 x 1200 pixel,
24-Bit di profondit colore
800 x 608 pixel, 24-Bit di profondit
colore
Compressione immagine:alta (1/5), normale (1/10) — esterna
alta (1/15), normale (1/20) — interna
Formato dei file :formato DCF
Memoria immagini :scheda di memoria esterna da 8
MB— 10 riprese (alta qualit ),
20 riprese (qualit normale)
Interna - 8 riprese (alta qualit ),
16 Aufnahmen riprese
(qualit normale)
Display LCD : display funzioni LCD B/N
Mirino :mirino ottico
Zoom :zoom digitale 2x
Obiettivo :a fuoco fisso.Macro 0.1-0.15M.
Distanza focale : f = 5 mm (corrisponde a 33 mm in
una macchina fotografica con pellico
la di piccolo formato)
Settore di messa a fuoco:normale — da 0,7 m a infinito
ripresa da vicino — sino a 0.17m.
Esposizione :automatica (EV 5-15)
Tempi d esposizione :1 — 1/250 s
Diaframma :F3.6/11
Valore ISO :100 — 400
Flash : flash automatico, flasch acceso,
flash spen to.
Autoscatto : ritardato di 10 s
Attacco per treppiede : standard
Interfaccia : USB, scheda di memoria
56
Page 57

Dati tecnici
Uscita video : NTSC / PAL Spegnimento auto
matico
della macchina fotografica : dopo 60 secondi
Alimentazione :a) 2 batterie "AA" b) alimen
tazione via USB
c) alimentatore di rete (non fornito
in dotazione)
Input : 100-240V, 50/60Hz
Output : 3,3V; 1,5A
Certificazione : CE, FCC classe B
Requisiti minimi del sistema: Windows 98/98SE/ME/2000
min. 32MB memoria RAM
110 MB spazio libero su disco
fisso
Mac OS 9.0 o superiore
Avver tenze
1. Se lavorate con la corrente di rete, controllate esattamente
che i dati trascritti sulla targhetta di identificazione coinci-
dano con i dati di rete. In caso siano diversi sussiste perico-
lo di scossa elettrica e incendio.
2. Spegnere la macchina fotografica prima di collegare o di
staccare il cavo per l alimentazione di rete.
3. Spegnere la macchina fotografica dopo l uso e staccare
l alimentatore dalla presa di corrente.
4. Non sovraccaricare il cavo e non lasciare l’alimentatore
esposto direttamente ai raggi del sole.
5. Togliere le batterie dalla macchina fotografica se questa non
viene utilizzata per un lungo periodo di tempo.
57
Page 58

JD210F Manual del Usuario
Le agradecemos la compra de la JENOPTIK JD210F.
Usted ha adquirido una c mara fiable y de f cil manejo.
Lea,por favo, detenidamente las instrucciones para el
manejo antes de utilizar por primera vez la c mara. Si
conoce en detalle el modo de funcionamiento y trata
con cuidado la c mara, podr disfrutar durante muchos
a os las fotos digitales que va a tomar.
58
Page 59

Características del producto
1. Son posibles altas capacidades de memoria
2. Plug & Play a trav s de interfaz USB
3. Salida de v deo para NTSC y PAL
4. Calidad de imagen natural
5. Pantalla LCD sencilla y f cil de manejar
6. Desconexi n autom tica despu s de 60 segundos
7. Bajo peso
Requerimientos de sistema
1. Sistema: Windows 98/98SE/ME/2000, Mac: OS9 o superior
2. Pentium PC con 166 MHz o superior
3. m nimo 32 MB de memoria de trabajo
4. m nimo 110 MB espacio de memoria disponible
5. Unidad CD-ROM
59
Page 60

Volumen de suministro
Volumen de suministro:
1. C mara digital incl. tarjeta CF de 8 MB
2. Software de controlador
3. Software Adobe PhotoDeluxe para Mac
4. Software Adobe PhotoDeluxe para PC
5. Cable de v deo
6. Cable USB
7. Lazo portador
8. Bolsa de c mara
9. 2 pilas de tipo "AA"
10. Instrucciones para el manejo
1
9
2
4
3
8
6
5
60
Page 61
Componentes de la cámara
1. Interruptor On/Off / conmu-
tador para fotograf a a corta
distancia
2. Disparador
3. Indicador de disposici n
(verde)
4. Indicador de funcionamien-
to (rojo)
5. Visor
6. Pantalla LCD
7. Flash
8. Objetivo
9. Compartimiento de la tarje-
ta de memoria
10. Ojal para lazo portador
11. Tecla Intro/confirmaci n
12. Selector, izquierda
13. Selector, derecha
14. Conector de salida de
v deo
15. Conector DC
16. Puerto USB
17. Alojamiento para tr pode
18. Tapa del compartimiento
de pilas
61
Page 62

Insertar las pilas
1. Insertar las pilas tal y como se muestra en la figura.
2. Al insertar las pilas, asegurarse de la polaridad correcta
seg n la figura.
3. Cerrar el compartimiento de pilas.
(-)
(+)
Insertar la tarjeta de memoria
1. Abrir el compartimiento de la tarjeta de memoria tal y como
se muestra en la figura.
2. Insertar la tarjeta de memoria.
3.Cerrar el compartimiento de la tarjeta de memoria.
62
Page 63

Pantalla LCD
A. Ajustes del conmutador de modos
a) Flash
b) Taille de
Effacement
g)
Retardateur
h)
Pulsar la tecla
Pulsar la tecla
l image
c)
Qualit de
l image
f) Zoom
digitale
B. Ajustes
a) Flash
Reducci n de
ojos rojos
Flash On
Flash-off Auto Flas
Flash Off
Flash autom tico
(b.)Image size Selection
1600x1200 800x608
e)
Formater la
carte de
mmoire
d) Mode TV
c) Calidad de imagen
Normal
Alta
Normal Best
d) Sistema TVNTSC
NTSC
PAL
Page 64
Pantalla LCD
e) Zoom digital
Zoom digital 2x On Zoom digital 2x Off
f) Autodisparador
On Off
g) Borrar
Borrar todas Borrar imagen
idividual
no no
Borrar todas Borrar ltima
imagen
ss
C.Other
h) Fotograf a a corta distancia
on off
Ajustar el selector a
i) Formatear la tarjeta de
memoria
Formato
no yes
Ninguna tarjeta
j) Visualizaci n del estado de pilas
llenas cargadas
parcialmente casi descargadas (cambiar las pilas)
64
Page 65

Trabajar con la cámara
Tomar fotos:
1. Encender la c mara.
2. Ajustar el tama o de imagen ((1600/800)) y la calidad (normal/alta).
3. Componer la imagen en el visor.
4. Controlar si el indicador de disposici n verde est iluminado
(c mara dispuesta para el funcionamiento).
5. Oprimir un poco el disparador.
Siempre prestar atenci n a la limpieza del objetivo. S lo as son posi-
bles unas fotos impecables.
Borrar im genes:
1. Borrar imagen individual: En el men de modos cambiar a la
funci n "Borrar imagen individual" y pulsar la tecla de men . Con la
tecla Derecha/Izquierda ir a SŒ/NO, dependiendo de su intenci n de
borrar la imagen o de abandonar la funci n. En el modo TV se
pueden visualizar las im genes en el televisor. Para este fin, conectar la c mara al televisor con el cable de v deo incluido en el suministro. Para borrar la ltima imagen, pulsar la tecla de men . Con la
tecla Derecha/Izquierda ir a SŒ/NO, dependiendo de su intenci n de
borrar la imagen o de abandonar la funci n, o pulsar la tecla
Disparador para abandonar la funci n.
2. Borrar todas las im genes: En el men de modos cambiar a la
funci n "Borrar todas" y pulsar la tecla de men . Con la tecla
Derecha/Izquierda ir a SŒ/NO, dependiendo de su intenci n de borrar las im genes o de abandonar la funci n. Se borran todas las
im genes. Para abandonar, pulsar la tecla Disparador.
65
Page 66

Trabajar con la cámara
Flash:
La c mara dispone de cuatro funciones de flash distintas:
1. Flash autom tico: Con esta funci n se toman todas las fotos
autom ticamente con flash, si las condiciones luminosas son inconvenientes.
2. Flash On: Con esta funci n se toman todas las fotos en general con
flash. Se recomienda trabajar con esta funci n, cuando hay poca luz o
cuando el objeto a tomar est iluminado desde atr s.
3. Flash Off: Con este ajuste no se dispara el flash.
4. Efecto de ojos rojos: Con esta funci n se reduce el efecto de ojos
rojos durante la toma.
Autodisparador:
Con esta funci n se atrasa la toma unos 10 segundos despu s de
oprimir el disparador. Durante este lapso, usted puede ocupar su
puesto en la foto.
(1) Press the mode button to self-timer mode.
(2) Using a tripod or a steady support to hold the camera firmly.
(3) Compose the picture and reserve a space for yourself later.
(4) Press the shutter release button.
(5) Red self-timer lamp light will blink for about 10 seconds before
shutter is released.
Go to the reserved space within this time to take the picture.
66
Page 67

Trabajar con la cámara
Modo TV:
1. Encender la c mara y conectar el cable de v deo.
2. Est n disponibles tres opciones para el trabajo con la pantalla del
televisor. Elija la funci n deseada con la tecla Derecha/izquierda y
pulse la tecla de men .
2.1 Imagen en vivo: Con esta funci n se representa la foto a tomar
directamente en la pantalla del televisor. La foto se toma tal y como
se ha descrito arriba. Para visualizar la foto, cambiar al modo de
selecci n y ajustar all el modo TV (NTSC/PAL). Usted tiene la posibilidad de visualizar im genes individuales o en forma de diapositivas. Con la tecla Derecha/izquierda puede regresar al modo TV.
2.3 Slide show: One by one to show the pictures on TV from CF card
or interior memory automatically. Pressing the menu button or SB
button to back the TV mode.
Software de funcionamiento
Instalación del controlador :
(1). Iniciar el ordenador.
(2). Insertar el CD de controlador en la unidad de CD.
(3). Conectar la c mara con el cable USB al ordenador.
Enchufar un extremo del cable en el conector USB del orde-
nador, el otro en el conector USB de la c mara.
(4). Seguir a las instrucciones que aparecen en la pantalla.
67
Page 68

Instalación del software
Adobe PhotoDeluxe
Para utilizar el software para procesamiento de im genes Adobe
PhotoDeluxe Home Edition 4.0 (versi n para Windows) o bien Adobe
PhotoDeluxe 2.0 (versi n para Macintosh), que est incluido en el
suministro, deben existir los siguientes requerimientos de sistema:
Para PC/AT IBM y compatibles:
ordenador
sistema
operativo
memoria
disco duro
monitor
unidad
CD-ROM
Para Apple Macintosh:
ordenador
sistema
operativo
memoria
disco duro
monitor
unidad de
CD
procesador Intel Pentium II con 233 MHz como m nimo
u ordenador con procesador plenamente compatible
Windows 95, Windows 98, Windows 2000, Windows NT
4.0 (Service Pack 5)
m nimo 32 MB de memoria de trabajo (para Windows
NT m n. 32 MB de memoria de trabajo)
m nimo 110 MB de espacio de memoria disponible
monitor en color con profundiad de color de 16 bits, resoluci n 800 x 600
se necesita (para instalaci n y uso del software)
68040 o procesador posterior o superior o Macintosh o
PowerMac
Mac OS 8.6, OS 9
m nimo 32 MB de memoria de trabajo
m nimo 110 MB de espacio de memoria disponible
monitor en color para la representaci n de 256 colores
se necesita (para instalaci n y uso del software)
68
Page 69

Instalación del software
Adobe PhotoDeluxe
Instalaci n en PC/AT IBM y compatibles
1. Encender el ordenador e iniciar Windows.
2. Insertar el CD-ROM con el software para procesamiento de
im genes Adobe PhotoDeluxe 4.0 en la unidad de CD.
3. El inicio del proceso de instalaci n se visualiza autom ticamente en
la pantalla.
¥ Si el programa de instalaci n no arranca de forma autom tica, ir a
"Inicio" "Ejecutar" e introducir:
D:\ENGLISH\INSTALL\SETUP.EXE en el cuadro de di logo "Abrir"
(si el CD-ROM se encuentra en la unidad D) y hacer clic en OK.
Instalaci n en Apple Macintosh
1..Encender el ordenador e iniciar el sistema operativo del Mac.
2. Insertar el CD-ROM con el software para procesamiento de
im genes Adobe PhotoDeluxe 2.0 en la unidad de CD.
3. Cuando aparece visualizado el icono del CD-ROM Adobe
PhotoDeluxe 2.0, hacer doble clic en el icono.
4. Con doble clic abrir el directorio "English".
5. Doble clic en el icono "PhotoDeluxe TM Installer ".
A partir de aqu seguir a las instrucciones que aparecen en la pantalla.
69
Page 70

Datos técnicos
* Resoluci n de sensor : 1,3 millones de pixel CCD
* Resoluci n de imagen : 1600 x 1200 pixel, profundidad de
* Compresi n de imagen : alta (1/5), normal (1/10) — externa
* Formato de archivo : formato DCF
* Memoria de im genes : externa: tarjeta de memoria de 8
* Pantalla LCD : LCD en blanco y negro para visu
* Visor : visor ptico
* Zoom : Zoom digital 2x
* Objetivo : foco fijo.Macro 0.1-0.15m.
* Distancia focal : f = 5 mm (33 mm en caso de
* Gama de ajuste : normal — 0,7 m hasta infinito
* Exposici n : Auto ( EV 5-15 )
* Tiempo de exposici n : 1 - 1/150 s
* Gama del diafragma : F3.6/11
*Valor ISO : 100 — 400
*Flash : flash autom tico, flash On, flash
*Autodisparador : 10 s de retardo
*Alojamiento para tr pode : est ndar
color de 24 bits
: 800 x 608 pixel, profundidad de
color de 24 bits
mente
: alta (1/15), normal (1/20) — interna
mente
MB — 10 fotos (alta calidad), 20
fotos (calidad normal)
interna: 8 fotos (alta calidad), 16
fotos (calidad normal)
alizaci n de funciones
c mara de peque o formato)
fotograf a a corta distancia hasta
0.17 m
Off.
70
Page 71

Advertencias de seguridad
*Interfaz : USB, tarjeta de memoria
*Salida de v deo : NTSC / PAL
*Desconexi n autom tica
*de la c mara : despu s de 60 segundos
*Alimentaci n el ctrica : a) 2 x pilas "AA"
b) alimentaci n USB
c) fuente de alimentaci n (no
incluida en el suministro)
Input : 100-240V, 50/60Hz
Output : 3,3V ; 1,5A
*Certificaci n : CE, FCC clase B
*Requerimientos de sistema : Windows 98/98SE/ME/2000
m n. 32MB de memoria de tra
bajo
110 MB de espacio de memoria
disponible
: Mac OS 9.0 o superior
Advertencias de seguridad
1. Si trabaja con corriente de la red, aseg rese de que los
datos en la placa de caracter sticas coinciden con los datos
de la red. En caso de no coincidencia hay peligro de electrochoque e incendio.
2. Antes de conectar o separar el cable de red, desconectar la
alimentaci n el ctrica de la c mara.
3. Despu s del uso, apagar la c mara y desenchufar la fuente
de alimentaci n de la tomacorriente.
4. No sobrecargar el cable y no exponerlo a la radiaci n de
calor directa.
5. Si no se utiliza la c mara durante un tiempo prolongado,
quitar las pilas de la c mara.
71
Page 72
JD2100f Mode d´Emploi
Nous vous félicitons de l'achat de votre nouvelle
caméra JD 2100f.
Vous avez fait acquisition d’un appareil-photo facile
à employer et fiable. Veuillez lire attentivement le
mode d’emploi avant d’employer l’appareil-photo
pour la premiére fois. Avec des connaissances
plus précises du mode de fonctionnement et un
emploi soigneux de l’appareil-photo, vous pouvez tirer
satisfaction des photos digitales que vous avez prises
durant de nombreuses ann es.
1
Page 73

Caractéristques du produit
1. Cartes CompactFlash de type I utilisables jusqu'à 256 Mo.
2. Plug-and-Play par l'interface USB
3. Détection sur ordinateur comme support de données amovible.
4. Sortie vidéo pour NTSC et PAL
5. Qualité naturelle de l'image
6. Affichage LCD simple et facile à manipuler
7. Arrêt automatique après 60 secondes
8
. Masse réduite
Systèmes requis
1. Windows 98/98SE/ME/2000/XP, Mac OS9.0.4/9.1/9.2
récent
2. Pentium PC avec 166 MHz ou plus récent
3. Au moins 32 MB de mémoire vidéo
4. Capacité libre en mémoire de 110 Mo minimum
5. Lecteur de CD-ROM
6. Moniteur couleur VGA
7. Raccord USB
2
Page 74

Ensemble de fournitures
Appareil-photo digital avec carte CF de 8 Mo comprise:
1. Logiciel d'emulation
2. Logiciel Adobe PhotoDeluxe pour PC
3. Logiciel Adobe PhotoDeluxe pour Mac
4. Câble vidéo
5. Câble USB
6. Courroie de transport de l'appareil-photo
7. Pochette de l'appareil-photo
8. 2 piles de type "AA"-Alkaline
9. Mode d'emploi
1
10
9
2
4
7
3
8
6
5
3
Page 75

Parties de l’appareil-photo
1. Commutateur Marche/Arrêt
/ Déclencheur pour la prise
de vue
2. Déclencheur
3. Affichage de disponibilité
(vert)
4. Affichage de service
(rouge)
5. Viseur
6. Affichage LCD
7. Flash
8. Objectif
9. Logement de carte à
mémoire
10. OEuillets pour la sangle de
transport
11. Touche
Enter/Confirmation
12. Sélectionneur, gauche
13. Sélectionneur, droit
14. Prise de sortie vidéo
15. Prise PC
16. Raccordement USB
17. Prise de vue avec statif
18. Couvercle de logement de
piles
4
Page 76
Disposition des piles
1. Disposer les piles comme indiqué sur l'illustration.
2. Lors du logement des piles, préter attention á la bonne
polaritè comme indiquè sur l'illustration.
3. Fermer le logement à piles.
(-)
(+)
Disposer la carte de mémoire
1. Ouvrir le logement de carte de mémoire comme indiqué sur
l'illstration.
2. Glisser la carte de mémoire.
3. Fermer le logement de carte mémoire
4
Page 77

Affichage LCD
A. Réglages du commutateur de mode
Flash
Effactement
Retardateur
Zoom digitale
B. Réglages
a) Flash
Réduction de l'effet
des yeux rouges
Flash en marche
Flash-off Auto Flas
b) Taille de l'image
1600x1200 800x592
Taille de
l'imagine
Qualité de
Mode TV
Formater la
darte de
mémoire
c) Qualité de l'image
Normal Best
d) Système TV
NTSC PAL
l'image
Page 78

Affichage LCD
e) Zoom digital
Zoom digital
2x en Marche
Zoom digital 2x
l arr t
f) Retardateur
Marche Arr t
g) Effacer
Tout effacer
non
Tout effacer
oui
Effacer les images
unitaires
Effacer la
derni re image
oui
C) Autres réglages
h) Prise de vue en gros
plan
Marche Ar r t
R glage du commutateur de
s lection sur
i) Formatage de la carte de
m moire
Format oui
non
Pas de carte
j) Affichage du statut de
piles
Plein
partiellement charg
presque puis ( remplacer les piles )
78
Page 79

Travaux avec l’appareil-photo
Faire des prises de vue:
1. Mettre l appareil-photo en marche
2. R gler la taille de l image ((1600/800)) et la qualit
(normale/ lev e).
3. Composition de la prise de vue avec le viseur.
4. Contr ler si le t moin de disponibilit s illumine (appareil-photo pr t
la prise de vue).
5. Appuyer l g rement sur le d clencheur.
Pr ter en permanence attention l tat propre de l objectif. Des prises
de vues parfaites sont uniquement possibles de cette mani re.
Effacer l image:
1. Effacer un image isol e: Aller dans le menu de mode sur la fonction
ªEffacer une image" et appuyer sur la touche de menu. Passer avec
la touche droite/gauche sur OUI/NON, si l image doit tre effac e ou
si la fonction doit tre quitt e. Dans le mode TV, les images peuvent
tre visionn es au t l viseur. Pour cela, raccordez l appareil-photo
au t l viseur par le c ble vid o fourni la livraison. Pour l effacement des derni res images, appuyez sur la touche de menu.
Passer avec la touche droite/gauche sur OUI/NON si l image doit
tre effac e ou si la fonction doit tre quitt e ou appuyer sur la
touche du d clencheur pour quitter.
2. Effacer toutes les images: passer dans le mode de menu sur la
fonction "tout effacer" et apuyer sur la touche de menu.. Passer
avec la touche droite/gauche sur OUI/NON si l image doit tre
effac e ou si la fonction doit tre quitt e. Toutes les images seront
effac es. Appuyer sur la touche du d clencheur pour quitter.
Le flash:
L appareil-photo dispose de quatres fonctions diff rentes de flash:
1. Flash en automatique: Avec cette fonction, toutes les prises de vues
r alis es avec des rapports de lumi re peu judicieux seront faites
en flash automatique.
79
Page 80

Travaux avec l’appareil-photo
2. Flash en marche: Avec cette fonction, toutes les prises de vues
seront r alis es avec le flash. Il est recommand de travailler avec
cette fonction lorsque l on dispose de peu de luminosit ou que
l arri re plan de l objet brille.
3. Flash l arr t: Avec ce r glage, aucun flash ne sera produit.
4. Effet des yeux rouges: Avec cette fonction, l effet des yeux rouges
seront r duits lors de la prise de vue.
Retardateur:
Avec cette fonction, la prise de vue sera retard e d environ 10 secon-
des apr s appui sur le d clencheur. Durant cette p riode, vous
pouvez prendre place sur votre prise de vue.
1. Passer sur le retardateur avec la touche de mode.
2. Disposer l appareil sur un statif ou sur un autre support stable, afin
que la prise de vue ne bouge pas.
3. Composer l image et pr voir un endroit sur l image pour soi-m me.
4. Appuyer sur le d clencleur.
5. La lampe rouge clignote environ 10 secondes avant la prise de vue.
Durant ce temps, vous pouvez prendre place l endroit vous tant
r serv sur la prise de vue.
Mode TV:
1. Mettre l appareil-photo en marche et raccorder le c ble vid o.
2. Il existe trois options pour le travail avec l cran de la t l vision.
S lectionnez la fonction souhait e dans la touche droite/gauche et
appuyer sur la touche menu.
2.1 Image live: Avec cette fonction, la repr sentation de l image
prendre est repr sent e directement sur l cran du t l viseur. La
prise de vue sera alors prise comme d crit ci-dessus. Passer sur le
mode de s lection pour visionner l image et y r gler le mode TV
80
Page 81

Travaux avec l’appareil-photo
(NTSC/PAL). Vous avez la possibilit , d observer les images une
par une ou de visionner les prises de vues sous forme de diapositives. Recommutez avec la touche droite/gauche dans le mode TV.
2.2 Affichage unitaire d image: Affichage des images de la carte de
m moire ou de la m moire interne. L image pr c dente ou suivante
sera affich e avec la touche droite/gauche. Le retour en mode TV
seffectue par activation de la touche de menu ou de la touche du
d clencheur
2.3 Visionner en diapos: Les images seront automatiquement
affich es l une cot de l autre par la carte de m moire ou par la
m moire interne. Le retour en mode TV s effectue par activation de
la touche de menu ou de la touche du d clecheur.
Logiciel d’émulation
Installation du logiciel d’émulation :
1. D marrer l ordinateur.
2. Disposer le CD du logiciel d mulation sur le lecteur de CD.
3. Raccorder l appareil-photo avec le c ble USB l ordinateur.
Enficher un embout de c ble de la prise USB de l ordinateur,
enficher l autre embout de c ble dans la prise USB de
l appareil-photo.
4. Suivez les instructions apparues l cran.
81
Page 82

Installation du logiciel Adobe
PhotoDeluxe
Pour l emploi du logiciel de traitement de l image fourni avec l appareil
Adobe PhotoDeluxe Home Edition 4.0 (Version Windows) ou Adobe
PhotoDeluxe 2.0 (Version Macintosh), les syst mes suivants sont req-
uis:
Pour les IBM-PC/AT et appareils compatibles
Ordinateur
Syst me
d exploitation
M moire
Processeur Intel Pentium II avec au moins 233 MHz ou
ordinateur avec processeur enti rement compatible
Windows 95, Windows 98, Windows 2000, Windows NT
4.0 (Paquet de service 5)
Au minimum 32 Mo de m moire vive (pour Windows
NT au minimum 32 Mo de m moire vive)
Disque dur
Moniteur
Lecteur de
CD-ROM
Pour Apple Macintosh
Ordinateur
Syst me
d exploitation
M moire
Disque dur
Moniteur
Lecteur de
CD-ROM
Au minimum 110 Mo de capacit de m moire disponible
Moniteur couleur avec une intensit de coloration en 16
bits , r sultion 800 x 600
sera n cessaire (pour installation et emploi du logiciel)
68040 ou processeur plus r cent ou plus r cent ou
Macintosh ou PowerMac
Mac OS 8.6, OS 9
Au minimum 32 Mo de m moire vive
Au minimum 110 Mo de capacit de m moire
disponible
Moniteur couleur pour repr sentation de 256 couleurs
sera n cessaire (pour installation et emploi du logiciel)
82
Page 83

Installation du logiciel Adobe
PhotoDeluxe
Installation sur des appareils IBM-PC/AT et compatibles
1. Mettre l ordinateur en marche et d marrer Windows.
2. Disposer le CD-ROM avec le logiciel de traitement de l image
Adobe PhotoDeluxe 4.0 dans le lecteur de CD.
3. Le d marrage du process d installation sera automatiquement
affich sur l cran.
¥ Si le programme d installation ne d marre pas automatiquement,
passer sur "Start" "ex cuter" et introduire dans le champs de
dialogue "Ouvrir": D:\ENGLISH\INSTALL\SETUP.EXE (lorsque le
CD-ROM ise trouve dans le lecteur D) et cliquer sur OK.
Installation sur Apple Macintosh
1. Mettre l ordinateur en marche et d marrer le syst me d exploitation
du Mac.
2. Disposer le CD-ROM avec le logiciel de traitement de l image
Adobe PhotoDeluxe 2.0 dans le lecteur de CD.
3. Lorsque le symbole du CD-ROM Adobe PhotoDeluxe 2.0 appara t,
faire un double-clic sur le symbole.
4. Ouvrir le registre ªAnglais" avec un double-clic.
5. Double-clic sur le symbole "PhotoDeluxe TM Installer ".
Suivez partir de ce moment les instructions sur l cran.
83
Page 84

Caractéristiques techniques
* R solution du capteur : 2.1 millions de Pixels CCD
* R solution de l image : 1600 x 1200 Pixels, intensit de
* Compression de l image : Elev e (1/5), normale (1/10) —
* Format de dossier : Format DCF
* M moire en images : Carte de m moire externe 8 Mo —
*Affichage LCD : N/B LCD pour affichage de fonc
* Viseur : Viseur optique d image
* Zoom : Zoom digital 2 x
* Objectif : focale rapide.Macro 0.1-0.15m.
* Profondeur de champs : f = 5 mm (33 mm pour un petit
* Plage de r glage : normal — 0,7 m l infini
* Exposition : Auto ( EV 5-15 )
* Dur es d expositiont : 1 - 1/150 s
* Plage de l obturateur : F3.6/11
* Valeur ISO : 100-400
* Flash : Flash en automatique, Flash
* Retardateur : 10 s retard e
* Prise de vue avec statif : Standard
couleur en 24 bits
: 800 x 608 Pixels, intensit de
couleur en 24 bits
externe
Elev e (1/15), normale (1/20) —
interne
10 prises de vues (qualit lev e),
20 prises de vue (qualit normale)
8 prises de vues interne (qualit
lev e), 16prises de vue (qualit
normale)
tion
appareil-photo)
Prise de vue en gros plan jusqu
0.17 m
marche,
Flash arr t.
84
Page 85

Caractéristiques techniques
* Interface : USB, carte de m moire
* Sortie vid o : NTSC / PAL
* D senclenchement
* automatique de l appareil : apr s 60 secondes
* Alimentation lectrique : a) 2 piles "AA"
b ) Alimentation USB
c) Appareil d alimentation (pas
dans l ebnsemble des fournitures)
Input: 100-240V, 50/60Hz
Output: 3,3V; 1,5A
* Certification : CE, FCC Classe B* Syst mes
* requis : Windows 98/98SE/ME/2000
Au minimum 32Mo de m moire
vive
110 Mo de capacit de m moire
disponible
: Mac OS 9.0 ou plus r cent
Conseil en matière de sécurité
1. Si vous travaillez avec le courant du r seau, contr ler de
mani re pr cise ce que les indications sur la plaque signal tique correspondent avec les donn es du r seau. En
cas de non concordance, il y a danger de choc lectrique et
d incendie.
2. Avant le reccordement ou le retrait du c ble d alimentation
au r seau, d senclencher en premier lieu l alimentation
lectrique de l appareil-photo.
3. D senclencher l appareil-photo apr s l emploi et retirer
l appareil d alimentation au r seau de la prise murale.
4. Ne pas soumettre le c ble la traction et ne pas l exposer
au rayonnement diret de chaleur.
5. Retirer les piles de l appareil-photo lorsque l appareil-photo
n est pas employ durant une p riode plus importante.
85
Page 86

620-210014-00
Page 87

 Loading...