

Page 1

mJENN.AIR
Use and Care Manual /
Gl_ll-Range with
Self-Cleaning Conventional
and Convection Oven
Models SVE47500and SVE47600
i
Model SVE47600
Page 2

Congratulations onyour choice of aJenn-Air grill-range. The indoor grilling
of meats, fish or fowl is one of the most attractive and succulent methods
of preparing these foods ... a unique flexibility made possible by Jenn-Air's
patented integral ventilation system.
YourJenn-Air self-cleaning oven combinesthe bestoffourcooking methods,
conventional baking or roasting, convection baking, convection roasting and
broiling. (Note; Only Model SVE47600 has the convection options.)
The Jenn-Air convection oven is actually aconventional oventhat circulates
heated airwithin the oven. As both bake and broil heating elements cycle on
and off with the thermostat, afan keeps the heated air circulating around the
food. The constantly recirculating heated air in the convection oven strips
away the layer of cooler air that surrounds the food. Consequently, many
foods cook more quickly. Evenly distributed heat makes multiple rack
cooking possible. Convection roasted meats retain their natural flavor and
juiciness with lessshrinkage than conventional roasting.
In addition to the many exclusive benefits of convection cooking, your Jenn-
Air oven isalso afine full featured conventional bake and broiloven. You can
cook your "oldfavorite" recipes as you have in the past. The conventional
bake oven also gives you the flexibility of preparing various foods when
convection cooking may not be as beneficial, as when cooking foods in
covered casseroles or clay pots. The broil element is convenient for top
browning and oven broiling of foods.
Before you begin cooking with your new range, please take a few minutes to
read and become familiar with the instructions in this book. On the following
pages youwill find awealth of information regarding all aspects of using your
new range. By following the instructions carefully, you will be able to fully
enjoy and properly maintain you rrangeand achieve excellent resultswith the
food you prepare.
Should you have any questions about using your Jenn-Air range or need a
Use and Care manual for your cooktop cartridge, write to us. Be sure to
provide the model number.
Jenn-Air Customer Assistance
c/o Maytag Customer Service
P,O, Box2370
Cleveland, TN 37320-2370
Page 3
Appliance Usage
BeforeYou Cail forService .......................................................................................... 46-48
Caring for your Range
Access Panel ............................................................................................................. 44
AdjustOvenTemperature .......................................................................................... 44
ChildProtectionLock ................................................................................................. 43
Cleaning Other PartsofYour Range ..................................................................... 42-43
Oven Light Bulb......................................................................................................... 45
RangeComponents ............................................................................................................. 8
SafetyPrecautions ........................................................................................................... 4-7
Using the Cooktop and Grill
Accessories.................................................................................................................. 50-51
CooktopCartridges
Home Canning ........................................................................................................... 11
[nstallation ................................................................................................................. 11
Cookwaro .......................................................................................................................... 12
DuctingInformation ........................................................................................................... 49
Gdiling
Cleaning ................................................................................................................ 16-17
GrillingGuide .............................................................................................................. 15
GrUlingTips ................................................................................................................ 16
Installation.................................................................................................................. 13
Usage ......................................................................................................................... 14
Surface Controls................................................................................................................ 10
VentilationSystem ............................................................................................................... 9
Using the Oven
Baking
BakingChart .............................................................................................................. 27
Causesof Cake Failure ............................................................................................. 28
ConvectBaking..................................................................................................... 28-29
GeneralRecommendations ....................................................................................... 26
Broiling ......................................................................................................................... 34.35
Clock Controls
ClockControlledBaking or Roasting .................................................................... 24-25
Time of Day Clock ..................................................................................................... 22
_mer ......................................................................................................................... 23
OvenCleaning
Self-Cleaning Process .......................................................................................... 36-41
OvenOperation
Oven Control Panel ............................................................................................... 18-19
F_ck Positions ........................................................................................................... 21
SettingControls ......................................................................................................... 20
Roasting
ConvectRoasting ...................................................................................................... 32
FrozenConvenience Foods ....................................................................................... 33
RoastingChart ........................................................................................................... 31
General RoastingRecommendations ........................................................................ 30
3
Page 4
Read before operating your range
All appliances -- regardless of the manufacturer -- havethe potential
through improper or careless use to create safety problems. There-
fore the following safety precautions should be observed:
1. Be sure your appliance is properly installed and grounded by a
qualified technician.
2. Never use your appliance for warming or heating the room.
3. Children should not be left alone or unattended in area where
appliance is in use. They should never be allowed to sit or stand
on any part of the appliance.
4. Wear properapparel. Loose-fittingorhanginggarmentsshould
never be worn while using the appliance.
5. Do not repair or replace any part of the appliance unless
specifically recommended in this manual. All other servicing
should be referred to an authorized Jenn-Air Service Contractor.
6. Flammable materials should not be stored in an oven or near
surface units.
7. Do not use water on grease fires. Smother fire or flame or use
dry chemical or foam-type extinguisher.
8. Use only dry potholders. Moist or damp potholders on hot
surfaces may result in burns from steam. Do not let potholder
touch hot heating elements. Do not use a towel or other bulky
cloth.
g. Use proper pan size. Many appliances are equipped with one
or more surface units of different size. Select cookware having
flat bottoms large enough to cover the surface unit heating
element. The useof undersized cookware will expose aportion
of the heating element to direct contact and may result in
ignition of clothing. Proper relationship of cookware to heating
element will also improve efficiency and performance.
10. Never leave surface units unattended at high heat settings. Boil
over causes smoking and greasy spillovers that may ignite.
4
Page 5
11.Glazed cookwara-- onlycertaintypesofglass,glass-ceramic,
ceramic,earthenwareorotherglazedcookpotsaresuitablefor
rangetopsurfacewithoutbreakingdue tothe suddenchange
intemperature.Useonlysuchcookwareasyouknowhasbeen
approvedforthis purpose.
12.Cookwara handlesshouldbe turned inwardand not extend
overadjacentsurfaceheatingelementstoavoidbums,ignition
offlammablematerialsandspillageduetounintentionalcontact
withthecookware.
13.CAUTION -- Do not store items of interest to children in
cabinetsabove a range or on the backguard of a range --
childrenclimbingontherangetoreachitemscouldbeseriously
injured.
14.Donotsoakorimmerseremovableheatingelementsinwater.
15.Donottouchsurfaceunitsorareasnearunits,heatingelements
orinterior surfacesofoven. Surface unitsorheatingelements
may be hot even though they are dark in color. Areas near
surface units and interiorsurfacesof an oven may become hot
enough tocause burns. During and after use, do nottouch or
let clothing or other flammable materials contact these areas
untilthey have hadsufficienttimeto cool. Other surfaces may
become hot enough to cause burns --among these surfaces
are the cooktop,the upper doorframe and glass,oven vent
openingandsurfacesneartheopening,andthetopedgeofthe
controlpanel.
16.Usecarewhenopeningovendoor. Lethotairorsteamescape
beforeremovingorreplacingfood.
17.Do not heatunopenedfoodcontainers. Build-upofpressure
may causecontainerto burstand resultin injury.
18.Keepovenventductsunobstructed.The ovenventis located
underneaththe airgrille.
19.Alwaysplaceovenracksindesiredlocationwhileoveniscool.
If rackmustbe movedwhileoven is hot,do notletpotholder
contacthotheatingelementin oven.
21).Donot cleandoorgasket. The doorgasketisessentialfora
goodseal. Careshouldbetakennotto rub, damageor move
thegasket.
Page 6

21.Do not use oven cleaners. No commercialoven cleaner or
ovenlinerprotectivecoatingof any kindshouldbe usedin or
aroundany part of theoven.
22.Clean only parts listed in this manualand use procedures
recommended.
23.CAUTION: BEFORESELF-CLEANINGTHEOVEN,REMOVE
FOOD, BROILERPAN ANDOTHER UTENSILS.
24.Listenforfan. A fannoiseshouldbeheardduringthebroiland
cleaningcycles. If not,calla servicemanbeforeself-cleaning
again.
25.Donotcookonglass-ceramiccookingsurfaceifthecooktopis
broken. Cleaningsolutionsandspilloversmay penetratethe
brokencooktopand create a shock hazard. Contact an
authorizedJenn-AirServiceContractor.
26.Clean glass-ceramiccooktopswithcaution. If wetspongeor
clothisusedtowipespillsona hotcookingarea, be carefulto
avoid steam burns. Some cleanserscan producenoxious
fumesif appliedtoa hotsurface.
27.Do not operate with damaged cooking element after any
productmalfunctionuntilproperrepairhas been made.
28.Keep allswitches"OFF" when unitisnotinuse.
29.Do notallowaluminumfoilto contactheatingelements.
30.On conventionalelementcartridgesmakesurethatdrippans
are in place. Absenceof these pans duringcookingmay
subjectwiringorcomponentsunderneathtodamage.
31.Donotusealuminumfoiltolinesurfaceunitdrip pans,grillbasin
orovenbottom.Installationoftheselinersmayresultinelectric
shockorfire hazard.
32.WARNING: To reducetheriskoftippingoftheappliance,the
appliancemustbesecuredbyproperlyinstalledanti-tipdevices.
Tocheckifdevicesare installedproperly,removetheaccess
panelandverifythattheanti-tipdevicesareengaged.
Page 7
33.This appliance has been tested for safe performance using
conventional cookware. Do not use any devices or accessories
that are not specifically recommended in this manual. Do not
use eyelid covers for the surface units, stovetop grills, or add-
on convection systems. The use of devices or accessories that
are not expressly recommended in this manual can create
serious safety hazards, result in performance problems, and
reduce the life of the components of the appliance.
34.PREPARED FOOD WARNING: Follow food manufacturer's
instructions. If a plastic frozen food container and/or its film
cover distorts, warps or is otherwise damaged during cooking,
immediately discard the food and its container. The food could
be contaminated.
IMPORTANT SAFETY NOTICE AND WARNING
The California Safe Drinking Water and Toxic EnforcementAct of 1986
(Proposition65) requires the Governor of California to publish a list of
substances known to the State of California to cause cancer or repro-
ductive harm, and requires businesses to warn customers of potential
exposures to such substances. Users of this appliance are hereby
warned that when the range is engaged in the self-clean cycle, there
may be some low level exposure to some of the listed substances,
including Carbon Monoxide. Exposure to these substances can be
minimized by properly venting the range to the outdoors during the
self-clean cycle.
- SAVE THESE INSTRUCTIONS -
7
Page 8
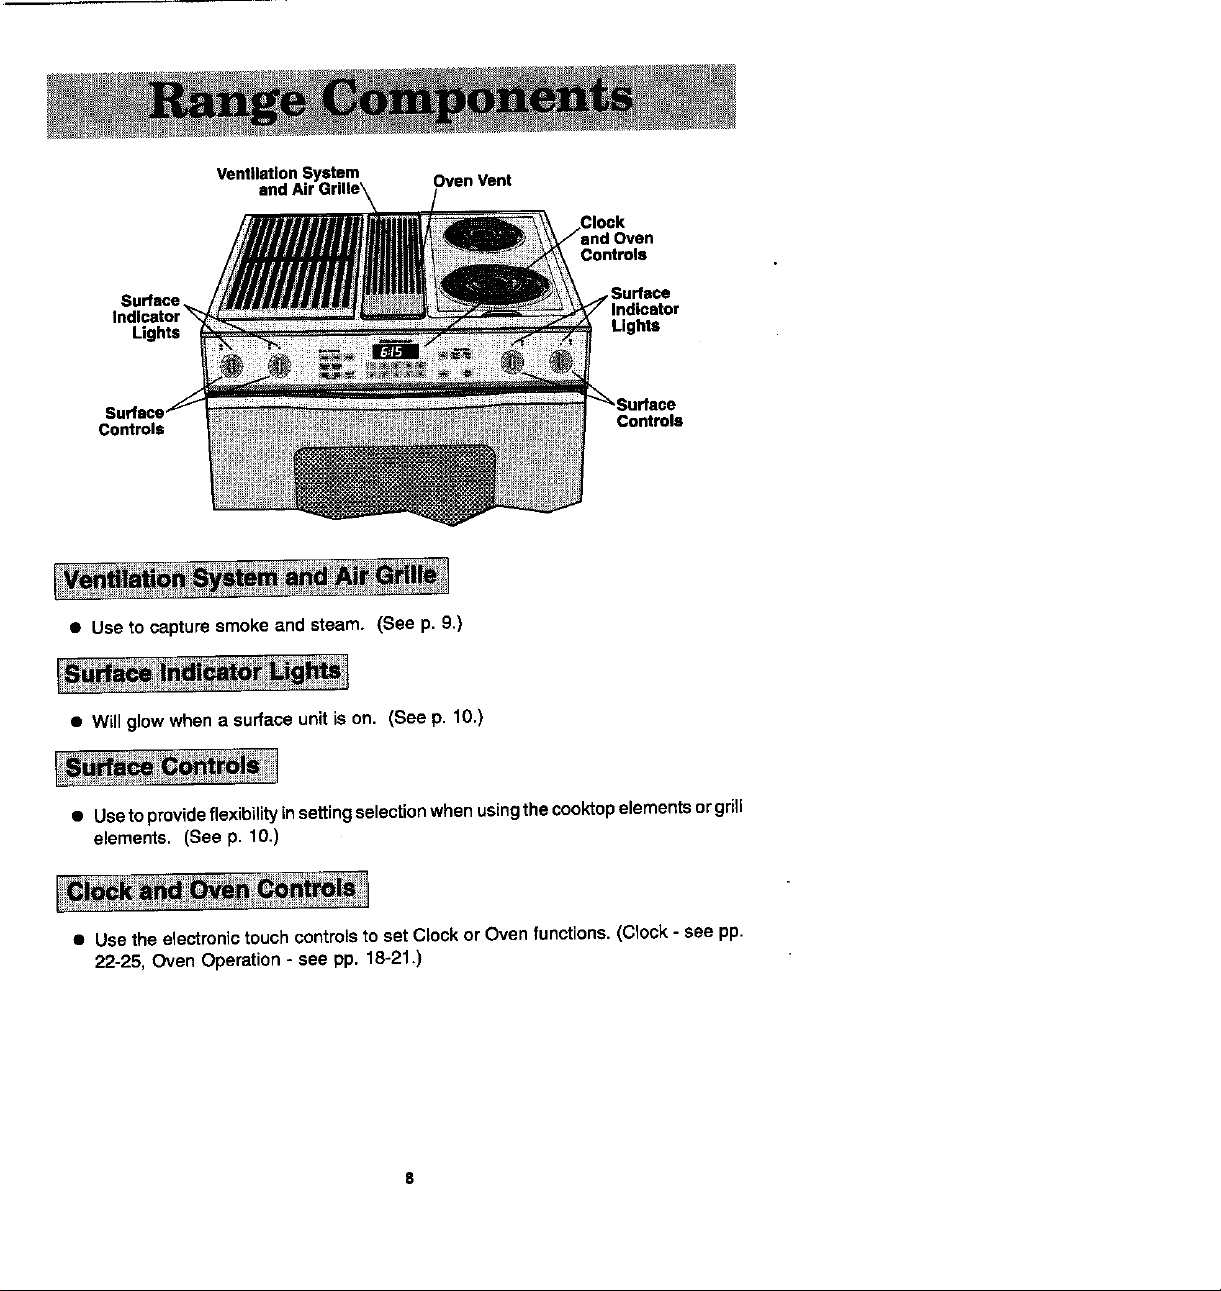
Oven Vent
Controls
Surface, Indicator
Lights Lights
Controls Controls
• Use to capture smoke and steam. (See p. 9.)
• Will glow when a surface unit is on. (See p. 10.)
• Use to provide flexibility in setting selection when using the cooktop elements or grill
elements. (See p. 10.)
• Use the electronic touch controls to set Clock or Oven functions. (Clock - see pp.
22-25, Oven Operation - see pp. 18-21.)
Page 9

The built-inventilationsystemremovescookingvapors,odorsandsmoke fromfoodsprepared
on the cooktop, gri}}and grill accessories. Regular use of this system wilt insure a more
comfortableandlesshumidl,_¢tchenwhichisfteeofheavy coakingodorsandfumesthatnormally
create afrequentneed for cleaningand redecorating, i
• Thedowndraftventilationsystemfeaturesatwospeedfan.
The fan positionsare: Hi, Lo, and OFF. To turn on the
ventilationsystem,touchthe Fan Pad. The fan wi({comeon
at the Hi speed. To set on Lo speed, touch the Fan Pad
(once from Hi settingor twice from the OFF position).
• A beep willsound every time the Fan Pad is touched.
• Toturn theventilationsystemOFF, touch theFan Pad (oncefrom Lo speedortwicefrom
Hispeed).
• The ventilationsystemwill operateautomatical/y on Hi speed when thegdll element is in
use. During grilling, the fan speed is automatically set for the Hi setting AND cannot be
changed to Lo speed.
• Use the HI fan speed for capturing steam. Use Lo fan speed for capturing smoke when
pan frying.
• The fan can beused toremovestrongodorsfrem the kitchenaswhenchoppingonionsnear
the fan.
• _,esidesusingthe ventilation systemto remove cookingvaporsandfumes, it canbeused
tocoolbaked piesorcakes, To coolan item, setiton the air gdlle and turn on the fan. The
airbeing pulledover the itemwillquicklycool it. Be carefulnot to coverthe oven vent or
the entireair gdne,
Air Grille
The air grilleliftsoff easily. Wipe clean orwash insinkwith mildhouseholddeten:jents.Itmay
be cleaned inthe dishwasher. Note:The ovenvent islocatedunderthe airgrille. Whenusing
orcleeningtheoven, hotandmoistairmaybenoticedinthisarea. 13ecarefulnottospillanything
intothisvent. Remove theair grillebefore self-creaningthe oven. (See p. 36.)
Filter
Turn offventilationsystembefore removing. The filterisapermanent
typoand shouldbe cleanedwhensoiled. Clean in sinkwith warm water
and liquid dishwashing detergent orindishwasher. Important: Filter
should aMays beplaced atan angle. As you face the frontofthe range,
the top ofthe filter shouldrest against the leftside of the vent opening
and the bottom of the filter should rest against the right side of the
ventilation chamber at the bottom. DO NOT OPERATE SYSTEM WITHOUT FILTER.
Ventilation Chamber
Thisarea, whichhousesthefilter,shouldbecleanedin the eventof spillsorwhenever it becomes
coatedwith afilmofgrease, It may be cleanedwithpapertower,dampcloth,orspongeend mild
householddetergent. 9
Page 10

• Sincethe controlsare a push-turntype,theymust bepusheddownbeforeturning.To set
(fromthe OFF position), push down on the controlknob and turn in either direction to
desired setting.
• Whenthecontrolisinanyposition,otherthanOFF, itmaybeturnedinanydirectionwithout
pushingdown.
• A green indicator lightwill glowwhen a surface heatingelement is ON. There are four
indicatorlights,one for each element.
1. 2. _. 4.
1. Left rear eJement(rear Energy-Saver or standard griIJ)
2. Leftfrontelement (frontEnergy-Saver)
3. Rightfront element (front Energy-Saver or standard grill)
4. Right rearelement (rear Energy-Saver)
NOTE: The "Energy-Saver"grillelement (right)is includedwithModel
SVE47600andmaybepurchasedasanoptionforothermodels.Itpermits
utilizingonlyhalfofthegrillarea,ifdesired,orusingdifferentsettingsfor the
frontand rear positionof the element. When usingthis element,both
cooktopcontrols,frontandrear,mustbe turnedon inordertousethefurl
grillarea.
NOTE SVE47E00Model: Onlytheleftrearor therightfrontcontrolsmust
beturnedontousethefull grill.
The size andtypeofcookwareand theamountandtype offoodbeingcookedwillinfluencethe
settingneeded for bestcookingresults. Electricalvoltage may alsovary,whichwillaffect the
neededcontrolsetting.The settingindicatedshouldserveas a guidewhileyoubecomefamiliar
withyour range.
Hi Afast heat to start cooking quickly,to bring liquids to a boil, to preheat oil for deep
fat hying. Use for most grilling.
7-10 (Medium High) For fast frying or browning foods, to maintain rapid boll of large
amounts of food, to maintain oil temperature for deep fat frying.
5-6 (Medium) For foods cooked in a double boiler, saut6ing, slow boil of large
amounts of food, and most frying.
3-4 (Medium Lo) To continue cooking foods started on higher settings.
Lo-2 Maintaining serving temperatures of foods, simmering foods, melting butter or
chocolate.
The controlsofferflexibilityinsettingselection. On settingsotherthanHi, you may adjustthe
controlaboveorbelowthenumberedsettingforbestresults.Thisappliestosettingswhenusing
cooktopcartridgesorwhenusingthegrillorany ofthegrillaccessories.Suggested settingsare
providedas generalguidelines.
10
Page 11
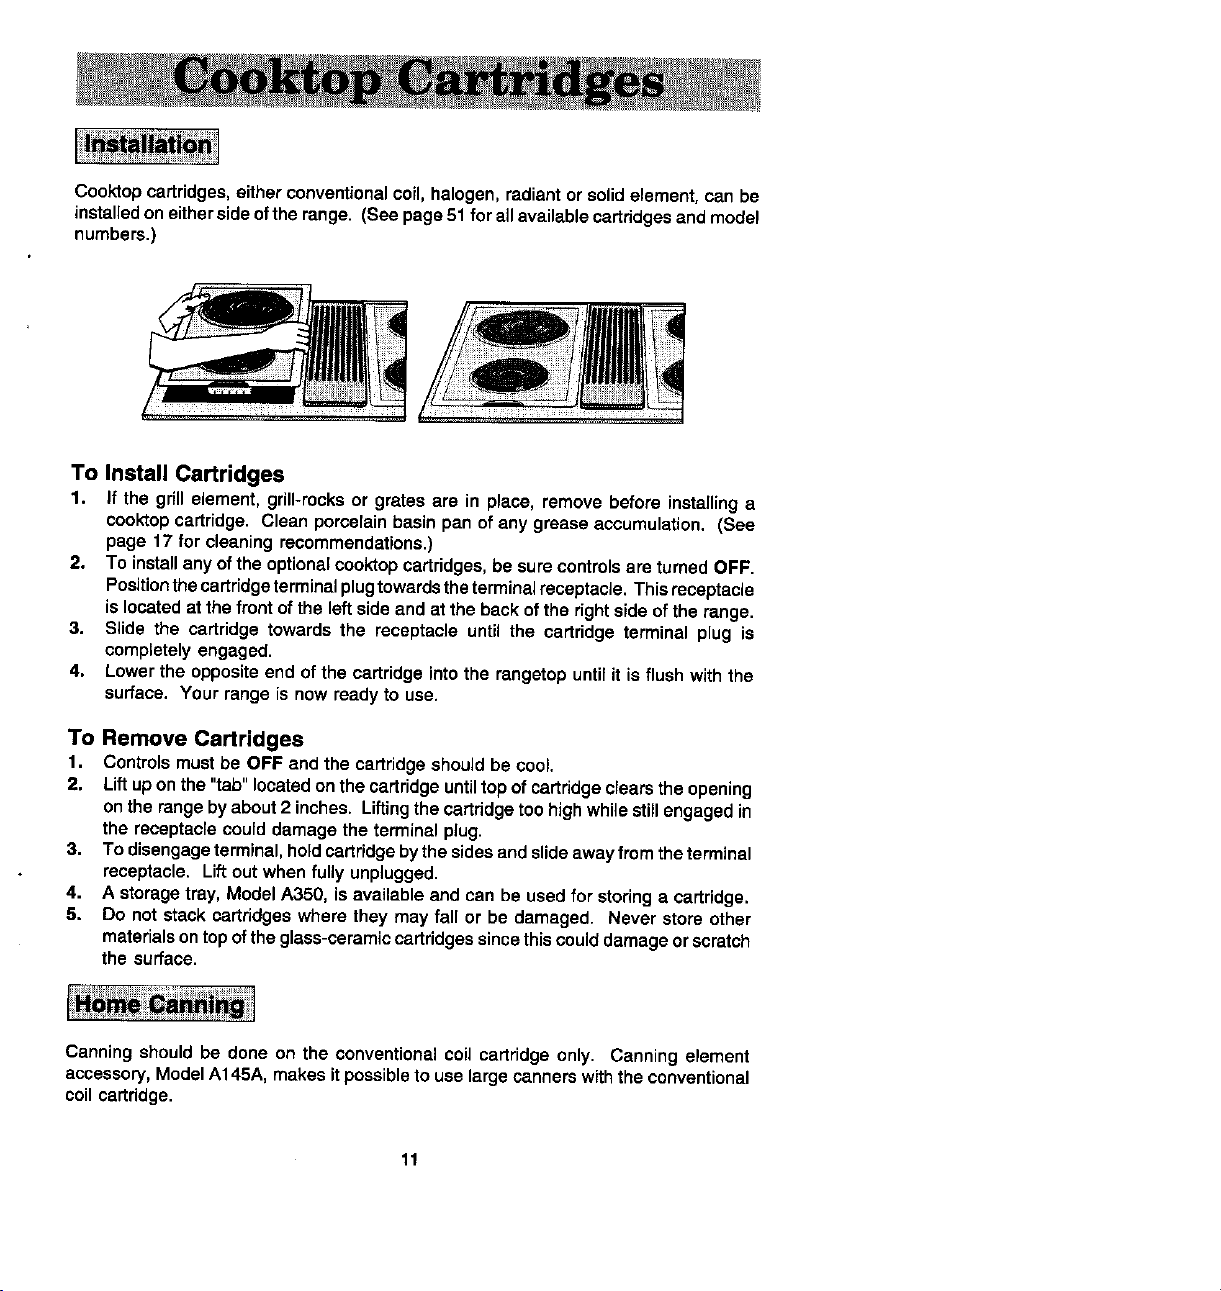
Cooktopcartridges,eitherconventionalcoil, halogen,radiantorsolidelement,can be
installedoneithersideoftherange. (See page51 for allavailablecartridgesandmodel
numbers.)
To Install Cartridges
1. If the grill element,grin-rocksor gratesare in place,remove before installinga
cooktopcartridge. Clean pomelainbasinpanof any greaseaccumulation.(See
page 17 for cleaningrecommendations.)
2. To installanyofthe optionalcooktopcartridges,be surecontrolsareturned OFF.
Positionthe cartridgeterminalplugtowardstheterminalreceptacle.Thisreceptacle
islocatedatthefrontof theleft sideand atthe backofthe rightsideof the range.
3. Slide the cartridgetowards the receptacleuntil the cartridge terminal plug is
completelyengaged.
4. Lowertheoppositeendof the cartridgeintothe rangetopuntilitis flushwiththe
surface. Yourrangeis now readytouse.
To Remove Cartridges
1. Controls must be OFF and the cartridgeshouldbecool.
2. Liftuponthe "tab"locatedonthecartridgeuntiltopof cartridgeclearsthe opening
ontherangebyabout2 inches. Liftingthecartridgetoohighwhilestillengagedin
the receptaclecoulddamage the terminalplug.
3. Todisengageterminal,holdcartridgebythesidesandslideawayfromthe terminal
receptacle. Liftoutwhenfully unplugged.
4. A storagetray,ModelA350, is availableand can be usedfor storinga cartridge.
5. Do notstack cartridgeswhere they may fal[ or be damaged. Never store other
materialsontopoftheglass-ceramiccartridgessincethiscoulddamageorscratch
the surface.
Canningshouldbe done on the conventionalcoil cartridgeonly. Canning element
accessory,ModelA145A,makesitpossibleto use largecannerswiththeconventional
coilcartridge.
11
Page 12
• Select heavy gauge cook,pots. Usuallyheavygauge cookpotswill notchange
shape when heated.
• Usecookpotswith flat, smoothbottoms. Thetwowaystodetermineifcookpots
have a flat, smoothbottomarc the rulertest and the cookingtest.
Ruler Test
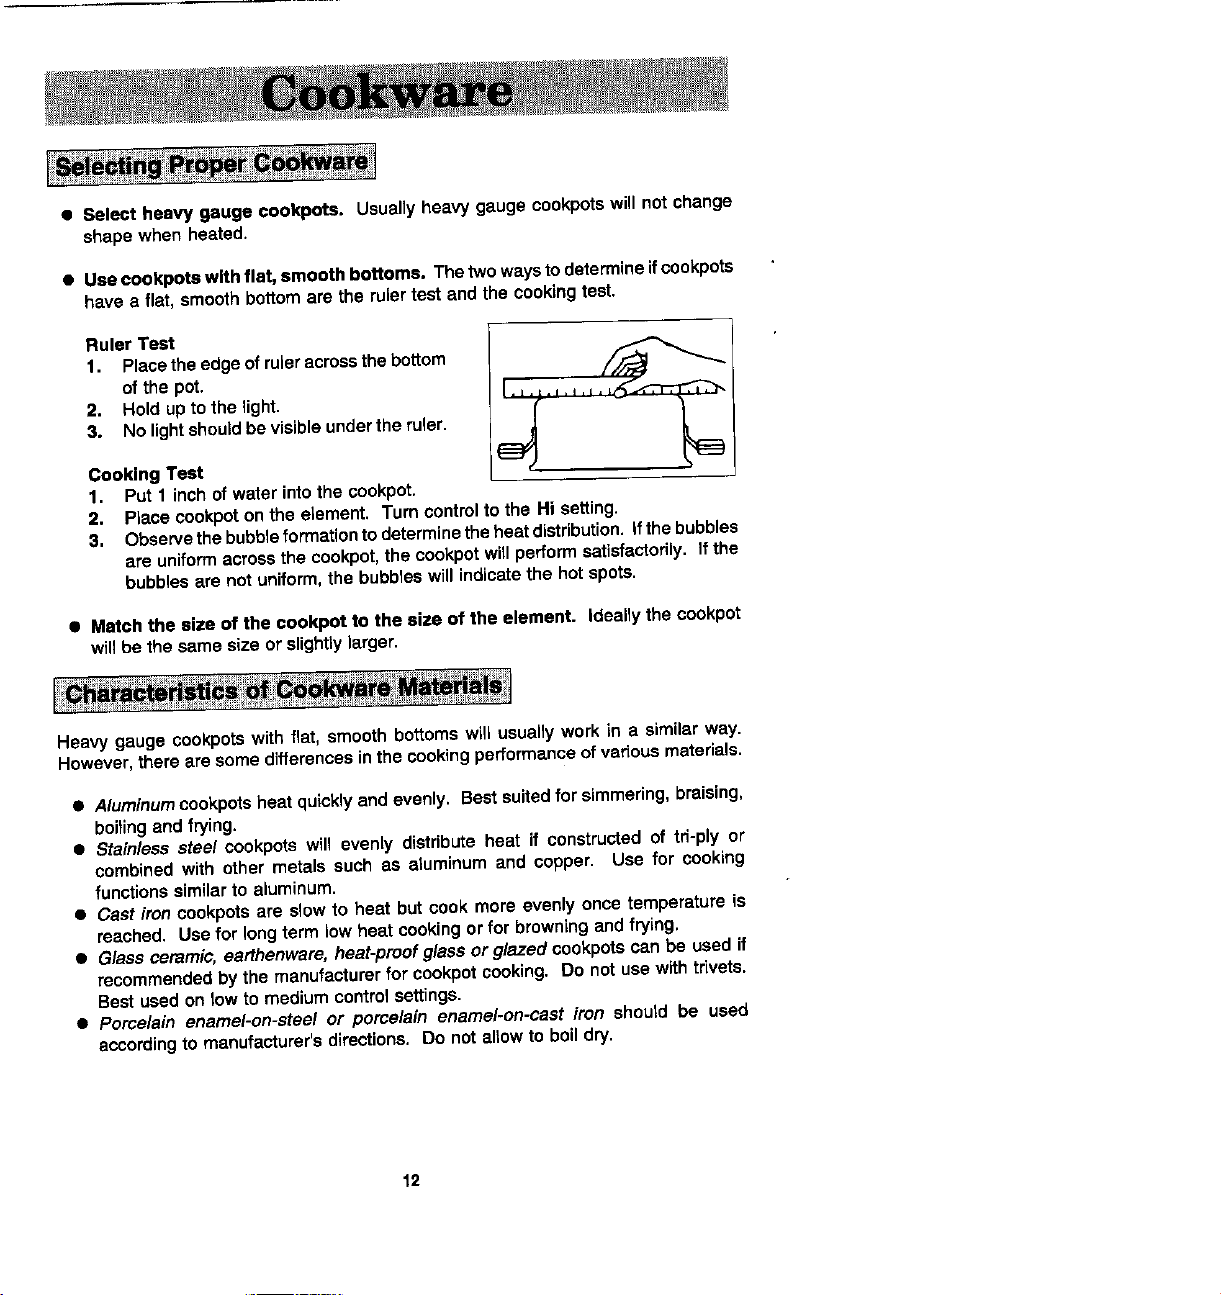
1. Placetheedgeof ruleracross the bottom /f,,-_ _
of the pot.
2. Hold uptothe light.
3. Nolightshouldbevisibleundertheruler.
Cooking Test
1. Put 1 inchof water intothe cookpot.
2. Place cookpotonthe element. "rumcontrolto the Hi setting.
3. Observethe bubbleformationto determinethe heatdistribution,if thebubbles
are uniformacrossthecookpot,the cookpotwillperformsatisfactorily.If the
bubblesare notuniform,the bubbleswillindicatethe hotspots.
• Match the size of the cookpot to the size of the element, ideally the cookpot
willbe thesame size or slightlylarger.
Heavy gauge cookpotswith fiat, smooth bottomswill usuallywork in a similar way.
However,therearesomedifferencesinthe cookingperformanceofvariousmaterials.
• Aluminum cookpotsheat quicklyand evenly. Bestsuitedforsimmering,braising,
boilingand frying.
• Stainless steel cookpots w_llevenly distributeheat if constructed of td-ply or
combinedwith other metals such as aluminumand copper. Use for cooking
functionssimilarto aluminum.
• Cast iron cookpotsare slowto heat but cook moreevenly once temperatureis
reached. Usefor longtermlow heat cookingorfor browningandfrying.
• Glassceramic, earthenware, heat-proof glass or glazed cookpotscan be used if
recommendedby the manufacturerfor cookpotcooking. Do not usewithtrivets.
Bestusedon low tomediumcontrolsettings.
• Porcelain enamel-on-steel or porcelain enamel-on-cast iron should be used
accordingto manufacturer'sdirections. Do not allowto boildry.
12
Page 13

The grillaccessoryconsistsof twoblackgrillgrates,a grillelement,andtwogrill-rocks.
To Install Grill
1. Before installinggrillcomponents,be certaincontrolsare OFF.
2. Placethetwo gritl-rocksintoanemptybasinpanwiththeirhandlesrunningparallel
tothefrontoftherange. These grill-rocksmustbeusedsincethey supportthegrill
element.
3. Positionthegrill elementwiththe terminalplugtowardsthe terminalreceptacle.
This receptacleis locatedat thefrontofthe leftsideand atthebackoftherightside
ofthe range. Slidethe elementtowardsthe receptacleuntilthe terminalplug is
completelyengaged. The grillelementshouldnowrestonthehandlesof thegrill-
rocks.
4. Placethe blackgrillgrateson the top ofthe rengetop.
To Remove Grill
1. Removegrillcomponentsoncethey arecool. Be surecontrolsare OFF.
2. To removegrillelement,pull awayfrom receptacleuntilit isunplugged. (Note;
Liftingthe element more than 2 inchesabove the rangetopsurface while it is
engaged inthe receptaclecoulddamagethe terminalplug.)
3. A storagetray, ModelA350, isavailableforpurchaseand can be usedfor storing
the grillassembly.
Installing Other Grill Accessories
1. Removethe two blackgrillgratesfrom the grill. Now you are readyto use the
optionalgrillaccessories.
2. RevLewtheinstructionsfor installingandusingtheaccessoriesthat arepackaged
withthe accessory.
Note: Accessoryoptionsare shownon page 50.
13
Page 14

• Beforethefirstuse,wash your new grill gratesin hotsoapywater, rinseand dry.
Then "season"the surface by wiping on a thin coating of cookingoil. Remove
excessoilby wipingagain with anotherpapertowel. This procedureshouldbe
repeated when either: a) cleaning in the dishwasher since the detergent may
removeseasoning,orb) anytimeasugar-basedmarinade(for example,barbecue
sauce) is goingtobe used.
• Preheatthe grill on HI for 5 minutes. Preheating improvesthe flavor and
appearanceof meats and quicklysears the meat to help retainthe juices. The
heatingelementshouldglow a brightcherryred.
• Usenonmetallicspatulasorutensi/stopreventdamagingtheExcalibur®nonst/ck
grill grate finish.
• Excessive amounts of fat should be trimmed from meats. Onlya normalamount
is necessaryto producethe smoke needed for that smoked, "outdoor"flavor.
Excessivefat cancreate cleaningand flare-upproblems.
• Allowing excessive amounts of grease or drippings to constantly flame voids the
warrantyon the grill grates. Excessiveflare-upsindicatethateitherthegrillinterior
needsto be cleaned or that excessiveamountsoffat are in the meat or the meat
was notproperlytrimmed.
• Greasedrippingswilloccasionallyigniteto produceharmlesspuffsof flame for a
secondortwo. This isa normal partofthe cookingprocess.
• NEVER LEAVE GRILL UNATTENDED DURING GRILL OPERATION.
Should excess grease cause sustained flare-up
1. Turn on FAN manually.
2. Immediatelyturngrillcontrol(s)to OFF.
3. Removemeat from gdll.
IMPORTANT
• Donot use aluminumfoilinsidethe gri, area.
• Donot use charcoalorwood chipsinthe grillarea.
• Donotallow gdll-reckstobecome overloadedwithgrease. Clean frequently.
• Donotcovergratescompletelywithmeat. Leave airspacebetweeneachsteak,
etc. to allow proper ventilationas well as preventflare-ups.
14
Page 15
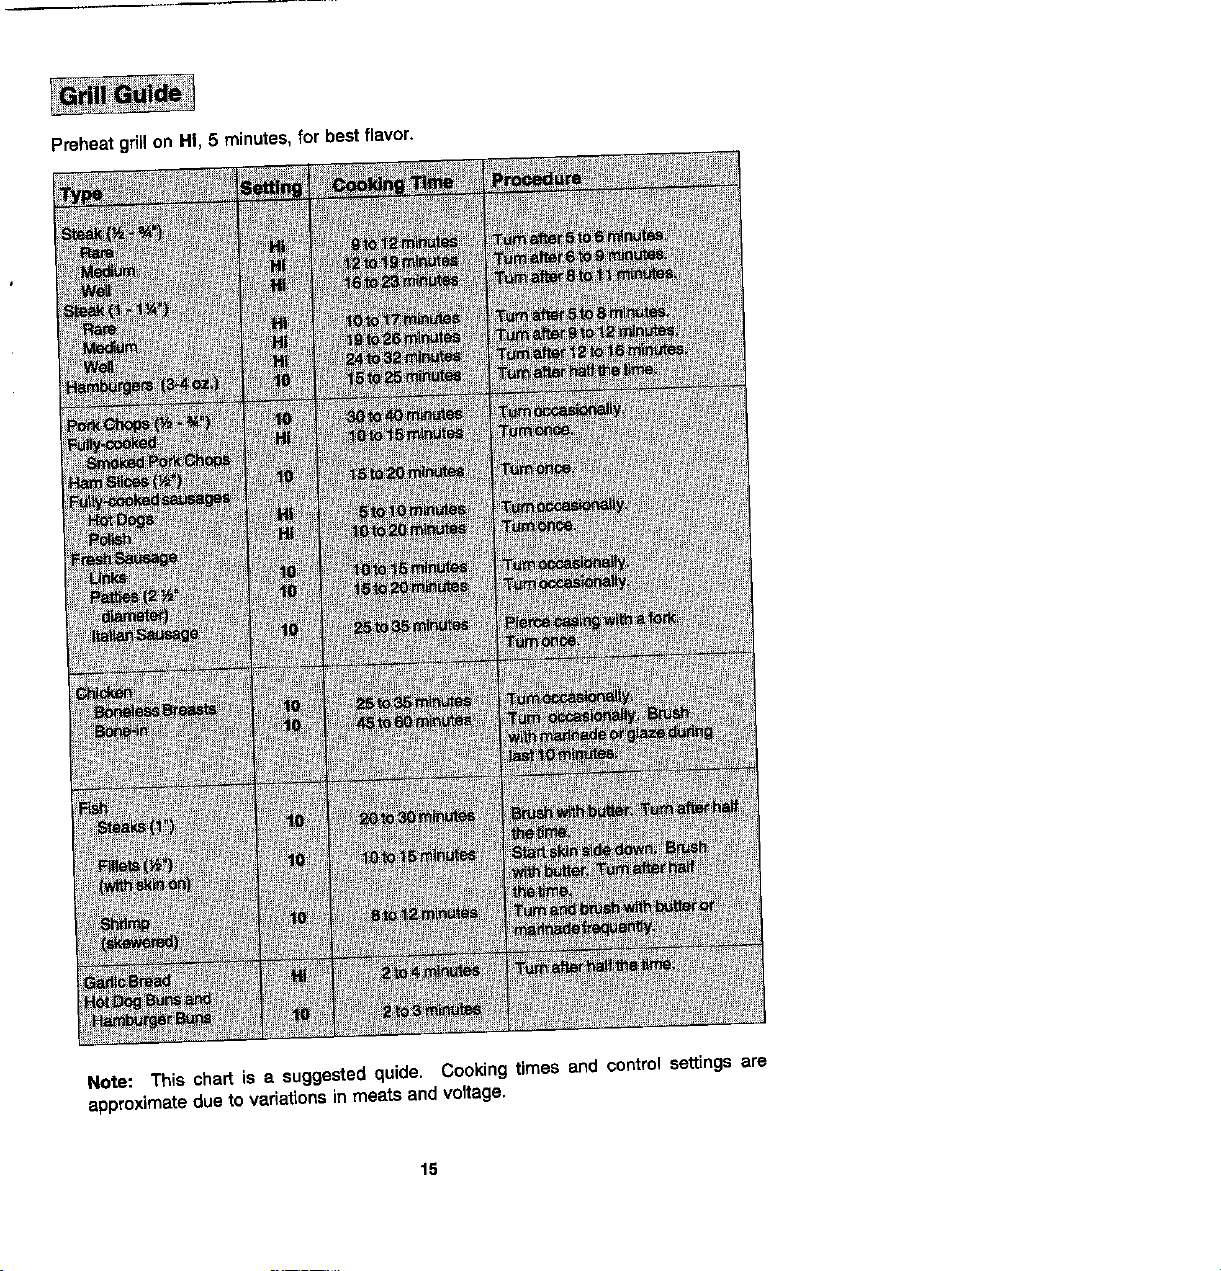
15
Page 16
WithyourJenn-Airgrilland accessories,literallyanyfoodyou've considered"atitsbest" when
preparedoutdoorscannowbeprepared indoorswithlessfussand greatflavor. The following
suggestionsare goodrulesto follow and willincreaseyourenjoymentofthe equipment.
• Be suretofollow directions onpage 14 for usingthe gdti.
• Suggestedcookingtimesandcontrolsettingsareapproximateduetovariationsinmeate.
Experiencewillquickly indicatecooking times as well as which settingswork best.
• Usethe Energy-Saver grillelementforgrillingsmall amountsoffoodon halfofthe gdllor
forkeepingcookedfoodswarm orpreparingfoodsrequiringdifferentcontrolsettings.Note
SVE47500 Owners: The Energy-Saver grillelement can be purchasedas an optional
accessory. (See p. 50.)
• Forbestresults, buytop grade meat. Meat thatis at least3/_inchthickwill grill better than
thinnercuts.
• Score fat on edges of steak, but do not cutinto meat, to prevent cudingwhile cooking.
• Forthe attractive"branded"look on steaks, be sure grillispreheated. Allow oneside of
meattocooktodesireddoneness,oruntiljuicesappearonthetopsurface,beforeturning.
Tum steaksand hamburgers just once. Manipulatingfood_?,_useslossofjuices.
• When bastingmeatsorapplyingsaucestofoods, remember that excossiveamountswind
up insideyourgrilland do not improve thefood flavor. Apply sauces during the last t 5 to
20 minutesof cookingtime unlessrecipespecifiesotherwise.Sugar-based sauces,when
used excessively,wilJcarmelize on the grill-rocksandcreate extra cleaning.
• There are many meatmarinadeswhichwillhelptenderize less expensive cutsof meatfor
cookingon the grill.
• Certain foods,such as poultryand non-oilyfish, may needsome extra fat, Brushwithoil
or meltedbutter occasionallywhile grilling.
• Usetongswithlonghandlesorspatulas fortuming meats. Do notuseforksas these pierce
the meat, allowingjuicesto be lost.
• To help retainmeat juices, saltafter cookingiscompleted.
• Shouldgrilledfoods be preparad and ready before you'reready to serve, turncontrol toa
lowsettingand covermeatwithasingleshset ofaiuminumfoil. Foodwillcontinuetocook.
Be sure the grilliscool and controlsare OFF.
Grill Grates
These are made fromcast aluminumand are coated withthe Excelibur_ nonstickfinish.
• Afterthe grillgrateshavecooled, wipeoffgrateswitha papertowel Wash coolgrates(DO
NOT IMMERSEHOTGRILL GRATES INWATER) withsoapordetergentinhotwaterinthe
sinkorwashtheminthedishwasher. Beeureto removeall foed residuebeforecookingon
the grillgratesagain.
• Removestubbomspotswithaplasticmeshpufforped. Forbestresults, useonlythose
cleaning productswhich statethey are recommended for use when cleaning nonstick
agrraces.
• It grateswere washed inthe dishwasher, seasonwith oilpriorto grilling. (See p. 14.)
• Donotusernetalbmshesorabrasivescouringpadsorotherscrubbersintendedtoclean
outdoor charcoal gril/s. These willremovethefinishaswell asscratchthe grates. Do not
clean in self-cleaning oven or use oven cleaners on the grates.
f6
Page 17

Grill Element
Follow instructions on page 13forremoving the griflelement. The grillelementshouid never
be immersed in water. Mostsoil willburn offduringuse, The terminal blockmay be cleaned
with a soapy sponge. Dry thoroughly before reinserting in the range.
Grill-Rocks
These are made from cast-ironwhich have been coated with porcelain enamel.
• The grill-rocksshould be cleaned frequently or after any excessive build-up of grease.
To clean tight soil, use detergent and a plasticscrubber, such as Tufty, or wash in the
dishwasherifburnedonresidueisfirstremoved. For heavysoil, soak inhot,soapywater
towhich acleanser, such as householdammonia, has beenadded. Stubborn spots on
grill-rocks,such as burned on residue from sauces, can be scrubbed with a stiffbristle
brush.
• An ovencleaner, suchas Easy-Off,canbeusedforburnedonsoil. Followmanufacturer's
directions;spray on cleaner and letsoak overnight. Do not clean grill-rocks in the self-
cleaning oven.
Porcelain Basin Pan
This area located under the grill-recks and/or cartridges. Clean after each use ofthe grill.
• To remove light soil,clean with soapy water or spraywith cleansers such as Fantastik
or 409. For easier cleanup: a) spray with a household cleanser; b) cover with paper
towels;c) add small amount of hot water to keep the paper towels moist; d)cover and
wait 15 mlnutas; and e) wipe clean.
• To remove moderate soil, scrubwith Comet, Son Ami, a soft scrub cleanser or plastic
scrubber.
• To remove stubborn soil, spray with an oven cleaner such as Easy-Off; let soak
overnight, wipe clean, rinse and dry.
Note: Clean the grease drain after each use. To clean: Pour about 1/3 cup of very hot tap
watermixed with 1 teaspoon dishdetergent downthe drain. In the event the drainisclogged,
due to large food particles being trapped, use the nylon stringthat was packaged with your
range. To usethe nylonstring,simplyinsertone end intothe drainopening inthe basin pan.
Feedthe nylonstringdown untilitisvisibleundertherange. Now pulluponthe end extending
outfromthe top whileholdingapapertowel around thestring,toclean thestringas itisbeing
pulled. Thisshould freeanytrappad particlesoffood. Pouranother 1/3cupofveryhotwater
mixed withdish detergent to assure the drain is opened and clear.
Grease Containers
The containers are locatedbehindthebottomaccess panel, underneaththe range. (See page
44 foropening accesspanel.) There is onecontainer forthe leftsideandone for therightside.
They collect grease and other liquidscreated whitegri((ingorusing some of the accassor[es.
Check each time after grilling and empty when grease is noticeable. To remove, simplygrasp
• Check thecontainerperiodicallytoprevent grease fromspilling
over. If this should happen, the grease will flow over the
containerandontothefloor. Thecontainerandscrew-onhandle
can be washed in hot,soapy water or inthe dishwasher. The
container can be replaced with any heat temperedjar, suchas
a canning jar, which has a standard screw neck.
thehandle, andpullfromthebracketholdingthecontainer.__
17
Page 18

The control panel is designed for ease in programming, The Display Window features
Indicator Words which will flash to prompt you for the next step.
To program
1. Touch the function pad to give command desired.
2. Touch the appropriate number pads to enter time or temperature.
Note: Four to fifteen seconds after entering the number, the time or temperature
willautomatically be entered. If more than fifteen seconds elapse between touching
a function pad and touching a number pad, the control is not set and Display will
return to previous Display. =,;*_.==NN-_tR
O_erl cor_tto_ I_c_en 1liner
Function Pads
Use forconventionalbakingorroasting.
Usefortop browningorovenbroiling.
Usetosetself-cleaningprocess.
Useforconvectroasting.(ModelSVE47600 only)
Use forconvect baking. (Model SVE47600 only)
Use for clockcontrolledcookingand cleaningwhen delayed startisdesired.
(Forlock function seepage 43.)
Usefor clockcontrolledcooking.
(Forlock function see page43.)
Cancelsall programmingexceptTimer.
Usetoturn the Ventilation Systemon or off, (See p.9.
Useto signal expirationof a time period upto 11 hoursand 55minutes.
Useto signal expiration ofa time period upto 11 hours and55 minutes.
Use to settime of day.
Usetoturn oven lighton andoff,
18
Page 19

Number Pads
Useto set time or temperature.
Oven Light Pad (Control Panel)
The ovenlightautomaticallycomesonwheneverthe ovendoorisopened. When door
is closed,touchthe Oven Light Pad to turnoven lightonor off.
Display Window
Shows time of day, timer, and ovenfunctions.
Display Numbers:
• Showtimeof day.
• Countdownoftime remainingwhen usingtimefunctions.
• Showtemperatureof oven as it risesto reach programmedtemperatureand the
settemperatureonceit isreached.
• Recallprogrammedtemperatureor time whencommanded.
• RoundingofDisplayNumbers:Temperaturerangeis100° to550°Fandcanbeset
in5°increments.When settingtemperature,thecontrolwillroundittothenearest
10°. Forexample,if237° isentered,thecontrolwillroundthetemperatureto 240°.
Prompts:
• Serve asaremindertoshutovendoor,if itisopen,forself-cleaningoperationwhen
theword, door, isdisplayed.
• "Err" willappear inthe Displaywhen an impropertemperatureortime has been
entered. "Err"willflashanda beepwillbe heardthreetimes. Then,the Displaywill
returnto the previousDisplaybeforethe errorwas entered.
Indicator Words:
• Flashto promptnextstep.
• Indicatestatusof programmedfunction.
• Show programmedfunctionwhen recalled.
Chimes vs. Beeps
• A chimesoundis usedtodesignatethe end of a timingor cookingoperation.
• A beepsoundis usedtodesignatean incorrectentry,dooris openwhensetfor a
self-clean,and a fault code.
NOTE: To changethe ovento a 24 hourclockor Celsius(C) degrees,contactyour
authorized Jenn-Air service contractoror installer.
19
Page 20

To set oven on Bake or Convect Bake or Convect Roast
1, Place oven racks on proper rack positions, (Bee p. 21,)
2, Touch Bake Pad or Convect Bake Pad or Convect Roast Pad,
Indicator Words BAKE or CONV BAKE or CONV ROAST will flash and three
dashes will be shown.
Note: If more than fifteen seconds elapse between touching a pad and touching a
number pad, Display will return to previous Display.
3. Touch the appropriate number pads for desired oven tempereture.
Allowable temperature range is 100° to 550°F. After four seconds the even will begin
to preheat. The Indicator Words ON, PREHEAT, and either BAKE or CONV BAKE
or CONV ROAST will appear in the Display. The temperature shown will be 100°
or the oven temperature whichever Is higher.
Example: If at 10 o'clock you set the oven for 350 ° for convect baking, after four
seconds the OJspJaywill show:
I,o:oo
During the preheat, the Display will show a rise in 5° increments until programmed
temperature is reached. When the oven is preheated, the oven will chime, the ON
and PREHEAT Indicator Words will go off, and programmed oven temperature will
be displayed.
Note: Oven will preheat for approximately 7 to 11 minutes.
Important: Whenever ON appears in the Display, the oven Is heating.
To recall temperature set during preheat: Touch the appropriate Bake or
Convect Bake Pad or Convect Roast Pad. Temperature will be bdefly displayed,
then will automatically return to on-goiog program.
To change temperature set: Touch appropriate Bake Pad or Convect Bake Pad
or Convect Roast Pad and the appropriate number pads for the new desired
temperature.
Note: If you are lowering the temperature below the current oven temperature, the
word PREHEAT and ON will appear briefly inthe Display and the preheat chime will
sound. Then, the Display will show programmed temperature and indicator word
BAKE or CONV BAKE or CONV ROAST only.
4. Touch Cancel Off Pad to turn oven off at end of baking. The oven will continue
operating until the Cancel Off Pad is touched.
2o
Page 21

The rack positionsnoted aregenerallyrecommendedforthe bestbrowningresultsand
mostefficientcookingtimes. For manyfooditems, excellentresultscan be achieved
whenusingoneof several differentreckpositions. Refertobakingandroastingsections
for recommendationsfor specificfoods.
Different Racks
One flat reck and one offset reckwas packaged withyour oven. The use of the offset
rack is denoted in the list below and the charts as an "o" after the rack number. Note
SVE47600 Owners: An additional flat rack was packaged inyour oven.
i
4 (flat rack)
• 30 (offset rack)
1 (flat rack)
Rack Uses
Rack Position #40 (offset rack on #4):
Most broiling.
Rack Position #3:
Mostbaked goodsoncookiesheets,cakes (sheetand layer).
Rack Position #30 (offset rack on #3):
Most baked goodson cookiesheets,frozenconveniencefoods, fresh fruit pie,
cream pie, layer cakes, main dishsouffle.
Rack Position #2:
Roastingsmallcuts ofmeat,cakes(tube, bundt orlayer),frozen fruitpie,pieshell,
large casseroles.
Rack Position #20 (offset rack on #2):
Roastingsmallcutsof meat,loaves ofbread, angelfoodcake.
Rack Position #1:
Large cutsofmeatand largepoultry,angelfood cake,loavesof bread,custardpie,
dessert souffle.
Multiple Rack Cooking:
Two racks,use#2o and #4. Three racks,use#t,#3o, and#4.
21
Page 22

When electrical power is supplied or after power interruption, the last clock time
displayed before power was interrupted will flash. Time will advance and continue to
flash until clock is reset.
To set Time of Day
1. Touch Clock Pad,
Indicator word TIME will flash and time digits willappear inthe Display. (If morethan
fifteen seconds elapse between touching Clock Pad and touching a number pad,
the Clock Pad must be touched again in order to set clock.)
2. Touch the appropriate number pads until correct time of day appears in Display,
Note: Four to fifteen seconds after touching the number pads, the time of day will
automaticallv be entered.
IMPORTANT
• To recall time of day when another time function is showing: Touch Clock Pad,
• Clock time cannot be changed when oven has been programmed for Timed Bake,
Timed Convect Bake, Timed Convect Roast or Self-clean. Cancel program before
reprogramming clock.
22
Page 23

Important: ThisintervalTimercanbe usedto remindyouwhenaperiod,upto 11hours
end 55 minutes,expires. It can be used independentlyofany other ovenactivityand
canbesetwhileanotherovenfunctionisoperating. TheTimerdoesnotcontrolthe oven.
To set Timer
1. Toucha Timer Pad.
The indicatorWordTimer end either 1 or 2 flashes and "0Hr:00"appears inthe
Display.
2. Touchtheappropriatenumberpads untilthe desirednumberof minutesor hours
and minutesappearin the Display.
Note: If morethanfifteen secondselapsebetweentouchinga Timer Pad and a
numberpad, the Timer Pad must be touchedagain.
Example: To set Timer One for 5 minutes,touch the Timer One Pad and the
number5 pad. Afterfifteen seconds,the displaywillshow:
TIMBq
:135 [
Example: To setTimerTwo for1 hourand30 minutes,touchtheTimer Two Pad
andthe numberst, 3, 0 pads. After fifteenseconds,the Display willshow:
I !,3o I
Countdownwillstart afterfifteenseconds. Countdownwillhavedisplayprecedence
overother time functions. If both timers are set, the timer with the leastamount of
time remaining will have display precedence.
At the end of timeset, the Timer will chime four times and "End" will appear in the
Oisplay. Iftimer is notcancelled (see below),"End"willremain inthe Displayand
there will be two chimes everythirty seconds for five minutes.
To cancel Timer
1. Touchand hold theTimer Pad for fourseconds.
OR
2. A. Touchthe Timer Pad.
B. Touch"0" numberpad. Fifteensecondslaterthe Timerwill be cancelled.
NOTE: TouchingCancel Off Pad to cancel chimeswill cancelALLselectedoven
programming.
23
Page 24

Lsteps 5 & 6 i you want baking to start immediately.
To set oven to start immediately and shut off automatically
1, Touch Bake Pad or Convect Bake Pad or Convect Roast Pad.
IndicatorWords BAKE orCONV BAKE orCONV ROAST willflashand three dashes
will be shown.
2. Touch the appropriate number pads for desired oven temperature.
After four seconds the oven will begin to preheat. The Indicator Words ON,
PREHEAT, andBAKE or CONV BAKE orCONV ROAST will appear inthe Display.
The temperature shown will be 100 ° or the temperature of the oven, whichever is
higher. Example: If at 10 o'clock you set the oven for3500 for convection baking,
the Display will show:
1o:oo
During the preheat, the Display will show a rise in 50 increments until programmed
temperature is reached. When the oven is preheated, the oven will beep, the ON
and PREHEAT Indicator Words will go off, and programmed oven temperature will
be displayed. Important: Whenever ON appears in the Display, the oven is heating.
3. Touch Cook Time Pad.
Indicator Words COOK TIME will flash and Display will show "0 HR:00".
4. Touch the appropriate number pads to enter cooking hours in five minute
increments. Hours are to left of colon and minutes to right of colon. (Allowable range
is 5 minutes to 11 hours and 55 minutes.) Example: If cooking time selected for
the oven is 2 hours and 30 minutes, the Display will show:
After fifteen seconds, the time of day returns to the Display.
Important: Oven will preheat for approximately 7 to 11 minutes. At end of
programmed Cook Time, oven will shut off automatically; retained heat will continue
tocook food. Clock controlled cooking is not recommended for baked items that
require a preheated oven, such as cakes, cookies, pies, breads. For these foods,
place food in preheated oven, then use Timer to signal end of baking time.
At the end of programmed Cook Time, the oven will shut off automatically and a
"chime" will be heard four times and "End" will appear in the Display. If oven is not
cancelled, "End" will remain in the Display and there will be a chime every minute
for one hour.
24
Page 25

To set oven to start at future time and shut off automatically
1-4, Follow preceding Steps 1-4 on page 24.
5. Touch Stop Time Pad,
Indicator Words STOP and TIME will flash. Display wil} show the calculated
stop time based on current time of day and cook time.
5. Touch the approprJate number pads to enter desired stop time.
A stop time can only be accepted for later in the day. Note: Since food continues
to cook if left in the oven, it is suggested that the clock controls be used primarily
to start the oven when no one is inthe kitchen. Provisions should be made to have
the food removed as soon as the chime has sounded,
Example: If at 10 o'clock you set the oven for 350 ° convection baking and 2 hours
and 30 minutes cooking time, the calculated stop time would be "12:30". The
Display would show:
12:90 ¢oo°
_TJE
If you want the stop time to be 1 o'clock, touch the number pads "I ,0,0". Fifteen
seconds later, the Display will briefly show the start time:
10:90 gso°1
After four seconds, the Display will return to current time of day, thus showing:
1!o:0£ °
Atthe end of the delayed period, the DELAY Indicator Word will go off and the oven
will begin to heat. 100° will be shown. As the oven heats, the Display will show
a rise in increments of 5° until programmed temperature Is reached.
At the end of programmed Cook Time, the oven will shut off automatically and a
"chime" will be heard four times and "End" will appear in the Display. If oven is
not cancelled, "End" will remain in the Display and there will be one chime every
minute for one hour.
IMPORTANT
• To recall time function programmed: Touch the appropriate time pad.
• To canceltimed function only: HoldCookTime Padfor four seconds. This will only
cancel cook time and stop time, not programmed bake mode.
• (f more than fifteen seconds elapse between touching a function pad and touching
appropriate number pads, the oven is n__tset and Display will return to previous
Display.
25
Page 26

J, ,iL J
• Whencookingfoods for the firsttime in your new oven,userecipe cooking times
and temperaturesas a guide.
• Use tested recipesfrom reliablesources.
• Preheatthe ovenonlywhen necessary. For bakedfoodsthatrise andfor richer
browning,a preheatedoven isbetter. Casserolescan be startedina cold oven.
Preheatingtakesfrom7to11 minutes;placefoodinovenafterPREHEAT Indicator
Wordcyclesoff.
• Arrangeovenracksbeforeturningonoven. Followsuggestedrackpositionson
page 21 and invariousbaking charts.
• AllowaboutItol½ inchesofspace betweenthe ovensidewallsandpans toallow
properair circulation.
• Whenbakingfoodsin morethan one pan,placethemon oppositecornersof the
rack. Staggerpans when baking on two racksso that one pan does not shield
anotherunless shieldingis intended.(Seeabove left.)
• To conserveenergy,avoidfrequentor prolongeddoor openings. At the end of
cooking,turnoven offbeforeremovingfood.
• Alwaystestfor aloneness(fingertip,toothpick,sidespullingawayfrompan). Donot
relyon timeor brownnessas only indicators.
• Use good quality baking pans and the size recommended in the recipe.
• Dull,dark,enameledor glasspanswillgenerally produceabrown,crisp crust. Shiny
metal pans produce a light, golden crust.
• Frozen pies in shiny aluminum pans should be baked on a cookie sheet on rack 2
or be removed to a dull or glass pan.
• Ifedgeof piecrustbrownstooquickly,fold astrip of foil around rimofcrust,covering
edge. (See above right.)
26
Page 27

27
Page 28

_ _ _ie_ i ..... I,,_
_i_iiiiiiiiiiiiiil i;:__._ i
• Use convection baking for breads, cakes, cookies and pies.
• As a general rule, when using recipes or prepared mixes developed for a
conventionai bake oven, set the oven temperature 25°F lower than the recipe
recommended temperature. Times will be similar to or a few minutes less than
recipe recommended times. The chart on page27 compares times and temperatures
of many baked foods. Use this as a reference.
• For better browning, place cookie sheets and baking pans lengthwise, side to side
on the rack.
• Cookie sheets should be without sides and made of shiny aluminum. The best size
to use for cookie sheets is 16"x 12" or sma!fer.
28
Page 29

For best results, bake foods on one rack at a time as described inthis manual However,
very good results can be obtained when baking quantities of foods on multiple racks.
Quantity cooking provides both time and energy savings,
Convect Bake is suggested for most multiple rack cooking, especially three rack
cooking, because the circulating heated air results in more even browning, For two rack
cooking, the conventional bake oven provides very good baking results especially when
pans can be staggered, such as with layer cakes and fresh pies.
Many foods can be prepared on three racks at the same time. These are just a few
examples: cookies, cupcakes, rolls, biscuits, muffins, pies, pizzas, appetizers, and
snack foods.
To obtain the best resuJts Jnmultiple reck cooking, follow these suggestions:
• Use temperature and times in this manual as a guide for best results.
• For two rack baking, rack positions #20 and 4 are best for most baked products but
positions #2 and 4 also provide acceptable results.
• For three rack baking use positions #1,3o and 4. One exception is pizza. (See p.
33.)
• Since foods on positions #1 and 4 will usuany be done before foods on position #3o,
additional cooking time will be needed for browning foods on the middle rack. An
additional minute is needed for thin foods such as cookies. For foods such as
biscuits, rolls, or muffins, allow 1 to 2 more minutes. Frozen pies and pizzas, which
should be baked on a cookie sheet, need about 2 to 4 more minutes.
• Stagger small pans, such as layer cake pans, in the oven.
• Frozen pies in shiny aluminum pans should be placed on cookie sheets and baked
on rack positions #1,3o and 4.
• Cookie sheets should be placed lengthwise, side to side, in front of the fan for more
even browning.
• Ovenmealsararecommendedforenergyoonservation. Userackpositions#1 and
3o or #2o and 4 and Convect Roast.
29
Page 30

• Preheating is not necessary.
• For open pan roasting, place meat or poultry on the slotted portion of the two-piece
pan included with the oven. Do not add water to the pan. Use open pan roasting
for tender cuts of meat. Less tender cuts of meat need to be cooked by moist heat
in a covered pan.
• For best results, a meat thermometer is the most accurate guide to degree of
doneness. The tip of the thermometer should be located in the thickest part of a
roast, not touching fat, bone, or gristle. For turkeys and large poultry products,
insert the tip of the thermometer into the thickest part of the inner thigh.
• PLace roast fat side up to allow self basting of meat during roasting.
• Since meats continue to cook after being removed from the oven, remove roast
from oven when it reaches an internal temperature about 5 degrees below the
temperature desired.
• For Jess loss of juices and easier carving, allow about 15 minutes "standing time"
after removing meat from oven.
• For best results in roasting poultry, thaw completely. Due tothe structureof poultry,
partially thawed poultry will cook unevenly.
• If preferred, tender cuts of meat can be roasted in the conventional bake oven by
following the general recommendations given above. However, meats will roast
more quickly in the convect oven using Convect Roast.
• Conventional bake is best for less tender cuts of meat that require a longer, moist
heat method of cooking. Followyour recipe for times and temperatures for covered
meats.
• Meats cooked in ovencooking bags, dutch ovens, orcovered roasting pans are best
cooked in the conventional bake oven using the Bake Pad.
• Use meat roasting charts in standard cookbooks for recommended times and
temperatures for roasting in a conventional bake oven.
3o
Page 31

Chart time is based on thawed meats only. For Conventional Roasting use the Bake
Pad.
iiiiiiiii
iiiiiiSi_!_iil
*WhenusingtheConvectRoastmode,thereisnoneed topreheattheovenor to lowerthe tem-
peraturefromconventionalroasttemperatures.
**Notrecommendedforconvectioncooking. Mostprecookedhamshaveto becoveredwhile
roasting,thustherewouldbe notimesavingsfrom usingtheconvec_mode.
31
Page 32

• Tender cuts of meat and poultry can be masted to a r_chgolden brawn in the
convectionoven. Followgeneral recommendationsforroastinganduseConvect
Roast.
• Referto convectionmeat roastingchart for recommendedcookingtemperature
and time. The chart can serve as a guide to help plan meal serving time.
• Minutes per pound will vary according to the size, shape, quality, and initial
temperatureof meat aswellasthe electricalvoltageinyour area. Times are based
on refrigerator cold meat.
• A large cut of meat will usually require fewer minutes per pound to roast than a
smaller cut of meet.
• Do not use a roasting pan with high sides; use pan provided with oven.
• Do not cover meat. Allow the circulating hot air to surround the meat and seal in
the juices.
• Sincethe breast meat on a large turkey cooksmore quicklythan the thigh area,
placea"foilcap" overthe breast areaafter desiredbrownnessis reachedto prevent
overbrowning. (See above.)
• Astuffedturkey will requirean extra 30 to 60 minutes, dependingon size. Stuffing
should reach an internal temperature of 185°F,
Convect Roasting: Frozen to Finish
Meats(exceptpoultry)maybe roastedfrozentofinish, Followtheseguidelinesforthe
mostsatisfactoryresults,
• Usetemperatures for roastingfresh meatsas recommendedby most cookbooks.
Generally, most meats are roasted at 325°F. For best results do not use
temperatures below 300°F.
• Usetimes for roasting freshmeatsgiven inyour favoritecookbooksasapproximate
guidesfor roasting frozen meats. Roastingtimes w)})vary due to factors such as
coldnessof meat, size,quality, or cut. Ingeneral, roastingtimesfor frozen to finish
in the convection oven win be approximately the same as fresh to finish in a
conventionalbake oven.
• The guidelines given for roasting fresh meats in the convection oven also applyto
roastingfrozen meats.
• Insertmeat thermometer midway during the cooking process.
32
Page 33

• Usethe Convect Roast Pad for bestresults.
• Preheating the oven is r_t necessary.
• Followpackagerecommendationsfor oven temperature,foilcoveringand use of
cookiesheets. Cooking times willbe similar. See chart belowfor someexceptions
and examples.
• Centerfoodsin theoven. If morethan one food item isbeingcooked or iffoods are
being cooked on multiple racks,stagger foods for proper air circulation.
• Mostfoods are cooked on rack position #3o.
• For multiple rack cooking, use racks #1, 3o and 4. However, pizzas should be
placed on cookie sheets and baked on rack position #2o, 3 and 4.
Herearea few examplesoftimesandtemperatures
............. =oN_t 1_
..... B_K_: _H__E_
i
_so_ .s
o _ : . ,o ,:, o,_.: o ::. o,
*An "o" after a rack number implies that the offset rack should be used.
**ConventionalBake uses the Bake Pad.
Note: Convect roastingtimes willbesimilartothe conventionaltimes becausethe oven
is not preheated. The time savingscomes from not having to preheat the oven.
33
ii ....
Page 34

1. Place oven rack on the rack position suggested in the chart on page 35.
Distance from broiling element depends on foods being prepared. Rack position
4o (offset rack in position #4) is usually recommended unless otherwise stated.
2. Touch Broil Pad,
Indicator Word BROIL will flash and Display will show three dashes,
Note: If more than fifteen seconds elapses between touching Broil Pad and
touching a number pad, the oven is not set and Display will return to previous
Display.
3. Touch the appropriate number pad(s).
The first number pad touched will enter "HI" in the Display.
The oven has a variable broil feature which means that a }ower temperature can be
selected. After "HI" appears inthe Display, touch the appropriate number pads for
the desired temperature. Temperature can be entered in 5° increments.
Fifteen seconds after entering "HI" or four seconds after entering a temperature,
the broil element will come on and the Indicator Words BROIL and ON will remain
in the Display. Ifthe variable broil feature was selected, the Indicator Word ON will
cycle with the element.
Example: If at 4 o'clock you set the oven for broil ("HI"), the Display will show:
4. Place food on broiler pan provided with oven. Broil element will preheat in 2 to 3
minutes. After broil element is red, place food in oven. Oven door MUST be left
eden at broil stoo Position.
5. Touch Cancel Off Pad to turn off oven when food is cooked.
willcycle on and off. If the fan does not operate, contact your authorized Jenn-
NOTE: AfancomesonduringtheBROtLcycle. It it does not, the oven broil element
Air Service Contractor for repair.
34
Page 35

• Tender cuts of meat or marinated meats are best for broiling, This includes riband
loin cutsof steak, greund beef, ham steaks, poultry pieces or fish. For best results,
steaks should be at least 1" thick. Thinner steaks should be pan-broiled.
• Do not cover broiler grid with foil since this prevents fat drippings from draining into
bottom of pan.
• Before broiling, remove excess fat from meat and score edges of fat (do not cut into
meat) to prevent meat from curling. Salt after cooking.
• To prevent dry surface on fish or lean meats, brush melted butter on top.
• Foods that require turning should be turned only once during broiling. Turn meat
with tongs to avoid piercing and loss of juices.
Chart time is based on a preheated broil erement using the "HI" setting.
*An "o" after a rack number implies that the offset rack should be used.
Note: This chart is a suggested guide. The times may vary with food being cooked.
35
Page 36

When the oven controls are set to CLEAN, the oven heats to temperatures that are
higherthan those used for cooking. The high temperatures cause food soil to burn off
and substantially disappear. While this occurs, a device in the oven vent helps to
consume normal amounts of smoke. The oven is vented through an opening under the
air grille.
• Remove the broiler pan and any other utensils from the oven. These utensils cannot
withstand the high temperatures of the cleaning process.
• Clean spatters and spills from those areas which will not be cleaned during the self-
cleaning process:
- center front of oven and door near opening in door gasket.
- porcelain oven door liner (area outside the door gasket).
- oven front frame.
Note; DO NOT CLEAN serial plate located on the , _._ / //_'
To clean these areas, use hot water and detergent, _\_
nonabrasive cleansers or soap filled steel wool pads.
Rinse thoroughly, being careful not to use an excessive
oven front. _it" _""
amount of water that would dampen the door gasket. _--_jj_h_._.-._\__/ i
Soil left in these areas will be more difficult to remove
after the self-cleaning process since the high heat will
bake on any soil that is present. DO NOT USE COMMERCIAL OVEN CLEANERS
TO CLEAN THESE AREAS.
• DO NOT ATTEMPT TO CLEAN, RUB, OR APPLY WATER TO GASKET ON OVEN
DOOR. The gasket is essential for a good door seal. Rubbing or cleaning will
damage the gasket and may affect the seal.
• Wipe up excess grease and food spillovers which have not baked on the bottom of
the oven. Large accumulations of soil can cause heavy smoke or fire in the oven
during the cleaning process. For ease of cleaning, the heating element can be lifted
slightly.
• Although smoke or fire in the oven is a normal occurrence and there is no safety
problem, there will be venting of excessive smoke and odor.
• Remove the air grille before self-cleaning. Since the oven vent is located just
beneath the air grille, soot from the vent could discolor white colored air grilles.
36
Page 37

• The ovenrackscanbe cleanedinthe oven. However,the ovenreckswilldiscolor,
loseshininess,and becomedifficult toslideinand out if left in the ovendudngthe
cleaning process. REMOVE RACKS FROM OVEN IF THIS DISCOLORATION
WiLL BE OBJECTIONABLE. ASa suggestion, do not leave the racks in the oven
dudngeach self-cleaningprocessif they do not need to be cleaned since theywill
discolorto a dull silver after one cleaning. Moderatelysoiled rackscan be cleaned
with a soapy S,O.S. pad or Scotch-Brits scour pad. Stubborn stains need to be
removed intheself-cleaningprocess. Besuretoread specialtipsonpage40 ifoven
racksare cleaned duringtheself-cleaningprocess.
*Omit steps 4 & 5 if youwishcleaningto begin immediately.
To set oven to start cleaning immediately
1. Closethe oven door,
2. TouchClean Pad.
indicatorWordsCLEAN TIME wigflash and Display wigshow" HR : ".
3. Touchthe appropriatenumber pad(s),
The first numberpadtouchedwill enter"3:00"inthe Displayfor an averagesoiled
oven. The cleaningtimecan bevarieddependingontheamountofsoil. Set"2:00"
for lightsoil or "4:00" for heavy soil.
Note: If more than fifteen seconds elapse between touching a Clean Pad and
touching a number pad,the oven is notsetandtime ofday will automatically return
to the Display.
Example: If at9o'clock youselectedtoself-cleanyour ovenfor 3hours,theDisplay
willshow:
3:00
Fifteensecondsafter entering"3:00"or foursecondsafter enteringa differenttime,
the oven doorwinstartto automatically latch and the cooling fan wlHcomeon. The
LOCK IndicatorWord wiJlcome on when the door is latched.
Note; If oven door was left open, "door" will flash in Display and a signal will
continuouslybeep until the door is closed and the Clean Pad is touched.
TheIndicatorWord ON comes on when thedoor islatched and will remainuntil the
cleantemperature is reached. The Indicator Word ONwill cycle with the elements
to maintain the clean temperature.
37
Page 38

Whenthe cleanfunction has been completed,the IndicatorWordsCLEAN and ON
will gooff. The IndicatorWord LOCKandthecooling fanwill remainonuntilthe oven
has cooled down and the door has unlocked.
To set oven to start cleaning at a later time
1-3. FollowSteps1-3 inprevioussectionon page 37.
4. Touch Stop Time Pad.
IndicatorWords STOPTIME will flash in the Display, The Indicator Word CLEAN
and the calculated stop timewill also appear in Display.
5. Touch the appropriate number pads to enter stoptime,
A stoptime can onlybe acceptedfor later in the day. Ifan unacceptablestop time
isentered, "Err"willflash briefly inthe Displayandthen Displaywill returnto previous
acceptable Stop Time.
Example: Ifat 9 o'clock you set the oven to clean for three hours, the calculated
stoptime would be "12:00". The Displaywould show:
12:00
If youwant the stop time to be t o'clock, touchthe number pads "t,0,0". Fifteen
seconds later, the Display would show Start Time:
c4_L_
I 0:00
After four seconds, the display will returnto current time of day, thus showing:
9:00
The LOCK Indicator Word will come on and the cooling fan will go off as soon as
the oven door has latched.
Whenthe ovenbeginstoclean, the IndicatorWord ONandthe coolingfan willcome
on and the Indicator Word DELAYwilt go off.
Whentheclean time has beencompleted, the IndicatorWords CLEAN andON will
go off. The Indicator Word LOCK and the cooling fan will remain on untilthe oven
hascooled down and the door has unlocked.
38
Page 39

To cancel self-clean
• Touch Cancel Off Pad.
• Theovendoorwillbelockedwhilethe LOCKIndicatorWordremainsin theDisplay.
Dependingonthelengthoftimetheovenhadbeenself-cleaning,it maytake upto
45 minutesfortheoventocooldown,thedoorto unlockand coolingfan toturnoff.
IMPORTANT
• Torecallcleaningtimeorstoptime:Touchtheappropriatepad(CleanPad orStop
Time Pad).
• TOchancecleaningtime orstoptimebeforecleaningbegins:Repeatthepreceding
steps.
• When the Clean Pad istouched,afan comes on. If thisfan is notoperating,the
ovenwillgothroughthecleaningprocessat a reducedoventemperatureandthe
ovenwillnotcleaneffectively.Ifthe fandoesnot operate,contactyourauthorized
Jenn-AirServiceContractorfor service.
39
Page 40

• A slight odor may be detected, and if an oven is heavily soiled, some smoke may
be visible. Some smoke and odor during the cleaning process is a normal
occurrence. Since the oven vent is located under the air grille, vapors, moisture,
etc. may be seen coming from this area. If the odor is strong or objectionable, turn
on the ventilation system to exhaust odors to the outdoors. (See p. 9.)
• During the cleaning process, do not be alarmed if an occasional flame is visible
through the oven window. This is caused by excessive food soil that was not
removed before the oven was set to clean.
• SINCE THE DOOR AND WINDOW OF THE OVEN WILL GET WARM DURING
THE SELF-CLEANING PROCESS, AVOID CONTACT.
• Some types of soil may disintegrate but leave a light film or heavier deposit of ash.
The amount of ash depends on the amount of soil which was in the oven. After oven
has cooled, this ash may be removed with a damp sponge. If other dark deposits
remain after wiping with a sponge, the time set for the length of cleaning was not
enough. Increase the cleaning time for future cleanings or clean more frequently.
The normal cleaning time is 3 hours. A maximum of 4 hours may be selected if
necessary.
• If racks have been left in oven during the cleaning process, they should be treated
as follows. After the cleaning process is completed and the oven has cooled, buff
the underside of rack edges with Scotch-Brite scour pad or rublight/ythe underside
of rack edges with a coating of vegetable oil. Use a light application of oil so it does
not soil the oven. This will make the cleaned racks slide more easily.
• To remove occasional spillovers between oleanings, use a soap-filled scouring pad
or mild cleanser; rinse well.
40
Page 41

• It is better to clean the oven regularly rather than wait until there is a heavy build-
up of soil in the oven.
• During the cleaning process, the kitchen should be well ventilated to help eliminate
normal odors associated with cleaning.
• DO NOT USE COMMERCIAL OVEN CLEANERS.
• DO NOT USE ALUMINUM FOIL OR OTHER LINERS IN THE OVEN.
41
Page 42

Stainless Steel Rangetop
On the white ranges, the top of the range (the trim around the porcelain basin areas),
is made of stainless steel,
• To clean light soil, wipe with soapy cloth or nonabrasive cleanser, such as Soft
Scrub, Rinse, buff with soft cloth; polish with glass cleaner if necessary,
• To clean moderate soil or discoloration of the surface (excessive heat will cause a
golden discotoration), ctean with Zud, Bar Keepers Friend, or Luneta (Jenn-Alr
Model A912, Part No. 712191 ). With a sponge or cloth, rub cleanser with the grain
to avoid streaking the surface. Rinse wel_, buff dry; polish with a glass cleaner if
necessary to remove cleanser residue and smudge marks.
• Heavy soil, such as burned on food soil, can be removed by first cleaning as per the
instructions for moderate soil. Stubborn stains can be removed with a damp
Scotch-Brite scour pad; rub evenly with the grain to avoid streaking the surface.
Rinse well, buff with dry cloth; polish with glass cleaner if necessary to remove
cleanser residue and smudge marks. Scotch-Bdte is also useful in buffing and
removing minor scratches.
• Stubborn food stains may also be removed by spraying with an oven cleaner. Allow
to set overnight, then rinse. If stains remain, clean with recommended cleansers
such as Zud, Luneta (Jenn-Air Model A912, Part No. 712191), or Scotch-Brite
Scour pad.
WP_e__ _sm!n!_i
Textured Black Rangetopa
On the black ranges, the top of the range (the trim around the porcelain basin areas),
is made of painted steel.
• To clean light soil, wipe with a soapy cloth or nonabrasive cleanser, such as
Fantastik or 409.
• To clean moderate to heavy soil, spray the area with a household cleaner, such as
Fantastik or 409 and allow to soak. If necessary, spray the area with cleanser, cover
with plastic wrap and allow to soak for a few hours. Do not use any abrasive
cleansers, oven cleaners, or scrub with any abrasive materials, such as S.O.S.
pads, Scotch-Brite pa¢l_;,etc.
42
Page 43

Control Knobs
The knobson the control panel can be removedwiththe controls inthe OFF position.
Pull eachknobstraight from theshaft. Wash knobsin warm soapy water or dishwasher;
do not use abrasive cleansers or materials. To replace each knob, match flat part of
knobopening with the spring on the shaft, returnir_j in OFF position.
Control Panel Area and Display Window
Wipe withpapertowelsdampenedwithsoapywateror glasscleaner. Do notsprayany
cleaningsolutionsdirectlyontothe displaywindowor uselargeamountsof soap and
water. Do not scrub with S.O.S pads or abresive c/eansere.
Glasson Oven Door Front
Use any suitableglasscleaneror soapywater.
Oven Door Trim
Slightlydampen a cloth or papertowelwithsoapy wateror glass cleaner. Do not use
excessiveamountsofwater or allow water to rundown throughthe air vents in thedoor
since this will cause streaks which will be visible through the glass door.
The ovenoperationcontrolscanbe lockedinthe "OFF" positionduringcleaningotto
prevent a child from accidentally turning them on. The oven functionswhich can be
lockedinthe "OFF" positionare:Bake,ConvectBake,ConvectRoast,BroilandClean.
Thecontrolfunctionswhichcanalwaysbe usedregardlessoflockoutare:Timer,Clock,
Fan andOven Light.
To set
Touch and hold the Cook Time Pad andthe Stop Time Pad simultaneouslyforfour
seconds. The IndicatorWord "OFF" willappearand remainin the temperaturedigits
forfifteen seconds.
Note: If an ovenfunctioniscurrentlybeing used,the controlscannotbe lockedoff.
Note: Ifsomeonetouchesanovenfunctionpad,the IndicatorWord "OFF" willagain
appearinthe temperaturedigitsfor fifteenseconds.
To cancel
Touchand holdthe Cook Time Pad andthe Stop Time Pad simultaneouslyforfour
seconds.The IndicatorWord"OFF" willappearbrieflyinthetemperaturedigitsandthen
gooff.
43
Page 44

openpanel,graspuppercornersandpullforward catch
anddown.Toclosepanel, liffupandinsertprongs P"_°_
intocatches inthe range.
Toavoidthepossibilityof accidentallydisconnect-
TheaccesspaneliseasJlyopenedorremoved. To _
ingany part ofthe ventilation system,do not use , 1
the area behind the access panel for storage.
To remove,pull forward tothe "stop" position; lift _
up on the front ofthe rack and pullout.
The oven temperaturecan be adjustedif all oventemperaturesare tooJowortoohigh
and the lengthof timeto cookALLfoodsis too long ortoo short. Do NOT adjustthe
temperatureifonlyoneor twoitems are notbakingproperly.
To adjust
1. Touch the Bake Pad.
2, Enter 500° by touching the number pads: "5,0,0."
3. Touchand holdthe Bake Pad for 8 secondsuntil"00°''appearsinthe Display.
4. Touchthe appropriatenumberpads to enter the offsettemperature. (Allowable
rangeis -35°to +35°,) Note: Touchingthe Broil Pad will changethe - signtoa
positivenumber or backto a negative number.
Note: Do not changethetemperaturesettingmorethan 10° beforecheckingthe
oven.
5. Touchthe Cancel Off Pad to returnto the previousDisplay.
Important: The ovenshouldbe adjustedonly 10°andthe oven shouldbe tested.
(We recommendbakingtwo9" yellowlayercakes usinga purchasedboxmix.) If the
oventemperatureisstilltoo lowor too high, repeat the proceduredescribedabove.
44
Page 45

Beforereplacingbulb,disconnectpower toovenat the mainfuse or circuitbreaker panel
andat theelectricreceptacle, Be surethattheentire ovencavityincludingthelightbulb
is coolbeforeattemptingto remove.
To replace light bulb
1. Carefullyunscrewthe glasslightlens.
2. To obtainfirm graspon the bulb, wearprotective
rubbergloves. Removebyturningbulbto the left. j
Donottouchahot ovenlight bulbwithadamp cloth
asbulb willbreak. Note; Ifthebulbdoesbreakand
you wishto removeit, be certainpower supplyis
disconnectedand wear protective gloves. You
may contact your authorized Jenn-Air Service
Contractorforservice.
3. Replacebulbwitha 40 watt oven-rated appliance
bu/b. A bulbwitha brassbaseisrecommendedto
preventfusingofbulbintosocket.
4. Replacebulbcoverand reconnectpowerto oven.
Reset clock.
45
Page 46

Checkthe followinglistto be sure a service call is really necessary. Aquick reference
ofthis manual may prevent an unneeded service call.
If nothing on the range operates:
• checkfora blowncircuitfuse or a trippedmaincircuitbreaker.
• checkifrange isproperlyconnectedto electriccircuitinhouse.
If ventilation fan does not operate but everything else on the range
does:
• check behind lower access panel if power cordto blower assemblyhas been
disconnected.
If grill heating element or cooktop does not get hot enough:
• cheek if heatingelementispluggedin solidly.
• surfacecontrols may not be set properly.
• voltageto house may be low.
If ventilation system is not capturing smoke efficiently:
• checkon crossventilationinroomor makeup air.
• excessiveamount of smoke is being created; check instructionsfor grilling,
trimmingmeats. (See pp. 14-16.)
• outsidewa_lcap maybe trappedshut.
• rangemay be improperlyinstalled;checkductinginformation.(See p. 49.)
• airfiltermay be improperlyinstalled (See p. 9.)
If oven does not heat:
• the ovencontrelsmay be set incorrectly.
• clockcontrols maybe set for delayed start of oven.
If the oven light does not work:
• the lightbulbis looseor defective.
• ovenlightdoesnot workduringself-cleaningprocess.
If oven will not go through self-cleaning process:
• controlsmay be improperlyset.
• checktheclockcontrolledsettingsandthe currenttimeof dayon the clock.
If oven did not clean properly:
• ovenmayneed longercleaningtime.
• excessivespills were not removed prior to self-cleaning process.
46
Page 47

If oven door will not unlock:
• ovenmay not havecooledto safetemperatureafter self-cleaningprocess.
• electriccurrentcomingintotheoven may be off.
If foods do not broil properly:
• theovencontrelsmay not be set properly.
• checkrackposition.
• voltageintohousemaybe low.
If baked food is burned or too brown on top:
• foodmay be positionedincorrectlyin oven.
• ovennot preheatedproperly.
If food• bake unevenly:
• therangemay be installedimproperly.
• checkthe oven rackwitha level.
• staggerpans,do not allowpansto touch eachotheroroven wall.
• checkinstructionsfor suggestedplacementof pans onoven rack.
If oven baking results are less than expected:
• the pans beingused may not be of the size or materialrecommendedfor best
results.
• there may notbe sufficientroom around sidesof the pans forproperair circulation
in the oven.
• check instructions for preheating, rack position and oven temperature.
• oven vent may have been blocked or covered.
If baking result• differ from previous oven:
• oventhermostatcalibrationmay differbetweenoldandnewovens. Followrecipe
and useandcare directionsbeforecallingforservicesincethe calibrationonthe
previousovenmayhavedriftedtoatoohighortoolowsetting.(See p.44- Adjusting
Oven Temperature.)
Fault Codes
• Faultcodesare shownintheDisplayas "F" anda number.If a faultcodeappears
intheDisplayandacontinuousbeepsounds,touchtheCancel Off Pad. Ifthefault
code reappears,disconnectpowerto the range and call an authorizedJenn-Air
Service Contractor.
47
Page 48

48
Page 49

Jenn-Air'sventilation system is designedto capture both cooking fumes and smoke
while grilling. If the system does not, these are some ducting installation situationsto
check:
• 6" diameter round or 3 1/4" x 10" rectangular ducting should be used. Note: 5"
diameter round ducting may be used if the duet length is 10' or less.
• Nomore thanthree 90° elbowsshould be used. Distance between elbowsshould
be at least 18".
• RecommendedJenn-Airwallcapshouldbeused. Makesure damper movesfreely
whenventilation system is operating.
• There should be a minimumclearance of 6" for cooktop installed near a side wall.
Ifthere is not anobviousimproper installation, there may be a concealed problem such
as a pinched joint, obstruction in the pipe, etc. Installation is the resoonsibilitv of the
installer and questions should be addressed first by the installer. The installer should
very carefully check the ducting installation instructions.
49
Page 50

Griddle Grill Accessory Grill Cover
Model A302 Model A188 Model A341
Self-draining griddte Grill accessory includes Attrectivegrillcover
makes many favorite two grill-rocks, Energy- protects grill when
foods easier to fix. Saver grill element, and not in use, Tex-
Family-sizedsurfacelets two black nonstick grill tured steel In black
you cook several grates. 2800 watt grill or white with
pancakes, hamburgers, element permits you to molded handles.
or grilled sandwiches at control temperatures
atime. Has a black non- under front and rear grills
stick finish, independently.
Cooker-Steamer Rotiss-Kebab
Model A335 Model A312
Ideal for anything you Enjoy the great flavor of
steam, blanch, poach or rotissed foods indoors all
stew. Includes a dual-posi- year around and make par-
tion basket and see-through ties more fun by serving at-
cover. Attractive blacknon- tractive shish kebabs. In-
stick finish, eludes chrome finish motor,
rotiss, shish kebab skewers
and all brackets. Folds for
easy storage.
5O
Page 51

Wok Canning Element
Model AO142 Model A145A
Ideal for stir-frying, steaming, Specialcanningelementplugsinto
braising and stewing. Wok has conventionalcoilcooktop/cartridge
nonstick finish, wood handles, raising the heating element above
cover, steaming rack, rice paddles the cooking surface. Allows use of
and cooking tips. Flat bottom wok oversized utensils and those with
can be used on ALL cartridges, warped or rippled bottoms.
-///1/!+
Conventional Halogen Radiant Solid
Coil Element
Conventional Coil*
Rated 240 volts ........................... A100B-Black Porcelain
A100S- Stainless Steel
A100W-White Porcelain
Halogen
Rated for 240 volts ........................ A125B-Black
A125W-White
Radiant*
Rated for 240 volts ........................ A121B-Black
A121 W-White
Solid Element
Rated for 240 volts ........................ A106B-BLack
A106W-White
* To order 208 volt cartridges, add -8 to the model number.
51
 Loading...