

Jenn-Air SU146 User And Care Manual
_l E N N-AI R
®
Useand Care Manual
Updraft Grill-Range with
Self-Cleaning Radiant Bake
and Convection Oven
MODEL SU146

About Your
JennoAir
Congratulations on your choice of a Jenn-Air grill-range. The
indoor grilling of meats, fish or fowl is one of the most attractive
and succulent methods of preparing these foods.., a unique
flexibility made possible by Jenn-Air's patented integral ventilation
system.
Your Jenn-Air self-cleaning oven combines the best of two cooking
methods, convection and radiant bake (conventional) baking or
roasting.
The Jenn-Air convection oven is actually a conventional oven
that circulates heated air within the oven. As both bake and broil
heating elements cycle on and off with the thermostat, a fan keeps
the heated air circulating around the food.
The constantly recirculating heated air in the convection oven
strips away the layer of cooler air that surrounds food. Conse-
quently, many foods cook more quickly. Distributed heat makes
multiple rack cooking possible. Convection roasted meats retain
their natural flavor and juiciness with less shrinkage than radiant
bake roasting.
In addition to the many exclusive benefits of convection cook-
ing, your Jenn-Air oven is also a fine full-featured "bake and broil"
oven.
You can cook your "old favorite" recipes as you have in the past.
The radiant bake oven also gives you the flexibility of preparing
various foods when convection cooking may not be as beneficial,
as when cooking foods in covered casseroles or clay pots.
The broil element isconvenient for top browning and oven broiling
of foods.
Before you begin cooking with your new grill-range, please take
a few minutes to read and become familiar with the instructions
in this book. On the following pages you will find a wealth of
information regarding all aspects of using your new grill-range.
By following the instructions carefully, you will be able to fully
enjoy and properly maintain your grill-range and achieve excellent
results with the food you prepare.
Should you have any questions about using your Jenn-Air grill-
range or need a use and care manual for your cooktop cartridge,
write to us. Be sure to provide the model number.
Consumer Relations Department
Jenn-Air Company
3035 Shadeland Avenue
Indianapolis, IN 46226-0901
SAFETY
PRECAUTIONS
Read before operating your range
All appliances -- regardless of the manufacturer -- have the
potential through improper or careless use to create safety prob-
lems. Therefore the following safety precautions should be
observed:
1. Be sure your appliance is properly installed and grounded
by a qualified technician.
2. Never use your appliance for warming or heating the room.
3. Children should not be left alone or unattended in area
where appliance is in use. They should never be allowed to
sit or stand on any part of the appliance.
4. Wear proper apparel. Loose-fitting or hanging garments
should never be worn while using the appliance.
5. Do not repair or replace any part of the appliance unless
specifically recommended in this manual. All other servicing
should be referred to an authorized Jenn-Air Service
Contractor.
6. Flammable materials should not be stored in an oven or
near surface units.
7. Do not use water on grease fires. Smother fire or flame
or use dry chemical or foam-type extinguisher.
8. Use only dry potholders. Moist or damp potholders on
hot surfaces may result in burns from steam. Do not let
potholder touch hot heating elements. Do not use a towel
or other bulky cloth.
9. Use proper pan size. Many appliances are equipped with
one or more surface units of different size. Select cookware
having flat bottoms large enough to cover the surface unit
heating element. The use of undersized cookware will
expose a portion of the heating element to direct contact
and may result in ignition of clothing. Proper relationship
of cookware to heating element will also improve efficiency
and performance.
10. Never leave surface units unattended at high heat settings.
Boil over causes smoking and greasy spillovers that may
ignite.
11. On conventional element ranges make sure that drip pans
are in place. Absence of these pans during cooking may
subject wiring or components underneath to damage.
12. Do not use aluminum foil to line surface unit drip pans,
grill basin or oven bottom. Installation of these liners may
result in an electric shock or fire hazard.
13. Glazed cookware -- only certain types of glass, glass-
ceramic, ceramic, earthenware, or other glazed cookpots
are suitable for range top surface without breaking due
to the sudden change in temperature. Use only such
cookware as you know has been approved for this purpose.
14, Cookware handles should be turned inward and not extend
over adjacent surface heating elements to avoid burns,
ignition of flammable materials and spillage due to uninten-
tional contact with the cookware.
15. Do not soak or immerse removable heating elements in
water.
16. CAUTION -- Do not store items of interest to children
in cabinets above a range or on the backguard of a range
--children climbing on the range to reach items could be
seriously injured.
17. Do not touch surface units or areas near units, heating
elements or interior surfaces of oven. Surface units or heat-
ing elements may be hot even though they are dark in color.
Areas near surface units and interior surfaces of an oven
may become hot enough to cause burns. During and after
use, do not touch or let clothing or other flammable mate-
rials contact these areas until they have had sufficient time
to cool. Other surfaces may become hot enough to cause
burns -- among these surfaces are the cooktop, the upper
door frame and glass, oven vent opening and surfaces near
the opening, and the top edge of the control panel.
18. Use care when opening oven door. Let hot air or steam
escape before removing or replacing food.
19. Do not heat unopened food containers. Build-up of pres-
sure may cause container to burst and result in injury.
20. Keep oven vent ducts unobstructed.
21. Always place oven racks in desired location while oven is
cool. If rack must be moved while oven is hot, do not let
potholder contact hot heating element in oven.
22. Do not clean door gasket. The door gasket is essential for
a good seal. Care should be taken not to rub, damage or
move the gasket.
23. Do not use oven cleaners. No commercial oven cleaner or
oven liner protective coating of any kind should be used
in or around any part of the oven.
24. Clean only parts listed in this manual and use procedures
recommended.
25. Before self-cleaning the oven, remove broiler pan and other
utensils.
26. Listen for fan. A fan noise should be heard during the broil
and cleaning cycles. If not, call a serviceman before self-
cleaning again.
27. Do not cook on glass-ceramic cooking surface if the cook-
top is broken. Cleaning solutions and spillovers may pene-
trate the broken cooktop and create a shock hazard. Contact
an authorized Jenn-Air Service Contractor.
28. Clean glass-ceramic cooktops with caution. If wet sponge
or cloth is used to wipe spills on a hot cooking area, be
careful to avoid steam burns. Some cleansers can produce
noxious fumes if applied to a hot surface.
29. Do not operate with damaged cooking element after any
product malfunction until proper repair has been made.
30. Keep all switches "OFF" when unit is not in use.
31. High performance range hood must be operated in con-
junction with grill.
32. Do not allow aluminum foil or meat probes to contact
heating elements.
33. WARNING: To reduce the risk of tipping of the appliance, the
appliance must be secured by properly installed anti-tip de-
vices. To check if devices are installed properly, remove the
access panel and verify that the anti-tip devices are engaged.
Cooktop and
Grill Operation
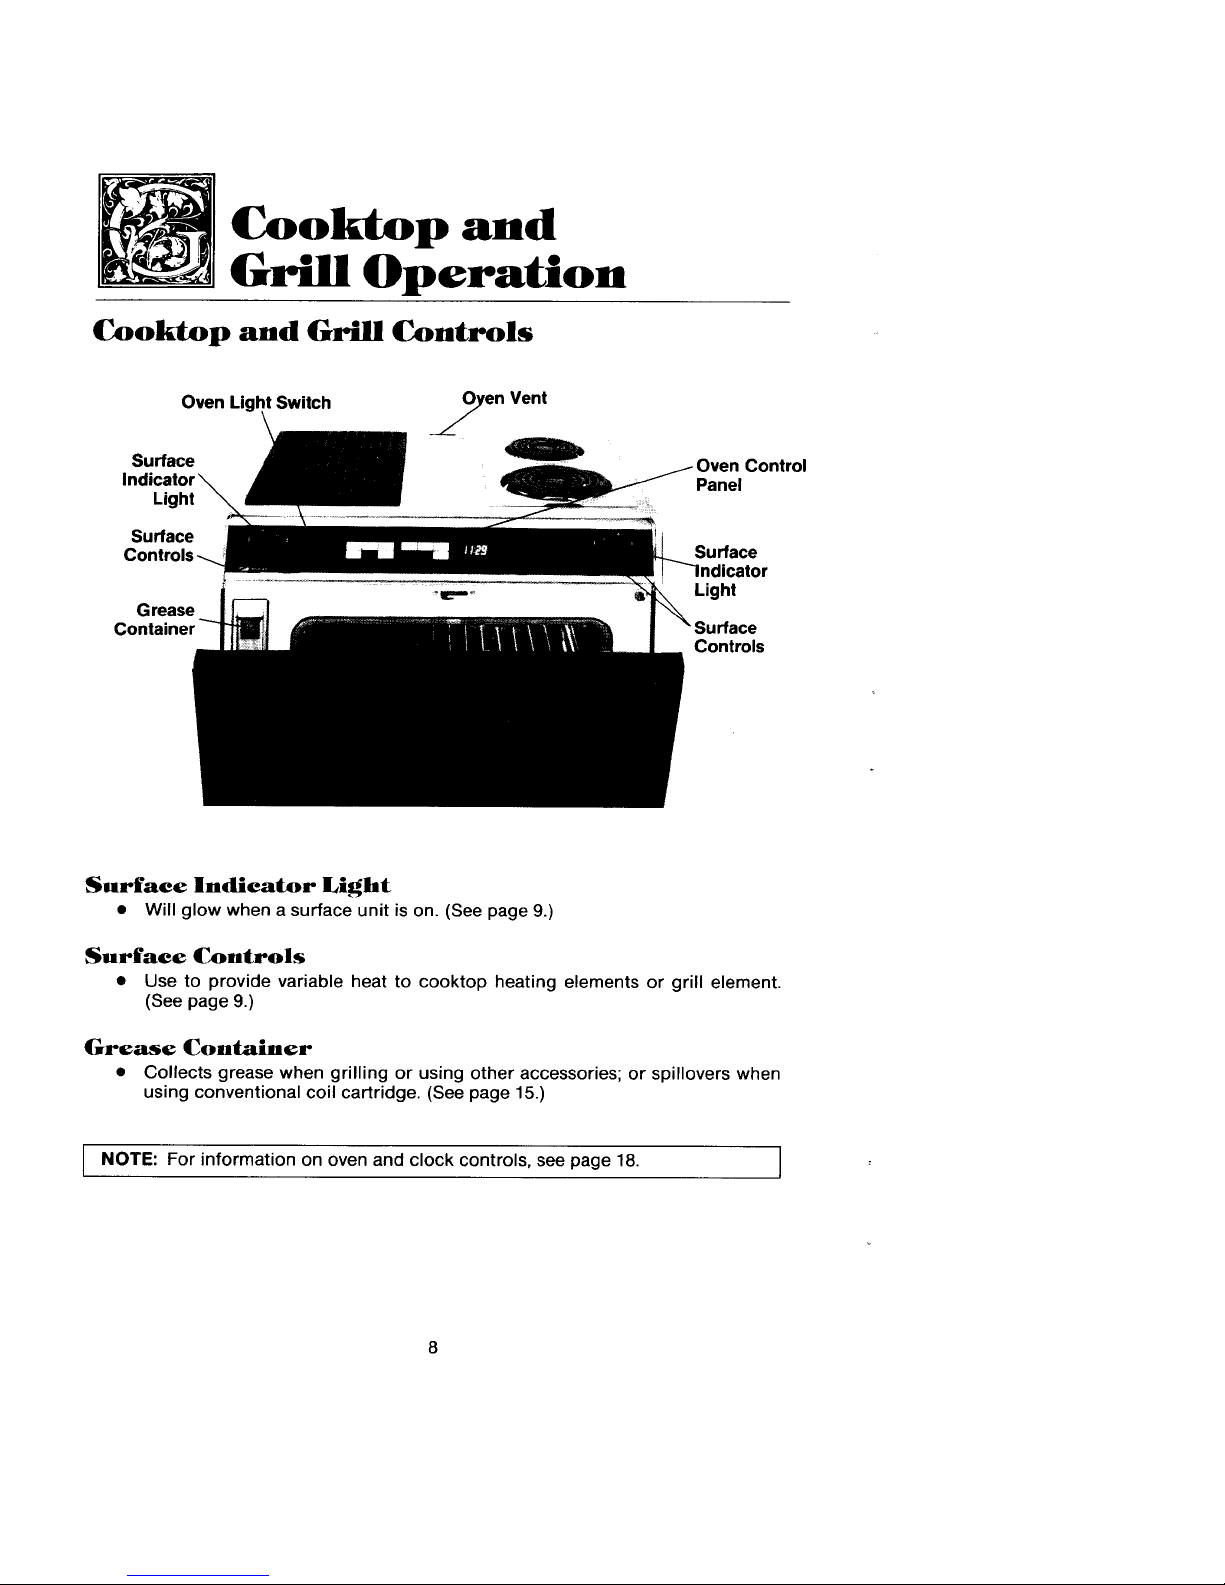
Cooktop and Grill Controls
Oyen Vent
Oven Lk Switch /
._L
Surface
Control
Panel
Light
Surface
Surface
Light
Grease
;urface
Controls
Surface Indicator Light
• Will glow when a surface unit is on. (See page 9.)
Surface Controls
• Use to provide variable heat to cooktop heating elements or grill element.
(See page 9.)
Grease Container
• Collects grease when grilling or using other accessories; or spillovers when
using conventional coil cartridge. (See page 15.)
I NOTE: For information on oven and clock controls, see page 18.
Surface Controls
The variable heat controls for the cooktop cartridges and grill element provide flexibil-
ity in heat setting selection.
To Set Controls
• Since the controls are a push-turn type, they must be pushed down before turning. To
set (from the OFF position), push down on control knob and turn in either direction
to desired heat setting.
• When control is in any position, other than OFF, it may be turned in any direction without
pushing down.
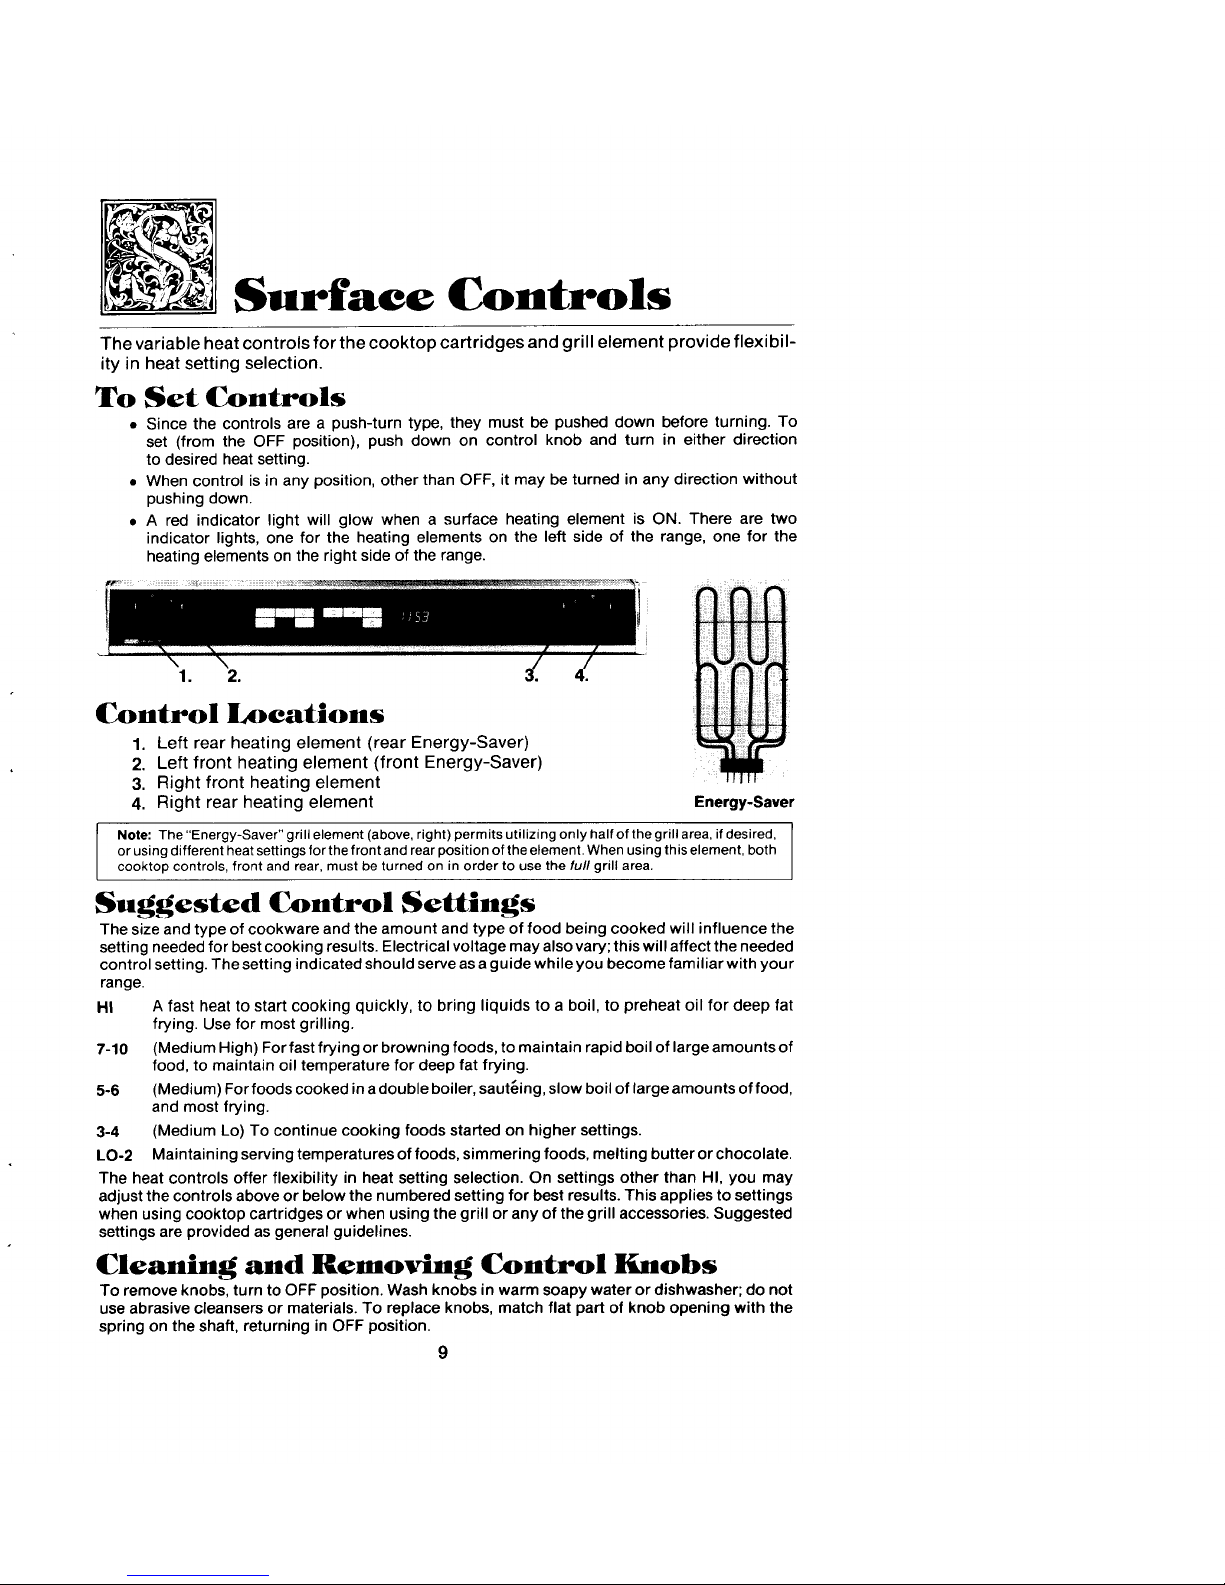
• A red indicator light will glow when a surface heating element is ON. There are two
indicator lights, one for the heating elements on the left side of the range, one for the
heating elements on the right side of the range.
Control Locations
1. Left rear heating element (rear Energy-Saver)
2. Left front heating element (front Energy-Saver)
3. Right front heating element
4. Right rear heating element Energy-Saver
Note: The "Energy-Saver" grill element (above, right) permits utilizing only half of the grill area, if desired,
or using different heat settings for the front and rear position of the element. When using this element, both
cooktop controls, front and rear, must be turned on in order to use the full grill area.
Suggested Control Settings
The sizeand type of cookware and the amount and type of food being cooked will influence the
setting needed for best cooking results. Electrical voltage may alsovary;this will affectthe needed
control setting. The setting indicated should serveasaguide while you become familiar with your
range.
HI A fast heat to start cooking quickly, to bring liquids to a boil, to preheat oil for deep fat
frying. Usefor most grilling.
7-10 (Medium High) Forfastfrying or browning foods, to maintain rapid boil of large amounts of
food, to maintain oil temperature for deep fat frying.
5-6 (Medium) Forfoods cooked inadouble boiler, sauteing, slow boil of large amounts of food,
andmost frying.
3-4 (Medium Lo) To continue cooking foods started on higher settings.
I.O-2 Maintaining serving temperatures of foods, simmering foods, melting butter or chocolate.
The heat controls offer flexibility in heat setting selection. On settings other than HI, you may
adjust the controls aboveor below the numbered setting for best results. This applies to settings
when using cooktop cartridges or when using the grill or any of the grill accessories. Suggested
settings are provided as general guidelines.
Cleaning and Removing Control Knobs
To remove knobs, turn to OFF position. Wash knobs in warm soapy water or dishwasher; do not
useabrasive cleansers or materials. To replace knobs, match flat part of knob opening with the
spring on the shaft, returning in OFF position.
9
Using Cooktop
Cartridges
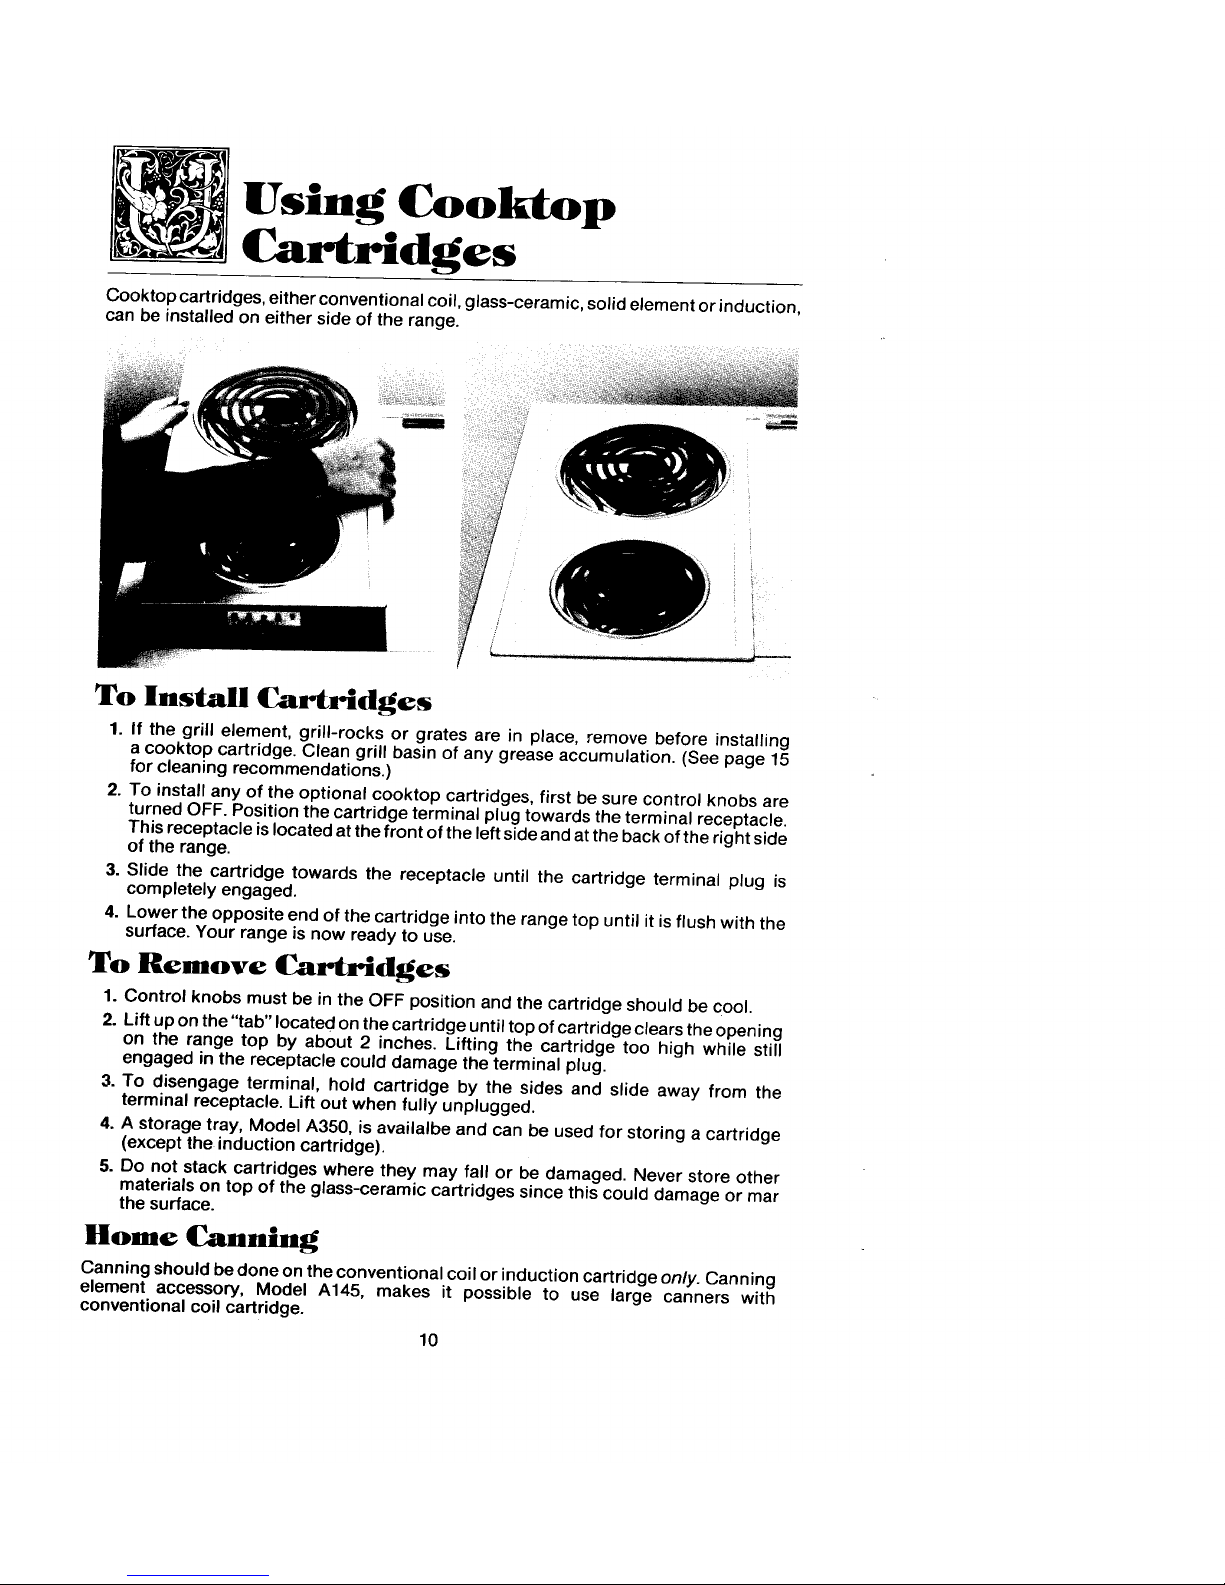
Cooktop cartridges, either conventional coil, glass-ceramic, solid element or induction,
can be installed on either side of the range.
To Install Cartridges
1. If the grill element, grill-rocks or grates are in place, remove before installing
a cooktop cartridge. Clean grill basin of any grease accumulation. (See page 15
for cleaning recommendations.)
2. To install any of the optional cooktop cartridges, first be sure control knobs are
turned OFF. Position the cartridge terminal plug towards the terminal receptacle.
This receptacle is located at the front of the left side and at the back of the right side
of the range.
3. Slide the cartridge towards the receptacle until the cartridge terminal plug is
completely engaged.
4. Lower the opposite end of the cartridge into the range top until it is flush with the
surface. Your range is now ready to use.
To Remove Cartridges
1. Control knobs must be in the OFF position and the cartridge should be cool.
2. Lift up on the "tab" located on the cartridge until top of cartridge clears the open ing
on the range top by about 2 inches. Lifting the cartridge too high while still
engaged in the receptacle could damage the terminal plug.
3. To disengage terminal, hold cartridge by the sides and slide away from the
terminal receptacle. Lift out when fully unplugged.
4. A storage tray, Model A350, is availalbe and can be used for storing a cartridge
(except the induction cartridge).
5. Do not stack cartridges where they may fall or be damaged. Never store other
materials on top of the glass-ceramic cartridges since this could damage or mar
the surface.
Home Canning
Canning should be done on the conventional coil or induction cartridge only. Canning
element accessory, Model A145, makes it possible to use large canners with
conventional coil cartridge.
10
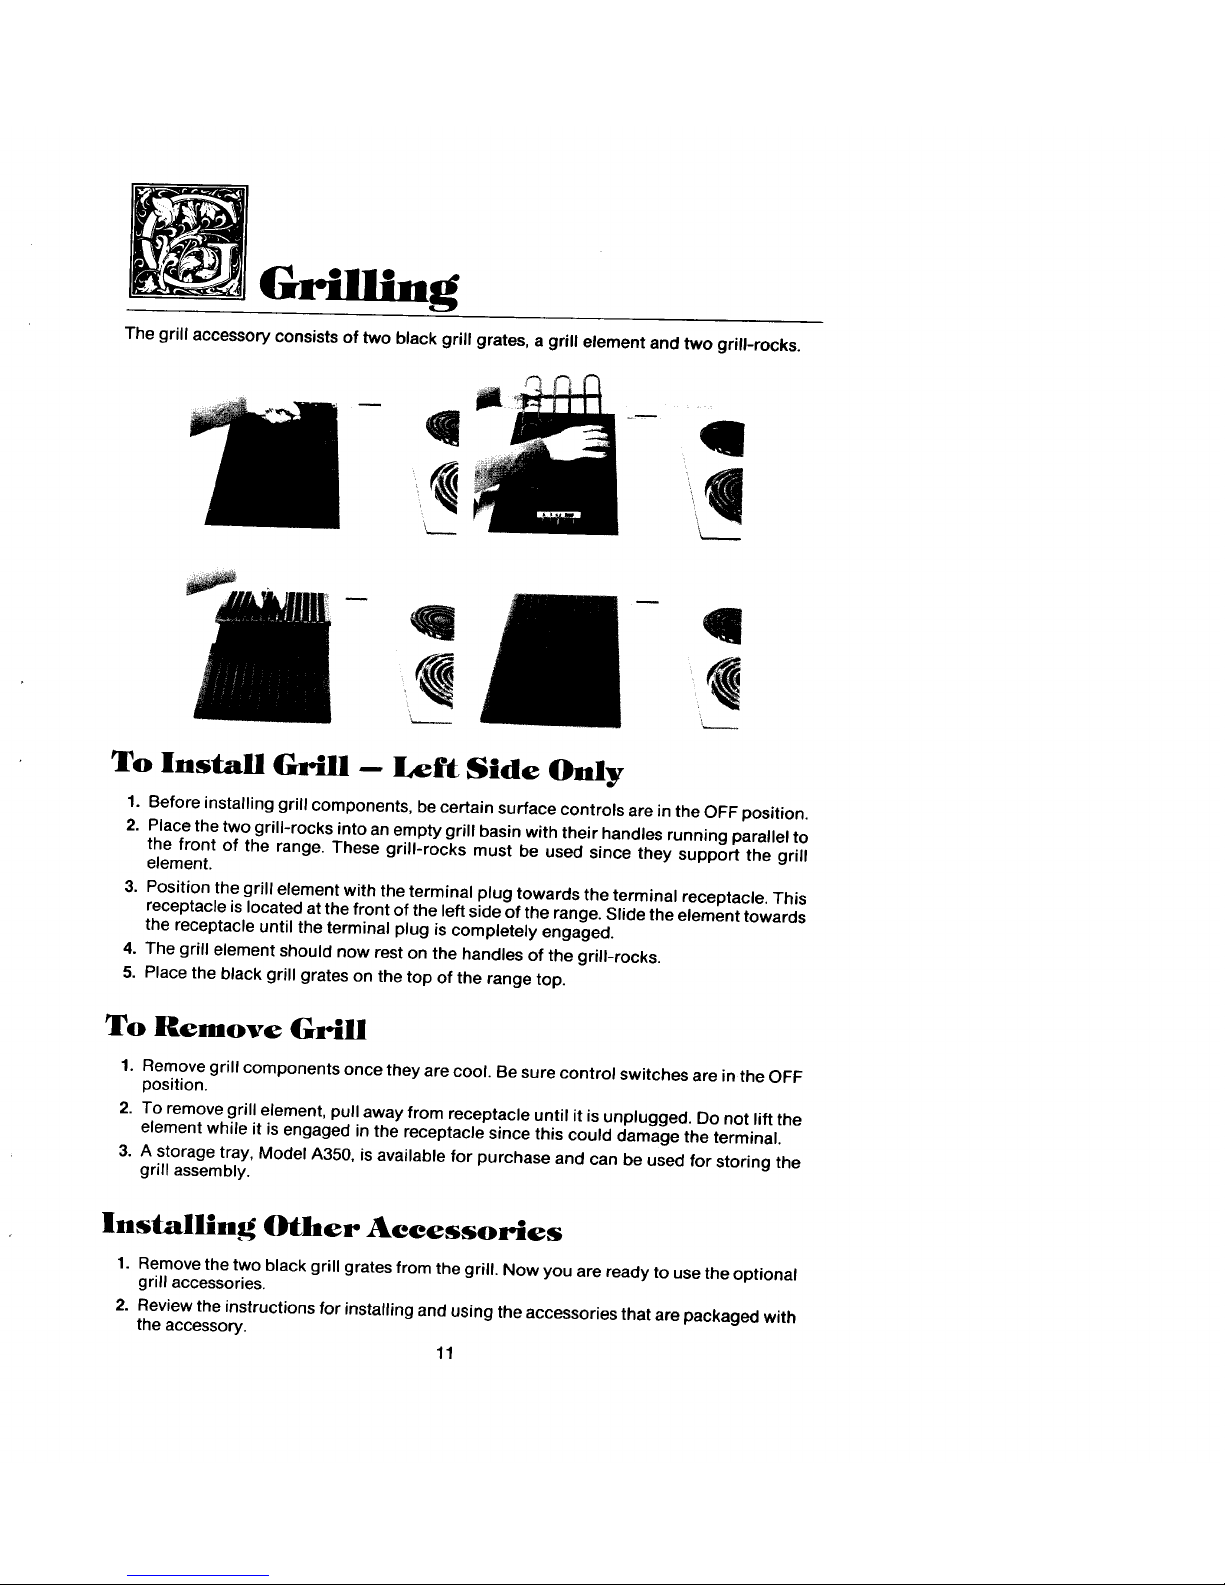
The grill accessory consists of two black grill grates, a grill element and two grill-rocks.
m
q q
To Install Grill -- Left Side Only
1. Before installing grill components, be certain surface controls are inthe OFF position.
2. Place the two grill-rocks intoan empty grill basin with their handles running parallel to
the front of the range. These grill-rocks must be used since they support the grill
element.
3. Position the grill element with the terminal plug towards the terminal receptacle. This
receptacle islocated at the front ofthe leftside of the range. Slide the element towards
the receptacle until the terminal plug is completely engaged.
4. The grill element should now rest on the handles of the grill-rocks.
5. Place the black grill grates on the top of the range top.
To Remove Grill
1. Remove grill components once they are cool. Be sure control switches are inthe OFF
position.
2. To remove grill element, pull away from receptacle until it is unplugged. Do not lift the
element while it is engaged in the receptacle since this could damage the terminal.
3. A storage tray, Model A350, is available for purchase and can be used for storing the
grill assembly.
lnstallin Other Accessories
1. Remove the two black grill grates from the grill. Now you are ready to use the optional
grill accessories.
2. Review the instructions for installing and using the accessories that are packaged with
the accessory.
11
Using the Grill
• HIGH PERFORMANCE RANGE HOOD MUST BE USED IN CONJUNCTION
WITH THE GRILL ELEMENT.
• Before using the grill for the first time, wash grill grates in hot soapy water; rinse
and dry.
• Precondition new grates and grill-rocks by brushing with vegetable oil or spraying
with a nonstick coating such as Pare. This procedure should be repeated after
cleaning in a dishwasher since the detergent removes seasoning.
• For easier clean-up, as well as preventing meats from sticking to grates until
they are seasoned, spray grates, grill-rocks and grill basin with a nonstick coating.
• Preheat grill on HI setting for 5 minutes. Preheating improves the flavor and
appearance of meats and quickly sears the meat to help retain the juices. The
heating element should glow a bright cherry red.
• A cooling fan can be heard whenever the grill element is on.
• Excessive amounts of fat should be trimmed from meats. Only a normal amount
is necessary to produce the smoke needed for that smoked, "outdoor" flavor.
Excessive fat can create cleaning and flame-up problems.
• Allowing excessive amounts of grease or drippings to constantly flame voids the
warranty on grill grates. Excessive flame-ups indicate that either the grill interior
needs to be cleaned or that excessive amounts of fat are in the meat or the
meat was not properly trimmed.
• Grease drippings will occasionally ignite to produce harmless puffs of flame for
a second or two. This is a normal part of the cooking process.
• NEVER LEAVE GRILL UNATTENDED DURING GRILL OPERATION.
Should excess grease cause sustained flame-up:
1. Immediately turn grill heat control switch to OFF position.
2. Remove meat from grill.
IMPORTANT
• DOnot usealuminum foil inside the grill area.
• Do not use charcoal or wood chips in the grill area.
• Do not allow grill-rocks to becomeoverloaded with grease. Clean frequently.
• Do not cover grates completely with meat. Leave air space between each steak, etc.
to allowproperventilationaswell as preventflame-ups.
12
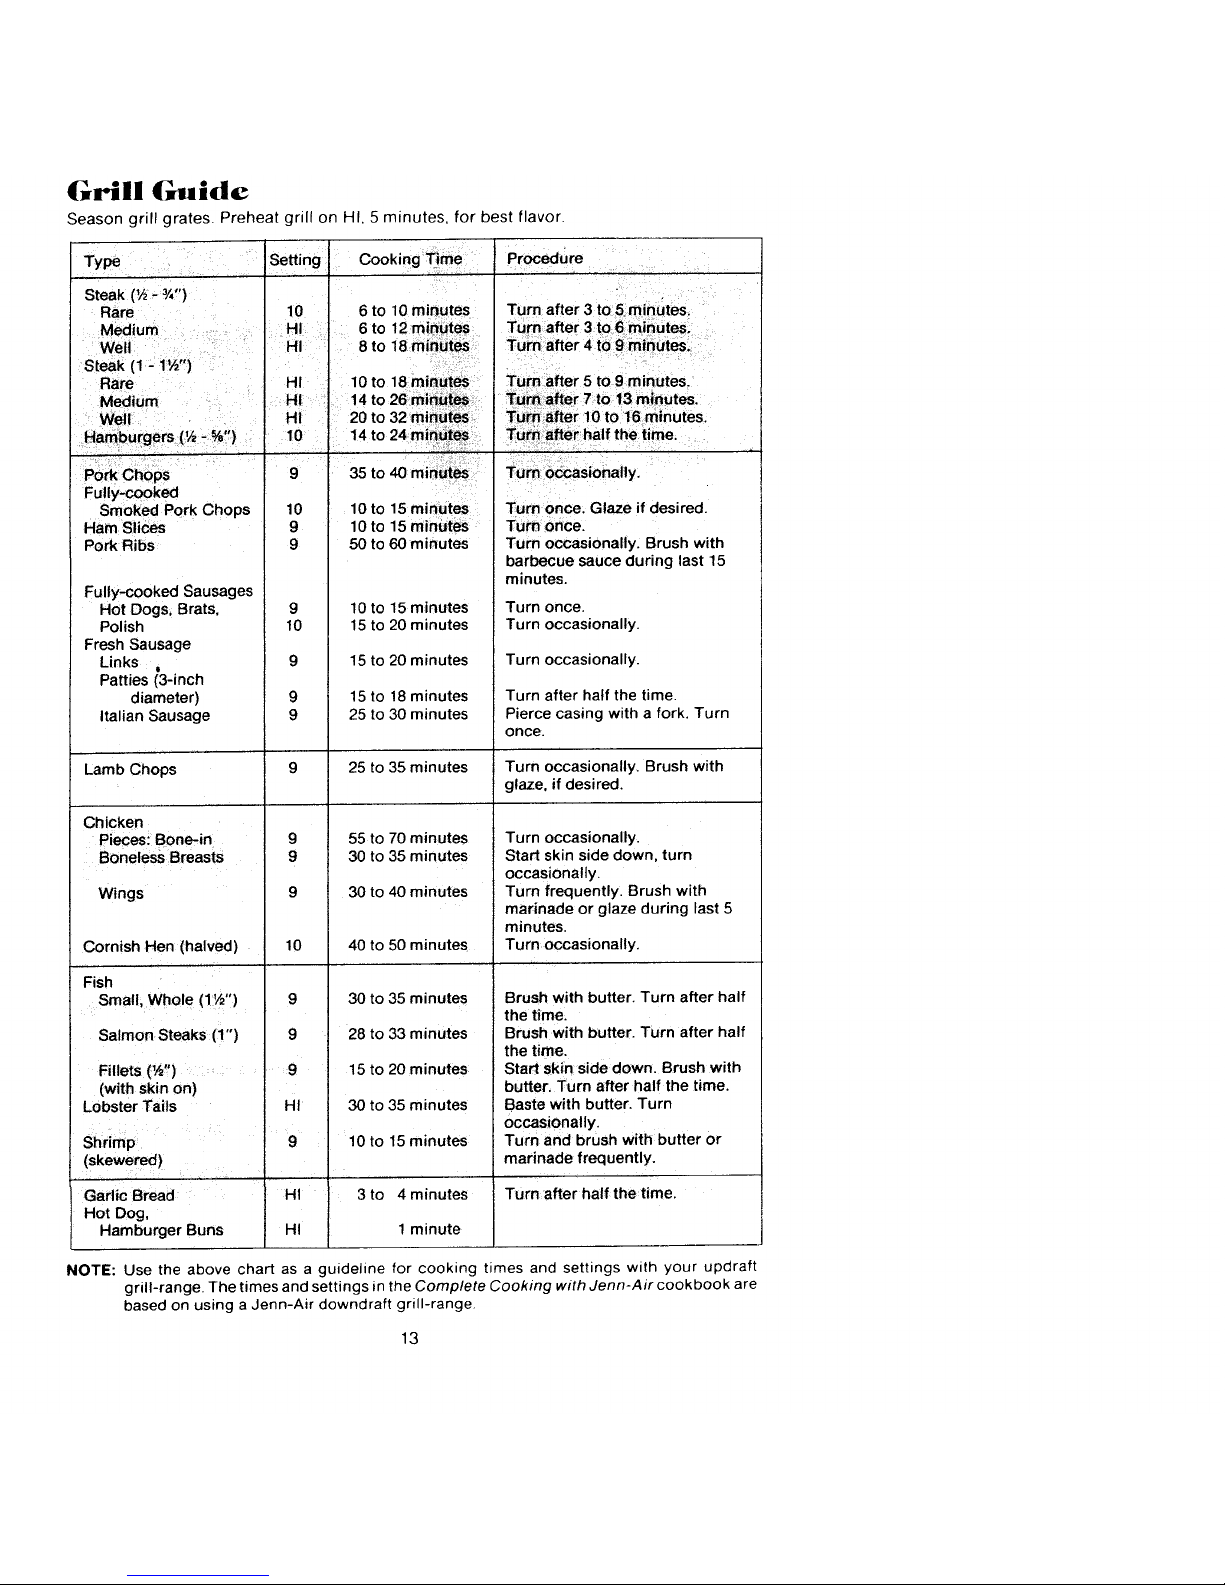
Grill Guide
Season grill grates. Preheat grill on HI, 5 minutes, for best flavor.
Type Setting Cooking Time Procedure
Steak (_/_- 3,_,,) -
Ra_iu m _0 6 to 10 minutes
Me ' 6 to 12 minutes
Well , " HI 8 to 18 minutes
Steak (1 - l_h ')
Fully-cooked
Smoked Pork Chops 10 10 to 15 minutes Turn once. Glaze if desired.
Ham Slices 9 10 to 15 minutes Turn once.
Pork Ribs 9 50 to 60 minutes Turn occasionally. Brush with
barbecue sauce during last 15
Fully-cooked Sausages minutes.
Hot Dogs, Brats, 9 10 to 15 minutes Turn once.
Polish 10 15 to 20 minutes Turn occasionally.
Fresh Sausage
Links 9 15 to 20 minutes Turn occasionally.
t
Patties (3-inch
diameter) 9 15 to 18 minutes Turn after half the time.
Italian Sausage 9 25 to 30 minutes Pierce casing with a fork. Turn
once.
Lamb Chops 9 25 to 35 minutes Turn occasionally. Brush with
glaze, if desired.
Chicken
Pieces: Bone-in 9 55 to 70 minutes Turn occasionally.
Boneless Breasts 9 30 to 35 minutes Start skin side down, turn
occasionally.
Wings 9 30 to 40 minutes Turn frequently. Brush with
marinade or glaze during last 5
minutes.
Cornish Hen (halved) 10 40 to 50 minutes Turn occasionally.
Fish
Small, Whole (1W') 9 30 to 35 minutes Brush with butter. Turn after half
the time.
Salmon Steaks (1") 9 28 to 33 minutes Brush with butter. Turn after half
the time.
Fillets (W') 9 15 to 20 minutes Start skin side down. Brush with
(with skin on) butter. Turn after half the time.
Lobster Tails HI 30 to 35 minutes Baste with butter. Turn
occasionally.
Shrimp 9 10 to 15 minutes Turn and brush with butter or
(skewered) marinade frequently.
Garlic Bread HI 3 to 4 minutes Turn after half the time.
Hot Dog,
Hamburger Buns HI 1 minute
NOTE: Use the above chart as a guideline for cooking times and settings with your updraft
grill-range. The times and settings in the Complete Cooking with Jenn-Air cookbook are
based on using a Jenn-Air downdraft grill-range.
13
Grilling Tips
With your Jenn-Air grill and accessories, literally any food you've considered "at its
best" when prepared outdoors can now be prepared indoors with less fuss and great
flavor.
The following suggestions are good rules to follow and will increase your enjoyment
of the equipment.
• Be sure to follow directions on page 12 for using the grill.
• Suggested cooking times and control settings are approximate due to variations
in meats and electrical voltage. Experience will quickly indicate cooking times
as well as which settings work best.
• Use the Energy-saver grill element for grilling small amounts of food on half
of the grill or for keeping cooked foods warm or preparing foods requiring different
heat control settings.
• For best results, buy top grade meat. Meat that is at least 3/4-inch will grill
better than thinner cuts.
• Score fat on edges of steak, but do not cut into meat, to prevent curling while
cooking.
• For the attractive "branded" look on steaks, be sure grill is preheated. Allow
one side of meat to cook to desired doneness, or until juices appear on the
top surface, before turning. It takes fewer minutes to cook the second side.
Turn steaks and hamburgers just once. Manipulating food causes loss of juices.
• When basting meats or applying sauces to foods, remember that excessive
amounts wind up inside your grill and do not improve the food flavor. Apply
sauces during the last 15 to 20 minutes of cooking time unless recipe specifies
otherwise. Sugar-based sauces, excessively used, will caramelize on the grill-
rocks and will create a cleaning chore.
• There are many meat marinades which will help tenderize less expensive cuts
of meat for cooking on the grill.
• Certain foods, such as poultry and non-oily fish, may need some extra fat. Brush
with oil or melted butter occasionally while grilling.
• Use tongs with long handles or plastic spatulas for turning meats. Do not use
forks as these pierce the meat, allowing juices to be lost.
• To help retain meat juices, salt after turning meat or after cooking is completed.
• Should grilled foods be prepared and ready before you're ready to serve, turn
heat control to a low setting and cover meat with a single sheet of foil. Food
will continue to cook.
14
Cleaning the Grill
Grates: These are made from cast aluminum which have a non-stick finish.
• The grates should be cleaned after each use. They can be cleaned with detergent and
a plastic scrubber, such as Tufty, or washed in the dishwasher if burned on residue is
first removed. For heavy soil, grates can be soaked in hot, soapy water to which a cleanser,
such as household ammonia, has been added.
• Do not use metal brushes or abrasive scouring pads or other scrubbers intended to clean
outdoor charcoal grills. These will remove the finish as well as scratch the grates. Do
not clean in the self-cleaning oven or use oven cleaners on the grates.
Grill-Rocks: These are made from cast-iron which have been coated with porcelain enamel.
• The grill-rocks should be cleaned frequently or after any excessive build-up of grease.
To clean light soil, use detergent and a plastic scrubber, such as Tufty, or wash in
the dishwasher if burned on residue is first removed. For heavy soil, soak in hot, soapy
water to which a cleanser, such as household ammonia, has been added. Stubborn
spots on grill-rocks, such as burned on residue from sauces, can be scrubbed with
a stiff bristle brush.
• An oven cleaner, such as Easy-Off, can be used for burned on soil. Follow manufacturer's
directions; spray on cleaner and let soak overnight. Do not clean grill-rocks in the self-
cleaning oven.
GHll Element: Follow instructions on page 11 for removing the grill element. The grill
element should never be immersed in water. Most soil will burn off during use. The terminal
block may be cleaned with warm soapy water. Do not use abrasive cleansers or materials.
Dry thoroughly before reinserting in the range.
Porcelain Grill Basin: This area, located under the grill-rocks, should be cleaned after
each heavy use of the grill.
• To remove light soil, clean area with soapy water or spray with cleansers such as 409
or Grease Relief. For easier clean-up, lay paper towels in grill basin, spray with a household
cleanser and soak for at least a half-hour or longer.
• To remove moderate soil, scrub with Comet, Bon Ami, a soft scrub cleanser or plastic
scrubber.
• To remove stubborn soil, spray with an oven cleaner such as Easy-Off; let soak overnight,
wipe clean, rinse and dry.
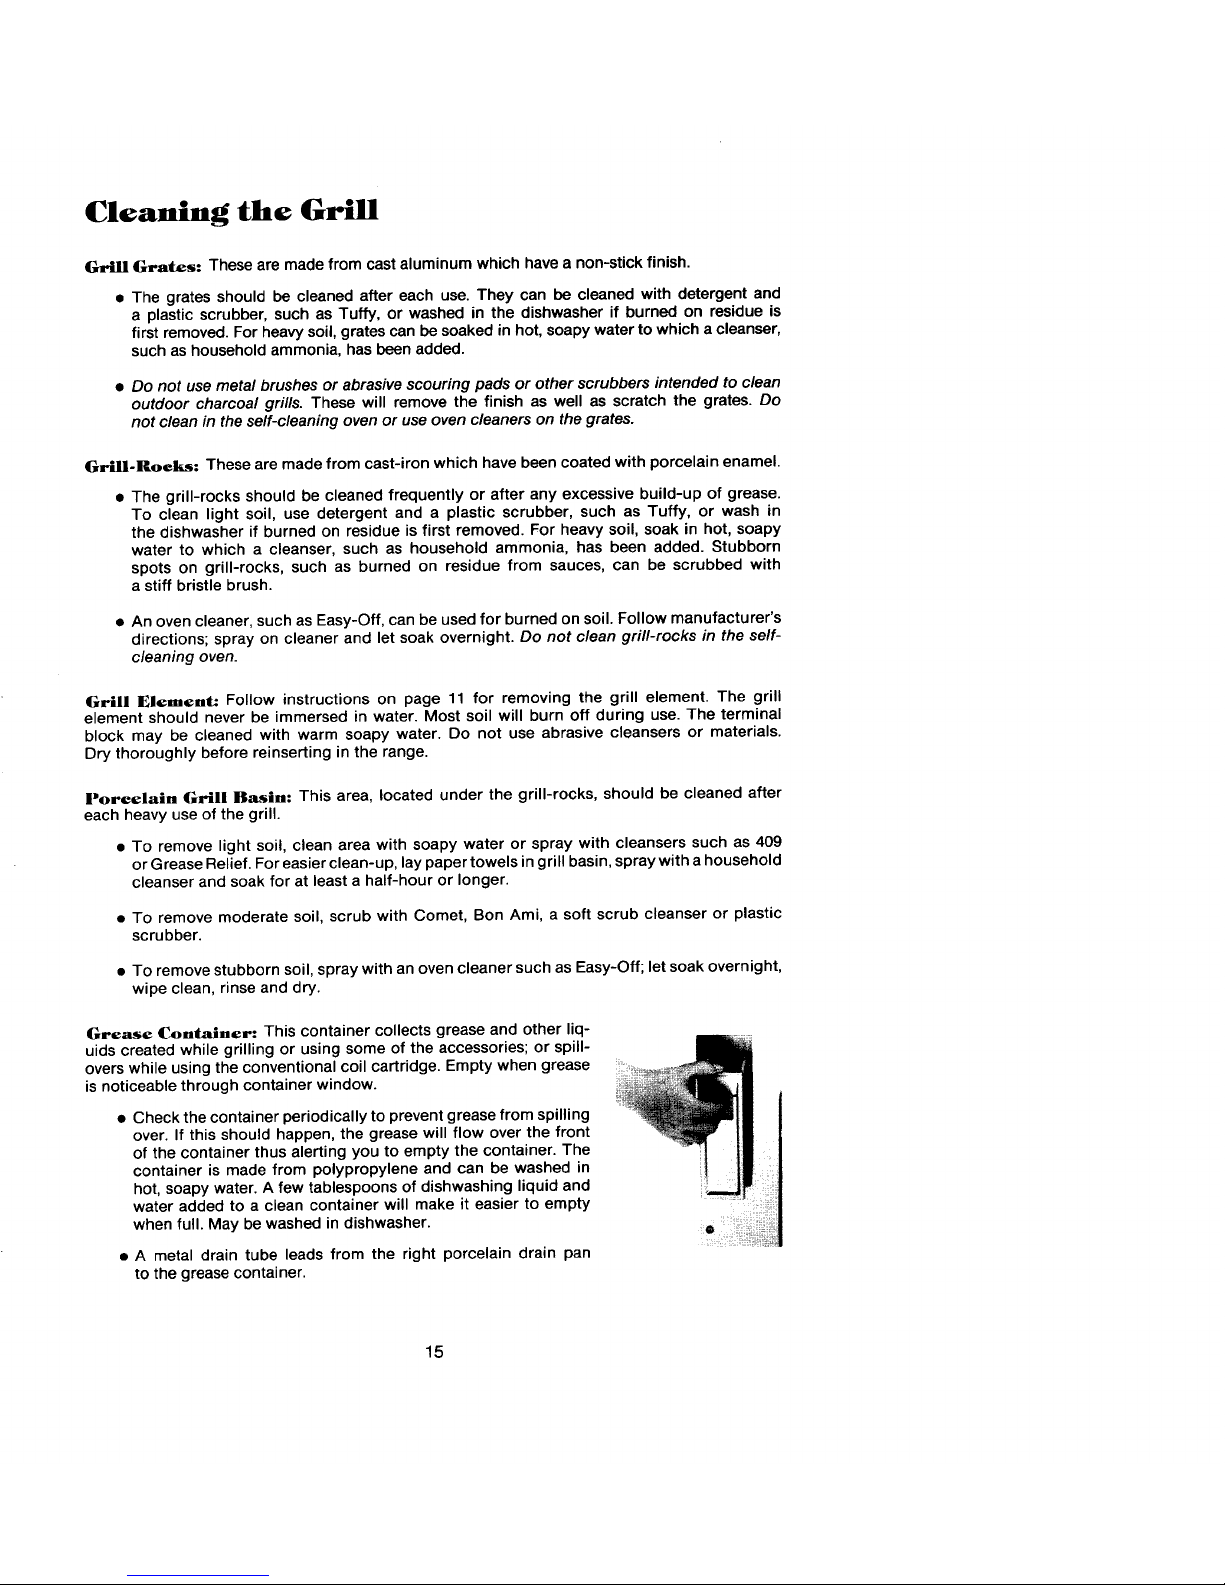
Grease Container: This container collects grease and other liq-
uids created while grilling or using some of the accessories; or spill-
overs while using the conventional coil cartridge. Empty when grease
is noticeable through container window.
• Check the container periodically to prevent grease from spilling
over. If this should happen, the grease will flow over the front
of the container thus alerting you to empty the container. The
container is made from polypropylene and can be washed in
hot, soapy water. A few tablespoons of dishwashing liquid and
water added to a clean container will make it easier to empty
when full. May be washed in dishwasher. •
• A metal drain tube leads from the right porcelain drain pan
to the grease container.
15
 Loading...