

Page 1

; i¸ _ _ , / [ _ :
JENN AIR PRo STYLE GAS RANGE
PRG3010, PRG3610, PRG4810
_ABLE OF CONTENTS
[mportant Safety instructions ...............................................[-4
Surface Cooking .......................................................................5-6
GrNdle ...........................................................................................7
Oven Operation ....................................................................8- I I
Care & Cleaning .................................................................. 12-13
Naintenance ............................................................................... [3
Before You Ca[[ for Service ................................................... [4
Warranty ....................................................................................IS
Guide de [_utHisateur ................................................................ [6
Guia de[ Usuario.......................................................................32
JENN-AIR
Form No. B/02/04 Part No. 8113P418-60 Rev.B P/N 17664 Rev. B Litho U,S,A,
Page 2
Installer; Pleaseleave this manual
with this appliance.
SA} g FY 5 ,}X 5
Warning and important Safety instructions
appearing in this guide are not meant to
Consumer: Pleaseread and keep
this manualfor future reference. Keep
salesreceipt and/or cancelled check
asproof of purchase.
Hodei Number
cover ai[ possibleconditions and situaqons
that may occur, Common sense, caution,
andcare must be exercisedwhen installing,
maintaining,or operating the appliance,
Always contact your dealer, distributor,
serviceagent,or manufacturer about prob-
lems or conditions you do not understand,
R[COGN[ZE SAFETY SYMBOLS,
Serial Number
WORDS, LABELS
WARNING - Hazards or unsafe prac-
Date ofPurchase
tices which COULD resuk in severe per-
sona[ injury or death,
A
If you have questions, call:
]enn-Air Customer Assistance
1-800-]ENNAJR(1-800-536-6247)
[-800-688-2080 ( U.S. TTY for hear-
ingor speechimpaired)
(Non,-Fri,, 8 am-8 pm EasternTime)
[nternet: http://www@nnair,com
For serwce information, see page
t&
[n our continuing effort[o _m°
provethe qua[kyand perfor-
manceofourcookingproducts.
itmay be necessaryto make
changestotheappliancewithout
revisingthisguide.
" PRG3OIO ' PRG3610 " PRG4810
Surface Burners 4 6 6
no no yes
Ovens I Convect/Conventional I ConvecrJConvendonal I ConvecdConventional
CAUTION - Hazardsor unsafepractices
which COULD resuk in minor personal
injury or product or property damage,
Read and follow all instructions be-
fore using this appliance to prevent the
potential risk of fire, electric shock, per-
sona[ injury or damage to the appliance as a
result of improper usage of the appliance.
Use appliance only for its intended purpose
as described in this guide,
To ensure proper and safe operation:
Appliance must be properly installed and
grounded by a qualified technician, Do not
attempt to adjust, repair, service, or replace
any part of your appliance unless iris specifi-
cally recommended in this guide, Ail other
servicing should be referred to a qualified
servicer. Have the installer show you the
location of the gas shut off valve and how to
shut it off in an emergency,
I Standard Bake
Always disconnect power to appliancebe-
fore servicing,
These products are for usewith natural gas
only.
A faint gasodor may indicate agas leak. If
a gas odor is detected, shut off the gas
supplyto the range. Cai[ your installer or
localgascompanyto havethe possibleleak
checked, Never use a match or other
flame to locate a gas leak,
in this manual is not
y, a fire or exploo
;ion may result causing property
damage, personal in]ury or death°
- Do not store or use gasoline or
other flammable vapors and liqo
uids in the vicinity of this or any
- (FYOU SMELL GAS:
• Do not tryto lightany
• Do not touch any electrical
switch.
• Do not use any phone inyour
• immediately call your gas
supplierfrom a neighbor's
phone.Followthegassupplier's
instructions°
• if you cannot reach your gas
supplier,call the fire
- installation and service must be
performed by aqualifled installer,
serviceagency or the gas
A W@RMING: Gas leaks
may occur in your system and
result in a dangerous situation.
Gas leaks may not be detected by
smell abne. Gas suppliers recomo
mend you purchase and install an
UL approved gas detector. Install
and use in accordance with the
manufacturer's instructions.
Page 3

[f appliance is installed near a window,
proper precautions should be taken to
prevent curtains from blowing over burn-
ers.
Do not use water on grease fires. Use
baking soda,a dry chemical or foam-type
extinguisher to smother fire or flame.
o ALL RANGES
CAN TiP AND
CAUSE iNJU-
RiES TO PER-
SONS
o iNSTALL
ANTbTJP DE-
ViCE PACKED
WiTH RANGE
o FOLLOW ALL iNSTALLA-
TiON iNSTRUCTiONS
WARNING: To reduce risk of tip-
ping of the appliance from ab-
normal usage or by excessive
[oading of the oven door, the
appliance must be secured by a
properly installed anti-tip device,
To check if device is properly installed, trip
circuit breaker to disconnect power, re-
move access pane[ and look underneath
range to verify that one of the rear leveling
legs is properly engaged in the bracket slot.
Replace the access pane[ and reset circuit
breaker. The anti-tip device secures the
rear leveling leg to the floor when properly
engaged. You should check this anytime
the range has been moved.
Avoid placing the range in a main "traffic
path" or in an isolated location with no
counter space nearby. Visualize the oven in
use before selecting a location. Remember
that open oven doors may block a passage-
way and create a hazard.
To F[:R:EO:R
5Moxg DA£A(;g
Be sure ai[ packingmaterials are removed
from the appliancebefore operating it.
Keep area around applianceclear and free
from combustible materials, gasoline,and
other flammablevapors and materials.
NEVER leave any items on the cod<top.
The hot air from the vent may ignite flam-
mable items and may increase pressure in
closedcontainers which may cause them to
burst.
Manyaerosol-type spray cansare EXPLO-
SIVEwhen exposed to heat and may be
highlyflammable.Avoid their use or stor-
agenear an appliance.
Many plasticsare vulnerable to heat. Keep
plastics away from parts of the appliance
that may become warm or hot. Do not
leaveplastic items on the cod<top asthey
may reek or soften if [eft too dose to the
vent or a lighted surfaceburner.
To eliminate the hazard of reaching over
hot surfaceburners, cabinetstorage should
not be provided direcdy above a unit. [f
storage isprovided, it should be limited to
itemswhich areusedinfrequendyandwhich
are safely stored in an area subjected to
heatfrom an appliance.Temperatures may
be unsafefor some items, such asvoiaqie
liquids, cleanersor aerosol sprays.
Do not hangarticles from any part of the
applianceor placeanythingagainsttheoven.
Somefabrics are quite flammableand may
catch on fire.
When using this restaurant caliber appli-
ance, use it with extreme care, asthis type
of appliance provides intense heat and can
increase the accident potential
(}£5:g
Turn off appliance and ventilating hood to
avoidspreadingthe flame. Extinguishflame
then turn on hood to remove smoke and
odor.
• Cool(top: Smother fire or flameina pan
with a lid or cookie sheet.
NEVER pick up or movea flaming pan.
* Oven: Smother fire or flame by closing
the oven door.
CH[:LD S£ :Er y
NEVER leave children alone or unsuper-
vised nearthe appliancewhen it is in useor
is still hot.
NEVER allow children to sit or stand on
any part of the applianceas they could be
injured or burned.
Children must be taught that the appliance
and utensilsinit canbehot. Let hot utensils
cod in a safeplace, out of reach of small
children. Children should betaught that an
applianceis not a toy, Children should not
be allowed to playwith controls or other
)arts of the unit.
_ @AUTI@_: NEVER store
items of interest to children in
cabinets above an appliance or on
backguard of arange. Children climb-
ing on the appliance door to reach
items could be seriously injured.
AB,)UI YOUR
NEVER useapplianceasaspaceheater to
heator warm a room to prevent potential
hazard to the user and damage to the
appliance.Also, do not usethe cooktop or
oven asa storagearea for food or cooking
utensils.
Do not obstruct the flow of combustion
andventilation air byblockingtheovenvent
or air intakes.Restriction of air flow to the
burner prevents proper performance and
increases carbon monoxide emission to
unsafelevels.
Keep oven vent ducts unobstructe& Your
rangeisvented through the front top of the
islandtrim, stubbackor highshelfbackspiash.
Never block oven vent or air intakes. Do
not obstruct the flow of combustion and
ventilation air. Restriction of air flow to the
burner prevents proper performance.
Page 4
..... <:,
Avoid touching oven vent areawhie oven
ison and for several minutes after oven is
turned off. Some parts of the vent and
surrounding area become hot enough to
causeburns.After ovenisturned off,do not
touch the oven vent or surrounding areas
unqI they have had sufficient time to cod.
Other potenqally hot surfaces include
cod<top, areas facing the cod<top, oven
vent, surfacesnear the vent opening,oven
door, areasaround theoven door andoven
window.
WARNIMG: NEVER use
appliance door, or drawer, ff
equipped, as a step stool or seat as
this may resultin possible tipping of
the appliance, damage to the appfio
ante, and serious injuries.
Do not touch a hot oven rightbulb with
dampcloth asthe bulb could break.Should
the bulb break, disconnect power to the
appliance before removing bulb to avoid
electrical shod<.
(_OOXIN(; SAFFI IY
Always place a pan on a surface burner
before turning it on. Be sure you know
which knob controls which surfaceburner.
Hake sure the correct burner isturned on
and that the burner has ignited. When
cooking is completed, turn burner off be-
fore removing panto prevent exposure to
burner flame.
Alwaysadjust surfaceburner flameso that
it doesnot extend beyondthe bottom edge
ofthe pan.Anexcessiveflameis hazardous,
wastes energy and may damagethe appli-
ance,panor cabinets abovethe appliance.
NEVER reaveasurfacecooking operation
unattended especially when using a high
heat setting or when deep fat frying.
Boi[overs cause smoking and greasy
spi[[oversmayignite. Clean up greasyspills
assoonaspossible.Do not usehighheatfor
extended cooking operations.
NEVER heat an unopened container on
the surfaceburner or in the oven. Pressure
build-up may causecontainer to burst re-
suiting in seriouspersona[injury or damage
to the appliance.
Use dry, sturdy pothoiders. Damp pot-
holders may cause burns from steam.
Dishtowels or other substitutes should
never be usedaspothdders becausethey
can trail across hot surface burners and
ignite or get caughton applianceparts.
Always let quantities of hot fat used for
deep fat frying coo[ before attempting to
move or handle.
Do not let cooking grease or other flare-
mane materialsaccumulate in or near the
appliance, hood or vent fan.Clean hood
frequently to prevent greasefrom accumu-
latingon hood or filter. When flamingfoods
under the hood turn the fan on.
NEVER wear garments made of flam-
mable material or loose fitting or long-
sleeved @pare[ while cooking. Clothing
may ignite or catch utensil handles.
Always place oven racks in the desired
positions while oveniscool SHe oven rack
out to add or remove food, using dry,
sturdy pothoiders. Always avoid reaching
into the oven to add or remove food. if a
rack must be moved while hot, use a dry
pothoider. Always turn the oven off at the
end of cooking.
Use carewhen opening the oven door. Let
hot air or steam escapebefore moving or
replacing food.
Always remove soiled broiler panfrom the
broiler compartment aftercooking.Grease
left in the pan may become hot enough
to ignite.
PREPARED FOOD WARNING: Fol-
low food manufacturer's instructions, if a
plastic frozen food container and/or its
cover distorts, warps, or isotherwise dam-
aged during cooking, immediately discard
the food and its container. The food could
be contaminated.
NEVER use aluminum foil to cover oven
racks or oven bottom. This could result in
risk of electric shock, fire, or damageto the
appliance. Use foil only as directed in this
guide.
Do not use aluminum foil to line burner
spi[[overbow[. Restriction of normalair flow
may result in unsafeoperation.
UT:gNS L SAF:g'Ft'
Use panswith fiat bottoms and handlesthat
are easilygraspedand staycod. Avoid using
unstable, warped, easily tipped or loose-
handled pans. Also avoid usingpans, espe-
cially small pans,with heavy handlesasthey
could be unstableandeasilytip. Pansthat are
heavyto movewhenfilled with food mayalso
be hazardous.
Be sure utensil is large enough to properly
contain food andavoid boiiovers. Pansize is
particularly important in deep fat frying. Be
sure pan wii[ accommodate the volume of
food that is to beaddedaswei[ asthe bubble
action of fat.
To minimize burns, ignition of flammable
materials and spillage due to unintentional
contactwith the utensil do notextendhandles
over adjacent surface burners. Alwaysturn
pan handlestoward the side or back of the
appliance,not out into the room where they
are easily hit or reached by sinai[ children.
Never let apanboil dry asthis could damage
the utensil andthe appliance.
Follow the manufacturer's directions when
usingoven cooking bags.
Only certain types of glass, glass/ceramic,
ceramic or glazed utensils are suitable for
cooktop or oven usagewithout breakingdue
to the suddenchangeintemperature. Follow
manufacturer'sinstructions when usingglass.
This appliancehasbeen tested for safeper-
formance usingconventional cod<ware. Do
not useany devices or accessoriesthat are
not specificallyrecommended in this guide.
Do not use eyelid covers for the surface
units,stovetop grills, or add-onovenconvec-
Page 5

tionsystems.Theuseofdevicesoracces-
soriesthatarenotexpresslyrecommended
inthismanualcancreateserioussafety
hazards,resukinperformanceproblems,
andreducethehfeofthecomponentsof
theapphance.
(} [,EANIN(; SAFETY
Turn off ai[ controls and wait for appliance
parts to coo[ before touching or cleaning
them. Do not touch the burner grates or
surrounding areas until they have had suffi-
cient time to coo[.
Clean appliancewith caution. Use care to
avoid steamburns if awet spongeor cloth
isused to wipe spillson a hot surface.Some
cleanerscanproduce noxious fumesif ap-
plied to a hot surface.
Cleanonly parts listed in this guide.Do not
dean door gasket. The door gasket is es-
sent@for agoodseal.Careshould betaken
not to rub, damage,or move the gasket.
IMPORTANT SAF[Z%
NOTICE AND
The California Safe Drinking Water and
Toxic Enforcement Act of 1986 (Proposi-
tion 65) requires the Governor of Califor-
niato punish a list of substancesknown to
the State of California to causecanceror
reproductive harm,andrequiresbusinesses
to warn customers of potential exposures
to such substances.
Users of this appliance are hereby warned
that the burning of natural gas can result in
low-level exposure to some of the listed
substances, including benzene, formalde-
hyde and soot, due primarily to the incom-
plete combustion of natural gas. Properly
adjusted burners wii[ minimize incomplete
combustion. Exposure to these substances
can also be minimized by properly venting
the burners to the outdoors.
[HPORTANT NOTICE REGARDING
PET BIRDS: Never keep pet birds in the
kitchen or in rooms where the fumesfrom
the kitchen could reach. Birds havea very
sensitive respiratory system. Fumes re-
leased during an oven self-cleaning cycle
may be harmful or fatal to birds. Fumes
releaseddueto overheated cooking oil, fat,
margarineandoverheated non-stickcook-
ware may be equallyharmful.
SAVE THESE INSIRUC[ ONS FOR FUTURE REFERENCE
4
Page 6
:A( B URNEI S
AI burner ignitors wtl spar[<when
anysurface burner isturned on.
Surfaceburners may be difficuk to
tght at times due to air in the gas
tne. This may occur:
a) during instalaton
b) if rangeis disconnected from
the maingassupply
c) if the apptance hasnot been
usedfor severaldays
To remove air in the gas fine,
hold a ighted match next to the
burner head and turn the control
knob on.
° The burner flamemayappear sepa-
rated from the port, if a pan is not
placedon the grate.
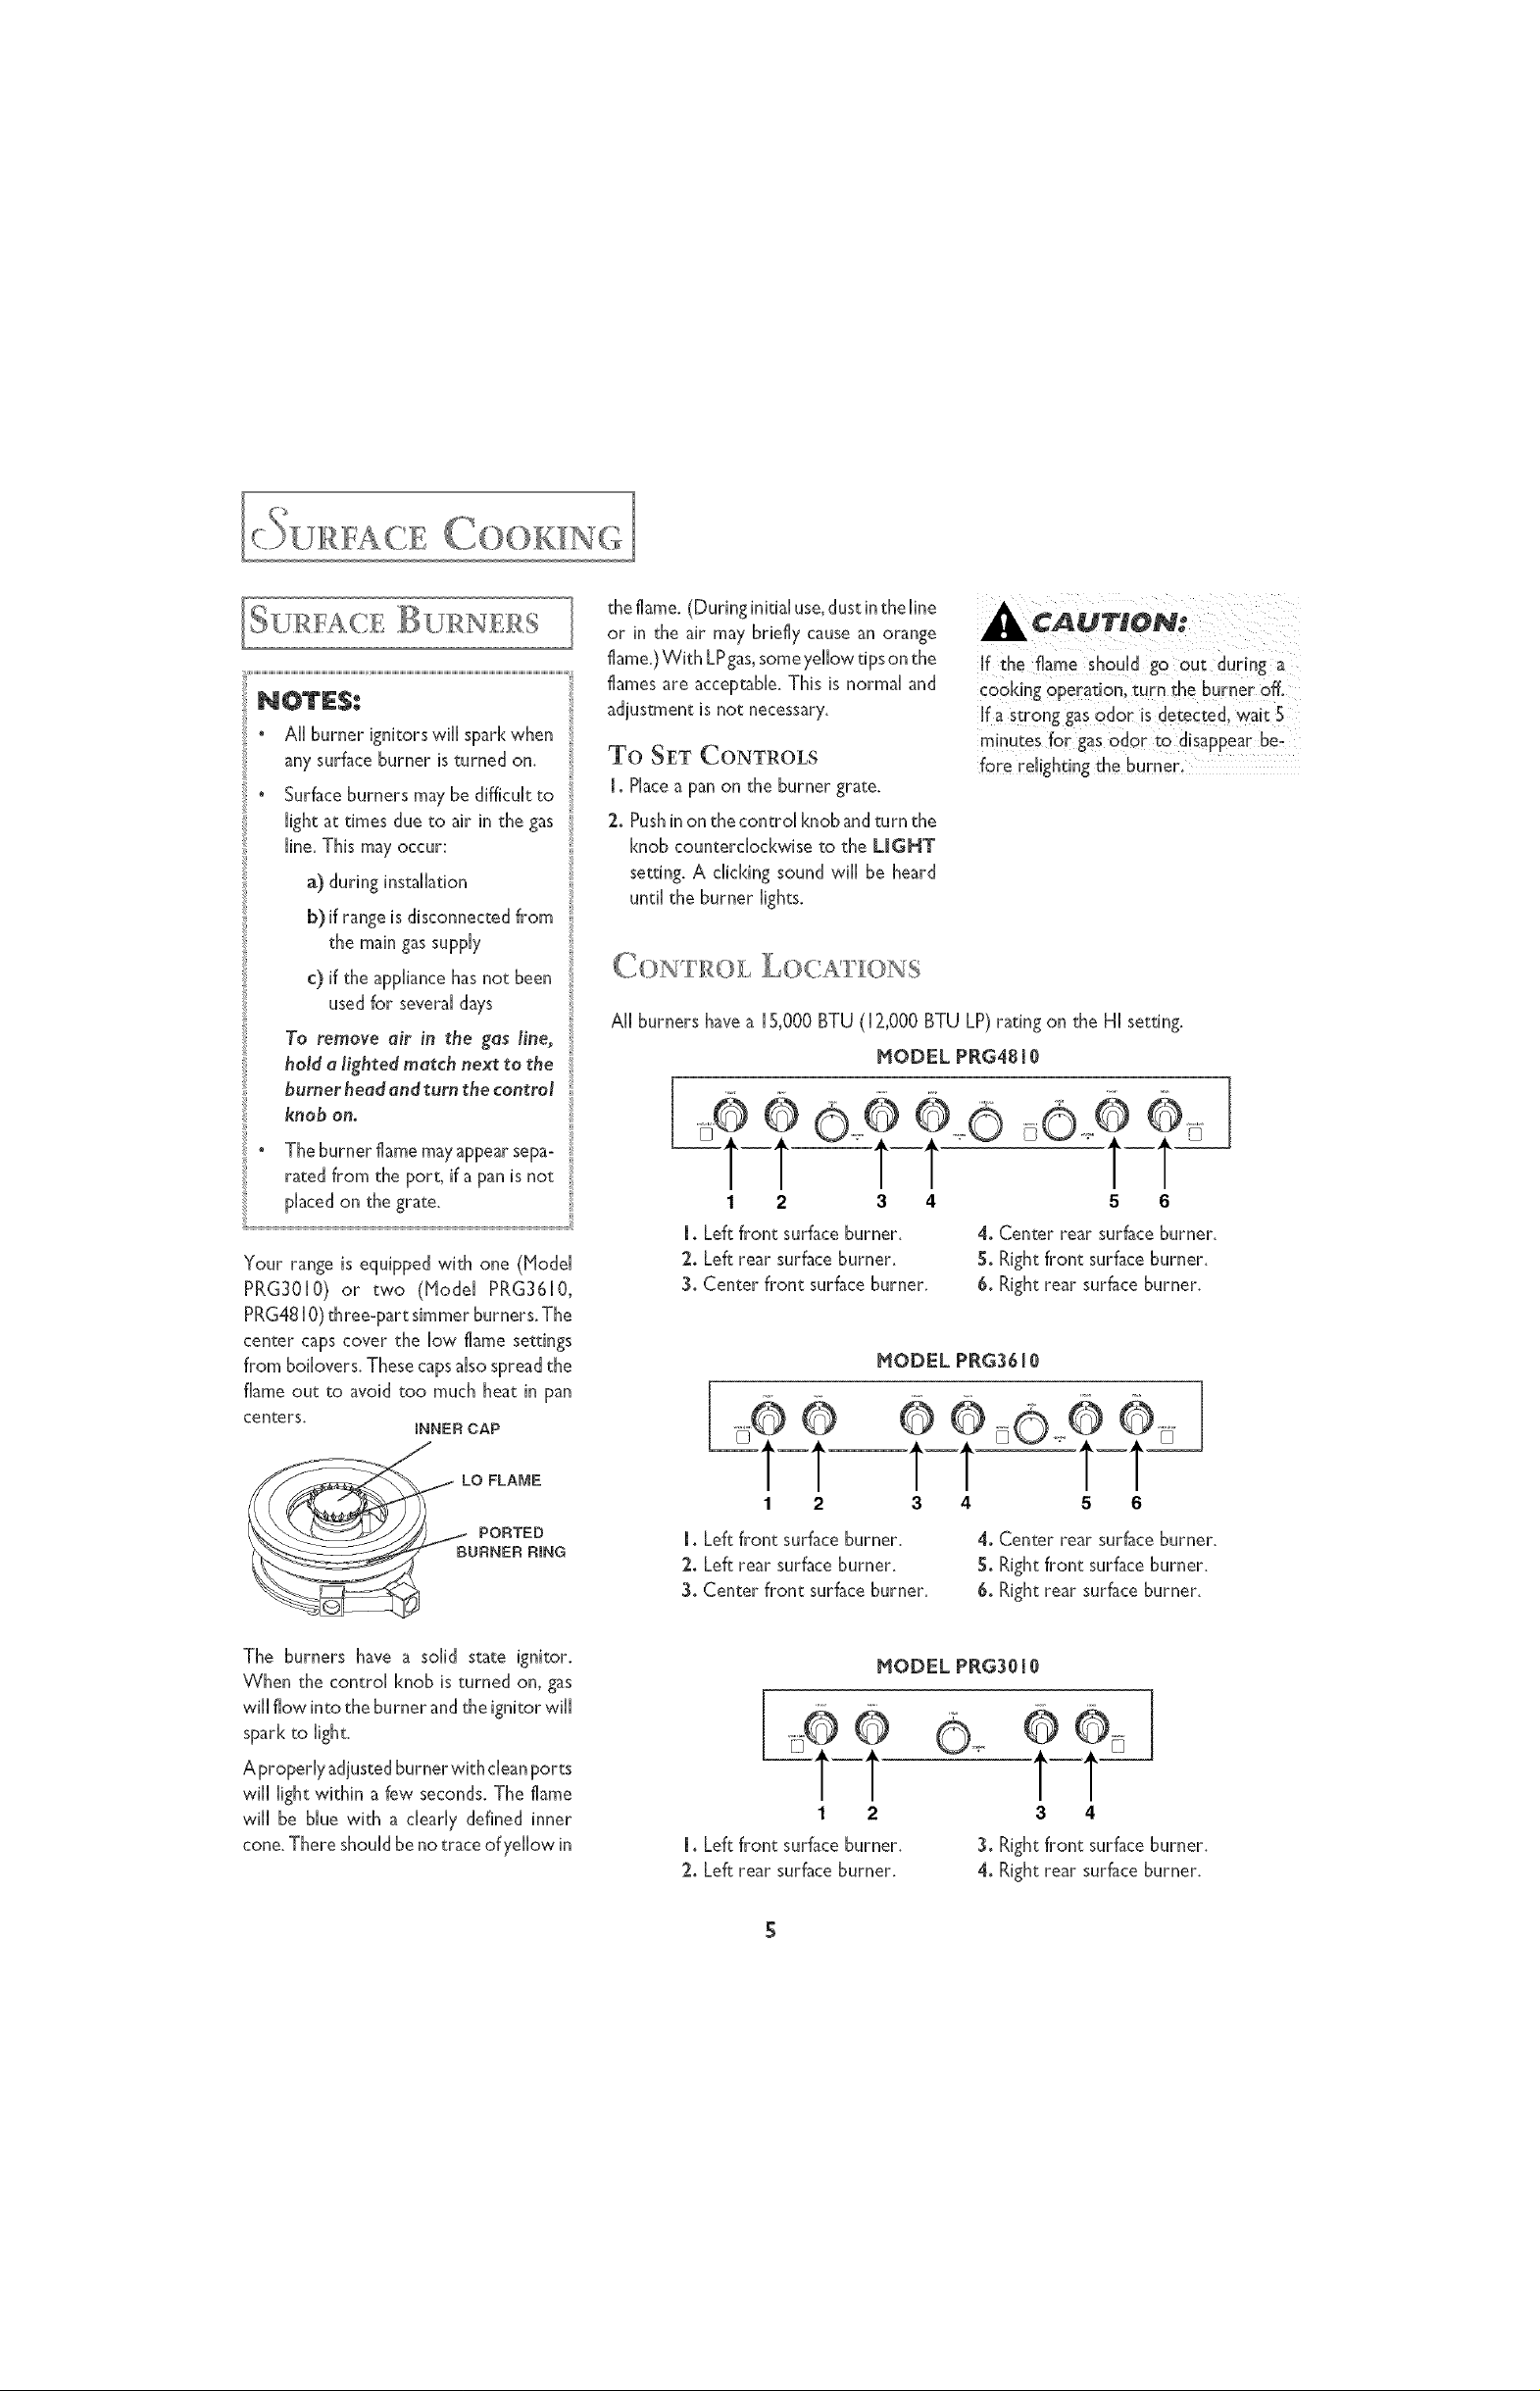
Your range is equipped with one (Mode[
PRG30[0) or two (Model PRG3610,
PRG48[0) three-part simmerburners. The
center caps cover the low flame settings
from botovers. Thesecapsalsospread the
flame out to avoid too much heat in pan
centers,
INNER CAP
theflame. (During initial use,dust inthe line
or in the air may briefly causean orange
flame.)With LPgas,someyellow tips on the
flamesare acceptable. This is normal and
adjustment is not necessary.
To SET CONTROLS
1oPlacea pan on the burner grate.
:2.Pushinon the control [<nobandturn the
knob counterclockwise to the LIGHT
setting. A ctcking sound will be heard
until the burner lights.
A[[ burners havea [5,000 BTU ([ 2,000 BTU LP)rating on the HI setting.
HODEL PRG48 i0
If the flame should go out during a
cooking operation, turn the burner off.
If a strong gasodor is detected, wait 5
minutes for gasodor to disappear beo
fore refghting the burner,
o -9
IT /1
1 2
I. Left front surface burner.
:2.Left rear surfaceburner.
3. Center front surfaceburner.
3 4 5 6
4. Center rear surfaceburner.
5oRight front surfaceburner.
6oRight rear surface burner.
HODEL PIG36 [0
LO FLAME
PORTED
URNER RING
The burners have a sold state ignitor.
When the contrd [<nobis turned on, gas
will flow into the burner andthe ignitor will
spar[<to tght.
A properly adjustedburner with dean ports
will light within a few seconds.The flame
will be blue with a clearly defined inner
cone.There shouldbe no trace ofyelow in
t-t T-T
1 2 3 4 5 6
I. Left front surface burner.
2. Left rear surfaceburner.
3oCenter front surfaceburner.
HODEL PRG3010
1 2
l oLeft front surfaceburner.
2. Left rear surfaceburner.
4. Center rear surfaceburner.
5oRight front surfaceburner.
6. Right rear surface burner.
@
t-t
3 4
3. Right front surfaceburner.
4. Right rear surface burner.
Page 7

CONT {OI[ SETTINGS ]
The controls provide an infinite number of settings between HIGH and LOW. Simply
adjust your flame to fityour needs.
The size and type of cookware and the amount and type of food being cooked will influence
the setting needed for best resuks. The following settingsare provided asguidelines.
Settings
HIGH
Uses
(_OOKWARE gELEC.... FI(,)N
To achieve optimum cooking perfor-
mance, use professional cookware°
This type of cookware can be found at
department stores, specialty cooking stores
or restaurant supply stores.
Handles on regular cookware may melt or
bubble due to the flame size on the large,
professional size burners.
A fast heat to start cooking quickly and to bring hquNs
to a bo&
NED
For most frying, sauteing, and slow boil of large amounts
of food.
For simmering and reeking butter or chocolate.
D
>'The LOW setting utilizesonly the inner burner. However, when usingthis setting,always
light the entire burner first.
p (,3- FIRFAILUI {IE
To operate the surface burners during a
power fai[ure:
l o Hold a[ighted match near the burner
ports.
2. Pushinandturn the control [<nobslowly
to the LIGHT setting.
3o Adjust the flame as desired.
NOTE: The broiler, ovenor griddle burn-
ers cannot be turned on during a power
failure.
When lighting the surface burners be
sure all of the controls are in the OFF
position. Strike a match first and hold it
[n position before turning the knob to
the Lite position.
Thin, single-ply stainless steel isnot recom-
mended because of hot spots and pomntial
burning of food.
_IZE OF COOKWARE
• Flamesize should be adjusted so itdoes not
extend beyond the edge of the cookware.
This instruction is based on safety con-
siderations. Adjusting the size of the
flame m fitthe size of the cookware also
helps m save fuel.
• Panswhichextend morethantwoinches
beyond the gram or touch the cooktop
may cause heat m build up, resulting in
damage m the burner grate, burner or
cooktop.
o Speciaky imms, such as woks with a
support ring, which restrict air circula-
tion around the burner will cause heat
to build up and may result in damage to
the burner grate, burner or cookmp.
Use Jenn-Air fiat bottom wok ac-
cessory, Mode[ AO [42.
CANNING
° When canning, use the HIGH setting
just until the water comes to a boil or
pressure is reached in a pressure can-
ner. Then, reduce to the lowest flame
setting that maintains the boil or pres-
sure.
Prolonged useof the HIGH setting or
the useof incorrect canningutensilswill
produce excessiveheat. Excessiveheat
can cause permanent damage to the
appliance.
6
Page 8
IDDLE ( V OD:ELI R(;4S 0 ONLY}
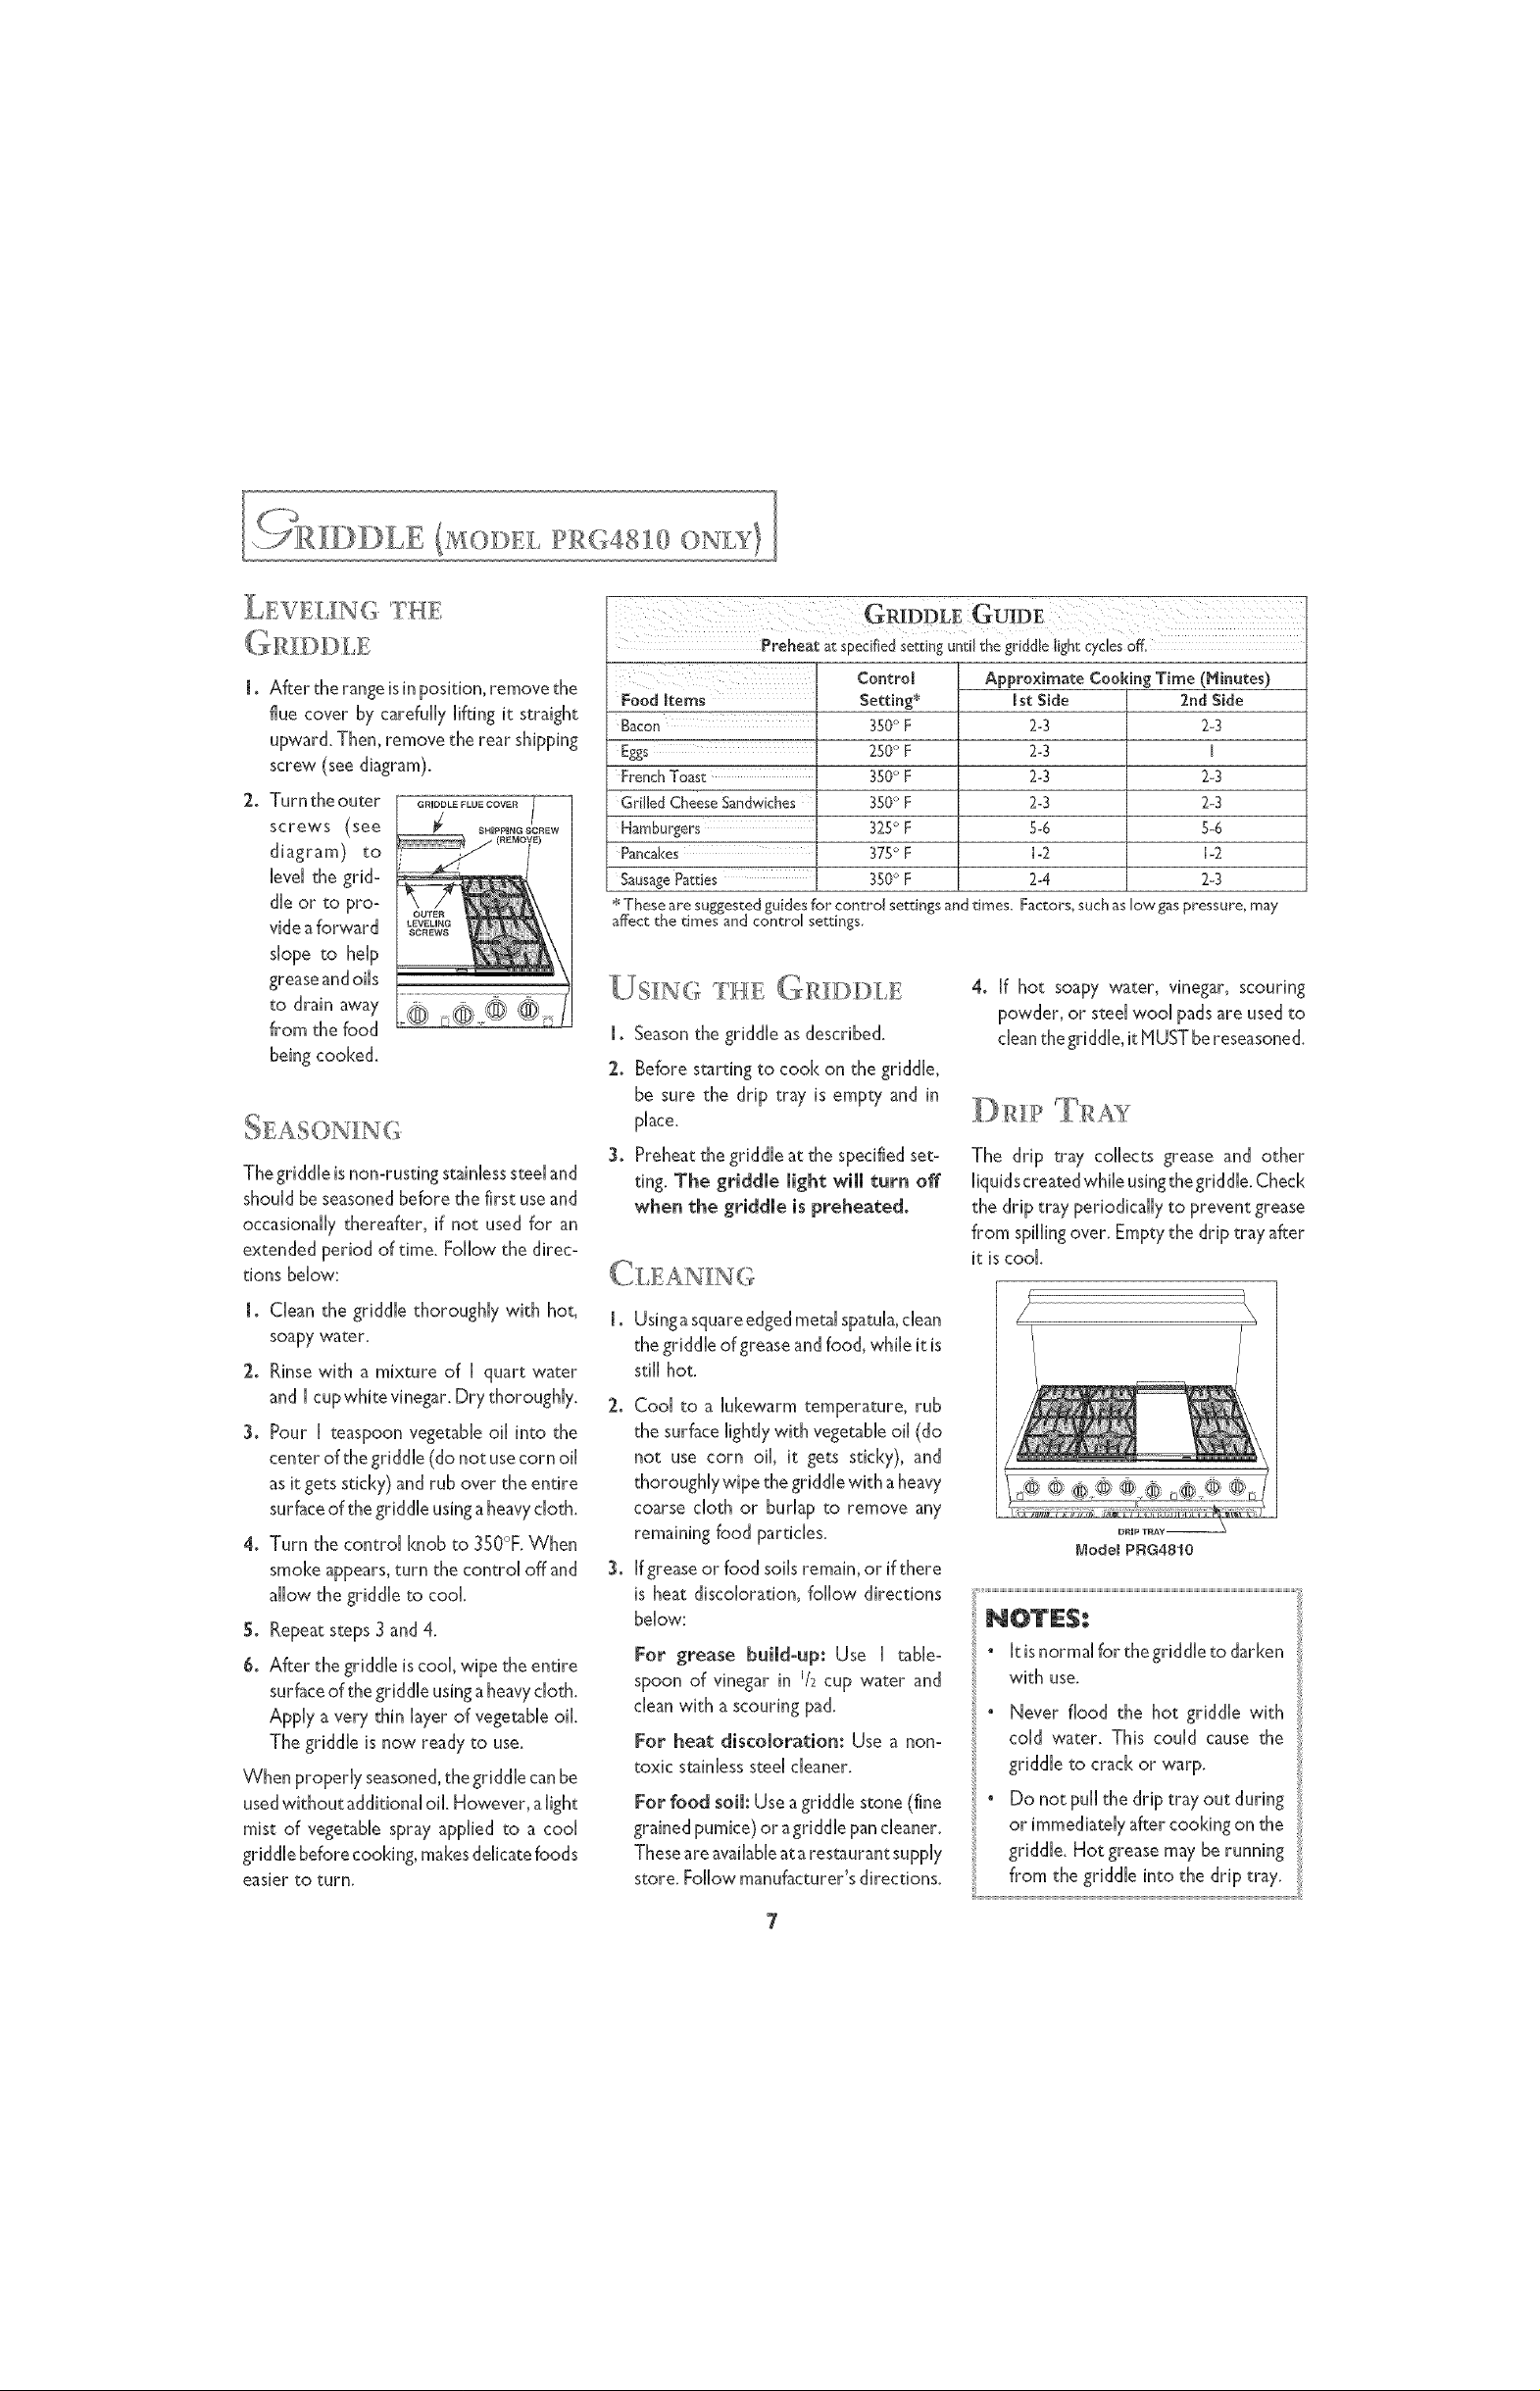
LEVELING THE
1o After the range isin position, remove the
flue cover by carefully liftingit straight
upward. Then, remove the rear shipping
screw (see diagram}.
2. Turntheouter G_UDDLEFW_COW./
screws (see _ S.UPPB.GSCREW
diagram) to
level the grid-
die or to pro-
vide a forward
slope to help
grease and oils
to drain away
from the food
being cooked.
Preheat at specifiedsetting untiJ the griddle light cycles off.
Control
Food ffems
French Toast
Grilled Cheese Sandwiches
Hamburgers
Pancakes
SausagePatties
* These are suggested guides for control settings and times. Factors, such as low gas pressure, may
affect the times and control settings,
Setting*
350° F
250° F
350° F
350° F
325° F
375° F
350° F
[JS[NG THE (_:Ri_DD:LE
Approximate Cooking Time (Minutes)
[st Side 2rid Side
2-3 2-3
2-3 I
2-3 2-3
2-3 2-3
5-6 5-6
1-2 1-2
2-4 2-3
4. If hot soapy water, vinegar, scouring
powder, or steel wool pads are used to
i o Seasonthe griddle asdescribed.
dean the griddle, it NUST be reseasoned.
2. Before starting to cook on the griddle,
be sure the drip tray is empty and in
place.
DR: p T:R£s'
Thegriddle isnon-rusting stainlesssteeland
shouldbe seasonedbefore the first useand
occasionally thereafter, if not used for an
extended period of time. Followthe direc-
tions below:
1. Clean the griddle thoroughly with hot,
soapy water.
2. Rinse with a mixture of I quart water
and I cupwhite vineDr. Dry thoroughly.
3o Pour [ teaspoon vegetableoil into the
center of the griddle (donot usecorn oil
asit gets sticky) and rub over the entire
surface of the griddle using a heavy cloth.
4. Turn the control knob to 3S0°F.When
smoke appears,turn the control off and
allow thegriddle to cool.
S. Repeat steps 3 and 4.
6. After the griddle iscool, wipe the entire
surface of the griddle using a heavy cloth.
Apply a very thin layer of vegetable oil.
The griddle is now ready to use.
When properly seasoned, the griddle can be
used without additional oil. However, a light
mist of vegetable spray applied to a cool
griddle before cooking, makes delicate foods
easierto turn.
3. Preheatthe griddle at the specified set-
ting. The griddle light will turn off
when the griddle is preheated.
Usingasquareedgedmetalspatula,dean
the griddle of greaseandfood, while it is
still hot.
2_
Coo[ to a lukewarm temperature, rub
the surface lightly with vegetable oil (do
not use corn oil it gets sticky), and
thoroughiywipe the griddle with a heavy
coarse cloth or burlap to remove any
.
Ifgreaseor food soilsremain,or if there
is heat discoloration, follow directions
below:
For grease build-up: Use I table-
spoon of vinegar in % cup water and
clean with a scouring pad.
For heat discoloration: Use a non-
toxic stainless steel cleaner.
For food soil: Useagriddle stone (fine
grainedpumice) or agriddie pancleaner.
Theseareavailableatarestaurantsupply
store. Follow manufacturer's directions.
The drip tray collects grease and other
liquids created while using the griddle. Check
the drip tray periodically to prevent grease
from spilling over. Empty the drip tray after
it is cook
DRIP TRAY --
ModelPtqG4810
" [t isnormal for the griddle to darken
with use.
" Never flood the hot griddle with
cold water. This could cause the
griddle to crack or warp.
° Do not pui[ the driptrayout during
orimmediately after cooking on the
griddle. Hot grease may be running
from the griddle into the drip tray.
7
Page 9

)N SYs'r:s, s
Be surethe oven control is set in the OFF
position prior m suppiyinggasm the range.
Your appliance features pilotless ignition.
The oven bake and brd burners are
equipped with anelectric glow ignitor and
safety system which ignites the gas.The
burner will light within 30 seconds.
With this ignition system,the ovenwill not
operate during a power failure or if the
oven isdisconnected from the wall outlet.
No attempt should be made to oper-
ate the oven during a power failure.
To burn off the manufacturing oils
usedat thefactory, turn the ovenand
broiler burners ON oneat atime to
450°F. Allow to heat for 20-30rain- '"
utes.Turn on the overhead hood to
remove the odor from the room.
° Hoisture evaporatesfrom food dur-
inganycooking process.Theamount
ofmoisture dependson the moisture
content of the food. This moisture
will condense on any surfacethat is
cooler than the inside of the oven,
suchasthe control pane[or the top
of the door. This is normal.
To replace: Tilt the front of the rack up
and place between rack slides. SHe the
rack back until it dears the stop position.
Lower the front and slide therack straight
in.
Do notusealuminum foil to coverthe
oven racksor to line the oven bot-
tom. Baking results will be affected
and the oven may be damaged.
2
1
HODEL PRG4810
4
3
a
--1
Oven Light Switch - push on the top of
the OVEN LIGHT switch to turn the oven
light on. Pushon the bottom of the switch
to turn the light off.
Convect Switch - pushon the top of the
CONVECT switch to turn the convection
fanON. Pushon the bottom of the switch
to turn the convection fan OFF. Avoid
using the convection fan while broiling.
Conventional heat ismore effective when
broiling.
Oven Knob - use to set oven tempera-
ture for baking or convection baking or m
select broiling. Be sure the indicator line is
positioned with the exact mmperature
desired.
Small Oven Knob (Model PRG481@
only) - useto set oven temperature for
baking.(This oven is not designed to broil
or convection bake.)Turn the control knob
to the temperature desired.
Oven hdicator Light - the light will
glow until the desired temperature is
reached.As the burners cycleto maintain
the selected temperature the lights will
cycleon and off also.
SETTING THE CONTROLS
[o Placeoven racks on proper rack psi-
tions.
2. Turn OVEN [<nobto desired tempera-
tUre,
3. Turn on the CONVECT fan if convec-
tioncooking isdesired.When theOVEN
indicator light cycles off, the oven is
preheatedto the selectedtemperature.
Placethe food in the oven. The OVEN
indicator light will cycle on and off
throughout the bakingprocess.Preheat
only when necessary.Refer to baking
and roasting sections (pgs.9-1 I) as to
when preheating is recommended.
4. After baking, turn OVEN knob and
CONVECT fan, if selected, OFF.
]> ,)SITI ,)NS
(,, g ,
Therackpositionsnotedarerecommended
for the best browning results and most
efficient cooking times.
To remove: Pull forward to the stop
position; lift upon the front of the rack and
pull out.
Rack Position #4 (large oven only):
Two rack baking,oven meals.
Rack Position#31
Two rack baking,oven meal
Rack Position#2:
Host bakedgoodsandroastingsmallcuts
of meat.
Rack Position #1:
Large cuts of meat and large poultry,
angel food cake.
Multiple Rack Cooking (large ovenonly):
Two racks,use #2 and#4 or #[ and#3.
Three racks,use# [,#2, #3 or #2,#3,#4.
8
Page 10
° Use tested recipes from reliable sources.
• Preheat the oven only when necessary.
For baked foods that rise and for richer
browning, a preheated oven is better.
Casseroles can be started in a cold oven.
Preheating takes from 8 to [3 minutes;
phce food in oven after Oven indicator
Light cycles off.
° Arrange oven racks before turning on
oven. Follow suggested rack positions
listed in the chart below.
" Allow about 2 inchesof spacebetween
the oven side wails and pans to allow
proper air drcu[ation.
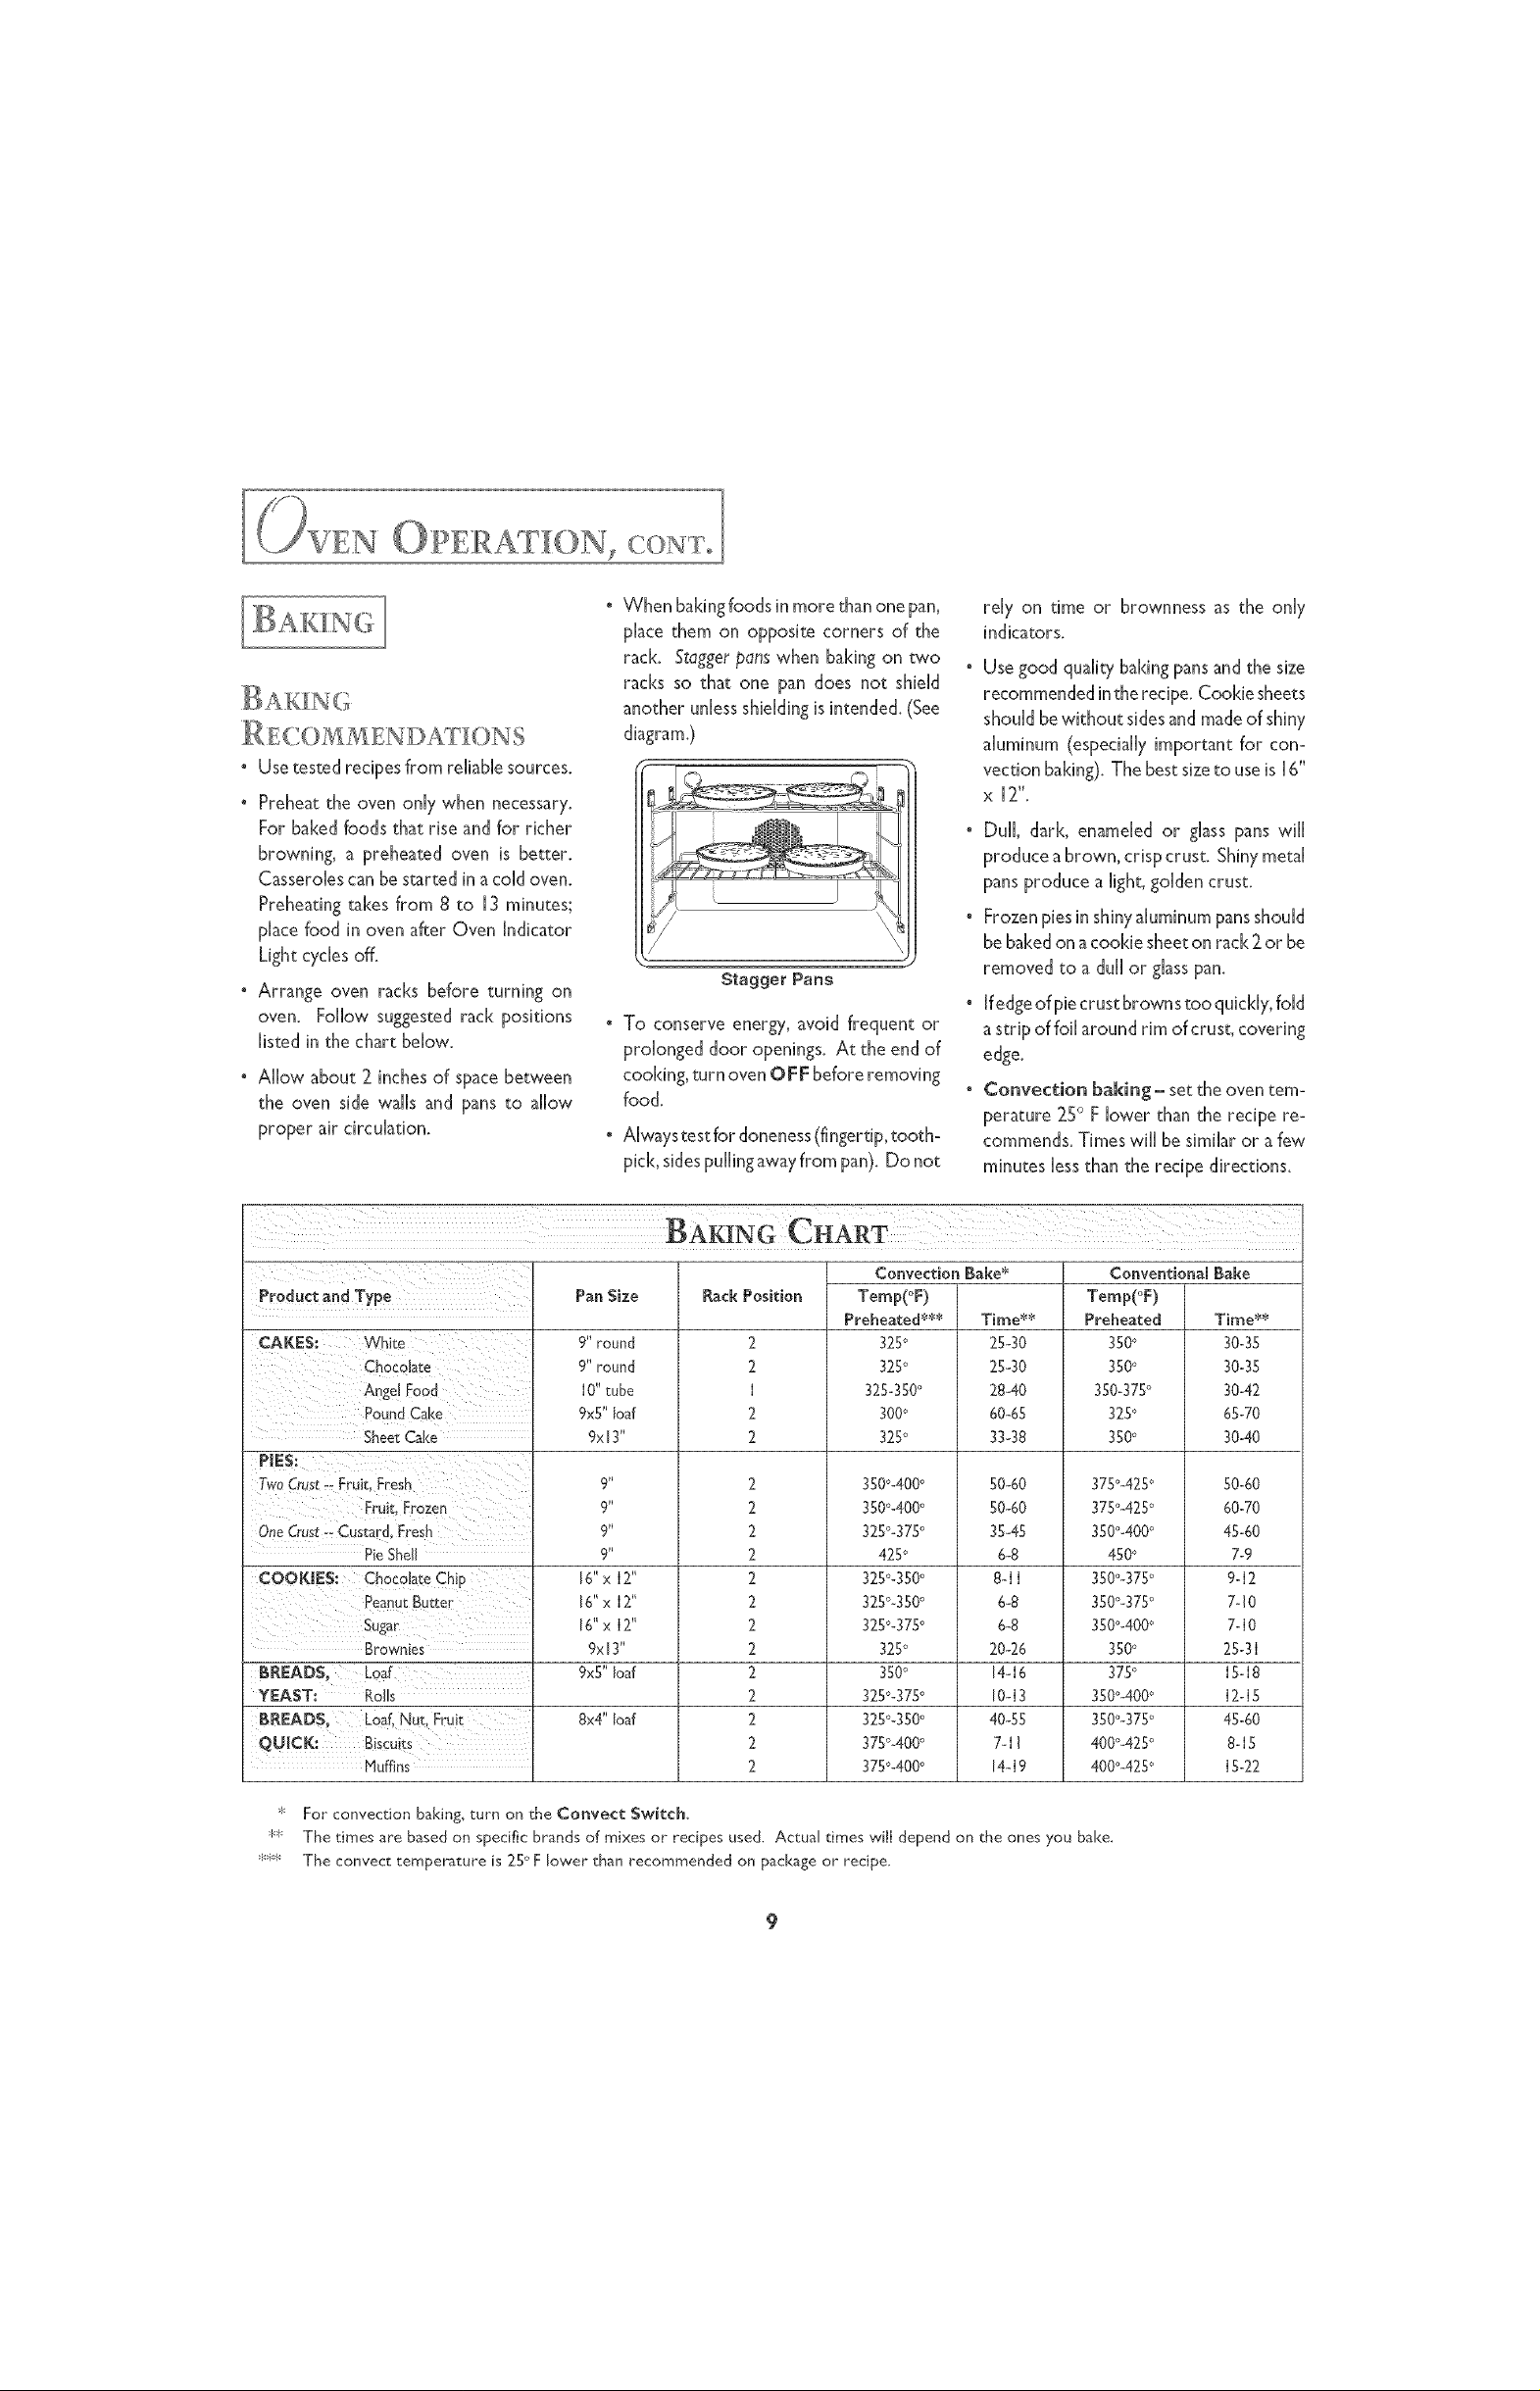
• When bakingfoods in more than one pan,
place them on opposite corners of the
rack. Staggerpanswhen baking on two
racks so that one pan does not shield
another unlessshieldingis intended. (See
diagram.)
I
Stagger Pans
• To conserve energy, avoid frequent or
probnged door openings. At the end of
cooking,turn oven OFF beforeremoving
food.
• Alwaystest for doneness(fingertip,tooth-
pick,sidespullingawayfrom pan). Do not
rely on time or brownness as the only
indicators.
Usegood quality bakingpansandthe size
recommendedinthe recipe. Cookie sheets
shouN bewithout sidesand madeof shiny
aluminum (especially important for con-
vection baking). Thebest sizeto useis [ 6"
xl2".
• Dull, dark, enameled or glass pans will
produce abrown, crisp crust. Shinymetal
pansproduce a light, golden crust.
° Frozenpiesin shinyaluminum pansshould
bebakedon acookie sheeton rack 2or be
removed to a dui[ or glasspan.
° fledgeof piecrust browns too quickly,fold
a strip offoil around rim of crust, covering
edge.
° Convection baking- set the oven tem-
perature 25° F lower than the recipe re-
commends. Times will be similar or a few
minutes less than the recipe directions.
Product and Type
Pound Cake
Sheet Cake
One Crust-- Custard, Fresh
Pie Shell
YEAST: Rolls
QUICK: Biscuits [
Huffins
BAKING CHART
I Convection Bake* Conventiona[ Bake
Pan Size
9" round
9" round
I0"tube
9xS"loaf
9xl3"
9"
9"
9"
9"
16"x I2"
16"x I2"
16"x I2"
9x13"
9xS"loaf
8x4" Iod
Rack Position
2
2
I
2
2
2
2
2
2
2
2
2
2
2
2
2
2
2
Ternp(°F)
Preheated***
325°
325°
325-350°
300o
325°
350°-400°
350°-400°
325°-375°
425°
325°-350°
325°-350°
325o-375 o
325°
350°
325°-375°
325°-350°
375°.400°
375°-400°
Time**
25-30
25-30
28-40
60-65
33-38
50-60
50-60
35-45
6-8
8-II
6-8
6-8
20-26
14-I6
10-I3
40-55
7ql
Nq9
Temp(°F)
Preheated
350o
350o
350-375°
325°
350°
375°-425°
375°-425°
350°-400°
450o
3500-375°
3500-375°
350o-400°
350o
375°
350%400°
350°-375°
400°-425°
400%425°
Time**
30-35
30-35
30-42
65-70
30-40
50-60
60-70
45-60
7-9
9-I2
7-10
7-I0
25-3I
I5-I8
I2-IS
45-60
8qS
15-22
s For convection baking, turn on the Convect Switch.
*>_ The times are based on specific brands of mixes or recipes used. Actual times will depend on the ones you bake.
_*:_ The convect temperature is 25° F lower than recommended on package or recipe.
9
Page 11

=4
=3
=2
=1
Three Reck Baking
(}OOX_NG ON
_UI:gIPLE _ACXS
The convection bake method is suggested
for most multiple rack cooking, especially
three rack cooking, because the circulating
heated air results in more even browning.
To obtain the best results in multiple rack
convection cooking, follow these sugges-
tions:
Use temperature and times inthis manual
as a guide for best results.
For two rack baking, rack position #2
and #4 or #1 and #3 are best for most
baked products.
For three rack baking use positions #1,
#2 and #3 or #2, #3 and #4.
Stagger small pans, such as layer cake
pans, in the oven.
Oven meals are recommended for en-
ergy conservation. Use rack positions
#1 and 3 or #1 and 4. (See above).
Cookie sheets should be placed length-
wise, side to side, in front of the fan for
more even browning. (See above left).
Three tad< baking may be used when
bakingcookies, rolls, frozen convenience
foods, appetizers and snack foods.
Oven Meatus
• Preheating is not necessary.
° Place tender cuts of meat or poultry on
the slotted portion of the two-piece pan
included with the oven. Do not add
water m the pan. Select convection or
conventional roasting. (Less tender cuts
of meat need to be cooked by moist heat
ina covered pan using conventional roast-
ing.)
° Heats cooked in oven cooking bags,
dutch ovens, or covered roasting pans
are best cooked inthe conventional bake
oven.
• Do not use a roasting pan with high sides
when convection roasting.
• Place roast fat side up to allow self
basting of meat during roasting.
• Useameatthermometer. Thetipof
the thermometer should be located in
the thickest part of aroast, not touching
fat, bone, or gristle. For turkey, insert
the tip of the thermometer into the
thickest part of the inner thigh.
° Allow about 15 minutes "standing time"
before carving to prevent loss of juices.
• Breast meat on a large turkey cooks
more quickly than the thigh area. Place a
"foil cap" over the breast area after
desired brownness is reached m prevent
over browning. (See illustration, right.)
A stuffedturkey will require an extra 30
to 60 minutes dependingon size. Stuff-
ingshouldreachaninternaltemperature
of 165°F.
See Roasting Chart, page 11.
ROASTING: F:ROZ:EN
F ,3 FINISH
Heats (except poultry) may be roasted
frozen to finish. Follow these guidelines for
the most satisfactory results.
• Recommended roasting temperature is
325° F. For best results do not use
temperatures below 300 ° F.
" Use times for roasting fresh meats as
approximateguidesfor convection roast-
ing frozen meats. [n general, roasting
times for frozen to finish in the convec-
tion oven will be approximately the same,
or a few minutes more per pound, as
fresh to finish in a conventional bake
oven,
° Insert meat thermometer midway dur-
ing the cooking process.
[0
Page 12

{4 _ ..... _...............
:'/VEN OPE ?A%ION
÷
÷
Approximate Oven Temp(°F)
Variety and Cut of Neat Weight 0b) no preheat
4 to 6 325°
Tenderbin Roast 2to 3 400°
Round Tip Roast 4 to 6 325°
4 to 6 325°
Top Loin Roast, boneless 3 to 4 325°
8 to 12 325°
12to 16 325°
16to 20 325°
20 to 24 325°
Chid<en,Whole 21hto 3% 375°
3.Placefood onbroiler panprovided with
BRO:H I:N(:;
Foroptimum broiling performance, this range
is not designed to operate the convection
oven.
4.Leaveovendoorclosedwhenbroiling.
L
fan when the oven is in Broil mode. To
insure that the fan and the broil burner
cannot be operated simultaneously, the
Screen should Flame shoumd be
be 8mowing red approxmmatemy t/8"
switch that controls the operation of the
convection fan wii]disconnect power to the
broiler igniter, disabling the broil burner
anytime the fan is on.
The two possible modes of operation of the
fan and burner are outlined in the following:
l oConvection fan is turned on, oven is set
for "Broil" mode - The broil burner will
not come on.
2oOvensetfor "Broil" mode,broil burner is
on. Convection fanisturned on. The broil
B:ROI::LIN(:;TIPS
• Tender cutsofmeator marinated meats
are best for broiling. For best results,
steaks should be at least I" thick. Thin-
ner steaks should be pan-broiled.
• Do not cover broiler pan insert with
foil. This prevents fat drippings from
draining into bottom of pan and may
cause excessive flare-ups.
burner will go out.
InternaJ Temp of
Neat _End of
Roasting Time (°P)
145° (rare)
J60° (medium)
145° (rare)
I45° (rare)
160° (medium)
170°
170°
180°- 185°
J80°- 185°
180°- 185°
180°- 185°
185°
thick and bmue
Approx. Convect
Roasting Time
(minutes per rob)
30-35
35-40
22-24
30-35
40-45
33-37
35-45
16-18
13-16
If-13
9-Jl
24-28
Approx° Convendonam
Roasting Time
(minutes per rob)
35-40
40-45
25-28
35-40
45-50
35-40
40-50
21-24
18-2I
16-I8
J4-I6
24-30
• Before broiling, remove excess fat from
meat and score edges of fat (do not cut
into meat) to prevent meats from cur]-
ing. Saltafter cooking.
• To prevent dry surface on fish or lean
meats, brush top with melted butter.
• Foods that require turning should be
turned only once during broiling. Turn
meat with tongs to avoid piercing and
loss of juices.
° The broiler burner and the bake
burner cannot be used at the same
time. When one is on, the other
cannot be turned on.
• Do not usethe convection fanin the
broil mode,
÷
Jfyou experience either of these conditions
when usingyour range,this should be con-
sidered normal operation.
SETTING THE CONTROLS
1. Place oven rack on the rack position
suggestedin the chart. Distance from
broiling burner dependson foods being
prepared. Rad< position #3 is usually
recommended unlessotherwise stated.
2oTurn OVEN Knob to Broil setting.
8113P418-60 12 _ 2/2/04, 2:01 PM
klL ¸{;/:}: ): //{
Foods
Hamburgers (3 Oz.): Nedium
WeJ[
PORK: Bacon
Chops(1/2")
POULTRY: BonelessChickenBreasts
SEAFOOD: FishSteaks(l")
MISCELLANEOUS: Ho_Dogs
Note: This chart is a suggested guide, The times may vary with food being cooked.
Rack
Position
3
3
3
3
3
3
3
3
3
Approximate (Minutes/Side)
]st 2rid
Side Side
7-9 6-7
10-II 8-9
6-7 4-5
7-8 5-6
3-4 1-2
5-6 4-6
6-8 6-8
II-I2 (no turning)
3-4 2-3
Page 13
CLEANING PROCEDURES
" Daily Cleaning/Light Soil -Wipe
with one of the following - soapy
A CA UTION:
° Be sure ap#iance is offand allparts
are cool before handming or clean-
ing. This is to avoid damage and
possibme burns,
° To prevent staining or discoloration.
clean appliance after each use.
° Ifa part isremoved, be sure itiscorrectly
replace&
water, white vinegar/water solution,
Formula 409 Glass and Surface
Cleaner* or a similar glass cleaner -
using a sponge or soft cloth. Rinse
and dry. To polish and help prevent
fingerprints,followwith StainlessSteel
Magic Spray (Jenn-Air Model A912,
Part No. 20000008)**.
" Moderate/Heavy Soi[-Wipe with
one of the following -gon Ami, Smart
Cleanser, or Soft Scrub* - using a
CONTROL KNOBS
" Remove knobs inthe OFF position by
pulling forward. (Never force the
knobs off.)
, Wash in dishwasher or soap and
water. Do not use abrasive
cleaners°
o Replace to OFF position. (Never hit
or use force to replace the knob.)
damp sponge or soft cloth. Rinse and
dry. Stubborn soils may be removed
with a damp Scotch-Brite* pad; rub
evenly with the grain. Rinse and dry.
To restore luster and remove streaks,
follow with Stainless Steel Nagic Spray.
° DiscoJoration - Using a damp
sponge or soft cloth,wipewith Cameo
Stainless Steel Cleaner*. Rinse imme-
diately and dry. To remove streaks
NOTE: The oven end griddge knobs
ore similar. However, the oven knob
has the word "Broil" on it. The
small oven knob (select models) is
interchangeable with the griddle
knob.
and restore luster, follow with Stain-
Jess Steel Hagic Spray.
OVEN INTERIOR (MANUAL
CLEAN -- PORCELAIN ENAMEL
FiNiSH)
CONTROL PANEL
" Wipe with a damp cloth. Dry
thoroughly.
° All spi[[overs, especially acidic
spillovers, should be wiped up
immediately with a dry cloth. To
prevent possible cracking or chipping
" Glass cleaners may be used if sprayed
on a cloth first. Do not spray
ofporcdain, neverwipeoffawarm
or hot surfacewith a damp cloth,
direcdy on the panel
° Clean with soap and water. Do not
" Do not use other cleaning sprays,
allow food to bake on a second time.
abrasive cleaners or large amounts of
water on the panel.
STAINLESS STEEL
° Heavy spi[lovers will require cleaning
with mild abrasive cleansers such as
S.O.S. or Bon AmP. Household am-
monia may be used to loosen soil.
" DO NOT USE ANY CLEANING
PROD UCT CONTAINING CHLO-
RINE BLEACH.
° DO NOT USE ORANGE OR ABRA-
SIVE CLEANERS.
" ALWAYS WIPE WITH THE GRAIN
WHEN CLEANING.
Place 72 cup of household ammonia
in a glass dish on oven rack in a
dosed, cold oven overnight.
o To remove difficult stains, use an
oven cleaner such as Easy-Off'Q Fol-
low oven cleaner directions. Do not
spray gasburner, light bulb, tempera-
* Brand namesare registered trademarks of the respective manufacturers.
** To order direct, ca[[ [-800-JENNAIR ([-800-536-6247). J2
ture sensing bulb, door gasket or
exterior of oven. Remove oven racks
before spraying with oven cleaner.
When a commercial cleaner is used,
rinse oven with a solution of I table-
spoon vinegar to I cup water.
OVEN RACKS
" Rub with a sponge or cloth using one
of the following cleaners: Bon-Ami,
Soft Scrub or CometSQRinse and dry.
o For hard to remove soils, use a
dampened soap-filled scouring pad.
Rinse and dry.
OVEN WINDOW
(SELECT MODELS)
• Washwith soapandwaterorg[assdeaner.
Avoid usingexcessiveamounts of water.
Do not use abrasive cleaners.
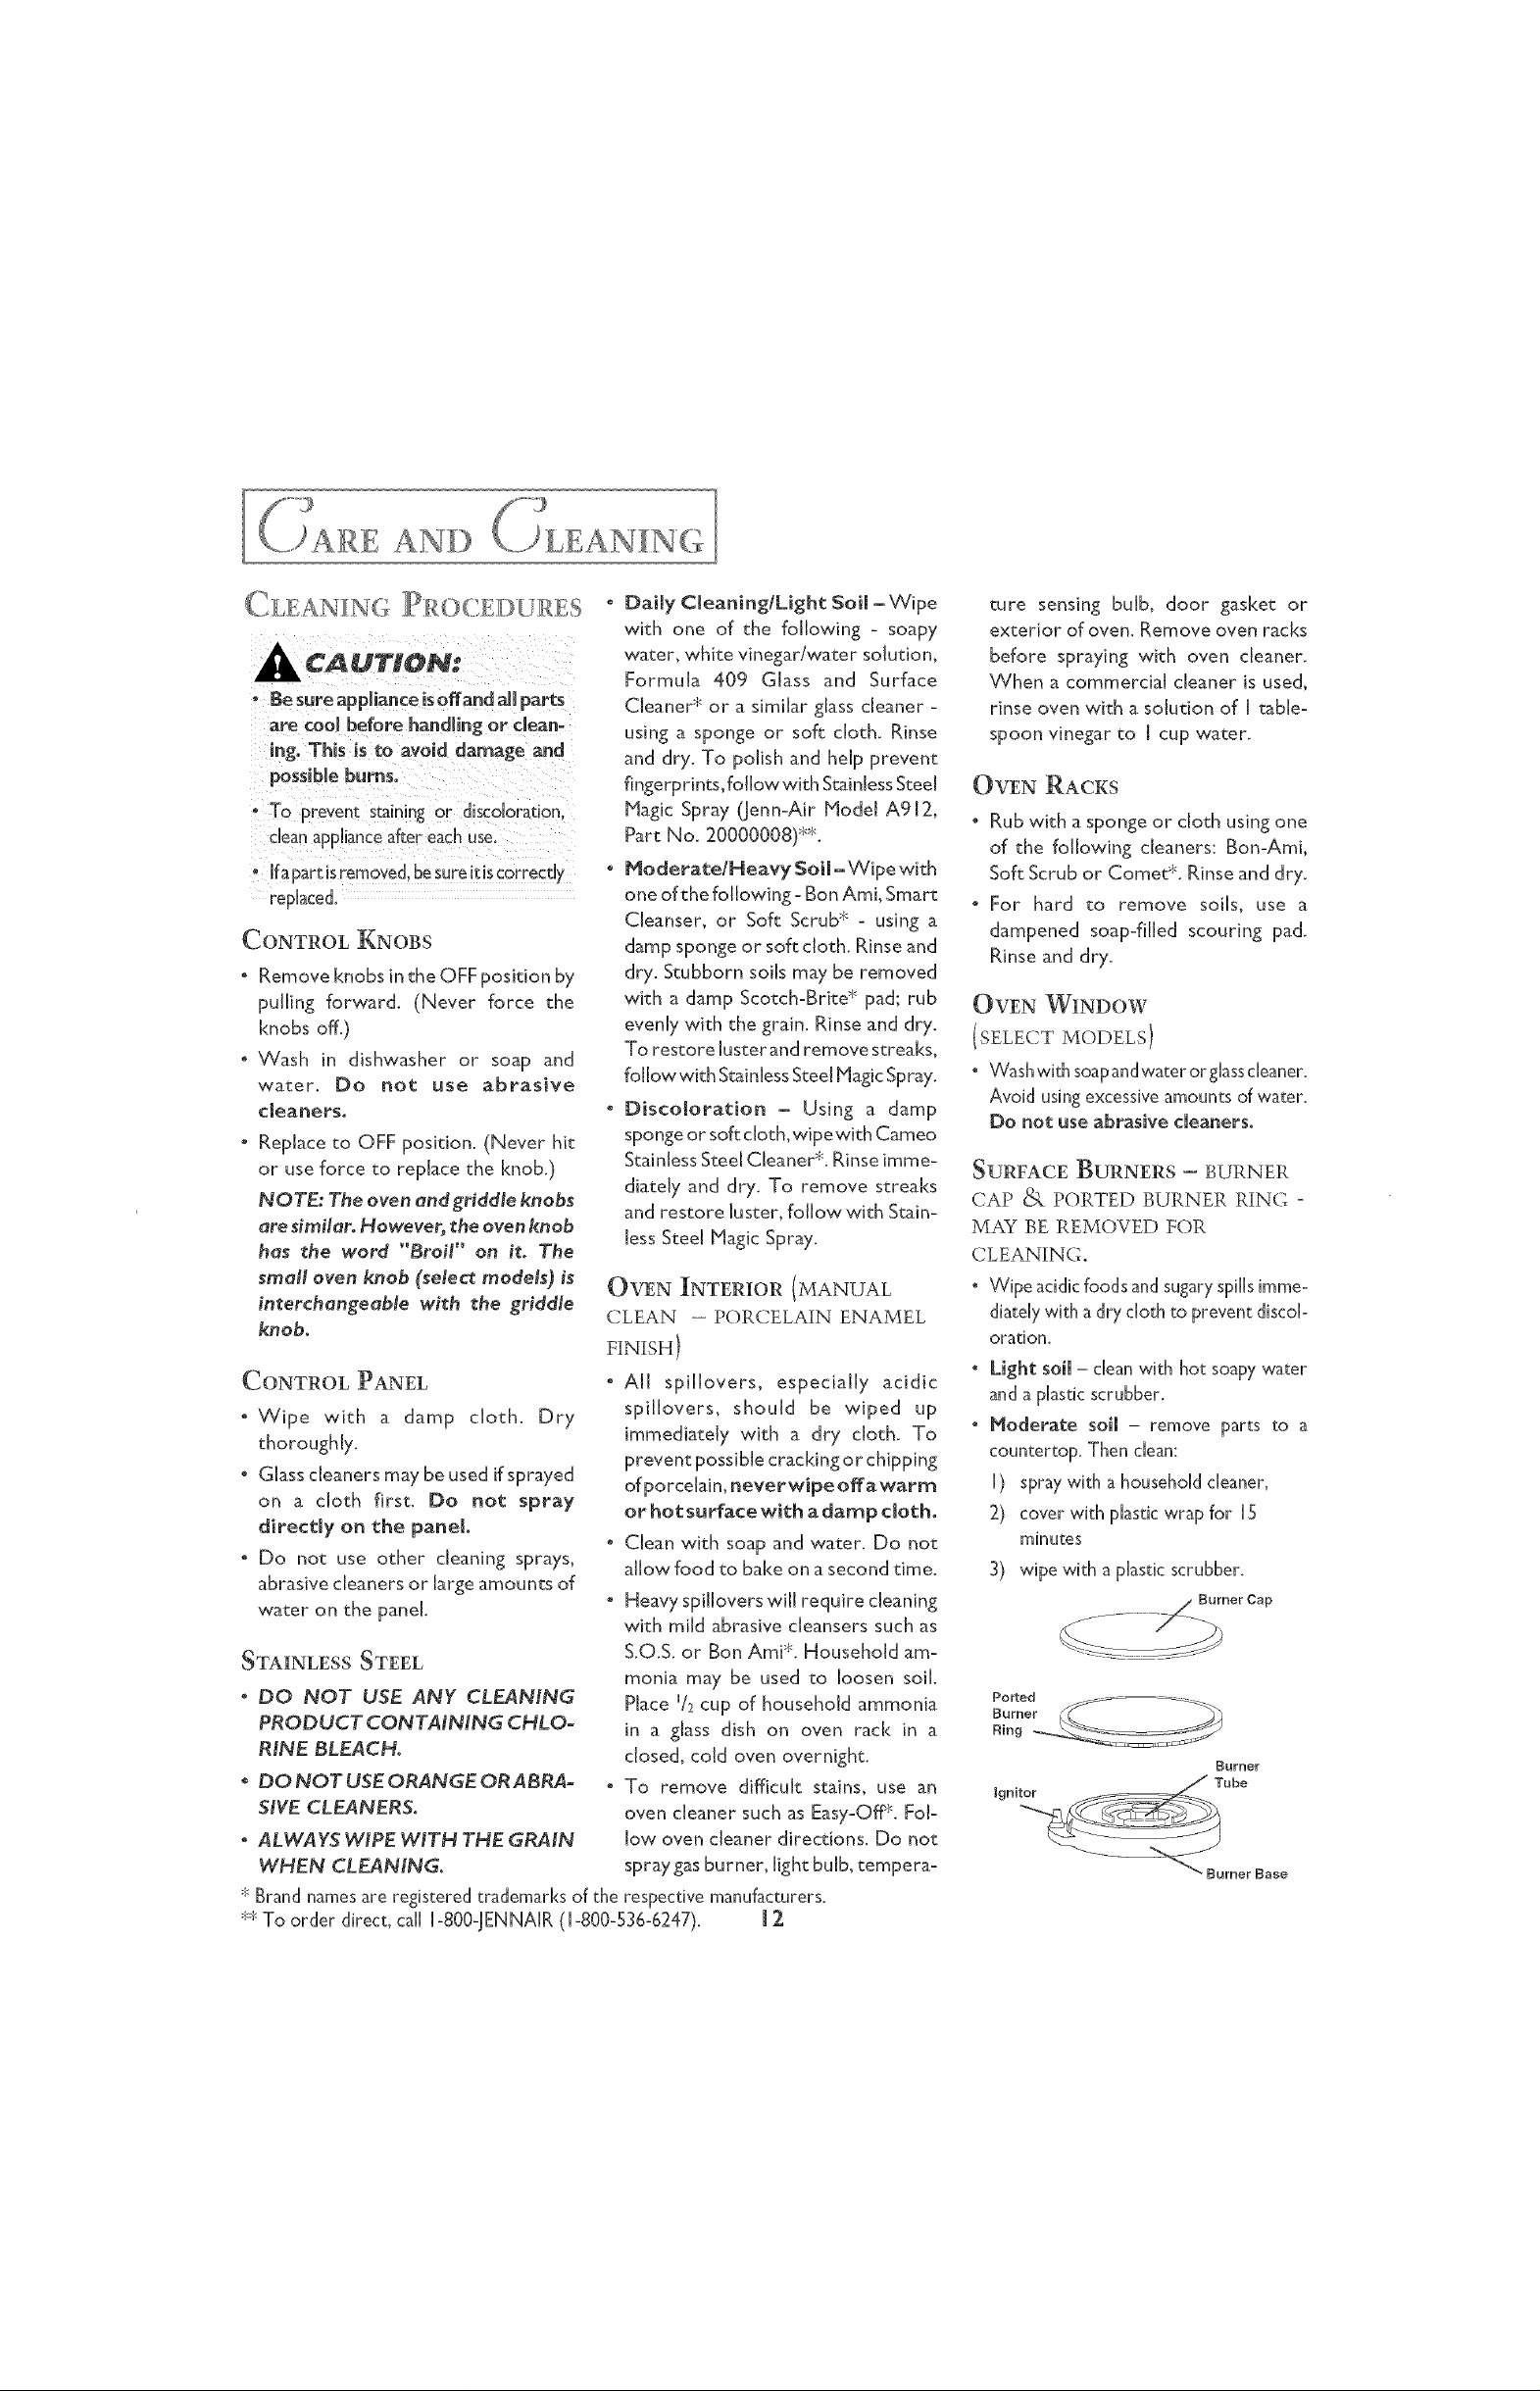
SURFACE BURNERS -- BURNER
CAP _ PORTED BURNER RiNG -
MAY BE REMOVED FOR
CLEANING.
• Wipe acidic foods and sugary spillsimme-
diately with a dry cloth m prevent discol-
oration.
• Light soil - dean with hot soapywater
and a plastic scrubber.
• Moderate soil - remove parts to a
countertop. Then clean:
[) spray with ahousehold cleaner,
2) cover with plastic wrap for [5
minutes
3) wipe with a plastic scrubber.
er Cap
Ported
Borner
Ring
Burner
Jgnit_Tube
met Base
Page 14

1
f
Stubborn soils - scrub with scouring
powder. (Do not use abrasive cleaners,
scouring pads or place in a serf-dean
oven.)IfcleaningpowdersNod<gasports
on burner ring,dean with a straight pin.
To replace parts after cleaning:
[) ported burner ring- alignthe slot on
the bottom of the ringwith the locat-
ing post on the burner base.The
burner ring andburner basemust be
in complete contact.
OVEN DOOR
. NEVER place excessive weighton or
stand on an open oven door. This
could cause the range to up over,
break the door. or injure the user,
• NEVER attempt to open or dose
door or operate oven until door is
proper[), replaced.
2) burner cap - placeon top of the
burner tube.
SURFACE BURNER _GNITORS
° Clean around ignitor carefully. Avoid
catchingthe ignitor with cleaningcloth. If
ignitor is damaged,the surface burner
wi[[ NOT light.
4. With the oven door fully open, unlock
hinge latchesand dose.
Door Hinge Roller
Lock
(Close)
Un{ock
SURFACE BURNER GRATES
(PORCELAIN ON CAST IRON 1
• Wash in the dishwasher or in soap and
water with a plastic scrubber.
• Do not operate the burners without a
panon the grate. The porcdain finishon
the grate may chip without a pan to
absorb the intense heat.
° Grates wi[[become du[[and may discolor
over time from the heat. This is normal
power supply is disconnected and
wear protect#re gloves when remov-
#rig. Contact an authorized ]enn-A#r
Servicer, if needed.
3_
Replacebulb with a40 watt oven-rated
appliancebulb. Bulb with brassbaseis
recommended.
,
Replacebulbcoverandreconnect power
tO oven,
ffthe oven door comes offtrack, realign by
following this simple procedure:
[. Open the door and hold it a[[ the way
open.
2. Lod<the hinge latches (see illustration),
and gendy lift the door up and partially
out until the door is evenly aligned.
3. Evenlyslide the door back into place and
check m be sure the hingesrest in the
center of each door hinge rd[er.
Before replacing bulk disconnectpowerto
oven at the main fuse or circuitbreaker panel.
Be sure that the oven cavity, including the
light bulb, is coo[.
TO REPLACE LIGHT BULB:
lo
Carefully unscrew
the glassbulb cover.
2.
To obtain firm grasp
on bulb, wear pro-
tective rubber
gloves. Turn bulb to
the left. Do not
touch ahot oven bulbwith adampcloth
asit wi[[ break.
Note: tf the bulb breaks, be certain
J3
( ..... ,)F GASREN ,)VAL ( ,
Gasapplianceconnectors usedm connect
this appliance m the gas supply are not
designedfor continuous movement. Once
installed, DO NOT repeated[),move this
gasappliancefor cleaningor to relocate. If
this appliance has to be moved and/or
removed for servicing, follow the proce-
dure described in the installation instruc-
tions. For information, contact Jenn-Air
Customer Service at 1-800-JENNAJR
(I-800-536-6247).
To prevent rangefrom accidentallytipping,
range must be secured to the floor by
sliding rear leveling leg into the anti-tip
bracket.
Page 15

S )EEORE ALL E©R
FOR MOST CONCERNS_ TRY
THESE FIRST:
Check to be sure unit is properHy con-
nected to power suppHy.
Check for a bHown circuit fuse or a
tripped main circuit breaker.
Check to be sure burner isoperating on
naturaHgas onHy.
Check to be sure burner ports or igni-
tion ports are not dogged.
Check to be sure igniter is dry and
cHkHdng.Burner wiHHnot Hightif igniter is
damaged, soiled or wet, [figniter doesn't
click, turn control knob OFF.
]_FTHE FLAME IS UNEVEN:
° Burner ports may be dogged.
° Flame setting may need to be adjusted.
]_F SURFACE BURNER FLAME
LIFTS OFF THE PORTS:
° Check to be sure a pan is sitting on the
grate above.
• Contact anauthorizedJenn-Air Servicer.
[F SURFACE BURNER FLAME IS
YELLOW IN COLOR:
• Contact an authorizedJenn-Air Servicer.
[F NOTHING ON THE RANGE
OPERATES:
• Check for a biown circuit fuse or a
tripped main circuit breaker.
° Check if rangeis properHyconnected to
eiectric circuit in house.
]_FTHE OVEN LIGHT DOES NOT
WORK:
° The light bulb is loose or defective.
]_FFOODS DO NOT BROIL
PROPERLY:
• The controH may not be set properHy.
• Check rack position.
° Close oven door when broiling.
]_FBAKED FOOD IS BURNED OR
TOO BROWN ON TOP:
° Food may be positioned incorrec@ in
oven,
° Oven not preheated proper[?,.
]F FOODS BAKE UNEVENLY:
° The oven may be installed improperHy.
° Check the oven rack with a ieveL
Stagger pans, do not allow pans to touch
each other or oven wall
Check instructions for suggested place-
ment of pans on oven rack.
[F BAKING RESULTS DIFFER
FRON PREVIOUS OVEN:
• Oven thermostat caHibration may differ
between oHd and new ovens. FoHHow
recipe and use and care directions be-
fore caiiingfor service since the caiibra-
tion on the previous oven may have
drifted to a too highor too low setting.
[F BAKING RESULTS ARE LESS
THAN EXPECTED:
• The pans may not be of the size or
material recommended for best results,
° There maynot be sufficient room around
the sides of the pans for proper ak
circulation in the oven,
• Check instructions for preheating, rack
position and oven temperature,
° Oven vent may be blocked or covered,
[4
Page 16

NNoA R
RANGE
FummO_e Year Warranty - Parts and Labor
For one (t) year from the orginal retail purchase
dam. any part whkh fails innormal home use w@be
repaired or replaced free of charge.
Limited Warranties - Parts onmy
Second Year - After the first year from the
original purchase date. parts which fail in normal
homeusewi[[be repairedor replacedfree ofcharge
for the part kseff, wkh the owner paying ai[ otheu
costs, including labor, mileage, transportation, trip
charge and diagnostic charge, if required.
Third Through Fifth Year = From the original
purchase date. parts listed below which fail in
normal home usewi[[ be repaired or replacedfree
of chargefor the part itseff, with the owner paying
a[[other costs, including labor, mileage, transporo
ration, trip charge and diagnostic charge, if re-
quired.
0 Sealed Gas Burners
W:H£r ;s N > C By THESE
[° Conditions and damagesresuking from anyof the following:
ao[mproper installation, delivery, or maintenance.
boAnyrepair, modification, akeration, or adjustment not authorized bythe
manufacturer or an authorized servicer.
coMisuse,abuse,accidents, or unreasonableuse.
do[ncorrect electric current, vokage, or supply.
e°[mproper setting of any control.
:2 Warranties arevoid if the original serialnumbers havebeen removed,
altered, or cannot be readily determined.
3. Light bulbs.
4. Products purchased for commercial or industrial use.
S° The cost of service or service call m:
a° Correct installation errors.
bo instruct the user on the proper use of the product.
c° Transport the appliance to the servicer.
6° Consequential or incidental damagessustainedby any person asa resuk
of anybreach of thesewarranties. Somestates do not allow the exclusion
or limitation of consequentialor incidentaldamages,sothe aboveexclusion
may not apply.
{...... , ...... .,
Canadian Residents
The above warranties only cover an appliance
installedin Canadathat hasbeencertified or listed
by appropriate test agenciesfor compliance to a
National Standard of Canada unlessthe appliance
was brought into Canada due to transfer of resi-
dencefrom the United Statesto Canada.
LimitedWarranty OutsidetheUnitedStates
and Canada- PartsOnly
For two (2) years from the aate of original retail
purchase,any part which failsin normal home use
wi[[ be repaired or rep[acedfree of chargefor the
part kse[f, with the owner payinga[[other costs
inchding labor, mileage,transportation, trip charge
and diagnostic charge, if required.
The sped_c warrantiesexpressed above are the ONLY
warrantiesprovidedbythe manufacturer.Thesewar-
rantiesave youspedpclegalrights,andyoumayalso
haveother rightswhi@varyt?omstate to state
IF YO . NEED SE W CE
° Cail the dealer from whom your appliancewas purchasedor cail
Maytag ServicessM,Jenn-Air Customer Assistanceat 1-800-JENNAJR
(1-800-536-6247) to locate an authorized servicer.
o Be sure to retain proof of purchase to verify warranty status. Refer to
WARRANTY for further information on owner's responsibilities for
warranty service.
o if the dealer or service company cannot resolve the problem, write to
MaytagServicessM,Attn: CA[R®Center, P.O. Box 2370, Cleveland, TN
37320-2370, or call i-8ee-JENNA[R ([-8ee-536-6247).
U.S. customers using TTY for deaf, hearing impaired or speech impaired,
call 1-800-688-2080.
NOTE: When writing or callingabout a service problem, pleaseinclude
the following information:
a. Your name,addressand telephone number;
bo Model number and serial number;
c° Name and address of your dealer or servicer;
doA dear description of the problem you are having;
eoProof of purchase (salesreceipt).
User's guides, service manualsand parts information are availablefrom
MaytagServicessM,Jenn-Air Customer Assistance.
iS
Page 17

PRG3010. PRG3610, PRG4810
_ABLE DES MATIERES
instructions de s_curit_ importantes ............................. [7-20
Cosson sur la surface.......................................................21-22
Plaquechauffante......................................................................23
Fonctionnement du four ...................................................24-27
Entretien et nettoyage .......................................................28-29
Entretien .....................................................................................29
Avant de contacter un r@arateur ........................................30
Garantie ......................................................................................3 [
Guia de[Usuafio .......................................................................32
Page 18

, RUCIIONS DE SECURITE
...... _ ""_...... P" "'7 ...........
[nstallateur: Remettre ce manuel
_NS'FRUCTI©NS DIE
au proprigtaire.
Consommateur: Dre [emanual; [e
conserver pour consu[taqon
u[t_rieure. Conserver [a facture
d'achatou [echequeencaissgcomme
preuve de ['achat.
Les instructions de s_curit6 importantes et [es
paragraphes <<avertissement>>de ce guide ne
sont pas desdngs _ couvrir routes [es condi-
tions et situations quipourraient se presenter.
[[faut loire preuve de bon sens, de prudence et
de soin [ors de ['installation, de ['entretien ou
Numgro de modgie
du fonctionnement de I'appareil.
Touiours prendre contact avec [ed_tai[[ant, [e
distributeur, ['agent de service aprgs-vente ou
le lubricant dons le cos de problemes ou de
conditions qui ne seraient puscomprises.
Numgro de sgrie
RECONNA[TRE LES [_T[QUETTES,
PARAGRAPHES ET SYNBOLES SUR
LA SECUR[TE
Date d'achat
" ILAVERTISSEME T
AVERTiSSENENT - Dangers ou pra-
tiquesdangereuses quiPOURRA[ENTrgsuker
en degravesb[essuresou mgme [amort.
Pour route question, contacter:
Service-client Jenn-Air
,-S00-JENNA R(,-8OO-536-6347)
(Lundi - vendredi, 8 h - 20 h -- heure
de ['Est)
Site [nternet: http://www@nnair.com
ATTENTION - Dangers ou pratiques
dangereusesqui POUR_A,IENT r_suker en
desb[essuresmineuresou desdommagesdu
produit ou dommages mat@ieis.
Pour le service apr_s-vente, voir
page 31o
Lire routes [es instructions avant
d'utiliser cet apparei[; observer routes [es
instructions pour _[iminer [es risques
Dans [e cadre de nos pramques
d'amfiHoratJon consrante de [a
quaHt_ et de [a performance de
nos produits de cuisson des
modifications de ['appareH qui ne
sont pas mendonn_es dons ce
guide ont pu @re introduites.
d'incendie, dgchargeglectrique, dommages
mat@ieiset corporeis quepourrait susciter
uneutiiisationincorrectede['appareiLUtiiiser
['apparel[ uniquement pour [es fonctions
pr@ues,d_crites clansceguide.
Pour une utilisation adequate et en
s_curit_, il faut que I'apparei[ soit
convenabiementinstai[_ par un technicien
• I I
PRG3010 PRG3610 PRG48[0
gr_]Jeurs de surface 4 6
Plaque Chauffante non non
Fours I avec convection/ [ avec convection/
conventionnel conventionnel
quaiifig,et reii& g la terre. Ne pasessayerde
fairedesr@ages,desr¶tions,deI'entretien
ou de rempiacer une piece queiconquede
I'appareil _ moins que ceia ne soit
sp(!cifiquement recommand_ dansce guide.
Tout autre entretien doit gtre exgcut6 par
un pr@os_ quaiifi_ au service apr_s-vente.
Demander _ ['instaiiateur de montrer ou se
trouve [e robinet d'arrgt de gazet comment
[e fermer en cas d'urgence.
Toqours d_brancher I'appareilavantd'yfaire
de ['entretien.
VEBT#S@EME_T:
_e pr6sen_ guide ne sont pus
respect6es 6 _a_ettre, i_y arisque
d'incendie ou d"expbsion pouv ant
causer des dommages, des
blessures et m_me _amort.
-Ne pas ranger N utiliser de gaz ou
autre mati@e inflammable
proximit_ de cet apparel[ ou de tout
autre appareiL
-QUE FAJRE S[ UON SENT UNE
ODEUR DE GAZ
, Ne me_re aucun apparei[ en
marche.
, Ne pus toucher_ un interrupteur
_[ectrique.
, N'uti[iser aucun t_i_phone de
['immeuble.
Se rendre chez un voisin et
t_[_phoner imm_diatement Ala
compagnie de gaz° $uivre [es
directives donn_es par [e pr_pos_
de [a compagnie de gaz°
" S'i[ est impossible de ioindre la
compagNe de gaz, tN@honer au
service des incendies.
-L'instaHation et [es r@arations
doivent @re confi_es Aun insta[[ateur
competent, i une entreprise de ser-
vice ou i la compagnie de gaz.
6
ou[
I avec convecdon/conventionnel
I _ cuissonstandard
17
Page 19

Cesproduks nedoivent_tre ut@s_squ%vecdu
gaznature[.
Unefoibleodeur de gazpeutindiquer uneluke
degaz.Si[*ond_cde uneodeur de gaz,fermer
Parriv&e de gaz _ la cuisiniere. Appeier
Pinsta[[ateurou [acompagniedegazlocalepour
une v_fificaqon de [a presence6ventue[[ede
luke. Ne iama[s se servir d*une allumette
ou d*uneflamme pourrep_rerune fuite
de gaz,
A A VERT#SSEME#WT:
Une fuite de goz pourrok survenir dons
le syst_me et susciter une situation
dangereuse. L'odorat peut ne pas
suffire pour d4tecter une fuite de gaz.
Les foumisseurs de gaz recommaMent
Vinstallation d'un d6tecteur de gaz (ho-
motogation UL). #nstaHeret utiliser le
d_tecteur conform4ment aux instruc-
tions du fabricant
E " ' .... _.... T
fIN S FRL C F_ON S G[£N_£RALES
A A VENTI$$EHENT:
PEUT BASCULER
ET PROVOQUER
DES BL[:SSUR[:S.
[NSTALL_:R LA
BR[DEANT[BASCU-
LEMENT FOURN[E
AVEC C_:TT_:CU[S-
RESPECTER LES INSTRUCTIONS
D'INSTALLAT!ON,
kVERT[SSEMENT: Pour r_duire
[e Hsque de basculement de Pap-
pare[[ _[ occasion d une utilisation
anormale ou d un chargement
excess[f de [a porte du four, [1faut
que [a bride antibascu[ement soft
convenab[ement [nsta[[_e.
Pourd_terminer sice disposkif est correctement
installS, d&c[encher [e coupe-circuit pour
interrompre Pa[imentation dectrique, retirer [e
panneau de service et regarder endessous de [a
cuisiniere pour v_rifier si Pun des pieds arri_re
de r_g[age de Papiomb est bien engag_ dons [a
fente de [abride. Remettre en place [e panneau
de service et r6enchencher [e coupe-circuit
Lorsque [acuisiniere estconvenabiement cai6e,
[a bride antibascuiement immobiiise [e pied
arri_re contre [e sol. V_rifier [a parfaite
immobiiisation de [a cuisiniere par [a bride
apr_s chaque d6piacement de [acuisiniere.
Eviter de placer [a cuisiniere dans une <<zone
detrafio> important ou dansun coin iso[_ sans
espace de comptoir _ c6t& Visuaiiser [e four
en cours d%qiisation avant de choisir un
emplacement Se souvenir que [es portes de
four ouvertes peuvent g_ner un passageet
crier un risque de danger.
POUR £VITER UN INCEND[K
OU DES DOM,S%&GESPAR LA
S'assurer que tous[es mat6riaux de
conditionnement sont retir6s de Papparei[
avant de [e mettre en marche.
Garder les mat6riaux combustibles, Pessence
et autres matieres et vapeurs inflammables
bien doign_s de PappareiL
Si['apparei[ est install& pres d'une fen&tre, des
pr6cautions appropri6es doivent &tre prises
pour @iter que [e vent entra_ne [es rideaux
au-dessus des br@eurs.
N E JAMAIS laisser desarticles sur latable de
cuisson. L'air chaud de i'6vent peut les
enfiammer et mettre egaiement souspression
des contenants ferm_s qui pourraient aiors
expioser.
De nombreux flacons d'a_roso[ peuvent
EXPLOSER Iorsqu'on les expose _ la chaieur,
et iispeuvent contenir un pro@it ires inflam-
mable. Eviter d'utiiiser ou remiser un flacon
d'a6roso[ _proximit_ de ['appareiL
De nombreux articles en piastique peuvent
_tre d&t_rior_s par [achaieur. Conserver [es
articles enpiastique _ distancedes composants
de ['apparei[ susceptibies de devenir ti&des ou
chauds.Ne pashisser desarticles en piastique
sur [a table de cuisson; un arQcie en piastique
trop proche de ['6vent du four ou d'un brQieur
aiium_ pourrait s'amoiiir ou fondre.
Pour aiiminer [e besoin d'atteindre queique
chose par-dessus[es brQieurs desurface, i[ est
prd&rabie qu'i[ n'y air aucune armoire de
18
cuisine directement au-dessus de PappareiL
S'i[ y a une armoire, on ne devrak y remiser
que des articles peu fr&quemment utiiis_s et
capables de r&sister _ [a chaieur _mise par
['apparei[. La temp&rature pourrait &tre ex-
cessive pour certains articles, comme liquides
voiatiis, produits de nettoyage ou flacons
d'a&rosol.
Ne pas suspendre d'articies _tune partie de
I'appareil ou ne rien placer contre le four.
Certains tissus sont tr&s inflammables et
Cet apparei[ est du calibre de ceux desrestau-
rants. L'utiiiser avec un soin extr&me car ce
type d%pparei[ produit une chaieur intense et
peut augmenter [es risques d'accident
gN CAS D INCENDIE
[nterrompre [efonctionnement de ['apparei[
et de [ahotte de ventilation pour minimiser
le risque d'extension des fiammes. Eteindre
[esflammes, puis mettre [ahotte en marche
pour @acuer [afum6e et ['air vici{,
" TaMe de cuisson : Utiiiser un couverde
ou une plaque _ biscuits pour &touffer [es
fiammes d'un feu qui se d_ciare dons un
ustensiie de cuisine.
" NEJAMAlSsaisirou d@iacerunustensiie
decuisineenfiamm_.
" Four: Fermeriaportedufourpour&touffer
iesfiammes.
Ne pasproieter de I'eau sur un feu de graisse.
Utiiiser du bicarbonate de sodium ou un
extincteur _ mousse ou produit chimique sec
pour &teindre les flammes.
ECL H{ POUR [£8
N E JAMAIS laisser desenfants seuis ou sans
supervision [orsque ['apparei[ est en service
ou encore chaud.
N E JAMAIS laisser un enfant s'asseoir ou se
tenir sur une partie queiconque de I'appareil.
[1pourrait se biesser ou se brQier.
[1est important d'enseigner aux enfants que
[a cuisini&re et [es ustensiies places dessus
ou dedans peuvent _tre chauds, hisser
Page 20

, STRUCTIONS DE SECURITE IMPORTANTES, 8 .:rTIE
refroidir HesustensiHesen un HieusOr,hors
d'atteinte des enfants, 11 est important
d'enseigner aux enfants qu'un appareH
mgnager n'est pas un [ouet, et qu'iIs ne
doivent toucher aucune commande ou au-
tre composant de Pappareil.
ATTENTION :NEJANAmS remisersurHe
dosseretd'unecuisiniereoudansunearmoire
au-dessus,des articles auxquds les enfants
peuvent s'int_resser. Un enfant tentant de
grimper sur h portede PappareiHpour atteindre
un ob}et pourrait subir de graves blessures.
FAi!I LI AR S£FI/ONAV
NE JAHA[$ utiliser Hacuisini6re comme
source de chaleur pour Hechauffagede Ha
piece,afind'6viter tout risquededommages
corporals et de d6terioration de Pappareil.
Ne pasremiser desaliments ou ustensiles
de cuisine sur Hatable de cuissonou dansHe
four.
Ne pas obstruer Hacirculation de Pairde
combustion et de ventihtion au niveaude
P_ventdu four ou des entr_es d'air. Une
ddiciencedePaHimentationenairdesbr_Heurs
d_grade Haperformance et augmente jusqu'_t
un niveau dangereux Haconcentration de
monoxyde de carbone dans Hesgaz de com-
bustion.
Les _vents doivent {tre degag4sde route
obstruction.Lacuisinierepr4sentedes{vents
surHapattiesup_rieureavantde Hagarniture
d'ilot,Hapartiesup_rieurearriereouHedosseret
_tagerehaute.Ne iamaisHoquerHes6vents
ou Hesentr_esd'air.Ne pasobstruct Hacircu-
htion de Pairdecombustionetdeventilation.
Une restriction de PaHimentationen air des
br_Heursemp&herait de bonnes perfor-
mances.
Eviter de toucher Hevoisinage de P_vent du
four [orsque [e four est uti[is_ et pendant
phsieursminutesapresParrOtdufour. Certains
composantsde P_ventet Hazone voisine
peuvent devenir suffisammentchaudspour
provoquerdesbr_hres.Apres Parr{tdufour,
ne pas toucher P_ventdu four ou Hazone
voisineavantquecescomposantsaientpuse
refroidir suffisamment.
AutressurfacespotentieHementchaudes:tabHe
de cuisson,zones faisantface _ Hatable de
cuisson,_vent du four, zones voisinesde
P_vent,porte dufour et zonesvoisinesdeHa
porte et du hubHot.
AVERTISSEHENT : NE JAHAmS utiHiser
Haporte dufour ou Hetiroir ([e cas &h&nt)
commetabouret/siege/escabeau;cecipourrait
fairebascuHerPappareiHetentrainerdommages
materialset corporals s&rieux.
Ne pastoucher PampouHechaude du four avec
un Hingehumid< Hechoc thermique pourrait Ha
briser. Encasde bris de PampouHe,d&brancher
Papparei[ de [a source d'_[ectricit_ avant
d'enHever PampouHe, pour &viter un choc
&Hectrique.
(,U]SSON ET " r........
Placertouiours unustensiHesurunbr_Heurde
surface avant de PaHhmer.VeiHHer_ bien
connaitreHacorrespondanceentreHesboutons
decommandeetHesbr_Heurs.VeiHHer_aHhmer
Hebr_Heurcorrect et v_rifier que Hebr_Heur
saHhmeeffectuvement.A Hafinde Hap_riode
decuisson,_teindreHebr_Heuravantderetirer
PustensiHe,pour _viter une exposition aux
flammesdu br_[eur.
Vei[[er _ touiours ajuster correctement [a
tai[[edesflammespourqu'e[[esned&passent
passurlap_riph&riedePustensile.Desflammes
de trop grande taille sur un br_leur sont
dangereuses, e[[es entrainent un gaspi[[age
d'_nergie et elles peuvent faire subir des
dommages _t I'ustensile, _. I'appareil ou
Parmoire situ_e au-dessus.
NE JAMA[$ hisser un br0[eur de surface
a[[um_sanssurvei[[ance,particu[ierementavec
une puissancede chauffage_[ev_eou [ors
d'uneop4rationdefriture. Un d_bordement
pourrait provoquer laformation defum4eet
des produits gras pourraient s'enflammer.
Eliminer des que possible les produits gras
renvers4s. Ne pas utiliser une puissance de
chauffage dev_e pendant une p_riode
SE(.LR] FE
prolong_e.
NE ]AHA[S faire chaufferunr_cipient non
ouvert dans le four ou sur un br_leur de
surface;Paccumulationde pression dansle
r_cipientpourrait provoquer son_clatement
etdegravesdommagesmaterielsoucorporals.
Uti[iserdesmaniquesrobustese_seches.Des
maniqueshumidespeuventprovoquer[afor-
mariondevapeurbr_lante.Ne iamaisutiliser
untorchon _vaisselleou autrearticletextile
laplacede maniques;un tel article pourrait
trainer sur un br_leur et s'enflammer,ou
accrocher un ustensileou un composantde
['appareiL
Laissertou}ours refroidir un r_cipient d'huile
defriture chaude avant detenter de le d_placer
Ne pas [aisser [a graisse de cuisson ou autre
mat4riau inflammable s'accumu[er dans ou
presde ['apparei[, de [ahotte ou du vend[ateur
de ['&vent. Nettoyer fr_quemment [a hotte
pour emp&her route accumulation sur [a
hotte e[[e-m&me ou sur [e fikre. Lots du
flambage d'a[iments sous [a hotte, mettre [e
venti[ateur en marche.
NE JAHAIS porter, [ors de ['uti[isationde
['appareiL des v_tements fairs d'un mat_riau
inflammable,ou amples, ou _ Ionguesmanches.
De tds v&ements peuvent s'enflammer ou
accrocher la poign{e d'un ustensile.
Placer touiours les grilles _t la position
appropri_e dans le four Iorsque le four est
froid. Faire coulisser la grille vers I'ext_rieur
avant d'a}outer ou enlever un plat; utiliser
pour cela une manique robuste et seche.
Ewter d mtrodume la maredans lefour pour y
placer ou retirer un plat.S'ilest n_cessaire de
d_placer une grille Iorsqu'elle est chaude,
utiliser une manique seche. Veiller_ttou}ours
arr&ter le four _t la fin d'une p_riode de
cuisson.
Ouvrir touiours [a porte du four tres
prudemment.Laisser['airchaudou [avapeur
s'&chapperavantderetirer/introduire unplat.
Enlevertouiours une I&chefritesaliedeson
compardment apr&slacuisson.La graisse
qu[ reste darts mal_chefrite pourrait
devenir assez _haude pour
s'enflammer.
AVERTISSEMENT : Hers pr4par4s :
Respecter [es instructions du fabricant. Si[e
contenant ou [e couverc[e en p[astique d'un
mets surgek_ se d_forme ou est endommag_
durant [a cuisson, ieter imm_diatement [e
r_cipient et son contenu. Les aliments
pourraient {tre contamin_s.
[9
Page 21

NE JAMAJ$ garnir h sale ou une grille du
four avec de la feuille d'aluminium. Ced
pourrait susdter un risque de choc
dectrique ou d'incendie, ou une autre
d_t_rioration de rappareiI. UtiNser de la
feuille d'ahminium uniquement salon les in-
structions de ce guide.
Ne pas uqhser de papier ahminium pour
rev&tir la cuvette de propret& des br_leurs.
Une restriction de h circulation normale de
I'air pourrait entraTner un fonctionnement
dangereux.
USTEN5;£5 Fr 5£C . R T£
Utiliser des ustensiles _ fond plat comportant
unepoign&e qu'on peut facilement saisir et qui
reste froide. Zviter d'udhser un ustensile in-
stable ou ddorm&, qui pourrait facilement
basculer, ou dont la poign&e est real fix&e.
Zviter &galement d'utiliser des ustensiles de
petite taille comportant une poign&e Iourde;
ces ustensiles sont g&n@alement instables et
peuventfacilement basculer. Un ustensile Iourd
Iorsqu'il est rempli peut &galement &tre
dangereux lots des manipulations.
Veiller _ utiliser un ustensile detaille suffisante
pour quele contenu nerisque pasded&border.
Ceci est particuli&rement important pour un
ustensile rempli d'huile de friture.V&rifier que
la taille de I'ustensile est suffisante pour qu'il
puisse recevoir les produits ahmentaires _t
cuire, et absorber raugmentaqon de volume
suscit&e par r&buNiqon de la graisse.
Pour minimiser les risques de br_lure,
d'infiammaqon de mati@es et de renversement
parcontact non intenqonnd avec un ustensile,
ne pasorienter la poign&e d'un ustensile vers
un br_leur adiacent; orienter touiours la
poign&ed'un ustensile vers lec6t& ou I'arri@e
de rappareik ne pas laisser non plus lapoign&e
d'un ustensile d&border _['avantde ['appareiL
o_ un jeune enfant pourrait facilement la
saisir.
VeiNer_ ne iamaishisser lecontenu Nquide
d'un ustensile s'@aporer compl&tement;
rustensileet rappareil pourraient subir des
dommages.
AppNquerlesinstructionsdufabricantIorsde
I'emploid'un sachetpour cuissonaufour.
SeuB certains mat&riaux en verre,
vitroc&ramique, c@amique, ou certains
ustensilesvitrifi&s/&maiN&speuvent&treutilis&s
sur la table de cuissonou dansle four sans
risquede brissousI'effetdu chocthermique.
ObserverlesinstructionsdufabricantIorsde
I'utilisationd'un ustensileenverre.
Las&curit&defonctionnementdecetappareil
a &t&test&e _tI'aide d'ustensilesde cuisine
conventionnds. Ne pasuqliser un ustensile
ou accessoirequi n'est pas sp&cifiquement
recommand&dansceguide.Ne pasuqliserde
couvre-br_ieur,gri[piac&sur[atabledecuisson
ou syst&me de convection addiqonnel.
L'utilisationd'un disposiqfou accessoirequi
n'estpasexpress&mentrecommand&dansce
guidepeut d&graderla s&curit&de I'appareil
ousaperformance,our&duirelalong@it&des
composants.
NETFOYAGE E'/ " ' ........"_
.... : SE(.LR/FE
Arr&ter routes lescommandeset attendre le
refroidissementdetouslescomposantsavant
delestoucheroud'entreprendrelenettoyage.
Ne pastoucher h grille d'un br@leurou h
zonevoisineavantquecescomposantsaient
pu suffisammentrdroidir.
ExercerunegrandeprudenceIorsdunettoyage
de I'appareil. Travaiiier prudemment pour
@iter des br_iures par [a vapeur en cas
d'uqiisation d'un chiffon ou d'une &ponge
humideIorsdeI'diminaqond'unproduitrenvers&
sur une surface chaude. Certains produits de
nettoyagepeuventg&n@erdesvapeursnocives
Iorsqu'onlesappliquesur une surfacechaude.
Nettoyer uniquement les pi&cesmentionn&es
dansceguide.Ne pasnettoyer lejoint de porte;
lejoint ioue unr61eessentialquant_I'&tanch@&.
Nepasfrotter, endommagerou d&placerlejoint.
AVERTISSE; {ENT E'I AVIS ;I;_/o
PORTANT POUR LA SEC{.I_I/E
La Ioi californienne<<SafeDrinkingWater and
Toxic EnforcementAct>>de 1986(proposition
65) stipulela publicationpar legouverneurde la
Californied'uneIistedessubstancesqueI'&tatde
Californie consid@e comme canc&rig&nesou
dangereusespour le syst&mereproducteur, et
imposeauxentreprisescommercialesI'obligation
de signaler_leursclientslesrisquesd'exposition
de reliessubstances.
Les utilisateurs de cet appareil peuvent &tre
expos&s _ une faible concentration de certaines
substances figurant dans la Iiste mentionn&e ci-
dessus, dont benz&ne, formald&hyde et suie, du
fair de la combustion incompl&te du gaz naturel.
Pour minimiser la combustion incompl&te, veiller
_tce que les br_leurs soient parfaitement r&gl&s.
Pour minimiser rexposiqon _t ces substances,
veiNer _ bien @acuer les gaz de combustion _t
I'ext&rieur.
AVIS IHPORTANT OISEAU×
FAHILIERS : Les oiseaux ont un syst&me
respiratoire tr&s sensible. Ne pasgarder un
oiseaufamilierdanslacuisineoudansunepi&ce
o_ il pourrait &tre expos& aux fum&es. Les
fum&es &raises durant une op&ration
d'autonettoyage peuvent &tre dangereusesou
mortelles pour un oiseau, de m&me que les
fum&es &mises Iors du chauffage excessif de
graisse,huile, margarine, ou d'un ustensile
garnissageanti-adh&sion.
PT,
CONSERVER CES INST:RL/CTT ONSPOLR CONSL L"FAT ON
2O
Page 22

) .......SUR LA SURFACE
BURSD:S
° Les aihmeurs de tousles braieurs
produisent unegqncdle qud quesoit
le brQleurde surfacequi est allure6.
° LesbrQieursde surfacepeuvent6tre
difficiles _ allumer certaineslois par
suitedepr6senced'airdanslaconduite
de gaz. Ceci peut se produire:
Iors de I'instaiiation
a)
silacuisini@eagt6dgbranch6ede
b)
Valimentationprincipaleengaz
c) si I'appareiln'a pas6t6 utilisg
pour piusieursjours
Pour retirer Fair darts#aconduite de
gaz, _enir une allumet_e en_amm_e
proche de#a_e debr_#eure_me,ire
#a¢ommande en mar€he.
• Laflammedu braleur peut apparakre
sgpargedeI%rifice,siunustensilen'est
pasplac_tout fl {ait sur lagrille.
La cuisinigre est dotge de une (Modde
PRG30i0) ou deux (Nod6ie PRG36i0,
PRG4810) brQleurs de mijotage en trois
parties. Les chapeaux centraux prot%ent
les rgglages de flamme bas des
d_bordements. Ces chapeaux font aussi
s'gcarter lesflammesvers I'ext@ieur pour
gviter unetrop grandechaleurdanslecentre
de I'ustensile. CHAPEAUINTERNE
quelques secondes. Laflamme est bleue avec
un cSne int@ieur dairement d6finL IIne doit
y avoir aucune trace de jaune dans laflamme.
(Lors de I'utilisation initiale, de la poussi@e
dans la conduite ou dans I'air peut entra_ner
bri@ement [a formation d'une flamme or-
ange.) Lors de ['aiimentation au gazde p_troie
[iqu6fi6, il est acceptable que ['extr6mit_ des
flammes soit iaune. Ceci est normal; aucun
r@age n'est ngcessaire.
REGLAGE DES COMMANDES
l oPlacerun ustensilesuriagrille du brQleur.
2oEnfoncer le bouton de commandeet le
tourner dans[esensantihorairefllaposition
LIGHT (AJJumage). Un d_clic se fair
entendre jusqu'_ ce que le br_leur s'allume.
Si un braieur s'6teint durant une op6ration
decuisson, fermer rarrivee de gaz aubr@ieur,
Si une forte odeur de gaz est perceptible,
attendre 5 minutes que I'odeur de gaz se
dissipeavantd'aiiumer de nouveau [ebrQieur,
E i}'IPLACE J}'IEN T DIES C_(,}i%i_AN D E5'
Tousles braleursont unepuissancethermique nominalede J5000 BTU( 12,000BTUaugazde
pgtroieiiqugfi6)aur@age HI (ELEVE)
NODELE PRG4810
- t-t
1 2 3 4
1. BrQleuravantgauche.
2. BrQieurarri@egauche.
3oBrQleurcentralavant.
4. BrQieurcentral arri@e.
5. BrQieuravantdroit.
_oBrQleurarri&redroit.
NODELE PRG3610
5 6
lit t-t
1 2
3 4 5 6
FLANNE BASSi
Les brQleurs ont un allumeur g semi-
conducteurs.Lorsqueleboutondecommande
esttourng sur ON (raiseen march@,legaz
s'6couledanslebraleur et I'allumeurpro@it
une_tincellepour allumerle gaz.
Un brQleur correctement r@6 avec des ori-
fices propres va s'alhmer en I'espacede
1. Braleur avantgauche.
2. Braleur arriere gauche.
3. BrQleurcentralavant.
1 2
1. Braleur avantgauche.
2oBrQleurarri@egauche.
ZJ
4. BrOleur central arriere.
5. BrOleur avant droit.
6. BrQleur arri@e droit.
NODELE PRG3010
t-t-
3 4
3oBrQleuravantdroit.
4. Braleurarriere droit.
Page 23

EG AGE$ $ IGGE E$ DES (@i%i%ANDE$
danslesmagasins_rayons,magasinssp&iaux
ou ceux r_serv& _tla fourniture desrestau-
rants.
Lescommandessont _r6giagecontinuentreHiGH (ELEVE) etLOW (BAS). lisuffitder6gier
laflammeselon lesbesoins.
Le type et la dimension des ustensiles ainsi que la quantit6 et le type de nourriture influencent
le r6glagen&essaire pour obtenir lesmeilleurs r6sultats. Lesr6glagessuivants sont fournis _ttitre
indicatif.
R_glages Utilisations
Chauffagerapidepour d_marrer rapidementunecuissonet
pour amener[es[iquides_ ['6buiiition.
MED (MOYEN)
Pour faire sauter, frire et bouiiiir [entement de grandes
quantit_s de nourriture.
LOW (gAS)*
Pour le miiotage et la fusion de beurre ou de chocolat.
Lespoign&s desustensilescourantspeuvent
fondre ou former des bullespar suite de la
dimensiondesflammessurdesgrandsbr_leurs
de taille professionnelle.
II n'est pasrecommand6d'utiliser deracier
inoxydable en feuille mince en raison des
pointschaudset risquespossiblesdebrOier[a
nourriture.
DIMENSION DES USTENSILES
• Ladimensionde/a_ammedolt&reajustOede
sort.equ'ellene @passepas du bord des
ustensifes,Cette remarque est bas_esur
desconsid@ationsdes&urit& Ler_glage
deladimensiondelaflammeselonlataille
derustensileestaussisourced'&onomie.
Lesustensilesquid@assentdeplus de 5
cm (2 po) de iagrille ou qui touchent ia
table de cuisson peuvent entrainer
I'accumuiation de chaieur ce qui
endommagelagrilledubr_leur,le br_leur
ou [atableeiie-m6me.
;_Ler6giage LOW (BAS) n'utiiise que ie br0ieur interne. Cependant, avec ce ragiage, ii faut
touiours commencer par alhmer le br_leur complet.
D[JRANT
UNE PANNE
A TTENTtON
Avant d'aiiumer un br8 eur de surface_
s'assurer que tous [es boutons de
commande sont _ [aposition OFF (ARRET}.
Pour utiliser les br_ieurs Iors d'une panne
d'6iectricit6 :
1oApprocher unealhmette enflamm& des
orificesde br@leur.
2. Enfoncer et faire tourner lentement le
bouton de commande jusqu'au r_glage
UGHT (AJJumage).
3. R6gler la flamme au besoin.
REMARQUE : Les br_leurs de gril, de four
ou de plaque chauffante ne peuvent &re
alhm6s Iors d'une panne de courant.
Approcher ['aiiumette enflamm6e du
b@[eur et [atenir ainsuen place avant de
faire tourner [ebouton iusqu'_ [a posituon
LIGHT (AHumage),
(}H@IX DIES [JSTENSILES
DIE C[JISINE
Pour obtenir des performances de
cuissonoptimum, utiiiserdes ustensiies
professionneJs. Ce type d'ustensile setrouve
Des articles sp&iaux comme les woks
avec anneau de support, qui limitent la
circulation de rair autour du br_leur,
entra_nent uneaccumulation dechaleur, ce
qui peut endommager la grille du br_leur,
[e br@ieur ou [atable de cuisson.
Utiiiser un accessoire pour wok 3_
fond plat jenmAir, module AO142.
• Pour la pr@aration deconserves,utiliser
reghgeHiGH (ELEVE) _usquace que
reau arrive__bullition ou que lapression
soitatteintedansler&ipient souspression.
Puis,r{duire le pluspossiblele r_ghgede
[afiammepour maintenir['6buiiitionou [a
pression.
° L'usage prolong6 du r6glage HiGH
(ELEVE) ' '
ou I utilisation d ustensiles
incorrects pour la pr@aration de con-
servespro@it unechaleurexcessive.Ceci
peutentra_nerdesdommagespermanents
de rappareil.
22
Page 24

IIJUE CHAUFPANTE
_{ISIE _ NIVEAU DIE LA
PLAQUE CHAUFFANTE
JoUnelois [a cuisi-
hi&reen phce, re-
tirer [e couverde
du conduit d'{vac-
uationen[e souIe-
rant doucement et
[a verticaIe. Pu&
retirer la vis d'ex-
p_dition arri@e
(voir sch&ma).
Pr@hadfer au r6gJageSpdcifi6_ moinsque le t6moin de plaquechauffantene S'dteigne.
Aliments 2&me c6t4
Oeufs ' (I)
Paindor6 ' 2-3
Sandwichesau fromagegrill6 2-3
Hamburgers 5-6
SaucissespJates 2-3
_Cesvaleursde dur6es et r6glagesne sont quedessuggestions. D'autres facteurs, comme une basse pression de
gaz,peuvent modifierlesr6gJageset [esdur@s.
R4gmage* Dur6e de cuisson approximative (minutes}
°F(°C)
350°(I75 °)
250°(I20o)
350°(I75 °)
350°(I75 °)
325°(I65o)
375°(I90 °)
350°(I75°)
met c6t4
2-3
2-3
2-3
2-3
5-6
I-2
2-4
2-3
1-2
2°Tourner les vis ext@ieures (voir schema)
pour mettre _ niveau la plaque chauffante
ou fournir une pente en avant permettant
la graisseet auxhuiles de s'_couler de la
nourriture en cours de cuisson.
Laplaque chauffante est en acier inoxydaHe qui
ne rouille pas. Be doit &tre pr&par&e avant de
['uti[iser [apremiere lois et par [asuite, detemps
flautre, sidie n'est pasutilis_e pendant une cer-
taine p&riode. Suivreles instructions cidessous:
l oBien nettoyer [a plaque chauffante avec de
['eau savonneuse tr&s chaude.
2°Rincer avec un mdange d'[ litre (1 pinte)
d'eau et de 250 mL(1tasse) de vinaigre blanc.
Bien sLcher.
3oVerser [ cuill&refl th6 d'huile v&g4taleau
centre dek plaquechauffante(nepasutiliser
d'huilede maisquicdle) et frotter I'huilesur
route lasurface de la plaquechauffante flI'aide
d'un chiffon &pais.
4oTournerle boutondecommandesur 350°F
([75 °C).Lorsquelarum@appara_ttourner
le bouton de commandesur off (arr&t) et
hisser laplaquechauffanterefroidir.
5oR@&ter les &tapes3 et 4.
6.Unelois[apiaquechauffanterefroidie,essuyer
route la surface fl I'aide d'un linge &Dis.
App[iquer une tr&s mince couche d'hui[e
v&g6tale.Laplaquechauffanteestmaintenant
prate flI'emploi.
Laplaque chauffante, correctement pr@ar&
peut &tre utilis6e sans a}outer de I'huile.
Cependant,une I&g&repulv&risationd'enduit
v&g&talappliqu&suruneplaquechauffantefroide
avant [a cuisson permet de retourner plus
faci[ement[esalimentsd4[icats.
[,JTII,ISA'FION DIE ILA
PLAQUE CHAUFFANTE
JoPr&parer[a plaquechauffantecomme i[ est
d&crit pr&c&demment.
2°Avant de commencer fl cuire sur [a plaque
chauffante, s'assurer que [e plateau de
r&cup_rationest videet en place.
3oPr&chauffer[a plaque chauffanteau r6g[age
sp6cifi&Le t{moin de plaque chauffante
s'@eint Iorsque ceiie-ci est pr@hauff4e.
[aplaquechauffantede [agraisseet des ali-
mentsa[orsqu'd[e estencore chaude.
2.Lorsquelaplaquechauffanteestti&de,frotter
I&gerementsasurface_ I'huilev@gLtale(pas
d'huile de maisqui cdle) et bien essuyerla
plaquechauffante_ hide d'un morceaude
toi[e ou d'unchiffon@aispourretirer routes
particu[esd'a[imentsrestantes.
3oS'i[reste de [a graisse ou des morceaux
d'aliments,ou s'i[y auned&colorationpar [a
cha[eur,suivre[esinstructionsci-dessous.
Accumulation de graisse : Nettoyer fl
['aided'untampon r6cureur et d'un mange
d'l cuillere _soupedevinaigredans 125mL
(1/2tasse)d'eau.
D@oJoration par la chaieur : Uti[iser un
pro@it de nettoyagede ['acier inoxydab[e
nontoxique.
23
D4bris aiimentaires : Utihser une pierre
ponce(_.grainfin)ou unpro@it de nettoyage
pour plaquechauffante.Ceux-cise trouvent
danslesmagasinspour restaurants.Suivreles
instructionsdu fabricant
4oSi['onutihsede ['eausavonneusetres chaude,
du vinaige, de [a poudre de r&curageou des
tampons de lained'acier pour nettoyer la pla-
que chauffante, cdle-ci DOff &trerepr&par&e.
PI ,A'rlEA DiE
Le plateau de
r&cup&ration
recuei[[e[agraisse
et autres liquides
pro@its Iors de
['uti[isation de [a
V4rifier de temps .ECUPE_AT_ON
fl autrece phteau Mode[ePRG4810
de r@up_ration pour emp&cher[a graissede
d&border.Vider ceplateauIorsqu'ilsontrefroid.
t:=:::::m:: = = = = = = = _:::::::::::_::_
Z]] Z: Z:]]]]]]}
PLATEAU DE
!! ...........................................................................................................
° [[ est normal que [a plaque chauffante
fonce fl ['empbi.
• Ne}ama,s,nonder[apkquechauffante
chaude d'eau froide. Ceci pourrait la
f.ssurero0,a ondo,er.
• Ne pas retirer le plateau de r&cup&ration
Iors de cuisson sur k plaque chauffante ou
imm&diatement apres. 11pourrait y avoir
de k graisse chaude qui s &coule dam le
plateau de r&cup&ration.
Page 25

, JONCIIONNEMEN7 DU FOUR
ysT£f ,tE ..... .........
S'assurer que la commande du four est 5.la
position OFF (ARRET) avant d'ouvrir le gaz
alimentant la cuMni@e.
L'apparoI est caractgrisg par unalhmage sans
volleuse. Les br01eurs de cosson et de griI
soar _quipgs d'un alhmeur glectrique et d'un
systeme de s_curit& qui alhme le gaz. Le
brQleur s'allume en 30 secondes.
Aveccesystemed'allumage,lefour nevapas
fonctionner Iors d'une pannede courant ou
s'ilestdgbranchgdelaprisemurale.JJnefaut
pas essayer de faire fonctionner le four
Iors d'une panne de couranL
(} ,}i ! IANDES
(............. ' F'(,}........[.1R
Commutateur OVEN LIGHT
(d'ECLAIRAGE DU FOUR) -- appu/er
sur la parqe sup@ieure du commutateur
OVEN LIGHT (d'ECLAIRAGEDU FOUR)
pour alhmer le four. Appuyer sur la partie
inf@ieuredu commutateurpour _teindre la
hmi@e.
D
T_moin d*aiiumage du four I le t6moin
s'aiiume [orsque [atemp6ratu re souhait6e est
atteinte.AIors que lesbr01eursfonctionnent
en intermittence pour maintenir la
temp@ature souhait6e, lestfmoins s'allument
et s'(_teignentaussi par intermittence.
o Pour brQler les huiles de fabrication
utilisgesenusine,ALLUNERlefour et
les br61eursde gril, un 5.la lois, 5.la
temp@aturede 450°F(235°C). hisser
chaufferpendant205.30minutes.Nettre
en marche la hotte pour retirer les
odeurs de la piece.
° Del'humidit_s'@aporedelanourriture
Iors de route cuisson. La quantit6
d'humidit6 est fonction du degr6
d'humidit_ de la nourriture. Cette
humidit6secondensesurroute surface
qui est plus froide que I'int6rieur du
four, comme le tableaude commande
ou le dessusde laporte. Ceciest nor-
real,
P(,}SITI" (,}NS' DIES (::;RH ,LES
Les positions de grilles indiqufes sont
recommandgespour obtenir les meilleurs
r6suitatsdebrunissageet[esdurgesdecuisson
[es pluscourtes.
D_pose d'une grille : La tirer iusqu'5, la
position d'arr_t. Souleverlagrille par I'avant
et latirer pour lasortir.
Remise en place d'une grille : Pencher
I'avantdelagrilleverslehut et placerlagrille
entre [esgiissi@es.Fairegiisser[agrille vers
'die d6passe [aposition
d'arr&t. BaisserI'avantdelagrilleet coulisser
lagrille en place.
Ne pas utNser de papier aluminum
pour re¢ouvrir les grilles de four ou
pour tapisser la sole. Les r_suitats de
cuisson en seraient affect_s et Jefour
risquerait d'@re endommag_.
Commutateur de CONVECT (CON-
VECTION) -- appuyer sur la parqe
sup@ieuredu commutateur de CONVECT
(CONVECTION) pour mettre leventilateur
deconvectionenNARCHE Appuyersurla 2.
partie inf@ieure du commutateur pour
ARRETER leventilateurdeconvection.Eviter 3.
d'utiliser leventilateur de convectionIors du
gril.Lachaleurconventionndleest phs efficace
pour ]acuissonaugrik
OVEN (BOUTON DE FOUR)- s'utilise
pour r@er [atemp@ature dufour n6cessaire
5.unecuissonordinaireouavecconvectionou
pour choisirle gril.S'assurer que le rep@e est
plac_5.latemp@atureexactesouhait6e.
SHALL OVEN (BOUTON DE FOUR
SECONDAmRE) (modUle PRG 4810
seuJement) I s'utilise pour r6gler la
temp@ature dufour ngcessaire5.unecuisson
ordinaire.(Ce four n'estpaspr@u pour une 4o
cuissonavecconvectionou augril.) Tourner
le bouton de commande5.la temp@ature
souhait_e.
REGLAGE DES COMMANDES
l o Placerlesgrilles defour auxbonnesposu-
tions.
TournerleboutondecommandedeOVEN
(FOUR)5.iatemp6raturesouhait_e.
Tourner le ventilateur de CONVECT
(CONVECTION)siI'ond_sireunecuisson
avec convection. Lorsque le t_moin
d'allumagedu four s'_teint, le four est
prgchauffg5.latemp@ature choisie. Placer
la nourriture dans le four. Le t_moin
d'alhmagedufour s'alhmeet s'_teintpar
intermittence pendantroute la cuisson.
Nepr&chaufferquesicda est n_cessaire.
Sereporter aux chapitres sur la cuisson
ordinaire et avec r6tissage (pages 25-27)
pour savoir Iorsque le prgchauffageest
recommand_.
Apres la cuisson,tourner le bouton de
OVEN(FOUR)et leventilateurdeCON i
VECT (CONVECTION) sitel est iecas,
sur OFF (ARRET),
NODC:LE PRG4810
Position de grille no4 (grandfour
seuiement):
Cuissonsur deuxgrilles, pour repas
complets.
Position de grille no3 :
Cuissonsurdeuxgrilles, pourrepascomplet.
Position de grille n o 2 :
Laphpart desalimentscots au four et le
r6tissage de petites coupes de viande.
Position de grille no I :
Degrandescoupesdeviandeet desgrosses
volailles, ggteau desanges.
Cuisson sur piusieurs grilles (grand
four seulement): Deux grilles: utiliser les
grillesnos 2 et 4 ou Iet 3.Trois grilles :
utiliser les grilles nos I, 2, 3 ou 2, 3, 4.
24
Page 26

)NCFIONNE TIENX DU FOUR,
(}U:[:SSON AU :F(X/R
POUR LA (UISS,}N AU
° UtiIiser [es recettes d_}_tessay_es par des
sources fiaHes.
• Pr6chauffer[e four seuiementsi cda est
n&cessaire.Pour [esahmentsqo [@entet
pour obtenir une cou[eur plus rkhe, i[ est
pref@ab[e de pr_chauffer [e four. Les plats
mijotis peuvent commencer i core dans un
four froid. Le pr_chauffage prend de 8 i [3
minutes.Placer[a nourriture dans [e four
apr_s que [e t_moin d'aiiumagedu four
s'_teint.
• Disposer[esgrillesavantde mettre [efour
en marche. Suivre[espositions sugg@_es,
_num_r_esdans [etableau ci-dessous.
° Laisserenviron 5 centimetres (2 pouces)
entre [esparoisdufour et lesustensi[espour
permettre _ Pairde circuler correctement.
• Lots de [acuisson dans plusieurs ustensi[es,
les placer aux coins opposes de la grille.
Disposertes ustensilesen quinconce pour la
cuisson sur deux grilles, de sorte qu'un
ustensile ne g_ne pas un autre, _moins que
cda ne soit vouh (voir schema).
UstensHes en quinconce
° Pourconserver['_nergie,@iterd'ouvrir [es
portestrop fr_quemmentoude%on trop
[efour avantd'eniever [anourriture.
° V@ifier toqours si [acuissonest termin_e
(avec[edoigt,uncure-dents,ou[orsque[es
c6t_ssed_tachentdePustensile).Ne passe
basersurladur_eouledegr_decoloration
commeseulsindicateurs.
• N'uti[iser quedesustensi[esde bonnequa[it_
et ladimensionrecommand_edartslarecette.
Lesplaques_biscuitsnedoiventpascomporter
de c6t_set doivent_tre enahminium brillant
(ceciestsurtoutimportant Iorsdecuissonavec
convection).Lameilleuredimensionestde40
x30cm(J6x [2 po).
° Lesustensi[esde cou[eursternes,fonc_es,en
verre ou en _mailvont pro@ire une cro@te
brune, croustillante. Lesustensilesen m4tal
brillant produiront une cro@e plusdor_e et
plusclaire.
• Les tartes congd_es dans des r_cipients en
ahminium brillant devraient {tre raisesau four
sur une plaque _ biscuits _ la position de grille
no 2, ou devraient&re transf@_esdartsun
ustensileen verre ou decouleur terne.
Silebord d'unecro@tebrunittrop rapidement,
[erecouvrir d'unebandede papieraiuminium.
Cuisson ave€ convection -- r6gier la
temp@ature du four _ unetemp@ature de
25 °F ([ 5°C) inf@ieure_ ceiierecommand{e
surlarecette.Lesdur@sserontsembiabiesou
de qudques minutes inf@ieures_ ceiies des
indicationsdonn(_es.
ABLEAU DE CUJ£SON
I
Produitet type
GaJette
TARTE$:
Deuxabdsses-- Non eonge!6es,auxfruits
I
Rondde 23cm(9 po)
Rondde 23crn(9po)
25crn (10po)
Houle rectangulairede
23x 13cm(9x 5po)
23x33cm(9x13po)
23cm(9po)
23cm(9po)
Uneabaisse-- Non conge!6e,5.la cr6me
Fondde rathe
@ATEAUX Auxbrisures de chocdat
23cm(9po)
23cm(9po)
40x30cm(16xl2po)
40x30cm(16xl2po)
40x30cm(16x 12po)
Brownies
PAJNS_A Hiehe
LA LEVURE: Petits pains
PA]N, PRE- Niche,aux noix,aux fruits
RAPiDE: Beignes
23x33cm(9x13po)
23x13cm(9xSpo)
20xlOcm(8x4po)
* Pour[acuissonavecconvection,mem°een marchelecommutateurdeCONVECT(CONVECTION).
*s Lesdur6es sont bas6essur desmarques pr6cisesde m61angesou sur des recettes d6js.utilis6es.Lesdur6es r6elles d6pendront des recettes actuellement utilis6es.
**;_ Latemp6rature de convection est inf6rieure de 25 °F (!5 °C) 5.cdle recommand6esur Iemballageou [a recette,
Position
de[agrille
2
2
2
2
2
2
2
2
2
2
2
2
2
2
2
2
2_
Cuisson avec convection*
Temp@ature °F(°C)
Avec pr@hauffage***
325°(165°)
325°(165°)
325-350°(165-175°)
300°(150°)
325°(165°)
350-400°(175-205°)
350-400o(175-205o)
325-375o(165-!90o)
425o(220 o)
325-350°(165-175°)
325-350°(165-175°)
325°-375°
325°(165°)
350°(175°)
325-375°(165-190 °)
325-350°(165-175°)
375-400o(190-205o)
375-400o(D0-205 °)
25-30
25-30
28-40
60-65
33-38
50-60
50-60
35-45
6-8
8-11
6-8
6-8
20-26
14-16
I0-13
40-55
7-11
14-19
Cuisso_ co_ve_tion_e[
Temp6rature°F (°C)
Avec pr@chauffage [ D_r6e**
350°(175°) 30-35
350°(175°) 30-35
350-375°(175-190°) 30-42
325°(165°) 65-70
350°(175°) 30-40
375-425°(190-220 °) 50-60
375-425°(190-220 °) 60-70
350-400°(175-205 °) 45-60
450°(235 °) 7-9
350-375°(175-!90 °) 9-12
350-375°(175-190 °) 7-10
350-400°(175-205 °) 7-10
350o(175o) 25-3!
375°(190°) 15-18
350-400°(175-205 °) 12-15
350-375°(175-190 °) 45-60
400-425°(205-220 °) 8-15
400-425°(205-220 °) 15-22
Page 27

Cuisson sur trois grilles Repas compmets
(]L ,)N £VEC
(ONVECT[ON S[. ]:{
PL,US[EURS G]:{[L,LES
Lam6thode de cosson avec convection est
sugg6r6e pour lacosson sur phsieurs grilles,
surtout cdle sur trois grilles, I'air chauff&
drculant r_sukant en un brunissage plus
uniforme.
Pour obtenir les meilleurs r6sukats avecla
cuissonsurphsieursgrilles,suivrecessugges-
tions :
" Uti[iser[estemp&ratureset dur6esindiqu_es
danscemanuelcommeguidespourobtenir
[esmei[[eursr6sukats.
. Pour unecuissonsurdeuxgrilles,[esposi-
tions no 2 et no 4 ou n o [ et no 3 sont [es
meilleurespour la phpart des aliments.
" Pour la cuissonsur trois grilles,utiliser les
positionsno I, no2 et no3 ou no2, no3 et
n°4.
° Placer en quinconce [es petits ustensi[es
commeceux pour [esg_tteaux_t_tages.
° [Iestrecommand_decuiretout unreds en
re&me temps pour conserver I'_nergie.
Utiliser lespositionsdegrille no [et no3ou
no [et no4 (voir ci-dessus).
° LesplaquesA biscuitsdoivent &tre plac_es
en Iongueurdevantleventilateur pour que
le brunissagesoit plus uniforme (voir ci-
dessus _ gauche).
° Lacuissonsurtrois grillespeut &treuti[is_e
pour [acuissondeg_teauxsecs,petitspains,
aliments pr_cuisin_s surgd_s et amuse-
gueule.
PO[. ]:{ LE R ,)TISSAGE
° Le pr6chauffage n'est pas n6cessaire.
° Placer [es coupes tendres de viande ou de
volaillesur la parQe rainur_e de la I&chefrite
inchse avec le four. Ne pas aiouter d'eau
dans la I&chefrite.Choisir le r6tissage avec
convection ou conventionnd. (Les coupes
moins tendres de viande doivent &trecotes
par chaleur humide dans une I&chefrite
recouverte _ I'aide de r6tissage
conventionnel.)
° Les viandes cotes dans des sachets pour
cuisson au four, faitouts, ou r6tissoires avec
couverde, cuisent mieux dans un four
cuisson conventionndle.
" Ne pasuti[iseruner6tissoireavecdesc6t_s
hauts[ors du r6tissageavecconvection.
" Placer[e r6ti c6t_ gras vers [e haut pour
permettre Alagraissedelavianded'arroser
le morceaupendantler6tissage.
, Utiiiser .n thermom_tre & viande. La
pointeduthermom&tredoit setrouverdans
lapartielaplus@aissed'unr6ti, sanstoucher
lagraisse,Fosou lecartilage.Pourla dinde,
introduire lapointeduthermometre dansla
pattie la plus @aissede hnt@ieur de la
cuisse.
° hisser environ [5 minutes de temps de
repos avant de d@ouper [a viande pour
_viter de perdre lesjus.
° Laviandedepoitrined'unegrossedindecuit
plusrapidementque lapartiecuisse.Placer
un capuchon en papier ahminium sur la
26
--4
--3
--2
--1
apr&sque [e
degr_ de
brunissage
est atteint,
poitrine I_
afin d'&viter
une sur-
° Unedindefarciedemande30_60minutesen
plusse[on[atai[[e.Lafarcedoit atteindreune
temperature internede 165"F (75 "C).
, Voirtableau de r6tissage page 27.
,) I IS SAG g AVEC
D A:LIi}']ENTS (,)N....GELES"'
Lesviandes(saul[avo[ai[[e)peuvent&tre raises
r6tir conge[_es.Suivreces indications pour
obtenir lesrisukats lesplussatisfaisants.
" La temperature de r6tissagerecommandie
est de 325 °F ([65 °C). Pour de meilleurs
risukats, ne pas utiliser de temp4ratures
inf@ieures_ 300 °F(150 °C).
° Uti[iser[esdur6esdonn6espour [e r6tissage
de viandes non congel6es,comme guides
approximatifspour [e r6tissageavecconvec-
tion des viandes congel6es.En g_n@a[,[es
dur_es de r6tissage des viandes congd{es
dans le four avec convection seront
approximativement les m6mes ou de qudques
minutes en plus par livre (0,5 kg), que cdles
dans un four conventionnd.
° [ns&rerunthermom&tre_tviandei mi-cuisson.
Page 28

,.J ()NCTIONNE51ENq DU FOUR, SUrT:E
La dur_e est bas_e sur des viandes dgcongeI_es seulement° Pour[e r6qssage avec convection, mettre Becomm_ateur du venNateur de convection en marche.
Temp. du four Temp. interne de [a Dur_e approx, de Dur_e approx, de
Poids approx. °F (C °) sans viande - fin de [a dur_e r&issage avec convection r&issage convendonnem
Vari_t_ et coupe de viande (kg) (Ib) pr&hauffage de rgdssage °F (°C) (minutes par kg [[b]) (minutes par kg [[b])
2 i 3 (4 i 6) 325° (I65°) 145° (65°) (saignant) 30-35 35-40
160° (70°) (5.point) 35-40 40-45
I i 1,5(2 _ 3) 400° (205°) 145° (65°) (saignant) 22-24 25-28
2 i 3 (4 i 6) 325° (I65°) 145° (65°) (saignant) 30-35 35-40
160°(70°) (i point) 40-45 45-50
PORC: Palette 2 i 3 (4 _ 6) 325° (I65U) 170° (75°) 33-37 35-40
R6t] de Ionge,d_soss6 I3 _ 2 (3 i 4) 325° (I 65°) 170° (75°) 35-45 40-50
VOLA[LLE:Dinde, non farcie 3,5 i 5,5 (8/_ I2) 325° (I65 °) 180-185°(80-85°) 16-18 21-24
5,5i7(I2i I6) 32g°(I65 °) 180-185°(80-85 °) 13-16 18-2I
7i9(I6i20) 325°(I65 °) I80-185°(80-85 °) iI-13 16-I8
Din&, non farcie 9 i I0 (20 i 24) 325° (I65 °) I80-185° (80-85°) 9-II I4-I6
Poulet entier [ i I3 (2% i 3%) 375° ( I90°) 185° (80°) 24-28 24-30
CU[SSON AU GRI[ .....
Afin d'assurer un fonctionnement optimal du
gril, cette cusini@e n'est pacon9ue pour faire
fonctionner leventilateurg convecction Iorsque
le four est en mode griL Pour @iter que le
venti[ateur et[e br0[eur du gri[ ne fonctionnent
simukangment, [e s6[ecteur qui contr6[e [e
ventihteur _ convection coupe Palimentation
de Palhmeur du gril, ce qui d@sactivele braleur
du gri[ chaquelois que [eventi[ateur esta[[um@.
Les deux modes de fonctionnement possibles
du ventihteur et du brQleur sont r&sum&s ci-
dessous:
1.Venti[ateur _convection a[[umg,four missur
mode <<Gri[ >>- Le br_[eur dugri[ ne s'a[[ume
pas.
Z Four mis sur mode <<Gri[ >>,bra[eur du gri[
aiiumg. Ventiiateur _.convection aiium_ - Le
SiPunedecessituations se produit [orsquevous
utiiisezvotre cusiniere, c'est tout gfait normal
R_;GLAGE DES COMNANDES :
l o Placer[a grille dufour g [a position sugggr6e
dansietabieau.Ladistanceau br@ieurd@end
desaliments _pr@arer. Laposition no3 est
habitueiiement recommand_e _ moins
d'indication contraire.
2. Tourner [e bouton de OVEN(FOUR) au
J
r@age BrN[ (Gri[).
3. Placer [anourriture sur [a[&hefrite fournie
avec le four.
4. Ldsserto porte du four ferm@ forsde culssonou "
grit.
L I
L'&ran dolt &tre La flamme dolt &tre Meue et d'une
rougeoyant _paisseur d'env[ron 3 mm ([/8 po)
C DNSEILS DE CUISS ,}N( , ...... , .... ,,( ......
AU (::;RIL
° Les coupes tendres de viande ou [es viandes
marin&es conviennent [e mieux _[acuisson au
gri[. Pour de meiiieurs r_suitats, [es biftecks
doivent _tre d'au moins 2,5 cm ([ po) d'@aisseur.
Lesbiftecks plus minces devraient _tre cuits _ [a
po_ie.
° Ne pas recouvrir d'ahminium une grille de
I&heffite. Ceci emp&herait la graisse de
s'&ouler danslefond de lalechefrite et pourrait
entra;ner une formation de flamme.
TABLEAU DE CUISSON AU GRIL
i i i i i i Z i
Aliments
Hamburger(85 g [3 oz,]) - A P0!nt
glen cuit
C6telette(J3mm[112po])
VOLAiLLE:Poitrined@oss_e
FRUITS O_ N_R: Dame de poisson (2,5cm [J po])
DIVERS:Hotdog
Remarque : Ce tableaun'est qu'unguide.Lesdur@s
27
Position de
)euventvarlet selon[anourriture raisei cuire.
Avant [egri[, retirer [agraisseen excesde [a
viandeet entaiiier les bords de graissesans
couper dans la viande, pour emp&her les
bordsdes'enrouier. Saierapres[acuisson.
Pouremp&her qul[ neseforme unesurface
s&he sur [e poissonou [esviandesmaigres,
passerdu beurrefondu sur le dessus_ Paide
d'unpinceau.
Lesaliments quidoivent 6tre retourngs ne
Retourner les viandes avec des pinces pour
gviter de percer [aviande et de perdre ainsi
des jus,
Lebr@ieurdegri[ et[e br@ieurde cuisson ne
peuvent &re utiiisgs en mgme temps.
Lorsque Punest en marche, Pautre ne peut
&tre aiiumg.
° Ne pasutiliser[eventiiateurdeconvection
en modegril.
Dur6eapprox. (en minuteslc&te)
la grille
Jet c6t_
7-9
10all
6-7
7-8
3-4
5-6
6-8
11-12
3-4
2_me c6t_
6-7
8-9
4-5
5-6
I-2
4-6
6-8
(sansretourner)
2d
Page 29

ET EN ET
N E TO YAGE ** Pourcommanderdkectement, composer[e [-800-JENNNR
(}LEAN, N(, PROCEX {)RES
AA TTENTION:
Avant route manipulation ou
operation de nettoyage, v_rifier que
[e four est arr_t_ et RUe tous[es
composantssontfroids, afin d'4vRer
des dommages ou des brO[ures.
° Pour @ker [aformation de taches ou un
changement de cou[eur_ nettoyer
['apparei[ apras chaque adibation,
. Apras tout damontage de composants
vei[ier _effectuer un remontage correct
BOUTONS DE COMN_ANDE
° Placerchaqueboutona[apos,t,ondARRET,
et [eretirer en [etirant. (Ne jamaisforcer.)
o Laverau[ave-vaisse[[eou_t['eausavonneuse.
Re pas utHiser de produits de mettoyage
abrasifs.
o Remettre[esboutonsa[aposutuondARRET.
(Neiamaisfrapperouforcer pour remettre
en place [e bouton.)
REMARQUE :Lesbou_onspour lefour et
la plaque chauffante sont semblables.
CepeMam, le bouton pour le four
compor_ele mot _Broib (gril) dessus.Le
bou_on du four secoMaire (certains
modules) est interchangeaNe avec le
bouton de la plaque chauffame.
TABLEAU DE COMMANDE
" Uessuyeravecun [ingehumideet bien [e
sacher.
o [I est possible d'utiliser des pro@its de
nettoyage du verre s'i[s sont d'abord
puivarisassurun[inge.Ne pas [es projeter
directementsur [e tableau.
o Ne pasuti[iserd'autresproduitsdenettoyage
pu[variser, pro@its abrasifsou grandes
quantitasd'eausur [e tableau.
ACIER INOXYDABLE
o NE PAS UTIUSER DE PRODUtTS DE
NETTOYAGE CONTENANT DU
]AVELLtSANT.
*Les nomsde marquemendonnassont des marquesde commerce
daposaesde [eurspropriatakes respecqfs.
(1-800-536-6247).
NE PA$ UTtUSER DE PRODUtTS 'OR-
ANGE' OU ABRASIFS.
TOU]OURS ESSUYERDANS LE SENS
DELA TEXTURE DEL'ACIERLORSDU
NETTOYAGEo
• Nettoyage journa[ier/salet4 [agate -
Essuyeravec ['un des produits suivants: eau
savonneuse, vinaigre blanc/eau, produit de
nettoyage pour verre et surface Formula
409* ou un produit semblable- avec unlinge
souple et une aponge. Rincer et sacher.
Pour polk et enlever les marques de doigts,
fake suivre par une pulvarisation de produit
pour Stainless Steel Nagic Spray (Jenn-Air
modeie A9 [2, piece no20000008)*%
° Safer4 modar_e/i_paisse - Essuyer avec
I'undes pro@its suivants: gon Ami, Smart
Cleanser ou Soft Scrub"r- _ I'aide d'un linge
souple ou d'une aponge humide. Rincer et
sachet. Les taches rebdles peuvent atre
enlevaes avec un tampon Scotch-grite >"
humidifi& Frotter uniformament dans le
sens du matal. Rincer et sachet. Pour
redonner du lustre et retirer [esrayures,
fake suivreparune pu[varisation de produit
pour Stainless Steel Nagic Spray.
° D_coloration - ik ['aide d'une aponge
humideoud'un[ingesoup[e,essuyeravec [e
produit de nettoyage pour Cameo Stainless
Steel Cleaner*. Rincer immadiatement et
sachet. Pour retirer lesmarques et redonner
du lustre, fake suivreparune pu[varisation
de produit pour StainlessSteel NagicSpray.
]NTERIEUR DU FOUR
(NETTOYAGE MANUEL -- FINI
PORCELANIS]E)
, Tous[es renversements, en particu[ier
acides,doivent atreimmadiatement essuyas
avecun [ingesec.Pouraviterque ['amai[ ne
sefissureounes'acai[[e,nejamais esswer
une surface ti&de ou chaude avec un
[inge humide.
o Nettoyer AI'eauet au savon. Ne pas hisser
[anourriture cuire une deuxiemelois.
o Lesrenversementsimportantsvont devoir
&tre nettoyasavecdespro@itsdenettoyage
moyennementabrasifs comme S.O.S. ou
Bon AMP'. Uammoniaquemanagerpeut
atre utiiisa pour datacher[asaiet&Verser
125 mL (Ih tasse) d'ammoniaque manager
dans un plat en verre que I'on place sur une
grille du four aiors que [e four est froid et
ferma, pendant une nuit.
Pourretirer [estaches rebeiies, seservir d'un
produit de nettoyage du four comme Easy-
Off _.Suivre [esinstructions donnaes. Ne pas
puivariser sur [esbrOieurs _gaz, ['ampoule, [e
capteur de temparature, [e joint de [a porte
ou ['extarieur du four. Retirer [es grilles du
four avant de [es puivariser avec un produit
de nettoyage pour four. Lorsqu'un produit de
nettoyage du commerce est utiiis6, rincer [e
four avec une solution composae d'une
cuiiierae _ soupe de vinaigre dans 250 mL
(1 tasse) d'eau.
GRILLES DU FOUR
° Lesfrotter _['aided'uneapongeoud'un[inge
et despro@its denettoyagesuivants: Bon-
Ami,SoftScrubou Comet ;l'.Rinceret sacher.
° Pour lestachesdifficiies_ten[ever, se servir
d'un tampon _ racurer rempii de savon,et
humidifi& Rinceret sacher.
_-_UBLOT DE FOUR
{CERTAINS MODELES)
• Le laver _ I'eau et au savon ou _ I'aide d'un
trop d'eau. Ne pas utHiser de produits de
nettoyage abrasifs.
BROLEURS DE SURFACE --
CHAPEAU DE BRULEUR ET
COURONNE DE BRULEUR AVEC
ORiFiCES - PEUVENT ]ETRE
ENLEVES POUR ]ETRE NETTOYES.
• Eniever tout de suite [es renversements
d'aiimentsacideset sucras_ ['aided'un [inge
secpour @iter [adacoioration.
° Salet& [agate - nettoyer avec de ['eau
savonneusetres chaude et un racureur
piastique.
° Sa[et_ moyenne - eniever[espieces et [es
mettre sur un comptoir. Puis nettoyer :
i) puivariserun produit de nettoyage
manager,puis
2) recouvrir d'une peiiicuiepiastiquepen-
dant [5 minutes,et
28
Page 30

FF NETT<)YAGE s<.Is'I:
3) essuyeri['aided'un r_cureur p[asqque.
hapeau de
br_[eur
Ceuronne de
brt_[eur avec
orifices
Tube de
brQ[eur
AHumeur __
* Sa[et4 rebel[e- frotter avecune poudre _t
r&curer. (Ne pas uqhser de produits de
nettoyageabrasifs,tampons _ r_curer ni
pincer dons un four autonettoyant.) gi[es
poudres de nettoyage obstruent [esorifices
degaz de [acouronne de brQIeur,[esnettoyer
['aide d'une agui[[e.
/2 _ .......... _......... #......... _ ......C,°N E EH]
Pour remettre en place des pi_ces apr_s
[e nettoyage :
1) couronne de brQIeur avec orifices -
aligner [afente _ la partie inf_rieure de
lacouronne avec le piton de
positionnement sur la base de brQleur.
Lacouronne de brQleurs et la base
doivent &tre en parfait contact.
2) chapeau de brQleur -le placer sur le
dessusdu tube de brQ[eur.
ALLUNtEURS DES BRULEURS DE
SURFACE
• Nettoyer soigneusement autour de
['a[[umeur.Eviterd'attraper ['a[[umeuravec
[e [inge de nettoyage. Si ['a[[umeur est
endommag& [e brQ[eur de surface NE
s'a[[umera PAS.
_<TR][LLESDES BROLEURS DE
SURFACE (PORCELA][NE SUR
FONTE)
" Laver au [ave-vaisse[[eou dans de ['eau
savonneuse _ ['aide d'un r&cureur p[astique.
• Ne pasloire fonctionner [es brQ[eurssans
ustensi[esur [agrille.Lefin porce[anis_de[a
grillepourraits'_cai[[erenabsorbant[acha[eur
intense.
• Lesgrilles deviennentternes et peuventse
d_co[orerapresuncertaintempsparsuitede
[achaieur.Ceciest normal
PORTE DU FOUR
o NE JANAIS grimper sur [a porte du
four ouverte,ou [uiimposerunecharge
excessive.Ceci pourrait provoquer un
basculementde[acuusimere.[ebrisde [a
porte oudesblessurespour [apersonne
concernee.
• NE ]ANAIS tenter d'ouvrir ou fermer
[aporte ou d'uti[iser [efour avant que [a
porte ait_t_ convenab[ement r_install_e.
Si[a porte du four sort de sesg[issi_res,[a
r&a[igneren suivantcette m_thodesimple:
1oOuvrir [a porte et [amaintenir ouverte.
2. Verroui[[er [es[oquets de charniere (voir
illustration)et sou[everdoucement[aporte
puis[asot- Roulette de charniere
tit partie[-
lement
iusqu'_ ce
qu'e[[esoit "-(Fermer)
uniform-
(_ment
a[ign_e.
VerrouiHer
\ D6verrouiHer
3. Cou[isseruniform_ment[aporte enplaceet
s'assurerque [es charni&resreposent au
centre de chaqueroulette decharniere.
4. Laporte _tantgrandeouverte,d@errouiller
lesIoquetsde charniereet fermer.
A ..... DE LAI%' PE D:E
Avant de remettre ['ampoule, interrompre
t'alimentationdu ['ourau p@neauprindpal de
co@e-circuitou de _usibles,S'assurerque [a
cavit_ du four, et ['ampoule, ont refro@.
POUR RENETTRE L'ANPOULE
l oD@isser prudem-
ment [e cabochon en
verre.
2. Pour bien saisir
['ampoule, porter des
gants de protection en
caoutchouc. Tourner
['ampoule _ gauche. Ne pas toucher une
ampoule de four chaude avecun [ingehumide,
ce[a briserait ['ampoule.
Remarque :Si _'ampou_e caste, s'assurer
que ra_imentation est interrompue et
29
_/
porter desgangsdepro_ectionpour retirer
rampou_e cass4e. Prendre contoct avec
un r6p_r_*;eur ogre6]e_n-Air _u besoim
3. Remp[acer['ampouleavecuneampoulepour
apparei[ m_nager de 40 watts. [[ est
recommand_ d'uti[iser une ampoule avec
cu[ot en[aiton.
4oRemettre [e cabochon et r_tabhr
['a[imentation&[ectriquedu four.
D£PLACE;%IENT D_UN
APPAREIL _ GAZ
Les raccords des apparei[s _ gaz servant
brancher cet apparei[ _ ['a[imentation de gaz ne
sont pas prgvus pour &tre d@[ac&s
continue[[ement. Une lois ['apparei[install&N E
PA$ [e d@[acer de fagon rgpgtge pour [e
nettoyer ou [echanger de place. Sicet apparei[
doit _tre dgm&nagg et/ou en[ev_ pour gtre
r@ar& suivre [a m&thode dgcrite dans [es in-
structions d'insta[[ation, Pour route informa-
tion, prendre contact avec[eservice_t[ac[ient&[e
deJenn-Airau [-800-688-[ [00.
[[ faut que[e piedarri_re de [acuisinieresoit
engag&dans[abride antibascuiementpour que
[acuisini&renepuissebascuieraccidenteiiement.
Page 31

UN IR,£PA
POURLA PLUPART DES PROBLENES
OBSERVe;S, ESSAYERD*ABORD CE
QUI SUIT._
° S'assurer que ['apparei[ est correctement
raccord{ _t['aIimentaqon &IectrNue.
, V@ifier qul[ n'y air pas de coupe-drcuit
" S'assurer que [e brQIeur foncdonne au gaz
natural seuIement.
" D&terminer sl[ y a une obstruction des
orificesdubr0Ieur ou des orificesd'aIhmage.
, V@ifierque I'alhmeur est sec et qu'il&met
des &tincdles. Lebr01eur ne peut s'alhmer
si I'alhmeur est endommag&, souill& ou
mouiii& Si ['aiiumeur ne gin@e pas
d'&tinceiies, ramener [e bouton de
commande _t[aposition OFF(ARRET).
SI LA FLANNE EST NON UNIFORNE.
, LesorificesdebrOieurpeuvent&treobstru&s.
" Le r@age de la fiammepeut avoir _t&tre
a]ust&
S_IL Y A S_;PARATION ENTRE LES
FLANNES ET LE BROLEURo
, Veiller _ placer correctement I'ustensile sur
lagrille dubrOieur.
" Prendrecontact avecun r@arateur agr&&
Jenn-Air.
SI LA FLANNE D_UN BROLEUR DE
SURFACE EST JAUNEo
" Prendrecontact avecun r@arateur agr&&
Jenn-Air.
Si RIEN NE FONCTIONNE SUR LA
CUISINIEREo
, V@ifier qu'i[ n'y air pas de coupe-circuit
d&ciench&eou de fusiblegriiig
, V@ifier si [a cuisini@e est correctement
branch&eaucircuit&iectriquede [amaison.
SI LA LANPE DE FOUR NE
FONCTIONNE PASo
" k'ampouie est desserr&e ou d&fectueuse.
gILES ALINENTS NE GRILLENT PAS
CORRECTENENTo
" La commande n'est peut-&tre pas r@&e
correctement.
, V@ifier laposition des grilles.
" Fermer la porte Iors du gril.
SI LES ALINENTS CUITS AU FOUR
SONT BRULES OU TROP COLORt_S
SUR LE DESSUS,
° hanourriture est peut-&tre ma[ dispos&e
dans ie four.
° Lefour n'apascorrectement pr&chauff&
SI LES ALINENTS CUISENT DE
FACON IN]_GALEo
"he four n'est peut-&tre pas install&
correctement.
, V@ifierlagrille dufour _ I'aided'un niveau.
" Placer [esustensiies en quinconce sans qu'iis
ne touchent [es parois du four ou ne se
touchent [es uns [es autres.
, V@ifier [es instructions pour [a bonne dis-
position des ustensiies sur [esgrilles defour.
Si LESR]_SULTATSDE CUISSON
DIFF]_RENT DE FOUR PR]_CEDENTo
" k'&ta[onnage du thermostat du four peut
diff&rer entre [esmod&iesneufset anciens.
Suivre [a recette et [es instructions
d'utiiisation avant d'appder [eservice apr&s-
vente,['&taionnagedu four pr&c&dentpeut
avoir vari&vers un r@age trop &iev&ou
trop has.
Si LESRESULTATS DE CUISSON
SONT INF_;RIEURS A. CEUX PREVUSo
" kesustensiiesne sont peut-_tre pasde [a
taiiie ou du mat@iau recommand&pour
obtenir [esmeiiieursr&sukats.
° Laplaceautour des ustensiiesn'est peut-
&tre passuffisantepour assurerunebonne
circulation de ['air dans[efour.
, V@ifier[esinstructionsdepr&chauffage,de
dispositiondesgrilleset detemp&rature du
four.
" Les&ventsdufour peuventgtreobstru&sou
ferm&s.
3O
Page 32

CUISINIER o
ENN
Garantie complete d'une annie - Pi_ces ÷t main-
d_oeuvre
Durant une p@iode d'un (J) an a compter de [adate de
['achatinitialtou_e pieceq@ser@6ierait ddectueuse dans
[es conditions normales d'usage menager sera r@arfie/
Garantie Hmit@e - pi@ces seulement
Deuxi_me annie _Apres [a premiere annee suivant la
datede rachadnitial,mute pi@equiser@deraitddectueuse
dansdes conditionsnormabs d'usagemgnagerserar@aree
ou remp[ac_e gratmtement _puece seu[ement): [e
propri4taire devra assumer tous[es autres frais, y
compris frais de main-d'oeuvre, de d@[acemenc de
transport, de kiiom4trage et de diagnostic. [e cas
@h6ant.
De la troisi_me a [a dnquigme annee a compter de
la date de ['achatinitialau d_tail, [es @_cesde [aliste ci-
dessous q@ se r@61eraientddectueuses dans des condi-
tions norma[es d'usage m_nager seront r@arees ou
remplacges gratmtement (pi6ces se@ement_: le
proprietaire devra assumer tousles autres frais, y
compris frais de main-d'oeuvre, de d@lacement, de
transport, de Uom@rage et de diagnosuc, le cas
_chgant.
ME SONT PAS COUVERTS PAIR CE'PTE
[° Les dommages ou d@angements dus g:
a. Hise en service, [ivraison ou entretien effectu6s incorrectement.
b°Toute r@araflon, modification, ak@ation et rout r@age non aumris_s par
le fabricant ou par un prestataire de service apr6s-vente agrg&
_°Accidents, mauvaise utilisation ou usage abusif ou d@aisonnable.
doAlimentation dectrique (tension, intensitY) incorrecte.
e°R@age incorrect d'une commande.
2. Les garanties ne peuvent gtre honor_es si [es numgros de s_rie d'origine ont _t6
en[ev_s, modifies ou nesont pas faci[ement [isib[es.
3, Ampou[es.
4. Apparei[sachetesaux finsd'usagecommercialou industrie[.
$. Les frais de visite d'un prestataire de service ou de service apr_s-vente encourus
pour [es raisonssuivantes:
aoCorrection d'erreurs de raiseen service.
bo[nitiation de ['uti[isateur _ ['emp[oi de ['apparei[.
c°Transport de I'appareil aux Iocaux du prestateire de service.
6, Dommages secondairesou indirects subis par mute personne suite au non-
respectde[agarantie.Certains6tatsnepermettent pas['exclusionou [a[imitation
des dommagessecondaires ou indirects; par consgquent [es [imitations ou
exclusionsci-dessuspeuvent ne pass'appiiquer_votre cas.
• Br_ [eurs agaz scel[@s
R_s[dents canadiens
Les garanties ci°dessus couvrent un appareil install{ au
Canada seuiement s'i[a @g agr66 par [esagences de test
habiiit4es {v@ificationde [a conformit_ _ une norme
nadonale du Canada), sad si ['appareila 4t6 introduit au
Canada _ ['occasion d'un changement de r4sidence des
Etats-Unisvers [eCanada.
Garande [imit_e horsdes _:tatsoUNs et du Canada
- Pi_¢es seulement
Pendant deux (2) ansa compter de [adate de ['acha_initial
audgtai[,route p@cequiser@6[eraitddectueuse dansdes
conditions normaies @usage menager sera reparee ou
remplac4egratuitement {pi@ese@emen@e propri4taire
devra assumer tous[es autres frais, y compris frais de
main-d'oeuvre, de d@iacement de transport, de
kilom4trage et de diagnostic. [e cas @h4anc
Lesgaran_essp@i_ques#_rmd@s&dessuss0nt/esSEULES
quelef@r£antaccorde.CettegarantJevouscoheredesdrdts
jut[cliquessp6cifiquese_vouspouvezegdementjcuir d"autres
droJts,variablesd'un 6tat a I%utre.
$I I/INTERVENTION D UN .... '.........
....... REPARA 7E( REST
Contacter [e revendeur chez q@['apparei[a _tg achetg,ou contacter Haytag
Servicessn,service-clientJenn-Air au 1-800-JENNAIR(I-800-536-6247), pour
obtenir [es coordonn_es d'uneagencede serviceagr6_e.
Veiiier gconserver[afactured'achatpourjustifierde[avaiidit&de[agarantie.Pour
d'autres informations en ce qui concerne [esresponsabiikesdu propri_teire
I%gardduservice sousgarantie,vok le texte de la GARANT[E
Si[erevendeurou['agencede serviceapr&s-ventene peut r_soudre[eprobigme,
6crire _ HaytagServicess_,attention CANe>Center, P.O.box 2370, Cleveland,
TN 37320-2370ou tel@honer au I-Se_-JENNA[R (I-see-s36-6247).
REMARQUE: Lorsdetout contactconcernantunprobigme,fournir ['information
suivante:
aoNora, adresse et num_ro de td@hone du client;
boNum@ode modde et numgro de s_riede ['apparei[;
c°Nora et adressedu revendeurou de ['agencedeservice;
doDescription clairedu probi&me observe;
eoPreuve d'achat (facmre de vente).
Les guides d'utiiisation,[esmanueisde service et [esrenseignementsdes pigces
sont disponibies auprgs de Haytag Servicessn, service-client Jenn-Air.
3J
Page 33

JENNoAIR
PRG3010, PRG3610, PRG4810
_ABLA DE !_/_A'TER[AS
[nstrucdones [mportantes sobre SegurNad.................33-36
Codnando en [a Estufa......................................................37-38 ....
Parrilla.........................................................................................39
Fundonamiento dd Horno ..............................................40-43
CuNado y Limpieza............................................................44-45
Hantenimiento ..........................................................................45
Antes de Solidtar Servido .....................................................46
Garantia ......................................................................................47
Page 34

9q RUCCION g5 MPORI"AN l g5
[nsta[ador: Por favor dqe esta guia
INS _ R( CC_ ,}Ng5 D:B
junto con e[e[ectrodom_sqco.
Consumidor: Porfavor leayconserve
estaguiaparareferendafutura. Con-
servee[redbo decompray/oe[cheque
canceiadocomo pruebade compra.
N_mero de Hode[o
N_mero de Serie
FechadeCompra
Sitiene a[guna pregunta, [lame a:
]enn-Air Customer Assistance
[-800-JENNAIR(1-800-536-6247)
1-800-688-2080(TTY en EE.UU.para
personasconimpedimentosaudkivoso
de[hab[a)
(Lunes- Viernes, 8:00a.m.- 8:00p.m.
Hora de[Este)
[nternet: http://www.jennair.com
Para informacien sobre serwcio, vet
pegina 47.
el e[ectrodomSsdcosin actuaiizar
estaguJa.
: PRG3@0 ' PRG3610 ' PRG4810
Quemadores Potentes 4 6 6
no no
I Conveccien/ I Conveccien/
Convencional Conventional
Las advertencias e instrucciones importantes
sobre seguridad que aparecen en este manual
no est_n destinadas a cubrir todas [asposibies
circunstancias7"situaci°nes que puedan ocurrir.
Sedebe qercer sentido tom,n, precaucien y
cuidado cuando instaie,reaiice mantenimiento
o hagafuncionar e[ artefacto.
Siempre pengase en contacto con su
distribuidor, agente de servicio o fabricante si
surgen probiemas o situaciones que usted no
comprenda.
RECONOZCA LOS S[MBOLOS DE
SEGUR[DAD,
ADVERTENC[A - Pe[igroo prficticas no
segurasquePODRIANcausarlesienpersonal
graveo mortal
PRECAUC[ON - Peligros o pr_cticasno
segurasquePODRIANcausarlesienpersonal
menosgraveodahosmateriaieso personaies.
Lea y siga todas [as instrucciones antes
de usar este eleetrodom_stico para evitar
e[riesgo potencia[deincendio, choque ei_ctrico,
lesien personal o dafio al eiectrodom_stico
como resuitado de su uso inapropiado. Utiiice
este eiectrodomestico soiamente para e[
propesito que ha sido destinado segQn se
describe en esta guia.
[[ Convecden/Convencional
I Horneado Est_ndar
Para asegurar funcionamiento correcto
y seguro: EIeiectrodomestko debe ser
instaiadodebidamentey puestoatierra pot
un tecnico ca[ificado. No intente aiustar,
reparar, prestar servicio o reparar ninguna
pieza de su estufa, a menos que sea
especificamenterecomendadoen estaguia.
Todas[asreparacionesdebenserefectuadas
por un t_cnico caiificado. Pidaa[ instaiador
que [e indique [a ubicaciende [a v3Jvuiade
cierre delgasycomo terraria encasodeuna
emergencia.
Siempredesenchufee[ eiectrodom_sticoan-
tes de efectuaraigunareparacien.
se sigue estrictamente la in-
formacien proporcionada en es_a
guia_ sepuede producir un incendio
o una e×pbsien, causando daF_os
materiales_ lesiones personales o
mor_ales.
- No almacene ni usegaso[ina ni otros
vapores y [[quMos inflamab[es en [a
vecindad de este electrodom_sti¢o
o de cua[quierotro_
- QUE HACER S[ PERC[BE OLOR A
GAS:
• No trate de encender ning_n
a_:efacto.
• No toque ning_n interruptor
ei_ctrico,
• No use ning_n tel6fono en su
edificio.
• Llame inmediatamente a su
proveedor de gasdesdeel tel_fono
de un vecino. Siga [as instruco
doriesproporcionadaspotel
proveedorde gas.
• $i no puede [ocalizar a su
proveedor de gas, [lame a[cuerpo
de bomberos.
- La instalacien y reparaciones deben
set efectuadas pot un t_cnico
ealificado, una agenda de reparo
aciones o el proveedor de gas.
33
Page 35

Estosproductosdebenusarsecongasnatural
so[amente.
Un[eveolor agaspuedeindkar queexisteun
escapedegas.Sisedetectaolor agas,derred
suministro de gas a la estufa. Llame a su
instaladoro a lacompafiiadegaslocalparaque
verffiquenel posibleescape. Nunca use un
f6sforo u otra Hama para [ocaiizar un
escape de gas.
A
, TODAS LAS ESTU-
FAS SE PUEDEN
VOLCAR Y CAUSAR
LES[ONES PERSON-
ALES
, [NSTALE EL D[SPOSo
[T[VO ANT[VUELCO
[NCLUiDO CON LA ESTUFA
, SiGA TODAS LAS [NSTRUC-
CLONES DE [NSTALAC[ON
ADVERTENCIA: Para reducir e[ riesgo
deweko de[ e[ectrodom(_stico acausa
de uso anorma[ o debido a peso
excesivo en [a puerta de[ homo, es
necesario asegurar e[ e[ectro-
dom_stico mediante un dispositivo
antivueko debidamente instaJado,
Para verificar si [a estufa est_ debidamente
insta[ada,desconecte e[disyuntor para cortar
[aenergia e[_ctrica, retire e[ pane[ de acceso y
mire debaio de [aestufa paraverificar que uno
de los torniiios niveiadores traseros est_
debidamente enganchado en la ranura del
soporte. Vueivaacolocarel paneldeaccesoy
reponD eldisyuntor. Eldispositivoantivueico
asegurae[ tornii[o niveiador trasero a[ piso
cuandoest_ debidamenteenganchado.Esto
debe verificarse cadavez que [a estufa sea
movida.
Eviteco[ocar [aestufaen una "3rea de m_s
tr3fico" o en unhDr aisiadoqueest6aiqado
deunamesada.[magineseelhornofuncionando
antes de seieccionarun [ugar para ubicar[o.
Recuerdeque [aspuertasabiertasde[ homo
puedenbioquearunpasii[oy crear un peiigro.
EN (}Ago D:g ]N(::gND O
Apaguee[ eiectrodom6stico y [acampanade
ventiiaci6n para evitar que [as [lamas se
dispersemExtinga[as[lamas[uegoencienda[a
campanaparaexpuisarelhumoy el o[or.
° En[a cubierta: Apagueelfuegoo lallama
en unasart6nconunatapao unabandeiade
hornear.
NUNCA [evanteo muevauna sart_n en
[lamas.
o En e[ homo: Apagueel fuego o la llama
cerrando lapuertadel homo.
No useaguaen los incendiosde grasa. Use
bicarbonato de soda, un producto quimico
secoo unextinguidorde[tipo conespumapara
apagarun incendioo [a[lama.
PARA EVI'FAR LN
IN(;END]O O DAiNO
(}AUSAD' (,} PO] EL
Aseg@ese de que se hayan retirado todos los
materiaies de empaque de[ eiectrodomgstico
antesde suuso.
Hantenga el grea airededor del
eiectrodomgstico [ibre y exenta de materiaies
combustibles, gasoiina u otros vapores y
materiaies infiamabies.
Si e[ eiectrodom_stico es instaiado cerca de
unaventana, se debe tener cuidado para evitar
que [ascortinas pasen sabre los quemadores.
NUNCA deje articuios sobre lacubierta de la
estufa.El aire caiiente del respiradero puede
encender los articuios infiamabies y aumentar
24
lapresi6nenlosenvasescerradoshastahacerios
reventar.
Huchos envases de tipo aerosol son
EXPLOSIVOScuandoson expuestoalcaiory
puedensetakamenteinflamables.Evitesuuso
o su almacenamiento cerca del
eiectrodom_stico.
Muchos pi_sticos son vuinerabies al caior.
Hantengalospi_sticosaiqadosdelaspiezasde
[aestufaquepuedanestartibiasocaiientes.No
deiearticuiosdepi_sticosobre[acubiertade[a
estufapues se puedenderretir o abiandarsi
est_indemasiado cerca de[ respiradero o de un
quemadorsuperior encendido.
Para eliminar el riesgo de pasar sobre los
quemadoressuperiorescaiientes,nosedeben
guardar articuios en [as armarios que est_in
directamente sabre [aestufa. Sitales armarios
sonusadosparaaimacenamiento,debelimitarse
aco[ocararticuiosdeusopocofrecuenteyque
puedenguardarseenformaseguraenuna_rea
queest_sujetaa[caior provenientede[aestufa.
Lastemperaturas pueden no ser apropiadas
para aigunos articuios, tales coma articuios
voi_tiies,[impiadoresospraysenaerosol
No cueiguearticuios de ninguna parte de[
artefacto ni co[oque nada contra e[ horno.
Aigunasteiassonbastanteinflamabiesypueden
prenderse fuego.
Cuando use esta estufa que es similar alas
usadasen restaurantes,h_gaiocon extremo
cuidado puesestetipo deartefacto proporciona
caiorintensoypuedeaumentard potencia[de
accidente.
SE(;U] IDAD PARA L
N U NCA deie alosnifios solos o sinsupervisi6n
cuando e[ e[ectrodom(_stico estg en uso o estg
ca[iente.
N UNCA permita que [as nifios se sienten o se
paren en ninguna parte de[ eiectrodom&stico
pues se pueden [esionar o quemar.
Se [es debe ensefiar a los ni_os que e[
eiectrodomgstico y los utensiiios que estgn en
_1 o sobre &[ pueden estar caiientes, Deie
enfriar losutensiiios caiientesen un[ugarseguro,
fuera del aicancede los nifios pequefios. Seles
debe ensefiar a los nifios que un
Page 36

532'RUCC ONES fTSPORTAN TES SOBRE [DAD
dectrodom6sqco no es un juguete. No se
debe permiqr que los nifios jueguen con los
contrdes uotras piezas de [aestufa.
NUNCA
a[macene ardcubs de inter&spara bs nifios
en bs armanos que est_n sobre [aestufa o
end protector trasero de [a estufa. Los
nifiosque setrepan en [a puerta de [aestufa
para akanzar tales ardcubs pueden
[esionarse senamente.
NUNCA used dectrodom_sqco como un
caiefactorparacaientaroentibiarunahabitaci6n
afindeevitarunriesgopotencia[parae[usuario
y dafiare[ e[ectrodom&stico. Adem_s,no use
[a cubierta o e[ homo como una_rea para
aimacenaraiimentoso utensiiiosdecocina.
No obstruya el fluio del aire de ventilaci6ny
combusti6n bioqueando el respiradero del
homo o[astomasdeaire. Siserestringee[flqo
de aire a[quemador se evita e[ rendimiento
correcto yseaumenta[aemisi6ndemon6xido
de carbonoa niveiespeiigrosos.
Plantengalos conductos de ventiiaci6n dd
homo sinobstrucciones.Suestufaesventiiada
atray,s de [acubiertadeianterade[amoidura
de [aisia,de[respaidotrasero o de[ protector
akodearmario.Nuncabioqueelosrespiraderos
de[homo ni lastomasdeaire. No obstruyae[
flqo delacombusti6nnidelairedeventiiaci6n.
La restricci6n delfiuio del aire al quemador
afectar_e[buenrendimiento.
Evitetocar el _reade[ respiraderode[ homo
cuando el homo est& encendido y durante
varios minutos despu_sde que e[homo haya
sidoapagado.Aigunaspiezasdelrespiraderoy
del _reacircundantesecaiientan1osuficiente
como para causar quemaduras. Despu6s de
que el horno haya sido apagado, no toque el
respiradero ni las_reas circundantes hasta que
elias hayan tenido tiempo suficiente para
enfriarse.
Otras superficies potenciaimente caiientes
inciuyenlacubiertadelaestufa,las_reasdirigidas
hacia[acubiertade [aestufa,e[ respiraderodd
homo, [assuperficiescercade la aberturadel
respiradero, [a puerta de[ horno y [as_reas
airededorde [apuerta y [aventanade[horno.
A
NUNCA use la puerta del eiectro-
dom&sticoo [agaveta,si[atiene, comouna
banquetaoasientopuesestopuederesukar
en la posibie voicadura del eiectro-
dom_stico, dato a[ eiectrodom_stico y
lesionesgraves.
No toque un foco caiiente dd horno con un
patio h_medo pues el foco se puede quebrar.
Si se quiebra el foco, desconecte la corriente
ei6ctrica hacia [aestufa antes de sacar e[ foco
para evitar choque ei&ctrico.
SE(;{, :RIDAD PA:RA
Siemprecoloqueunutensilioenunquemador
superior antesde encenderlo. Aseg@esede
usar [a periiia correcta que controia cada
quemadorsuperior.Aseg@esedeencenderel
quemadorcorrecto y comprobar de queen
efecto el quemador haya sido encendido.
Cuando hayaterminado de cocinar, @ague el
quemador antes de retirar el utensilio para
evitar exposici6n a la llama del quemador.
Siempre quste la llamadel quemador superior
de modo que no se extienda m_sall_del borde
inferior de[ utensilio. Una llama excesiva es
pdigrosa, desperdicia energia y puede datar la
estufa, el utensilio o los armarios que est_n
sobre laestufa.
NUNCA deje sinsupervisi6n la cubierta de la
estufa cuando est_ cocinando, especiaimente
cuando usa un ajuste de caior ako o cuando
est6 usando unafreidora. Los derrames pueden
producir humo y los derrames degrasapueden
infiamarse. Limpie los derrames grasosos tan
pronto como sea posibie. No use caior ako
durante periodos de cocci6n proiongados.
NUNCA caiiente un envase cerrado en e[
quemador superior o en el horno. La
acumuiaci6n de presi6n puede hacer expiotar
e[envasecausando una [esi6n persona[ grave o
dato a [a estufa.
Use tomaoiias secos y gruesos. Los tomaoiias
h_medos pueden causar quemaduras a causa
de[ vapor. Las toaiias u otros sustitutos no
deben ser usadoscomo tomaoiias porque eiios
pueden quedar coigando a trav&s de los
3g
quemadores superiores y encenderse o
enredarse en las piezas de la estufa.
Siempre dqe enfriar lagrasacaiiente que se ha
usado en [afreidora antes de intentar mover o
No permita que se acumuie grasa u otros
materiaies inflamabies en la estufa o cerca de
ella, en [acampanao en e[ventiiador aspirador.
Limpie [a campana extractora con frecuencia
para evitar que [a grasa u otros materiaies
infiamabies se acumuien en [a campana o en e[
fikro. Encienda e[ ventiiador cuando cocine
aiimentos fiameados debqo la campana.
NUNCA use vestimentas de materiaies
infiamabies, ropa sueka o de mangas [argas
cuandoest&cocinando. Lavestimenta se puede
encender o enganchar en los mangos de los
utensiiios.
Siemprecoloque las parrillasdel horno en la
posici6n deseadacuando el homo est& frio.
Desiicelaparriiia delhorno haciaafuerapara
agregaro retirar aiimento, usandotomaoiias
secosy resistentes. Siempreevite aicanzar
dentro de[ horno para agregar o retirar
aiimentos. Si una parriiia debe ser sacada
cuandoest_to&via caiiente,useuntomaoiias
seco. Siempre@agueel horno despu&sde
haberterminado de cocinar.
Tenga cuidado cuando abra lapuerta del horno.
Dqe que escapee[aire o e[ vapor caiiente antes
de sacar o voiver co[ocar e[ aiimento.
Siempre retire la asadera sucia del
compartimientode[asadordespu&sdecocinar.
La grasa que queda en [a asadera puede
calentarse Io sufi¢iente como para
erlcenderse,
ADVERTENCiA $OBRE LOS ALIMEN-
TOg PREPARADOS: Sigalasinstrucciones
de[ fabricante de los aiimentos. Siun envasede
pi_stico de aiimento congeiado y/o su tapa se
deforma, se comba o se data de aiguna otra
manera durante [a cocci6n, descarte
inmediatamente e[ aiimento y su envase. E[
aiimento puede estar contaminado.
N UNCA usepape[de aiuminio paracubrir una
parriiia de[ horno o [aparte inferior de[ horno.
Eluso incorrecto puede resukar en un riesgo
de choque ei&ctrico, incendio o dato a[
eiectrodom6stico. Use pape[ de aiuminio
soiamente como se indica en esta guia.
Page 37

Nousepapddeahminioparsforrarlos
plaqllosprotectoresdelosquemadores.La
restrkd6n del {hjo normal del sire puede
afectar la segur@ad del {undonamiento.
Use sartenes con rondos pianos y mangos que
sean/3riles detomar y que permanezcan/rios.
Evke usarsartenes uolhs inestables,combadas
que se pueden vNcar/_dlmente u olhs cups
mangos est_n suekos. Adem_s evke usar
utens@osespec@mente peque_os o sartenes
con mangos pesados pues ellos pueden ser
inestables yvdcarse/Scilmente. Losutens@os
queson pesados demover cuando est_n llenos
con alimento pueden tambi_n ser un peligro.
AsegQrese de que el utensilio sea Io
suficientemente grande como pars contener
enforms debidalos alimentos yevitar defames.
El tama_o es parqcuhrmente importante
cuando se uqlizan fre@oras. Asegurese de que
el utensilio qene capac@adpars el vohmen de
alimentos que se va a agregar al igual que pars
la {ormaci6n de burbuias de la grass.
Parsreducir aun minimo [asquemaduras yque
los materiaies infiamabies y los derrames se
enciendan debidos a contacto no intentional
con el utensilio, los mangos no deben
extenderse sobre el quemador superior
adyacente. Siempre gire los mangos de los
utensilios haciael lado o haciala parte trasera
de laestufa, no hacialahabitaci6n donde puede
ser {_cilmente goIpeados o alcanzadospor los
ni_os peque_os.
NUNCA deie que un utens@o hierva hasta
quedar seco puesesto puede da_ar e[ utensilio
y laestufa.
Sigalas instrucciones del{abricante cuando use
bolsas pars cocinar en el homo.
Solamente ciertos tipos de utensilios devidrio/
cer_mico, de ceramics o ghseados son
convenientes pars uso en la cubierta de la
estufa o en el homo sin quebrarse debido al
cambio repentino de temperatura. Si@ las
instrucciones del fabricante cuando use
utensilios de vidrio.
Este eiecwodom6sqco ha sido probado
respeao a su rendimiento seguro usando
utensiiios de cocina convencionaies. No use
ningun dispositivo o accesorio que no hays
s@o especificamente recomendado en esta
guia. No usetapas pars cubrir losquemadores
superiores, rqillas pars lacubierta de laesmfa
niagreguesistemasdeconvecci6n pars hornos.
Eluso de disposiqvos o accesorios que no son
expresamente recomendados en esta guia,
puede crear serios peligros de seguridad,
resu[tar en probiemas de rendimiento yreducir
[avida 6til de los componentes de [a estufa.
SEGURIDAD DE ILA
Apague todos los controles y espere que se
enfrien las piezasde laestufa antes de tocarlas
o limpiarlas. No toque las rqillas de los
quemadores o hs _reas circundantes hasta
queelias no hayantenido qempo suficiente de
enfriarse.
Limpie la estufa con cu@ado. Ten@ cu@ado
pars evkar quemaduras de vapor sise usauna
espo@a o un paso mojado pars limpiar los
defames en unasuperficie caliente. AIgunos
limpiadores pueden producir vapores nocivos
cuando se aplican a una superficie caliente.
Limpie sohmente laspiezas que se indican en
estaguia. No [impie el empaque de [apuerta.
EI empaque es esencia[ pars un seiiado
herm_qco. No restriegue, daffe, nimueva e[
Av 5o Y ADV:E:R' %NC A
La(Propuesta 65) de iaLey de 1986dei Estado
de California sobre SeguridadyContaminaci6n
del Agua Potable (California Safe Drinking
Water and Toxic Enforcement Act of 1986)
exige que elGobernador deCalifornia publique
unalists de lassustanciasque segQnel Estado
de California causanc_ncer o da_o alsistema
reproductor y exige alas empresas que
adviertan a sus clientes de la exposici6n
potencial a tales sustancias.
Seadvierte a los usuarios de esta estufa que la
combusti6n del gas puede resukar en
exposici6n de baio nivel a algunas de las
sustancias publicadas en la lists, inchyendo
benceno, formaldehido y hollin, debido
principalmente a la combusti6n incompleta
del gas natural Los guemadores qustados en
forms debida reducir_n la combusti6n
incompleta. La exposici6n a estas sustancias
puede tambi_n ser reducida a un minimo
venqlando los guemadores al exterior en
forms adecuada.
AVISO IMPORTANTE RESPECTO A
LOS PAJAROS DOMESTICOS: Nunca
mantengaalos@iaros dom_sticos en lacocina
o en habkaciones hasta donde puedan Ilegar
los humos de la cocina. Los p_iaros qenen un
sistema respiratorio muysenskivo. Los humos
producidos durante el ciclo de autolimpieza
del homo pueden ser periudiciales o mortales
pars los p_iaros. Los humos que despide el
aceite de cocina, la grass, la margarina al
sobrecalentarse y la vaiilla antiadherente
sobrecalentada pueden tambi6n ser
periudiciales.
£OHSERVE E$]°A5 X[NSTRU(,(,[ONE5 PARA REFEREN(,[A F(1][1RA
36
Page 38

:LAESS'U> ]
" Todos los encendedores de los
quemadores emiqrin chspas cuando se
endenda cualquier quemador superior.
" A veces es dificil encender los
quemadores supefiores debido a que
hay aire en la tuberia dd gas.Esto puede
ocurrir:
a) durante h instahd6n
b) si laestufaes desconectadadel
suministrodegasprindpaI
c) silaestufano hasidousa& du-
rantevariosdias
Para extraer el aire dela rubella del
gas, coloque un [6s/oro encendido
junto a tacabezadelquemadory gire
la perila de ¢antrN hada la posici6n
"on" (encendido).
" La llama dd quemador puede verse
separadadd orificio sino secdoca un
utenstio sobrela reiila.
SUestufa esti equipacBcon uno (Hoddo
PRG3010) o dos (Hodelo PRG3610,
PRG4810)quemadoresparacocinar afuego
lento de tres piezas. Lastapas centrales
cubrenlosaiustesdelamabaiacuandoocurren
derrames. Estastapastambi_n extienden la
llama hacia afuera para evitar que haya
demasiadocalor enelcentro delosutenstios.
TAPA
/ INTERIOR
ANILLO DE
I-"'_QU EMADOR E
CON ORIRCIOS
LLAMA BAJA
Un quemador debidamente qustado con
orificios[impiosseencender_dentrodepocos
segundos. La llamaser_ azulcon un cono
interior daramentedefinido. No debehaber
ningin rastro deamarillo enla llama. (Du-
ranteelusoinicial,el polvoenlatuberiao en
el aire puedecausarbrevemente una lama
color narania.) Congas[icuadosonaceptabie
aigunaspuntasamarilasen [alama. Esto es
normaly no esnecesariohaterningin a_uste.
AJUSTE DE LOS CONTROLES
1. Coloque un utensilio en la reiilla del
quemador.
2, Oprima la perilla de control y girela a la
izquierda a la posici6n "LIGHT"
(encendido). Seoir_ unchasquidohasta
quelaslucesdelquemadornoseenciendan.
ECAUCiON:
Si[allamaseapagacuandoeat6cocinande.
apaguee[ quemador. Si se detecta un
fuerte olor a gas,espere cinco minums
hasta que desaparezca e[ dor antes de
voiver a encender el quemador.
[,.JBICACI" ....(,}N DIE L(",}S (}ONTROLES
Todoslosquemadores en el ajuste"HIGH" (Alto) tienen unapotencia de I5.000 BTU(I2,000
con gas licuado).
HODELO PRG48 i0
L ?_Teo.e ®..o
t-t
1 2 3 4
l. Quemadorsuperiordelantero izquierdo. 4, Quemadorsuperior trasero central.
2. Quemadorsuperior trasero izquierdo. 5, Quemadorsuperior delanteroderecho.
3. Quemadorsuperior delanterocentral. 6, Quemadorsuperior trasero derecho.
HODELO PRG3610
1 2
l oQuemadorsuperior delantero izquierdo. 4. Quemadorsuperior trasero central.
2, Quemadorsuperior trasero izquierdo. 5oQuemadorsuperior delantero derecho.
3, Quemadorsuperior delanterocentral. 6, Quemadorsuperior trasero derecho.
HODELO PRG3010
T-t
5 6
t-t
5 6
Los quemadorestienen un encendedor de
estados61ido.Cuandolaperila decontrol se
giraa la posici6n"on" (encendido),fhiri gas
haciaelquemadoryelencendedorproduciri
unachispaparaencenderlo.
1 2
1. Quemadorsuperior delantero izquierdo.
2. Quemadorsuperior trasero izquierdo.
37
t-T-
3 4
3oQuemadorsuperiordelanteroderecho.
4. Quemadorsuperior trasero derecho.
Page 39

USTE5 D:E
Loscontroies ofrecen un nQmero infinito de a}ustes entre "H[GH" (alto) y "LOW" (bajo).
Simpiemente a}ustesu llamade acuerdo a sus necesidades.
Eitamafio ytipo delutensiiio y la canqdad yqpo de aiimento que est3 siendo cocinado infhenciar_
elaiuste necesario para obtener losme}oresresukados. Lossiguientesa}ustesson proporcionados
como guia.
Lasmaniiaso los utensi[ios de cocina reDiares
pueden derretirse o desarro[[ar burbuias
debido a[tamafio de [a[lamaenlos quemadores
grandes de qpo profesionaL
No se recomiendan los utensiiios de cocina de
acero inoxidabie de capa deigada porque se
producen puntos caiientes y existe [a
posibiiidad de que los aiimentos se quemen.
Ajustes
Usos
"HIGH" (ALTO)
Uncaior r_pido paracomenzaracodnar r_pidamentey
hervir losliquidos.
Parafreir, sofritar yhervir lentamente grandes canqdades de
alimento.
Paracaientarafuegolentoy derredr mantequiiiao choco-
late.
;_E[ajuste "LOW" u@za so[amente e[ quemador interior. Sin embargo, cuando use este aiuste,
siempre encienda primero el quemador completo.
DU]:{ANTE UNA
IN FERRY. PC] ,}N DIE ILA
ENER(::; A EL£C' % C A
Para hacer funcionar los quemadores
superiores durante una interrupci6n de [a
energiael_ctrica:
l o Acerque un f6sforo encendido a los
orificios del quemador.
2. Optima y gire la perilla de control
lentamente a la posici6n "LIGHT"
(encendido).
3, A}uste[a[lamacomo 1odesee.
NOTA: Los quemadores de[ asador, de[
homo o delaparrillano pueden ser encendidos
cuando hay una interrupci6n de la energia
el_ctrica.
Cuando se encienden los quemadores
superiores, asegL]rese de que todas [as
perillas de control est6n en [a posmion
"OFF" (apagado). Primero encienda un
f6sforo y mant_nga[o en posici6n antes de
girar [a periiia a [a posicuon _'LIGHT"
(encendido).
SELECC] ,)N DE IL,)S
Para [ograr un rendimiento 6primo a[
codnar, use utensi[ios de cocina
profesiona[es. Este tipo de utensilio puede
adquirirse en lastiendas de departamentos, en
los almacenes de artkulos de cocina o en los
almacenes que venden articulos para
restaurantes.
TAMANO DE LOS UTENSILIOS
° Eltomafiodefallamadebe ajustarse demodo
que no se extien@rods@'0del bordedel
utens#io. Esta instrucci6n se basaen
consideracionesdeseguridad.Siseaiusta
e[ tamafio de[a[lamaparaquese adaptea[
tamafiode[utensiiiosecontribuyea[ahorro
de combusqbie.
Los utensiiios que se extienden m_sde dos
puigadas(5 cm) de [areiiiia o que toquen [a
cubierta de [a estufa, pueden causar
acumuiaci6n de caior, resukando en dafio
a [areiiiia de[ quemador, a[ quemador o a
[a cubierta.
Losartkuios especiaies,tales comowoks
con un aro desoporte, que restringen [a
circuiaci6ndelaireairededordelquemador,
permiten[aacumuiaci6ndecaiorycausar_n
dafioalareiiiiadelquemador,alquemador
o a[a cubierta.
Use el accessorio de wok de rondo
piano Jenn-Air, Modelo AO 142.
CONSERVAS
• Cuando haD conservas, use el aiuste
"HIGH" hasta que e[ aguaempiece a
hervirosehaya[ogrado[apresi6nen[aoiia
a presi6n. Luego,reduzcael ajuste a la
llamam_sbajaquemantengaelhervor o la
presi6n.
• EIusoproiongadodelaiuste"H[GH" oel
usoincorrecto delos utensiiiosparahacer
conservasproducir_ caior excesivo. El
caior excesivo puede causar dafio
permanente al artefacto.
38
Page 40

,./XRRILLA (S, LAMSNrs h O }:S:LO......
.................. PRt4S 0}
MIV:E],ADO DE LA
moDespugs de que
Haestufa est6 en
CUBIERTA DE HUHOS DE LA PARRILLA
TORNILLO DE
EHBARQUE (}tETIRAR)
cubierta de
humos [evantin-
doia cuidadosa-
mente derecho
hada arriba.
Lugo retire e[ .....
torniiio de em- i@, @ @
barque trasero (ver diagrama).
2oGire HostorniHHosexteriores (ver diagrama)
para nivdar Haparriih o para darie una indin-
acidn hada de[ante a fin de que Hasgrasas y
aceite se escurran aieiados dellaiimento que
estfi siendo codnado.
La parriih es de acero inoxidabie y debe ser
preparada antes de[primer usoy ocasionaimente
de ahien addante, si noes usada pot un periodo
de tiempo proiongado. Siga [asinstrucciones
indicadas a continuacidn:
moLimpie bien Haparriih con agua jabonosa
caHiente.
2° Eniuaguecon unamezda de Icuarto degaidn
(I L) de agua y una taza (250 mL) de vinagre
bianco. Sequebien.
3oVacieunacucharaditadeaceitevegetalen el
centro de Haparriih (no useaceite de maiz
pues quedapegaioso)yfrotetoda Hasuperficie
de Haparriih usando un paso grueso.
4oGire Haperiih de control a 350°F (I 75°C).
Cuando aparezca humo, gire Haperiiia a Ha
posicidn "off" (apagado)y deie que Haparriiia
seenfrie.
SoRepita los pasos 3 y 4.
6oDespu_s de que Haparriih se ha enfriado,
frote toda Hasuperficie de Haparriih usando
un paso grueso. Apiique una capa ddgada
de aceite vegetal. Laparriih ahora estfi iista
para ser usada.
Cuando Haparriih es debidamente preparada,
puede usarse sin agregar aceite adicionai. Sin
embargo, sise apiicauna nebiina[eve de aceite
Ajuste de
Alimentos Controm[°F (°C)]*
' Tocino ' 350° (175°)
Huevos 250° ( 120°)
Tostadas Francesas 350° ( 175°)
Sandwichde Queso Derreddo 350° (175°)
Hamburguesas 325° (165°)
Panqueques 375° (190°)
Hamburguesasde Sakhicha 350° ( 175°)
Estasson guiassugeridasparaa ustesde control y tiempo. EstostiemposYajustesde control puedenset afectados
por factoresta es como bajapresi6n de gas.
vegetal a una parrilla fria antes de cocinar los pueden encontrarlos en un almac_n de
alimentos delicados se podr_n dar vueka con articulos para restaurantes. Siga las
Tiempo de Coccidn Aproximado (Ninutos)
metLado 2do Lado
2-3 2-3
2-3 (t)
2-3 2-3
2-3 2-3
5-6 5-6
1-2 I-:2
2-4 2-3
instrucciones de fabricante.
4. Si se usa agua caliente, vinagre, polvos
U5'(,} Dg LA ])AI q I:LLA
pulidoreso esponiasde lanade acero para
Iimpiar la parriiia, la parrilla DEBE ser
1oPreparelaparrilla como se describi6.
2°Antes de comenzar a cocinar en la parrilla,
preparada nuevamente como se indic6
anteriormente.
asegurese de que labandeia paragoteos est6
vaciay ensu lugar.
3oPrecalientelaparrilla al aiusteespecificado.
La luz de la parrilla se apagar_i cuando
la parrilla se haya precalentado.
BAND:E A PA:RA GO%gO
La bandeia
para goteo \
recoiecta Ha
grasa y otros
iiquidoscrea-
1oUsando una espgtula met_lica de borde
cuadrado, limpie la parrilla para retirar la
grasayaHimentocuandotodaviaest_icaHiente.
2oEn/riehastaquequedetibia,frotelasuperficie
Hevementeconaceitevegetal(no useaceite
de maizpues queda pega_oso)y frote bien [a
parriiiaconunpasogrueso_sperooarpiiiera
doscuandose
est_iusandola \
parrilla. Re-
vise periddi-
camente la
BANDEIA DE GOTEO
Model PRG4810
bandqa de goteo para evitar que la grasa se
derrame. Vacie labandeia de goteo despugs de
queest_fria.
paraquitarcualquierparticuladealimentos
restantes.
3. Sipermanecegrasao suciedaddealimentos
o si haydecoloracidn pot el calor,sigalas
il.
Para acumuladdn de grasa: Use una
cucharada de vmgre en i/_taza (I25 mL)de
Nuncainundelaparrillacalienteconagua
fria. Estopuedecausarque la parrilla se
agriete o se combe.
agua y limpie con una esponja de restregar.
• No retire hacia afuera la parrilla para
Para decoloracidn par el calor: Use un
iimpiador de acero inoxidabie no tdxico.
Para suciedad de alimentos: Useuna
piedra para parriih (piedra pdmez de grano
fino) o un iimpiador para parriihs. Estos
goteo cuando estg cocinando o
inmediatamentedespugsdecocinaren la
parrilla. La grasa caliente puede estar
escurriendo desde la parrilla hacia la
bandeia de goteo.
39
Page 41

Y DEL HORNO
SI_$TE/}_A DiE
Aseg@esede que [a per@ade control de[
homo est_ en laposki6n "OFF" (Apagado)
antesde suministrargasalaestufa.
Su estufaest_ eq@padacon encend@osin
piloto. Losquemadoresdehorneadoyasado
alaparr@aest_nequipadosconunencendedor
el4_ctricoy un sistema de seguridad que
enciendeel gas. Elquemador seencender_
dentro de 30segundos.
Con estesistemade encendido,el homo no
funcionar_duranteunafaiiadeenergiaei_ctrica
o si el homo ha sido desenchufadodel
tomacorriente mural No se debe Jntentar
hater funcionar e_ horno durante una
faHa de energJa e[_¢trica°
(}ONTROEES DEL
mnterruptor de la Luz de[ Homo - oprima
en [apartesuperior de[ interruptor "OVEN
LIGHT" (Luzdel Horn@paraencenderlaluz
de[ homo. Optima [a parte inferior de[
interruptor paraapagarlaluz.
[nterruptor de Convecci6n - optima [a
partesuperior de[interruptor "CONVECT"
(Convecci6n)paraENCENDER (_ON") e[
ventihdor de convecci6n. Optima [a parte
inferior del interruptor para APAGAR
(_'OFF") e[ ventiiadorde convecci6n. Evite
usare[ventiiadordeconvecci6ncuandoest6
asandoa h parrilla. Paraasarala parrillaes
m4sefectivoel cabr traditional
Peril[a del Homo- seusaparaprogramar[a
temperaturade[homoparahornearuhornear
por convecci6no paraseleccionarasara h
parr@a.Aseg@esedeque[a[ineaindicadora
quede co[ocada en [a temperatura exacta
deseada.
PerHla del Homo Pequefio (Modelo
PRG48i 0soiamente)- useparaprogramar
[atemperaturade[horno parahornear. (Este
homo noest_disefiadoparaasara[aparri[[a
o horneadopor convecci6n.) Gire [a peri[[a
decontrol a [atemperatura deseada.
Luz [ndicadora de[ Homo - [a [uz se
i[uminar_ hastaque se a[cance [atemperatura
deseada. A medida quelos quemadores pasan
por cidos de encendido y apagado para
mantener [a temperatura seieccionada, [as
lutes tambi_n se encender_n y apagar_n.
° Paraquemarlosaceitesde fabricaci6n
usadosen la f_brica ENCIENDA los
quemadoresdel homo 7 del asadorde
uno a la vez a 450°F (235°C). Deie
calentar durante 20 a 30 minutos.
Encienda[a campanaextractora para
quitare[ o[or de [ahabitaci6n.
o Lahumedadseevaporadelosaiimentos
durante e[ proceso de cocci6n. La
cantidad de humedad depende del
contenido de humedadde[ aiimento.
Estahumedadsecondensar_encuaiquier
superficiequeest_m_sfria quee[inte-
rior de[ homo, ta[ como e[ pane[de
control o [apartesuperiorde [apuerta.
Estoesnormal
PROGRA_4ACI6N DE LOS
1o Coloque las parr@asdel horno en las
posicionesapropiadas.
2. Co[oque[aperiiia"OVEN" (horno) en[a
temperaturadeseada.
3o Enciendael ventiiador "CONVECT" su
deseahornearpor convecci6n.Cuando[a
luzindicadora"OVEN" seapaga,el horno
se ha precaientado a [a temperatura
seieccionada.Co[oquee[aiimento en e[
horno. La luz indicadora "OVEN" se
encender_y apagar_atrav_sde[ proceso
de horneado. Precaiiente el horno
soiamentecuandoseanecesario.Consuke
la secci6n sobre horneado y asado al
homo (@ginas4[-43) para informarse
cuandoserecomiendae[ precaientamiento.
4o Despu_s del horneado, gire la periiia
"OVEN" y elventiiador "CONVECT% si
rue seieccionado,a [a posici6n _'OFF"
(Apagado).
POS]CI,}NES DE LAS
Lasposiciones de [asparr@asque se indicadas
se recomiendan para obtener los mejores
resukados de dorado y los de tiempos de
cocci6n m_s eficaces.
Para retirar: Tire de la parriiia hacia afuera
hasta[aposici6ntope; [evante[aparte deiantera
de la parriiia y saque hacia afuera.
Para vo[ver a co[ocar: Incline haciaarriba
e[ horde deiantero de [a parriiia y co[6queia
entre [ascorrederas de [asparriiias. Desiice
[aparriiia haciaarrashastaque pase[aposici6n
tope. Baie la parte deiantera de la parriiia y
desiiceia derecho hacia adentro.
No usepapel de aiuminio para cubrir las
parr[llas del homo o para forrar el rondo
de[ homo. Losresultados de[ horneado
se ver_n afectados y se puede dafiar el
homo.
a a
2
1
HODELO PRG4810
Posid6n #4 de la Parriiia (horno grande
soiamente):
Horneadocon dos parr@as,comidasa[
homo.
Posid6n #3 de la Parriiia:
Horneado con dos parr@as, comidas al
homo.
PosM6n #2 de la Parriiia:
Paralamayoriadelosaiimentoshorneados
y asado de cortes pequefios de carne.
Posici6n #i de la Parriiia:
Paracortesdecamegrandesyayesgrandes,
paste[ espoqoso.
Horneado con Parriiias H_itipies (horno
grandesoiamente):
Dos parr@as,usela posici6n#2 y #4 o#[
y#3. Tres parr@as,uselaposici6n# [,#2 y
#3 o #2, #3 y #4.
4O
Page 42

NC ()NAM[ENTO DgL HORNO <,>N
I HORNKADO I
PARA gL HORNgADO
° Userecetas probadas defuentes confiab[es.
° Precahente el homo so[amente cuando sea
necesario. El preca[entamiento de[ horno
serecomienda paralos aiimentos horneados
que aumentan de tamaSo y para mejorar e[
dorado. Las caceroias pueden ser
comenzadas en un homo frio. El
precaientado demora de 8 a [3 minutos;
co[oque e[ aiimento en e[ homo despu6sde
que la Luz [ndicadora de[ Homo se @ague
indicando que e[ homo est_ precaientado.
° Coloque las parr@as del horno antes de
encender e[horno. Siga[assugerencias para
[asposiciones de [asparr@asindicadas en [a
tabia siguiente.
° Deje airededor de 2 puigadas (5 cm) de
distancia entre [as paredes [ateraies de[
homo y losutensiiios parapermitir circuiaci6n
adecuada del aire.
Cuando hornee aiimentos en mis de un
utensiiio, co[oque los utensiiios en esquinas
opuestas de [a parriiia. Afterne los utensflios
cuando hornee en dos parr@asde modo que
un utensiiio no cubre e[ otro a menos que se
intente hacer[o. (Ver diagrama).
/ \
A[terne bs Utensi[ios
Paraconservarenergia,eviteabrir [a puerta
delhomo confrecuenciao duranteperiodos
largos. Ai finaldel horneado,APAGUE el
homo antesde retirar e[aiimento.
Siempre pruebe si los aiimentos est_n [istos
(con ia punta de los dedos, con un
picadientes, si los [ados se despegan de[
moide). No confie en el tiempo o en el
color dorado como los 6nicos indicadores.
o Use utensiiios de hornear de buenacaiidad y
e[ tamafio recomendado en [a receta. Las
bandqas de homo no deben tener lados y
deben ser deaiuminio briiiante (especiaimente
importante parae[horneado por convecci6n).
Eimqor tama_o es [6" x [2" (40 cm x 30cm).
o Los utensiiios opacos, obscuros, esmakados
o de vidrio no crean una corteza dorada y
crujiente. Los utensiiios de metal briiiante
producen una corteza dorada decolor ciaro.
o Lospayscongeiadosen utensiiiosdeaiuminio
deben ser horneados en una bandeia de
hornear con [a parriiia en [a posici6n 2 o ser
colocados en una bandeia opaca o de vidrio.
° Si el borde de la corteza del pay sedora muy
r_pidamente, co[oque unafrania de pape[de
aiuminio airededor del borde de la corteza
cubriendo todo e[ borde.
Homeado pot convecd6n - coloque la
temperaturadeihomo a25°F([ 5°C) menos
queIoquerecomiendalareceta.Lostiempos
ser_n simiiareso con unos pocos minutos
menosque [asinstruccionesde[areceta.
TABLA PARA HORNEADO
Homeado pot Convecd6n*
Producto y Tipo
Chocolate
PastelBfisico
Paste[de Galleta
PAYS:
TamaSo de[
Utensiib
redondode 9" (23cm)
redondode 9" (23cm)
moldedetubo de IO"(25cm)
9x5" (23cmx I3cm)
9x!}" (23 cmx 33cm)
9"(23cm)
9"(23era)
9"(23cm)
PayFresca
GALLETAS: ChispSdeChocolate
9"@3cm)
16"x 12"(40cmx30cm)
16"x 12"(40cmx 30cm)
Az_car
BrowniesdeChocoJate
16"x 12"(40cmx30era)
9x!3"(23cmx 33cm)
moiderectangularde
LEVADURA:Panec@os
FANES, BagueU:esdenuezy defruta
9"x9' (23cmx 13cm)
molderectangularde
8"x4"(20cm x 10cm)
_Parahorneadopot convecci6n,enciendael [nterruptor Convect
:_ Lashorassebasanenmarcasdemezclasespecifieas o reeetasusadas.Lostiemposrealesdependen delosqueustedhornee.
Latemperaturadeconvecd6nes2S'F(I5cC)misbaja que[arecomendadaenelenvaseo enlareceta,
Pos[ci6nde[a
ParriIla
1
2
I
1
1
2
2
2
2
2
2
2
2
2
2
2
2
2
4J
Temp[°F(C°)]
PrecaJentado*** Tiempo**
325°(!65 °) 25-30
325°(!650) 25-30
325-350°(185°-!75°) 28-40
300°(!50 °) 60-65
325°(!65o) 33-38
35_'-400°(175q05 °) 50-60
350°-400°(!75q05 °) 50-60
325°-375°(165°-190°) 35-45
425°(2209 6-8
325°-350_(!65°q75°) 8-[!
32S°dSO°(165°q75°) 68
325q75°(!65°-190 °) 68
325°(!65°) 2046
350°(!75°) 14q6
325°-375°(!65°-190°) 10-13
325°-35@(165°-175°) 4655
375°-400°(190°-205o) 7-1!
375°-400°(!90°-205°) 14-19
Horneado Conventional
Temp[°F(C°)]
Preea[entado
350°(17S°)
350o([75°)
3S0-375o(175o-190_)
32so(16so)
350°(175°)
375o-425o([90o-220o)
375o-425o(190o-220o)
350o40@(175o-205o)
450°(2359
350-375o(175o-190°)
350-375o(175o-190°)
350o-400o(175q05o)
3S0°(175°)
375°(190°)
3%°-40@(17Sq05°)
350-375o(175o-19@)
400o-425o([90o-220o)
400o-425o(190o-220o)
Tbmpo**
30-35
30-35
30-42
65-70
30-40
50-60
60-70
45-60
7-9
%!2
7-10
7-10
2L3 I
IL!8
12dg
45-60
8dS
I5-22
Page 43

Homeado con tree Parriiiae
Comidas al Homo Compmetas
( ONVECC 0N EN
PARR_LLAS _{_. L_ _PLES
Para [a mayoria dd horneado en parrHhs
mQkip[es se sugiere d m_todo de horneado
por convecci6n, especia[mente para d
horneado con tres parfiHas porque d aire
cahente que drcu[a produce un dorado m_s
uniforme.
Para obtener los meiores resukados con
horneado por convecci6n en parriiias mQitipies,
sigaestas sugerencias:
• Use [atemperatura y los tiempos indicados
en este manualcomo unaguia para obtener
los mqores resuitados.
° Para horneado en dos parriiias, la posici6n
#2 y #4 de la parriiia o #1 y #3 son las
meiores para [a mayoria de los aiimentos
horneados.
° Para horneado entres parriiias use [as
posiciones#1, #2 y#3 o#2, #3 y #4.
• Akerneene[homo losutensiiiospequefos,
tales como los moides para torta de capas.
• Lascomidas al homo se recomiendan para
ahorro de energia. Use las posiciones #1 y
#3 o #1 y#4. (Ver arriba.)
• Las bandqas para gaiietas deben set
co[ocadasa1o[argo,de[adoa[ado,enfrente
de[ventiiadorparaundoradom_suniforme.
(Ver iiustraci6nsuperior izquierda).
• El horneado entres parriiias puede ser
usadocuandosehorneengaiietas,paneciiios,
aiimentos congeiados, aperitivos y
bocadiiios.
• No es necesarioprecalentar el homo.
• Co[oqueloscortesdecametiernaodeave
enlaporci6nranuradadelaasaderadedos
piezasque se inciuye con el horno. No
agregueaguaa[aasadera.Seieccioneasado
por convecci6noconvencionaL(Loscortes
de came menos tiernos necesitan set
cocinados con calor hQmedoen unaasadera
cubierta usando asado convencional.)
• Lascarnes cocinadas en bolsas para cocinar
al homo, ollaso utensilios de asar con tapa
se cocinan me}oren el homo con horneado
conventional.
° No use una asadera con lados altos cuando
est& asando por convecci6n.
• Coloque el lado con grasa del asado hacia
arriba para que lacame se sazone con los
}ugosmientrasseasan.
° Use un term6metro para [acarne. La
punta del term6metro debe ser colocada
en laparte m_sgruesa del asado, sin tocar
la grasa, hueso o cartilago. Para el pavo
inserte la punta dd term6metro en la parte
mis gruesadel muslointerior.
• Dqe reposardurante [5 minutosantesde
cortar [a came para evitar p_rdida de los
iugos.
° La pechuga de los paros grandes se cocina
m_s r_pidamente que el_rea de los muslos.
Coloque papelde ahminio sobre la regi6n
delapechugadespu6s dequese haalcanzado
el dorado deseado para evitar que se dore
42
(Veriaiiustra-
ci6n).
Un pavo rel-
demasiado.
leno demo-
rari 30 a 60
minutos adicionaies dependiendo de[
tamafio. EI reiieno debe aicanzar una
temperatura interna de 165°F(75°C).
Ver laTablaparaAsar,pigina 43.
iiiJ
ASAD"(,) iPO[( C°
C ,]No {}ON(£ELADO
HAST£ ACABADO
Lascarnes(excepto [acamede ave)pueden
set asadas congeiadas hasta sut_rmino. Siga
estas pautas para obtener resukados mis
satisfactorios.
Latemperaturarecomendadaparaasara[
homo es 325_'F([65_'C). Para obtener
meiores resuitadosno use temperaturas
infer[oresa 300° F ([ 50° C).
Use los tiempos para asado de carnes
f_escascomo guiasaproximadas para asado
por convecci6n de carnes cong@@s. En
general, el tiempo para asar alimentos
congdados en elhomo de convecci6n ser_
aproximadamente el mismo o unos pocos
minutos m_spor libra (0,5kg), que asar
carnesfrescasen un horno por horneado
convenciona[.
• [nsertee[ term6metro de came cuando
hayatranscurrido [amitadde[ procesode
cocci6n.
Page 44

Los tiempos de k taNa se basan en cames descongdadas sdamente. Para asado pot convecd6n, endenda eJ _nterruptor dd VentiJador de Convecci6n.
Variedad y Corte de Came
CARNE:AsadodePuntadeLorao ,
Lomo Asado
AsadodeVudta de Lorno '
CARNEDEAsadodePaleta
CERDO: LomoAsado,deshuesado
CARNIEDEPavo,nor'dieno
AVE: Pavo,nor'dieno
Pavo, nO rdJeno
Polio,entero
I
IPesoApro×imado
[Hbras (kg)]
4a6(2a3)
I
2a3flal,5)
4a6(2a3)
4a6(283)
3a4(I,Sa2)
8a12(3,Sa£5)
12a16(5,Sa7)
16a20(7a9)
20824(9a10)
2r/2a3/2(lal,5)
Temperatnra deJ
Homo[°F(°C)]
sin precaJentar
325_(165)
4oo_(2o5_)
325_(165_)
32D (165°)
325_(165_)
325_(165_)
325° (16D)
325' (165_)
325' (16D)
375,(190_)
Temperatura Jnterna
de JaCame- Fin dd
Tiempo de Asado [°F (°C)]
145_(6g)(crudo)
160_(75_)(semicrudo)
145_(65_)(crudo)
145_(6g)(crudo)
160_(75_)(semicrudo)
170(77)
170(77)
_80-18S_(80-85_)
150-!55_(50-85_)
150-18s.(5045o)
_50d55.(5o45,)
_55'(55')
T[emj de Asado pot
Convecci6n Aprox.
[minutos pot libra (0,5 kg)]
30-35
35-40
22-24
30-35
40-45
33-37
35-45
16d8
13-16
Ild3
%II
24-28
Tiempo de Asado
Conventional Aprox.
[minntos pot libra (0,5 kg)]
35-40
40-45
25-28
35-40
4540
35-40
40-50
21-24
18-21
1&18
14-16
24-30
ASAI)O A
ParaIograrun asado6ptimo, esta estu/a no est_
disefiadaparahacerfuncionarel ventiladorde
convecci6ncuandoel homo estl en el modo
"Broil" (Asar).Paraasegurarquenosepuedausar
el ventihdor y el quemador de asaral mismo
tiempo, el interruptor que controh el
funcionamientodd ventilador de convecci6n
desconectar4laalimentaci6nal encendedordd
quemadorde asar,desactivandoel quemador
Dra asarcarlavezqueelventiladorest_encendido.
A continuaci6nse describe los do modos de
operaci6nposiNesdd ventiladorydelquemador:
1.Elventiladordeconvecci6nest4encendido,el
homo est4en el modo "Broil" (Asar)- no se
encender_e[quemadorparaasar.
2. El homo est4en el modo "Broil" (Asar),el
quemadorparaasarest4encendido.Seenciende
el ventilador de convecci6n- Se apagar4el
3oCdoque el alimentoen h asaderaprovista
conel horno.
4. De]eb puertodelhornocerradacuandoasea[o
porril[¢
La mamma debe La Hama debe set aproxlma°damente
ilum[narse de rojo de US" (3 ram) gruesa y azul
8L GE:REN{Z_AS PARA
ASA:R A LA
• Los cokes de came tiernos o hs carnes
adobadassonmejoresparaasaralaparrilla.
Paraobtenermeioresresukados,losbistecs
&ben ser por Io menosde I" (2,5cm)de
grosor. Los bistecsmis ddgados &ben
asarsealsartin.
° No cubra el inserto de h asaderacon
ahminio. Estoevitaque lagrasaquegotea
seescurrahacialabandejainferiory puede
causarIlamaradasexcesivas.
° Antes de asara h parriUa,retire el excesode
grasade lacamey corte losbordesde lagrasa
(no corte enlacame)paraevitarquelascarnes
seenrdlen. Agreguelasaldespu_sdelacocci6n.
• Para evitar que la superficie se sequeen el
pescadoo en lascarnes sin grasa extienda
mantequilladerretidaconunaescoWlasobrela
partesuperior.
• Los alimentosquenecesitanser dadosvueka
debenserdadosvuekaunasolavezduranteel
asadoalaparrilla.Girelacamecontenazaspara
evitar perforary perder losiugos.
esti encendido el otro no puede
encenderse.
No use el ventilador de convecci6n
cuandoest_asandoa laparrilla.
Siexperimentaunadeestassituacionesalusarla
estufa, se debe considerar que &ste es el
funcionamientonormal.
AJUSTE DE LOS CONTROLES:
l oCdoque laparrilla dd homo enla posici6n
sugeridaen la taNa. La distanciadesdeel
quemadordd asadordependedelosalimentos
que est4nsiendopreparados.Generalmente
serecomiendalaposici6n#3 delaparrilla,a
menosquelarecetaindiqueIo contrario.
2. Gire laperilh OVEN(Horno) alajusteBroil
(Asar a la Parrilla).
Amimentos
Hamburguesas[3 onzas(85g)] ; Semicrudo
BienAsado
CARNEDECERDO:Tocino
Chu]etas[J/2" (J3ram)]
CARNEDE AVE: Pechu_asde PoUoDeshuesadas
HAR]$CO$: BistecsdePescado[1" (2,8cm)]
HJSCELANEO$: Sakhichas
Nora: Estatablaesunaguiasolamente.Lostiempos
43
Posici6n de
[a Parrilla
5
5
3
5
3
5
5
5
5
}uedenvariar con elalimento queesr_siendococinado,
(Minutos/Lado) Aproximados
Ier Lado
7-9
10-[I
6-7
7-8
3-4
8-6
6-8
11-12
3-4
2do Lado
6-7
8-9
4-5
5-6
I-2
4-6
6-8
(nosedavuelta)
2-5
Page 45

)
UH}AI) © Y
_ ___ _ Z_ $Losnombresde losproductossonmarcasregistradasde susrespecdvosfabrkantes.
...... <×Para sNkkar pedNos directamente, Ihme aI 1-800-JENNAIR(I-800-536-6247).
PRO(}EDN%%I_EN'FOS [}E
A, PRECA ucloN:
- Asegt_rese de que ma estufa est6
apagaday que to_las las piezas est4n
frias antes de tocar_a o mimpiar_a.
Estoes para evitar da_o y posibles
quemaduras,
- Paraevitarmanchas o decdoraci6n limpm
laestufa despues de cada uso.
" Si se mtira alguna pieza, asegurese de
que la vuebe a cNocar en h forma
correcta.
PERILLAS DE CONTROL
o Retire hs per@ascuandoest&nenh posici6n
'OFF' tir_ndohs hacia adehnte. (Nunca
fuerce hs per@as para sacarhs.)
o Laveen el hvavaj@asocon aguayiab6n. No
Use LimpiadoresAbrasivos,
. Vudva a cdocar en h posici6n "OFF".
(Nunca hs gNpee ni use fuerza para vober
a instahr hs per@as.)
NOTA: Las periHas de] homo y de ]a
parriHa son ]gua]es. Sin embarga, ]a
periHe de] horna tiene ]e pe]ebra "BroiP'
en eric La periHa peqaefaade] harna
(made]osse]ectas) esintercembiable can
]a perfl]a de ]a parriHa.
PANEL DE CONTROL
° Limpie con un patio h6medo. Seque bien.
° Loslimpiavidriosse pueden usar sise rocian
en el patio primero. No rocie
directamente en e_ panel
o No use otros atomizadores,limpiadores
abrasivos o grandes cantidades de aguaen el
panel.
ACERO ]_NOXIDABLE
o NO USE NINGUN PRODUCTO DE
MMPIEZA QUE CONTENGA BLAN-
QUEADOR A BASE DE CLORO.
* NO USEUN PRODUCTO DEUMPgEZA
'ORANGE' 0 ABRAS]VO.
° SIEMPRELIMPIE LAS SUPERFICIESDE
ACERO A FAVOR DEL GRANO.
. Limpieza DiariadSuciedad Leve - Limpie
usando uno de lossiguientes - aguacon }ab6n,
una sohci6n de vinagre bhnca con agua,
LimpiavidriosF6rm@a409so unlimpiavidrios
similar- usandouna esponiaoun patiosuave.
Eniuaguey seque. Para p@r y evitar marcas
de los dedos,use el producto 'Stainless Steel
Magic Spray' (Jenn-Air Hoddo A912, Pieza
No. 20000008);I°I'%
° Suciedad Moderada/Manchas Re-
beldes - Limpiecon uno de los siguientes -
'Bon Ami', 'Smart @eanser' o 'Soft Scrub's -
usandounaesponjah6medao un patiosuave.
Enjuagueyseque.Lasmanchasdificilespueden
set quitadascon una esponia 'Scotch-Brite '$"
h6meda; frote afavor dd grano. Equague y
seque. Para restaurar el lustre y sacar hs
vetas, ap[ique 'Stainless SteelMagicSpray'.
o Deco_oraci6n. Usandounaespoqamoiada
o un patio suave, limpie con limpiador para
acero inoxidaHe 'Cameo Stainless Steel
Cleaner"". Enjuagueinmediatamente yseque.
Parasacarhs vetasyrestaurarel lustre, ut@ce
'Stainless Steel MagicSpray'.
]_NTERIOR DEL _{ORNO
(L][MP][EZA MANUAL -- ACABADO
DE PORCELANA ESMALTADA}
° Todos los derrames espec@mente los
derrames _cidos deben ser limpiados
inmediatamentecon un patio seco. Para
evitar posibles grietas o picaduras de la
porcelana, nunca Hmpie tma superficie
tibia o caHente con un patio h6medo,
o Limpie con agua y )ab6n. No dqe que el
alimento se hornee una segunda vez.
o Los derrames grandes requerir_n limpieza
con limpiadores abrasivos suaves tales como
S.O.S. o ton Amff. El amoniaco debe ser
usado para sokar la suciedad. Coloque Ihtaza
(( 25 mL)de amoniaco de uso dom&stico en
un plato de vidrio enuna parrilla del horno
cerradoy frio durante la noche.
o Para quitar [as manchasdificiies, use un
limpiadorde horno tal como Easy-Offf. Siga
lasinstruccionesdellimpiadordel homo. No
rocieel quemadorde gas,elfocode laluz,el
foco que detecta la temperatura, la
empaquetaduradelapuertao elexterior del
horno. Retire lasparr@asdel horno antes
derociarconunlimpiadordehorno.Cuando
se usaun limpiadorcomercial,eniuagueel
horno con unasoluci6nde [ cucharadade
vinagrecon unataza(250 mL)de agua.
PARRILLAS DEL }_ORNO
° Restrie£uecon unaesponiao patio usando
unodelossiguienteslimpiadores: Bon-Ami,
Soft Scrubo Comet S. Equaguey seque.
° Para la suciedaddificil de sacar use una
esponjade restregar h6medacon jab6n.
Equaguey seque.
VENTANA DEL _!ORNO
(MODELOS SELECTOS}
° Laveconaguayiab6n o conunlimpiavidrios.
Evite usar cantidades excesivas de agua.No
use Hmpiadores abrasivos,
QUEMADORES SUPERIORES-
LA TAPA DEL QUEMADOR Y EL
AN][LLO CON OR][F][C][OS DEL
QUEMADOR - PUEDEN SER
RET][RADOS PARA SU L][MP][EZA.
° Limpie los alimentos acidicos y los derrames
azucaradosinmediatamentecon un patio
seco paraevitar decoloraci6n.
° Suciedad _eve-limpie conun restregador
de pl_stico limpiocon aguaiabonosa.
° Suciedad moderada - retire las piezas,
col6quehs sobre h mesa y h%o limpiehs:
I) rode con un limpiador dom&stico,
2) cubra con pl_stico de envober durante
IS minutos,
3) limpiecon un restregadorde pl_stico
__// Tapa del Ouemador
Anillo con
Orificios del
Ouemador
Tubo deU
Encendedor
Quemador
Base del
Ouemador
44
Page 46

)UIDADO Y LIMPIEZA '
° Sudedad dif&H - restdegueconun po[vo
puhdor. (No use hmpiadores abrasivos,
espo@asde restregar ni cNoque en un
homo de autohmpieza,) Si bs pdvos de
hmpiezabbquean bs orifidos de[gasend
an@ode[ quemador, hmpiecon un a[fi[er
derecho.
Paravolver aco[ocar)aspiezasdespu_s
de [a [[mpieza:
[) an@oconofifidos de[quemador- a[inee
e[orificio en [aparte inferior de[ani[[o
cone[ [oca[izadoren[abasede[
quemador.E[ani[[ode[quemadory [a
basede[quemador&ben quedaren
contacto comp[eto.
2) taD de[quemador- se co[ocasabree[
tuba de[quemador.
ENCENDEDORES DE LOS
QUEMADORES SUPERIORES
" kimpie cuidadosamente a[rededor de[
encendedor. Eviteatrapar el encendedor
cone[ patiode[impieza. Sie[ encendedor
se datia, e[ quemador superior NO se
encender_,
REHLLAS DE LOS
QUEMADORESSUPER*ORES
(PORCELANA EN HIERRO
FORJADO}
" Laveend [avava}i[[aso con aguey}ab6ncon
un restregador de pl_stico.
• No haD funcionar los quemadores sin un
utensilio en la parrilla. El acabado de
porcelana en la parrilla puede picarse si
no se coloca un utensilio )are absorber el
ca[or intenso.
" Las parr@as se pondrin opacas y se
desco[orar_ncone[tiempodebidoa[ca[or.
Estoes normal
PUERTA DEL HORN0
A, PRECAUCI6N:
• NUNCA cdoque peso excesivo nl se
pareen [apuerta de[horno. Esmpodda
3. Des[ice uniformemente [a puerta hacia su
[ugar y verifique pare asegurarse de que [as
bisagras descansan en e[ centro de cada
rodi[[o de [a bisagra de [a puerta.
4. Con [a puerta de[ homo tota[mente abierta,
desb[oquee los pesti[[os de[abisagray cierre.
hacervokar hestda, romper [apuerta o
[esionaral usuano.
" NUNCA intenteabrir o cerrar [apuerta
ni hater funaonar el homo hastaque la
puerta no ha_'a sido debidamente
FOCO DEL HO:RNO
Antes de reemplazar el foco, carte b c0rriente
hac/aelhomoy d fusibleprincipalo d paneldel
reemp[azada disyuntor. Aseghresede que [a cavidadde[
homo inc[uyendoe[foco est&frio.
Si[apuerta de[horno sesalede[carri[,vue[va
aa[inearsiguiendoestesenci[[oprocedimiento:
I. Abra [apuerta y mant&nga[aabiertahasta
atris.
2° B[oquee los pesti[[os de [a bisagra (ver
i[ustraci6n) RodR[o de [a Bisagra de [a
y [evante Puerta \
suavemente
[a puerta B[oquear
hacia arriba " -(cerrar)
y parcia[-
mente hada \Desb[oquear
afuera hasta
PARA REEHPLAZAR
EL FOCO:
i. Cuidadosamente
destorni[[e[acubierta
devidrio de[foco.
2_
Para sujetar firme e[
foco, use guantes de
game protectores.
Gire e[ foco a [a
izquierda. No toque un foco de homo
ca[ienteconunpatiohhmedopuessepuede
quebrar.
Note: fi elfoco sequiebra, esegdrese de
que le energfo el4ctfice est4 descon-
ectede y use guentes protectores pare
retirarlo. P6ngaseen ¢ontacto con an
t_cnico autorizado de ]enn-Air, si es
neceserio.
3_
Reemp[ace e[ foco con un foco pare
e[ectrodom&sticosde40wets.Serecomienda
e[ foco con base de [at6n.
4_
Vueivaacolocarlacubiertadelfoco yvueiva
a conectar[aenergiaei&ctricaa[horno.
RETI:RO DE LA EST{. A
Losconectores de [a estufaa gasusadospare
conectaresteartefactoa[suministro degasno
est_ndisetiados paremovimientocontinuo.Una
vez insta[ados,NO muevarepetidamenteeste
artdacto agasparasu[impiezaopara ubicar[oen
otro [ugar. Si este artefacto t[ene que ser
movido y/o retirado pare reparaci6n, sigae[
procedimientodescrito en [asinstruccionesde
insta[aci6n. Para informaci6n, p6ngase en
contactocon e[Servicioa losCiientesJenn-Air
[[amandaa[ [-800-JENNAJR(1-800-536-6247).
Pare evitar que [a estufa se vue[que
accidenta[mente, se debe asegurar a[ piso
co[ocandoe[ torni[[o nivdador trasero dentro
de[soporte antivue[co.
45
Page 47

,........YNIE$ DE SOLICIIAR
PARA LA MAYORIA DE LOS
PROBLEMAS r VERIFIQUE PRIMERO
LO SIGUIENTE:
" Vefifique que [a estufa est_ debidamente
conectada a [afuente de aiimentad6n.
, Vefifique si hay un fusible quemado o un
, Verifique para asegurarse de que d
quemador est_ifundonando a gas natural
sdamente.
, Verifiqueparaasegurarsedeque losorifidos
de los quemadores o los orifidos dd
encendedor no est&nobstruidos.
, Verifique para asegurarse de que d
encendedor estg seco y que emita
chasquidos. EIquemador no se encender_
si d encendedor estg dafiado, sudo o
moiado. Si el encendedor no produce un
chasquido, gire la perilla de control a la
posicidn"OFF".
SI LA LLAMA NO ES PAREJAo
" Los orificios del quemador pueden estar
obstruidos.
, Puedequeseanecesariomodificarelaiuste
de iallama.
SI LA LLAMA DEL QUEMADOR
SUPERIOR SE LEVANTA DE LOS
ORIFICIOSo
, Verifiqueparaasegurarsedequeelutensilio
est_i asentado en la parrilla sobre el
quemador.
" Pdngase en contacto con un t&cnico
autorizadodeJenn-Air.
_I LA LLAMA DEL QUEMADOR
SUPERIOR ES DE COLOR AMARILLO.
" Consulteaunt_cnicoautorizadodeJenn-Air.
SI NADA FUNCIONA EN LA ESTUFA.
, Verifique si hay un fusible quemadoen el
circuito o undisyuntor disparado.
, Verifique si la estufa est_i debidamente
conectada al circuito dgctrico de la casa.
$1 LA LUZ DEL HORNO NO
TRABAJA°
" Elfoco est_ sudto o defectuoso.
SI LOS ALIMENTOS NO SE ASAN
BIEN A LA PARRILLAo
" Elcontrol puedenoestaraiustadoenforma
debida.
, Verifiquela posicidnde lasparrillas.
" Cierre la puerta del horno cuando est&
asandoala parrilla.
_I LOS ALIMENTOS HORNEADOS SE
QUEMAN 0 ESTAN DEMASIADO
DORADOS EN LA PARTE SUPERIOR°
" El alimento puede estar colocado
incorrectamenteen el horno.
° Elhornonorueprecalentadoenformadebida.
Si LOS ALIMENTOS SE HORNEAN EN
FORMA DISPARE_Ao
" El horno puedeestar instaladode manera
incorrecta.
Verifique las parrillas del homo con un
nivel.
° AIterne los utensilios, no dqe que los
utensilios se toquen unos con otros o
toquen la pared dd horno.
" Verifique las instrucciones para las
posicionessugeridasparalos utensiliosen
SI LOS RESULTADOS DEL
HORNEADO SON DIFERENTES A
LOS DEL HORNO ANTIGUO.
" ka calibracidn del termostato del homo
puede ser diferente entre los hornos
antiguos y nuevos. Siga la receta y las
instrucciones de uso y cuidado antes de
solicitar servicio ya que lacalibraci6n en el
homo antiguo puede haberse cambiado a
un ajuste demasiado alto o demasiado bqo.
SI LOS RESULTADOS DEL
HORNEADO NO SON TAN BUENOS
COMO USTED ESPERABA.
, Losutensiliospuedenno ser dd tamafioo
material recomendado para obtener los
meioresresultados.
" Puede que no haya suficiente espacio
alrededor de los ladosde los utensilios para
una circulaci6n adecuada dd aire en el
horno.
° Verifiquelasinstruccionesparaprecalentar,
para la posicidn de las parrillas y la
temperaturadd horno.
° El respiradero dd homo puede estar
Noqueadoo cubierto.
Page 48

<Z? .............
.........JARANTIA DE XLA
XEssx;Fa ENNoA
Garantia Completa de Un A_o- Piezas y Nano
de Obra
Durante un (J) aiio desde Jafecha original de compra
alpor menor_ se repararzi o reemplazari gramitamente
cualquier pieza que falledurante uso normal en el hogar.
Garandas Limitadas - Piezas Somamente
$egundo Afio - Despues dd primer aho de la fecha
originaJ de compra_ se reemplazara o reparara
gramitamente Jas@ezas que fallen durante uso normal
en el hogar en Jo que respecm alas piezas y el
propietario deberfi pagar todos los otros costos
induyendo mano de o_ra° kilometraielmillaie
transporte costo dd viaje y costo dd diagn6suco, su
fuese necesario.
Desde el Tercero Basra ei Quinto A_o =A parUr
de lafecha originalde compra, se reparara o reemplazar_i
gramitamente Jas @ezas indicadas a continuacion que
fallendurante uso normal en Ioque respecta alas puezas
y el propietario deberfi pagar todos los otros costos
incluyendo mano de obra. kilometrajetmillaje
transporte, costo dd viaje y costo dd diagn6stico, sl
fuese necesano.
- Quemadores de Gas Seimados
Residentes Canadienses
[.as garantias anteriores cubren sdamente aqudlos
dectrodomesticos [nstalados en Canadfi que han s@o
certificados o aprobados por las agencias de pruebas
correspondientes para cumplimiento con ,a Norma
Nacional de Canadi a menos que el dectrodomesuco
haya sido traido a Canad_idesde los EE.UU. debido a un
cambio de residencia.
Garantia kimitada Fuera de los Estados Unidos
y Canadi- Piezas $omamente
Durante dos (2) afios de Jafecha de compra original al
por menor, cualqumr piezaque falle durante uso normal
en el hogar serfi reemplazada o reparada gramitamente
en Joaue respecm a Japiezay el propietado deber4
pagar todos Josotros costos induyendo mano de
obra. kilometrajelm@qe, transporte, costo dd viajey
costo dd diagn6sdco, sifuese necesarlo.
Lasgar@tias espedftcas expresadas anteriormente son las
UNICAS garandas provistas por el fabricante. Estas
garantias /e omrgan dere@os bgdes especiftcos y usted
puede tenerademds otros derechosque vdriande un esmd0
d O1TO.
Lo @;:E ES'rASGAIRAN'r AS
m°Situacionesy daBosresukantes de cualquiera de hs siguientes eventuaHades:
a° Instahcidn, entrega o mantenimiento inapropiados.
b. Cualquier reparacidn, modificacidn, alteracidn o ajuste no autorizado
por el fabricante o por un centro de servicio autorizado.
c° Hal uso, abuso, accidentes o uso irrazonable.
d. Corriente dgctrica, vdtaje o suministro incorrecto.
e. Programaci6n incorrecta de cualquiera de los contrdes.
2. Las garantias quedan n@as si los n@meros de serie originales han sido
retirados, alterados o no son f_icilmentelegibles.
3. Focos.
4. Productos comprados para uso comercial o industrial.
5° Elcosto del servicio o llamadade servicio para:
a° Corregir errores de instalacidn.
b° Instruir ai usuario sobre el uso correcto del artefacto.
c. Transporte de[ artefacto alestablecimiento de servicio.
6. Los da_os consecuentes o incidentales sufridos por cualquier persona
como resukado del incumplimiento deestagarantia. Enalgunos estados
nosepermite laexdusidnolimitacidndedaBosconsecuentesoincidentales,
por Iotanto lalimitaci6n o exchsidn anterior puedeno aplicarseensucaso.
M:H;:ES 'rA SF::RvIC O
° marne al distribuidor donde compr6 su electrodom_stico o llame a
Haytag Services sn, Jenn-Air Customer Assistance al 1-800-JENNAIR
(I-800-536-6247) para ubicar a un tecnico autorizado.
° Aseg@esedeconservarel comprobante de compra paraverificar el estado
de la garantia. Consuke la secci6n sobre la GARANTIA para mayor
informacidn sobre lasresponsabilidadesdel propietario para servicio bajo
lagarantia.
" Siel distribuidor o lacompaNa deservicio no puedenresdver el proNema,
escribaaHaytagServicessM,Attn: CAIR®,Center, P.O.Box2370,Cleveland,
TN 373204370 o [lamea[ I-SOO-JENNA_R (1-800-S36-6247).
Los dientes de EEUU. que usan TTY para personas con impedimentos
auditivos odd habh deben Ihmar al 1-800-688-2080.
NOTA: Cuando Ihme o escriba acerca de un proNema de servicio, por
favor induya la siguiente informaci6n.
a. Su nombre, direcci6n y n@mero de tdgfono;
b° N@mero de moddo y n@mero de serie;
c. Nombre y direcci6n de su distribuidor o t6cnico de servicio;
d. Una descripci6n clara dd proNema que est_ experimentando;
e° Comprobante de compra (recibo de compra).
• Lasguiasde[ usuario, manuaiesde servicio e informacidn sobre laspiezas
pueden soiicitarse a Haytag Services sn, Jenn-Air Customer Assistance.
JENN°AIR * 403 West Fourth Street North * P.O. Box 39 * Newton, Iowa g0208
Form No, [3/02/04 Part No. 8313P418-60 Rev, [3 P/N 17664 Rev. B Litho U.[3.A,
 Loading...