

Page 1
L'mJENN-AIR
Use & Care Manual
Frost Free Refrigerators
MODELS JRS207, JRSD209, JRS229, JRSf12250,
JRSDE229, JRSD2450, JRSDE249, JRSD279
RECE ED
CUSTOMERASS3TANCE
M_R20 95'
4M PM
Model JRSDE249
Printed in U,S,A Cat. No. SSU207
19953er_n-Air Part No, 10972B-2
Page 2
About Your
Je gerator
Your Jenn-Air frost-free refrigerator was designed, engineered, and manufactured to the
highest standards of quality and performance. Since this manual explains how you can
obtain the best use of your Jenn-Air refrigerator, it is essential that you follow the
instructions carefully.
Should you have any questions about using your Jenn-Air appliance, write to us. Be sure
to provide the model number of your appliance. Jenn-Air Customer Assistance, c/o
Maytag Customer Service, PO Box 2370, Cleveland, TN 37320-2370
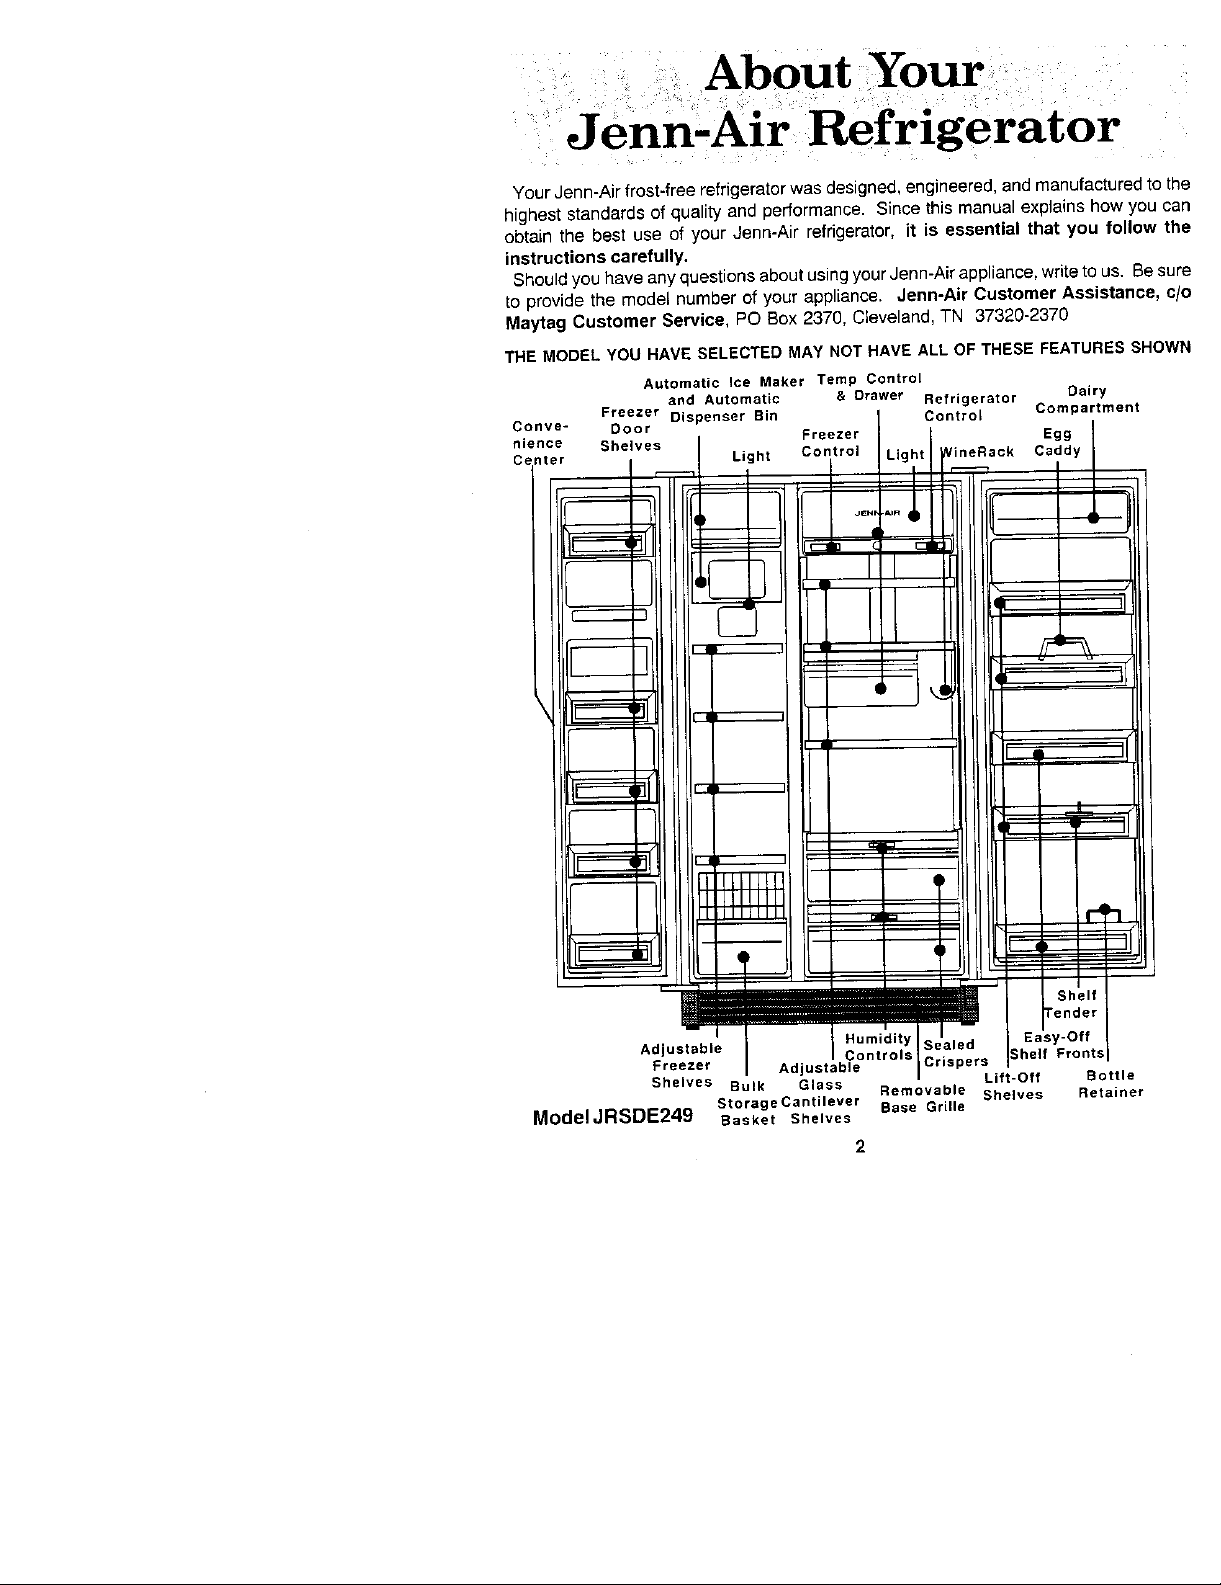
THE MODEL YOU HAVE SELECTED MAY NOT HAVE ALL OF THESE FEATURES SHOWI,
Automatic ice Maker Temp Control
Freezer Dispenser Bin Control Compartment
Conve- Door Egg
and Automatic & Drawer Refrigerator Dairy
Light VineRack Caddy
Adjustable I Humid(ty Sealed
Freezer I Adjustable
Shelves Bulk Glass Lift-Off
Model JRSDE249 Basket Shelves
Storage Cantilever Base Grille
Controls ICrispers
Removable Shelves Retainer
2
Page 3

Safety Precautions
1. Use the three-pronged plug only with a groundingreceptacle to provide protection
from electrical shock (see below). This appliance must be installed in accordance
with the installation and grounding instructions on pages 3-4.
2. Unplug your refrigerator before cleaning condenser, replacing a light bulb, or
making any repairs. Any servicing should be performed by a qualified technician.
3. Incaseof power failure, minimizedoor openings. If powerfailure is oflongduration,
protectfrozen food byplacing blocksof dryiceontopofthepackages,orcheck with
a localfrozen foods lookerplantabout temporarystorage. Frozenfoods which have
thawed completely should not be refrozen.
4. Any electric service cord that becomes frayed or damaged should be immediately
repaired or replaced. Never unplug your appliance by pulling on the power cord.
5. Your refrigerator should not be operated in the presence of explosive fumes.
6. Remove the doorsfrom any out-of-use refrigerator to prevent child entrapment and
suffocation.
7. Do not place fingers or hands on the automatic ice making mechanism while the
refrigerator is plugged in. This will help protect you from possible injury, it will also
prevent interference with moving parts of the ejector mechanism and the heating
element that releases the cubes.
Electrical Connection and Grounding [
Your refrigerator is designed to operate on a nominal 115 rF=
grounded circuit, serving this refrigerator only. DO NOT use _ou.=.G.LUG"
volt, 15 amp., 60 cycle line. There should be a separate, "*'°_?"_-"_'_°"c°"°I1( •
Your refrigerator is equipped with a three-pronged ground-
ing plug for your protection against possible electrical shock
hazards. It must be plugged into a grounding receptacle.
an extension cord. _ ! _
Where a standard twoprongwall receptacle isencountered, .. _°_""_E'T_CCE
it is the personal responsibility and obligation of the CUS-
tomer to have it replaced with a properly grounded three................. o.Yov.Moo,,
prong wall receptacle. DO NOT, under any circumstances,
cut or remove the third (ground) prong from the powercord.
DO NOT use an adapter plug.
3
*LO_tlON OFpRON6_ #J'4_JWER CO_D
;_,,N _HOWN HE_(.
Page 4
ILocation ]
If you are installing your new refdgerator yourself, pleasefollow thesehelpful su§
tions.
1. Remove base skids. , [I J
Jii LJlJ J!: I
2. Remove all exterior and interior tape carefully and ._lli
retain old tape. Make a small pad of this tape to pick
offanyremainingtaperesidues. Thiswilleliminatethe '&_
need to use dangerous solvents of any kind.
3. Removeand discardthe cantilever shelfpackingclips
located just above each shelf where they hook onto
the frame. To remove the red plastic clip, wiggle it
sideways and pull straight out.
4. Select a location foryour newrefrigeratoraway from any heat sources. Allow ;
flow of air through the front base grille.
5. Your model should not be installed where the room temperature will go bel
55°F. because it will not run frequently enough to maintain proper temperat_
the freezer.
[Leveling Is Important I
To enhance its appearance, maintain efficient performance and for proper func
the ice maker, your refrigerator should be level. Usinga carpenter's level, ohec:
refrigeratorto make sure it is level frontto back and side toside. The front wheel.'
adjusted at the factory so the cabinet would be level. However, jarring in trar
standingthe refrigeratoronan uneven floormaycause thedoorsto shiftoutof aligr
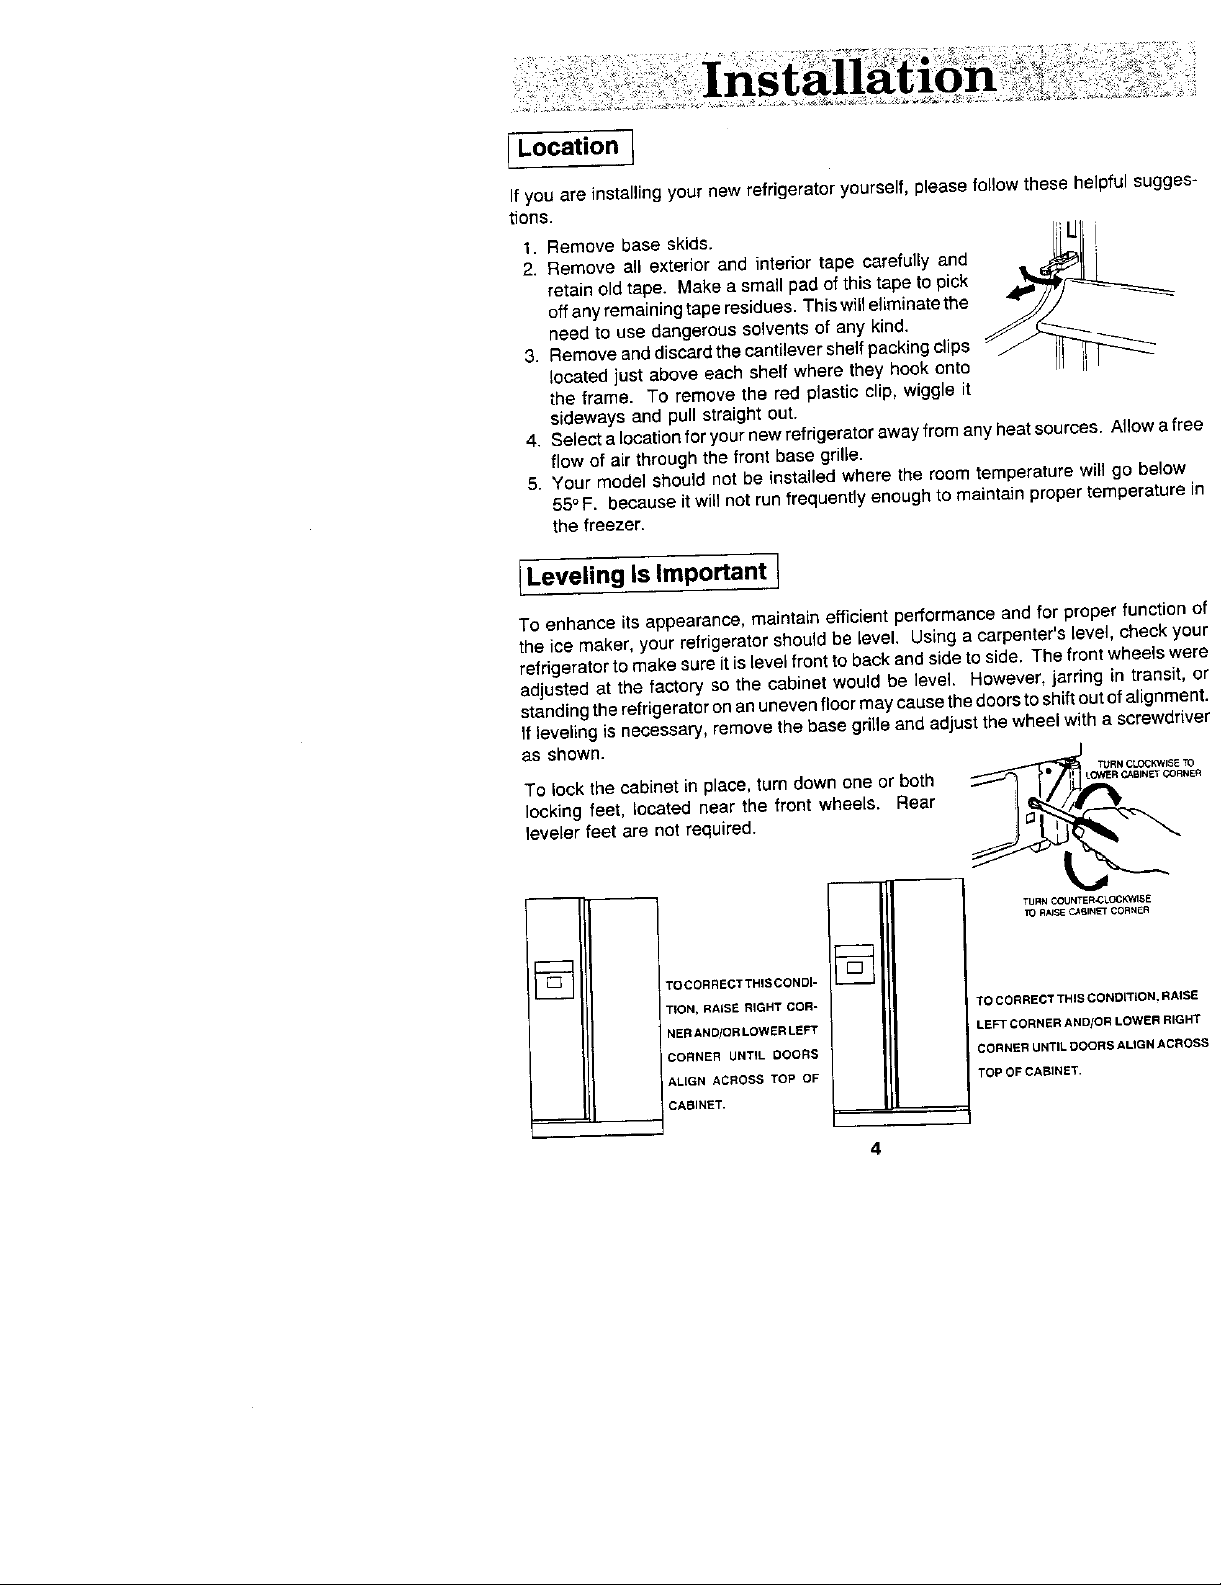
ffleveling is necessary, remove the base grille and adjust the wheel with a scre_
as shown.
To lock thecabinet in place, turn down one or both .o,_.c.,a_-r
locking feet, located near the front wheels. Rear
leveler feet are not required.
TURNCOUNTER_t.OCk'_VI_E
! _L-_ ! TOCORRE_TTH,SCONDI* []
TION, RAISE RIGHT COR- TO CORRECT THIS CONOW[DN.
NER AND/OR LOWER LBFT LEFT CORNER AND/OR LOWER
CORNER UNTIL DOORS CORNERUNTILOOORSAUGN
ALIGN ACROSS TOP OF TO_ OF CABINET.
CABINET.
4
Page 5
[ Setting Controls]
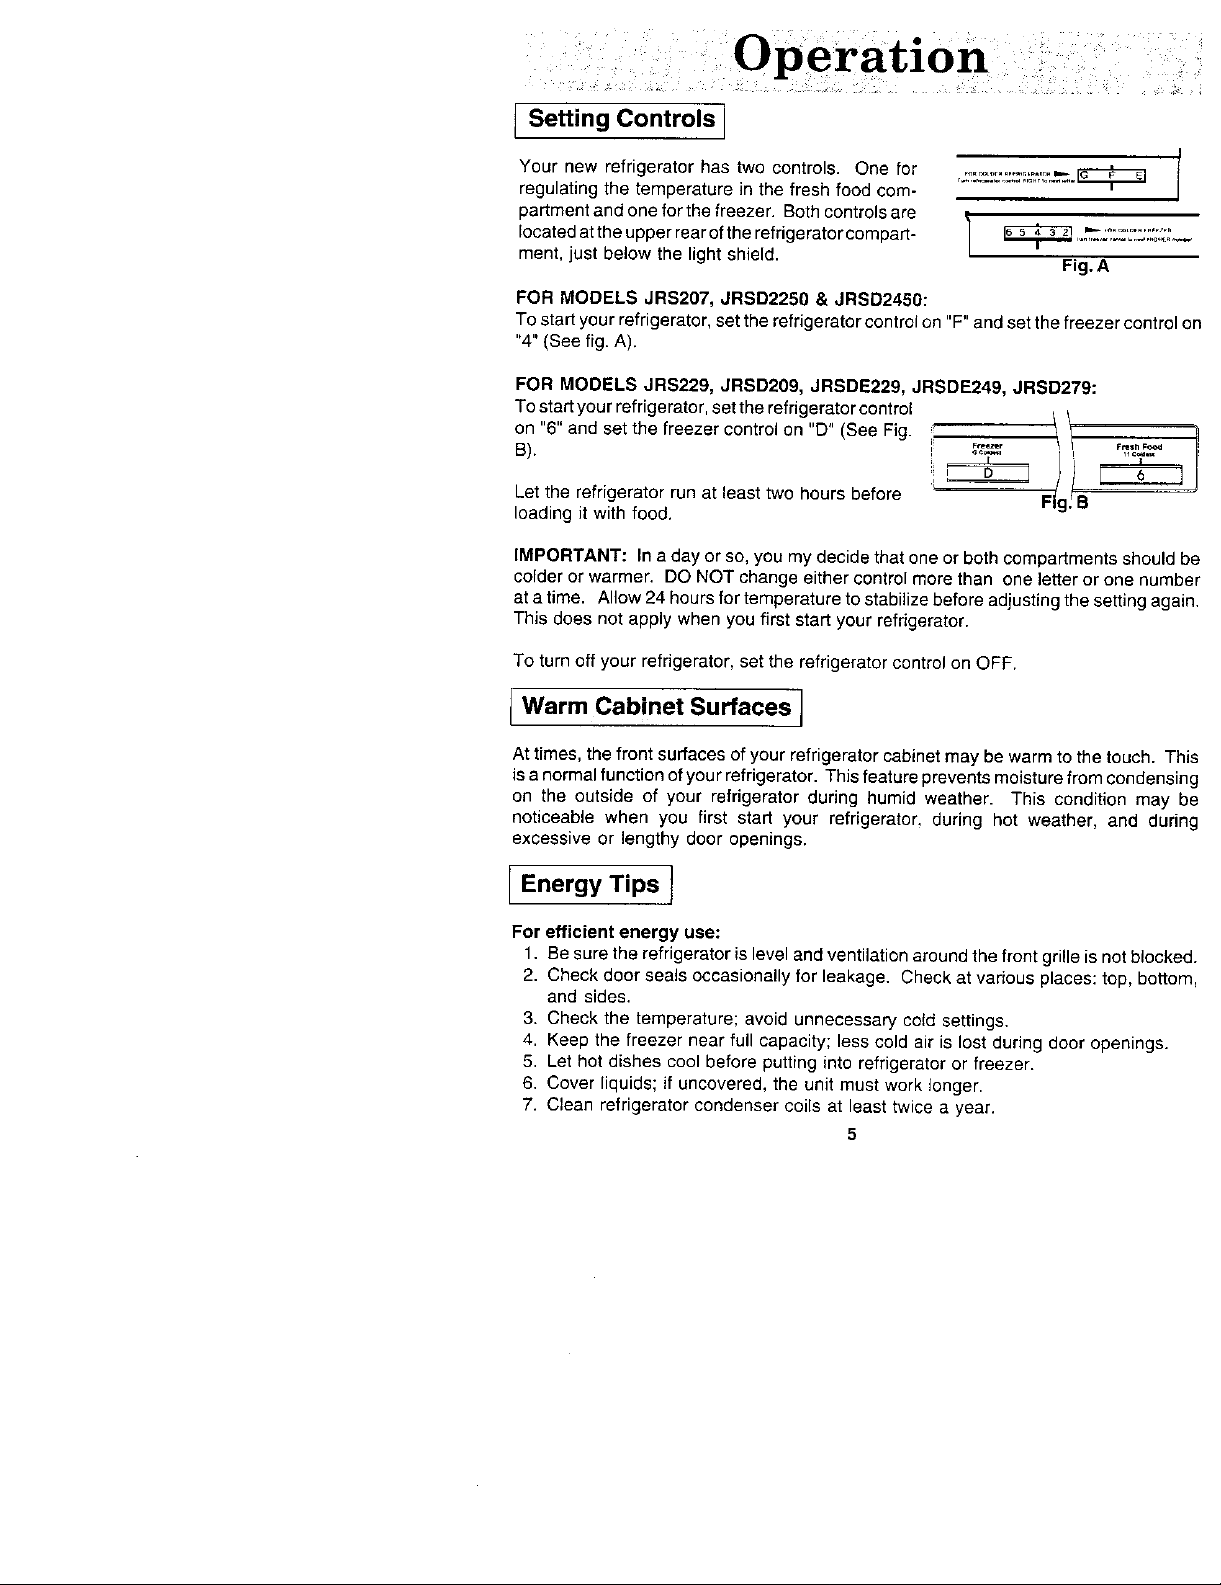
Your new refrigerator has two controls. One for r;,".",_:'_,_'.",_.';,._%__ T
regulating the temperature in the fresh food com-
partment and one for the freezer. Both controls are
located atthe upper rearofthe refrigerator compart- / _, ,,._.'","-'.%%',_'.C_
ment, just below the light shield. Fig.A
FOR MODELS JRS2O7, JRSD2250 & JRSD2460:
Tostartyourrefrgerator, settherefrgeratorcontrolon F andsetthefreezercontrolo
"4" {See fig. A).
FOR MODELS JRS229, JRSD209, JRSDE229, JRSDE249, JRSD279:
on "6" and set the freezer control on "D" (See Fig. F,.,,
• , i . n
/
/
B).
To start your refrigerator, setthe refrigerator control i)
Let the refrigerator run at least two hours before _ Fig.
loading it with food.
IMPORTANT: In a day or so, you my decide that one or both compartments should be
colder or warmer. DO NOT change either control more than one letter or one number
at a time. Allow 24 hours for temperature to stabilize before adjusting the setting again.
This does not apply when you first start your refrigerator.
To turn off your refrigerator, set the refrigerator control on OFF.
[ Warm Cabinet Surfaces ]
At times, the front surfaces of your refrigerator cabinet may be warm to the touch. This
is a normal function of you r refrigerator. This feature prevents moisture from condensing
on the outside of your refrigerator during humid weather. This condition may be
noticeable when you first start your refrigerator, during hot weather, and during
excessive or lengthy door openings.
[Ener,Ti.s]
For efficient energy use:
1. Be sure the refrigerator is level and ventilation around the front grille is not blocked.
2. Check door seals occasionally for leakage. Check at various places: top, bottom,
and sides.
3. Check the temperature; avoid unnecessary cold settings.
4. Keep the freezer near full capacity; less cold air is lost during door openings.
5. Let hot dishes cool before putting into refrigerator or freezer.
6. Cover liquids; if uncovered, the unit must work longer.
7. Clean refrigerator condenser coils at least twice a year.
5
Page 6
Refri
Compartment
To maintain the natural flavor, moisture, andnutrition effresh foods,we recommendth_
all dishes, trays, and containers of food be covered.
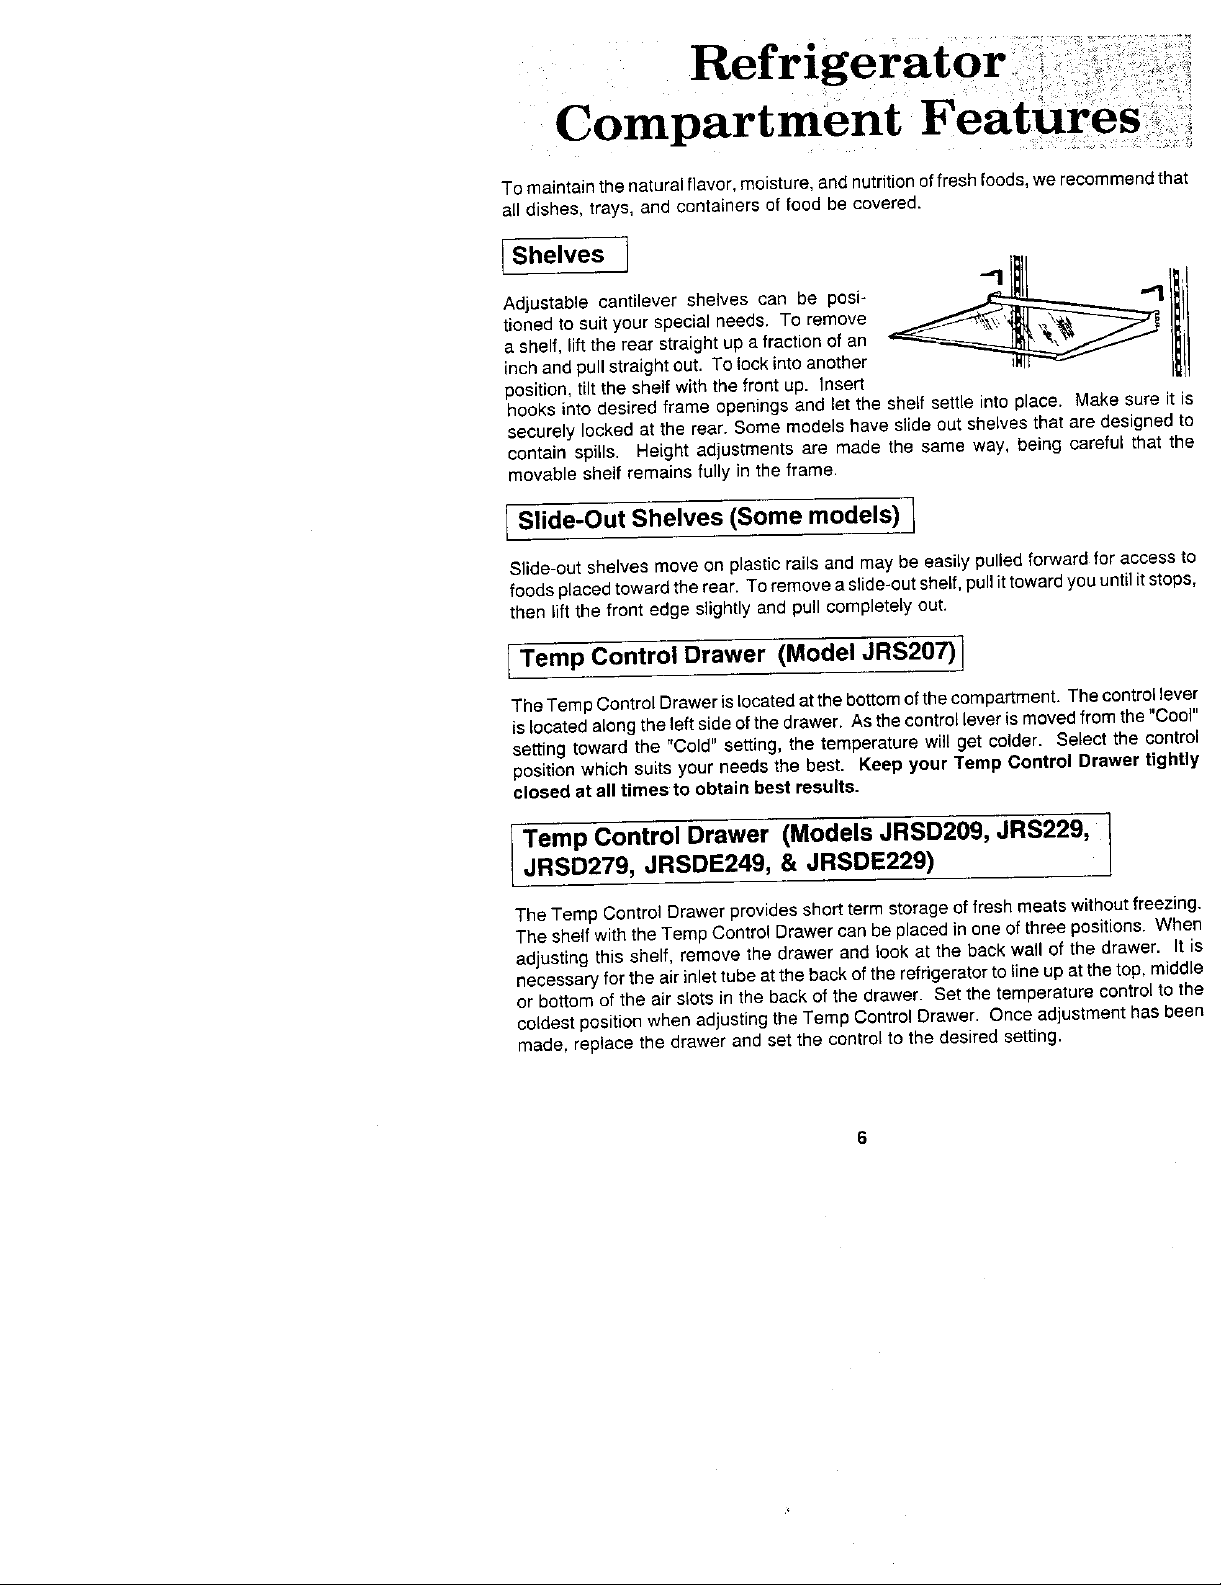
_Shelves j
Adjustable cantilever shelves can be posi- __ '_3 I
tioned to suit your speciat needs. To remove
a shelf, lift the rear straight up a fraction of an
inchand pull straight out. To lock into another
position, tilt the shelf with the front up. Insert
hooks into desired frame openings and let the shelf settle into place. Make sure it
securely locked at the rear. Some models have slideout shelves that are designed
contain spiUs. Height adjustments are made the same way, being careful that ti"
movable shelf remains fully in the frame.
I Slide-Out Shelves (Some models) ]
Slide-out shelves move on plastic rails and may be easilypulled forward for access
foods placedtowardthe rear. Toremoveaslide-outshelf,pullit toward you until itstol
then lift the front edge slightly and putt completely out.
I Temp Control Drawer (Model JRS207)I
The Temp Control Draweris locatedatthebottomofthecompartment. The controlle_
is loCatedalong the leftside ofthe drawer. As the control leveris moved from the "Co
setting toward the "Cold" setting, the temperature will get colder. Select the cont
position which suits your needs the best. Keep your Temp Control Drawer tigb
closed at all times to obtain best results.
Temp Control Drawer (Models JRSD209, JRS229, ]
JRSD279, JRSDE249, & JRSDE229)
h
J
The Temp Control Drawer providesshortterm storage of fresh meatswithout freezi
The shelf withthe Temp ControlDrawer can be placed inoneof three positions. W!
adjusting this shelf, remove the drawer and look at the back wall of the drawer. I
necessary for the air intertube at the back of therefdgeratorto line up at thetop, mid
or bottom of the air slots inthe backof the drawer. Set the temperature control to
co(dest position when adjustingthe Temp Control Drawer. Onceadjustment has b_
made, replace the drawer and set the control to the desired setting.
Page 7

The control knob is located near the refrigerator control. As the knob is turned from
"Cool" settingtowardthe "Cold"setting,the temperaturewillget colder. Selectthe"C.
setting for storage of luncheon meat and cheese. Selectthe "Cold" setting for stor
offresh meats.
All meats or poultryshould be stored intheiroriginal store wrappings or in plastic b
to reduce the evaporation of moisture from them. Keep your Temp Control Dra'
tightly closed at all times to obtain best results,
[Sealed Crispers I
The Sealed Crispers are idea_for storingvegetables andfruit. Keepyour crispersti!
closed toinsure freshhess. Storingleafyvegetables, suchascelery and lettuceinpl_
bags, reduces moisture evaporation.
The crispers slide out for easy access to foods stored within. They are compl_
removable for cleaning (hand wash only) or for use elsewhere in your kitchen.
The top crisper cover alsoserves as a refrigerator storage shelf. To remove the cri
cover for cleaning, lift the front edge and pull straight out.
[ Humidity Control (Most models) I
The humiditycontrolleverislocatedontheshelfabovethe crisper drawers. The
control should generally be set at the "Low" setting for fruits and the "High" settin!
vegetables.
[Wine Rack (Most models)1
To useyour wine rack fit it along r, , ,
shelf,engage itsrearnotchtothe
shelf back corner. Lay the wine
bottle on the rack.
e,ther side of any refrigerator
7
Page 8

IAutomatic Door Closers and Magnetic Door Gaskets1
All doors contain built-in mechanismsthat automatically pullthem completelyshuto
they are closed to within 6 inches of the cabinet. All doors also have magnetic c
gaskets that cling to the cabinet front, once thedoors are closedto within their magn
range. It is important that your refrigerator be reasonably levelfor the door closure
function properly•
Door shelf frontscan be removed for easy cleaning of the door
liner and shelf fronts, Lift the shelf front straight up until it clears
the retainer on the door liner and pull straight out. Reversethis
procedure when replacing the door shelf front,
[ Easy-Off Shelf Front ]
I Lilt'Off DO°f Shelves I
Lift-offdoorshelvesmay be easilyadjustedto anotherpositionon _,_C_II_
the door. Liftthe shelf straightup untilit clearsthe retainersonthe
door liner and pull straight out. Reverse this procedurewhen
replacing a shelf.
I Slide-Out Door Shelves (Model JRSD279) (
These shelves are easy to remove and move to a ]i,_--_
dLfferentIocatton.To remove,pullthe shelfforward. To ]_*==_ _
replace, lineup thetop ofthe shelfwith the slides onthe (_.. _ _._
door and slide back into place• L__
)Bottle Retainer I
Some models have a bottle retainer located on the lower refrigerator door she
preventstall bottles from falling out when the dooris openedor closed• To atta¢
retainer on the shelffront, have the smooth side facing forward, align the retaine
the front lipof the shelf front and snap into position. The bottleretainer can be adj
to any position on the shelf by sliding sideways.
IShelf Tender 1
All models have a Shelf Tender located on one of the refrigerator door sheiv
provides upright storagefor packages or bottles, The Shelf Tender can be adju.'
any position on the shelf by sliding sideways•
Page 9

Freezer Compartment
Features
To maintain the natural flavor, moisture, and nutrition of frozen foods, and to prevent
freezer burn, we recommend that all foods be wrapped or sealed properly.
To remove a freezer shelf, lift the shelf straight up, tilt
sideways and pull straight out. When replacing a freezer
shelf, reverse the removal procedure.
IFreezer Shelves (Model JRS207) I
IAdjustable Freezer Shelves (Most models) I
The freezer shelves can be adjusted up or down or __
removed to accommodate various sized packages. To :
remove a shelf, lift up on right side of shelf and push to the
right. Then, tilt shelf and remove.
To replace a freezer shelf: (1) tilt the shelf and insert right
rod ends into upper portion of oblong holes in the freezer
side wall; and (2) lower the left side of the shelf and insert in oblong holes in the left side
of the freezer wall. Make sure the shelf is secure before loading.
[Bulk Storage Drawer (Models JRS207,JRSD2250, JRSD2450) ]
The slide-out Sulk Storage drawer can be removed by pulling it out
as far as it will go, then lifting the front edge and pulling straight out. I__ __/_/
If you notice that the drawer is not sliding smoothly or easily,
lubricate the slide rails with petroleum jelly. Apply lubrication to
points as shown. Also, make sure the bottom of the freezer is clean I/I S.UOE_,L_/II
where the slide rails make contact. _
IBulk Storage Basket (Most Models) I F"Z'_)°_O_C'M"'
To remove the freezer basket; (1) pull the basket partially out; (2) reach to the back of the
basket and pivot the metal clips up to a horizontal position; and (3) pull the basket out,
When replacing the basket, reverse the removal procedure.
Page 10

fFreezer Baskets (JRSD279) t '
Your refrigeratorhasthreefreezer baskets,oneshallow, i,'
one Pizza and one deep. Each slides out for more
convenientaccesstothe frozenfood.ThePizzabasketis /
designedwithalower rightsidefor easystorageoffrozen
pizzas. All baskets can be removedfor cleaning. In
addition,theshallowandPizza basketscan be adjusted
up or downto accommodate varioussizedpackages.
Toremovethebaskets,pullthebaskettowardyouuntilitstops.Liftthefrontofthe L
and pulluntilitstopsagain,thenliftitup andoverthe fronttabs.
To replacethe basket,reversethe aboveprocedure.To adjustthe shallowand
baskets,removethebasketasdirectedpreviouslyandplaceoneofthebottomtwo
wires inthe track and replaceit.
IAutomatic Ice Maker (Select Models)l
The water inlettubingassemblyrequiredtocompletethe waterconnectiontothe
valve is locatedin thecrisperdrawerin a bag. Connectthe icemakerto thewater.,
as instructed in the separate instructions, furnished with the refrigerator.
The automatic ice maker is designed to furnish a continual supply of ice cubes
amount of ice produced depends on the temperature in the freezer section o
refrigerator. The colder thefreezer section, the more ice is produced. We sugge
start withyour refrigerator and freezercontrols attheir mid settings. In mostcase
is satisfactory. If the door to the refrigerator or freezer is opened frequer
temperatures in the kitchen are abnormally high, a colder setting may be nece_
After your model has been installed and the water supply connectedto the ice n
it may take 8 to 12 hours beforethe ice maker furnishesany usableice cubes. Th,
one or two harvests will probably contain undersized and irregular cubes becau
air inthe supply line. The initial harvestmayalsocontainimpuritiesfrom the new
supply piping. Therefore, all cubes from the first two or three harvests shou
discarded.
Under certain rare circumstances, icecubes may be disco[ored,usually egpearin(.
a green-bluish hue. The cause of this unusual discolorationisapparently a combir
of factors such as certain characteristics of local waters, household plumbing an
accumulation of coppersalts in an inactive water supply line which feeds the icem
Continued consumption of such discolored icecubesmaybeinjurious tohealth. If
discoloration is observed, discard the ice cubes and contact the dealer from whol
ice maker or refrigerator was purchased.
Ice cubes that have been in the ice storage for a considerable length of time ma_
up off-flavor taste, sticktogether,and gradually becomesmaller. We suggestthatI
cubes be thrown away. We also suggest using an open box of baking soda i
refrigerator for food odor absorption.
10
Page 11

Certain sounds may accompany thevarious cycles ofthe ice maker. Examples are: (1)
the motor may have a slighthum, (2)thecubeswillrattle asthey fallintoan emptystorage
bin, and (3) the water valve may click or "buzz" occasionally. All of these sounds are
normal and should be ignored.
Note: When dispensing icecubes, it is important that you use onlythe ice supplied by
thisicemaker. Icefromanyothersourcecouldcauseanicejam. Ifthis happens,remove
and discard all ice from the storage bin and any ice lodged in the ice chute.
I Starting or Stopping Your Ice Maker I *UTOM,T,C
Your automatic ice maker is located near the topof / SENSOR
the freezer compartment behind the Ice Access
ICE MAKER
1| ARM
tl /
Panel. To gain access to the ice making mecha- |_,.,_,_ _,_LOF F
nism, lift the Ice Access Panel.
The ice maker has a wire sensor arm that is con-
nected to a shut-off switch. This arm stops the
mechanism when the ice cube storage bin is full,
and restarts itafterseveralice cubes havebeenused. You canuse thestoparmto stop
allproduction of ice at any time. Allyou needto do israisethe armintotheOFF position.
The ice maker should be turned off (arm up) when:
1. icestorage bin is tobe removedfor extendedperiodof time.
2. Refrigeratorisnot tobe usedfor a considerabletime, suchasvacations.Also,turn
offthe water supplyto the icemakerin thisinstance,if practical.
3. Water supplyis to be shut-offfor several hours.
FILL
Water fills the empty cube mold (Fig.1)when the TUBE
freezer compartmenthas cooledto freezingtem-
I How the Ice Maker Works I
perature.Coldairisforceddirectlyoverthe mold.
When frozen, the cubes are rotated up andout of iCE
into the ice storage bin below. '2 BIN
the mold (Fig. 2). The sweeper arm ejects them F_. Ij/ jJ-,,_----IcE
Thesensor arm(Fig. 3) senses whenthe bin isfull
and signals the ice maker to stop ejecting more
However,the moldhasbeenrefilledandcubes
frozen sothe newsupplyis readywhen needed. I_
As soon as ice is removed from the bin, the
sensor arm signals that more is needed. The
icemakerresumesoperationbyejectingready-
cubes. _
and-waiting frozen cubes, __POSlTION
11
Page 12

Removing and Replacing the Automatic Ice Cube
Dispenser Bin
Lift the front of the Automatic Dispenser bin and pull it straight out. Wash the bin
occasionally in mild soap and lukewarm water. To replace the bin, push it at1the way
back until the bottom ofthe bin is behind the raised edge at the front of the shelf itrests
upon. Makesurethe tabs,atthe back of the bin, that turnthe spiral augerarepositioned
between the prongs from the auger motor.
IOperating Your Automatic Ice and Water Dispenser {
Water/Ice Control
For dispensing ice cubes, the slide control must be
moved to the "Cube" position (center). For dispensing _._,,,..,_
crushed ice, move the controltothe "Crushed" position _/-
(left). c.................
For dispensing chilledwater, the slide control must be : ( _ ii
moved completelyto the "Water" position (right). I
I
WaterfromthaO,sponser,soh,,ed,ce,dorwatar llil li
simp,addiceOefo adispensingthewa,ar.,so.the liL: l]first glass of waterdispensed eachtime may be warmer
than consecutive glasses. It will be cooler if a full glass
ofwater is dispensed rather than a partial glass. Fill a
container with icebefore adding liquidto prevent splash-
ing.
Dispensing
To fill a glass, positionthe glass against the top portion
ofthe actuatorpad andpress.Hold the glass high inthe
dispenser opening to reduce the ice falling outside _,
the glass.
Some crushed ice may be dispensed even thoughyou
selectedCUBE. This happens occasionally when a few
cubes accidentally get channeled in the crusher,
Whenchangingfromcrushediceto cubes somecrushed
icemay bedispensed. This ma
sized cubes or ice chips are in the storage bin.
Theremay be adelay whenyou switch fromcubes tocrushedice. Ittakes afew sect
for the cubes to be channeled in the crusher. Crushed ice pieces will vary in size
shape.
12
Page 13

Ice shouldnot bedispensed directlyinto thinglasses,fine chinaordelicatecrystal --t
can crack or chip from the combined pressure of your hand pressing them against
actuator pad and ice dropping into the container.
Ice other than that produced by your ice maker shouldnot be added to the ice ston
bin - it may not crush and/or dispense properly.
For large quantities of cubed ice, remove the icedirectly from the storage bin. Do
operate the ice dispenser continuously for more than five minutes.
Ifthe icedispenser is not used frequently, icecubes may clump together and mayn_
to be broken apart or discarded.
[To Stop Dispensing }
Releasethe pressure onthe pad and hold the container in position momentarily toc
the last pieces of iceordrops ofwater. The ice deliverydoor will remainopen for a s
time. When it closes you may hear a closing sound.
[Spi"'rayl
Donot discard water intothe grille atthe bottomofthe fountain. This is a spill area
adrain. Normal spillswill be evaporated inthe recessedareabelowthe spillshelfg
Excessive spills should be removed with an absorbent sponge or cloth. The spill
should be cleaned occasionally.
[Foo.t=n,,ght]
The push button light switch is located behind the panel at the top and on the right
ofyour fountain. For replacement, use a 12Or, 7 watt bulb.
[Child Proof Lock J
A child proof lock is located behind the panel at the top and on the left side o
dispenser. This toggle switch will turn your ice and water dispensers on or off.
13
Page 14

It is recommended that you disconnectthe power cord before cleaning.
Yourrefrigeratorcanbe roiledoutfor cleaning.Turnthe levelers,at eachfrontco_
of the cabinet,counterclockwise untiltheyturnfreely. Thenpullthe cabinetstra
out. Note: If you have an Automaticice Makerinstalled,werecommendthatyou
off the water suppty before moving the cabinet.
After cleaning behind your refrigerator,pushit backandturn thelevelersclockwise_
they touch the floor end lock the cabinet in place.
[out.i,.1
Use mild soap and water, DO NOT use scouring powders, automobile wax, or furn
polish. Rinse with clear water.
Door gaskets may be cleaned with soap and water, a baking soda solution, or
scouring powder.
[I.si,e]
Clean both compartments and inner doorpanelswith mildsoap and water. Oo no
an abrasive powder, solvent, polish cleaner or undiluted detergent.
When cleaning a glass cantilever shelf, you can remove it and submerge the
assemb(yin warm water. Neverusehotwater. Alwayeallowglesstowarmupto
temperature before immersing in warm water.
14
Page 15

I Defrost Pan 1
Defrost water drainsintoa shaJIowpanbeneath the /_
humidity, water could remain in the pan. This pan
should be cleaned once a month with a strong
solutionof soap and water. It is located behindthe
base grille. To remove the base grille, grasp it at
cabinet and evaporates. During periods of high ____/-
both ends and pull straight out.
Liftthefrontofthe defrost panand pullitstraightout. ".......
TOshown.replacethe defrost pan, reverse procedure as ._/___
To replace the base grille, line upthe spring clips
cabinet and gently tap each end in until the grille
locks in place.
on the base grille with the square openings in the ,__-_--___
tCondenser ]
To allowyour refrigeratorto run more effi-
ciently, the base grille and the area around
twice a year. Theareaaroundthe condens-
er can be cleaned whenever therefrigerator
is moved during routine house-cleaning. .-
Unplug the refrigerator and move it away
from the wall. Vacuum the condenser and OE_,OST-
the condenser should be cleaned at least _11
base grille area and the area where the o--_'_----_I-c_-----___
cabinet normally sits. Plug in the refrigera- c
tor after cleaning. _°""_"_ _._L_
To clean the base grille, grasp both ends
and pullstraight out. After cleaning, replace
the base grille.
15
Page 16

Other Hints On Caring
For Your Refrigerator
[Replacing Light Bulbs ]
it is recommendedthat you disconnect thepowercordbeforereplacing lightbulb:
Toreplace the upper refrigerator light bulb: (t) graspthe lightshield nearthe endsan
pull out until the shield pulls free of the retainer lugs; (2) unscrewbulb and replace wil
a 40 watt appliance bulb (60 watt appliance bulb for Model JRS207, JRSD2250 ar
JRSD2450); and (3) hook the light shield over the upper retainer lugs and press in ;
the bottom until the shield snaps in place.
To replace the lower refrigerator light bulb on some models: (1) remove the Ten-
Control Drawer; (2)using two hands, spreadthetop adbottomofthe lightshieldver_ica
away from each other and pull to the front to remove; (3) unscrew the bulb and repla,
itwith a 40 watt showcase bulb; (4) using two hands, spread the top and bottom of tl
lightshieldandpush itintoplaceengaging tabsinslots;and (5)replace theTempContJ
Drawer.
To replace the freezer light bulb: (1) remove the ice cube dispenser bin and the t_
freezer shelf; (2) unhook the tabs on the top of the light shield by pressing in with yo
thumb onthe center top ofthe light shield; (3)pivot theshielddown; (4) unscrew the b,
when itis cool and replace itwith a standard 40 watt appliance bulb; (5) pivot the shi
up into place, snapping the tabs into the slots: (6) replace the freezer shelf and the
cube dispenser bin.
LGoing On Vacation ]
If you willbe gone for a month or less, leave the control knob at its usual setting.
During longer absences, {a) remove all food, (b) disconnect from electrical outlet,
clean the refrigerator thoroughly, including defrostpan, (d) leavedoors open to pre_
odor formation, and e) turn offwater supply to ice maker, if practical
16
Page 17

,re
Problems? Save yourself the nuisance of unnecessary service calls; check these first:
Refrigerator runs too frequently.
• Frequent running provides more stable temperatures.
• Too many door openings.
• Prolonged door openings.
Refrigerator runs too long.
• Under normalconditions,due to larger size and coldertemperatures,modern
refrigeratorsrun a greaterpercentageof the time.
• Prolonged or frequent door openings.
• Condenser needs cleaning.
• Poor air circulation around condenser.
Refrigeratorwon't run.
• Temperature control turned to OFF.
• Power cord not plugged in.
• No power at electrical outlet.
• House fuse blown or circuit breaker tripped.
Cabinet vibrates.
• Cabinet not level.
• Weak floor.
Warm air from cabinet bottom,
• Normal air flow for condenser circulation.
Front cabinet surface warm to touch.
• Special design to prevent condensation during periods of high humidity.
Moisture on outside surface.
• Hot,humid weather increases condensation. When humidity drops, condensation
disappears.
Red glow visible in freezer.
• Reflection of defrost mechanism during normal defrost cycle.
Sizzling sound in freezer.
• Normal sound caused by defrost water dripping on defrost mechanism.
17
Page 18

Water on floor under cabinet.
• Defrost pan missingor not positionedcorrectly.
• Water connection loose on water valve.
Noisy operation.
• Fan noise perfectly normal infrost-free refrigerators. You may not be used tc
if previous model was manual defrost,
• Cabinet not level.
• Weak floor.
• Defrost pan not positioned correctly.
Odor in cabinet.
• Defrost pan needs cleaning.
• Food left uncovered,
• Interior needs cleaning.
Foods dry out (Fresh or Frozen).
• Packages not wrapped or sealed properly.
• Crisper not tightly closed.
Fresh food compartment too cold.
• Refrigerator control set too cold.
Fresh food compartment too warm.
• Refrigerator control set too warm.
• Freezer control set at coldest position.
• Prolonged door openings.
Freezer compartment too warm.
• Freezer control set too warm.
• Prolonged door openings.
Ice cubes evaporate.
• Cold air moving over Joecubes causes shrinkage.
Automatic ice maker not operating. (Select Models)
• Stop arm in OFF position.
• Water supply turned off.
• Water pressure too low,
• Freezer too warm.
Ice Dispenser not operating. (Select Models)
• Ice jam in the dispenser. (Clear with plastic orwooden utensil.)
• Ice maker not operating.
• The padlock switch activated, (Toggle switch to check.)
• The ice is clumped in the bin. (Break up or discard,)
• An icejam in the crusher. (Remove ice from storage bin and turn auger b_
18
Page 19

Water Dispenser not operating. (Select models)
• Water supplyturnedoff.
• Water pressuretoo low.
Cabinet light not working.
• Bulb burned out.
• No power at outlet.
If You Need Service
• Call the dealer fromwhom your appliance was purchasedor the authorized
Jenn-AirServiceContractorlistedintheYellowPages. YourJenn-AirContractor
canprovidebetterandfasterserviceifyoucanaccuratelydescribeproblemsand
givemodelandserialnumberoftheappliance.Besuretoretainproofofpurchase
toverify warrantystatus. RefertoWARRANTY forfurtherinformationof owner's
responsibilitiesfor warrantyservice.
• If the dealer or servicecompany cannotresolvethe problem,writeto Jenn- Air
CustomerAssistance,e/oMaytagCustomerService,POBox2370, Cleveland,
TN 37320-2370, 1-800-688-1100 (U.S. and Ontario)or 1-615-559-3646.
• Use andcare manuals,service manuals,and partscatalogsare availablefrom
Jenn-AirCustomer Assistance,c/o Maytag CustomerService.
All specifications subjectto change by manufacturerwithoutnotice.
19
 Loading...