

Page 1
_ About Your .
_[enn-Alr Refrigerator
Your Jenn-Air frost-free refrigerator was designed, engineered, and manufac-
tured to the highest standards of quality and performance. Since this manu-
al explains how you can obtain the best use of your Jenn-Air, it is essential
that you follow the instructions carefully.
Should you have any questions about using your Jenn-Air appliance, write
to us. Be sure to provide the model number of your appliance.
Consumer Relations Department
Jenn-Air Company
3035 Shadeland Avenue
Indianapolis, IN 46226-0901
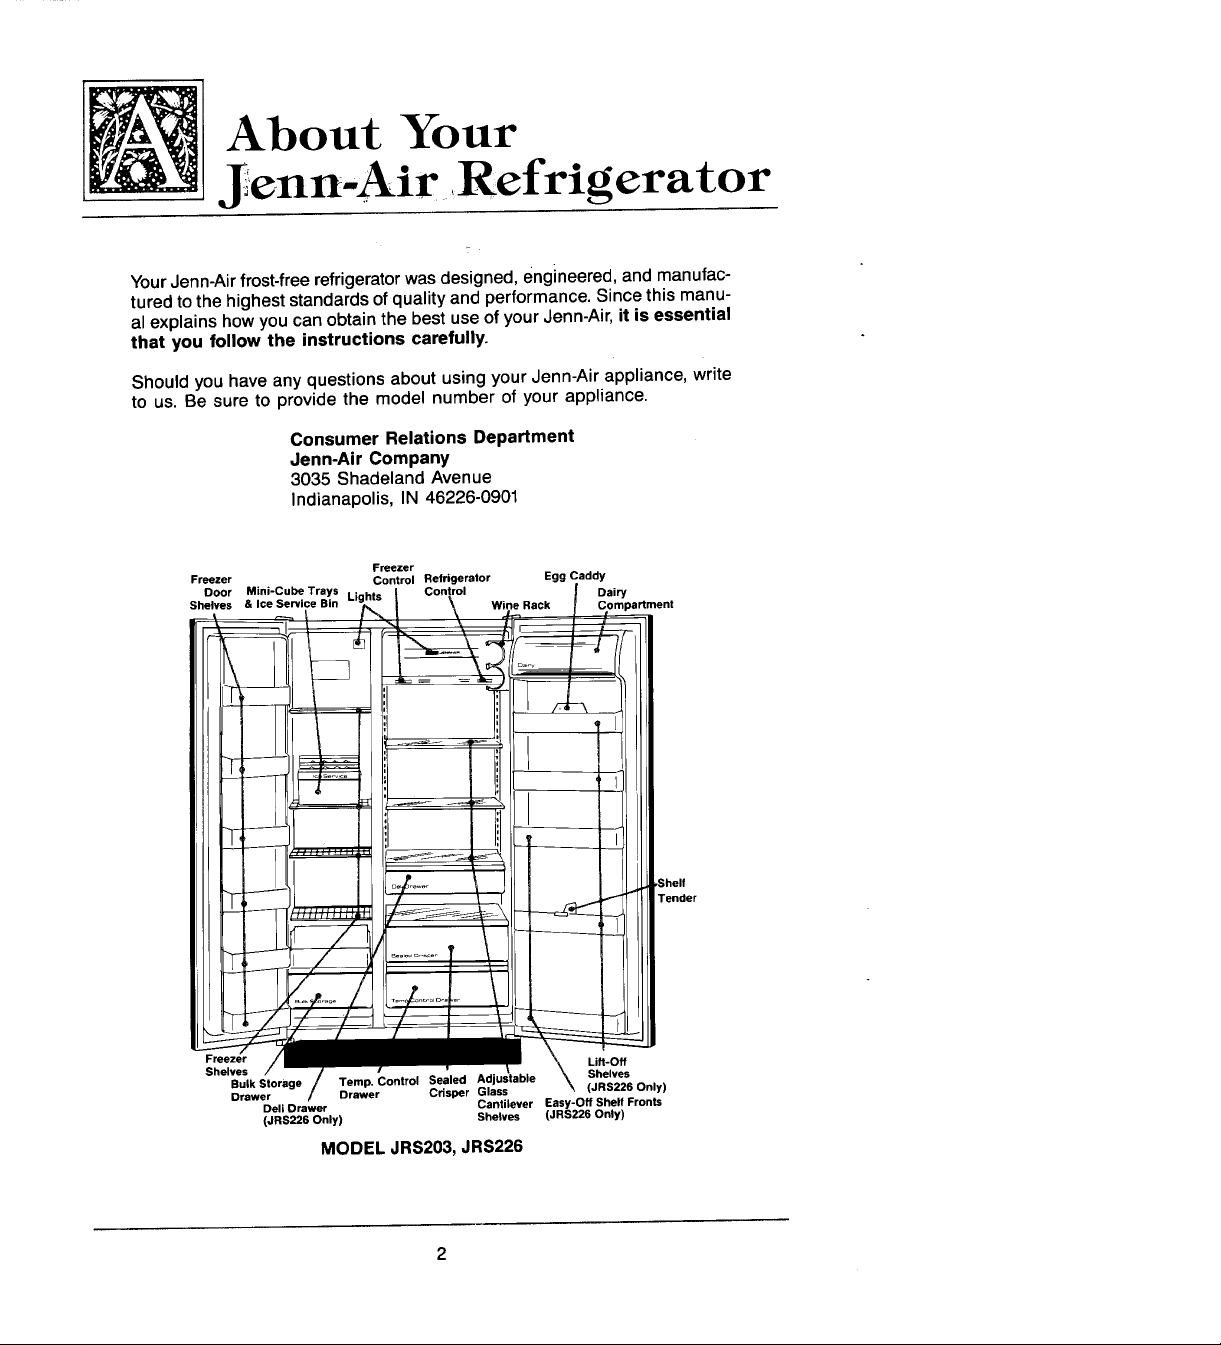
Freezer Control Refrigerator Egg Caddy
Door Mini-Cube Trays Lk Dairy
Shelves & Ice Service Bin •
Freezer
,
:_] ' II
d
II
•-_ _______ I
TV__ TenOer
/J
Fre
Shelves / - _ _ Lift-Off
Bulk SIorage / Temp. Conlrol Sealed \ Shelves
Drawer / Drawer Crisper Glass (JRS226 Only)
Dell Drawer Cantilever Easy-Off Shelf Fronts
(JRS226 Only) Shelves (JRS226 Only)
MODEL JRS203, JRS226
'
2
Page 2

Convenience
Center Freeze r Automatic Ice Maker
Door " and Automatic Freezer Refrigerator
Shelves Dispenser Bin Control Control Egg Dairy
Wine Rack Caddy Compartment
I
/
/ Lift-Off Shelves
Freezer
Bulk . Control Sealed able
Shelves Storage Drawer Drawer Crisper Glass Easy-Off
Drawer Cantilever Shelf Fronts
MODEL JRSD226
3
Shelves
Shelf
Tender
Page 3
Installat o
Location
If you are installing your new refrigerator yourself, please follow these helpful suggestions.
1. Remove base skids and reinsert two front levelers. Discard two rear levelers.
2. Remove all exterior and interior tape carefully and retain old tape. Make a small pad
of this tape to pick off any remaining tape residues. This will eliminate the need to
use dangerous solvents of any kind.
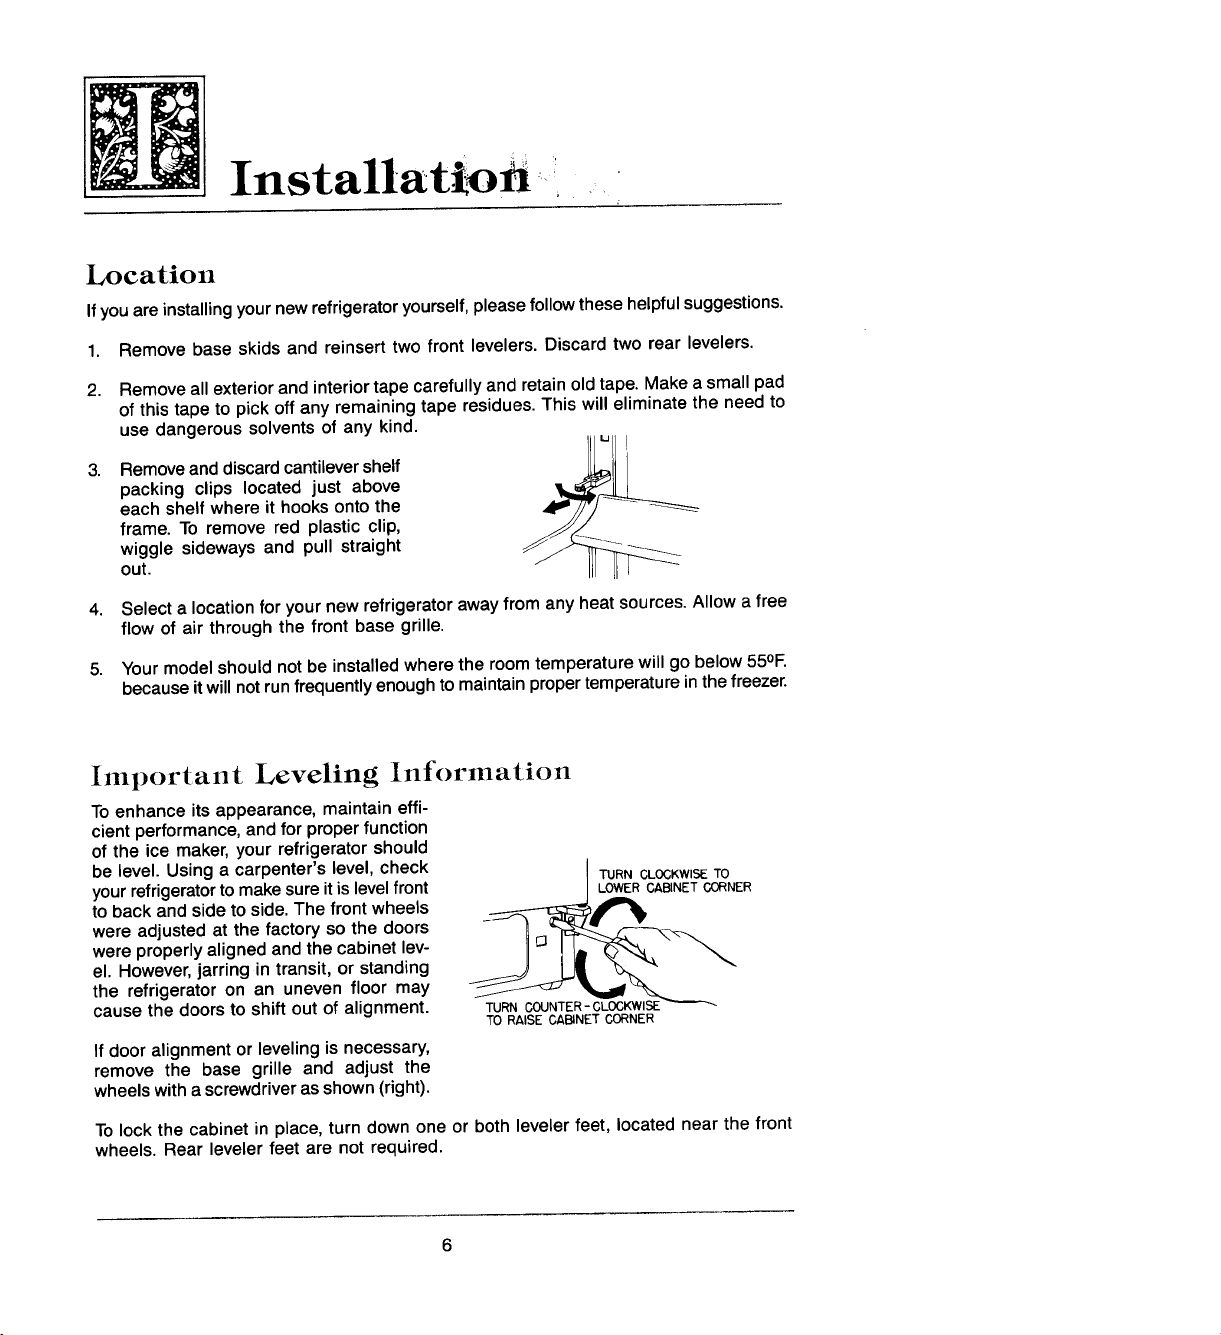
3. Remove and discard cantilever shelf ll,,i,,lll_ll I
packing clips located just above
each shelf where it hooks onto the
frame. To remove red plastic clip,
wiggle sideways and pull straight
out.
4. Select a location for your new refrigerator away from any heat sources. Allow a free
flow of air through the front base grille.
5. Your model should not be installed where the room temperature will go below 55OF.
because it will not run frequently enough to maintain proper temperature in the freezer.
Important Leveling Information
To enhance its appearance, maintain effi-
cient performance, and for proper function
of the ice maker, your refrigerator should
be level. Using a carpenter's level, check I TURNCLOCKWISETO
to back and side to side. The front wheels
were adjusted at the factory so the doors
were properly aligned and the cabinet lev-
el. However, jarring in transit, or standing
the refrigerator on an uneven floor may
your refrigerator to make sure it is level front __ _ _I_I_ER
cause the doors to shift out of alignment. URNCOUNTER-CLOCKWISE
If door alignment or leveling is necessary,
remove the base grille and adjust the
wheels with a screwdriver as shown (right).
To lock the cabinet in place, turn down one or both leveler feet, located near the front
wheels. Rear leveler feet are not required.
TO RAISE CABINET CORNER
Page 4
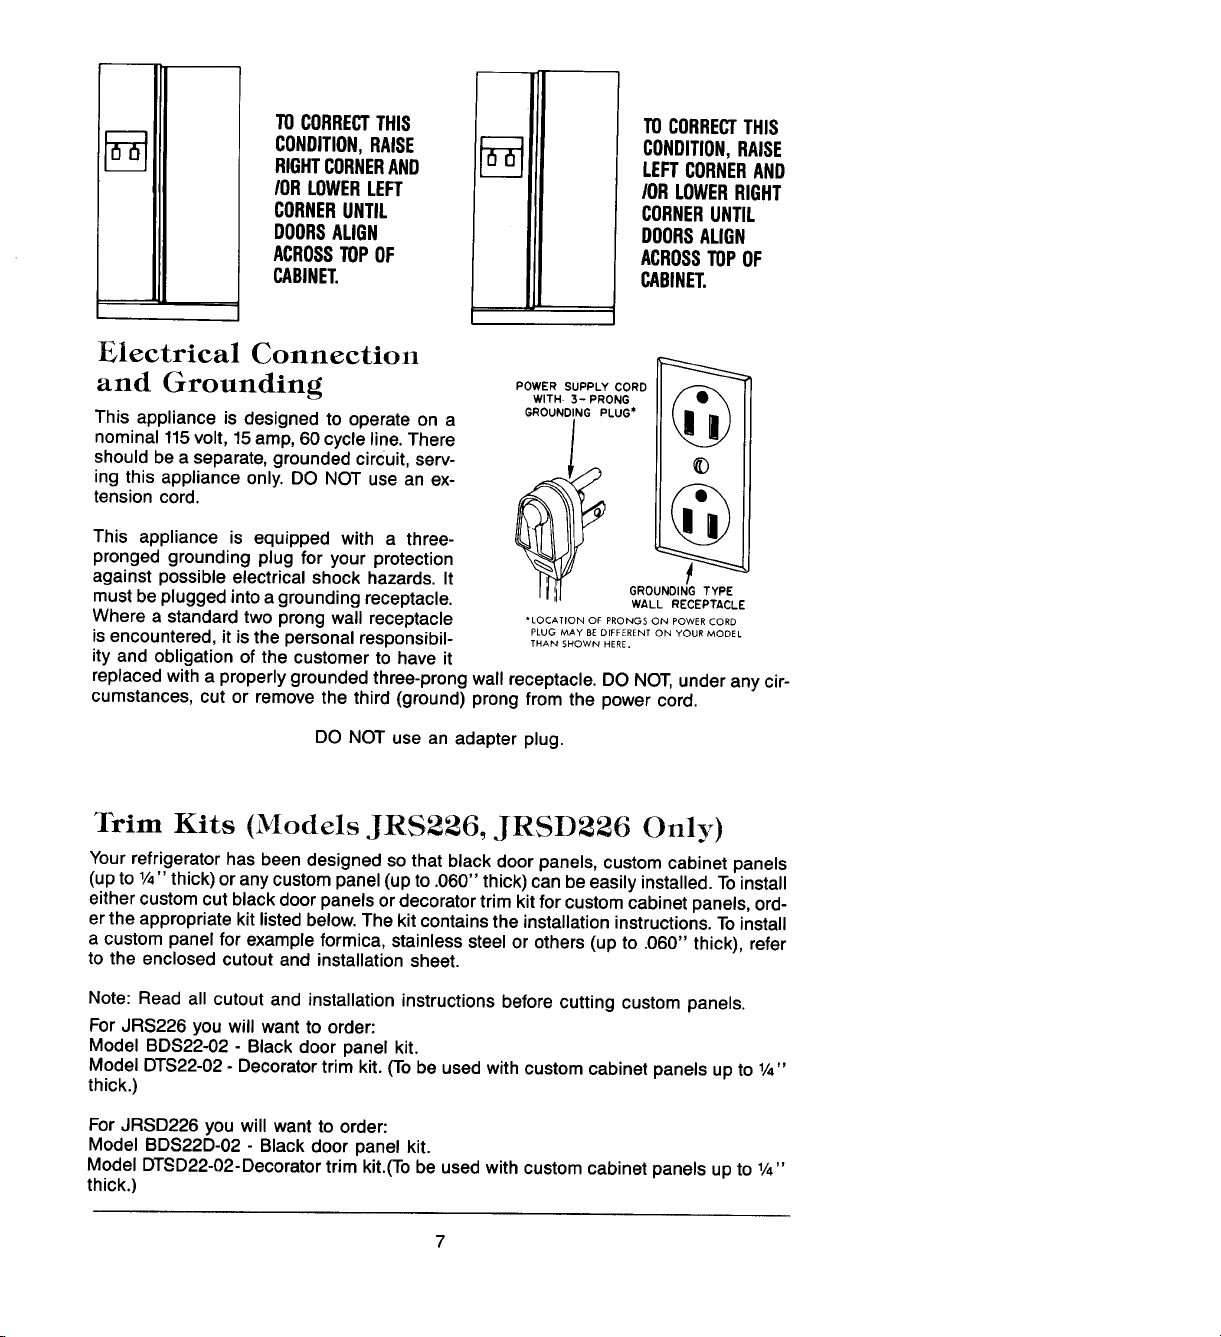
TOCORRECTTHIS TOCORRECTTHIS
CONDITION,RAISE CONDITION,RAISE
RIGHTCORNERAND LEFTCORNERAND
/ORLOWERLEFT /ORLOWERRIGHT
CORNERUNTIL CORNERUNTIL
DOORSALIGN DOORSALIGN
ACROSSTOPOF ACROSSTOPOF
CABINET. CABINET.
Electrical Connection
and Grounding POWERSUPPLYCORD
This appliance is designed to operate on a GROUNDINGPLUG"
nominal 115volt, 15amp, 60 cycle line. There \| II,)
should be a separate, grounded circuit, serv-
ing this appliance only. DO NOT use an ex-
tension cord. / " ",
This appliance is equipped with a three- \11 II)
pronged grounding plug for your protection
against possible electrical shock hazards. It
must be plugged into a groundingreceptacle. WALLRECEPTACLE
Where a standard two prong wall receptacle *LOCATIONOFPRONGSONPOWERCORD
iSencountered, it isthe personal responsibil- PLUGMAYBEDIFFERENTONYOURMODELTHAN SHOWN HERE.
ity and obligation of the customer to have it
replaced with a properly grounded three-prong wall receptacle. DO NOT,under any cir-
cumstances, cut or remove the third (ground) prong from the power cord.
WITH. 3-PRONG / i \
GROUNDING TYP
DO NOT use an adapter plug.
]¥im Kits (Models JRS226, JRSD226 Only)
Your refrigerator has been designed so that black door panels, custom cabinet panels
(up to 1/4"thick) or anycustom panel (up to .060" thick) can be easily installed. To install
either custom cut black door panels or decorator trim kit for custom cabinet panels, ord-
er the appropriate kit listed below.The kit contains the installation instructions. To install
a custom panel for example formica, stainless steel or others (up to .060" thick), refer
to the enclosed cutout and installation sheet.
Note: Read all cutout and installation instructions before cutting custom panels.
For JRS226 you will want to order:
Model BDS22-02 - Black door panel kit.
Model DTS22-02- Decorator trim kit. (To be used with custom cabinet panels up to 1/4"
thick.)
For JRSD226 you will want to order:
Model BDS22D-02 - Black door panel kit.
Model DTSD22-02-Decoratortrim kit.(To be used with custom cabinet panels up to 1/4"
thick.)
Page 5

Oporat,o°
Setting Controls
Your new refrigerator has two controls.
One for regulating the temperature in ..................... ,,.-- G I_ E I
the refrigerator compartment and one ...... 0_..............,........... i
for the freezer compartment. Both con-
trols are located at the upper rear of the
refrigerator compartment, just below the
light shield. _ 5 4 3 21 .................
To start your refrigerator, set the refrig- I
erator control on "F" and set the freez-
er control on "4".
IMPORTANT: In a day or so, you may decide that one or both compartments should
be colder or warmer. DO NOT change either control more than one letter or one number
at a time. Allow 24 hours for temperature to stabilize before adjusting the setting again.
This does not apply when you first start your refrigerator.
To turn off your refrigerator, set the refrigerator control on off.
Warm Cabinet Surfaces
At times, the front surfaces of your refrigerator cabinet may be warm to the touch. This
is a normal function of your refrigerator. This feature prevents moisture from condensing
on the outside of your refrigerator during humid weather. This condition may be noticea-
ble when you first start your refrigerator, during hot weather, and during excessive or
lengthy door openings.
-- ' TURN freez,, con,rol to ng,t HIGHERnumbe,
Energy Tips
For efficient energy use:
1. Be sure refrigerator is level and ventilation around front grille is not blocked.
2. Check door seals occasionally for leakage. Check at various places, top, bottom,
and sides.
3. Check the temperature; avoid unnecessary cold settings.
4. Keep freezer full to near capacity, less cold air is lost during door openings.
5. Let hot dishes cool before putting into refrigerator or freezer.
6. Cover liquids; if uncovered, the unit must work longer.
7. Clean refrigerator condenser coils at least twice a year.
Page 6

Refrigerator
Compartment Features
To maintain the natural flavor, moisture, and nutrition of fresh foods, we recommend that
all dishes, trays, and containers of food be covered.
Shelves
tioned to suit your special needs. To remove
a shelf, lift the rear straight up a fraction of an
inch and pull straight out. To lock into another
position, tilt the shelf with the front up. Insert
hooks into desired frame openings and let the
shelf settle into place. Make sure it is secure-
Adjustable cantilever shelves can be posi- _AI_I] i
ly locked at the rear.
Temp Control Drawer
The Temp Control drawer is located at the bottom of the compartment. The control lever
is located along the left side of the drawer. As the control lever is moved from the "Cool"
setting toward the "Cold" setting, the temperature will get colder. Select the control po-
sition which suits your needs the best. Keep your Temp Control drawer tightly closed
at all times to obtain best results.
All meats or poultry should be stored in their original store wrappings or inplastic bags
to reduce the evaporation of moisture from them. You can store most quality meats for
several days. Ground meats and poultry should be used sooner.
Sealed Crisper
The Sealed Crisper drawer slides out for easy access to foods stored within. It is com-
pletely removable for cleaning or for use elsewhere in your kitchen. The crisper cover
also serves as a refrigerator storage shelf. To remove the cover for cleaning, lift the front
edge and pull straight out.
Keep your crisper tightly closed to insure crispness and freshness. Storing leafy vegeta-
bles, such as celery and lettuce in plastic bags reduces the evaporation of moisture from
them.
To use your Wine Rack, pivot each rack out
until it is fully extended. Then slide the bot-
tles in as shown.
Page 7

Door Features
(Models JRS226 and
JRSD226 Only) \
Doorshelffrontscan be removedforeasyclean-
ingof the door liner and shelf fronts. Lift the shelf
Easy-Off Shelf Fronts ' E_
front straight up until itclearsthe retainerson the
door liner and pull straight out. Reverse this
procedure when replacing the door shelf front.
(Models JRS226 and
JRSD226 Only)
Lift-offshelvesmay be easilyadjustedto another _/
position on thedoor. Lift itstraightup until it clears
Lift-Off Door Shelves _ _
the retainers on the door liner and pull straight
out. Reverse this procedure when replacing a
shelf.
Cover (Model JRSD226 Only)
h cover is located on one ofthe large adjustable shelves on the refrigerator door.It pro-
vides short term storage of fresh foods. Keepthe lid tightly closed to insure freshness
of your foods.
Egg Caddy
Your model has an egg caddy that fits securely on a door shelf. This tray can be re-
moved and carried to your working area.
Automatic Door Closers
All doors contain built-in mechanisms that automatically pull them completely shut once
they areclosed towithin 6 inchesof the cabinet.All doors also havemagneticdoor gaskets
that cling to the cabinet front.
These features combine to insure complete doorclosures and air tight seals all around.
It is always important that your refrigerator is reasonably level for the door closers to
function properly.
Magnetic Door Gaskets
Door gaskets are magnetized to insure an air tight seal all around. Thesegaskets cling
to the cabinet front, once the doors are closed to within their magnetic range.
10
Page 8

Freezer
Compartment Features
Tomaintain the natural flavor, moisture, and nutrition of frozen foods, and to prevent freezer
burn, we recommend that all foods be wrapped or sealed properly.
Shelves
To remove a freezer shelf, lift the shelf straight I ,_'/_m_'/1_3::_
up, tilt sideways and pull straight out. When
replacing a freezer shelf, reverse the removal
procedure.
Bulk Storage Drawer
The slide-out Bulk Storage drawer can be removed IA I_1
by pulling it out as far as it will go, then lifting the
front edge and pulling straight out.
If you notice that the drawer is not sliding smoothly
or easily, lubricate the slide rails with petroleum jelly.
Apply lubrication to points as shown. Also, make sure
the bottom of the freezer is clean where the slide
rails make contact.
FREEZER COMP&BTMENT
BOTTOM
Automatic Ice Maker (JRSD226 Only)
The water inlet tubing assembly required to complete the water connection to the water
valve is located in the crisper drawer in a bag. Connect the ice maker to the water sup-
ply as instructed in the separate instructions, furnished with the refrigerator.
The automatic ice maker is designed to furnish a continual supply of ice cubes. The
amount of ice produced depends on the temperature inthe freezer section of your refriger-
ator. The colder the freezer section, the more ice is produced. We suggest you start with
your refrigerator and freezer controls at their mid settings. In most cases, this is satisfac-
tory. If the door to the refrigerator or freezer is opened frequently or temperatures in the
kitchen are abnormally high, a colder setting may be necessary.
After your model has been installed and the water supply connected to the ice maker,
it may take 8 to 12 hours before the ice maker furnishes any usable ice cubes. The first
one or two harvests will probably contain undersized and irregular cubes because of
air in the supply line. The initial harvest may also contain impurities from the new water
supply piping. Therefore, all cubes from the first two or three harvests should be discarded.
Under certain rare circumstances, ice cubes may be discolored, usually appearing with
agreen-bluish hue. The cause of this unusual discoloration is apparently a combination
of factors such as certain characteristics of local waters, household plumbing and the
accumulation of copper salts in an inactive water supply line which feeds the ice maker.
Continued consumption of such discolored ice cubes may be injurious to health. If such
discoloration is observed, discard the ice cubes and contact the dealer from whom the
icemaker or refrigerator was purchased.
11
Page 9

Ice cubes that have been in the ice storage bin for a considerable length of time may
pick up off-flavor taste, stick together, and gradually become smaller. We suggest that
these cubes be thrown away. We also suggest using an open box of baking soda in the
refrigerator for food odor absorption.
Certain sounds may accompany the various operating cycles of the ice maker. The mo-
tor may have a slight hum--a dull thump may be heard as cubes are ejected--the cubes
will rattle as they fall into an empty storage bin--water valve may click or "buzz" occa-
sionally. All of these sounds are normal and are no cause for alarm.
Note: When dispensing ice cubes, it is important that you use only the ice supplied
by this ice maker. Ice from any other source could cause an ice jam. If this happens,
remove and discard all ice from the storage bin and any ice lodged in the ice chute.
Starting or Stopping Your Ice Maker
0RSD226 Only)
Your automatic ice maker is located near the _
top of the freezer compartment behind the
panel above the Automatic Dispenser bin. Re-
move the panel in front of the ice maker by
pulling the bottom right hand corner of the
panel forward. Then pull the top right hand
corner forward and slide the panel out of the
sockets on the left side of the freezer line. 4---
The ice maker has a wire sensor arm that is connected to a shut-off switch. This arm
stops the mechanism when the ice cube storage pan is full, and restarts it after several
ice cubes have been used. You can use the stop arm to stop all productions of ice at
any time. All you need to do is raise the arm into the OFF position.
The icemaker should be turned off (arm up) when:
1. Ice storage bin is to be removed for extended period of time.
2. Refrigerator is not to be used for a considerable time, such as vacations. Also, turn
off the water supply to the ice maker in this instance, if practical.
3. Water supply is to be shut-off for several hours.
How the Ice Maker Works
Water fills the empty cube mold (Fig. 1) _ _'_,_u
to freezing temperature. Cold air is forced
when the freezer compartment has cooled _ be
directly over mold.
When frozen, the cubes are rotated up and
out of the mold (Fig. 2). The sweeper arm ._......
ejects them into the ice storage bin below. _ v_'°e
The sensor arm (Fig. 3) senses when bin / l_ ......
is full and signals ice maker to stop eject- _,
ing more cubes.
However, the mold has been refilled and .__._ _ _
cubes frozen so the new supply is ready
when needed. As soon as ice is removed
from the bin, the sensor arm signals that
more is needed. Ice maker resumes oper-
ation by ejecting ready-and-waiting frozen
cubes. _ ........
12
Page 10

Removing and Replacing the Automatic
Ice Cube Dispenser Bin (]RSD226 Only)
Lift the front of the Automatic Dispenser bin and pull it straight out. Wash the bin occa-
sionally in mild soap and lukewarm water. Toreplace the bin, push it all the way back
until the bottom of the binis behind the raised edge at the front ofthe shelf it restsupon.
Make sure the tabs, at the back ofthe bin, that turn the spiral auger are positioned be-
tween the prongs from the auger motor.
Operating Your Automatic Ice Cube Dispenser
(]RSD226 Only)
ing it as high as possible (just below the ice chute).
Preventice cubes from missing yourglass by hold-
Pressthe glassagainstthe padded lever at the left IH
sideof the fountain.Tostopdispensingice,release
pressurejust enough to stopthe dispensermotor
and leave the glassin place to holdthe dooropen
untilicestopsfalling. With a littlepractice,you will
learnto anticipatewhento releasepressureto pre-
ventan unwanteddispenseof ice,whichoccurseach
one and one half seconds.
After installation,it may take 1 to 2 daysto fill the
AutomaticDispenser bin with cubes.
Operating Your Water Dispenser (lRSD226 Only)
Todispense water,pressa containeragainst the pad-
ded lever at the right side of the fountain. To stop the
water flow, release pressure. To minimize splashing,
hold the container as high as possible.
When you first operate your dispenser or after recon-
necting waterto your refrigerator, air will escape from
the dispenser for a few minutes before water begins to
flow. Draw 10glasses of water and empty them in the
kitchensink. Thiswill insurecompletefilling ofthe reser-
voir with fresh water.
Spill Tray
Do not discard water into the grille at the bottom of the fountain. This is a spill area,
not a drain. Normal spills will be evaporated in the recessed area below the spill shelf
grille. Excessive spills should be removed with an absorbent sponge or cloth. The spill
area should be cleaned occasionally.
Fountain Light
The push button light switch is located behind the panel at the top and on the right side
of your fountain. For replacement, use a 120v, 7 watt bulb.
13
Page 11

Cleaning
It is recommended that you disconnect the power cord before cleaning.
Yourrefrigerator can be rolled out for cleaning. Turnthe levelers, at each front corner
ofthe cabinet, counterclockwise until they turn freely.Then pull thecabinet straight out.
Note: Ifyou have an automatic ice maker installed, we recommend that you turn off
the water supply before moving the cabinet.
After cleaning behindyour refrigerator,push it back and turn the levelers clockwise until
they touch the floor and lock the cabinet in place.
Outside
Use mild soap and water.DO NOTuse scouring powders, automobile wax, or furniture
polish. Rinse with clear water.
Doorgaskets may be cleaned with soap and water,a baking soda solution, or mild scour-
ing powder.
Inside
Clean both compartments and inner door panels with mild soap and water. Do not use
an abrasive powder, solvent, polish cleaner or undiluted detergent.
When cleaning a glass cantilever shelf, you can remove it and submerge the entire as-
sembly in warm water.Never use hot water. Always allow glass to warm up to room
temperature before immersing in warm water.
Defrost Pan
Defrost water drains into a shallow pan _ J
beneath the cabinet and evaporates. Dur-
ing periods of high humidity, water couldremain in the pan. This pan should be
cleaned once a month with a solution o_
strong soap andwater. It's located behind
base grille.
To remove base grille, grasp it at both
ends and pull it straight out.
14
Page 12

Lift front of defrost pan and pull straight out.
_IDE R_LS
To replace, reverse procedure as shown. __"_-__-_.-_ t_J
in the cabinet and tap each end in until grille
on the base grille with the square openings _ _
locks in place.
Toreplace base grille, line up the spring clips 9__f.:___
Condenser
The condenser should be cleaned at least
twice a year.If you move your refrigerator out
for cleaning, the condenser can be cleaned
through the rear access opening. Thoroughly
vacuum dirt and lint from the open end ofthe
condenser.
Ifyoudo not pull the cabinet out, the condens-
er can be cleaned through the left front base
opening. Grasp the base grille at both ends
and pull straight out. Reach through the base
opening with your vacuumcleaner attachment
to clean the front and open end of the con-
denser. After cleaning, replace base grille.
15
Page 13

Other Hints on Caring
For Your Refrigerator
Replacing Light Bulbs
It is recommended that youdisconneet the power cord before replacing light
bulbs.
To replace upper refrigerator light bulb! _.1)grasp the light shield near the ends
and pull out untilthe shield pulls free of the retainer lugs,'2) unscrew bulb and replace
with a60 watt appliance bulb; and 3) hook the light shield over the upper retainer lugs
and press in at the bottom until the shield snaps in place.
To replace freezer light bulb (Model JRS203 and JRS226 only): use a 40 watt
standard base bulb.
To replace freezer light bulb (ModelJRSD226 only): 1)removethe ice cube dis-
penser bin and the top freezer shelf; 2)unhook tabs on top of the light shield by press-
ing in with thumb on center top of light shield; 3) pivot shield down; 4) unscrew bulb
when cool and replace with standard 40 watt appliance bulb; 5) pivotshield up intoplace,
snapping tabs into slots; and 6) replace freezer shelf and ice cub dispenser bin.
(i)I1 Vacation
If you will be gone for a month or less, leave the control knob at its usual setting.
During longer absences, (a) remove all food, (b) disconnect from electrical outlet, (c)
clean the refrigerator thoroughly, including defrost pan, (d) leave doors open to prevent
odor formation.
16
 Loading...