

Jenn-Air JES1750FS0 Owner’s Manual

User Guide
Electric Downdraft Range
THANK YOU for purchasing this high-quality product. Register your range at www.jennair.com. In Canada, register your range at
www.jennair.ca.
For future reference, please make a note of your product model and serial numbers. These can be found on the label located on the oven
frame behind the top right side of the oven door.
Model Number______________________________________________ Serial Number_______________________________________________
Para una versión de estas instrucciones en español, visite www.jennair.com.
Deberá tener a mano el número de modelo y de serie, que están ubicados en el marco del horno, detrás del lado derecho superior de la
puerta del horno.
Table of Contents
RANGE SAFETY .............................................................................2
The Anti-Tip Bracket ....................................................................2
KEY USAGE TIPS ...........................................................................4
AquaLift® Self-Cleaning Technology ............................................4
Surface Temperatures ..................................................................4
Preheating ....................................................................................4
Ceramic Glass Cooktop Cleaning ...............................................4
FEATURE GUIDE ............................................................................5
Electronic Oven Controls .............................................................7
COOKTOP .......................................................................................9
Downdraft Ventilation System ....................................................10
Cookware ...................................................................................11
Home Canning ...........................................................................11
OVEN .............................................................................................12
Aluminum Foil .............................................................................12
Positioning Racks and Bakeware ..............................................12
Roll-Out Rack .............................................................................13
Oven Vent ...................................................................................14
Sabbath Mode............................................................................14
Baking and Roasting ..................................................................14
Broiling........................................................................................14
Convection Cooking ..................................................................15
Proofing Bread ...........................................................................15
Favorite .......................................................................................15
Cook Time ..................................................................................16
Oven Light ..................................................................................16
RANGE CARE ...............................................................................17
Clean Cycle ................................................................................17
General Cleaning ........................................................................18
TROUBLESHOOTING ..................................................................20
ACCESSORIES .............................................................................22
WARRANTY ..................................................................................23
W10896663A
Range Safety
Your safety and the safety of others are very important.
We have provided many important safety messages in this manual and on your appliance. Always read and obey all safety
messages.
This is the safety alert symbol.
This symbol alerts you to potential hazards that can kill or hurt you and others.
All safety messages will follow the safety alert symbol and either the word “DANGER” or “WARNING.”
These words mean:
You can be killed or seriously injured if you don't immediately
DANGER
WARNING
All safety messages will tell you what the potential hazard is, tell you how to reduce the chance of injury, and tell you what can
happen if the instructions are not followed.
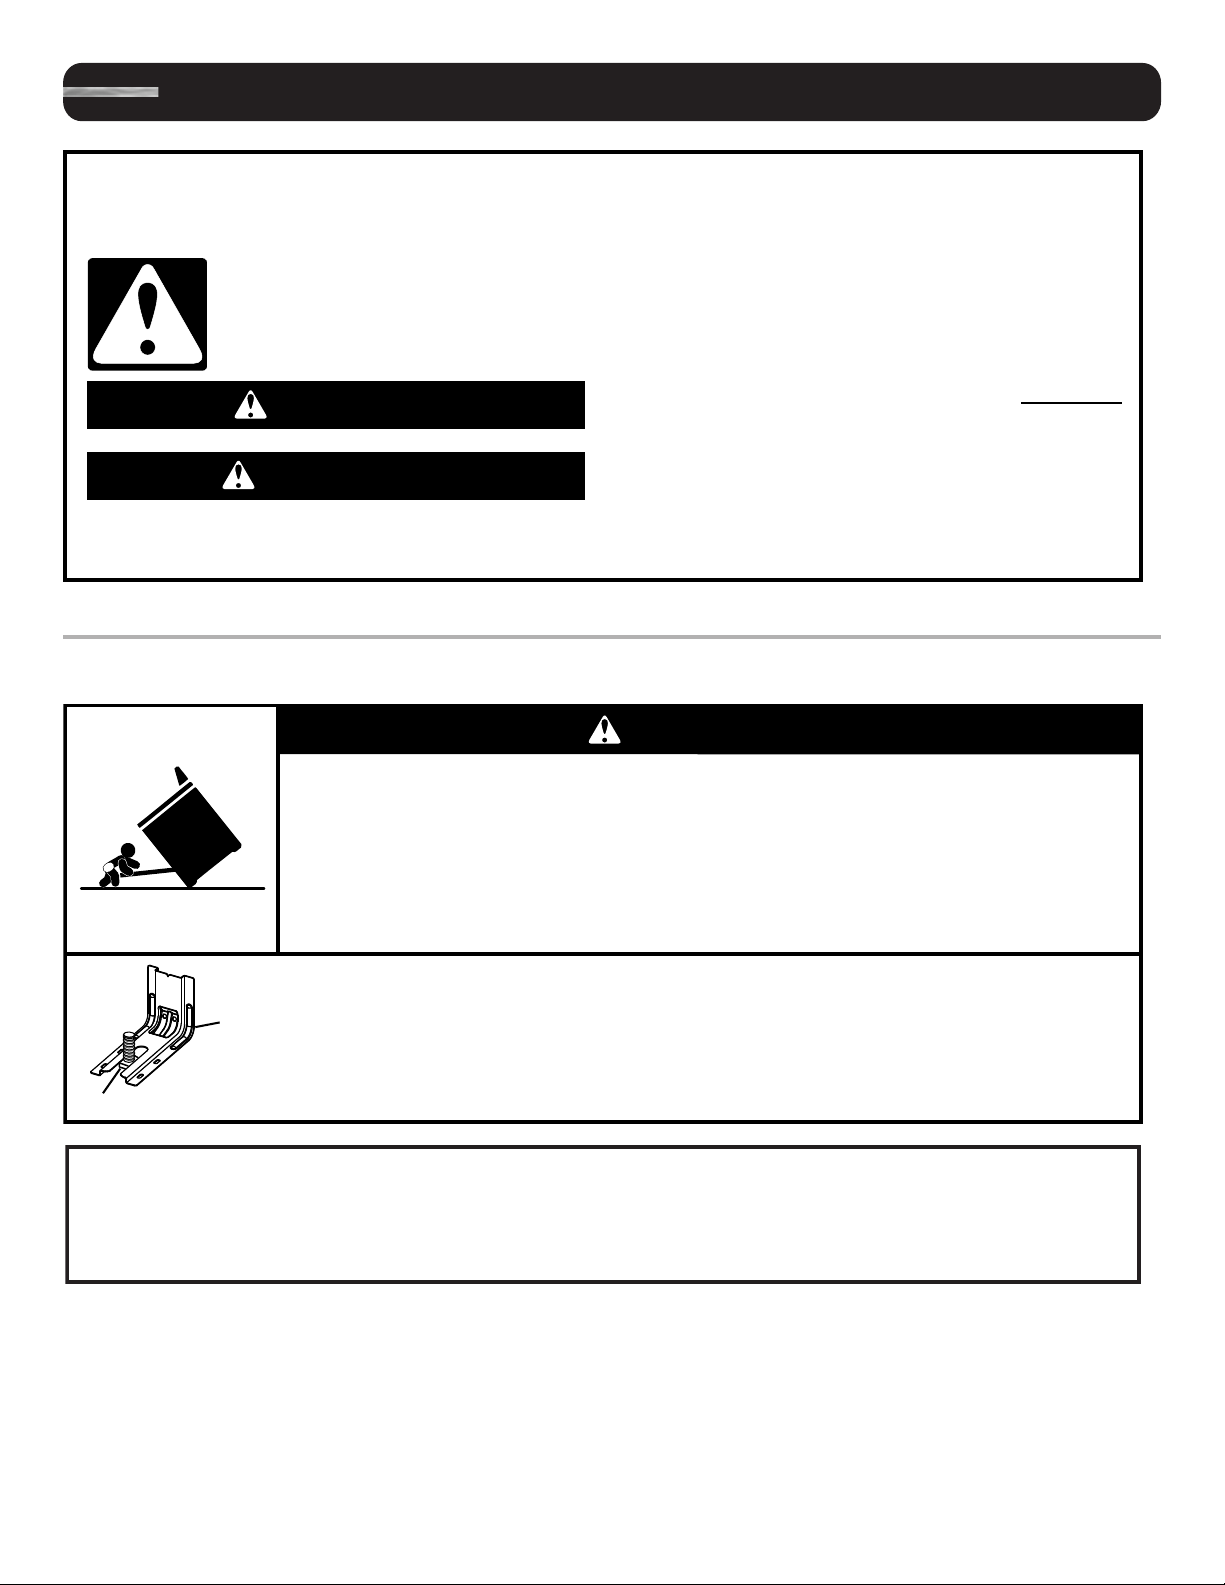
The Anti-Tip Bracket
The range will not tip during normal use. However, the range can tip if you apply too much force or weight to the open door without having
the anti-tip bracket fastened down properly.
follow instructions.
You
can be killed or seriously injured if you don't
instructions.
follow
WARNING
Tip Over Hazard
A child or adult can tip the range and be killed.
Verify the anti-tip bracket has been properly installed and engaged per installation instructions.
Re-engage anti-tip bracket if range is moved.
Do not operate range without anti-tip bracket installed and engaged.
Failure to follow these instructions can result in death or serious burns to children and adults.
To verify the anti-tip bracket is installed and engaged:
Anti-Tip
Bracket
Range Foot
State of California Proposition 65 Warnings:
WARNING: This product contains one or more chemicals known to the State of California to cause cancer.
WARNING: This product contains one or more chemicals known to the State of California to cause birth defects or other
reproductive harm.
• Slide range forward.
• Look for the anti-tip bracket securely attached to floor or wall.
• Slide range back so rear range foot is under anti-tip bracket.
• See installation instructions for details.
2

IMPORTANT SAFETY INSTRUCTIONS
WARNING: To reduce the risk of fire, electrical shock,
injury to persons, or damage when using the range, follow
basic precautions, including the following:
■ WARNING:
THE RANGE, THE RANGE MUST BE SECURED BY
PROPERLY INSTALLED ANTI-TIP DEVICES. TO CHECK
IF THE DEVICES ARE INSTALLED PROPERLY, SLIDE
RANGE FORWARD, LOOK FOR ANTI-TIP BRACKET
SECURELY ATTACHED TO FLOOR OR WALL, AND
SLIDE RANGE BACK SO REAR RANGE FOOT IS
UNDER ANTI-TIP BRACKET.
■ CAUTION: Do not store items of interest to children in
cabinets above a range or on the backguard of a range –
children climbing on the range to reach items could be
seriously injured.
■ Proper Installation – Be sure the range is properly installed
and grounded by a qualified technician.
■ Never Use the Range for Warming or Heating the Room.
■ Do Not Leave Children Alone – Children should not be left
alone or unattended in area where the range is in use.
They should never be allowed to sit or stand on any part of
the range.
Wear Proper Apparel – Loose-fitting or hanging garments
■
should never be worn while using the range.
User Servicing – Do not repair or replace any part of the
■
range unless specifically recommended in the manual. All
other servicing should be referred to a qualified technician.
■ Storage in or on the Range – Flammable materials should
not be stored in an oven or near surface units.
■ Do Not Use Water on Grease Fires – Smother fire or flame
or use dry chemical or foam-type extinguisher.
■ Use Only Dry Potholders – Moist or damp potholders on
hot surfaces may result in burns from steam. Do not let
potholder touch hot heating elements. Do not use a towel
or other bulky cloth.
■ DO NOT TOUCH SURFACE UNITS OR AREAS NEAR
UNITS – Surface units may be hot even though they are
dark in color. Areas near surface units may become hot
enough to cause burns. During and after use, do not touch,
or let clothing or other flammable materials contact surface
units or areas near units until they have had sufficient time
to cool. Among those areas are the cooktop and surfaces
facing the cooktop.
■ Use Proper Pan Size – The range is equipped with one or
more surface units of different size. Select utensils having
flat bottoms large enough to cover the surface unit heating
element. The use of undersized utensils will expose a
portion of the heating element to direct contact and may
result in ignition of clothing. Proper relationship of utensil to
burner will also improve efficiency.
■ Never Leave Surface Units Unattended at High Heat
Settings – Boilover causes smoking and greasy spillovers
that may ignite.
■ Make Sure Reflector Pans or Drip Bowls Are in Place –
Absence of these pans or bowls during cooking may
subject wiring or components underneath to damage.
TO REDUCE THE RISK OF TIPPING OF
■ Protective Liners – Do not use aluminum foil to line surface
unit drip bowls or oven bottoms, except as suggested in
the manual. Improper installation of these liners may result
in a risk of electric shock, or fire.
Glazed Cooking Utensils – Only certain types of glass,
■
glass/ceramic, ceramic, earthenware, or other glazed
utensils are suitable for range-top service without breaking
due to the sudden change in temperature.
■ Utensil Handles Should Be Turned Inward and Not Extend
Over Adjacent Surface Units – To reduce the risk of burns,
ignition of flammable materials, and spillage due to
unintentional contact with the utensil, the handle of a
utensil should be positioned so that it is turned inward, and
does not extend over adjacent surface units.
■ Do Not Soak Removable Heating Elements – Heating
elements should never be immersed in water.
■ Do Not Cook on Broken Cooktop – If cooktop should
break, cleaning solutions and spillovers may penetrate the
broken cooktop and create a risk of electric shock. Contact
a qualified technician immediately.
■ Clean Cooktop With Caution – If a wet sponge or cloth is
used to wipe spills on a hot cooking area, be careful to
avoid steam burn. Some cleaners can produce noxious
fumes if applied to a hot surface.
Use Care When Opening Door – Let hot air or steam
■
escape before removing or replacing food.
Do Not Heat Unopened Food Containers – Build-up of
■
pressure may cause container to burst and result in injury.
■ Keep Oven Vent Ducts Unobstructed.
■ Placement of Oven Racks – Always place oven racks in
desired location while oven is
cool. If rack must be moved
while oven is hot, do not let potholder contact hot heating
element in oven.
DO NOT TOUCH HEATING ELEMENTS OR INTERIOR
■
SURFACES OF OVEN – Heating elements may be hot even
though they are dark in color. Interior surfaces of an oven
become hot enough to cause burns. During and after use,
do not touch, or let clothing or other flammable materials
contact heating elements or interior surfaces of oven until
they have had sufficient time to cool. Other surfaces of the
appliance may become hot enough to cause burns – among
these surfaces are oven vent openings and surfaces near
these openings, oven doors, and windows of oven doors.
For self-cleaning ranges –
■ Do Not Clean Door Gasket – The door gasket is essential
for a good seal. Care should be taken not to rub, damage,
or move the gasket.
■ Do Not Use Oven Cleaners – No commercial oven cleaner
or oven liner protective coating of any kind should be used
in or around any part of the oven.
■ Clean Only Parts Listed in Manual.
■ Before Self-Cleaning the Oven – Remove broiler pan and
other utensils.
For units with ventilating hood –
■ Clean Ventilating Hoods Frequently – Grease should not
be allowed to accumulate on hood or filter.
■ When flambeing foods under the hood, turn the fan on.
SAVE THESE INSTRUCTIONS
3
Key Usage Tips
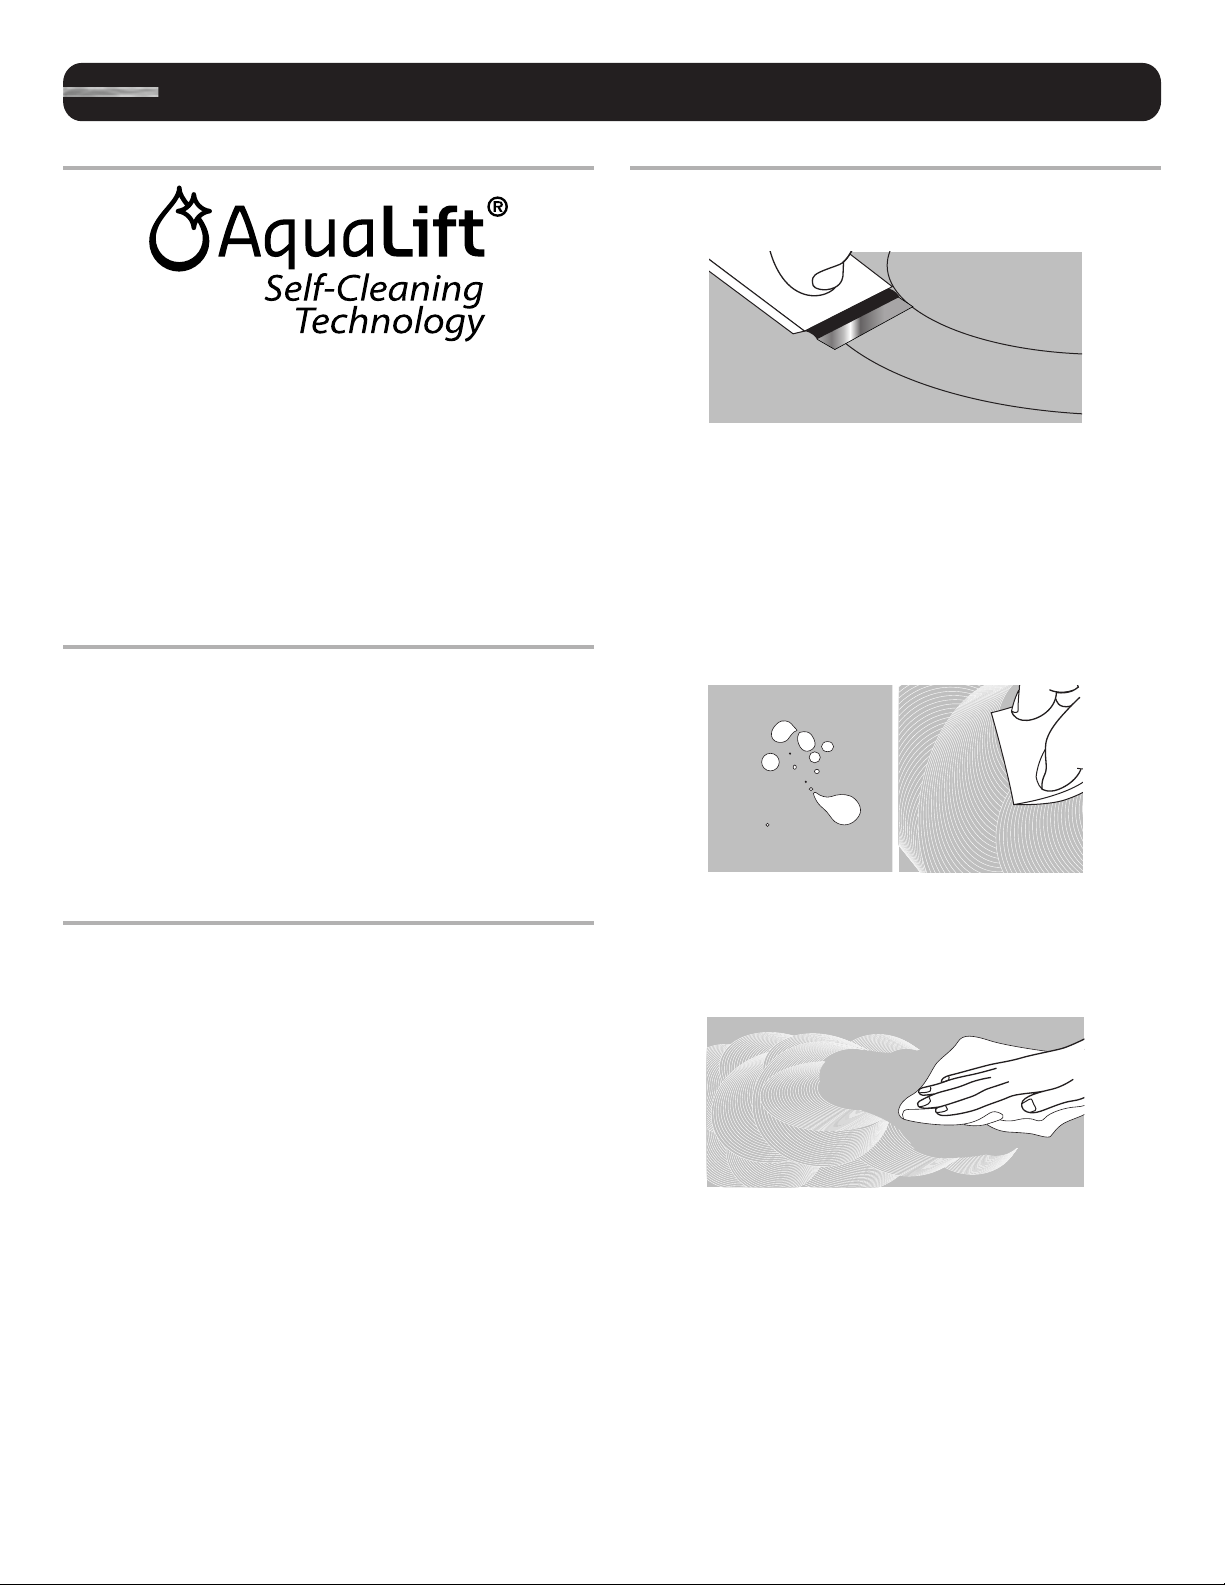
AquaLift® Self-Cleaning Technology
AquaLift® Self-Cleaning Technology is a first-of-its-kind cleaning
solution designed to minimize the time, temperature, and odors
that ordinarily come with traditional self-cleaning methods. With
AquaLift® Self-Cleaning Technology, an exclusive coating on the
interior of the oven is activated with heat and water to release
baked-on soil. To use AquaLift® Self-Cleaning Technology, simply
wipe out loose debris, pour water into the oven bottom, and run
the AquaLift® Self-Cleaning cycle. When the cycle finishes in under
1 hour at a lower temperature than in traditional self-cleaning
methods, just wipe out the remaining water and loose debris.
See the “Clean Cycle” section for more detailed instructions. For
additional information, frequently asked questions, and videos
on using AquaLift® Self-Cleaning Technology, visit our website at
http://whirlpoolcorp.com/aqualift.
Surface Temperatures
When the range is in use, all range surfaces may become hot,
such as the knobs and oven door.
Baking Drawer
When the oven is in use, the drawer may become hot. Do not store
plastics, cloth, or other items that could melt or burn in the drawer.
Ceramic Glass Cooktop Cleaning
To avoid damaging the cooktop, do not use steel wool, abrasive
powder cleansers, chlorine bleach, rust remover, or ammonia.
1. Remove food/residue with the Cooktop Scraper.
■ For best results, use the Cooktop Scraper while the
cooktop is still warm but not hot to the touch. It is
recommended to wear an oven mitt while scraping the
warm cooktop.
■ Hold the Cooktop Scraper at approximately a 45° angle
against the glass surface and scrape the residue. It will
be necessary to apply pressure in order to remove the
residue.
Allow the cooktop to cool down completely before proceeding
to Step 2.
2. Apply a few dime-sized drops of affresh® Cooktop Cleaner to
the affected areas.
Oven Vent
The oven vent releases hot air and moisture from the oven and
should not be blocked or covered. Do not set plastics, paper, or
other items that could melt or burn near the oven vent.
Preheating
When beginning a Bake, Convect Bake, or Convect Roast cycle,
the oven will begin preheating after Start is pressed. The oven
will take approximately 12 to 15 minutes to reach 350°F (177°C)
with all of the oven racks provided with your oven inside the
oven cavity. Higher temperatures will take longer to preheat. The
preheat cycle rapidly increases the oven temperature. The actual
oven temperature will go above your set temperature to offset
the heat lost when your oven door is opened to insert food. This
ensures that when you place your food in the oven, the oven
will begin at the proper temperature. Insert your food when the
preheat tone sounds. Do not open the door during preheat before
the tone sounds.
■ Rub affresh
with the Blue Cooktop Cleaning Pad. Some pressure is
needed to remove stubborn stains.
■ Allow the cleaner to dry to a white haze before proceeding
to Step 3.
3. Polish with a clean, dry cloth or a clean, dry paper towel.
■ Repeat steps 1 through 3 as necessary for stubborn or
burned-on stains.
The Complete Cooktop Cleaner Kit is available for order including
the following:
■ Cooktop Scraper
■ affresh
■ Blue Cooktop Cleaning Pads
See the “Accessories” section for part numbers and information
on ordering.
®
®
Cooktop Cleaner onto the cooktop surface
Cooktop Cleaner
4
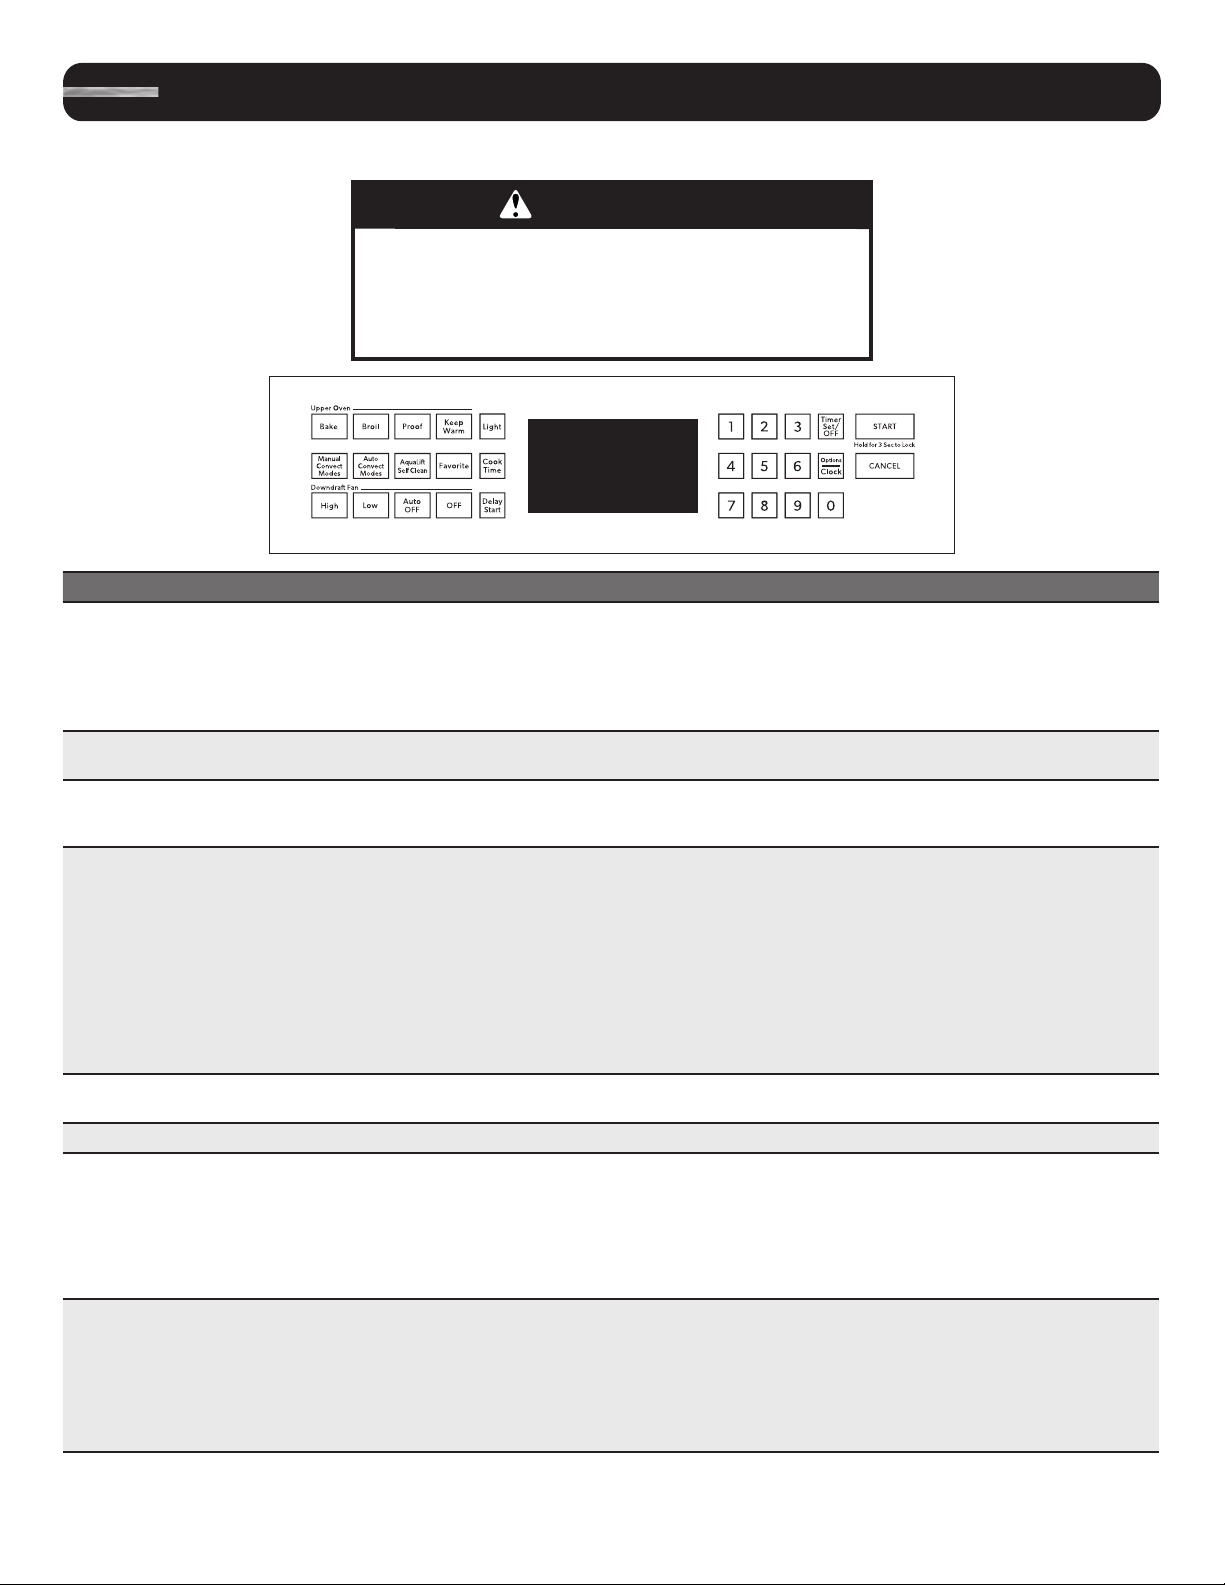
Feature Guide
WARNING
This manual covers several models. Your model may have some or all of the items listed. Refer to this manual or the Product Help section
of our website at www.jennair.com for more detailed instructions. In Canada, refer to the Product Help Section at www.jennair.ca.
Food Poisoning Hazard
Do not let food sit for more than one hour before or
after cooking.
Doing so can result in food poisoning or sickness.
Keypad Feature Instructions
OPTIONS/CLOCK Clock
OPTIONS/CLOCK Settings
LIGHT Oven cavity
light
TIMER SET/OFF Oven timer
START Cooking start
CANCEL Range function
BAKE Baking and
roasting
BROIL Broiling
The Clock can use a 12- or 24-hour cycle. See the “Electronic Oven Controls” section.
1. Press OPTIONS/CLOCK until “CLOCK” is displayed.
2. Use the number keypads to set the time of day.
3. Press START to change the time.
4. Press “3” for AM or “6” for PM.
Enables you to personalize the audible tones and oven operation to suit your needs. See the
“Electronic Oven Controls” section.
The oven light is controlled by a keypad on the oven control panel. While the oven door is
closed, press LIGHT to turn the light on and off. When the oven door is opened, the oven
light will automatically come on.
The Timer can be set in hours or minutes up to 9 hours and 59 minutes.
1. Press TIMER SET/OFF.
2. Press the number keypads to set the length of time in hr-min-min. Leading zeros do not
have to be entered. For example, for 2 minutes, enter “2.”
3. Press TIMER SET/OFF to begin the countdown. If enabled, one tone will sound at end of
countdown.
4. Press TIMER SET/OFF again to cancel the Timer and return to the time of day. Do not
press CANCEL because the oven will turn off.
5. If the Timer is running but not in the display, press TIMER SET/OFF to display the
countdown for 5 seconds.
The Start keypad begins any oven function. If Start is not pressed within 2 minutes after
pressing a keypad, the function is canceled and the time of day is displayed.
The Cancel keypad stops any function for the oven except the Clock and Timer.
1. Press BAKE.
2. Set the desired temperature between 170°F and 500°F (75°C and 260°C) using the
number keypads. The default temperature is 350°F (180°C).
3. Press START.
4. To change the temperature, repeat steps 2 and 3.
5. Press CANCEL when finished.
1. Press BROIL.
2. Press the number keypads to set the desired temperature.
3. Press START and allow the oven to preheat for 2 minutes.
4. To change the temperature, repeat steps 2 and 3.
5. Position the cookware in the oven and close the door.
6. Press CANCEL when finished.
5

Keypad Feature Instructions
MANUAL CONVECT
MODES
AUTO CONVECT
MODES
KEEP WARM Hold warm
PROOF Proofing bread
FAVORITE Saved favorite
DELAY START Delayed start
COOK TIME Timed cooking
AQUALIFT SELF
CLEAN
DOWNDRAFT FAN
HIGH/LOW/AUTO
OFF/OFF
START (hold for 3
sec to lock)
Convection
cooking
Convection
cooking
Clean cycle
Downdraft fan
Oven control
lockout
1. Press MANUAL CONVECT MODES until the desired convection mode appears in the
display.
2. Press START.
3. Press the number keypads to set the desired temperature.
4. Press START.
5. Insert food when prompted.
6. To change the temperature, repeat steps 3 and 4.
7. Press CANCEL when finished.
1. Press AUTO CONVECT MODES until the desired convection mode appears in the
display.
2. Press START.
3. Press the number keypads to set the desired temperature.
4. Press START.
5. Press the number keypads to set the desired cook time.
6. Press START.
7. Insert food when prompted.
8. To change the temperature, repeat steps 3 through 6.
9. Press CANCEL when finished.
Food must be at serving temperature before placing it in the warmed oven.
1. Press KEEP WARM.
2. Set the desired temperature between 145°F and 190°F (63°C and 88°C) using the
number keypads. The default temperature is 170°F (75°C).
3. Press START.
4. Press CANCEL when finished.
1. Place prepared dough in oven. Press PROOF.
2. Press START.
3. Let the dough rise until nearly doubled in size. Proofing time may vary depending on
dough type and quantity.
4. Press CANCEL when finished proofing.
Refer to the “Proofing Bread” section for more information.
The Favorite keypad stores the oven mode, cook time, and temperature for your favorite
recipe. To save or use favorite, see the “Favorite” section.
The Delay Start keypad is used to enter the starting time for an oven function with a delayed
start. Delay Start should not be used for foods such as breads and cakes because they may
not bake properly.
To set a Timed Cook or a Delayed Timed Cook, see the “Cook Time” section.
Timed cooking allows the oven to be set to turn on at a certain time of day, cook for a set
length of time, and/or shut off automatically.
To set a Timed Cook or a Delayed Timed Cook, see the “Cook Time” section.
See the “Clean Cycle” section.
Press DOWNDRAFT FAN HIGH or DOWNDRAFT FAN LOW to turn on the Downdraft Fan at
the desired speed.
Press DOWNDRAFT FAN OFF to turn off the Downdraft Fan immediately.
Press DOWNDRAFT FAN AUTO OFF to automatically turn off the Downdraft Fan after a set
time. To add 15 minutes to the set time, up to 1 hour, press DOWNDRAFT FAN AUTO OFF
again.
If the Downdraft Fan is OFF, pressing DOWNDRAFT FAN AUTO OFF will turn the Downdraft
Fan on at High speed. If the Downdraft Fan is already ON, pressing DOWNDRAFT FAN
AUTO OFF will not change the Downdraft Fan speed.
1. Check that the oven is OFF.
2. Press and hold START (hold for 3 sec to lock) for 3 seconds.
3. A tone will sound, “Control Locked” will scroll, and then “Locked” will be displayed.
4. Repeat to unlock. No keypads will function with the controls locked. The cooktop
functions are not affected by the oven control lockout.
6

Keypad Feature Instructions
OPTIONS/CLOCK Energy save
1. Press OPTIONS/CLOCK until “ENERGY SAVER” is displayed.
2. The current setting will be displayed.
3. Press the “1” keypad to adjust the setting.
4. Press CANCEL to exit and display the time of day.
If Energy Save is ON, the range will go into Sleep mode after 5 minutes of inactivity. Any
keypad press will activate the display. If Energy Save is OFF, the display will be ON at all
times.
Electronic Oven Controls
Control Display
The display will flash when powered up or after a power loss.
Press CANCEL to clear. When the oven is not in use, the time of
day is displayed. If the range is in Energy Save mode, the display
will be blank when not in use.
Tones
Tones are audible signals, indicating the following:
One Tone
■ Valid keypad press
■ Oven is preheated (long tone).
■ Function has been entered.
■ Reminder, repeating each minute after the end-of-cycle tones
Three Tones
■ Invalid keypad press
Four Tones
■ End of cycle
Use the Options/Clock keypad to change the tone settings.
Energy Save
The Energy Save mode puts the range into Sleep mode and
reduces energy consumption.
To Activate the Energy Save Mode:
1. Press OPTIONS/CLOCK until “ENERGY SAVER” is displayed.
2. The current setting will be displayed.
3. Press the “1” keypad to adjust the setting.
4. Press CANCEL to exit and display the time of day.
5. The setting will be activated after 5 minutes.
To Deactivate the Energy Save Mode:
1. Press OPTIONS/CLOCK until “ENERGY SAVER” is displayed.
2. The current setting will be displayed.
3. Press the “1” keypad to adjust the setting.
4. Press CANCEL to exit and display the time of day.
5. The clock will reappear in the display and the range can be
operated as usual.
Clock
The Clock can use a 12- or 24-hour cycle.
1. Press OPTIONS/CLOCK until “CLOCK” is displayed.
2. Use the number keypads to set the time of day.
3. Press START to change the time.
4. Press “3” for AM or “6” for PM.
Fahrenheit and Celsius
The temperature is preset to Fahrenheit but can be changed to
Celsius.
1. Press OPTIONS/CLOCK until “TEMP UNIT” is displayed.
2. The current setting will be displayed.
3. Press the “1” keypad to adjust the setting.
4. Press START or CANCEL to exit and display the time of day.
Audible Tones Disable
Turns off all tones, including the end-of-cycle tone and keypress
tones. Reminder tones are still active when all tones are disabled.
1. Press OPTIONS/CLOCK until “SOUND” is displayed.
2. The current setting will be displayed.
3. Press the “1” keypad to adjust the setting.
4. Press START or CANCEL to exit and display the time of day.
Sound Volume
Sets the volume of the tone to either high or low.
1. Press OPTIONS/CLOCK until “SOUND VOLUME” is displayed.
2. The current setting will be displayed.
3. Press the “1” keypad to adjust the setting.
4. Press START or CANCEL to exit and display the time of day.
End-of-Cycle Tone
Activates or turns off the tones that sound at the end of a cycle.
1. Press OPTIONS/CLOCK until “END TONE” is displayed.
2. The current setting will be displayed.
3. Press the “1” keypad to adjust the setting.
4. Press START or CANCEL to exit and display the time of day.
Settings
Many features of the oven control can be adjusted to meet your
personal needs. These changes are made using the Options/
Clock keypad.
Use the Options/Clock keypad to scroll through the features that
can be changed. Each press of the Options/Clock keypad will
advance the display to the next setting. After selecting the feature
to be changed, the control will prompt you for the required input.
Then press START or CANCEL to exit and display the time of day.
Details of all of the feature changes are explained in the following
sections.
Press CANCEL to exit Settings.
Keypress Tones
Activates or turns off the tones when a keypad is pressed.
1. Press OPTIONS/CLOCK until “KEYPRESS TONE” is
displayed.
2. The current setting will be displayed.
3. Press the “1” keypad to adjust the setting.
4. Press START or CANCEL to exit and display the time of day.
Reminder Tones Disable
Turns off the short repeating tone that sounds every 1 minute after
the end-of-cycle tones.
1. Press OPTIONS/CLOCK until “REMINDER TONE” is displayed.
2. The current setting will be displayed.
3. Press the “1” keypad to adjust the setting.
4. Press START or CANCEL to exit and display the time of day.
7

12/24 Hour Clock
1. Press OPTIONS/CLOCK until “12/24 HOUR” is displayed.
2. The current setting will be displayed.
3. Press the “1” keypad to adjust the setting.
4. Press START or CANCEL to exit and display the time of day.
Demo Mode
IMPORTANT: This feature is intended for use on the sales floor
with 120 V power connection and permits the control features
to be demonstrated without the oven turning on. If this feature is
activated, the oven will not work.
1. Press OPTIONS/CLOCK until “DEMO MODE” is displayed.
2. The current setting will be displayed.
3. Press the “1” keypad to adjust the setting.
4. Press START or CANCEL to exit and display the time of day.
Sabbath Mode
The Sabbath mode sets the oven to remain on in a Bake setting
until turned off.
When the Sabbath mode is set, only the Bake cycle will operate.
All other cooking and cleaning cycles are disabled. No tones will
sound and the displays will not indicate temperature changes.
When the oven door is opened or closed, the oven light will not
turn on or off and the heating elements will not turn on or off
immediately.
To Enable Sabbath Mode Capability (One Time Only):
1. Press OPTIONS/CLOCK until “SABBATH” is displayed.
2. The current setting will be displayed.
3. Press the “1” keypad to adjust the setting.
4. Press START or CANCEL to exit and display the time of day.
Languages - Scrolling Display Text
Language options are English, Spanish, and French.
1. Press OPTIONS/CLOCK until “LANGUAGE” is displayed.
2. The current setting will be displayed.
3. Press the “1” or “2” keypad to select the desired language.
4. Press START or CANCEL to exit and display the time of day.
Oven Temperature Offset Control
IMPORTANT: Do not use a thermometer to measure oven
temperature. Elements will cycle on and off as needed to provide
consistent temperature but may run slightly hot or cool at any
point in time due to this cycling. Most thermometers are slow
to react to temperature change and will not provide an accurate
reading due to this cycling.
The oven provides accurate temperatures; however, it may cook
faster or slower than your previous oven, so the temperature can
be adjusted to personalize it for your cooking needs. It can be
changed to Fahrenheit or Celsius.
To Adjust Oven Temperature:
1. Press OPTIONS/CLOCK until “TEMP CALIB” is displayed.
2. Press START, wait 10 seconds for the display to change, and
then continue with Step 3.
OR
Press START to adjust the oven temperature calibration. Wait
10 seconds for the display to change, and then continue with
Step 3.
3. Press the “3” keypad to increase the temperature in 5°F
(3°C) increments or press the “6” keypad to decrease the
temperature in 5°F (3°C) increments. The offset range is from
-30°F to +30°F (-18°C to +18°C).
4. Press START or CANCEL to exit and display the time of day.
12-Hour Shutoff
The oven control is set to automatically shut off the oven 12 hours
after the oven initiates a cook or clean function. This will not
interfere with any timed or delay cook functions.
1. Press OPTIONS/CLOCK until “12Hr AUTO_OFF” is displayed.
2. The current setting will be displayed.
3. Press the “1” keypad to adjust the setting.
4. Press START or CANCEL to exit and display the time of day.
8
 Loading...