

Jenn-Air JER8500AAA Use And Care Manual
mmmIENN.AIR Gourmet Edition
Use and Care
Electric Range
with
Self-Cleaning Oven
f
TABLEOFCONTENTS
IMPORTANTSAFETYINSTRUCTIONS .......... 2-4 • LevelingLegs ............................ 16
RANGEFEATURES............................. 5 ABOUTCLEANING ......................... 17-21
CLOCK,TIMER, OVENCONTROL .............. 6-7 • Self-CleanOven Feature ............... 17-18
ABOUTYOURCOOKTOP ...................... 8-9
• HowTo OperateSurface Unit ............... 8 ABOUTCOOKING.......................... 22-27
• Cooktop .................................. 9 • Surface Cooking ...................... 22-23
- Coil Elements ............................. 9 Se/ectingheat settings ................... 22
• DripBowls ................................ 9 Canninginformation ..................... 22
ABOUTYOUROVEN ....................... 10-13
• HowTo SetOven To Bake Or Roast ........ 10
• Automatic Oven Timer Control ............. 11 • Baking& Roasting ..................... 24-27
• HowTo Set OvenTo Broil ................. 12 Rackpositions .......................... 24
• Oven Characteristics ..................... 13 Bakingtips ............................. 25
• Control Lock-OutFeature ................. 13 Roastingtips ........................... 25
ABOUTYOUR RANGE ...................... 14-16 • Broiling .................................. 27
• Oven Door ............................... 14
• DoorLockLever .......................... 14 ABOUTSERVICE ........................... 28-32
• Oven Vent ................................ 14 • TroubleshootingChart ................. 28-30
• Oven Ught ............................... 15 • Oven TemperatureAdjustment ............ 31
• Oven Racks .............................. 15
• StorageDrawer........................... 16 WARRANTY .................................. 32
• CleaningChart ........................ 19-21
Suggestedheatsettingguide ............. 22
About cookware......................... 23
• Aluminum Foil Usage ..................... 24
Preheating ............................. 24
Commonbakingprob/emchart ............ 26
• HowToReceiveService .................. 32
INSTALLER Pleaseleave ModelNumber:
thismanualwiththisappliance. SerialNumber:
"-- CONSUMER Tosaveyou DateofPurchase: J
time,energyandmoney,read
andkeepthismanualforfuture Modelandserialnumbersareonthe ratingplate.See page5 forlocation.
reference, purchaseShouldwarrantyservicebe needed.
Pleasekeepyoursaes receiptand/oryourcancelledcheckasproofof
FOR CUSTOMERASSISTANCECALL 1-800-688-1100 8111 P366-60
(12-97-00)
IMPORTANTSAFETYINSTRUCTIONS
Thank You forpurchasingour cooking IMPORTANT INSTRUCTIONS
appliance.Tohelpyouobtainthemaximumincooking Read andfollowall instructionsbefore usingthis
satisfaction,weofferthesesuggestions: appliancetopreventthepotentialriskoffire,electric
shock,personalinjuryordamagetotheapplianceasa
[]E_=Readthismanualbeforeusingtheappliance, resultof improperusageoftheappliance.Useappliance
onlyforitsintendedpurposeasdescribedinthismanual.
IE_ Reviewallsafetyandcautioninstructions.
ET' ReviewtheTroubleshootingCharton technician.
pages29to 31 ifservicebecomesnecessary.
appliancewhen requestingservice.
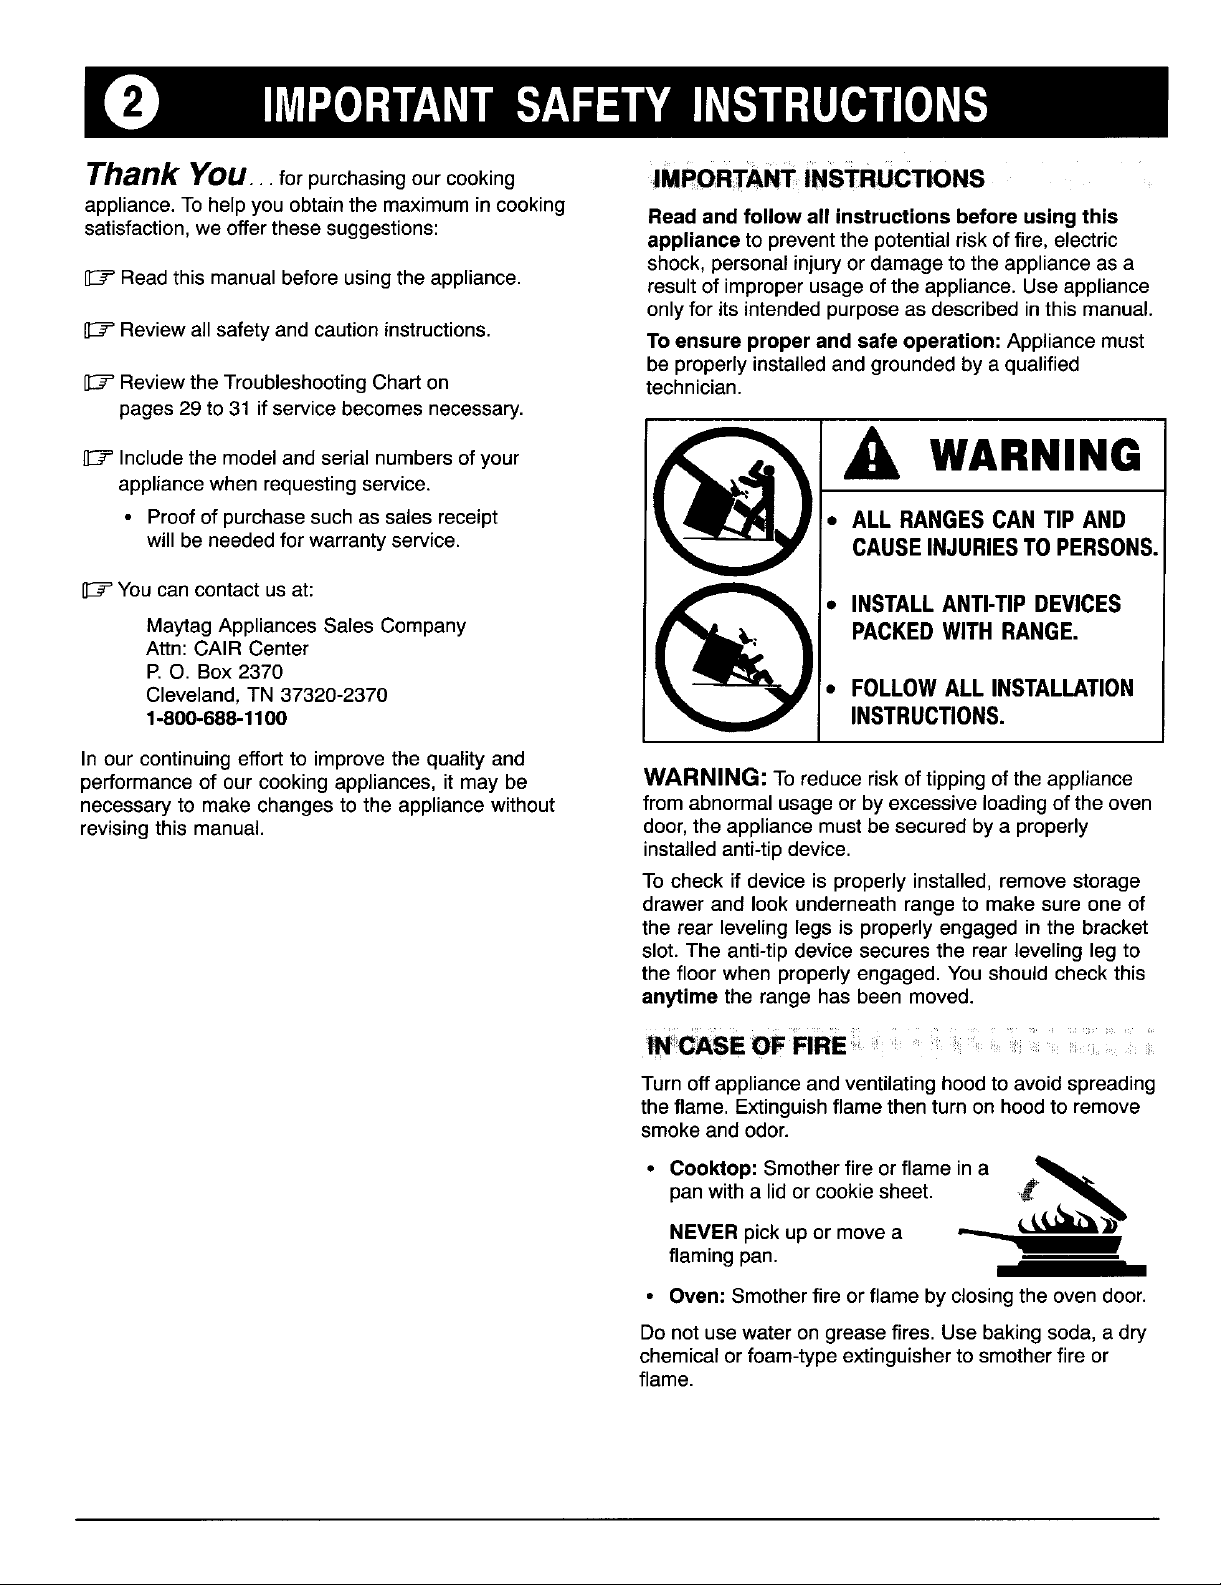
• Proofofpurchasesuchas salesreceipt • ALL RANGES CAN TIP AND
[]ET'Includethe modeland serialnumbersofyour I _ _) ACAUSEINJURIEsWARNINGToPERSONS.
lET'Youcancontact usat: ___) • INSTALLANTI-TIPDEVICES
will beneededfor warrantyservice. V
Maytag AppliancesSalesCompany PACKEDWITH RANGE.
Attn: CAIR Center i
P.O. Box2370
Cleveland,TN 37320-2370 • FOLLOWALL INSTALLATION
1-8oo-688-11oo INSTRUCTIONS.
Toensureproperand safe operation:Appliancemust
be properlyinstalledandgroundedbyaqualified
In our continuingeffortto improvethe qualityand
performanceof ourcookingappliances,it maybe WARNING: Toreduceriskoftippingof theappliance
necessaryto makechangestothe appliancewithout fromabnormalusageor by excessiveloadingofthe oven
revisingthis manual, door,the appliancemustbe securedbya properly
installedanti-tipdevice.
Tocheckif deviceisproperlyinstalled,removestorage
drawerand lookunderneathrangeto makesureone of
therear levelinglegsis properlyengagedin the bracket
slot.The anti-tipdevicesecuresthe rearlevelinglegto
thefloorwhenproperlyengaged.Youshouldcheckthis
anytimethe rangehas been moved.
INCASE OFFIRE :;
Turn off applianceandventilatinghoodto avoidspreading
theflame. Extinguishflame thenturn on hoodto remove
smokeandodor.
• Cooktop: Smotherfire or flame in a _,
pan withalidor cookiesheet. ,,_
NEVERpickupor movea
flamingpan.
• Oven:Smotherfireorflame by closingthe ovendoor.
Donotusewaterongreasefires.Usebakingsoda,adry
chemicalor foam-typeextinguishertosmotherfireor
flame.
3=%
GENERALINSTRUCTIONS COOKTOP
WARNING:NEVERuse appliance '_'_'_%ililil_ NEVERleavesurface units .,t_,_ _i_
door, or drawer, ifequipped, as a ,f _,_ , _. unattended especially when using _ '_iI}_ _ _
step stool or seat as this may result i _ high heat settings. An unattended i_i o_i_ _ _
inpossibletippingof the appliance, _,,[_ i_i_, Ill
damageto theappliance,and '_! boilover could causesmokinganda H_ F!4• Jii_
seriousinjuries, greasyspillovercan cause a fire. 'i_,=. I _,_!i5,
Ifapplianceisinstalledneara window,proper Thisapplianceis equippedwith differentsizesurface
precautionsshould betakento preventcurtainsfrom elements.Selectpans havingflat bottomslargeenough to
blowingover surfaceelements. ,._,_'_"_'=_%_o coverelement.Proper relationshipof pantoelementwill
NEVERuseappliancetowarmor _i!',i_,1_ improvecookingefficiency.
heattheroom.Failureto followthis . j, _==_
instructioncan leadtopossible .___, Ifpanis smallerthan element,a _!i_
burns,injury,fire, or damage to the =_ portionofthe elementwillbe _i "_"
appliance, exposedto directcontactand -
NEVERwearloose-fittingor #i_ ,_,
hanginggarmentswhileusingthe _i.'r'_m_L ............
appliance.Clothingcould catch _iL__,__"_,_I , III_L_, Onlycertaintypesof glass,glass/ceramic,ceramic,
utensilhandlesor igniteandcause _i_.__ earthenware,orotherglazedutensilsare suitablefor
burnsifgarmentcomesincontact _ cooktoporovenservicewithoutbreakingdueto the
with hot heatingelements. _=_ sudden changeintemperature.Follow utensil
Toensure properoperationandto avoiddamageto the
applianceor possible injury,do notadjust,service,repair Turn pan handletoward center of _._._
...._=._,.. _!i!i_ __._.._,__ _. •
_'_ couldigniteclothingor potholder.
manufacturer'sinstructionswhen usingglass.
or replaceany part of theapplianceunlessspecifically cooktop, not outintothe room or _' _I_
recommendedinthismanual.Referall otherservicingto a over anothersurfaceelement.This _ _--1_ _
qualifiedtechnician, reducesthe riskof burns, ignitionof !_i
flammablematerials,orspillageif __
NEVERstore or use gasolineor other combustibleor pan is accidently bumpedor
flammablematerialsinthe oven,near surface unitsor in reachedbysmall children. _'
thevicinityof thisapplianceas fumescouldcreateafire Topreventdamageto removableheatingelements,do not
hazardor an explosion, immerse,soakor clean in a dishwasheror self-clean
Toprevent greasefires,donotlet cookinggreaseor other oven.A damagedelementcould short resultingin afire or
flammablematerialsaccumulateinor nearthe appliance, shockhazard.
Useonly dry potholders.Moistor Makesuredrip bowlsare in placeas absenceofthese
damppotholdersonhot surfaces ._|_....... _i_.__
_o_,_. bowls duringcookingcoulddamagewiringorparts.
mayresultina steamburn. Do not _'_1:___
let potholdertouchhotheating '___
elements.Donotusea towelor
OVEN
otherbulkyclothwhichcouldeasily _,,=""..... ' Usecarewhenopeningdoor.Lethot
touchhotheatingelementsand _' airorsteamescapebeforeremoving
ignite, or replacingfood.
Alwaysturnoffallcontrolswhencookingis completed. Forproperovenoperationand
NEVERheatunopenedcontainersonthe surfaceunitor performance,donotblockorobstruct
intheoven.Pressurebuild-upinthecontainermay cause ovenventduct.
containertoburstresultinginburns,injuryordamageto
theappliance. Alwaysplaceovenracksindesiredlocationswhileovenis
cool.If rackmustbemovedwhileovenis hot,donotlet
NEVERusealuminumfoilto linedripbowls,orto cover potholdercontacthotheatingelementinoven.
anovenrackorovenbottom.Misusecouldresultinriskof
electricshock,fire,or damagetotheappliance.Usefoil
onlyasdirectedinthismanual.

0 IMP()RTANTSAFETYINSTRUCTIONS
SELF-CLEANINGOVEN
Cleanonly partslistedinthismanual.Do not cleandoor CAUTION:NEVER store itemsof _==.-..=,,,_==.._.=_,,_.,_..........
gasket.The gasketis essentialfora goodseal. Care interestto childrenJncabinets .,_= _%=
shouldbetakennotto rub,damage, ormovethe gasket, abovean applianceor on backguard ,_i_1=_ _iii
Do not useovencleaners.No ,,S_%=. appliance,dooror drawertoreach ___J
linerprotectivecoatingofany kind
commercialovencleaneroroven _"_'1_'____'_"1 itemscoulddamage the appliance
shouldbeusedinoraroundany ,!11_ I _ or be burned or seriouslyinjured.
partoftheoven. _i_._l_?. _! Childrenmustbe taughtthattheapplianceand utensilsin
Beforeself-cleaningthe oven, '°_'_"°_"_..... out of reach ofsmallchildren.Childrenshouldbetaught
removebroilerpan,ovenracksandotherutensilsto that anapplianceis notatoy.Childrenshouldnotbe
preventexcessivesmoking,discolorationofthe oven allowedtoplaywithcontrolsorotherpartsofthe unit.
racksorpossibledamageto utensils.
Wipeupexcessivespillovers,especiallygreasyspills,
beforethecleancycleto preventexcessivesmokingor HEATINGELEMENTS
flare-ups. NEVERtouchsurfaceor oven
It isnormalfor thecooktopto becomehotduringa clean heatingelements,areas near
cycle.Therefore,avoidtouchingorliftingthe cooktop elementsor interiorsurfacesof
duringa cleancycle, oven. _= .....
VENTILATING HOODS ' surfaces of anoven may becomehotenoughtocause
Cleanrangehoodandfiltersfrequentlyto preventgrease
orother flammablematerialsfromaccumulatingon hood
orfilterandto avoid greasefires.
_. -_, i _
'_,_ _:, or on itcan behot.Lethotutensilscool ina safeplace,
. : near surfaceelementsand interior
of a range.Childrenclimbingon i _ _
Heatingelementsmay be hot even
though they are darkincolor.Areas
burns.During and after use, do not touchor let clothing
or otherflammablematerialscontactheatingelements,
areasnearelements,orinteriorsurfaces ofoven until
theyhave hadsufficienttime to cool.
._ _
Turnthefanoffwhenfiamb_ingfoods (suchas Cherry Other potentially hot surfacesinclude:Cooktop,areas
Jubilee)underthehood.The fan,ifoperating,may spread facingthe cooktop,ovenventopening,surfaces nearthe
theflame, vent opening,ovendoor, areasaround the door, andoven
window.
DEEPFATFRYERS
IMPORTANT SAFETYNOTICE & WARNING
Useextreme cautionwhenmovingthegrease kettleor
disposingof hotgrease.Allowgreasetocool before TheCaliforniaSafeDrinkingWater andToxicEnforcement
attemptingto movepan. Actof 1986(Proposition65) requiresthe Governorof
Californiato publisha list ofsubstancesknownto the
Stateof Californiato causecanceror reproductiveharm,
CHILDSAFETY and requiresbusinessestowarncustomersofpotential
exposurestosuch substances.
NEVERleavechildren alone or
unsupervisedin areawhere Usersof thisapplianceare herebywarnedthatwhenthe
applianceisin useor isstillhot. oven is engagedintheself-clean cycle,theremaybe
NEVERallow childrento sit or stand includingcarbonmonoxide. Exposuretothese substances
onanypartof the applianceas they can beminimizedby properlyventingthe oven to the
couldbeinjuredor burned, outdoorsduring the self-cleancycle by openinga window
somelowlevelexposureto some of the listedsubstances,
and/ordoorinthe roomwhere the appliance is located.
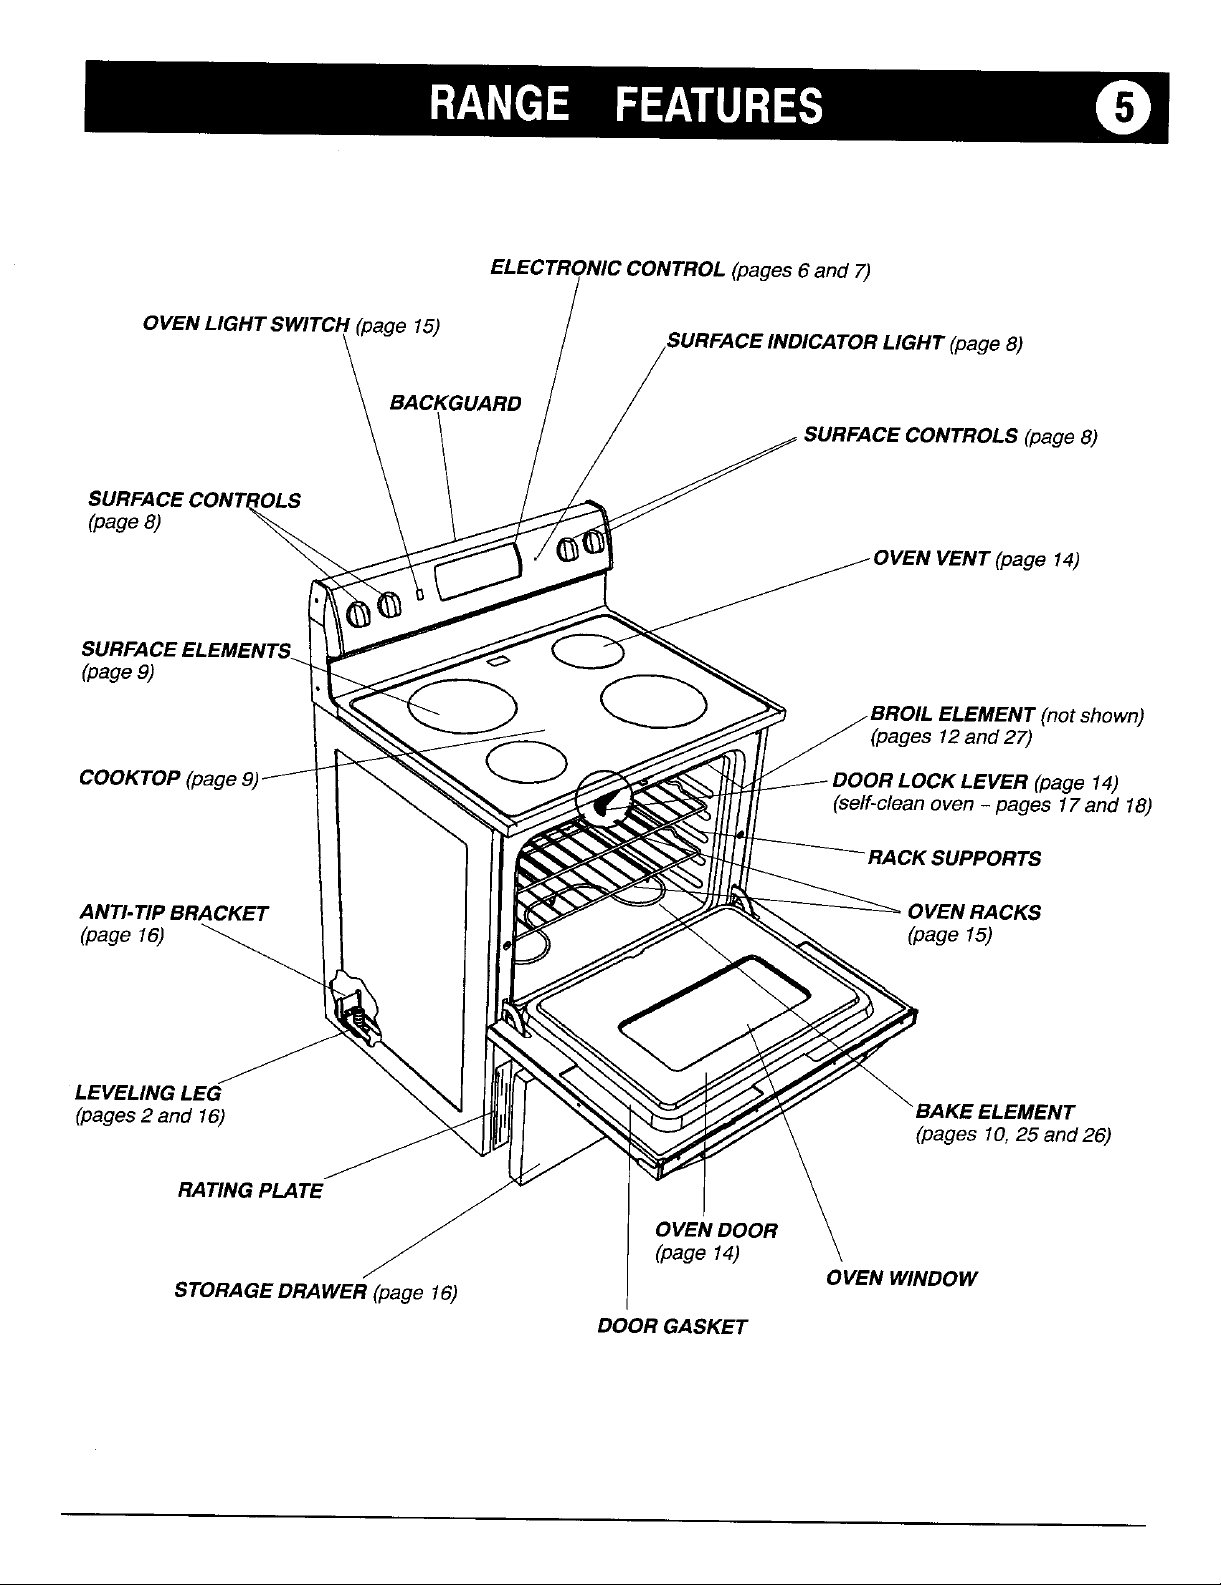
ELECTRONICCONTROL(pages6 and 7)
OVE_ r(page 15) (page8)
BACKGUARD
SURFACECONTROLS(page8)
SURFACE
(page8) VENT(page 14)
(page9)
(pages 12and 27)
COOKTOP(page (self-cleanoven - pages 17and 18)
"RACKSUPPORTS
OVENRACKS
ANTI-TIP BRACKET (page 15)
(page 16)
LEVELING LEG BAKE ELEMENT
(pages2 and 16) (pages 1O,25and 26)
RATINGPLATE
OVENDOOR
(page 14)
OVENWINDOW
STORAGEDRAWER(page 16)
DOORGASKET
(notshown)
(page 14)
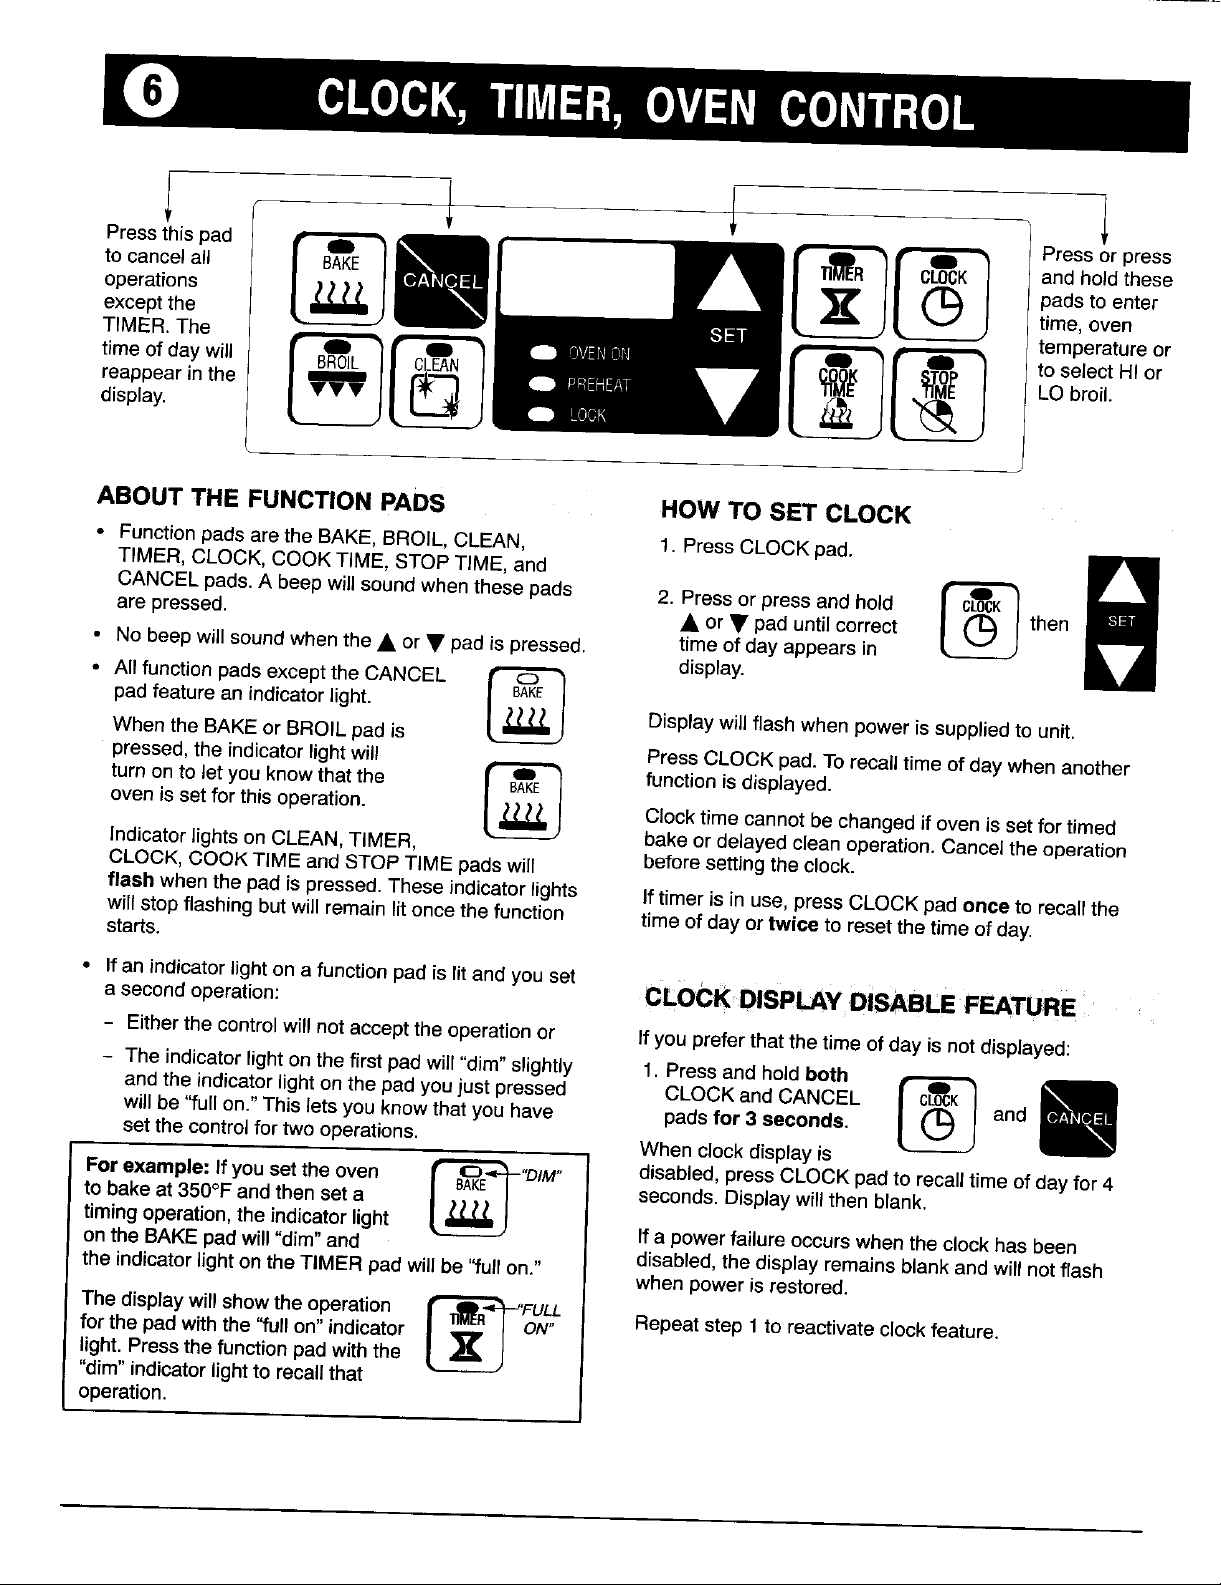
CLOCK,TIMER,OVENCONTROL
to cancel all and holdthese
operations pads to enter
exceptthe time,oven
Pressth,s, a Pressor, ress
TIMER.The temperatureor
reappearin the LO broil.
display.
timeofdaywill [_ _. [ _ 1[_ I toselectHIor
ABOUT THE FUNCTIONPADS HOW TO SETCLOCK
• Functionpads arethe BAKE,BROIL,CLEAN, 1. PressCLOCKpad.
TIMER,CLOCK,COOKTIME, STOPTIME, and
CANCELpads.A beepwillsound whenthese pads 2. Pressorpressandhold [ C_K ]
are pressed. •or •pad until correct [ (_ _ then
• No beepwillsoundwhenthe• or • padispressed, time ofday appears in
tt
• Allfunction pads exceptthe CANCEL _ display.
featurean indicator
pad
WhentheBAKEor BROILpadis
pressed,the indicatorlightwill PressCLOCKpad. Torecalltimeof day when another
turnonto let youknowthat the _ function isdisplayed.
light.
I_l Displaywill flashwhen poweris suppliedto unit.
ovenis setfor this operation. _ _- / Clocktimecannotbechangedif ovenis setfor timed
Indicatorlightson CLEAN,TIMER, bake or delayed cleanoperation.Cancel the operation
CLOCK,COOKTIMEandSTOP TIME padswill beforesettingthe clock.
flash whenthepad is pressed.These indicatorlights Iftimer is in use, pressCLOCKpadoncetorecall the
will stop flashingbutwill remainlit oncethe function time ofday ortwice toresetthetimeof day.
starts.
• Ifan indicatorlightona functionpadislitand you set
a second operation: CLOCKDISPLAY DISABLE PEATURE
Eitherthe controlwill notacceptthe operationor Ifyou preferthatthetimeof day isnot displayed:
- The indicatorlight onthe firstpad will "dim" slightly 1.Pressand holdboth
andthe indicatorlight on the padyoujustpressed CLOCKand CANCEL
will be"fullon."This letsyouknowthatyou have padsfor 3seconds, and
L 'J
set the controlfor two operations. When clockdisplay is
Forexample: Ifyou setthe oven _"DIM" disabled,pressCLOCKpadtorecalltime of dayfor 4
timingoperation,the indicatorlight
to bakeat 350°Fandthenset a [_/ seconds.Displaywill then blank.
ontheBAKE padwill"dim"and Ifa powerfailure occurswhentheclockhas been
the indicatorlight onthe TIMERpad will be "full on." disabled,the display remainsblankand will notflash
The displaywillshowthe operation _"R_'FUL,,L
for the pad withthe "fullon" indicator Repeatstep 1to reactivateclock feature.
light. Pressthefunctionpadwiththe
"dim"indicatorlighttorecallthat
operation.
LzJ
whenpoweris restored.
CLOCK,TIMER,OVENCONTR()L
HOW TO SETTIMER .... "END 'OFTIMED COOK" BEEPS
1. PressTIMERpad. _ _ You havea choice ofthree"end ofcooking"reminder
• or• pad until correct • Option 1: Four beepsthen one beepevery30 seconds
timeappearsin display, for the next 5minutes or until CANCELpad is
Thetimerfeaturedoesnotoperatethe oven. pressed,(Defaultoption,)
2. Pressorpressandhold ['_1 then _ beepsfor the Automatic Oven lqmer feature.
Thetimer can be setfrom 1 minute [0:01]up to 9 hours ° Option 2: Fourbeeps.There areno other beeps.
and 50 minutes [9:50]. • Option 3: Fourbeeps thenone beepeveryminutefor
Thetimerwillstart automatically.The TIMER indicatoron the next 12 hours or until CANCELpadis pressed.
theTIMERpadwill light wheneverthe timer isin use.One
longbeepand"End"willbebrieflydisplayedtosignalthe How to selectthedesiredoption:
end ofthetimeroperation. 1. Pressand hold both _
Tocanceltimer: PressandholdTIMER pad for 3 COOKTIMEandCLOCK
seconds. Timeofdaywill reappearin thedisplay, padsfor 3 seconds, and
• A single beep willsound.
12 HOURENERGY SAVERFEATURE • Displaywillshowcurrent
The 12 HourEnergySaverfeature automaticallyturns off 2. Press• or• padto _f"_
theoven if it was accidentlyleft onfor 12 hours.To select the option number
deactivatethisfeature so theoven will NOT turnoff you wish.The currenttime
automaticallyat the endof 12 hours: ofdaywill reappearin the
1. Pressand holdCLOCKpad _ displayafter 4 seconds.
for3 seconds.
2, Press• or•pad until 8:88 i _K I then
appearsinthedisplay.
Currenttime ofday will
reappearin the display after
4 seconds.
Repeatsteps1and 2 to reactivatethe 12 HourEnergy
Saverfeature. 12:00will appearindisplay to indicatethe
EnergySaver feature is restored,
, option.
N

0 ABOUTYOURCOOKTOP
r UTION _,
I c. I
Before cooking... Other tips...
• Always place a pan on the surface unitbefore you • To eliminate the hazard of reaching over hot surface
turn it on. To prevent damage to range, never elements do not install cabinet storage directly
operate surface unit without a pan in place, above a unit.
• NEVER use the cooktop as a storage area for food If storage is provided, limit it to items that are
or cookware, infrequently used and can be safely stored in an
• Be sure you know which knob controls which surface area subjected to heat.
unit. Make sure you turned on the correct surface
unit. Temperatures may be unsafe for items such as
During cooking.., volatile liquids, cleaners or aerosol sprays.
• Begin cookingon a higher heat settingthen reduce
to a lower setting to complete the operation. Never • Aerosol-type spray cans are EXPLOSIVE or highly
use a high heat setting for extended cooking, flammable when exposedto heat. Avoid their use or
• NEVER allow a panto boil dry.This could damage storage near an appliance.
the pan and the appliance. • NEVER leave any items, especially plasticitems,
• NEVER touch cooktopuntil it has cooled. Expect unattended on the cooktop. The hotair from the vent
some parts of the cooktop,especiallyaround the may igniteflammable items, meltor soften plastics,
surface units,to become warm orhot during or increase pressure in closedcontainers causing
cooking.Use potholdersto protect hands, them to burst.
After cooking... • NEVER allow aluminum foil, meat probes or any
• Be suresurface element isoff after cooking, other metal object, otherthan a utensilona surface
• Clean up greasy spillsas soon as possible, element, to contactheating elements.
HOW TO OPERATE
1. Place pan on surface unit. off A SURFACE indicator light located on the backguard will
2. Push in and turn knob to desired Low_ High turn on whenever a surface unit is turned on. Light will
setting. 1/ Ill \_. turn off when surface unit is turned off.
international symbols located • •
below each knob. 3 7
• Each knob is identified by _2 8 7"_,__/_'", _ o, '_
• Knob can be turned in either 4 • 5 • 6 • ,.' •,. /
direction.
• Knob can be set on any number _ w
or between any numbers. 10-.=-- INTERNATIONAL
3. After cooking, turn knob to OFF then Front SYMBOLS
remove pan. INDICATOR
SURFACE UNIT SURFACE INDICATOR UGHT
ire
Re_r Fr_l
SURFACE
LIGHT
ABOtlTYOURCOOKTOP
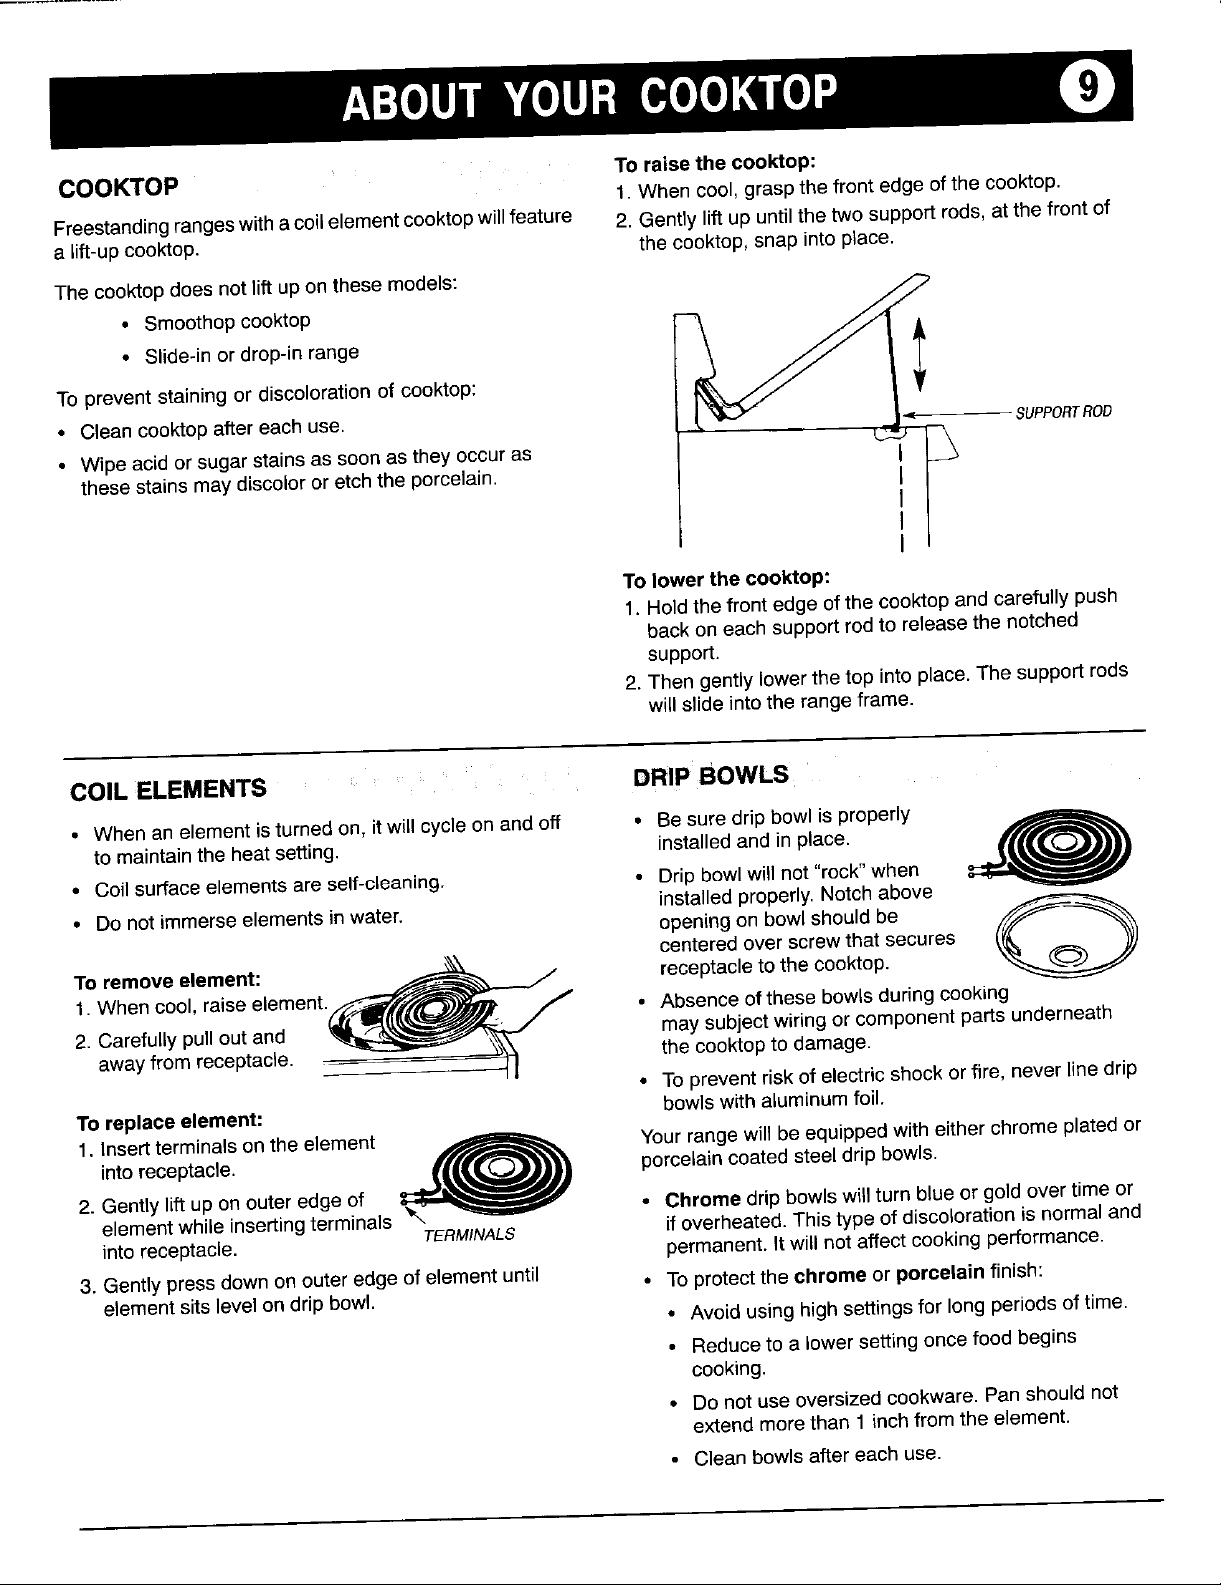
COOKTOP To raise the cooktop:
1.Whencool,graspthefrontedgeofthe cooktop.
Freestandingrangeswitha coilelementcooktopwillfeature 2. Gentlylift upuntilthe twosupportrods,at thefrontof
a lift-upcooktop, the cooktop, snapintoplace.
The cooktopdoes notliftupon these models:
• Slide-inordrop-inrange
To preventstainingor discolorationof cooktop:
• Cleancooktopafter each use. -, SUPPORTROD
• Wipe acidorsugarstainsas soonas they occuras _ }\
• Smoothopcooktop __ j,___
thesestainsmaydiscoloror etchthe porcelain.
Y
Tolowerthecooktop:
1. Holdthefrontedgeof thecooktopandcarefullypush
backoneachsupportrodtoreleasethe notched
support.
2. Thengentlylowerthetopintoplace.Thesupportrods
willslideintotherangeframe.
COIL ELEMENTS DRIP BOWLS:
• When an elementisturned on, itwill cycleonandoff • Besuredrip bowlis properly
to maintaintheheatsetting, installedand inplace.
• Coil surfaceelementsareself-cleaning. • Dripbowlwill not"rock" when
• Do not immerseelementsin water, installedproperly.Notchabove
To
removeelement: _ receptacleto thecooktop.
openingonbowlshouldbe f_f__
centeredoverscrew that secures
tWhencoo,.ra,see,ement l(-. / •Absenceofthesebow,sdur,ng ook,ng
2. Carefullypulloutand _ maysubjectwiringor componentparts underneath
awayfromreceptacle. _ __ _ the cooktoptodamage.
To replaceelement: bowlswithaluminumfoil.
1. Insertterminalsontheelement _ Yourrangewillbeequippedwitheitherchromeplatedor
2. Gentlyliftuponouteredgeof • Chromedripbowlswillturnblueorgoldovertimeor
intoreceptacle. _ porcelaincoatedsteeldripbowls.
elementwhileinsertingterminals
intoreceptacle. TERMINALS ifoverheated.This type of discolorationis normaland
3. Gently pressdownon outer edgeofelementuntil • To protectthe chrome or porcelain finish:
elementsitslevelondripbowl.
/|
• Toprevent riskof electricshockorfire,neverlinedrip
permanent.Itwill not affectcookingperformance.
• Avoidusinghigh settingsfor long periods oftime.
• Reduceto a lowersettingonce food begins
cooking.
• Do not use oversizedcookware.Pan shouldnot
extendmore than 1inchfrom the element.
• Cleanbowls after each use.

ABOUTYOUROVEN
HOWTO SET OVEN TO BAKE OR ROAST
• BAKEindicatorontheBAKE padwilllight. LIGHT
1. PressBAKEpad. INDICAToRBAKE--_
• 000 will light indisplay.
2. Pressor pressandhold• or • padto select oven
temperature.
• 350° will lightwheneitherpad ispressed.
• Oventemperaturecan be setfrom 170°to 550°.
3.Therewill be a 4 seconddelay beforethe oventurns
on.Whenthe oven turnson:
• OVENONindicatorwill light.
• PREHEATindicatorwill light.
• The preselectedtemperaturewillremainindisplay.
4. Allow 8 to 15minutesfor the ovento preheat.
• A singlebeep will indicatethatthe ovenhas
preheated.
• The OVENON indicatorwillremainlit.
• The PREHEATindicatorwill turn off.
gD OVENON
I PREHEAT
LOOK
5. Placefood in the oven. NOTE:The oventemperaturecan be changedat
anytime.Ifthetemperatureischanged,the
PREHEATindicatorwillturnbackonuntilthenew
temperatureisreached.A beepwillsignalthatthe
newtemperaturehas beenreached.
6. Checkcookingprogressatthe minimumcooking NOTE: Seepages24, 25, and26foradditional
time.Cooklongerifneeded, informationon bakingandroasting.
• The BAKE indicatorontheBAKEpadwill turn off.
7. PressCANCELpadand removefoodfrom the oven.
• The OVENONindicatorwillturn off.
NOTE: If you forget to turn offthe oven, it will
• Timeof daywillreappearindisplay, automaticallyturn off at the end of 12 hours. If
you wishto deactivatethis energysaving feature,
see page7.
 Loading...