

Jenn-Air JCD2595WES02, JCD2595WES01, JCD2595WES00, JCD2595WEP02, JCD2595WEP01 Owner’s Manual
...
THANK YOU for purchasing this high-quality product. If you should experience a problem not covered in TROUBLESHOOTING,
please visit our website at www.jennair.com for additional information. If you still need assistance, call us at 1-800-688-1100. In
Canada, visit our website at www.jennair.ca or call us at 1-800-807-6777.
You will need your model and serial number, located on the inside wall of the refrigerator compartment.
Para obtener acceso a "lnstrucciones parael usuario del refrigerador" en espa_ol, o paraobtener informaci6n adicional acerca de
su producto, visite: www.jennair.com.
Necesitara su nQmero de modelo y de serie, ubicado en el interior del compartimiento del refrigerador.
TableofContents/Tabledes mati6res
REFRIGERATOR SAFETY ..................................................................... 1
REFRIGERATOR USE ........................................................................... 2
REFRIGERATOR CARE ......................................................................... 5
TROUBLESHOOTING ............................................................................ 6
ACC ESSORI ES ...................................................................................... 8
WATER FILTER CERTIFICATIONS ...................................................... 9
PERFORMANCE DATA SHEETS ........................................................ 10
WAR RAN TY .......................................................................................... 14
SI_CURITI_ DU RI_FRIGI_RATEUR ..................................................... 15
UTILISATION DU RI_FRIGI_RATEUR ................................................. 16
ENTRETIEN DU RI_FRIGI_RATEUR ................................................... 20
DI_PANNAGE ........................................................................................ 21
ACCESSOIRES .................................................................................... 23
FEUlLLES DE DONNI=ES SUR LA PERFORMANCE ........................ 24
GARANTIE ............................................................................................ 28
REFRIGERATORSAFETY
Your safety and the safety of others are very important.
We have provided many important safety messages in this manual and on your appliance. Always read and obey all safety
messages.
This is the safety alert symbol.
This symbol alerts you to potential hazards that can kill or hurt you and others.
All safety messages will follow the safety alert symbol and either the word "DANGER" or "WARNING."
These words mean:
You can be killed or seriously injured if you don't immediately
follow instructions.
You can be killed or seriously injured if you don't follow
instructions.
All safety messages will tell you what the potential hazard is, tell you how to reduce the chance of injury, and tell you what can
happen if the instructions are not followed.
W10203274A
IMPORTANT SAFETY INSTRUCTIONS
WARNING: To reduce the risk of fire, electric shock, or injury when using your refrigerator, follow these basic precautions:
• Plug into a grounded 3 prong outlet.
• Do not remove ground prong.
• Do not use an adapter.
• Do not use an extension cord.
• Disconnect power before servicing.
• Replace all parts and panels before operating.
• Remove doors from your old refrigerator.
SAVE THESE INSTRUCTIONS
• Use nonflammable cleaner.
• Keep flammable materials and vapors, such as gasoline,
away from refrigerator.
• Use two or more people to move and install refrigerator.
• Disconnect power before installing ice maker (on ice maker
kit ready models only).
• Use a sturdy glass when dispensing ice (on some models).
Proper Disposal of Your Old Refrigerator
Suffocation Hazard
Remove doors from your old refrigerator.
Failure to do so can result in death or brain damage.
IMPORTANT: Child entrapment and suffocation are not problems
of the past. Junked or abandoned refrigerators are still dangerous
- even if they will sit for "just a few days." Ifyou are getting rid of
your old refrigerator, please follow these instructions to help
prevent accidents.
REFRIGERATORUSE
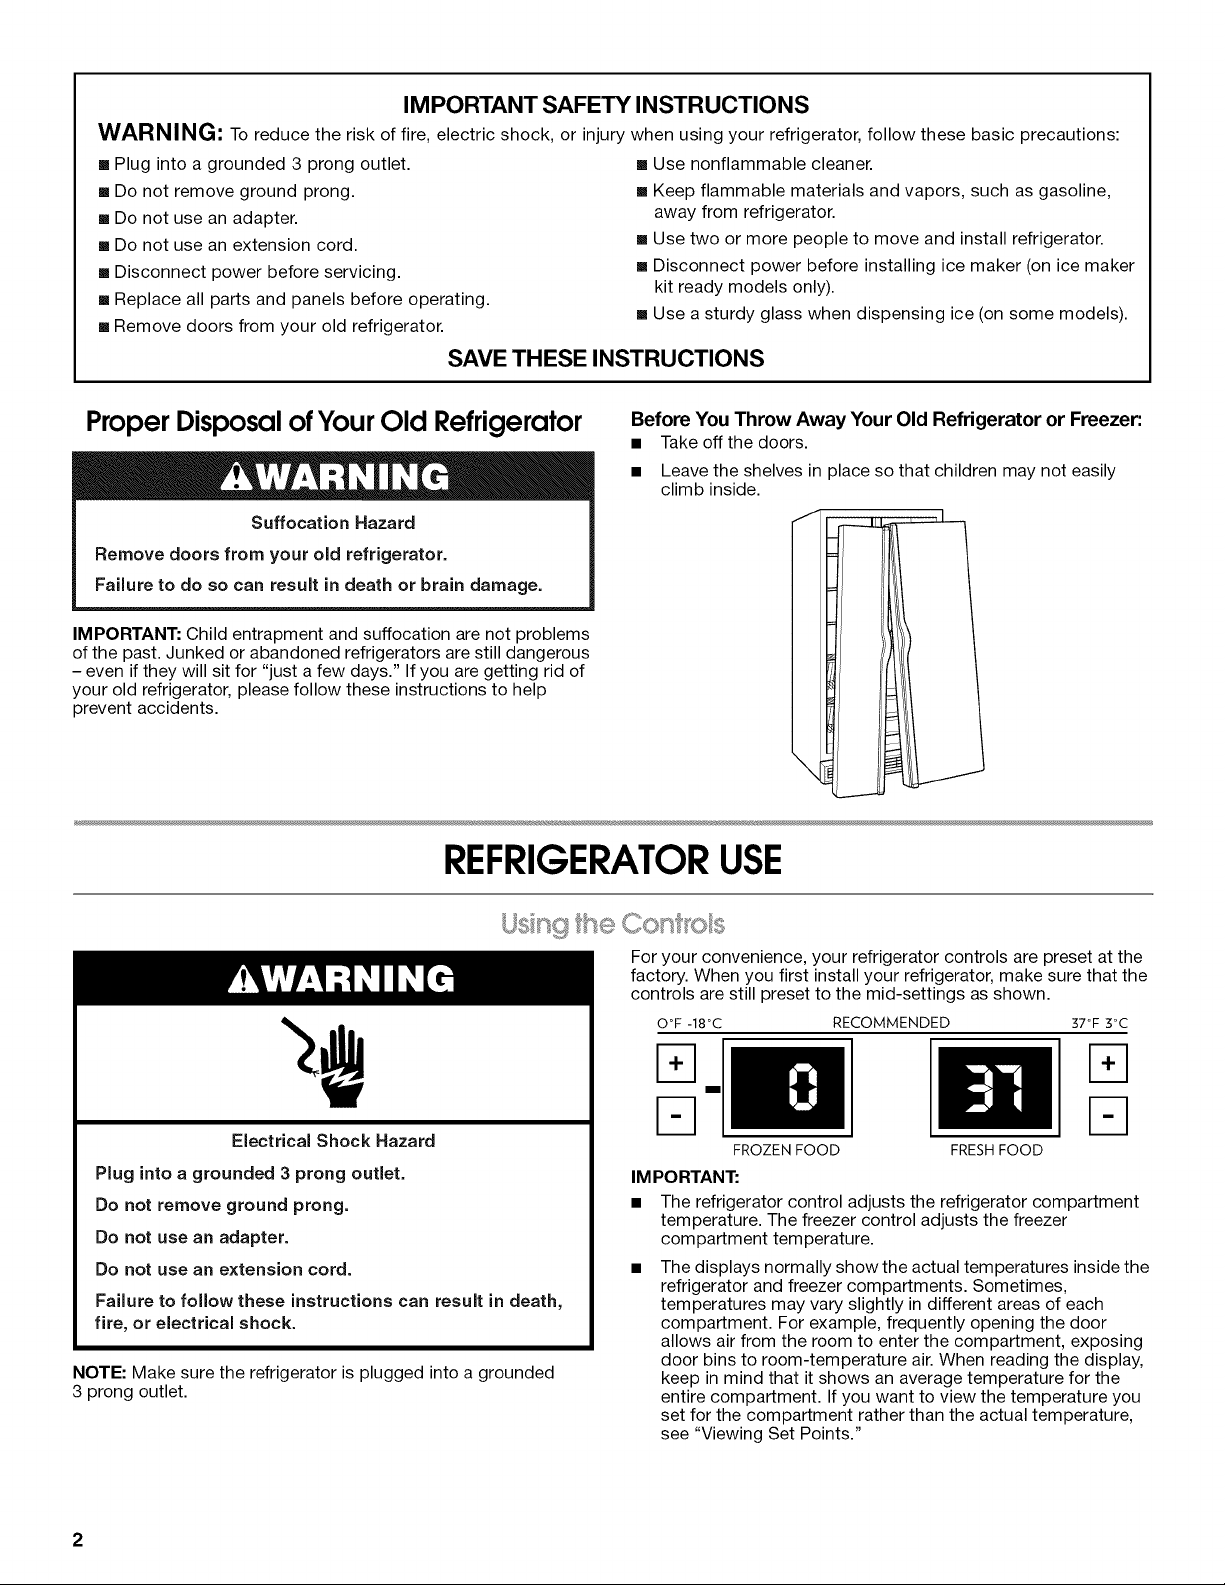
Before You Throw Away Your Old Refrigerator or Freezer:
• Takeoff the doors.
• Leave the shelves in place so that children may not easily
climb inside.
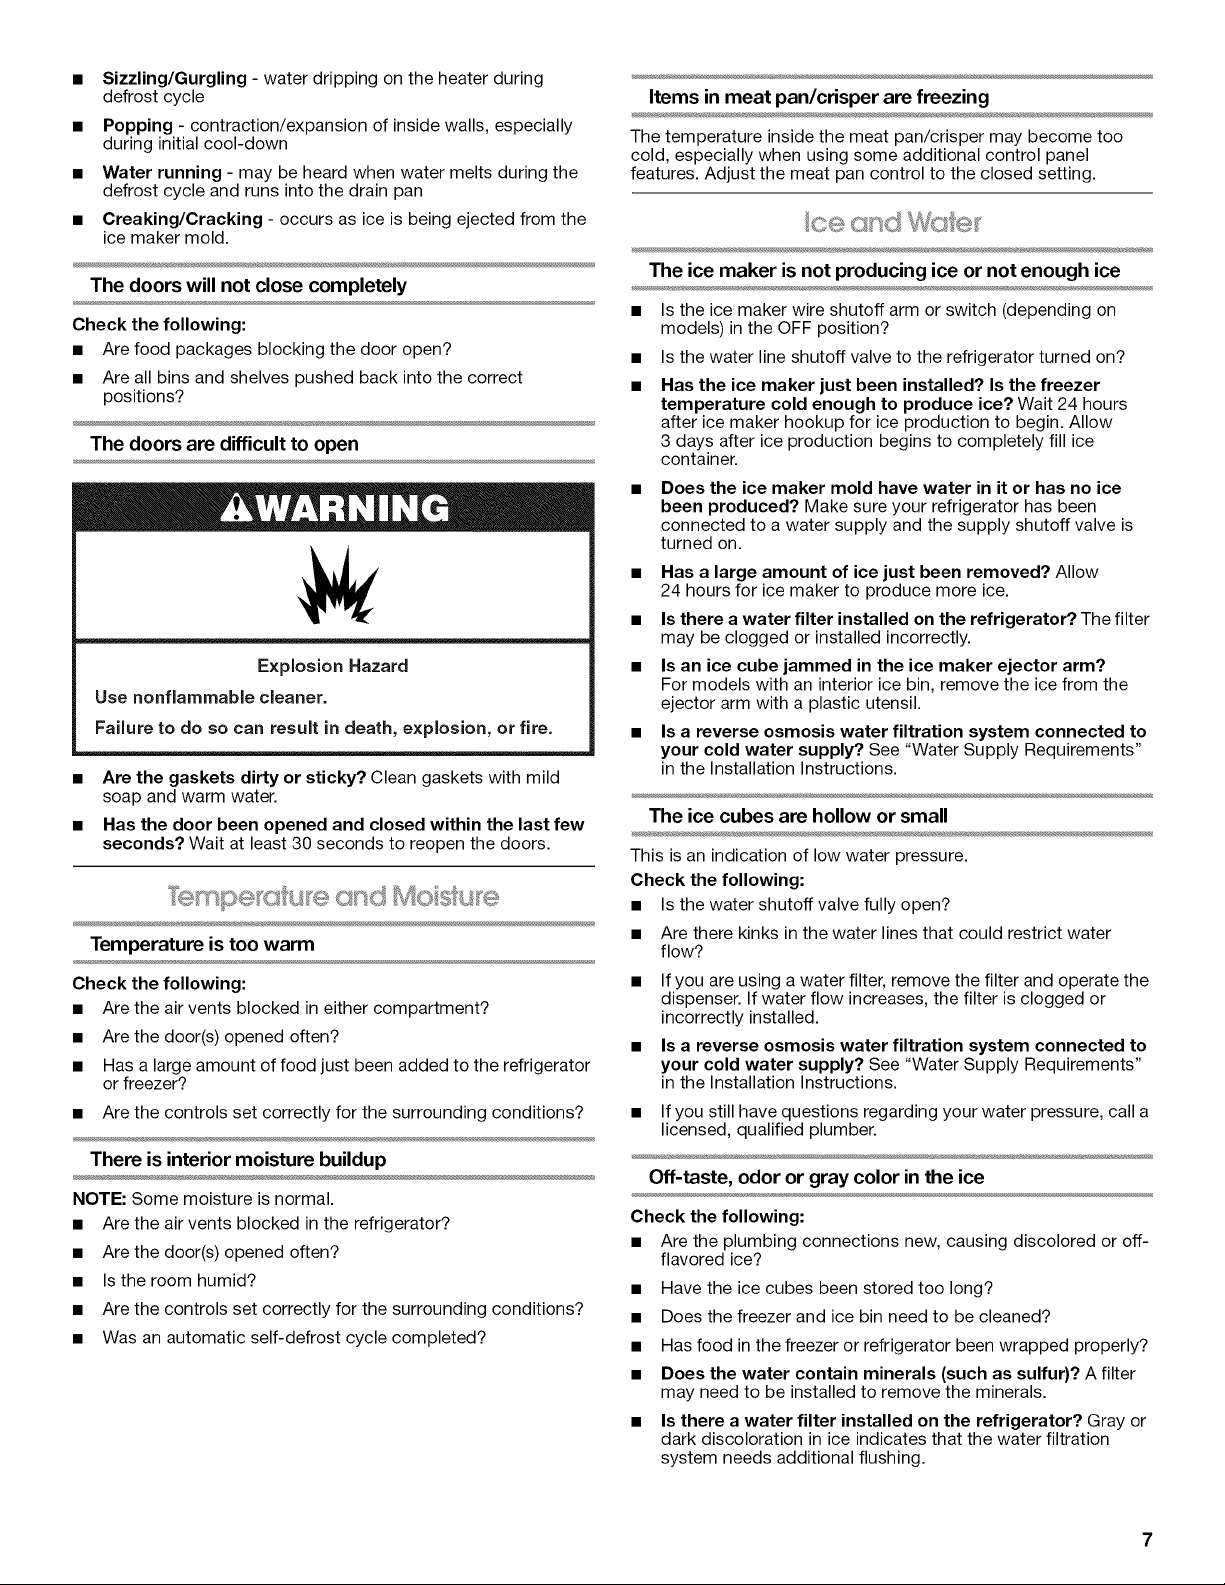
For your convenience, your refrigerator controls are preset at the
factory. When you first install your refrigerator, make sure that the
controls are still preset to the mid-settings as shown.
O°F -18°C RECOMMENDED
37°F 3°C
Electrical Shock Hazard
Plug into a grounded 3 prong outlet.
Do not remove ground prong.
Do not use an adapter.
Do not use an extension cord.
Failure to follow these instructions can result in death,
fire, or electrical shock.
NOTE: Make sure the refrigerator is plugged into a grounded
3 prong outlet.
2
D
D
FROZEN FOOD FRESHFOOD
IM PORTANT:
• The refrigerator control adjusts the refrigerator compartment
temperature. The freezer control adjusts the freezer
compartment temperature.
The displays normally show the actual temperatures inside the
refrigerator and freezer compartments. Sometimes,
temperatures may vary slightly in different areas of each
compartment. For example, frequently opening the door
allows air from the room to enter the compartment, exposing
door bins to room-temperature air. When reading the display,
keep in mind that it shows an average temperature for the
entire compartment. If you want to view the temperature you
set for the compartment rather than the actual temperature,
see "Viewing Set Points."

Wait 24 hours before you put food into the refrigerator. If you
add food before the refrigerator has cooled completely, your
food may spoil.
NOTE: Adjusting the refrigerator and freezer controls to a
lower (colder) setting will not cool the compartments any
faster.
Turning Refrigerator On
• If the refrigerator is off, press ON/OFF to turn the cooling on.
• To turn your refrigerator off, press ON/OFF. Your refrigerator
will not cool when the control is set to Off.
NOTE: Pressing the On/Oft button does not disconnect power
to the refrigerator. The interior lights will turn off if either
compartment door is open for more than 10 minutes. Simply
close and open the door to turn on the interior lights.
I On/Off I
Viewing Set Points
The factory recommended set points are 0°F (-18°C) for the
freezer and 37°F (3°C) for the refrigerator.
Set point range for the freezer: -6 ° to 6°F (-21 °C to -14°C)
Set point range for the refrigerator: 32° to 46°F (0°C to 8°C)
Toview the set point temperatures, press either the up or down
button for the refrigerator or freezer temperature. The display will
become brighter to indicate that you are viewing the set points.
Five seconds after an adjustment is made, the display lights will
dim and return to the actual temperature.
NOTE: During automatic defrost cycles, the actual temperature
displayed may be higher than the set point. This is normal. The
actual temperatures should return to the set points within a few
hours following completion of the defrost cycle.
Adjusting Controls
The mid-settings indicated in the previous section should be
correct for normal household refrigerator usage. The controls are
set correctly when milk or juice is as cold as you like and when ice
cream is firm.
If the temperature is too warm or too cold in the refrigerator or
freezer, first check the air vents to be sure they are not blocked.
If you need to adjust temperatures, use the settings listed in the
chart below as a guide. Wait at least 24 hours between
adjustments.
CONDITION/REASON: ADJUSTMENT:
REFRIGERATOR too warm REFRIGERATOR Control
1o lower
FREEZER too warm/too little ice FREEZER Control
1o lower
REFRIGERATOR too cold REFRIGERATOR Control
1o higher
FREEZER too cold FREEZER Control
1o higher
Additional Control Panel Features
Max Cold
Use Max Cold to speed cooling when large grocery loads are
added. Max Cold sets the refrigerator temperature to 34°F (1°C)
and the freezer temperature to -6°F (-21 °C) for 24 hours.
NOTE: While Max Cold is on, the display shows the Max Cold
temperature set points. After 24 hours or when Max Cold is
manually turned off, the set points will be returned to their
previous setting.
• Press MAX COLD to select this mode. Max Cold will stay on
for 24 hours or until it is manually turned off.
I MaxCold I
Co s dbe Dss mpe xl:ue Cont s
The control can be adjusted to properly chill meats or vegetables.
The air inside the pan is cooled to avoid "spot" freezing and can
be set to keep meats at the National Livestock and Meat Board
recommended storage temperatures of 28° to 32°F (-2 ° to 0°C).
The convertible drawer temperature control is preset to the
PRODUCE setting.
To Store Meat:
Set the control to one of the three MEAT settings to store meat at
its optimal storage temperature.
To Store Vegetables:
Set the control to PRODUCE to store vegetables at their optimal
storage temperatures.
NOTE: If food starts to freeze, move the control to the left (less
cold). Remember to wait 24 hours between adjustments.
{on some modes}
You can control the amount of humidity in the moisture-sealed
crisper. Adjust the control to any setting between LOW and HIGH.
LOW (open) for best storage of fruits and vegetables with skins.
HIGH (closed) for best storage of fresh, leafy vegetables.
The door air control is located on the left-hand side of the
refrigerator compartment.
A ........
A. Door air control
Slide the door air control to the left to reduce the flow of cold
air to the bin or can rack and make it less cold.
Slide the door air control to the right to increase the flow of
cold air to the bin or can rack and make it colder.
Temp Mode
• Press the °C button to select either Celsius or Fahrenheit
temperature displays.

2. Remove the glass to stop dispensing.
SabbathModeisdesignedforthosewhosereligiousobservances
requireturningoffthelightsanddispensers.
TofullyactivateSabbathMode,youmustfollowtheinstructions
belowforboththecontrolanddispenserpanels.
IMPORTANT:IfyoudonotactivateSabbathModeinbothways
listedbelow,somefunctionsyouwishtodisablewillremain
active.
Control Panel
In Sabbath Mode, the temperature set points remain unchanged
and the interior lights turn off.
• Press SABBATH MODE to turn on Sabbath Mode.
ISabbathModeI
• Press SABBATH MODE again to turn off Sabbath Mode.
Dispenser Panel
In Sabbath Mode, the dispenser levers are disabled and the
dispenser lights turn off.
• To turn on Sabbath Mode, press and hold ICE, LIGHT and
LOCKOUT at the same time for 3 seconds. When the feature
turns on, the indicator light around the LOCKOUT button will
blink.
• To turn off Sabbath Mode, press and hold ICE, LIGHT and
LOCKOUT at the same time for 3 seconds again.
_'0_'%soYe L(ses
Depending on your model, your water and ice dispensers may
have one or more of the following features: a removable dispenser
tray, a special light that turns on when you use the dispenser, or a
lock option to avoid unintentional dispensing.
NOTES:
• The dispensing system will not operate when the freezer door
is open.
After connecting the refrigerator to a water source, flush the
water system. Use a sturdy container to depress and hold the
water dispenser lever for 5 seconds, then release it for
5 seconds. Repeat until water begins to flow. Once water
begins to flow, continue depressing and releasing the
dispenser lever (5 seconds on, 5 seconds off) for an additional
5 minutes. This will flush air from the filter and water
dispensing system. Additional flushing may be required in
some households. As air is cleared from the system, water
may spurt out of the dispenser.
Allow 24 hours for the refrigerator to cool down and chill
water.
• Allow 24 hours to produce the first batch of ice. Discard the
first three batches of ice produced.
The Ice Dispenser
Ice dispenses from the ice maker storage bin in the freezer when
the dispenser pad is pressed. The dispensing system will not
operate when the freezer door is open. To turn off the ice maker,
see "Ice Maker and Storage Bin."
Your ice maker can produce both crushed and cubed ice. The
display screen reads "CRUSHED" or "CUBED," indicating which
type is selected. To change the setting, press the ICE button
before dispensing ice.
For crushed ice, cubes are crushed before being dispensed. This
may cause a slight delay when dispensing crushed ice. Noise
from the ice crusher is normal, and pieces of ice may vary in size.
When changing from crushed to cubed, a few ounces of crushed
ice will be dispensed along with the first cubes.
To Dispense Ice'.
1. Press the button to select the desired type of ice.
Cut Hazard
Use a sturdy glass when dispensing ice.
Failure to do so can result in cuts.
2.
Press a sturdy glass against the ice dispenser pad. Hold the
glass close to the dispenser opening so ice does not fall
outside of the glass.
IMPORTANT: You do not need to apply a lot of pressure to the
pad in order to activate the ice dispenser. Pressing hard will
not make the ice dispense faster or in greater quantities.
3.
Remove the glass to stop dispensing.
NOTE: Ice may continue to dispense for up to 10 seconds
after removing the glass from the pad. The dispenser may
continue to make noise for a few seconds after dispensing.
Removable Dispenser Tray (on some models)
Your dispenser may include a small tray at the bottom of the
dispenser. It is designed to catch small spills and allow for easy
cleaning. The tray can be removed from the dispenser and carried
to the sink to be emptied or cleaned.
NOTE: There is no drain in the tray. When the tray is full of water, it
will need to be removed and emptied.
The Dispenser Light (on some models)
The Water Dispenser
IMPORTANT: Dispense enough water every week to maintain a
fresh supply.
To Dispense Water:
1. Press a sturdy glass against the water dispenser pad.
NOTES:
While dispensing water and for 3 seconds after dispensing
has stopped, the digital display will show how many
ounces of water have been dispensed.
To switch from ounces to cups, press and hold ICE and
LOCKOUT at the same time until the dispenser beeps
after 3 seconds. To switch from cups to liters, press and
hold the buttons for another 3 seconds. To switch back to
ounces, repeat the process a third time.
When you use the dispenser, the light will automatically turn on.
If you want the light to be on continuously, you may choose either
ON or AUTO.
ON: Press LIGHT to turn the dispenser light on.
AUTO: Press LIGHT a second time to select AUTO mode. The
dispenser light will automatically adjust to become brighter as the
room brightens, dimmer as the room darkens.
OFF: Press LIGHT a third time to turn the dispenser light off.
The dispenser lights are LEDs that cannot be changed. If it
appears that your dispenser lights are not working, be sure that
the light sensor is not blocked (in AUTO mode). See
"Troubleshooting" for more information.

The Dispenser Lock (on some models)
The dispenser can be turned off for easy cleaning or to avoid
unintentional dispensing by small children and pets.
NOTE: The lock feature does not shut off power to the product, to
the ice maker, or to the dispenser light. It simply deactivates the
ice and water dispensers. To turn off the ice maker, see "Ice
Maker and Storage Bin."
• Press and hold LOCKOUT for 3 seconds to lock the
dispenser. While the dispenser is locking, "LOCKING" will
appear on the display screen and the blue indicator light
around the LOCKOUT button will flash. When the dispenser is
locked, the indicator light will change to red for a few seconds,
then turn off.
Press and hold LOCKOUT a second time to unlock the
dispenser. While the dispenser is unlocking, "UNLOCKING"
will appear on the display screen and the red indicator light
around the LOCKOUT button will flash. When the dispenser is
unlocked, the indicator light will change to blue for a few
seconds, then turn off.
Turning the Ice Maker On/Off
The On/Oft switch is located on the top right-hand side of the
freezer compartment.
Toturn on the ice maker, slide the control to the ON (left) position.
To manually turn off the ice maker, slide the control to the OFF
(right) position.
NOTE: Your ice maker has an automatic shutoff. The ice maker
sensors will automatically stop ice production, but the control will
remain in the ON (left) position.
REMEMBER:
• Allow 24 hours to produce the first batch of ice. Discard the
first three batches of ice produced.
The quality of your ice will be only as good as the quality of the
water supplied to your ice maker. Avoid connecting the ice
maker to a softened water supply. Water softener chemicals
(such as salt) can damage parts of the ice maker and lead to
poor quality ice. If asoftened water supply cannot be avoided,
make sure the water softener is operating properly and is well
maintained.
Do not use anything sharp to break up the ice in the storage
bin. This can cause damage to the ice container and the
dispenser mechanism.
Do not store anything on top of or in the ice maker or storage
bin.
,.,, Fffc4on System
Do not use with water that is microbiologically unsafe or of
unknown quality without adequate disinfection before or
after the system.
Water Filter Status Display (on some models)
The filter status display will help you know when to change your
water filter. When the display reads 10%, order a new filter. It is
recommended that you replace the filter when the display reads
0% OR when water flow to your water dispenser or ice maker
decreases noticeably. The filter should be replaced at least every
6 months depending on your water quality and usage.
After changing the filter, reset the display by pressing the button.
The display will read 99% when the system is reset.
Non-Indicator Water Filter (on some models)
If your refrigerator does not have the water filter status light, you
should change the water filter cartridge at least every 6 months
depending on your water quality and usage. If the water flow to
the water dispenser or ice maker decreases noticeably before
6 months have passed, replace the water filter more often.
Changing the Water Filter
1. Press the eject button to release the filter from the base grille.
2. Pull the filter straight out.
3. Turn the cap counterclockwise to remove it from the filter.
IMPORTANT: Do not discard the cap. It is part of your
refrigerator. Keep the cap to use with the replacement filter.
4=
Align the ridge on the cap with the arrow on the new filter and
turn the cap until it snaps into place.
NOTE: You can run the dispenser without afilter. Your water
will not be filtered. Simply insert the cap all of the way into the
base grille and rotate the cap until it is firmly in place.
5. Remove the covers from the O-rings. Be sure the O-rings are
still in place after the covers are removed.
6. Push the filter into the base grille. The eject button will pop
back out when the filter is fully engaged.
7. Flush the water system. See "Water and Ice Dispensers."
REFRIGERATORCARE
Removing and Replacing Ice Storage Bin
1=
Hold the base of the storage bin with both hands and press
the release button to lift the storage bin up and out.
NOTE: It is not necessary to turn the ice maker control to the
OFF (right) position when removing the storage bin. The
sensor cover ("flipper door") on the left wall of the freezer
stops the ice maker from producing ice if the door is open or
the storage bin is removed.
2.
Replace the storage bin on the door and push down to make
sure it is securely in place.
Explosion Hazard
Use nonflammable cleaner.
Failure to do so can result in death, explosion, or fire.
Both the refrigerator and freezer sections defrost automatically.
However, clean both sections about once a month to avoid
buildup of odors. Wipe up spills immediately.

IMPORTANT:Becauseaircirculatesbetweenbothsections,any
odorsformedinonesectionwilltransfertotheother.Youmust
thoroughlycleanbothsectionstoeliminateodors.Toavoidodor
transferanddryingoutoffood,wraporcoverfoodstightly.
ToCleanYourRefrigerator:
NOTE:Donotuseabrasiveorharshcleanerssuchaswindow
sprays,scouringcleansers,flammablefluids,cleaningwaxes,
concentrateddetergents,bleachesorcleanserscontaining
petroleumproductsonplasticparts,interioranddoorlinersor
gaskets.Donotusepapertowels,scouringpads,orotherharsh
cleaningtools.
1. Unplugrefrigeratorordisconnectpower.
2. Handwash,rinse,anddryremovablepartsandinterior
surfacesthoroughly.Useacleanspongeorsoftclothanda
milddetergentinwarmwater.
3. Washstainlesssteelandpaintedmetalexteriorswithaclean
spongeorsoftclothandamilddetergentinwarmwater.
4. Thereisnoneedforroutinecondensercleaninginnormal
homeoperatingenvironments.Iftheenvironmentis
particularlygreasyordusty,orthereissignificantpettrafficin
thehome,thecondensershouldbecleanedevery2to
3monthstoensuremaximumefficiency.
TROUBLESHOOTING
If you need to clean the condenser:
• Remove the base grille.
• Use a vacuum cleaner with a soft brush to clean the grille,
the open areas behind the grille and the front surface area
of the condenser.
• Replace the base grille when finished.
5.
Plug in refrigerator or reconnect power.
NOTE: Not all bulbs will fit your refrigerator. Be sure to replace the
bulb with one of the same size, shape and wattage. On some
models, the dispenser light requires a heavy duty 10-watt bulb. All
other lights require a 40-watt bulb. Replacement bulbs are
available from your dealer.
1. Unplug refrigerator or disconnect power.
2. Remove light shield when applicable.
NOTE: To clean the light shield, wash it with warm water and
liquid detergent. Rinse and dry the shield well.
3. Remove light bulb and replace with one of the same size,
shape and wattage.
4. Replace light shield when applicable.
5. Plug in refrigerator or reconnect power.
First try the solutions suggested here or visit our website and reference FAQs (Frequently Asked Questions)
to possibly avoid the cost of a service call.
In the U.S.A., www.jennair.com In Canada, www.jennair.ca
• Are controls on? Make sure the refrigerator controls are on.
The refrigerator will not operate
Electrical Shock Hazard
Plug into a grounded 3 prong outlet.
Do not remove ground prong.
Do not use an adapter.
Do not use an extension cord.
Failure to follow these instructions can result in death,
fire, or electrical shock.
Power cord unplugged? Plug into a grounded 3 prong outlet.
Is outlet working? Plug in a lamp to see if the outlet is
working.
Household fuse blown or circuit breaker tripped? Replace
the fuse or reset the circuit breaker. If the problem continues,
call an electrician.
See "Using the Controls."
• New installation? Allow 24 hours following installation for the
refrigerator to cool completely.
NOTE: Adjusting the temperature controls to coldest setting will
not cool either compartment more quickly.
The motor seems to run too much
Your new refrigerator may run longer than your old one due to its
high-efficiency compressor and fans. To maximize energy
efficiency, the compressor changes speed to provide just the right
amount of cooling as it is needed. Your refrigerator may run as
much as 100% of the time, but it will still use less energy than an
older refrigerator. You may notice that it runs more often when the
room is warm, a large amount of food is added to either
compartment, or the doors are opened often.
The refrigerator is noisy
Refrigerator noise has been reduced over the years. Due to this
reduction, you may hear intermittent noises from your new
refrigerator that you did not notice from your old model. Below are
listed some normal sounds with an explanation.
• Buzzing - heard when the water valve opens to fill the ice
maker
Pulsating - fans/compressor adjusting to optimize
performance
Rattling - flow of refrigerant, water line, or from items placed
on top of the refrigerator
6
Sizzling/Gurgling - water dripping on the heater during
defrost cycle
Popping - contraction/expansion of inside walls, especially
during initial cool-down
Water running - may be heard when water melts during the
defrost cycle and runs into the drain pan
Creaking/Cracking - occurs as ice is being ejected from the
ice maker mold.
Items in meat pan/crisper are freezing
The temperature inside the meat pan/crisper may become too
cold, especially when using some additional control panel
features. Adjust the meat pan control to the closed setting.
The doors will not close completely
Check the following:
• Are food packages blocking the door open?
• Are all bins and shelves pushed back into the correct
positions?
The doors are difficult to open
Explosion Hazard
Use nonflammable cleaner.
Failure to do so can result in death, explosion, or fire.
Are the gaskets dirty or sticky? Clean gaskets with mild
soap and warm water.
Has the door been opened and closed within the last few
seconds? Wait at least 30 seconds to reopen the doors.
Temperature is too warm
Check the following:
• Are the air vents blocked in either compartment?
• Are the door(s) opened often?
• Has a large amount of food just been added to the refrigerator
or freezer?
• Are the controls set correctly for the surrounding conditions?
There is interior moisture buildup
NOTE: Some moisture is normal.
• Are the air vents blocked in the refrigerator?
• Are the door(s) opened often?
• Is the room humid?
• Are the controls set correctly for the surrounding conditions?
• Was an automatic self-defrost cycle completed?
The ice maker is not producing ice or not enough ice
Is the ice maker wire shutoff arm or switch (depending on
models) in the OFF position?
Is the water line shutoff valve to the refrigerator turned on?
Has the ice maker just been installed? Is the freezer
temperature cold enough to produce ice? Wait 24 hours
after ice maker hookup for ice production to begin. Allow
3 days after ice production begins to completely fill ice
container.
Does the ice maker mold have water in it or has no ice
been produced? Make sure your refrigerator has been
connected to a water supply and the supply shutoff valve is
turned on.
Has a large amount of ice just been removed? Allow
24 hours for ice maker to produce more ice.
Is there a water filter installed on the refrigerator? The filter
may be clogged or installed incorrectly.
Is an ice cube jammed in the ice maker ejector arm?
For models with an interior ice bin, remove the ice from the
ejector arm with a plastic utensil.
Is a reverse osmosis water filtration system connected to
your cold water supply? See "Water Supply Requirements"
in the Installation Instructions.
The ice cubes are hollow or small
This is an indication of low water pressure.
Check the following:
• Is the water shutoff valve fully open?
Are there kinks in the water lines that could restrict water
flow?
If you are using a water filter, remove the filter and operate the
dispenser. If water flow increases, the filter is clogged or
incorrectly installed.
Is a reverse osmosis water filtration system connected to
your cold water supply? See "Water Supply Requirements"
in the Installation Instructions.
If you still have questions regarding your water pressure, call a
licensed, qualified plumber.
Off-taste, odor or gray color in the ice
Check the following:
• Are the plumbing connections new, causing discolored or off-
flavored ice?
• Have the ice cubes been stored too long?
• Does the freezer and ice bin need to be cleaned?
• Has food in the freezer or refrigerator been wrapped properly?
• Does the water contain minerals (such as sulfur)? A filter
may need to be installed to remove the minerals.
• Is there a water filter installed on the refrigerator? Gray or
dark discoloration in ice indicates that the water filtration
system needs additional flushing.
The ice dispenser will not operate properly
The water dispenser will not operate properly
Check the following:
• Is the freezer door closed completely?
• Is the ice bin installed correctly?
• Is there ice in the bin?
• Has the ice frozen in the ice bin?
• Is ice stuck in the delivery chute?
• Has the wrong ice been added to the bin? Use only cubes
produced by the current ice maker.
• Has the ice melted around the auger (metal spiral} in the
ice bin? Empty the ice container. Use warm water to melt the
ice if necessary.
Cut Hazard
Use a sturdy glass when dispensing ice.
Failure to do so can result in cuts.
Is the ice dispenser stalling while dispensing "crushed"
ice? Change the ice button from "crushed" to "cubed." If
cubed ice dispenses correctly, depress the button for
"crushed" ice and begin dispensing again.
Has the dispenser lever been held in too long? Ice will stop
dispensing when the arm is held in too long. Wait 3 minutes
for dispenser motor to reset before using again.
Check the following:
• Is the freezer door closed completely?
• Is the water shutoff valve not turned on, incorrectly installed or
clogged?
• Is the water line connected at the source?
• Is there a kink in the home water source line?
• Has the water system not filled? The water system needs to
be filled the first time it is used.
Is the refrigerator connected to a cold water line with
water pressure of at least 30 psi (207 kPa)? The water
pressure to the home determines the flow from the dispenser.
Is there a water filter installed on the refrigerator? The filter
may be clogged or incorrectly installed.
Is a reverse osmosis water filtration system connected to
your cold water supply? See "Water Supply Requirements"
in the Installation Instructions.
Water is leaking from the dispenser
Check the following:
• Is the glass not being held under the dispenser long enough?
• Has the water system been flushed since installation or
changing filters?
The dispenser water is not cool enough
NOTE: Water from the dispenser is chilled to only 50°F (10°C).
• Has the refrigerator been newly installed or a large
amount of water recently dispensed? Allow 24 hours for the
refrigerator to cool completely.
• Has water not been recently dispensed? The first glass of
water may not be cool. Discard the first glass of water.
ACCESSORIES
To order replacement filters, call 1-800-442-9991 and ask for the
part number listed below or contact your authorized Jenn-Air
dealer. In Canada, call 1-800-807-6777.
Stainless Steel Cleaner and Polish:
Order Part #4396095
Standard Base Filter Cartridge:
Order Part #4396841 (T2RFWG2 and P2RFWG2)
8
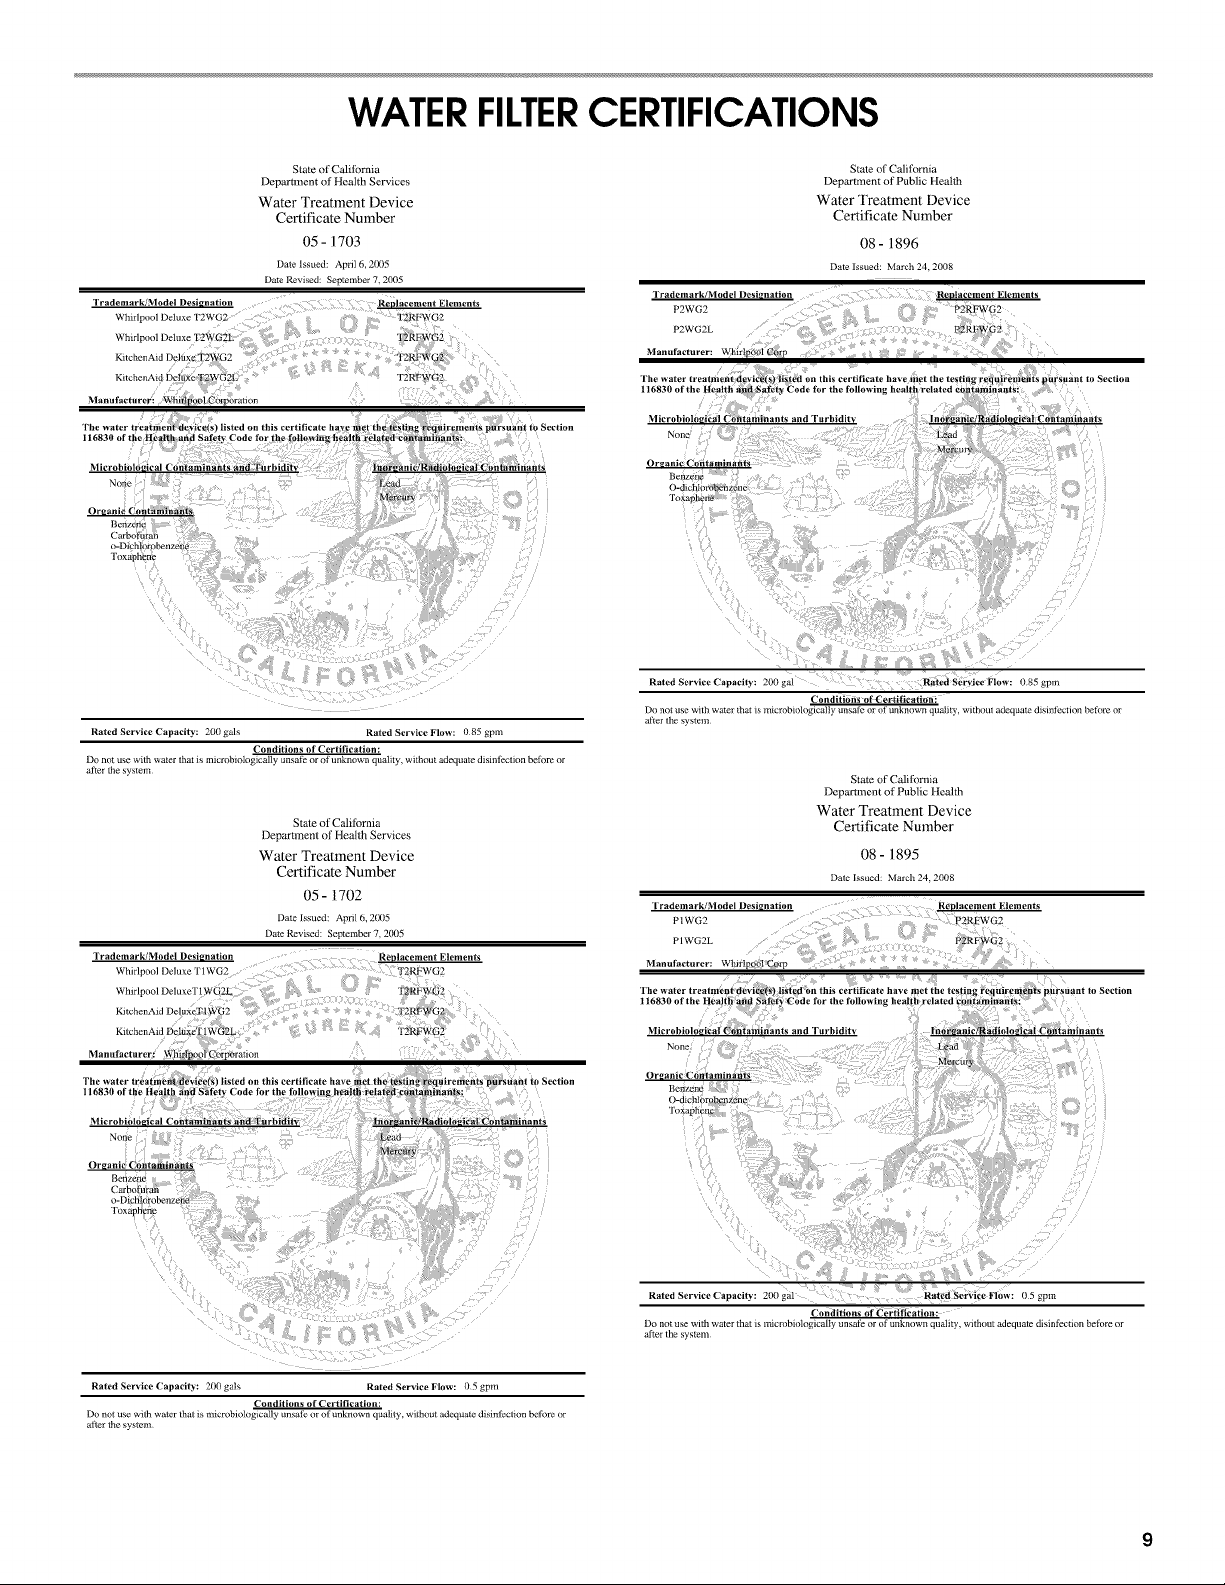
WATERFILTERCERTIFICATIONS
State of California
Department of Health Services
Water Treatment Device
Certificate Number
05 - 1703
Date Issued: AprlI 6, 2(X15
Date Revised: September 7, 2005
Trademark/Model Designation
Whirlpool Deluxe T2WG2
Manufacturefl
to Section
Rated Service CapaciD,: 2(Xtgals RatedServiceFlo_: 085gpm
Do not use with water that is microbiologicalIy unsal_ or of unknown quality, without adequate disinfection before or
after tbe system
Con ditions of Certification:
Stale of California
I)epartment of Health Services
Water Treatment Device
Certificate Number
05 - 1702
Date Issued: April 6, 2005
Date Revised: September 7, 2005
TrademarldModel Desi_natioa
Whirlpool Deluxe T1WG2
Whirlpool DeluxeT
State of California
Department of Public I {eatth
Water Treatment Device
Certificate Number
08- 1896
Date Issued: March 24, 2008
Trademark/Model I)esi_nation
2w-G2 ............
P2WG2L
Manufacturer: Vgl{_rtp_ol rp :, ....
Rated Service Capacity: 200 ga] R_e_ S_rvice _iow: 085 gpm
Do no{ use with water lhat is microbioh)gically unsalE or of ullknown quality, withotll adequate disinf '_tion belore or
after the system
Co nditi6ns of Certification!
State of California
Department of Public tlealth
Water Treatment Device
Certificate Number
08 - 1895
Dale Issued: March 24, 2008
Trademark/Model Designation Replacement Elements
PIWG2 P2RFWti2
P IWG2L P2RFWG2
Manuli_eturer: W/uvlpooPCorp
Manufacturer:
116830oftl
Node
RatedServiceCapacit_: 200gals Rated Service Flow: (t5gpm
Do not use with water that is _Ylicrobiologically unsali: or el unknown quali_y, without adeqtlme disinli_ction beRire or
after the system
Conditions of Certification:
'i! i
None l_ad
Oruanic Contaminants
Rated Service Capacltv: 200 gaI - ' Rated Service Flow: 05 gpm
Do no* use with water that is mlcrobn)Ioglcalt 3 unsaf? or of unknown quahty, without adequate disinfection before ol
after |he sysmm
('endittens of Certifieation:
Mercur_
 Loading...