

Page 1
OperatingInstructions J EN N-AI R ®ModelsDU460and DU466
i i
For Future Reference
For future reference we suggest you retain this manual dishwasher in the spaces provided below.
after recording the model number, run number, and This information can be found on the data plate located
serial number (six numbers and two letters) of this on the upper left corner of the tub opening.
Model Run No. Serial No.
I II I
WARNING: Check with installer to make sure appliance has been grounded to avoid
possible electrical shock. Be sure you read the IMPORTANT SAFETY PRECAUTIONS on
page 2 before you start to use this dishwasher.
I
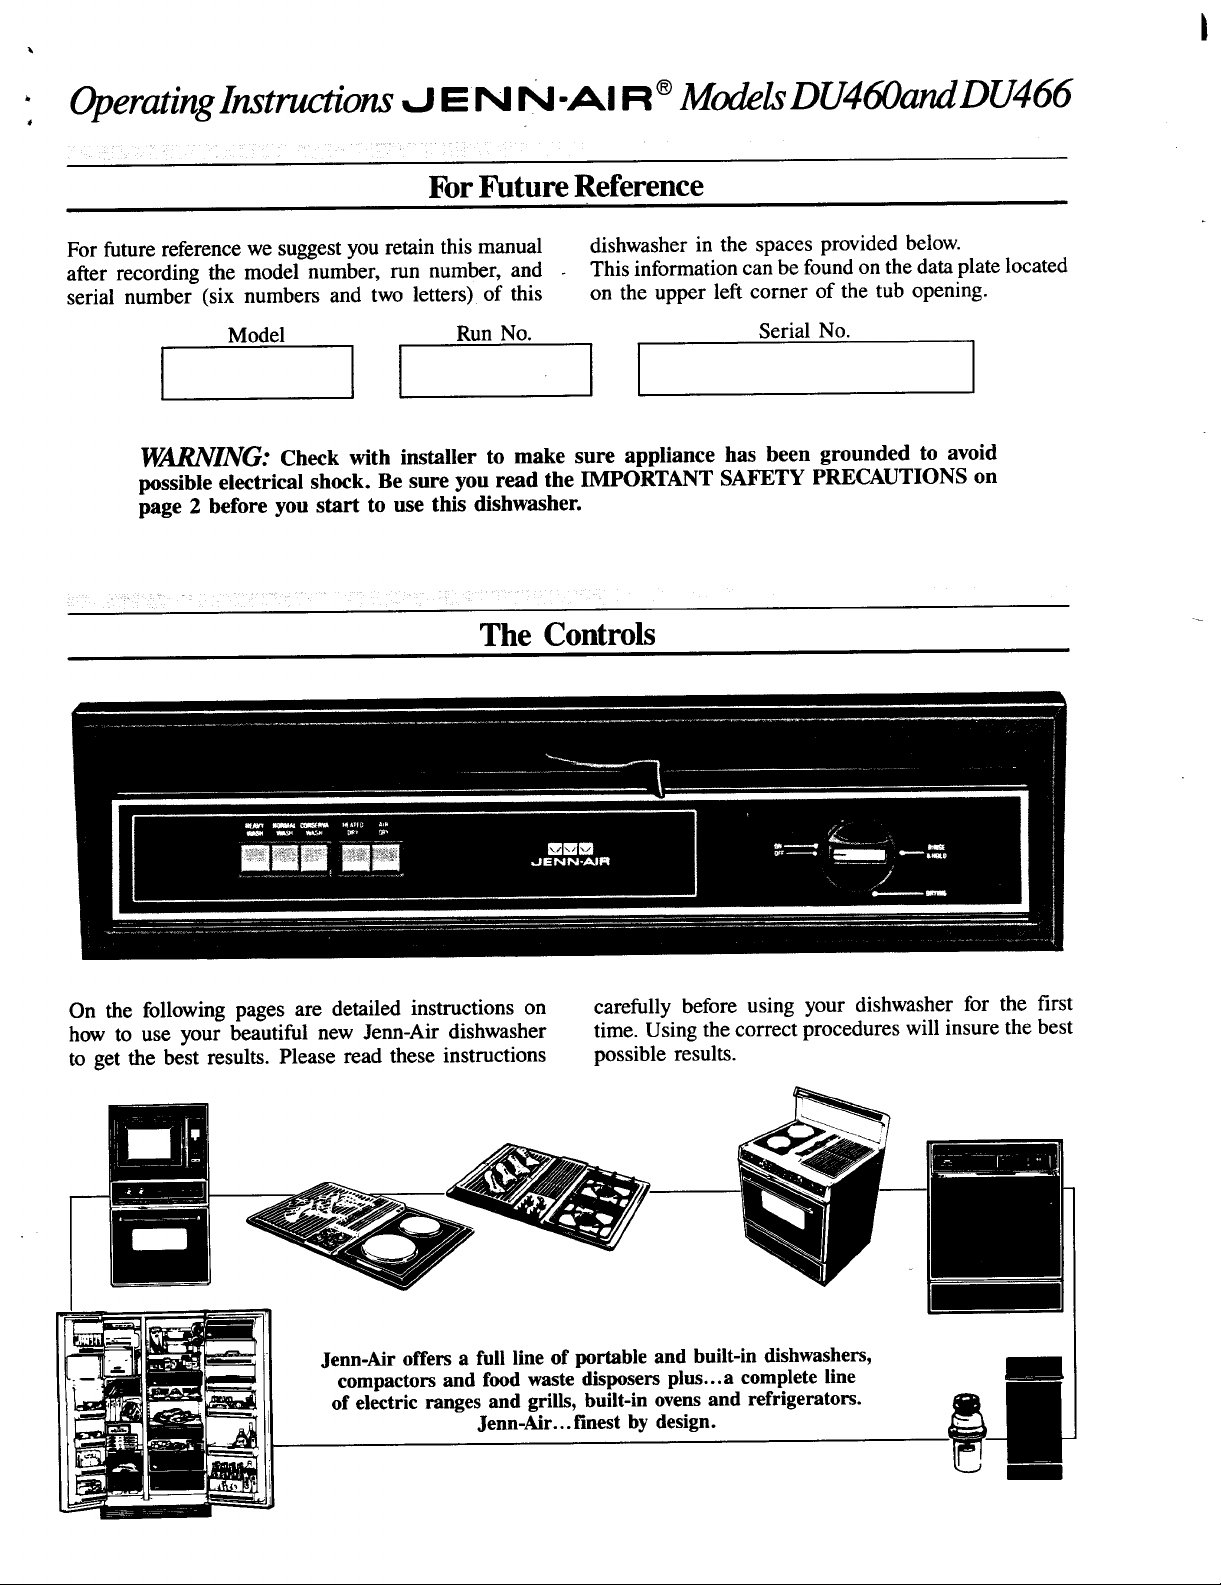
The Controls
On the following pages are detailed instructions on carefully before using your dishwasher for the first
how to use your beautiful new Jenn-Air dishwasher time. Using the correct procedures will insure the best
to get the best results. Please read these instructions possible results.
Jenn-Air offers a full line of portable and built-in dishwashers,
compactors and food waste disposers plus...a complete line
of electric ranges and grills, built-in ovens and refrigerators.
Jenn-Air... finest by design.
I
Page 2

IMPORTANT SAFETY PRF_AUTIONS
WARNING--Products with g Use only a detergent 13. Load light plastic items
a UL label have been listed with designed for anautomatic so they will not become
the Underwriter's Laboratories, dishwasher. Never use soap, dislodged and drop to the
Inc.--those with a CSA taghave laundrydetergent, or hand bottom of the dishwasher--
been listed with Canadian washing detergentin your they may come into contact
Standards Association. dishwasher. Keep these with the heating unit and
Nevertheless, as with any other products out of the reach be damaged.
equipment using electricity and of children. 14. Do not tamper with controls.
moving parts, there is a potential 9. Do not sit, stand on or abuse 15. Always remove the door to
hazard. When using your the door or dish rack of the the washing compartment
dishwasher, follow basic dishwasher, when removing an old
precautions, including the
following: 10. To minimize the possibility dishwasher from service
1. Read all instructions before this appliance from the power 16. Instructions for grounding
using the dishwasher, supply before attempting any this appliance can be found in
2. Use the dishwasher only for maintenance. Note: Turning the Installation Instructions.
its intended function, the control dial to the OFF
of electric shock, disconnect or discarding it.
t
3. Toavoid electrical shock position does not disconnect
hazard, the sides and back the appliance from the power SAVE THESE
must be enclosed, and the INSTRUCTIONS
front panels must be attached a qualified technician service
before electrical power is your appliance.
applied to the dishwasher. 11. WARNING--Under certain
Refer to the installation conditions, hydrogen gas
instructions for proper may be produced in ahot
grounding procedures, water system that has not
4. Children should never be been used fortwo weeks or
permitted to operate, or play more. Hydrogen gas is
in, with or around this explosive. Ifthe hot water
dishwasher, twoweeks oryou havemoved
5. Toreduce the risk of injury into a residence in which the
when loading items to be hot water system may not
washed, sharpor pointed have been used for some
items should be located with time, turnon all hot water
the handles up. Also, load faucets and let the water flow
sharpitems so they are not from each for several minutes.
likely to damagethe door seal. This will release any
6. Be careful not totouch the accumulated hydrogengas.
heating element on the bottom As the gas is flammable, do
of the tub during or atthe not smoke or use an open
completion of a cycle. It may flame duringthis process.
be hot. 12. Do not wash plastic items
7. Do not store or use unless marked "dishwasher
combustible materials, safe" or the equivalent. For
gasoline or other flammable plastic items not so marked,
vapors and liquids in the check the manufacturer's
vicinity, of this or any other recommendations.
appliance.
supply,we recommend having
system has not been used for
Page 3
k.,
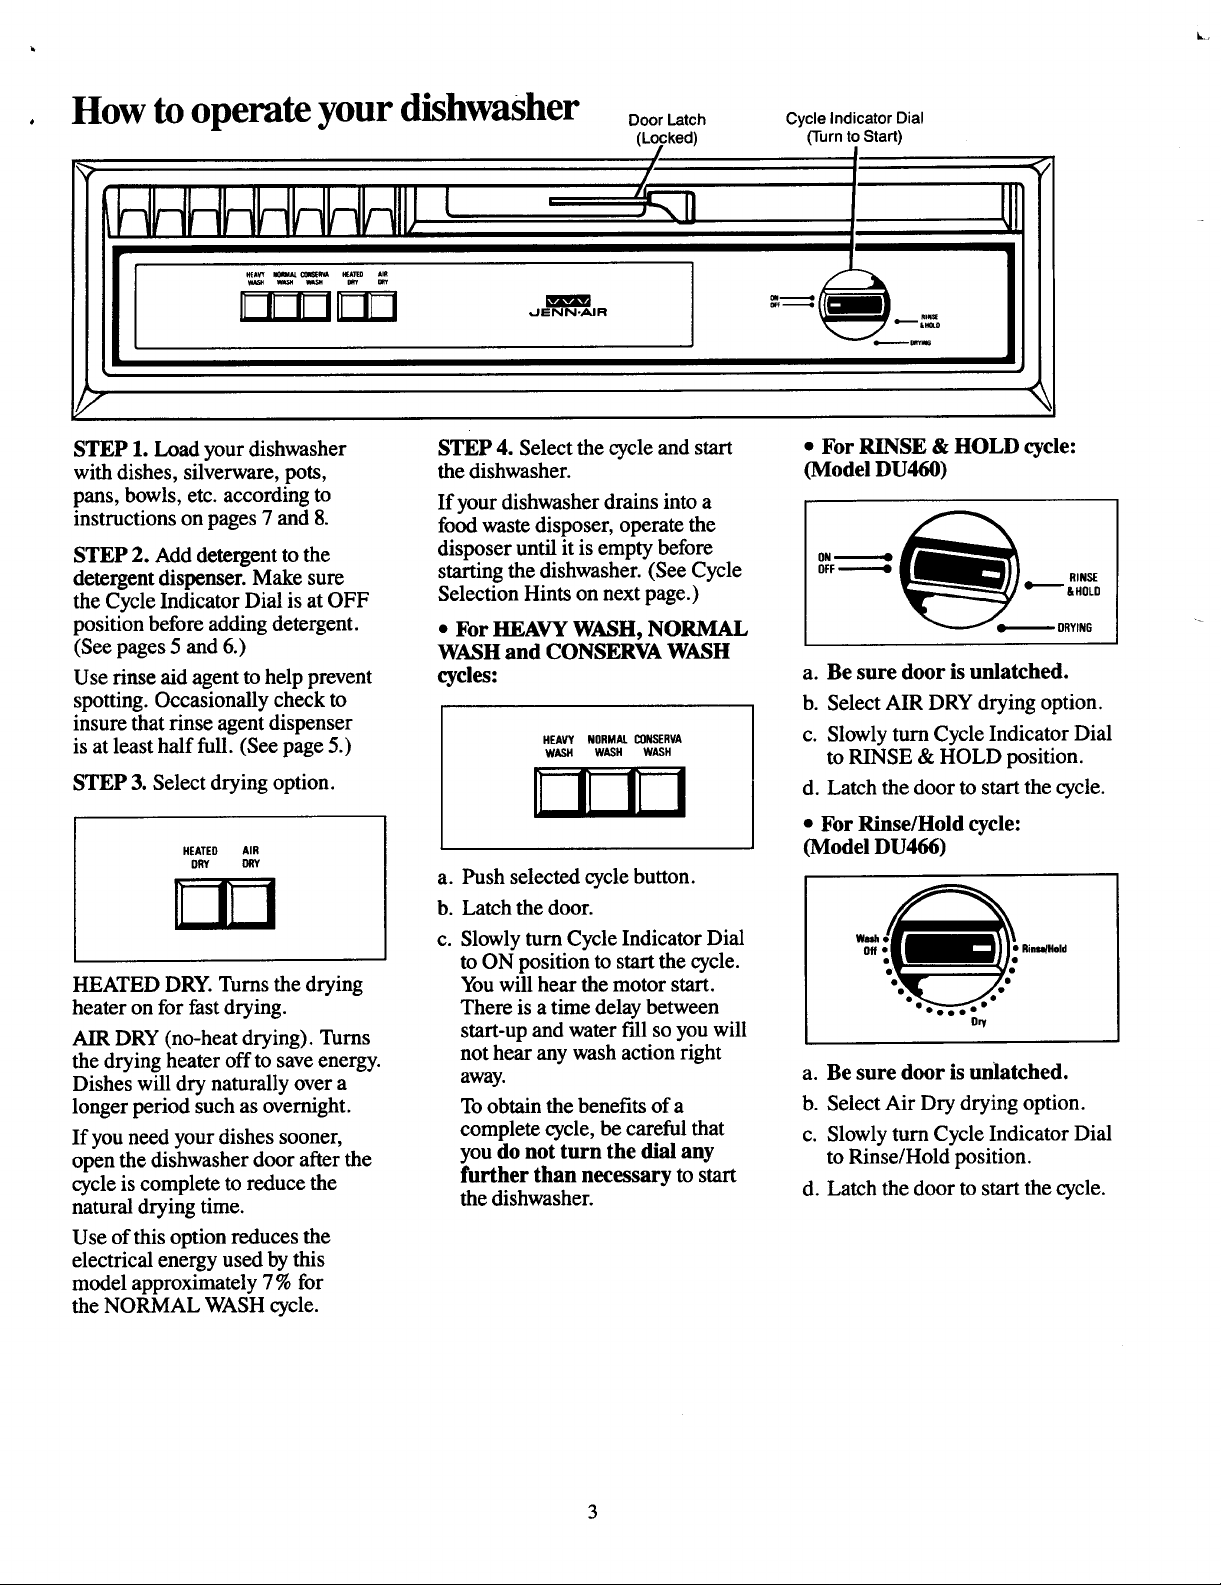
. How to operate your dishwasher ooor,ch oyc,e,n,oatorO,a,
•ked) (TurntoStart)
HHHHHHHHIIJ
_EAWI_ C_ IEe_n AIR
I1-FII-IIFI
f
STEP 1. Load your dishwasher STEP 4. Select the cycle and start • For RINSE & HOLD cycle:
with dishes, silverware, pots, the dishwasher. (Model DU460)
pans, bowls, etc. according to If your dishwasher drains into a
instructions on pages 7 and 8. food waste disposer, operate the
STEP 2. Add detergent to the disposer until it is empty before 0N
detergent dispenser. Make sure starting the dishwasher. (See Cycle DEE---'-'--4 R,NSE
the Cycle Indicator Dial is at OFF Selection Hints on next page.) m,HOLD
position before adding detergent. • For HEAVY WASH, NORMAL • ORYfNG -
(Seepages 5 and 6.) WASH and CONSERVA WASH
Use rinse aid agent to help prevent cycles: a. Be sure door is unlatched.
spotting. Occasionally check to b. Select AIR DRY drying option.
insure that rinse agent dispenser I
is at least half full. (See page 5.) HEA_NDRMAte0NSE_VA I C. Slowly turn Cycle Indicator Dial
STEP 3. Select drying option. I d. Latch the door to start the cycle.
HEATED AIR (Model DU466)
DRY DRY
a. Push selected cycle button.
_..IE N N.,_kl R
was, WASHWASH to RINSE & HOLD position.
• For Rinse/Hold cycle:
I
c. Slowly turn Cycle Indicator Dial _ Ri*_H,d
to ON position to start the cycle.
HEATED DRY. Turns the drying Youwill hear the motor start.
heater on for fast drying. There is a time delay between
AIR DRY (no-heat drying). Turns start-up and water fill so you will O,
the drying heater off to save energy, not hear any wash action right
Dishes will dry naturally over a away. a. Be sure door is unlatched.
longer period such as overnight. To obtain the benefits of a b. Select Air Dry drying option.
If you need your dishes sooner, complete cycle, be careful that c. Slowly turn Cycle Indicator Dial
open the dishwasher door after the you do not turn the dial any to Rinse/Hold position.
cycle is complete to reduce the further than necessary to start
natural drying time. the dishwasher, d. Latch the door to start the cycle.
Use of this option reduces the
electrical energy used by this
model approximately 7 % for
the NORMAL WASH cycle.
_ il i b. Latch the door. .:_
Page 4
Cycle selection hints
It is important to follow the loading
instructions on pages 7 and 8.
HEAVY WASH--For items such
as pots, pans and casseroles with
dried-on or baked-on soils.
Everyday dishes may be included.
NORMAL WASH--For loads
of everyday dishes, glasses
and cookware.
CONSERVA WASH--For dishes
that are lightly soiled with soils that
have not dried on. Also for
everyday dishes that have extra
preparation before loading.
RINSE & HOLD--For rinsing
partial loads which will be washed
later. Do not use detergent.
ig.-,
What happens in each cycle
• You'll hear occasional clicking • During the drying period:
sounds: --The motor stops.
--Soft food disposer shredding --Water vapor comes through the
action, vent by the door latch during
--Drain valve opening to pump drying and when water is being
water out. pumped out.
--Timer control as cycle
progresses.
--Detergent cup opening.
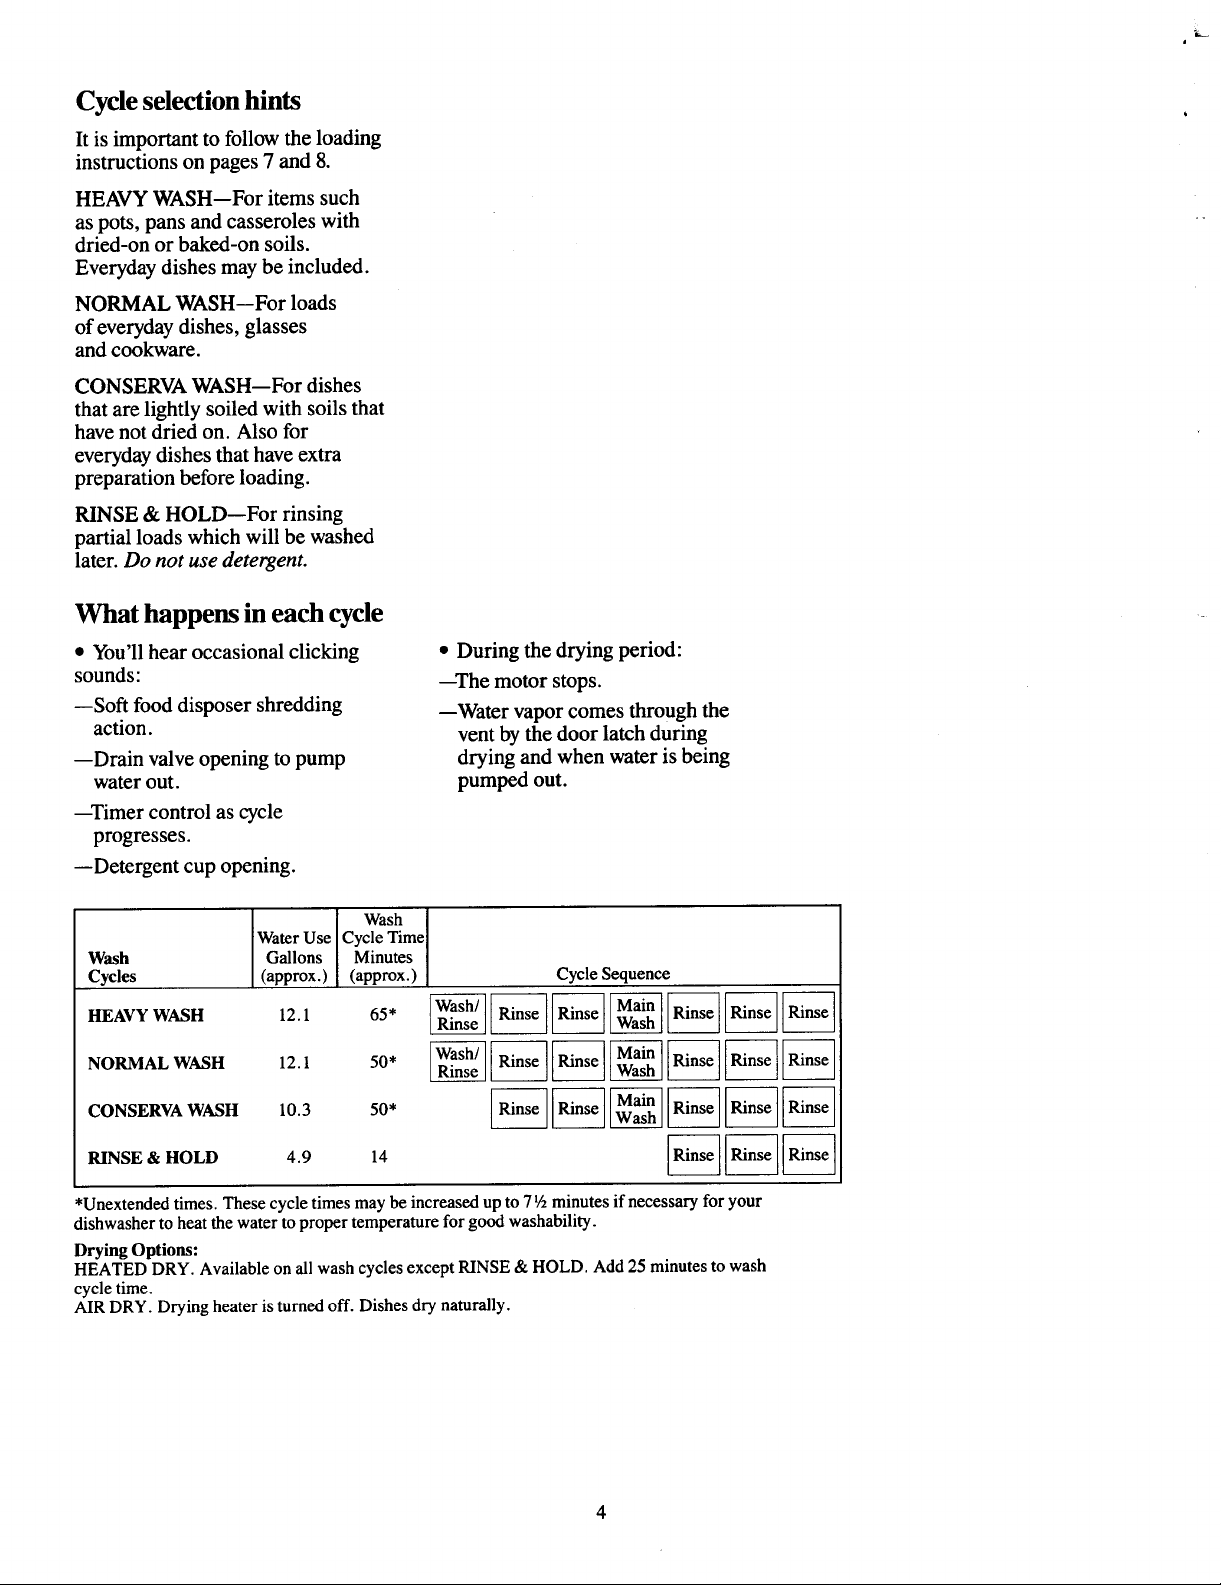
Wash
Wash Gallons Minutes
Cycles (approx.) (approx.) Cycle Sequence
HEAVY WASH 12.1 65* _______-
NORMAL WASH 12.1 50" _______
CONSERVA WASH 10.3 50* _-______
RINSE& HOLD 4.9 14 _ _ _s-e
Water Use Cycle Time
*Unextended times. These cycle times may be increased up to 7',_ minutes if necessary for your
dishwasher to heat the water to proper temperature for good washability.
DryingOptions:
HEATEDDRY.AvailableonallwashcyclesexceptRINSE&HOLD.Add25minutesto wash
cycletime.
AIRDRY.Dryingheateristurnedoff. Dishesdrynaturally.
Page 5
WaterTemperature Help prevent spotting Howto choose and use
ControlSystem with a rinse agent, the right detergent.
To get dishes clean and dry you A rinse agent makes water flow First, use only powder or liquid
need hot water. Tohelp you get off dishes quicker than usual. This detergents specifically made for
water of the proper temperature, lessens water spotting. Makes use in dishwashers. Other types
your dishwasher has a water heating drying faster, too. will cause oversudsing.
feature that automatically senses For best dishwashing performance, Second, check the phosphate
the temperature of the water in the use of a rinse agent is recommended, content. Phosphate helps prevent
wash cycle and heats it, if necessary,
to the proper temperature. This Rinse agents come in either liquid hard-water materials from forming
water heating feature may allow or solid form. Your dishwasher's spots or film on your dishes. If
you to turn down your household dispenser uses the liquid form. your water is hard (7 grains or
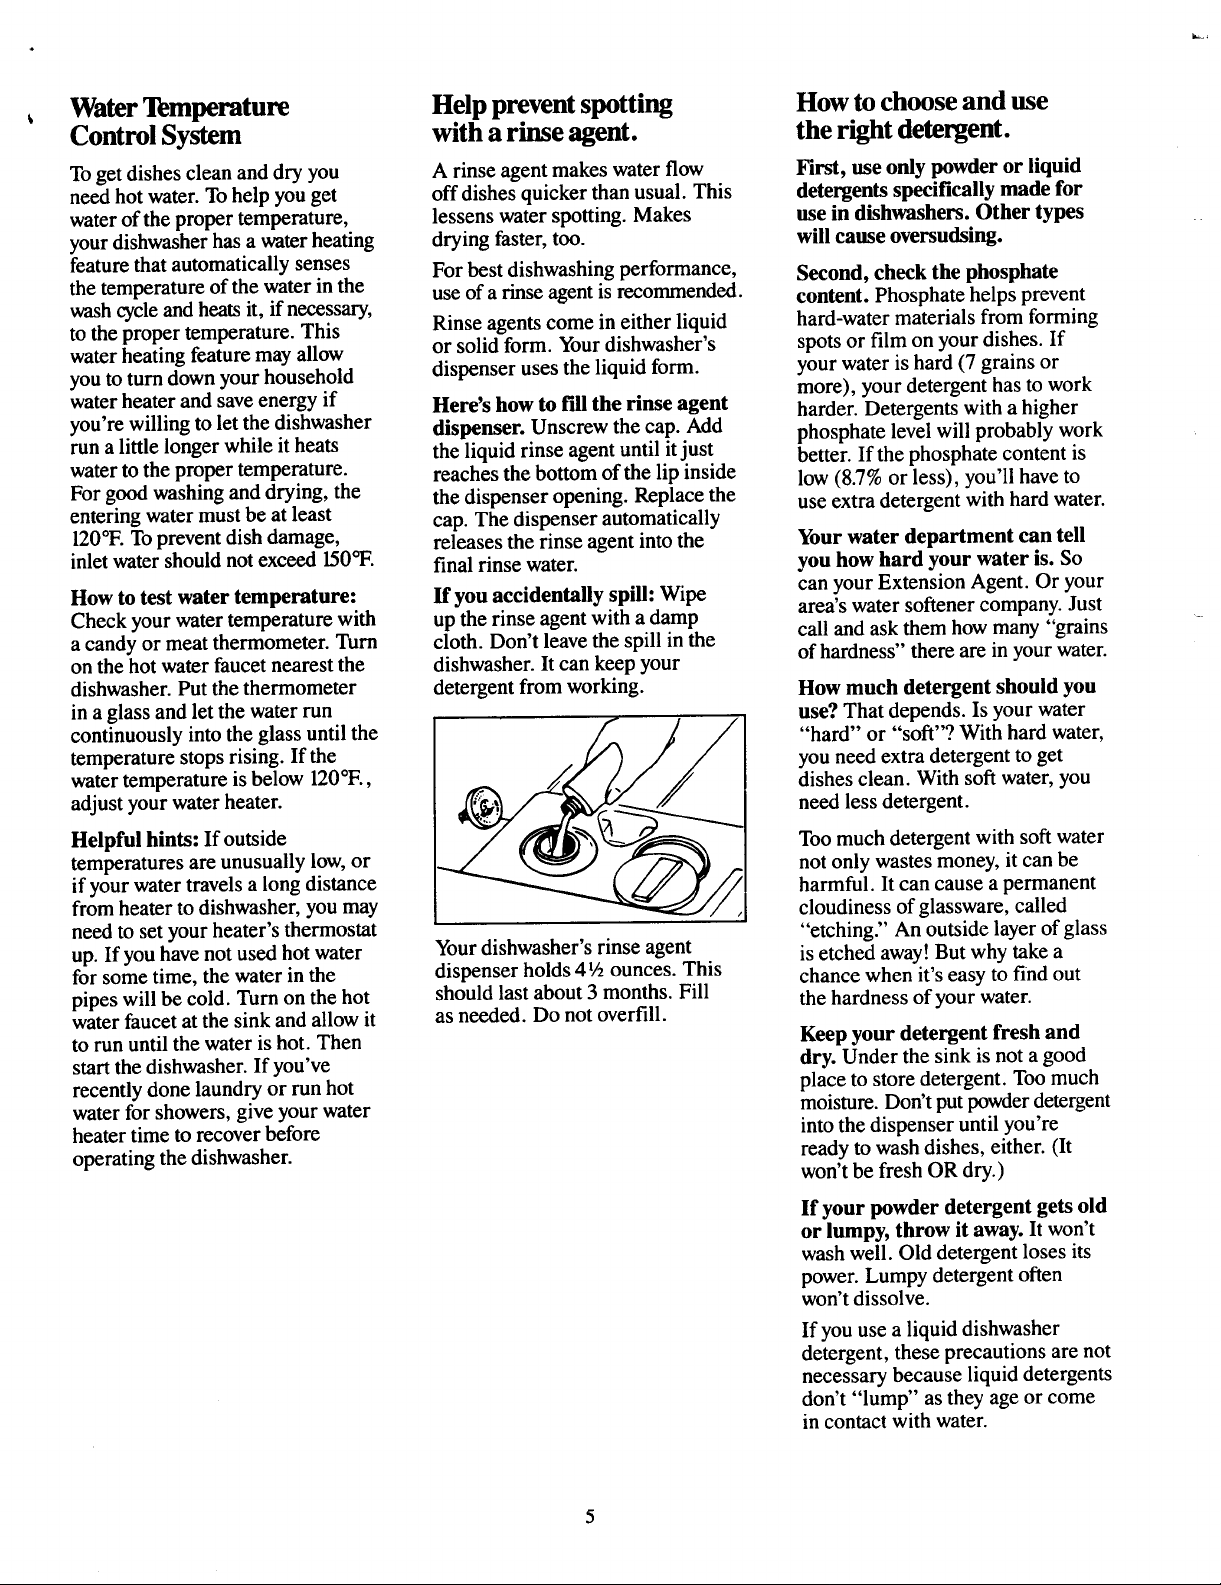
water heater and save energy if Here's how to fill the rinse agent harder. Detergents with a higher
you're willing to let the dishwasher dispenser. Unscrew the cap. Add phosphate level will probably work
run a little longer while it heats the liquid rinse agent until it just better. If the phosphate content is
water to the proper temperature, reaches the bottom of the lip inside low (8.7% or less), you'll have to
For good washing and drying, the the dispenser opening. Replace the use extra detergent with hard water.
entering water must be at least cap. The dispenser automatically
120°E To prevent dish damage, releases the rinse agent into the Your water department can tell
inlet water should not exceed 150°F. final rinse water, you how hard your water is. So
more), your detergent has to work
How to test water temperature: If you accidentally spill: Wipe can your Extension Agent. Or your
Check your water temperature with up the rinse agent with a damp call and ask them how many "grains -
a candy or meat thermometer. Turn cloth. Don't leave the spill in the
on the hot water faucet nearest the dishwasher. It can keep your
dishwasher. Put the thermometer detergent from working. How much detergent should you
in a glass and let the water run __,_ use? That depends. Is your water
temperature stops rising. If the you need extra detergent to get
water temperatureis below 120°E, dishes clean. With soft water, you
adjust your water heater. _ need less detergent.
continuously into the glass until the /.._j /z ___ "_//__'__ "hard" or "soft"? With hard water,
Helpful hints: If outside "'-_'/_)_-_, 4_._,,-"- Too much detergent with soft water
if your water travels a long distance harmful. It can cause a permanent
temperatures are unusually low, or _ not only wastes money, it can be
from heater to dishwasher, you may cloudiness of glassware, called
need to set your heater's thermostat "etching." An outside layer of glass
up. If you have not used hot water Your dishwasher's rinse agent is etched away! But why take a
for some time, the water in the dispenser holds 41/2ounces. This chance when it's easy to find out
pipes will be cold. Turn on the hot should last about 3 months. Fill the hardness of your water.
water faucet at the sink and allow it as needed. Do not overfill.
to run until the water is hot. Then Keep your detergent fresh and
start the dishwasher. If you've
recently done laundry or run hot place to store detergent. Too much
water for showers, give your water
heater time to recover before into the dispenser until you're
operating the dishwasher, ready to wash dishes, either. (It
area's water softener company. Just
of hardness" there are in your water.
dry. Under the sink is not a good
moisture. Don't put powder detergent
won't he fresh OR dry.)
If your powder detergent gets old
or lumpy, throw it away. It won't
wash well. Old detergent loses its
power. Lumpy detergent often
won't dissolve.
If you use a liquid dishwasher
detergent, these precautions are not
necessary because liquid detergents
don't "lump" as they age or come
in contact with water.
Page 6

L
How to prepare the
dishes for washing.
You'll find two detergent If this is your first dishwasher, or Note: The foods mentioned here
dispensers on the inside door of if you're replacing a much older are for examples only. Other foods
your dishwasher. There are two, model, you may wonder how much not mentioned may also need to be _
because some cycles use two washes, pre-preparation your dishes need. removed from your dishes. You
Actually very little. Pre-rinsing of may also want to consider removing
\ With common sense and a little vinegar, lemon juice and other\
practice you'll soon know what foods that can cause discoloration
OPENCUP foods to remove. Here are some of stainless steel if allowed to
i_p normal food soils is not necessary, foods such as mustard, mayonnaise,
1. Scrape off bones, seeds, skins, of time.
toothpicks and other hard solids. It When using the HEAVY WASH
is also best to remove hard shelled cycle, less preparation is required
__ _ __ guidelines: remain on dishes for a long period
- vegetables, meat trimmings, leafy before loading. The HEAVY WASH
See 'Detergent Usage Guide" below, vegetables and crusts. Remove cycle can wash heavily-soiled
(Be sure the Cycle Indicator Dial excessive quantities of oil or dishes and remove dried-on and
is at OFF position before adding grease, baked-on soils from pots, pans and
casseroles. Items with burned-on
detergent. Otherwise, the detergent 2. Remove large quantities of any soils may not come clean. And the
cup lid will not close and latch food. Yourdishwasher has a built-in dishwasher cannot remove burn --
properly.) soft food disposer that pulverizes marks or restore fading caused by
GRASPHANDLE, _ It can handle small amounts of
ROTATE
soft food bits and flushes them away. overheating during cooking.
ANDCLOSE _ SOftfOodS,but large amounts of
TIGHTLY _ _" food as soft as mashed potatoes or
applesaucewill be difficult to handle.
3. Try to remove food scraps and
place dishes in dishwasher before
soil has a chance to dry and become
hard. Dishes with dried-on soil are
more difficult to wash and may
Always close the main cup tightly, not come clean in the NORMAL
Whenfirmly latched you will hear a WASH cycle. Remember to use
clicking sound. Do not overtighten, your RINSE & HOLD cycle for
NOTE: Detergent cup may be
small "holding" loads.
opened manually with no harm.
Turn handle counterclockwise until
it releases. A snapping sound is
normal when it opens.
Detergent Usage Guide (powder orliquid)
SOFT WATER MEDIUM WATER HARD WATER
(0-3 grains hardness) (3-7 grains) (7-12grains*)
CYCLES Main Cup_ Open Cup_ Main Cup:_ Open Cup:_ Main Cup:_ Open Cup_
HEAVY WASH and 1 Tablespoon 1Tablespoon Half Full _ Half Full Completely _ Completely
NORMAL WASH cycles minimum minimum Full Full
CONSERVA WASH cycle 1 Tablespoon None Half Full None Completely None
RINSE & HOLD cycle Use no detergent Use no detergent Use no detergent
•12grains and up is extremely hard water. A water softener is recommended. Without it, :_FilledMain Cup holds 3 tablespoons;
lime can build up in water valve. Watervalve may stick while open and cause flooding. Filled Open Cup holds 2 tablespoons.
minimum Full
6
Page 7

How toload your dishwasher How to load the TOP RACK
The top rack is best for glasses, cups and saucers. Cups
and glasses fit best along the sides. This is the place for
dishwasher-safe plastics, too. Make sure small plastic
items are lodged in tightly so they can't fall onto the
This is a random mixed load, the most common type you heating unit. Arrange stemware so that it cannot move -
will have. easily. Don't let the glasses touch each other.
Make sure dishes are properly loaded to insure that
water can reach the soiled surfaces. The wash armin
the bottom sprays water up. The tower that rises in the
center sends water out over the dishes to wash the items
in the upper rack. A spray armin the top washes down.
Make sure to place tall items to the outside so the upper
wash arm is not blocked.
L
WATCH OUT FOR THIS.
The wash tower rises through the center of the bottom
rack during the wash and rinse portions of the cycle.
Don't block itor load tall things nextto it. Also, be
careful not to let a portion of an item such as a pot or
dish handle extend through the bottom rack. This could
block the wash arm and cause poor washing results.
Sauce pans, mixing bowls and other small items may
be placed--face down--in the top rack. The top rack is
handy for all kinds of odd shapes. Be sure the force of
waterand detergent can reach soiled surfaces.
Page 8

How to load the BOT'IM RACK
Fit plates and saucers between the pins. Place items so As shown here this plate is being placed with the soiled
that water and detergent from wash arm can reach soiled side facing the center of the rack so water and detergent
surfaces, from wash arm can reach soiled surfaces.
Load platters, pots, pans and bowls along the sides, in Heavily soiled pots, pans and casseroles MUST be
comers, or in the back. All large items, such as loaded in the bottom rack, facing down. Prop broiler
pitchers, salad bowls, and mixing bowls, should be pans and racks along the edge.
washed in the lower rack.
Don'tletany
itemextend
Put flatware in the removable basket with handles up to throughbottom.
protect your hands. Mix knives, forks and spoons so _x
they don't nest together. Distribute evenly.
The security cell cover, hinged in the handle, can be
lowered to either side to secure light-weight items from
the effects of the vigorous wash action. When it is not
needed, this cover can remain upright.
Precaution!
Takeout anything that may fall or extend through the
bottom of the basket.
Page 9

What you can usually wash safely in your dishwasher.
And what you can't.
Usually
Material Safe Exceptions (not safe) Special Instructions
Aluminum Some coloredanodiz_ Somedarkeningor spottingpossible.Removeby
I , aluminumcan fade. scouring with soap-filledsteel woolpads.
China/ I YES i Antique,metal-trimmed, If in doubt,checkwiththemanufacturer.Ortest wash
Stoneware hand-paintedorover-the-glaze onepiece dailyforat leastamonth. Comparewiththe
I I Goldleafwiltdiscolor.
patternsfade. restof theset.
Crystal YES ' Antique,metal-trimmedor Loadsecurelytopreventmovement.
Non-dishware NO I I Do not washin dishwasher.Damagetodishwasher
acres--such I [ [ anddiscolorationor stainingofdishwashermayresult.
asetearo_ ! I
air deaner I I
filters, furnace
hand-paintedpatternsfade. Checkmanufacturer'sinstructionsforyourcrystal.
, Goldleafwill discolor.
_er_ pnlnt ,
brushes, etc.
Glass ! YES I Milk Glassmayyellow.
Iron NO Ironwill rust.
Pewter NO ; Pewtertarnishes.
If it doesn't sayDISHWASHERSAFE, test one piece
before dishwashingan entire set. Wash in top rack only.
Stainlesssteel YES I Rinseif not washingimmediately.Salty oracid foods
[ canstainifleft on.
SterlingSilver YES Don'tputinsamesilverware Rinse ifnot washingimmediately.Salty oracid foods
andSilver basketwithstainlesssteel, canstainifleft on. Drydetergentcancausedifficult-
plate I Contactbetweenmetalscan to-removeblackspots. Placeinbacksectionof silverware
damagesilver, baskettoavDidexposuretodetergentfromthedetergentcup.
Don'twashcopperutensilsin
thesameload. Silvermaygeta
brownfilm.
Adhesiveusedto attachsome
hollow-handleknivescanloosen.
Non-stick YES Afterwashing,wipethe non-stickcoatingareawith
coatings vegetableoilto keepit fromlosingitsnon-stickquality.
Tin NO Tincan rust.
Wood NO Wood canwarp,crackorlose
itsfinishwithanytypewashing.
Forget a dish? Here's when However, opening the door during 2. Wait a few seconds until the
you can add it. any cycle lessens cleaning power, water calms. Then open the door.
Add dishes any time during the So try to load everything at the 3. Add dishes you've forgotten.
RINSE & HOLD cycle. With other beginning. 4. Close the door and push the
wash cycles, you can add dishes Here's how to add a forgotten dish: latch to the far right. When the
at any time BEFORE the main 1. Push the door latch to the left. door is locked, washing will
detergent wash portion of the cycle. Washing will stop. continue.
Page 10

Questions?
Use This Problem Solver
PROBLEM POSSIBLE CAUSE AND REMEDY
DISHWASHER A fuse in your home may be blown, or the circuit breaker tripped. Replace fuse or
WON'T RUN reset circuit breaker. Remove any other appliances from the circuit.
UNUSUAL NOISE Utensils may not be secure on rackpins, or something small may have dropped from
the rack. Water is causing utensils to rattle. Make sure everything is securely placed
in dishwasher.
DISHES DON'T DRY Make sure inlet water temperature is correct. (See page 5.)
Unload the bottom rack first. Waterfrom dishes in the top rack maybe spilling into the
bottom rack.
Check for improper loading. Dishes shouldn't nest togethen Avoid overloading.
Check the rinse agent dispenser to see that it's not empty.
UNCLEAN DISHES Check inlet water temperature. It should be at least 120_F.(To test, see page 5.)
AND FLATWARE To obtain the benefits of acomplete cycle, be careful that you do not turn the dial any
further than necessary to start the dishwasher.
Waterpressure may be temporarily low. Turn on a faucet. Is water coming out slower
than usual? If so, waituntil pressure is normal before using your dishwasher.
Plugged air gap. (See page 13.)
Improper rack loading. (See pages 7 and 8.)
BLACK OR GRAY Aluminum deposits often leave marks when they rub against other things. Remove
MARKS ON DISHES marks with amild abrasive cleanser.
DETERGENT LEFT Watermaynot be reaching the detergent cups. Move dishes that maybe blocking
IN DISPENSER CUPS detergentcup.
The dispenser cover may not be opening or maybe blocked by improperly loaded
items. If you used a powder detergent, open the cup and remove any caked-on
detergent. If the cup still doesn't open automatically, call for service.
Detergent may be old. If the powder detergent is hard or caked in the box, throw it
away.The detergent may not be working well. Try another brand.
DETERGENT CUP Cycle Indicator dial must be in OFF position for cup lid to close and latch properly.
LID WON'T LATCH If you unlatch the door and open it to dry your dishes, the Cycle Indicator does not
AFTER ADDING advance to OFF by itself.
DETERGENT
YELLOW OR BROWN Tea or coffee can stain cups. Remove the stains by hand, using asolution of 1/2cup
FILM bleach and 3 cups warmwater.
An overall yellow or brown film on dishes or glassware can be caused by iron deposits
in water.A special filter inthe water supplyline is the only wayto correctthis problem.
Yourwater softener company can tell you about the filter.
Yellow film on sterling silver results when you wash copper utensils inthe same load.
Silver polish will usually remove this stain.
(continued on next page)
10
Page 11

PROBLEM POSSIBLE CAUSE AND REMEDY
SPOTSAND FILMING Spotting can be caused byall these things:
ON GLASSES AND • Extremely hardwater. (See page5.)
FLATWARE
• Low inlet watertemperature. (Totest, see page 5.)
i • Overloading the dishwasher.
l
• Improper loading. (See pages 7 and8.)
• Old or damppowder detergent.
• Phosphate level in detergent too low. (See page 5.)
• Rinse agent dispenser empty. (See page 5.)
! • Too little detergent. (See page 6.)
Local water conditions andpersonal preferences vary. Try several brands of detergents
to find one that gives the best results for you. A liquid dishwasher detergent may help
reduce filming.
To remove stubborn spots and film from glassware:
1. Remove all metal utensils from the dishwasher.
2. Do not add detergent.
3. Select HEAVY WASH cycle.
4. Start the dishwasher and allow to runfor 15to20 minutes. The dishwasher will now
be in the main wash.
5. Then open the door and pour 2 cups (500 rnl) of white vinegar into the bottom of
the dishwasher.
6. Close the door and allow to complete the cycle.
If vinegar rinse doesn't work: Repeat as above, except use 1/4cup (60 ml) of citric
acid crystals instead of vinegar. (Most drugstores carrycitric acid crystals.)
Using a vinegar or citric acid crystal rinse more than twice a month? Consider a home
water softener.
CLOUDINESS ON If vinegar or citric acid crystal rinse doesn't work, the cloudiness is "etching:' The film
GLASSWARE cannot be removed.
Etching can be caused by: (1) using too much detergent or (2) water temperature
over 150°F.
CHIPPING OF CHINA Rough handling can cause chipping. Load with care. Make sure glassware and china
are secure and can't jar loose. (See page 7 for correct way to load glassware.) Make
sure tall glasses and stemware will clear the top of the tub when you push the rack into
the dishwasher.
Always use the top rack for delicate items.
11 [ (continuednext page)_
Page 12

The Problem Solver (continued)
PROBLEM POSSIBLE CAUSE AND REMEDY
SMALL AMOUNT OF Water around the outlet on the tub bottom at the back of the tub is normal. It is clean
WATER STANDING water. It's there to keep the water seal lubricated.
IN THE BOTTOM
OF THE TUB
WATER WON'T PUMP If the entire bottom ofthe tub has water, you may have a drain problem. Clean the air
OUT OF THE TUB gap, if you have one. (See page 13.)
Check the kitchen sink. Is it draining well? Youmay need a plumber.
If dishwasher drains into disposer, run disposer to clear. Be sure disposer is not
clogged.
SUDS IN THE TUB Sudsing detergents are not meant for dishwashers. USE ONLY AUTOMATIC
DISHWASHER LEAKS Suds can cause unit to overflow. That's why it's so important to use a detergent that's
DISHWASHER DETERGENTS TO AVOID SUDSING.
To remove suds from the tub: Open the dishwasher. Let suds evaporate. Add 1 gallon -
of cold water to the tub. Close and latch the dishwasher. Pump out water by slowly
turning the control dial until a drain period is reached.
Repeat if necessary.
designed for automatic dishwashers.
Spilling the rinse agent can cause foam during washing. This can lead to overflowing.
Wipe upaccidental spill of rinse agent with a damp cloth. 1
12
Page 13

Care and Cleaning
USERMAINTENANCE Built-in dishwashers Not using your dishwasher
INSTRUCTIONS often use an air gap. in winter? Protect against
Clean the control panel with Keep it clean, freezing.
a lightly dampened cloth. Dry An air gap is a plumbing device. If your dishwasher is leftin an
thoroughly. Do not use abrasives It protects your dishwasher against unheatedplace duringthe winter,
or sharp objects on the panel, waterbacking up into it if a drain ask a service technician to:
They candamage it. clogs. The airgap is not a partof * Cut off electric power to the
Clean the outside with a lightly the dishwasher. And you maynot dishwasher. Remove fuses or trip
dampened cloth. The outside even have one. Not all plumbing circuit breaker.
cabinet finish is durable, but it can codes require airgaps.
scratch. Do notuse scouring pads, • Turnoff the water supply.
or harsh or gritty cleaners. TWOTYPES _ ,!i :i_ • Disconnect the water inlet line
of itself. If it should ever need • Drain waterfrom the inlet line
The inside usually takes care _,___ from the water valve.
cleaning, use amild cleansing
powder. Scouring pads and harsh __ and water valve. (Use a pan to
cleaners can mar the finish. __ _ ..... catch the water.)
O_A,RaAPS _:id
-- __ -" ---_ • Reconnect the water inlet line to _
the water valve.
• Remove the plastic pump cover in
If you have an air gap, check it the tub bottom and use a sponge to
at least once a month. IT IS NOT soak up water in the rubber boot.
PART OF YOUR DISHWASHER.
IT IS NOT COVERED IN YOUR PUMPCOVERSCREWS
WARRANTY. - o._:._?.
The air gap is easy to clean.
With most types, first turn off the
dishwasher, then lift off the chrome
cover. Then unscrew the plastic cap
and check for any buildup of grit.
A toothpick makes cleaning easy.
Check the air gap any time your
dishwasher isn't draining well.
13
Page 14

How to change color panels If you need service
If you are redecorating, you can Color insert panels for both door To obtain service, see your warranty
change your dishwasher's front and lower panel can be replaced by packed with your appliance.
panels to match or blend with your 1/4" thick wood inserts to match We're proud of our service and
new colors, your kitchen cabinets. Get them
The panels are held in place by the from your nearest cabinet or reason you are not happy with the
door trim and the trim on the panel lumber dealer, service you receive, here are two
below the door. Each side of each Dimensions for 1/4" wood inserts: steps to follow for further help.
panel is a different color. Or you Door Panel: 19_" H x 23_6" V,: FIRST, contact the people who
can paint a panel with the color of
your own choice. Lower Panel: 3_6 " H x 239/16"W. serviced your appliance. Explain
How to change door panel inserts: while changing panels or when
1. Takeout three trim screws on lower access panel is removed. NEXT, if you are still not pleased,
either side of the dishwasher door. write all the details--including your
Remove the side trim. _ J.[!J_ " phone number--to:
2. Slide out both insert panels. _!:._ Consumer Relations Department
3. Put the color you want in front.
(Careful--edges may be sharp.) Service Company
4. Replace insert panels, side trim Cleveland, TN 37311
and screws. _ When writing about an unsolved
How to change lower panel inserts: _ service problem, please include the
1. Remove four panel attachment _ following information:
screws. (Two above the panel, two (a) Your name, address, and
below the panel.) Change color in minutes. Just telephone number;
2. Remove the entire panel, remove trim and change. (b) Model number, series number,
3. Take out three screws and remove and serial number (found on a
top trim. appliance;
4. Slide out both insert panels
together. (c) Name and address of your
5. Put the color you want in front, was bought;
6. Replace insert panels, top trim (d) A clear description of the
and screws, problem you are having;
7. Replace entire panel and four (e) Water hardness, detergent brand
attachment screws, and amount, water temperature,
Note: Do not operate dishwasher cases, this will solve the problem.
want you to be pleased. If for some
why you are not pleased. In most
Maycor Appliance Parts and
240 Edwards Street S.E.
label inside the door) of your
dealer and date the appliance
and cycle used.
14
 Loading...