

Page 1
JENN-AIR
mmm _
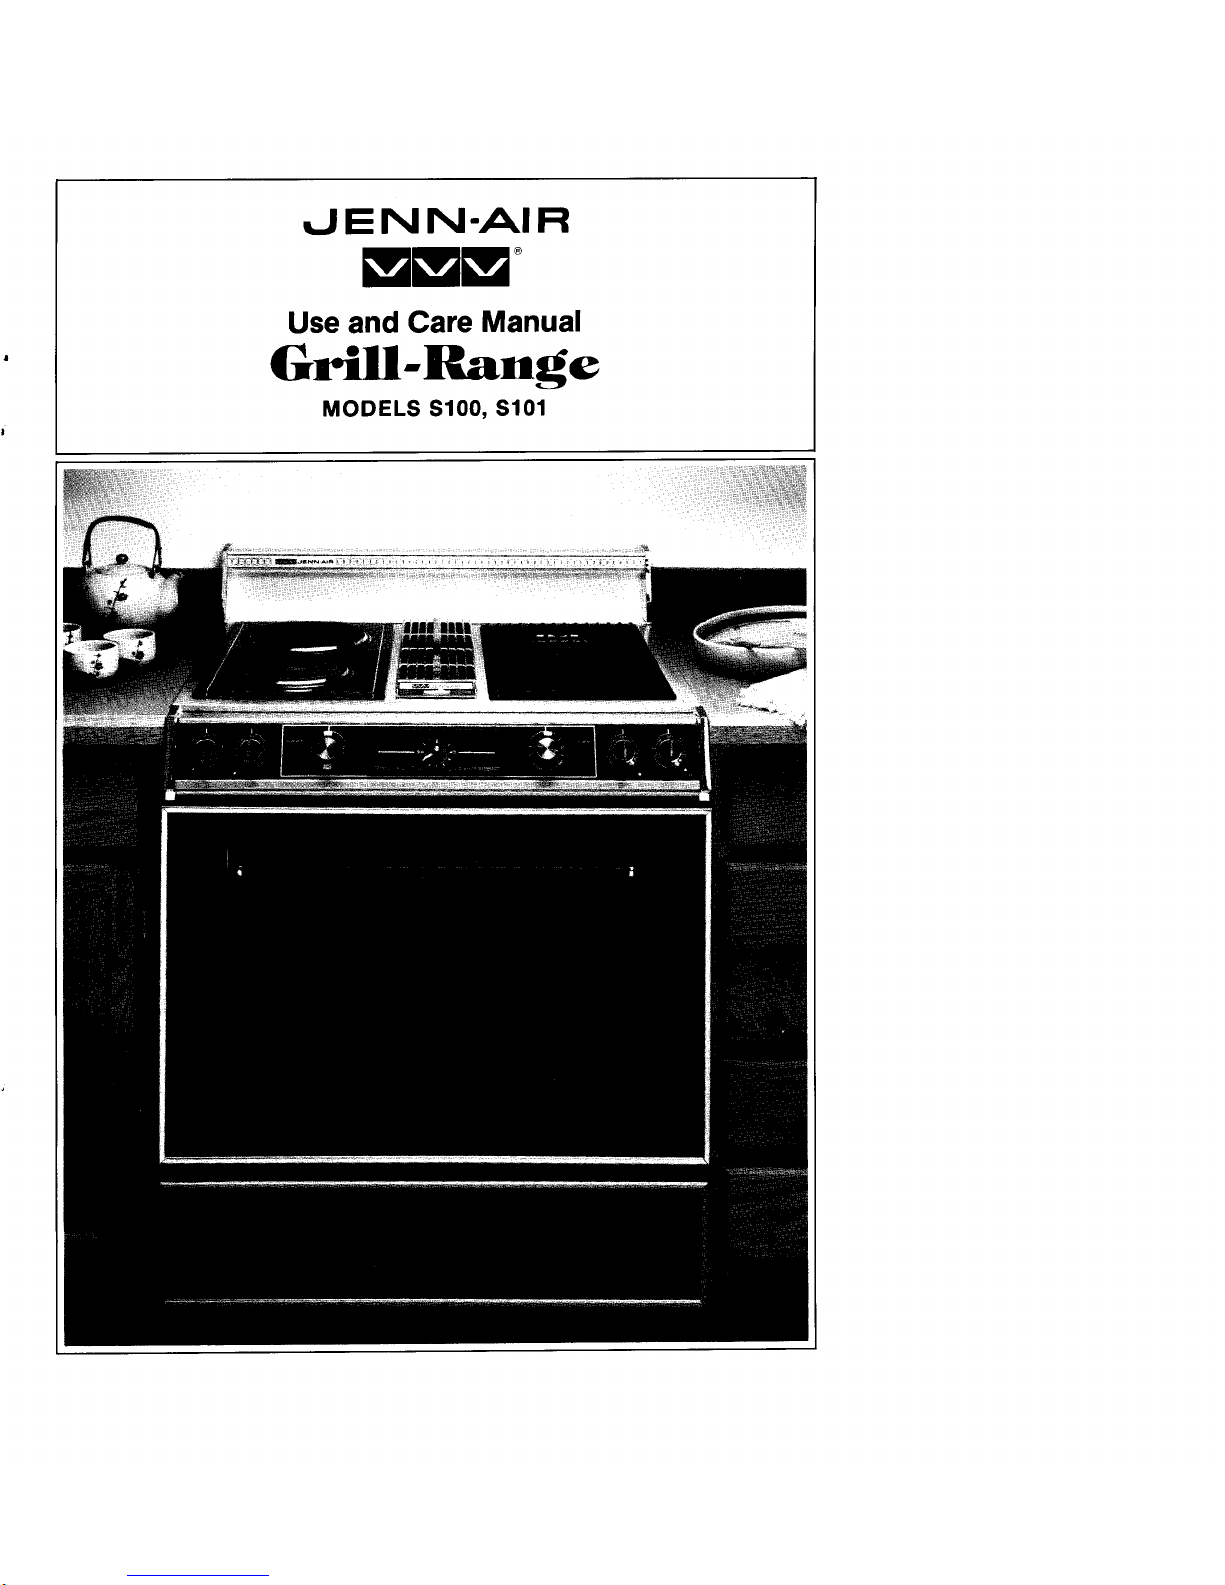
Use and Care Manual
i Grill-Range
MODELS SlO0, S101
Page 2
About YourJenn-Air
Your Jenn-Air Grill-Range offers new vistas in food preparation. The
countertop grilling of meats, fish or fowl isone of the most attractive
and succulent methods of preparing these foods.., aunique flexibility
made possible by Jenn-Air's patented integral ventilation system.
Your Jenn-Air oven is also a fine full featured "bake and broil" oven.
Since this manual explains how you can obtain the best use of your
Jenn-Air, it is essential that you follow the instructions carefully. This
will enable you to fully enjoy andproperly maintain your Jenn-Air and
will also assure you of achieving the finest cooking results with the
foods you prepare.., year after year.
Should you have any questions about using your Jenn-Air appliance,
write to us. Be sure to provide the model number of your appliance.
ConsumerRelationsDepartment
Jenn-AirCompany
3035 Shadeland Avenue
Indianapolis, IN 46226-0901
Page 3

SAFETY
PRECAUTIONS
Read before operating your range
All appliances -- regardless of the manufacturer -- have the
potential through improper or careless use to create safety prob-
lems. Therefore the following safety precautions should be
observed:
1. Be sure your appliance is properly installed and grounded
by a qualified technician.
2. Never use your appliance for warming or heating the room.
3. Children should not be left alone or unattended in area
where appliance is in use. They should never be allowed to
sit or stand on any part of the appliance.
4. Wear proper apparel. Loose-fitting or hanging garments
should never be worn while using the appliance.
5. Do not repair or replace any part of the appliance unless
specifically recommended inthis manual. All other servicing
should be referred to an authorized Jenn-Air Service
Contractor.
Page 4
6. Flammable materials should not be stored in an oven or
near surface units.
7. Do not use water on grease fires. Smother fire or flame or
use dry chemical or foam-type extinguisher.
8. Use only dry potholders. Moist or damp potholders on hot
surfaces may result in burns from steam. Do not let
potholder touch hot heating elements. Do not use a towel
or other bulky cloth.
g. Use proper pan size. Many appliances are equipped with
one or more surface units of different size. Select utensils
having flat bottoms large enough to cover the surface unit
heating element. The use of undersized utensils will expose
a portion of the heating element to direct contact and may
result in ignition of clothing. Proper relationship of utensil
to heating element will also improve efficiency and perfor-
mance.
10. Never leave surface units unattended at high heat settings.
Boil over causes smoking and greasy spillovers that may
ignite.
11. On conventional element ranges make sure that drip pans
are in place. Absence of these pans during cooking may
subject wiring or components underneath to damage.
12. Do not use aluminum foil to line surface unit drip pans, grill
basin or oven bottom. Installation of these liners may result
in an electric shock or fire hazard.
13. Glazed cooking utensils -- only certain types of glass,
glass-ceramic, ceramic, earthenware, or other glazed uten-
sils are suitable for range top surface without breaking due
to the sudden change in temperature. Use only such uten-
sils as you know have been approved for this purpose.
14. Utensil handles should be turned inward and not extend
over adjacent surface heating elements to avoid burns,
ignition of flammable materials and spillage due to uninten-
tional contact with the utensil.
15. Do not soak or immerse removable heating elements in
water.
16. CAUTION -- Do not store items of interest to children in
cabinets above a range or on the backguard of a range
--children climbing on the range to reach items could be
seriously injured.
17. Do not touch surface units or areas near units, heating
elements or interior surfaces of oven. Surface units or heat-
Page 5
ing elements may be hot even though they are dark in color.
Areas near surface units and interior surfaces of an oven
may become hot enough to cause burns. During and after
use, do not touch or let clothing or other flammable mate-
rials contact these areas until they have had sufficient time
to cool. Other surfaces may become hot enough to cause
burns --among these surfaces are the cooktop, the upper
door frame and glass, oven vent opening and surfaces near
the opening, and the top edge of the control panel.
18. Use care when opening oven door. Let hot air or steam
escape before removing or replacing food.
19. Do not heat unopened food containers. Build-up of pres-
sure may cause container to burst and result in injury.
20. Keep oven vent ducts unobstructed.
21. Always place oven racks in desired location while oven is
cool. If rack must be moved while oven is hot, do not let
potholder contact hot heating element in oven.
22. Clean only parts listed in this manual and use procedures
recommended.
23. Do not cook on glass-ceramic cooking surface if the cook-
top is broken. Cleaning solutions and spillovers may pene-
trate the broken cooktop and create a shock hazard.
Contact an authorized Jenn-Air Service Contractor.
24. Clean glass-ceramic cooktops with caution. If wet sponge
or cloth is used to wipe spills on a hot cooking area, be
careful to avoid steam burns. Some cleansers can produce
noxious fumes if applied to a hot surface.
25. Do not operate with damaged cooking element after any
product malfunction until proper repair has been made.
26. Keep all switches "OFF" when unit is not in use.
Page 6
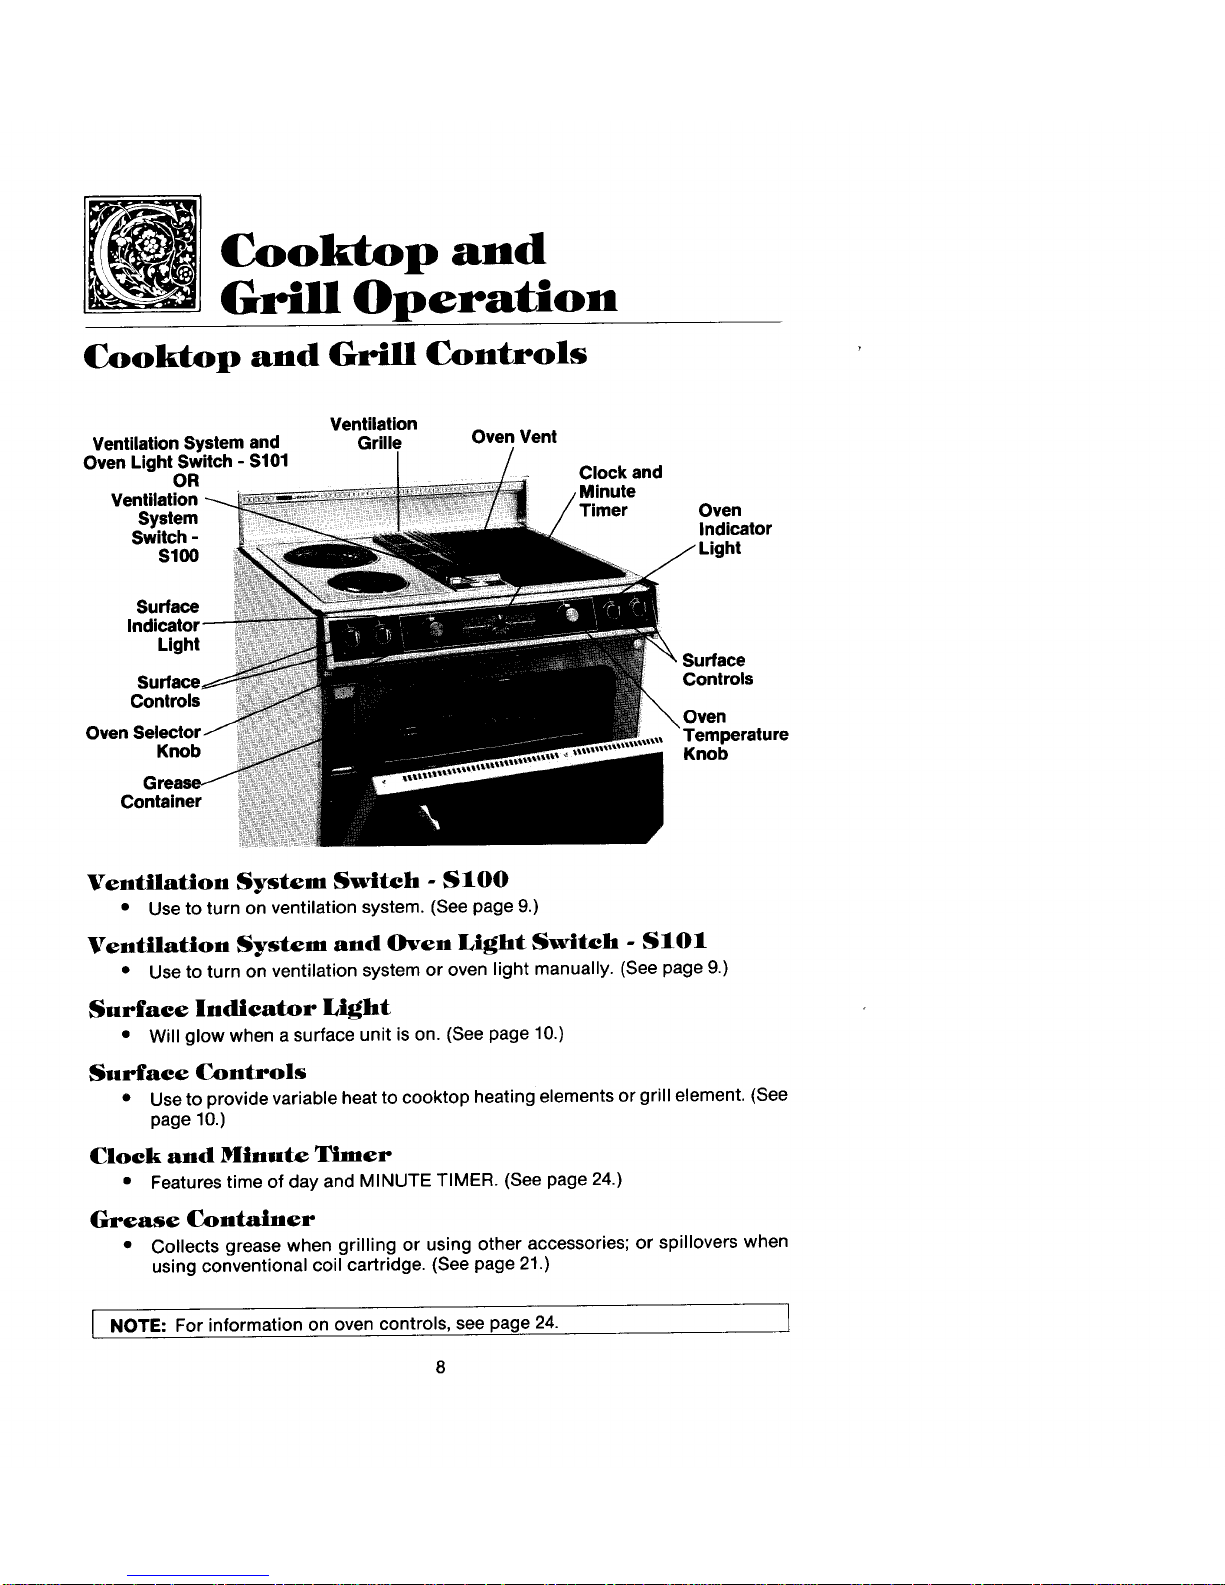
Cooktop and
Grill Operation
Cooktop and Grill Controls
Ventilation
Ventilation System and Grille Oven Vent
Oven Light Switch - $101
OR Clock and
Ventilation
System Timer Oven
Switch - Indicator
Sl00
Surface
Light
Surface Controls
Controls
Oven
Knob Knob
Container
Ventilation System Switch - SIO0
• Use to turn on ventilation system. (See page 9.)
Ventilation System and Oven Light Switch - SIO1
• Use to turn on ventilation system or oven light manually. (See page 9.)
Surface Indicator Light
• Will glow when a surface unit is on. (See page 10.)
Surface Controls
• Use to provide variable heat to cooktop heating elements or grill element. (See
page 10.)
Clock and Minute Timer
• Features time of day and MINUTE TIMER. (See page 24.)
Grease Container
• Collects grease when grilling or using other accessories; or spillovers when
using conventional coil cartridge. (See page 21.)
{ NOTE: For information on oven controls, see page 24. l
8
Page 7

Ventilation System
The built-in ventilation system removes cooking vapors, odors and smoke from foods
prepared on the cooktop, grill and grill accessories.
Using the Ventilation System
• Model $100: to operate the ventilation system man ually, push the on/off switch
located in front of the ventilation grille.
• Model $101: to operate the ventilation system man-
ually, push the fan symbol on the three position
VENTILATION AND OVEN LIGHT SWITCH located
in front of the ventilation grille. To turn the fan off,
push the switch to the middle position. If the light
symbol is pushed, the oven light will be turned on.
• The ventilation system will operate automatically when the grill element is in
use.
• Besides using the ventilation system to remove cooking vapors and fumes, it
can be used to cool baked pies, cakes or hot utensils. To cool an item, set it on
the ventilation grille and turn on the fan. The air being pulled over the item will
quickly cool it. Be careful not to cover the entire ventilation grille.
• The fan can be used to remove strong odors from the kitchen as when chopping
onions near the fan.
Cleaning the Ventilation System
Ventilation Grille: The surface grille lifts off easily.
, Wipe clean or wash in sink with mild household detergents.
May be cleaned in dishwasher. NOTE: The oven vent is
located under the grille. When using the oven, hot and moist
air may be noticed in this area. Be careful not to spill any-
thing into this vent.
Filter= Turn off ventilation system before removing. The filter is a permanent type
and should be cleaned when soiled. Clean in sink with warm water and liquid dishwash-
ing detergent or in dishwasher.
IMPORTANT: Filter should always be placed at an angle. As you face the front of the
range, the top of the filter should rest against the left side of the vent opening and the
bottom of the filter should rest against the right side of the ventilation chamber at the
bottom. DO NOT OPERATE SYSTEM WITHOUT FILTER.
Ventilation Chamber: This area, which houses the filter, should be cleaned in the
event of spills or whenever it becomes coated with a film of grease. May be cleaned with
paper towel, damp cloth or sponge and mild household detergent.
9
Page 8
Surface Controls
The variable heat controls for the cooktop cartridges and g rill element provide flexibil-
ity in heat setting selection.
To Set Controls
• Since the controls are a push-turn type, they must be pushed down before turning. To set
(from the OFF position), push down on control knob and turn in either direction to desired
heat setting.
• When control is in any position, other than OFF, it may be turned in any direction without
pushing down.
• The SURFACE INDICATOR LIGHT will glow red when any surface heating element is ON.
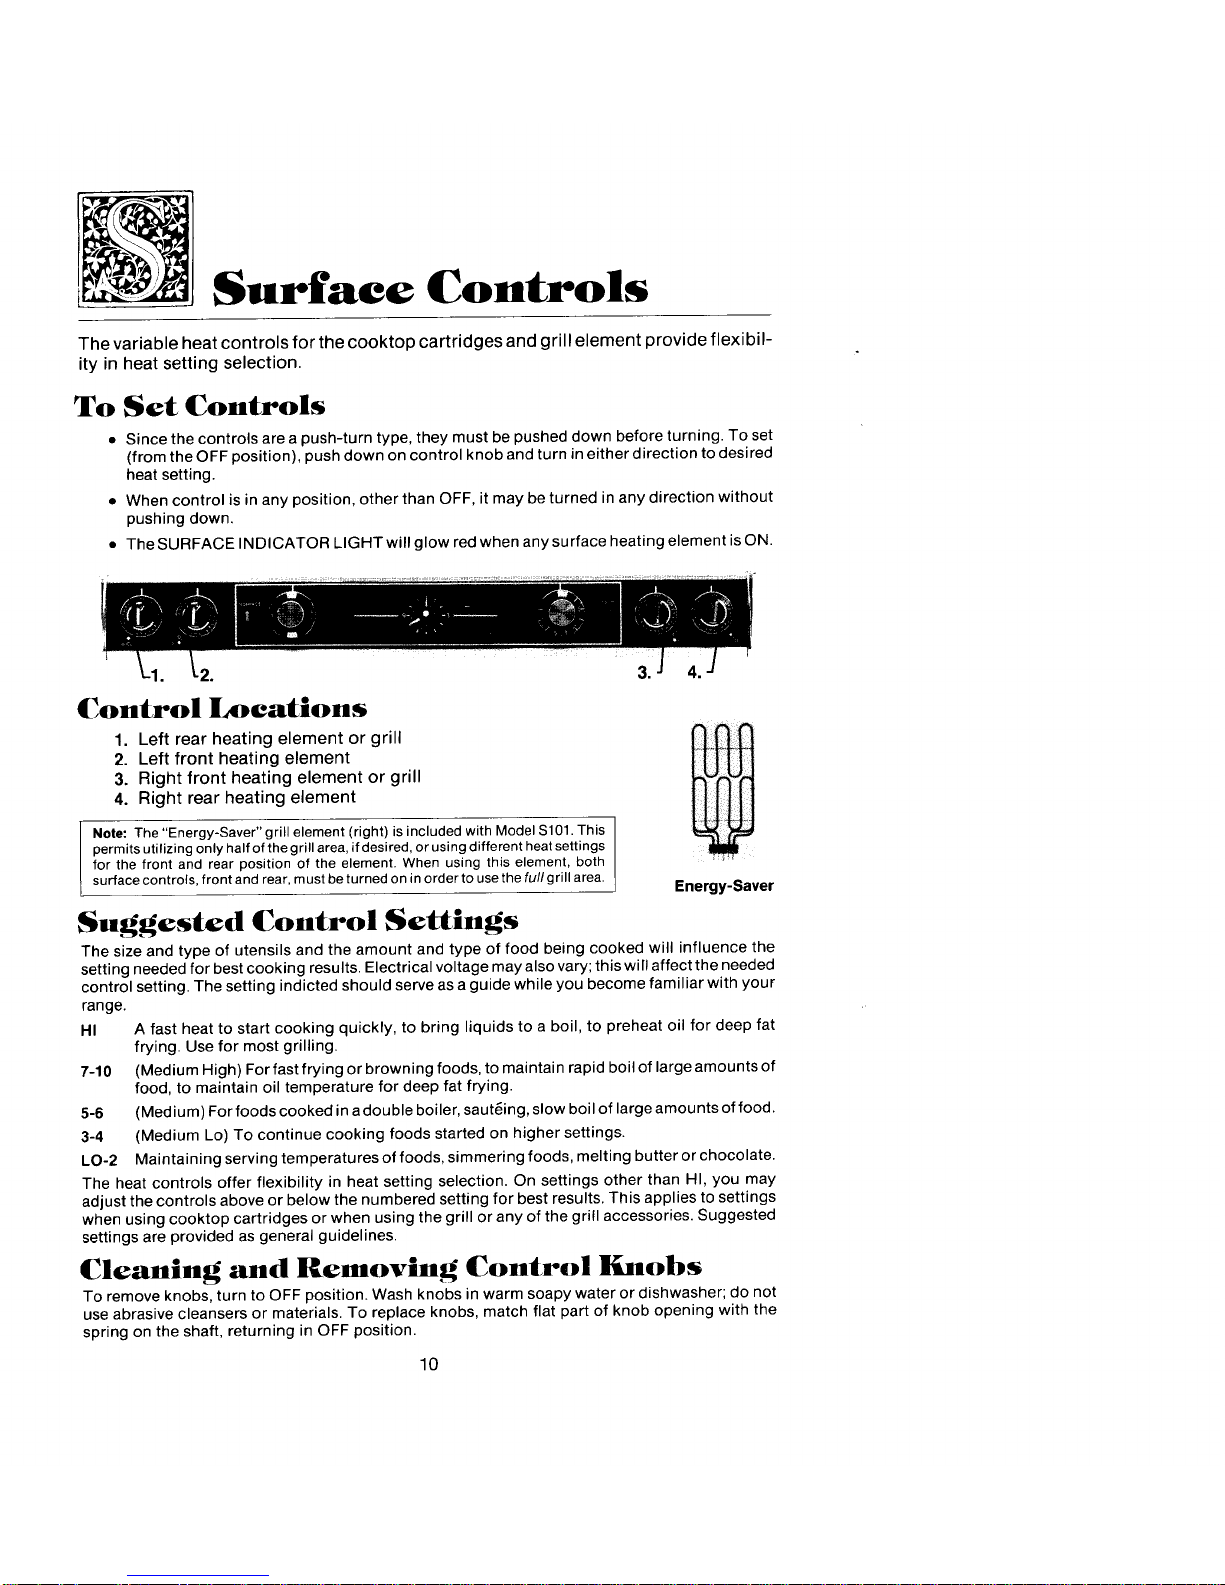
3.
Control Locations
1. Left rear heating element or grill
2. Left front heating element
3. Right front heating element or grill
4. Right rear heating element
I Note" The "Energy-Saver" grill element (right) is included with Model$101.This
permits utilizing only half of the grill area, ifdesired, or usingdifferent heatsettings
for the front and rear position of the element. When using this element, both
surface controls, front and rear, must beturned on in order to usethe fullgrill area. Energy-Saver
Suggested Control Settings
The size and type of utensils and the amount and type of food being cooked will influence the
setting needed for best cooking results. Electrical voltage may also vary; this will affect the needed
control setting. The setting indicted should serve as a guide while you become familiar with your
range.
HI A fast heat to start cooking quickly, to bring liquids to a boil, to preheat oil for deep fat
frying. Use for most grilling.
7-10 (Medium High) For fast frying or browning foods, to maintain rapid boil of large amounts of
food, to maintain oil temperature for deep fat frying.
5-6 (Medium) For foods cooked in adouble boiler, sauteing, slow boil of large amounts of food.
3-4 (Medium Lo) To continue cooking foods started on higher settings.
LO-2 Maintaining serving temperatures of foods, simmering foods, melting butter or chocolate.
The heat controls offer flexibility in heat setting selection. On settings other than HI, you may
adjust the controls above or below the numbered setting for best results. This applies to settings
when using cooktop cartridges or when using the grill or any of the grill accessories. Suggested
settings are provided as general guidelines.
Cleaning and Removing Control Knobs
To remove knobs, turn to OFF position. Wash knobs in warm soapy water or dishwasher; do not
use abrasive cleansers or materials. To replace knobs, match flat part of knob opening with the
spring on the shaft, returning in OFF position.
10
Page 9
Using Cooktop
Cartridges
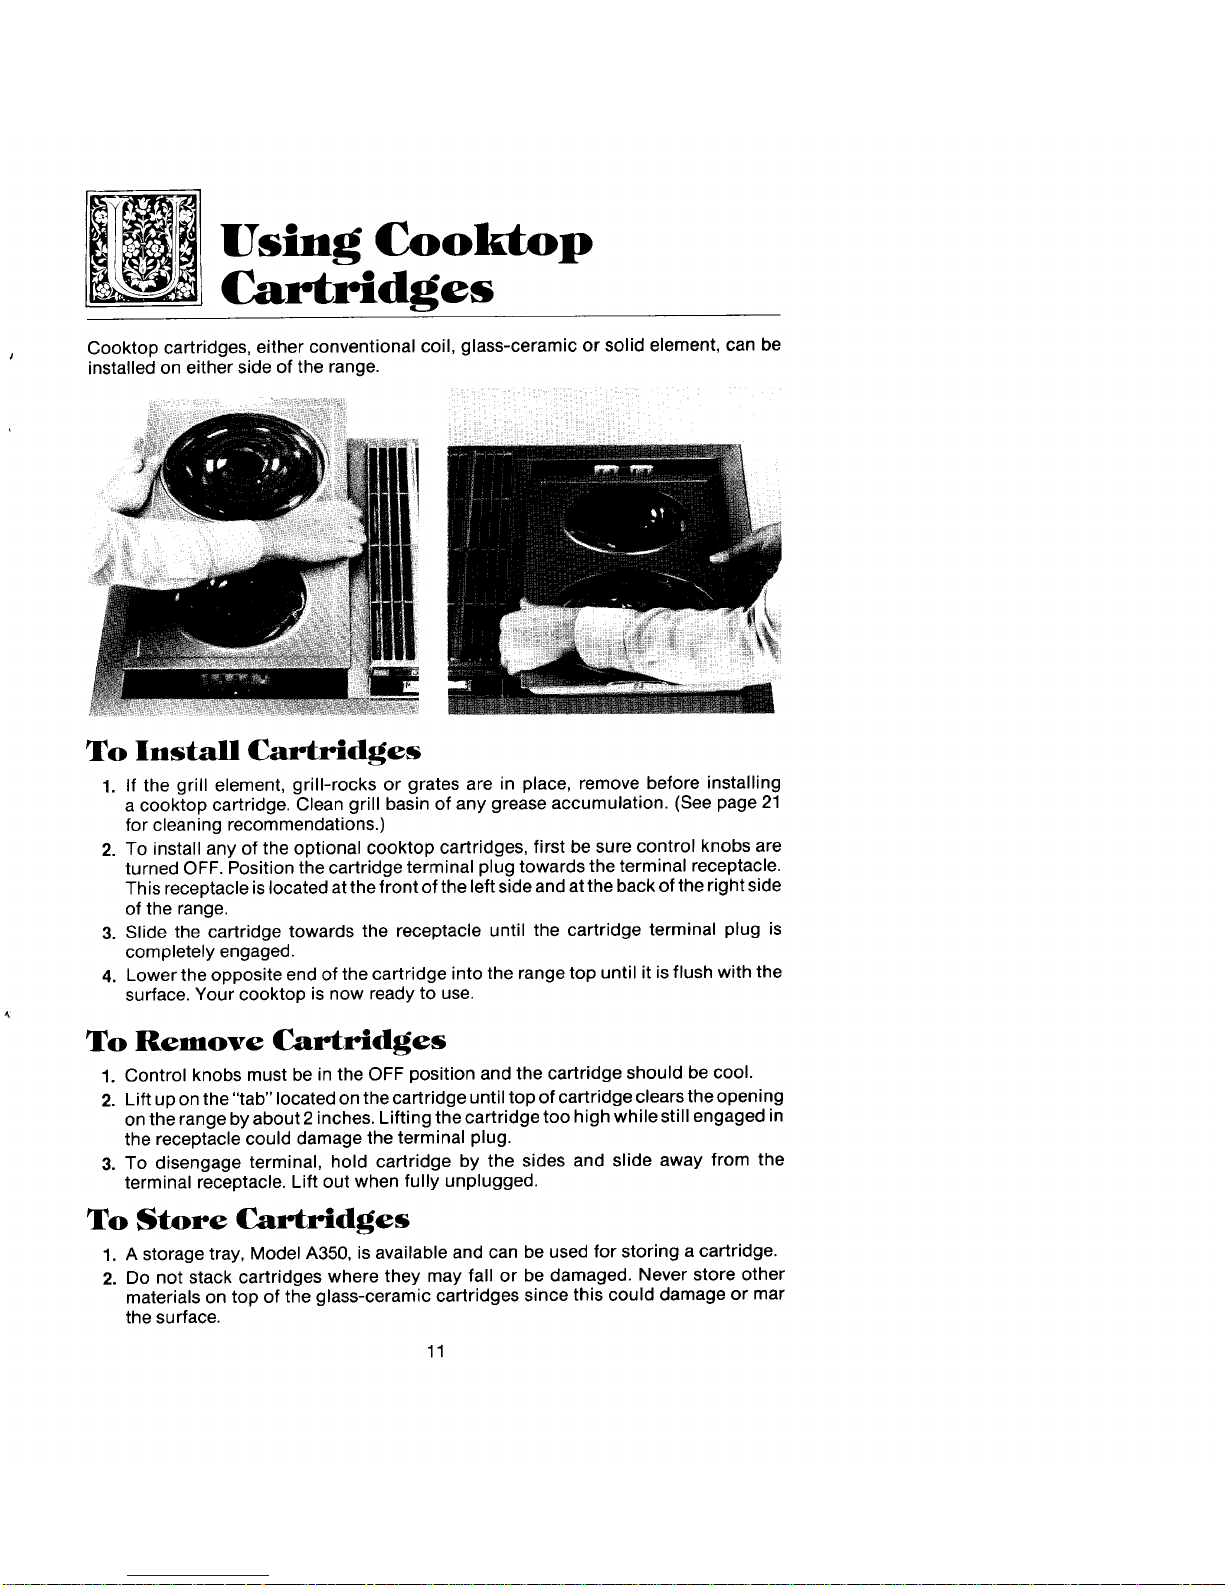
Cooktop cartridges, either conventional coil, glass-ceramic or solid element, can be
installed on either side of the range.
To Install Cartridges
1. If the grill element, grill-rocks or grates are in place, remove before installing
a cooktop cartridge. Clean grill basin of any grease accumulation. (See page 21
for cleaning recommendations.)
2. To install any of the optional cooktop cartridges, first be sure control knobs are
turned OFF. Position the cartridge terminal plug towards the terminal receptacle.
This receptacle is located at the front of the left side and at the back of the right side
of the range.
3. Slide the cartridge towards the receptacle until the cartridge terminal plug is
completely engaged.
4. Lower the opposite end of the cartridge into the range top until it is flush with the
surface. Your cooktop is now ready to use.
To Remove Cartridges
1. Control knobs must be in the OFF position and the cartridge should be cool.
2. Lift up on the "tab" located on the cartridge until top of cartridge clears the opening
on the range by about 2 inches. Lifting the cartridge too high while still engaged in
the receptacle could damage the terminal plug.
3. To disengage terminal, hold cartridge by the sides and slide away from the
terminal receptacle. Lift out when fully unplugged.
To Store Cartridges
1. A storage tray, Model A350, is available and can be used for storing a cartridge.
2. Do not stack cartridges where they may fall or be damaged. Never store other
materials on top of the glass-ceramic cartridges since this could damage or mar
the surface.
11
Page 10
Conventional
Coil Cooktop
For best results, most efficient use of electricity and to prevent damage to the conven-
tional coil elements, select cookware as described below.
The variable control setting allows flexibility in selecting desired heat. The HI setting
should be used only to start cooking. The control should then be turned to a lower
setting. Energy can be saved by avoiding unnecessary rapid boiling of foods and
covering utensils when bringing water to a boil. Use the lowest setting possible to
maintain correct frying temperature to avoid excessive splattering. Use atight fitting lid
on utensils to speed cooking.
Retained heat in the elements can be used to finish cooking.
Do not allow pans to boil dry as this could damage both the cooktop and pan.
Selecting Proper Cooking Utensils
• Select cookware with flat bottom_. Flat bottom pans are the fastest and best
conductors of heat and provide the most consistent and satisfactory results. The
entire bottom of the utensil should touch the heating element evenly. Avoid using
utensils with convex, concave or irregular bottoms. A utensil which is not flat
receives the most heat at the point of contact, which causes "hot spots" and
uneven heat distribution. Hot spots can result in scorching or burning of the food.
Uneven heat distribution slows the cooking process and wastes energy.
• To determine if a utensil is flat, lay a straight edge ruler against the bottom.
• Do not use a wire trivet or any kind of heat retarding pad between the utensil and
element. Reduce the heat control setting instead.
• Do not use utensils that extend more than 1 inch on either side of the element.
(See exceptions for canning on page 13.) Use the correct size pan for the size of
the heating element.
• Do not use large diameter canners or utensils except when boiling water or
canning. Sauce mixtures, syrups and fried foods all cook at much higher temper-
atures than boiling water and could eventually reflect damaging heat to the
adjacent component parts of the range, shorten life span of heating element,
damage and discolor drip pans or cause impossible to clean spots on metal
surfaces. These problems are increased when the HI setting is used excessively
with oversized cooking utensils.
• Do not use any vessel with a turned down flange around the bottom.
• Special cooking equipment without flat bottoms, such as the Oriental wok, should
not be used on the cooktop. Only use the Jenn-Air wok accessory, Model A 140,
on the range. It has a special heating element designed to elimate problems
associated with using traditional round bottom woks on the conventional coil
cartridge, such as shortening the life of the heating element.
12
Page 11
Cleaning the Conventional Coil Cooktop
The cooktop cartridge does not need to be removed from the range for normal cleaning.
Never immerse cartridge in water to clean. This can damage wiring. A drain hole within
the cartridge permits drainage of normal spills into the porcelain drain pan where it will
drain into the grease container. Interior and bottom of cartridge may bewiped clean with
detergent solution if necessary.
Cartridge terminals, if dirty, may be polished with S.O.S. pad, but must be cleaned
thoroughly of soap and dried thoroughly before being inserted into range.
Heating Elements: Under normal conditions, most soil will burn off elements. The
heating elements unplug for your convenience in cleaning the drip pans. Lift slightly
and pull away from receptacle. DO NOT IMMERSE IN WATER. To replace elements,
push completely into the receptacle. Make sure the elements fit flat inside the chrome
bowl.
Drip Pans: To keep the like-new appearance, clean frequently and never allow
anything to burn on twice. Remove soiled pans (first remove heating element). Clean
lightly soiled pans with soap and water or clean in dishwasher. Difficult to remove spots
can be cleaned by rubbing lightly with soapy S.O.S. pads or nonabrasive cleansers
such an Bon Ami. To help release burned on soil, soak in a solution of 1/2 cup ammonia
and 1 gallon warm water or boil in 2 quarts of water for 20 minutes. (All drip pans cannot
be boiled at once because element being used must have adrip pan in place.) Do not
use abrasive cleansers, steel wool or cleansers not recommended for use on chrome. A
bluing of the drip pans indicates improper utensil selection and/or using excessively
high heat and cannot be removed.
Stainless Steel Areas: See page 22 for cleaning instructions for stainless steel
areas.
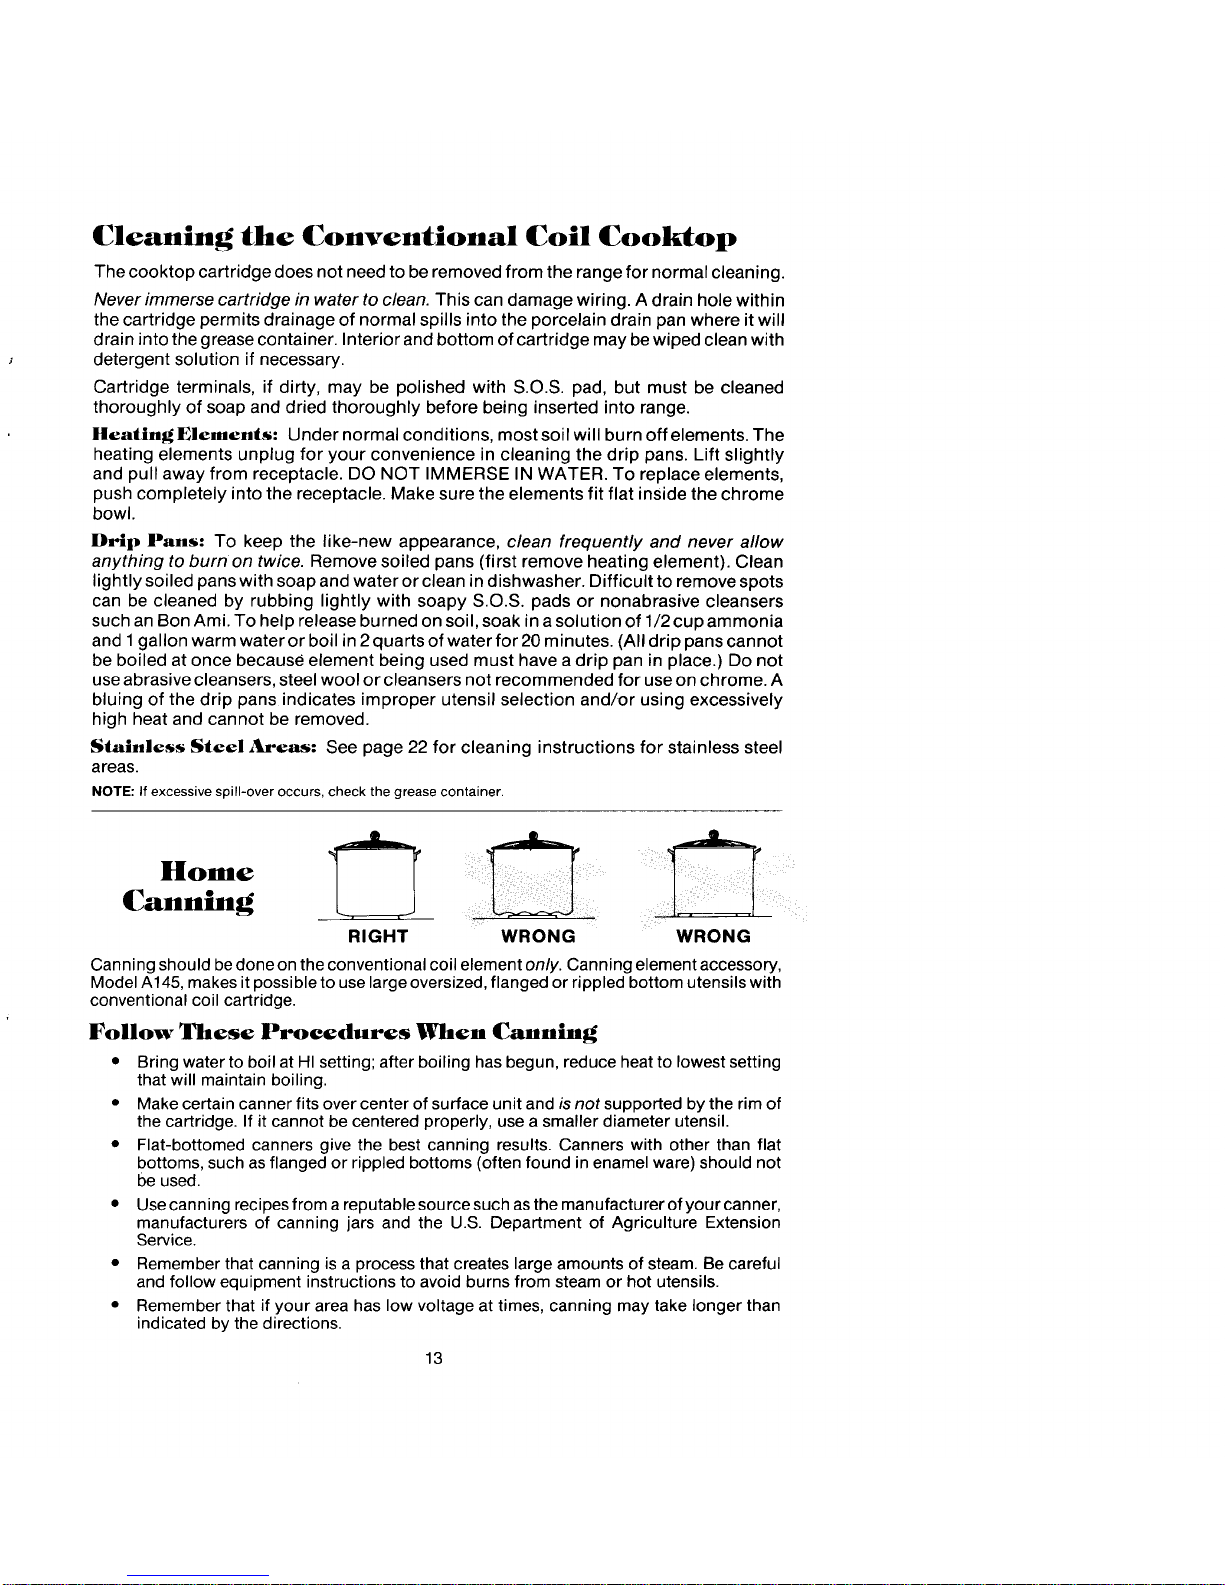
NOTE;Ifexcessivespill-overoccurs,checkthegreasecontainer.
CanningHome t!
RIGHT WRONG WRONG
Canning should bedone on the conventional coil element only. Canning element accessory,
Model A145, makes it possible to use large oversized, flanged or rippled bottom utensils with
conventional coil cartridge.
Follow These Procedures When Canning
• Bring water to boil at HIsetting; after boiling has begun, reduce heat to lowest setting
that will maintain boiling.
• Make certain canner fits over center of surface unit and is not supported by the rim of
the cartridge. If itcannot be centered properly, use a smaller diameter utensil.
• Flat-bottomed canners give the best canning results. Canners with other than flat
bottoms, such as flanged or rippled bottoms (often found in enamel ware) should not
be used.
• Usecanning recipes from areputable source such as the manufacturer of your canner,
manufacturers of canning jars and the U.S. Department of Agriculture Extension
Service.
• Remember that canning is a process that creates large amounts of steam. Be careful
and follow equipment instructions to avoid burns from steam or hot utensils.
• Remember that if your area has low voltage at times, canning may take longer than
indicated by the directions.
13
Page 12

Glass-Ceramic
Cooktop
For best results, always use proper cookware as described below. Utensils should
match the size of the heating element. The utensils should be made of a material which
conducts heat well and does not warp after heating, such as heavy duty aluminum and
stainless steel.
Different utensils and different amounts of food being prepared will affect the tempera-
ture control setting. (See page 10 for typical control settings.) For fastest cooking, start
with the surface control on HI for one minute; then turn the control to the lower desired
setting. Covering utensils, whenever possible, Speeds cooking and is more energy
efficient.
Glass-ceramic retains heat for a longer period of time than a conventional coil element.
Consequently, if water is brought to a boil at the HI setting, it will continue to boil
rapidly for a minute or so after being turned to a lower heat setting. In the event of a
potential boil over, move the utensil to a coot element or from the cooking surface.
A benefit of the retained heat feature of glass-ceramic cooktops is that the heating
element can be turned off several minutes before the food is done and the retained
heat can be used to finish cooking the food or for keeping the food warm until ready to
serve.
Selecting Proper Cooking Utensils
• Select cookware with flat bottoms. Flat bottom pans are the fastest and best
conductors of heat and provide the most consistent and satisfactory results.
• To determine if the utensil is flat, place the edge of a ruler on the bottom. Hold up
to the light. No light should be visible between the edge of the ruler and the pan.
Reject any pans that do not fit flush against ruler's edge.
• Avoid utensils with convex, concave, or those that have irregular bottoms, such
as those with rims or ripples. These utensils not only cause the element to cycle
off but can also cause stains which may be difficult or impossible to remove.
• Test cast ironware since all are not flat. Also be cautioned against possible
"impact damage" should the heavy utensil be dropped on the glass-ceramic
surface.
• Do not use utensils of a diameter that permits either side of the bottom to rest on
any rim portion of the cooktop cartridge. Large utensils, such as pressure
canners or oversized skillets, should be used only on conventional coil or induc-
tion cartridges if they do not meet this test. For tips on canning, see page 13.
14
Page 13

Cleaning the Glass-Ceramic Cooktop
Save on Clean-up Time
• Make sure bottoms of cookware utensils are always clean and dry. Before using
utensils on the glass-ceramic cooktop for the first time, and periodically as
needed, clean the bottoms with scouring pads or other cleansers. Rinse and dry
thoroughly. Soil from the utensil bottom can be transferred to the cooktop
surface.
• Make it a practice to wipe cooktop surface with a clean damp cloth or paper towel
before each use; dry thoroughly. Invisible spatters, dust specks, cleansers or
water can cause stain that appear after unit is heated. A sponge or dishcloth
which is not clean will leave film and soil laden detergent water which may cause
stains on surface after area is heated.
• Use correct heat settings and cookware large enough to hold food and liquid to
prevent boil overs and spattering.
• When frying, use a spatter shield to reduce spattering.
• If a bad spillover occurs while cooking, spills may be cleaned from the cooktop
while it is hot to prevent a tough cleaning chore later. Using extreme care, wipe
with a clean damp towel. Be careful to avoid burns from steam or hand touching
the hot cooktop.
IMPORT. It]r
• Do not use the glass-ceramic cooktop as a cutting board.
• Do not use or place plastic itemsanywhere on the cooktop.
• Do not use cartridge in the event a break has occured. Call anauthorized Jenn-Air
Service Contractor.
• Do not slide or scrape aluminum utensils across the cooktop since this may cause
marks or pits insurface which are permanent.
• Do not slide heavymetal utensils across surface since these may scratch the surface.
• Do not cook foods directly on cooktop.
• Do not use aluminum foil, disposable foil pans (such as those packaged with popcorn)
or foil wrapped food bundles on cooktop since this can permanently mark the surface.
• Do not allow pan to boil dry as this could damagethe cooktop and the pan.
• Do not use trivets or any kind of heat retarding pad under cooking utensils.
15
Page 14

Daily Care
• After cooktop has cooled, remove any spillover or spatter.
• Thecartridgedoesnotneedtoberemovedfromtherangefornormalcleaning. if
removed, bottom may be wiped clean with damp cloth. If electrical terminals on
cartridge are cleaned, dry them thoroughly before using.
• For general daily cleaning and light surface soil, wash surface with solution of
water and any of these cleansers: dishwashing liquid such as Ivory or Joy, baking
soda, fine polishing powders such as Bon Ami, or commercial ceramic cooktop
cleansers. Wipe with clean damp cloth or paper towel. Rinse and dry thoroughly.
• To remove residue from burned on spills, make a paste of water and baking soda
or Bon Ami, Bar Keepers Friend, Comet, Shiny Sinks or nonabrasive soft scrub-
bing cleansers. Scrub with paper towels, nylon or plastic scrubber, such as Tuffy.
Rinse and dry thoroughly. If stain is not removed easily, allow paste to remain on
surface for 30 to 40 minutes. Keep moist by covering with wet paper towel.
• To remove burned on spot, use a single edge razor blade. Place blade edge on
cooktop at 30 ° angle; scrape off spot. Clean remainder of soil with method
described above.
• To remove moderate to heavy stains, remove cartridge from range (to prevent
unit from being turned on). Make a paste of Bar Keepers Friend and water. Apply
to stained area. To keep paste moist, cover with clear polyester sheet, such as
Reveal and Glad. Allow to remain overnight. Rinse surface and dry thoroughly. If
stain is not completely removed, repeat procedure.
• For cartridges with chrome trim, clean with Bon Ami glass cleanser or polishing
cleanser, mild soap or detergent. See page 22 for cleaning instructions for
stainless steel trim.
RT. .C Ir
• For cleaning: Do Not use soap pads containing metal fibers such as steel wool or
S.O.S.pads, oven cleaning compounds, ruststain removers, abrasive cleansers or other
cleansers not specifically recommended for use on glass-ceramic.
• Never immerse your cooktop cartridge in water. This could damage internal wiring.
16"
Page 15

Grilling
The grill accessory consists of two black grill grates, a grill element and two grill-rocks.
, To Install Grill
1. Before installing grill components, be certain surface controls are inthe OFF position.
2. Place the two grill-rocks into an empty grill basin with their handles running parallel to
the front of the range. These grill-rocks must be used since they support the grill
element.
3. Position the grill element with the terminal plug towards the terminal receptacle. This
receptacle is located at the front of the left side and at the back of the right side of the
range. Slide the element towards the receptacle until the terminal plug is completely
engaged.
4. The grill element should now rest on the handles of the grill-rocks.
5. Place the black grill grates on the top of the range top.
To Remove Grill
1. Remove grill components once they are cool. Besure control switches are in the OFF
position.
2. To remove grill element, pull away from receptacle until it is unplugged. Do not lift the
element while it is engaged in the receptacle since this could damage the terminal.
3. A storage tray, Model A350, is available for purchase and can be used for storing the
grill assembly.
Installing Other Accessories
1. Remove the two black grill grates from the grill. Now you are ready to use the optional
grill accessories.
2. Review the instructions for installing and using the accessories that are packaged with
the accessory.
17
Page 16

Using the Grill
• Before using the grill for the first time, wash grill grates in hot soapy water; rinse
and dry.
• Precondition new grates and grill-rocks by brushing with vegetable oil or spraying
with a non-stick coating such as Pare. This procedure should be repeated after
cleaning in a dishwasher since the detergent removes seasoning.
• For easier clean-up, as well as preventing meats from sticking to grates until they
are seasoned, spray grates, grill-rocks and grill basin with a non-stick coating.
• Preheat grill on HI setting for 5 minutes. Preheating improves the flavor and
appearance of meats and quickly sears the meat to help retain the juices. The
heating element should glow a bright cherry red.
• Excessive amounts of fat should be trimmed from meats. Only a normal amount
is necessary to produce the smoke needed for that smoked, "outdoor" flavor.
Excessive fat can create cleaning and flame-up problems.
• Allowing excessive amounts of grease or drippings to constantly flame voids the
warranty on grill grates. Excessive flame-ups indicate that either the grill interior
needs to be cleaned or that excessive amounts of fat are in the meat or the meat
was not properly trimmed.
• Grease drippings will occasionally ignite to produce harmless puffs of flame for
a second or two. This is a normal part of the cooking process.
• NEVER LEAVE GRILL UNATTENDED DURING GRILL OPERATION.
Should excess grease canse sustained flame-up
1. Immediately turn grill heat control switch to OFFposition.
2. Turn on FAN manually.
3. Removemeat from grill.
IMPORTANT
• Do not use aluminum foil inside the grill area.
• Do not use charcoal orwood chips in the grill area.
• Do not allow grill-rocks to become overloaded with grease. Clean frequently.
• Do not cover grates completely with meat.Leave air space between each steak, etc. to
allow proper ventilation aswell as prevent flame-ups.
18
Page 17

Grill Guide
Season grill grates. Preheat grill on HI, 5 minutes, for best flavor.
J
HI
HI
HI
HI
HI
HI
10
9-10
HI
10
10
Ht
10
9
9
25 to 35 minutes
45 to 6) minutes
25 to 3 Yminutes
20 to 2 _minutes
35to 4_)minutes
20to 25 minutes
25to 30minutes
tOto 15 minutes
20to 30minutes
10to 15minutes
19
Page 18

Grilling Tips
With your Jenn-Air grill and accessories, literally any food you've considered "at its
best" when prepared outdoors over charcoal can now be prepared indoors with less
fuss and great flavor.
Many grilling ideas are contained in Jenn-Air's Cookbook, Complete Cooking With Jenn-
Air. There are also many cookbooks containing recipes for outdoor grilling which
can be used on a Jenn-Air.
The following suggestions are good rules to follow and will increase your enjoyment of
the equipment.
• Be sure to follow directions on page 18 for using the grill.
• Suggested cooking times and control settings are approximate due to variations
in meats and electrical voltage. Experience will quickly indicate cooking times as
well as which settings work best.
• Use the Energy-saver grill element for grilling small amounts of food on half of the
grill or for keeping cooked foods warm or preparing foods requiring different
heat control settings.
• For best results, buy top grade meat. Meat that is at least 3/4-inch will grill better
than thinner cuts.
• Score fat on edges of steak, but do not cut into meat, to prevent curling while
cooking.
• For the attractive "branded" look on steaks, be sure grill is preheated. Allow one
side of meat to cook to desired aloneness, or until juices appear on the top
surface, before turning. It takes fewer minutes to cook the second side. Turn
steaks and hamburgers just once. Manipulating food causes loss of juices.
• When basting meats or applying sauces to foods, remember that excessive
amounts wind up inside your grill and do not improve th; food flavor. Apply
sauces during the last 15 to 20 minutes of cooking time unless recipe specifies
otherwise. Sugar-based sauces, excessively used, will caramelize on the grill-
rocks and will create a cleaning chore.
• There are many meatmarinades which will help tenderize less expensive cuts of
meat for cooking on the grill.
• Certain foods, such as poultry and non-oily fish, may need some extra fat. Brush
with oil or melted butter occasionally while grilling.
• Use tongs with long handles or spatulas for turning meats. Do not use forks as
these pierce the meat, allowing juices to be lost.
• To help retain meat juices, salt after turning meat or after cooking is completed.
• Should grilled foods be prepared and ready before you're ready to serve, turn
heat control to a low setting and cover meat with a single sheet of foil. Food will
continue to cook.
20
Page 19

Cleaning the Grill
Grill Grates: These are made from cast aluminum which have been anodized. This coating
will fade with use.
• The grates should be cleaned after each use. They can be cleaned with detergent and a
plastic scrubber, such as Tuffy, or washed in the dishwasher if burned on residue is first
removed. For heavy soil, grates can be soaked in hot, soapy water to which a cleanser, such
as household ammonia, has been added.
• Do not use metal brushes or abrasive scouring pads or other scrubbers intended to clean
outdoor charcoal grills. These will remove the finish as well as scratch the grates. Do not
clean in the self-cleaning oven or use oven cleaners on the grates.
Grill-Rocks: These are made from cast-iron which have been coated with porcelain enamel.
• The grill-rocks should be cleaned frequently or after any excessive build-up of grease. To
clean light soil, use detergent and a plastic scrubber, such as Tufty, or wash in the
dishwasher if burned on residue is first removed. For heavy soil, soak in hot, soapy water to
which a cleanser, such as household ammonia, has been added. Stubborn spots on
grill-rocks, such as burned on residue from sauces, can be scrubbed with a stiff bristle
brush.
• An oven cleaner, such as Easy-Off, can be used for burned on soil. Follow manufacturer's
directions; spray on cleaner and let soak overnight. Do not clean grill-rocks in the self-
cleaning oven.
Grill Element: Follow instructions on page 17 for removing the grill element. The grill element
should never be immersed in water. Most soil will burn off during use. The terminal block may be
cleaned with soapy S.O.S. pad. Dry thoroughly before reinserting in the range.
Porcelain Drain Pan: This area, located under the grill-rocks, should be cleaned after each
heavy use of the grill.
• To remove light soil, clean area with soapy water or spray with cleansers such as 409 or
Grease Relief. For easier clean-up, soak paper towels in a household cleanser, lay in drain
pan, and soak for at least a half-hour or longer.
• To remove moderate soil, scrub with Comet, Bon Ami, a soft scrub cleanser or plastic
scrubber.
• To remove stubborn soil, spray with an oven cleaner such as Easy-Off; let soak overnight,
wipe clean, rinse and dry.
Grease (_ntainer: This container collects grease and other liq-
uids created while grilling or using some of the accessories; or spill-
overs while using t he conventional coil cartridge. Empty when grease is
noticeable through container window.
• Check the container periodically to prevent grease from spilling
over. If this should happen, the grease will flow over the front of
the container thus alerting you to empty the container. The
container is made from polypropylene and can bewashed in hot,
soapy water. A few tablespoons of dishwashing liquid and water
added to a clean container will make it easier to empty when full.
May be washed in dishwasher.
• A metal drain tube leads from the right grill basin to the grease
container. To prevent tube from becoming clogged if the right
side of the range is used for most grilling, after grilling remove
food particles with a paper towel. Then, pour a cup of hot, soapy water through the drain
tube.
21
Page 20

Cleaning Other Parts
of Your Range
Control Dial Area: Use mild cleansers, such as soapy water, glass cleaners or
mild liquid sprays, such as 409. Wipe with sponge, damp cloth or paper towel. Do not
scrub with S.O.S. pads or abrasive cleansers.
Clock Control Surface: Wipe with paper towels dampened with soapy water or
glass cleaner. Do not scrub with S.O.S. pads or abrasive cleansers.
Glass on the Oven Door Front: Use any suitable glass cleaner or soapy water.
Oven Door Trim: Slightly dampen a cloth or paper towel with a nonabrasive
cleanser, such as Bon Ami, soapy water or glass cleaner. Do not use excessive amounts
of water or allow water to run down through the air vents in the door since this will
cause streaks which will be visible through the glass door.
Stainless Steel Areas: The top of the range (the trim area around the grill basin
areas), conventional coil cartridge and the trim around glass cartridge.
• To clean light soil, wipe with soapy cloth or nonabrasive cleanser, such as Soft Scrub.
Rinse, buff with soft cloth; polish with glass cleaner if necessary.
• To clean moderate soil or discoloration of the surface (excessive heat will cause a
golden discoloration), clean with Shiny Sinks, Zud, Bar Keepers Friend, or Luneta
(Jenn-Air Model A912, Part No. 712191). With a sponge or cloth, rub cleanser with the
grain to avoid streaking the surface. Rinse well, buff dry; polish with a glass cleaner if
necessary to remove cleanser residue and smudge marks.
• Heavy soil, such as burned on food soil, can be removed by first cleaning as per the
instructions for moderate soil. Stubborn stains can be removed with a damp Scotch-
Brite scour-pad; rub evenly with the grain to avoid streaking the surface. Rinse well,
buff with dry cloth; polish with glass cleaner if necessary to remove cleanser residue
and smudge marks. Scotch-Brite is also useful in buffing and removing minor
scratches.
• Stubborn food stains may also be removed by spraying with Easy-Off oven cleaner.
Allow to set overnight, then rinse. If stains remain, clean with recommended
cleansers such as Zud, Luneta (Jenn-Air Model A912, Part No. 712191), or Scotch-
Brite scour-pad. CAUTION: When using Easy-Off, avoid spraying areas other than
the stainless steel such as the area under drip pans, ventilation air grille, control knob
area, areas around cooktop. Immediately wipe up any spray from these areas with a
damp cloth. Read the manufacturer's precautions on using oven cleaners. The
caustic materials in these products will discolor materials such as aluminum, brushed
or chrome plate. Hint: Easy-Off can be used to clean the porcelain grill basin area.
• Hint: for ease in cleaning the stainless steel cooktop cartridge when it is moderately
or heavily soiled, remove cartridge from range top and work near the sink area. Do
not immerse the cartridge or heating elements in water. Be very careful not to get
cleanser or water into the wiring in the receptacle area.
22
Page 21

Griddle
To Use
1. Before using the new griddle, wash in hot, soapy water; rinse and dry.
2. Place two clean grill-rocks (with handles parallel to range front) into clean grill
basin. Insert grill element. Do not use surface grill grates.
3. Place griddle over grill element so that the drain holes are in front. This will permit
excess grease to be collected in the grease container.
4. Preheat the griddle as noted below. Settings above 10 during griddle operation are
unnecessary, can ruin the finish or cause seasonings or food to adhere to the
griddle.
5. After griddle is preheated, season griddle with butter or oil. DO NOT PREHEAT A
SEASONED GRIDDLE. Normally, the griddle needs to be seasoned for all but high
fat foods. If the griddle isseasoned during preheat, oil changes its chemical compo-
sition and forms a varnish-like finish on the griddle which is difficult to remove.
6. To maintain the finish, use nonmetallic spatulas or utensils while cooking.
Cleaning
1. THE GRIDDLE MUST BE CLEANED AFTER EACH USE IN ORDER TO PROPERLY
MAINTAIN THE FINISH. Any seasoning or food residue left on the griddle will
adhere to it during the next preheat. The residue will create a varnish-like or tacky
surface that will build up over aperiod of time. This built-up residue will tend to flake
off which creates a rough texture on the griddle surface, interfering with perfor-
mance and appearance of the griddle.
2. Once the griddle has cooled (DO NOT immerse a hot griddle in cold water), wash
with soap or detergent in hot water in the sink. Be sure to remove all food residue
before cooking on the griddle again. Any difficult to remove, cooked on residue can
be removed with a plastic scrubber.
3. In the event the griddle has not been cleaned sufficiently and has a light, tacky film of
oil or cooked on residue, remove with plastic scrubber and Bar Keepers Friend, Ajax,
or other nonabrasive cleansers.
4. DO NOT wash in dishwasher as strong detergents remove some of the natural
seasoning of the non-stick finish.
Griddle Guide Preheat 5 to 10 minutes at specified settings.
Control Approximate Cooking Time (Minutes)
Setting First Side Second Side
Sausage Patties 8- 9 8 6
Bacon (Wafer) 8- 9 3 1-2
Ham Slice 8- 9 6 5-6
Hamburgers 7- 8 6 5
Fish Sticks 6- 7 5 3-4
Hot Dogs 8- 9 5 5
Buns 8- 9 3
French Toast* 9-10 3 2-3
Eggs* 5- 6 2-3 (1)
*For bestresults,preheatfor 10 minutes.
NOTE:These aresuggestedguidesfor controlsettingsand times. Factors,such aslow vOltage,
mayaffect the time and controlsettingwhich providesthe best results.
23
Page 22

Oven Operation
Oven Controls p cturedonpage
Selector Knob
• This knob controls the oven operation. To operate the oven, turn to desired setting
and turn TEMPERATURE knob to desired setting.
The settings are:
OFF The oven will not operate when knob is on this setting.
Keep knob on this position when oven is not is use.
BAKE Use for baking or roasting. (See pages 26-29.)
BROIL Use for top browning or oven broiling of foods. (See
pages 30-31 .)
Temperature Knob
• Use to set oven temperature. Be sure the indicator line is in line with the exact
temperature desired. This knob is used with all oven operation settings noted on
the SELECTOR knob.
Oven Indicator Light
• Indicates when oven is turned to an operating position. Light will glow until the
desired temperature is reached. It will cycle on and off as this temperature is
maintained during cooking.
Oven Light Switch
• On Model $100, the oven light automatically comes on whenever the oven door is
opened. On Model $101, the oven light may be turned on by pushing the light
symbol on the three position switch. To turn oven light off, push switch to the
middle position.
Clock Control
To Set Clock
Push in clock knob and turn in either direction to correct time. Reset MINUTE
TIMER to OFF position.
Minute Timer
This interval timer reminds you when any cooking period, up to 60 minutes, has
expired. Simply turn pointer to number of minutes desired. Do not push knob in as
th is will reset the clock. At the end of the selected period, the timer will sound. Turn
to OFF position to discontinue signal.
24
Page 23

Oven Operation
Baking or Roasting
1. Locate oven racks on proper rack positions.
2. Turn TEMPERATURE knob to desired temperature.
3. Turn SELECTOR knob to BAKE setting. When the OVEN INDICATOR LIGHT
cycles off, the oven is preheated to the selected temperature. Place the food in the
oven. The OVEN INDICATOR LIGHT will cycle on and off throughout the baking
process. Preheat only when necessary. Refer to baking and roasting sections as to
when preheating is recommended.
4. After baking, turn both TEMPERATURE and SELECTOR knobs to OFF position.
Rack Positions
The rack positions noted are generally recommended for the best browning results and
most efficient cooking times. Refer to charts in the baking and roasting sections for
recommendations for specific foods.
Use Rack Position #1 for:
Roasting large cuts of meat and large poultry, frozen pies, souffles, angel food
cake, loaves of bread.
Use Rack Position #2 for:
Roasting small cuts of meat, large casseroles, loaves of bread, cakes (in either
tube, bundt or layer pans).
Use Rack Position #3 for:
Most baked goods on cookie sheet or jelly roll pan, frozen convenience foods.
Use Rack Position #4 for:
Most broiling.
Use Rack Position #2 and #4 for:
Two rack baking of cookies, layer cakes, biscuits.
25
Page 24

Baking
General Baking Recommendations
• When cooking foods for the first time in your new oven, use recipe cooking
times and temperatures as a guide.
• Use tested recipes from reliable sources.
• Preheat the oven only when necessary. For baked foods that rise and for
richer browning, a preheated oven is better. Casseroles can be started in a
cold oven. Preheating takes from 6 to 8 minutes; place food in oven after
OVEN INDICATOR LIGHT cycles off.
• Arrange oven racks before turning on oven. Follow suggested rack posi-
tions on pages 25 and 27.
• Allow about 1 to 11/2inches of space between the oven side walls and
utensils to allow proper air circulation.
• When baking foods in more than one utensil, place them on opposite
corners of the rack. Stagger utensils when baking on two racks so that one
utensil does not shield another unless shielding is intended. (See above
photo.)
• To conserve energy, avoid frequent or prolonged door openings. At the
end of cooking, turn oven off before removing food.
• Always test for doneness (fingertip, toothpick, sides pulling away from
pan). Do not rely on time or brownness as only indicators.
• Use good quality baking utensils and the size recommended in the recipe.
• Dull, dark, enameled or glass utensils will generally produce a brown, crisp
crust. Shiny metal utensils produce a light, golden crust.
• Frozen pies in shiny aluminum pans should be baked on a cookie sheet on
rack 1 or be removed to a dull or glass pan.
26
Page 25

Baking Chart
Bake
Pan Rack Temp.(°F) Bake
Product and Type Size Position Preheated Time*
CAKE
Yellow - 2 layers 9" 2 or 3 350 ° 30-35
White - 2 layers 9" 2 or 3 350 ° 25-30
Chocolate - 2 layers 9" 2 or 3 350 ° 30-35
Bundt tube 1 or 2 350 ° 35-45
Angel Food tube 1 or 2 375 ° 30-40
Pound Cake loaf 2 325 ° 40-50
Snacking Cake 8x8" 2 375 ° 30-35
Cupcakes 3 350 ° 15-20
Sheet Cake 15x 10" 3 350 ° 20-25
PIES
Two Crust
Fruit, fresh 9" 2 4000-425 ° 35-55
Fruit, frozen 9" 1 4000-425 ° 45-60
One Crust
Custard, fresh
Custard, frozen 9" 1 375 ° 60-65
Pie Shell 9" 2 425o-450 ° 8-12
COOKIES
Chocolate Chip 3 350o-375 ° 8-12
3 3500-375 ° 8-12
Peanut Butter
Sugar 3 ' 350o-375 ° 8-12
x " , 2 I 350° , 30-40Brownies 8 8
i i
BREADS, YEAST
Loaf loaf 1 or 2 t 375° 30-40
Roils , 3, i 375°'400° 15-20
BREADS, QUICK I
Loaf, Nut, Fruit 60-75
Gingerbread
Cornbread 8x8" I 2 , 400°-450° I 15-30
Cornbread Muffins 3 400 ° 10-20
Biscuits 3 400°-425 ° 10-20
Muffins 3 400 ° ' 15-25
*Thetimes given are based on specific brands of mixes or recipes tested.
Actual times will depend on the ones you bake.
27
Page 26

Roasting
General Roasting Recommendations
• Preheating is not necessary.
• For open pan roasting, place meat or poultry on the slotted portion of the
two-piece pan included with the oven. Do not add water to the pan. Use open
pan roasting for tender cuts of meat. Less tender cuts of meat need to be cooked
by moist heat in a covered utensil.
• For best results, a meat thermometer is the most accurate guide to degree of
doneness. The tip of the thermometer should be located in the thickest part of a
roast, not touching fat, bone, or gristle. For turkeys and large poultry products,
insert the tip of the thermometer into the thickest part of the inner thigh.
• Place roast fat side up to allow self basting of meat during roasting.
• Since meats continue to cook after being removed from the oven, remove roast
from oven when it reaches an internal temperature about 5 degrees below the
temperature desired.
• For less loss of juices and easier carving, allow about 15 minutes "standing
time" after removing meat from oven.
• For best results in roasting poultry, thaw completely. Due to the structure of
poultry, partially thawed poultry will cook unevenly.
• Minutes per pound will vary according to the size, shape, quality, and initial
temperature of meat as well as the electrical voltage in your area.
• A large cut of meat will usually require fewer minutes per pound to roast than a
smaller cut of meat.
• Since the breast meat on a large turkey cooks more quickly than the thigh area,
place a "foil cap" over the breast area after desired brownness is reached to
prevent overbrowning.
• A stuffed turkey will require an extra 30-60 minutes depending on size. Stuffing
should reach an internal temperature of 165°F.
• Use meat roasting charts in standard cookbooks for recommended times and
temperatures for roasting cuts of meat not listed on page 29.
28
Page 27

Roasting Chart (Thawed Meats Only)
internal
Oven Temperature Approximate
Approximate Temperature of Meat -- End of RoastingTime
Varietyand Weight (not preheated) RoastingTime (minutesper
Cut of Meat (pounds) °F °F pound)
BEEF
Rib Roast (cutside down) 4 to 8 325° 140° (rare) 26-30
160° (medium) 30-35
Rib Eye Roast 4 to 6 325° 140° (rare) 25-30
160° (medium) 30-35
LoinTenderloin Roast 2 to 3 400° 140° (rare) 20-25
RoundEye Round Roast 4 to 5 325° 140° (rare) 25-30
160° (medium) 30-35
TopSirloin Roast 3to 6 325° 140° (rare) 25-30
160° (medium) 30-35
RoundTip Roast 4to 6 325° 140° (rare) 25-30
160° (medium) 30-35
PORK
Shoulder BladeRoast, 4 to 6 325° 170° 35-45
Boneless
ShoulderBlade Roast 4 to 6 325o 170° 30-40
LoinBladeor Sirloin Roast 3 to 4 325° 170° 35-45
Leg (FreshHam) 10 to 16 325° 170° 25-35
Ham, Half (Fully cooked) 5 to 7 325° 140° , 25-35
Ham, Half (Cook- 5 to 7 275° 160° 35-45
before-eating)
ArmPicnic Shoulder 5to 8 325° 140° 25-30
LAMB
Shoulder Roast,Boneless 31/2to 5 325° 160° (medium) 35-40
170° (well) 40-45
Leg,Whole 5 to 7 325° 160° (medium) 30-35
170° (well) 35-40
Leg, ShankHalf 3 to4 325° 160° (medium) 30-35
170° (well) 35-40
Leg, SirloinHalf 3 to 4 325° 160° (medium) 35-40
170° (well) 40-45
VEAL
RibRoast 3 to 5 325° 170° 40-45
Shoulder,Boneless 4to 6 325° 170° 40-45
Leg,Half, Boneless 3 to 5 325° 170° 40-50
POULTRY
Turkey, unstuffed 8to 12 325° 180°-185° 20-22
Turkey, unstuffed 12to 16 325o 180°-185° 18-20
Turkey, unstuffed 16to 20 325° 180°-185o 16-18
Turkey, unstuffed 20to 24 325° 180°-185° 14-16
Turkey,Whole, Boneless 4 to 6 350° 170°-175o 35-45
Turkey, Breast 3 to 8 325° 180° 30-40
Chicken, Fryer 21/2to 3_h 375° 185° 20-24
Chicken, Roaster 4 to 6 375° 185° 20-25
Capon, unstuffed 5 to 8 375° 180°-185° 20-25
Cornish Game Hen 1to 11/2 375° 180°-185° 45-55
Duck 4 to 6 350° 185° 20-25
29
Page 28

Broiling
The broil element provides flexibility for
broiling foods.
We recommend you use the grill acces-
sory for most of your broiling. There are
some types of foods that do require use of
the oven broil element. These include
foods such as stuffed lobsters, meringue
pies, or other foods which require top
browning.
To Broil
1. Place oven rack on the rack position
suggested in the chart. Distance from
broiling element depends on foods being
prepared. Rack position #4 (second
from the top) is usually recommended
unless otherwise stated.
2. Turn SELECTOR knob to BROIL
setting.
3. Turn TEMPERATURE knob to 550°F
(until knob comes to a complete stop).
4. Place food on roasting pan provided
with oven. After top broil element is red
place food in oven. Preheating takes a
few minutes, or until element glows a
bright cherry red.
5. Leave oven door open at broil stop posi-tion when broiling.
Broiling Tips
• Tender cuts of meat or marinated meats are best for broiling. This includes rib
and loin cuts of steak, ground beef, ham steaks, lamb chops, poultry pieces or
fish. For best results, steaks should be at least 1" thick. Thinner steaks should be
pan-broiled.
• Do not cover broiler grid with foil since this prevents fat drippings from draining
into bottom of pan.
• Before broiling, remove excess fat from meat and score edges of fat (do not cut
into meat) to prevent meat from curling. Salt after cooking.
30
Page 29

• To prevent dry surface on fish or lean meats, brush melted butter on top.
• Foods that require turning should be turned only once during broiling. Turn
meat with tongs to avoid piercing and loss of juices.
• Cooking times given in the chart are to be used only as a guide.
• The oven has a variable broil feature which means that the broiling temperature
can be varied by selecting a lower temperature setting on the TEMPERATURE
knob. Using a lower temperature setting will cause the broil element to cycle on
and off. This feature can be used for foods that need to cook more slowly or need
less radiant heat. If foods are broiling too fast, the control can be set at a lower
temperature to reduce the cooking speed rather than moving the broiler pan to a
lower rack.
BROILING CHART
(BROIL, 550°F, PREHEATED)
Rack Approximate Minutes/Side
FOODS Position 1st Side' 2nd Side
BEEF
Steak(1") 4
Rare 3 3
Medium 4 4
Well 5 5
Hamburgers (3A,,) 4
Rare 3 2
Medium 4 2
Well 4 3
PORK
Bacon 4 5 (no turning)
Chops (W') 4 8 3
Chops(1") 3 9 8
Ham Steak 4 3 2
SausageLinks 4 5 3
SausagePatties 4 5 1
LAMB
Chops(1") 4
Medium 5 3
Well 5 5
Patties(3_,,) 4
Medium 4 3
WetI 5 4
POULTRY
BreastHalves 3 7 4
SEAFOOD
FishFillets, Buttered(W') 4 4 (no turning)
Scrod,Buttered (1/2") 4 8 (no turning)
Cod (1") 4 12 (no turning)
LobsterTail 4 9-12 (no turning)
MISCELLANEOUS
Hot Dogs 4 2 2
Toast 4 1 1
NOTE: This chart is a suggested guide. The times may vary with food being cooked.
31
Page 30

- Oven Care
Oven Cleaning
The oven porcelain walls and door can be wiped clean with soap and water if food
is not allowed to bake on a second time. Heavy spattering of spillovers will require
cleaning with mild abrasive cleansers such as Bar Keepers Friend, S.O.S. or Bon
Ami. Household ammonia may be used to loosen soil by placing _/2cup household
ammonia in a glass dish placed on oven rack in a closed, cold oven overnight.
• To remove difficult stains, use an oven cleaner such as Easy-Off on oven liner.
Follow oven cleaner directions. Do not spray electrical controls, temperature
sensing bulb, door gasket or exterior of oven. Remove oven racks and rack
supports before spraying with oven cleaner.
• For cleaning other areas of the oven, clean oven racks with S.O.S. pads. Oven
window on Model $101 may be cleaned with soap and water or a glass cleaner.
Oven Racks and Rack Supports
Oven I_cks: To remove, pull forward to the "stop" position; lift up on the front of the
rack and pull out.
(h'en II{aek SuiDports: TO remove, lift support holders from slots at the front of the
oven then move supports away from oven wall. Pull forward to remove from oven. To
replace, reverse procedure. Be sure front supports are correctly in place so that racks
will be level.
32
Page 31

Oven Light Bulb
Before replacing bulb, disconnect power to oven at the main fuse or circuit breaker
panel. Be sure that the entire oven cavity including the light bulb is cool before
attempting to remove.
To replace light bulb:
1. Carefully remove the glass light lens and lens
retainer by removing the two screws in the light
lens retainer using a phillips screwdriver. Note: The
light lens is separate from the light lens retainer.
The two pieces will drop down into your hands at
the same time. Do NOT remove the remaining two
screws.
2. To obtain firm grasp on bulb, wear protective
rubber gloves. Remove by turning bulb to the left.
Do not touch a hot oven light bulb with a damp
cloth as bulb will break. Note: If the bulb does
break and you wish to remove it, be certain power
supply isdisconnected and wear protective gloves.
You may contact your authorized Jenn-Air Service
Contractor for service.
3. Replace bulb with a 40 watt oven-rated appliance
bulb. Bulb with brass base is recommended to
prevent fusing of bulb into socket.
4. Place light lens inside of light lens retainer. Hold-
ing the light lens and lens retainer in place, insert
the two screws into the light lens retainer and
tighten.
Access Door
The access door is easily removed to clean under the
range if necessary. To remove door, pull door down
and lift off pivot points. To replace door, slide door
over pivot points; lift up and insert prongs into holes in
the range.
To avoid the possibility of accidentally disconnecting
any part of the ventilation system, do not use the area
behind the access door for storage.
33
Page 32

Oven Thermostat Knob Adjustment
The oven thermostat knob can be adjusted if the oven temperature is too low or too
high and the length of time to cook ALL foods is too long or too short. Do NOT adjust
the thermostat knob if only one or two items are not baking properly.
To a_L|ust the thermostat knob:
Triangle
Turn the oven thermostat knob to OFF. r,_.v __TopScrew
Removetheknobandturnittotheunder- l _l_ _._ _//__T)_ _)
top. (See Fig. 1) Loosen the two screws
slightly. Holding the skirt in place, move the
top screw by rotating the knob one notch, as
noted by one click, in direction necessary. If ,(A__' _._r_ Skirt
notch indentation is not apparent, tighten
screws until clicking is heard. There are five _;_o_,._-- __,o_"
notches in each direction. One notch equals _ FIG. 1
approximately IO° F.
EXAMPLE: If the oven temperature is too
cool and ALL foods are requiring I_ 1_ Pi_ _' )
a longer time period to cook, the _
knob should be rotated to move
the top screw toward the word
"HOTTER". (See Fig. 2)
Tighten the screws while tightly holding .,
knob to skirt. To replace knob, match flat
part of knob opening with spring on the _tv _,c
shaft, returning to OFF position. _ FIG. 2
IMPORTANT: The oven thermostat knob should be adjusted one notch and then the
oven should be tested. (We recommend baking 2 -- 9" yellow layer cakes using a
purchased box mix.) If the oven temperature is still too low or too high, repeat the
procedure described above.
If the knob is rotated too far or in the wrong direction, rotate the knob in the opposite
direction until the center of the screw isdirectly under the triangle, which is the starting
point. Initiate the procedure again until the desired temperature is reached.
34
Page 33

Before you Call
for Service
Check thefollowing list to besure aservice call isreally necessary.A quick reference
of this manual, as well as reviewing additional information on items to check, may
prevent an unneeded service call.
If nothing on the range operates:
• check for ablown circuit fuse or a tripped main circuit breaker.
• check if range is properly connected to electric circuit in house.
If ventilation fan does not operate but everything
else on the range does:
• check behind lower access door if power cord to blower assembly has been
disconnected.
If grill heating element or cooktop does not get hot
enough:
• check if heating element is plugged in solidly.
• surface controls may not beset properly.
• voltage to house may be low.
If ventilation system ts not capturing smoke
efficiently:
• check on cross ventilation in room or make up air.
• excessive amount of smoke is being created; check instructions for grilling,
trimming meats.
• outside wall cap may be trapped shut.
• range may be improperly installed; check installation instructions.
If oven does not heat
• the SELECTOR and/or TEMPERATURE knobs may be set incorrectly.
If the oven light does not work:
• the light bulb is loose or defective.
If foods do not broil properly:
• the SELECTOR andor TEMPERATURE knobs may not beset proper_y.
• check rack position.
• voltage into house may be low.
36
Page 34

If baked food is burned or too brown on top:
• the SELECTOR knob may be in the BROIL position.
• food may be positioned incorrectly in oven.
• oven not preheated properly.
If foods bake unevenly:
• the range may be installed improperly.
• check the oven rack with a level.
• racks or rack supports may be improperly installed.
• stagger utensils; do not allow utensils to touch each other or oven wall.
• check instructions for suggested placement of utensils on oven rack.
If oven baking results are less than expecled:
• the utensils being used may not be of the size or material recommended for best
results.
• there may not be sufficient room around sides of the pans for proper air
circulation in the oven.
• check instructions for preheating, rack position and oven temperature.
• oven vent may have been blocked or covered.
If baking results differ from previous oven:
• oven thermostat calibration may differ between old and new ovens. Follow
recipe and use and care directions before calling for service since the calibra-
tion on the previous oven may have drifted to a too high or too low setting.
If You Need Service
• call the authorized Jenn-Air Service Contractor listed in the Yellow Pages or
the dealer from whom your appliance was purchased.
• your Jenn-Air Service Contractor can provide better and faster service if you
can accurately describe problems and give model and serial number of the
appliance. Be sure to retain proof of purchase to verify warranty status. Refer
to WARRANTY for further information of owner's responsibilities for warranty
service.
NOTE: Complete service and parts literature are available from any auth-
orized Jenn-Air Parts Distributor.
All specifications subject to change by manufacturer without notice.
37
Page 35

Accessories
Griddle -- Model A300
Self-draining griddle makes many favorite
foods easier to fix. Family-sized surface
lets you cook several pancakes, hamburg-
ers, or grilled sandwiches at atime. Has a
black nonstick finish.
Cooker-Steamer -- Model A335
Ideal for anything you steam, blanch,
poach or stew. Includes a dual-position
basket and see-through cover. Attractive
black nonstick finish.
Grill Cover -- Model A341
Attractive grill cover protects grill when not
in use. Black textured steel with molded
handles.
Two-in-One Combination
Accessory. Rotiss-Kebab
Model A312
Enjoy the great flavor of rotissed foods
indoors all year 'round and make parties
more fun by serving attractive shish
kebabs. Includes chrome finish motor,
rotiss, shish kebab skewers and all
brackets. Folds for easy storage.
Wok Plug-in Cooktop Accessory.
Model AI41
For use with conventional coil cartridge
only. Includes special plug-in contoured
element that installs in large element. Wok
has nonstick finish, wood handles, cover,
steaming rack, rice paddles, cooking tips
and recipes.
38
Page 36

Plug-in Grill As_cml_ly
Grill assemblies include one plug-in
element, two grill-rocks and two black
anodized aluminum grates to convert
either side of your grill-range to a grill. A
storage tray is included. (Tray is not
included with grill shipped with your grill-
range.)
"Energy-Saver" Model A151.2800 watt grill StandardModelA150.2800 watt grill element
element permits you to control tempera- distributes heat under entire grill area.
tures under front and rear grills in-
dependently.
Storage Tray -- Mode| A_)_O
To store grill assemblies which came with
range or cooktop cartridges except induc-
Complete Cookin_ tion.
with Jenn-Air
Model ADO5
Mo(l¢i A 114_
This outstanding cookbook by Jenn-Air Special canning element plugs into con-
features many invaluable recipes and cook- ventional coil cooktop cartridge (Model
ing tips when using your Jenn-Air grill, A100), raising the heating element above
accessories or selective-use convection the cooking surface. Allows use of over-
oven. 192 pages, sized utensils and those with warped or
rippled bottoms.
Cooktop Cartridges
BLACKCERAMIC CONVENTIONALCOIL SOLIDELEMENT BLACK&WHITE INDUCTION
BlackGlass-Ceramic
Twin elementplug-incooktop cartridge.......................... Rated240 volts No,A120
Rated 208volts No.A120-8
ConventionalCoil Dual rated208/240volts
Twin Elementplug-in cooktop cartridge ....................................... No. A100
SolidElement
Twin elementplug-in cooktop cartridge .......................... Rated 240 volts No. A105
InductionCartridgeDual rated208/240 volts
Twin elementcartridge withrear plug-interminal......... White-No.A130R,Black-No.A135R
Twin elementcartridgewith front plug-interminal ........ White-No.A130F, Black-No.A135F
39
 Loading...