

Page 1

JENN-AIR GAS RANGE
ELECTRONIC TOUCH CONTROL 800
USE & CARE
GUIDE
TABLE OF CONTENTS
Important Safety Instructions .....................................1-4
Surface Cooking.............................................................. 5-6
Oven Cooking................................................................ 7-18
Care & Cleaning ......................................................... 19-22
Maintenance................................................................ 23-24
Troubleshooting ......................................................... 25-26
Warranty & Service...........................................................27
Guide de l’utilisation et entretien................................28
Guía de Uso y Cuidado................................................... 60
Form No. B/09/04 Part No. 8113P463-60 Rev. 1 ©2004 Maytag Appliances Sales Co. Litho U.S.A .
Page 2
Installer: Please leave this manual with this appliance.
Consumer: Please read and keep this manual for future
reference. Keep sales receipt and/or cancelled check as
proof of purchase.
Model Number __________________________________
Serial Number __________________________________
Date of Purchase ________________________________
If you have questions, call:
Jenn-Air Customer Assistance
1-800-JENNAIR (1-800-536-6247)
1-800-688-2080 ( U.S. TTY for hearing or speech impaired)
(Mon.-Fri., 8 am-8 pm Eastern Time)
Internet: http://www.jennair.com
In our continuing effort to improve the quality and performance of our cooking products, it may be necessary to make
changes to the appliance without revising this guide.
For service information, see page 27.
IMPORTANT SAFETY
INSTRUCTIONS
replace any part of your appliance unless it is specifically recommended in this guide. All other servicing
should be referred to a qualified servicer. Have the
installer show you the location of the gas shut off valve
and how to shut it off in an emergency.
Always disconnect power to appliance before servicing.
WARNING
If the information in this manual is not followed
exactly, a fire or explosion may result causing
property damage, personal injury or death.
– Do not store or use gasoline or other flam-
mable vapors and liquids in the vicinity of this
or any appliance.
– IF YOU SMELL GAS:
• Do not try to light any appliance.
• Do not touch any electrical switch.
• Do not use any phone in your building.
• Immediately call your gas supplier from a
neighbor’s phone. Follow the gas supplier’s
instructions.
• If you cannot reach your gas supplier, call
the fire department.
– Installation and service must be performed by
a qualified installer, service agency or the gas
supplier.
Warning and Important Safety Instructions appearing in
this guide are not meant to cover all possible conditions
and situations that may occur. Common sense, caution,
and care must be exercised when installing, maintaining, or operating the appliance.
Always contact your dealer, distributor, service agent, or
manufacturer about problems or conditions you do not
understand.
Recognize Safety Symbols, Words, Labels
WARNING
WARNING – Hazards or unsafe practices which
COULD result in severe personal injury or death.
CAUTION
CAUTION – Hazards or unsafe practices which
COULD result in minor personal injury.
Read and follow all instructions before using this
appliance to prevent the potential risk of fire, electric
shock, personal injury or damage to the appliance as a
result of improper usage of the appliance. Use appliance
only for its intended purpose as described in this guide.
To ensure proper and safe operation: Appliance
must be properly installed and grounded by a qualified
technician. Do not attempt to adjust, repair, service, or
WARNING
Gas leaks may occur in your system and result in a
dangerous situation. Gas leaks may not be detected
by smell alone. Gas suppliers recommend you purchase and install an UL approved gas detector. Install
and use in accordance with the manufacturer’s
instructions.
General Instructions
WARNING
• ALL RANGES CAN TIP AND
CAUSE INJURIES TO PERSONS
• INSTALL ANTI-TIP DEVICE
PACKED WITH RANGE
• FOLLOW ALL INSTALLATION
INSTRUCTIONS
WARNING: To reduce risk of
tipping of the appliance from
abnormal usage or by excessive loading of the
oven door, the appliance must be secured by a
properly installed anti-tip device.
1
Page 3

IMPORTANT SAFETY INSTRUCTIONS
To check if device is properly installed, look underneath
range with a flashlight to make sure one of the rear
leveling legs is properly engaged in the bracket slot. The
anti-tip device secures the rear leveling leg to the floor
when properly engaged. You should check this anytime
the range has been moved.
To Prevent Fire or Smoke
Damage
Be sure all packing materials are removed from the
appliance before operating it.
Keep area around appliance clear and free from combustible materials, gasoline, and other flammable vapors
and materials.
If appliance is installed near a window, proper precautions should be taken to prevent curtains from blowing
over burners.
NEVER leave any items on the cooktop. The hot air from
the vent may ignite flammable items and may increase
pressure in closed containers which may cause them to
burst.
Do not use water on grease fires. Use baking soda, a
dry chemical or foam-type extinguisher to smother fire
or flame.
Child Safety
CAUTION
NEVER store items of interest to children in cabinets
above an appliance or on backguard of a range. Children climbing on the appliance door to reach items
could be seriously injured.
NEVER leave children alone or unsupervised near the
appliance when it is in use or is still hot.
NEVER allow children to sit or stand on any part of the
appliance as they could be injured or burned.
Children must be taught that the appliance and utensils
in it can be hot. Let hot utensils cool in a safe place, out
of reach of small children. Children should be taught
that an appliance is not a toy. Children should not be
allowed to play with controls or other parts of the unit.
Many aerosol-type spray cans are EXPLOSIVE when
exposed to heat and may be highly flammable. Avoid
their use or storage near an appliance.
Many plastics are vulnerable to heat. Keep plastics away
from parts of the appliance that may become warm or
hot. Do not leave plastic items on the cooktop as they
may melt or soften if left too close to the vent or a
lighted surface burner.
To eliminate the hazard of reaching over hot surface
burners, cabinet storage should not be provided directly
above a unit. If storage is provided, it should be limited
to items which are used infrequently and which are
safely stored in an area subjected to heat from an
appliance. Temperatures may be unsafe for some items,
such as volatile liquids, cleaners or aerosol sprays.
In Case of Fire
Turn off appliance and ventilating hood to avoid spreading the flame. Extinguish flame then turn on hood to
remove smoke and odor.
• Cooktop: Smother fire or flame in a pan with a lid or
cookie sheet.
NEVER pick up or move a flaming pan.
• Oven: Smother fire or flame by closing the oven door.
About Your Appliance
WARNING
NEVER use appliance door as a step stool or seat as this
may result in possible tipping of the appliance and serious
injuries.
NEVER use this appliance as a space heater to heat or
warm a room. Doing so may result in carbon monoxide poisoning and overheating of the oven.
NEVER cover any slots, holes or passages in the oven
bottom or cover the entire rack with materials such as
aluminum foil. Doing so blocks air flow through the
oven and may cause carbon monoxide poisoning.
Aluminum foil may also trap heat causing a fire
hazard.
NEVER obstruct the flow of combustion and ventilation
air by blocking the oven vent or air intakes. Doing so
restricts air to the burners and may result in carbon
monoxide poisoning.
The oven vent is located at the base of the backguard.
Avoid touching oven vent area while oven is on and for
several minutes after oven is turned off. Some parts of
the vent and surrounding area become hot enough to
2
Page 4

IMPORTANT SAFETY INSTRUCTIONS
cause burns. After oven is turned off, do not touch the
oven vent or surrounding areas until they have had
sufficient time to cool.
Other potentially hot surfaces include cooktop, areas
facing the cooktop, oven vent, surface near the vent
opening, oven door, area around the oven door and
oven window.
Do not touch a hot oven light bulb with a damp cloth as
the bulb could break. Should the bulb break, disconnect
power to the appliance before removing bulb to avoid
electrical shock.
Cooking Safety
Always place a pan on a surface burner before turning
it on. Be sure you know which knob controls which
surface burner. Make sure the correct burner is turned
on and that the burner has ignited. When cooking is
completed, turn burner off before removing pan to
prevent exposure to burner flame.
Always adjust surface burner flame so that it does not
extend beyond the bottom edge of the pan. An excessive flame is hazardous, wastes energy and may
damage the appliance, pan or cabinets above the
appliance.
NEVER leave a surface cooking operation unattended
especially when using a high heat setting or when
deep fat frying. Boilovers cause smoking and greasy
spillovers may ignite. Clean up greasy spills as soon as
possible. Do not use high heat for extended cooking
operations.
NEVER heat an unopened container on the surface
burner or in the oven. Pressure build-up may cause
container to burst resulting in serious personal injury
or damage to the appliance.
Use dry, sturdy potholders. Damp potholders may
cause burns from steam. Dish towels or other substitutes should never be used as potholders because
they can trail across hot surface burners and ignite or
get caught on appliance parts.
Always let quantities of hot fat used for deep fat frying
cool before attempting to move or handle.
Do not let cooking grease or other flammable materials
accumulate in or near the appliance, hood or vent fan.
Clean hood frequently to prevent grease from accumulating on hood or filter. When flaming foods under the
hood turn the fan on.
NEVER wear garments made of flammable material or
loose fitting or long-sleeved apparel while cooking.
Clothing may ignite or catch utensil handles.
Always place oven racks in the desired positions while
oven is cool. Slide oven rack out to add or remove food,
using dry, sturdy potholders. Always avoid reaching into
the oven to add or remove food. If a rack must be moved
while hot, use a dry potholder. Always turn the oven off
at the end of cooking.
Use care when opening the oven door. Let hot air or
steam escape before moving or replacing food.
PREPARED FOOD WARNING: Follow food
manufacturer’s instructions. If a plastic frozen food
container and/or its cover distorts, warps, or is otherwise
damaged during cooking, immediately discard the food
and its container. The food could be contaminated.
NEVER use aluminum foil to cover oven racks or oven
bottom. This could result in risk of electric shock, fire, or
damage to the appliance. Use foil only as directed in this
guide.
Utensil Safety
Use pans with flat bottoms and handles that are easily
grasped and stay cool. Avoid using unstable, warped,
easily tipped or loose-handled pans. Also avoid using
pans, especially small pans, with heavy handles as they
could be unstable and easily tip. Pans that are heavy to
move when filled with food may also be hazardous.
Be sure utensil is large enough to properly contain food
and avoid boilovers. Pan size is particularly important in
deep fat frying. Be sure pan will accommodate the
volume of food that is to be added as well as the bubble
action of fat.
To minimize burns, ignition of flammable materials and
spillage due to unintentional contact with the utensil, do
not extend handles over adjacent surface burners.
Always turn pan handles toward the side or back of the
appliance, not out into the room where they are easily hit
or reached by small children.
3
Page 5

IMPORTANT SAFETY INSTRUCTIONS
Never let a pan boil dry as this could damage the utensil
and the appliance.
Follow the manufacturer’s directions when using oven
cooking bags.
Only certain types of glass, glass/ceramic, ceramic or
glazed utensils are suitable for cooktop or oven usage
without breaking due to the sudden change in temperature. Follow manufacturer’s instructions when using glass.
This appliance has been tested for safe performance
using conventional cookware. Do not use any devices or
accessories that are not specifically recommended in this
guide. Do not use eyelid covers for the surface units,
stovetop grills, or add-on oven convection systems. The
use of devices or accessories that are not expressly
recommended in this manual can create serious safety
hazards, result in performance problems, and reduce the
life of the components of the appliance.
Cleaning Safety
Turn off all controls and wait for appliance parts to cool
before touching or cleaning them. Do not touch the
burner grates or surrounding areas until they have had
sufficient time to cool.
Clean appliance with caution. Use care to avoid steam
burns if a wet sponge or cloth is used to wipe spills on a
hot surface. Some cleaners can produce noxious fumes if
applied to a hot surface.
Self-Clean Oven
CAUTION
Before self-cleaning the oven, remove broiler pan, oven
racks and other utensils and wipe up excessive
spillovers to prevent excessive smoke, flare-ups or
flaming.
It is normal for the cooktop of the range to become hot
during a self-clean cycle. Therefore, touching the
cooktop during a clean cycle should be avoided.
Important Safety Notice and
Warning
The California Safe Drinking Water and Toxic Enforcement Act of 1986 (Proposition 65) requires the Governor
of California to publish a list of substances known to the
State of California to cause cancer or reproductive harm,
and requires businesses to warn customers of potential
exposures to such substances.
Users of this appliance are hereby warned that the
burning of gas can result in low-level exposure to some
of the listed substances, including benzene, formaldehyde and soot, due primarily to the incomplete combustion of natural gas or liquid petroleum (LP) fuels. Properly adjusted burners will minimize incomplete combustion. Exposure to these substances can also be minimized by properly venting the burners to the outdoors.
Users of this appliance are hereby warned that when
the oven is engaged in the self-clean cycle, there may
be some low-level exposure to some of the listed
substances, including carbon monoxide. Exposure to
these substances can be minimized by properly venting
the oven to the outdoors by opening the windows and/
or door in the room where the appliance is located
during the self-clean cycle.
Do not leave food or cooking utensils, etc. in the oven
during the self-clean cycle.
Clean only parts listed in this guide. Do not clean door
gasket. The door gasket is essential for a good seal.
Care should be taken not to rub, damage, or move the
gasket. Do not use oven cleaners of any kind in or
around any part of the self-clean oven.
Save These Instructions for Future Reference
IMPORTANT NOTICE REGARDING PET BIRDS:
Never keep pet birds in the kitchen or in rooms where
the fumes from the kitchen could reach. Birds have a
very sensitive respiratory system. Fumes released during
an oven self-cleaning cycle may be harmful or fatal to
birds. Fumes released due to overheated cooking oil, fat,
margarine and overheated non-stick cookware may be
equally harmful.
4
Page 6
SURFACE COOKING
Lo: Use to simmer foods, keep foods
warm and melt chocolate or butter. Some
cooking may take place on the Lo setting
if the pan is covered. It is possible to
reduce the heat by rotating the knob
toward OFF. Be sure flame is stable.
Surface Controls
CAUTION
• If flame should go out during a cooking operation, turn
the burner off. If a strong gas odor is detected, open a
window and wait five minutes before relighting the
burner.
• Be sure all surface controls are set in the OFF position
prior to supplying gas to the range.
• NEVER touch cooktop until it has cooled. Expect some
parts of the cooktop, especially around the burners, to
become warm or hot during cooking. Use potholders to
protect hands.
Pilotless Ignition
Pilotless ignition eliminates the
need for a constant standing
pilot light. Each surface burner
has a spark ignitor. Use care
when cleaning around the
surface burner.
If the surface burner does
not light, check if ignitor is
broken, soiled or wet.
Hi: Use to bring liquid to a boil, or reach
pressure in a pressure cooker. Always
reduce setting to a lower heat when liquids
begin to boil or foods begin to cook.
An intermediate flame size is used to
continue cooking. Food will not cook any
faster when a higher flame setting is used
than needed to maintain a gentle boil.
Water boils at the same temperature
whether boiling gently or vigorously.
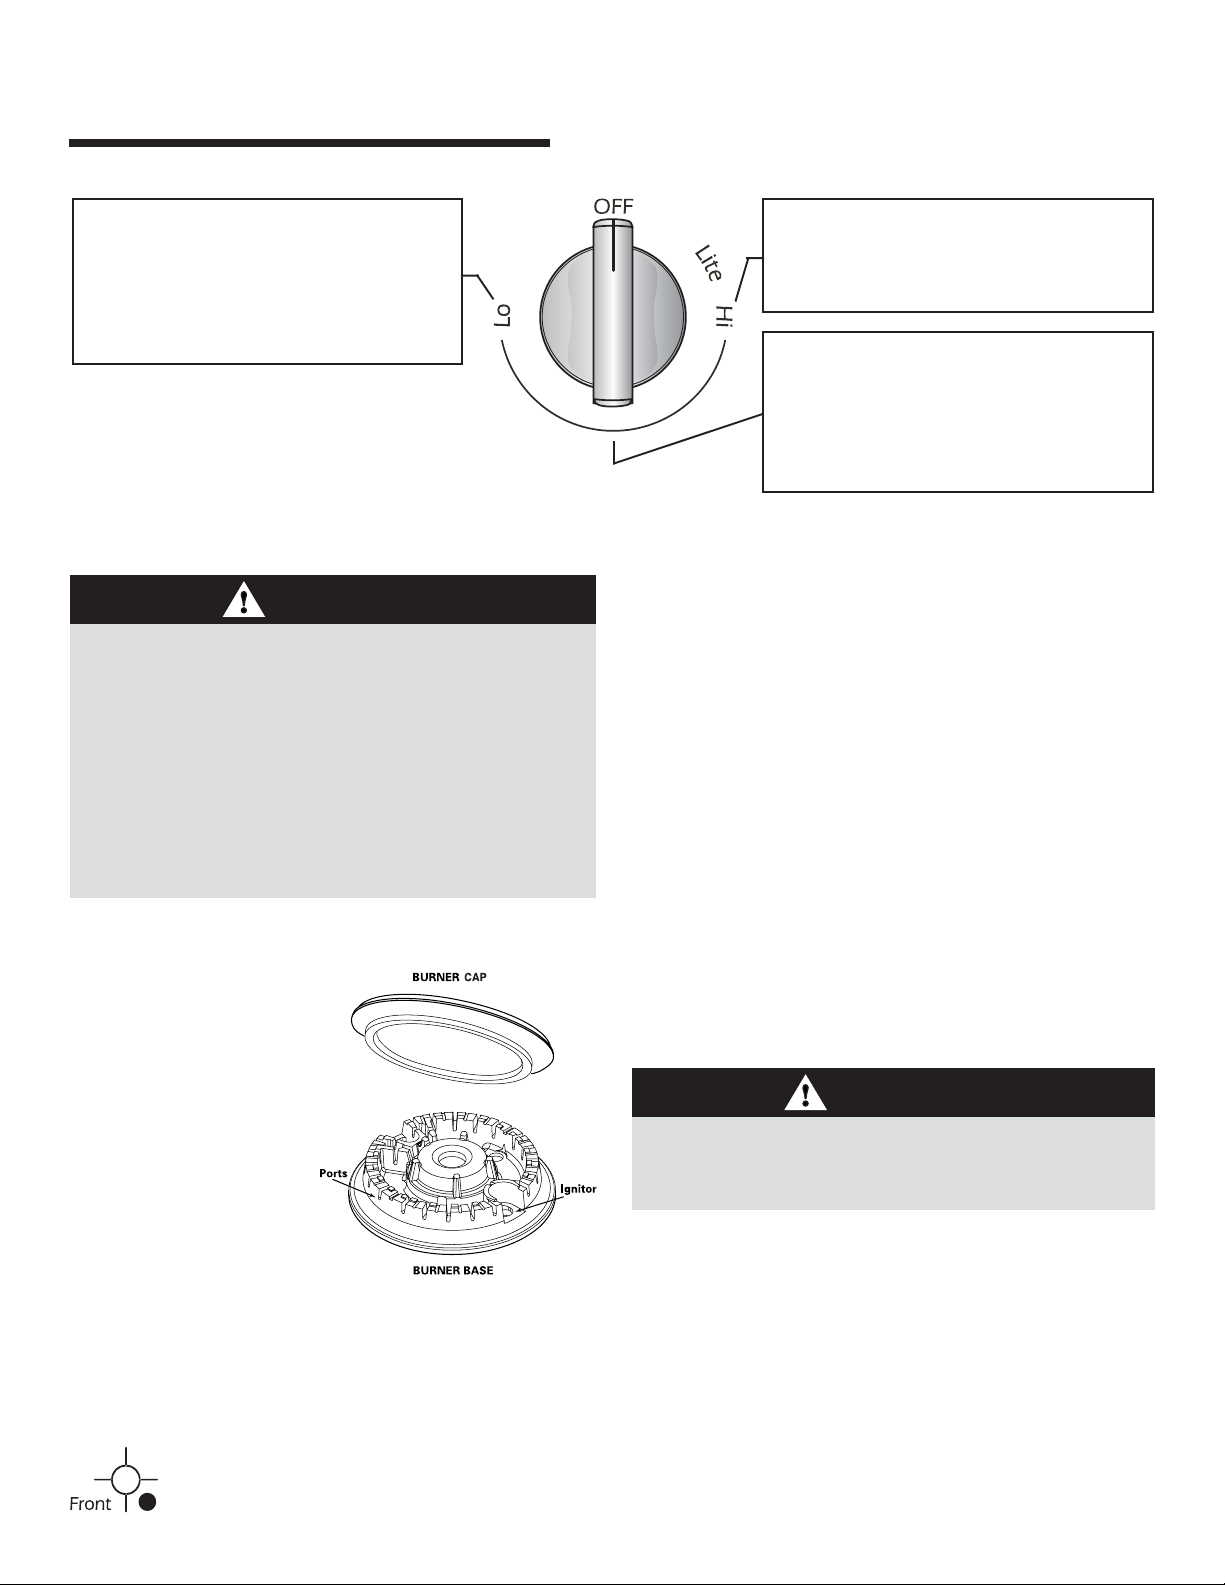
Setting the controls:
The size and type of cookware will affect the heat setting. For
information on cookware and other factors affecting heat
settings, refer to “Cooking Made Simple” booklet.
1. Place a pan on the burner grate.
• The burner flame may lift off or appear separated from
the port if a pan is not placed on the grate.
2. Push in and turn the knob counterclockwise to the Lite
setting.
• A clicking (spark) sound will be heard and the burner
will light. (All five ignitors will spark when any surface
burner knob is turned to the Lite position.)
3. After the burner lights, turn knob to desired flame size.
• The ignitor will continue to spark until the knob is
turned past the Lite position.
Operating During a
Power Failure
CAUTION
When lighting the surface burners, be sure all of the
controls are in the OFF position. Strike the match first and
hold it in position before turning the knob to Lite.
Surface Control Knobs
Use to turn on the surface burners. An infinite choice of heat
settings is available from Lo to Hi. At the Hi setting a detent
or notch may be felt. The knobs can be set on or between any
of the settings.
Graphics next to the knob identify which burner
the knob controls. For example, the graphic at left
shows the right front burner location.
1. Hold a lighted match to the desired surface burner head.
2. Push in and turn the control knob slowly to Lite.
3. Adjust the flame to the desired level.
5
Page 7

SURFACE COOKING
Cooktop
To prevent the cooktop from discoloring or
staining:
• Clean cooktop after each use.
• Wipe acidic or sugary spills as soon as the cooktop has
cooled as these spills may discolor the
porcelain.
Unlike a range with standard gas burners,
this cooktop does not lift-up nor is it
removable. Do not attempt to lift the
cooktop for any reason.
Sealed Burners
The sealed burners of your range are secured to the cooktop
and are not designed to be removed. Since the burners are
sealed into the cooktop, boilovers or spills will not seep
underneath the cooktop.
However, the burner should be cleaned after each use. The
head portion of the burner is easily removed for cleaning.
(See page 21 for cleaning directions.)
The burner heads must be correctly placed on the burner
base for proper operation of the burner.
Burner Grates
The grates must be properly positioned before cooking.
When installing the grates, place the tab ends toward the
center, matching the straight bars.
Improper installation of the grates may result in chipping of
the cooktop.
Do not operate the burners without a pan on the grate.
The grate’s porcelain finish may chip without a pan to
absorb the heat from the burner flame.
Use care when stirring food in a pot/pan sitting on the burner
grate. The grates have a smooth finish for ease of cleaning.
The pot/pan will slide if the handle is not held. This may result
in spilling of hot food items and may be a burn hazard.
Although the burner grates are durable, they will gradually
lose their shine and/or discolor, due to the high temperatures
of the gas flame.
High Performance Burner
There is one 16,000 BTU* high speed burner on your range,
located in the right front position. There is a 12,000 BTU*
burner located in the left front position. These burners offer
higher speed cooking that can be used to quickly bring water
to a boil and for large-quantity cooking.
Simmer Burner
This burner is located in the center position.
The simmer burner offers a lower BTU flame
for delicate sauces or melting chocolate.
* BTU ratings will vary when using LP gas.
Notes:
• A properly adjusted burner with clean ports will light
within a few seconds. If using natural gas, the flame
will be blue with a deeper blue inner cone.
If the burner flame is yellow or is noisy, the air/gas
mixture may be incorrect. Contact a service technician
to adjust. (Adjustments are not covered by the warranty.)
With LP gas, slight yellow tips on the flames are
acceptable. This is normal and adjustment is not
necessary.
• With some types of gas, you may hear a “popping”
sound when the surface burner is turned off. This is a
normal operating sound of the burner.
• If the control knob is turned very quickly from Hi to Lo,
the flame may go out, particularly if the burner is cold.
If this occurs, turn the knob to the OFF position, wait
several seconds and relight the burner.
• The flame should be adjusted so it does not extend
beyond the edge of the pan.
6
Page 8
OVEN COOKING
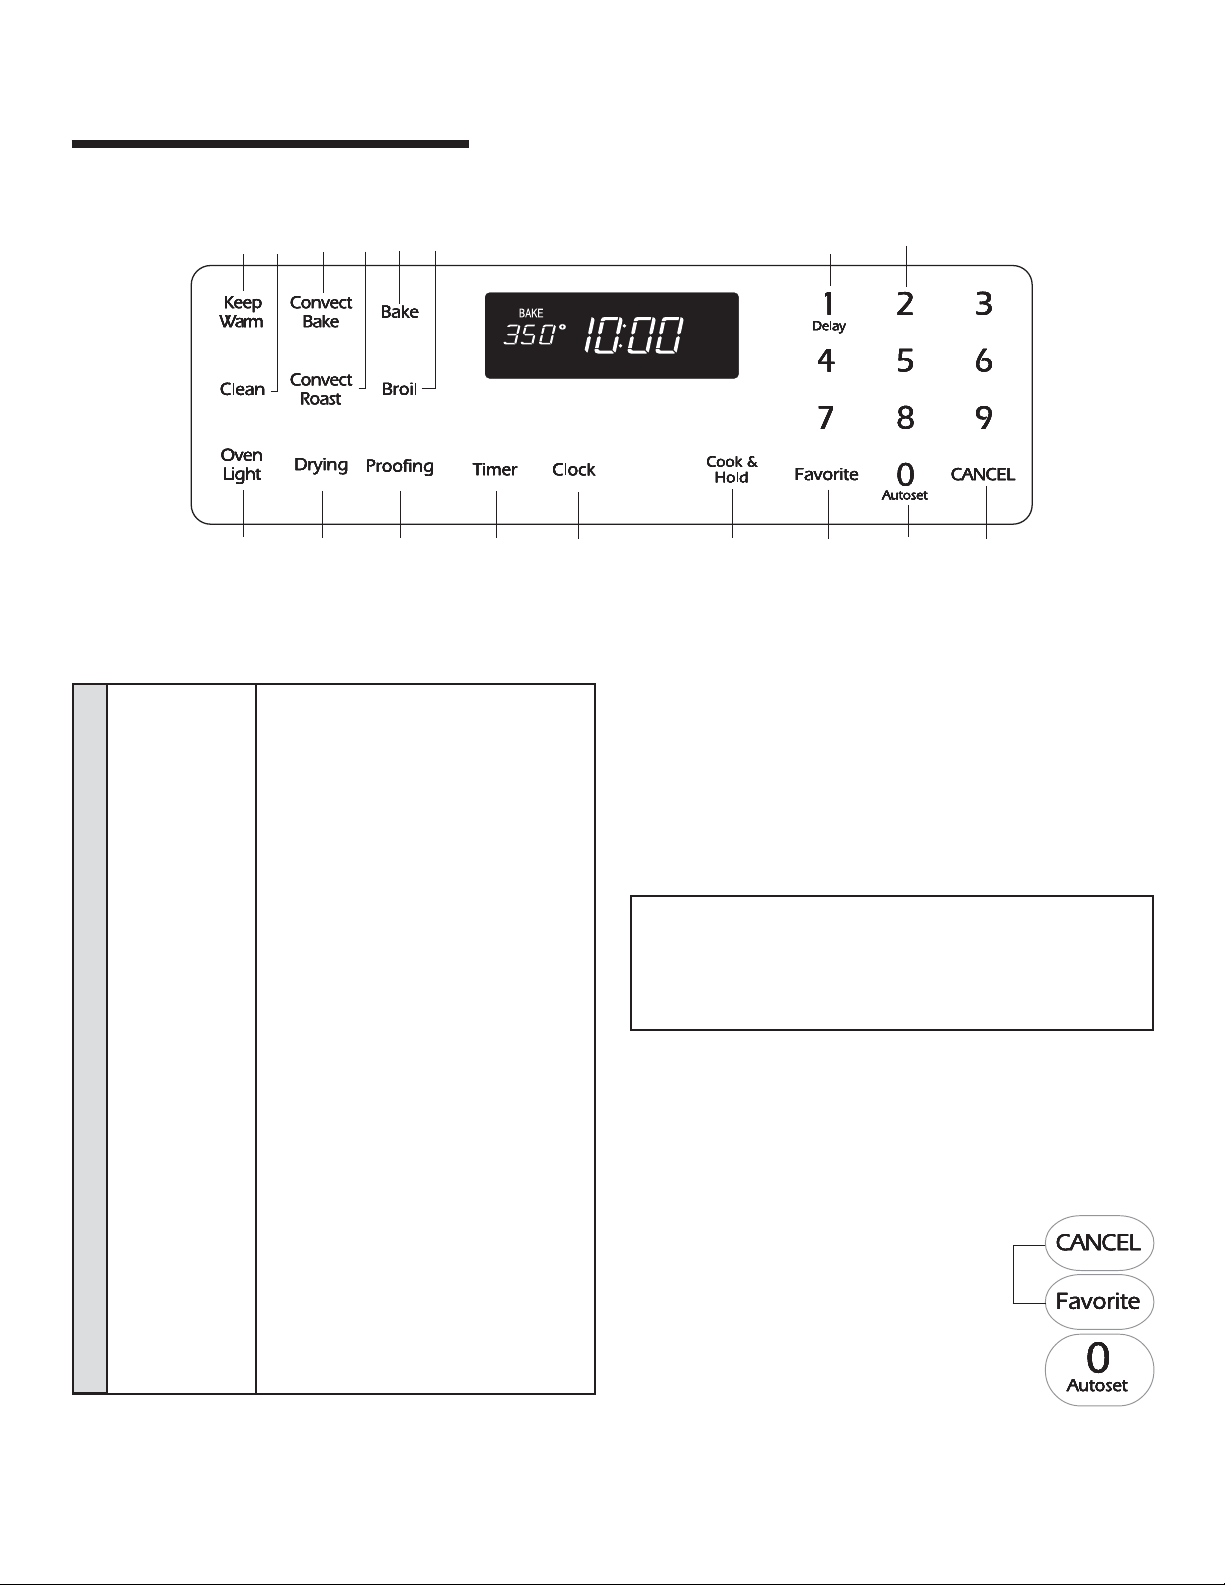
Control Panel
A B C D E F G H
I J K L M N O P Q
The control panel is designed for ease in programming. The display window on the control shows time of day, timer and oven functions.
Control panel shown includes Convect and other model specific features. (Styling may vary depending on model.)
A Keep Warm Use to keep cooked food warm in oven.
B Clean Use to set self-clean cycle.
C Convect Bake Use for convection baking.
(select models)
D Convect Roast Use for convection roasting.
(select models)
E Bake Use for baking and roasting.
F Broil Use for broiling and top browning.
G Delay Programs the oven to start baking or
cleaning at a later time.
H Number Pads Use to set time and temperature.
I Oven Light Use to turn the oven light on or off.
J Drying Use for drying fruits, vegetables, herbs,
(select models) etc.
K Proofing Use to raise yeast-based bread products
(select models) before baking.
L Timer Sets the timer.
M Clock Use to set time-of-day clock.
N Cook & Hold Bakes for a preset time, then holds food
warm for 1 hour.
O Favorite Use to set and save a specific Cook
& Hold procedure.
P Autoset Use to quickly set temperature.
Q CANCEL Cancels all operations except Timer and
Clock.
Using the Touchpads
• Press the desired pad.
• Press the number pads to enter time or temperature.
• Press the Autoset 0 pad to enter temperature.
• A beep will sound when any pad is touched.
• A double beep will sound if a programming error occurs.
Note: Four seconds after entering the number, the time or
temperature will automatically be entered. If more than 30
seconds elapse between touching a function pad and the
number pads, the function will be canceled and the display
will return to the previous display.
Clock
The clock can be set to display time in a 12-hour or 24-hour
format. The clock is set at the factory for the 12-hour format.
To change the clock to 24-hour format:
1. Press and hold the CANCEL and Favorite
pads for three seconds.
• 12 Hr flashes in the display.
2. Press the Autoset 0 pad to select 24 Hr;
press again to select 12 Hr.
3. Set the time of day following the directions
in the To set the Clock section.
7
Page 9

OVEN COOKING
To set the Clock:
1. Press the Clock pad.
• The time of day flashes in the display.
2. Press the appropriate number pads to set the time of day.
• Colon flashes in the display.
3. Press the Clock pad again or wait four seconds.
• The colon will remain on.
When electrical power is supplied or after a power interruption, the last clock time before power was interrupted will
flash.
To recall the time of day when another time function is
showing, press the Clock pad.
Clock time cannot be changed when the oven has been
programmed for Delay cook or clean or Cook & Hold.
To cancel the Clock display:
If you do not want the time of day to display:
Press and hold the CANCEL and Clock pads
for three seconds. The time of day will
disappear from the display.
When the clock display is canceled, press the
Clock pad to briefly display the time of day.
When the clock display is canceled, after 15 minutes, the oven
control will go into Standby Mode to save energy. The display
will be blank and the oven light will not operate. To "wake up"
the control from Standby Mode, press any touchpad. A double
beep will sound.
To restore the Clock display:
Press and hold the CANCEL and Clock pads for three seconds. The time of day will reappear in the display.
Timer
The timer can be set from one minute (0:01) up to 99 hours
and 59 minutes (99:59).
The timer can be used independently of any other oven
activity. It can also be set while another oven function is
operating.
The Timer does not control the oven. It only controls a
beeper.
3. Press Timer pad again or wait four seconds.
• The colon stops flashing and the time begins counting
down.
• The last minute of the timer countdown will be displayed
in seconds.
4. At the end of the set time, one long beep will sound and
“End” will be displayed.
5. Press the Timer pad to clear the display.
To cancel the Timer:
1. Press and hold the Timer pad for three seconds.
OR
2. Press the Timer pad and press ‘0’
using the number pads.
Locking the Control
and Oven Door
The touchpad and oven door can be locked for safety,
cleaning, or to prevent unwanted use. The touchpads will not
function when locked.
If the oven is currently in use, the touchpads and door cannot
be locked.
The current time of day will remain in the display when the
touchpads and door are locked.
To lock:
Press and hold the CANCEL and Cook &
Hold pads for three seconds. (Press the
CANCEL pad first.)
• OFF appears in the display
• LOCK flashes while the door is
locking.
To unlock:
Press and hold the CANCEL and Cook & Hold pads for three
seconds. (Press the CANCEL pad first.) OFF disappears from
the display.
Note: The touchpads and oven door cannot be locked if
the oven temperature is 400° F or above.
To set the Timer:
1. Press the Timer pad.
• 0:00 and TIMER flash in the display.
2. Press the appropriate number pads until the correct time
appears in the display.
• The colon and TIMER will continue to flash.
Fault Codes
BAKE or LOCK may flash rapidly in the display to alert you if
there is an error or a problem. If BAKE or LOCK flash in the
display, press the CANCEL pad. If BAKE or LOCK continue to
flash, disconnect power to the appliance. Wait a few minutes,
and then reconnect power. If the flashing still continues,
disconnect power to the appliance and call an authorized
servicer.
8
Page 10
OVEN COOKING
Baking
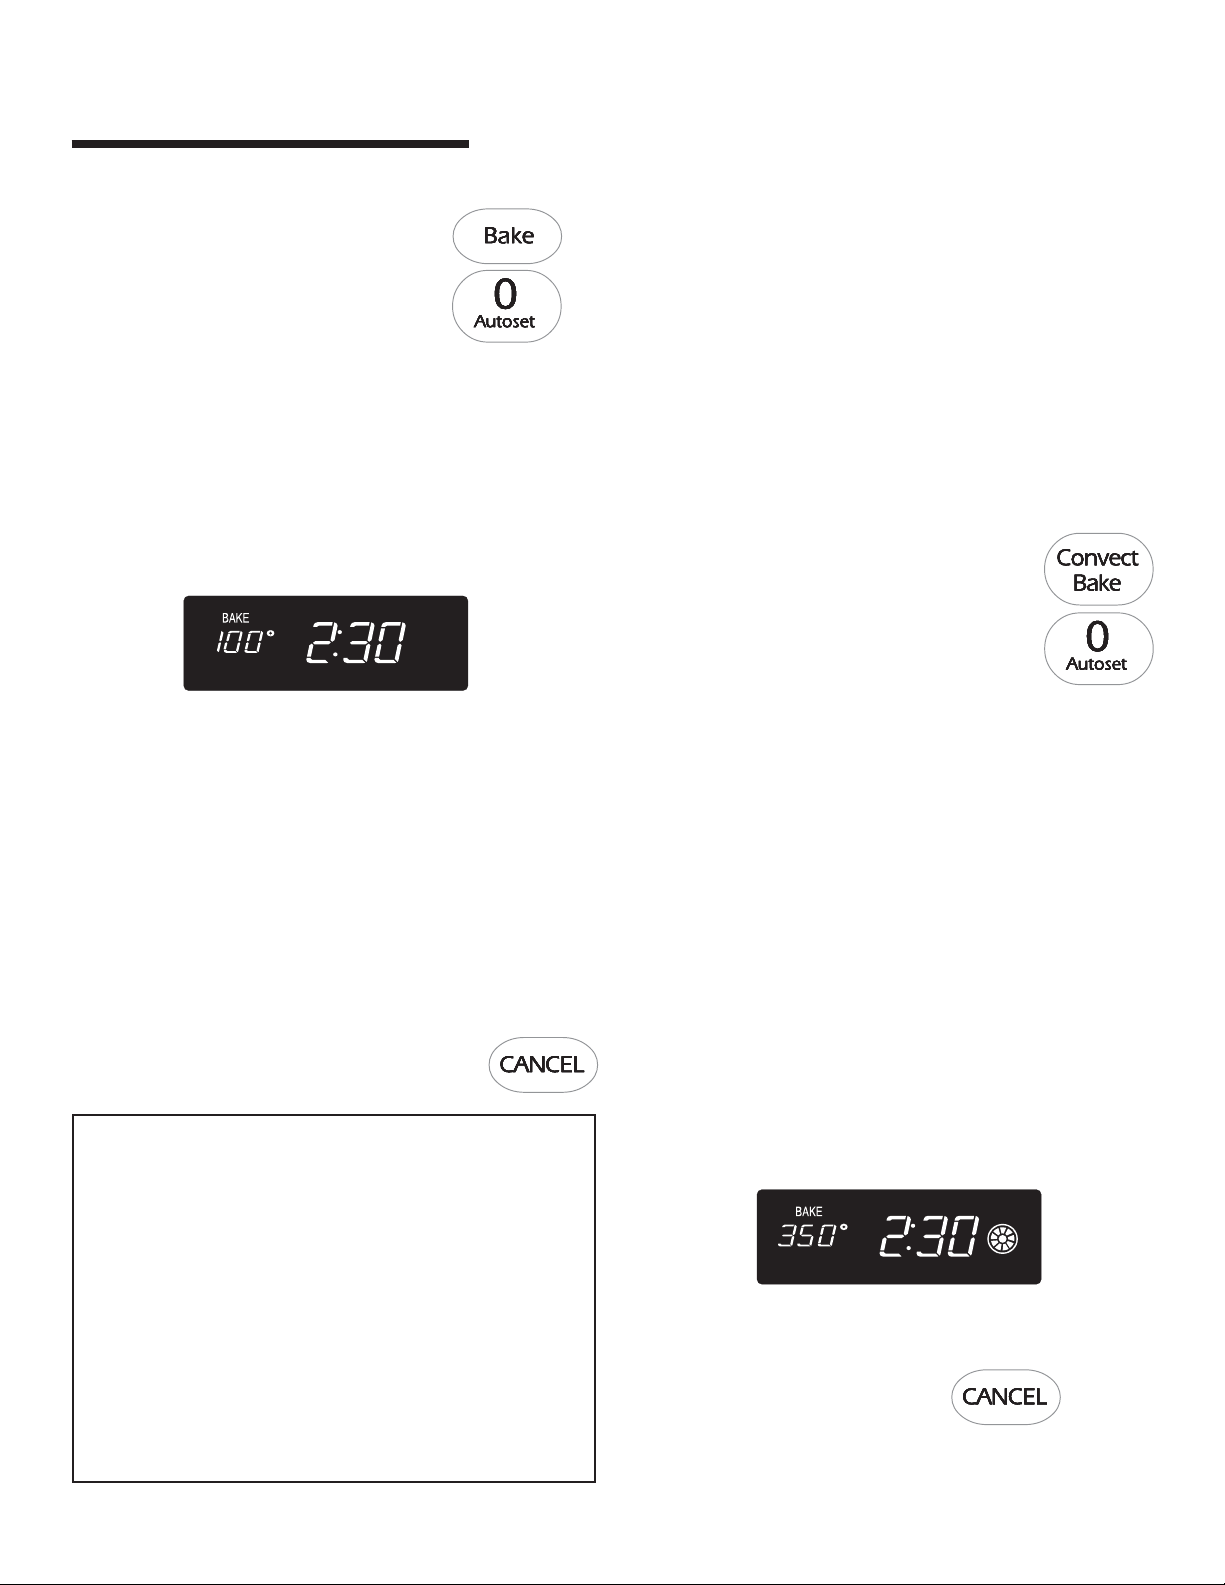
To set Bake:
1. Press the Bake pad.
• BAKE will flash.
• 000 will flash in the display.
2. Select the oven temperature. Press the Autoset 0 pad for
350° F or the appropriate number pads.
• Each additional press of the Autoset 0 pad will increase
the temperature by 25°.
• The oven temperature can be set from 170° to 550°.
3. Press Bake pad again or wait four seconds.
• BAKE will stop flashing and light in the display.
• 100° or the actual oven temperature if over 100° F will
display. It will rise in 5° increments until the preset
temperature is reached.
4. Allow the oven to preheat for 8-15 minutes.
• When the set oven temperature is reached, one long
beep will sound.
• The set temperature will display.
• To recall set temperature during preheat, press Bake pad.
5. Place food in the oven.
6. Check cooking progress at the minimum cooking time.
Cook longer if needed.
7. When cooking is finished, press CANCEL pad.
8. Remove food from the oven.
Baking Notes:
• To change the oven temperature during cooking, press
Bake, then press the Autoset 0 pad or appropriate number
pads until the desired temperature is displayed.
• To change the oven temperature during preheat, press
the Bake pad twice, then press the Autoset 0 pad or
appropriate number pads until the desired temperature is
displayed.
• If you forget to turn off the oven, it will automatically turn
off at the end of 12 hours. If you wish to deactivate this
feature, see page 15.
• For additional baking and roasting tips, see “Cooking Made
Simple” booklet.
Baking Differences Between Your Old
and New Oven
It is normal to notice some baking time differences between a
new oven and an old one. See “Adjusting the Oven Temperature”
on page 16.
Baking with Convection
(select models)
When convection baking, enter your normal baking
temperature. The control will automatically reduce the set
oven temperature by 25°. The entered temperature will be
displayed. The convection fan will start after the oven has
been on for five minutes.
To set Convect Bake:
1. Press the Convect Bake pad.
• BAKE and the FAN icon will flash
• 000 will flash in the display.
2. Select the oven temperature. Press the Autoset 0 pad for
350° F or the appropriate number pads.
• Each additional press of the Autoset 0 pad will increase
the temperature by 25 degrees. The oven temperature
can be set from 170° to 550°.
3. Press Convect Bake pad again or wait four seconds.
• BAKE will stop flashing.
• 100° or the actual oven temperature if over 100° F will
display. It will rise in 5° increments until the preset
temperature is reached.
• The FAN icon will start to rotate.
4. Allow the oven to preheat for 8-15 minutes.
• When the set oven temperature is reached, one long
beep will sound.
• The set temperature will display.
• To recall the set temperature during preheat, press the
Convect Bake pad.
5. Place food in the oven.
6. Check cooking progress at the minimum cooking time.
Cook longer if needed.
7. When cooking is finished, press
CANCEL pad.
8. Remove food from the oven.
9
Page 11
OVEN COOKING
Roasting With Convection
(select models)
When convection roasting, enter your normal roasting
time and temperature. The control will automatically
prompt you to check the food for doneness at 75% of the set
time. The convection fan will start after the oven has
been on for five minutes.
Roasting Notes:
• When convection roasting, the cooking time must be set
before setting the temperature.
• If your recipe requires a preheated oven, add 15 minutes
to the cooking time programmed.
• Roasting times can vary with different cuts of meat.
• It is not necessary to preheat when convect roasting
large cuts of meat.
• Refer to “Cooking Made Simple” booklet for suggested
roasting temperatures and times.
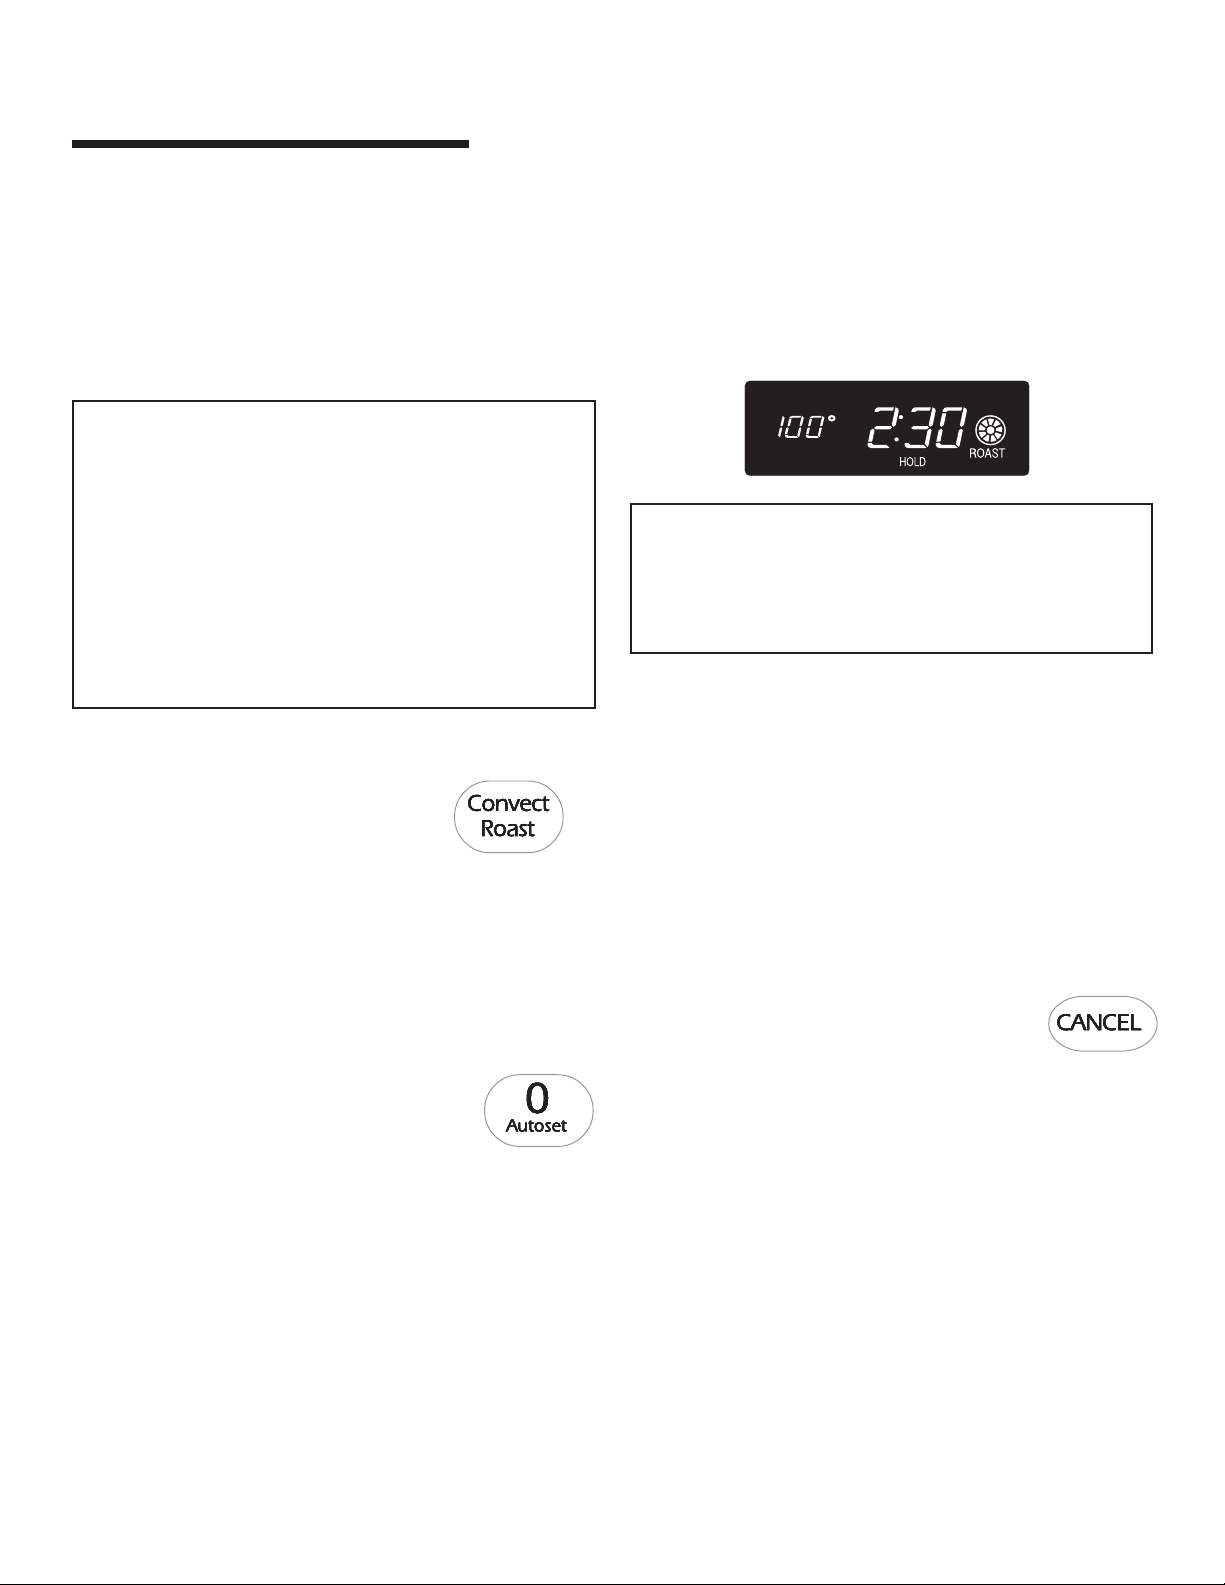
To set Convect Roast:
1. Press the Convect Roast pad.
• ROAST and the FAN icon will flash.
• 00:00 will flash in the display.
• 000 lights in the display.
2. Enter the roasting time using the number pads.
• Time can be set from 10 minutes (00:10) to 11 hours,
59 minutes (11:59).
• Press Convect Roast pad again or wait 4 seconds.
• ROAST and the FAN icon flash in the display.
• 000 will flash in the display.
3. Select the oven temperature. Press the
Autoset 0 pad for 325° F or the appropriate
number pads.
• Each additional press of the Autoset 0 pad will increase
the temperature by 25°.
• The oven temperature can be set from 170° to 550°.
4. Press Convect Roast pad again or wait four seconds.
• ROAST will stop flashing and light in the display.
• 100° or the actual oven temperature will display. It will
rise in 5° increments until the preset temperature is
reached.
• The FAN icon will start to rotate.
Notes:
• If a preheat is required, allow the oven to preheat for 8-15
minutes.
• When the set oven temperature is reached, one long beep
will sound.
5. Place food in the oven.
• Time will start counting down once oven starts heating
up.
• To recall the set temperature during preheat, press the
Convect Roast pad.
6. When 75% of the set cooking time has elapsed, the oven
light will turn on and FOOD will flash in the display. Check
the cooking progress at this time. Cook longer if needed.
• The oven light will remain on until the Oven Light pad is
pressed.
• Press any pad to recall the cook time remaining.
7. When cooking is finished, press CANCEL pad.
8. Remove food from the oven.
10
Page 12
OVEN COOKING
Cook & Hold
When using the Cook & Hold option, the oven begins to heat
immediately after the control has been set. Then, the oven
cooks for a specified length of time. When that time has
elapsed, the oven will keep the food warm for up to an hour
then automatically turn off.
To set Cook & Hold:
1. Press the Cook & Hold pad.
• HOLD will flash to indicate that you are in Cook &
Hold programming.
• 00:00 will flash in the display.
2. Select the amount of time you want to cook by using the
number pads.
• HOLD continues to flash.
• The time will light in the display.
• Time can be set from ten minutes (00:10) to 11 hours,
59 minutes (11:59).
3. While HOLD is still flashing, press Bake,
Convect Bake or Convect Roast (select
models) and select the oven temperature.
Press the Autoset 0 pad for 350° F or the
appropriate number pads.
• The desired function word will flash.
• The oven temperature can be set from
170° F to 550° F.
4. Press the desired function pad again OR
wait four seconds.
• The desired function word will remain lit.
• The cooking time will show in the display.
• The actual oven temperature will be displayed
during preheat.
• The set temperature will display when the oven is
preheated.
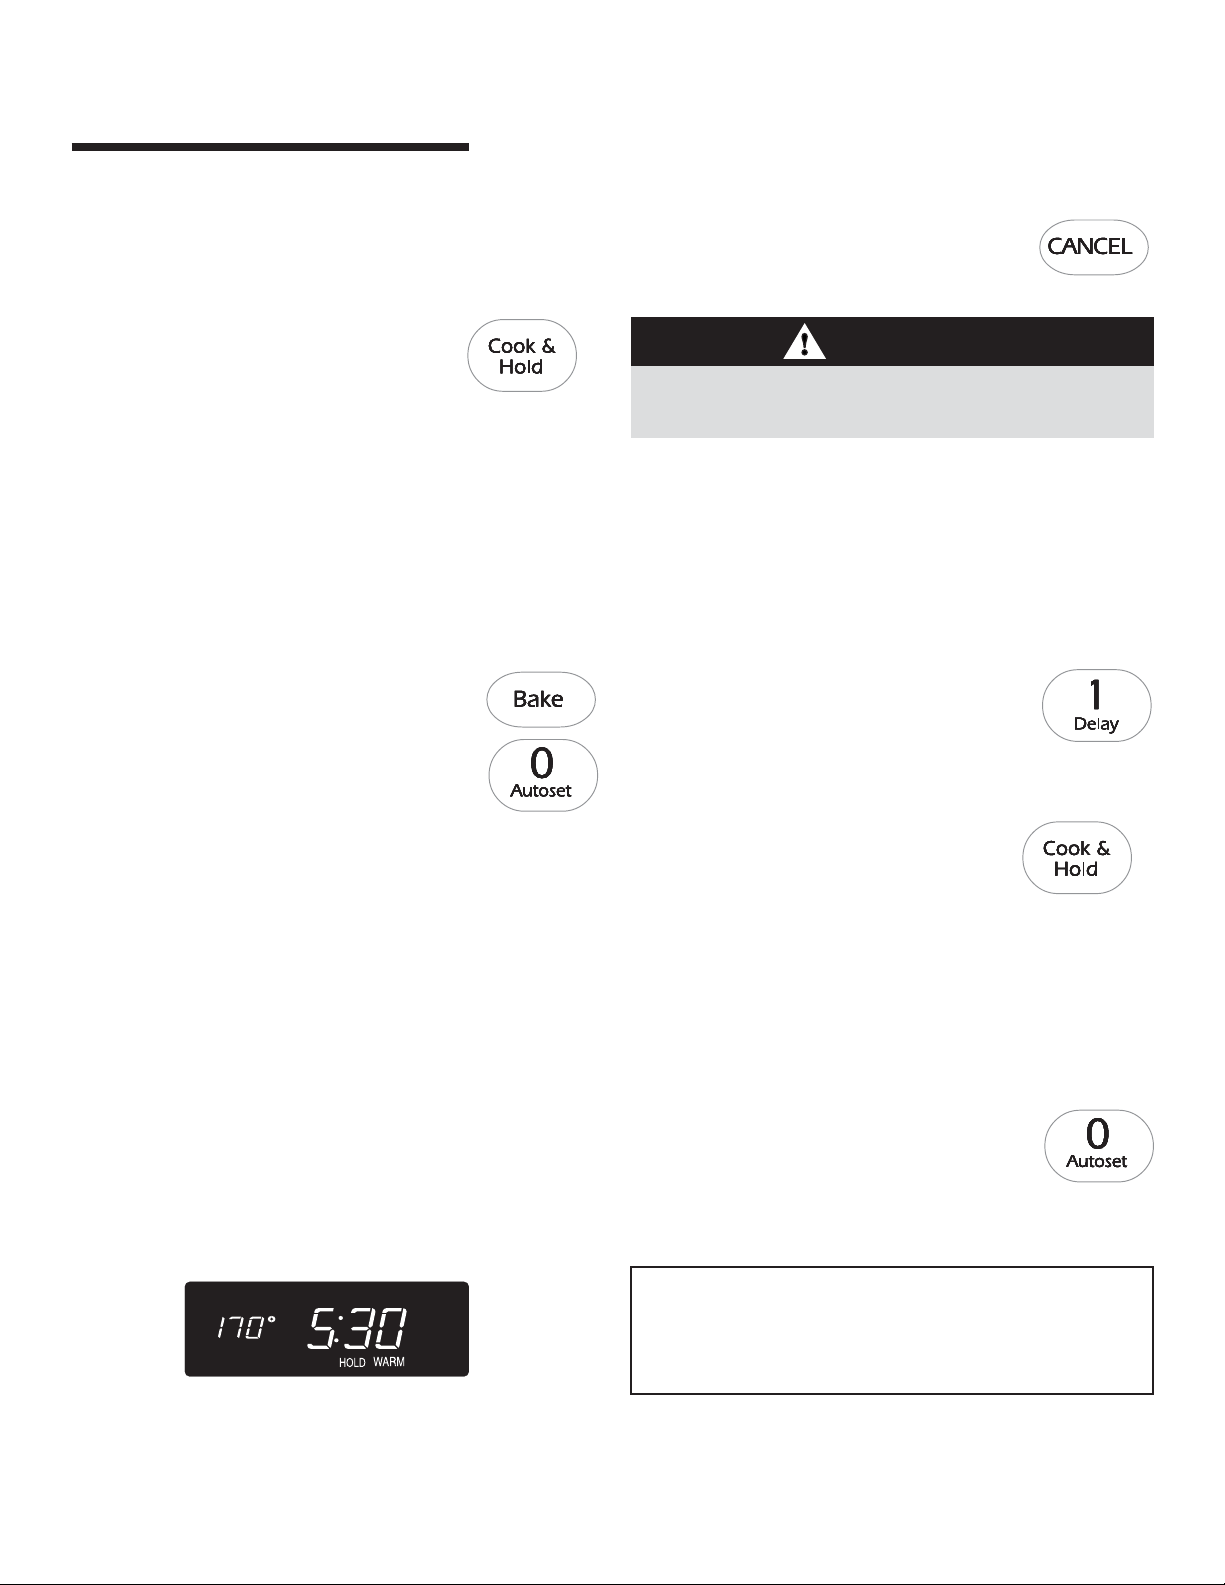
When the cooking time has elapsed:
• Four beeps will sound.
• HOLD and WARM will light.
• 170° will display.
• Time of day will display.
After one hour in HOLD WARM:
• The oven turns off automatically.
• HOLD and WARM go off.
• Remove food from oven.
To cancel Cook & Hold at any time:
Press the CANCEL pad. Remove food from oven.
Delay Cook & Hold
CAUTION
Do not use delayed baking for highly perishable foods such
as dairy products, pork, poultry, or seafood.
When using Delay, the oven begins to cook later in the day.
Set the amount of time that you want to delay before the oven
turns on and how long you want to cook. The oven begins to
heat at the selected time and cooks for the specified length of
time.
Delay time can be set from 10 minutes (00:10) to 11 hours, 59
minutes (11:59).
To set a Delayed Cook & Hold cycle:
1. Press the 1 Delay pad.
• DELAY flashes in the display.
• 00:00 flashes in the display.
2. Using the appropriate number pads, enter the amount of
time you want to delay the start of the Cook & Hold cycle.
3. Press the Cook & Hold pad.
• HOLD and DELAY flash in the display.
• 00:00 flashes in the display.
4. Enter the amount of time you want to cook using the
number pads.
5. Press Bake, Convect Bake or Convect Roast pad (select
models).
6. Set the oven temperature desired by pressing the Autoset
0 pad or the appropriate number pads.
• 350° will light when Autoset 0 pad is pressed.
• After four seconds, the entered delay time
will appear in the display.
• HOLD turns off.
• BAKE and DELAY remain lit to remind you that
a delayed Cook & Hold cycle has been programmed.
Notes:
• Do not use Delayed Cook & Hold for items that require a
preheated oven, such as cakes, cookies, and breads.
• Do not use Delayed Cook & Hold if oven is already hot.
11
Page 13
OVEN COOKING
Broiling
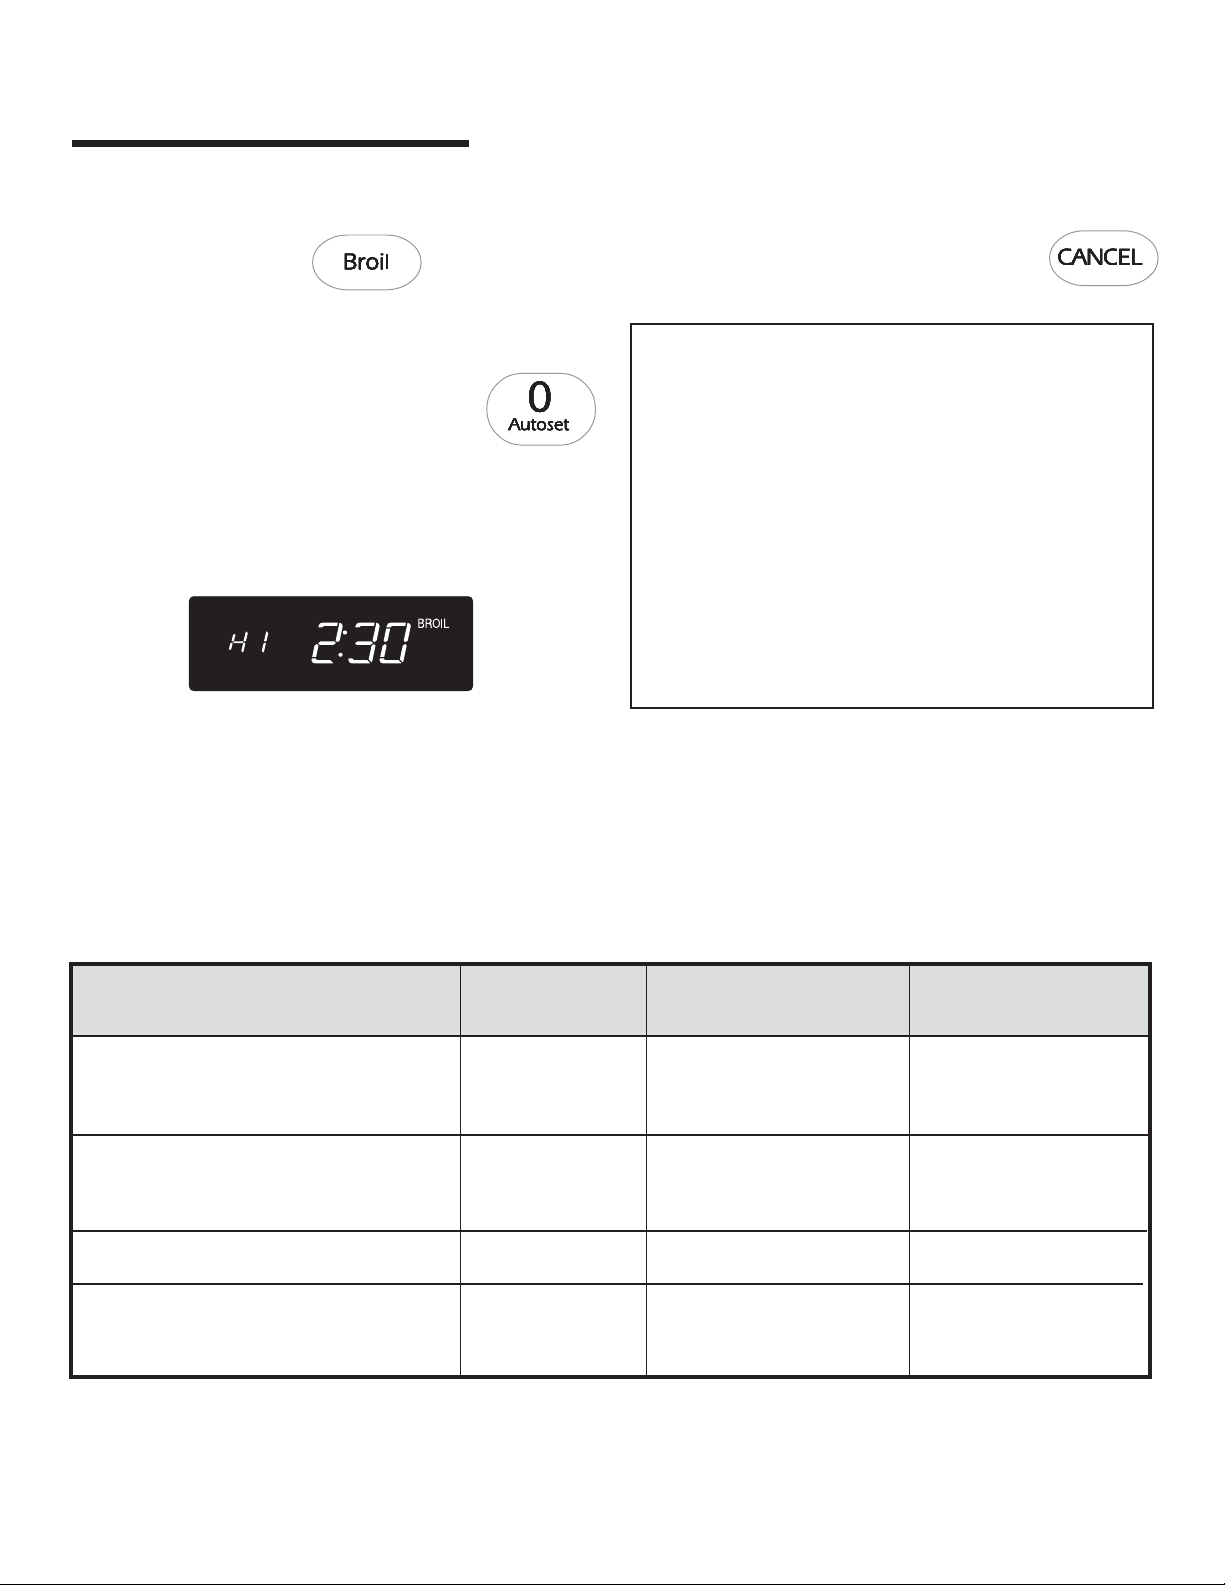
To set Broil:
1. Press the Broil pad.
• BROIL and SET flash in the display.
2. Press the Autoset 0 pad once to set HI broil or
twice to set LO broil.
• HI or LO will be displayed.
• Select HI broil (550° F) for normal broiling.
Select LO broil (450° F) for low-temperature
broiling of longer cooking foods such as poultry.
3. After four seconds, the oven will start.
• BROIL will remain lit.
• HI or LO will remain lit.
4. For optimum browning, preheat 2-3 minutes before adding
food.
5. Place food in the oven. Close the oven door.
6. Turn meat once about halfway through cooking.
7. When food is cooked, press the CANCEL pad.
Remove food and broiler pan from the oven.
• The time of day will reappear in the display.
Broil Notes:
• For best results when broiling, use a pan designed for
broiling.
• HI is used for most broiling. Use LO broil when broiling
longer cooking foods. The lower temperature allows
food to cook to the well done stage without excessive
browning.
• Broil times may be longer when the lower broiling
temperature is selected.
• Most foods should be turned halfway through broiling
time.
• For additional broiling tips and temperatures, refer to the
“Cooking Made Simple” booklet.
Broiling Chart
Preheat oven for 2-3 minutes.
RACK TOTAL
FOOD POSITION DONENESS COOK TIME
Beef Steaks, 1” thick 5 Medium 15 - 20 min.
5 Well Done 18 - 24 min.
Hamburger Patties, 3/4” thick 5 or 6 Well Done 13 - 18 min.
Pork Bacon 5 Well Done 6 - 10 min.
Ham, precooked 1/2” slice 5 Warm 8 - 12 min.
Chops, 1” thick 5 Well Done 22 - 26 min.
Poultry Chicken Breasts, bone-in 4 Well Done 30 - 45 min. (Lo Broil)
Seafood Fish filets 5 Flaky 8 - 12 min.
Fish steaks, 1” thick 5 Flaky 10 - 15 min.
Lobster tails, 3-4 oz. each 5 Done 7 - 10 min.
For a browned/seared exterior and rare interior, it may be necessary to decrease cook time on side one and decrease the distance
between the meat and heat source.
Note: This chart is a suggested guide. The times may vary with the food being cooked.
12
Page 14
OVEN COOKING
Keep Warm
For safely keeping hot foods warm or for warming breads and
plates.
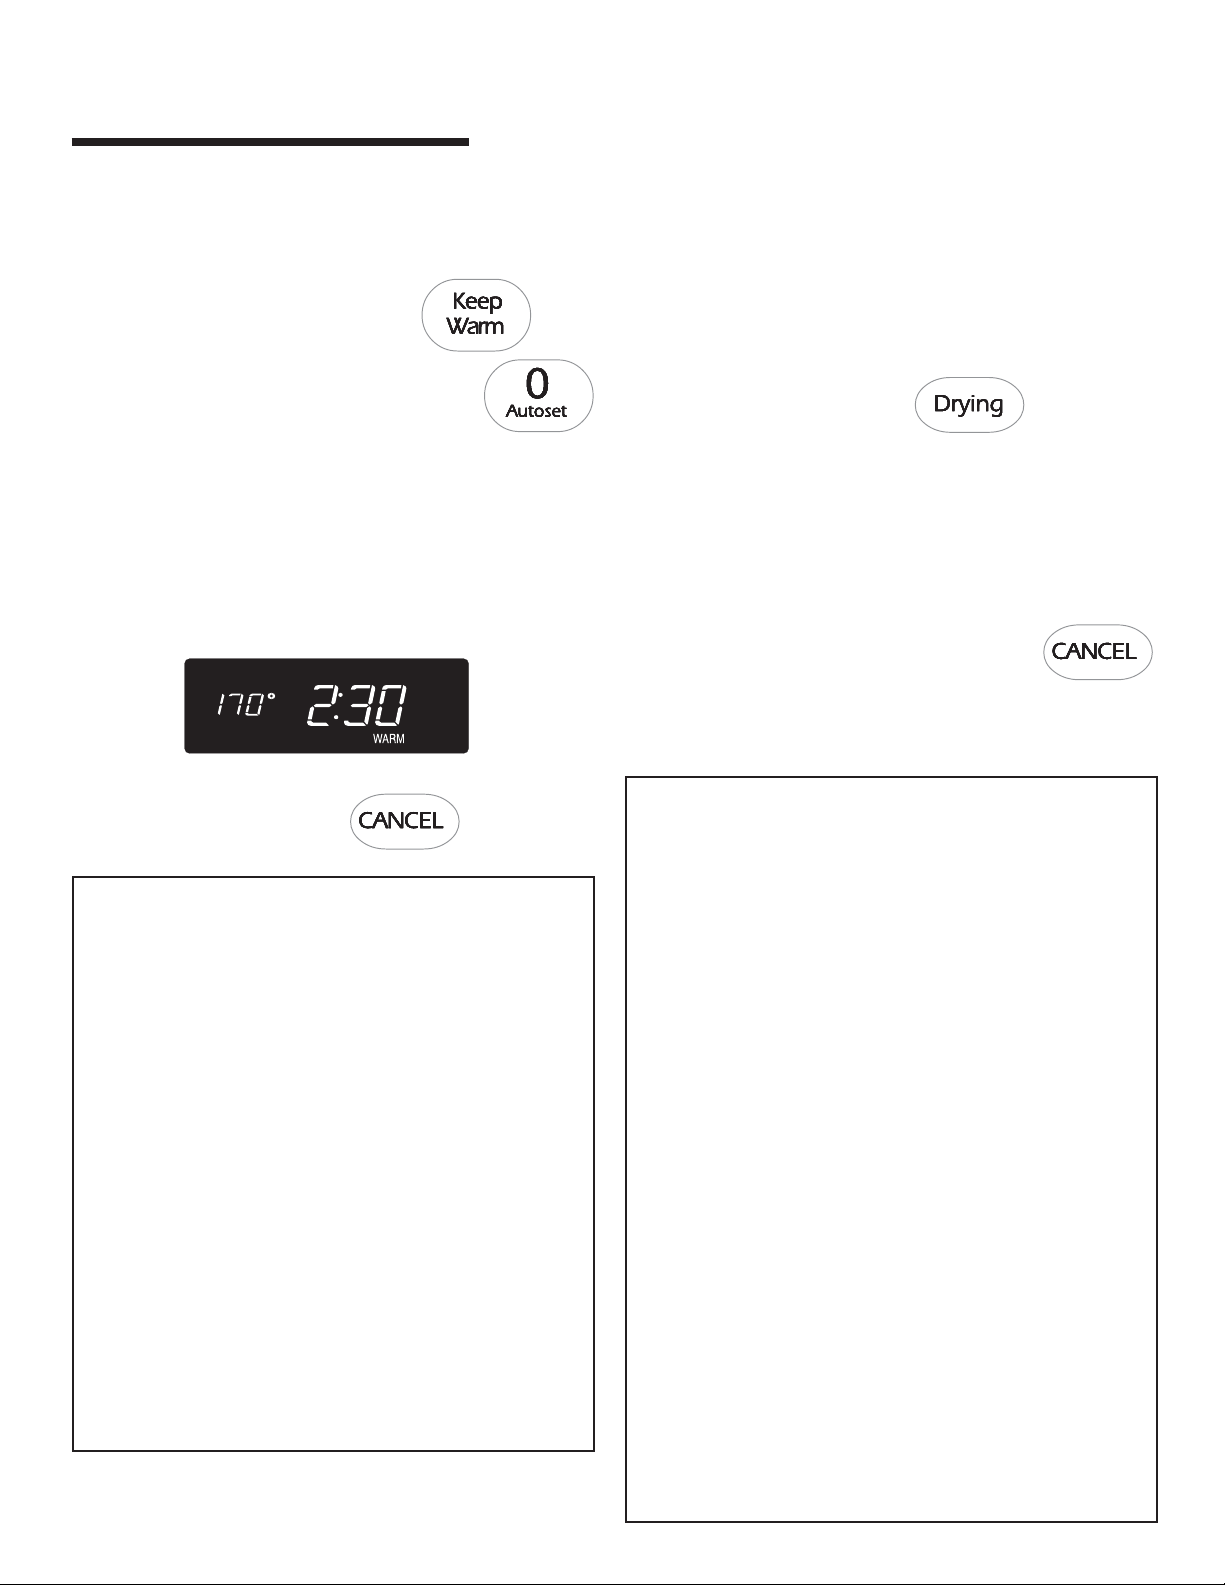
To set Keep Warm:
1. Press the Keep Warm pad.
• WARM flashes in the display.
• 000 flashes in the display.
2. Select the Keep Warm temperature. Press the
Autoset 0 pad or the appropriate number pads.
• 170° will light when the Autoset 0 pad is pressed.
• Each press of the Autoset 0 pad will increase the
temperature by 5°.
The Keep Warm temperature can be set from 145° to 190°.
WARM and the temperature will be displayed while the
function is active.
To cancel Keep Warm:
1. Press the CANCEL pad.
2. Remove food from the oven.
Keep Warm Notes:
• For optimal food quality, oven cooked foods should be
kept warm for no longer than 1 to 2 hours.
• To keep foods from drying, cover loosely with foil or a lid.
• To warm dinner rolls:
- cover rolls loosely with foil and place in oven.
- press Keep Warm and Autoset 0 pads.
- warm for 12-15 minutes.
• To warm plates:
- place 2 stacks of up to four plates each in the oven.
- press Keep Warm and Autoset 0 pads.
- warm for five minutes, turn off the oven and leave
plates in the oven for 15 minutes more.
- use only oven-safe plates, check with the
manufacturer.
- do not set warm dishes on a cold surface as rapid
temperature changes could cause crazing or
breakage.
Drying (select models)
For best results, use a drying rack. A drying rack allows air to
circulate evenly around the food.
The convection fan will operate during the drying procedure.
To set Drying:
1. Place food in the oven and close door.
2. Press the Drying pad.
• DRY flashes in the display.
3. Press the Autoset 0 pad for 140° F or press the appropriate
number pads for the desired drying temperature.
• Pressing the Autoset pad will increase the temperature
in 10° increments.
• The temperature may be set between 100° - 200° F.
4. After four seconds, DRY and the set temperature will appear
in the display.
5. When drying is complete, turn the oven off
by pressing the CANCEL pad.
Follow the Drying Guide on page 14 for drying times. Check
foods at minimum times given. Cool foods to room temperature
before testing for doneness.
Drying Notes:
• To purchase a drying rack, contact your Jenn-Air dealer for the
“DRYINGRACK” Accessory Kit or call 1-800-JENNAIR.
• Most fruits and vegetables dry well and retain their color when
dried at 140° F. Meat and jerky should be dried at 145° - 150° F.
For optimal flavor, dry herbs at 100° F, however, at this lower
temperature expect extended drying times of up to 8 hours.
• The length of drying times vary due to the following: Water and
sugar content of food, size of food pieces, amount of food
being dried, humidity in the air.
• Check foods at the minimum drying time. Dry longer if necessary.
• Fruits that turn brown when exposed to air should be treated
with an antioxidant. Try one of the following methods:
1. Dip fruit in a mixture of two parts bottled lemon juice to
one part cool water.
2. Soak fruit in a solution of 1 tsp. ascorbic acid or commer-
cial antioxidant to 1 quart of cold water.
• Foods may drip during the drying process. After drying high
acid or sugary foods, clean the oven bottom with soap and
water. The porcelain oven finish may discolor if acidic or sugary
food soils are not wiped up prior to high heat or a self-cleaning
cycle.
• More than one rack of food may be dried at the same time.
However, additional drying time is needed.
• Refer to other resources at your local library or call your local
County Extension service for additional information.
13
Page 15
OVEN COOKING
Drying Guide (select models)
APPROX.
FRUITS VARIETIES BEST PREPARATION DRY TIME TEST FOR DONENESS
FOR DRYING at 140°F ** AT MIN. DRY TIME
Apples* Firm varieties: Graven Wash, peel if desired, core and slice 4-8 hours Pliable to crisp. Dried
Stein, Granny Smith, into 1/8” slices. apples store best when they
Jonathan, Winesap, are slightly crisp.
Rome Beauty, Newton.
Apricots* Blenheim/Royal most Wash, halve, and remove pits. 18-24 hours Soft, pliable.
common. Tilton also good.
Bananas* Firm varieties Peel and cut into 1/4” slices. 17-24 hours. Pliable to crisp.
Cherries Lambert, Royal Ann, Wash and remove stems. Halve and 18-24 hours. Pliable and leathery.
Napoleon, Van or Bing. remove pits.
Nectarines Freestone varieties. Halve and remove pits. Peeling 24-36 hours Pliable and leathery.
and Peaches* is optional but results in
better-looking dried fruit.
Pears* Bartlett Peel, halve and core. 24-36 hours Soft and pliable.
Pineapple Fresh or canned. Wash, peel and remove thorny eyes. Canned: Soft and pliable.
Slice length wise and remove the 14-18 hours
small core. Cut crosswise into Fresh:
1/2” slices. 12-16 hours
Orange and Select rough-skinned fruit. Wash well. Thinly peel the outer 1-2 hours Tough to brittle.
Lemon Peel Do not dry the peel of fruit 1/16 to 1/8” of the peel. Do not use
marked “color added”. the white bitter pith under the peel.
VEGETABLES
Tomatoes Plum, Roma Halve, remove seeds. Place tomatoes 12-18 hours Tough to crisp.
skin side up on rack. Prick skins.
Carrots Danvers Half Long, Do not use carrots with woody fiber 4-8 hours Tough to brittle.
Imperator, Red Cored or pithy core. Wash, trim tops and
Chantenay peel if desired. Slice crosswise or
diagonally into 1/4” slices. Steam
blanch for 3 min.
Hot Peppers Ancho, Anaheim Wash, halve and seed. Prick 4-6 hours Pods should appear
skin several times. shriveled dark red and crisp.
HERBS
Parsley, Mint, Rinse in cold water. Pat dry with a 1-3 hours Brittle and crumbly.
Cilantro, Sage, paper towel. Leave stems on until
Oregano leaves are dry, then discard.
Basil Cut leaves 3 to 4” from top of plant 2-5 hours Brittle and crumbly.
just as buds appear. Rinse leaves in
cold water.
*Fruits requiring an antioxidant to prevent discoloration and loss of nutrients. Refer to the notes on page 13 for specific methods.
** 12 Hour Off will not occur during drying functions.
14
Page 16
OVEN COOKING
Proofing (select models)
Use the Proofing feature to raise yeast-based bread products
before baking. Proofing in the oven protects dough from room
temperature changes or drafts that commonly affect proofing
done on the countertop.
1. Press the Proofing pad.
• PROOF flashes in the display.
• SET flashes in the display.
2. Press the Autoset 0 pad.
• PROOF will light in the display.
3. When proofing is complete, press
the CANCEL pad.
Automatic Shut-Off/Sabbath
Mode
The oven will automatically turn off after 12 hours if you
accidentally leave it on. This safety feature can be turned off.
To cancel the 12-hour shut-off and run the
oven continuously for 72 hours:
1. Press and hold the Clock pad for five
seconds
• “SAb” will be displayed and flash for five seconds.
• “SAb” will then be displayed continuously until turned
off or until the 72-hour time limit is reached.
• BAKE will also be displayed if a bake cycle is in
use while the oven is in Sabbath Mode.
• All functions EXCEPT BAKE (Timer, Keep Warm,
Clean, etc.) are locked out during the Sabbath Mode.
• A Cook & Hold can be programmed during the Sabbath
Mode, however a Delay Cook & Hold is not allowed.
To cancel the Sabbath Mode:
1. Press the CLOCK pad for five seconds.
• “SAb” will flash for five seconds.
• The time of day will return to the display.
OR
2. After 72 hours, the Sabbath Mode will end.
• “SAb” will flash for five seconds.
• The time of day will return to the display.
Sabbath Mode Notes:
• Sabbath Mode can be turned on at any time with or
without the oven on.
• Sabbath Mode cannot be turned on if the touchpads are
locked out or when the door is locked.
• Most prompts and messages and all beeps are
deactivated when Sabbath Mode is active.
• If the oven is baking when Sabbath Mode is set, BAKE
will go out when Bake is canceled. There will be no
audible beeps.
• The oven light will not automatically come on when the
oven door is opened while the oven is in Sabbath Mode.
If the oven light is desired while in Sabbath Mode, it
must be turned on before the Sabbath Mode is started.
• When the Sabbath Mode is started, the temperature
display will immediately show the set temperature, rather
than the actual oven cavity temperature. No preheat
beep will sound.
• The self-clean cycle and automatic door lock do not
operate during the Sabbath Mode.
• Pressing CANCEL pad will cancel a bake cycle, however
the control will stay in the Sabbath Mode.
• If power fails, the oven will power up in Sabbath Mode
with 72 hours remaining and no cycle active.
15
Page 17

OVEN COOKING
Adjusting the Oven Temperature
Oven temperatures are carefully tested for accuracy at the
factory. It is normal to notice some baking or browning
differences between a new oven and an old one. As ovens
get older, the oven temperature can shift.
You may adjust the oven temperature if you think the oven is
not baking or browning correctly. To decide how much to
change the temperature, set the temperature 25 degrees
higher or lower than your recipe recommends, then bake.
The results of the “test” should give you an idea of how much
to adjust the temperature.
To adjust the oven temperature:
1. Press the Bake pad.
2. Enter 550° by pressing the appropriate number pads.
3. Press and hold the Bake pad for several seconds or until
00° appears in the display.
If the oven temperature was previously adjusted, the
change will be displayed. For example, if the oven temperature was reduced by 15° the display will show “-15°”.
4. Press the Autoset 0 pad to adjust the temperature.
Each time the Autoset pad 0 is pressed, the temperature
changes by 5°. The oven temperature can be increased or
decreased by 5° to 35°.
Pressing the Autoset 0 pad will first cycle through increasing the oven temperature (5, 10, . . . 35). Continuing to
press the Autoset 0 pad will then cycle through decreasing
the oven temperature (-35, -30, . . . -5).
5. The time of day will automatically reappear in the display.
You do not need to readjust the oven temperature if there is a
power failure or interruption. Temperature adjustment applies
to Bake, Convect Bake and Convect Roast (select models)
only. Broiling and cleaning temperatures cannot be adjusted.
Changing Temp °F/°C
1. The factory default setting for temperature is Fahrenheit.
2. To change the setting, press and hold the CANCEL and Bake
pads at the same time for three seconds.
3. A single beep will sound and the current setting will be
displayed (°F or °C). (If no change is made, the range will
return to the existing setting after 30 seconds.)
4. To change the setting, press the Autoset 0 pad. Press again
to return to existing setting. Wait five seconds and the setting
will be complete.
Favorite
The Favorite pad allows you to save the time and temperature
from a Cook & Hold function.
To set a Favorite cycle, Cook & Hold must be either active or
just programmed.
To set a new Favorite cycle or to save a currently running Cook & Hold as a Favorite:
1. Program a Cook & Hold cycle as described in the Cook &
Hold section on page 11.
2. Press and hold the Favorite pad for three
seconds.
• The newly set or currently running Cook & Hold cycle
will be saved.
• A beep will sound to indicate that the control has
accepted the Favorite setting.
To start a cycle programmed into Favorite:
1. Press the Favorite pad.
• Time and temperature for the set Cook & Hold cycle will
be displayed. (If no Cook & Hold cycle has been programmed, “nonE” is displayed.)
2. Press the Bake, Convect Bake or Convect Roast (select
models) pad.
• The Favorite cycle will begin immediately.
• The selected cycle word will light in the display
• The cooking time will light in the display
When the cooking time has elapsed:
• The selected cycle word will turn off.
• HOLD and WARM will light.
• 170° will display.
To cancel a Favorite cycle in progress:
1. Press the CANCEL pad.
• The stored Favorite cycle will not
be affected.
2. Remove food from the oven.
16
Page 18
OVEN COOKING
Pilotless Ignition
Your range is equipped with pilotless ignition. With this type of
ignition system, the gas automatically shuts off and the oven
will not operate during a power failure.
A lighted match will not light the oven burner. No attempt
should be made to operate the oven during a power failure.
Oven Fan
A convection fan is used to circulate hot air in the oven when
the convection feature is selected. It automatically turns on 5
minutes after the Convect pad is pressed and will turn off
when Convect is canceled.
Note: The convection fan will automatically stop when the
oven door is opened.
Oven Vent
When the oven is in use the area near the vent may become
hot enough to cause burns. Never block the vent opening.
The oven vent is located below the backguard vent
shield on your range.
OVEN VENT
LOCATION
Do not place
plastics near the
vent opening as
heat from the vent
could distort or
melt the plastic.
Oven Light
The oven light automatically comes on when
the door is opened. When the door is closed,
press the oven light pad to turn the oven light
on and off. A beep will sound every time the
oven light pad is pressed.
Oven Bottom
Protect oven bottom against spillovers, especially acidic or
sugary spills, as they may discolor the porcelain enamel. Use
the correct pan size to avoid spillovers and boilovers. Do not
place utensils or aluminum foil directly on the oven
bottom.
Oven Racks
CAUTION
• Do not attempt to change the rack position when the oven
is hot.
• Do not use the oven for storing food or cookware.
The oven has two racks (three if convection). All racks are
designed with a lock-stop edge.
To remove:
1. Pull rack straight out until it
stops at the lock-stop
position.
2. Lift up on the front of the
rack and pull out.
To replace:
1. Place rack on the rack support in the oven.
2. Tilt the front end up slightly. Slide rack back until it clears
the lock-stop position.
3. Lower front and slide back into the oven.
Do not cover an entire rack with aluminum foil or place
foil on the oven bottom. Baking results will be affected
and damage may occur to the oven bottom.
Rack Positions
RACK 7 (highest
position): For some
single rack baking on
cookie sheets and
broiling.
RACK 6: Used for some
single rack baking on
cookie sheets and
broiling. Used for
multiple rack baking.
RACK 5: For single rack baking on cookie sheets and broiling.
RACK 4: Used for single rack baking on cookie sheets, sheet
cakes, casseroles and broiling. Used for multiple rack baking.
RACK 3: For single rack baking on cookie sheets, casseroles,
layer cakes, loaves of bread and sheet cakes. Used for
multiple rack baking.
Three Rack
Convection Baking
(select models)
7
6
5
4
3
2
1
Oven
Bottom
17
Page 19
OVEN COOKING
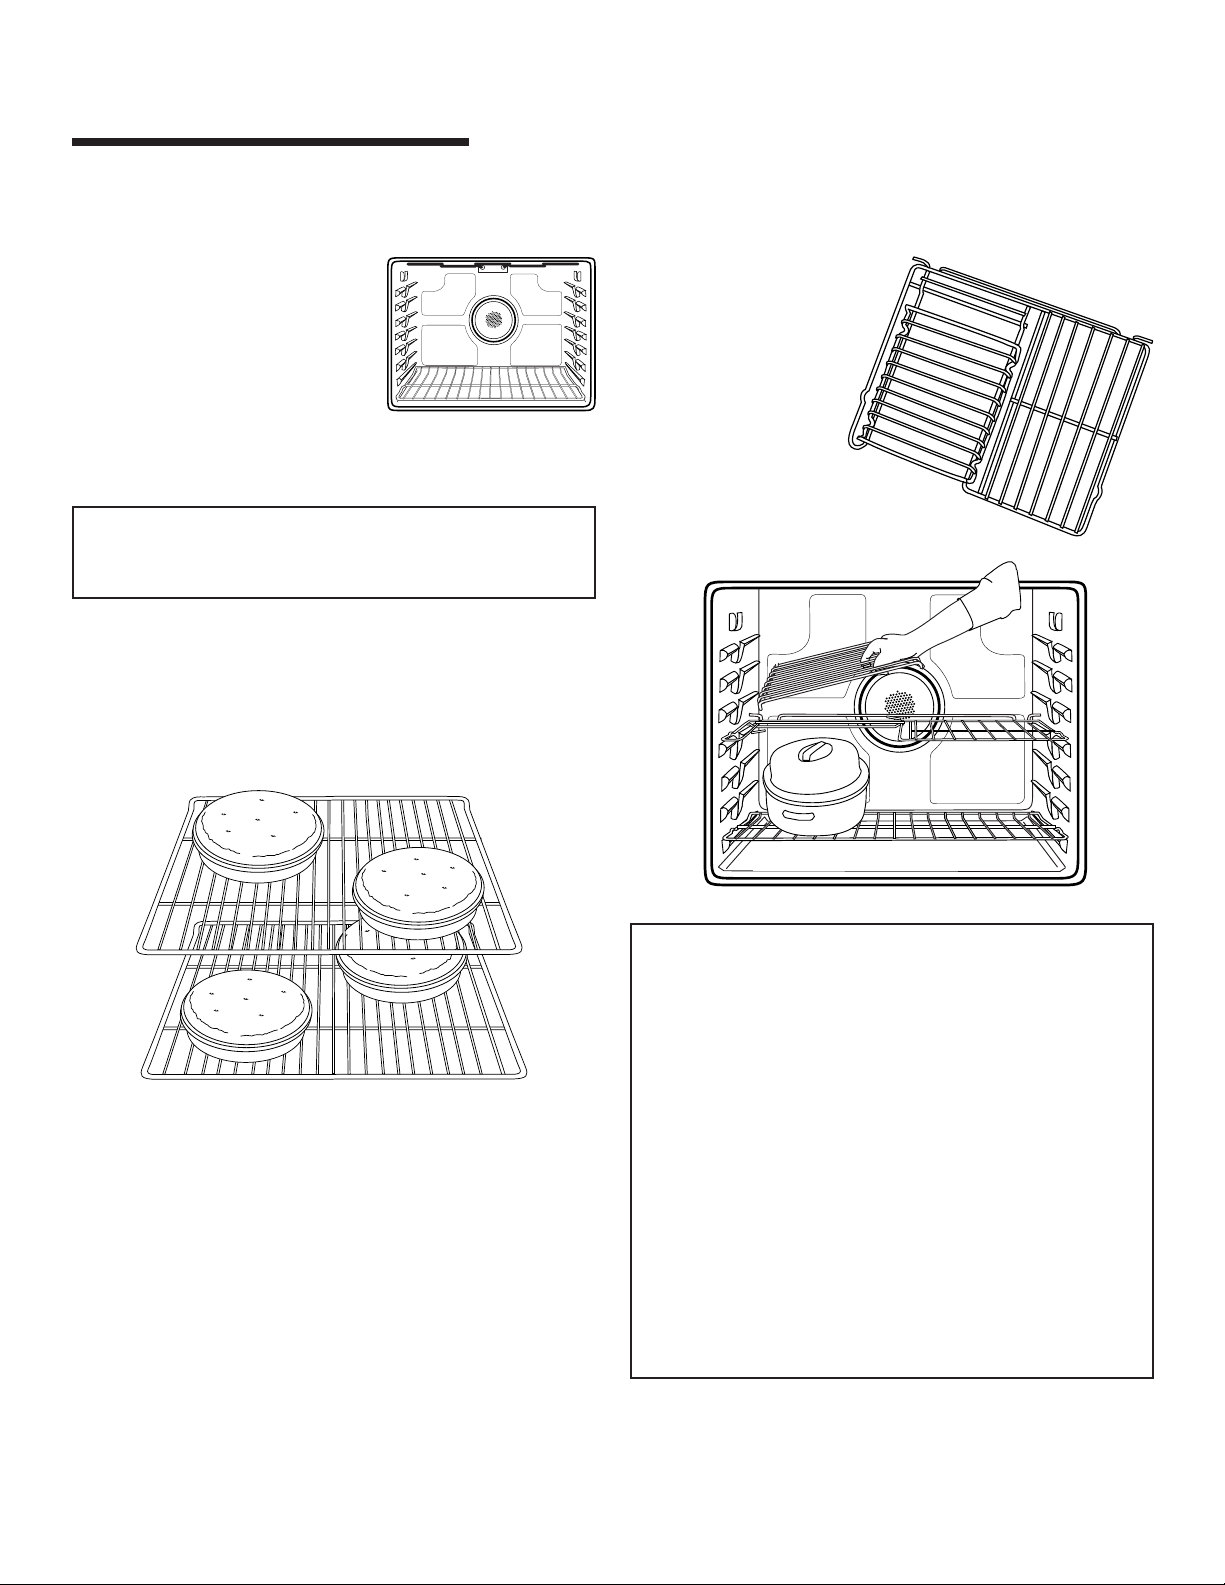
RACK 2: Used for some single rack baking on cookie sheets
and roasting small cuts of meat. Use for multiple rack baking.
RACK 1: Use for roasting large
cuts of meat and poultry.
Oven Bottom: Place oven rack on
raised sides of oven bottom. Use
for additional space when cooking
large oven meals.
MULTIPLE RACK COOKING:
Two rack: Use rack positions 3 and 6, or 2 and 4.
Three rack: (convection only) Use rack positions 1, 3 and 6.
Note: When convect baking (select models) on two or three
racks, check foods at the minimum suggested time to avoid
over-browning or over-cooking.
Baking Layer Cakes on Two Racks
For best results when baking cakes on two racks, use racks 2 and
4 for regular baking and racks 3 and 6 for convection baking
(select models).
Place the cakes on the rack as shown.
Create-A-SpaceTM Half Rack
Select range models are
equipped with a convertible
half rack. The left side of
the rack can be removed
to accommodate a large
roaster on the lower
rack. The right side of
the rack is still available to hold a casserole dish.
Notes:
• The removable section of the rack can be used as a
roasting rack in the broiling pan. Do not use the top
insert when using the rack in the broiling pan.
• The removable section of the rack can be used as a
cooling rack or trivet.
• Make sure oven is cool before removing or reinstalling
the half rack.
• Do not use cookware that extends beyond edge of rack.
• For best results, allow two inches between the pan
placed on the rack and the oven side wall.
• Use caution when removing items from the half rack to
avoid burns.
• Carefully remove items from the lower rack to avoid
disturbing the half rack.
18
Page 20
CARE & CLEANING
Self-Clean Oven
CAUTION
• It is normal for parts of the oven to become hot during a
self-clean cycle.
• To prevent damage to oven door, do not attempt to open
the door when LOCK is displayed.
• Avoid touching door, window or oven vent area during a
clean cycle.
• Do not use commercial oven cleaners on the oven finish
or around any part of the oven. They will damage the
finish or parts.
The self-clean cycle uses above-normal cooking temperatures
to automatically clean the oven interior.
It is normal for flare-ups, smoking, or flaming to occur during
cleaning if the oven is heavily soiled. It is better to clean the
oven regularly rather than to wait until there is a heavy buildup of soil in the oven.
During the cleaning process, the kitchen should be well
ventilated to get rid of normal odors associated with cleaning.
Before Self-Cleaning
1. Turn off the oven light before cleaning. The oven light may
burn out during the clean cycle.
2. Remove broiler pan, all pans, and oven racks from the
oven. The oven racks will discolor and may not slide easily
after a self-clean cycle if they are not removed.
3. Clean oven frame, door frame, area outside of gasket, and
around the opening in the door gasket with a nonabrasive
cleaner such as Bon Ami* or detergent and water. The
self-cleaning process does not clean these areas. They
should be cleaned to prevent soil from baking on during
the clean cycle. (The gasket is the seal around the oven
door and window.)
4. To prevent damage, do not clean or
rub the gasket around the oven
door. The gasket is designed to
seal in heat during the clean cycle.
5. Wipe up excess grease or spillovers from the oven bottom. This
prevents excessive smoking, flare-ups or flaming during
the clean cycle.
6. Wipe up sugary and acidic spillovers such as sweet
potatoes, tomato, or milk-based sauces. Porcelain enamel
is acid-resistant, not acid-proof. The porcelain finish may
discolor if acidic or sugary spills are not wiped up before a
self-clean cycle.
To set Self-Clean:
Note: Oven temperature must be below 400° F to
program a clean cycle.
1. Close the oven door.
2. Press the Clean pad.
• CLEAN flashes.
• SET flashes in the display.
3. Press the Autoset 0 pad.
• MEd (Medium Soil, 3 hours) is displayed.
4. Press the Autoset 0 pad to scroll through the self-cleaning
settings.
HVy (Heavy Soil, 4 hours)
MEd (Medium soil, 3 hours)
LITE ( Light Soil, 2 hours)
Choosing the soil level of the oven automatically programs
the self-cleaning time.
5. After four seconds, the oven will start cleaning.
• If the door is not closed, beeps will sound and “door” will
display. If the door is not closed within 30 seconds, the
self-cleaning operation will be canceled and the display
will return to the time of day.
• CLEAN will appear in the display.
• LOCK will flash in the display. Once the door locks, the
word will remain steady.
• The cleaning time will start counting down in the display.
To Delay a Self-Clean Cycle:
1. Press the Delay 1 pad.
• DELAY flashes.
• 00:00 will flash in the display.
2. Enter the amount of time you want to delay the cycle using the
appropriate number pads.
3. Press the Clean pad.
• SET flashes in the display.
4. Press the Autoset 0 pad.
• LITE (Light soil level) is displayed.
* Brand names for cleaning products are registered trademarks of the respective manufacturers.
19
Page 21
CARE & CLEANING
5. Press the Autoset 0 pad to scroll through
the self-cleaning settings.
HVy (Heavy Soil, 4 hours)
MEd (Medium Soil, 3 hours)
LITE (Light Soil, 2 hours)
Choosing the soil level of the oven automatically programs
the self-cleaning time.
6. After four seconds, CLEAN and DELAY will light and LOCK
will flash in the display. When the oven door latches,
LOCK will stop flashing and light continuously to show that
the oven is set for a delayed clean operation. The delay
time will display.
During the Self-Clean Cycle
When LOCK shows in the display, the door cannot be opened.
To prevent damage to the door, do not force the door open
when LOCK is displayed.
Smoke and Smells
You may see some smoke and smell an odor the first few
times the oven is cleaned. This is normal and will lessen in
time.
Smoke may also occur if the oven is heavily soiled or if a
broiler pan was left in the oven.
Sounds
As the oven heats, you may hear sounds of metal parts
expanding and contracting. This is normal and will not
damage the oven.
After Self-Cleaning
About one hour after the end of the self-clean cycle, LOCK
will turn off. The door can then be opened.
Some soil may leave a light gray, powdery ash. Remove
it with a damp cloth. If soil remains after wiping, that means
the clean cycle was not long enough. The soil will be removed during the next clean cycle.
If oven racks were left in the oven and do not slide
smoothly after a clean cycle, wipe racks and rack supports
with a small amount of vegetable oil to make them easier to
move.
Fine lines may appear in the porcelain because it went
through heating and cooling. This is normal and will not
affect performance.
A white discoloration may appear after cleaning if acidic
or sugary foods were not wiped up before the self-clean
cycle. This discoloration is normal and will not affect perfor-
mance.
Notes:
• If the oven door is left open, “door” will flash in the
display and a signal will beep until the door is closed
and the Clean pad is pressed again.
• If more than five seconds elapse between pressing the
Clean pad and the Autoset 0 pad, the program will
automatically return to the previous display.
• The oven door will be damaged if the oven door is
forced to open when LOCK is still displayed.
20
Page 22
CARE & CLEANING
Cleaning Procedures
CAUTION
• Be sure appliance is off and all parts are cool before handling
or cleaning. This is to avoid damage and possible burns.
• To prevent staining or discoloration, clean appliance after each use.
• If a part is removed, be sure it is correctly replaced.
PART PROCEDURE
Broiler Pan Never cover insert with aluminum foil as this prevents the fat from draining to the pan below.
and Insert • Place soapy cloth over insert and pan; let soak to loosen soil.
• Wash in warm soapy water. Use scouring pad to remove stubborn soil.
• Broiler pan and insert can be cleaned in dishwasher.
Burner Caps and Removable Burner Heads
Sealed Gas • Allow burner to cool. Remove burner cap and wash in soapy water with a plastic scouring pad. For
Burners stubborn soils, clean with a soap-filled, nonabrasive pad or Cooktop Cleaning Creme*
(Part #20000001)** and a sponge.
• Do not clean in the dishwasher or self-cleaning oven.
Sealed Gas Burners
• Clean frequently. Allow burner to cool. Clean with soap and plastic scouring pad. For stubborn soils,
clean with a soap-filled, nonabrasive pad. Do not enlarge or distort holes.
• Be careful not to get water into burner ports.
• Use care when cleaning the ignitor. If the ignitor is wet or damaged the surface burner will not light.
* Brand names are registered trademarks of the
respective manufacturers.
** To order call 1-800-JENNAIR (1-800-536-6247).
Burner Grates - • Wash with warm, soapy water and a nonabrasive, plastic, scrubbing pad. For stubborn soils,
Porcelain on clean with a soap-filled, nonabrasive, plastic pad or Cooktop Cleaning Creme* (Part #20000001)**
Cast Iron and a sponge. If soil remains, reapply Cooktop Cleaning Creme, cover with a damp paper towel and
soak for 30 minutes. Scrub again, rinse and dry.
• Do not clean in the dishwasher or self-cleaning oven.
Clock and • To activate “Control Lock” for cleaning, see page 8.
Control Pad • Wash, rinse and dry. Do not use abrasive cleaning agents as they may scratch the finish.
Area • Glass cleaners may be used if sprayed on a cloth first. DO NOT spray directly on control pad and
display area.
Control Knobs • Remove knobs in the OFF position by pulling forward.
• Wash, rinse and dry. Do not use abrasive cleaning agents as they may scratch the finish.
• Turn on each burner to be sure the knobs have been correctly replaced.
Cooktop and Porcelain enamel is glass fused on metal and may crack or chip with misuse. It is acid resistant, not acid proof.
Control Panel - All spillovers, especially acidic or sugary spillovers, should be wiped up immediately with a dry cloth.
Porcelain Enamel • When cool, wash with soapy water, rinse and dry.
• Never wipe off a warm or hot surface with a damp cloth. This may cause cracking or chipping.
• Never use oven cleaners, abrasive or caustic cleaning agents on exterior finish of range.
Side Panels, • When cool, wash with warm soapy water, rinse and dry. Never wipe a warm or hot surface with a damp
Storage Drawer cloth as this may damage the surface and may cause a steam burn.
and Door • For stubborn soil, use mildly abrasive cleaning agents such as baking soda paste or Bon Ami*. Do not use
Handles - abrasive cleaners such as steel wool pads or oven cleaners. These products will scratch or permanently
Painted Enamel damage the surface.
Note: Use a dry towel or cloth to wipe up spills, especially acidic or sugary spills. Surface may
discolor or dull if soil is not immediately removed. This is especially important for white surfaces.
21
Page 23
CARE & CLEANING
PART PROCEDURE
Oven Window • Avoid using excessive amounts of water which may seep under or behind glass causing staining.
and Door - Glass • Wash with soap and water. Rinse with clear water and dry. Glass cleaner can be used if sprayed on a cloth
first.
• Do not use abrasive materials such as scouring pads, steel wool or powdered cleaners as they will scratch
glass.
Oven Interior • Follow instructions on page 19-20 to set a self-clean cycle.
Oven Racks • Clean with soapy water.
• Remove stubborn soil with cleansing powder or soap-filled scouring pad. Rinse and dry.
• Racks will permanently discolor and may not slide out smoothly if left in the oven during a self-clean
operation. If this occurs, wipe the rack and embossed rack supports with a small amount of vegetable oil
to restore ease of movement, then wipe off excess oil.
Stainless Steel • DO NOT USE ANY CLEANING PRODUCT CONTAINING CHLORINE BLEACH.
(select models) • DO NOT USE ABRASIVE OR ORANGE CLEANERS.
• ALWAYS WIPE WITH THE GRAIN WHEN CLEANING.
• Daily Cleaning/Light Soil –– Wipe with one of the following - soapy water, white vinegar/water solution,
Formula 409 Glass and Surface Cleaner* or a similar glass cleaner - using a sponge or soft cloth.
Rinse and dry. To polish and help prevent fingerprints, follow with Stainless Steel Magic Spray*
(Part No. 20000008)**.
• Moderate/Heavy Soil –– Wipe with one of the following - Bon Ami, Smart Cleanser, or Soft Scrub* -
using a damp sponge or soft cloth. Rinse and dry. Stubborn soils may be removed with a damp ScotchBrite* pad; rub evenly with the grain. Rinse and dry. To restore luster and remove streaks, follow with
Stainless Steel Magic Spray*.
• Discoloration –– Using a damp sponge or soft cloth, wipe with Cameo Stainless Steel Cleaner*. Rinse
immediately and dry. To remove streaks and restore luster, follow with Stainless Steel Magic Spray*.
* Brand names for cleaning products are registered trademarks of the respective manufacturers.
** To order direct, call 1-800-JENNAIR (1-800-536-6247).
22
Page 24
MAINTENANCE
T
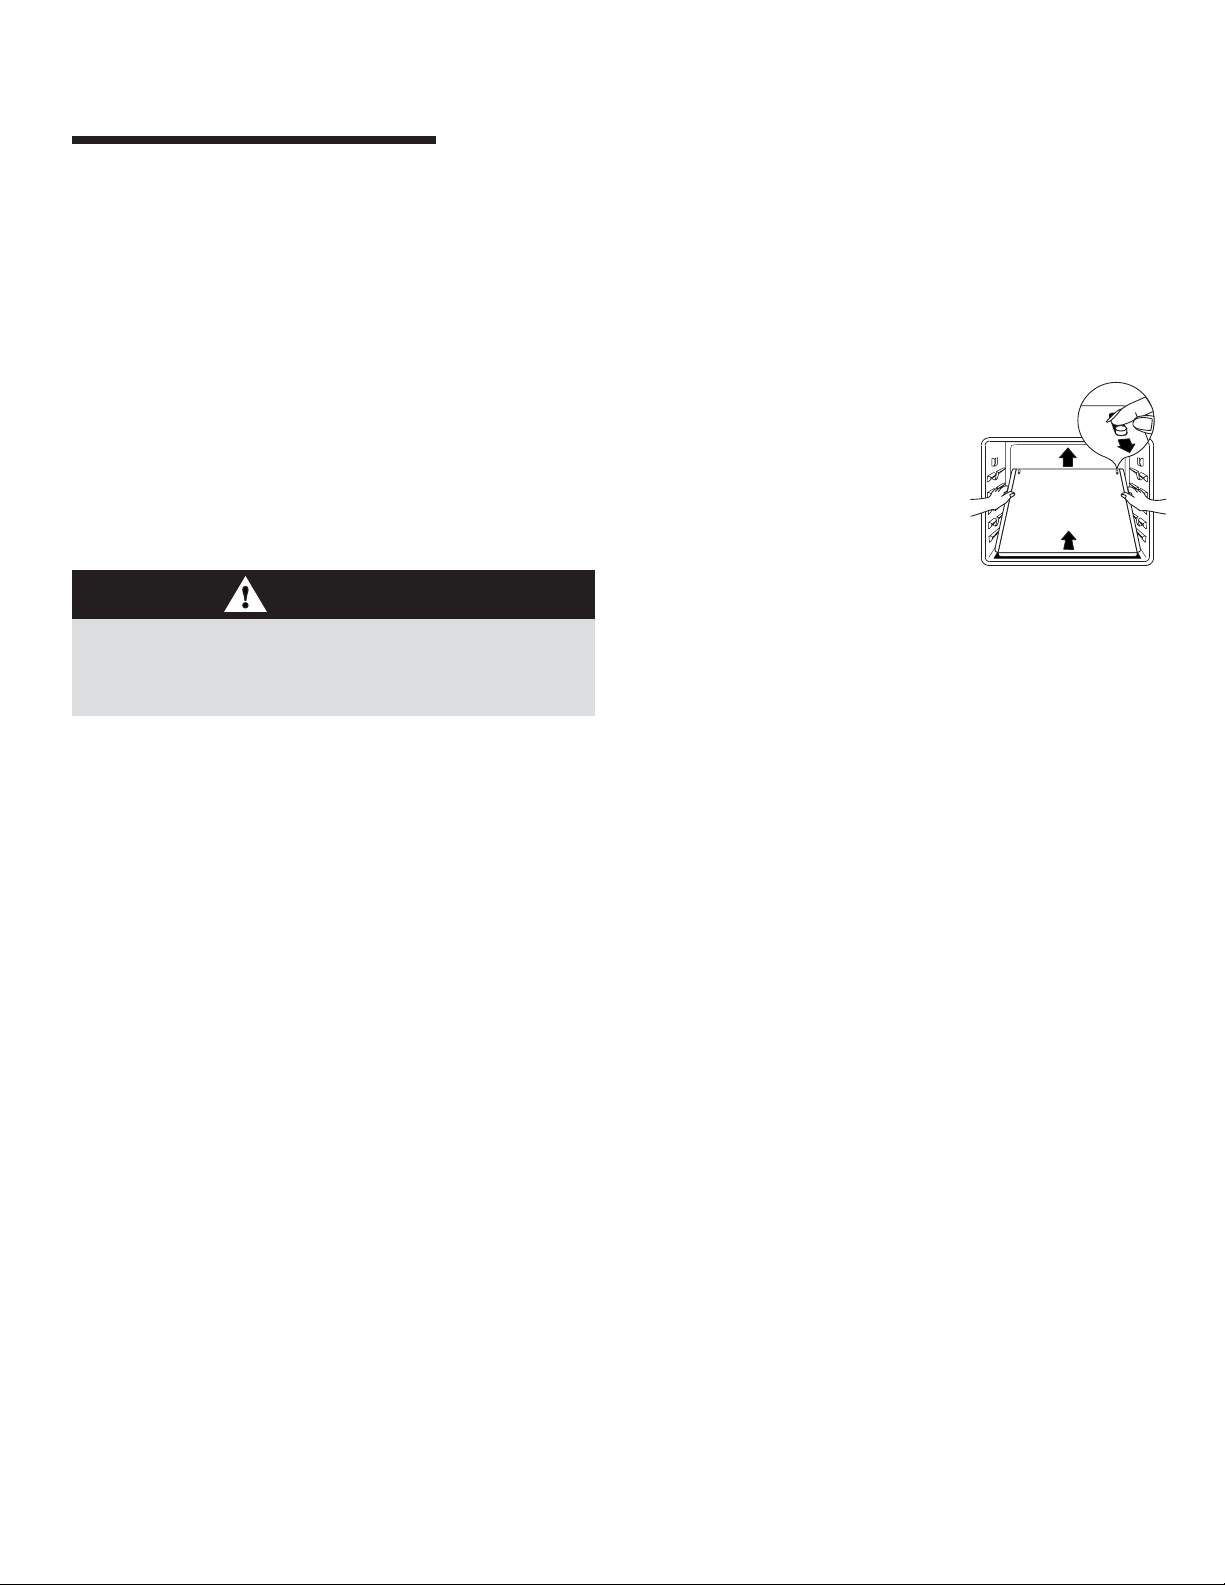
BULB COVER
WIRE
RETAINER
Oven Door
CAUTION
Do not place excessive weight on or stand on an open
oven door. This could cause the range to tip over, break
the door, or injure the user.
Note: The oven door on a new range may feel “spongy”
when it is closed. This is normal and will decrease with use.
Oven Window
To protect the oven door window:
1. Do not use abrasive cleaning agents such as steel wool
scouring pads or powdered cleansers as they may scratch
the glass.
2. Do not hit the glass with pots, pans, furniture, toys, or other
objects.
3. Do not close the oven door until the oven racks are in
place.
Scratching, hitting, jarring or stressing the glass may weaken
its structure causing an increased risk of breakage at a later
date.
Leveling Legs
CAUTION
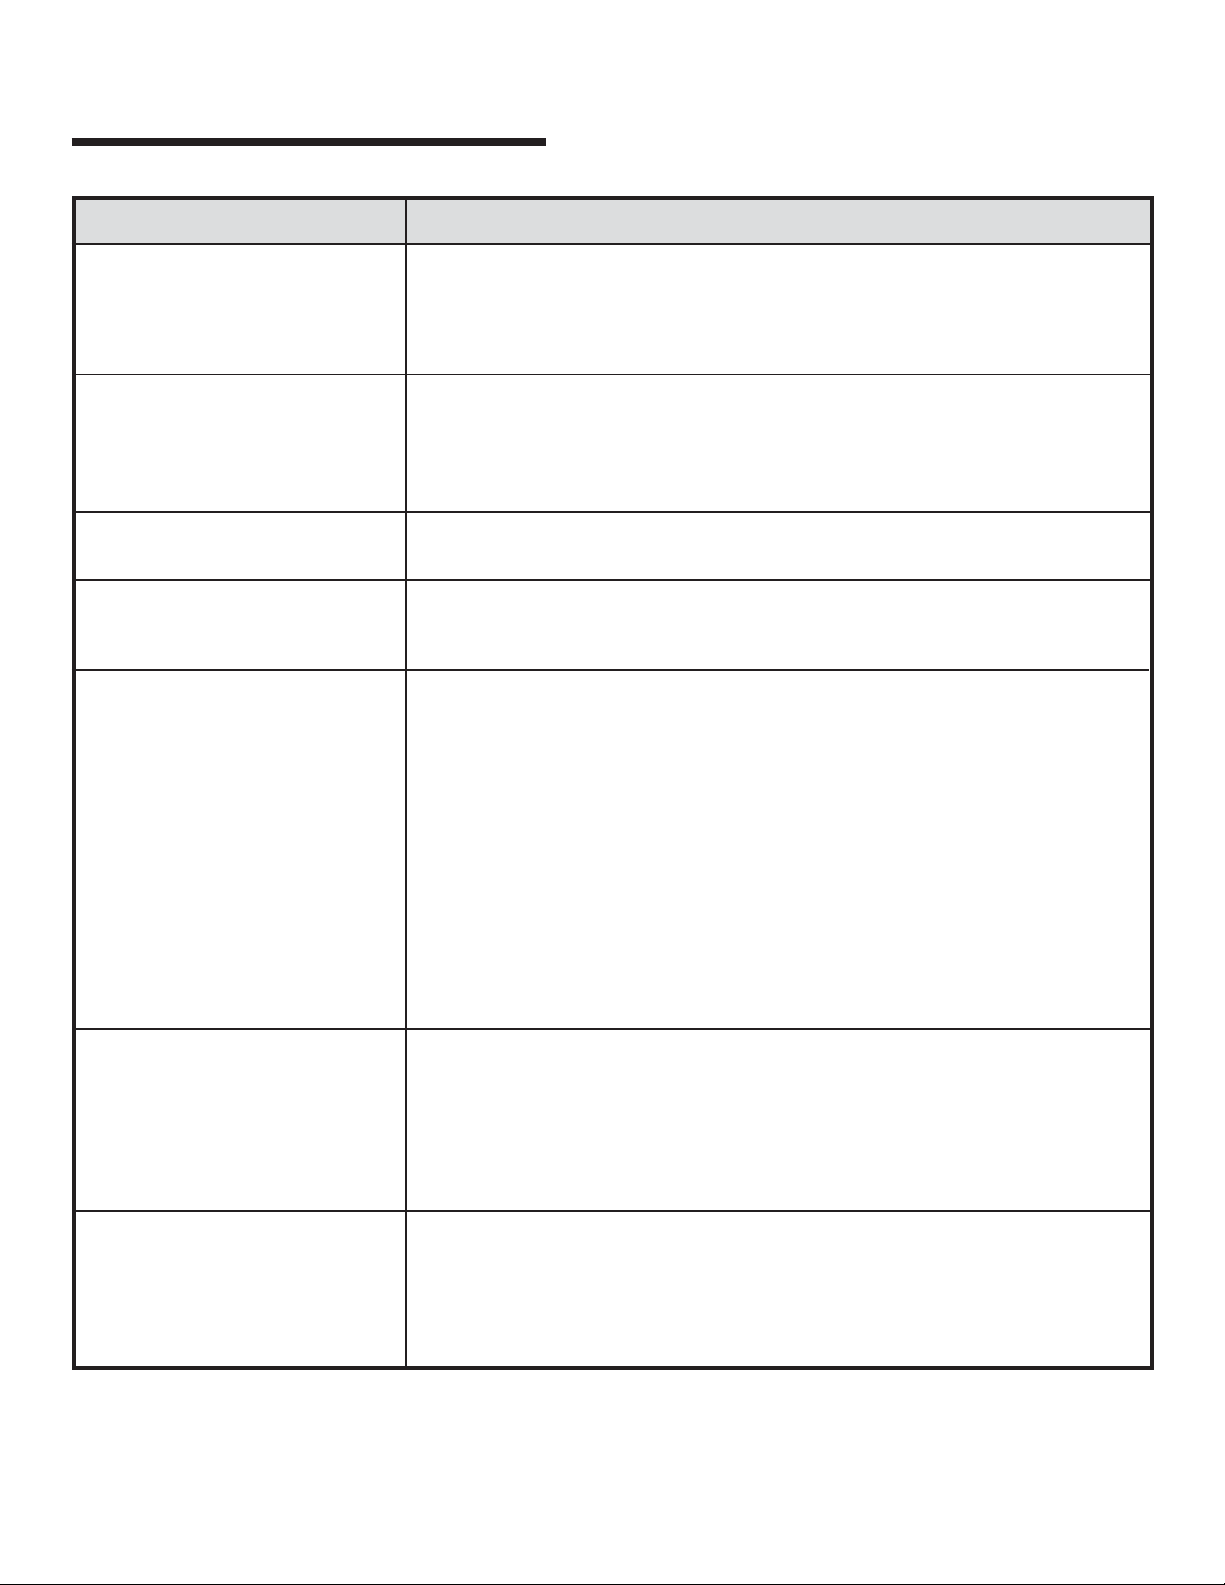
Be sure the anti-tip bracket secures one of the rear
leveling legs to the floor. This bracket prevents the range
from accidentally tipping.
The range should be leveled when installed. If
the range is not level, turn the plastic leveling
legs, located at each corner of the range, until
range is level.
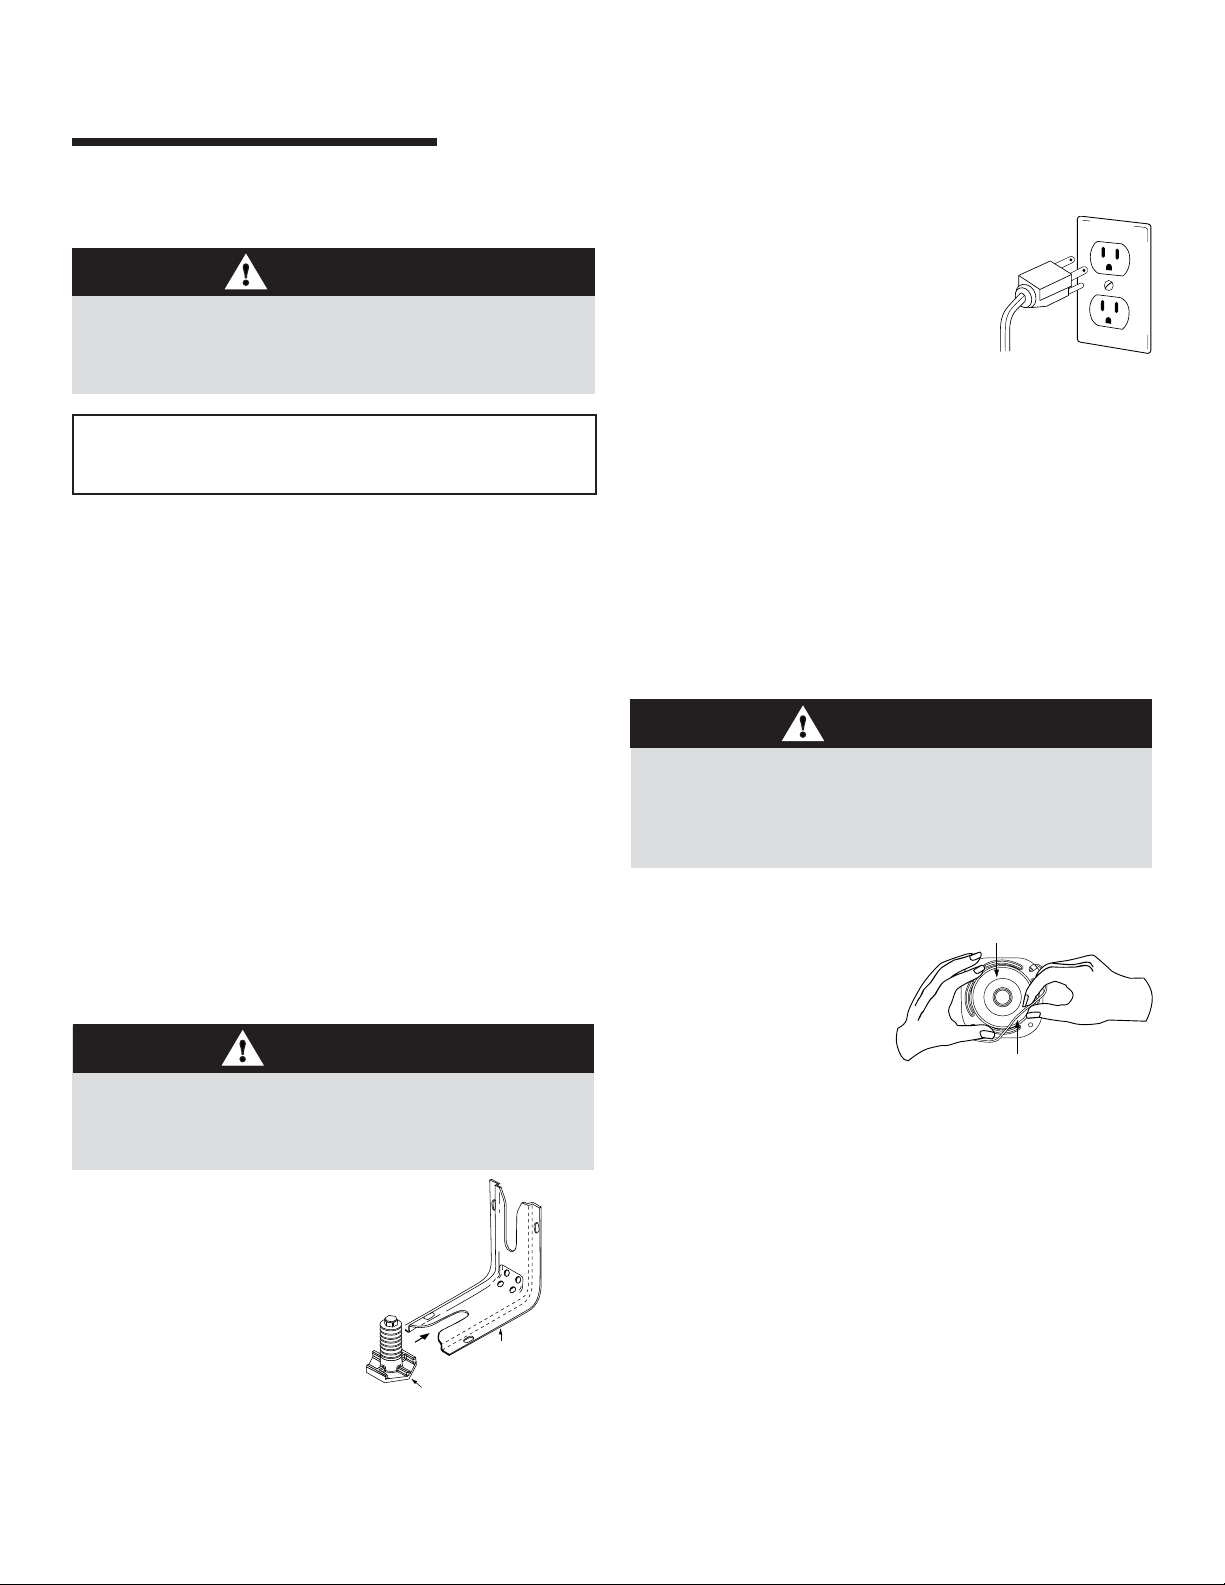
Electrical Connection
Appliances which require electrical power
are equipped with a three-prong
grounding plug which must be plugged
directly into a properly grounded threehole 120 volt electrical outlet.
Always disconnect power to appliance before servicing.
The three-prong grounding plug offers protection against
shock hazards. DO NOT CUT OR REMOVE THE THIRD
GROUNDING PRONG FROM THE POWER CORD PLUG.
If an ungrounded, two-hole or other type electrical outlet is
encountered, it is the personal responsibility of the
appliance owner to have the outlet replaced with a
properly grounded three-hole electrical outlet.
Oven Light
CAUTION
• Disconnect power to oven before replacing light bulb.
• Allow oven to cool before replacing light bulb.
• Make sure bulb cover and bulb are cool before touching.
To replace oven light bulb:
1. When oven is cool, hold bulb cover
in place, then slide wire retainer
off cover. NOTE: Bulb cover
will fall if not held in place
while removing wire retainer.
2. Remove bulb cover and light
bulb.
3. Replace with a 40-watt appliance bulb.
4. Replace bulb cover and secure with wire retainer.
5. Reconnect power to range. Reset clock.
ANTI-TIP BRACKE
ANTI-TIP BRACKET
LEVELING LEG
LEVELING LEG
23
Page 25
MAINTENANCE
Removal of Gas Appliance
Gas appliance connectors used to connect this appliance to
the gas supply are not designed for continuous movement.
Once installed, DO NOT repeatedly move this gas appliance
for cleaning or to relocate. If this appliance has to be moved
and/or removed for servicing, follow the procedure described
in the installation instructions. For information, contact JennAir Customer Service at 1-800-JENNAIR (1-800-536-6247).
To prevent range from accidentally tipping, range must be
secured to the floor by sliding rear leveling leg into the antitip bracket.
Storage Drawer
CAUTION
Do not store plastic, paper products, food or flammable
materials in this drawer. The drawer may become too warm
for these items when the oven is in use.
The storage drawer can be removed to allow you to clean
under the range.
To remove:
1. Empty drawer and pull out to the first stop position.
2. Lift up the front of the drawer.
3. Pull out to the second stop position.
4. Grasp sides and lift drawer up and out.
To replace:
1. Fit the ends of the drawer glides into the rails in the range.
2. Lift up the front of the drawer and gently push in to the
first stop position.
3. Lift drawer up again and push until drawer is closed.
Oven Bottom
Protect oven bottom against spillovers, especially acidic or
sugary spills, as they may discolor the porcelain enamel. Use
the correct pan size to avoid spillovers and boilovers.
The oven bottom may be removed for easier cleaning.
To remove:
When cool, remove the oven racks. Slide the two
catches, located at each rear corner of
the oven bottom, toward the front of the
oven.
Lift the rear edge of the oven bottom
slightly, then slide it back until the front
edge of the oven bottom clears the
oven front frame. Remove oven bottom
from oven.
2
To replace:
Fit the front edge of the oven bottom into the oven front
frame. Lower the rear of the oven bottom and slide the two
catches back to lock the oven bottom in place.
1
3
24
Page 26
TROUBLESHOOTING
PROBLEM SOLUTION
For most concerns, try these first. • Check if oven controls have been properly set.
• Check to be sure plug is securely inserted into receptacle.
• Check or re-set circuit breaker. Check or replace fuse.
• Check power supply.
Surface burner fails to light. • Check to be sure unit is properly connected to power supply.
• Check for a blown circuit fuse or a tripped main circuit breaker.
• Check to be sure ignitor is dry and clicking. Burner will not light if ignitor is damaged,
soiled or wet. If ignitor doesn’t click, turn control knob OFF.
The flame is uneven. • Burner ports may be clogged.
Surface burner flame lifts • Check to be sure a pan is sitting on the grate above.
off ports.
Baking results are not as • Check the oven temperature selected. Make sure oven is preheated when recipe
expected or differ from or directions recommend preheat.
previous oven. • Make sure the oven vent has not been blocked. See page 17 for location.
• Check to make sure range is level.
• Temperatures often vary between a new oven and an old one. As ovens age, the oven
temperature often “drifts” and may become hotter or cooler. See page 16 for
instructions on adjusting the oven temperature. NOTE: It is not recommended to
adjust the temperature if only one or two recipes are in question.
• Use correct pan. Dark pans produce dark browning. Shiny pans produce light
browning. See “Cooking Made Simple” booklet for more information on bakeware.
• Check rack positions and pan placement. Stagger pans when using two racks. Allow
1-2 inches between pans and oven wall.
• Check the use of foil in the oven. Never use foil to cover an entire oven rack. Place
a small piece of foil on the rack below the pan to catch spillovers.
Food is not broiling properly or • Check oven rack positions. Food may be too close to flame.
smokes excessively. • Aluminum foil was incorrectly used. Never line the broiler insert with foil.
• Trim excess fat from meat before broiling.
• A soiled broiler pan was used.
• Preheat oven for 2-3 minutes before placing food in the oven.
• Broil with the oven door closed.
Oven will not self-clean. • Check to make sure the cycle is not set for a delayed start. See pages 19-20.
• Check if door is closed.
• Check if control is in Sabbath Mode. See page 15.
• Oven may be over 400° F. Oven temperature must be below 400° F to program a
clean cycle.
25
Page 27
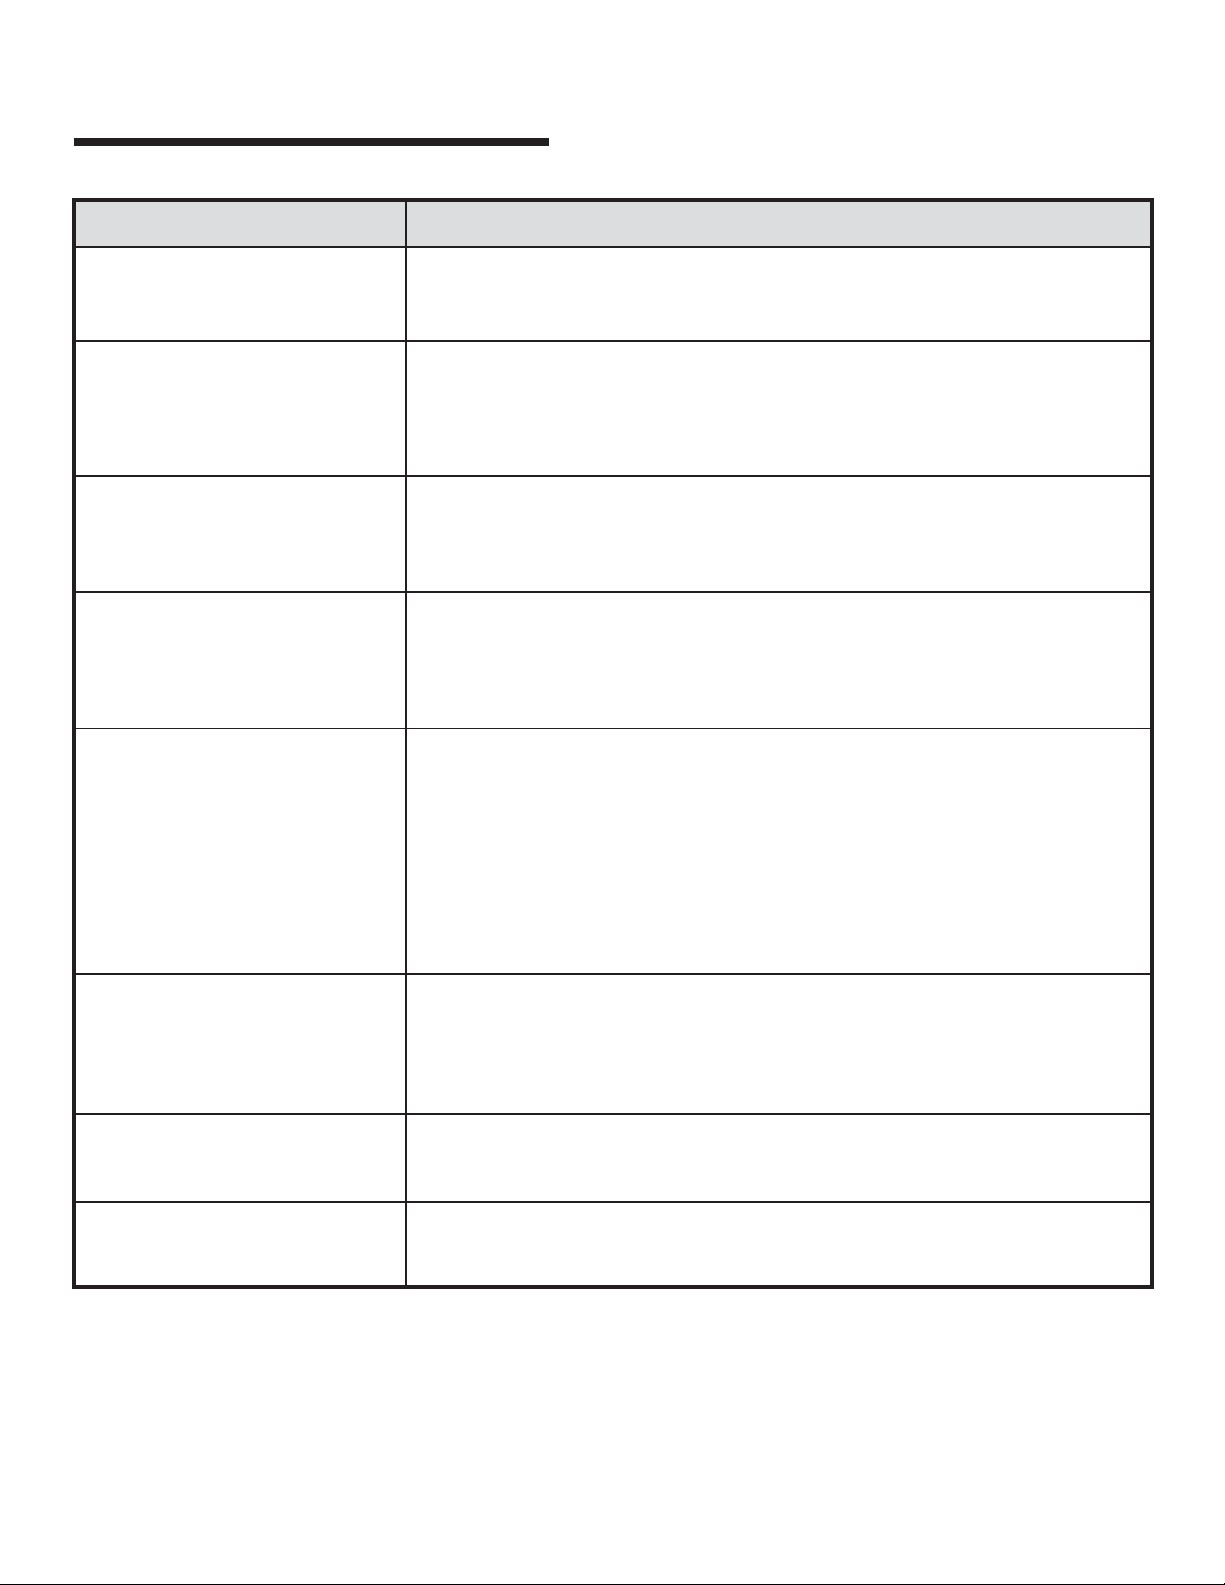
TROUBLESHOOTING
PROBLEM SOLUTION
Oven did not clean properly. • Longer cleaning time may be needed.
• Excessive spillovers, especially sugary and/or acidic foods, were not removed prior
to the self-clean cycle.
Oven door will not unlock after • Oven interior is still hot. Allow about one hour for the oven to cool after the
self-clean cycle. completion of a self-clean cycle. The door can be opened when the LOCK indicator
word is not displayed.
• The control and door may be locked. See page 8.
Moisture collects on oven • This is normal when cooking foods high in moisture.
window or steam comes from • Excessive moisture was used when cleaning the window.
oven vent.
There is a strong odor or light • This is normal for a new range and will disappear after a few uses. Initiating a clean
smoke when oven is turned on. cycle will “burn off” the odors more quickly.
• Turning on a ventilation fan will help remove the smoke and/or odor.
• Excessive food soils on the oven bottom. Use a self-clean cycle.
Fault Codes • BAKE or LOCK may flash rapidly in the display to alert you if there is an error
or a problem. If BAKE or LOCK appear in the display, press the CANCEL pad.
If BAKE or LOCK continue to flash, disconnect power to the appliance.
Wait a few minutes, and then reconnect power. If the flashing still continues,
disconnect power to the appliance and call an authorized servicer.
• If the oven is heavily soiled, excessive flareups may result in a fault code during
cleaning. Press the CANCEL pad and allow the oven to cool completely, wipe out
excess soil, then reset the clean cycle. If the fault code reappears, contact an
authorized servicer.
Noises may be heard. • The oven makes several low level noises. You may hear the oven relays as they go on
and off. This is normal.
• As the oven heats and cools, you may hear sounds of metal parts expanding and
contracting. This is normal and will not damage your appliance.
There are no beeps and • Oven may be in Sabbath Mode. See page 15.
no display.
“SAb” flashing and then • Oven is in Sabbath Mode. To cancel, press and hold the Clock pad for five
displayed continuously. seconds.
26
Page 28

WARRANTY & SERVICE
Full One Year Warranty Parts and Labor
For one (1) year from the original retail
purchase date, any part which fails in normal
home use will be repaired or replaced free of
charge.
Limited Warranties - Parts Only
Second Year - After the first year from the
original purchase date, parts which fail in
normal home use will be repaired or replaced
free of charge for the part itself, with the owner
paying all other costs, including labor, mileage,
transportation, trip charge and diagnostic
charge, if required.
Third Through Fifth Year - From the original
purchase date, parts listed below which fail in
normal home use will be repaired or replaced
free of charge for the part itself, with the owner
paying all other costs, including labor, mileage,
transportation, trip charge and diagnostic
charge, if required.
• Sealed Gas Burners
• Electronic Controls
Canadian Residents
The above warranties only cover an appliance
installed in Canada that has been certified or
listed by appropriate test agencies for compliance to a National Standard of Canada unless
the appliance was brought into Canada due to
transfer of residence from the United States to
Canada.
Limited Warranty Outside the
United States and Canada Parts Only
For two (2) years from the date of original retail
purchase, any part which fails in normal home
use will be repaired or replaced free of charge
for the part itself, with the owner paying all
other costs, including labor, mileage, transportation, trip charge and diagnostic charge, if
required.
The specific warranties expressed above are the
ONLY warranties provided by the manufacturer.
These warranties give you specific legal rights,
and you may also have other rights which vary
from state to state.
What is Not Covered By These
Warranties:
1. Conditions and damages resulting from any of the following:
a. Improper installation, delivery, or maintenance.
b. Any repair, modification, alteration, or adjustment not authorized by
the manufacturer or an authorized servicer.
c. Misuse, abuse, accidents, or unreasonable use.
d. Incorrect electric current, voltage, or supply.
e. Improper setting of any control.
2. Warranties are void if the original serial numbers have been removed,
altered, or cannot be readily determined.
3. Light bulbs.
4. Products purchased for commercial or industrial use.
5. The cost of service or service call to:
a. Correct installation errors.
b. Instruct the user on the proper use of the product.
c. Transport the appliance to the servicer.
6. Consequential or incidental damages sustained by any person as a
result of any breach of these warranties. Some states do not allow
the exclusion or limitation of consequential or incidental damages, so
the above exclusion may not apply.
If You Need Service
• Call the dealer from whom your appliance was purchased or call
Maytag Services
(1-800-536-6247) to locate an authorized servicer.
• Be sure to retain proof of purchase to verify warranty status. Refer to
WARRANTY for further information on owner’s responsibilities for
warranty service.
• If the dealer or service company cannot resolve the problem, write to
Maytag Services
37320-2370, or call 1-800-JENNAIR (1-800-536-6247).
U.S. customers using TTY for deaf, hearing impaired or speech
impaired, call 1-800-688-2080.
• User’s guides, service manuals and parts information are available
from Maytag Services
Notes:
When writing or calling about a service problem, please include the
following information:
a. Your name, address and telephone number;
b. Model number and serial number;
c. Name and address of your dealer or servicer;
d. A clear description of the problem you are having;
e. Proof of purchase (sales receipt).
SM
, Jenn-Air Customer Assistance at 1-800-JENNAIR
SM
, Attn: CAIR® Center, P.O. Box 2370, Cleveland, TN
SM
, Jenn-Air Customer Assistance.
27
Page 29

CUISINIÈRE À GAZ JENN-AIR
TOUCHES ÉLECTRONIQUES 800
À
GUIDE D’UTILISATION
ET
D’ENTRETIEN
TABLE DES MATIÈRES
Instructions de sécurité importantes............................. 28-33
Cuisson sur la surface ........................................................ 34-35
Cuisson dans le four ............................................................ 36-49
Nettoyage ................................................................................ 50-53
Entretien ................................................................................... 54-55
Recherche des pannes ....................................................... 56-57
Garantie et service après-vente ............................................. 59
Guía de Uso y Cuidado .............................................................. 60
Page 30

Installateur: Remettez ce guide au propriétaire.
Consommateur: Veuillez lire le guide et le conserver pour
consultation ultérieure. Conservez la facture d’achat ou le chèque
encaissé comme preuve de l’achat.
Numéro de modèle ___________________________________
Numéro de série _____________________________________
Date d’achat _________________________________________
Si vous avez des questions, veuillez nous appeler :
Service à la clientèle de Jenn-Air
1-800-JENNAIR (1-800-536-6247)
(lundi au vendredi, 8 h à 20 h, heure de l’Est)
Internet: http://www.jennair.com
Dans le cadre de nos pratiques d’amélioration constante de la
qualité et de la performance de nos produits de cuisson, des
modifications de l’appareil qui ne sont pas mentionnées dans ce
guide ont pu être introduites.
Reportez-vous à la page 59 pour plus d’informations
concernant le service après-vente.
INSTRUCTIONS DE
SÉCURITÉ
Lire toutes les instructions avant d’utiliser cet appareil;
observer toutes les instructions pour éliminer les risques
d’incendie, choc électrique, dommages matériels et corporels
que pourrait susciter une utilisation incorrecte de l’appareil.
Utiliser l’appareil uniquement pour les fonctions prévues,
décrites dans ce guide.
Pour une utilisation adéquate et en sécurité, il faut que
l’appareil soit convenablement installé par un technicien
qualifié, et relié à la terre. Ne pas régler, réparer ni remplacer
un composant, à moins que cela ne soit spécifiquement
recommandé dans ce guide. Toute autre réparation doit être
effectuée par un technicien qualifié. Demander à l’installateur
de montrer où se trouve le robinet d’arrêt de gaz et comment
le fermer en cas d’urgence.
Toujours débrancher l’appareil avant d’y faire de l’entretien.
AVERTISSEMENT
Si les directives données dans le présent guide ne
sont pas respectées à la lettre, il y a risque d’incendie
ou d’explosion pouvant causer des dommages, des
blessures et même la mort.
- Ne pas ranger ni utiliser d’essence ou autre vapeur
ou liquide inflammable à proximité de cet appareil
ou de tout autre appareil.
IMPORTANTES
Les instructions de sécurité importantes et les paragraphes
«avertissement» de ce guide ne sont pas destinés à couvrir
toutes les conditions et situations qui pourraient se présenter.
Il faut faire preuve de bon sens, de prudence et de soin lors de
l’installation, de l’entretien ou du fonctionnement de l’appareil.
Toujours prendre contact avec le détaillant, le distributeur,
l’agent de service après-vente ou le fabricant dans le cas de
problèmes ou de conditions qui ne seraient pas comprises.
Reconnaître les étiquettes, paragraphes et
symboles sur la sécurité
AVERTISSEMENT
AVERTISSEMENT - Dangers ou pratiques dangereuses qui
POURRAIENT résulter en de graves blessures ou même la
mort.
ATTENTION
- QUE FAIRE SI L’ON SENT UNE ODEUR DE GAZ :
• Ne mettre aucun appareil en marche.
• Ne pas toucher à un interrupteur électrique.
• N’utiliser aucun téléphone de l’immeuble.
• Se rendre chez un voisin et téléphoner
immédiatement à la compagnie de gaz. Suivre les
directives données par le préposé de la
compagnie de gaz.
• S’il est impossible de joindre la compagnie de
gaz, téléphoner au service des incendies.
- L’installation et les réparations doivent être
confiées à un installateur compétent, à une
entreprise de service ou à la compagnie de gaz.
AVERTISSEMENT
Une fuite de gaz pourrait survenir dans le système et
susciter une situation dangereuse. L’odorat peut ne pas
suffire pour détecter une fuite de gaz. Les fournisseurs de
gaz recommandent l’installation d’un détecteur de gaz
(homologation UL). Installer et utiliser le détecteur
conformément aux instructions du fabricant.
ATTENTION - Dangers ou pratiques dangereuses qui
POURRAIENT résulter en des blessures mineures.
29
Page 31

INSTRUCTIONS DE SÉCURITÉ IMPORTANTES
Instructions générales
AVERTISSEMENT
• TOUTE CUISINIÈRE PEUT BASCULER
ET PROVOQUER DES BLESSURES.
• INSTALLER LA BRIDE
ANTIBASCULEMENT FOURNIE AVEC
CETTE CUISINIÈRE.
• RESPECTER TOUTES LES INSTRUCTIONS D’INSTALLATION.
AVERTISSEMENT: Pour réduire le
risque de basculement de l’appareil à l’occasion
d’une utilisation anormale ou d’un chargement
excessif de la porte du four, il faut que la bride
antibasculement soit convenablement installée.
Utiliser une lampe torche pour déterminer si la bride
antibasculement est convenablement installée sous la
cuisinière: L’un des pieds arrière de réglage de l’aplomb doit
être convenablement engagé dans la fente de la bride.
Lorsque la cuisinière est convenablement calée, la bride
antibasculement immobilise le pied arrière contre le sol.
Vérifier la parfaite immobilisation de la cuisinière par la bride
après chaque déplacement de la cuisinière.
Pour éviter un incendie ou des
dommages par la fumée
S’assurer que tous les matériaux de conditionnement sont
retirés de l’appareil avant de le mettre en marche.
composants de l’appareil susceptibles de devenir tièdes ou
chauds. Ne pas laisser des articles en plastique sur la table
de cuisson; un article en plastique trop proche de l’évent du
four ou d’un brûleur allumé pourrait s’amollir ou fondre.
Pour éliminer le besoin d’atteindre quelque chose par-dessus
les brûleurs de surface, il est préférable qu’il n’y ait aucune
armoire de cuisine directement au-dessus de l’appareil. S’il y
a une armoire, on ne devrait y remiser que des articles peu
fréquemment utilisés et capables de résister à la chaleur
émise par l’appareil. La température pourrait être excessive
pour certains articles, comme liquides volatils, produits de
nettoyage ou flacons d’aérosol.
En cas d’incendie
Interrompre le fonctionnement de l’appareil et de la hotte de
ventilation pour minimiser le risque d’extension des flammes.
Éteindre les flammes, puis mettre la hotte en marche pour
évacuer la fumée et l’air vicié.
• Table de cuisson : Utiliser un couvercle ou une plaque à
biscuits pour étouffer les flammes d’un feu qui se déclare
dans un ustensile de cuisine.
NE JAMAIS saisir ou déplacer un ustensile de cuisine
enflammé.
• Four : Fermer la porte du four pour étouffer les flammes.
Ne pas projeter de l’eau sur un feu de graisse. Utiliser du
bicarbonate de sodium ou un extincteur à mousse ou produit
chimique sec pour éteindre les flammes.
Sécurité pour les enfants
Garder les matériaux combustibles, l’essence et autres
matières et vapeurs inflammables bien éloignés de l’appareil.
Si l’appareil est installé près d’une fenêtre, des précautions
appropriées doivent être prises pour éviter que le vent entraîne
les rideaux au-dessus des brûleurs.
NE JAMAIS laisser des articles sur la table de cuisson. L’air
chaud de l’évent peut les enflammer et mettre également sous
pression des contenants fermés qui pourraient alors exploser.
De nombreux flacons d’aérosol peuvent EXPLOSER lorsqu’on
les expose à la chaleur, et ils peuvent contenir un produit très
inflammable. Éviter d’utiliser ou remiser un flacon d’aérosol à
proximité de l’appareil.
De nombreux articles en plastique peuvent être détériorés par
la chaleur. Conserver les articles en plastique à distance des
NE JAMAIS laisser des enfants seuls ou sans supervision
lorsque l’appareil est en service ou encore chaud.
NE JAMAIS laisser un enfant s’asseoir ou se tenir sur une
partie quelconque de l’appareil. Il pourrait se blesser ou se
brûler.
Il est important d’enseigner aux enfants que la cuisinière et les
ustensiles placés dessus ou dedans peuvent être chauds.
Laisser refroidir les ustensiles en un lieu sûr, hors d’atteinte
30
ATTENTION
NE JAMAIS remiser sur le dosseret d’une cuisinière ou
dans une armoire au-dessus, des articles auxquels les
enfants peuvent s’intéresser. Un enfant tentant de grimper
sur la porte de l’appareil pour atteindre un objet pourrait
subir de graves blessures.
Page 32

INSTRUCTIONS DE SÉCURITÉ IMPORTANTES
des enfants. Il est important d’enseigner aux enfants qu’un
appareil ménager n’est pas un jouet, et qu’ils ne doivent
toucher aucune commande ou autre composant de l’appareil.
Familiarisation avec l’appareil
AVERTISSEMENT
NE JAMAIS utiliser la porte de four comme tabouret/siège/
escabeau; ceci pourrait faire basculer l’appareil et entraîner
dommages corporels sérieux.
NE JAMAIS utiliser la cuisinière comme source de chaleur
pour le chauffage de la pièce. Sinon, un empoisonnement au
monoxyde de carbone pourrait s’ensuivre ainsi qu’une
surchauffe du four.
NE JAMAIS recouvrer les fentes, ouvertures ou passages
de la sole de four ni la grille toute entière avec un matériau
comme du papier d’aluminium. Sinon, la circulation de l’air
dans le four sera entravée et donc entraîner un
empoisonnement au monoxyde de carbone. Le papier
d’aluminium peut aussi emprisonner de la chaleur et
entraîner un risque d’incendie.
NE JAMAIS obstruer la circulation de l’air de combustion et
de ventilation au niveau de l’évent de four ou des entrées
d’air. Sinon, l’air ne parvient pas correctement aux brûleurs
et donc cela peut poser un risque d’empoisonnement au
monoxyde de carbone.
Cuisson et sécurité
Placer toujours un ustensile sur un brûleur de surface avant de
l’allumer. Veiller à bien connaître la correspondance entre les
boutons de commande et les brûleurs. Veiller à allumer le
brûleur correct et vérifier que le brûleur s’allume
effectivement. À la fin de la période de cuisson, éteindre le
brûleur avant de retirer l’ustensile, pour éviter une exposition
aux flammes du brûleur.
Veiller à toujours ajuster correctement la taille des flammes
pour qu’elles ne dépassent pas sur la périphérie de l’ustensile.
Des flammes de trop grande taille sur un brûleur sont
dangereuses, elles entraînent un gaspillage d’énergie et elles
peuvent faire subir des dommages à l’ustensile, à l’appareil ou
à l’armoire située au-dessus.
NE JAMAIS laisser un brûleur de surface allumé sans
surveillance, particulièrement avec une puissance de
chauffage élevée ou lors d’une opération de friture. Un
débordement pourrait provoquer la formation de fumée et des
produits gras pourraient s’enflammer. Éliminer dès que
possible les produits gras renversés. Ne pas utiliser une
puissance de chauffage élevée pendant une période
prolongée.
NE JAMAIS faire chauffer un récipient non ouvert dans le
four ou sur un brûleur de surface; l’accumulation de pression
dans le récipient pourrait provoquer son éclatement et de
graves dommages matériels ou corporels.
L’évent de four est situé à la base du dosseret.
Évitez de toucher le voisinage de l’évent de four lorsque le four
est utilisé et pendant plusieurs minutes après l’arrêt du four.
Certains composants de l’évent et la zone voisine peuvent
devenir suffisamment chauds pour provoquer des brûlures.
Après l’arrêt du four, ne touchez pas l’évent de four ou la zone
voisine avant que ces composants aient pu se refroidir
suffisamment.
Autres surfaces potentiellement chaudes : table de cuisson,
zones faisant face à la table de cuisson, évent de four, zone
voisine de l’évent, porte de four et zone voisine de porte et de
hublot.
Ne touchez pas l’ampoule chaude du four avec un linge
humide; le choc thermique pourrait la briser. Si tel est le cas,
débranchez l’appareil avant de retirer l’ampoule pour éviter
une décharge électrique.
Utiliser des maniques robustes et sèches. Des maniques
humides peuvent provoquer la formation de vapeur brûlante.
Ne jamais utiliser un torchon à vaisselle ou autre article textile
à la place de maniques; un tel article pourrait traîner sur un
brûleur et s’enflammer, ou accrocher un ustensile ou un
composant de l’appareil.
Laisser toujours refroidir un récipient d’huile de friture chaude
avant de tenter de le déplacer et le manipuler.
Ne pas laisser la graisse de cuisson ou autre matériau inflammable s’accumuler dans ou près de l’appareil, de la hotte ou
du ventilateur de l’évent. Nettoyer fréquemment la hotte pour
empêcher toute accumulation sur la hotte elle-même ou sur le
filtre. Lors du flambage d’aliments sous la hotte, mettre le
ventilateur en marche.
NE JAMAIS porter, lors de l’utilisation de l’appareil, des
vêtements faits d’un matériau inflammable, ou amples, ou à
longues manches. De tels vêtements peuvent s’enflammer ou
accrocher la poignée d’un ustensile.
31
Page 33

INSTRUCTIONS DE SÉCURITÉ IMPORTANTES
Placer toujours les grilles à la position appropriée dans le four
lorsque le four est froid. Faire coulisser la grille vers l’extérieur
avant d’ajouter ou enlever un plat; utiliser pour cela une
manique robuste et sèche. Éviter d’introduire la main dans le
four pour y placer ou retirer un plat. S’il est nécessaire de
déplacer une grille lorsqu’elle est chaude, utiliser une manique
sèche. Veiller à toujours arrêter le four à la fin d’une période
de cuisson.
Ouvrir toujours la porte du four très prudemment. Laisser l’air
chaud ou la vapeur s’échapper avant de retirer/introduire un
plat.
AVERTISSEMENT : Mets préparés : Respecter les instructions du fabricant. Si le contenant ou le couvercle en plastique
d’un mets surgelé se déforme ou est endommagé durant la
cuisson, jeter immédiatement le récipient et son contenu. Les
aliments pourraient être contaminés.
NE JAMAIS garnir la sole ou une grille du four avec de la
feuille d’aluminium. Ceci pourrait susciter un risque de choc
électrique ou d’incendie, ou une autre détérioration de
l’appareil. Utiliser de la feuille d’aluminium uniquement selon
les instructions de ce guide.
Appliquer les instructions du fabricant lors de l’emploi d’un
sachet pour cuisson au four.
Seuls certains matériaux en verre, vitrocéramique, céramique,
ou certains ustensiles vitrifiés/émaillés peuvent être utilisés sur
la table de cuisson ou dans le four sans risque de bris sous
l’effet du choc thermique. Observer les instructions du
fabricant lors de l’utilisation d’un ustensile en verre.
La sécurité de fonctionnement de cet appareil a été testée à
l’aide d’ustensiles de cuisine conventionnels. Ne pas utiliser un
ustensile ou accessoire qui n’est pas spécifiquement
recommandé dans ce guide. Ne pas utiliser de couvre-brûleur,
gril placé sur la table de
additionnel. L’utilisation d’un dispositif ou accessoire qui n’est
pas expressément recommandé dans ce guide peut dégrader
la sécurité de l’appareil ou sa performance, ou réduire la
longévité des composants.
Nettoyage et sécurité
Arrêter toutes les commandes et attendre le refroidissement
de tous les composants avant de les toucher ou d’entreprendre le nettoyage. Ne pas toucher la grille d’un brûleur ou
la zone voisine avant que ces composants aient pu suffisamment refroidir.
Ustensiles et sécurité
Utiliser des ustensiles à fond plat comportant une poignée
qu’on peut facilement saisir et qui reste froide. Éviter d’utiliser
un ustensile instable ou déformé, qui pourrait facilement
basculer, ou dont la poignée est mal fixée. Éviter également
d’utiliser des ustensiles de petite taille comportant une
poignée lourde; ces ustensiles sont généralement instables et
peuvent facilement basculer. Un ustensile lourd lorsqu’il est
rempli peut également être dangereux lors des manipulations.
Veiller à utiliser un ustensile de taille suffisante pour que le
contenu ne risque pas de déborder. Ceci est particulièrement
important pour un ustensile rempli d’huile de friture. Vérifier
que la taille de l’ustensile est suffisante pour qu’il puisse
recevoir les produits alimentaires à cuire, et absorber
l’augmentation de volume suscitée par l’ébullition de la
graisse.
Pour minimiser les risques de brûlure, d’inflammation de
matières et de renversement par contact non intentionnel
avec un ustensile, ne pas orienter la poignée d’un
vers un brûleur adjacent; orienter toujours la poignée d’un
ustensile vers le côté ou l’arrière de l’appareil; ne pas laisser
non plus la poignée d’un ustensile déborder à l’avant de
l’appareil, où un jeune enfant pourrait facilement la saisir.
Veiller à ne jamais laisser le contenu liquide d’un ustensile
s’évaporer complètement; l’ustensile et l’appareil pourraient
subir des dommages.
ustensile
Exercer une grande prudence lors du nettoyage de l’appareil.
Travailler prudemment pour éviter des brûlures par la vapeur
en cas d’utilisation d’un chiffon ou d’une éponge humide lors
de l’élimination d’un produit renversé sur une surface chaude.
Certains produits de nettoyage peuvent générer des vapeurs
nocives lorsqu’on les applique sur une surface chaude.
Four autonettoyant
Nettoyer uniquement les pièces mentionnées dans ce guide.
Ne pas nettoyer le joint de porte; le joint joue un rôle essentiel
quant à l’étanchéité. Ne pas frotter, endommager ou déplacer
le joint. Ne pas utiliser de produit de nettoyage du four dans
le four autonettoyant ou sur les zones voisines.
Avant d’exécuter une opération d’autonettoyage, retirer la
lèchefrite, les grilles du four et les autres ustensiles, et éliminer
par essuyage tout excès de résidus renversés pour éviter la
formation de fumée ou l’inflammation de ces résidus.
cuisson ou système de convection
ATTENTION
Ne laisser aucune nourriture ni ustensile de cuisine, etc.
dans le four lors d’une opération d’autonettoyage.
32
Page 34

INSTRUCTIONS DE SÉCURITÉ IMPORTANTES
Il est normal que la surface de cuisson devienne chaude
durant une opération d’autonettoyage; par conséquent, éviter
de toucher la surface de cuisson durant l’autonettoyage.
Avertissement et avis
important pour la sécurité
La loi californienne «Safe Drinking Water and Toxic Enforcement Act» de 1986 (proposition 65) stipule la publication par le
gouverneur de la Californie d’une liste de substances que
l’état de Californie considère comme cancérigènes ou
dangereuses pour le système reproducteur, et impose aux
entreprises commerciales l’obligation de signaler à leurs
clients les risques d’exposition à de telles substances.
Les utilisateurs de cet appareil peuvent être exposés à une
faible concentration de certaines substances figurant dans la
liste mentionnée ci-dessus, dont benzène, formaldéhyde et
suie, du fait de la combustion incomplète du gaz naturel ou du
gaz de pétrole liquéfié. Pour minimiser la combustion
incomplète, veiller à ce que les brûleurs soient parfaitement
réglés. Pour minimiser l’exposition à ces substances, veiller à
bien évacuer les gaz de combustion à l’extérieur.
Nous informons les utilisateurs de cet appareil que lors d’une
opération d’autonettoyage, ils peuvent être exposés à une
faible concentration de certaines substances figurant dans la
liste mentionnée ci-dessus, dont le monoxyde de carbone.
Pour minimiser l’exposition, veiller à ce que la pièce où se
trouve le four soit convenablement aérée durant une opération
d’autonettoyage par l’ouverture d’une fenêtre ou d’une porte.
AVIS IMPORTANT - OISEAUX FAMILIERS : Les oiseaux ont
un système respiratoire très sensible. Ne pas garder un oiseau
familier dans la cuisine ou dans une pièce où il pourrait être
exposé aux fumées. Les fumées émises durant une opération
d’autonettoyage peuvent être dangereuses ou mortelles pour
un oiseau, de même que les fumées émises lors du chauffage
excessif de graisse, huile, margarine, et du chauffage excessif
dans un ustensile à revêtement antiadhésif.
Conserver ces instructions pour consultation ultérieure
33
Page 35

CUISSON SUR LA SURFACE
Lo (Basse) : S’utilise pour le mijotage ou le
maintien de la température d’un mets, ou pour
la fusion de chocolat ou beurre. Lorsque le plat
ou l'ustensile est couvert, un début de cuisson
peut se produire avec la puissance de
chauffage Lo. Pour réduire la puissance de
chauffage, tourner le bouton à la position OFF.
Vérifier la stabilité des flammes sur le brûleur.
Commandes de la
surface de cuisson
ATTENTION
• Si un brûleur s’éteint durant une opération de cuisson, fermer
l’arrivée de gaz au brûleur. Si une forte odeur de gaz est
perceptible, ouvrir une fenêtre et attendre cinq minutes avant
d’allumer de nouveau le brûleur.
• Avant d’ouvrir l’arrivée de gaz à la cuisinière, vérifier que
chaque bouton de commande est à la position OFF (ARRÊT).
• NE JAMAIS toucher la surface de cuisson avant qu’elle se soit
complètement refroidie. Certaines zones de la surface,
particulièrement au voisinage des brûleurs, peuvent devenir
très chaudes durant une cuisson. Utiliser des maniques.
Allumage sans flamme de
veille
Le dispositif d’allumage ne fait
intervenir aucune flamme de veille.
Chaque brûleur de la table de cuisson
comporte un allumeur par étincelle.
Travailler prudemment lors du
nettoyage autour des brûleurs de
la table de cuisson.
Si un brûleur de la table de cuisson ne
s’allume pas, déterminer si l’allumeur
est brisé, sali ou mouillé.
Orifices
CHAPEAU DE BRÛLEUR
Allumeur
BASE DU BRÛLEUR
Hi (Élevée) : S’utilise pour porter un liquide à
ébullition ou atteindre la bonne pression dans un
autocuiseur. Réduire ensuite la puissance de
chauffage après le début de l’ébullition ou de la
cuisson des aliments.
Une puissance de chauffage intermédiaire est
utilisée pour la poursuite de la cuisson. Les
aliments ne cuisent pas plus rapidement si on
utilise une puissance de chauffage plus élevée que
nécessaire pour le maintien d’une douce ébullition.
L’eau bout toujours à la même température, que
l’ébullition soit tranquille ou vigoureuse.
Un graphique près de chaque bouton identifie le brûleur
de surface commandé par ce bouton. Par exemple, le
graphique à gauche identifie le brûleur avant/droit.
Réglage des commandes:
La puissance de chauffage à employer dépend du type et de la taille
de l’ustensile utilisé. On trouve dans la brochure La cuisson simplifiée
de l’information sur les ustensiles et autres facteurs affectant le
réglage de la puissance de chauffage.
1. Placer un ustensile sur la grille du brûleur.
• Si aucun ustensile n’est placé sur la grille du brûleur, les
flammes peuvent avoir tendance à se séparer du brûleur.
2. Appuyer et tourner le bouton dans le sens anti-horaire, jusqu’à la
position Lite (Allumage).
• On peut percevoir le cliquetis correspondant à la production
des étincelles, et le brûleur s’allume. (Les cinq allumeurs
produisent des étincelles lorsqu’on place le bouton de l’un des
brûleurs à la position Lite.)
3. Après l’allumage du brûleur, régler la taille des flammes selon le
désir en tournant le bouton de commande.
• L’allumeur continue à produire des étincelles aussi longtemps
que le bouton est à la position Lite.
Utilisation durant une panne
d’électricité
ATTENTION
Boutons de commande de la
surface de cuisson
On utilise ces boutons pour commander l’allumage des brûleurs de
surface. On peut régler chaque bouton à toute position entre les
positions extrêmes Lo (Basse) et Hi (Élevée). On peut percevoir
une détente de calage à la position Hi. On peut choisir toute position
de réglage entre les deux positions extrêmes.
34
Avant d’allumer un brûleur de surface, vérifier que tous les boutons
de commande sont à la position OFF (ARRÊT). Approcher
l’allumette enflammée du brûleur avant de faire tourner le bouton
jusqu’à la position Lite.
1. Approcher une allumette enflammée du brûleur à utiliser.
2. Enfoncer et faire tourner lentement le bouton de commande
jusqu’à la position Lite.
3. Ajuster les flammes à la taille désirée.
Page 36

CUISSON SUR LA SURFACE
Surface de cuisson
Une grille de brûleur incorrectement installée peut écailler l’émail de
la surface de cuisson.
Pour éviter la formation de taches ou un
changement de couleur de la surface de
cuisson :
• Nettoyer la surface de cuisson après chaque utilisation.
• Enlever les résidus renversés de produits acides ou sucrés dès que
la surface de cuisson a refroidi; ces produits renversés peuvent
faire changer la couleur de l’émail.
À la différence d’une cuisinière dotée de
brûleurs à gaz standard, la surface de cuisson
de cette cuisinière n’est pas amovible ou
relevable. Ne pas tenter de relever la
surface de cuisson, quelle qu’en soit la
raison.
Brûleurs scellés
Les brûleurs scellés de la cuisinière sont fixés sur la surface de
cuisson; ils ne sont pas conçus pour être enlevés. Comme les
brûleurs sont scellés, un produit qui déborde d’un ustensile ne
s’infiltrera pas sous la surface de cuisson.
On devrait cependant nettoyer les brûleurs après chaque utilisation.
La tête du brûleur s’enlève facilement pour être nettoyée. (Voir les
instructions de nettoyage à la page 52.)
Pour le bon fonctionnement du brûleur, le chapeau de brûleur doit
être correctement placé sur la base du brûleur.
Ne pas faire fonctionner un brûleur sans qu’un ustensile soit
placé sur la grille. L’émail de la grille peut s’écailler s’il n’y a
aucun ustensile capable d’absorber la chaleur émise par le
brûleur.
Travailler prudemment lorsqu’il faut remuer des aliments dans un
ustensile placé sur la grille de brûleur. Les grilles comportent un fini
lisse qui facilite le nettoyage. L’ustensile peut glisser sur la grille si on
ne tient pas fermement la poignée; ceci pourrait provoquer un
renversement d’aliments chauds, et susciter un risque de brûlure.
Même si les grilles de brûleur sont très durables, elles perdront
progressivement leur lustre et changeront de couleur, du fait des
températures élevées auxquelles les brûleurs les exposent.
Brûleurs de haute
performance
Cette cuisinière est dotée d'un brûleur de 16 000 BTU, à haute
vitesse, placé à l'avant droit. Un brûleur de 12 000 BTU est situé à
l'avant gauche. Ces brûleurs permettent une cuisson rapide qui peut
servir à faire bouillir rapidement de l'eau ou à cuire une grande
quantité d'aliments.
Brûleur de mijotage
Ce brûleur est situé à la position centrale. Il offre
une plus faible puissance pour la cuisson de
sauces délicates ou la fusion du chocolat.
* La puissance thermique (BTU) des brûleurs est différente lors de
l’alimentation au gaz de pétrole liquéfié.
Grilles de brûleur
A
vant une opération de cuisson, vérifier que la grille est
correctement placée. Lors de l’installation des grilles, placer
l’extrémité avec pattes vers le centre, au niveau des barres droites.
Remarques:
• Un brûleur convenablement réglé et dont les orifices
sont propres s’allume en quelques secondes. Lors de
l’alimentation au gaz naturel les flammes sont bleues,
avec un cône interne bleu intense.
Si les flammes d’un brûleur sont jaunes ou si la combustion est bruyante, le ratio air/gaz peut être incorrect.
Demander à un technicien d’effectuer le réglage. (La
garantie ne couvre pas ce réglage.)
Lors de l’alimentation au gaz de pétrole liquéfié, il est
acceptable que l’extrémité des flammes soit jaune. Ceci
est normal; aucun réglage n’est nécessaire.
• Avec certains types de gaz, on peut percevoir un petit
bruit d’explosion lors de l’extinction d’un brûleur de
surface. Ceci est normal.
• Si on fait passer rapidement le bouton de commande de
la position Hi (Élevée) à la position Lo (Basse), les
flammes peuvent s’éteindre, particulièrement si le
brûleur est froid. Si ceci se produit, placer le bouton de
commande à la position OFF (ARRÊT) et attendre
quelques secondes avant d’allumer de nouveau le
brûleur.
• Ajuster la puissance de chauffage de telle manière que
les flammes ne débordent pas à la périphérie de
l’ustensile.
35
Page 37

CUISSON DANS LE FOUR
Tableau de commande
A B C D E F G H
I J K L M N O P Q
Le tableau de commande est conçu pour faciliter la programmation. La fenêtre d’affichage indique l’heure, les fonctions avec minuterie et
fonctions du four. Le tableau de commande représenté comprend la convection et d’autres caractéristiques spécifiques au modèle. (Le style
peut varier selon le modèle.)
A Maintien au S’utilise pour maintenir au chaud dans le four les
chaud aliments cuits.
B Nettoyage S’utilise pour programmer le cycle
d’autonettoyage.
C Cuisson avec S’utilise pour la cuisson avec convection.
convection (certains modèles)
D Rôtissage avec S’utilise pour le rôtissage avec convection.
convection (certains modèles)
E Cuisson courante S’utilise pour la cuisson courante et le rôtissage.
F Gril S’utilise pour la cuisson au gril et le rissolage sur
partie supérieure.
G Démarrage différé Programme le four pour débuter une cuisson ou
un nettoyage plus tard.
H Touches S’utilisent pour programmer températures et
numériques durées.
I Lampe du four S’utilise pour allumer ou éteindre la lumière du
four.
J Dessiccation S’utilise pour déshydrater les fruits, légumes,
(certains modèles) herbes aromatiques, etc.
K Fermentation S’utilise pour faire lever des produits de
(certains modèles) boulangerie à base de levure avant de les cuire.
L Minuterie Programme la minuterie.
M Horloge S’utilise pour programmer l’heure du jour.
N Cuisson et Pour cuire pendant une durée préétablie, avec
maintien maintien au chaud pendant une heure.
O Favori S’utilise pour programmer et sauvegarder une
méthode particulière de cuisson et maintien.
P Programmation S’utilise pour programmer rapidement les
automatique températures.
Q ANNULER Annule toutes les opérations sauf minuterie et
horloge.
Utilisation des touches
• Appuyer sur la touche désirée.
• Appuyer sur les touches numériques pour entrer la durée ou la
• Appuyer sur la touche Autoset 0 pour entrer la température.
• Un bip retentit lorsque l’on appuie sur une touche.
• Un double bip retentit en cas d’erreur de programmation.
Horloge
L’horloge peut être programmée pour afficher la durée dans un
format de 12 ou 24 heures. L’horloge est programmée en usine pour
un format de 12 heures.
Changement de l’horloge à un format de 24 heures:
1. Appuyer sur les touches CANCEL (ANNULER)
2. Appuyer sur la touche Autoset 0 pour
3. Programmer l’heure en suivant les instructions
température.
Remarque: Quatre secondes après avoir entré les chiffres, la
durée ou la température seront automatiquement enregistrées. Si
plus de 30 secondes s'écoulent entre la pression sur une touche
de fonction et celle sur les touches numériques, la fonction est
annulée et l'afficheur revient à l'affichage précédent.
et Favorite (Favori) et maintenir la pression
pendant trois secondes.
• 12 Hr clignote à l’afficheur.
sélectionner 24 Hr; appuyer de nouveau pour
choisir 12 Hr.
données dans la section Réglage de l’horloge.
36
Page 38

CUISSON DANS LE FOUR
Réglage de l’horloge
1. Appuyer sur la touche Clock (Horloge).
• L’heure clignote à l’afficheur.
2. Appuyer sur les touches numériques appropriées pour programmer l’heure du jour.
• Deux points clignotent à l’afficheur.
3. Appuyer à nouveau sur la touche Clock ou attendre quatre
secondes.
• Les deux points restent.
Lorsque le courant électrique arrive ou après une interruption de
courant, la dernière heure avant l’interruption de courant va clignoter.
Pour rappeler l’heure du jour lorsqu’une autre fonction de durée
s’affiche, appuyer sur la touche Clock.
L’heure de l’horloge ne peut être changée lorsque le four a été
programmé pour une cuisson ou un nettoyage différé ou pour la
fonction de cuisson et maintien.
Annulation de l’affichage de l’heure :
Si l’on ne désire pas l’affichage de l’heure du jour :
Appuyer sur les touches CANCEL (ANNULER) et Clock (Horloge) et
les maintenir ainsi pendant trois secondes. L’heure du jour disparaît
de l’afficheur.
Lorsque l’affichage de l’heure est annulé,
appuyer sur la touche Clock pour afficher
brièvement l’heure du jour.
Lorsque l’affichage de l’heure est annulé, après
15 minutes, le four passe en mode Attente pour économiser de
l’énergie. L’afficheur sera vierge et l’éclairage du four ne fonctionnera
pas. Pour « réveiller » les commandes à partir du mode attente,
appuyer sur n’importe quelle touche. Un double bip retentira.
Réaffichage de l’heure :
Appuyer sur les touches CANCEL et Clock et les maintenir ainsi
pendant trois secondes. L’heure du jour réapparaît à l’afficheur.
Minuterie
La minuterie peut être programmée de une minute (0:01) jusqu’à
99 heures et 59 minutes (99:59).
La minuterie peut être utilisée indépendamment de toute autre
activité du four. Elle peut être aussi programmée alors qu’une autre
fonction du four est en cours d’utilisation.
La minuterie ne commande pas le four. Elle ne sert qu’à émettre des
bips.
2. Appuyer sur les touches numériques appropriées jusqu’à ce que
3. Appuyer à nouveau sur la touche TIMER ou attendre quatre
4. À la fin de la durée programmée, un bip long retentit et le mot
5. Appuyer sur la touche TIMER pour effacer l’afficheur.
Annulation de la minuterie :
1. Appuyer sur la touche Timer et la maintenir
2. Appuyer sur la touche Timer et sur la touche numérique « 0 ».
Verrouillage des commandes
et de la porte du four
La porte du four et les touches peuvent être verrouillées pour des
raisons de sécurité, nettoyage ou pour empêcher toute utilisation
non souhaitée. Les touches ne fonctionneront pas si elles sont
verrouillées.
Si le four est en cours d’utilisation, les touches et la porte ne peuvent
être verrouillées.
L’heure actuelle du jour restera à l’afficheur lorsque les touches et la
porte seront verrouillées.
Verrouillage :
Appuyer sur les touches CANCEL et Cook & Hold
(Cuisson et maintien) et les maintenir
ainsi pendant trois secondes. (Appuyer d’abord
sur la touche CANCEL.)
Déverrouillage :
Appuyer sur les touches CANCEL et Cook & Hold et les maintenir
ainsi pendant trois secondes. (Appuyer d’abord sur la touche
CANCEL.) Le mot OFF (ARRÊT) disparaît de l’afficheur.
Programmation de la minuterie :
1. Appuyer sur la touche Timer (Minuterie).
• 0:00 et le mot TIMER (MINUTERIE) clignotent à l’afficheur.
l’heure juste paraisse à l’afficheur.
• Les deux points et le mot TIMER continuent à clignoter.
secondes.
• Les deux points s’arrêtent de clignoter et le décompte de la
durée commence.
• La dernière minute du décompte sera affichée sous forme de
secondes.
End (Fin) sera affiché.
ainsi pendant trois secondes.
OU
• OFF (ARRÊT) paraît à l’afficheur.
• Le mot LOCK (VERROUILLAGE) clignote
lorsque la porte est en cours de verrouillage.
Remarque : La porte du four et les touches ne peuvent être
verrouillées si la température du four est de 205 °C (400 °F) ou
plus.
37
Page 39

CUISSON DANS LE FOUR
Codes d’anomalie
Les mots BAKE (CUISSON COURANTE) ou LOCK (VERROUILLAGE)
peuvent clignoter rapidement à l’afficheur pour prévenir en cas
d’erreur ou de problème. Si tel est le cas, appuyer sur la touche
CANCEL. Si les mots BAKE ou LOCK continuent à clignoter,
débrancher l’appareil. Attendre quelques minutes, puis rebrancher
l’appareil. Si un des mots continue à clignoter, débrancher l’appareil
et prendre contact avec un réparateur autorisé.
Cuisson courante
Programmation de la cuisson courante :
1. Appuyer sur la touche Bake (Cuisson courante).
• Le mot BAKE (CUISSON COURANTE) clignote.
• 000 clignote à l’afficheur.
2. Sélectionner la température du four. Appuyer sur
la touche Autoset 0 (Programmation automatique) pour
175 °C (350 °F) ou sur les touches numériques appropriées.
• Chaque pression additionnelle de la touche Autoset 0
augmente la température de 15 °C (25 °F).
• La température peut être programmée de 75 à 285 °C
(170 à 550 °F).
3. Appuyer de nouveau sur la touche Bake ou attendre quatre
secondes.
• Le mot BAKE s’arrête de clignoter et s’allume à l’afficheur.
Remarques sur la cuisson courante au
four :
• Pour changer la température du four pendant la cuisson,
appuyer sur Bake, puis sur la touche Autoset 0 ou les touches
numériques appropriées jusqu’à ce que la température désirée
soit affichée.
• Pour changer la température du four lors du
préchauffage, appuyer deux fois sur la touche Bake, puis sur
la touche Autoset 0 ou sur les touches numériques appropriées
jusqu’à ce que la température désirée soit affichée.
• Si l’on oublie d’arrêter le four, il s’arrêtera automatiquement
après 12 heures. Si l’on désire désactiver cette fonction, voir
page 46.
• Pour des conseils supplémentaires sur la cuisson courante et le
rôtissage, voir la brochure La cuisson simplifiée.
Différences de cuisson entre l’ancien four et
le nouveau
Il est normal de remarquer quelques différences dans la durée de
cuisson entre un four neuf et un four ancien. Voir Ajustement de la
température du four à la page 47.
Cuisson avec convection
(certains modèles)
•38° (100°) ou la température réelle du four, si la température est
de plus de 38 °C (100 °F), sera affichée. Elle augmentera par
intervalle de 3 °C (5 °F) jusqu’à ce que la température
préprogrammée soit atteinte.
4. Laisser le four préchauffer pendant 8 à 15 minutes.
• Lorsque la température programmée pour le four est atteinte,
un bip long retentit.
• La température programmée s’affiche.
• Pour rappeler la température programmée pendant le
préchauffage, appuyer sur la touche Bake.
5. Placer la nourriture dans le four.
6. Vérifier l’avancement de la cuisson à la durée minimale de
cuisson. Cuire plus longtemps au besoin.
7. Lorsque la cuisson est terminée, appuyer sur la
touche CANCEL (ANNULER).
8. Retirer la nourriture du four.
Pour la cuisson avec convection, entrer la température de
cuisson normale. La commande réduit automatiquement la
température programmée de 15 °C (25 °F). La température entrée
sera affichée. Le ventilateur de convection se met en marche
une fois que le four a fonctionné pendant 5 minutes.
Programmation de la cuisson avec convection :
1. Appuyer sur la touche Convect Bake (Cuisson
avec convection).
• Le mot BAKE et l’icône VENTILATEUR clignotent.
• 000 clignote à l’afficheur.
2. Sélectionner la température du four. Appuyer sur
la touche Autoset 0 pour 175 °C (350 °F) ou sur les
touches numériques appropriées.
• Chaque pression additionnelle sur la touche Autoset 0
augmente la température de 15 °C (25 °F). La température du
four peut être programmée de 75 à 285 °C (170 à 550 °F).
suite . . .
38
Page 40

CUISSON DANS LE FOUR
3. Appuyer à nouveau sur la touche Convect Bake ou attendre
quatre secondes.
• Le mot BAKE (CUISSON COURANTE) s’arrête de clignoter.
•38° (100°) ou la température réelle du four, si la température
est de plus de 38 °C (100 °F), sera affichée. Elle augmentera par
intervalle de 3 °C (5 °F) jusqu’à ce que la température
préprogrammée soit atteinte.
• L’icône VENTILATEUR se met à tourner.
4. Laisser le four préchauffer pendant 8 à 15 minutes.
• Lorsque la température programmée pour le four est atteinte,
un bip long retentit.
• La température programmée s’affiche.
• Pour rappeler la température programmée pendant le
préchauffage, appuyer sur la touche Convect Bake.
5. Placer la nourriture dans le four.
6. Vérifier l’avancement de la cuisson à la durée minimale de
cuisson. Cuire plus longtemps au besoin.
7. Lorsque la cuisson est terminée, appuyer sur
la touche CANCEL (ANNULER).
8. Retirer la nourriture du four.
Rôtissage avec convection
(certains modèles)
Pour le rôtissage avec convection, entrer la température et la
durée de rôtissage normales. Le programmateur indique
automatiquement de vérifier la cuisson de la nourriture à 75 % de la
durée programmée. Le ventilateur de convection se met en
marche une fois que le four a fonctionné pendant 5 minutes.
Remarques sur le rôtissage :
• Lors du rôtissage avec convection, la durée de cuisson doit
être programmée avant la température.
• S'il faut, d'après la recette, préchauffer le four, ajouter
15 minutes à la durée de cuisson programmée.
• Les durées de rôtissage peuvent varier selon les coupes de
viande.
• Il n'est pas nécessaire de préchauffer lors du rôtissage avec
convection de gros morceaux de viande.
• Se reporter à la brochure La cuisson simplifiée pour connaître
les durées et températures de rôtissage suggérées.
Programmation du rôtissage avec convection :
1. Appuyer sur la touche Convect
Roast (Rôtissage avec convection).
• Le mot ROAST (RÔTISSAGE) et l’icône
VENTILATEUR clignotent.
• 00:00 clignote à l’afficheur.
• 000 s’allume à l’afficheur.
2. Entrer la durée de rôtissage à l’aide des touches numériques.
• La durée peut être réglée de 10 minutes (00:10) à
11 heures et 59 minutes (11:59).
• Appuyer à nouveau sur Convect Roast ou attendre
4 secondes.
• Le mot ROAST et l’icône VENTILATEUR clignotent à
l’afficheur.
• 000 clignote à l’afficheur.
39
Page 41

CUISSON DANS LE FOUR
3. Sélectionner la température du four. Appuyer sur
la touche Autoset 0 (Programmation automatique)
pour 165 °C (325 °F) ou sur les touches
numériques appropriées.
• Chaque pression additionnelle sur la touche Autoset 0
augmente la température de 15 °C (25 °F).
• La température du four peut être programmée de 75 à 285 °C
(170 à 550 °F).
4. Appuyer à nouveau sur la touche Convect Roast ou attendre
quatre secondes.
• Le mot ROAST s’arrête de clignoter et s’allume à
l’afficheur.
•38° (100°) ou la température réelle du four, si la température
est de plus de 38 °C (100 °F), sera affichée. Elle augmentera
par intervalle de 3 °C (5 °F) jusqu’à ce que la température
préprogrammée soit atteinte.
• L’icône VENTILATEUR se met à tourner.
Remarques :
• S’il faut un préchauffage, laisser le four préchauffer pendant 8 à
15 minutes.
• Lorsque la température programmée pour le four est atteinte, un
bip long retentit.
5. Placer la nourriture dans le four.
• La durée commence le compte à rebours dès que le four se met
à chauffer.
• Pour rappeler la température programmée pendant le
préchauffage, appuyer sur la touche Convect Roast.
6. Lorsque les trois quarts de la durée de cuisson programmée se
sont écoulés, le four se met en marche et le mot FOOD
(NOURRITURE) clignote à l’afficheur. Vérifier l’avancement de la
cuisson à ce moment. Cuire plus longtemps au besoin.
• La lampe du four reste allumée jusqu’à ce que l’on appuie sur la
touche Oven Light (Lampe du four).
• Appuyer sur n’importe quelle touche pour rappeler la durée de
cuisson restante.
7. Lorsque la cuisson est terminée, appuyer sur la
touche CANCEL (ANNULER).
8. Retirer la nourriture du four.
Cuisson et maintien
Lors de l’utilisation de l’option Cook & Hold (Cuisson et maintien),
le four se met à chauffer immédiatement une fois que la commande a
été programmée. Puis, le four cuit pendant la durée spécifiée. Lorsque
cette durée s’est écoulée, le four maintient la nourriture au chaud
pendant une heure au maximum, puis s’éteint automatiquement.
Programmation de Cuisson et maintien :
1. Appuyer sur la touche Cook & Hold (Cuisson
et maintien).
• Le mot HOLD (MAINTIEN) clignote pour indiquer que la
programmation de cuisson et maintien est en cours.
• 00:00 clignote à l’afficheur.
2. Sélectionner la durée désirée de cuisson en utilisant les touches
numériques.
• Le mot HOLD continue à clignoter.
• La durée s’allume à l’afficheur.
• La durée peut être réglée de 10 minutes (00:10) à 11 heures
et 59 minutes (11:59).
3. Alors que le mot HOLD clignote, appuyer sur la
touche Bake (Cuisson courante), Convect Bake
(Cuisson avec convection) ou Convect Roast
(Rôtissage avec convection) (certains modèles)
et sélectionner la température du four. Appuyer
sur la touche Autoset 0 (Programmation
automatique) pour 175 °C (350 °F) ou sur les
touches numériques appropriées.
• Le mot correspondant à la fonction désirée clignote.
• La température du four peut être programmée de 75 à 285 °C
(170 à 550 °F).
4. Appuyer à nouveau sur la touche de fonction désirée OU attendre
quatre secondes.
• Le mot correspondant à la fonction désirée reste allumé.
• La durée de cuisson paraît à l’afficheur.
• La température réelle du four sera affichée pendant le
préchauffage.
• La température programmée s’affiche lorsque le four est
préchauffé.
40
Page 42

CUISSON DANS LE FOUR
Lorsque la durée de cuisson s’est écoulée :
• Quatre bips retentissent.
• Les mots HOLD (MAINTIEN) et WARM (CHAUD) s’allument.
•75° (170°) paraît à l’afficheur.
• L’heure du jour paraît à l’afficheur.
Après une heure de MAINTIEN AU CHAUD :
• Le four s’éteint automatiquement.
• Les mots HOLD et WARM s’éteignent.
• Retirer la nourriture du four.
Annulation de Cook & Hold à tout moment :
Appuyer sur la touche CANCEL (ANNULER). Retirer
la nourriture du four.
Cuisson et maintien différés
ATTENTION
Ne pas utiliser la cuisson différée pour des denrées très périssables
comme les produits laitiers, le porc, la volaille ou les fruits de mer.
Avec la fonction différée, le four set met à cuire plus tard dans la
journée. Programmer la durée d’attente désirée avant que le four ne
se mette en marche et la durée de cuisson désirée. Le four commence à chauffer à l’heure sélectionnée et cuit pour la durée
spécifiée.
La durée d’attente peut être programmée de 10 minutes (00:10) à
11 heures et 59 minutes (11:59).
Programmation d’un cycle de cuisson et maintien
différés :
1. Appuyer sur la touche 1 Delay.
• Le mot DELAY (ATTENTE) clignote à l’afficheur.
• 00:00 clignote à l’afficheur.
2. À l’aide des touches numériques appropriées, entrer la durée
d’attente avant que ne débute le cycle de cuisson et maintien.
3. Appuyer sur la touche Cook & Hold.
• Les mots HOLD et DELAY clignotent à
l’afficheur.
• 00:00 clignote à l’afficheur.
4. Entrer la durée désirée de cuisson à l’aide des touches
numériques.
5. Appuyer sur la touche Bake (Cuisson courante), Convect Bake
(Cuisson avec convection) ou Convect Roast (Rôtissage avec
convection) (certains modèles).
6. Programmer la température du four désirée
en appuyant sur la touche Autoset 0 (Programmation automatique) ou sur les touches
numériques appropriées.
• 175° (350°) s’allume lorsque l’on appuie sur la touche
Autoset 0.
• Après quatre secondes, la durée d’attente entrée paraît à
l’afficheur.
• Le mot HOLD s’éteint.
• Les mots BAKE (CUISSON COURANTE) et DELAY (ATTENTE)
restent allumés pour rappeler qu’un cycle de cuisson et
maintien différés a été programmé.
Remarques :
• Ne pas utiliser le cycle de cuisson et maintien différés pour des
articles qui nécessitent que le four soit préchauffé, comme les
gâteaux, les petits biscuits et les pains.
• Ne pas utiliser le cycle de cuisson et maintien différés si le four
est déjà chaud.
41
Page 43

CUISSON DANS LE FOUR
Cuisson au gril
Programmation de la cuisson au gril :
1. Appuyer sur la touche Broil (Gril).
• Les mots BROIL (GRIL) et SET (VALIDER) clignotent à
l’afficheur.
2. Appuyer sur la touche Autoset 0 (Programmation
automatique) une fois pour programmer un gril
à température élevée ou deux fois pour programmer un gril à température basse.
• Les mots HI (ÉLEVÉE) ou LO (BASSE) seront affichés.
• Sélectionner HI broil (Gril à température élevée) (285 °C
[550 °F]) pour un gril normal. Sélectionner LO broil (Gril à
température basse) (230° C [450° F]) pour un gril à tempéra-
ture inférieure d’aliments à cuisson plus longue comme la
volaille.
3. Après quatre secondes, le four se met en marche.
• Le mot BROIL reste allumé.
• Les mots HI ou LO restent allumés.
4. Pour un rissolage maximum, préchauffer le four pendant 2 ou 3
minutes avant d’ajouter la nourriture.
5. Placer la nourriture dans le four. Fermer la porte
du four.
6. Retourner la viande une fois à la moitié de la
durée de cuisson.
7. Lorsque l’aliment est cuit, appuyer sur la touche CANCEL
(ANNULER). Retirer la nourriture et la lèchefrite du four.
• L’heure du jour réapparaît à l’afficheur.
Remarques sur la cuisson au gril :
• Pour de meilleurs résultats lors du gril, se servir d’un ustensile
prévu pour ce type de cuisson.
• Le gril au réglage HI (Élevé) est utilisé pour la majorité des
opérations de cuisson au gril. Utiliser le gril au réglage LO
(Bas) pour la cuisson de mets devant cuire plus longtemps,
afin de leur permettre d’être bien cuits sans rissolage excessif.
• Les durées de cuisson au gril peuvent être plus longues avec
une température de gril inférieure.
• Retourner la plupart des aliments lorsque la moitié de la durée
prévue pour la cuisson au gril s’est écoulée.
• Pour des températures et des conseils supplémentaires sur la
cuisson au gril, se reporter à la brochure La cuisson simplifiée.
Tableau de cuisson au gril
Préchauffer le four pendant 2-3 minutes.
POSITION DES DEGRÉ DE TEMPS DE
ALIMENTS GRILLES* CUISSON CUISSON TOTAL
Boeuf Bifteck, 2,5 cm (1 po) d’épaisseur 5 À point 15 - 20 min.
5 Bien cuit 18 - 24 min.
Hamburger, 2 cm (3/4 po) d’épaisseur 5 ou 6 Bien cuit 13 - 18 min.
Porc Bacon 5 Bien cuit 6 - 10 min.
Tranche de jambon précuit, 5 Chaud 8 - 12 min.
1,3 cm (1/2 po) d’épaisseur
Côtelette, 2,5 cm (1 po) d’épaisseur 5 Bien cuit 22 - 26 min.
Volaille Blancs, avec os 4 Bien cuit (Gril à température basse)
30 - 45 min.
Fruits de mer Filet de poisson 5 Émiettement 8 - 12 min.
Darne de poisson, 2,5 cm (1 po) d’épaisseur 5 Émiettement 10 - 15 min.
Queue de homard, 85 à 115 g (3 à 4 onces) 5 Bien cuit 7 - 10 min.
F
our obtenir une surface extérieure saisie/brunie et un intérieur saignant, il peut être nécessaire de réduire le temps de cuisson sur la première face,
et de réduire la distance entre la viande et la source de chaleur.
Remarque : Ce tableau n’est qu’un guide de suggestions. Les durées peuvent varier selon l’aliment à cuire.
42
Page 44

CUISSON DANS LE FOUR
Maintien au chaud
Pour maintenir au chaud dans le four des aliments cuits et chauds
ou pour réchauffer pains et assiettes.
Programmation du Maintien au chaud :
1. Appuyer sur la touche Keep Warm
(Maintien au chaud).
• Le mot WARM (CHAUD) clignote à l’afficheur.
• 000 clignote à l’afficheur.
2. Sélectionner la température de maintien au
chaud. Appuyer sur la touche Autoset 0
(Programmation automatique) ou sur les touches
numériques appropriées.
•75° (170°) s’allume lorsque l’on appuie sur la touche
Autoset 0.
• Chaque pression sur la touche Autoset 0 augmente la
température de 3 °C (5 °F).
La température de maintien au chaud peut être
programmée de 63 à 90 °C (145 à 190 °F).
Le mot WARM (CHAUD) et la température seront affichés
pendant que la fonction est active.
Remarques sur la fonction de
maintien au chaud :
• Pour obtenir des qualités alimentaires et nutritives optimales,
les aliments ne doivent pas être gardés au chaud plus de 1 à
2 heures.
• Pour empêcher les aliments de dessécher, les recouvrir de
papier aluminium, sans serrer, ou d’un couvercle.
• Pour réchauffer des petits pains :
- recouvrir les petits pains de papier aluminium sans
serrer et les placer au four.
- appuyer sur les touches Keep Warm et Autoset 0.
- réchauffer pendant 12 à 15 minutes.
• Pour réchauffer des assiettes :
- placer deux piles de quatre assiettes maximum dans
le four.
- appuyer sur les touches Keep Warm et Autoset 0.
- réchauffer pendant 5 minutes, arrêter le four et laisser
les assiettes au four pendant encore 15 minutes.
- n’utiliser que des assiettes pouvant aller au four, à
vérifier avec le fabricant.
- ne pas poser des assiettes tièdes sur une surface
froide, les changements rapides de température
pouvant casser l’assiette ou la fendiller.
Annulation du maintien au chaud :
1. Appuyer sur la touche CANCEL (ANNULER).
2. Retirer la nourriture du four.
43
Page 45

CUISSON DANS LE FOUR
Dessiccation (certains modèles)
Pour de meilleurs résultats, utiliser une grille de dessiccation qui
permet à l’air de circuler uniformément autour de la nourriture.
Le ventilateur de convection fonctionne pendant la dessiccation.
Programmation de la dessiccation :
1. Placer les aliments dans le four et fermer la porte.
2. Appuyer sur la touche Drying (Dessiccation).
• Le mot DRY (DESSICCATION) clignote à
l’afficheur.
3. Appuyer sur la touche Autoset 0 (Programmation automatique)
pour programmer une température de 60 °C (140 °F) ou appuyer
sur les touches numériques correspondant à la température de
dessiccation souhaitée.
• La pression sur la touche Autoset augmente la
température par intervalle de 7 °C (10 °F).
• La température peut être réglée entre 38 et 94 °C
(100 et 200 °F).
4. Après quatre secondes, le mot DRY et la température
sélectionnée paraîtront à l’afficheur.
5. Lorsque la dessiccation est terminée, arrêter le
four en appuyant sur la touche CANCEL
(ANNULER).
Suivre le guide de dessiccation de la page 45 pour connaître les
durées de dessiccation. Vérifier les aliments aux durées minimum
indiquées. Refroidir les aliments à la température ambiante avant de
vérifier s’ils sont bien déshydratés.
Remarques sur la dessiccation :
• Pour acheter une grille de dessiccation, prendre contact
avec un détaillant Jenn-Air afin d’obtenir l’accessoire
« DRYINGRACK », ou composer le 1-800-JENNAIR.
• La majorité des fruits et légumes sèchent bien et conservent
leur couleur une fois séchés à 60 °C (140 °F). Les viandes
fraîches et séchées doivent être déshydratées à 63 °C-65 °C
(145 °F-150 °F). Pour obtenir des résultats optimaux, dessécher
les herbes aromatiques à 38 °C (100 °F). Cependant, à cette
température inférieure, prévoir des durées de séchage pouvant
aller jusqu’à 8 heures.
• La durée de dessiccation varie selon les critères suivants:
contenu en eau et sucre de l’aliment, taille des morceaux,
quantité d’aliments à déshydrater, humidité dans l’air.
• Vérifier les aliments au temps de séchage minimum. Les
sécher plus longtemps au besoin.
• Les fruits qui brunissent une fois exposés à l’air doivent être
traités avec un antioxydant. Essayer l’une des méthodes
suivantes:
1. Tremper le fruit dans un mélange composé de 2
parties de jus de citron en bouteille pour une partie
d’eau fraîche.
2. Tremper le fruit dans une solution d’acide ascorbique
ou d’antioxydant commercial à raison de une cuillère
à thé pour 1 litre (1 pinte) d’eau froide.
• Les aliments peuvent s’égoutter lors du processus de
dessiccation. Après la dessiccation d’aliments à contenu élevé
en sucre ou acide, la sole du four doit être nettoyée à l’eau et
au savon. Le fini porcelanisé peut se décolorer si les projections de sucre ou d’acide ne sont pas essuyées avant que le
four ne soit chauffé à chaleur élevée ou avant un cycle
d’autonettoyage.
• Il est possible d’utiliser plus d’une grille à la fois. Cependant,
une durée supplémentaire est nécessaire.
• Consulter d’autres sources (comme la bibliothèque de la
région) pour obtenir des informations supplémentaires.
44
Page 46

CUISSON DANS LE FOUR
Guide de dessiccation (certains modèles)
DURÉE RÉSULTATS DE
FRUITS MEILLEURES VARIÉTÉS PRÉPARATION APPROX. À DESSICCATION APRÈS
POUR LA DESSICCATION 60 °C (140 °F )** DURÉE MINIMALE
Pommes* Variétés fermes: Graven Laver, peler au besoin, évider et couper en 4 à 8 heures Souples à croustillantes. Les
Stein, Granny Smith, tranches de 3 mm (1/8 po). pommes desséchées se
Jonathan, Winesap, Rome conservent mieux lorsqu’elles
Beauty, Newton. sont légèrement croustillantes.
Abricots* Blenheim/Royal: les plus Laver, couper en deux et retirer les noyaux. 18 à 24 heures Souples et flexibles.
courantes. Tilton aussi est
une bonne variété.
Bananes* Variétés fermes. Peler et couper en tranches de 6 mm (1/4 po). 17 à 24 heures Souples à croustillantes.
Cerises Lambert, Royal Ann, Laver et retirer les queues. Couper en deux et 18 à 24 heures Souples et caoutchouteuses.
Napoleon, Van ou Bing. retirer les noyaux.
Nectarines Variétés à noyau non Couper en deux et retirer les noyaux. Épluchage 24 à 36 heures Souples et caoutchouteuses.
et pêches* adhérent. facultatif, mais fruits séchés de meilleur aspect.
Poires* Bartlett Peler, couper en deux et évider. 24 à 36 heures Souples et flexibles.
Ananas Frais ou en boîte. Laver, peler et retirer les points épineux. En boîte : Souple et flexible.
Trancher dans le sens de la longueur et retirer le 14 à 18 heures
petit noyau central. Couper diagonalement en Frais :
tranches de 13 mm (1/2 po). 12 à 16 heures
Écorces d’orange Choisir des fruits à écorce Bien laver. Enlever l’écorce externe sur 1 à 2 heures Dures à cassantes.
et de citron rugueuse. Ne pas sécher 1,5 mm (1/16 po) à 3 mm (1/8 po). Ne pas
l’écorce du fruit s’il est utiliser la partie blanche amère sous l’écorce.
marqué «colorant ajouté».
LÉGUMES
Tomates Oblongues, Roma Couper en deux, retirer les graines. Placer 12 à 18 heures Dures à croustillantes.
les tomates peau vers le haut sur la grille.
Percer des trous à la fourchette dans la peau.
Carottes Type demi-long Danvers, Ne pas utiliser les carottes si elles sont fibreuses 4 à 8 heures Dures à cassantes.
Imperator, Red Cored ou creuses. Laver, enlever les feuilles et peler au
Chantenay. besoin. Trancher transversalement ou
diagonalement en tranches de 6 mm (1/4 po).
Blanchir à la vapeur 3 minutes.
Piments forts Ancho, Anaheim. Laver, couper en deux et enlever les graines. 4 à 6 heures Les gousses doivent apparaître
Percer la peau plusieurs fois à la fourchette. ridées, rouge foncé et croustillantes.
HERBES AROMATIQUES
Persil, menthe, Rincer à l’eau froide. Éponger à l’aide d’un 1 à 3 heures Cassants, en miettes.
coriandre, papier essuie-tout. Laisser les queues jusqu’à ce
sauge, origan que les feuilles soient sèches, puis les jeter.
Basilic Couper les feuilles à 8-10 cm (3-4 po) du haut 2 à 5 heures Cassant, en miettes.
de la plante, juste lorsque les bourgeons
apparaissent. Rincer les feuilles à l’eau froide.
* Fruits nécessitant un antioxydant pour empêcher la décoloration et la perte de nutriments. Se reporter aux remarques de la page 44 pour connaître les méthodes
particulières.
** L’arrêt après 12 heures ne se produit pas lors des fonctions de dessiccation.
45
Page 47

CUISSON DANS LE FOUR
Fermentation (certains modèles)
Cette caractéristique s’utilise pour faire lever des produits de
boulangerie à base de levure avant de les cuire. La fermentation
dans le four protège la pâte des changements de température ou
des courants d’air qui affectent couramment les résultats de
l’opération faite sur le comptoir.
1. Appuyer sur la touche Proofing (Fermentation).
• Le mot PROOF (FERMENTATION) clignote à l’afficheur.
• Le mot SET (VALIDER) clignote à l’afficheur.
2. Appuyer sur la touche Autoset 0 (Programmation automatique).
• Le mot PROOF s’allume à l’afficheur.
3. Lorsque la fermentation est terminée, appuyer
sur la touche CANCEL (ANNULER).
Annulation du mode sabbat :
1. Appuyer sur la touche Clock pendant cinq
2. Après 72 heures, le mode sabbat se termine.
Arrêt automatique/Mode
sabbat
Le four s’arrête automatiquement après 12 heures s’il a été
accidentellement laissé en marche. Cette caractéristique de sécurité
peut être arrêtée.
Pour annuler l’arrêt 12 heures et faire fonctionner le
four en continu pendant 72 heures :
1. Appuyer sur la touche Clock (Horloge) et la
maintenir ainsi pendant cinq secondes.
• SAb sera affiché et clignotera pendant cinq secondes.
• SAb sera ensuite affiché en continu jusqu’à ce qu’on l’arrête
ou jusqu’à ce que la durée limite de 72 heures soit atteinte.
• Le mot BAKE (CUISSON COURANTE) sera aussi affiché si un
cycle de cuisson courante est en cours alors que le four est en
mode sabbat.
• Toutes les autres fonctions (MINUTERIE, MAINTIEN AU
CHAUD, NETTOYAGE, etc.) sont verrouillées, SAUF BAKE,
pendant le mode sabbat.
• Un cycle de cuisson et maintien peut être programmé durant
le mode sabbat. Cependant, un cycle de cuisson et maintien
différés n’est pas possible.
secondes.
• SAb clignote pendant cinq secondes.
• L’heure du jour revient à l’afficheur.
OU
• SAb clignote pendant 5 secondes.
• L’heure du jour revient à l’afficheur.
Remarques sur le mode sabbat :
• Le mode sabbat peut être mis en marche à tout moment, que
le four soit en marche ou non.
• Le mode sabbat ne peut pas être mis en marche si les touches
sont verrouillées ou la porte verrouillée.
• La majorité des messages et tous les bips sont désactivés
lorsque le mode sabbat est actif.
• Si le four est en mode cuisson lorsque le mode sabbat est
programmé, le mot BAKE (CUISSON COURANTE) s’éteint
lorsque la cuisson courante est annulée. Il n’y aura aucun
signal sonore audible.
• La lampe du four ne s’allume pas automatiquement à
l’ouverture de la porte lorsque le four est en mode sabbat. Si
l’éclairage du four est souhaité pendant le mode sabbat, la
lampe devra être allumée avant que le mode sabbat ne débute.
• Lorsque le mode sabbat a démarré, l’afficheur indique
immédiatement la température programmée plutôt que la
température réelle de la cavité du four. Aucun bip de
préchauffage ne retentit.
• Le cycle d’autonettoyage et le verrouillage automatique de la
porte ne fonctionnent pas pendant le mode sabbat.
• Si l’on appuie sur la touche CANCEL, un cycle de cuisson
courante au four sera annulé. Cependant, le programmateur
restera en mode sabbat.
• Après une panne de courant, le four revient en mode sabbat
avec 72 heures restantes et aucun cycle actif.
46
Page 48

CUISSON DANS LE FOUR
Ajustement de la température
du four
La précision des températures du four a été soigneusement vérifiée
à l’usine. Il est normal de remarquer quelques différences dans la
cuisson ou la couleur du rissolage obtenu entre un four neuf et un
four ancien. Au fur et à mesure que le four est moins neuf, sa
température peut varier.
Il est possible d’ajuster la température du four si l’on pense que le
four ne cuit pas ou ne rissole pas correctement. Pour décider de
l’ajustement à apporter, régler le four à une température de 15 °C
(25 °F) plus élevée ou plus basse que la température indiquée dans
la recette, puis faire cuire la préparation. Les résultats de «l'essai» de
cuisson doivent donner une idée du nombre de degrés duquel la
température doit être ajustée.
Ajustement de la température du four :
1. Appuyer sur la touche Bake (Cuisson courante).
2. Entrer 285 °C (550 °F) en appuyant sur les touches numériques
appropriées.
3. Appuyer sur la touche Bake et la maintenir ainsi pendant
plusieurs secondes ou jusqu’à ce que 00° paraisse à l’afficheur.
Si la température du four a été précédemment ajustée, le
changement sera affiché. Par exemple, si la température du four
a été réduite de 8 °C (15 °F), l’afficheur indiquera -8° (-15°).
4. Appuyer sur la touche Autoset 0 (Programmation automatique)
pour ajuster la température.
À chaque fois que l’on appuie sur la touche Autoset 0, la
température change de 3 °C (5 °F). La température du four peut
être augmentée ou diminuée de 3 à 20 °C (5 à 35 °F).
Appuyer sur la touche Autoset 0 pour augmenter la température
du four (5, 10 . . . 35). Continuer d’appuyer sur la touche Autoset
0 pour diminuer la température du four (-35, -30 . . . -5).
5. L’heure du jour réapparaît automatiquement à l’afficheur.
Il n’est pas nécessaire de réajuster la température du four en cas
de panne ou d’interruption de courant. L’ajustement de la
température s’applique seulement aux fonctions de cuisson
courante, cuisson avec convection et rôtissage avec convection
(certains modèles). Les températures de gril et de nettoyage ne
peuvent être ajustées.
Changement de la
température °F/°C
1. Le réglage par défaut de l’usine pour la température est en
Fahrenheit.
2. Pour modifier ce réglage, appuyer sur les touches CANCEL et
Bake simultanément et maintener-les enfoncées pendant trois
secondes.
3. Un bip retentit et le réglage courant (°F ou °C) paraît à l’afficheur.
(Si vous ne faites pas de changement, la cuisinière retourne au
réglage existant après 30 secondes.)
4. Pour modifier le réglage, appuyer sur la touche Autoset 0.
Appuyer à nouveau sur la touche pour retourner au réglage
existant. Attender cinq secondes et le réglage sera effectué.
Favori
La touche Favorite (favori) permet de sauvegarder la durée et la
température d’une fonction de cuisson et maintien.
Pour programmer un cycle Favori, une fonction de cuisson et
maintien doit être active ou tout juste programmée.
Programmation d’un nouveau cycle favori ou
sauvegarde d’un cycle en cours de cuisson et
maintien comme favori :
1. Programmer un cycle de cuisson et maintien comme il est décrit
à la section Cuisson et maintien à la page 41.
2. Appuyer sur la touche Favorite et la maintenir
ainsi pendant trois secondes.
• Le cycle cuisson et maintien nouvellement programmé ou en
cours de fonctionnement sera sauvegardé.
• Un bip sonore retentit pour indiquer que les commandes ont
accepté le réglage favori.
Démarrage d’un cycle programmé dans favori :
1. Appuyer sur la touche Favorite.
• La durée et la température du cycle programmé de cuisson et
maintien seront affichées (si aucun cycle de cuisson et
maintien n’a été programmé, « nonE » sera affiché).
2. Appuyer sur la touche Bake, Convect Bake ou Convect Roast
(certains modèles).
• Le cycle favori commence immédiatement.
• Le mot correspondant au cycle sélectionné s’allume à
l’afficheur.
• La durée de cuisson s’allume à l’afficheur.
Lorsque la durée de cuisson s’est écoulée :
• Le mot correspondant au cycle sélectionné s’éteint.
• Les mots HOLD (MAINTIEN) et WARM (CHAUD) s’allument.
•75° (170°) paraît à l’afficheur.
Annulation d’un cycle favori en cours :
1. Appuyer sur la touche CANCEL (ANNULER).
• Le cycle favori sauvegardé ne sera pas affecté.
2. Retirer la nourriture du four.
47
Page 49

CUISSON DANS LE FOUR
Allumage sans flamme de
veille
La cuisinière est dotée d’un système d’allumage sans flamme de
veille. Ce système ferme automatiquement l’arrivée de gaz et
empêche tout fonctionnement du four lors d’une interruption
de l’alimentation électrique.
Il ne sera pas possible d’allumer le brûleur du four avec une
allumette. Ne pas tenter de faire fonctionner le four lors d’une
interruption de l’alimentation électrique.
Ventilateur du four
Un ventilateur de convection sert à faire circuler l’air chaud dans le
four lorsque la caractéristique de convection est sélectionnée. La
fonction se met automatiquement en marche 5 minutes après avoir
appuyé sur la touche Convect Bake, et s’éteint lorsque la fonction
Convect Bake est annulée.
Remarque : Il s’arrête automatiquement lorsque l’on ouvre la
porte.
Évent du four
Lorsque le four fonctionne, les surfaces voisines de l’évent peuvent
devenir assez chaudes pour entraîner des brûlures. Ne jamais
bloquer l’évent.
L’évent est situé sous le protecteur d’évent du dosseret, sur la
cuisinière.
ÉVENT
DU FOUR
Ne pas mettre de
plastiques près de
l’évent, la chaleur
pouvant les déformer
ou les faire fondre.
Éclairage du four
La lampe du four s’allume automatiquement à
l’ouverture de la porte. Lorsque la porte est fermée,
appuyer sur Oven Light (Lampe du four) pour
allumer ou éteindre la lampe. Le four produit un
signal sonore chaque fois que l’on appuie sur Oven Light.
Sole du four
Protéger la sole des produits renversés, en particulier acides ou
sucrés, ceux-ci pouvant décolorer l’émail vitrifié. Utiliser des
ustensiles de la bonne dimension pour éviter que les produits ne se
renversent ou passent par-dessus l’ustensile en bouillant. Ne pas
placer d’ustensiles ou de feuille d’aluminium directement sur
la sole du four.
Grilles du four
ATTENTION
• Ne pas tenter de changer la position des grilles lorsque le four
est chaud.
• Ne pas ranger de nourriture ou d’ustensile dans le four.
Le four comporte deux grilles (trois s’il y a convection) avec, pour
chacune, un dispositif de calage.
Extraction :
1. Tirer la grille en ligne droite
jusqu’à ce qu’elle s’arrête à la
position de calage.
2. Soulever la grille à l’avant pour
pouvoir l’extraire.
Réinstallation :
1. Placer la grille sur les supports dans le four.
2. Soulever légèrement l’avant. Faire glisser la grille vers l’arrière
au-delà de la position de calage.
3. Abaisser la grille et la faire glisser dans le four.
Ne pas couvrir la totalité d’une grille de papier d’aluminium ni
mettre d’aluminium sur la sole du four. Cela ne donnerait pas
de bons résultats dans la cuisson de gâteaux et la sole
pourrait se trouver abîmée.
Positions des grilles
POSITION 7 (position la
plus haute) : Pour la
cuisson au gril et la cuisson
au four sur une seule grille
avec une tôle à biscuits.
POSITION 6 : S’utilise pour
la cuisson au gril et la
cuisson au four sur une
seule grille avec une tôle à
biscuits. S’utilise pour une
cuisson sur plusieurs grilles.
POSITION 5 : Pour la cuisson au gril et la cuisson au four sur une
seule grille avec une tôle à biscuits.
POSITION 4 : S’utilise pour la cuisson au four de gâteaux et de mets
en sauce, sur une seule grille avec une tôle à biscuits, et la cuisson
au gril. S’utilise pour une cuisson sur plusieurs grilles.
POSITION 3 : Pour la cuisson au four de mets en sauce, de gâteaux
à étages, de miches de pain, sur une seule grille avec une tôle à
biscuits. S’utilise pour une cuisson sur plusieurs grilles.
POSITION 2 : S’utilise pour la cuisson au four de gâteaux sur une
seule grille avec une tôle à biscuits, et pour le rôtissage de petites
pièces de viande. S’utilise pour une cuisson sur plusieurs grilles.
Cuisson avec convection
sur trois grilles
(certains modèles)
7
6
5
4
3
2
1
Sole du
four
48
Page 50

CUISSON DANS LE FOUR
POSITION 1 : S’utilise pour le rôtissage d’une volaille ou de grosses
pièces de viande.
Sole du four : Placer la grille sur les
côtés relevés de la sole. Donne une
place supplémentaire pour la cuisson
de grandes quantités.
CUISSON SUR PLUSIEURS
GRILLES :
Deux grilles : Utiliser les positions
3 et 6, ou 2 et 4.
Trois grilles (convection seulement) : Utiliser les positions
1, 3 et 6.
Remarque: Pour la cuisson avec convection (certains modèles)
sur deux ou trois grilles, vérifier les aliments à la durée minimale
suggérée pour éviter un excès de cuisson ou de coloration.
Cuisson de gâteaux à étages sur deux grilles
Pour de meilleurs résultats pour la cuisson de gâteaux sur deux
grilles, utiliser les positions 2 et 4 pour une cuisson traditionnelle et
les positions 3 et 6 pour une cuisson avec convection (certains
modèles).
Placer les gâteaux sur la grille, comme il est indiqué.
Demi-grille Create-A-Space
Certains modèles de cuisinières
sont dotés d’une demi-grille
convertible. Le côté gauche de
la grille peut être enlevé pour
loger une grosse marmite sur
la grille inférieure. Le côté
droit de la grille est
toujours libre pour loger
une cocotte.
TM
Remarques :
• La partie amovible de la grille peut être utilisée comme grille de
rôtissage dans la lèchefrite. Ne pas utiliser la partie supérieure
si la grille du four est placée dans la lèchefrite.
• La section amovible de la grille peut être utilisée comme
support ou grille de refroidissement.
• S’assurer que le four a refroidi avant de retirer ou de réinstaller
la demi-grille.
• Ne pas utiliser un ustensile qui dépasserait du bord de la grille.
• Pour obtenir les meilleurs résultats, laisser un espace libre de
5 cm (2 po) entre l’ustensile placé sur la grille et la paroi du
four.
• Agir prudemment pour retirer un article placé sur la demi-grille,
afin d’éviter des brûlures.
• Enlever prudemment les articles placés sur la grille inférieure,
pour ne pas perturber la demi-grille.
49
Page 51

NETTOYAGE
Four autonettoyant
6. Essuyer les résidus sucrés et acides, comme les patates douces,
ATTENTION
• Il est normal que certaines pièces de la cuisinière deviennent
très chaudes lors d’un cycle de nettoyage.
• Pour éviter que la porte du four ne subisse des dommages, ne
pas tenter de l’ouvrir lorsque le mot LOCK (VERROUILLAGE) est
visible sur l’afficheur.
• Éviter de toucher la porte, le hublot et la zone de l’évent du four
lors d’un cycle d’autonettoyage.
• Ne pas utiliser de nettoyant pour four du commerce sur le fini
du four ou sur tout autre composant du four. Cela abîmerait le
fini ou les composants du four.
Le cycle d’autonettoyage utilise des températures supérieures à la
normale pour assurer le nettoyage automatique de la totalité du four.
Si le four est très sale, il est normal qu’on observe la formation de
fumée ou de flammes durant le nettoyage. Nettoyer le four à
intervalles réguliers plutôt que d’attendre une accumulation
importante de résidus.
Durant le processus d’autonettoyage, il convient de bien aérer la
cuisine pour éliminer les odeurs normalement émises durant le
nettoyage.
Programmation de l’autonettoyage :
1. Fermer la porte du four.
2. Appuyer sur la touche Clean (Nettoyage).
3. Appuyer sur la touche Autoset 0 (Programmation
4. Appuyer sur la touche Autoset 0 pour voir défiler les différents
Avant l’autonettoyage
1. Éteindre la lampe du four avant le nettoyage. Elle risquerait sinon,
de griller.
2. Enlever la lèchefrite, tous les plats et les grilles du four. Les grilles
risquent de se décolorer et de ne plus glisser aussi bien après un
cycle d’autonettoyage si on ne les enlève pas.
3. Nettoyer le cadre du four, le cadre de la porte, la zone à l’extérieur
du joint et autour de l’ouverture dans le joint de la porte, à l’aide
d’un produit de nettoyage non abrasif comme Bon Ami* ou d’eau
additionnée de détergent. Le processus d’autonettoyage ne
nettoie pas ces zones. Elles doivent être nettoyées pour empêcher
la saleté de s’incruster pendant le cycle de nettoyage. (Le joint
assure l’étanchéité autour de la porte et du hublot du four.)
4. Pour empêcher tout dommage, ne pas nettoyer ni frotter le joint
qui se trouve autour de la porte du four.
Ce joint est conçu pour éviter les pertes
de chaleur pendant le cycle
d’autonettoyage.
5. Éliminer les résidus de graisse ou de
produits renversés sur la sole avant le
nettoyage. Ceci empêche la formation
de flammes ou de fumée durant le nettoyage.
5. Après quatre secondes, le four commence le nettoyage.
Démarrage différé d’un cycle d’autonettoyage :
1. Appuyer sur la touche 1 Delay.
2. Entrer la durée d’attente désirée pour le démarrage du cycle à
3. Appuyer sur la touche Clean.
4. Appuyer sur la touche Autoset 0.
la tomate ou les sauces à base de lait. La porcelaine vitrifiée
possède une certaine résistance aux composés acides, mais qui
n’est pas limitée. Elle peut se décolorer si les résidus acides ou
sucrés ne sont pas enlevés avant de commencer l’autonettoyage.
Remarque : La température du four doit être située en dessous
de 205 °C (400 °F) pour programmer un cycle d’autonettoyage.
• Le mot CLEAN (NETTOYAGE) clignote.
• Le mot SET (VALIDER) clignote à l’afficheur.
automatique).
• MEd (Moyen) (Saleté moyenne, 3 heures) est affiché.
réglages de l’autonettoyage :
HVy (Très sale) (Saleté épaisse, 4 heures)
MEd (Moyen) (Saleté moyenne, 3 heures)
LITE (Léger) (Saleté légère, 2 heures)
Le choix du niveau de saleté du four programme automa-
tiquement la durée du cycle d’autonettoyage.
• Si la porte n’est pas fermée, des bips retentissent et le mot
« door » (porte) paraît à l’afficheur. Si la porte n’est pas
fermée dans les 30 secondes, l’opération d’autonettoyage est
annulée et l’afficheur revient à l’heure du jour.
• Le mot CLEAN paraît à l’afficheur.
• Le mot LOCK (VERROUILLAGE) clignote à l’afficheur. Une fois
la porte verrouillée, le mot reste stable.
• La durée de nettoyage commence le décompte à l’afficheur.
• Le mot DELAY (ATTENTE) clignote.
• 00:00 clignote à l’affichage.
l’aide des touches numériques appropriées.
• Le mot SET clignote à l’afficheur.
• Le mot LITE (saleté légère) est affiché.
*Les noms de marque des produits de nettoyage sont des marques déposées des différents fabricants.
50
Page 52

NETTOYAGE
5. Appuyer sur la touche Autoset 0 (Programmation
automatique) pour voir défiler les différents
réglages de l’autonettoyage :
HVy (Très sale) (Saleté épaisse, 4 heures)
MEd (Moyen) (Saleté moyenne, 3 heures)
LITE (Léger) (Saleté légère, 2 heures)
Le choix du niveau de saleté du four programme automa-
tiquement la durée du cycle d’autonettoyage.
6. Après quatre secondes, les mots CLEAN (NETTOYAGE) et
DELAY (ATTENTE) s’allumeront et le mot LOCK
(VERROUILLAGE) clignotera à l’afficheur. Lorsque la porte du
four se verrouille, le mot LOCK s’arrête de clignoter et reste
allumé en continu pour indiquer que le four est programmé pour
une opération de nettoyage différé. Le délai d’attente sera
affiché.
Pendant le cycle d’autonettoyage
Lorsque le mot LOCK paraît à l’afficheur, la porte ne peut être
ouverte. Pour éviter d’endommager la porte, ne pas forcer la porte
pour l’ouvrir lorsque LOCK est affiché.
Fumée et odeurs
La première fois où le four est nettoyé, il peut y avoir production
d’odeur et de fumée. Ceci est normal et disparaîtra à l’usage.
Si le four est très sale ou si la lèchefrite a été laissée dans le four, il
peut y avoir production de fumée.
Bruits
Pendant que le four chauffe, il peut se produire des bruits de métal
en dilatation ou en contraction. Ceci est normal et n’indique pas que
le four s’abîme.
Après le cycle d’autonettoyage
Environ une heure après la fin du cycle, le mot LOCK s’éteint. À ce
moment, la porte peut être ouverte.
La saleté peut avoir laissé un résidu gris poudreux. L’enlever
avec un linge humide. S’il reste de la saleté, cela indique que le cycle
de nettoyage n’a pas été assez long. Cette saleté restante sera
enlevée au prochain cycle d’autonettoyage.
Si les grilles ont été laissées à l’intérieur du four pendant le
cycle d’autonettoyage et qu’elles glissent mal sur leurs sup-
ports, les enduire, ainsi que les supports, d’une fine couche d’huile
végétale.
De fines lignes peuvent apparaître dans la porcelaine parce
qu’elle a subi chaleur et refroidissement. Ceci est normal et
n’affectera pas la performance.
Une décoloration blanche peut apparaître après le nettoyage
si des aliments acides ou sucrés n’ont pas été enlevés avant
que ne commence l’autonettoyage. La décoloration est normale
et n’affectera pas la performance du four.
Remarques:
• Si la porte du four n’est pas fermée, le mot « door » (porte)
clignote à l’afficheur et le four émet des bips jusqu’à ce que la
porte soit fermée et que l’on appuie à nouveau sur Clean
(Nettoyage).
• S’il s’écoule plus de cinq secondes entre le moment où l’on
appuie sur Clean et celui où l’on appuie sur la touche
Autoset 0 (Programmation automatique), l’afficheur retourne
automatiquement à l’affichage précédent.
• La porte du four se trouvera endommagée si l’on force son
ouverture alors que le mot LOCK (VERROUILLAGE) est encore
affiché.
51
Page 53

NETTOYAGE
Méthodes de nettoyage
ATTENTION
• Avant toute manipulation ou opération de nettoyage, vérifier que l’appareil est arrêté
et que tous les composants sont froids, afin d’éviter des dommages ou des brûlures.
• Pour éviter la formation de taches ou un changement de couleur, nettoyer l’appareil après
chaque utilisation.
• Après tout démontage de composants, veiller à effectuer un remontage correct.
*Les noms de marque sont des marques
déposées des différents fabricants.
** Pour commander directement,
composer le 1-800-JENNAIR
(1-800-536-6247).
PIÈCE NETTOYAGE
Lèchefrite et Ne jamais couvrir la grille de papier d’aluminium; cela empêche la graisse de couler dans la lèchefrite.
sa grille • Recouvrir la lèchefrite et sa grille d’un linge savonneux; laisser agir pour détacher les résidus.
• Laver avec de l’eau savonneuse tiède. Utiliser un tampon à récurer pour éliminer les souillures tenaces.
• On peut placer les deux composants de la lèchefrite dans un lave-vaisselle.
Chapeaux de Têtes de brûleur amovibles
brûleur et • Laisser le brûleur refroidir. Enlever le chapeau de brûleur pour le laver dans de l’eau savonneuse avec un tampon à
brûleurs à gaz récurer en plastique. Pour les souillures tenaces, nettoyer avec un tampon non abrasif, savonneux, ou avec une
éponge et la crème de nettoyage pour table de cuisson Cooktop Cleaning Creme* (produit n° 20000001)**.
• Ne pas effectuer le nettoyage au lave-vaisselle ou dans le four autonettoyant.
Brûleurs à gaz scellés
• Nettoyer fréquemment. Laisser le brûleur refroidir. Nettoyer avec du savon et un tampon à récurer en plastique. Pour
les souillures tenaces, nettoyer avec un tampon savonneux et non abrasif. Ne pas agrandir ou déformer les trous.
• Veiller à ne pas introduire d’eau dans les orifices du brûleur.
• Travailler prudemment lors du nettoyage de l’allumeur. Si l’allumeur est endommagé ou mouillé, les brûleurs de la
table de cuisson ne pourront pas s’allumer.
Grilles des • Laver les grilles avec de l’eau savonneuse tiède et un tampon à récurer en plastique non abrasif. Pour les souillures
brûleurs - tenaces, nettoyer avec un tampon en plastique non abrasif, savonneux, ou avec une éponge et la crème de nettoyage
porcelaine pour table de cuisson Cooktop Cleaning Creme* (produit n° 20000001)**. S’il reste des souillures, appliquer de
sur fonte nouveau la crème pour table de cuisson, recouvrir avec un essuie-tout humide, et laisser tremper pendant 30 minutes.
Frotter de nouveau, rincer et faire sécher.
• Ne pas effectuer le nettoyage au lave-vaisselle ou dans le four autonettoyant.
Zone de la • Pour utiliser la fonction Verrouillage des commandes pour le nettoyage, voir page 37.
console de • Laver, rincer et faire sécher. Ne pas utiliser un agent de nettoyage abrasif susceptible de rayer la finition.
commande et • On peut utiliser un produit de nettoyage du verre, pulvérisé d’abord sur un chiffon. NE PAS projeter le produit
horloge directement sur les touches de commande ou sur l’afficheur.
Boutons de • Placer chaque bouton à la position d’ARRÊT, et retirer chaque bouton en le tirant.
commande • Laver, rincer et faire sécher. Ne pas utiliser un agent de nettoyage abrasif susceptible de rayer la finition.
• Faire fonctionner brièvement chaque brûleur pour vérifier que le bouton a été correctement réinstallé.
Table de cuisson L’émail vitrifié est du verre lié au métal par fusion. Il peut se fissurer ou s’écailler en cas de mauvaise utilisation. Il est
et tableau de résistant aux acides, mais pas totalement inattaquable par les acides. Tous les produits renversés, en particulier acides
commande - ou sucrés, doivent être essuyés immédiatement avec un linge sec.
émail vitrifié • Une fois refroidi, laver avec de l’eau savonneuse, rincer et sécher.
• Ne jamais essuyer une surface tiède ou chaude avec un linge humide. Ceci pourrait la fissurer ou l’écailler.
• Ne jamais utiliser de nettoyants pour four, d’agents de nettoyage caustiques ou abrasifs sur le fini extérieur de la
cuisinière.
52
Page 54

NETTOYAGE
PIÈCE NETTOYAGE
Panneaux • Une fois les pièces refroidies, les laver à l’eau savonneuse tiède, rincer et sécher. Ne jamais essuyer une surface
latéraux, tiroir tiède ou chaude avec un linge humide, ceci pouvant endommager la surface et entraîner une brûlure par la vapeur.
de remisage • Pour les taches rebelles, utiliser des agents de nettoyage légèrement abrasifs comme la pâte au bicarbonate de
et poignées soude ou Bon Ami*. Ne pas utiliser de nettoyants abrasifs, caustiques ou énergiques comme les nettoyants pour
de porte - four ou les tampons en laine d’acier. Ces produits raieraient ou endommageraient de façon permanente la surface.
émail peint Remarque : Utiliser un linge ou un torchon sec pour essuyer les produits renversés, surtout s’ils sont acides
ou sucrés. La surface pourrait se décolorer ou se ternir si la saleté n’était pas immédiatement enlevée. Ceci
est particulièrement important dans le cas de surfaces blanches.
Hublot et porte • Éviter d’utiliser trop d’eau, qui risquerait de s’infiltrer sous ou derrière le verre et de tacher.
du four en verre • Laver à l’eau et au savon. Rincer avec de l’eau propre et sécher. Un produit de nettoyage du verre peut être utilisé en
le vaporisant d’abord sur un linge.
• Ne pas utiliser de produits abrasifs comme tampons à récurer, laine d’acier ou produit de nettoyage en poudre qui
risqueraient de rayer le verre.
Intérieur du four • Exécuter les instructions présentées aux pages 50-51 pour l’autonettoyage du four.
Grilles du four • Nettoyer avec de l’eau savonneuse.
• Éliminer les souillures tenaces avec une poudre de nettoyage ou un tampon à récurer savonneux. Rincer et faire
sécher.
• Si les grilles sont laissées dans le four pendant le cycle d’autonettoyage, elles se décolorent et peuvent ne plus très
bien glisser. Si ceci se produit, appliquer par essuyage un peu d’huile végétale sur la grille et ses supports en relief
pour faciliter le mouvement, et enlever l’excès d’huile.
Acier inoxydable • NE PAS UTILISER DE PRODUITS DE NETTOYAGE CONTENANT DU JAVELLISANT.
(certains modèles) • NE PAS UTILISER DE NETTOYANTS « ORANGE » OU ABRASIFS.
• TOUJOURS ESSUYER DANS LE SENS DE LA TEXTURE DE L’ACIER LORS DU NETTOYAGE.
• Nettoyage journalier/saleté légère - Essuyer avec l’un des produits suivants: eau savonneuse, vinaigre blanc/eau,
produit de nettoyage pour verre et surface Formula 409* ou un produit semblable pour verre - avec un linge souple
et une éponge. Rincer et sécher. Pour polir et enlever les marques de doigts, faire suivre par une vaporisation de
Magic Spray* pour acier inoxydable (produit n° 20000008)**.
• Saleté modérée/épaisse - Essuyer avec l’un des produits suivants: Bon Ami*, Smart Cleanser* ou Soft Scrub* - à
l’aide d’un linge souple ou d’une éponge humide. Rincer et sécher. Les taches rebelles peuvent être enlevées avec
un tampon multi-usages Scotch-Brite* humidifié. Frotter uniformément dans le sens du métal. Rincer et sécher. Pour
redonner du lustre et retirer les rayures, faire suivre par une vaporisation de Magic Spray* pour acier inoxydable.
• Décoloration - À l’aide d’une éponge humidifiée ou d’un linge souple, essuyer à l’aide du nettoyant Cameo* pour
acier inoxydable. Rincer immédiatement et sécher. Pour enlever les marques et redonner du lustre, faire suivre par
une vaporisation de Magic Spray* pour acier inoxydable.
* Les noms de marque sont des marques déposées des différents fabricants.
** Pour commander directement, composer le 1-800-JENNAIR (1-800-536-6247).
53
Page 55

ENTRETIEN
T
BULB COVER
WIRE
RETAINER
Porte du four
ATTENTION
Ne pas grimper sur la porte du four ouverte, ou lui imposer une
charge excessive. Ceci pourrait provoquer un basculement de la
cuisinière, le bris de la porte ou des blessures pour la personne
concernée.
Remarque : On peut percevoir une certaine « élasticité » lors de la
fermeture de la porte du four d’une cuisinière neuve; ceci est
normal; cet effet disparaît progressivement.
Hublot du four
Pour protéger le hublot de la porte du four :
1. Ne pas utiliser de produits nettoyants abrasifs comme des
tampons à récurer en laine d’acier ou des produits de nettoyage
en poudre qui risqueraient de rayer le verre.
2. Ne pas heurter le hublot en verre avec un ustensile, un article de
mobilier, un jouet, etc.
3. Ne pas fermer la porte du four avant que les grilles ne soient en
place dans le four.
Toute dégradation du hublot de verre - rayure, choc, tension, etc. peut affaiblir sa structure et augmenter le risque de bris à une date
ultérieure.
Pieds de réglage de l’aplomb
ATTENTION
Vérifier que la bride antibasculement agrippe convenablement
l’un des pieds arrière de réglage de l’aplomb, pour que la
cuisinière ne puisse basculer accidentellement.
La cuisinière doit être d’aplomb une fois installée. Si
elle ne l’est pas, tourner les pieds de réglage de
l’aplomb en plastique, à chacun des angles de la
cuisinière, jusqu’à ce que celle-ci soit d’aplomb.
Raccordement électrique
Les appareils nécessitant une alimentation
électrique comportent une fiche à trois broches
mise à la terre qui doit être branchée directement
dans une prise de 120 volts à trois cavités et
correctement mise à la terre.
Toujours débrancher l’appareil avant d’y faire de
l’entretien.
La fiche à trois broches mise à la terre fournit une protection contre
les décharges électriques. NE PAS COUPER NI ENLEVER LA
BROCHE DE TERRE DU CORDON D’ALIMENTATION.
Si la prise ne comporte que deux cavités, n’est pas mise à la terre ou
n’est pas appropriée, le propriétaire de l’appareil a la responsa-
bilité de faire remplacer la prise par une prise à trois cavités
correctement mise à la terre.
Lampe du four
ATTENTION
• Débrancher la cuisinière avant de remplacer l'ampoule.
• Laisser le four refroidir avant de remplacer l'ampoule.
• S'assurer que le cabochon et l'ampoule sont froids avant de les
toucher.
Pour remplacer l’ampoule du four :
1. Après le refroidissement du four,
maintenir le cabochon tout en
enlevant la pièce métallique
qui la maintient en place.
REMARQUE : Le cabochon
tombera si on ne le maintient
pas en place.
2. Enlever le cabochon et
l’ampoule.
3. Installer une ampoule de 40 watts pour appareil ménager.
4. Réinstaller le cabochon et le fil métallique de retenue.
5. Rétablir l’alimentation de la cuisinière. Régler de nouveau
l’horloge.
CABOCHON
RESSORT DE RETENUE
(fil métallique)
ANTI-TIP BRACKE
BRIDE
ANTIBASCULEMENT
LEVELING LEG
PIED DE RÉGLAGE
DE L’APLOMB
54
Page 56

ENTRETIEN
Déplacement d’un appareil à
gaz
Les raccords des appareils à gaz servant à brancher cet appareil à
l’alimentation de gaz ne sont pas prévus pour être déplacés
continuellement. Une fois l’appareil installé, NE PAS le déplacer de
façon répétée pour le nettoyer ou le changer de place. Si cet
appareil doit être déménagé et/ou enlevé pour être réparé, suivre la
méthode décrite dans les instructions d’installation. Pour toute
information, prendre contact avec le service à la clientèle de JennAir au 1-800-JENNAIR (1-800-536-6247).
Il faut que le pied arrière de la cuisinière soit engagé dans la bride
antibasculement pour que la cuisinière ne puisse basculer
accidentellement.
Tiroir de remisage
ATTENTION
Ne pas ranger dans ce tiroir des articles de plastique ou de
papier, des produits inflammables ou des produits alimentaires.
Durant le fonctionnement du four, une température excessive
pour ces articles peut s’établir dans le tiroir.
Sole du four
Protéger la sole du four contre les renversements (particulièrement
pour les produits acides ou sucrés), qui peuvent susciter un
changement de couleur de l’émail vitrifié. Utiliser un ustensile de la
taille appropriée pour éviter tout renversement ou débordement.
La sole du four peut être enlevée pour permettre un nettoyage plus
facile.
Dépose :
Après le refroidissement du four, retirer les
grilles du four. Faire coulisser vers l’avant du
four les deux pitons situés dans les angles
arrière de la sole du four.
Soulever le bord arrière de la sole du four,
puis la faire glisser vers l’arrière pour
dégager le bord avant de la partie frontale
du châssis. Retirer la sole du four.
2
Réinstallation :
Engager le bord avant de la sole du four dans la partie frontale du
châssis du four. Abaisser l’arrière de la sole et faire coulisser les
deux pitons vers l’arrière pour immobiliser la sole en place.
1
3
Le tiroir de remisage peut être enlevé pour vous permettre de
nettoyer sous la cuisinière.
Dépose :
1. Vider le tiroir et le tirer jusqu’à la position de la première butée.
2. Soulever l’avant.
3. Tirer jusqu’à la position de la seconde butée.
4. Saisir le tiroir par les côtés et soulever/tirer pour l’extraire.
Réinstallation :
1. Insérer les extrémités des glissières du tiroir dans les rails de la
cuisinière.
2. Soulever l’avant du tiroir et pousser doucement jusqu’à la
position de la première butée.
3. Soulever de nouveau le tiroir et le pousser pour le fermer.
55
Page 57

RECHERCHE DES PANNES
PROBLÈME SOLUTION
Pour la plupart des problèmes
observés, essayer d’abord les
solutions possibles, à droite.
Un brûleur de surface ne s’allume
pas.
Flammes non uniformes.
Séparation entre les flammes et
le brûleur.
Résultats de cuisson au four
différents des attentes ou de ceux ceci est demandé dans la recette.
produits par le four antérieur.
•
Vérifier que les commandes du four sont correctement réglées.
•
Vérifier si le four est bien raccordé au circuit électrique.
•
Inspecter/réarmer le disjoncteur. Inspecter/remplacer les fusibles.
•
Contrôler la source d’alimentation électrique.
•
Vérifier que l’appareil est correctement raccordé à la source d’électricité.
•
Déterminer si l’alimentation électrique est interrompue (fusible grillé/disjoncteur ouvert).
•
Vérifier que l’allumeur est sec et qu’il émet des étincelles. Le brûleur ne peut s’allumer si
l’allumeur est endommagé, souillé ou mouillé. Si l’allumeur ne génère pas d’étincelles, ramener
le bouton de commande à la position OFF (ARRÊT).
•
Orifices du brûleur obstrués.
•
Veiller à placer correctement l’ustensile sur la grille du brûleur.
•
Vérifier que la température sélectionnée est correcte. Veiller à préchauffer le four si
•
Déterminer si l’évent du four est obstrué. Voir son emplacement page 48.
•
S’assurer que la cuisinière est d’aplomb.
•
Les réglages de température varient souvent entre un four neuf et le four qu’il remplace.
On observe souvent une dérive du réglage de température d’un four à mesure qu’il vieillit;
il peut devenir plus chaud ou moins chaud. Voir page 47 les instructions d’ajustement de
la température du four. REMARQUE : Il n’est pas utile de modifier le réglage de température
si la variation n’affecte qu’une ou deux recettes.
•
Utiliser les bons ustensiles. Les ustensiles foncés donnent un brunissement de couleur foncée,
les ustensiles brillants, un brunissement plus clair. Pour d’autres informations au sujet de la
cuisson au four, voir la brochure La cuisson simplifiée.
•
Vérifier la position des grilles et des ustensiles. Lors de la répartition sur deux grilles, ne pas
superposer les plats. Veiller à laisser un espace de 2,5 à 5 cm (1 à 2 po) entre les plats et les
parois du four.
•
Contrôler l’utilisation de feuille d’aluminium dans le four. Ne jamais recouvrir complètement
une grille du four avec de la feuille d’aluminium. Placer un petit morceau de feuille d’aluminium
sur la grille sous le plat pour récupérer les matières renversées.
Résultats incorrects lors de la
cuisson au gril, ou émission
excessive de fumée. de la feuille d’aluminium.
•
Déterminer la position des grilles. Les aliments peuvent être trop près des flammes.
•
Utilisation incorrecte de feuille d’aluminium. Ne jamais garnir la grille de lèchefrite avec
•
Enlever l’excès de graisse sur la pièce de viande avant la cuisson au gril.
• Utilisation d’une lèchefrite souillée.
• Préchauffer le four pendant trois minutes avant de placer le plat dans le four.
• Porte du four fermée durant la cuisson au gril.
56
Page 58

RECHERCHE DES PANNES
PROBLÈME SOLUTION
Impossibilité d’autonettoyage • Déterminer que l’appareil n’a pas été programmé pour un autonettoyage différé. Voir
du four. pages 50-51.
•
Vérifier que la porte est fermée.
•
Vérifier si la commande est en mode sabbat. Voir page 46.
• Le four est peut être à une température supérieure à 205 °C (400 °F). La température du
four doit être inférieure à 205 °C (400 °F) pour pouvoir programmer un cycle d’autonettoyage.
Le four ne se nettoie pas
correctement.
La porte du four ne se déverrouille
pas après l’autonettoyage. période d’autonettoyage. Il est possible d’ouvrir la porte après la disparition du message LOCK
Accumulation d’humidité sur le
hublot ou vapeur sortant de l’évent. • Utilisation excessive d’humidité lors du nettoyage du hublot.
Émission d’une forte odeur ou de • Ceci est normal pour un four neuf et disparaît après quelques utilisations.
fumée lors de la mise en marche Un cycle d'autonettoyage « brûlera » plus rapidement les odeurs.
du four. • La mise en marche d'un ventilateur aide à retirer fumée et odeurs.
Codes d’anomalie. • Les mots BAKE ou LOCK peuvent clignoter rapidement à l’afficheur pour prévenir d’une erreur
•
Un temps de nettoyage plus long peut être nécessaire.
•
On n’a pas éliminé avant l’opération d’autonettoyage les accumulations excessives de résidus,
particulièrement les résidus d’aliments acides ou sucrés.
•
L’intérieur du four est encore chaud. Attendre environ une heure après l’achèvement de la
(VERROUILLAGE) sur l’afficheur.
•
Les commandes et la porte sont peut-être verrouillées. Voir page 37.
•
Ceci est normal durant la cuisson d’aliments contenant beaucoup d’eau.
• Présence de saletés sur la sole. Procéder à un autonettoyage.
ou d’un problème. Si le mot BAKE ou LOCK paraît à l’afficheur, appuyer sur la touche CANCEL.
Si le mot BAKE ou LOCK continue à clignoter, débrancher l’appareil. Attendre quelques
minutes, puis rebrancher l’appareil. Si le mot continue à clignoter, débrancher l’appareil et
prendre contact avec un réparateur autorisé.
• Si le four est très sale, les flammèches peuvent produire un code d’anomalie au cours du cycle
d’autonettoyage. Appuyer sur la touche CANCEL et laisser le four refroidir complètement,
essuyer la saleté en excès puis reprogrammer l’autonettoyage. Si le code d’anomalie réapparaît,
prendre contact avec un réparateur autorisé.
•
Des bruits se font entendre.
Il n’y a ni bip ni affichage. • Le four est peut-être en mode sabbat. Voir page 46.
« SAb » clignote puis • Le four est en mode sabbat. Pour annuler, appuyer sur la touche Clock et maintener-la
reste allumé. enfoncée pendant cinq secondes.
Le four fait plusieurs bruits faibles. Il est possible d’entendre les relais du four qui se mettent
en marche et s’arrêtent. Ceci est normal.
• Alors que le four se réchauffe et se refroidit, il est possible d’entendre des bruits correspondant
à la dilatation et à la contraction des pièces métalliques. Ceci est normal et n’endommage pas
l’appareil.
57
Page 59

NOTES
58
Page 60

GARANTIE ET SERVICE APRÈS-VENTE
Garantie complète d’une année - Pièces
et main-d’œuvre
Durant une période d’un (1) an à compter de la date
de l’achat initial au détail, toute pièce qui se révélerait
défectueuse dans des conditions normales d’usage
ménager sera réparée ou remplacée gratuitement.
Garanties limitées - Pièces seulement
Deuxième année - Après la première année suivant
la date de l’achat initial au détail, les pièces qui se
révéleraient défectueuses dans des conditions
normales d’usage ménager seront réparées ou
remplacées gratuitement (pièces seulement); le
propriétaire devra assumer tous les autres frais, y
compris frais de main-d’œuvre, de déplacement, de
transport, de kilométrage et de diagnostic, le cas
échéant.
De la troisième à la cinquième année - À compter
de la date de l’achat initial au détail, les pièces de la
liste ci-dessous qui se révéleraient défectueuses dans
des conditions normales d’usage ménager seront
réparées ou remplacées gratuitement (pièces
seulement); le propriétaire devra assumer tous les
autres frais, y compris frais de main-d’œuvre, de
déplacement, de transport, de kilométrage et de
diagnostic, le cas échéant.
• Brûleurs à gaz scellés
• Commandes électroniques
Résidents canadiens
Les garanties ci-dessus couvrent un appareil installé
au Canada, seulement s’il a été agréé par les agences
de test habilitées (vérification de la conformité à une
norme nationale du Canada), sauf si l’appareil a été
introduit au Canada à l’occasion d’un changement de
résidence des États-Unis vers le Canada.
Garantie limitée hors des États-Unis et
du Canada - Pièces seulement
Pendant deux (2) ans à compter de la date de l’achat
initial au détail, toute pièce qui se révélerait
défectueuse dans des conditions normales d’usage
ménager sera réparée ou remplacée gratuitement
(pièce seulement); le propriétaire devra assumer tous
les autres frais, y compris frais de main-d’œuvre, de
déplacement, de transport, de kilométrage et de
diagnostic, le cas échéant.
Les garanties spécifiques formulées ci-dessus sont les
SEULES que le fabricant accorde. Ces garanties vous
confèrent des droits juridiques spécifiques et vous
pouvez également jouir d’autres droits, variables d’un
état à l’autre, d’une province à une autre.
Ne sont pas couverts par ces
garanties :
1. Les dommages ou dérangements dus à:
a. Mise en service, livraison ou entretien effectués incorrectement.
b. Toute réparation, modification, altération et tout réglage non autorisés par
le fabricant ou par un prestataire de service après-vente agréé.
c. Accidents, mauvaise utilisation ou usage abusif ou déraisonnable.
d. Alimentation électrique (tension, intensité) incorrecte.
e. Réglage incorrect d’une commande.
2. Les garanties ne peuvent être honorées si les numéros de série d’origine ont
été enlevés, modifiés ou ne sont pas facilement lisibles.
3. Ampoules.
4. Appareils achetés aux fins d’usage commercial ou industriel.
5. Les frais de visite d’un prestataire de service ou de service après-vente
encourus pour les raisons suivantes:
a. Correction d’erreurs de mise en service.
b. Initiation de l’utilisateur à l’emploi de l’appareil.
c. Transport de l’appareil aux locaux du prestataire de service.
6. Dommages secondaires ou indirects subis par toute personne suite au nonrespect de ces garanties. Certains états ou provinces ne permettent pas
l’exclusion ou la limitation des dommages secondaires ou indirects; par
conséquent les limitations ou exclusions ci-dessus peuvent ne pas
s’appliquer à votre cas.
Si l’intervention d’un réparateur est
nécessaire
• Contacter le détaillant chez qui l’appareil a été acheté, ou contacter
Maytag Services
(1-800-536-6247), pour obtenir les coordonnées d’une agence de service
agréée.
• Veiller à conserver la facture d’achat pour justifier de la validité de la garantie.
Pour d’autres informations en ce qui concerne les responsabilités du
propriétaire à l’égard du service sous garantie, voir le texte de la GARANTIE.
• Si le détaillant ou l’agence de service après-vente ne peut résoudre le
problème, écrire à Maytag ServicesSM, attention CAIR® Center, P.O. Box
2370, Cleveland, TN 37320-2370 ou téléphoner au 1-800-JENNAIR
(1-800-536-6247).
• Les guides d’utilisation, les manuels de service et les renseignements sur les
pièces sont disponibles auprès de Maytag Services
Jenn-Air.
Remarques :
Lors de tout contact concernant un problème, fournir l’information suivante:
a. Nom, adresse et numéro de téléphone du client;
b. Numéro de modèle et numéro de série de l’appareil;
c. Nom et adresse du détaillant ou de l’agence de service;
d. Description claire du problème observé;
e. Preuve d’achat (facture de vente).
SM
/ service à la clientèle de Jenn-Air au 1-800-JENNAIR
SM
, service à la clientèle de
59
Page 61

ESTUFA A GAS JENN-AIR CON
CONTROL ELECTRÓNICO SENSIBLE AL TACTO 800
GUÍA DE USO
CUIDADO
Y
TABLA DE MATERIAS
Instrucciones Importantes sobre Seguridad .............
Cocinando en la Estufa .....................................................
Cocinando en el Horno .....................................................
Cuidado y Limpieza.............................................................
Mantenimiento .....................................................................
Localización y Solución de Averías...............................
Garantía y Servicio ......................................................................
61-65
66-67
68-81
82-85
86-87
88-89
91
Page 62

Instalador: Por favor deje esta guía junto con el
electrodoméstico.
Consumidor: Por favor lea y conserve esta guía para referencia
futura. Conserve el recibo de compra y/o el cheque cancelado
como comprobante de compra.
Número de Modelo ___________________________________
Número de Serie _____________________________________
Fecha de Compra ____________________________________
Si tiene preguntas, llame a:
Jenn-Air Customer Assistance
1-800-JENNAIR (1-800-536-6247)
(Lunes a Viernes, 8:00 a.m. a 8:00 p.m. Hora del Este)
Internet: http://www.jennair.com
En nuestro continuo afán de mejorar la calidad y rendimiento de
nuestros electrodomésticos, puede que sea necesario modificar
el electrodoméstico sin actualizar esta guía.
Para información sobre servicio, ver página 91.
Lea y siga todas las instrucciones antes de usar este
electrodoméstico para evitar el riesgo potencial de incendio,
choque eléctrico, lesión personal o daño al electrodoméstico
como resultado de su uso inapropiado. Utilice este
electrodoméstico solamente para el propósito que ha sido
destinado según se describe en esta guía.
Para asegurar funcionamiento correcto y seguro: El
electrodoméstico debe ser instalado debidamente y puesto a
tierra por un técnico calificado. No intente ajustar, reparar,
prestar servicio o reemplazar ninguna pieza de este electrodoméstico a menos que sea específicamente recomendado en
esta guía. Todas las reparaciones deben ser realizadas por un
técnico calificado. Pida al instalador que le indique la
ubicación de la válvula de cierre del gas y como cerrarla en
caso de una emergencia.
Siempre desenchufe el electrodoméstico antes de efectuar
alguna reparación.
ADVERTENCIA
INSTRUCCIONES
IMPORTANTES
SOBRE
Las advertencias e instrucciones importantes sobre seguridad
que aparecen en esta guía no están destinadas a cubrir todas
las posibles circunstancias y situaciones que puedan ocurrir.
Se debe ejercer sentido común, precaución y cuidado cuando
instale, realice mantenimiento o haga funcionar el artefacto.
Siempre póngase en contacto con su distribuidor, agente de
servicio o fabricante si surgen problemas o situaciones que
usted no comprenda.
Reconozca los símbolos, advertencias,
etiquetas de seguridad
ADVERTENCIA - Peligro o prácticas no seguras que
PODRIAN causar lesión personal grave o mortal.
PRECAUCIÓN - Peligros o prácticas no seguras que
PODRIAN causar lesión personal menos grave.
SEGURIDAD
ADVERTENCIA
PRECAUCIÓN
Si no se sigue estrictamente la información
proporcionada en esta guía, se puede producir un
incendio o una explosión, causando daños materiales,
lesiones personales o mortales.
- No almacene ni use gasolina ni otros vapores y
líquidos inflamables en la vecindad de este
electrodoméstico o de cualquier otro.
- QUE HACER SI PERCIBE OLOR A GAS:
• No trate de encender ningún artefacto.
• No toque ningún interruptor eléctrico.
• No use ningún teléfono en su edificio.
• Llame inmediatamente a su proveedor de gas
desde el teléfono de un vecino. Siga las
instrucciones proporcionadas por el proveedor
de gas.
• Si no puede localizar a su proveedor de gas,
llame al cuerpo de bomberos.
- La instalación y reparaciones deben ser efectuadas
por un técnico calificado, una agencia de
reparaciones o el proveedor de gas.
ADVERTENCIA
Puede ocurrir un escape de gas en su sistema y provocar
una situación peligrosa. Los escapes de gas no pueden ser
detectados por el olor solamente. Los proveedores de gas
recomiendan que compre e instale un detector de gas
aprobado por el laboratorio UL. Instálelo y úselo de
acuerdo con las instrucciones del fabricante.
61
Page 63

INSTRUCCIONES IMPORTANTES
SOBRE
Instrucciones Generales
• TODAS LAS ESTUFAS SE PUEDEN
VOLCAR Y CAUSAR LESIONES
PERSONALES
• INSTALE EL DISPOSITIVO
ANTIVUELCO INCLUIDO CON LA
ESTUFA
• SIGA TODAS LAS INSTRUCCIONES
DE INSTALACION
ADVERTENCIA: Para reducir el riesgo de vuelco del
electrodoméstico a causa de uso anormal o debido a
peso excesivo en la puerta del horno, es necesario
asegurarlo mediante un dispositivo antivuelco
debidamente instalado.
Para verificar si el dispositivo está debidamente instalado, mire
debajo de la estufa con una linterna para asegurarse de que
uno de los tornillos niveladores traseros esté debidamente
enganchado en la ranura del soporte. El dispositivo antivuelco
asegura el tornillo nivelador trasero al piso cuando está
debidamente enganchado. Esto debe verificarse cada vez
que la estufa sea movida.
Para Evitar un Incendio o
Daño Causado por el Humo
Asegúrese de que se hayan retirado todos los materiales de
empaque del electrodoméstico antes de su uso.
Mantenga el área alrededor del electrodoméstico libre y
exenta de materiales combustibles, gasolina u otros vapores y
materiales inflamables.
Si el electrodoméstico es instalado cerca de una ventana, se
debe tener cuidado para evitar que las cortinas pasen sobre
los quemadores.
NUNCA deje artículos sobre la cubierta de la estufa. El aire
caliente del respiradero puede encender los artículos
inflamables y aumentar la presión en los envases cerrados
hasta hacerlos reventar.
Muchos envases de tipo aerosol son EXPLOSIVOS cuando son
expuestos al calor y pueden ser altamente inflamables. Evite
su uso o su almacenamiento cerca del electrodoméstico.
SEGURIDAD
ADVERTENCIA
Muchos plásticos son vulnerables al calor. Mantenga los
plásticos alejados de las piezas de la estufa que puedan estar
tibias o calientes. No deje artículos de plástico sobre la
cubierta de la estufa pues se pueden derretir o ablandar si
están demasiado cerca del respiradero o de un quemador
superior encendido.
Para eliminar el riesgo de pasar sobre los quemadores
superiores calientes, no se deben guardar artículos en los
armarios que están directamente sobre la estufa. Si tales
armarios son usados para almacenamiento, debe limitarse a
colocar artículos de uso poco frecuente y que pueden
guardarse en forma segura en una área que está sujeta al
calor proveniente de la estufa. Las temperaturas pueden no
ser apropiadas para algunos artículos, tal como líquidos
volátiles, limpiadores o sprays en aerosol.
En Caso de Incendio
Apague el electrodoméstico y la campana de ventilación para
evitar que las llamas se dispersen. Extinga las llamas luego
encienda la campana para expulsar el humo y el olor.
• En la cubierta: Apague el fuego o la llama en una sartén
• En el horno: Apague el fuego o la llama cerrando la puerta
No use agua en los incendios de grasa. Use bicarbonato, un
producto químico seco o un extinguidor del tipo con espuma
para apagar un incendio o la llama.
Seguridad para los Niños
NUNCA deje a los niños solos o sin supervisión cuando el
electrodoméstico esté en uso o esté caliente.
NUNCA permita que los niños se sienten o se paren en
ninguna parte del electrodoméstico pues se pueden lesionar o
quemar.
con una tapa o una bandeja de hornear.
NUNCA levante o mueva una sartén en llamas.
del horno.
PRECAUCIÓN
NUNCA almacene artículos de interés para los niños en los
armarios que están sobre la estufa o en el protector trasero
de la estufa. Los niños que se trepan en la puerta de la
estufa para alcanzar tales artículos pueden lesionarse
seriamente.
62
Page 64

INSTRUCCIONES IMPORTANTES
SOBRE
Se les debe enseñar a los niños que el electrodoméstico y
los utensilios que están en él o sobre él pueden estar
calientes. Deje enfriar los utensilios calientes en un lugar
seguro, fuera del alcance de los niños pequeños. Se les
debe enseñar a los niños que un electrodoméstico no es un
juguete. No se debe permitir que los niños jueguen con los
controles u otras piezas de la estufa.
Generalidades
NUNCA use la puerta de este electrodoméstico como peldaño
o asiento ya que el electrodoméstico se puede volcar, y causar
lesiones graves.
NUNCA use este electrodoméstico como calefactor de área
o para elevar la temperatura de la habitación. Esto puede
causar envenenamiento por monóxido de carbono y el
sobrecalentamiento del horno.
NUNCA cubra ninguna rendija, agujero o canal en la parte
inferior del horno o cubra la rejilla completa con materiales
tales como el papel de aluminio. Esto evita que el aire fluya
a través del horno y puede causar envenenamiento por
monóxido de carbono. El papel de aluminio también puede
contener el calor y producir un riesgo de incendio.
NUNCA obstruya el flujo del aire de combustión y de
ventilación cubriendo las entradas o salidas de aire del horno.
Esto puede restringir el acceso del aire a los quemadores y
causar envenenamiento por monóxido de carbono.
El respiradero del horno se encuentra debajo del protector
trasero.
Evite tocar el área del respiradero mientras el horno esté
encendido y durante varios minutos después de haberlo
apagado. Algunas partes del respiradero y del área que lo
rodea se calientan lo suficiente como para causar
quemaduras. Después de apagar el horno, no toque el
respiradero o el área que lo rodea hasta que haya tenido
suficiente tiempo para enfriarse.
Otras superficies que pueden estar calientes incluyen la
cubierta, las superficies que están dirigidas hacia la cubierta,
el respiradero del horno, las superficies cercanas a la abertura
del respiradero, la puerta del horno y la área que la rodea, y la
ventanilla del horno.
SEGURIDAD
ADVERTENCIA
No toque un foco de horno caliente con un paño húmedo ya
que se puede romper. Si el foco se rompe, desconecte el
suministro eléctrico al electrodoméstico antes de retirar el foco
para evitar un choque eléctrico.
Seguridad Para Cocinar
Siempre coloque un utensilio en un quemador superior antes
de encenderlo. Asegúrese de usar la perilla correcta que
controla cada quemador superior. Asegúrese de encender el
quemador correcto y comprobar de que en efecto el
quemador haya sido encendido. Cuando haya terminado de
cocinar, apague el quemador antes de retirar el utensilio para
evitar exposición a la llama del quemador.
Siempre ajuste la llama del quemador superior de modo que
no se extienda más allá del borde inferior del utensilio. Una
llama excesiva es peligrosa, desperdicia energía y puede
dañar la estufa, el utensilio o los armarios que están sobre la
estufa.
NUNCA deje sin supervisión la cubierta de la estufa cuando
esté cocinando, especialmente cuando usa un ajuste de calor
alto o cuando esté usando una freidora. Los reboses pueden
producir humo y los derrames de grasa pueden inflamarse.
Limpie los derrames grasosos tan pronto como sea posible.
No use calor alto durante períodos de cocción prolongados.
NUNCA caliente un envase cerrado en el quemador superior
o en el horno. La acumulación de presión puede hacer
explotar el envase causando una lesión personal grave o daño
a la estufa.
Use tomaollas secos y gruesos. Los tomaollas húmedos
pueden causar quemaduras a causa del vapor. Las toallas u
otros sustitutos no deben ser usados como tomaollas porque
ellos pueden quedar colgando a través de los quemadores
superiores y encenderse o enredarse en las piezas de la
estufa.
Siempre deje enfriar la grasa caliente que se ha usado en la
freidora antes de intentar mover o manipularla.
No permita que se acumule grasa u otros materiales
inflamables en la estufa o cerca de ella, en la campana o en el
ventilador aspirador. Limpie la campana extractora con
frecuencia para evitar que la grasa u otros materiales
inflamables se acumulen en la campana o en el filtro.
Encienda el ventilador cuando cocine alimentos flameados
debajo la campana.
63
Page 65

INSTRUCCIONES IMPORTANTES
SOBRE
NUNCA use vestimentas de materiales inflamables, ropa
suelta o de mangas largas cuando esté cocinando. La
vestimenta se puede encender o enganchar en los mangos de
los utensilios.
Siempre coloque las parrillas del horno en la posición deseada
cuando el horno esté frío. Deslice la parrilla del horno hacia
afuera para agregar o retirar alimento, usando tomaollas secos
y resistentes. Siempre evite alcanzar dentro del horno para
agregar o retirar alimentos. Si una parrilla debe ser sacada
cuando está todavía caliente, use un tomaollas seco. Siempre
apague el horno después de haber terminado de cocinar.
Tenga cuidado cuando abra la puerta del horno. Deje que
escape el aire o el vapor caliente antes de sacar o volver
colocar el alimento.
ADVERTENCIA SOBRE LOS ALIMENTOS PREPARADOS:
Siga las instrucciones del fabricante de los alimentos. Si un
envase de plástico de alimento congelado y/o su tapa se
deforma, se comba o se daña de alguna otra manera durante
la cocción, descarte inmediatamente el alimento y su envase.
El alimento puede estar contaminado.
NUNCA use papel de aluminio para cubrir una parrilla del
horno o la parte inferior del horno. El uso incorrecto puede
resultar en un riesgo de choque eléctrico, incendio o daño al
electrodoméstico. Use papel de aluminio solamente como se
indica en esta guía.
SEGURIDAD
extenderse sobre el quemador superior adyacente. Siempre
gire los mangos de los utensilios hacia el lado o hacia la parte
trasera de la estufa, no hacia la habitación donde puede ser
fácilmente golpeados o alcanzados por los niños pequeños.
Nunca deje que un utensilio hierva hasta quedar seco pues
esto puede dañar el utensilio y la estufa.
Siga las instrucciones del fabricante cuando use bolsas para
cocinar en el horno.
Solamente ciertos tipos de utensilios de vidrio cerámico, de
cerámica o glaseados son convenientes para uso en la
cubierta de la estufa o en el horno sin quebrarse debido al
cambio repentino de temperatura. Siga las instrucciones del
fabricante cuando use utensilios de vidrio.
Este electrodoméstico ha sido probado respecto a su
rendimiento seguro usando utensilios de cocina
convencionales. No use ningún dispositivo o accesorio que no
haya sido específicamente recomendado en esta guía. No use
tapas para cubrir los quemadores superiores, rejillas para la
cubierta de la estufa ni agregue sistemas de convección para
hornos. El uso de dispositivos o accesorios que no son
expresamente recomendados en esta guía, puede crear serios
peligros de seguridad, resultar en problemas de rendimiento y
reducir la vida útil de los componentes de la estufa.
Seguridad de la Limpieza
Apague todos los controles y espere que se enfríen las piezas
Utensilios Apropiados
Use sartenes con fondos planos y mangos que sean fáciles de
tomar y que permanezcan fríos. Evite usar sartenes u ollas
inestables, combadas que se pueden volcar fácilmente u ollas
cuyos mangos estén sueltos. Además evite usar utensilios
especialmente pequeños o sartenes con mangos pesados
pues ellos pueden ser inestables y volcarse fácilmente. Los
utensilios que son pesados de mover cuando están llenos con
alimento pueden también ser un peligro.
Asegúrese de que el utensilio sea lo suficientemente grande
como para contener en forma debida los alimentos y evitar
derrames. El tamaño es particularmente importante cuando
se utilizan freidoras. Asegúrese de que el utensilio tiene
capacidad para el volumen de alimentos que se va a agregar
al igual que para la formación de burbujas de la grasa.
Para reducir a un mínimo las quemaduras y que los materiales
inflamables y los derrames se enciendan debidos a contacto
no intencional con el utensilio, los mangos no deben
de la estufa antes de tocarlas o limpiarlas. No toque las
rejillas de los quemadores o las áreas circundantes hasta que
ellas no hayan tenido tiempo suficiente de enfriarse.
Limpie la estufa con cuidado. Tenga cuidado para evitar
quemaduras de vapor si se usa una esponja o un paño mojado
para limpiar los derrames en una superficie caliente. Algunos
limpiadores pueden producir vapores nocivos cuando se
aplican a una superficie caliente.
Horno Autolimpiante
Limpie solamente las piezas que se indican en esta guía. No
limpie la junta de la puerta. La junta es esencial para un
sellado hermético. No restriegue, dañe, ni mueva la junta de
64
PRECAUCIÓN
No deje alimento ni utensilios de cocina, etc. en el horno
durante el ciclo de autolimpieza.
Page 66

INSTRUCCIONES IMPORTANTES
SOBRE
la puerta. No use limpiadores de horno de ninguna clase en el
horno ni alrededor de cualquier parte del horno autolimpiante.
Antes de la autolimpieza del horno, saque la asadera, las
parrillas del horno y otros utensilios y limpie los derrames
excesivos para evitar que se produzca demasiado humo,
llamaradas o llamas.
Es normal que la cubierta de la estufa se caliente durante el
ciclo de autolimpieza. Por lo tanto, se debe evitar tocar la
cubierta durante un ciclo de autolimpieza.
Aviso y Advertencia
Importante Sobre Seguridad
La Propuesta 65 de la Ley de 1986 del Estado de California
Sobre Seguridad y Contaminación del Agua Potable (California
Safe Drinking Water and Toxic Enforcement Act of 1986) exige
que el Gobernador de California publique una lista de las
sustancias que según el estado de California causan cáncer o
daño al sistema reproductivo y exige que las empresas
adviertan a sus clientes sobre la exposición potencial a tales
sustancias.
Se advierte a los usuarios de esta estufa que la combustión
del gas puede resultar en exposición de bajo nivel a algunas
de las sustancias publicadas en la lista, incluyendo benceno,
formaldehído y hollín, debido principalmente a la combustión
SEGURIDAD
incompleta del gas natural o de los combustibles de petróleo
licuado. Los quemadores ajustados en forma debida
reducirán la combustión incompleta. La exposición a estas
sustancias puede también ser reducida a un mínimo
ventilando los quemadores al exterior en forma adecuada.
Se advierte a los usuarios de este electrodoméstico que
cuando el horno está funcionando en el ciclo de autolimpieza,
puede haber exposición de bajo nivel a algunas de las
sustancias indicadas en la lista, incluyendo monóxido de
carbono. La exposición a estas sustancias puede ser reducida
a un mínimo ventilando el horno al exterior en forma
adecuada, abriendo las ventanas y/o la puerta en la habitación
en donde está ubicado el electrodoméstico durante el ciclo de
autolimpieza.
AVISO IMPORTANTE RESPECTO A LOS PAJAROS
DOMESTICOS:
Nunca mantenga los pájaros en la cocina o en las
habitaciones donde puedan llegar los humos de la cocina. Los
pájaros tienen un sistema respiratorio muy sensitivo. Los
humos producidos durante el ciclo de autolimpieza del horno
pueden ser perjudiciales o mortales para los pájaros. Los
humos que despide el aceite de cocina recalentado, la grasa,
margarina y los utensilios antiadherentes recalentados pueden
también ser perjudiciales.
Conserve estas Instrucciones para Referencia Futura
65
Page 67

COCINANDO EN LA ESTUFA
‘Lo’ (Bajo): Se usa para calentar alimentos a
fuego lento, mantener los alimentos calientes y
derretir chocolate o mantequilla. Se puede
cocinar en el ajuste ‘Lo’ siempre que el utensilio
esté tapado. Es posible reducir el calor girando
la perilla a la posición ‘OFF’ (Apagado).
Asegúrese de que la llama sea estable.
Controles Superiores
PRECAUCIÓN
• Si la llama se apaga cuando esté cocinando, apague el
quemador. Si se detecta un olor fuerte a gas, abra una ventana
y espere cinco minutos antes de volver a encender el quemador.
• Asegúrese de que todos los controles superiores estén en la
posición ‘OFF’ (Apagado) antes de suministrar gas a la estufa.
• NUNCA toque la superficie de la estufa hasta que no se haya
enfriado. Se espera de que algunas de las piezas de la
superficie, especialmente alrededor de los elementos, se
entibien o calienten mientras está cocinando. Use tomaollas
para proteger sus manos.
Encendido Sin Piloto
El encendido sin piloto elimina la
necesidad de una luz piloto
constante permanente. Cada
uno de los quemadores
superiores tiene un encendedor de
chispa. Tenga cuidado cuando
limpie alrededor del quemador
superior.
Si el quemador superior
no enciende, verifique si el
encendedor está roto, sucio o
mojado.
Orificios
TAPA DEL QUEMADOR
Encendedor
BASE DEL QUEMADOR
‘Hi’ (Alto): Se usa para hacer hervir un líquido o
alcanzar la presión adecuada en una olla a
presión. Siempre reduzca el ajuste a un calor
más bajo cuando los líquidos comiencen a hervir
o cuando los alimentos comiencen a cocinarse.
Se usa una llama de tamaño intermedio para
continuar cocinando. El alimento no se cocinará
más rápido cuando se usa un ajuste de llama
más alto que el necesario para mantener un
hervor suave. El agua hierve a la misma
temperatura si está hirviendo suave o
vigorosamente.
Las ilustraciones cerca de la perilla identifican cual es
el quemador que controla esa perilla. Por ejemplo, la
ilustración a izquierda muestra la ubicación del
quemador delantero derecho.
Programación de los Controles:
El tamaño y el tipo de utensilio afectarán el ajuste de calor. Para
información sobre los utensilios y otras factores que afectan los
ajustes de calor, consulte el folleto “La Cocina Fácil”.
1. Coloque un utensilio sobre la rejilla del quemador.
• La llama del quemador puede levantarse o parecer separada
del orificio si no se coloca un utensilio en la rejilla.
2. Oprima y gire la perilla a la izquierda al ajuste ‘Lite’ (Encendido).
• Se oirá un chasquido (chispa) y el quemador se encenderá.
(Los cinco quemadores producirán chispa cuando se coloca la
perilla de cualquiera de los quemadores en la posición ‘Lite’.)
3. Después que el quemador se ha encendido, gire la perilla al
tamaño de llama deseado.
• El encendedor continuará produciendo chispas hasta que la
perilla sea girada más allá de la posición ‘Lite’.
Funcionamiento durante una
Interrupción de la Energía
Eléctrica
PRECAUCIÓN
Perillas de Control de los
Elementos Superiores
Se utilizan para encender los quemadores superiores. Se dispone de
una selección infinita de ajustes de calor desde ‘Lo’ a ‘Hi’ (Bajo a
Alto). En el ajuste ‘Hi’ se puede sentir un tope o una muesca. Las
perillas pueden ser ajustadas exactamente en los ajustes
correspondientes o entre cualquiera de ellos.
1. Acerque un fósforo encendido a la cabeza del quemador
2. Oprima y gire la perilla de control lentamente a la posición ‘Lite’.
3. Ajuste la llama al nivel deseado.
66
Cuando se encienden los quemadores superiores, asegúrese de
que todas las perillas de control estén en la posición ‘OFF’.
Primero encienda el fósforo y manténgalo en posición antes de
girar la perilla al ajuste ‘Lite’.
superior deseado.
Page 68

COCINANDO EN LA ESTUFA
Cubierta
Para evitar que la cubierta se descolore o se
La instalación incorrecta de las rejillas puede resultar en picaduras
de la cubierta.
manche:
• Limpie la cubierta de la estufa después de cada uso.
• Limpie los derrames ácidos o azucarados tan pronto como la
cubierta se haya enfriado pues estos derrames
pueden descolorar la porcelana.
A diferencia de una estufa con quemadores de
gas estándar, esta cubierta no se levanta ni
tampoco es removible. No intente levantar la
cubierta por ningún motivo.
Quemadores Sellados
Los quemadores sellados de su estufa están asegurados a la
cubierta y no han sido diseñados para ser sacados. Debido a que
los quemadores están sellados en la cubierta, los derrames o
reboses no se escurrirán debajo de la cubierta de la estufa.
Sin embargo, los quemadores pueden ser limpiados después de
cada uso. La parte de la cabeza del quemador puede ser fácilmente
sacada para su limpieza.(Ver en la página 84 las instrucciones sobre
la limpieza.)
Las cabezas de los quemadores deben estar correctamente
colocadas en la base del quemador a fin de que éste funcione de
manera apropiada.
Quemadores de Alto
Rendimiento
Existe un quemador de alto rendimiento (16.000 btu*) en su estufa,
situado en la posición derecha delantera. Hay un quemador de
12.000 BTU* situado en la posición delantera izquierda. Estos
quemadores ofrecen cocción más rápida y pueden ser usados para
hervir agua con rapidez o para cocinar grandes cantidades de
alimento.
Quemador para
Cocinar a Fuego Lento
Este quemador se encuentra en la posición central.
El quemador para cocinar a fuego lento ofrece una
llama de menor intensidad (BTU inferior) para calentar salsas
delicadas o derretir chocolate.
*El régimen nominal de BTU variará cuando se usa gas licuado.
No use los quemadores sin tener un utensilio en la rejilla. El
acabado de porcelana de las rejillas puede picarse si no existe
un utensilio que absorba el calor de la llama del quemador.
Tenga cuidado al revolver el alimento de una olla o sartén colocado
sobre la rejilla del quemador. Las rejillas tienen un acabado suave
para facilitar su limpieza. La olla o sartén pueden resbalar si no se
sujetan por el mango. Esto puede provocar derrame de alimentos
calientes y constituir un riesgo de sufrir una quemadura.
Aunque las rejillas de los quemadores son durables, gradualmente
perderán su brillo y/o se descolorarán, debido a las altas
temperaturas de la llama del gas.
Notas:
• Un quemador ajustado de manera correcta con orificios
limpios se encenderá dentro de unos pocos segundos. Si
está usando gas natural la llama será azul con un cono
interior azul profundo.
Si la llama del quemador es amarilla o es ruidosa, la mezcla
de aire/gas puede ser incorrecta. Póngase en contacto con
un técnico de servicio para ajustarla. (Los ajustes no están
cubiertos por la garantía.)
Con gas licuado son aceptables algunas puntas amarillas en
la llama. Esto es normal y no es necesario hacer ningún
ajuste.
• Con algunos tipos de gas, usted puede oír un “chasquido”
cuando el quemador superior se apaga. Este es un sonido
normal del funcionamiento del quemador.
• Si la perilla de control se gira muy rápidamente de ‘Hi’ a ‘Lo’,
la llama puede apagarse, particularmente si el quemador está
frío. Si esto ocurre, gire la perilla a la posición ‘Off’
(Apagado), espere algunos segundos y vuelva encender el
quemador.
• La llama debe ser ajustada de modo que no se extienda más
allá del borde del utensilio.
Rejillas de los Quemadores
Las rejillas deben estar debidamente colocadas antes de comenzar a
cocinar. Cuando instale las rejillas, coloque los extremos de las
lengüetas hacia el centro, de manera que coincidan con las barras
derechas.
67
Page 69

COCINANDO EN EL HORNO
Panel de Control
A B C D E F G H
I J K L M N O P Q
El panel de control ha sido diseñado para su fácil programación. El indicador visual en el panel de control muestra la hora del día, el
temporizador y las funciones del horno. El panel de control mostrado arriba incluye las características de convección y además las
características específicas de otros modelos. (El estilo del panel de control varía según el modelo.)
A ‘Keep Warm’ Se usa para mantener caliente en el
(Mantener Caliente) horno el alimento cocinado.
B ‘Clean’ Se usa para programar un ciclo de
(Limpieza) autolimpieza.
C ‘Convect Bake’ Se usa para hornear por convección.
(Horneado por (modelos selectos)
Convección)
D ‘Convect Roast’ (Asado Se usa para asar por convección.
por Convección) (modelos selectos)
E ‘Bake’ (Hornear) Se usa para hornear y asar.
F ‘Broil’ (Asar a Se usa para asar a la parrilla y dorar los
la Parrilla) alimentos.
G ‘Delay’ (Diferido) Programa el horno para comenzar a
hornear o limpiarse a una hora posterior.
H Teclas Numéricas Se usan para programar los tiempos y
temperaturas.
I ‘Oven Light’ Se usa para encender o apagar la luz del
(Luz del Horno) horno.
J ‘Drying’ (Secado) Se usa para secar frutas, verduras,
(modelos selectos) hierbas, etc.
K ‘Proofing’ (Esponjamiento Se usa para esponjar masa de pan con
de masa) levadura antes del horneado.
(modelos selectos)
L ‘Timer’ (Temporizador) Programa al temporizador.
M ‘Clock’ (Reloj) Se usa para programar la hora del día.
N ‘Cook & Hold’ (Cocción Se usa para hornear durante un tiempo
y Mantener Caliente) seleccionado, luego mantiene el alimento
caliente durante una hora.
O ‘Favorite’ (Favorito) Se usa para programar y guardar un
procedimiento específico de ‘Cook & Hold’.
P ‘Autoset’ (Programa- Se usa para programar temperaturas
ción Automática) con rapidez.
Q ‘CANCEL’ (Cancelar) Cancelar todas las funciones a excepción
del temporizador y el reloj.
Uso de las Teclas
• Oprima la tecla deseada.
• Oprima las teclas numéricas para programar el tiempo o la
temperatura.
• Oprima la tecla ‘Autoset 0’ para programar la temperatura.
• Se escuchará una señal sonora cada vez que oprima una tecla.
• Se escucharán dos señales sonoras si ocurre un error en la
programación.
Nota: Cuatro segundos después de haber indicado el número, el
tiempo o la temperatura, la función será automáticamente
programada. Si transcurren más de 30 segundos después de
haber oprimido una tecla de función y antes de oprimir las teclas
numéricas, la función será cancelada y el indicador visual volverá
al despliegue anterior.
‘Clock’ (Reloj)
El reloj puede ser ajustado para desplegar la hora ya sea en formato
de 12 horas o 24 horas. El reloj ha sido programado en la fábrica
para el formato de 12 horas.
Para cambiar el reloj a formato de 24 horas:
1. Oprima y mantenga oprimidas las teclas
‘CANCEL’ y ‘Favorite’ durante tres segundos.
• ‘12 Hr’ destella en la pantalla.
2. Oprima la tecla ‘Autoset 0’ para seleccionar
24 horas; oprímala nuevamente para
seleccionar ‘12 Hr’.
3. Programe la hora del día siguiendo las
instrucciones indicadas en la sección
Programación del reloj.
68
Page 70

COCINANDO EN EL HORNO
Programación del Reloj:
1. Oprima la tecla ‘Clock’.
• En el indicador destella la hora del día.
2. Oprima las teclas numéricas apropiadas para programar la hora
del día.
• Los dos puntos destellan en el indicador.
3. Oprima la tecla ‘Clock’ nuevamente o espere cuatro segundos.
• Los dos puntos permanecerán iluminados.
Cuando se conecta energía eléctrica al horno o después de una
interrupción de la energía eléctrica, la última hora del reloj previa a
la interrupción destellará en el indicador.
Para desplegar la hora del día cuando el indicador esté mostrando
otra función de tiempo, oprima la tecla ‘Clock’.
La hora del reloj no puede ser cambiada cuando el horno ha sido
programado para ‘Delay Cook’, ‘Clean’ o ‘Cook & Hold’.
Para cancelar el despliegue del reloj:
Si no desea que el indicador visual muestre la hora del día:
Oprima y mantenga oprimida las teclas ‘CANCEL’
y ‘Clock’ durante tres segundos. La hora del día
desaparecerá del indicador.
Cuando se cancela el despliegue del reloj,
oprima la tecla ‘Clock’ para desplegar
brevemente la hora del día.
Cuando se cancela el despliegue del reloj, después de 15 minutos, el
control del horno pasará a Modo de Reserva para ahorrar energía.
El indicador visual estará en blanco y la luz del horno no funcionará.
Para activar el control y sacarlo del modo de reserva, oprima
cualquier tecla. Se escucharán dos señales sonoras.
Para restaurar el despliegue del reloj:
Oprima y mantenga oprimida las teclas ‘CANCEL’ y ‘Clock’ durante
tres segundos. La hora del día reaparecerá del indicador.
‘Timer’ (Temporizador)
El temporizador puede ser programado de un minuto (0:01) hasta 99
horas y 59 segundos (99:59).
El temporizador puede ser usado independientemente de cualquier
otra actividad del horno. Además puede ser programado cuando otra
función del horno esté en funcionamiento.
El temporizador no controla el horno. Solamente controla una señal
sonora.
3. Oprima nuevamente la tecla ‘Timer’ o espere cuatro segundos.
4. Al final del tiempo programado, se escuchará una señal sonora
5. Oprima la tecla ‘Timer’ para despejar el indicador visual.
Para cancelar el temporizador:
1. Oprima y mantenga oprimida la tecla ‘Timer’ durante tres
2. Oprima la tecla ‘Timer’ y oprima ‘0’ usando
Bloqueo de los Controles y de
la Puerta del Horno
El teclado y la puerta del horno pueden ser bloqueados para
seguridad, limpieza o evitar el uso no autorizado. Las teclas no
funcionan cuando están bloqueadas.
Si el horno está en funcionamiento, las teclas ni la puerta puede ser
bloqueada.
La hora actual del día permanecerá en el indicador cuando las teclas
y la puerta esté bloqueada.
Para bloquear:
Oprima y mantenga oprimidas las teclas ‘CANCEL’
y ‘Cook & Hold’ durante tres segundos. (Oprima
primero la tecla ‘CANCEL’).
Para desbloquear:
Oprima y mantenga oprimidas las teclas ‘CANCEL’ y ‘Cook & Hold’
durante tres segundos. (Oprima primero la tecla ‘CANCEL’). ‘OFF’
desaparece del indicador visual.
Para programar el temporizador:
1. Oprima la tecla ‘Timer’.
• En el indicador visual destellará ‘0:00’ y ‘TIMER’.
2. Oprima las teclas numéricas apropiadas hasta que el tiempo
correcto aparezca en el indicador visual.
• Los dos puntos y ‘TIMER’ continuarán destellando.
Códigos de Errores
‘BAKE’ o ‘LOCK’ pueden destellar rápidamente para advertirle que
hay un error o un problema. Si ‘BAKE’ o ‘LOCK’ destellan en el
indicador visual, oprima le tecla ‘Cancel’. Si ‘BAKE’ o ‘LOCK’
continúan destellando, desconecte la corriente eléctrica hacia el
artefacto. Espere unos pocos minutos y vuelva a conectar la
corriente eléctrica. Si las palabras aún continúan destellando,
desconecte la corriente eléctrica hacia el artefacto y llame a un
técnico de servicio autorizado.
69
• Los dos puntos dejan de destellar y el tiempo comienza la
cuenta regresiva.
• El último minuto de la cuenta regresiva del temporizador se
desplegará en segundos.
larga y ‘End’ (Fin) se desplegará en el indicador visual.
segundos.
U
las teclas numéricas.
• En el indicador visual aparece ‘OFF’.
• ‘LOCK’ destella cuando la puerta se está
bloqueando.
Nota: Las teclas y la puerta del horno no puede bloquearse si la
temperatura del horno es 205° C (400° F) o superior.
Page 71

COCINANDO EN EL HORNO
Horneado
Para programar ‘Bake’ (Hornear):
1. Oprima la tecla ‘Bake’.
• ‘BAKE’ y ‘000’ destellará en el indicador
visual.
2. Seleccione la temperatura del horno. Oprima la tecla ‘Autoset 0’
para 175° C (350° F) o las teclas numéricas apropiadas.
• Cada vez que oprima la tecla ‘Autoset 0’ la temperatura se
aumentará en 15° C (25° F).
• La temperatura del horno puede ser programada de 75° a
285° C (170° a 550° F).
3. Oprima la tecla ‘Bake’ nuevamente o espere cuatro segundos.
• ‘BAKE’ dejará de destellar y se iluminará en el indicador visual.
• En el indicador visual se desplegará 38° (100°) o la temperatura
real del horno si es que es superior a 38° C (100° F). La
temperatura aumentará en incrementos de 3° C (5° F) hasta
llegar a la temperatura programada.
4. Espere a que el horno se precaliente durante 8-15 minutos.
• Cuando el horno llega a la temperatura programada se
escuchará una señal sonora larga.
• La temperatura programada se desplegará en el indicador
visual.
• Para verificar la temperatura programada durante el
precalentamiento del horno, oprima la tecla ‘Bake’.
5. Coloque el alimento en el horno.
6. Verifique el progreso de la cocción cuando haya transcurrido el
tiempo mínimo recomendado. Continúe la cocción si es necesario.
7. Al término de la cocción, oprima la tecla ‘CANCEL’.
8. Retire el alimento del horno.
Notas sobre Horneado:
• Para cambiar la temperatura del horno durante el proceso
de cocción, oprima la tecla ‘Bake’, luego oprima ‘Autoset 0’ o
las teclas numéricas apropiadas hasta que se despliegue la
temperatura deseada.
• Para cambiar la temperatura del horno durante ‘Preheat’,
oprima dos veces la tecla ‘Bake’, luego oprima ‘Autoset 0’ o las
teclas numéricas apropiadas hasta que se despliegue la
temperatura deseada.
• Si olvida apagar el horno, se apagará automáticamente después
de transcurrir 12 horas. Si desea desactivar esta característica,
vea la página 78.
• Para sugerencias adicionales sobre horneado y asado, consulte
el folleto “La Cocina Fácil”.
Diferencias del horneado entre su horno
antiguo y su horno nuevo
Es normal observar algunas diferencias en el tiempo de horneado de
su horno antiguo y su horno nuevo. Vea “Ajuste de la Temperatura
del Horno” en la página 79.
Horneado por Convección
(modelos selectos)
Cuando hornee por convección, programe la temperatura
normal de horneado. El control reducirá automáticamente la
temperatura programada en 15° C (25° F). En el indicador visual se
desplegará la temperatura programada. El ventilador de
convección comenzará a funcionar después de que el horno
haya estado encendido durante cinco minutos.
Para programar ‘Convect Bake’
(Horneado por Convección):
1. Oprima la tecla ‘Convect Bake’.
• ‘BAKE’ y el ícono del ventilador destellarán.
• ‘000’ destellará en el indicador visual.
2. Seleccione la temperatura del horno. Oprima la
tecla ‘Autoset 0’ para 175° C (350° F) o las teclas numéricas
apropiadas.
• Cada vez que oprima la tecla ‘Autoset 0’ la temperatura se
aumentará en 15° C (25° F). La temperatura del horno puede
ser programada de 75° a 285° C (170° a 550° F).
3. Oprima la tecla ‘Convect Bake’ nuevamente o espere cuatro
segundos.
• ‘BAKE’ dejará de destellar.
• En el indicador visual se desplegará 38° (100°) o la
temperatura real del horno si es que es superior a 38° C
(100° F). La temperatura aumentará en incrementos de
3° C (5° F) hasta llegar a la temperatura programada.
• El ícono del ventilador comenzará a girar.
4. Espere a que el horno se precaliente durante 8-15 minutos.
• Cuando el horno llega a la temperatura programada se
escuchará una señal sonora larga.
• Se desplegará la temperatura programada.
• Para verificar la temperatura programada durante el
precalentamiento del horno, oprima la tecla ‘Convect Bake’.
5. Coloque el alimento en el horno.
6. Verifique el progreso de la cocción cuando haya transcurrido el
tiempo mínimo recomendado. Continúe la cocción si es necesario.
7. Al término de la cocción, oprima la tecla ‘CANCEL’.
8. Retire el alimento del horno.
70
Page 72

COCINANDO EN EL HORNO
Asado por Convección
4. Oprima la tecla ‘Convect Roast’ nuevamente o espere cuatro
(modelos selectos)
Cuando esté asando por convección, programe el tiempo y
temperatura de asar normal. El control le advertirá
automáticamente cuando haya transcurrido 75% del tiempo de asado
programado para que verifique el grado de cocción de los alimentos.
El ventilador de convección comenzará a funcionar después de
que el horno haya estado encendido durante cinco minutos.
Notas sobre Asado:
• Cuando asa por convección, el tiempo de cocción debe ser
programado antes que la temperatura.
• Si su receta requiere un horno precalentado, agregue 15
minutos al tiempo de cocción programado.
• Los tiempos de asado pueden varier con los diferentes cortes
de carne.
• No es necesario precalentar el horno cuando se asan por
convección cortes de carne grandes.
• Consulte las temperaturas y tiempos de asado sugeridos en el
folleto “La Cocina Fácil”.
Para programar ‘Convect Roast’ (Asado por
Convección):
1. Oprima la tecla ‘Convect Roast’.
• ‘ROAST’ y el ícono del ventilador destellarán.
• ’00:00' destellará en el indicador visual.
• ‘000’ se ilumina en el indicador visual.
2. Seleccione la temperatura de asar usando las teclas numéricas
apropiadas.
• El tiempo puede ser programado de 10 minutos (00:10) a 11
horas, 59 minutos (11:59).
• Oprima la tecla ‘Convect Roast’ nuevamente o espere 4
segundos.
• ‘ROAST’ y el ícono del ventilador destellarán en el indicador
visual
• ‘000’ destellará en el indicador visual.
3. Seleccione la temperatura del horno. Oprima la
tecla ‘Autoset 0’ para 165° C (325° F) o las
teclas numéricas apropiadas.
• Cada vez que oprima la tecla ‘Autoset 0’ la temperatura se
aumentará en 15° C (25° F).
• La temperatura del horno puede ser programada de 75° a
285° C (170° a 550° F).
5. Coloque el alimento en el horno.
6. Cuando haya transcurrido 75% del tiempo de cocción, la luz del
7. Al término de la cocción, oprima la tecla
8. Retire el alimento del horno.
segundos.
• ‘ROAST’ dejará de destellar y se iluminará en el indicador
visual.
• En el indicador visual se desplegará 38° (100°) o la
temperatura real del horno. Aumentará en incrementos de 3° C
(5° F) hasta llegar a la temperatura programada.
• El ícono del ventilador comenzará a girar.
Notas:
• Si es necesario precalentamiento, espere a que el horno se
precaliente durante 8-15 minutos.
• Cuando el horno llega a la temperatura programada se
escuchará una señal sonora larga.
• La cuenta regresiva del tiempo comenzará cuando el horno
comience a calentarse.
• Para verificar la temperatura programada durante el
precalentamiento del horno, oprima la tecla ‘Convect Roast’.
horno se encenderá y ‘FOOD’ destellará en el indicador visual. En
este momento verifique el progreso de la cocción. Cocine por
más tiempo si es necesario.
• La luz del horno permanecerá encendida hasta que se oprima
la tecla ‘Oven Light’.
• Oprima cualquier tecla para verificar el tiempo de cocción
restante.
‘CANCEL’.
71
Page 73

COCINANDO EN EL HORNO
‘Cook & Hold’
Cuando se usa la opción ‘Cook & Hold’, el horno comienza a
calentar inmediatamente después de que el control ha sido
programado. Luego, el horno cocina durante un período de tiempo
especificado. Cuando ese tiempo expira, el horno mantendrá el
alimento caliente hasta durante una hora y luego se apagará
automáticamente.
Para programar ‘Cook & Hold’:
1. Oprima la tecla ‘Cook & Hold’.
• ‘HOLD’ destellará para indicarle que usted
está programando ‘Cook & Hold’.
• ’00:00' destellará en el indicador visual.
2. Seleccione la cantidad de tiempo que usted desea cocinar
usando las teclas numéricas.
• ‘HOLD’ continúa destellando.
• El tiempo se iluminará en el indicador visual.
• El tiempo puede programarse de 10 minutos (00:10) a
11 horas, 59 minutos (11:59).
3. Cuando HOLD esté destellando, oprima ‘Bake’,
‘Convect Bake’ o ‘Convect Roast’ (modelos
selectos) y seleccione la temperatura del horno.
Oprima la tecla ‘Autoset 0’ para 175° C (350° F)
o las teclas numéricas apropiadas.
• En el indicador visual destellará el nombre del ciclo deseado.
• La temperatura del horno puede ser programada de 75° a
285° C (170° a 550° F).
4. Oprima nuevamente la tecla del ciclo deseado O espere cuatro
segundos.
• El nombre del ciclo deseado permanecerá iluminado.
• En el indicador visual se desplegará el tiempo de cocción.
• La temperatura real del horno se desplegará durante el
precalentamiento.
• La temperatura programada se desplegará cuando el horno se
haya precalentado.
Cuando haya expirado el tiempo de cocción:
• Se escucharán cuatro señales sonoras.
• ‘HOLD’ y ‘WARM’ se iluminarán.
• En el indicador se desplegará 75° (170°).
• Se desplegará la hora del día.
Después de una hora en ‘HOLD WARM’ (Mantener
Caliente):
• El horno se apaga automáticamente.
• ‘HOLD’ y ‘WARM’ se apagan.
• Retire el alimento del horno.
Para cancelar ‘Cook & Hold’ en cualquier momento:
Oprima la tecla ‘CANCEL’. Retire el alimento
del horno.
72
Page 74

COCINANDO EN EL HORNO
‘Delay Cook & Hold’
(‘Cook & Hold’ Diferido)
PRECAUCIÓN
No use horneado diferido para alimentos de corta duración tales
como productos lácteos, cerdo, carne de ave o mariscos.
Cuando usa ‘Delay’, el horno comienza a cocinar más tarde en el
día. Programe la cantidad de tiempo que usted desea diferir antes de
que se encienda el horno y cuanto tiempo desea cocinar el alimento.
El horno comienza a calentar en la hora seleccionada y cocina
durante el tiempo especificado.
El tiempo diferido puede programarse de 10 minutos (00:10) hasta
11 horas, 59 minutos (11:59).
4. Programe la cantidad de tiempo que usted desea cocinar
5. Oprima ‘Bake’, ‘Convect Bake’ o ‘Convect Roast’ (modelos
6. Programe la temperatura del horno deseada oprimiendo la
Para programar un ciclo de ‘Cook & Hold’ diferido:
1. Oprima la tecla ‘1 Delay’.
• ‘DELAY’ se destella en el indicador.
• ‘00:00’ destella en el indicador.
2. Usando las teclas numéricas apropiadas, programe la cantidad
de tiempo que usted desea diferir el comienzo del ciclo ‘Cook
& Hold’.
3. Oprima la tecla ‘Cook & Hold’.
• ‘HOLD’ y ‘DELAY’ destellan en el indicador
visual.
• ‘00:00’ destella en el indicador visual.
usando las teclas numéricas.
selectos).
tecla ‘Autoset 0’ o las teclas numéricas
apropiadas.
• ‘175°’ (‘350°’) se iluminará cuando se oprime
‘Autoset 0’.
• Después de cuatro segundos, el tiempo diferido programado
aparecerá en el indicador visual.
• ‘HOLD’ se apaga.
• Las palabras ‘BAKE’ y ‘DELAY’ permanecen iluminadas para
recordarle que se ha programado un ciclo de ‘Cook & Hold’
diferido.
Notas:
• No use ‘Cook & Hold’ diferido para artículos que requieren un
horno precalentado, tales como pasteles, galletas y panes.
• No use ‘Cook & Hold’ diferido si el horno ya está caliente.
73
Page 75

COCINANDO EN EL HORNO
‘Broiling’ (Asar a la Parrilla)
5. Coloque el alimento en el horno. Cierre la puerta
Para programar ‘Broil’:
1. Oprima la tecla ‘Broil’.
• ‘BROIL’ y ‘SET’ (Validar) destellan en el indicador visual.
2. Oprima la tecla ‘Autoset 0’ una vez para ‘HI
broil’ (Asar a la parrilla con temperatura alta)
o dos veces para ‘LO broil’ (230° C [450° F])
(Asar a la parrilla con temperatura baja).
• En el indicador visual se desplegará ‘HI’ o ‘LO’.
• Selecciones ‘HI broil’ (285° C [550° F]) para asado a la parrilla
normal. Seleccione ‘LO broil’ (230° C [450° F]) para asar a la
parrilla con temperatura baja alimentos que deben ser
cocinados por más tiempo, tal como la carne de ave.
3. Después de cuatro segundos, el horno comenzará a funcionar.
• ‘BROIL’ continuará iluminado.
• ‘HI’ o ‘LO’ permanecerán iluminados.
4. Para un dorado óptimo, precaliente el horno durante 3 a 4 minutos
antes de colocar el alimento.
6. Dé vuelta a la carne una vez aproximadamente a
7. Cuando el alimento esté cocinado, oprima la tecla ‘CANCEL’.
del horno.
mitad de la cocción.
Retire el alimento y la asadera del horno.
• La hora del día volverá a desplegarse en el indicador visual.
Notas Sobre Asado a la Parrilla:
• Para mejores resultados cuando ase a la parrilla, use una
asadera diseñada para asar a la parrilla.
• ‘Hi’ se usa para la mayoría de los asados a la parrilla. Use ‘LO
broil’ cuando ase a la parrilla alimentos que necesitan cocción
prolongada. La temperatura inferior permite que el alimento
se cocine hasta quedar bien asado sin dorarse demasiado.
• Los tiempos de asado a la parrilla pueden ser más largos
cuando se selecciona la temperatura más baja de asar a la
parrilla.
• El mayor de los alimentos debe ser dado vuelta cuando está a
mitad del tiempo de asar.
• Para sugerencias y temperaturas adicionales sobre asar a la
parrilla, consulte el folleto “La Cocina Fácil”.
Tabla de Asar a la Parrilla
Precaliente el horno durante 2-3 minutos.
POSICION DE GRADO DE TIEMPO DE
ALIMENTOS LA PARRILLA COCCION COCCION TOTAL
Carne de Res Biftec, 2,5 cm (1") 5 A medio asar 15 - 20 minutos
5 Bien asado 18 - 24 minutos
Hamburguesas, 1,9 cm (3/4") de grosor 5 o 6 Bien asado 13 - 18 minutos
Carne de Cerdo Tocino 5 Bien asado 6 - 10 minutos
Jamón, precocido, rebanada de
1,3 cm (1/2") 5 Tibio 8 - 12 minutos
Chuletas, 2,5 cm (1") 5 Bien asado 22 - 26 minutos
Carne de Ave Pechugas de Pollo, con hueso 4 Bien asado ‘Lo Broil’ (lado de la piel
hacia abajo primero)
30 - 45 minutos
Mariscos Filetes de pescado 5 Hojaldrado 8 - 12 minutos
Tajadas de pescado,
2,5 cm (1") de grosor 5 Hojaldrado 10 - 15 minutos
Colas de langosta, 85-115 g 5 Bien cocidas 7 - 10 minutos
(3-4 onzas) cada una
Para un exterior más dorado y más asado y un interior a medio cocer, puede ser necesario disminuir el tiempo de cocción en el primer lado y
acercar más la carne a la fuente de calor.
Nota: Esta tabla es sólo una guía. Los tiempos pueden variar con el tipo de alimento que se está cocinando.
74
Page 76

COCINANDO EN EL HORNO
‘Keep Warm’ (Mantener Caliente)
Para mantener calientes en forma segura alimentos calientes o para
calentar panes y platos.
Para programar ‘Keep Warm’:
1. Oprima la tecla ‘Keep Warm’ en el indicador
visual.
• ‘WARM’ destella en el indicador visual.
• ‘000’ destella en el indicador visual.
2. Seleccione la temperatura de ‘Keep Warm’.
Oprima la tecla ‘Autoset 0’ o las teclas
numéricas apropiadas.
•75° (170°) se iluminará cuando se oprima la tecla ‘Autoset 0’.
• Cada vez que oprima la tecla ‘Autoset 0’, la temperatura
aumentará en 3° C (5° F).
La temperatura de ‘Keep Warm’ puede ser programada de 63° a
90° C (145° a 190° F).
‘WARM’ y la temperatura se desplegarán en el indicador cuando
la función esté activa.
Notas sobre ‘Keep Warm’:
• Para calidad óptima de los alimentos, los alimentos cocinados
en el horno deben ser mantenidos calientes por no más de 1 a
2 horas.
• Para evitar que los alimentos se sequen, cúbralos levemente
con papel de aluminio o una tapa.
• Para calentar panecillos:
– cubra levemente los panecillos con papel de aluminio y
colóquelos en el horno.
– oprima las teclas ‘Keep Warm’ y ‘Autoset 0’.
– caliente durante 12 a 15 minutos.
• Para calentar platos:
– coloque 2 filas de cuatro platos cada una en el horno.
– oprima las teclas ‘Keep Warm’ y ‘Autoset 0’.
– caliente los platos durante cinco minutos, apague el horno y
deje los platos en el horno durante 15 minutos más.
– use solamente platos resistentes al horno, verifique con el
fabricante.
– no coloque los platos calientes sobre una superficie fría
pues el cambio rápido de temperatura puede causar fisuras
superficiales o rotura.
Para cancelar ‘Keep Warm’:
1. Oprima la tecla ‘CANCEL’.
2. Retire el alimento del horno.
75
Page 77

COCINANDO EN EL HORNO
‘Drying’ (Secado) (modelos selectos)
Use una rejilla de secado para obtener mejores resultados. La rejilla
permite que el aire circule en forma pareja alrededor de los
alimentos.
El ventilador de convección funcionará durante el procedimiento de
secado.
Para programar ‘Drying’:
1. Coloque el alimento en el horno y cierre la puerta.
2. Oprima la tecla ‘Drying’.
• ‘DRY’ destella en el indicador visual.
3. Oprima la tecla ‘Autoset 0’ para 60° C (140° F) u oprima las teclas
numéricas correspondientes para la temperatura de secado
deseada.
• Al oprimir la tecla ‘Autoset’ la temperatura se aumenta en
incrementos de 10°.
• La temperatura puede ser programada entre 38° - 94° C
(100° - 200°F).
4. Después de cuatro segundos, ‘DRY’ y la temperatura
programada se desplegarán en el indicador visual.
5. Cuando termine el secado, apague el horno
oprimiendo la tecla ‘CANCEL’.
Siga la Guía de Secado que se incluye en la página 77 para los
tiempos de secado. Verifique los alimentos en los tiempos mínimos
recomendados. Enfríe los alimentos a temperatura ambiente antes
de probar el grado de cocción.
Notas sobre el secado:
• Para comprar una rejilla de secado, póngase en contacto con
su distribuidor Jenn-Air y solicite el accesorio ‘DRYINGRACK’ o
llame al 1-800-JENNAIR.
• La mayoría de las frutas y vegetales se secan bien y retienen su
color cuando son secadas a 60° C (140° F). La carne fresca y el
charqui deben secarse a 63° - 65° C (145° - 150° F). Para sabor
óptimo, seque las hierbas a 38° C (100° F), sin embargo, a esta
temperatura más baja se esperan tiempos de secado más
prolongados, de hasta 8 horas.
• La duración de los tiempos de secado varía debido a lo
siguiente: contenido de agua y azúcar del alimento, tamaño de
los pedazos de alimento, cantidad de alimento que está siendo
secado, humedad del aire.
• Verifique los alimentos cuando haya pasado el tiempo mínimo
de secado. Continúe secando si es necesario.
• Las frutas que adquieren un color café cuando son expuestas al
aire deben ser tratadas con un antioxidante. Trate uno de los
siguientes métodos:
1. Sumerja la fruta en una mezcla de dos partes de jugo de
limón embotellado y una parte de agua fría.
2. Sumerja la fruta en una solución de una cucharadita de ácido
ascórbico o antioxidante comercial y 1 cuarto de galón de
agua fría.
• Los alimentos pueden gotear durante el proceso de secado.
Después de secar alimentos que son ácidos o azucarados,
limpie la parte inferior del horno con agua y jabón. El acabado
de porcelana del horno puede descolorarse si los derrames
ácidos o azucarados no son limpiados antes de colocar una
temperatura alta o de un ciclo de autolimpieza.
• Se puede secar más de una parrilla a un mismo tiempo. Sin
embargo, es necesario prolongar el tiempo de secado adicional.
• Consulte otros recursos en su biblioteca local o llame al
Servicio del Condado Local para información adicional.
76
Page 78

COCINANDO EN EL HORNO
Guía de Secado (modelos selectos)
LAS MEJORES TIEMPO PRUEBA PARA
FRUTAS VARIEDADES PREPARACION APPROX. A GRADO DE SECADO
PARA SECAR 60° C (140°F) ** AL TIEMPO MINIMO
Manzanas* Variedades Firmes: ‘Graven’, Lavar, pelar si se desea, sacar las 4 a 8 horas Blandas a crujientes. Las
‘Stein’, ‘Granny Smith’, semillas y cortar en rebanadas de manzanas secas se guardan
‘Jonathan’, ‘Winesap’, ‘Rome 3 mm (1/8"). mejor cuando están
Beauty’, ‘Newton’. ligeramente crujientes.
Damascos* Los más comunes son Lavar, cortar en mitades y sacar los huesos. 18 a 24 horas Suaves y blandos.
‘Blenheim/Royal’. ‘Tilton’
también son buenos.
Plátanos* Variedades firmes. Pelar y cortar en rebanadas de 6 mm (1/4"). 17-24 horas Blandas a crujientes.
Cerezas ‘Lambert’, ‘Royal Ann’, Lavar y sacar los tallos. Cortar en 18 a 24 horas Blandas y curtidas.
‘Napoleon’, ‘Van’ o ‘Bing’. mitades y sacar los huesos.
Nectarinas y Las variedades ‘Freestone’. Cortar en mitad y sacar los huesos. Pelar es 24 a 36 horas Blandos y curtidos.
Duraznos* opcional pero los resultados son frutas secas
de mejor apariencia.
Peras* ‘Barlett’ Pelar, cortar en mitades y sacar huesos. 24 a 36 horas Suaves y blandas.
Piña Fresca o envasada. Lavar, pelar y sacar las espinas. Cortar en Envasada: Suave y blanda.
rebanadas a lo largo y sacar el hueso 14 a 18 horas
pequeño. Cortar horizontalmente en Fresca:
rebanadas de 13 mm (1/2"). 12 a 16 horas
Naranja y Seleccione fruta de piel Lavar bien. Pelar la cáscara exterior 1 a 2 horas Duras a quebradizas.
Limón - Cáscara áspera. No seque la delgada más o menos de 1,5 a 3 mm
cáscara de la fruta que esté (1/16 a 1/8"). No use la piel blanca
marcada “se agregó color”. que está debajo de la cáscara.
VERDURAS
Tomates ‘Plum’ y ‘Roma’. Cortar en mitades, sacar las semillas. 12 a 18 horas Duros a crujientes.
Colocar los tomates con el lado de la piel
hacia arriba en la rejilla. Agujerear la piel.
Zanahorias ‘Danvers Half Long’, No use zanahorias que tengan fibras o 4 a 8 horas Duras a quebradizas.
‘Imperator’, ‘Red Cored núcleo duro. Lave, corte las puntas y pele si
Chantenay’ se desea. Corte transversalmente o
diagonalmente en rebanadas de 6 mm (1/4").
Cocínelas al vapor por 3 minutos.
Pimientos Chile ancho, ‘Anaheim’. Lavar, cortar y quitar la semilla. 4 a 6 horas Las vainas deben parecer
Picantes Agujerear la piel varias veces. marchitas, de color rojo
obscuro y crujientes.
HIERBAS
Perejil, Menta, Enjuagar en agua fría. Secar con una toalla 1a 3 horas Quebradizos y migajosos.
Cilantro, Salvia, de papel. Dejar los tallos hasta que las hojas
Orégano estén secas, después descartarlos.
Albahaca Cortar hojas de 8 a 10 cm (3 a 4") desde la 2 a 5 horas Quebradizos y migajosos.
parte superior de la planta justo hasta donde
aparecen los botones. Enjuagar las hojas en
agua fría.
* Frutas que requieren un antioxidante para evitar la decoloración y pérdida de nutrientes. Consulte las notas en la página 76 para métodos específicos.
** El ajuste de apagado automático del horno después de 12 horas no se activará durante las funciones de secado.
77
Page 79

COCINANDO EN EL HORNO
‘Proofing’ (Esponjamiento de Masa)
Para cancelar el Modo Sabático:
1. Oprima la tecla ‘CLOCK’ durante cinco segundos.
(modelos selectos)
Use la característica de esponjamiento para fermentar la masa de
pan a base de levadura antes del horneado. El esponjamiento en el
horno protege la masa contra los cambios de temperatura y las
corrientes que comúnmente afectan los resultados del
esponjamiento.
1. Oprima la tecla ‘Proofing’.
• ‘PROOF’ destella en el indicador visual.
• ‘SET’ destella en el indicador visual.
2. Oprima la tecla ‘Autoset 0’.
• ‘Proof’ se iluminará en el indicador visual.
3. Cuando se ha completado el esponjamiento,
oprima la tecla ‘CANCEL’.
2. Después de 72 horas, el modo sabático terminará.
Cierre Automático/Modo
Sabático
El horno se apagará automáticamente después de 12 horas si usted
lo deja accidentalmente encendido. Esta característica de seguridad
puede ser desactivada.
Para cancelar el cierre automático de 12 horas y
dejar que el horno funcione continuamente durante
72 horas:
1. Oprima y mantenga oprimida la tecla ‘Clock’
durante cinco segundos.
• ‘SAb’ se desplegará y destellará durante cinco segundos.
• ‘SAb’ se desplegará continuamente hasta que se desactive o
hasta que transcurra el límite de 72 horas.
• ‘BAKE’ también se desplegará si se está usando un ciclo de
horneado cuando el horno está en modo sabático.
• Todas las otras funciones EXCEPTO ‘BAKE’ (‘Timer’, ‘Keep
Warm’, ‘Clean’, etc.) están bloqueadas durante el Modo
Sabático.
• Se puede programar ‘Cook & Hold’ durante el Modo Sabático,
sin embargo no se puede programar ‘Delay Cook & Hold’.
• ‘SAb’ destellará durante cinco segundos.
• La hora del día reaparecerá en el indicador visual.
O
• ‘SAb’ destellará durante cinco segundos.
• La hora del día reaparecerá en el indicador visual.
Notas Sobre el Modo Sabático:
• El Modo Sabático puede ser activado en cualquier momento,
esté o no el horno encendido.
• El Modo Sabático no se puede activar si las teclas están
bloqueadas o cuando la puerta está bloqueada.
• La mayoría de las advertencias y mensajes y todas las señales
sonoras están desactivadas cuando el Modo Sabático está
activo.
• Si el horno está horneando cuando el Modo Sabático es
programado, ‘BAKE’ se apagará cuando se cancele el
horneado. No se emitirán señales sonoras.
• Mientras el horno esté en Modo Sabático la luz del horno se
encenderá automáticamente cuando se abra la puerta. Si se
desea la luz del horno durante el Modo Sabático, ésta debe ser
encendida antes de que comience el Modo Sabático.
• Cuando comienza el Modo Sabático, la temperatura que se
despliega será la temperatura programada en vez de la
temperatura real de la cavidad del horno. No se emitirá la
señal sonora de precalentamiento.
• El ciclo de autolimpieza y bloqueo automático de la puerta no
funcionará durante el Modo Sabático.
• Si oprime la tecla ‘CANCEL’ se cancelará un ciclo ‘bake’, sin
embargo el control permanecerá en Modo Sabático.
• Si falla la corriente eléctrica, cuando vuelva la energía el horno
se activará en Modo Sabático con 72 horas restantes y ningún
ciclo activo.
78
Page 80

COCINANDO EN EL HORNO
Ajuste de la temperatura del
horno
La exactitud de las temperaturas del horno es cuidadosamente
probada en la fábrica. Es normal notar alguna diferencia entre la
temperatura de horneado o en el dorado, entre un horno nuevo y un
horno antiguo. A medida que el horno se usa, la temperatura del
horno puede cambiar.
Usted puede ajustar la temperatura del horno, si considera que su
horno no está horneando o dorando en forma correcta. Para decidir
cuanto debe cambiar la temperatura, programe la temperatura del
horno a 15° C (25° F) más alta o más baja que la temperatura
indicada en sus recetas, luego hornee. Los resultados de la
"prueba" pueden darle una idea de cuanto debe ajustar la
temperatura.
Para ajustar la temperatura del horno:
1. Oprima la tecla ‘Bake’.
2. Programe 285° C (550° F) oprimiendo las teclas numéricas
apropiadas.
3. Oprima y mantenga oprimida la tecla ‘Bake’ durante varios
segundos o hasta que 00° aparezca en el indicador visual.
Si la temperatura del horno ha sido previamente ajustada, el
cambio aparecerá en el indicador visual. Por ejemplo, si la
temperatura del horno fue reducida en 8° C (15° F) el indicador
mostrará “- 8°” (“-15°”).
4. Oprima la tecla ‘Autoset 0’ para ajustar la temperatura.
Cada vez que se oprima la tecla ‘Autoset 0’, la temperatura
cambia en 3° C (5° F). La temperatura del horno puede ser
aumentada o disminuida en 3° a 20° C (5° a 35° F).
Si oprime la tecla ‘Autoset 0’ (Autoajuste 0), la temperatura del
horno pasará por un ciclo de aumento de temperatura (5, 10 . . .
35). Si continúa oprimiendo la tecla ‘Autoset 0’ (Autoajuste 0), la
temperatura del horno pasará por un ciclo de descenso de
temperatura (-35, -30 . . .-5).
5. La hora del día reaparecerá automáticamente en el indicador
visual.
No necesita reajustar la temperatura del horno si hay una falla o
interrupción de energía eléctrica. El ajuste de la temperatura es
válido para ‘Bake’, ‘Convect Bake’ y ‘Convect Roast’ (modelos
selectos) solamente. Las temperaturas de asar a la parrilla y de
limpieza no pueden ser ajustadas.
Cambio de la temperatura de
°F/°C
1. El ajuste de fábrica de la medida de temperatura es Fahrenheit.
2. Para cambiar el ajuste, oprima y mantenga oprimidas las teclas
‘CANCEL’ (Anular) y ‘Bake’ (Hornear) al mismo tiempo durante
tres segundos.
3. Escuchará una señal sonora y el ajuste actual (°F o °C) se
desplegará en la pantalla. (Si no se realiza ningún cambio, la
estufa regresará al ajuste actual después de 30 segundos).
4. Para cambiar el ajuste, oprima la tecla ‘Autoset 0’ (Autoajuste 0).
Oprímala nuevamente para regresar al ajuste anterior. Espere
cinco segundos y el ajuste se guardará.
‘Favorite’ (Favorito)
La tecla ‘Favorite’ le permite guardar en memoria el tiempo y la
temperatura de un ciclo ‘Cook & Hold’.
Para programar un ciclo favorito, debe estar activa o recientemente
programada una función de ‘Cook & Hold’.
Para programar un nuevo ciclo Favorito o para
guardar como Favorito un ciclo ‘Cook & Hold’ que
esté en progreso:
1. Programe un ciclo de ‘Cook & Hold’ como se describe en la
sección ‘Cook & Hold’ en la página 72.
2. Oprima y mantenga oprimida la tecla ‘Favorite’
durante tres segundos.
• El ciclo ‘Cook & Hold’ recientemente programado o en
progreso será guardado en memoria.
• Se oirá una señal sonora para indicar que el control ha
aceptado el ajuste ‘Favorite’.
Para comenzar un ciclo programado como Favorito:
1. Oprima la tecla ‘Favorite’.
• Se desplegará el tiempo y la temperatura para el ciclo ‘Cook &
Hold’ programado (si no hay ciclo ‘Cook & Hold’ programado,
en el indicador visual se desplegará ‘nonE’.)
2. Oprima la tecla ‘Bake’, ‘Convect Bake’ o ‘Convect Roast’ (modelos
selectos).
• El ciclo Favorito comenzará inmediatamente.
• El nombre del ciclo seleccionado se se iluminará en el
indicador visual.
• El tiempo de cocción se iluminará en el indicador visual.
Cuando ha expirado el tiempo de cocción:
• El nombre del ciclo seleccionado se se apagará.
• Se iluminarán ‘HOLD’ y ‘WARM’.
• En el indicador se desplegará ‘75°’ (‘170°’).
Para cancelar un ciclo favorito en progreso:
1. Oprima la tecla ‘CANCEL’.
• El ciclo favorito guardado en memoria no
será afectado.
2. Retire el alimento del horno.
79
Page 81

COCINANDO EN EL HORNO
Encendido sin Piloto
Su estufa está equipada con un sistema de encendido sin piloto.
Con este tipo de encendido, el gas se apaga automáticamente y el
horno no operará durante una interrupción de la corriente
eléctrica.
Un fósforo encendido no encenderá el quemador del horno.
No se debe intentar encender el horno durante una
interrupción de la corriente eléctrica.
Ventilador del horno
Se usa un ventilador de convección para circular el aire caliente en
el horno cuando se selecciona la opción de convección. Se activa
automáticamente 5 minutos después de que se oprime la tecla
‘Convect’ y se apagará cuando se cancele ‘Convect’.
Nota: El ventilador de convección se apagará automáticamente
cada vez que se abra la puerta del horno.
Respiradero del Horno
Cuando el horno está en uso, el área cerca del respiradero puede
calentarse lo suficiente como para causar quemaduras. Nunca
bloquee la abertura del respiradero.
El respiradero del horno se encuentra debajo del respaldo
protector de su estufa.
RESPIRADERO
DEL HORNO
No coloque plásticos
cerca de la abertura
del respiradero pues
el calor que sale
puede deformar o
derretir el plástico.
‘Oven Light’ (Luz del Horno)
La luz del horno se enciende automáticamente
siempre que se abre la puerta del horno. Cuando
se cierra la puerta, oprima la tecla ‘Oven Light’ para
encender o apagar la luz del horno. Se escuchará
una señal sonora cada vez que se oprima la tecla ‘Oven Light’.
Panel Inferior del Horno
Proteja el panel inferior del horno contra derrames, especialmente
azucarados o acídicos, pues pueden descolorar la porcelana
esmaltada. Use el utensilio de tamaño correcto a fin de evitar
derrames. No coloque utensilios ni papel de aluminio
directamente en la parte inferior del horno.
Parrillas del Horno
PRECAUCIÓN
• No intente cambiar la posición de las parrillas cuando el horno
esté caliente.
• No use el horno para guardar alimentos ni utensilios.
El horno tiene dos parrillas (tres si es horno de convección). Todas
las parrillas tienen un borde con tope de enganche.
Para retirar la parrilla:
1. Tire de la parrilla derecho hacia
afuera hasta que se detenga en
la posición del tope de
enganche.
2. Levante el frente de la parrilla y
tire de la parrilla hacia afuera.
Para reinstalar la parrilla:
1. Coloque la parrilla en el soporte de la parrilla en el horno.
2. Incline levemente hacia arriba el extremo delantero; deslice la
parrilla hacia atrás hasta que pase sobre los topes de enganche.
3. Baje el frente de la parrilla y deslícela hacia adentro del horno.
No cubra una parrilla completa con papel de aluminio ni
coloque papel de aluminio en el panel inferior del horno. Se
afectarán los resultados del horneado y se puede dañar el
panel inferior del horno.
Posiciones de la Parrilla
PARRILLA 7 (posición más
alta): Para hornear con una
sola parrilla en bandejas de
hornear galletas y para asar
a la parrilla.
PARRILLA 6: Se usa para
hornear con una sola
parrilla en bandejas de
hornear galletas, para asar
a la parrilla y para horneado
con varias parrillas.
PARRILLA 5: Para hornear con una sola parrilla en bandejas de
hornear galletas y para asar a la parrilla.
PARRILLA 4: Se usa para hornear con una sola parrilla en bandejas
de hornear galletas, pasteles de una capa, cacerolas, asar a la parrilla
y para horneado con varias parrillas.
PARRILLA 3: Para hornear con una sola parrilla en bandejas de
hornear galletas, cacerolas, pasteles de varias capas, barras de pan,
pasteles de una capa y para horneado con varias parrillas.
PARRILLA 2: Se usa para hornear con una sola parrilla en bandejas
de hornear galletas, para asar cortes de carne pequeños y para
horneado con varias parrillas.
Horneado por Convección
con Tres Parrillas
(modelos selectos)
7
6
5
4
3
2
1
Panel
Inferior
del
Horno
80
Page 82

COCINANDO EN EL HORNO
PARRILLA 1: Se usa para asar cortes de carne grandes y carne de
ave.
Panel Inferior del Horno: Coloque la
parrilla del horno en los soportes en
relieve del panel inferior del horno.
Use para disponer de espacio
adicional cuando cocine comidas
grandes en el horno.
HORNEADO CON PARRILLAS MULTIPLES:
Dos parrillas: Use la posición 3 y 6 o 2 y 4.
Tres parillas (convección solamente): Use las posiciones 1, 3 y 6.
Nota: Cuando se hornea por convección (modelos selectos) con
dos o tres parrillas, revise los alimentos en el tiempo mínimo
sugerido para evitar que queden demasiado dorados o
demasiado cocinados.
Media Parrilla
Create-A-Space
Los modelos de estufa selectos
están equipados con una media
parrilla convertible. El lado
izquierdo de la parrilla puede
ser retirado para acomodar
una asadera más grande
en la parrilla inferior. El
lado derecho de la
parrilla todavía se puede
dejar para colocar una
cacerola.
Horneado de Pasteles de Capas en Dos
Parrillas
Para obtener mejores resultados cuando hornea pasteles en dos
parrillas, use la posición 2 y 4 para horneado regular y la posición 3 y
6 para horneado por convección (modelos selectos).
Coloque los pasteles en las parrillas como se muestra.
MR
Notas:
• La porción removible puede ser usada como una parrilla de
asar en la asadera de asar a la parrilla. No use el inserto
superior de la asadera cuando use la porción removible de la
parrilla en la asadera.
• La porción removible de la parrilla puede ser usada como una
parrilla de enfriamiento o como un salvamanteles.
• Asegúrese de que el horno esté frío antes de retirar o reinstalar
la media parrilla.
• No use utensilios que se extiendan más allá del borde de la
parrilla.
• Para mejores resultados, deje dos pulgadas entre el utensilio
colocado en la parrilla y la pared lateral del horno.
• Tenga cuidado cuando retire artículos que estén en la media
parrilla para evitar quemaduras.
• Saque con cuidado los alimentos de la parrilla inferior para
evitar mover la media parrilla.
81
Page 83

CUIDADO Y LIMPIEZA
Horno Autolimpiante
Para programar ‘Self-Clean’ (Autolimpieza):
PRECAUCIÓN
• Es normal que las piezas del horno se calienten durante el ciclo
de autolimpieza.
• Para evitar daño a la puerta, no intente abrirla cuando la palabra
‘LOCK’ esté desplegada en el indicador visual.
• Evite tocar la puerta, la ventana o el área del respiradero del
horno durante un ciclo de limpieza.
• No use limpiadores de hornos comerciales en el acabado del
horno ni alrededor de ninguna pieza del horno pues puede
dañar el acabado o las piezas.
El ciclo de autolimpieza usa temperaturas de cocción superiores a las
normales para limpiar automáticamente todo el interior del horno.
Es normal que ocurran llamaradas, humo o llamas durante la limpieza
si el horno está demasiado sucio. Es mejor limpiar el horno
regularmente en vez de esperar hasta que se haya acumulado
demasiada suciedad.
Durante el proceso de limpieza, la cocina debe estar bien ventilada
para eliminar los olores normales asociados con la limpieza.
1. Cierre la puerta del horno.
2. Oprima la tecla ‘Clean’.
3. Oprima la tecla ‘Autoset 0’.
4. Oprima la tecla ‘Autoset 0’ para desplegar los ajustes de
5. Después de cuatro segundos, el horno comenzará a limpiar.
Antes de la Autolimpieza
1. Apague la luz del horno antes de la limpieza. La luz del horno
puede fundirse durante el ciclo de limpieza.
2. Retire la asadera, todos los utensilios y las parrillas del horno. Las
parrillas del horno se descolorarán y no se deslizarán fácilmente
después de un ciclo de autolimpieza si no son retiradas del horno.
3. Limpie el marco del horno, el marco de la puerta, el área fuera de
la junta de la puerta y alrededor de la abertura en la junta de la
puerta, con un agente de limpieza no abrasivo tal como ‘Bon
Ami’* o con detergente y agua. El proceso de autolimpieza no
limpia estas áreas. Ellas deben ser limpiadas para evitar que la
suciedad se hornee durante el ciclo de autolimpieza. (La junta es
el sello alrededor de la puerta y ventana del horno.)
4. Para evitar daño no limpie ni frote la
junta situada alrededor de la puerta del
horno. La junta está diseñada para
sellar herméticamente el calor durante
el ciclo de limpieza.
5. Limpie el exceso de grasa o derrames
de la parte inferior del horno. Esto
evita humo excesivo o llamaradas durante el ciclo de limpieza.
6. Limpie los derrames azucarados o ácidos tales como papa dulce
(camote), tomates o salsas a base de leche. La porcelana
esmaltada es resistente al ácido pero no a prueba de ácidos. El
acabado de porcelana puede descolorarse si los derrames ácidos
o azucarados no son limpiados antes de un ciclo de autolimpieza.
Para diferir un ciclo de autolimpieza:
1. Oprima la tecla ‘Delay 1’.
2. Programe la cantidad de tiempo que usted desea diferir el ciclo
3. Oprima la tecla ‘Clean’.
4. Oprima la tecla ‘Autoset 0’.
Nota: La temperatura del horno debe ser inferior a 205° C
(400° F) para programar un ciclo de limpieza.
• ‘CLEAN’ destella en el indicador visual.
• ‘SET’ destella en el indicador visual.
• ‘MEd’ (Suciedad mediana, 3 horas) se despliega en el
indicador.
autolimpieza.
‘HVy’ (Suciedad intensa, 4 horas)
‘MEd’ (Suciedad mediana, 3 horas)
‘LITE’ (Suciedad leve, 2 horas)
Al seleccionar el nivel de suciedad del horno se programa
automáticamente el tiempo de limpieza.
• Si la puerta no se cierra, se oirá una señal sonora y la palabra
‘door’ se desplegará en el indicador visual. Si la puerta no es
cerrada dentro de 30 segundos, la operación de autolimpieza
será cancelada y el indicador volverá a desplegar la hora del
día.
• ‘CLEAN’ aparecerá en el indicador visual.
• ‘LOCK’ destellará en el indicador visual. Una vez que la puerta
se bloquea, la palabra ‘LOCK’ permanecerá iluminada sin
destellar.
• El tiempo de limpieza comenzará la cuenta regresiva en el
indicador.
• ‘DELAY’ destella.
• ’00:00' destellará en el indicador visual.
usando las teclas numéricas apropiadas.
• ‘SET’ destella en el indicador visual.
• Se despliega ‘LITE’ (nivel de suciedad leve).
*Los nombres de los productos son marcas registradas de sus respectivos fabricantes.
82
Page 84

CUIDADO Y LIMPIEZA
5. Oprima la tecla ‘Autoset 0’ para desplegar los
ajustes de autolimpieza.
‘HVy’ (Suciedad intensa, 4 horas)
‘MEd’ (Suciedad mediana, 3 horas)
‘LITE’ (Suciedad leve, 2 horas)
Al seleccionar el nivel de suciedad del horno se programa
automáticamente el tiempo de limpieza.
6. Después de cuatro segundos, las palabras ‘CLEAN’ y ‘DELAY’ se
iluminarán y ‘LOCK’ destellará en el indicador visual. Cuando la
puerta del horno se cierra, ‘LOCK’ dejará de destellar y se
iluminará permanente para mostrar que el horno está
programado para una operación de limpieza diferida. En el
indicador aparecerá el tiempo diferido.
Durante el ciclo de autolimpieza
Cuando aparece ‘LOCK’ en el indicador, la puerta no se puede abrir.
Para evitar daño a la puerta, no fuerce la puerta para abrirla cuando
la palabra ‘LOCK’ está desplegada en el indicador visual.
Humo y Olores
Usted puede ver humo y sentir olor las primeras veces que el horno
es limpiado. Esto es normal y disminuirá con el tiempo.
También puede ocurrir humo si el horno está demasiado sucio o si
se ha dejado una asadera en el horno.
Sonidos
A medida que el horno se calienta, usted puede oír sonidos de
piezas metálicas que se expanden y contraen. Esto es normal y no
dañará el horno.
Después del ciclo de autolimpieza
Aproximadamente una hora después del fin del ciclo de limpieza,
‘LOCK’ desaparecerá. La puerta ahora puede ser abierta.
Alguna suciedad puede quedar como una leve ceniza gris tipo
polvo. Retírela con un paño húmedo. Si la suciedad permanece
después de limpiarla, significa que el ciclo de limpieza no fue lo
suficientemente largo. La suciedad será eliminada durante el
próximo ciclo de limpieza.
Si las parrillas del horno fueron dejadas en el horno y no se
deslizan suavemente después de un ciclo de limpieza, limpie
las parrillas y los soportes de las parrillas con una pequeña cantidad
de aceite vegetal para hacerlas deslizar con más facilidad.
Pueden aparecer líneas delgadas en la porcelana al pasar por
ciclos de calentamiento y enfriamiento. Esto es normal y no
afectará el rendimiento.
Una descoloración blanca puede aparecer después del ciclo
de limpieza si los alimentos ácidos o azucarados no fueron
limpiados antes del ciclo de autolimpieza. Esta descoloración es
normal y no afectará el rendimiento.
Notas:
• Si se deja abierta la puerta del horno, la palabra ‘door’
destellará en el indicador visual y se escuchará una señal
sonora hasta que la puerta sea cerrada y la tecla ‘Clean’ sea
oprimida nuevamente.
• Si transcurren más de cinco segundos después de oprimir la
tecla ‘Clean’ y antes de oprimir la tecla ‘Autoset 0’, el programa
volverá automáticamente al despliegue previo.
• La puerta del horno se dañará si se fuerza para abrirla cuando
la palabra ‘LOCK’ continúa desplegada en el indicador.
83
Page 85

CUIDADO Y LIMPIEZA
Procedimientos de Limpieza
PRECAUCIÓN
• Asegúrese de que el horno esté apagado y que todas las piezas estén
frías antes de tocarlo o limpiarlo. De este modo se evitará daño y
posibles quemaduras.
• Para evitar manchas o decoloración limpie el horno después de cada uso.
• Si se retira alguna pieza, asegúrese de que sea reinstalada en forma correcta.
PIEZA PROCEDIMIENTO DE LIMPIEZA
Asadera e Nunca cubra el inserto con papel de aluminio pues esto evita que la grasa se escurra a la bandeja inferior.
Inserto • Coloque un paño enjabonado sobre el inserto y la bandeja; deje remojar para soltar la suciedad.
• Lave en agua jabonosa tibia. Use una esponja de fregar para quitar la suciedad persistente.
• La bandeja de asar y el inserto pueden ser lavados en el lavavajillas.
Tapas de Cabezas de Quemadores Removibles
Quemadores y • Deje enfriar el quemador. Retire la tapa y lávela en agua jabonosa con una esponja de restregar de plástico. Para suciedad
Quemadores de difícil, limpie con una esponja no abrasiva rellena con jabón o con crema para limpieza de cubiertas ‘Cooktop Cleaning
Gas Sellados Creme’* (Pieza #20000001)** y una esponja.
• No las lave en el lavavajillas ni en un horno autolimpiante.
Quemadores de Gas Sellados
• Límpielos con frecuencia. Deje enfriar el quemador. Limpie con jabón y una esponja de restregar de plástico. Para
suciedad difícil, limpie con una esponja no abrasiva rellena con jabón. No agrande ni modifique los agujeros.
• Tenga cuidado de que no entre agua en los orificios de los quemadores.
• Tenga cuidado cuando limpie el encendedor. Si el encendedor está húmedo o dañado, el quemador superior no
encenderá.
*Los nombres de los productos son marcas registradas
de sus respectivos fabricantes.
** Para hacer pedidos, llame al 1-800-JENNAIR
(1-800-536-6247).
Rejillas de los • Lávelas con agua tibia jabonosa y una esponja de plástico no abrasiva. Para manchas rebeldes, limpie con una esponja
Quemadores - de plástico rellena con jabón, no abrasiva o con ‘Cooktop Cleaning Creme’* (Crema para Limpieza de Cubiertas) (Pieza
porcelana sobre 20000001)** y una esponja. Si la suciedad persiste, vuelva a aplicar ‘Cooktop Cleaning Creme’, cubra con una toalla de
hierro forjado papel húmeda y deje remojar durante 30 minutos. Restriegue nuevamente, enjuague y seque.
• No las lave en el lavavajillas ni en un horno autolimpiante.
Area del Reloj y • Para activar ‘Control Lock’ (Bloqueo de los controles) para la limpieza, ver página 69.
de las Teclas • Lave, enjuague y seque. No use agentes de limpieza abrasivos pues pueden rayar el acabado.
de Control • Se puede usar limpiavidrios si se rocían en el paño primero. No rocíe directamente en el panel.
Perillas de • Retire las perillas cuando estén en la posición ‘OFF’ tirándolas hacia adelante.
Control • Lave, enjuague y seque. No use agentes de limpieza abrasivos pues pueden rayar el acabado.
• Encienda cada quemador para asegurarse de que las perillas han sido correctamente reinstaladas.
Cubierta y Panel La porcelana esmaltada es vidrio fundido en metal y puede agrietarse o picarse si no se usa correctamente. Es resistente
de Control - a los ácidos, no a prueba de ácidos. Todos los derrames, especialmente los derrames azucarados o acídicos deben ser
Esmalte de limpiados inmediatamente con un paño seco.
Porcelana • Cuando se enfríe, lave con agua jabonosa, enjuague y seque.
• Nunca limpie una superficie tibia o caliente con un paño húmedo. Esto puede causar agrietamiento o picaduras.
• Nunca use limpiadores de horno, agentes de limpieza abrasivos o cáusticos en el acabado exterior de la estufa.
84
Page 86

CUIDADO Y LIMPIEZA
PIEZA PROCEDIMIENTO DE LIMPIEZA
Paneles Laterales, • Cuando esté fría, lave con agua tibia jabonosa, enjuague y seque. Nunca limpie una superficie tibia o caliente
Gaveta de con un paño húmedo pues esto puede dañar la superficie y causar una quemadura a causa del vapor.
Almacenamiento • Para manchas rebeldes, use agentes de limpieza levemente abrasivos tal como pasta de bicarbonato o ‘Bon Ami’*.
y Manijas de las No use limpiadores abrasivos, cáusticos o ásperos tal como esponjas de lana de acero o limpiadores de hornos. Estos
Puertas - Esmalte productos pueden rayar o dañar permanentemente la superficie.
Pintado Nota: Use una toalla o un paño seco para limpiar los derrames, especialmente los derrames acídicos o
azucarados. La superficie se puede descolorar o perder el brillo si el derrame no se limpia inmediatamente.
Esto es especialmente importante en las superficies blancas.
Ventana y Puerta • Evite usar cantidades excesivas de agua pues puede escurrirse debajo o detrás del vidrio causando manchas.
del Horno - Vidrio • Lave con agua y jabón. Enjuague con agua limpia y seque. El limpiador de vidrio puede usarse si se rocía en un
paño primero.
• No use materiales abrasivos tales como esponjas de restregar, limpiadores en polvo o esponjas de lana de acero
pues pueden rayar el vidrio.
Interior del Horno • Siga las instrucciones en las páginas 82-83 para programar un ciclo de autolimpieza.
Parrillas del • Limpiar con agua con jabón.
Horno • Sacar las manchas difíciles con polvo de limpieza o una esponja llena con jabón. Enjuague y seque.
• Las parrillas se descolorarán permanentemente y pueden no deslizarse con suavidad si son dejadas en el horno durante
un ciclo de autolimpieza. Si esto sucede, limpie la parrilla y los soportes en relieve con una pequeña cantidad de aceite
vegetal para restaurar la facilidad de movimiento, luego limpie el exceso de aceite.
Acero Inoxidable • NO USE NINGUN PRODUCTO DE LIMPIEZA QUE CONTENGA BLANQUEADOR A BASE DE CLORO.
(modelos selectos) • NO USE LIMPIADORES “ORANGE” NI LIMPIADORES ABRASIVOS.
• SIEMPRE LIMPIE LAS SUPERFICIES DE ACERO A FAVOR DEL GRANO.
• Limpieza Diaria/Suciedad Leve - Limpie con uno de los siguientes - agua con jabón, una solución de vinagre
blanco con agua, limpiador para superficies y vidrio ‘Formula 409’* o un limpiavidrios similar - usando una esponja
o un paño suave. Enjuague y seque. Para pulir y evitar marcas de los dedos, use el producto ‘Stainless Steel
Magic Spray’* (Pieza No. 20000008)**.
• Suciedad Moderada/Intensa - Limpie con uno de los siguientes - ‘Bon Ami’*, ‘Smart Cleanser’* o ‘Soft Scrub’* -
usando una esponja húmeda o un paño suave. Enjuague y seque. Las manchas difíciles pueden ser quitadas con
una esponja multi-uso ‘Scotch-Brite’* húmeda; frote a favor del grano. Enjuague y seque. Para restaurar el lustre y
sacar las vetas, aplique ‘Stainless Steel Magic Spray’*.
• Descoloración — Use una esponja mojada o un paño suave, limpie con limpiador de acero ‘Cameo Stainless Steel
Cleaner’*. Enjuague inmediatamente y seque. Para eliminar las estrías y restaurar el lustre, use después rociador
para acero inoxidable ‘Stainless Steel Magic Spray’*.
*Los nombres de los productos son marcas registradas de sus respectivos fabricantes.
** Para hacer pedidos, llame al 1-800-JENNAIR (1-800-536-6247).
85
Page 87

MANTENIMIENTO
T
BULB COVER
WIRE
RETAINER
Puerta del Horno
PRECAUCIÓN
No coloque peso excesivo ni se pare en la puerta del horno. Esto
podría hacer volcar la estufa, quebrar la puerta o lesionar al
usuario.
Nota: La puerta del horno en una estufa nueva puede sentirse
“esponjosa” cuando se cierra. Esto es normal y disminuirá con el
uso.
Ventana del Horno
Para proteger la ventana de la puerta del horno:
1. No use agentes de limpieza abrasivos tales como esponjas de
restregar de lana de acero o limpiadores en polvo pues ellos
pueden rayar el vidrio.
2. No golpee el vidrio con ollas, sartenes, muebles, juguetes u otros
objetos.
3. No cierre la puerta del horno hasta que las parrillas del horno no
estén en su lugar.
Al golpear, rayar, hacer vibrar o esforzar el vidrio puede debilitar su
estructura causando un mayor riesgo de rotura en una fecha
posterior.
Tornillos Niveladores
Conexión Eléctrica
Los electrodomésticos que requieren energía
eléctrica están equipados con un enchufe de
tres clavijas con conexión a tierra, el cual
debe ser enchufado directamente en un
tomacorriente eléctrico de tres agujeros, para
120 voltios debidamente conectado a tierra.
Siempre desenchufe el electrodoméstico antes de efectuar
reparaciones.
El enchufe de tres clavijas con conexión a tierra ofrece protección
contra peligros de choques eléctricos. NO CORTE NI ELIMINE LA
TERCERA CLAVIJA DE CONEXION A TIERRA DEL ENCHUFE
DEL CORDON ELECTRICO.
Si solamente se dispone de un tomacorriente sin conexión a tierra,
de dos agujeros u otro tipo de tomacorriente eléctrico, el
propietario del electrodoméstico es personalmente
responsable de reemplazar el tomacorriente con un
tomacorriente eléctrico de tres agujeros debidamente puesto
a tierra.
Luz del Horno
PRECAUCIÓN
• Desconecte la energía eléctrica hacia la estufa antes de
reemplazar el foco.
• Deje que el horno se enfríe antes de reemplazar el foco.
• Asegúrese de que la cubierta del foco y el foco estén fríos
antes de tocarlos.
PRECAUCIÓN
Verifique si el soporte antivuelco está asegurando al piso uno de
los tornillos niveladores traseros. Este soporte evita que la estufa
se vuelque accidentalmente.
La estufa debe ser nivelada cuando se instala. Si la
estufa no está nivelada, gire los tornillos niveladores
de plástico ubicados en cada esquina de la estufa
hasta que quede nivelada.
ANTI-TIP BRACKE
DISPOSITIVO
ANTIVUELCO
LEVELING LEG
TORNILLO NIVELADOR
Para reemplazar el foco del horno:
1. Cuando el horno esté frío, sujete la tapa de la bombilla en su
lugar, luego deslice el retén de alambre fuera de la cubierta.
NOTA: La cubierta de la bombilla se caerá si no es sujeta en su
lugar cuando está sacando el retén de alambre.
2. Saque la cubierta del foco y el foco.
3. Coloque un foco de 40 watts para
electrodomésticos.
4. Vuelva a colocar la cubierta
de la bombilla y asegúrela
con el retén de alambre.
5. Vuelva a enchufar la estufa.
Vuelva a colocar la hora
correcta.
CUBIERTA DE
LA BOMBILLA
RETÉN DE ALAMBRE
86
Page 88

MANTENIMIENTO
Retiro de la Estufa a Gas
Los conectores de la estufa a gas usados para conectar este
artefacto al suministro de gas no están diseñados para movimiento
continuo. Una vez instalados, NO mueva repetidamente este
artefacto a gas para su limpieza o para ubicarlo en otro lugar. Si
este artefacto tiene que ser movido y/o retirado para reparación,
siga el procedimiento descrito en las instrucciones de instalación.
Para información, póngase en contacto con el Servicio a los Clientes
Jenn-Air llamando al 1-800-JENNAIR (1-800-536-6247).
Para evitar que la estufa se vuelque accidentalmente, se debe
asegurar al piso colocando el tornillo nivelador trasero dentro del
soporte antivuelco.
Gaveta de Almacenamiento
PRECAUCIÓN
No guarde productos de papel o de plástico, alimentos ni
materiales inflamables en esta gaveta. La gaveta puede
calentarse demasiado para estos artículos cuando se está usando
el horno.
La gaveta de almacenamiento puede ser retirada para que usted
pueda limpiar debajo de la estufa.
Para sacar :
1. Vacíe la gaveta y deslícela hacia afuera hasta la primera posición
tope.
2. Levante la parte delantera de la gaveta.
3. Tírela hasta la segunda posición de tope.
4. Sujete los lados y levante la gaveta para retirarla.
Para volver a colocar:
1. Inserte los extremos de las correderas de la gaveta en los rieles
de la estufa.
2. Levante la parte delantera de la gaveta y suavemente empújela a
la primera posición de tope.
3. Levante la gaveta nuevamente y empújela hasta que quede
completamente cerrada.
Panel Inferior del Horno
Proteja el panel inferior del horno contra derrames, especialmente de
tipo acídico o azucarado, pues pueden descolorar la porcelana
esmaltada. Use el utensilio de tamaño correcto a fin de evitar
derrames y reboses.
El panel inferior del horno puede ser sacado para su limpieza.
Para sacar:
Cuando se enfríe, saque las parrillas del horno. Deslice
los dos retenes, ubicados en cada esquina
del panel inferior del horno hacia la parte
delantera del horno.
Levante el borde trasero del panel inferior
del horno ligeramente y luego deslícelo
hacia atrás hasta que el borde delantero del
horno pasa por sobre el marco delantero.
Saque el panel inferior del horno.
2
Para volver a colocar:
Coloque el borde delantero del panel inferior del horno en el marco
delantero del horno. Baje la parte trasera del panel inferior del
horno y deslice los dos retenes hacia atrás para bloquear el panel
inferior del horno en su lugar.
1
3
87
Page 89

LOCALIZACIÓN Y SOLUCIÓN DE AVERÍAS
PROBLEMA SOLUCIÓN
Para la mayoría de los problemas,
verifique primero lo siguiente.
El quemador superior no se
enciende.
La llama es dispareja.
La llama del quemador superior se•Verifique para asegurarse de que el utensilio está asentado en la parrilla sobre el quemador.
levanta del orificio.
Los resultados del horneado no son•Verifique la temperatura del horno seleccionada. Asegúrese de que el horno esté
como se esperaban o son precalentado cuando la receta o instrucciones recomiendan precalentamiento del horno.
diferentes a los del horno anterior.
•
Revise si los controles del horno están debidamente ajustados.
•
Verifique si el enchufe está firmemente insertado en el tomacorriente.
• Verifique o vuelva a reponer el disyuntor. Verifique o reemplace el fusible.
• Verifique el suministro de energía eléctrica.
•
Verifique si la estufa está debidamente conectada a la fuente de alimentación.
•
Verifique si está fundido un fusible del circuito o si se disparó el disyuntor principal.
• Verifique para asegurarse de que el encendedor esté seco y que emita chasquidos. El
quemador no se encenderá si el encendedor está dañado, sucio o mojado. Si el encendedor
no produce un chasquido, gire la perilla de control a la posición ‘Off’.
•
Los orificios del quemador pueden estar obstruidos.
•
Asegúrese de que el respiradero del horno no esté bloqueado. Ver página 80 para la ubicación.
• Verifique para asegurarse de que la estufa está nivelada.
• Las temperaturas a menudo varían entre un horno nuevo y uno antiguo. A medida que pasa
el tiempo, la temperatura del horno cambia y puede hacerse más caliente o más fría. Ver
pág. 79 para las instrucciones como ajustar la temperatura del horno. NOTA: No se
recomienda ajustar la temperatura si ha tenido problemas con solo una o dos recetas.
• Use el utensilio correcto. Los utensilios oscuros producen dorado oscuro. Los utensilios
brillantes producen dorado claro. Consulte el folleto “La Cocina Fácil” para mayor información
sobre los utensilios de hornear.
• Verifique las posiciones de las parrillas y la colocación de los utensilios. Alterne los utensilios
cuando use dos parrillas. Deje 2,5-5 cm (1-2 pulgadas) entre los utensilios y las paredes del
horno.
• Verifique el uso de papel de aluminio en el horno. Nunca use papel de aluminio para cubrir
una parrilla completa del horno. Coloque un pedazo pequeño de papel de aluminio en la parrilla
que está debajo del utensilio para recibir los derrames.
Los alimentos no se asan a la
parrilla en forma debida o salen la llama.
demasiado humo.
•
Verifique las posiciones de las parrillas del horno. El alimento puede estar muy cerca de
•
El papel de aluminio se usó de manera incorrecta. Nunca forre el inserto del asador con papel
de aluminio.
• Recorte el exceso de grasa de la carne antes de ponerla a asar a la parrilla.
• Se usó una asadera sucia.
• Precaliente el horno durante dos a tres minutos antes de colocar el alimento en el horno.
• Ase a la parrilla con la puerta del horno cerrada.
88
Page 90

LOCALIZACIÓN Y SOLUCIÓN DE AVERÍAS
PROBLEMA SOLUCIÓN
El horno no se autolimpia.
El horno no se limpió en
forma debida.
La puerta del horno no se
desbloquea después del ciclo para que el horno se enfríe antes de que se complete un ciclo de autolimpieza. La puerta
de autolimpieza. puede ser abierta cuando desaparezca la palabra ‘LOCK’ del indicador visual.
Se junta humedad en la ventana
del horno o sale vapor por
el respiradero del horno.
Hay un olor fuerte o humo leve
cuando se enciende el horno. Al iniciar un ciclo de autolimpieza se “quemarán” los olores más rápidamente.
•
Verifique para asegurarse de que el ciclo no esté ajustado para un comienzo diferido. Ver
páginas 82-83.
• Verifique si la puerta está cerrada.
• Verifique si el control está en Modo Sabático. Ver pág. 78.
• El horno puede estar a más de 205° C (400° F). La temperatura del horno debe ser inferior a
205° C (400° F) para programar un ciclo de limpieza.
•
Puede que sea necesario un tiempo de limpieza más largo.
•
Los derrames excesivos, especialmente de alimentos azucarados y/o ácidos no fueron
limpiados antes del ciclo de autolimpieza.
•
El interior del horno todavía está caliente. Deje que pase aproximadamente una hora
• El control y la puerta puede estar bloqueada. Ver pág. 69.
•
Esto es normal cuando se cocinan alimentos con alto contenido de humedad.
•
Se usó humedad excesiva cuando limpió la ventana.
•
Esto es normal en una estufa nueva y desaparecerá después de unos pocos usos.
• Si se enciende el ventilador ayudará a eliminar el humo y/o el olor.
• Suciedad excesiva de alimentos en el panel inferior del horno. Use un ciclo de autolimpieza.
Códigos de Errores
Se escuchan ruidos.
No se escuchan señales sonoras
y el indicador visual no se activa.
‘SAb’ destella y luego se • El horno está en modo sabático. Para anular el modo sabático, oprima y mantenga oprimida la
despliega continuamente. tecla ‘Clock’ (Reloj) durante cinco segundos.
•
‘BAKE’ o ‘LOCK’ pueden destellar rápidamente en el indicador para avisarle que hay un error
o un problema. Si ‘BAKE’ o ‘LOCK’ aparecen en el indicador visual, oprima la tecla ‘CANCEL’.
Si ‘BAKE’ o ‘LOCK’ continúan destellando, desconecte la energía eléctrica al electrodoméstico.
Espere unos pocos minutos y vuelva a reconectar la energía eléctrica. Si continúan destellando,
desconecte la energía eléctrica del electrodoméstico y llame al técnico de servicio autorizado.
• Si el horno está demasiado sucio, pueden ocurrir demasiadas llamaradas lo cual resultará en
un código de error durante la limpieza. Oprima la tecla ‘CANCEL’ y deje que el horno se enfríe
completamente, limpie el exceso de suciedad y luego vuelva a programar el ciclo de limpieza.
Si el código de error reaparece, llame a un técnico autorizado.
•
El horno emite varios sonidos bajos. Usted puede oír los relés del horno cuando se encienden
y se apagan. Esto es normal.
• A medida que el horno se calienta y se enfría, usted puede oír sonidos de piezas metálicas que
se expanden y contraen. Esto es normal y no dañará su electrodoméstico.
•
El horno puede estar en Modo Sabático. (Ver pág. 78).
89
Page 91

NOTAS
90
Page 92

GARANTÍA Y SERVICIO
Garantía Completa de Un Año - Piezas
y Mano de Obra
Durante un (1) año desde la fecha original de
compra al por menor, se reparará o reemplazará
gratuitamente cualquier pieza que falle durante uso
normal en el hogar.
Garantías Limitadas - Piezas Solamente
Segundo Año - Después del primer año desde la
fecha original de compra, se reemplazarán o
repararán gratuitamente las piezas que fallen
durante uso normal en el hogar en lo que respecta a
las piezas y el propietario deberá pagar todos los
otros costos incluyendo mano de obra, kilometraje/
millaje, transporte, costo del viaje y costo del
diagnóstico, si fuese necesario.
Desde el Tercero hasta el Quinto Año - A partir
de la fecha original de compra, se repararán o
reemplazarán gratuitamente las piezas indicadas a
continuación que fallen durante uso normal en el
hogar en lo que respecta a las piezas y el
propietario deberá pagar todos los otros costos
incluyendo mano de obra, kilometraje/millaje,
transporte, costo del viaje y costo del diagnóstico, si
fuese necesario.
• Quemadores de Gas Sellados
• Controles Electrónicos
Residentes Canadienses
Las garantías anteriores cubren solamente aquellos
electrodomésticos instalados en Canadá que han
sido certificados o aprobados por las agencias de
pruebas correspondientes para cumplimiento con la
Norma Nacional de Canadá a menos que el
electrodoméstico haya sido traído a Canadá desde
los EE.UU. debido a un cambio de residencia.
Garantía Limitada Fuera de los Estados
Unidos y Canadá - Piezas Solamente
Durante dos (2) años desde la fecha de compra
original al por menor, cualquier pieza que falle
durante uso normal en el hogar será reemplazada o
reparada gratuitamente en lo que respecta a la pieza
y el propietario deberá pagar todos los otros costos
incluyendo mano de obra, kilometraje/millaje,
transporte, costo del viaje y costo del diagnóstico, si
fuese necesario.
Las garantías específicas expresadas anteriormente
son las UNICAS garantías provistas por el fabricante.
Estas garantías le otorgan derechos legales
específicos y usted puede tener además otros
derechos que varían de un estado a otro.
Lo que No Cubren Estas Garantías:
1. Situaciones y daños resultantes de cualquiera de las siguientes
eventualidades:
a. Instalación, entrega o mantenimiento inapropiados.
b. Cualquier reparación, modificación, alteración o ajuste no autorizado por
el fabricante o por un centro de servicio autorizado.
c. Mal uso, abuso, accidentes o uso irrazonable.
d. Corriente eléctrica, voltaje o suministro incorrecto.
e. Programación incorrecta de cualquiera de los controles.
2. Las garantías quedan nulas si los números de serie originales han sido
retirados, alterados o no son fácilmente legibles.
3. Focos.
4. Productos comprados para uso comercial o industrial.
5. El costo del servicio o llamada de servicio para:
a. Corregir errores de instalación.
b. Instruir al usuario sobre el uso correcto del artefacto.
c. Transporte del artefacto al establecimiento de servicio.
6. Los daños consecuentes o incidentales sufridos por cualquier persona como
resultado de cualquier incumplimiento de estas garantías. En algunos
estados no se permite la exclusión o limitación de los daños consecuentes o
incidentales, por lo tanto la exclusión anterior puede que no se aplique en su
caso.
Si Necesita Servicio
• Llame al distribuidor donde compró su electrodoméstico o llame a Maytag
ServicesSM, Jenn-Air Customer Assistance al 1-800-JENNAIR (1-800-536-
6247) para ubicar a un técnico autorizado.
• Asegúrese de conservar el comprobante de compra para verificar el estado de
la garantía. Consulte la sección sobre la GARANTIA para mayor información
sobre las responsabilidades del propietario para servicio bajo la garantía.
• Si el distribuidor o la compañía de servicio no pueden resolver el problema,
escriba a Maytag Services
37320-2370 o llame al 1-800-JENNAIR (1-800-536-6247).
• Las guías del usuario, manuales de servicio e información sobre las piezas
pueden solicitarse a Maytag Services
Notas:
Cuando llame o escriba acerca de un problema de servicio, por favor
incluya la siguiente información.
a. Su nombre, dirección y número de teléfono;
b. Número de modelo y número de serie;
c. Nombre y dirección de su distribuidor o técnico de servicio;
d. Una descripción clara del problema que está experimentando;
e. Comprobante de compra (recibo de compra).
SM
, Attn: CAIR® Center, P.O. Box 2370, Cleveland, TN
SM
, Jenn-Air Customer Assistance.
Form No. B/09/04 Part No. 8113P463-60 Rev. 1 ©2004 Maytag Appliances Sales Co. Litho U.S.A .
 Loading...