

Jenn-Air 2240 Use And Care Manual

USE
AND
CARE
MANUAL
MODEL 2240
A
Finer WALLOVEN
Kitchen
Produc t
by
_ d E N N "AIR
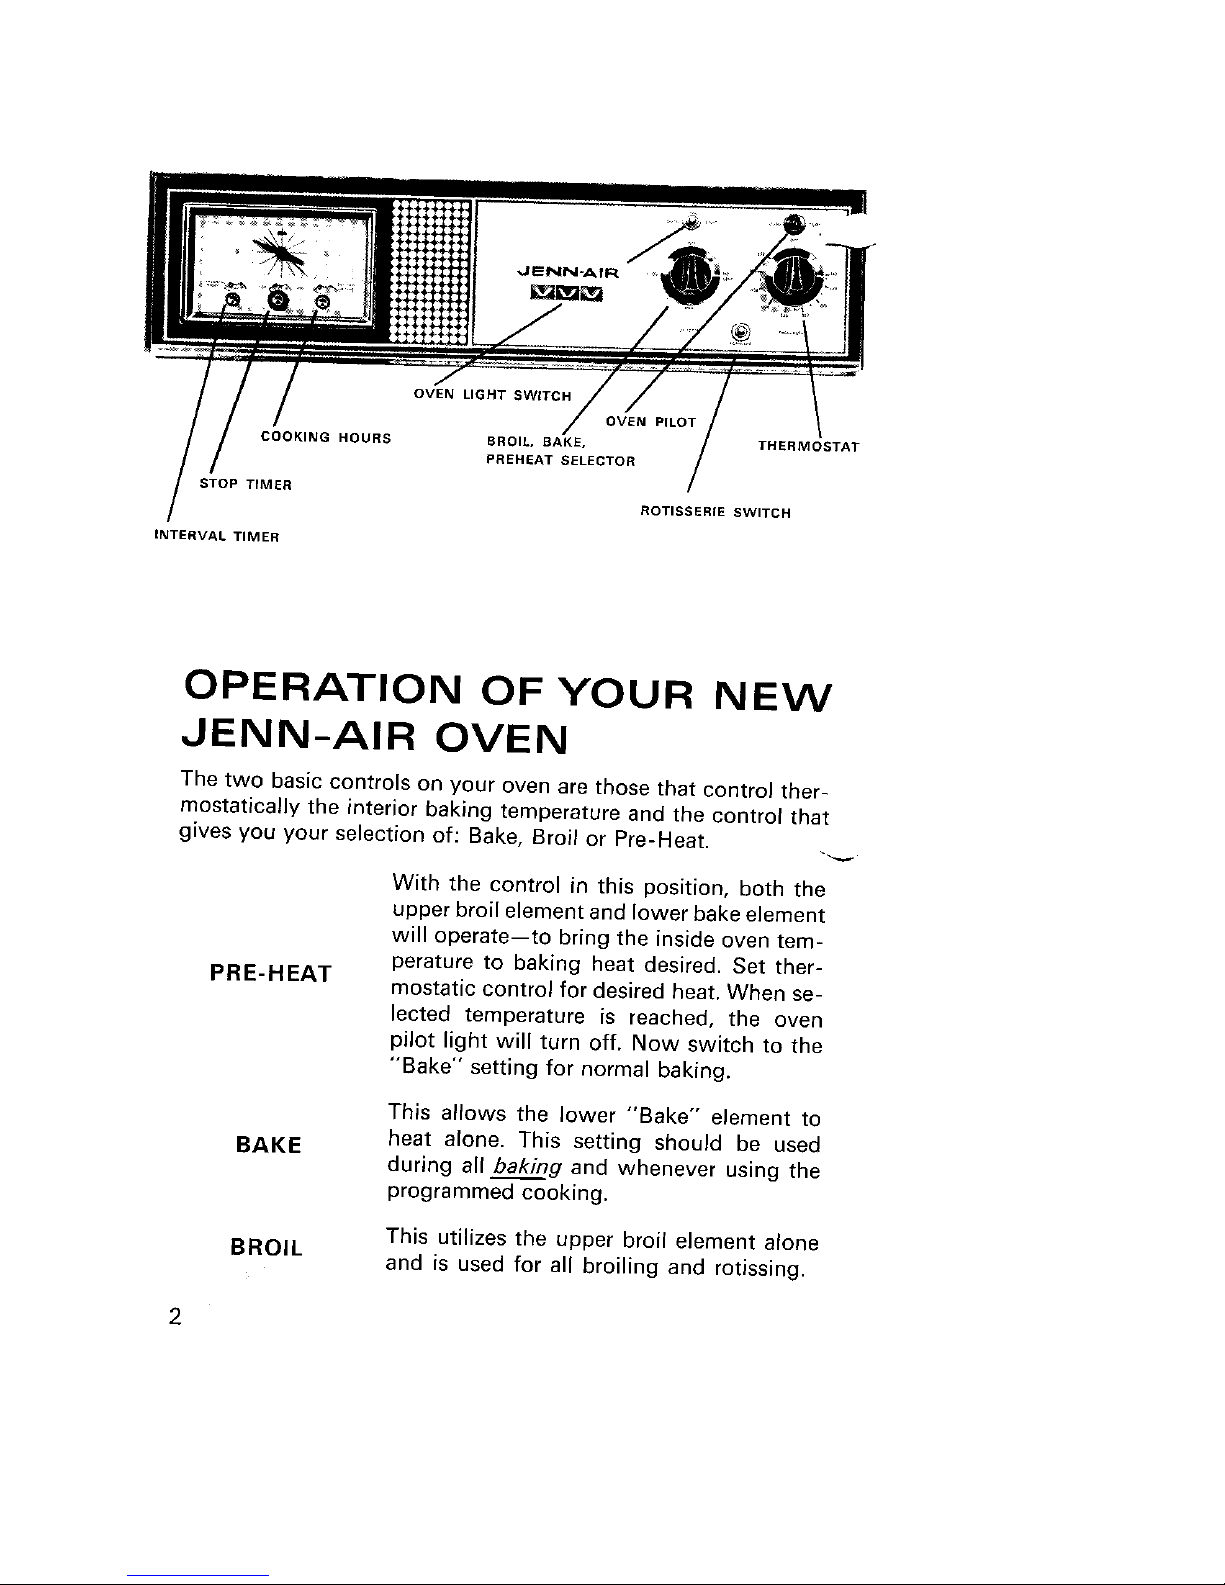
INTERVAL TIMER
OPERATION OF YOUR NEW
JENN-AIR OVEN
The two basic controls on your oven are those that control ther-
mostatically the interior baking temperature and the control that
gives you your selection of: Bake, Broil or Pre-Heat.
With the control in this position, both the
upper broil element and lower bake element
will operate--to bring the inside oven tem-
perature to baking heat desired. Set ther-
PRE-HEAT mostatic control for desired heat. When se-
lected temperature is reached, the oven
pilot light will turn off. Now switch to the
"Bake" setting for normal baking.
This allows the lower "Bake" element to
BAKE heat alone. This setting should be used
during all baking and whenever using the
programmed cooking.
This utilizes the upper broil element alone
BROIL
and is used for all broiling and rotissing.
2

11. On conventional element cooktops make sure that drip pans
are in place. Absence of these pans during cooking may
subject wiring or components underneath to damage.
12. Do not use aluminum foil to line surface unit drip pans
or grill basin. Installation of these liners may result in an
electric shock or fire hazard.
13. Glazed cookware -- only certain types of glass, glass-
ceramic, ceramic, earthenware, or other glazed cookpots
are suitable for cooktop surface without breaking due to
the sudden change in temperature. Use only such cookware
as you know has been approved for this purpose.
14. Cookware handles should be turned inward and not extend
over adjacent surface heating elements to avoid burns,
ignition of flammable materials and spillage due to uninten-
tional contact with the cookware.
15. Do not soak or immerse removable heating elements in
water.
16. CAUTION -- Do not store items of interest to children in
cabinets above cooktop--children climbing on the cook-
top to reach items could be seriously injured.
17. Do not touch surface units or areas near units. Surface
units or heating elements may be hot even though they
are dark in color. Areas near surface units may become
hot enough to cause burns. During and after use, do not
touch or let clothing or other flammable materials contact
these areas until they have had sufficient time to cool. Other
surfaces may become hot enough to cause burns -- among
these surfaces are the cooktop.
18. Do not cook on glass-ceramic cooking surface if the cook-
top is broken. Cleaning solutions and spillovers may pene-
trate the broken cooktop and create a shock hazard. Contact
an authorized Jenn-Air Service Contractor.
19. Clean glass-ceramic cooktops with caution. If wet sponge
or cloth is used to wipe spills on a hot cooking area, be
careful to avoid steam burns. Some cleansers can produce
noxious fumes if applied to a hot surface.
20. Do not operate with damaged cooking element after any
product malfunction until proper repair has been made.
21. Keep all switches "OFF" when unit is not in use.
3
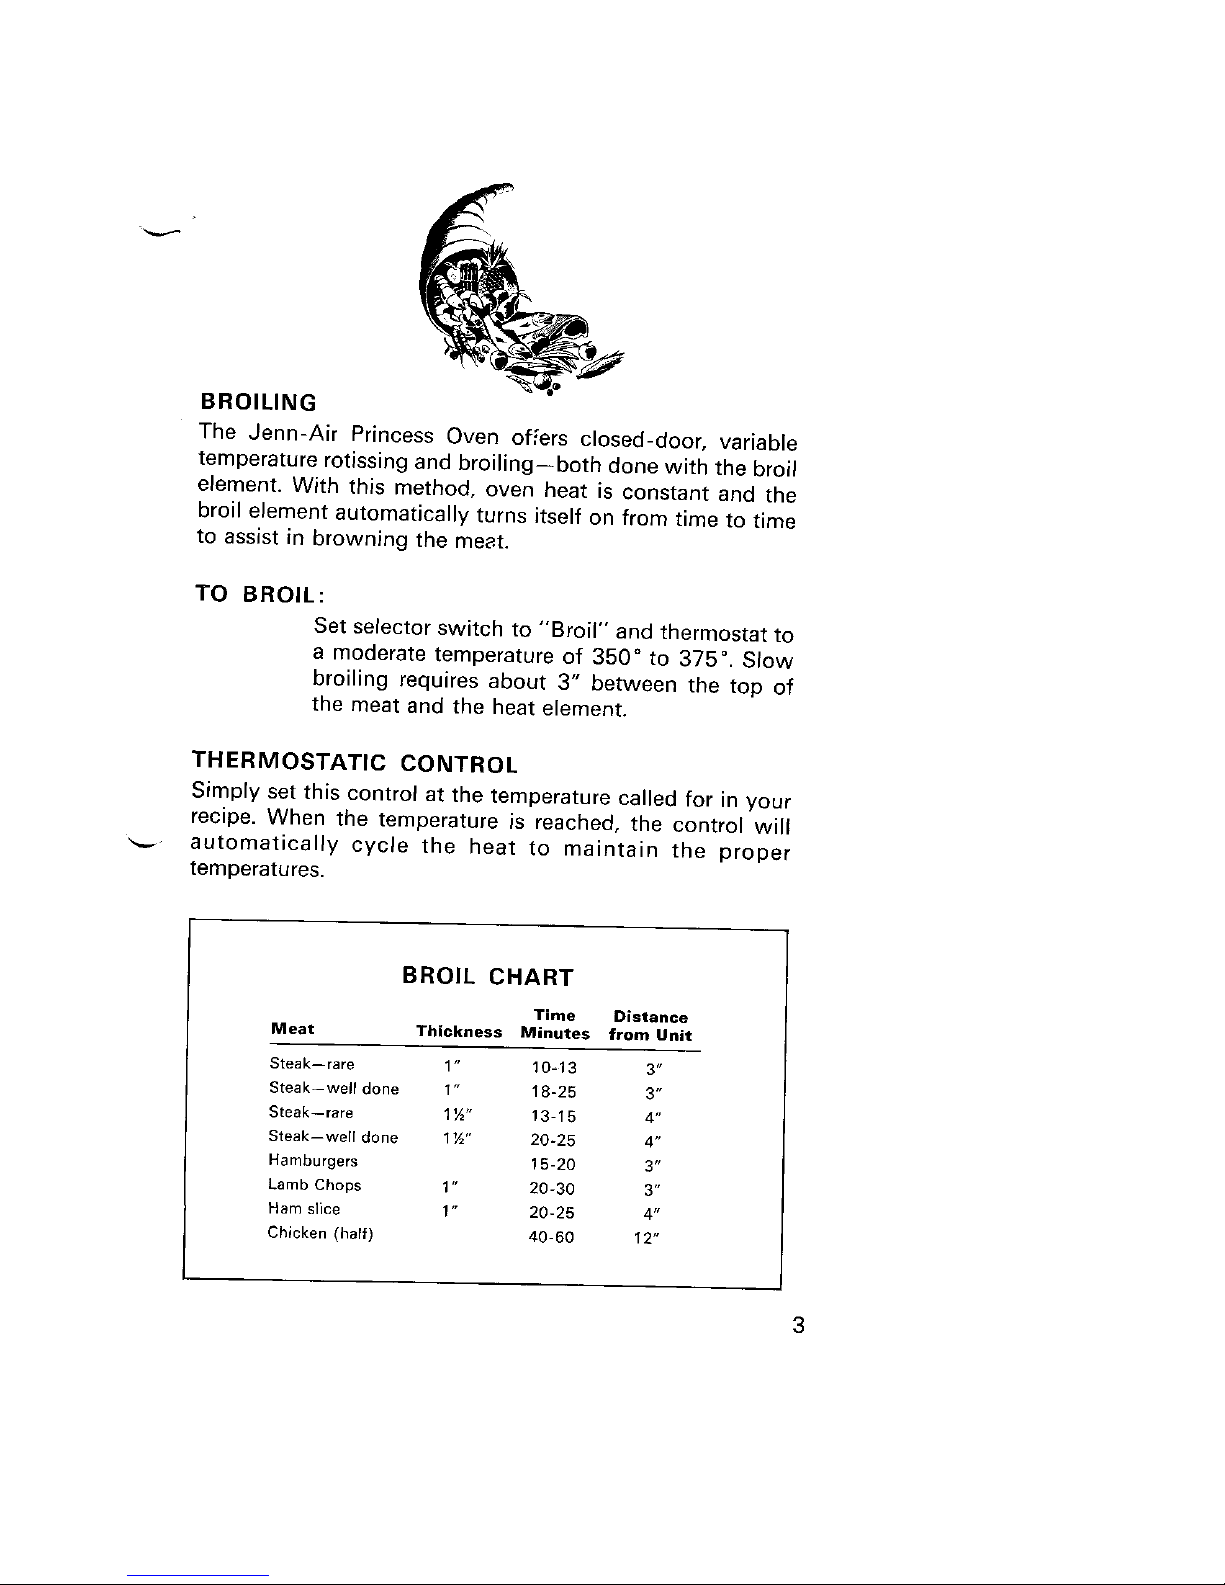
BROILING
The Jenn-Air Princess Oven offers closed-door, variable
temperature rotissing and broiling--both done with the broil
element. With this method, oven heat is constant and the
broil element automatically turns itself on from time to time
to assist in browning the meat.
TO BROIL:
Set selector switch to "Broil" and thermostat to
a moderate temperature of 350 ° to 375°. Slow
broiling requires about 3" between the top of
the meat and the heat element.
THERMOSTATIC CONTROL
Simply set this control at the temperature called for in your
recipe. When the temperature is reached, the control will
,_.,- automatically cycle the heat to maintain the proper
temperatures.
BROIL CHART
Time Distance
Meat Thickness Minutes from Unit
Steak--rare 1" 10-13 3"
Steak--welt done 1" 18-25 3"
Steak--rare 1½" 13-15 4"
Steak--well done 1½" 20-25 4"
Hamburgers 15-20 3"
Lamb Chops 1" 20-30 3"
Ham slice 1" 20-25 4"
Chicken (half) 40-60 12"
3
11. On conventional element cooktops make sure that drip pans
are in place. Absence of these pans during cooking may
subject wiring or components underneath to damage.
12. Do not use aluminum foil to line surface unit drip pans
or grill basin. Installation of these liners may result in an
electric shock or fire hazard.
13. Glazed cookware -- only certain types of glass, glass-
ceramic, ceramic, earthenware, or other glazed cookpots
are suitable for cooktop surface without breaking due to
the sudden change in temperature. Use only such cookware
as you know has been approved for this purpose.
14. Cookware handles should be turned inward and not extend
over adjacent surface heating elements to avoid burns,
ignition of flammable materials and spillage due to uninten-
tional contact with the cookware.
15. Do not soak or immerse removable heating elements in
water.
16. CAUTION -- Do not store items of interest to children in
cabinets above cooktop--children climbing on the cook-
top to reach items could be seriously injured.
17. Do not touch surface units or areas near units. Surface
units or heating elements may be hot even though they
are dark in color. Areas near surface units may become
hot enough to cause burns. During and after use, do not
touch or let clothing or other flammable materials contact
these areas until they have had sufficient time to cool. Other
surfaces may become hot enough to cause burns -- among
these surfaces are the cooktop.
18. Do not cook on glass-ceramic cooking surface if the cook-
top is broken. Cleaning solutions and spillovers may pene-
trate the broken cooktop and create a shock hazard. Contact
an authorized Jenn-Air Service Contractor.
19. Clean glass-ceramic cooktops with caution. If wet sponge
or cloth is used to wipe spills on a hot cooking area, be
careful to avoid steam burns. Some cleansers can produce
noxious fumes if applied to a hot surface.
20. Do not operate with damaged cooking element after any
product malfunction until proper repair has been made.
21. Keep all switches "OFF" when unit is not in use.
3
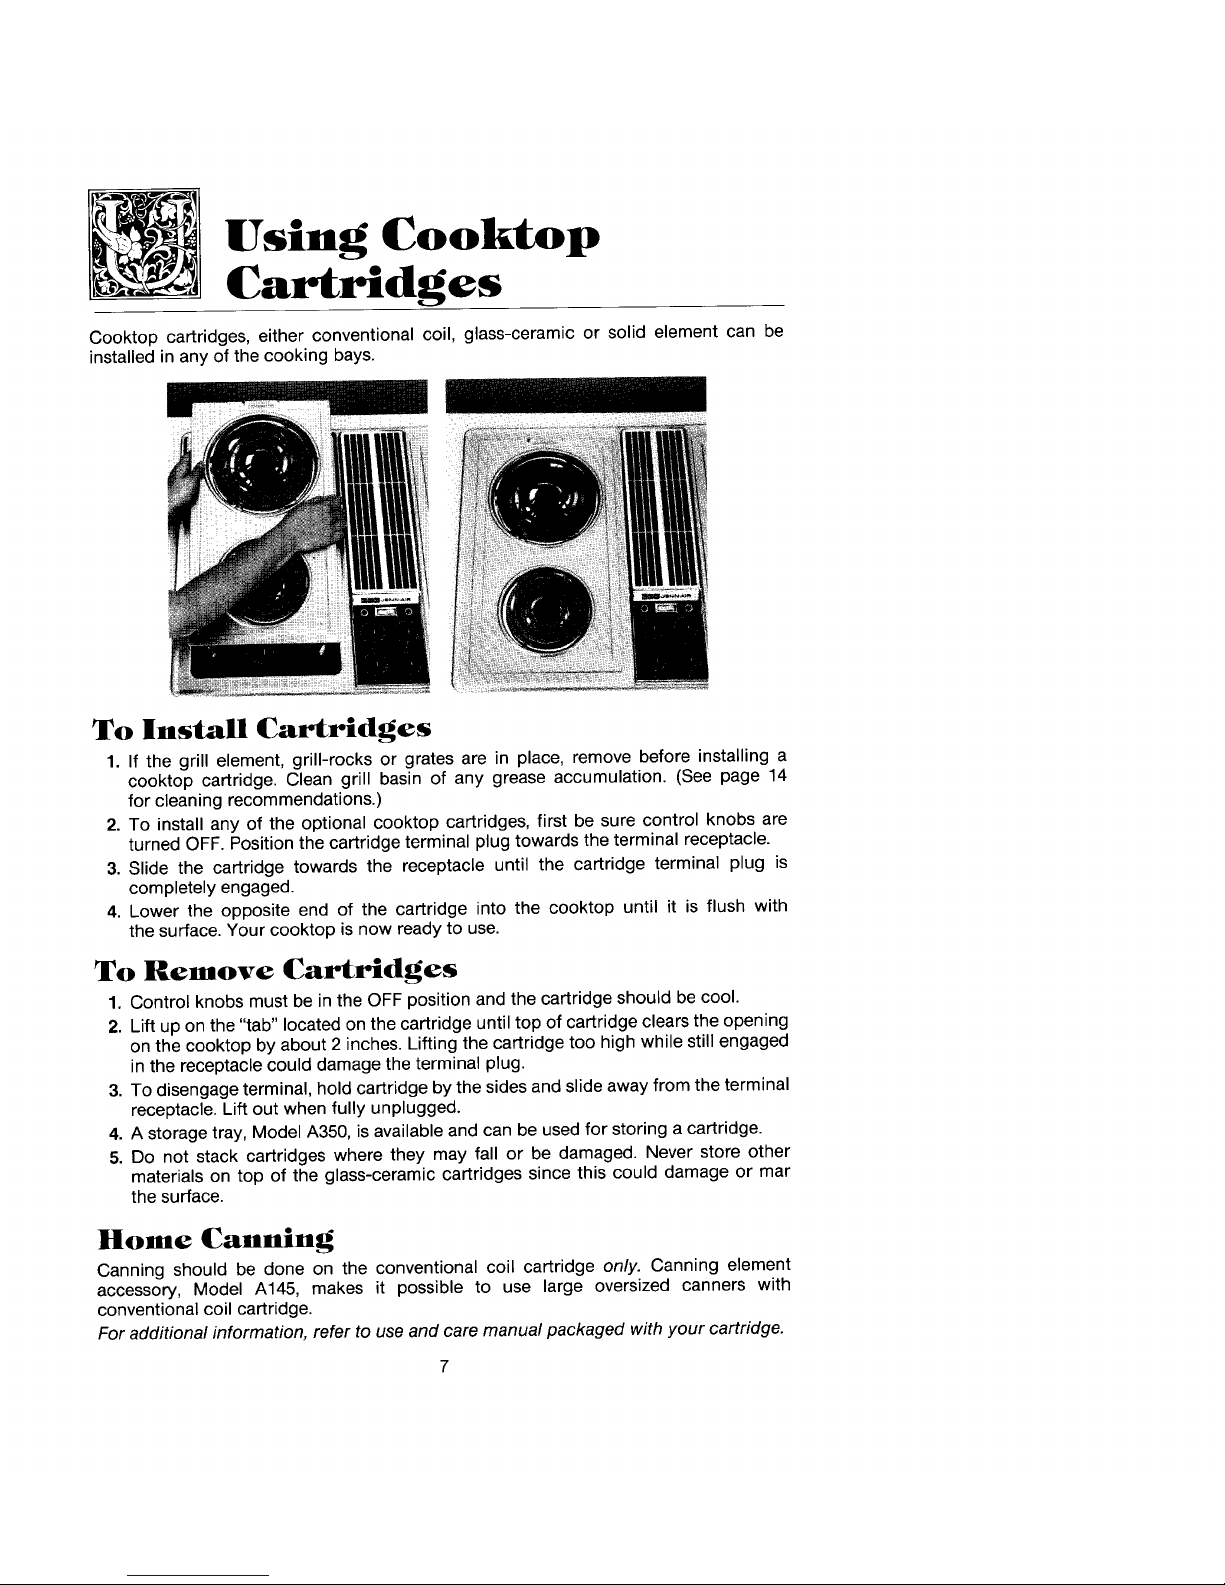
Using Cooktop
Cartridges
Cooktop cartridges, either conventional coil, glass-ceramic or solid element can be
installed in any of the cooking bays.
To Install Cartridges
1. If the grill element, grill-rocks or grates are in place, remove before installing a
cooktop cartridge. Clean grill basin of any grease accumulation. (See page 14
for cleaning recommendations.)
2. To install any of the optional cooktop cartridges, first be sure control knobs are
turned OFF. Position the cartridge terminal plug towards the terminal receptacle.
3. Slide the cartridge towards the receptacle until the cartridge terminal plug is
completely engaged.
4. Lower the opposite end of the cartridge into the cooktop until it is flush with
the surface. Your cooktop is now ready to use.
To Remove Cartridges
1. Control knobs must be in the OFF position and the cartridge should be cool.
2. Lift up on the "tab" located on the cartridge until top of cartridge clears the opening
on the cooktop by about 2 inches. Lifting the cartridge too high while still engaged
in the receptacle could damage the terminal plug.
3. To disengage terminal, hold cartridge by the sides and slide away from the terminal
receptacle. Lift out when fully unplugged.
4. A storage tray, Model A350, is available and can be used for storing a cartridge.
5. Do not stack cartridges where they may fall or be damaged. Never store other
materials on top of the glass-ceramic cartridges since this could damage or mar
the surface.
Home Canning
Canning should be done on the conventional coil cartridge only. Canning element
accessory, Model A145, makes it possible to use large oversized canners with
conventional coil cartridge.
For additional information, refer to use and care manual packaged with your cartridge.
7
 Loading...