

Page 1
JENN-AIR BOTTOM FREEZER REFRIGERATOR
Introduction ...........................................................................2
Important Safety Information ............................................ 3
Installation Instructions .................................................. .4-9
How to Remove the Doors and Hinges .....................4
How to Reverse Refrigerator Door ............................. 5
How to Install and Remove Handles ............................S
How to Replace the Doors and Hinges ......................6
How to Install and Remove Panels ............................... 6
How to Remove and Installthe Pullout Drawer.......7
How to Connect the Water Supply..............................8
How to LevelYour Refrigerator ....................................9
Temperature Controls......................................................I0
FreshFood Features....................................................11-12
Water Dispenser .............................................................
Interior Shelves................................................................
Door Storage...................................................................
Climate-Controlled Drawers .......................................12
Accessories.......................................................................12
Form No. B/,0102 Part No. 12642718 JENN-AIR. MCSo2002No.16021782MaytagAppliancesPrintedSalesinU.S.A.Co.
Freezer Features................................................................13
Automatic Ice Maker ......................................................13
Drawers.............................................................................13
Accessories.......................................................................13
Water Filtration .................................................................14
Water Filter Data ..............................................................15
Hints and Care ...................................................................16
Cleaning Instructions......................................................16
How to Remove and Replace Light Bulbs................17
Food StorageTips..............................................................18
Food StorageChart ..........................................................19
Normal Operating Sounds..............................................20
BeforeYou Call For Service......................................21-22
Warranty ..............................................................................23
Guide de L'Udlisateur .......................................................25
Guia del Usuario................................................................49
Page 2
gNSTALLATION INSTRUCTIONS
These instructions were provided to aid
you in the installationof your refrigerator.
MEASURING THE
OPENING
A '/2"of air spaceshouldbe provided for
the back of the unit to allow for the
power cord and water line. When
installingyour unit, measurecarefully.
Subflooring or floor coverings (i.e.
carpet,file, wood floors, rugs) may make
your openingsmaller than anticipated.
Someclearancemay be gainedby using
the levelingprocedure on page9.
IMPORTANT: If unit is to be installed
into a recess where top of unit is
completely covered,usedimensionsfrom
floor to top of hingecap to verify proper
clearance.
TRANSPORTING YOU
REFRIGERATOR
Follow these tips when movingthe unit
to final location:
> NEVER transport unit on its side. If
an upright position is not possible, lay
unit on its back. Allow unit to sit
upright for approximately 30 minutes
prior to pluggingunit in to assure oi[
return to the compressor. Plugging
unit in immediately may causedamage
to internal parts.
Use an appliancedolly when moving
unit.ALWAYS truck unit from its
side-NEVER from itsfront or back.
> Protect outsidefinish of unit during
transport by wrapping cabinet in
blanketsor inserting paddingbetween
the unit anddolly.
_- Secureunit to dolly firmly with straps
or bungee cords. Thread straps
through handles when possible. DO
NOT overtighten. Overfightening
restraints may dent or damage
outside finish.
SELECTING THE BEST
LOCATION
Allow for a free flow of air through
the front base grille.
Install the refrigerator where the
room temperature will not go below I.
55° F.With temperaturesbelow55° F,
the refrigerator will not run
frequentlyenoughto maintainproper
temperature in the freezer.
Locate the refrigerator away from
heatproducing appliancessuchas the
range or dishwasher,heat vents and
direct sunlight.
A minimumof 72"clearanceisrequired
at the back.Allow Y2"at the sidesfor
easeof installation. If refrigerator is
placedwith the door hingeside against
a wall, you may want to allow
additionalspace.
>-Use caution when installingthe
refrigerator on vinyl or hardwood
floorssoas not to mark or otherwise
damage the flooring. A piece of
plywood, a rug or other material
should be used to protect the floor
while positioningthe refrigerator.
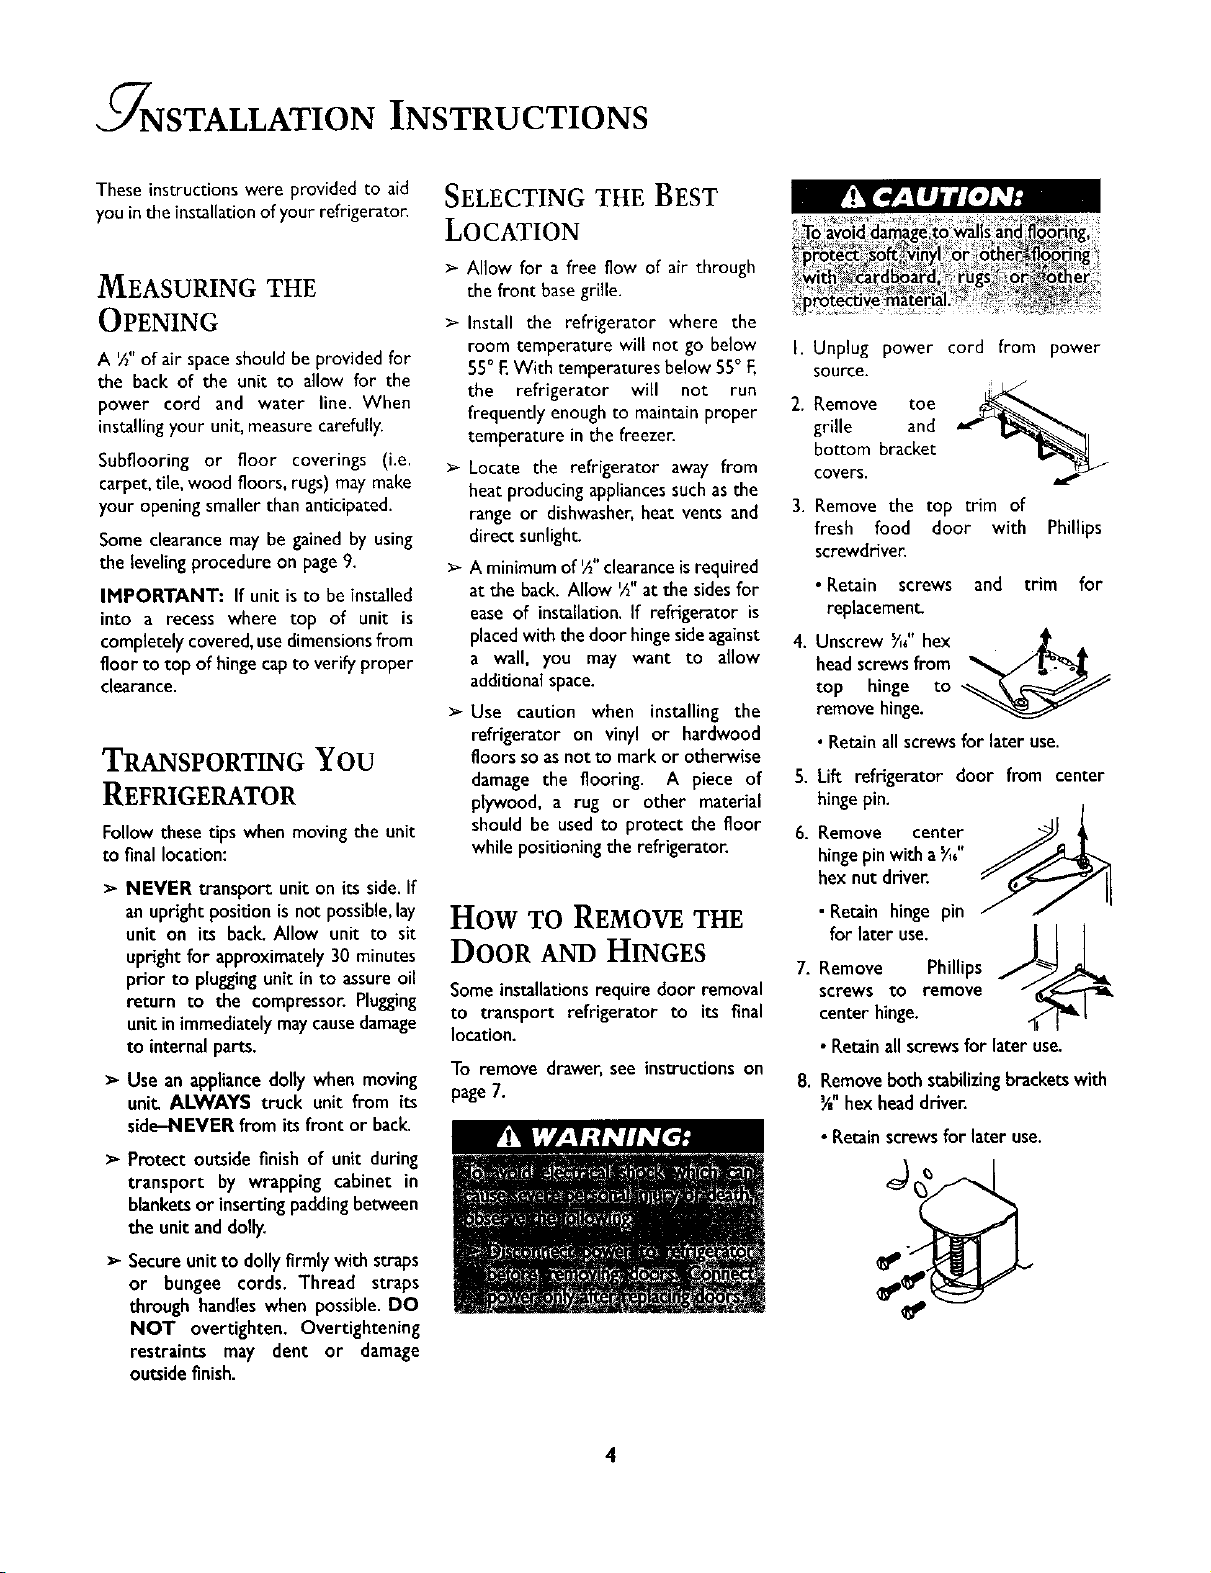
How TOREMOVETHE
DOOR AND HINGES
Some installationsrequire door removal
to transport refrigerator to its final
location.
To remove drawer, see instructions on
page 7.
Unplug power cord from power
source.
2.
grille and
Remove toe ,__
bottom bracket
covers.
3.
Remove the top trim of
fresh food door with Phillips
screwdriver:
• Retain screws and trim for
replacement
4.
Unscrew Y,/' hex _ .
head screws from
top hinge to
removehinge.
• Retainallscrewsfor later use.
5.
Lift refrigerator door from center
hinge pin.
Remove center
6.
hingepin with a Y_6"
hex nut driver.
• Retain hinge pin
for later use. _ [ j
7.
Remove Phillips
screws to remove
center hinge.
• Retainallscrewsfor lateruse.
8.
Removeboth stabilizingbracketswith
Y_"hexheaddriver.
• Retain screws for later use.
Page 3
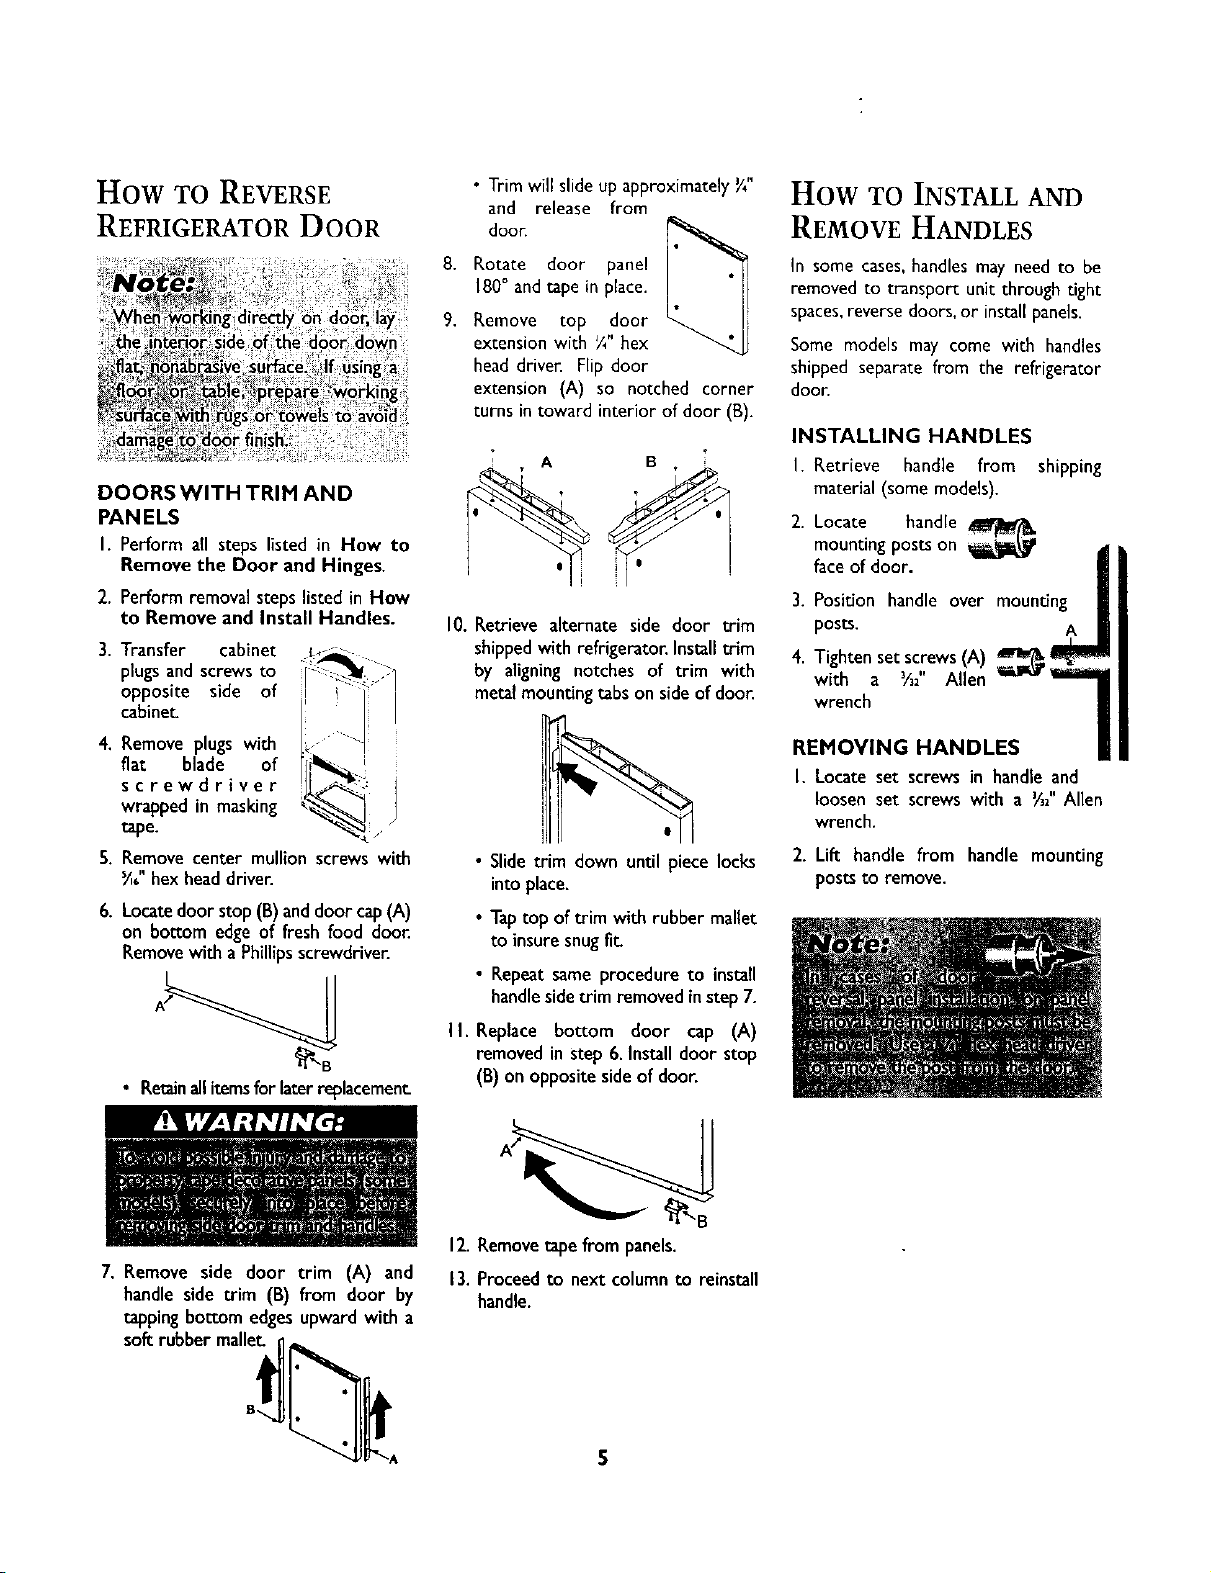
How TO REVERSE
REFRIGERATOR DOOR
DOORS WITH TRIM AND
PANELS
I. Perform all steps listed in How to
Remove the Door and Hinges.
2. Perform removal stepslistedinHow
to Remove and Install Handles.
3. Transfer cabinet
plugsand screwsto
opposite side of
cabinet
4. Remove plugs with
flat blade of i
screwdriver
wrapped in masking
tape.
5. Remove center mullion screws with
Y_6"hex headdriver.
6. Locatedoor stop (B)anddoor cap(A)
on bottom edge of freshfood door.
Removewith a Phillipsscrewdriver.
• Trim will slide up approximately Y4"
and release from
8,
Rotate door panel
180° and tape in place.
door.
9.
Remove top door
extension with ¼" hex
head driver. Flip door
extension (A) so notched corner
turns in toward interior of door (B).
10.
Retrieve alternate side door trim
shippedwithrefrigerator.Installtrim
by aligningnotches of trim with
metalmountingtabs onsideof door.
• Slidetrim down until piece locks
into place.
• Taptop of trim with rubber mallet
to insuresnugfit_
• Repeatsameprocedure to install
handlesidetrim removedinstep7.
How TO INSTALL AND
REMOVE HANDLES
In some cases, handles may need to be
removed to transport unit through tight
spaces,reverse doors, or install panels.
Some models may come with handles
shipped separate from the refrigerator
door.
INSTALLING HANDLES
I. Retrieve handle from shipping
material (somemodels).
2. Locate handle
mountingpostson _ j
faceof door.
3. Position handle over mounting J
posts.
4. Tighten set screws(A) _
with a Y_2 Allen _
wrench /
REMOVING HANDLES
I. Locateset screws in handleand
loosen set screws with a Y32"Allen
wrench.
2. Lift handle from handle mounting
posts to remove.
i
• Retainallitemsfor laterreplacement
7. Remove side door trim (A) and
handleside trim (13)from door by
tappingbottom edgesupward with a
soft rubber mallet.
II. Replace bottom door cap (A)
removed in step 6.Installdoor stop
(B)on opposite side of door.
B
12.Removetapefrom panels.
13.Proceed to next columnto reinstall
handle.
5
Page 4

_,_NSTALLATION INSTRUCTIONS, CONT.
How TO REPLACE THE
DOOR AND HINGES
I. Install center hinge with Phillips
screws.
2. Install stabilizing brackets with _" hex
3. Replace center
head screws.
hinge pin.
4. Place hinge side of
refrigerator door on center hinge pin.
5. While holding 2.
upright, tighten 3.
down top hinge 4.
refrigerator door
with Y_"hex head
driver.
6. Install top door trim of fresh food
door with a Phillipsscrewdriver.
How TO INSTALL AND
REMOVE PANELS
(SOME MODELS)
TO INSTALL PANELS:
I. Perform the handle removal
instructions in How to Install and
Remove the Handles, including
instructions to remove mounting
posts from door face.
Remove top door trim.
Remove handle side door trim.
Slidepanelinthe handleside ofdoor,
byusinggroovesprovided by bottom
door capandside door trim.
,
Replace mounting posts, handles,and
trim.
WHAT IF I AM
INSTALLING RAISED
PANELS?
Pleaseseerecommendeddimensionsfor
paneling.All panelholesare ¼ dtameten
2679-
73cm
H
TO REMOVE PANELS:
I. Perform the handle
removal
instructionsin How to Install and
Remove the Handles, including
instructions to remove mounting
postsfrom door face.
2,
Removetop doortrim.
3.
Removehandlesidedoor trim.
4.
Slide panel out the handleside of
door.
How Do I MOUNT
HANDLESON RAISED
PANELS?
The refrigerator is shipped with the
handle mounting posts attached to the
door with ¼" hex head screw that is
approximately 1½" long. This length is
necessaryto safely secure the mounting
post to the door.
Ifhandlesarebeingmountedto a raised
surface,the factory supplied hex head
screws will haveto be replacedwith a
longerversion.To determinehow long
the replacementscrewmusthe,addthe
thicknessof the raisedpanelto the 1½"
measurementSeeexamplebelow.
1½" k_ng _" hex_-_ (factory
I" thick raised
i ,_mlL_
panel = 2½ long
Page 5

How TO REMOVE AND
INSTALL THE PULLOUT
DRAWER
To remove:
I. Pullupperbasketoutto full extension
andlift out to remove.
3. Pulldrawer open to full extension.
4. RemovePhillipsscrew from eachside
of rail system. (Somemodels)
]
i
5. Lift top of door to unhook door
supports from rail system.Lift door
OUt tO remove,
\
3. Lower door into final position.
4. Replace and tighten Phillips screws
that were removedfrom each sideof
rail system.
\\
5. With drawer pulled out to full
extension, insert lower basket by
aligningtabs on both sidesof lower
basketwith notches in rail assembly.
Verify that the basket sides are
hookedsecurelyover the rails.
2. Remove lower basket by pressing
inward on basket sides, then lift
basket
PressTab Here
To install:
I. Pull both rails out to full extension.
6. Slide upperbasket intofreezer.Make
surethat rearof baskethooks behind
rail catch.
2. While supporting door, hook door
supports into tabs locatedon inside
of rail.
L
Page 6

gNSTALLATION INSTRUCTIONSp CONT.
How TO CONNECT
THE WATER SUPPLY
HATERIALS NEEDED
> ¼" outer diameter flexible copper
tubing
> Shut-off valve (requires a ¼" hole to
be drilled into water supply before
valve attachment)
> Adjustable wrench
>- ¼" hex nut driver
I. Create service loop with tubing using
care to avoid kinks in tubing.
2. Removeplasticcap from water valve
inlet port.
4. Place end of copper tubing into water
valve inlet port.Shape tubing slightly -
DO NOT KINK - so that tubing feeds
straight into inlet port.
5. Slidebrassnut over sleeveand screw
nut into inlet port-Tighten nut with
wrench.
IHPORTANT: DO NOT overtighten.
Crossthreading mayoccur.
6. Pullon tubing to confirmconnection
is secure, Connect tubing to frame
with water tubingclamp(C) and turn
on water supply.Checkfor leaksand
correct, if present.
3. Placebrassnut(A) and sleeve(B) on
copper tube endasillustrated.
A
B
7. Monitor water connection for 24
hours,Correct leaks,if necessary.
Page 7

How TO LEVEL YOUR
REFRIGERATOR
Ifyour refrigerator requiresan icemaker
water supply connection, complete
connection instructions on page8 before
levelingyour refrigerator.
V!T4 _I d£.J
MATERIALS NEEDED
Ya"hex headdriver
:_ Level
I. Removetoe grille andbottombracket
covers.
4. Turn stabilizing legs (C) clockwise
until firmly againstfloor.
5. Turn front roller adjustment screws
(A) 2 to 3 times counterclockwise,so
that full weight of unit rests on
stabilizinglegs(C).
6,
Using a level, make sure front of
refrigerator is¼"(6ram) or V2bubble
higher than back of refrigerator. See
levelingstep3 for assistance.
7,
Replace toe grille and bracket
cover(s). See markingson inside of
toe grille to insureproperplacement.
Snap bottom portion into place
first. Pressdown ontop part of grille
until top portionsnapsintoplace.
2. Turn both front adjustment screws
(A) clockwise to raise and counter-
clockwiseto lower.
3. Turn both rear adjustmentscrews(B)
clockwise to raise and counter-
clockwiseto lower.
 Loading...