

ELLY BELLY™ SLUSHIE EXPRESS
Instruction Manual
Register this and other Focus Electrics products through our website:
www.registerfocus.com
Important Safeguards ............................................................................................... 2
Before Using for the First Time ................................................................................ 3
Using Your Slushie Express™ .................................................................................. 4
Cleaning Your Slushie Express™ ............................................................................. 4
Cool & Easy Treats .................................................................................................. 5
Warranty ................................................................................................................... 6
J
™
SAVE THIS INSTRUCTION MANUAL FOR FUTURE REFERENCE
™, ™, 2011 Jelly Belly Candy Company, Fairfield, CA 94533 USA
Manufactured and Distributed by Focus Electrics, LLC Authorized Licensee,
West Bend, WI 53095 USA
www.focuselectrics.com

IMPORTANT SAFEGUARDS
To prevent personal injury or property damage, read and follow all instructions
and warnings.
When using electrical appliances, basic safety precautions should always be
followed including:
• Read all instructions.
• To protect against fire, electric shock, and injury to persons do not immerse
cord, plugs, or other electric parts in water or other liquids.
• Close supervision is necessary when this appliance is used by or near children.
• Always unplug from outlet when not in use and before cleaning. Allow to cool
before putting on or taking off parts and before cleaning.
• Do not operate any appliance with a damaged cord or plug, after the appliance
malfunctions, or has been damaged in any manner. For service information see
warranty page.
• The use of accessory attachments not recommended by Focus Electrics may
cause fire, electric shock, or injury.
• Do not use this appliance outdoors.
• Do not let cord hang over the edge of the table or counter, or touch hot surfaces.
• Do not place on or near a hot gas or electric burner, or in a heated oven.
• Plug cord into wall outlet. To disconnect, turn any control to “OFF,” then remove
plug from wall outlet.
• Do not use appliance for other than intended use.
• Extreme caution must be used when moving an appliance containing hot oil or
other hot liquids.
• Do not attempt to repair this appliance yourself.
• A short power-supply cord is provided to reduce risks resulting from becoming
entangled in or tripping over a longer cord.
• Longer extension cords are available, but care must be exercised in their use.
While use of an extension cord is not recommended, if you must use one,
ensure that the marked electrical rating of the extension cord is equal to or
greater than that of the appliance. If the plug is of the grounded type, the
extension cord must be a grounding-type 3-wire cord. To avoid pulling, tripping
or entanglement, position the extension cord so that it does not hang over the
edge of the counter, table or other area where it can be pulled on by children or
tripped over.
• This appliance has a polarized plug (one blade is wider than the other). To
reduce the risk of electric shock, this plug is intended to fit into a polarized outlet
only one way. If the plug does not fit fully into the outlet, reverse the plug. If it
still does not fit, contact a qualified electrician. Do not attempt to modify the plug
in any way.
2
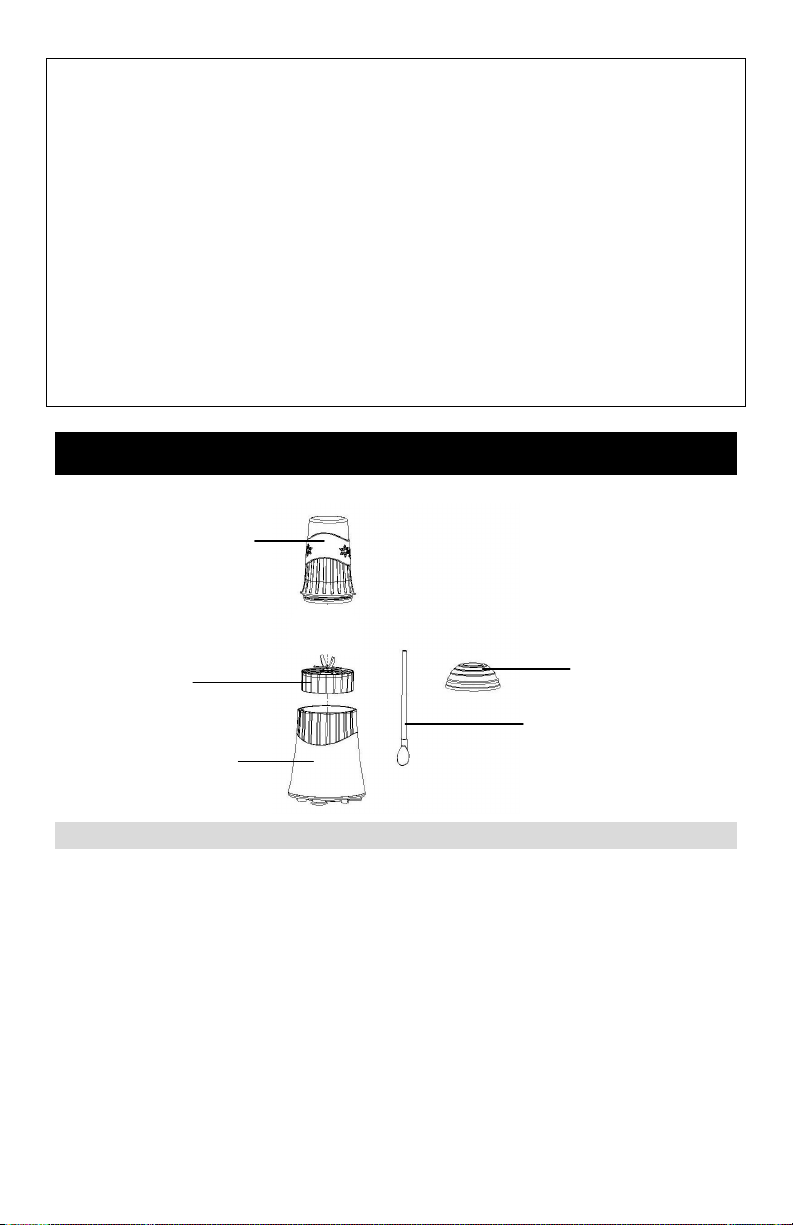
Blade Base
with Gasket
• Do not use an outlet or extension cord if the plug fits loosely or if the outlet or
extension cord feels hot.
• Avoid contact with moving parts.
• Blades are sharp. Use extreme caution during assembly, while operating,
disassembly and cleaning.
• Do not use if blades are broken, cracked or loose.
• Always hold slushie cup while processing for stability.
• Do not leave appliance unattended while it is operating.
• Do not remove slushie cup from base until the motor has stopped completely.
• Do not use a cracked, chipped or broken slushie cup.
• Do not blend hot liquids.
• To reduce the risk of injury, never place blade base on motor base without
slushie cup properly attached.
• For household use only.
SAVE THESE INSTRUCTIONS
Slushie Cup
Slushie Cup Lid
Slushie
Motor Base
B
EFORE USING FOR THE FIRST TIME
Please check all packaging material carefully before discarding. Many
accessory parts are contained within the packaging material.
Thoroughly wash the blade base, slushie cup, lid and spoon/straw in warm, soapy
water. Rinse and dry thoroughly. Do not wash any parts in dishwasher.
DO NOT IMMERSE THE MOTOR BASE IN WATER OR ANY OTHER LIQUID.
3
Spoon/Straw

U
SING YOUR SLUSHIE EXPRESS
™
The slushie cup has convenient measuring marks to create perfect slushies and
frozen drinks. To make your favorite slushie, follow the steps below.
1. Add ingredients to the slushie cup using the markings on the back of the cup as
a measuring guide:
a. Add Jelly Belly™ premium flavored syrup up to the “Syrup” line.
b. Add water up to the “Liquid” line.
c. Add ice until the liquid mixture reaches the “Ice” line. Gently press
ice down to make liquid rise to “Ice” line if necessary. Do not add
too much ice.
2. Place the blade base on the slushie cup and turn clockwise until tight. If lid will
not go on properly due to too much ice, remove some ice before proceeding.
3. Flip the slushie cup with blade base attached over (cup will be upside down).
Position the blade base onto the motor base by aligning the small tabs on the
blade base with the matching openings on the motor base top.
4. Holding the cup bottom, press cup down and turn clockwise to lock in and run
the motor.
5. Run motor until ice is finely crushed, mixture appears “slushie” and the top of
the slushie mixture forms a funnel shape. Mix time is about 15 – 20 seconds.
6. If ice gets jammed in the blades at the beginning of processing and prevents the
blades from spinning, turn cup counter-clockwise to disengage motor and stop
machine. Gently shake the cup to dislodge ice and repeat steps 4 and 5.
Note: Jammed ice is most often caused by using large ice cubes frozen in ice
trays. Ice from a refrigerator/freezer ice maker, smaller cube trays, larger trays
filled only half full or purchased bagged ice works best.
7. When slushie is done, turn cup counter-clockwise to stop the machine and
unlock from the base.
8. Remove slushie cup from motor base and turn right side up.
9. Turn blade base counter-clockwise and remove from slushie cup.
10. Attach slushie cup lid by placing over the top of the slushie cup and turning
clockwise.
11. Use the spoon/straw to eat and drink your frozen slushie treat.
Flavor Strength - To increase the flavor, add more syrup and less water. To
decrease the flavor, add less syrup and more water. Note: Be sure to keep the total
liquid ingredients no higher than the “Liquid” marking and ice no higher than the “Ice”
marking on the slushie cup.
• A small amount of smoke and/or odor may occur upon use due to the
release of manufacturing oils – this is normal.
• Some minor expansion/contraction sounds may occur during use – this is
normal.
C
LEANING YOUR SLUSHIE EXPRESS
™
Always unplug appliance before cleaning.
Before using the first time and after each use, be sure to thoroughly wash the blade
base, slushie cup, lid and spoon/straw in warm, soapy water. Rinse and dry
thoroughly. Do not wash any parts in dishwasher.
DO NOT IMMERSE THE MOTOR BASE IN WATER OR ANY OTHER LIQUID.
WIPE CLEAN AFTER EACH USE WITH A DAMP CLOTH.
4

Note: The Slushie Express includes a small, clear gasket inside the rim of the blade
base and slushie cup lid. This gasket provides an effective seal between the slushie
cup and blade base/lid. The gasket does NOT need to be removed. If the clear
gasket becomes dislodged from the blade base or lid, replace by setting the gasket
flat onto the circular slot inside the perimeter of the blade base (blade side up) or the
lid. Holding the blade base (blade side up) or lid with both hands, use your thumbs
to lightly push the gasket down into the circular slot of the base perimeter until it is
firmly in place. Screw the slushie cup onto the blade base or lid to ensure the gasket
is seated properly.
C
OOL & EASY TREATS
Favorite Slushies: Follow the instructions in this manual and use your favorite Jelly
Belly™ premium flavored syrup. Combine different syrups to create your own unique
flavors.
Soda Pop Slushies: Follow the instructions in this manual except substitute your
favorite soda pop flavor for the water. Let the cup sit a minute before adding ice so
the carbonation disperses. Add ice slowly so the cup does not overflow. After
processing, let the Slushie sit a few seconds before removing the blade base. A
great combination is Cherry syrup and your favorite cola flavor. Lemon-Lime sodas
and Ginger Ale also make great water substitutes. Be sure to let the liquid “rest” a
moment before adding ice and after processing to prevent cup overflow.
Juice Slushies: Freeze ice cube trays half full with your favorite juice. Fill the
slushie cup to the “Liquid” line with juice. Add the juice ice cubes to the “Ice” line and
process per the instructions in this manual. Try your own combination of juices for
unique, refreshing slushies.
Flavored Ice Cubes: Freeze ice cube trays half full with flavored milk, such as
chocolate, vanilla, banana, or strawberry. Fill the slushie cup to the “Liquid” line with
the same flavor of milk. Add the milk cubes to the “Ice” line and process per
instructions.
Berry Delight Smoothie: Pour milk into the slushie cup to the “Syrup” line. Add ½
small banana (about ½ cup) cut into chunks, 1 - 6oz. carton of flavored yogurt and ½
cup individually frozen berries. Process until smooth. Vary the fruit and yogurt
flavors for more unique combinations.
5

P
RODUCT WARRANTY
Appliance 1 Year Limited Warranty
Focus Electrics, LLC (“Focus Electrics”) warrants this appliance from failures in the material
and workmanship for one (1) year from the date of original purchase with proof of purchase,
provided the appliance is operated and maintained in conformity with the provided Instruction
Manual. Any failed part of the appliance will be repaired or replaced without charge at Focus
Electrics’ discretion. This warranty applies to indoor household use only.
This warranty does not cover any damage, including discoloration, to any non-stick surface of
the appliance. This warranty is null and void, as determined solely by Focus Electrics if the
appliance is damaged through accident, misuse, abuse, negligence, scratching, or if the
appliance is altered in any way.
THIS WARRANTY IS IN LIEU OF ALL IMPLIED WARRANTIES, INCLUDING WARRANTIES
OF MERCHANTABILITY, FITNESS FOR A PARTICULAR PURPOSE, PERFORMANCE, OR
OTHERWISE, WHICH ARE HEREBY EXCLUDED. IN NO EVENT SHALL FOCUS
ELECTRICS BE LIABLE FOR ANY DAMAGES, WHETHER DIRECT, INDIRECT,
INCIDENTAL, FORSEEABLE, CONSEQUENTIAL, OR SPECIAL, ARISING OUT OF OR IN
CONNECTION WITH THIS APPLIANCE.
If you think the appliance has failed or requires service within its warranty period, please
contact the Focus Electrics Customer Service Department at (866) 290-1851, or e-mail us at
service@focuselectrics.com. A receipt proving the original purchase date will be required for all
warranty claims, hand written receipts are not accepted. You may also be required to return
the appliance for inspection and evaluation. Return shipping costs are not refundable. Focus
Electrics is not responsible for returns lost in transit.
Replacement parts, if available, may be ordered directly from Focus Electrics, LLC several
ways. Order online at www.focuselectrics.com, e-mail service@focuselectrics.com, over the
phone by calling (866)290-1851, or by writing to:
Focus Electrics, LLC
Attn: Customer Service
P. O. Box 2780
West Bend, WI 53095
To order with a check or money order, please first contact Customer Service for an order total.
Mail your payment along with a letter stating the model or catalog number of your appliance,
which can be found on the bottom or back of the unit, a description of the part or parts you are
ordering, and the quantity you would like. Your check should be made payable to Focus
Electrics, LLC.
Your state/province’s sales tax and a shipping fee will be added to your total charge. Please
allow two weeks for processing and delivery.
This manual contains important and helpful information regarding the safe use and care of your
new Focus Electrics product. For future reference, attach dated sales receipt for warranty proof
of purchase and record the following information:
Date purchased or received as gift: _______________________________________________
Where purchased and price, if known: _____________________________________________
Item number and Date Code (shown bottom/back of product):___________________________
Valid only in USA and Canada
R
EPLACEMENT PARTS
L5825B 12/10 Focus Electrics, LLC. Printed in China
6
 Loading...