

Page 1
VINYL WINDOWS AND PATIO DOORS
The Summit
®
Vinyl Collection
EXTENSION JAMB INSTALLATION AND REPLACEMENT
INSTALLATION
xtension jambs for vinyl windows and patio doors are trim
E
components designed to attach to the interior side of the frame
and extend the frame width to fi t a 4 9/16" or 6 9/16" wall. We offer
two trim options: red oak or white vinyl wrap.
These extension jambs are designed to be attached to the window
prior to being installed in the wall. To replace extension jambs on a
unit already installed, skip these installation instructions and proceed
to the next page to the Replacement section.
Note: These instructions do not apply to the Colonial Series vinyl
windows.
KIT CONTENTS
■ Two side extension jamb boards with clip(s) attached
■ One head extension jamb board with clip(s) attached
■ One sill extension jamb board with clip(s) attached
Note: Number of clips per board depends on size.
■ Eight 1 5/8" drywall screws
TOOLS
■ Tape measure
■ Rubber mallet or hammer with 8"-10" 2x4 wood block
■ Phillips head #2 screwdriver
Note: Extension jamb clips should be included with your new extention jambs.
1. Carefully remove all packaging materials.
2. Place window/patio door with exterior side down on a fl at, rigid,
non-abrasive surface (e.g. cardboard)
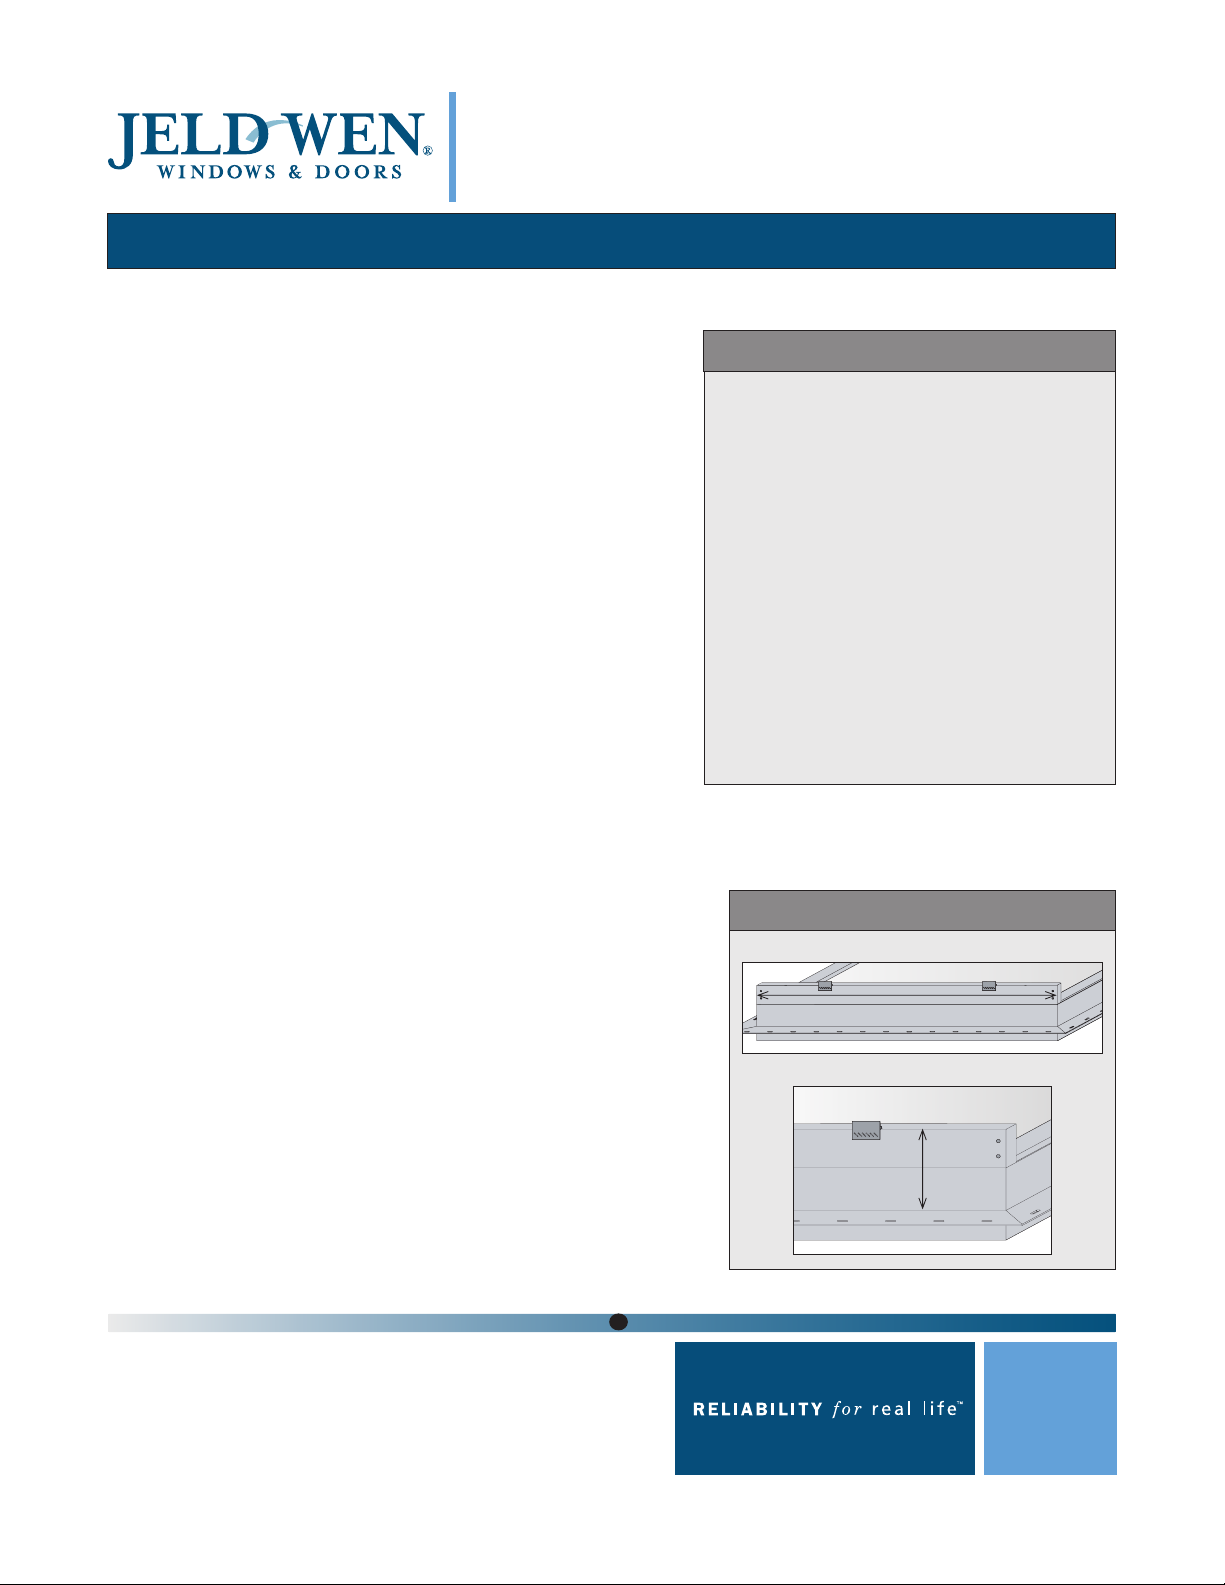
3. Verify size as follows (see Size Verifi cation):
• Lay extension jambs on window/patio door frame with clips on
top to verify length.
Note: The side extension jamb pieces should extend the length of
the window side jamb, and the head and sill extension jambs fi t
between the side extension jambs.
• With extension jamb still laying on window/patio door
frame, measure from nailing fi n on the frame to the top of the
extension jamb; this measurement should be the same as the
wall thickness (or very close)
If extension jambs are not the correct size, return to point of
purchase for replacement.
PRECAUTIONS/SAFETY/HANDLING
Precautions/Safety
■ Do not work alone.
■ Wear necessary protective gear (gloves,
clothing, goggles, etc.).
■ Avoid wearing rings, jewelry or loose
clothing.
Handling
■ Store extension jambs fl at in a dry and well
ventilated area with a continuous support
underneath.
■ Protect from
• dust, water, and other contaminates.
• exposure to direct sunlight.
• accidental damage from wind.
• other job site dangers.
■ Install only in dry conditions.
■ Do not stress joints, corners, or frames.
If injury occurs, seek medical attention
SIZE VERIFICATION
Length
Width
Extension jamb
Window frame
Nailing fi n
Do-It-Yourself
The advice offered herein should be reviewed and performed by a trained service
provider. It is recommended that you consult with a competent and licensed
construction contractor or building professional prior to taking any action. JELDWEN disclaims any and all liability associated with the use and/or provision of these
instructions. Any reliance upon the information or advice is at the risk of the party so
relying. The information contained herein may be changed from time to time without
notifi cation.
© 2004 JELD-WEN, inc. JELD-WEN and Summit are registered trademarks of JELDWEN, inc., Oregon USA.
Technician
Page 2
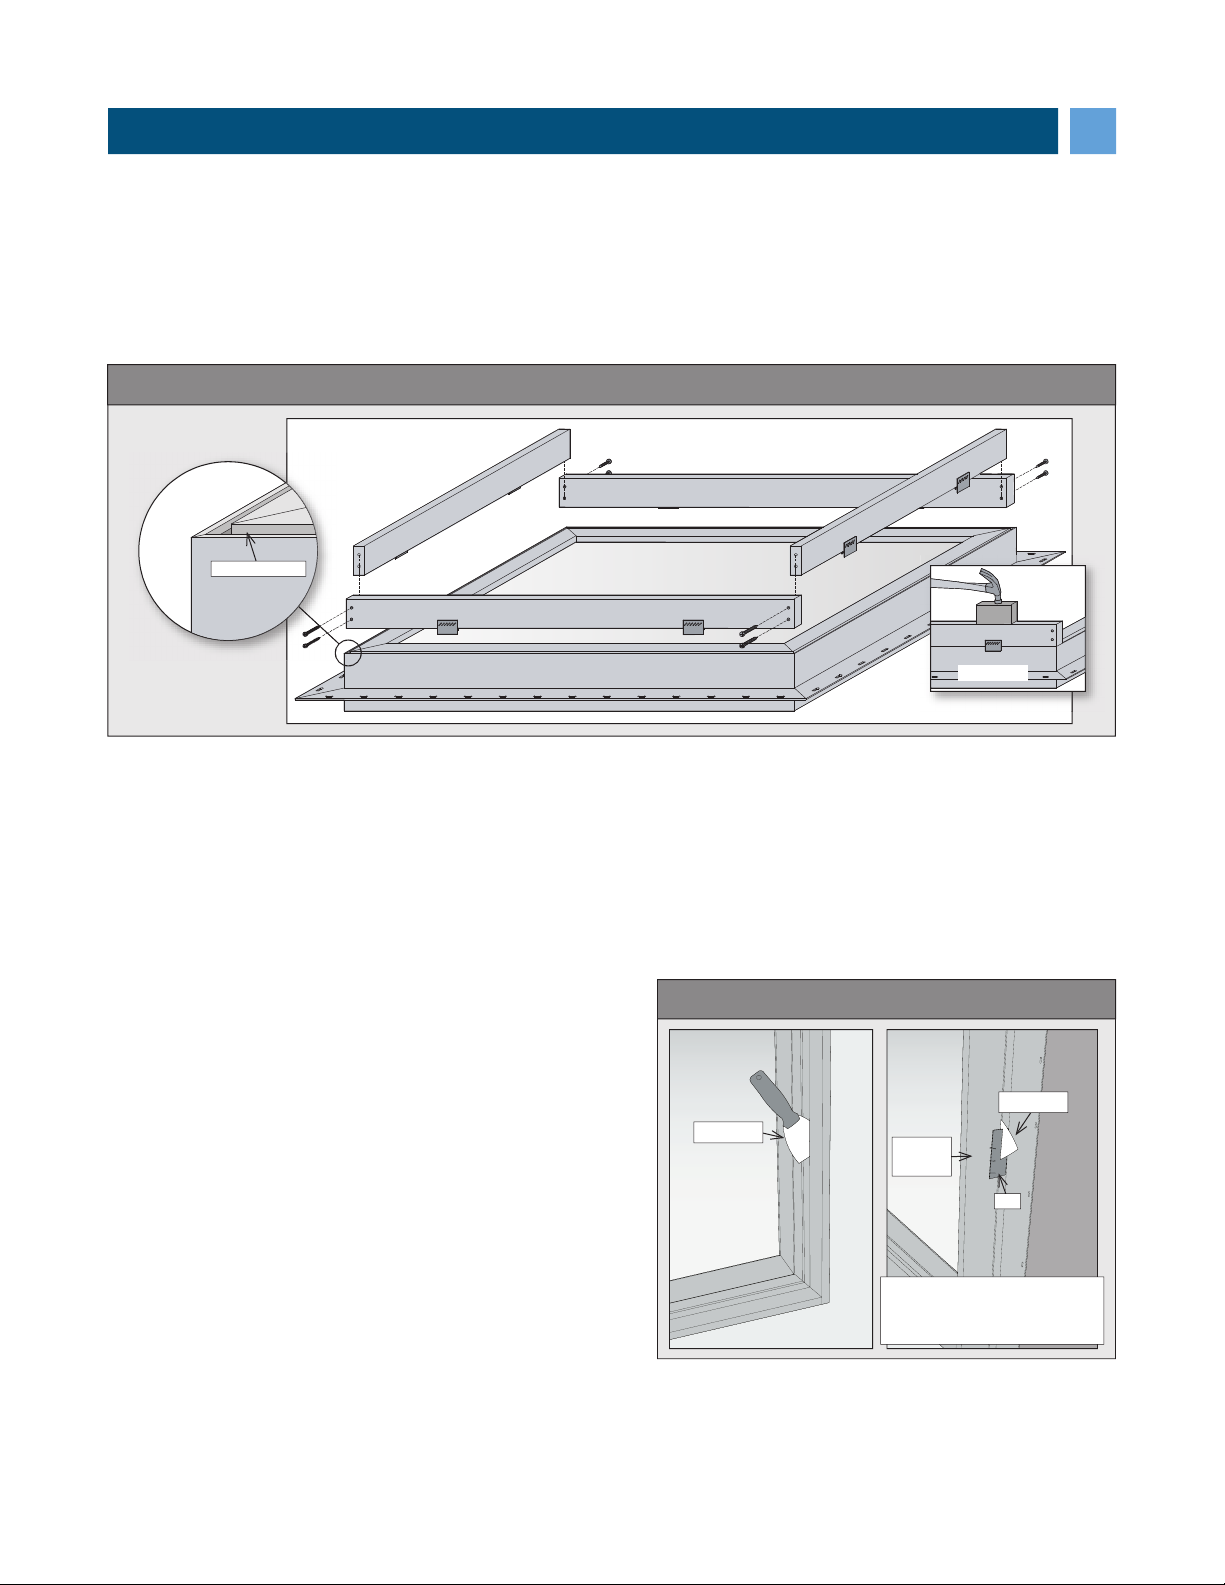
4. Assemble as follows (see Assembly):
• Beginning with side extension jamb pieces, align clips with accessory groove and tap extension jamb above
each clip with rubber mallet or wood block and hammer to secure.
• Repeat for head and sill pieces.
• Make sure jambs are tight against frame, clips are securely seated in the accessory groove, and screw holes at
the corners are aligned.
• Fasten each corner with two 1 5/8” screws (included) through pre-drilled screw holes. Drive screws snug.
Do not overdrive screw heads to avoid damage to the extension jambs.
ASSEMBLY
Accessory groove
Engage clips
REPLACEMENT
Extension jamb kit contents should be the same as listed for Installation. The clips may not be pre-installed and
extension jambs may not be pre-drilled.
TOOLS (in addition to installation tools)
■ Heavy duty stapler ■ Power drill with 5/64" d rill bit
■ Wide blade, thin putty knife ■ Eight 1 5/8" drywall screws (if not supplied)
■ Cotter pin extractor (or small fl at head screw driver)
1. Verify size as follows:
• To verify length, compare measurements of the old and
new extension jambs. They should be the same.
• To verify width, compare width of extension jambs to
the wall depth. They should be the same or very close.
2. Remove interior trim.
3. Remove old extension jambs. The old extension jambs are
attached to the unit with retaining clips.
• Slide a thin, wide blade putty knife between the
extension jamb and the frame to locate retaining clips.
• Break retaining clips with putty knife.
• Remove extension jambs.
• Remove broken retaining clips from accessory groove in
frame edge by prying with cotter pin extractor or small
fl at head screwdriver.
4. Assemble new extension jamb frame.
• Staple new retaining clips to new extension jambs, if
not already installed.
• Drill screw holes in the ends as shown in Assembly if not predrilled, and assemble with screws.
6. Hold extension jamb frame up to the window/patio door and, with a wood block and rubber mallet or hammer,
fi rmly engage clips into accessory groove.
7. Replace interior trim.
EXTENSION JAMB REMOVAL
Putty knife
Side
jamb
Extension
jamb back
side
Extension jamb back side
shown for illustration purposes.
Not visible on installed unit.
Putty knife
Clip
Extension Jamb Installation and Replacement Page 2SIV001 12/04
 Loading...